- About This Guide
- Index
- Glossary
-
- Configuring IPSec and ISAKMP
- Configuring L2TP over IPSec
- Setting General VPN Parameters
- Configuring Tunnel Groups, Group Policies, and Users
- Configuring IP Addresses for VPN
- Configuring Remote Access VPNs
- Configuring Network Admission Control
- Configuring Easy VPN on the ASA 5505
- Configuring the PPPoE Client
- Configuring LAN-to-LAN VPNs
- Configuring Clientless SSL VPN
- Configuring AnyConnect VPN Client Connections
- Configuring AnyConnect Host Scan
Cisco ASA 5500 Series Configuration Guide using the CLI, 8.4 and 8.6
Bias-Free Language
The documentation set for this product strives to use bias-free language. For the purposes of this documentation set, bias-free is defined as language that does not imply discrimination based on age, disability, gender, racial identity, ethnic identity, sexual orientation, socioeconomic status, and intersectionality. Exceptions may be present in the documentation due to language that is hardcoded in the user interfaces of the product software, language used based on RFP documentation, or language that is used by a referenced third-party product. Learn more about how Cisco is using Inclusive Language.
- Updated:
- November 13, 2018
Chapter: Configuring Multiple Context Mode
- Information About Security Contexts
Configuring Multiple Context Mode
This chapter describes how to configure multiple security contexts on the ASA and includes the following sections:
- Information About Security Contexts
- Licensing Requirements for Multiple Context Mode
- Guidelines and Limitations
- Default Settings
- Configuring Multiple Contexts
- Changing Between Contexts and the System Execution Space
- Managing Security Contexts
- Monitoring Security Contexts
- Configuration Examples for Multiple Context Mode
- Feature History for Multiple Context Mode
Information About Security Contexts
You can partition a single ASA into multiple virtual devices, known as security contexts. Each context is an independent device, with its own security policy, interfaces, and administrators. Multiple contexts are similar to having multiple standalone devices. Many features are supported in multiple context mode, including routing tables, firewall features, IPS, and management. Some features are not supported, including VPN and dynamic routing protocols.

Note![]() When the ASA is configured for security contexts (for example, for Active/Active Stateful Failover), IPsec or SSL VPN cannot be enabled. Therefore, these features are unavailable.
When the ASA is configured for security contexts (for example, for Active/Active Stateful Failover), IPsec or SSL VPN cannot be enabled. Therefore, these features are unavailable.
This section provides an overview of security contexts and includes the following topics:
- Common Uses for Security Contexts
- Context Configuration Files
- How the ASA Classifies Packets
- Cascading Security Contexts
- Management Access to Security Contexts
- Information About Resource Management
- Information About MAC Addresses
Common Uses for Security Contexts
You might want to use multiple security contexts in the following situations:
- You are a service provider and want to sell security services to many customers. By enabling multiple security contexts on the ASA, you can implement a cost-effective, space-saving solution that keeps all customer traffic separate and secure, and also eases configuration.
- You are a large enterprise or a college campus and want to keep departments completely separate.
- You are an enterprise that wants to provide distinct security policies to different departments.
- You have any network that requires more than one ASA.
Context Configuration Files
This section describes how the ASA implements multiple context mode configurations and includes the following sections:
Context Configurations
The ASA includes a configuration for each context that identifies the security policy, interfaces, and almost all the options you can configure on a standalone device. You can store context configurations on the internal flash memory or the external flash memory card, or you can download them from a TFTP, FTP, or HTTP(S) server.
System Configuration
The system administrator adds and manages contexts by configuring each context configuration location, allocated interfaces, and other context operating parameters in the system configuration, which, like a single mode configuration, is the startup configuration. The system configuration identifies basic settings for the ASA. The system configuration does not include any network interfaces or network settings for itself; rather, when the system needs to access network resources (such as downloading the contexts from the server), it uses one of the contexts that is designated as the admin context. The system configuration does include a specialized failover interface for failover traffic only.
Admin Context Configuration
The admin context is just like any other context, except that when a user logs in to the admin context, then that user has system administrator rights and can access the system and all other contexts. The admin context is not restricted in any way, and can be used as a regular context. However, because logging into the admin context grants you administrator privileges over all contexts, you might need to restrict access to the admin context to appropriate users. The admin context must reside on flash memory, and not remotely.
If your system is already in multiple context mode, or if you convert from single mode, the admin context is created automatically as a file on the internal flash memory called admin.cfg. This context is named “admin.” If you do not want to use admin.cfg as the admin context, you can change the admin context.
How the ASA Classifies Packets
Each packet that enters the ASA must be classified, so that the ASA can determine to which context to send a packet. This section includes the following topics:
Note![]() If the destination MAC address is a multicast or broadcast MAC address, the packet is duplicated and delivered to each context.
If the destination MAC address is a multicast or broadcast MAC address, the packet is duplicated and delivered to each context.
Valid Classifier Criteria
This section describes the criteria used by the classifier and includes the following topics:
Note![]() For management traffic destined for an interface, the interface IP address is used for classification.
For management traffic destined for an interface, the interface IP address is used for classification.
The routing table is not used for packet classification.
Unique Interfaces
If only one context is associated with the ingress interface, the ASA classifies the packet into that context. In transparent firewall mode, unique interfaces for contexts are required, so this method is used to classify packets at all times.
Unique MAC Addresses
If multiple contexts share an interface, then the classifier uses the interface MAC address. The ASA lets you assign a different MAC address in each context to the same shared interface. By default, shared interfaces do not have unique MAC addresses; the interface uses the burned-in MAC address in every context. An upstream router cannot route directly to a context without unique MAC addresses. You can set the MAC addresses manually when you configure each interface (see the “Configuring the MAC Address and MTU” section), or you can automatically generate MAC addresses (see the “Automatically Assigning MAC Addresses to Context Interfaces” section).
NAT Configuration
If you do not use unique MAC addresses, then the mapped addresses in your NAT configuration are used to classify packets. We recommend using MAC addresses instead of NAT, so that traffic classification can occur regardless of the completeness of the NAT configuration.
Classification Examples
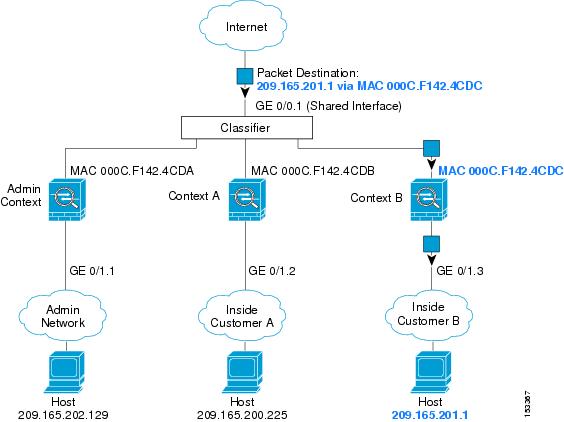
Figure 6-1 shows multiple contexts sharing an outside interface. The classifier assigns the packet to Context B because Context B includes the MAC address to which the router sends the packet.
Figure 6-1 Packet Classification with a Shared Interface using MAC Addresses
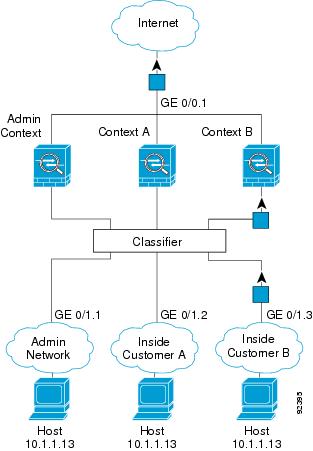
Note that all new incoming traffic must be classified, even from inside networks. Figure 6-2 shows a host on the Context B inside network accessing the Internet. The classifier assigns the packet to Context B because the ingress interface is Gigabit Ethernet 0/1.3, which is assigned to Context B.
Figure 6-2 Incoming Traffic from Inside Networks
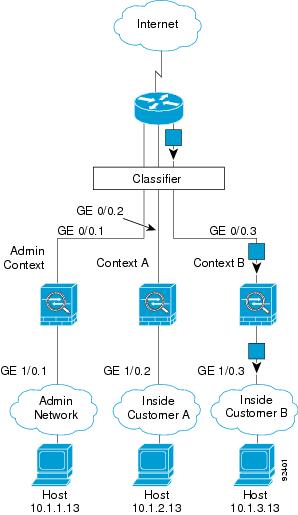
For transparent firewalls, you must use unique interfaces. Figure 6-3 shows a host on the Context B inside network accessing the Internet. The classifier assigns the packet to Context B because the ingress interface is Gigabit Ethernet 1/0.3, which is assigned to Context B.
Figure 6-3 Transparent Firewall Contexts
Cascading Security Contexts
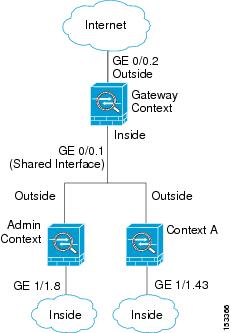
Placing a context directly in front of another context is called cascading contexts; the outside interface of one context is the same interface as the inside interface of another context. You might want to cascade contexts if you want to simplify the configuration of some contexts by configuring shared parameters in the top context.
Note![]() Cascading contexts requires that you configure unique MAC addresses for each context interface. Because of the limitations of classifying packets on shared interfaces without MAC addresses, we do not recommend using cascading contexts without unique MAC addresses.
Cascading contexts requires that you configure unique MAC addresses for each context interface. Because of the limitations of classifying packets on shared interfaces without MAC addresses, we do not recommend using cascading contexts without unique MAC addresses.
Figure 6-4 shows a gateway context with two contexts behind the gateway.
Management Access to Security Contexts
The ASA provides system administrator access in multiple context mode as well as access for individual context administrators. The following sections describe logging in as a system administrator or as a context administrator:
System Administrator Access
You can access the ASA as a system administrator in two ways:
From the console, you access the system execution space, which means that any commands you enter affect only the system configuration or the running of the system (for run-time commands).
See “Configuring Management Access,” to enable Telnet, SSH, and SDM access.
As the system administrator, you can access all contexts.
When you change to a context from admin or the system, your username changes to the default “enable_15” username. If you configured command authorization in that context, you need to either configure authorization privileges for the “enable_15” user, or you can log in as a different name for which you provide sufficient privileges in the command authorization configuration for the context. To log in with a username, enter the login command. For example, you log in to the admin context with the username “admin.” The admin context does not have any command authorization configuration, but all other contexts include command authorization. For convenience, each context configuration includes a user “admin” with maximum privileges. When you change from the admin context to context A, your username is altered, so you must log in again as “admin” by entering the login command. When you change to context B, you must again enter the login command to log in as “admin.”
The system execution space does not support any AAA commands, but you can configure its own enable password, as well as usernames in the local database to provide individual logins.
Context Administrator Access
You can access a context using Telnet, SSH, or ASDM. If you log in to a non-admin context, you can only access the configuration for that context. You can provide individual logins to the context. See “Configuring Management Access,” to enable Telnet, SSH, and SDM access and to configure management authentication.
Information About Resource Management
By default, all security contexts have unlimited access to the resources of the ASA, except where maximum limits per context are enforced. However, if you find that one or more contexts use too many resources, and they cause other contexts to be denied connections, for example, then you can configure resource management to limit the use of resources per context.
The ASA manages resources by assigning contexts to resource classes. Each context uses the resource limits set by the class.
Resource Limits
When you create a class, the ASA does not set aside a portion of the resources for each context assigned to the class; rather, the ASA sets the maximum limit for a context. If you oversubscribe resources, or allow some resources to be unlimited, a few contexts can “use up” those resources, potentially affecting service to other contexts.
You can set the limit for individual resources, as a percentage (if there is a hard system limit) or as an absolute value.
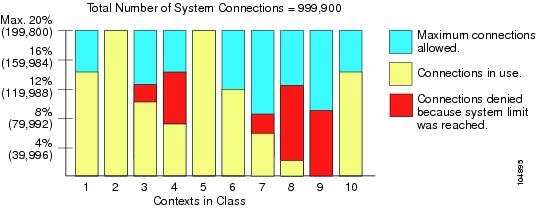
You can oversubscribe the ASA by assigning more than 100 percent of a resource across all contexts. For example, you can set the Bronze class to limit connections to 20 percent per context, and then assign 10 contexts to the class for a total of 200 percent. If contexts concurrently use more than the system limit, then each context gets less than the 20 percent you intended. (See Figure 6-5.)
Figure 6-5 Resource Oversubscription
If you assign an absolute value to a resource across all contexts that exceeds the practical limit of the ASA, then the performance of the ASA might be impaired.
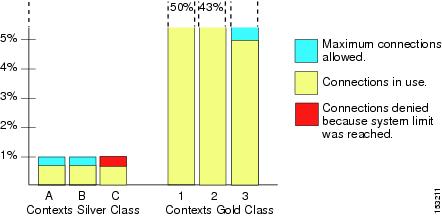
The ASA lets you assign unlimited access to one or more resources in a class, instead of a percentage or absolute number. When a resource is unlimited, contexts can use as much of the resource as the system has available or that is practically available. For example, Context A, B, and C are in the Silver Class, which limits each class member to 1 percent of the connections, for a total of 3 percent; but the three contexts are currently only using 2 percent combined. Gold Class has unlimited access to connections. The contexts in the Gold Class can use more than the 97 percent of “unassigned” connections; they can also use the 1 percent of connections not currently in use by Context A, B, and C, even if that means that Context A, B, and C are unable to reach their 3 percent combined limit. (See Figure 6-6.) Setting unlimited access is similar to oversubscribing the ASA, except that you have less control over how much you oversubscribe the system.
Figure 6-6 Unlimited Resources
Default Class
All contexts belong to the default class if they are not assigned to another class; you do not have to actively assign a context to the default class.
If a context belongs to a class other than the default class, those class settings always override the default class settings. However, if the other class has any settings that are not defined, then the member context uses the default class for those limits. For example, if you create a class with a 2 percent limit for all concurrent connections, but no other limits, then all other limits are inherited from the default class. Conversely, if you create a class with a limit for all resources, the class uses no settings from the default class.
By default, the default class provides unlimited access to resources for all contexts, except for the following limits, which are by default set to the maximum allowed per context:
- Telnet sessions—5 sessions.
- SSH sessions—5 sessions.
- IPsec sessions—5 sessions.
- MAC addresses—65,535 entries.
Figure 6-7 shows the relationship between the default class and other classes. Contexts A and C belong to classes with some limits set; other limits are inherited from the default class. Context B inherits no limits from default because all limits are set in its class, the Gold class. Context D was not assigned to a class, and is by default a member of the default class.
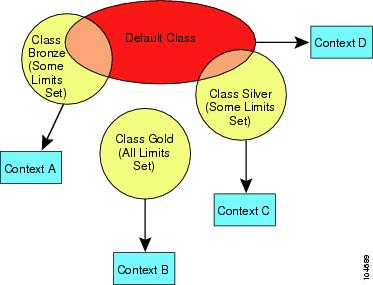
Class Members
To use the settings of a class, assign the context to the class when you define the context. All contexts belong to the default class if they are not assigned to another class; you do not have to actively assign a context to default. You can only assign a context to one resource class. The exception to this rule is that limits that are undefined in the member class are inherited from the default class; so in effect, a context could be a member of default plus another class.
Information About MAC Addresses
To allow contexts to share interfaces, you should assign unique MAC addresses to each shared context interface.
The MAC address is used to classify packets within a context. If you share an interface, but do not have unique MAC addresses for the interface in each context, then other classification methods are attempted that might not provide full coverage. See the “How the ASA Classifies Packets” section for information about classifying packets.
In the rare circumstance that the generated MAC address conflicts with another private MAC address in your network, you can manually set the MAC address for the interface within the context. See the “Configuring the MAC Address and MTU” section to manually set the MAC address.
Default MAC Address
If you disable MAC address generation, the physical interface uses the burned-in MAC address, and all subinterfaces of a physical interface use the same burned-in MAC address.
See the following sections for your release for additional information about automatic MAC address generation. See also the “MAC Address Format” section.
Automatic MAC address generation is enabled—Uses an autogenerated prefix. The ASA autogenerates the prefix based on the last two bytes of the interface MAC address. You cannot use the legacy auto-generation method (without a prefix).
Note![]() To maintain hitless upgrade for failover pairs, the ASA does not convert an existing auto-generation configuration upon a reload if failover is enabled. However, we strongly recommend that you manually change to the prefix method of generation when using failover. After upgrading, to use the prefix method of MAC address generation, reenable MAC address autogeneration to use a prefix.
To maintain hitless upgrade for failover pairs, the ASA does not convert an existing auto-generation configuration upon a reload if failover is enabled. However, we strongly recommend that you manually change to the prefix method of generation when using failover. After upgrading, to use the prefix method of MAC address generation, reenable MAC address autogeneration to use a prefix.
Interaction with Manual MAC Addresses
If you manually assign a MAC address and also enable auto-generation, then the manually assigned MAC address is used. If you later remove the manual MAC address, the auto-generated address is used.
Because auto-generated addresses (when using a prefix) start with A2, you cannot start manual MAC addresses with A2 if you also want to use auto-generation.
Failover MAC Addresses
For use with failover, the ASA generates both an active and standby MAC address for each interface. If the active unit fails over and the standby unit becomes active, the new active unit starts using the active MAC addresses to minimize network disruption. See the “MAC Address Format” section for more information.
MAC Address Format
The MAC address format without a prefix is a legacy version not supported on newer ASA versions.
MAC Address Format Using a Prefix
The ASA generates the MAC address using the following format:
Where xx.yy is a user-defined prefix or an autogenerated prefix based on the last two bytes of the interface MAC address, and zz.zzzz is an internal counter generated by the ASA. For the standby MAC address, the address is identical except that the internal counter is increased by 1.
For an example of how the prefix is used, if you set a prefix of 77, then the ASA converts 77 into the hexadecimal value 004D ( yyxx). When used in the MAC address, the prefix is reversed ( xxyy) to match the ASA native form:
MAC Address Format Without a Prefix (Legacy Method; Not Available in 8.6(1) and Later)
Without a prefix, the MAC address is generated using the following format:
- Active unit MAC address: 12_ slot. port _ subid. contextid.
- Standby unit MAC address: 02_ slot. port _ subid. contextid.
For platforms with no interface slots, the slot is always 0. The port is the interface port. The subid is an internal ID for the subinterface, which is not viewable. The contextid is an internal ID for the context, viewable with the show context detail command. For example, the interface GigabitEthernet 0/1.200 in the context with the ID 1 has the following generated MAC addresses, where the internal ID for subinterface 200 is 31:
This MAC address generation method does not allow for persistent MAC addresses across reloads, does not allow for multiple ASAs on the same network segment (because unique MAC addresses are not guaranteed), and does not prevent overlapping MAC addresses with manually assigned MAC addresses. We recommend using a prefix with the MAC address generation to avoid these issues.
Licensing Requirements for Multiple Context Mode
|
|
|
|---|---|
Guidelines and Limitations
This section includes the guidelines and limitations for this feature.
Supported in routed and transparent firewall mode.
Active/Active mode failover is only supported in multiple context mode.
Note![]() Cross context IPv6 routing is not supported.
Cross context IPv6 routing is not supported.
Does not support the ASA 5505.
Multiple context mode does not support the following features:
Security contexts support only static routes. You cannot enable OSPF, RIP, or EIGRP in multiple context mode.
- The context mode (single or multiple) is not stored in the configuration file, even though it does endure reboots. If you need to copy your configuration to another device, set the mode on the new device to match.
- If you store context configurations in the root directory of flash memory, on some models you might run out of room in that directory, even though there is available memory. In this case, create a subdirectory for your configuration files. Background: some models, such as the ASA 5585-X, use the FAT 16 file system for internal flash memory, and if you do not use 8.3-compliant short names, or use uppercase characters, then fewer than 512 files and folders can be stored because the file system uses up slots to store long file names (see http://support.microsoft.com/kb/120138/en-us).
Default Settings
Configuring Multiple Contexts
This section describes how to configure multiple context mode, and includes the following topics:
- Task Flow for Configuring Multiple Context Mode
- Enabling or Disabling Multiple Context Mode
- Configuring a Class for Resource Management
- Configuring a Security Context
- Automatically Assigning MAC Addresses to Context Interfaces
Task Flow for Configuring Multiple Context Mode
To configure multiple context mode, perform the following steps:
Step 1![]() Enable multiple context mode. See the “Enabling or Disabling Multiple Context Mode” section.
Enable multiple context mode. See the “Enabling or Disabling Multiple Context Mode” section.
Step 2![]() (Optional) Configure classes for resource management. See the “Configuring a Class for Resource Management” section.
(Optional) Configure classes for resource management. See the “Configuring a Class for Resource Management” section.
Step 3![]() Configure interfaces in the system execution space. See Chapter12, “Starting Interface Configuration (ASA 5510 and Higher)”
Configure interfaces in the system execution space. See Chapter12, “Starting Interface Configuration (ASA 5510 and Higher)”
Step 4![]() Configure security contexts. See the “Configuring a Security Context” section.
Configure security contexts. See the “Configuring a Security Context” section.
Step 5![]() (Optional) Automatically assign MAC addresses to context interfaces. See the “Automatically Assigning MAC Addresses to Context Interfaces” section.
(Optional) Automatically assign MAC addresses to context interfaces. See the “Automatically Assigning MAC Addresses to Context Interfaces” section.
Step 6![]() Complete interface configuration in the context. See “Completing Interface Configuration (Routed Mode),” or Chapter9, “Completing Interface Configuration (Transparent Mode)”
Complete interface configuration in the context. See “Completing Interface Configuration (Routed Mode),” or Chapter9, “Completing Interface Configuration (Transparent Mode)”
Enabling or Disabling Multiple Context Mode
Your ASA might already be configured for multiple security contexts depending on how you ordered it from Cisco. If you are upgrading, however, you might need to convert from single mode to multiple mode by following the procedures in this section.
Enabling Multiple Context Mode
When you convert from single mode to multiple mode, the ASA converts the running configuration into two files: a new startup configuration that comprises the system configuration, and admin.cfg that comprises the admin context (in the root directory of the internal flash memory). The original running configuration is saved as old_running.cfg (in the root directory of the internal flash memory). The original startup configuration is not saved. The ASA automatically adds an entry for the admin context to the system configuration with the name “admin.”
Prerequisites
- When you convert from single mode to multiple mode, the ASA converts the running configuration into two files. The original startup configuration is not saved, so if it differs from the running configuration, you should back it up before proceeding.
- The context mode (single or multiple) is not stored in the configuration file, even though it does endure reboots. If you need to copy your configuration to another device, set the mode on the new device to match.
Detailed Steps
|
|
|
|---|---|
|
|
Changes to multiple context mode. You are prompted to reboot the ASA. |
Restoring Single Context Mode
To copy the old running configuration to the startup configuration and to change the mode to single mode, perform the following steps.
Prerequisites
Detailed Steps
Configuring a Class for Resource Management
To configure a class in the system configuration, perform the following steps. You can change the value of a particular resource limit by reentering the command with a new value.
Prerequisites
Guidelines
Table 6-1 lists the resource types and the limits. See also the show resource types command.
|
|
|
|
|
|
|---|---|---|---|---|
For transparent firewall mode, the number of MAC addresses allowed in the MAC address table. |
||||
Concurrent connections: See the “Supported Feature Licenses Per Model” section for the connection limit for your platform. |
TCP or UDP connections between any two hosts, including connections between one host and multiple other hosts. |
|||
| Note ASDM sessions use two HTTPS connections: one for monitoring that is always present, and one for making configuration changes that is present only when you make changes. For example, the system limit of 32 ASDM sessions represents a limit of 64 HTTPS sessions. |
||||
|
1.If this column value is N/A, then you cannot set a percentage of the resource because there is no hard system limit for the resource. |
Detailed Steps
|
|
|
|
|---|---|---|
|
hostname(config)# threat-detection scanning-threat shun except ip-address 10.1.1.0 255.255.255.0 |
Specifies the class name and enters the class configuration mode. The name is a string up to 20 characters long. To set the limits for the default class, enter default for the name. |
|
|
|
Sets all resource limits (shown in Table 6-1 ) to be unlimited. For example, you might want to create a class that includes the admin context that has no limitations. The default class has all resources set to unlimited by default. |
|
limit-resource [ rate ] resource_name number [ % ] |
Sets a particular resource limit. For this particular resource, the limit overrides the limit set for all. Enter the rate argument to s et the rate per second for certain resources. For resources that do not have a system limit, you cannot set the percentage (%) between 1 and 100; you can only set an absolute value. See Table 6-1 for resources for which you can set the rate per second and which do not have a system limit. |
|
Examples
For example, to set the default class limit for conns to 10 percent instead of unlimited, enter the following commands:
All other resources remain at unlimited.
To add a class called gold, enter the following commands:
Configuring a Security Context
The security context definition in the system configuration identifies the context name, configuration file URL, and interfaces that a context can use.
Prerequisites
- Perform this procedure in the system execution space.
- For ASA 5500 series appliances, configure physical interface parameters, VLAN subinterfaces, and redundant interfaces according to the Chapter12, “Starting Interface Configuration (ASA 5510 and Higher)”
- If you do not have an admin context (for example, if you clear the configuration) then you must first specify the admin context name by entering the following command:
hostname(config)# admin-context name
Although this context name does not exist yet in your configuration, you can subsequently enter the context name command to match the specified name to continue the admin context configuration.
Detailed Steps
|
|
|
|
|---|---|---|
|
|
Adds or modifies a context. The name is a string up to 32 characters long. This name is case sensitive, so you can have two contexts named “customerA” and “CustomerA,” for example. You can use letters, digits, or hyphens, but you cannot start or end the name with a hyphen. “System” or “Null” (in upper or lower case letters) are reserved names, and cannot be used. |
|
|
|
||
To allocate a physical interface: allocate-interface physical_interface [ mapped_name ] [ visible | invisible ] To allocate one or more subinterfaces: allocate-interface physical_interface . subinterface [ - physical_interface . subinterface ] [ mapped_name [ - mapped_name ]] [ visible | invisible ] |
Specifies the interfaces you can use in the context. Do not include a space between the interface type and the port number. Enter these commands multiple times to specify different ranges. If you remove an allocation with the no form of this command, then any context commands that include this interface are removed from the running configuration. Transparent firewall mode allows a limited number of interfaces to pass through traffic; however, you can use a dedicated management interface, Management slot / port, (physical, subinterface, redundant, or EtherChannel) as an additional interface for management traffic. The management interface for transparent mode does not flood a packet out the interface when that packet is not in the MAC address table. You can assign the same interfaces to multiple contexts in routed mode, if desired. The mapped_name is an alphanumeric alias for the interface that can be used within the context instead of the interface ID. If you do not specify a mapped name, the interface ID is used within the context. For security purposes, you might not want the context administrator to know which interfaces are being used by the context. A mapped name must start with a letter, end with a letter or digit, and have as interior characters only letters, digits, or an underscore. For example, you can use the following names: If you specify a range of subinterfaces, you can specify a matching range of mapped names. Follow these guidelines for ranges:
If you enter
If you enter Specify visible to see the real interface ID in the show interface command if you set a mapped name. The default invisible keyword shows only the mapped name. |
|
|
|
Identifies the URL from which the system downloads the context configuration. When you add a context URL, the system immediately loads the context so that it is running, if the configuration is available. Note Enter the allocate-interface command(s) before you enter the config-url command. If you enter the config-url command first, the ASA loads the context configuration immediately. If the context contains any commands that refer to (not yet configured) interfaces, those commands fail. The filename does not require a file extension, although we recommend using “.cfg”. The server must be accessible from the admin context. If the configuration file is not available, you see the following message: For non-HTTP(S) URL locations, after you specify the URL, you can then change to the context, configure it at the CLI, and enter the write memory command to write the file to the URL location. (HTTP(S) is read only). Note The admin context file must be stored on the internal flash memory. Available URL types include: disk number (for flash memory), ftp, http, https, or tftp. To change the URL, reenter the config-url command with a new URL. See the “Changing the Security Context URL” section for more information about changing the URL. |
|
|
|
Assigns the context to a resource class. If you do not specify a class, the context belongs to the default class. You can only assign a context to one resource class. |
|
|
|
Assigns a context to a failover group in Active/Active failover. By default, contexts are in group 1. The admin context must always be in group 1. See the “Configuring the Primary Failover Unit” section for detailed information about failover groups. |
|
| allocate-ips sensor_name [ mapped_name ] [ default ] |
Assigns an IPS virtual sensor to this context if you have the AIP SSM installed. See the “Assigning Virtual Sensors to a Security Context (ASA 5510 and Higher)” section for detailed information about virtual sensors. |
Examples
The following example sets the admin context to be “administrator,” creates a context called “administrator” on the internal flash memory, and then adds two contexts from an FTP server:
Automatically Assigning MAC Addresses to Context Interfaces
This section describes how to configure auto-generation of MAC addresses.
The MAC address is used to classify packets within a context. See the “Information About MAC Addresses” section for more information, especially if you are upgrading from an earlier ASA version. See also the “Viewing Assigned MAC Addresses” section.
Guidelines
- When you configure a nameif command for the interface in a context, the new MAC address is generated immediately. If you enable this feature after you configure context interfaces, then MAC addresses are generated for all interfaces immediately after you enable it. If you disable this feature, the MAC address for each interface reverts to the default MAC address. For example, subinterfaces of GigabitEthernet 0/1 revert to using the MAC address of GigabitEthernet 0/1.
- In the rare circumstance that the generated MAC address conflicts with another private MAC address in your network, you can manually set the MAC address for the interface within the context. See the “Configuring the MAC Address and MTU” section to manually set the MAC address.
Detailed Steps
|
|
|
|---|---|
mac-address auto [ prefix prefix ] |
Automatically assign private MAC addresses to each context interface. The prefix is a decimal value between 0 and 65535. This prefix is converted to a 4-digit hexadecimal number, and used as part of the MAC address. The prefix ensures that each ASA uses unique MAC addresses, so you can have multiple ASAs on a network segment, for example. See the “MAC Address Format” section for more information about how the prefix is used. |
Changing Between Contexts and the System Execution Space
If you log in to the system execution space (or the admin context using Telnet or SSH), you can change between contexts and perform configuration and monitoring tasks within each context. The running configuration that you edit in a configuration mode, or that is used in the copy or write commands, depends on your location. When you are in the system execution space, the running configuration consists only of the system configuration; when you are in a context, the running configuration consists only of that context. For example, you cannot view all running configurations (system plus all contexts) by entering the show running-config command. Only the current configuration displays.
To change between the system execution space and a context, or between contexts, see the following commands:
|
|
|
|---|---|
Changes to a context. The prompt changes to the following: |
|
Changes to the system execution space. The prompt changes to the following: |
Managing Security Contexts
This section describes how to manage security contexts and includes the following topics:
- Removing a Security Context
- Changing the Admin Context
- Changing the Security Context URL
- Reloading a Security Context
Removing a Security Context
You can only remove a context by editing the system configuration. You cannot remove the current admin context, unless you remove all contexts using the clear context command.
Note![]() If you use failover, there is a delay between when you remove the context on the active unit and when the context is removed on the standby unit. You might see an error message indicating that the number of interfaces on the active and standby units are not consistent; this error is temporary and can be ignored.
If you use failover, there is a delay between when you remove the context on the active unit and when the context is removed on the standby unit. You might see an error message indicating that the number of interfaces on the active and standby units are not consistent; this error is temporary and can be ignored.
Prerequisites
Detailed Steps
|
|
|
|---|---|
Removes a single context. All context commands are also removed. |
|
Changing the Admin Context
The system configuration does not include any network interfaces or network settings for itself; rather, when the system needs to access network resources (such as downloading the contexts from the server), it uses one of the contexts that is designated as the admin context.
The admin context is just like any other context, except that when a user logs in to the admin context, then that user has system administrator rights and can access the system and all other contexts. The admin context is not restricted in any way, and can be used as a regular context. However, because logging into the admin context grants you administrator privileges over all contexts, you might need to restrict access to the admin context to appropriate users.
Guidelines
You can set any context to be the admin context, as long as the configuration file is stored in the internal flash memory.
Prerequisites
Detailed Steps
Changing the Security Context URL
Guidelines
- You cannot change the security context URL without reloading the configuration from the new URL. The ASA merges the new configuration with the current running configuration.
- Reentering the same URL also merges the saved configuration with the running configuration.
A merge adds any new commands from the new configuration to the running configuration.
- If the configurations are the same, no changes occur.
- If commands conflict or if commands affect the running of the context, then the effect of the merge depends on the command. You might get errors, or you might have unexpected results. If the running configuration is blank (for example, if the server was unavailable and the configuration was never downloaded), then the new configuration is used.
If you do not want to merge the configurations, you can clear the running configuration, which disrupts any communications through the context, and then reload the configuration from the new URL.
Prerequisites
Detailed Steps
Reloading a Security Context
You can reload the context in two ways:
This action clears most attributes associated with the context, such as connections and NAT tables.
This action clears additional attributes, such as memory allocation, which might be useful for troubleshooting. However, to add the context back to the system requires you to respecify the URL and interfaces.
Reloading by Clearing the Configuration
To reload the context by clearing the context configuration, and reloading the configuration from the URL, perform the following steps.
Detailed Steps
Reloading by Removing and Re-adding the Context
To reload the context by removing the context and then re-adding it, perform the steps in the following sections:
Monitoring Security Contexts
This section describes how to view and monitor context information and includes the following topics:
- Viewing Context Information
- Viewing Context Information
- Viewing Resource Allocation
- Viewing Resource Usage
- Monitoring SYN Attacks in Contexts
- Viewing Assigned MAC Addresses
Viewing Context Information
From the system execution space, you can view a list of contexts including the name, allocated interfaces, and configuration file URL.
From the system execution space, view all contexts by entering the following command:
The following is sample output from the show context command. The following sample output shows three contexts:
Table 6-2 shows each field description.
|
|
|
|---|---|
Lists all context names. The context name with the asterisk (*) is the admin context. |
|
The following is sample output from the show context detail command:
See the command reference for more information about the detail output.
The following is sample output from the show context count command:
Viewing Resource Allocation
From the system execution space, you can view the allocation for each resource across all classes and class members.
To view the resource allocation, enter the following command:
|
|
|
|---|---|
Shows the resource allocation. This command shows the resource allocation, but does not show the actual resources being used. See the “Viewing Resource Usage” section for more information about actual resource usage. The detail argument shows additional information. See the following sample outputs for more information. |
The following sample output shows the total allocation of each resource as an absolute value and as a percentage of the available system resources:
Table 6-3 shows each field description.
The following is sample output from the show resource allocation detail command:
Table 6-4 shows each field description.
Viewing Resource Usage
From the system execution space, you can view the resource usage for each context and display the system resource usage.
From the system execution space, view the resource usage for each context by entering the following command:
|
|
|
|---|---|
show resource usage [ context context_name | top n | all | summary | system ] [ resource { resource_name | all } | detail ] [ counter counter_name [ count_threshold ]] |
By default, all context usage is displayed; each context is listed separately. Enter the top n keyword to show the contexts that are the top n users of the specified resource. You must specify a single resource type, and not resource all, with this option. The summary option shows all context usage combined. The system option shows all context usage combined, but shows the system limits for resources instead of the combined context limits. For the resource resource_name, see Table 6-1 for available resource names. See also the show resource type command. Specify all (the default) for all types. The detail option shows the resource usage of all resources, including those you cannot manage. For example, you can view the number of TCP intercepts. The counter counter_name is one of the following keywords:
The count_threshold sets the number above which resources are shown. The default is 1. If the usage of the resource is below the number you set, then the resource is not shown. If you specify all for the counter name, then the count_threshold applies to the current usage. |
The following is sample output from the show resource usage context command, which shows the resource usage for the admin context:
The following is sample output from the show resource usage summary command, which shows the resource usage for all contexts and all resources. This sample shows the limits for 6 contexts.
The following is sample output from the show resource usage summary command, which shows the limits for 25 contexts. Because the context limit for Telnet and SSH connections is 5 per context, then the combined limit is 125. The system limit is only 100, so the system limit is shown.
The following is sample output from the show resource usage system command, which shows the resource usage for all contexts, but it shows the system limit instead of the combined context limits. The counter all 0 option is used to show resources that are not currently in use. The Denied statistics indicate how many times the resource was denied due to the system limit, if available.
Monitoring SYN Attacks in Contexts
The ASA prevents SYN attacks using TCP Intercept. TCP Intercept uses the SYN cookies algorithm to prevent TCP SYN-flooding attacks. A SYN-flooding attack consists of a series of SYN packets usually originating from spoofed IP addresses. The constant flood of SYN packets keeps the server SYN queue full, which prevents it from servicing connection requests. When the embryonic connection threshold of a connection is crossed, the ASA acts as a proxy for the server and generates a SYN-ACK response to the client SYN request. When the ASA receives an ACK back from the client, it can then authenticate the client and allow the connection to the server.
Monitor SYN attacks using the following commands:
|
|
|
|---|---|
Monitors the amount of resources being used by TCP intercept for individual contexts. |
|
Monitors the resources being used by TCP intercept for the entire system. |
The following is sample output from the show perfmon command that shows the rate of TCP intercepts for a context called admin.
The following is sample output from the show resource usage detail command that shows the amount of resources being used by TCP Intercept for individual contexts. (Sample text in italics shows the TCP intercept information.)
The following sample output shows the resources being used by TCP intercept for the entire system. (Sample text in italics shows the TCP intercept information.)
Viewing Assigned MAC Addresses
You can view auto-generated MAC addresses within the system configuration or within the context. This section includes the following topics:
Viewing MAC Addresses in the System Configuration
This section describes how to view MAC addresses in the system configuration.
Guidelines
If you manually assign a MAC address to an interface, but also have auto-generation enabled, the auto-generated address continues to show in the configuration even though the manual MAC address is the one that is in use. If you later remove the manual MAC address, the auto-generated one shown will be used.
Detailed Steps
Examples
The following output from the show running-config all context admin command shows the primary and standby MAC address assigned to the Management0/0 interface:
The following output from the show running-config all context command shows all the MAC addresses (primary and standby) for all context interfaces. Note that because the GigabitEthernet0/0 and GigabitEthernet0/1 main interfaces are not configured with a nameif command inside the contexts, no MAC addresses have been generated for them.
Viewing MAC Addresses Within a Context
This section describes how to view MAC addresses within a context.
Detailed Steps
|
|
|
|---|---|
Shows the MAC address in use by each interface within the context. |
Examples
Note![]() The show interface command shows the MAC address in use; if you manually assign a MAC address and also have auto-generation enabled, then you can only view the unused auto-generated address from within the system configuration.
The show interface command shows the MAC address in use; if you manually assign a MAC address and also have auto-generation enabled, then you can only view the unused auto-generated address from within the system configuration.
Configuration Examples for Multiple Context Mode
- Automatically sets the MAC addresses in contexts.
- Sets the default class limit for conns to 10 percent instead of unlimited.
- Creates a gold resource class.
- Sets the admin context to be “administrator.”
- Creates a context called “administrator” on the internal flash memory to be part of the default resource class.
- Adds two contexts from an FTP server as part of the gold resource class.
hostname(config)# mac-address auto prefix 19
Feature History for Multiple Context Mode
Table 6-5 lists each feature change and the platform release in which it was implemented.
 Feedback