Prerequisites for Configuration Groups
To use configuration groups, the minimum software version for Cisco SD-Routing devices is Cisco IOS XE Release 17.13.1a
The documentation set for this product strives to use bias-free language. For the purposes of this documentation set, bias-free is defined as language that does not imply discrimination based on age, disability, gender, racial identity, ethnic identity, sexual orientation, socioeconomic status, and intersectionality. Exceptions may be present in the documentation due to language that is hardcoded in the user interfaces of the product software, language used based on RFP documentation, or language that is used by a referenced third-party product. Learn more about how Cisco is using Inclusive Language.
After a device is onboarded, Cisco Catalyst SD-WAN Manager provisions the device with the required configuration. The use of configuration groups streamlines this provisioning process.
Configuration Groups in Cisco SD-WAN Manager provide a simple, reusable, and structured approach for creating and applying device specific configurations to SD-Routing devices. Configuration groups are made up of feature profiles, features and subfeatures.
Configuration Group: A configuration group is a logical grouping of features or configurations that can be applied to one or more devices in the network managed by Cisco SD-WAN Manager. You can define and customize this grouping based on your business needs.
Feature Profile: A feature profile is a flexible building block of configurations that can be reused across different configuration groups. You can create profiles based on features that are required, recommended, or uniquely used, and then put together the profiles to complete a device configuration.
Feature: A feature profile consists of features. Features are the individual capabilities you want to share across different configuration groups.
To use configuration groups, the minimum software version for Cisco SD-Routing devices is Cisco IOS XE Release 17.13.1a
Configuration Group provisioning is supported on the following platforms.
Cisco Catalyst 8000V Series Edge Platforms, Cisco Catalyst 8200 Series Edge Platforms, Cisco Catalyst 8300 Series Edge Platforms, Cisco Catalyst 8500 Series Edge Platforms
Cisco 1000 Series Integrated Services Routers. However, ISR1100-4G/6G and ISR1100X-4G/6G do not support SD-Routing mode.
Cisco Catalyst IR1100 Rugged Series Routers
 Note |
For flex interfaces on supported devices, always configure the L2 or L3 mode using either the CLI or a CLI Add-on Profile, regardless of whether you are using a CLI Configuration Group or a Profile Configuration Group. |
To set the interface to Layer 3 (L3) mode, configure no switchport under the interface.
To set the interface to Layer 2 (L2) mode, configure switchport under the interface.
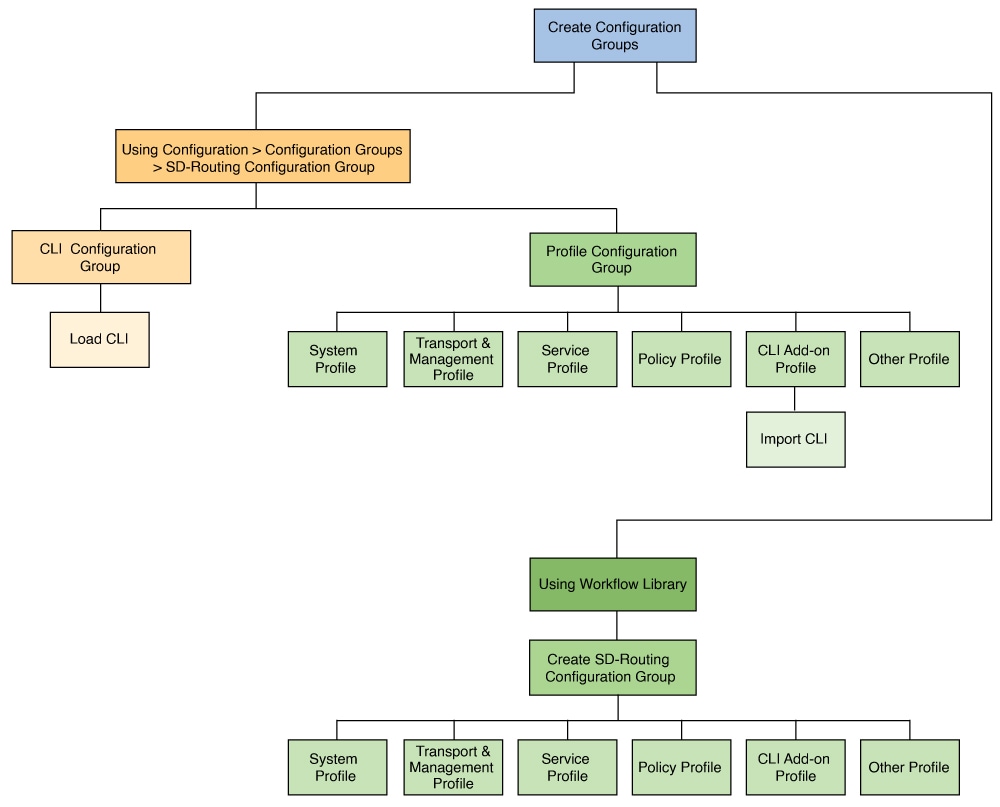
The Configuration Group menu in Cisco Catalyst SD-WAN Manager provides building blocks to assemble configurations for SD-Routing devices. The preferred method varies based on whether the device is an existing device or a new one.
For existing devices, create configuration groups using CLI Configuration Group .
For new devices, create configuration groups using Profile Based Configuration Group.
The Configuration Groups menu on Cisco Catalyst SD-WAN Manager provides a user friendly method to create configuration groups for SD-Routing devices. After onboarding existing SD-Routing devices into Cisco SD-WAN Manager, use the CLI Configuration Group to load the device’s running configurations, modify and deploy the configurations to these devices.
To create a CLI configuration group for SD-Routing devices, perform the outlined procedure.
Ensure that the onboarded device is reachable on Cisco SD-WAN Manager.
Ensure that you have an understanding of the configurations needed for your deployment.
|
Step 1 |
From Cisco SD-WAN Manager main menu, go to and select Solution as SD-Routing. |
||
|
Step 2 |
Click . |
||
|
Step 3 |
Add a name and description, select the CLI Configuration Group and click Create. |
||
|
Step 4 |
On the CLI pane, select a reachable device and load the running configuration. If your device has configurations that do not have associated yang models, a prompt indicates that.
|
||
|
Step 5 |
Click Yes to save the running configurations. |
The Configuration Groups menu on Cisco Catalyst SD-WAN Manager provides a user friendly method to create configuration groups for SD-Routing devices. The building blocks: feature profiles, features and subfeatures can be quickly assembled to create the configuration group and deployed to provision the SD-Routing devices.
To create a profile based configuration group for SD-Routing devices, perform the outlined procedure.
Ensure that you have an understanding of the configurations needed for your deployment.
|
Step 1 |
From Cisco SD-WAN Manager main menu, go to and select Solution as SD-Routing. |
||
|
Step 2 |
Click . |
||
|
Step 3 |
Add a name and description, and click Create. |
||
|
Step 4 |
Create a System Profile, Transport&Management Profile, Service Profile and add features to these profiles. To know how to add features and subfeatures, refer to Add a Feature and Subfeatures to a Feature Profile.
|
||
|
Step 5 |
Create a CLI Add-on Profile to add device configurations that are not available through other configuration group features. You can add these commands in the CLI Configuration area or click Import Config File to import and save the configurations. |
Associate and Deploy the Configuration Group to an SD-Routing Device
You should have created a configuration group earlier.
|
Step 1 |
From the Cisco Catalyst SD-WAN Manager, select the SD-Routing configuration group and click ... to edit. |
|
Step 2 |
Click a feature profile and open it. |
|
Step 3 |
Click Add New Feature and choose a feature from the drop-down list. |
|
Step 4 |
Enter a name for the feature. The name can be up to 128 characters and can contain only alphanumeric characters. |
|
Step 5 |
Enter a description of the feature. The description can be up to 2048 characters and can contain only alphanumeric characters and spaces. |
|
Step 6 |
Configure the options as needed. Some parameter have a scope drop-down list that enables you to choose Global, Device Specific, or Default for the parameter value. Select your preference as described in the table. |
|
Step 7 |
Add subfeatures as required. |
|
Step 8 |
Click Save to add the feature to the Feature profile. |
Associate and Deploy the Configuration Group to an SD-Routing Device
|
Step 1 |
From Cisco SD-WAN Manager, select the Configuration Group created earlier. |
|
Step 2 |
Click + Add and select the devices from the list. Click Save to attach the configuration group to the selected devices. |
|
Step 3 |
To provision the configuration changes, click Deploy. |
|
Step 4 |
Select the device on which you want to provision the configuration changes. Click Next. |
|
Step 5 |
For each device, review or update variables based on the configurations. Click Next. |
|
Step 6 |
If you want to review device configuration changes, click Preview CLI. For any incorrect device configuration, an error message on the top left of the screen highlights the issue.
|
|
Step 7 |
View deployment status to ensure that the logs indicate a successful device provisioning. |
Once the deployment is complete, click View deployment status to view the status of the device provisioning. The Device Group pane provides the following information:
|
Parameters |
Description |
|---|---|
|
Status |
Indicates the deployment status. |
|
Chassis Number |
Specifies the Chassis number of the devices. |
|
Hostname |
Specifies the name of the host(s). |
|
Message |
Describes the status. |
|
Start Time |
Date and time at which you started the deployment. |
|
System IP |
Displays the system IP of the devices. |
|
Action |
Displays an ellipsis (…), which, when clicked, opens a menu providing you with detailed information about the logs. |
Use the Device Group pane to review the deployment status and click on Action > Ellipsis (…) to view the detailed logs on the deployment status.
This workflow illustrates the various deployment statuses.
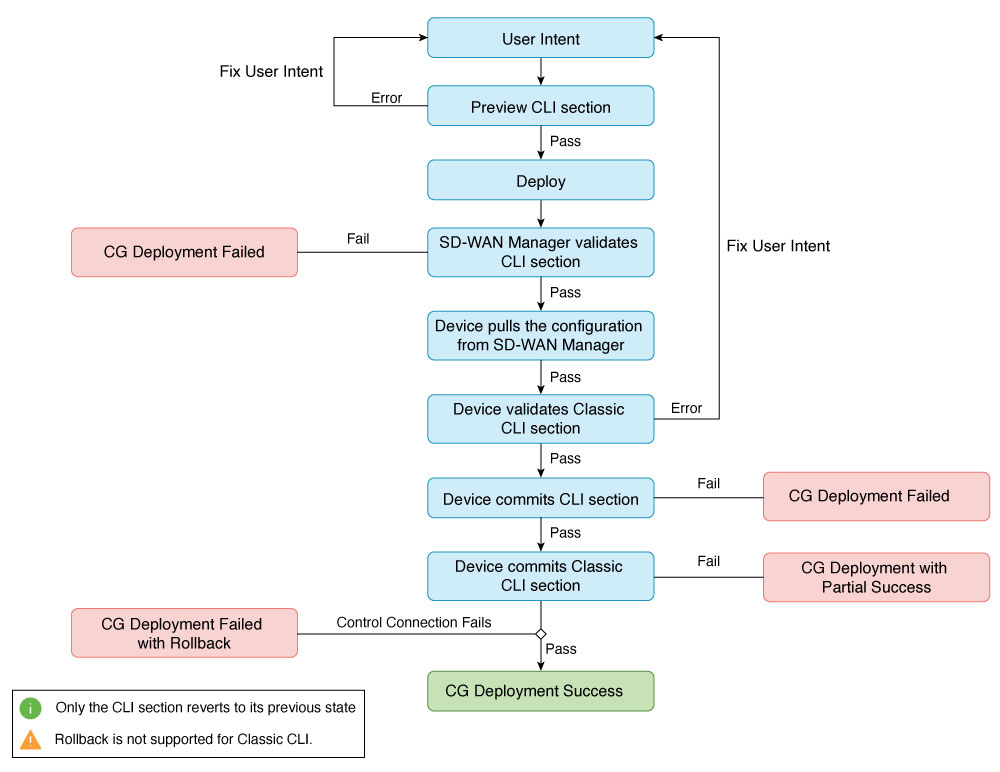
This table provided outlines the different deployment statuses and the recommended user actions for each scenario.
|
Status |
Description |
User Action |
|---|---|---|
|
Successful |
The deployment was successful, and the device is fully configured. |
- |
|
Partial success |
The associated YANG configuration was committed, but Classic CLI failed at the device end. |
Select Action > ellipsis (…) to view detailed log information about the issue. Then go back to the configuration group page to correct the error and then deploy the device again. |
|
Failure |
The associated YANG configuration failed. The entire transaction was aborted, and no configuration was committed. |
Select Action > ellipsis (…) to view detailed log information about the issue. Then go back to the configuration group page to correct the error and if there is a Valid IOS XE CLI without an associated YANG model then move the configuration to the Classic CLI pane. Then deploy the device again. |
|
Rollback |
The Control Connection failed causing a rollback to its previous working state. Only the CLI section reverts to its previous state, rollback for Classic CLI is not supported. To retain the previous device configurations, you need to correct these manually using SD-WAN Manager. Note, the system will wait for 5 minutes to re-establish the control connection; if the connection is not restored within this time, a rollback will occur. |
Select Action > ellipsis (…) to view detailed log information about the issue. Then go back to the configuration group page to correct the error and then deploy the device again. For any unknown issues, get in touch with Cisco Technical Assistance (TAC) team. |
When moving a device to a different Configuration Group, you must first disassociate it from its current group. Follow the steps below to disassociate a device from the Configuration Group.
| Command or Action | Purpose | |
|---|---|---|
|
Step 1 |
From Cisco Catalyst SD-WAN Manager, choose |
|
|
Step 2 |
Select the preferred SD-Routing configuration group from the list. |
|
|
Step 3 |
Click +Add adjacent to Associated field. |
|
|
Step 4 |
Uncheck the devices to disassociate the devices from the Configuration group. |
|
|
Step 5 |
Click Save. |
The Create SD-Routing Config workflow available in the Workflow Library is a simplified workflow that guides you in creating a configuration group for SD-Routing devices. This is an alternative way to quickly create a configuration group.
|
Step 1 |
From Cisco SD-WAN Manager menu, choose . |
|
Step 2 |
Enter a name and optionally a description and click to create a SD-Routing config group. |
|
Step 3 |
Select the configuration group and add any additional profiles that you need. For more information refer to Create Configuration Groups Using Profile Configuration Group |
Associate and Deploy the Configuration Group to an SD-Routing Device
You should have created an SD-Routing Configuration Group and associated one or more devices with the configuration group.
|
Step 1 |
From the Cisco SD-WAN Manager menu, choose . |
|
Step 2 |
Start the Deploy Configuration Group workflow. |
|
Step 3 |
Follow the instructions provided in the workflow. |
When you push configurations to a device using a Configuration Group, the device console locks, blocking any other actions through the terminal. To make the console available for pushing configurations directly through the terminal, you release it from the SD-WAN Manager. Follow these steps to release a console from a Configuration Group.
|
Step 1 |
From Cisco Catalyst SD-WAN Manager, choose |
|
Step 2 |
Click … adjacent to the configuration group name. |
|
Step 3 |
Select Config Unlock. |
|
Step 4 |
Click Yes in the Config Unlock dialogue box to release the console. |
 Feedback