Mapping Cisco CSR 1000v Network Interfaces to VM Network Interfaces
Mapping the Router Network Interfaces to vNICs
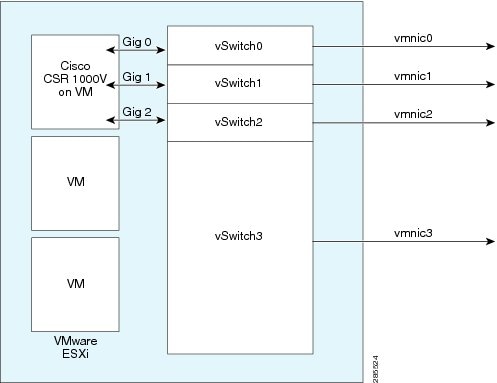
The Cisco CSR 1000v maps the GigabitEthernet network interfaces to the logical virtual network interface card (vNIC) name assigned by the VM. The VM in turn maps the logical vNIC name to a physical MAC address.
When the Cisco CSR 1000v is booted for the first time, the router interfaces are mapped to the logical vNIC interfaces that were added when the VM was created. The figure below shows the relationship between the vNICs and the Cisco CSR 1000v router interfaces.

After the Cisco CSR 1000v boots, you need to display the mapping between the logical interface on the router with the vNIC and the vNIC MAC address using the show platform software vnic-if interface-mapping command. The display for this command is different depending on your Cisco IOS XE release version. (Note: For Cisco IOS XE Release 3.11 or later, the GigabitEthernet0 interface is no longer supported.)
Router# show platform software vnic-if interface-mapping
--------------------------------------------------------------------------
Interface Name        Short Name     vNIC Name                Mac Addr
--------------------------------------------------------------------------
GigabitEthernet0       Gi0        eth0 (vmxnet3)           000c.2946.3f4d
GigabitEthernet2       Gi2        eth2 (vmxnet3)           0050.5689.0034
GigabitEthernet1       Gi1        eth1 (vmxnet3)           0050.5689.000b
--------------------------------------------------------------------------
The vNIC name shown in the display is a logical interface that the Cisco CSR 1000v uses to map to the interface on the hypervisor. It does not always map to the corresponding NIC name added during the VM installation. For example, the logical “eth1” vNIC name in the display may not necessarily map to “NIC1” that was added in the VM installation process.
 Caution |
It is important that you verify the interface mapping before you begin configuring the Gigabit Ethernet network interfaces on the Cisco CSR 1000v. This ensures that the network interface configuration will apply to the correct physical MAC address interface on the VM host. |
If you reboot the router and do not add or delete any vNICs, the interface mapping remains the same as before. If you reboot the router and delete vNICs, special care must be taken to ensure that the configuration for the remaining interfaces remains intact. For more information, see Adding and Deleting Network Interfaces on the Cisco CSR 1000v.
 Note |
In Cisco IOS XE Release 3.10S and earlier, the first vNIC added is automatically mapped to the GigabitEthernet0 management interface. All subsequent vNICs added are mapped to router interfaces. Support for the GigabitEthernet0 interface was removed in Cisco IOS XE Release 3.11S. |
Adding and Deleting Network Interfaces on the Cisco CSR 1000v
The Cisco CSR 1000v maps the router GigabitEthernet interfaces to the logical vNIC name assigned by the VM, which in turn is mapped to a MAC address on the VM host. You can add or delete vNICs on the VM to add or delete GigabitEthernet interfaces on the Cisco CSR 1000v. You can add vNICs while the router is active.
To delete a vNIC from the VM, you must first power down the VM. If you delete any vNICs, the router must be rebooted. For more information about adding and deleting vNICs, see the VMware Documentation .
Caution |
If you remove a vNIC without first updating the Cisco CSR 1000v network interface configuration, you risk a configuration mismatch when the router reboots. When the router reboots and a vNIC has been removed, the remaining logical vNIC names could get reassigned to different MAC addresses. As a result, the GigabitEthernet network interfaces on the Cisco CSR 1000v can be reassigned to different physical interfaces on the hypervisor. |
Before you add or delete network interfaces, first verify the interface-to-vNIC mapping using the show platform software vnic-if interface-mapping command.
csr1000v# show platform software vnic-if interface-mapping
--------------------------------------------------------------------------
Interface Name             Driver Name               Mac Addr
--------------------------------------------------------------------------
GigabitEthernet3            vmxnet3                 000c.2946.3f4d
GigabitEthernet2            vmxnet3                 0050.5689.0034
GigabitEthernet1            vmxnet3                 0050.5689.000b
GigabitEthernet0            vmxnet3                 000c.2946.3f4d
--------------------------------------------------------------------------
After adding or deleting network interfaces on the VM, always verify the new interface-to-vNIC mapping before making configuration changes to the network interfaces. The following example shows the interface mapping after a new vNIC has been added. The new vNIC maps to the GigabitEthernet4 network interface on the Cisco CSR 1000v.
csr1000v# show platform software vnic-if interface-mapping
--------------------------------------------------------------------------
Interface Name             Driver Name               Mac Addr
--------------------------------------------------------------------------
GigabitEthernet4            vmxnet3                 0010.0d40.37ff
GigabitEthernet3            vmxnet3                 000c.2946.3f4d
GigabitEthernet2            vmxnet3                 0050.5689.0034
GigabitEthernet1            vmxnet3                 0050.5689.000b
GigabitEthernet0            vmxnet3                 000c.2946.3f4d
--------------------------------------------------------------------------
Removing a vNIC from a Running VM
To remove a vNIC from a running VM, use the clear platform software command (described below). Perform this command before removing a vNIC from the hypervisor configuration. This is part of
a "two-step hot remove". To see which hypervisors support a two-step hot remove, look for hypervisors with vNIC Two-Step Hot
Remove Support = Yes in Hypervisor Support.
clear platform software vnic-if interface GigabitEthernetinterface-number
interface-number—value from 0–32.
Example:
csr1000v# clear platform software vnic-if interface GigabitEthernet4Next, remove the vNIC from the hypervisor configuration.
Note |
Starting with the IOS XE 17.1 release, you no longer need to execute the |
Cisco CSR 1000v Network Interfaces and VM Cloning
When first installed, the Cisco CSR 1000v creates a database that maps the vNIC name to the MAC address. This database is used to maintain a persistent mapping between the router interfaces and the vNIC-to-MAC address mapping in case vNICs are added or deleted. The interfaces are mapped to the stored Universal Unique Identification (UUID) maintained by VMware.
The mapping between the router network interfaces and the vNICs only applies to the current VM that the Cisco CSR 1000v is installed on. If the VM is cloned, then the stored UUID will not match the current UUID and the interface mapping will not match the router configuration.
To prevent the interface mapping from becoming mis-matched, you need to perform the following steps on the original VM before cloning:
SUMMARY STEPS
- Make sure the original VM includes the number of configured vNICs required on the cloned VM before beginning the cloning process.
- Enter the clear platform software vnic-if nvtable command on the original VM.
- Reboot the Cisco CSR 1000v.
- On the cloned VM, verify the interface mapping using the show platform software vnic-if interface-mapping command.
- Configure the router interfaces on the cloned VM accordingly.
DETAILED STEPS
|
Step 1 |
Make sure the original VM includes the number of configured vNICs required on the cloned VM before beginning the cloning process. |
|
Step 2 |
Enter the clear platform software vnic-if nvtable command on the original VM. This command clears the persistent interface database on the original VM and updates the interface mapping to the hypervisor. |
|
Step 3 |
Reboot the Cisco CSR 1000v. |
|
Step 4 |
On the cloned VM, verify the interface mapping using the show platform software vnic-if interface-mapping command. |
|
Step 5 |
Configure the router interfaces on the cloned VM accordingly. If you follow these steps, the router configuration on the cloned VM should match the configuration of the original VM. |
 Feedback