Managing MSX Authentication
Managing MSX Authentication contains the following sections:
Configuring Password Policies
The password policies allow you to enforce secure password checks on newly created passwords for additional management users of the controller and access points.
Cisco MSX allows you to configure and update password policies using an API or the MSX admin portal.
This topic contains the following sections:
Configuring Password Policies Through an API
In Cisco MSX, as a user with an administrator role, you can define various settings for the password policies, such as password strength, password length, account locking, password history, and password aging.
By default, there are three built-in policies available on Cisco MSX. As a user with an administrator role, you can modify these existing policies or create new policies. These built-in policies can be used when you add users. The default policies could be edited, but can not be deleted. The default policies created are:
-
ppolicy_default: Applies to the consumer user.
-
ppolicy_strong: Applies to the administrator accounts.
-
ppolicy_system: Applies to both consumer user and administrator accounts.
To define the password policies, use the PwdPolicy POST API in the IDM User Controller section of the User Management Service API. For more information on the User Management Service API, refer to the Swagger documentation accessible from the MSX portal > Account Settings > Swagger > User Management Service API.
The following are the password policy settings available in Cisco MSX:
-
Password strength (characterRule): Determines series of guidelines that are important for a strong password.
-
Password length (lengthRule): Determines minimum and maximum password length.
-
Account Locking (accountLocking): Determines the lockout of a user account. Using this setting you can control how may invalid password attempts (lockoutFailCount) are allowed within a time period (lockoutFailIntervalSec). If the number of attempts is exceeded, then account gets locked for a specified time (lockoutDurationMin).
-
Password History (historyRule): Determines whether the users can reuse previous password within a predefined time period.
-
Password Aging Rules (agingRule): Determines how long an existing password is valid. The following password aging settings are available in Cisco MSX.
-
Password Expire Warning Period (expireWarningSec): With this setting, you can set the number of seconds before a password expires. In this policy, you can also set when an email notification is sent to the user before their password expires. Use the pwdExpireWarning parameter to define when the user starts to receive password expiration notifications. If this time interval is set to 0, no warning messages are sent out. The user can change their password at any time before the expiry. After expiry, they must change their password to continue using MSX.
-
Password Grace Period (graceAuthNLimit): Use this setting to define the number of grace login attempts after the Password lifetime limit has exceeded. In this policy, you can set the number of times an expired password can be used to authenticate after the password lifetime limit has exceeded. Users attempting to log in to the account during this grace period receives a warning message to change the password. If grace authentication is not defined for the user or the user has used all allowed attempts, user login to the account fails, and the system displays the following error message, "Your password expired. Please Reset your password".
-
Maximum Password Age (maxAgesec): Using this setting, specify the number of seconds after which a password expires. Set the value to 0 if you want the password never to expire.
-
Minimum Password Age (minAgesec): Using this setting, you can set the minimum number of seconds between modifications to the password. Set the value to 0 if you want to reset/change the password at any time.
-
Password Characters (dictionaryRule): Using this setting, you can enable the dictionary rule to reject passwords that are vulnerable. The user’s password is checked against the words in the dictionary and is rejected if the password matches any of these dictionary words. If the parameter 'testReversedPassword' is true, the user’s password is checked against the reversed word as well.
-
{
  "policies": [
    {
      "name": "ppolicy_default",
      "description": "PHI ppolicy_default",
      "characterRule": {
        "enabled": true,
        "minDigit": 1,
        "minLowercasechars": 1,
        "minUppercasechars": 1,
        "minSpecialchars": 1
      },
      "lengthRule": {
        "enabled": true,
        "minLength": 8,
        "maxLength": 16
      },
      "accountLocking": {
        "enabled": true,
        "lockoutDurationMin": 30,
        "lockoutFailCount": 3,
        "lockoutFailIntervalSec": 60
      },
      "historyRule": {
        "enabled": true,
        "passwdhistorycount": 10,
        "passwdhistorydurationMonth": 60
      },
      "agingRule": {
        "enabled": true,
        "graceAuthNLimit": 3,
        "maxAgeSec": 10368000,
        "minAgeSec": 86400,
        "expireWarningSec": 1209600
      },
       "dictionaryRule": {
          "enabled": true,
          "testReversedPassword": true
        }
      }]
Managing Device Password Using API
Cisco MSX allows you to retrieve the deleted secrets. It also allows you to store and view the historical data of the secrets.
To define the secrets, use the below APIs in the IDM Microservice of the User Management Service API:
-
Secret Controller
-
Tenant Secrets Controller
For more information on the User Management Service API, refer to the Swagger documentation accessible from the MSX portal > Account Settings > Swagger > User Management Service API.
The current secret API supports:
-
Soft delete
-
Secret version
-
Store by any combination of the identifiers like serial and device id and tenant id
You can set the force flag as an optional parameter. For example:
-
For soft delete —You need to set the flag force=false
-
For hard delete —You need to set the flag force=true
 Note |
With hard delete, you cannot get the secret back, which means it is an irreversible action. By default, in Cisco MSX, the secret delete option is a soft delete, which is a reversible action, unless you mention the parameter as force=true. |
Configuring Password Policies Through the MSX Portal
In Cisco MSX, as a user with an administrator role, you can configure and update password policies using the MSX admin web portal, in addition to using the API.
The password policies supported are:
-
Password History—The number of previous passwords that cannot be reused.
-
Maximum Password Age—The number of days a password is valid.
-
Minimum Password Length policy—Minimum number of characters needed to create a password.
-
Complexity Requirements—Passwords must:
-
Contain a number
-
Contain a special character
-
Contain an upper case character
-
Contain a lower case character
-
Using this procedure, you can configure password policies using the MSX portal.
Procedure
| Step 1 |
Log in to the Cisco MSX portal using your credentials. |
| Step 2 |
From the left pane, choose Settings > Authentication. The Authentication window is displayed. |
| Step 3 |
Click Add Policy to add a new policy. The Create Password Policy window is displayed. |
| Step 4 |
In the Password Policy section, enter:
|
| Step 5 |
In the Complexity Requirements section, check:
|
| Step 6 |
Click OK. A new policy is added and displayed in the Password Policies table. |
| Step 7 |
Select a policy from the Password Policies table, click the Edit icon if you want to change the password policy features. The Edit Password Policy window is displayed. |
| Step 8 |
Change the features as required and click OK. |
| Step 9 |
Select a policy from the Password Policies table, click the Delete icon if you want to delete a policy feature. The Delete Password Policy window is displayed. |
| Step 10 |
Click Delete. |
Enabling Two-Factor User Authentication
Two-Factor Authentication (TFA) is an additional layer of security along with a strong password to ensure the identity of a user and reduce the risk of unauthorized access to Cisco MSX application and data. This additional factor can be something that only a user has access to, such as a One-time authentication code (OTP).
You can enable the Two-Factor Authentication from the MSX portal or by using the Global Settings API. To enable it from the MSX portal, select the Use Two Factor Authentication check box available in Settings > Authentication. For more information on the Global Setting API, refer to the Swagger documentation accessible from MSX portal > Account Settings > Swagger > Administration Service API.
When enabled, it is applicable for all users. After the Two-Factor Authentication is enabled, users accessing the MSX portal must provide the following authentication factors:
-
Username and password
-
One-time authentication code (OTP). This code is sent to registered email address of the user. Each OTP is intended for use by only one user. This code is valid for a specific period of time and becomes invalid after the user successfully logs in.
By default, the user login attempts and validity duration of OTP are as follows:
-
Number of user login attempts–The number of times a user can try logging in to the MSX portal. By default, this is five.
-
Validity duration of OTP–The default validity duration of an OTP is 5 minutes. If the OTP expires, the user is forced to sign in again with the first authentication factor, that is, username and password.
Note |
|
Configuring Authorization Server Properties
The Cisco MSX authorization server provides standard authorization APIs - OAuth2 and SAML. Using these APIs, clients (i.e., MSX UI app, SD-WAN vManage, and so on) can authenticate their users. Access tokens granted to the authenticated user can be used to access MSX APIs.
The Cisco MSX authorization server also provides the ability to connect to different identity providers. The identity provider is resolved based on the domain. In a deployment, a domain can be configured to a specific identity provider (i.e., internal user, SAML IDP, and so on), and a client can authenticate using this identity provider via MSX authorization server using either OAuth2 or SAML.

You can configure auth server properties, such as the timeout period, an authentication method, access token validity, and so on.
Using this procedure, you can specify session timeout and other auth server properties.
Procedure
| Step 1 |
Specify the SAML protocol: |
||||||||||||||||||||||||||||||||||||||||
| Step 2 |
Specify the Host: Specify the domain for which the session cookie must be set. Usually, this is the base domain when multiple IDP is configured. For example, msx.com when there are saml.msx.com and internal.msx.com, and so on. Setting it to the base domain abstract the IdP detail from third-party SSO app. |
||||||||||||||||||||||||||||||||||||||||
| Step 3 |
Specify the server session timeout property. The property, server.session.timeout defines the max idle time of the server session after which the platform logs out the user out automatically. After the session timeout period, the session expires. To specify the timeout period, use the following curl command: |
||||||||||||||||||||||||||||||||||||||||
| Step 4 |
Set the following parameters as required:
|
||||||||||||||||||||||||||||||||||||||||
| Step 5 |
Verify the auth server properties using the following curl command: |
||||||||||||||||||||||||||||||||||||||||
Configuring Session Timeout Values
The Cisco MSX portal allows you to configure the inactivity timeout of a server session, as well as the absolute timeout.
Note |
|
When the session expires, Cisco MSX displays a message stating that the session has expired. You have the option to log in again or reauthenticate with the login credentials.
Using this procedure, you can configure session timeout values.
Procedure
| Step 1 |
Log in to the Cisco MSX portal using your credentials. |
||
| Step 2 |
From the left pane, choose Settings > Authentication. The Authentication window is displayed. |
||
| Step 3 |
In the session timeout, enter the inactivity timeout value and the absolute session timeout value in seconds.
|
||
| Step 4 |
Click Save. |
Configuring Single Sign-On (SSO)
Cisco MSX allows you to configure and update SSO either through the API or the MSX admin portal.
Cisco MSX supports the following types of SSO configuration:
-
Configuring SAML-Based IDPs on MSX: An Identity Provider (IDP) is responsible for issue authentication assertions. Cisco MSX can be configured with multiple SAML IDPs. If Service Providers already have one or more IDPs, they can configure MSX to work with these IDPs to set up SSO. Cisco MSX supports SAML 2.0 for SSO.
When one or more IDPs are configured, Cisco MSX uses a subdomain to determine which IDP to route the login request to. The default IDP is the local database IDP—user credentials will be validated against the local user database. This means that by default, SSO using SAML is not enabled on Cisco MSX. Additional SAML IDP can be configured either through an API or through the MSX admin portal. Adding an IDP allows the login request to be routed to that IDP. Users will be logged in to MSX once the IDP authenticates the user.
Note
For Configuring Identity Provider used by MSX to work, the property
security.idp.saml.enabledshould be set to true. For more information, see the Parameters table in the Configuring Authorization Server Properties section.
-
Configuring the SSO Clients (Using MSX as an IDP): This means MSX can be configured as an IDP. Cisco MSX itself can also act as an IDP to other systems that want to use MSX for SSO. A third-party system can connect to Cisco MSX using OAuth2, OpendID Connect (OIDC), or SAML. SAML is an XML-based, open-standard data format that enables users to have access to multiple applications seamlessly after they sign in to Cisco MSX.
When a user visits the third-party system, they will be redirected to MSX to login. Once MSX authenticates the user, the user will be redirected back to the third-party system and is logged in there. These third-party systems are considered SSO clients to MSX. This can work in conjunction with the multiple IDPs configured in MSX.
This topic contains the following sections:
Configuring Single Sign-On (SSO) Through API
Cisco MSX enables you to configure and update SSO through API at run time. This will allow you to add and remove IDP, OAuth2 client, and SAML client without having to interact with consul directly. It will also not require a microservice restart.
Cisco MSX supports the following types of SSO authentication through API:
-
Configuring SAML-Based IDPs on MSX: To configure Cisco MSX with multiple SAML IDPs, use the Identity Provider Management Controller section of the User Management Service API. For more information on the User Management Service API, refer to the Swagger documentation accessible from the MSX portal > Account Settings > Swagger > User Management Service API.
-
Configuring the SSO Clients (Using MSX as an IDP): To configure Cisco MSX as an IDP, use the Security Client Controller section of the User Management Service API if the SSO client is an Oauth2 or OpenID Connect (OIDC) client.
If the SSO client is a SAML Service Provider, you need to additionally add the SAML specific details by using the SAML Service Provider Management Controller section of the User Management Service API. For more information on the User Management Service API, refer to the Swagger documentation accessible from the MSX portal > Account Settings > Swagger > User Management Service API.
Configuring Single Sign-On (SSO) Through the MSX Portal
In Cisco MSX, as a user with an administrator role, you can configure SSO using the MSX admin portal, in addition to using the API.
You need to either add the IDP or SSO clients based on your SSO requirements.
The SSO clients are of two types—SAML and Non-SAML. It depends on the selection of the value in the Grant Types field selection.
Cisco MSX supports the following types of SSO authentication through MSX Portal:
Configuring SAML-Based IDPs on MSX
Using this procedure, you configure the SAML based IDP using the MSX portal (Setting up MSX as an IDP).
Procedure
| Step 1 |
Log in to the Cisco MSX portal using your credentials. |
||
| Step 2 |
From the left pane, choose Settings > SSO Configuration. The SSO Configuration window is displayed. |
||
| Step 3 |
Click the expand button for Add IDP. A table appears with a list of all the IDPs that you can add, edit, or delete. |
||
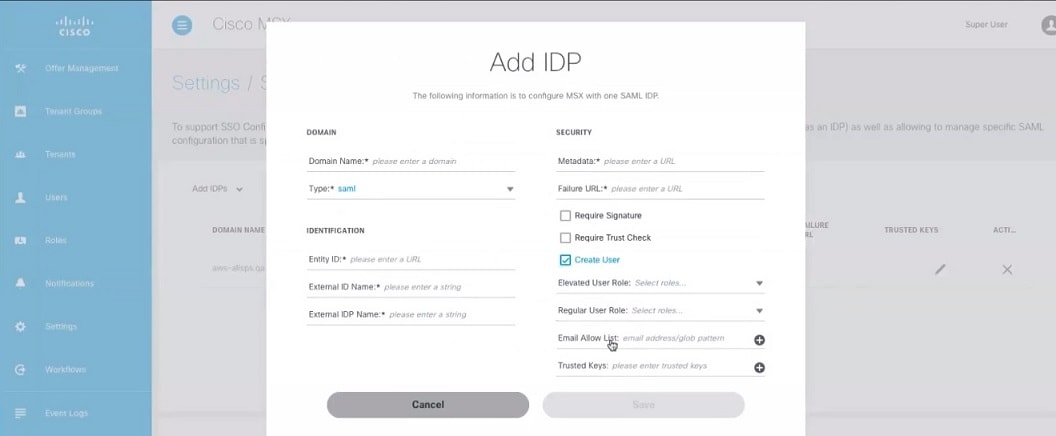
| Step 4 |
Click Add to configure MSX with one SAML IDP. The Add IDP window is displayed. |
||
| Step 5 |
Enter the following in the Domain section.
|
||
| Step 6 |
Enter the following in the Identification section.
|
||
| Step 7 |
Enter the following in the Security section.
|
||
| Step 8 |
Create a tenant dynamically by enabling Create User option. To create a tenant:
|
||
| Step 9 |
Click Save. A new IDP is added and displayed in the IDPs table. |
||
| Step 10 |
Select an IDP from the IDPs table, click the Edit icon if you want to change the IDP features. The Edit IDP window is displayed. |
||
| Step 11 |
Change the features as required and click Save. |
||
| Step 12 |
Select an IDP from the IDPs table, click the Delete icon if you want to delete an IDP. The Delete IDP window is displayed. |
||
| Step 13 |
Click Delete. |
Configuring the Non-SAML SSO Client
Using this procedure, you cna configure SSO using the MSX portal for non-SAML SSO client authentication.
Procedure
| Step 1 |
Log in to the Cisco MSX portal using your credentials. |
||||
| Step 2 |
From the left pane, choose Settings > SSO Configuration. The SSO Configuration window is displayed. |
||||
| Step 3 |
Click the expand button for Add SSO Clients. A table is displayed with a list of all the SSO Clients that you can add, edit, or delete. |
||||
| Step 4 |
Click Add to configure MSX with non-SAML SSO Client. The Add SSO Client window is displayed. |
||||
| Step 5 |
In the Attributes section:
|
||||
| Step 6 |
In the Token section, enter:
|
||||
| Step 7 |
In the Client ID section, enter:
|
||||
| Step 8 |
In the Scope section, enter:
|
||||
| Step 9 |
Click Save. A new SSO Client configuration is added and displayed in the SSO Clients table. |
||||
| Step 10 |
Select a SSO Client from the SSO Clients table, click the Edit icon if you want to change the SSO Client features.
The Edit SSO Client window is displayed. |
||||
| Step 11 |
Change the features as required and click Save. |
||||
| Step 12 |
Select a SSO Client from the SSO Clients table, click the Delete icon if you want to delete a SSO Client. The Delete SSO Client window is displayed. |
||||
| Step 13 |
Click Delete. 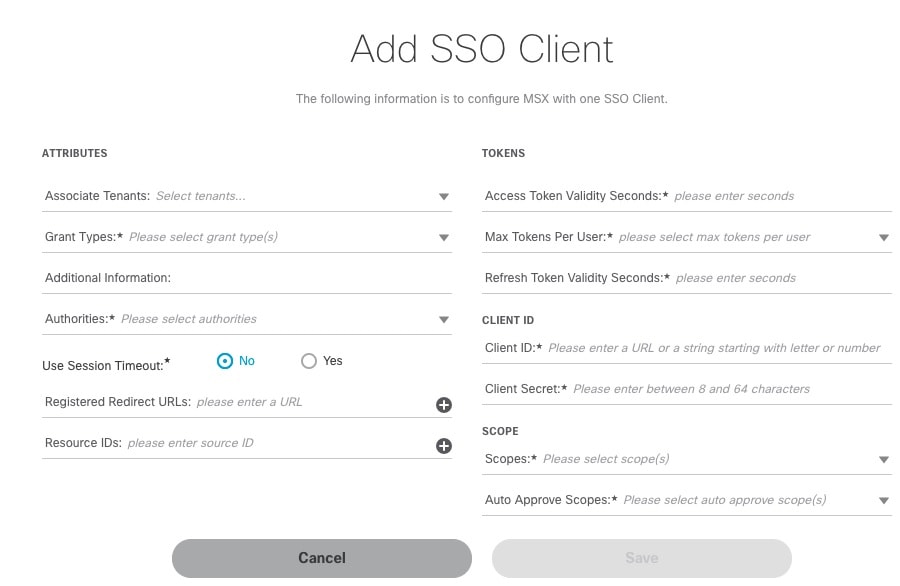
|
What to do next
For SSO to seamlessly work between Cisco MSX to SD-WAN Control Plane, do the following additional steps:
-
Upload the MSX Metadata to SD-WAN Control Plane.
-
Download the MSX metadata from the following link: https://msx-fqdn/idm/metadata.
-
Upload the metadata file to SD-WAN Control Plane manually using the SD-WAN Control Plane web interface under Settings > Identity Provider Settings.
-
-
Create user roles in MSX that map to SD-WAN Control Plane user roles (Basic, Netadmin, and Operator).
Configuring the SAML SSO Client
Using this procedure, you can configure SSO using the MSX portal for SAML SSO client authentication.
Procedure
| Step 1 |
Log in to the Cisco MSX portal using your credentials. |
||||||
| Step 2 |
From the left pane, choose Settings > SSO Configuration. The SSO Configuration window is displayed. |
||||||
| Step 3 |
Click the expand button for Add SSO Clients. A table is displayed with a list of all the SSO Clients that you can add, edit, or delete. |
||||||
| Step 4 |
Click Add to configure MSX with SAML SSO Client. The Add SSO Client window is displayed. |
||||||
| Step 5 |
In the Attributes section:
|
||||||
| Step 6 |
In the Token section, enter:
|
||||||
| Step 7 |
In the Client ID section, enter:
|
||||||
| Step 8 |
In the Scope section, enter:
|
||||||
| Step 9 |
Click Save. A new SSO Client configuration is added and displayed in the SSO Clients table. |
||||||
| Step 10 |
Select a SSO Client from the SSO Clients table, click the Edit icon if you want to change the SSO Client features.
The Edit SSO Client window is displayed. |
||||||
| Step 11 |
Change the features as required and click Save. |
||||||
| Step 12 |
Select a SSO Client from the SSO Clients table, click the Delete icon if you want to delete a SSO Client. The Delete SSO Client window is displayed. |
||||||
| Step 13 |
Click Delete. |
What to do next
For SSO to seamlessly work between Cisco MSX to SD-WAN Control Plane, do the following additional steps:
-
Upload the MSX Metadata to SD-WAN Control Plane.
-
Download the MSX metadata from the following link: https://msx-fqdn/idm/metadata.
-
Upload the metadata file to SD-WAN Control Plane manually using the SD-WAN Control Plane web interface under Settings > Identity Provider Settings.
-
-
Create user roles in MSX that map to SD-WAN Control Plane user roles (Basic, Netadmin, and Operator).
Managing User Sessions
When a user is authenticated (regardless of the authentication mechanism), an authenticated session is created for the user. For an authenticated session, administrators can configure:
-
A session timeout. For more information on configuring session-related properties, see Configuring Authorization Server Properties.
-
Limit the number of authenticated sessions for a user. By default, the number of sessions is unlimited. For more information, see Enabling Concurrent Sessions.
Enabling Concurrent Sessions
Concurrent interactive sessions refer to the simultaneous active sessions a user can have per Cisco Managed Services Accelerator (MSX) instance. Cisco MSX session is considered active with every new login. By default, there are no limitations on the number of active sessions a user can have.
As an administrator user, you can activate and configure the concurrent sessions from the MSX Portal or by using the PUT API /administration/api/v1/globalsettings. For more information on the API, refer to the Swagger documentation accessible from the MSX portal > Account Settings > Swagger > Administration Service API.
Using this procedure, you can enable the concurrent session from the MSX portal.
Procedure
| Step 1 |
Log in to the Cisco MSX portal using your credentials. |
| Step 2 |
From the main menu, choose Settings > Integrations. The Integrations window is displayed. |
| Step 3 |
In the Global settings tab, select one of the following options for the Concurrent Sessions:
|
Retrieving the Device Password
The Cisco MSX platform allows you to retrieve the deleted or existing device password using the serial number. When the devices are deleted from the Cisco MSX, you can enter the device serial number in the Devices window and retrieve the deleted device password using the IDM Microservice API.
You can manage the configurations of the IDM Microservice API as follows:
Manage the secrets configuration and supports scope such as servicetype, devicetype, devicesubtype, and serialkey. Use the Secrets Controller API of the IDM Microservice API.
For more information on this API, refer to the Swagger documentation that can be accessed for MSX portal > Account Settings > Swagger > IDM Microservice API.
Using this procedure, you can retrieve the deleted password using the device serial number.
Procedure
| Step 1 |
Log in to the Cisco MSX portal using your credentials. |
| Step 2 |
From the left pane, click Devices. The Devices window is displayed. |
| Step 3 |
Click the ellipsis (...) that is located on the far right of the column heading and choose Retrieve Deleted Device. The Retrieve Deleted Device dialog box is displayed. You can also select mutliple device and click the ellipsis (...) on the column heading to retrieve multiple deleted devices credential. |
| Step 4 |
Enter the device serial number. |
| Step 5 |
Click Show Credentials. The device credential is displayed. You can also copy this device password by clicking the Copy icon. 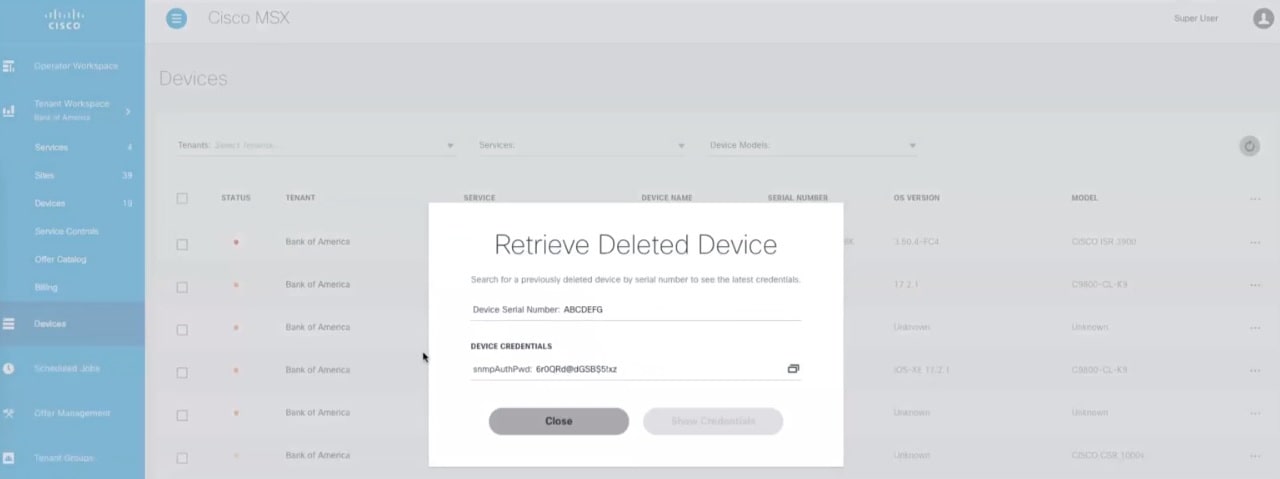
|
 Feedback