Managing Meraki
Using Cisco MSX Managed Devices services, operators can manage organizations (attach, edit, or delete) and create networks comprising Meraki devices and services. An organization implies Meraki networks managed by one or more accounts. For deploying a Meraki solution, it is essential to consider an organizational structure that will use this solution. It is recommended to have one organization per customer or one organization per service. For more information on when to use multiple organizations, see the section, 'Building a Scalable Meraki Solution' in Cisco Meraki documentation.
The following are the Meraki wireless and combined device types currently supported on Cisco MSX:
-
MX -Security and SD-WAN: The Meraki MX is an enterprise security & also equipped with SD-WAN capabilities that enable administrators to maximize network resiliency and bandwidth efficiency.The following are the MX devices supported on MSX.
-
MX64, MX65, MX67, and MX68 required for a small branch setup
-
MX84 and MX100 required for a medium branch setup
-
MX250 and MX450 required for a large branch/campus setup
-
vMX device types for virtual devices
-
-
MR- Wireless LAN: MR device types for cloud-managed WLAN access points.
-
MS - Switches: MS device types are cloud-managed access and aggregation switches series of access switches. Using these switches, thousands of switch ports can be configured and monitored instantly, over the web.
Attaching Organizations
You can associate one or more organizations to the tenant's control plane. Organization implies a collection of networks that are part of a single organizational entity. These networks, in turn, can have multiple devices.
To attach oragnizations in MSX:Procedure
| Step 1 |
Log in to the Cisco MSX portal using your credential. |
||
| Step 2 |
From the left pane, choose Tenant Workspace > Settings > Meraki Organizations. The Meraki Organization page is dispalyed. |
||
| Step 3 |
Click Attach Organizations. The Attach Meraki Organizations dialog box is displayed.  |
||
| Step 4 |
Click Get Started. |
||
| Step 5 |
Enter the Meraki API Access Key on the Connect to Meraki page. Use the eye icon to view and validate the API key.
 |
||
| Step 6 |
Click > to move to the next page. |
||
| Step 7 |
On the Select Meraki Organization page, select upto five organizations to attach to your Meraki control plane. The drop-down lists the available organizations for the access key you had provided in the previous step. In case you want to attach more than five organizations, you can do so at the end of this process by selecting Attach Another Organization option.
|
||
| Step 8 |
Click > to move to the next window and initiate the attaching process. You can close the window or click Attach Another Organization to add more organizations to the control plane. All the organizations added to the tenant's control plane is displayed in Tenant Workspace > Settings > Meraki Organizations. |
Editing or Detaching Organizations
Procedure
| Step 1 |
Log in to the Cisco MSX portal using your credential. |
| Step 2 |
From the left pane, choose Tenant Workspace > Settings > Meraki Organizations. The Meraki Organization page is displayed with the list of organizations that were added to the tenant's control plane. |
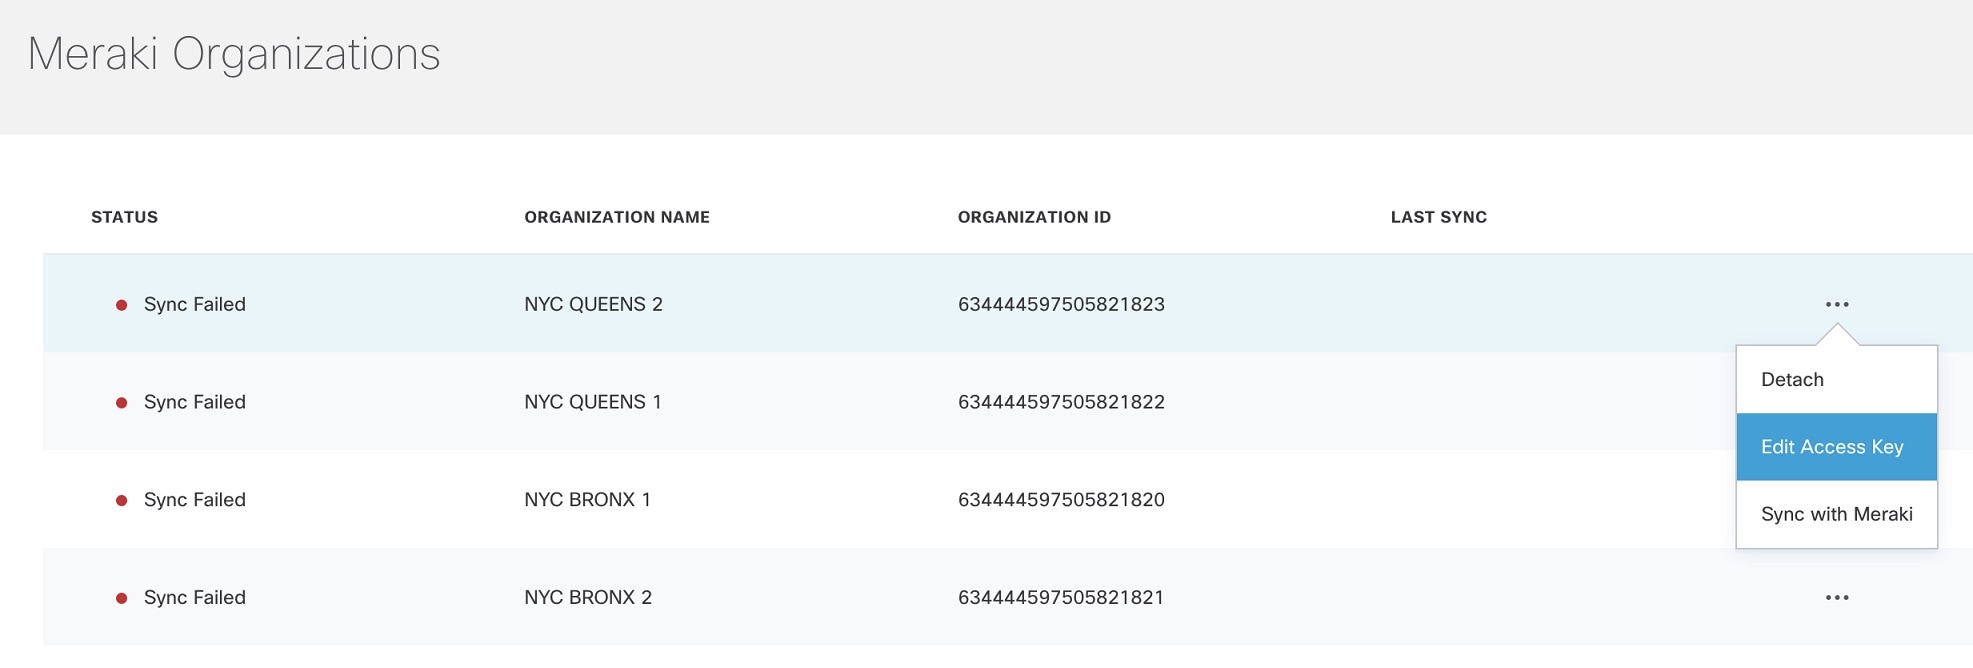
| Step 3 |
Select a row and click on the ellipsis (...) and choose Edit Access Key to edit the Organization details that were provided while attaching the organization to your tenant's control plane.
|
| Step 4 |
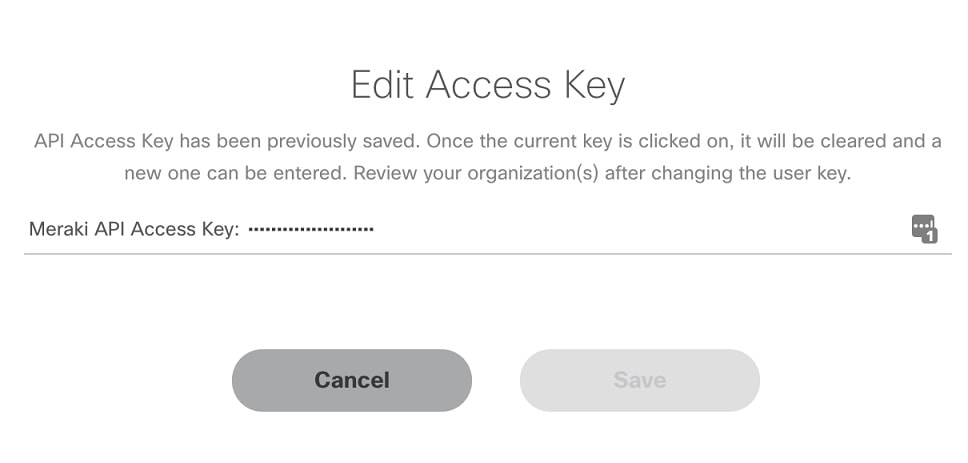
On the Edit Access Key dialog box, click Meraki API Access Key field to clear the previous key and enter a new key and click Save. Click Cancel to retain the old key. Detaching Organizations: If you want to detach or disassociate an organization from a tenants control plane, click on the ellipsis (...) and choose Detach. 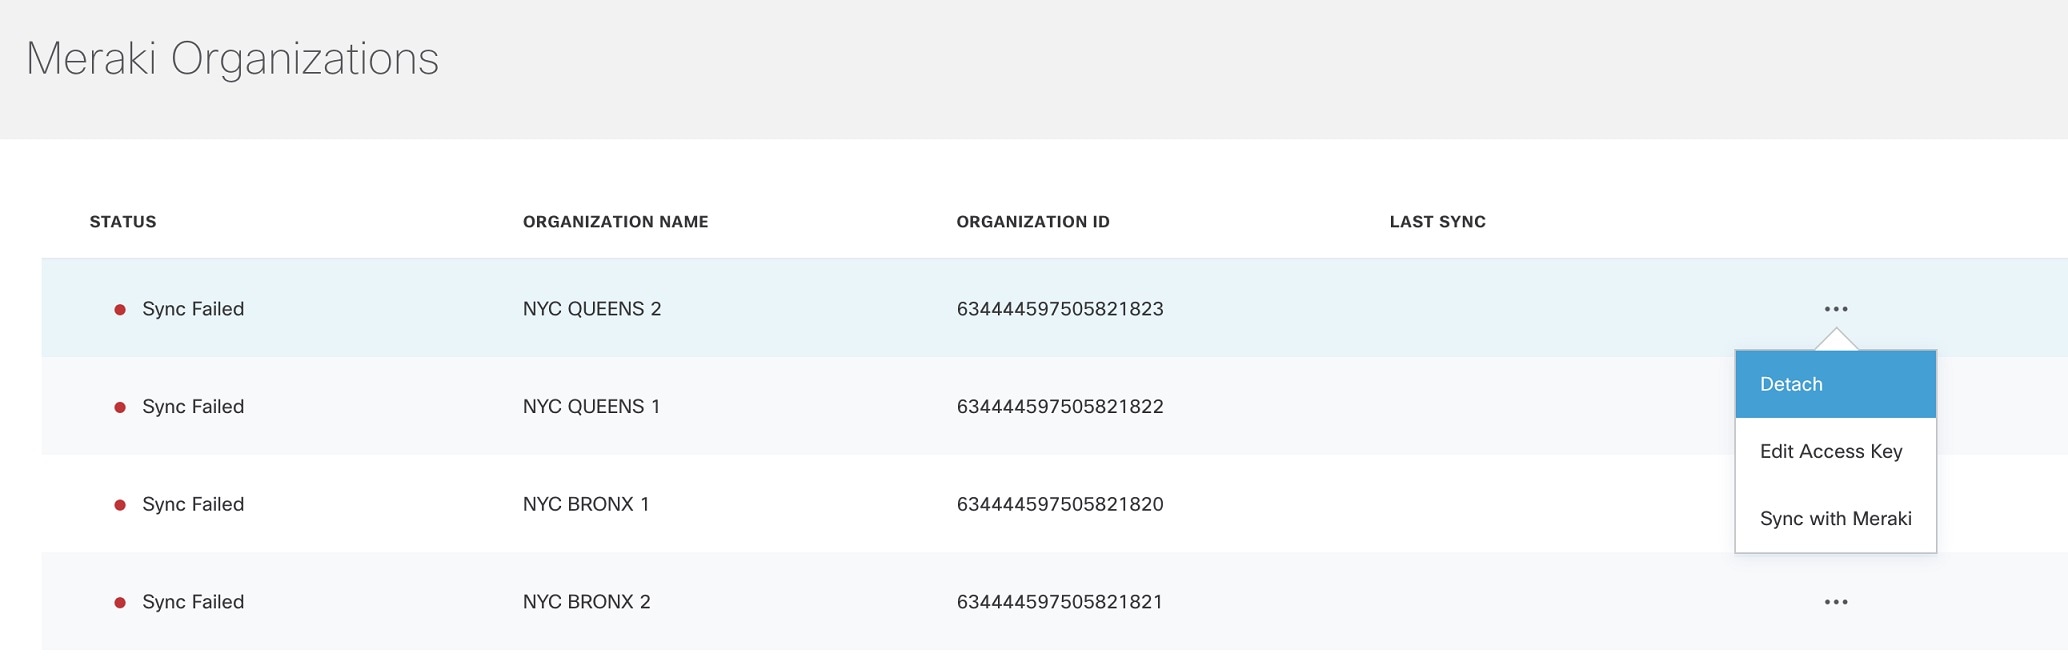 |
Creating Networks
Before you begin
Procedure
| Step 1 |
Log in to the Cisco MSX portal. |
| Step 2 |
From the left pane, choose Tenant Workspace > Sites. The list of sites associated with a tenant is displayed. |
| Step 3 |
Select any one of the sites to view the detailed site status. This page lists all the site metrics along with status of the selected site. |
| Step 4 |
Under the Managed Device section on the page, click + > Create New Meraki Networks to associate a new network to the selected site. 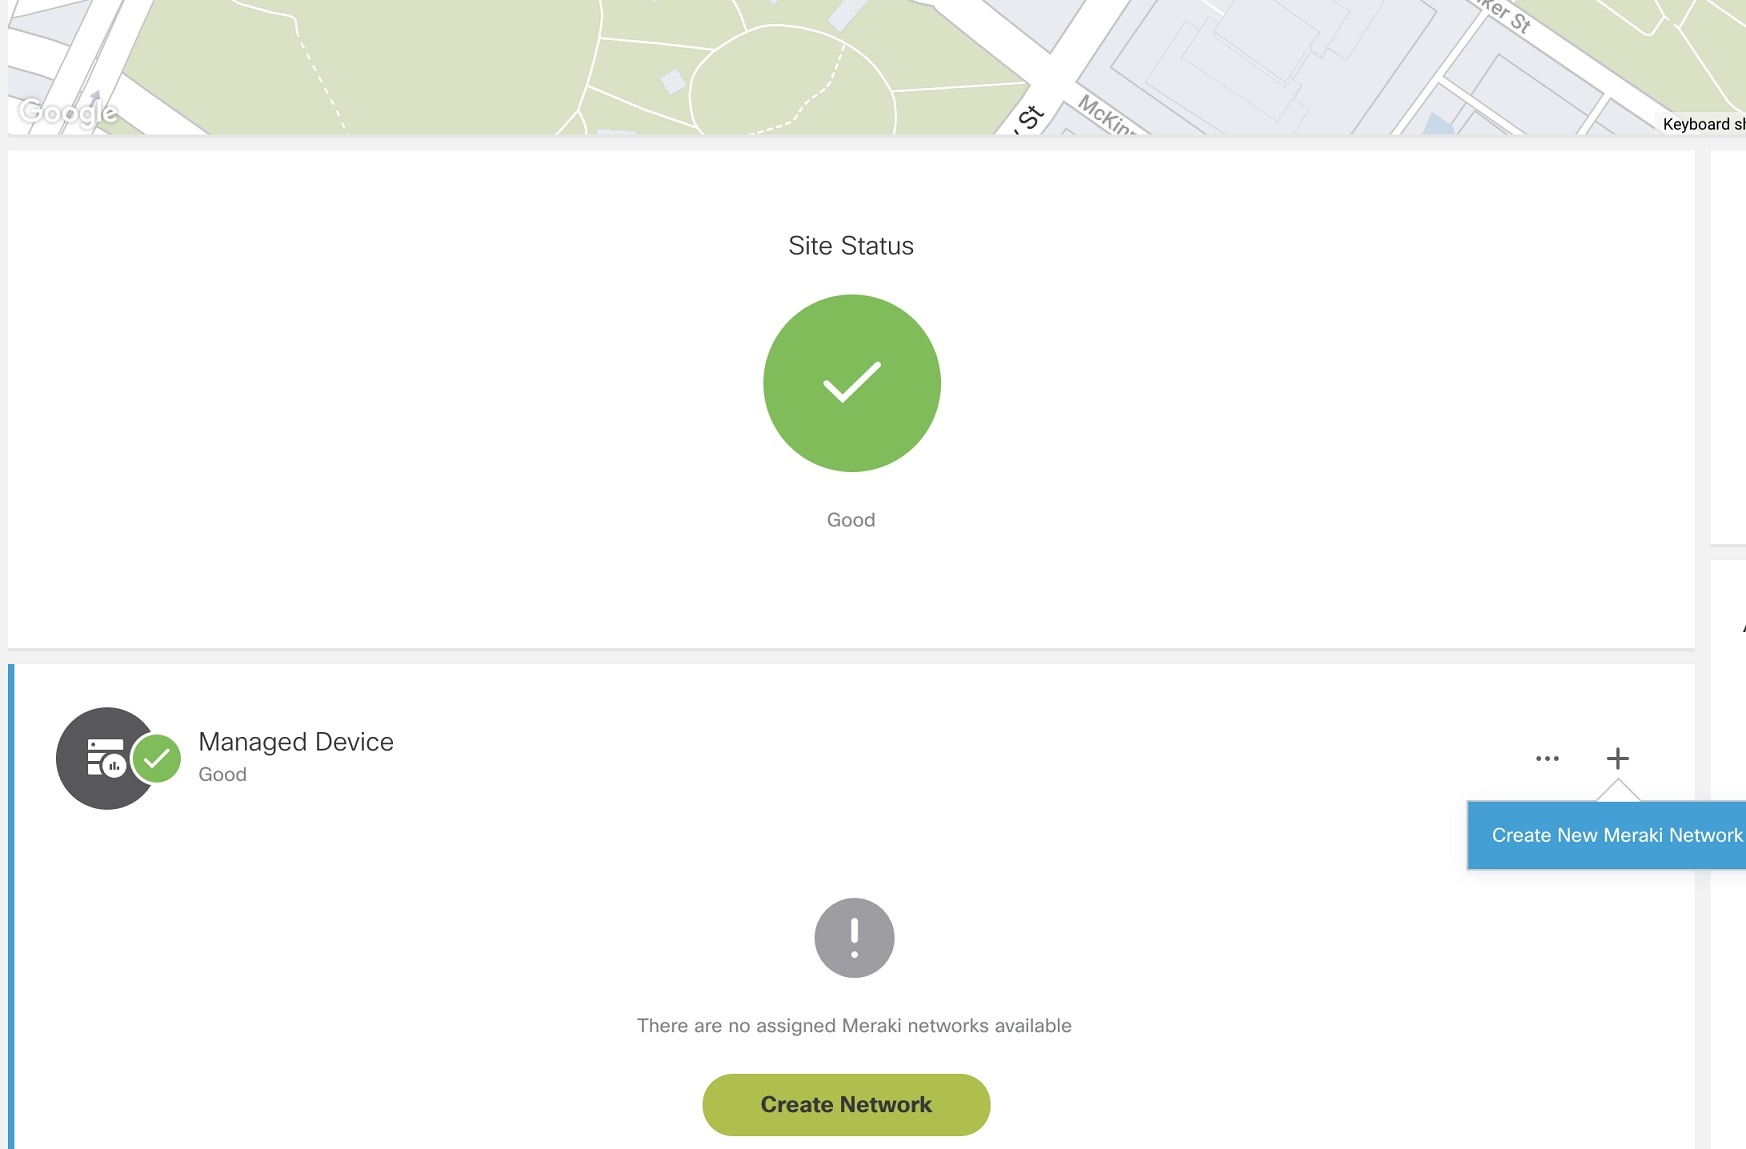 The Create New Meraki Network wizard is displayed to set up networks to manage multiple devices. |
| Step 5 |
Click Get Started. The Meraki Network Information dialog box is displayed. |
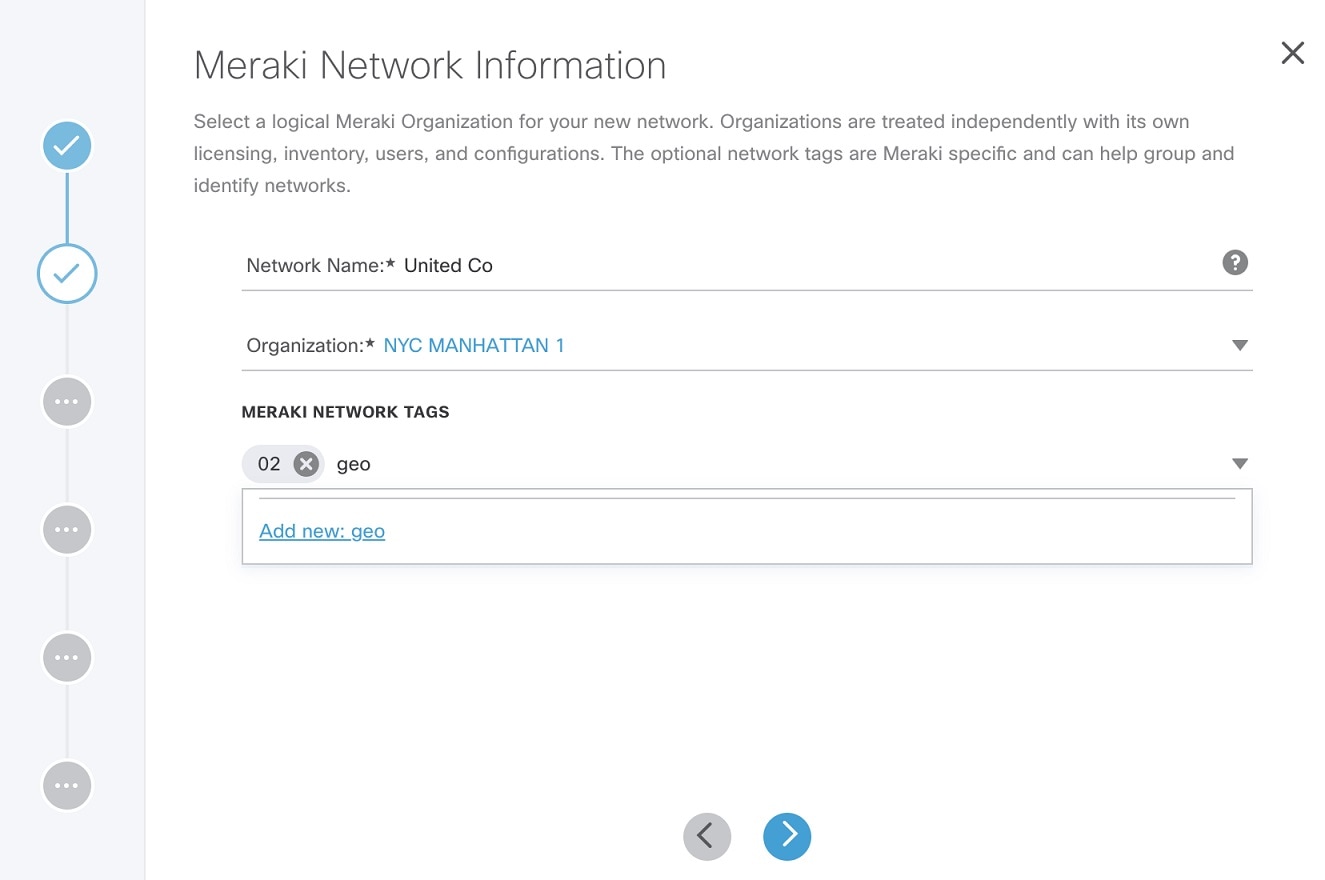
| Step 6 |
Enter the following details on the Meraki Network Information page.
|
| Step 7 |
Click > to move to the Select Network Type page. |
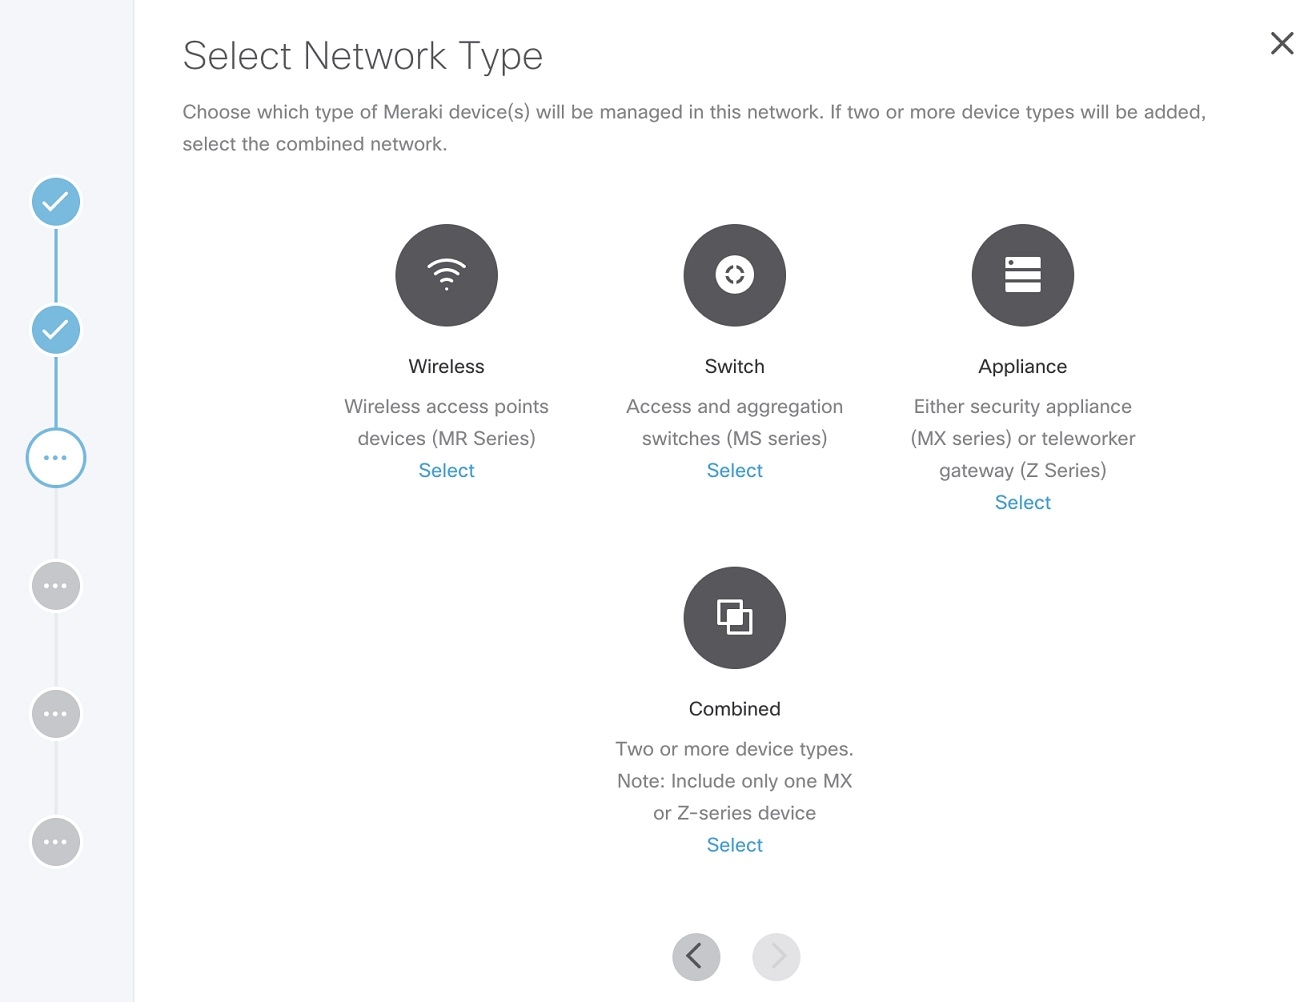
| Step 8 |
In the Select Network Type page, choose the type of Meraki devices (Wireless, Switch, Appliance) that will be managed in this new network. Choose the
Combined option to add different device types to your network. |
| Step 9 |
Click > to move to the Select Initial Configuration for Network page. |
| Step 10 |
Set up a network. Choose from one of the following options to setup the network configurations:
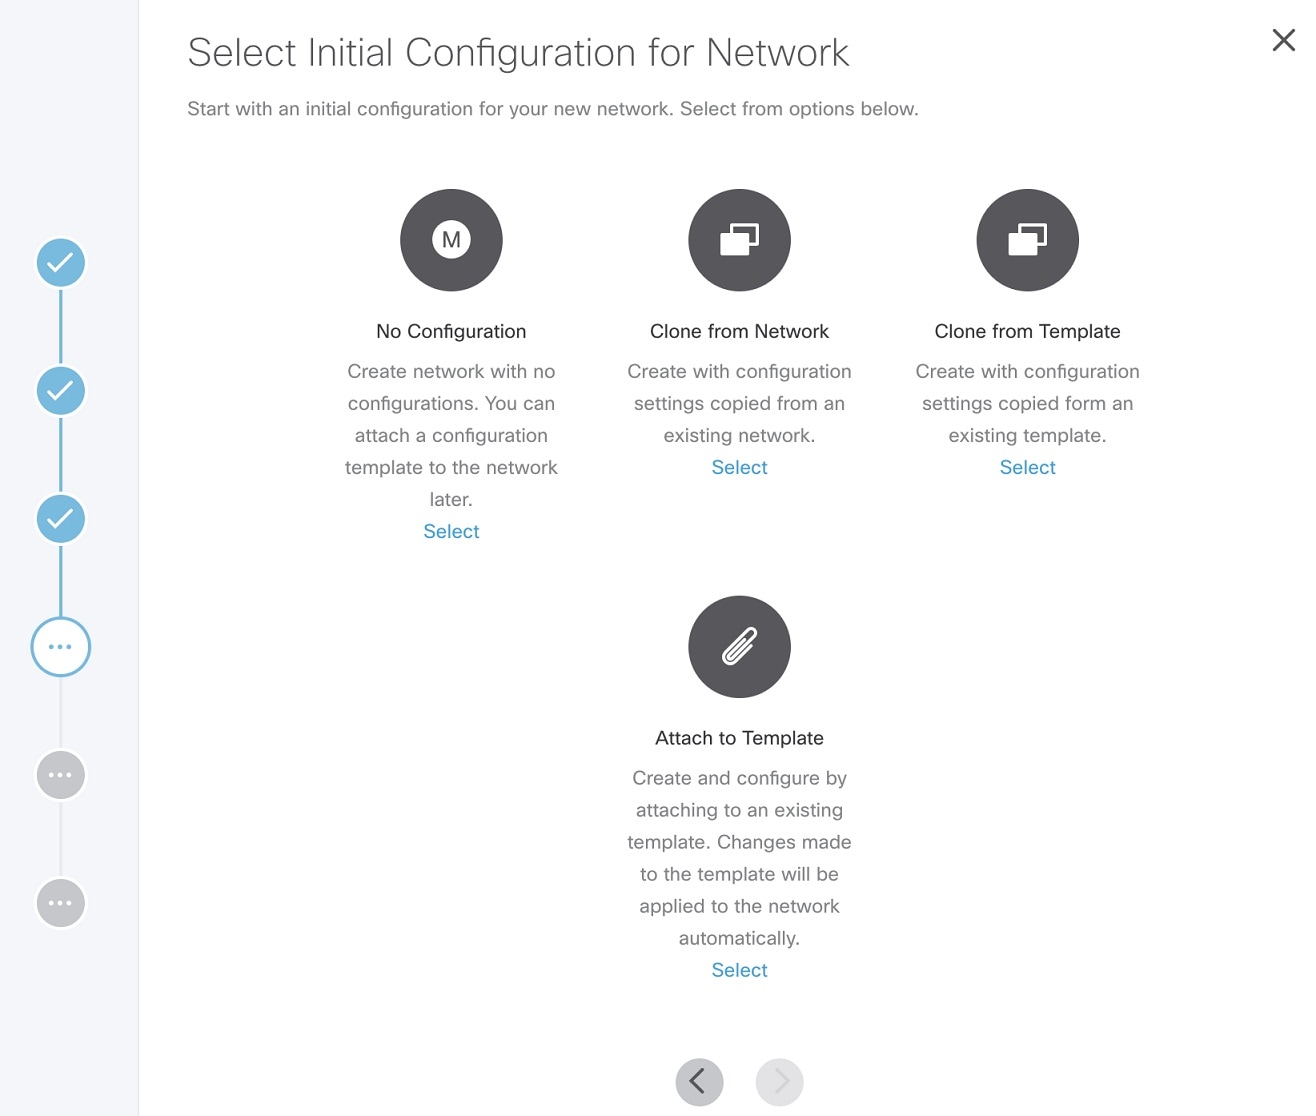 |
| Step 11 |
Click > to move to the Review and Submit page. |
| Step 12 |
Review the details and click Submit to complete the process. |
Viewing Meraki Networks for a Site
Cisco MSX Managed Device service pack provides the capability to monitor the site status and the networks associated to the sites.
To view the site details:
Procedure
| Step 1 |
Log in to the Cisco MSX portal. |
| Step 2 |
From the left pane, choose Tenant Workspace > Sites. The list of sites associated with a tenant is displayed. |
| Step 3 |
Select any one of the sites to view the detailed site status. This page lists all the site metrics along with status of the selected site. Under the Managed Device section of the page, you can view the list of Meraki network assigned to this site. |
Assigning Meraki Network to a Site
In the following cases, you may want to attach a Meraki Network to a site:
-
When a control plane is attached, and you want to plot network to different site locations.
-
When a site is deleted, the network gets unmapped, and you want to associate this network with a site.
To attach a network to a site, use the POST API : /merkai/api/v1/controlplanes/{controlPlaneID}/network/site/assign.
For more information on these APIs, refer to the Swagger documentation that can be accessed from MSX portal > Account Settings > Swagger > Meraki Service API.
Synchronizing Networks and its Devices
In MSX, you can synchorinze Meraki details into MSX at:
-
Organization-level: Use the Sync with Meraki option in Tenant > Setting > Organization to sync all networks and devices available within an Organization.
-
Network-level: Using the APIs in the Meraki-Control-Plane-Controller section of Merakiservice APIs, you can do the following:
-
Synchronize only a list of networks and the devices in the network. Provide the list of network IDs for which the synchronization needs to be performed. Use the POST /merkai/api/v1/controlplanes/{controlPlaneID}/synchronize for the synchronization.
-
Schedule a sycnhronization task
-
 Note |
Only users with Meraki Synchronization (Manage) permission under Meraki Service section can perform the sychronization within MSX. For more information on these APIs, refer the Swagger documentation that can be accessed from MSX portal > Account Settings > Swagger > Meraki Service API. |
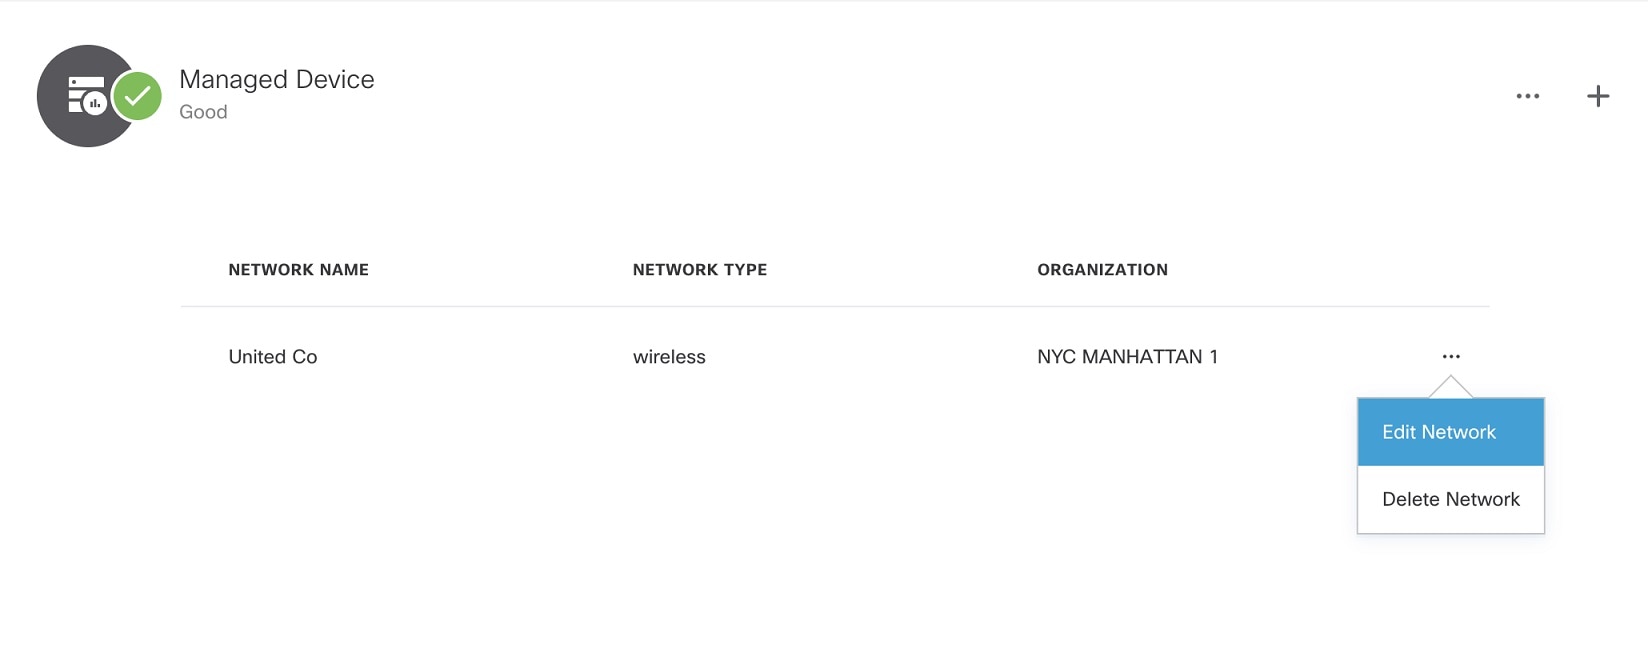
Editing or Deleting a Network
To edit and delete a Meraki network:
Procedure
| Step 1 |
Log in to the Cisco MSX portal. |
| Step 2 |
From the left pane, choose Tenant Workspace > Sites. The list of sites associated with a tenant is displayed. |
| Step 3 |
Select any one of the sites to view the detailed site status. This page lists all the site metrics along with status of the selected site. Under the Managed Device section of the page, you can view the list of Meraki network assigned to this site. |
| Step 4 |
Select a network, and click on the ellipsis (…) and select Edit Networkto edit the network details. You can add or edit the existing network tags, and also change template for a network using the
Edit Meraki Network dialog box. 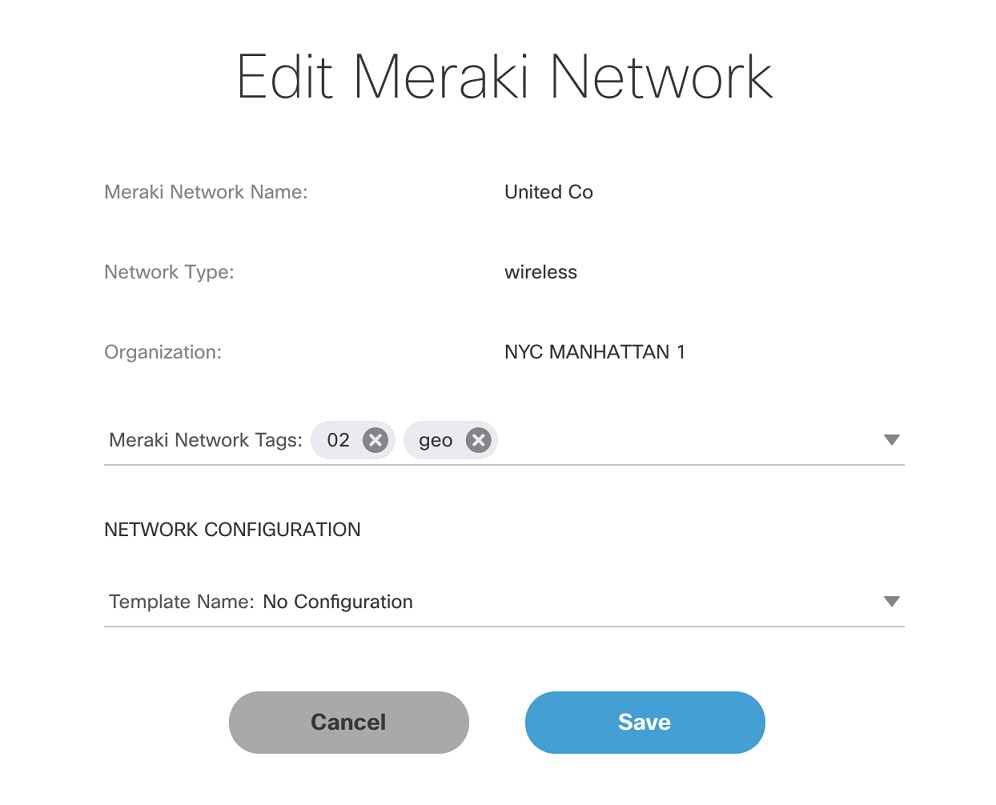 Deleting the Network: Click on the ellipsis (…) and select Delete to delete the selected network. |
 Feedback