Transceiver Firmware

A transceiver firmware in Nexus 9000 switches is a software that

  • is embedded within the optical transceiver modules (optics) installed in the switch interfaces

  • controls the operation of the optics, including signal transmission, reception, diagnostics, and performance optimization, and

  • is specific to the transceiver model.

Beginning with NX-OS Release 10.6(2)F, transceiver firmware upgrade using NX-OS commands is supported and explained in this chapter.

Transceiver firmware upgrades

Transceiver firmware upgrades are the software upgrades that

  • enhance transceiver performance and resolve known issues

  • are bundled with NX-OS releases,

  • and apply only to supported transceiver models.

The transceiver firmware upgrade feature provides network administrators with the ability to

  • update transceiver firmware to address bugs and security vulnerabilities

  • enhance transceiver performance through firmware optimizations

  • maintain compliance with latest industry standards, and

  • perform bulk firmware updates across multiple interfaces.

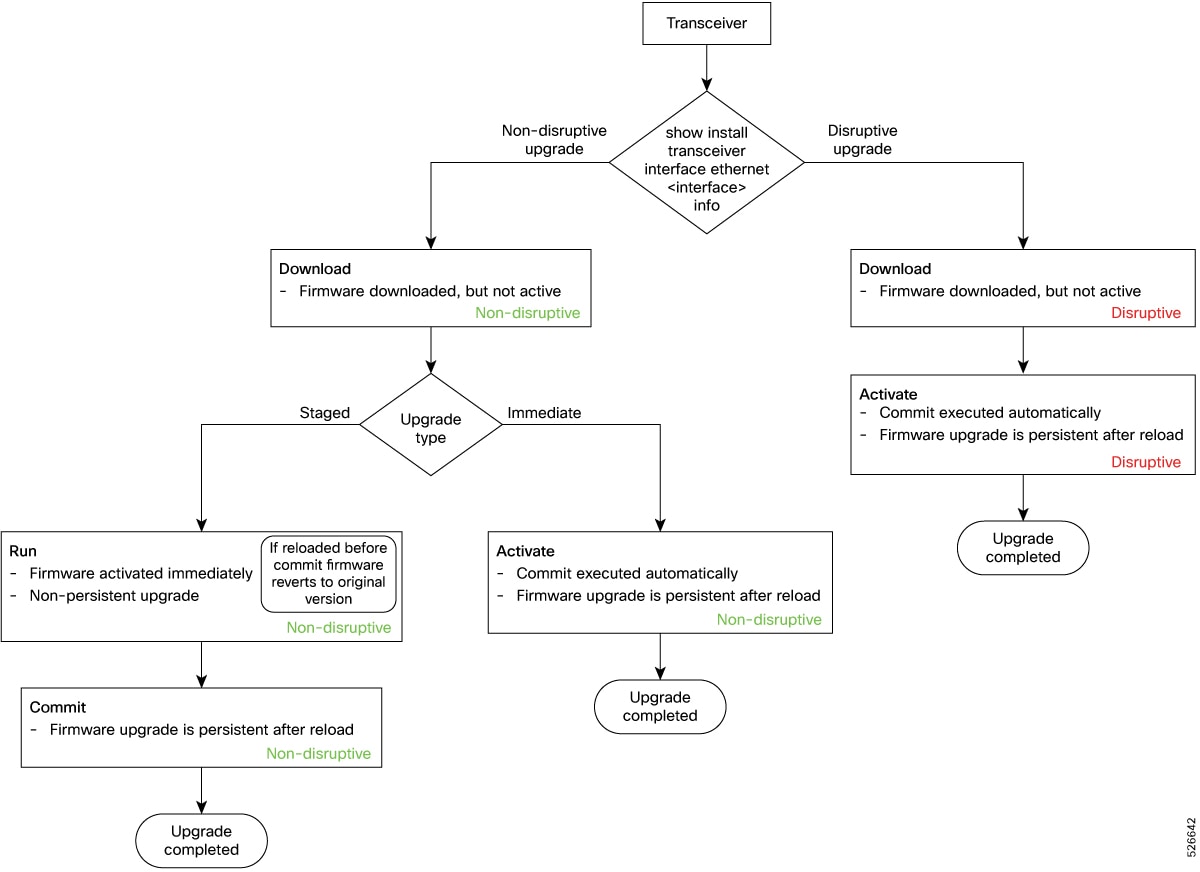
One of the ways in which the transceiver firmware upgrade can be performed is by using the NX-OS command framework. This requires careful procedural adherence to avoid disruption and maintain network stability. For more information, see Firmware upgrade using NX-OS commands.

You can upgrade transceiver firmware faster by processing multiple downloads simultaneously. The process involves careful grouping of ports for parallel operations, but ports on the same Inter-Integrated Circuit (I2C) line are updated sequentially. For more information, see Parallel firmware download.

Firmware upgrade using NX-OS commands

This section includes the required details that allow the users to download, install, and manage firmware upgrades for all Command Data Block (CDB) supported transceivers or optical transceivers across multiple hardware platforms.

The key benefits include

  • CMIS compliance as this upgrade supports standards such as CMIS 4.0, 5.0, and above for modern transceivers

  • unified or consistent command syntax across all supported platforms, and

  • robust error handling through comprehensive error detection and recovery mechanisms.

The sections that follow explain the concept, procedures, and sample scenarios for the transceiver firmware upgrade using NX-OS commands.

Parallel firmware download queues and port mapping

The system supports parallel firmware downloads with eight separate queues. Each queue handles downloads for a specific range of ports. You can download up to eight files at once, with one assigned to each queue.

Here is a list of port to queue mappings:

  • Queue 1: Ports 1–8

  • Queue 2: Ports 9–16

  • Queue 3: Ports 17–24

  • Queue 4: Ports 25–32

  • Queue 5: Ports 33–40

  • Queue 6: Ports 41–48

  • Queue 7: Ports 49–56

  • Queue 8: Ports 57–64


Note


The parallel download behavior is determined by the selected ports and queues. If the specified ports are in different queues, then the file download happens simultaneously. If the specified ports are in the same queue, then other ports have to wait in the queue until the first port completes the file download.


Assuming the download is executed for ports 19 to 25, download starts for port 19 from queue 3. Port 20 to 24 will be in queue 3 in a waiting state. Download for port 25 from queue 4 will also start simultaneously.

Firmware upgrade phases

The firmware upgrade process for transceivers involves distinct phases to manage the transfer, activation, and permanence or persistence of new firmware.

Firmware upgrades for transceivers occur in four main phases:

  • Download: Transfers the new firmware image from the source (such as the switch bootflash) to the transceiver's memory. The download can be disruptive or non-disruptive.

  • Activate: Switches the transceiver from the current firmware to the newly downloaded version immediately, with no warning. This phase activates the new firmware and commits it by immediately making it operational and persistent or permanent without a separate commit step.

  • Run: Activates the new firmware temporarily for testing without making it permanent or persistent. If not committed, the firmware reverts after a reload. This phase allows you to test the new firmware without making the firmware upgrade permanent.

  • Commit: Makes the newly activated firmware persistent across reloads. This step is required only after the run phase, and not after the activate phase as activate executes commit automatically. If a commit is not performed, the transceiver reverts to the old firmware after a subsequent reboot or power cycle.

Firmware upgrade procedures

The procedure for firmware upgrade varies significantly depending on whether the transceiver supports non-disruptive upgrade or disruptive upgrade.

This is a flowchart that illustrates how the different phases are used for the transceiver upgrade. For more information about the procedure, see Upgrade firmware using NX-OS commands.

Figure 1. Firmware upgrade procedure
Firmware upgrade procedure

This table provides information about the upgrade phases recommended for transceivers based on the supported upgrade types.

Upgrade

Upgrade Type

Upgrade Phases

Disruptive

Immediate

  1. Download

  2. Activate

Non-disruptive

Staged

  1. Download

  2. Run

  3. Commit

Immediate

  1. Download

  2. Activate


Note


To determine whether an upgrade is disruptive, use the show install transceiver interface ethernet <interface> info command. If the answer to Is Firmware Upgrade Service Affecting? is

  • Yes, then it indicates that the transceiver supports disruptive upgrade.

  • No, then it indicates that the transceiver supports non-disruptive upgrade.


For sample scenarios, see Examples for firmware upgrade.

Guidelines and limitations for firmware upgrade using NX-OS commands

Read these operational limitations and precautions to avoid interruptions or failures when performing firmware upgrade using NX-OS commands.

  • Beginning with Release 10.6(2)F, this feature is supported only on N9364E-SG2-Q and N9364E-SG2-O platforms and 800 G optics.

  • Complete the firmware download before reloading or power cycling the system to avoid corruption. If the system restarts and the optic is not detected, restart the firmware download process to restore functionality.

Upgrade firmware using NX-OS commands

Use the procedures provided in this section to upgrade the firmware of all Command Data Block (CDB) supported transceivers. For unsupported transceivers, the upgrade command displays an error.

For more information about ZR optics firmware upgrade, see Cisco Nexus 9000 Series NX-OS Interfaces Configuration Guide.


Note


  • Different firmware files may be required for different transceiver types.

  • Enter the show install transceiver interface ethernet <interface> status command after each state to determine current transceiver upgrade status and impact of next step.


Based on the upgrade types, there are three ways to upgrade the transceiver:

  • Disruptive immediate upgrade of the transceiver

  • Non-disruptive staged upgrade of the transceiver

  • Non-disruptive immediate upgrade of the transceiver

Before you begin

The common pre-requisites for the three procedures are:

  • Verify that the firmware file is correct and compatible with the transceiver model.

  • Ensure that you have access to the switch command line interface and the ability to copy the firmware file from a remote location where it is stored (SCP, SFTP, and so on).

A detailed information about the three procedures are provided here.

Disruptive immediate upgrade of the transceiver

Use this procedure for transceivers that support only disruptive upgrade.

For more information about the different phases and upgrade procedures, see the Firmware upgrade procedures section before you perform this procedure.

For two sample scenarios, see Sample disruptive immediate upgrade with both banks valid and Sample disruptive immediate upgrade with one bank invalid.

Procedure

Step 1

Get the firmware file, copy it on to the switch bootflash, and check the information of the firmware.

  1. Copy the firmware file to the switch under bootflash.

    Example:
    switch# copy scp://<ip-address>/<location of firmware>/bank_trapp_qsfp-100g-sr-s_signed_rel_0.73.4.bin bootflash:///bank_trapp_qsfp-100g-sr-s_signed_rel_0.73.4.bin vrf management use
  2. Verify the information of the firmware including versions and default running images that reside in the module using the show install transceiver interface ethernet <interface> info command.

    Example:
    switch# show install transceiver interface ethernet 1/7/1 info 
    Eth1/7/1
    ********************Bank A***********************
    =================================================
    Version : 2.6.0 : Build Time: May 28 2025 15:56:10 
    Operational Status     : Not Running
    Administrative Status  : Uncommitted
    Validity Status        : Valid
    -------------------------------------------------
    ********************Bank B***********************
    =================================================
    Version : 2.6.0 : Build Time: May 28 2025 15:56:10 
    Operational Status     : Running
    Administrative Status  : Committed
    Validity Status        : Valid
    -------------------------------------------------
    Is Firmware Upgrade Service Affecting? Yes
    -------------------------------------------------
    

    Note


    In the show install output, Yes indicates that the transceiver supports disruptive upgrade and a No indicates that the transceiver supports non-disruptive upgrade as well.

    Verify the output for other significant information such as:

    • Image version – indicates the version of the image

    • Operational Status – indicates the operational status of the image, whether it is running or not running

    • Administrative Status - indicates whether the image is committed or not committed

    • Image validity - indicates the validity of the image, whether it is valid or invalid

  3. Verify the status using the show install transceiver interface ethernet <interface> status command.

    Example:
    switch# show install transceiver interface ethernet 1/7/1 status 
    Eth1/7/1
    Download Status:    Ready to start
    Run Status:         Ready to start
    Commit Status:      Ready to start
    Activation Status:  Ready to start
    

    When the status is Ready to start, proceed to the next step.

Step 2

Download firmware on the transceiver module and verify the download status.

  1. Download and install the firmware on the transceiver with the install transceiver interface ethernet <interface>download bootflash:<firmware-file-name> command. The download is disruptive.

    Note


    Parallel firmware download is supported for Silicon One PIDs with range command support for non-ZR transceiver. If the same firmware file is used for all transceivers, use the same file across all devices. If different firmware files are required for different transceivers, copy those files under bootflash and specify the corresponding file names in the download command.

    Example:
    switch# install transceiver interface ethernet 1/11 download bootflash:tmg_bank_trappb_qdd-400g-bd_signed_dev.bin
  2. Verify the status of the firmware download using the show install transceiver interface ethernet <interface> status command. Track the progress of the download using this command.

    Example:
    switch# show install transceiver interface E1/16 status 
    Eth1/16:
    Last download is completed successfully
    Download Status:   Ready to start
    Run Status:        Ready to start
    Commit Status:     Ready to start
    Activation Status: Ready to start
    

    Note


    When the download is in progress, you can execute the next command, which will be queued.

Step 3

Activate the firmware using the install transceiver interface ethernet <interface> activate command. The new upgrade persists across reloads.

Example:
switch# install transceiver interface E1/16 activate

After performing this command, verify the progress using the show install transceiver interface ethernet <interface> status command.

Step 4

Verify that the module is upgraded and the newly downloaded image is running and committed using the show install transceiver interface ethernet <interface> info command.


Non-disruptive staged upgrade of the transceiver

Use this procedure for transceivers that support non-disruptive upgrade and when you want the upgrade to be a staged upgrade.

For more information about the different phases and upgrade procedures, see the Firmware upgrade procedures section before you perform this procedure.

For a sample scenario, see Sample non-disruptive staged upgrade.

Procedure

Step 1

Get the firmware file, copy it on to the switch bootflash, and check the information of the firmware.

  1. Copy the firmware file to the switch under bootflash.

    Example:
    switch# copy scp://<ip-address>/<location of firmware>/bank_trapp_qsfp-100g-sr-s_signed_rel_0.73.4.bin bootflash:///bank_trapp_qsfp-100g-sr-s_signed_rel_0.73.4.bin vrf management use
  2. Verify the information of the firmware including versions and default running images that reside in the module using the show install transceiver interface ethernet <interface> info command.

    Example:
    switch# show install transceiver interface ethernet 1/7/1 info 
    Eth1/7/1
    ********************Bank A***********************
    =================================================
    Version : 2.6.0 : Build Time: May 28 2025 15:56:10 
    Operational Status     : Not Running
    Administrative Status  : Uncommitted
    Validity Status        : Valid
    -------------------------------------------------
    ********************Bank B***********************
    =================================================
    Version : 2.6.0 : Build Time: May 28 2025 15:56:10 
    Operational Status     : Running
    Administrative Status  : Committed
    Validity Status        : Valid
    -------------------------------------------------
    Is Firmware Upgrade Service Affecting? Yes
    -------------------------------------------------
    

    Note


    In the show install output, Yes indicates that the transceiver supports disruptive upgrade and a No indicates that the transceiver supports non-disruptive upgrade as well.

    Verify the output for information such as

    • Image version – indicates the version of the image

    • Operational Status – indicates the operational status of the image, whether it is running or not running

    • Administrative Status - indicates whether the image is committed or not committed

    • Image validity - indicates the validity of the image, whether it is valid or invalid

    • Is Firmware Upgrade Service Affecting? – Yes indicates that the transceiver supports disruptive upgrade and No indicates that the transceiver supports non-disruptive upgrade

  3. Verify the status using the show install transceiver interface ethernet <interface> status command.

    Example:
    switch# show install transceiver interface ethernet 1/7/1 status 
    Eth1/7/1
    Download Status:    Ready to start
    Run Status:         Ready to start
    Commit Status:      Ready to start
    Activation Status:  Ready to start
    

    When the status is Ready to start, proceed to the next step.

Step 2

Download firmware on the transceiver module and verify the download status.

  1. Download and install the firmware on the transceiver with the install transceiver interface ethernet <interface>download bootflash:<firmware-file-name> command. The download is disruptive.

    Note


    Parallel firmware download is supported for Silicon One PIDs with range command support for non-ZR transceiver. If the same firmware file is used for all transceivers, use the same file across all devices. If different firmware files are required for different transceivers, copy those files under bootflash and specify the corresponding file names in the download command.

    Example:
    switch# install transceiver interface ethernet 1/11 download bootflash:tmg_bank_trappb_qdd-400g-bd_signed_dev.bin
  2. Verify the status of the firmware download using the show install transceiver interface ethernet <interface> status command. Track the progress of the download using this command.

    Example:
    switch# show install transceiver interface E1/16 status 
    Eth1/16:
    Last download is completed successfully
    Download Status:   Ready to start
    Run Status:        Ready to start
    Commit Status:     Ready to start
    Activation Status: Ready to start
    

    Note


    When the download is in progress, you can execute the next command, which will be queued.

Step 3

Activate the firmware using the run and commit commands. Both commands are non-disruptive.

  1. Run the new firmware version using the install transceiver interface ethernet <interface> run command.

    Note


    Do not reload before running the commit command. The upgrade is non-persistent. So, if you reload before using the commit command, the transceiver reverts to the version before the upgrade.

    Example:
    switch# install transceiver interface E1/16 run
  2. Commit the downloaded firmware. Use the install transceiver interface ethernet <interface> commit command, so the module records the new firmware image, which is now active and is ready to be used on any future reset or reboot.

    Example:
    switch# install transceiver interface E1/16 commit

    After performing the commit command, verify the progress using the show install transceiver interface ethernet <interface> status command.

Step 4

Verify that the module is upgraded and the newly downloaded image is running and committed using the show install transceiver interface ethernet <interface> info command.


Non-disruptive immediate upgrade of the transceiver

Use this procedure for transceivers that support non-disruptive upgrade and when you want the upgrade to be an immediate upgrade.

For more information about the different phases and upgrade procedures, see the Firmware upgrade procedures section before you perform this procedure.

For a sample scenario, see Sample non-disruptive immediate upgrade.

Procedure

Step 1

Get the firmware file, copy it on to the switch bootflash, and check the information of the firmware.

  1. Copy the firmware file to the switch under bootflash.

    Example:
    switch# copy scp://<ip-address>/<location of firmware>/bank_trapp_qsfp-100g-sr-s_signed_rel_0.73.4.bin bootflash:///bank_trapp_qsfp-100g-sr-s_signed_rel_0.73.4.bin vrf management use
  2. Verify the information of the firmware including versions and default running images that reside in the module using the show install transceiver interface ethernet <interface> info command.

    Example:
    switch# show install transceiver interface ethernet 1/7/1 info 
    Eth1/7/1
    ********************Bank A***********************
    =================================================
    Version : 2.6.0 : Build Time: May 28 2025 15:56:10 
    Operational Status     : Not Running
    Administrative Status  : Uncommitted
    Validity Status        : Valid
    -------------------------------------------------
    ********************Bank B***********************
    =================================================
    Version : 2.6.0 : Build Time: May 28 2025 15:56:10 
    Operational Status     : Running
    Administrative Status  : Committed
    Validity Status        : Valid
    -------------------------------------------------
    Is Firmware Upgrade Service Affecting? Yes
    -------------------------------------------------
    

    Note


    In the show install output, Yes indicates that the transceiver supports disruptive upgrade and a No indicates that the transceiver supports non-disruptive upgrade as well.

    Verify the output for information such as

    • Image version – indicates the version of the image

    • Operational Status – indicates the operational status of the image, whether it is running or not running

    • Administrative Status - indicates whether the image is committed or not committed

    • Image validity - indicates the validity of the image, whether it is valid or invalid

    • Is Firmware Upgrade Service Affecting? – Yes indicates that the transceiver supports disruptive upgrade and No indicates that the transceiver supports non-disruptive upgrade

  3. Verify the status using the show install transceiver interface ethernet <interface> status command.

    Example:
    switch# show install transceiver interface ethernet 1/7/1 status 
    Eth1/7/1
    Download Status:    Ready to start
    Run Status:         Ready to start
    Commit Status:      Ready to start
    Activation Status:  Ready to start
    

    When the status is Ready to start, proceed to the next step.

Step 2

Download firmware on the transceiver module and verify the download status.

  1. Download and install the firmware on the transceiver with the install transceiver interface ethernet <interface>download bootflash:<firmware-file-name> command. The download is non-disruptive.

    Note


    Parallel firmware download is supported for Silicon One PIDs with range command support for non-ZR transceiver. If the same firmware file is used for all transceivers, use the same file across all devices. If different firmware files are required for different transceivers, copy those files under bootflash and specify the corresponding file names in the download command.

    Example:
    switch# install transceiver interface ethernet 1/11 download bootflash:tmg_bank_trappb_qdd-400g-bd_signed_dev.bin
  2. Verify the status of the firmware download using the show install transceiver interface ethernet <interface> status command. Track the progress of the download using this command.

    Example:
    switch# show install transceiver interface E1/16 status 
    Eth1/16:
    Last download is completed successfully
    Download Status:   Ready to start
    Run Status:        Ready to start
    Commit Status:     Ready to start
    Activation Status: Ready to start
    

    Note


    When the download is in progress, you can execute the next command, which will be queued.

Step 3

Activate the firmware using the run and commit commands. Both commands are non-disruptive.

  1. Run the new firmware version using the install transceiver interface ethernet <interface> run command.

    Note


    Do not reload before running the commit command. The upgrade is non-persistent. So, if you reload before using the commit command, the transceiver reverts to the version before the upgrade.

    Example:
    switch# install transceiver interface E1/16 run
  2. Commit the downloaded firmware. Use the install transceiver interface ethernet <interface> commit command, so the module records the new firmware image, which is now active and is ready to be used on any future reset or reboot.

    Example:
    switch# install transceiver interface E1/16 commit

    After performing the commit command, verify the progress using the show install transceiver interface ethernet <interface> status command.

Step 4

Activate the firmware using the install transceiver interface ethernet <interface> activate command. The new upgrade persists across reloads.

Example:
switch# install transceiver interface E1/16 activate

After performing this command, verify the progress using the show install transceiver interface ethernet <interface> status command.

Step 5

Verify that the module is upgraded and the newly downloaded image is running and committed using the show install transceiver interface ethernet <interface> info command.


Examples for firmware upgrade

This section provides few examples for certain scenarios that you may encounter during the firmware upgrade.

Sample disruptive immediate upgrade with both banks valid

Transceivers have either one or two banks, labeled as Bank A and B, to store the firmware image. Either of the banks can hold valid firmware images. During an upgrade, the new firmware is first downloaded to the inactive bank—the one not in use. After the download, the firmware is activated by switching the active bank to the newly updated bank, while the previously active bank becomes inactive. This method allows for a safer upgrade process by retaining the previous firmware until the new firmware is fully committed and finalized.

This section shows a sample scenario for the disruptive immediate upgrade of a transceiver firmware that supports only disruptive upgrade and has both Bank A and B status as valid.

For more information about the procedure, see Disruptive immediate upgrade of the transceiver.

Let us assume that v 3.2.0 is the current active version of your transceiver firmware and you want to upgrade to v 3.9.0.

Procedure

Step 1

Enter the info command.

Example:
switch# show install transceiver interface ethernet 1/1 info 
Eth1/1
********************Bank A***********************
=================================================
Version                 : 3.1.0 
Operational Status      : Not Running
Administrative Status   : Uncommitted
Validity Status         : Valid
-------------------------------------------------
********************Bank B***********************
=================================================
Version                  : 3.2.0 
Operational Status       : Running
Administrative Status    : Committed
Validity Status          : Valid
-------------------------------------------------
Is Firmware Upgrade Service Affecting? Yes
-------------------------------------------------

The current active image is v 3.2.0 and this resides in Bank B.

Step 2

Next, enter the download command.

Example:
switch# install transceiver interface ethernet 1/1 download bootflash:CISCO-EOPTOLINK_QDD-8X100G-FR_HW_1.0_FW_3.9.bin 
Transceiver firmware download Command submitted, Please use status command to check progress.

Step 3

Enter the status command to verify the progress.

Example:
switch# show install transceiver interface ethernet 1/1 status 
Downloading is in progress [5/100 Completed].
Eth1/1
Download Status:    In Progress
Run Status:         Ready to start
Commit Status:      Ready to start
Activation Status:  Ready to start

The download is in progress. After completion of the download, the status command output displays that the download is completed.

switch# show install transceiver interface ethernet 1/1 status 
Last Download is completed successfully
Eth1/1
Download Status:    Ready to start
Run Status:         Ready to start
Commit Status:      Ready to start
Activation Status:  Ready to start

Step 4

Enter the info command.

Example:
switch# show install transceiver interface ethernet 1/1 info 
Eth1/1
********************Bank A***********************
=================================================
Version                 : 3.9.0 
Operational Status      : Not Running
Administrative Status   : Uncommitted
Validity Status         : Valid
-------------------------------------------------
********************Bank B***********************
=================================================
Version                 : 3.2.0 
Operational Status      : Running
Administrative Status   : Committed
Validity Status         : Valid
-------------------------------------------------
Is Firmware Upgrade Service Affecting? Yes
-------------------------------------------------

The new image, v 3.9.0, is downloaded to Bank A, the passive bank (which has the new but inactive image) .

Step 5

Enter the activate command to activate the new image, v 3.9.0.

Example:
switch# install transceiver interface ethernet 1/1 activate 
Transceiver firmware Activate Command submitted, Please use status command to check progress

Step 6

Enter the info command.

Example:
switch# show install transceiver interface ethernet 1/1 info 
Eth1/1
********************Bank A***********************
=================================================
Version                  : 3.9.0 
Operational Status       : Running
Administrative Status    : Committed
Validity Status          : Valid
-------------------------------------------------
********************Bank B***********************
=================================================
Version                   : 3.2.0 
Operational Status        : Not Running
Administrative Status     : Uncommitted
Validity Status           : Valid
-------------------------------------------------
Is Firmware Upgrade Service Affecting? Yes
-------------------------------------------------

Bank A is active now with the new image, v 3.9.0.


The transceiver firmware upgrade is complete.

Sample disruptive immediate upgrade with one bank invalid

Transceivers have either one or two banks to store the firmware image. The banks are labelled as Bank A and Bank B. This section shows a sample scenario for the disruptive immediate upgrade of a transceiver firmware that supports only disruptive upgrade and has only one Bank with a valid status, either Bank A or Bank B.

For more information about the procedure, see Disruptive immediate upgrade of the transceiver.

Let us assume that v 126.4.0 is the current active version of your transceiver firmware and you want to upgrade to v 126.55.0.

Procedure

Step 1

Enter the info command.

Example:
switch# show install transceiver interface ethernet 1/23 info 
Eth1/23
********************Bank A***********************
=================================================
Version                         : 126.4.0 :  
Operational Status              : Running
Administrative Status           : Committed
Validity Status                 : Valid
-------------------------------------------------
********************Bank B***********************
=================================================
Version                          : 0.0.0 :  
Operational Status               : Not Running
Administrative Status            : Uncommitted
Validity Status                  : Invalid
-------------------------------------------------
Is Firmware Upgrade Service Affecting? Yes
-------------------------------------------------

The current active image is v 126.4.0 and this resides in Bank A.

Note


As the answer to the question Is Firmware Upgrade Service Affecting? is Yes, the transceiver supports disruptive upgrade.

Step 2

Next, enter the download command.

Example:
switch# install transceiver interface ethernet 1/23 download bootflash:CISCO-INNOLIGHT_OSFP-800G-VR8_HW_1.10_FW_126.55.bin 
Transceiver firmware download Command submitted, Please use status command to check progress

Step 3

Enter the status command to verify the progress.

Example:
switch# show install transceiver interface ethernet 1/23 status 
Downloading is in progress [10/100 Completed].
Eth1/23
Download Status:      In Progress
Run Status:           Ready to start
Commit Status:        Ready to start
Activation Status:    Ready to start

The download is in progress. After completion of the download, the status command output displays that the download is completed.

switch# show install transceiver interface ethernet 1/23 status 
Last Download is completed successfully
Eth1/23
Download Status:   Ready to start
Run Status:        Ready to start
Commit Status:     Ready to start
Activation Status: Ready to start

Step 4

Enter the info command.

Example:
switch# show install transceiver interface ethernet 1/23 info 
Eth1/23
********************Bank A***********************
=================================================
Version                 : 126.55.0   
Operational Status      : Running
Administrative Status   : Committed
Validity Status         : Valid
-------------------------------------------------
********************Bank B***********************
=================================================
Version                 : 0.0.0   
Operational Status      : Not Running
Administrative Status   : Uncommitted
Validity Status         : Invalid
-------------------------------------------------
Is Firmware Upgrade Service Affecting? Yes
-------------------------------------------------

The new image, v 126.55.0, has replaced the existing image as it has only one bank to store the firmware image. It is activated by default. However, still it is recommended to use the activate command.

Note


Bank B can be invalid in cases where the transceiver does not use Bank B.

Step 5

Enter the activate command to activate the new image, v 126.55.0.

Example:
switch# install transceiver interface ethernet 1/23 activate 
Transceiver firmware Activate Command submitted, Please use status command to check progress

Step 6

Enter the info command.

Example:
switch# show install transceiver interface ethernet 1/23 info 
Eth1/23
********************Bank A***********************
=================================================
Version                 : 126.55.0   
Operational Status      : Running
Administrative Status   : Committed
Validity Status         : Valid
-------------------------------------------------
********************Bank B***********************
=================================================
Version                 : 0.0.0 :  
Operational Status      : Not Running
Administrative Status   : Uncommitted
Validity Status         : Invalid
-------------------------------------------------
Is Firmware Upgrade Service Affecting? Yes
-------------------------------------------------

Bank A is active now with the new image, v 126.55.0. The transceiver firmware upgrade is complete.


Sample non-disruptive staged upgrade

This section shows a sample scenario for the non-disruptive staged upgrade of a transceiver firmware.

For more information about the procedure, see Non-disruptive staged upgrade of the transceiver.

Let us assume that v 3.12.0 is the current active version of your transceiver firmware and you want to upgrade to v 3.15.0.

Procedure

Step 1

Enter the info command.

Example:
switch# show install transceiver interface ethernet 1/1 info 
Eth1/1
********************Bank A***********************
=================================================
Version                 : 3.9.0 
Operational Status      : Not Running
Administrative Status   : Uncommitted
Validity Status         : Valid
-------------------------------------------------
********************Bank B***********************
=================================================
Version                   : 3.12.0 
Operational Status        : Running
Administrative Status     : Committed
Validity Status           : Valid
-------------------------------------------------
Is Firmware Upgrade Service Affecting? No
-------------------------------------------------

The current active image is v 3.12.0 and this resides in Bank B.

Note


As the answer to the question Is Firmware Upgrade Service Affecting? is No, the transceiver supports non-disruptive upgrade.

Step 2

Next, enter the download command.

Example:
switch# install transceiver interface ethernet 1/1 download bootflash:CISCO-EOPTOLINK_QDD-8X100G-FR_HW_1.0_FW_3.15.bin
Transceiver firmware download Command submitted, Please use status command to check progress.

Step 3

Enter the status command to verify the progress.

Example:
switch# show install transceiver interface ethernet 1/1 status 
Downloading is in progress [5/100 Completed].
Eth1/1
Download Status:    In Progress
Run Status:         Ready to start
Commit Status:      Ready to start
Activation Status:  Ready to start

The download is in progress. After completion of the download, the status command output displays that the download is completed.

switch# show install transceiver interface ethernet 1/1 status 
Last Download is completed successfully
Eth1/1
Download Status:    Ready to start
Run Status:         Ready to start
Commit Status:      Ready to start
Activation Status:  Ready to start

Step 4

Enter the info command.

Example:
switch# show install transceiver interface ethernet 1/1 info
Eth1/1
********************Bank A***********************
=================================================
Version                 : 3.15.0 
Operational Status      : Not Running
Administrative Status   : Uncommitted
Validity Status         : Valid
-------------------------------------------------
********************Bank B***********************
=================================================
Version                 : 3.12.0 
Operational Status      : Running
Administrative Status   : Committed
Validity Status         : Valid
-------------------------------------------------
Is Firmware Upgrade Service Affecting? No
-------------------------------------------------

The new image, v 3.15.0, is downloaded to Bank A, the passive bank. This image is inactive.

Step 5

Enter the run command to activate the new image, v 3.15.0.

Example:
switch# install transceiver interface ethernet 1/1 run 
Transceiver firmware Run Command submitted, Please use status command to check progress

Step 6

Enter the status command to check the progress.

Example:
switch# show install transceiver interface ethernet 1/1 status 
Last Run is completed successfully
Eth1/1
Download Status:        Ready to start
Run Status:             Ready to start
Commit Status:          Ready to start
Activation Status:      Ready to start

The output displays that the run command is completed.

Now, enter the info command.

switch# show install transceiver interface ethernet 1/1 info 
Eth1/1
********************Bank A***********************
=================================================
Version                          : 3.15.0 
Operational Status      : Running
Administrative Status   : Uncommitted
Validity Status         : Valid
-------------------------------------------------
********************Bank B***********************
=================================================
Version                 : 3.12.0 
Operational Status      : Not Running
Administrative Status   : Committed
Validity Status         : Valid
-------------------------------------------------
Is Firmware Upgrade Service Affecting? No
-------------------------------------------------

Image v 3.15.0 in Bank A is running but not committed. Though the v 3.15.0 is active, it is temporarily active until the next reload or reset. It will be permanently or persistently active only after it is committed (next step). If not committed, then the existing image v 3.12.0 in bank B will become active after the next reset or reload operation.

Step 7

Enter the commit command to make the activation persistent.

Example:
switch# install transceiver interface ethernet 1/1 commit
Transceiver firmware Commit Command submitted, Please use status command to check progress

Step 8

Enter the status command.

Example:
switch# show install transceiver interface ethernet 1/1 status 
Last Commit is completed successfully
Eth1/1
Download Status:      Ready to start
Run Status:           Ready to start
Commit Status:        Ready to start
Activation Status:    Ready to start

Step 9

Enter the info command

Example:
switch# show install transceiver interface ethernet 1/1 info 
Eth1/1
********************Bank A***********************
=================================================
Version                 : 3.15.0 
Operational Status      : Running
Administrative Status   : Committed
Validity Status         : Valid
-------------------------------------------------
********************Bank B***********************
=================================================
Version                 : 3.12.0 
Operational Status      : Not Running
Administrative Status   : Uncommitted
Validity Status         : Valid
-------------------------------------------------
Is Firmware Upgrade Service Affecting? No
-------------------------------------------------

Bank A is active now with the new image, v 3.15.0, and the upgrade is persistent. Image v 3.12.0 in Bank B is inactive even after a reload.


The transceiver firmware upgrade is complete.

Sample non-disruptive immediate upgrade

This section shows a sample scenario for the non-disruptive immediate upgrade of a transceiver firmware.

For more information about the procedure, see Non-disruptive immediate upgrade of the transceiver.

Let us assume that v 3.9.0 is the current active version of your transceiver firmware and you want to upgrade to v 3.12.0.

Procedure

Step 1

Enter the info command.

Example:
switch# show install transceiver interface ethernet 1/1 info 
Eth1/1
********************Bank A***********************
=================================================
Version                 : 3.9.0 
Operational Status      : Running
Administrative Status   : Committed
Validity Status         : Valid
-------------------------------------------------
********************Bank B***********************
=================================================
Version                 : 3.2.0 
Operational Status      : Not Running
Administrative Status   : Uncommitted
Validity Status         : Valid
-------------------------------------------------
Is Firmware Upgrade Service Affecting? No
-------------------------------------------------

The current active image is v 3.9.0 and this resides in Bank A.

Note


As the answer to the question Is Firmware Upgrade Service Affecting? is No, the transceiver supports non-disruptive upgrade.

Step 2

Next, enter the download command.

Example:
switch# install transceiver interface ethernet 1/1 download bootflash:CISCO-EOPTOLINK_QDD-8X100G-FR_HW_1.0_FW_3.12.bin
Transceiver firmware download Command submitted, Please use status command to check progress.

Step 3

Enter the status command to verify the progress.

Example:
switch# show install transceiver interface ethernet 1/1 status 
Downloading is in progress [5/100 Completed].
Eth1/1
Download Status:    In Progress
Run Status:         Ready to start
Commit Status:      Ready to start
Activation Status:  Ready to start

The download is in progress. After completion of the download, the status command output displays that the download is completed.

switch# show install transceiver interface ethernet 1/1 status 
Last Download is completed successfully
Eth1/1
Download Status:    Ready to start
Run Status:         Ready to start
Commit Status:      Ready to start
Activation Status:  Ready to start

Step 4

Enter the info command.

Example:
switch# show install transceiver interface ethernet 1/1 info 
Eth1/1
********************Bank A***********************
=================================================
Version                 : 3.9.0 
Operational Status      : Running
Administrative Status   : Committed
Validity Status         : Valid
-------------------------------------------------
********************Bank B***********************
=================================================
Version                 : 3.12.0 
Operational Status      : Not Running
Administrative Status   : Uncommitted
Validity Status         : Valid
-------------------------------------------------
Is Firmware Upgrade Service Affecting? No
-------------------------------------------------

The new image, v 3.12.0, is downloaded to Bank B, the passive bank. This image is inactive.

Step 5

Enter the activate command to activate the new image, v 3.12.0.

Example:
switch# install transceiver interface ethernet 1/1 activate 
Transceiver firmware Activate Command submitted, Please use status command to check progress

Step 6

Enter the info command

Example:
switch# show install transceiver interface ethernet 1/1 info
Eth1/1
********************Bank A***********************
=================================================
Version                 : 3.9.0 
Operational Status      : Not Running
Administrative Status   : Uncommitted
Validity Status         : Valid
-------------------------------------------------
********************Bank B***********************
=================================================
Version                   : 3.12.0 
Operational Status        : Running
Administrative Status     : Committed
Validity Status           : Valid
-------------------------------------------------
Is Firmware Upgrade Service Affecting? No
-------------------------------------------------

Bank B is active now with the new image, v 3.12.0. Image v 3.9.0 in Bank A is inactive.


The transceiver firmware upgrade is complete.

Firmware upgrade for a range of interfaces or parallel firmware download

This is a sample output for the parallel firmware download and information command for a range of interfaces.

show install transceiver interface E1/59,E1/60-64 info 
install transceiver interface E1/15-18 download bootflash:CISCO-EOPTOLINK_QDD-2X400G-LR4_HW_1.2_FW_3.13.bin
show install transceiver interface  E1/15-18 status
install transceiver interface E1/15-18 run
install transceiver interface E1/15-18 commit
install transceiver interface E1/15-18 activate

Parallel firmware download

The parallel firmware download feature reduces the time needed for upgrading transceiver firmware in network switches by allowing multiple downloads to occur simultaneously.

Firmware download guidelines and limitations

Understand the supported firmware download workflow and operational steps before starting the update.

  • Group ports correctly for parallel processing.

  • Although different port groups can be processed in parallel, ports on the same Inter-Integrated Circuit (I2C) line download sequentially.

  • Use this list of commands to perform these operations:

    • Start: Initiates the firmware download to the transceiver.


      Note


      For single-bank transceivers, this overwrites the existing firmware. Execute the run and commit commands even for single-bank transceivers. For dual-bank transceivers, the new firmware is downloaded to the inactive bank.


    • Run: Activates the newly downloaded firmware image.


      Note


      For dual-bank transceivers, this command switches the newly downloaded firmware to the active bank and moves the previously active firmware to the inactive bank.


    • Commit: Finalizes the firmware update by ensuring that the active firmware image is used during future resets or reboots.

Follow these operational limitations and precautions to avoid interruptions or failures during firmware updates.

  • Monitor system resources to ensure that firmware threads do not interfere with higher-priority operations such as USD threads.

  • Run the info command per port because it does not support range input, unlike start, commit, and run.

  • Perform all physical OIR (Online Insertion and Removal) actions outside the firmware download process. Restart the firmware download process if necessary.

  • Complete the firmware download before reloading or power cycling the system to avoid corruption. If the system restarts and the optic is not detected, restart the firmware download process to restore functionality.

Copy Transceiver Firmware to Switch and Line Card

Copy the transceiver firmware file to the switch bootflash and then to the line card temporary directory before you initiate the firmware update process on transceiver ports.

This is a preparatory step for updating transceiver firmware. Different firmware files may be needed for distinct transceiver types. Name each file appropriately on the Line Card (LC). Then, refer to it as LC throughout the document.

Before you begin

Ensure you have access to the switch and a network location such as an SCP server where the firmware file is stored. You must have root access on the line card to copy files to the LC.

Procedure


Step 1

Use the copy command to copy the firmware file to the switch's bootflash.

Example:

switch# copy scp://192.0.2.1/<location of firmware>/bank_trapp_qsfp-100g-sr-s_signed_rel_0.73.4.bin bootflash:///bank_trapp_qsfp-100g-sr-s_signed_rel_0.73.4.bin vrf man use

This command copies the firmware file from an SCP server to the switch bootflash memory.

Step 2

Use the run bash sudo su and scp commands to gain root access and copy the firmware file from the switch to the Line Card (LC).

Example:

run bash sudo su
            bash# scp -r /bootflash/bank_trapp_qsfp-100g-sr-s_signed_rel_0.73.4.bin root@lc1:/var/sysmgr/tmp/firmware.bin

This command transfers the firmware file from the switch bootflash to the specified Line Card temporary directory. If different transceiver types need separate firmware files, copy and name each file so they are easily identified.

Step 3

Use the rlogin and ls -lrt commands to log in to the Line Card and verify the firmware file.

Example:

rlogin lc1
            root@lc1:~# ls -lrt /var/sysmgr/tmp/firmware.bin
            -rw-r--r-- 1 root root 831200 May 7 17:54 /var/sysmgr/tmp/firmware.bin

This step confirms that the firmware file is present and accessible on the Line Card device.


The transceiver firmware file is successfully copied to the switch bootflash and the Line Card temporary directory, and its presence is verified.

What to do next

Proceed to download, run, and commit the firmware on the transceiver ports as described in Download, Run, and Commit Transceiver Firmware.

Download, Run, and Commit Transceiver Firmware

Download the pre-staged firmware to the specified transceiver ports, verify the status, run the firmware, and then commit it.

Perform this task after you successfully copy the firmware file to the switch and line card. The task requires direct interaction with the transceiver hardware.

Before you begin

Before initiating the firmware download:

  • Ensure the firmware file is copied to the switch and line card as described in "Copy Transceiver Firmware to Switch and Line Card".

  • Verify that the firmware file is correct and compatible with the transceiver model.

  • Verify that the file paths and names are accurate.

Procedure


Step 1

Use the debug hardware internal linkctrl transceiver firmware fp-port 1-10,6,15-16 start file-name /var/sysmgr/tmp/firmware10.bin command to initiate firmware download to a specified range of transceiver ports.

Example:

switch# debug hardware internal linkctrl transceiver firmware fp-port 1-10,6,15-16 start  file-name /var/sysmgr/tmp/firmware10.bin

Warning


Executing firmware download commands requires caution. Using an incorrect firmware file can lead to a failed download and may corrupt the existing firmware. This is particularly critical for single bank transceivers, as they may require a firmware re-download to recover from a faulty state.

Note


During the firmware download process, the optical module will go offline automatically and will come back online once the download is completed. This behavior is part of the update process and does not require manual intervention.

Step 2

(Optional) Use the debug hardware internal linkctrl transceiver firmware fp-port 14 start file-name /var/sysmgr/tmp/firmware10.bin command to initiate firmware download to a single specified transceiver port.

Example:

switch# debug hardware internal linkctrl transceiver firmware fp-port 14 start  file-name /var/sysmgr/tmp/firmware10.bin

Use this command to start downloading firmware to a single specified port.

Step 3

Use the debug hardware internal linkctrl transceiver firmware fp-port 3 status command to check the status of the firmware download process.

Example:

switch# debug hardware internal linkctrl transceiver firmware fp-port 3 status
            front_port_num[3]  Status of Firmware Download
            
            QUEUE content for the group of 8 ports
            Port: 3, File: /var/sysmgr/tmp/firmware10.bin Op Type: Run
            Port: 4, File: /var/sysmgr/tmp/firmware10.bin Op Type: Run
            
            -> Run command is in queue
            
            -> Downloading is not in progress
            
            -> Run command is not in progress
            
            -> Commit is not in progress
            
            -> Download completed percentage: 100
            
            
            Error occured in last five commands
            ------------------------------------------
            2025-02-19 11:08:57.199684: FP: 17 Command executed: 101- Start Firmware Download: Module Flags Byte-8 Val: 0x0 Cdb Status Val: 0x0 Failure Message: Unable to open firmware file
            2025-02-19 11:10:52.188798: FP: 17 Command executed: 101- Start Firmware Download: Module Flags Byte-8 Val: 0x0 Cdb Status Val: 0x0 Failure Message: Unable to open firmware file
            2025-02-19 11:44:14.468031: FP: 17 Command executed: 101- Start Firmware Download: Module Flags Byte-8 Val: 0x0 Cdb Status Val: 0x40 Failure Message: CDB Status failed
            
            Below values are updated after every start command
            --------------------------------------------------------
            Command 101 Module Flags Byte-8 Val 0x0 Cdb Status Val 0x40
          

Use this command to check the progress of start, run, and commit operations and view the contents of the queue for the group of ports.

Note


Use the status command and look for the following messages to ensure the download completed successfully:

Download completed percentage: 100
              Downloading is not in progress
              No Command is in progress

Step 4

Use the debug hardware internal linkctrl transceiver firmware fp-port 1-10,6,15-16 run command to run the downloaded firmware on the specified range of transceiver ports.

Example:

switch# debug hardware internal linkctrl transceiver firmware fp-port 1-10,6,15-16 run

Use this command to run the downloaded firmware on the specified ports.

Step 5

Use the debug hardware internal linkctrl transceiver firmware fp-port 1-10,6,15-16 commit command to commit the downloaded firmware to the specified range of transceiver ports.

Example:

switch# debug hardware internal linkctrl transceiver firmware fp-port 1-10,6,15-16 commit

Use this command to commit the downloaded firmware to a range of ports, making the changes permanent.


The new firmware is successfully downloaded, run, and committed to the specified transceiver ports.