Configuring LDAP

This chapter describes how to configure the Lightweight Directory Access Protocol (LDAP) on Cisco NX-OS devices and includes the following sections:

About LDAP

The Lightweight Directory Access Protocol (LDAP) provides centralized validation of users attempting to gain access to an NX-OS device. An LDAP daemon (service process), which typically runs on a UNIX or Windows NT workstation, maintains LDAP services in a database. To make the LDAP features on your Cisco NX-OS device available, you must access and configure an LDAP server first.

LDAP provides for separate authentication and authorization facilities. LDAP allows a single access control server (the LDAP daemon) to provide authentication and authorization for each service independently. Each service can be tied into its own database to take advantage of other services available on that server or on the network, depending on the capabilities of the daemon.

The LDAP client/server protocol uses TCP (port 389) for transport requirements. NX-OS devices provide centralized authentication using the LDAP protocol.

LDAP Authentication and Authorization

Clients establish a TCP connection and authentication session with an LDAP server through a simple bind (username and password). As part of the authorization process, the LDAP server searches its database to retrieve the user profile and other information.

You can configure the bind operation to authenticate first, then authorize, or configure the operation to search first and then bind.

When you search first and bind later, you can use the distinguished name (DN) from the search result as the user DN for binding. You avoid creating a DN by adding the username (cn attribute) to the baseDN. This is useful if the user DN differs from the username and the baseDN together. For user binding, construct the bind DN using the base DN and append-with-baseDN. By default, append-with-baseDN is cn=$userid.


Note


As an alternative to the bind method, you can establish LDAP authentication using the compare method, which compares the attribute values of a user entry at the server. For example, the user password attribute that can be compared for authentication. The default password attribute type is userPassword.

LDAP operations for user logins

When you attempt to log in to an NX-OS device using Password Authentication Protocol (PAP) over LDAP, these actions occur:

  • When the NX-OS device establishes a connection, it contacts the LDAP daemon to obtain your username and password.

  • The Cisco NX-OS device receives one of these responses from the LDAP daemon:

    • ACCEPT—User authentication succeeds and service begins. If the NX-OS device requires user authorization, authorization begins.

    • REJECT—User authentication fails. The LDAP daemon either denies further access to the user or prompts the user to retry the login sequence.

    • ERROR—An error may occur in the daemon during authentication or in the network connection between the daemon and the Cisco NX-OS device. If the NX-OS device receives an ERROR response, it uses an alternative authentication method for your account.

  • After authentication, you also undergo an additional authorization phase if authorization is enabled on the NX-OS device. You must successfully complete LDAP authentication before proceeding to LDAP authorization.

  • If LDAP authorization is required, the NX-OS device contacts the LDAP daemon again. The daemon then returns an ACCEPT or REJECT authorization response. An ACCEPT response contains attributes that determine which services you can access. It also directs the EXEC or NETWORK session for your account. Examples of these services include:

    • Telnet, rlogin, Point-to-Point Protocol (PPP), Serial Line Internet Protocol (SLIP), and EXEC services

    • Connection parameters, including host IP addresses or a client IP address, such as IPv4 or IPv6 (Internet Protocol version 4 or 6), access lists, and user timeouts


Note


  • LDAP allows an arbitrary conversation between the daemon and you until the daemon receives enough information to authenticate your identity. This usually involves prompts for your username and password and may include prompts for other information.

  • In LDAP, authorization can occur before authentication.


LDAP Server Monitoring

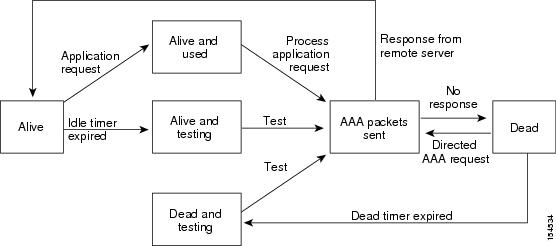
An unresponsive LDAP server can delay the processing of AAA requests. A Cisco NX-OS device can periodically monitor an LDAP server to check whether it is responding (or alive) to save time in processing AAA requests. The Cisco NX-OS device marks unresponsive LDAP servers as dead and does not send AAA requests to any dead LDAP servers. A Cisco NX-OS device periodically monitors dead LDAP servers and brings them to the alive state once they are responding. This process verifies that an LDAP server is in a working state before real AAA requests are sent its way. Whenever an LDAP server changes to the dead or alive state, a Simple Network Management Protocol (SNMP) trap is generated, and the Cisco NX-OS device displays an error message that a failure is taking place before it can impact performance. The following figure shows the server states for LDAP server monitoring.

Figure 1. LDAP Server States


Note


The monitoring interval for alive servers and dead servers is different and can be configured by the user. The LDAP server monitoring is performed by sending a test authentication request to the LDAP server.

Vendor-Specific Attributes for LDAP

You can use the Internet Engineering Task Force (IETF) draft standard method to communicate vendor-specific attributes between your network access server and the LDAP server. Attribute 26 serves this purpose. You can use vendor-specific attributes to enable extended features that are not intended for general use.

Cisco VSA Format for LDAP

The Cisco LDAP implementation supports one vendor-specific option using the format recommended in the IETF specification. The Cisco vendor ID is 9, and the supported option is vendor type 1, which is named cisco-av-pair. The value is a string with the following format:

protocol : attribute separator value *

The protocol is a Cisco attribute for a particular type of authorization, the separator is an = (equal sign) for mandatory attributes, and an * (asterisk) indicates optional attributes. When you use LDAP servers for authentication on a Cisco NX-OS device, LDAP directs the LDAP server to return user attributes, such as authorization information, along with authentication results. This authorization information is specified through VSAs. The following VSA protocol option is supported by the Cisco NX-OS software:

  • Shell—Protocol used in access-accept packets to provide user profile information.

The Cisco NX-OS software supports the following attribute:

  • roles—Lists all the roles to which the user belongs. The value field is a string that lists the role names delimited by white space.

Virtualization Support for LDAP

The Cisco NX-OS device uses virtual routing and forwarding instances (VRFs) to access the LDAP servers. For more information on VRFs, see the Cisco Nexus 9000 Series NX-OS Unicast Routing Configuration Guide.

Prerequisites for LDAP

LDAP has the following prerequisites:

  • Obtain the IPv4 or IPv6 addresses or hostnames for the LDAP servers.

  • Ensure that the Cisco NX-OS device is configured as an LDAP client of the AAA servers.

Guidelines and Limitations for LDAP

LDAP has the following guidelines and limitations:

Supported features

The supported features are

  • You can configure a maximum of 64 LDAP servers on the Cisco NX-OS device.

  • Cisco NX-OS supports only LDAP version 3.

  • Cisco NX-OS supports only these LDAP servers:

    • OpenLDAP

    • Microsoft Active Directory

  • For LDAP over SSL, the LDAP client configuration must include the hostname as a subject in the LDAP server certificate.

  • If you have a user account configured on the local Cisco NX-OS device that has the same name as a remote user account on a AAA server, the Cisco NX-OS software applies the user roles for the local user account to the remote user, not the user roles configured on the AAA server.

Supported platforms

Default Settings for LDAP

This table lists the default settings for LDAP parameters.

Table 1. LDAP default parameters and value

Parameters

Default

LDAP

Disabled

LDAP authentication method

First search and then bind

LDAP authentication mechanism

Plain

Dead-time interval

0 minutes

Timeout interval

5 seconds

Idle timer interval

60 minutes

Periodic server monitoring username

test

Periodic server monitoring password

Cisco

Configuring LDAP

This section describes how to configure LDAP on a Cisco NX-OS device.

LDAP Server Configuration Process

Summary

You can configure LDAP servers by following this configuration process.

Workflow

You can configure LDAP servers by following this configuration process.

  1. Enable LDAP.
  2. Establish the LDAP server connections to the Cisco NX-OS device.
  3. If needed, configure LDAP server groups with subsets of the LDAP servers for AAA authentication methods.
  4. (Optional) Configure the TCP port.
  5. (Optional) Configure the default AAA authorization method for the LDAP server.
  6. (Optional) Configure an LDAP search map.
  7. (Optional) If needed, configure periodic LDAP server monitoring.

Enable the LDAP feature

LDAP is initially disabled on NX-OS devices. You need to enable the LDAP feature to access authentication configuration and verification commands.

Follow these steps to enable the LDAP feature:

Procedure


Step 1

Enter global configuration mode using the configure terminal command.

Example:

switch# configure terminal

Step 2

Enable LDAP by using the feature ldap command. To disable it, enter the no form of the command.

Example:

switch(config)# feature ldap

Note


Disabling LDAP removes all related configurations.

Step 3

Save the running configuration to the startup configuration with copy running-config startup-config

Example:

switch(config)# copy running-config startup-config

The LDAP feature is enabled, and authentication configuration commands are now accessible.

Configure LDAP server hosts

Configure LDAP server hosts to allow Cisco NX-OS devices to access remote LDAP servers for user authentication. Use this procedure to add LDAP server IPs or hostnames and optionally enable SSL for secure communication.


Note


By default, when you configure an LDAP server IP address or hostname on the Cisco NX-OS device, the LDAP server is added to the default LDAP server group. You can also add the LDAP server to another LDAP server group.


Follow these steps to configure LDAP server hosts:

Before you begin

  • Enable LDAP on the device.

  • Obtain the IPv4 or IPv6 addresses or the hostnames for the LDAP servers.

  • If enabling SSL, ensure the LDAP server certificate is manually configured on your device.

Procedure


Step 1

Enter the global configuration mode using the configure terminal command. .

Example:

switch# configure terminal
switch(config)#

Step 2

Specify the IP address or hostname for an LDAP server using the command ldap-server host .

  • Optionally, use the enable-ssl keyword to encrypt communication.

  • Optionally, use the referral-disable keyword to disable referral links.

Example:

switch(config)# switch(config)# ldap-server host 10.10.2.2 enable-ssl

Step 3

(Optional) Verify LDAP server configuration using the show ldap-server command .

Example:

switch(config)# show ldap-server

Step 4

Save the configuration with copy running-config startup-config command.

Example:

switch(config)# copy running-config startup-config

LDAP server hosts are configured and ready for authentication operations.

Configuring the RootDN for an LDAP Server

You can configure the root designated name (DN) for the LDAP server database. The rootDN is used to bind to the LDAP server to verify its state.

Before you begin

  • Enable LDAP.

  • Obtain the IPv4 or IPv6 addresses or the hostnames for the remote LDAP servers.

Procedure


Step 1

Enter global configuration mode using the configure terminal command.

Example:

switch# configure terminal
switch(config)#

Step 2

Specify the rootDN for the LDAP server database and the bind password for the root using the [ no ] ldap-server host { ipv4-address | ipv6-address | hostname } rootDNroot-name [ passwordpassword [ porttcp-port [ timeoutseconds ] | timeoutseconds ]]

Example:

switch(config)# ldap-server host 10.10.1.1 rootDN cn=manager,dc=acme,dc=com password Ur2Gd2BH timeout 60

Optionally specifies the TCP port to use for LDAP messages to the server. The range is from 1 to 65535, and the default TCP port is the global value or 389 if a global value is not configured. Also specifies the timeout interval for the server. The range is from 1 to 60 seconds, and the default timeout is the global value or 5 seconds if a global value is not configured.

Step 3

(Optional) Display the LDAP server configuration. show ldap-server

Example:

switch(config)# show ldap-server

Step 4

(Optional) Copy the running configuration to the startup configuration using the copy running-config startup-config command.

Example:

switch(config)# copy running-config startup-config

Configuring LDAP Server Groups

Specify one or more remote authentication, authorization, and accounting (AAA) servers in server groups to authenticate your users.

After you configure the servers, the system uses the servers in the order you specify. You can configure these server groups at any time, but they take effect only when you apply them to an AAA service.

Before you begin

Enable LDAP.

Procedure


Step 1

Enter global configuration mode. Create an LDAP server group. Enter LDAP server group configuration mode.

Example:

switch# configure terminal
switch(config)# aaa group server ldap LDAPServer1

Command Syntax

configure terminal

Command Syntax

[ no ] aaa group server ldapgroup-name

Step 2

Configure the LDAP server as a member of the LDAP server group.

Example:

switch(config-ldap)# server 192.0.2.2

Command syntax

[ no ] server { ipv4-address | ipv6-address | host-name }

If the specified LDAP server is not found, configure it using the ldap-server host command and retry this command.

Step 3

(Optional) Perform LDAP authentication using the bind or compare method. The default LDAP authentication method is the bind method using first search and then bind.

Example:

switch(config-ldap)# authentication compare password-attribute TyuL8r

Command Syntax

[ no ] authentication { bind-first [ append-with-baseDNDNstring ] | compare [ password-attributepassword ]}

Step 4

(Optional) Enable group validation using the [ no ] enable user-server-group command.

Example:

switch(config-ldap)# enable user-server-group

Configure the group name in the LDAP server. Users can log in with public-key authentication if their username appears as a member of this configured group in the LDAP server.

Step 5

(Optional) Allow users to log in if a user profile lists the subject-DN for the user certificate as authorized. Use the [ no ] enable Cert-DN-match command.

Example:

switch(config-ldap)# enable Cert-DN-match

Step 6

(Optional) Specify the VRF that contacts the servers in the server group. Use the [ no ] use-vrfvrf-name command.

Example:

switch(config-ldap)# use-vrf vrf1

Step 7

Exit LDAP server group configuration mode with the exit command.

Example:

switch(config-ldap)# exit
switch(config)#

Step 8

(Optional) Display the LDAP server group configuration using the show ldap-server groups command.

Example:

switch(config)# show ldap-server groups

Step 9

(Optional) Copy the running configuration to the startup configuration using the copy running-config startup-config command.

Example:

switch(config)# copy running-config startup-config

Configuring the Global LDAP Timeout Interval

You can set a global timeout interval that determines how long the NX-OS device waits for responses from all LDAP servers before declaring a timeout failure.

Before you begin

Enable LDAP.

Procedure


Step 1

Enter global configuration mode with the configure terminal command

Example:

switch# configure terminal
switch(config)#

Step 2

Set the timeout interval for LDAP servers by entering the [ no ] ldap-server timeoutseconds command.

Example:

switch(config)# ldap-server timeout 10

The default timeout interval is five seconds. Specify a value from one to sixty seconds.

Step 3

(Optional) Display the LDAP server configuration by using the show ldap-server command.

Example:

switch(config)# show ldap-server

Step 4

(Optional) Copy the running configuration to the startup configuration with the copy running-config startup-config command.

Example:

switch(config)# copy running-config startup-config

Configure the Timeout Interval for an LDAP Server

You can set a timeout interval that determines how long the NX-OS device waits for responses from an LDAP server before declaring a timeout failure.

Complete these steps to configure the timeout interval for an LDAP server.

Before you begin

Enable LDAP.

Procedure


Step 1

Enter global configuration mode with the configure terminal command.

Example:

switch# configure terminal
switch(config)#

Step 2

Specify the timeout interval for a specific server using the [ no ] ldap-server host { ipv4-address | ipv6-address | hostname } timeoutseconds command.

Example:

switch(config)# ldap-server host server1 timeout 10

The default is the global value.

Note


The timeout interval value specified for an LDAP server overrides the global timeout interval value specified for all LDAP servers.

Step 3

(Optional) Display the LDAP server configuration with the show ldap-server command.

Example:

switch(config)# show ldap-server

Step 4

(Optional) Copy the running configuration to the startup configuration with the copy running-config startup-config command.

Example:

switch(config)# copy running-config startup-config

Configure the TCP Ports

Configure an alternate TCP port for LDAP servers if another application conflicts with the default port 389 on NX-OS devices.

To configure the TCP port for LDAP servers, complete these steps.

Before you begin

Enable LDAP.

Procedure


Step 1

Enter global configuration mode with the configure terminal command.

Example:

switch# configure terminal
switch(config)#

Step 2

Specify the TCP port to use for LDAP messages to the server using the [ no ] ldap-server host { ipv4-address | ipv6-address | hostname } porttcp-port [ timeoutseconds ] command.

Example:

switch(config)# ldap-server host 10.0.0.1 port 200 timeout 5
  • The default TCP port is 389. You can specify any port from 1 to 65,535.

  • You can specify a timeout interval for the server from 1 to 60 seconds. If you do not set a value, the system uses the global timeout value, or 5 seconds if none is set.

Note


The timeout interval value specified for an LDAP server overrides the global timeout interval value specified for all LDAP servers.

Step 3

(Optional) Display the LDAP server configuration using the show ldap-server command.

Example:

switch(config)# show ldap-server

Step 4

(Optional) Copy the running configuration to the startup configuration with the copy running-config startup-config command.

Example:

switch(config)# copy running-config startup-config

The specified LDAP server uses the configured TCP port and timeout for LDAP communication. The system saves your configuration changes permanently after you save them.

What to do next

Test connectivity to the LDAP server using the new TCP port to ensure successful configuration.

Configure LDAP Search Maps

Configure LDAP search maps on a Nexus switch. This enables LDAP queries based on attributes, filters, and search bases.

Performing this configuration allows the switch to send queries to an LDAP server for purposes such as user profiles or role definitions. The switch uses the specified criteria in search maps for these queries.

Proceed with the configuration steps for LDAP search maps.

Before you begin

You must enable LDAP.

Procedure


Step 1

Enter global configuration mode using the configure terminal command.

Example:

switch# configure terminal
switch(config)#

Step 2

Create a new LDAP search map using the ldap search-mapmap-name command.

Example:

switch(config)# ldap search-map map1
switch(config-ldap-search-map)#

Step 3

(Optional) Configure the attribute name, search filter, and base-DN for the required search operation, such as user profile, trusted certificate, certificate revocation list, certificate DN match, public key match, or user-switchgroup lookup. Use the corresponding command: [ userprofile | trustedCert | CRLLookup | user-certdn-match | user-pubkey-match | user-switch-bind ] attribute-nameattribute-namesearch-filterfilterbase-DNbase-DN-name .

Example:

switch(config-ldap-search-map)# userprofile attribute-name att-name search-filter (&(objectClass=inetOrgPerson)(cn=$userid)) base-DN dc=acme,dc=com
  • The attribute-name refers to the LDAP server attribute containing the Nexus role definition.

  • The values specified are used to generate the LDAP query.

Step 4

(Optional) Exit LDAP search map configuration mode. Use the exit command.

Example:

switch(config-ldap-search-map)# exitswitch(config)#

E

Step 5

(Optional) Display the configured LDAP search maps using the show ldap-search-map command.

Example:

switch(config)# show ldap-search-map

Step 6

(Optional) Save the running configuration to the startup configuration using the copy running-config startup-config command.

Example:

switch(config)# copy running-config startup-config

You have configured the LDAP search maps. You can search the LDAP server when needed.

Configure periodic LDAP server monitoring

You can monitor the availability of LDAP servers. The configuration parameters include the username, password, rootDN (used to bind and verify the state of the server), and an idle timer of the server. The idle timer is the period the LDAP server receives no requests before the NX-OS device sends a test packet. Configure this option to test servers periodically or perform a single test.

Monitor the availability of LDAP servers using these steps.


Note


To protect network security, use a username that does not exist in the LDAP server database.


Before you begin

Enable LDAP.

Procedure


Step 1

Enter global configuration mode with the configure terminal command.

Example:

switch# configure terminal
switch(config)#

Step 2

Specify the parameters for server monitoring using the [ no ] ldap-server host { ipv4-address | ipv6-address | hostname } test rootDNroot-name [ idle-timeminutes | passwordpassword [ idle-timeminutes ] | usernamename [ passwordpassword [ idle-timeminutes ]]] command.

Example:

switch(config)# ldap-server host 10.10.1.1 test rootDN root1 username user1 password Ur2Gd2BH idle-time 3

The default username is test, and the default password is Cisco. The default value for the idle timer is sixty minutes (1 hour), and the valid range is from one to one thousand four hundred forty minutes (24 hours).

Note


Use a username that does not exist in the LDAP server database.

Step 3

Check the unresponsive connection time, in minutes, between the NX-OS device and the LDAP server using the [ no ] ldap-server deadtimeminutes command.

Example:

switch(config)# ldap-server deadtime 5

The default value is zero minutes, and the valid range is from one to sixty minutes (1 hour).

Step 4

(Optional) Display the LDAP server configuration using the show ldap-server command.

Example:

switch(config)# show ldap-server

Step 5

(Optional) Copy the running configuration to the startup configuration using the copy running-config startup-config command

Example:

switch(config)# copy running-config startup-config

You have configured the LDAP server monitoring frequency.

Configure the LDAP dead-time interval

You can configure the dead-time interval for all LDAP servers. This interval is the period the NX-OS device waits after declaring an LDAP server dead. After this period, the device sends a test packet to determine whether the server is alive.


Note


When the dead-time interval is zero minutes (0 min), LDAP servers are not marked as dead even if they are not responding. You can configure the dead-time interval per group.


To configure the dead-time interval for the LDAP server, use these steps.

Before you begin

Enable LDAP.

Procedure


Step 1

Enters global configuration mode using the configure terminal command.

Example:

switch# configure terminal
switch(config)#

Step 2

Configure the global dead-time interval with the [ no ] ldap-server deadtimeminutes command.

Example:

switch(config)# ldap-server deadtime 5

The default value is zero minutes (0 min). You can configure a range from one to sixty minutes (1 hour, 60 min).

Step 3

(Optional) Display the LDAP server configuration using the show ldap-server command.

Example:

switch(config)# show ldap-server

Step 4

(Optional) Copy the running configuration to the startup configuration using the copy running-config startup-config command.

Example:

switch(config)# copy running-config startup-config

You have configured the LDAP dead-time interval.

Configure AAA authorization on LDAP servers

Configure the default Authentication, Authorization, and Accounting (AAA) authorization method for Lightweight Directory Access Protocol (LDAP) server.

Before you begin

Enable Lightweight Directory Access Protocol (LDAP).

Procedure


Step 1

Enter global configuration mode using the configure terminal command.

Example:

switch# configure terminal
switch(config)#

Step 2

Configure the default Authentication, Authorization, and Accounting (AAA) authorization method for the Lightweight Directory Access Protocol (LDAP) servers using the aaa authorization { ssh-certificate | ssh-publickey } default { groupgroup-list | local } command.

Example:

switch(config)# aaa authorization ssh-certificate default group LDAPServer1 LDAPServer2

The ssh-certificate keyword enables LDAP or local authorization with certificate authentication. The ssh-publickey keyword enables LDAP or local authorization with SSH public key authentication. By default, authorization is local, which means the authorized commands are determined by the assigned user role.

The group-list argument consists of a space-delimited list of LDAP server group names. Servers that belong to this group are contacted for AAA authorization. The local method uses the local database for authorization.

Step 3

(Optional) Display the Authentication, Authorization, and Accounting (AAA) authorization configuration using the show aaa authorization [ all ] command.

Example:

switch(config)# show aaa authorization

The all keyword displays the default values.

Step 4

(Optional) Copy the running configuration to the startup configuration using the copy running-config startup-config command.

Example:

switch(config)# copy running-config startup-config

The default AAA authorization method for LDAP servers is now configured.

Configure LDAP SSH Public Key Authorization (task)

Enable AAA SSH public key authorization through LDAP.

To configure LDAP SSH public key authorization, use these steps.

Before you begin

Before configuring LDAP SSH public key authorization, complete these prerequisites:

  • Save the user public key under the attribute defined in the

  • Sign in using the user private key from an SSH client to confirm access.


    Note


    The private key that is presented during SSH sign-in is verified with the public key which is saved in the LDAP server.


Procedure


Step 1

Save the public key of the user under the attribute defined in the user-pubkey-match configuration in the LDAP server.

Example:

configure terminal
                        ldap-server host fully qualified domain name.com rootDN "CN=ucsadmin1,CN=Users,DC=PI-Sec-DT,DC=com" password 7 password1
                        ldap search-map Map1
                        userprofile attribute-name "description" search-filter "(cn=$userid)" base-DN "DC=PI-Sec-DT,DC=com"
                        user-pubkey-match attribute-name "sshPublicKeys" search-filter "(cn=$userid)" base-DN "DC=PI-Sec-DT,DC=com"
                        aaa group server ldap ldap1
                        server fully qualified domain name.com
                        use-vrf management
                        ldap-search-map Map1
                        aaa authorization ssh-publickey default group ldap1

The sshPublicKeys attribute is added in the user-pubkey-match.

Step 2

Use the SSH client with the user's private key to sign in to the switch management IP address.

Example:

ssh ldapuser@10.0.0.1 -i ldap_pub_key_test 

The LDAP server now enables SSH public key AAA authorization.

Configure LDAP SSH certificate authorization (task)

Authorize SSH access using LDAP server certificates and distinguished names.

Authentication, authorization, and accounting (AAA) authorization is performed through an LDAP server with a certificate, and the distinguished name (DN) of the certificate is saved in the user attribute of the LDAP server.

Before you begin

During LDAP SSH certificate authorization, the following tasks are addressed:

  • Validation of the user certificate presented through the Secure Shell (SSH) client using the certificate authority certificate installed in the switch.

  • By default, the enable cert-dn-match configuration is enabled, so cert-DN-match automatically validates the certificate using the distinguished name (DN) stored in the LDAP server.

Procedure


Step 1

Save the certificate DN in an LDAP server under any specific attribute that is mentioned in the user-certdn-match configuration.

Example:

ldap-server host fully qualified domain example.com rootDN "CN=ucsadmin1,CN=Users,DC=PI-Sec-DT,DC=com"  password 7 password1
                    ldap search-map Map24
                    userprofile attribute-name "description" search-filter "(cn=$userid)" base-DN "DC=PI-Sec-DT,DC=com"
                    user-certdn-match attribute-name <attribute> search-filter "(cn=$userid)" base-DN "DC=PI-Sec-DT,DC=com"
                    aaa group server ldap ldap24
                    server fully qualified domain name.com
                    enable Cert-DN-match
                    use-vrf management
                    ldap-search-map Map24
                    aaa authorization ssh-certificate default group ldap24
                

The format is "x509v3-sign-rsa DN /DC=com, DC=PI-Sec-DT, CN=Users, CN=username1".

Step 2

Display the details of the root certificate authority certificate installed on the switch.

Example:

switch# show crypto ca certificates
                        Trustpoint: ldap
                        CA certificate 0:
                        subject=C = IN, ST = KAR, L = BGL, O = Cisco, OU = DCBG-Cert, CN = RootCA
                        issuer=C = IN, ST = KAR, L = BGL, O = Cisco, OU = DCBG-Cert, CN = RootCA
                        serial=82EE7603BF7E74A9
                        notBefore=May 29 07:12:30 2023 GMT
                        notAfter=May 26 07:12:30 2033 GMT
                        SHA1 Fingerprint=D5:AE:75:8E:A1:4F:79:1E:80:3E:5E:67:C5:42:44:10:13:C6:F7:1D
                        purposes: sslserver sslclient
                        n7700-DE#
                    

Step 3

Sign in from the Secure Shell (SSH) client

Example:

ssh username1@10.0.0.1 -i username1.crt -vvv -oCACertificateFile=rootCA.crt
  • In the Secure Shell (SSH) client, the input certificate contains both private key and user certificate concatenated in a single file "<user>.crt".

  • The rootCA.crt file contains the root certificate authority certificate.

  • The IP address is the switch management IP address.


Users can authenticate to the switch via SSH using LDAP certificates. The switch validates the certificate DN against the LDAP server attribute.

What to do next

  • Verify successful Secure Shell (SSH) authentication and access control.

  • Check the logs to confirm that certificate validation events occurred.

Monitoring LDAP Servers

You can monitor the statistics that the Cisco NX-OS device maintains for LDAP server activity.

Before you begin

Configure LDAP servers on the Cisco NX-OS device.

Procedure

Command or Action Purpose

show ldap-server statistics {hostname | ipv4-address | ipv6-address}

Example:

switch# show ldap-server statistics 10.10.1.1

Displays the LDAP server statistics.

Clearing LDAP Server Statistics

You can display the statistics that the Cisco NX-OS device maintains for LDAP server activity.

Before you begin

Configure LDAP servers on the Cisco NX-OS device.

Procedure


Step 1

(Optional) Display the LDAP server statistics using the show ldap-server statistics { hostname | ipv4-address | ipv6-address } command.

Example:

switch# show ldap-server statistics 10.10.1.1
					

Step 2

Clear the LDAP server statistics using the clear ldap-server statistics { hostname | ipv4-address | ipv6-address } command.

Example:

switch# clear ldap-server statistics 10.10.1.1
					

Verifying the LDAP Configuration

To display Lightweight Directory Access Protocol (LDAP) configuration information, perform one of the following tasks.

Table 2. Verification commands

Command

Purpose

show running-config ldap [all]

Displays the LDAP configuration in the running configuration.

show startup-config ldap

Displays the LDAP configuration in the startup configuration.

show ldap-server

Displays LDAP configuration information.

show ldap-server groups

Displays LDAP server group configuration information.

show ldap-server statistics {hostname | ipv4-address | ipv6-address}

Displays LDAP statistics.

show ldap-search-map

Displays information about the configured LDAP attribute maps.

LDAP configuration examples

These configuration examples help you set up LDAP server hosts and groups, create LDAP search maps, configure AAA authorization with certificate authentication, and validate authentication in your operating system.

Configure an LDAP server host and group:

feature ldap
ldap-server host 10.10.2.2 enable-ssl
aaa group server ldap LdapServer
server 10.10.2.2
exit
show ldap-server
show ldap-server groups

Configure an LDAP search map:

ldap search-map s0
userprofile attribute-name att-name search-filter "
(&(objectClass=Person)(sAMAccountName=$userid))" base-DN dc=acme,dc=com
exit
show ldap-search-map

Configure AAA authorization with certificate authentication for LDAP server:

aaa authorization ssh-certificate default group LDAPServer1 LDAPServer2
 exit
show aaa authorization

Validate authentication:

failing
test aaa group LdapServer user <user-password>
user has failed authentication

! working
test aaa group LdapServer user <user-password>
user has been authenticated

Where to Go Next

You can now configure AAA authentication methods to include the server groups.

Additional References for LDAP

Related Documents

Related Topic

Document Title

Cisco NX-OS licensing

Cisco NX-OS Licensing Guide

VRF configuration

Cisco Nexus 9000 Series NX-OS Unicast Routing Configuration Guide

Standards

Standards

Title

No new or modified standards are supported by this feature, and support for existing standards has not been modified by this feature.

MIBs

MIBs

MIBs Link

MIBs related to LDAP

To locate and download the supported MIBs, go to the following URL:

https://cisco.github.io/cisco-mibs/supportlists/nexus9000/Nexus9000MIBSupportList.html