Replacing Power Supplies
The server can have one or two Titanium 80PLUS rated power supplies. When two power supplies are installed they are redundant as 1+1 by default.
-
See also Power Specifications for more information about the power supplies.
This section includes procedures for replacing AC and DC power supply units.
Replacing AC Power Supplies
 Note |
If you have ordered a server with power supply redundancy (two power supplies), you do not have to power off the server to replace a power supply because they are redundant as 1+1. |
Note |
Do not mix power supply types or wattages in the server. Both power supplies must be identical. |
Procedure
|
Step 1 |
Remove the power supply that you are replacing or a blank panel from an empty bay: |
||
|
Step 2 |
Install a new power supply:

|
Replacing DC Power Supplies
Note |
This procedure is for replacing DC power supplies in a server that already has DC power supplies installed. If you are installing DC power supplies to the server for the first time, see Installing DC Power Supplies (First Time Installation). |
 Warning |
A readily accessible two-poled disconnect device must be incorporated in the fixed wiring. Statement 1022 |
Warning |
This product requires short-circuit (overcurrent) protection, to be provided as part of the building installation. Install only in accordance with national and local wiring regulations. Statement 1045 |
Warning |
Installation of the equipment must comply with local and national electrical codes. Statement 1074 |
Note |
If you are replacing DC power supplies in a server with power supply redundancy (two power supplies), you do not have to power off the server to replace a power supply because they are redundant as 1+1. |
Note |
Do not mix power supply types or wattages in the server. Both power supplies must be identical. |
Procedure
|
Step 1 |
Remove the DC power supply that you are replacing or a blank panel from an empty bay: |
||||||||
|
Step 2 |
Install a new DC power supply:
|
Installing DC Power Supplies (First Time Installation)
Note |
This procedure is for installing DC power supplies to the server for the first time. If you are replacing DC power supplies in a server that already has DC power supplies installed, see Replacing DC Power Supplies. |
Warning |
A readily accessible two-poled disconnect device must be incorporated in the fixed wiring. Statement 1022 |
Warning |
This product requires short-circuit (overcurrent) protection, to be provided as part of the building installation. Install only in accordance with national and local wiring regulations. Statement 1045 |
Warning |
Installation of the equipment must comply with local and national electrical codes. Statement 1074 |
Note |
Do not mix power supply types or wattages in the server. Both power supplies must be identical. |
 Caution |
As instructed in the first step of this wiring procedure, turn off the DC power source from your facility’s circuit breaker to avoid electric shock hazard. |
Procedure
|
Step 1 |
Turn off the DC power source from your facility’s circuit breaker to avoid electric shock hazard.
|
||||||||
|
Step 2 |
Wire the non-terminated end of the cable to your facility’s DC power input source. |
||||||||
|
Step 3 |
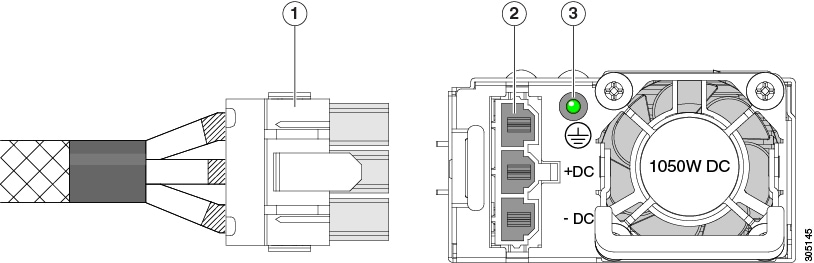
Connect the terminated end of the cable to the socket on the power supply. The connector is keyed so that the wires align for correct polarity and ground. |
||||||||
|
Step 4 |
Return DC power from your facility’s circuit breaker. |
||||||||
|
Step 5 |
Press the Power button to boot the server to main power mode.
|
||||||||
|
Step 6 |
See Grounding for DC Power Supplies for information about additional chassis grounding. |
Grounding for DC Power Supplies
AC power supplies have internal grounding and so no additional grounding is required when the supported AC power cords are used.
When using a DC power supply, additional grounding of the server chassis to the earth ground of the rack is available. Two screw holes for use with your dual-hole grounding lug and grounding wire are supplied on the chassis rear panel.
Note |
The grounding points on the chassis are sized for 10-32 screws. You must provide your own screws, grounding lug, and grounding wire. The grounding lug must be dual-hole lug that fits 10-32 screws. The grounding cable that you provide must be 10 AWG (5 mm), minimum 60° C wire, or as permitted by the local code. |
 Feedback