
New and changed information
The following table provides an overview of the significant changes up to this current release. The table does not provide an exhaustive list of all changes or of the new features up to this release.
| Release Version | Feature | Description |
|---|---|---|
|
Nexus Dashboard 4.3.1 |
Extended support for configuration drift and reconciliation |
Beginning with release 4.3.1, Nexus Dashboard now detects and reconciles configuration drift for additional Application template properties, including EPG and BD subnets, bridge domain DHCP labels, EPG static ports, contract relationships, and uSeg attributes. For more information, see sections Configuration drifts and Reconcile configuration drift in application templates. |
Schema and Template Design Considerations
Nexus Dashboard provides a number of policy templates that allow you to define one or more policies together and deploy them to one or more fabrics at the same time. These include Application templates, Tenant Policies templates, Fabric Policies and Fabric Resources Policies templates, and Monitoring templates. A schema is a collection of Application templates, which are used for defining application policies, with each template assigned to a specific tenant; schemas apply to Application templates only. There are multiple approaches you can take when it comes to creating the templates configurations specific to your deployment use case. The following sections describe a few simple design directions you can take when deciding how to define the schemas, templates, and policies in your Multi-Fabric domain.
Keep in mind that when designing schemas, you must consider the supported scalability limits for the number of schemas, templates, and objects per schema. Detailed information on verified scalability limits is available in the Nexus Dashboard Verified Scalability Guides for your release.
Application Templates
There are 3 types of schema templates, also known as application templates, available in Nexus Dashboard, each designed for a specific purpose:
-
ACI Multi-Fabric-Template used for Cisco ACI on-premises. This template supports two deployment types:
-
Multi-Fabric- The template can be associated to a single fabric (fabric-local policies) or to multiple fabrics (stretched policies) and the option should be selected for Multi-Fabric Network (ISN) or VXLAN inter-fabric communication to allow template and object stretching between multiple fabrics. -
Autonomous- The template can be associated to one or more fabrics that are operated independently and are not connected through an Inter-Fabric Network (no inter-fabric VXLAN communication).Because autonomous fabrics are by definition isolated and do not have any inter-fabric connectivity, there is no shadow object configuration across fabrics and no cross-programming of pctags or VNIDs in the spine switches for inter-fabric traffic flow.
The autonomous templates also allow for significantly higher deployment scale.
The following sections focus primarily on this type of templates.
-
-
NDFC-Templates designed for Cisco Nexus Dashboard Fabric Controller (formerly Data Center Network Manager) fabrics.
When creating schemas and application templates, you can choose to adopt one of the following simple approaches:
-
Single Template Deployment
The simplest schema design approach is a single schema, single template deployment. You can create a single schema with a single template within it and add all VRFs, Bridge Domains, EPGs, Contracts and other elements to that template and deploy it to one or more fabrics.
This simplest approach to Multi-Fabric schema creation is to create all objects within the same schema and template. However, the supported number of schemas scalability limit may make this approach unsuitable for large scale deployments, which could exceed those limits.
Note also that with this approach all the objects defined in the template become "stretched objects" and all changes made to the template are always simultaneously deployed to all the fabrics associated to such template.
-
Multiple Templates with Network Separation
Another approach to schema design is to separate the networking objects from the application policy configuration. Networking objects include VRFs, Bridge Domains, and subnets, while the application policy objects include EPGs, Contracts, Filters, External EPGs, and Service Graphs.
You begin by defining a schema that contains the network elements. You can choose to create a single schema that contains all the network elements or you can split them into multiple schemas based on which applications reference them or which fabrics the network is stretched to.
You can then define one or more separate schemas which contain each application’s policy objects. This new schema can reference the network elements, such as bridge domains, defined in the previous schema.
After creating and deploying the policy schemas and templates, the networking objects in the networking schema will display the number of external references by the policy schema elements. The object with external references will also be denoted by the ribbon icon.
Schemas designed this way provide logical separation of networking objects from the policy objects. However, this creates additional complexity when it comes to keeping track of externally referenced objects in each schema.
-
Multiple Templates Based On Object Relationships
When configuring multiple schemas with shared object references, it is important to be careful when making changes to those objects. For instance, making changes to or deleting a shared networking object can impact applications in one or more fabrics. Because of that, you may choose to create a template around each individual fabric that contains only the objects used by that fabric and its applications, including the VRFs, BDs, EPGs, Contracts, and Filters. And create different templates containing the shared objects.
For example, you can create a
Fabric1template that contains only the objects that are local to Fabric1 and the template is deployed to only that fabric. Similarly, theFabric2template contains only the object relevant to fabric2 and is deployed to that fabric only. Any change made to any object in either of these templates has no effect on the other one. Then you can create aSharedtemplate which contains objects that are shared between the fabrics.You can extend this scenario for an additional fabric with the following template layout:
-
Fabric 1 template
-
Fabric 2 template
-
Fabric 3 template
-
Fabric 1 and 2 shared template
-
Fabric 1 and 3 shared template
-
Fabric 2 and 3 shared template
-
All shared template
Similarly, rather than separating objects based on which fabric they are deployed to, you can also choose to create schemas and templates based on individual applications instead. This would allow you to easily identify each application profile and map them to schemas and fabrics as well as easily configure each application as local or stretched across fabrics.
+ However, as this could quickly exceed the templates per schema limit (listed in the Verified Scalability Guide for your release), you would have to create additional schemas to accommodate the multiple combinations. While this creates additional complexity with multiple additional schemas and templates, it provides true separation of objects based on fabric or application.
-
Fabric Policy Templates
In addition to the three types of application templates, Release 4.0(1) adds 3 new templates designed for fabric-wide policies:
-
Fabric Policies templates can be used for managing the following fabric-wide policies:
-
VLAN Pool
-
Physical Domains
-
SyncE Interface Policies
-
Interface Settings
-
Node Settings
-
Pod Settings
-
MACsec
-
NTP Policies
-
PTP Policies
-
QoS DSCP Policies
-
QoS SR-MPLS Policies
-
QoS Class Policies
For additional information, see the "Create fabric policies" section in Fabric Management Templates for ACI Fabrics.
-
-
Fabric Resources Policies templates can be used for managing the following fabric-wide policies:
-
Physical Interfaces
-
Port Channel Interfaces
-
Virtual Port Channel Interfaces
-
Node Profiles
These templates reference policies are defined in the Fabric Policies templates, so those templates must be created and deployed first. For additional information, see the "Create fabric resources policies" section in Fabric Management Templates for ACI Fabrics.
-
-
Monitoring Policy templates can be used for managing
Tenant SPANorAccess SPANpolicies.For additional information, see the "Create monitoring policies" section in Fabric Management Templates for ACI Fabrics.
Template Design Best Practices
Nexus Dashboard validates and enforces a number of best practices when it comes to template design and deployment. Regardless of the type of template you are creating, keep in mind the following:
-
All policy objects must be deployed in order according to their dependencies.
For example, when creating a bridge domain (BD), you must associate it with a VRF. In this case, the BD has a VRF dependency so the VRF must be deployed to the fabric before or together with the BD. If these two objects are defined in the same template, then the Orchestrator will ensure that during deployment, the VRF is created first and associate it with the bridge domain.
However, if you define these two objects in separate templates and attempt to deploy the template with only the BD first, the Orchestrator will return a validation error as the associated VRF is not yet deployed. In this case, you must deploy the VRF template first, followed by the BD template.
-
All policy objects must be undeployed in order according to their dependencies, or in the opposite order in which they were deployed.
As a corollary to the point above, when you undeploy templates, you must not undeploy objects on which other objects depend. For example, you cannot undeploy a VRF before undeploying the BD with which the VRF is associated.
-
Specific cyclical dependencies are allowed across multiple templates.
Consider a case of a VRF (
vrf1) associated with a bridge domain (bd1), which is in turn associated with an EPG (epg1). If you createvrf1intemplate1and deploy that template, then createbd1intemplate2and deploy that template, there will be no validation errors since the objects are deployed in correct order. However, if you then attempt to createepg1intemplate1, it would create a circular dependency between the two template, so the Orchestrator will not allow you to savetemplate1addition of the EPG.
Concurrent Configuration Updates
The Nexus Dashboard GUI will ensure that any concurrent updates on the same fabric or schema object cannot unintentionally overwrite each other. If you attempt to make changes to a fabric or template that was updated by another user since you opened it, the GUI will reject any subsequent changes you try to make and present a warning requesting you to refresh the object before making additional changes; refreshing the template will lose any edits you made up to that point and you will have to make those changes again:

However, the default REST API functionality was left unchanged in order to preserve backward compatibility with existing applications. In other words, while the UI is always enabled for this protection, you must explicitly enable it for your API calls for Nexus Dashboard to keep track of configuration changes.

-
This release supports detection of conflicting configuration changes for Fabric and Schema objects only.
-
Only
PUTandPATCHAPI calls support the version check feature. -
If you do not explicitly enable the version check parameter in your API calls, Nexus Dashboard will not track any updates internally. And as a result, any configuration updates can be potentially overwritten by both subsequent API calls or GUI users.
To enable the configuration version check, you can pass the enableVersionCheck=true parameter to the API call by appending it to the end of the API endpoint you are using, for example:
https://__<mso-ip-address>__/mso/api/v1/schemas/__<schema-id>__?*enableVersionCheck=true*Example
We will use a simple example of updating the display name of a template in a schema to show how to use the version check attribute with PUT or PATCH calls.
First, you would GET the schema you want to modify, which will return the current latest version of the schema in the call’s response:
{
    "id": "601acfed38000070a4ee9ec0",
    "displayName": "Schema1",
    "description": "",
    "templates": [
        {
            "name": "Template1",
            *"displayName": "current name",*
            [...]
        }
    ],
    *"_updateVersion": 12,*
    "fabrics": [...]
}
Then you can modify the schema in one of two ways appending enableVersionCheck=true to the request URL:
You must ensure that the value of the "_updateVersion" field in the payload is the same as the value you got in the original schema.
-
Using the
PUTAPI with the entire updated schema as payload:PUT /v1/schemas/601acfed38000070a4ee9ec0*?enableVersionCheck=true*{ "id": "601acfed38000070a4ee9ec0", "displayName": "Schema1", "description": "", "templates": [ { "name": "Template1", *"displayName": "new name",* [...] } ], *"_updateVersion": 12,* "fabrics": [...] } -
Using any of the
PATCHAPI operations to make a specific change to one of the objects in the schema:PATCH /v1/schemas/601acfed38000070a4ee9ec0*?enableVersionCheck=true*[ { "op": "replace", "path": "/templates/Template1/displayName", *"value": "new name",**"_updateVersion": 12* } ]
When the request is made, the API will increment the current schema version by 1 (from 12 to 13) and attempt to create the new version of the schema. If the new version does not yet exist, the operation will succeed and the schema will be updated; if another API call (with enableVersionCheck enabled) or the UI have modified the schema in the meantime, the operation fails and the API call will return the following response:
{
    "code": 400,
    "message": "Update failed, object version in the DB has changed, refresh your client and retry"
}
Template Renaming
-
You must have the schema, template, and any objects you want to deploy to fabric already created, as described in previous sections of this document.
-
Ensure that you understand the required deployment order and object dependencies that are described in Schema and Template Design Considerations.
This section describes how to rename a template. Both the "Display Name" and the "Internal Name" (i.e. the name in the Nexus Dashboard internal database) for the template are changed in this procedure.
In order to change the template name, ensure there are no unsaved changes in the schema.
-
From the View drop-down list, choose the template you want to rename.
-
Click on Edit Template to open the Template Settings page.
-
Click on Edit Template Name option to open the page.
-
Enter a new name for the template in the Display Name text box.
-
Click Save to confirm renaming the template.
-
Verify that the new name is shown in the Display Name text box and associated to the Internal Name label.
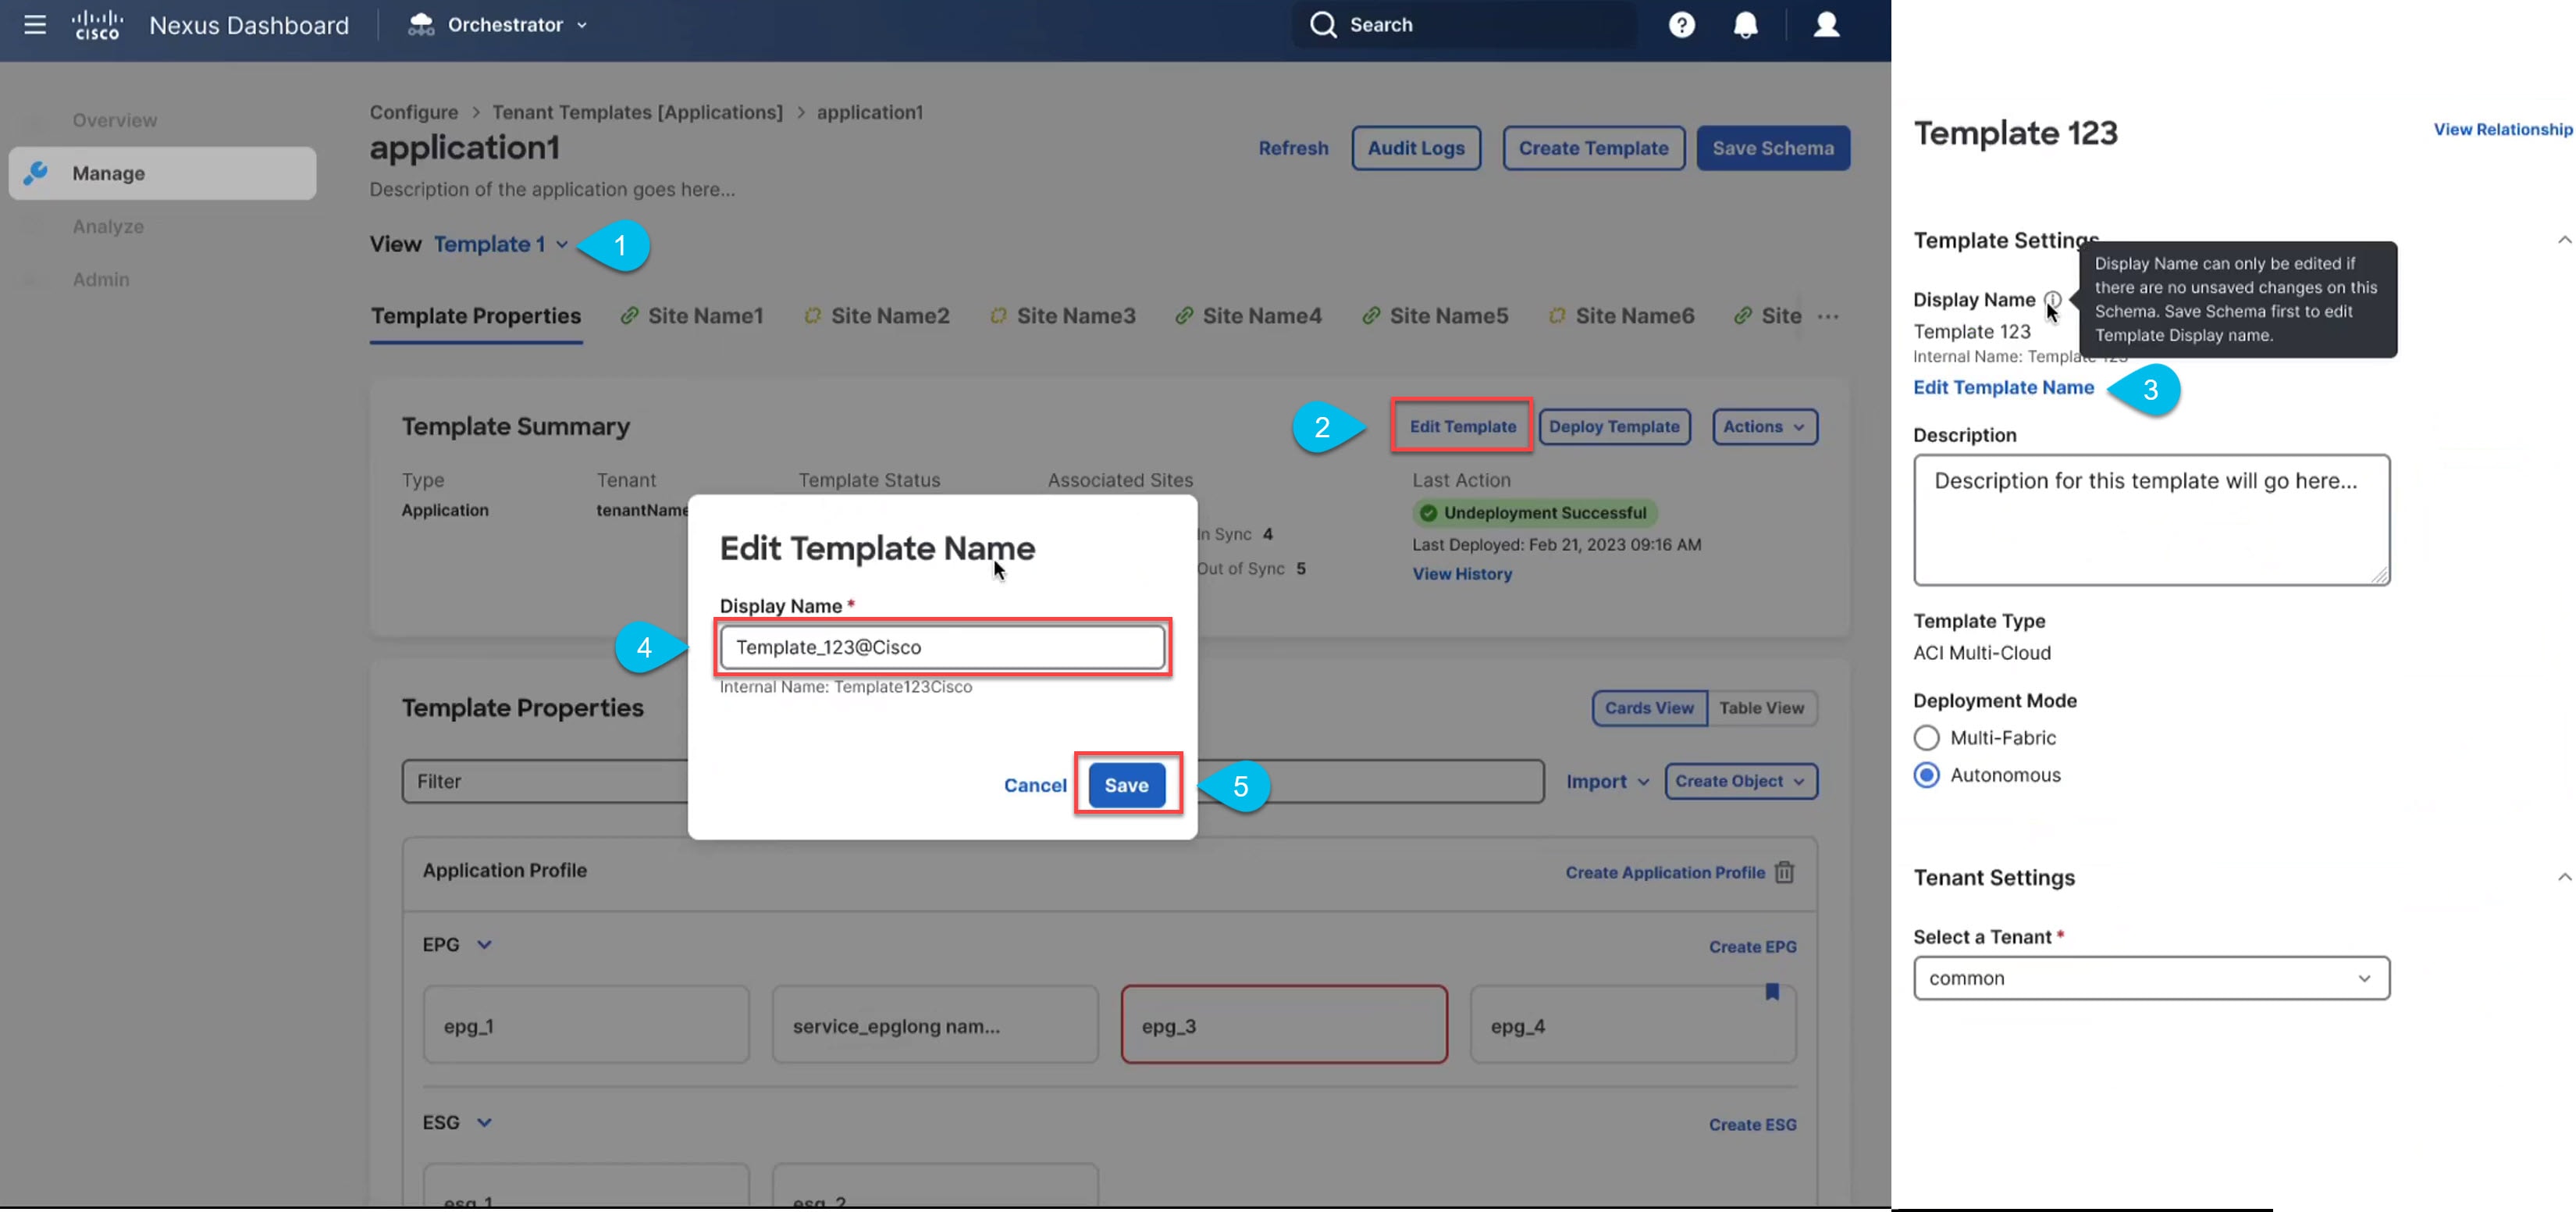 Renaming the Template
Assigning Templates to Fabrics
You must have the schema, template, and any objects you want to deploy to fabrics already created, as described in previous sections of this document.
This section describes how to assign a template to fabrics.
-
Navigate to the schema that contains one or more templates that you want to deploy.
-
In the left sidebar, select the template that you want to assign to fabrics.
-
In the Template Summary view, click Actions and choose Add/ Remove Fabrics.
The Add Fabrics to <template-name> page opens.
-
In the Add Fabrics page, check the checkbox next to the fabrics where you want to deploy the template.
Note that some fabrics may not be available for assignment depending on the type of the template you chose and the inter-fabric connectivity between fabrics:
-
When assigning templates to multiple fabrics, the inter-fabric connectivity between those fabrics must be established using BGP-EVPN protocol. If you select a fabric that has partial mesh connectivity, any fabric to which there is no inter-fabric connectivity or inter-fabric connectivity is established using BGP-IPv4 will be grayed out and unavailable for assignment.
-
Click Ok.
You deploy one template at a time, so you must associate the template with at least one fabric before you can deploy it.
-
Disassociating Template from Fabrics
-
The template and its configuration must already be deployed to a fabric.
-
The template must be deployed to a single fabric only and not stretched across fabrics.
-
The objects defined in the template must not be deployed as shadow objects in other fabrics.
You can choose to disassociate a template from a fabric without undeploying it. This allows you to preserve any configuration deployed to the fabric from Nexus Dashboard while removing the template-fabric association in the schema. The managed object and policy ownership is transferred from Nexus Dashboard to the fabric’s controller.
Disassociate is supported on all templates.
When you use the Disassociate Fabric operation in the orchestrator, understand its effect on different template types:
-
Templates that remain in the orchestrator: Application, fabric policy, fabric resource, service device, and tenant policy templates. Disassociating a fabric only removes the link to the fabric, so manually delete these templates for full removal.
-
Templates that are fully removed from the orchestrator: L3out and monitoring policy templates (for tenant SPAN and access SPAN). Disassociating a fabric completely removes these templates and all their associated objects.
-
Navigate to the Orchestration page.
Manage > Orchestration
-
Choose Tenant Templates > Applications.
-
Click on the schema that contains the template you want to disassociate.
-
In the Schema UI text view drop-down list, choose the template under the specific fabric from which you want to disassociate it.
-
From the Actions menu, choose Disassociate Fabric.
-
In the confirmation page, click Confirm Action.
-
Deploying Out of Sync Templates
-
You must have the schema, template, and any objects you want to deploy to Fabrics already created and the templates assigned to one or more Fabrics, as described in previous sections of this document.
-
If template review and approval is enabled, the template must also be already approved by the required number of approvers as described in Template Review and Approval.
-
You can deploy multiple templates and the deployment order is determined based on dependency. Ensure that you understand the required deployment order and object dependencies that are described in Schema and Template Design Considerations.
This section describes how to deploy new or updated policies to the ACI fabrics.
-
Navigate to the schema that contains the template that you want to deploy.
-
From the View dropdown menu, select the template you want to deploy.
-
In the template properties, click Deploy Template.
-
The Deploy template page opens that shows list of dependent templates that need to be successfully deployed in order to deploy this template. Here you can choose to deploy all the templates in one go, or deploy them individually:
-
To Deploy All Templates:
-
Click on Deploy Out of Sync Templates.
-
Nexus Dashboard will deploy all the templates based on their deployment sequence.
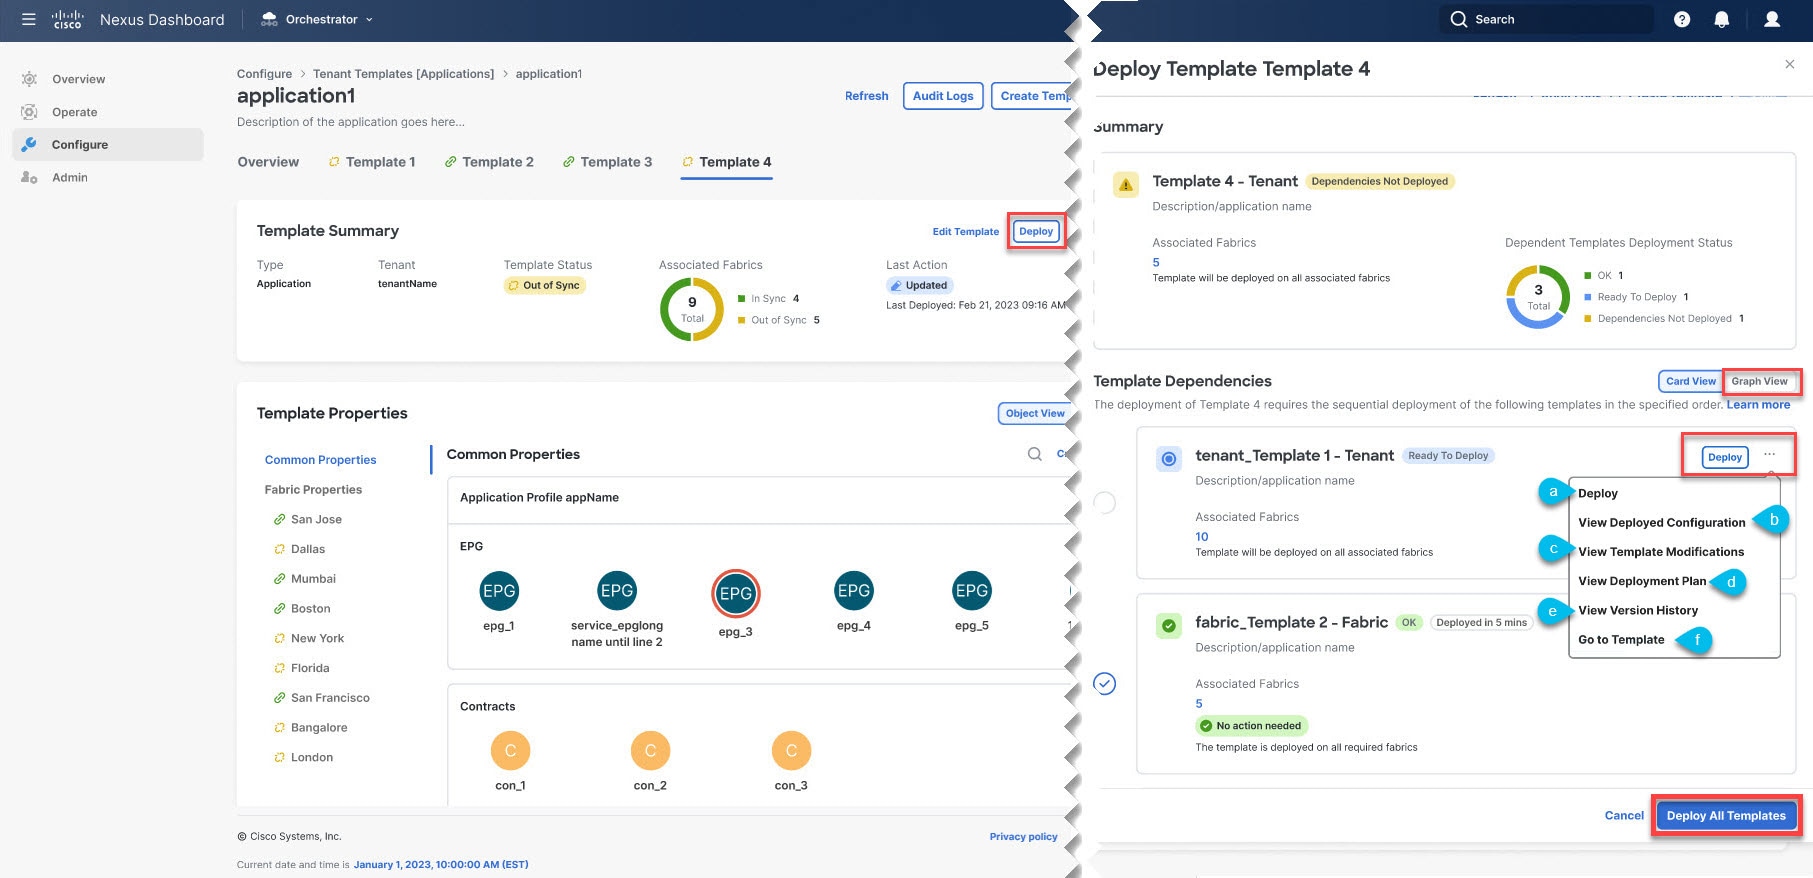 Deploy to fabric
Template dependencies are numbered in accordance of their deployment hierarchy, or in-order of their deployment sequence.
Color codes represent the individual template dependency status, implying:
-
Green: OK or Deployed
-
Orange: Dependent templates not deployed
-
Blue: Dependencies not Deployed.
-
-
-
To Deploy template dependency individually:
Individual deployment will not be successful unless the underlying dependencies are fulfilled. Here you can choose to deploy out-of-sync templates to ensure all the required dependencies are fulfilled.
-
Click on the three dots (…) at the top-right corner of the individual template dependency and/or select Deploy to deploy any individual template dependency.
-
Select View Deployed configuration to see graphical representation of comparison between what is already deployed to the Fabric and what’s defined in the template.
-
If you have made changes to your template, review the View Template Modifications to verify the new configuration.
You can also filter the view using the filter options like:
-
Created -
Modified -
Deleted -
Config Drift -
Migrated
Using checkboxes for informational purposes, but keep in mind that all of the changes are still deployed when you click Deploy.
-
-
Check the Deployment Plan to see a visualization and an JSON payload of the configuration that will be deployed from this template. This option will only show Ready to Deploy template dependencies.
This feature provides better visibility into configuration changes that the Orchestrator will provision to the different fabrics that are part of your Multi-Fabric domain after you make a change to the template and deploy it to one or more fabric.
The Deployment Plan provides full visibility into all the objects that the deployment of the template would provision across the different fabrics. For example, depending on what change you make, shadow objects may be created in multiple fabrics even if the specific change is applied to only a single fabric.
We recommend verifying your changes using the Deployment Plan as described in this step before deploying the template. The visual representation of the configuration changes can help you reduce potential errors from deploying unintended configuration changes.
(Optional) Click View Payload to see the JSON payload for each fabric.
In addition to the visual representation of the new and modified objects, you can also choose to Download Payload to review the changes in each fabric:
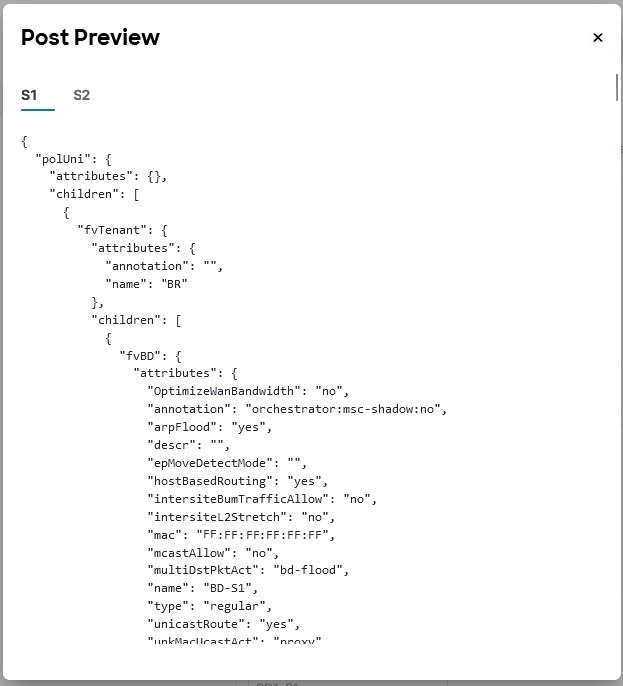 View Payload
 -
View Version History shows the complete version history and incremental changes made between versions. Additional information about version history is available in Viewing History and Comparing Previous Versions.
If you have previously deployed this template but made no changes to it since, the Re-Deploy Template button indicates that there are no changes and you can choose to re-deploy the entire template.
-
The Go to Template page takes you to the template page.
-
-
-
After you are done deploying the template, click the
Xicon to close the Deploy Template screen.The following screenshots show a simple example of adding a
consumercontract to an existing EPG (EPG1-S2) inS2.
In this case, only the difference in configuration is deployed to the fabric. If you want to re-deploy the entire template, you must deploy once to sync the differences and then redeploy again to push the entire configuration as described previously.
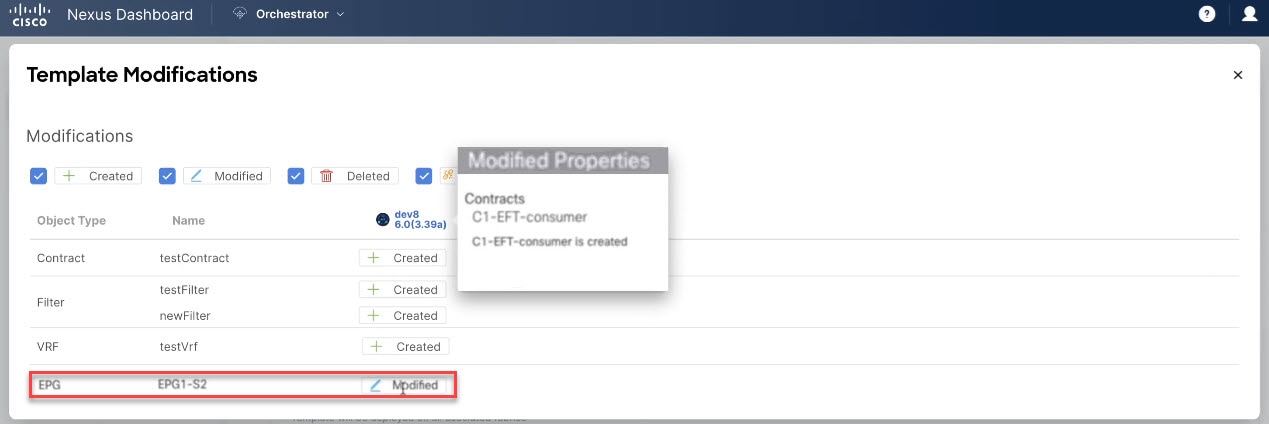 Template Status
-
Click the Deployment Plan button.
Here a consumer contract was added to an existing EPG in
S2, the Deployment Plan allows you to also see that there are additional changes to be deployed toS1as a result of the change toS2. -
Verify your changes in the first listed fabric.
Based on the highlighted legend, you can see that the Orchestrator will create the shadow objects in
S1that are required by the contract you added to an EPG inS2.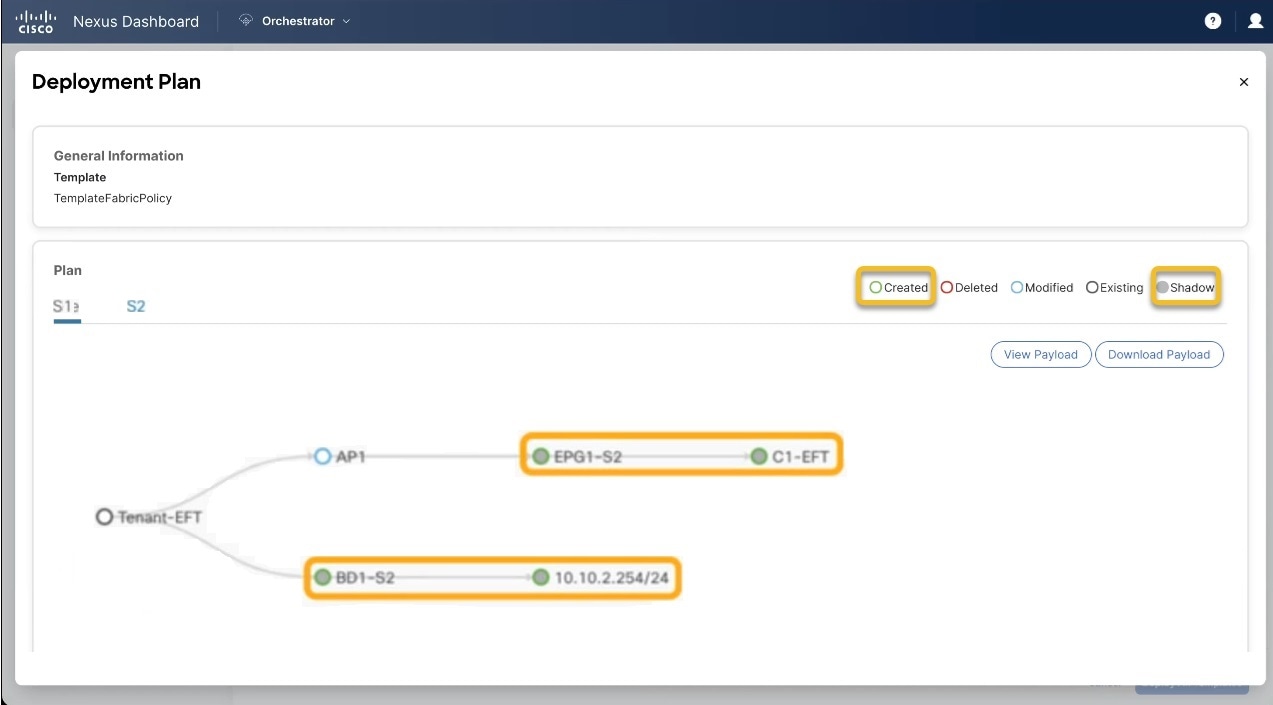
-
Repeat the previous substep to verify the changes in other fabric
Here you can see the change you made explicitly to the EPG (
EPG1-S2) inS2when you assigned the contract (C1-EFT) to it, as well as the shadow objects for the EPG (EPG1-S1) in the other fabric, which is providing that contract.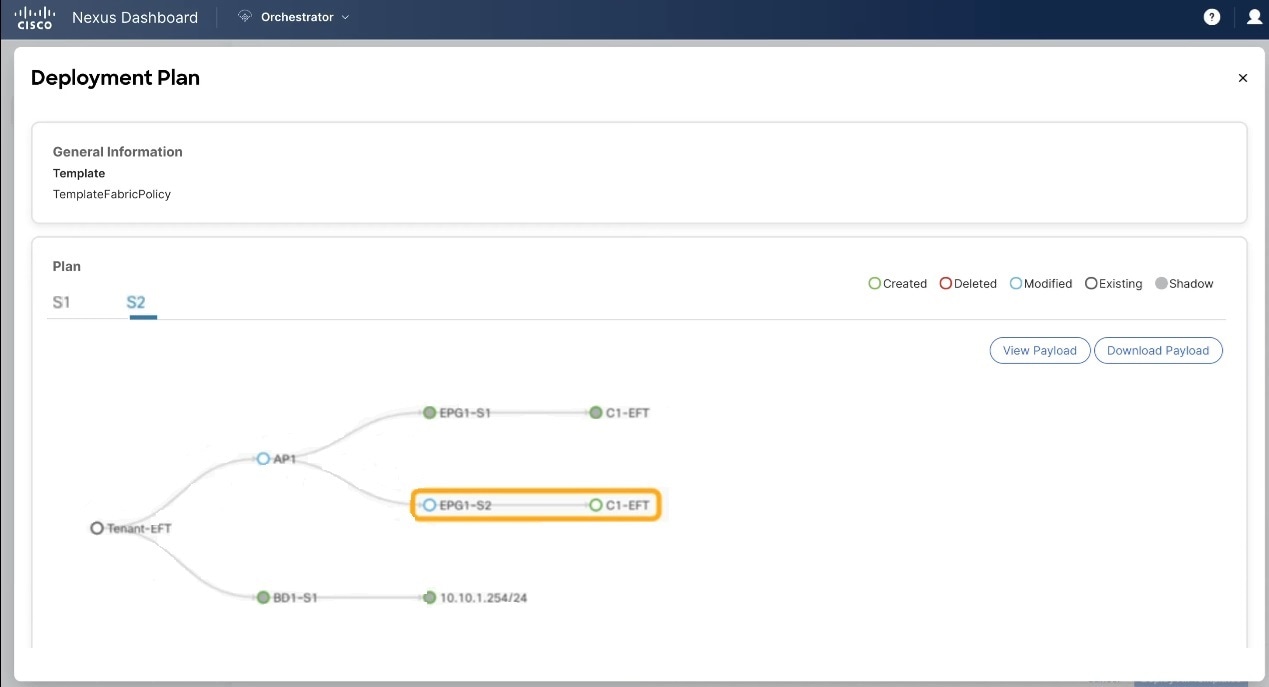
-
Undeploying templates
-
Ensure that you have not made any changes to the template since you last deployed it.
Undeploying a template that was modified since it was last deployed may create a configuration drift because the set of objects deployed with the template would be different than the set of objects you try to undeploy after making changes to the template.
-
If you are undeploying a template that contains VRFs that are used in route leak configurations, the route leaks must be deleted before you can undeploy that template.
This section describes how to undeploy a template from a fabric. Undeploying a template removes all configurations defined in that template from a specific fabric where the template is deployed.
This action removes managed objects (MOs) and their properties from the fabric’s controller and can disrupt the network connectivity that depends on those configurations.
-
Choose the schema that contains the template you want to undeploy.
-
From the View drop-down list, choose the template you want to undeploy.
-
From the Actions menu, click Undeploy template.
Remove fabrics from a template
-
Before removing a fabric from a template, undeploy the template from the fabric. This is required even for empty templates (templates without policies).
Follow these steps to remove fabrics from a template.
-
Navigate to the schema that contains the template you want to remove a fabric association.
-
Choose the template from the Overview drop-down list.
The Template Properties page appears.
-
In the Template Summary view, click Actions and choose Add/Remove Fabrics from the drop-down list.
-
In the Add Fabrics to template-name page, uncheck the check box next to the fabric you want to remove from the template association.
-
Click Ok.
Bulk Update for Template Objects
The bulk update feature allows you to update multiple properties on multiple different objects of the same type within a template at once. For example, you can enforce Infra EPG Isolation on two or more EPGs at the same time, instead of having to modify each object individually. When using this workflow, all selected objects must be of the same type, for example, you cannot choose to update an EPG and a BD simultaneously.
If the selected objects already have different property values configured on them, the update will overwrite those properties with the values you provide. This feature allows you update template-level object properties for on-premises; updating fabric-local properties is not supported.
This feature is supported for Application templates only with Cisco NDFC fabrics; it is not supported for other template types, or Cisco APIC.
-
Navigate to the schema and template that contains the objects you want to update.
-
From the main pane, choose Select. It will allow you to choose multiple objects of same type.
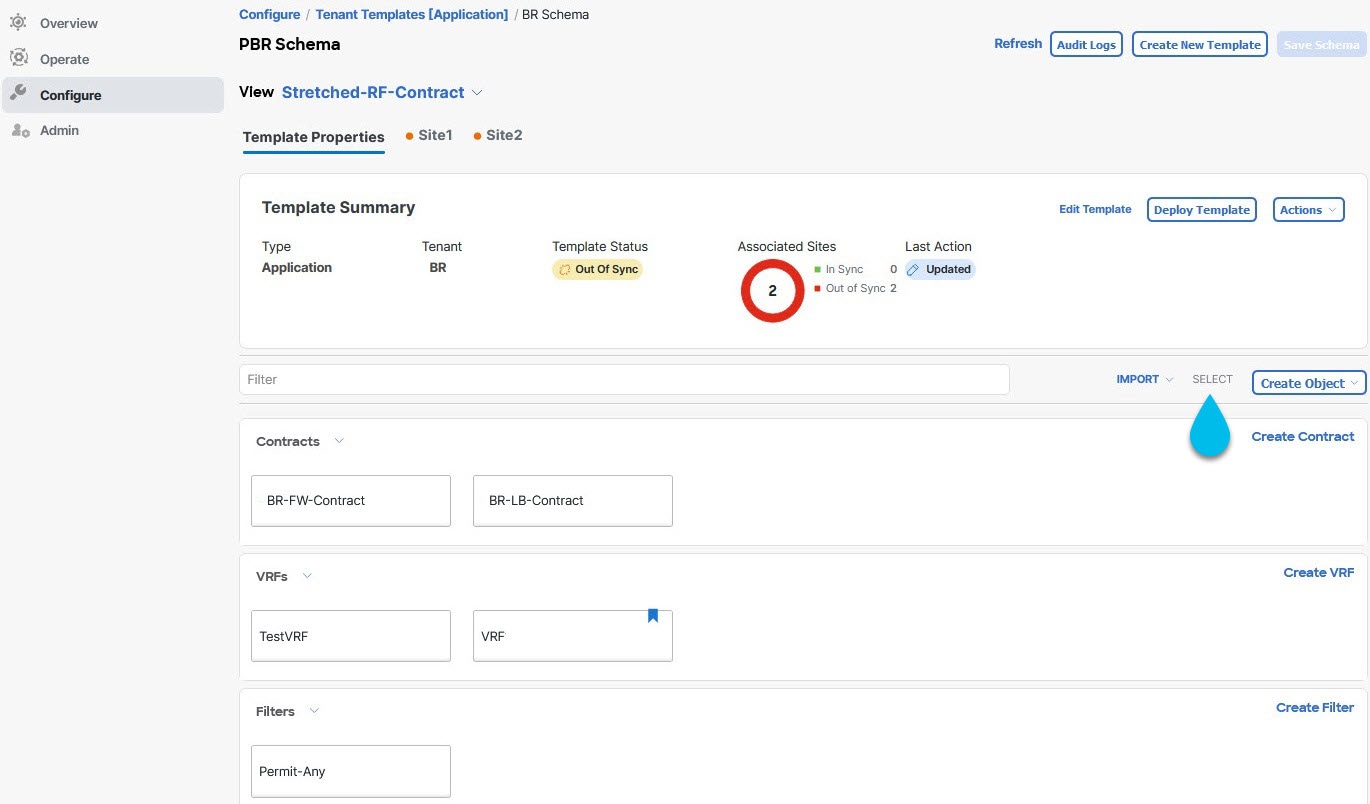
-
After selecting all the objects that you want to update.
-
Choose "…" right next to the cancel option.
-
From the dropdown Choose "Edit".
If you choose objects of different type, you won’t see the Edit option in the dropdown.
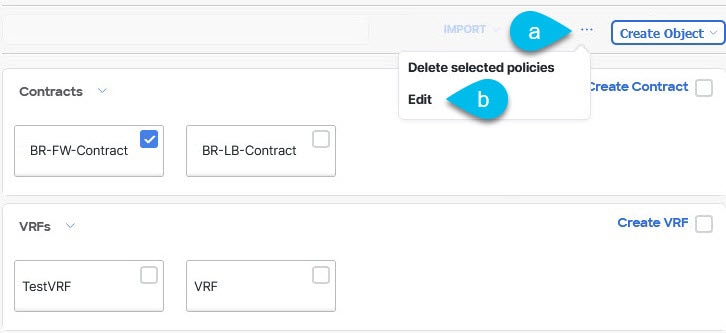
-
-
After choosing "Edit", a Bulk Update will show up. It will show you a subset of the properties for the objects you selected.
You can Select Properties the following properties based on the type of objects you selected.
-
EPG: Bridge Domain, Contract, EPG Type, Infra EPG, Preferred Group.
-
Contracts: Scope, Filter Chain, QOS Level.
-
VRF: IP Data-Plane Learning.
-
Bridge Domain: Virtual Routing and Forwarding, L2 Stretch, L2 Unknown Unicast, Unknown Multicast Flooding, IPv6 Unknown Multicast Flooding, Multi Destination Flooding, DHCP Policies, Unicast Routing.
-
External EPG: Contract, External EPG Type, Preferred Group.
-
-
After selecting all the fields, you wish to update. Choose "Save" which will implement the bulk update you just made.
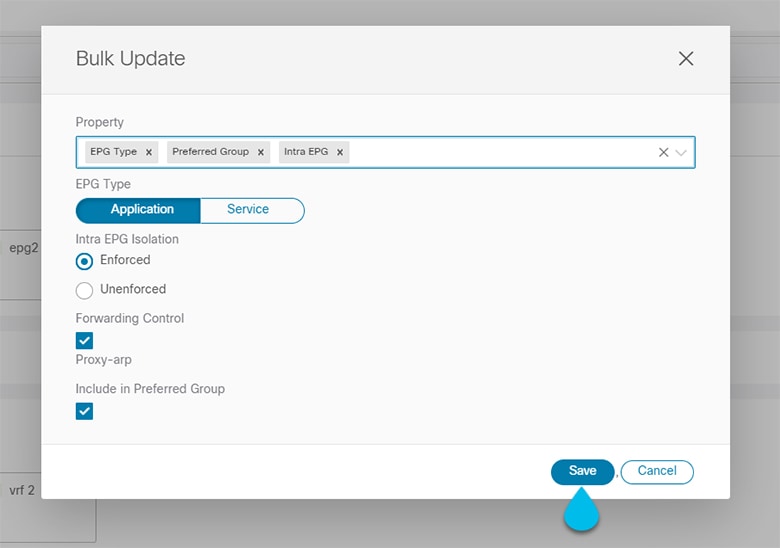
-
As you save the updates, you can see the changes you’ve made.
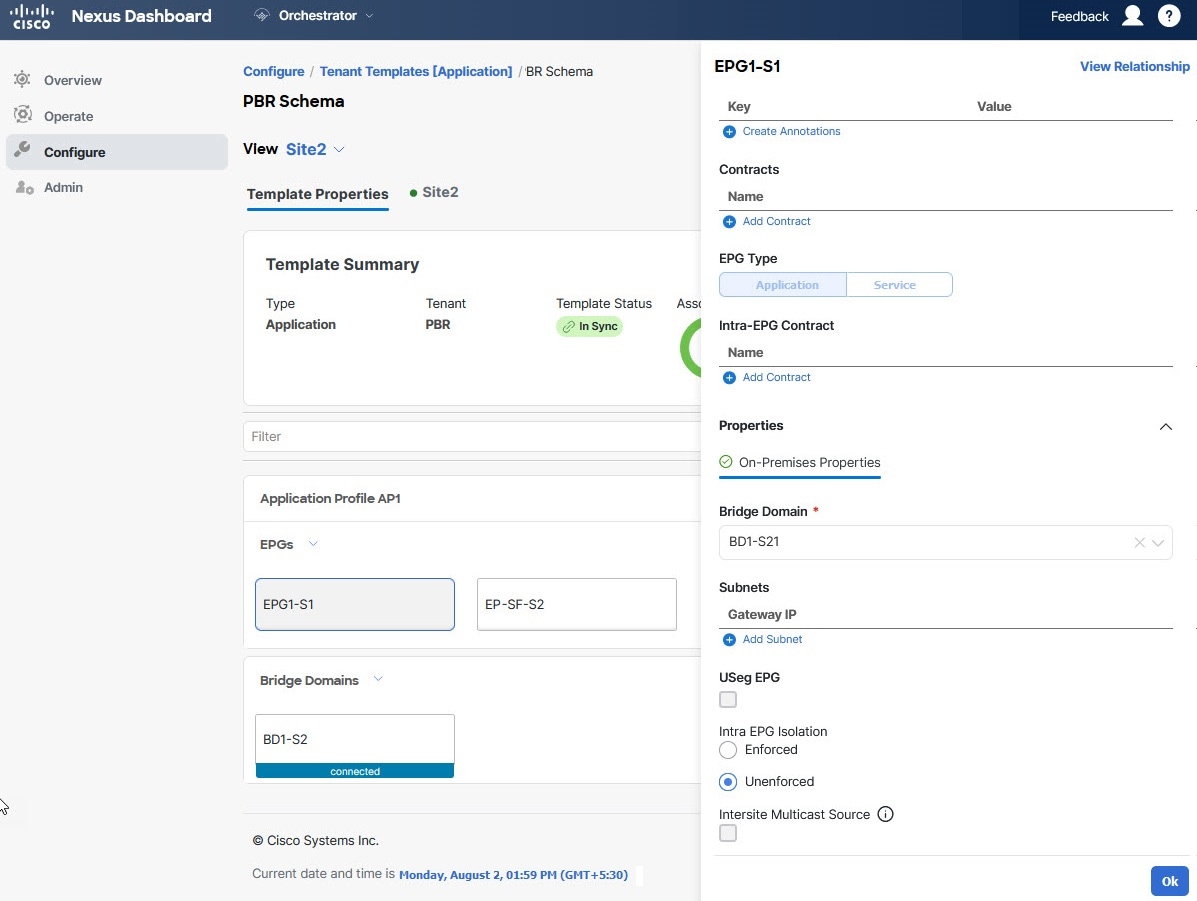
Template Versioning
A new version of the template is created every time it is saved. From within the Nexus Dashboard UI, you can view the history of all configuration changes for any template along with information about who made the changes and when. You can also compare any of the previous versions to the current version.
New versions are created at the template level, not schema level, which allows you to configure, compare, and roll back each template individually.
Template versions are created and maintained according to the following rules:
-
All template versions are either
DeployedorIntermediate.Deployed-versions of the template that have been deployed to fabrics.Intermediate-versions of the template that have been modified and saved, but not deployed to fabrics. -
A maximum of 20
Deployedand 20Intermediateversions per template can be stored at any given time. -
When a new
Intermediateversion is created that would exceed the 20 version limit, the earliest existingIntermediateversion is deleted. -
When a template is deployed and a new
Deployedversion is created, allIntermediateversions are deleted. If the newDeployedversion exceeds the 20 version limit, the earliest existingDeployedversion is deleted. -
Tagging a version
Goldendoes not affect the number of stored template versions. -
A template that is tagged
Goldencannot be deleted.You must untag the template first before you can delete it.
-
When a template is modified and saved or deployed, any versions that exceed the 20
Deployedand 20Intermediatescale are removed according to the above rules. -
When upgrading from a release prior to 4.0(1) to release 4.0(1) or later, only the latest versions of templates are preserved.
Tagging Templates
At any point you can choose to tag the current version of the template as "golden", for example for future references to indicate a version that was reviewed, approved, and deployed with a fully validated configuration.
-
Navigate to the Orchestration page.
Manage > Orchestration
-
Choose Tenant Templates > Applications.
-
Click the schema that contains the template you want to view.
-
In the Schema view, select the template you want to review.
-
From the template’s actions (…) menu, select Tag.
If the template is already tagged, the option will change to Un-Tag and allows you to remove the tag from the current version.
Any version that was tagged will be indicated by a star icon in the template’s version history screen.
Viewing History and Comparing Previous Versions
This section describes how to view previous versions for a template and compare them to the current version.
-
Navigate to the Orchestration page.
Manage > Orchestration
-
Choose Tenant Templates > Applications.
-
Click the schema that contains the template you want to view.
-
In the Schema view, select the template you want to review.
-
From the template’s actions (…) menu, select View Version History.
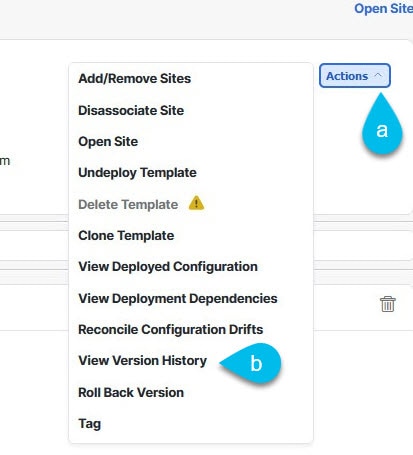 View Version History
 -
In the Version History page, make the appropriate selections.
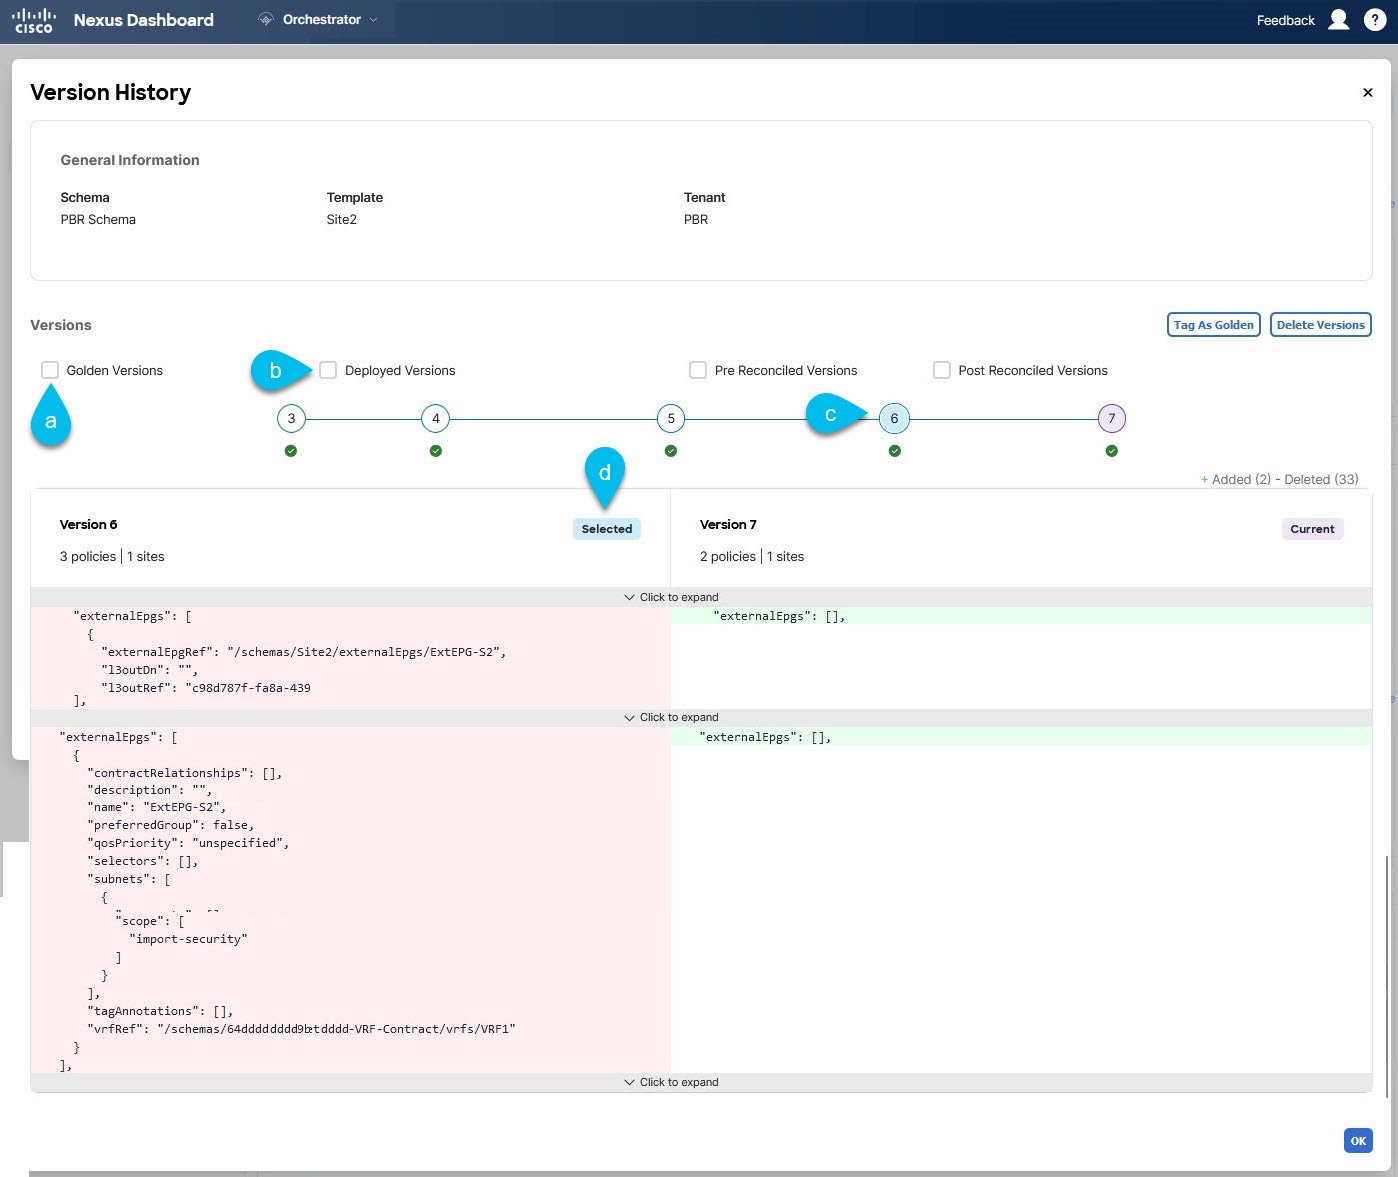 Version History
-
Enable the Golden Versions checkbox to filter the list of previous versions to display only the versions of this template that had been marked as
Golden.Tagging a template as "Golden" is described in Tagging Templates.
-
Enable the Deployed Versions checkbox to filter the list of previous versions to display only the versions of this template that had been deployed to fabrics.
A new template version is created every time the template is changed and the schema is saved. You can choose to only show the versions of the template that were actually deployed to fabrics at some point.
-
Click on a specific version to compare it to the current version.
The version you select is always compared to the current version of the template. Even if you filter the list using the Golden Versions or Deployed Versions filters, the current version will always be displayed even if it was never deployed or tagged as golden.
-
Mouse over the Edit icon to see information about who created the version and when.
-
Enable the Pre Reconciled Versions checkbox to filter the list of previous versions to display only the versions of this template that had been marked as
Reconciled -
Enable the Post Reconciled Versions checkbox to filter the list of previous versions to display only the versions of this template that had been marked as
Reconciled
-
-
Click OK to close the version history page.
Reverting Template to Earlier Version
This section describes how to restore a previous version of the template. When reverting a template, the following rules apply:
-
If the target version references objects that are no longer present, restore operation will not be allowed.
-
If the target version references fabrics that are no longer managed by Nexus Dashboard, restore operation will not be allowed.
-
If the current version is deployed to one or more fabrics to which the target version was not deployed, restore operation will not be allowed.
You must first undeploy the current version from those fabrics before reverting the template.
-
If the target version was deployed to one or more fabrics to which the current version is not deployed, restore operation is allowed.
-
Navigate to the Orchestration page.
Manage > Orchestration
-
Choose Tenant Templates > Applications.
-
Click the schema that contains the template you want to view.
-
In the Schema view, select the template you want to review.
-
From the Actions (…) menu, select Rollback Versions.
-
In the Rollback page, select one of the earlier versions to which you want to restore.
You can filter the list of versions using the Golden Versions, Pre Reconciled Versions, Post Reconciled Versions, and Deployed Versions checkboxes.
When you select a version, you can compare the template configuration of that version to the current version of the template.
-
Click Restore to restore the selected version.
When you restore a previous version, a new version of the template is created with the same configuration as the version you selected in the previous step.
For example, if the latest template version is
3and you restore version2, then version4is created that is identical to the version2configuration. You can verify the restore by browsing to the template version history and comparing the current latest version to the version you had selected during restore, which should be identical.If template review and approval (change control) is disabled and your account has the correct privileges to deploy templates, you can deploy the version to which you reverted.
However, if change control is enabled, then:
-
-
If you revert to a version that had been previously deployed and your account has the correct privileges to deploy templates, you can immediately deploy the template.
-
If you revert to a version that had not been previously deployed or your account does not have the correct privileges to deploy templates, you will need to request template approval before the reverted version can be deployed.
Additional information about review and approval process is available in the Template Review and Approval section.
Template Review and Approval
Template review and approval (change control) workflow allows you to set up designated roles for template designers, reviewers and approvers, and template deployers to ensure that the configuration deployments go through a validation process.
From within the Nexus Dashboard UI, a template designer can request review on the template they create, and also approve their own designed templates. Then reviewers can view the history of all configuration changes for the template along with information about who made the changes and when, at which point they can approve or deny the current version of the template. If the template configuration is denied, the template designer can make any required changes and re-request review; if the template is approved, it can be deployed to the fabrics by a user with Support Engineer role. Finally, the deployers themselves can deny deployment of an approved template and restart the review process from the beginning. Once deployed, the user with Support Engineer role cannot deny their own deployed template. You can redeploy or if any edits are made on the template, the approval process must be completed before a new deployment.
The workflow is done at the template level, not schema level, which allows you to configure, review, and approve each template individually.
Enabling Template Approval Requirement
Before you can use the review and approval workflow for template configuration and deployment, you must enable the feature in the Nexus Dashboard’s system settings.
-
From the left navigation menu, choose Admin > System Settings > Fabric Management.
-
On the Change control tile, click Edit.
-
In the Change control page, check the Enable change control check box to enable the feature.
-
Check the Enable for Orchestration check box.
-
In the Required number of approvers field, enter the number of unique approvals required before the templates can be deployed.
-
Check the Allow self approval/deploy check box to enable self approvals.
-
Click Save to save the changes.
Create Users with Required Roles
Before you can use the review and approval workflow for template configuration and deployment, you must create the users with the necessary privileges in Nexus Dashboard.
-
From the main navigation menu, choose Admin > Users and Security.
-
Click the Users tab.
-
In the main pane, click Create local user.
-
Create the required users.
The workflow depends on three distinct user roles: template designer, approver, and deployer. You can assign each role to a different user or combine the roles for the same user; users with
Observerprivileges can only view the screens.In addition to the default
Observeruser role:-
Designershould be used when the designer needs to make changes to templates associated only to a specific tenant (or a subset of tenants). In this case, the user should be mapped to the specific tenants. -
Designershould be used when the designer needs to make changes to templates assigned to them.In contrast to the
Designerrole, there are pre-definedApproverandSupport Engineerroles on the Nexus Dashboard that can be associated to the users.ApproverandSupport Engineerroles are not bound to specific tenant(s) by design. However, when creating a user role with both designer and approver (or designer and deployer) rights, follow the same guidelines as listed above.Detailed information about configuring users and their privileges for local or remote Nexus Dashboard users is described in the Configuring Users and Security.
You must have at least as many unique users with
Approverrole as the minimum number of approvals required, which you configured in Enabling Template Approval Requirement.
If you disable the Change Control Workflow feature, an
Approveruser will have read-only access to the Nexus Dashboard. But aSupport Engineercan continue to deploy templates.
-
Requesting Template Review and Approval
You must have:
-
Enabled the global settings for approval requirement, as described in Enabling Template Approval Requirement.
-
Created or updated users in Nexus Dashboard with
ApproverandSupport Engineerroles, as described in Create Users with Required Roles. -
Created a template with one or more policy configurations and assigned it to one or more fabrics.
This section describes how to request template review and approval.
-
Log in to your Nexus Dashboard GUI as a user with the
DesignerorSuper Administratorrole. -
If you assigned the
Designerrole, associate the user with the tenants.
If you used the
Super Administratorrole, skip this step.
If you assign the
Super Administratorrole, you must also associate the user with the specific tenants they will manage. This is a one-time activity.-
From the left navigation menu, choose Manage > Orchestration > Tenants.
-
Select the tenant which the user will manage.
-
Check the box next to the designer user you created in Nexus Dashboard.
-
Repeat this step for all other tenants the user will manage.
-
-
From the left navigation menu, select Configure > Tenant Template.
-
Click the schema that contains the template for which you want to request approval.
-
In the schema view, select the template.
-
In the main pane, click Send for Approval.
Note that the Send for Approval button will not be available in the following cases:
-
The global change control option is not enabled
-
The template has no policy configurations or is not assigned to any fabrics
-
Your user does not have the right permissions to edit templates
-
The template has already been sent for approval
-
The template was denied by the approver user
-
Reviewing and Approving Templates
You must have:
-
Enabled the global settings for approval requirement, as described in Enabling Template Approval Requirement.
-
Created or updated users in Nexus Dashboard with
ApproverandSupport Engineerroles, as described in Create Users with Required Roles. -
Created a template with one or more policy configurations and assigned it to one or more fabrics.
-
Had the template approval requested by a designer, as described in Requesting Template Review and Approval.
This section describes how to request template review and approval.
-
Log in to your Nexus Dashboard GUI as a user with the
ApproverorObserverrole. -
Navigate to the Orchestration page.
Manage > Orchestration
-
Choose Tenant Templates > Applications.
-
Click the schema that contains the template you want to review and approve.
-
In the schema view, select the template.
-
In the main pane, click Approve.
If you have already approved or denied the template, you will not see the option until the template designer makes changes and re-sends the template for review again.
-
In the Approving template page, review the template and click Approve.
The approval screen will display all the changes which the template would deploy to the fabrics.
You can click View Version History to view the complete version history and incremental changes made between versions. Additional information about version history is available in the "Viewing History and Comparing Previous Versions" section in Templates Overview and Operations.
You can also click Deployment Plan to see a visualization and a JSON of the configuration that would be deployed from this template. The functionality of the "Deployment Plan" view is similar to the "Deployed View" for already-deployed templates, which is described in Viewing Currently Deployed Configuration.
Configuration drifts
Occasionally, you may run into a situation where the configuration deployed to an APIC fabric differs from the configuration you defined for that fabric in Orchestrator. These discrepancies are called configuration drifts, and Orchestrator flags them with an Out of sync warning on the Templates page, as shown in the following figure.
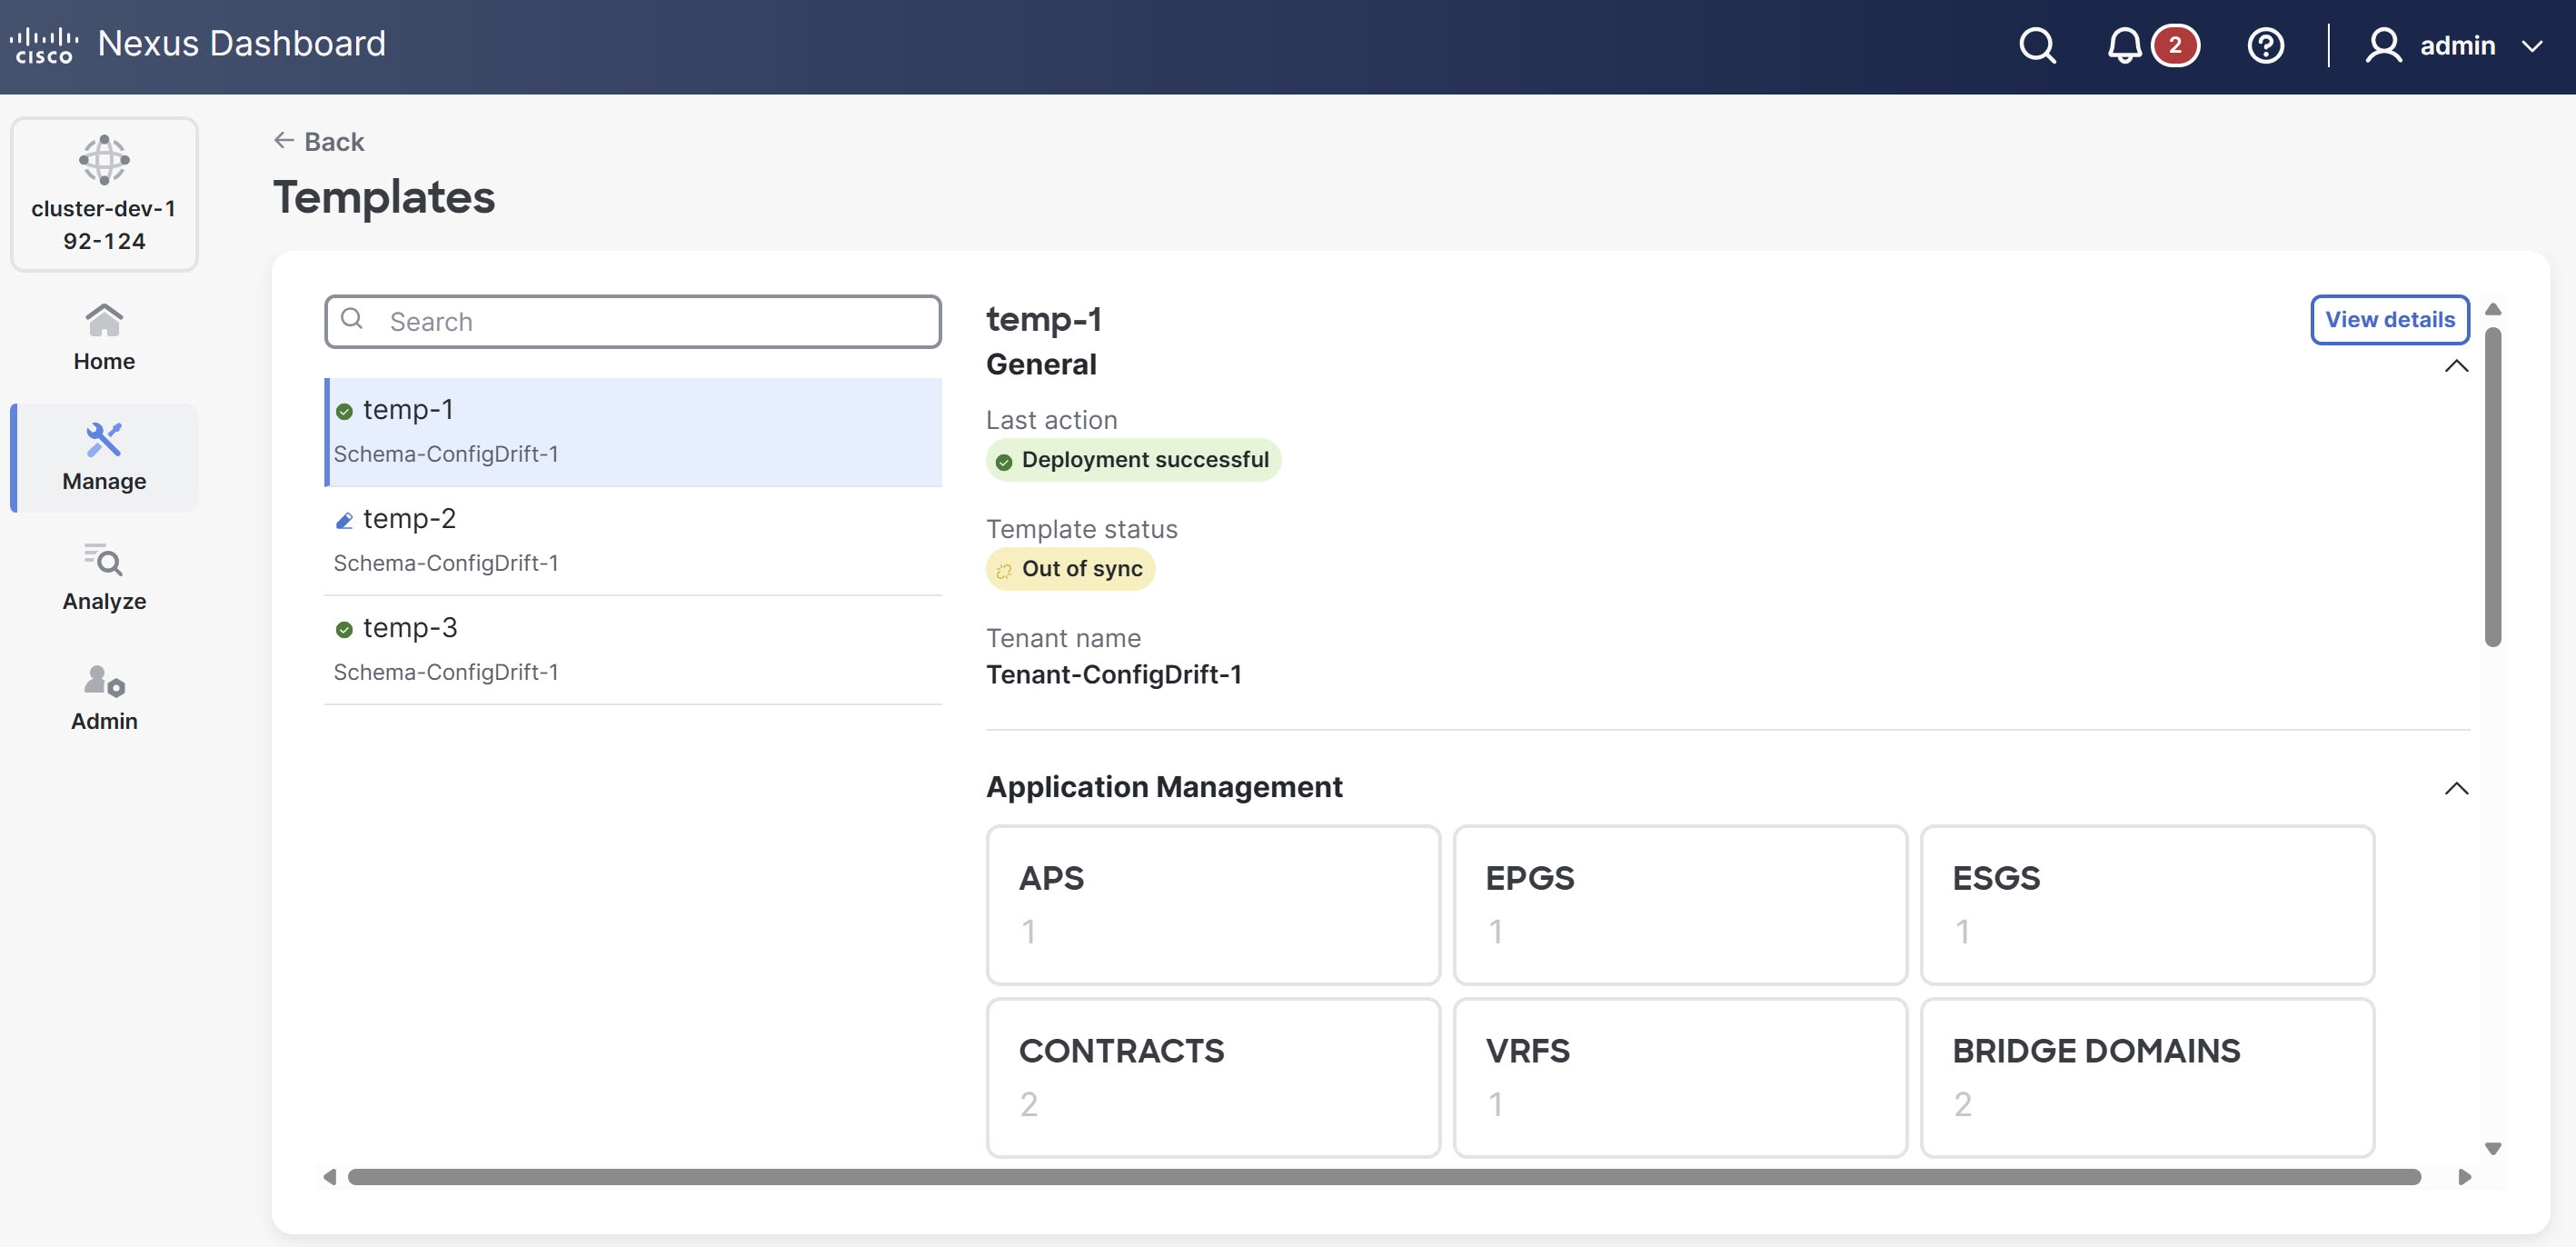
Orchestrator detects a configuration drift whenever the configuration you define in a template diverges from the configuration present on the APIC.
Orchestrator supports drift detection for Application templates, including supported top-level objects (such as VRFs, bridge domains, EPGs, ESGs, external EPGs, contracts, and filters) and their nested properties (such as subnets, contract relationships, static ports, domain associations, uSeg attributes, EPG selectors, and filter entries).
The following table details the parent objects and their supported nested properties for drift detection in Application templates.
| Parent object | Supported nested properties |
|---|---|
|
VRF |
vzAny provider/consumer contracts, route-leak handling (External Prefixes and Subnets), BGP route target address (site-local), L3 Multicast |
|
Bridge Domain (BD) |
Subnets, L3Out associations, DHCP labels (tenant-owned), DHCP option-label relationships, IGMP interface/snoop policy refs, MLD snoop policy ref, L3 Multicast |
|
Contract |
Filter relationships (under existing subject) |
|
Filter |
Filter entries |
|
EPG |
Subnets, provider/consumer/intra-EPG contracts, static leafs, static ports, domain associations, uSeg attributes (MAC, IP, VM, and DNS filters), QoS ref |
|
ESG |
Provider/consumer/intra-ESG contracts, EPG selectors |
|
External EPG / Instance profile |
External subnets (extSubnets), provider/consumer contracts, QoS priority |
When Orchestrator detects a drift, it marks the affected template Out of sync and displays a Config Drift indicator on the Deploy view. You can hover over the indicator and choose View details to view a detailed comparison of the configuration you defined in Orchestrator against the configuration currently on the APIC. From there, you can launch the drift reconciliation workflow to resolve the differences—either by accepting the APIC changes to update the Orchestrator template or by redeploying the Orchestrator configuration to overwrite the changes on the APIC.
-
Beginning with release 4.3.1, Nexus Dashboard detects drift for a wider set of nested properties under Application templates, including EPG/BD subnets, bridge domain DHCP labels, EPG static ports, and contract relationships between EPGs. However, Nexus Dashboard does not currently detect drift for the following.
-
Service graph and service chaining objects
-
Objects that Nexus Dashboard does not model (such as APIC-only L3Out components like node profiles within Application templates)
-
IPv6 PIM (pimIPV6CtxP) configurations
-
For properties not covered by automatic drift detection, you can check for configuration drift manually by running the drift reconciliation workflow. For more information, see Reconcile configuration drift in application templates.
When you deploy a template from Orchestrator, it suppresses drift notifications for objects in that template for 60 seconds. Orchestrator does not detect any configuration changes you make directly on the APIC during this window as drift.
Causes of configuration drift
Configuration drifts can occur for several reasons, and the steps required to resolve a drift depend on its cause. The following are the most common scenarios and how to resolve them.
-
Configuration changes in Orchestrator — When you modify a template in the Orchestrator GUI for policies that are already deployed to the APIC, Orchestrator reports the change as a configuration drift until you deploy the updated configuration to the fabrics.
To resolve this type of configuration drift, either deploy the template to apply the changes to the fabrics or revert the changes in the schema.
-
Direct changes on the APIC — Although the APIC marks objects deployed from Orchestrator with a warning icon and text, an admin user can still modify those objects directly, which causes a configuration drift.
Each time someone modifies an object on the APIC, the APIC sends a notification to Orchestrator. When Orchestrator receives the notification, it starts a 30-second timer to allow additional notifications to arrive. When the timer expires, Orchestrator calls the APIC API to retrieve detailed information about all the modified objects and then displays a drift indicator in the UI for every template that contains those objects. One exception applies: when Orchestrator deploys the configuration for all or a subset of the objects in a template, Orchestrator ignores any APIC notifications about those specific objects for 60 seconds and therefore does not display a drift indicator during that window.
-
Configuration restore from a backup — When you restore a backup, Orchestrator restores only the objects and their state as they existed when you created the backup; it does not automatically redeploy the restored configuration. If you modified the configuration on the APIC after creating the backup, restoring the backup creates a configuration drift.
-
Configuration restore from an earlier release backup — If the newer release adds support for object properties that the earlier release did not support, these properties may trigger a configuration drift warning. This typically happens when someone modifies the new properties directly on APIC and the values differ from the defaults that Orchestrator assumes.
-
Orchestrator upgrade from an earlier release — This scenario is similar to the previous one. If the new release adds new object properties, your existing configuration may show a drift.
Cisco recommends that you check for configuration drifts regularly and, when necessary, run the Reconcile Drift workflow for affected templates. This workflow gives you greater visibility into the cause of the drift and helps you reconcile it. This recommendation applies to all the drift scenarios described in this section.
Reconcile configuration drift in application templates
You can use the drift reconciliation workflow to compare the configuration defined in a Orchestrator template with the configuration on the APIC controllers of the fabrics in your multi-fabric domain. This workflow gives you visibility into changes made in either Orchestrator or on the APIC, and allows you to choose how to resolve the drift.
Drift reconciliation covers supported top-level objects in Application templates (such as ESGs, EPGs, BDs, VRFs, contracts, filters, and external EPGs) and their nested properties (such as subnets, contract relationships, static ports, and domain associations).
Guidelines and limitations
Before you reconcile configuration drift, review the following guidelines and limitations.
-
Supported scope — Drift reconciliation applies only to objects and properties that Orchestratormodels. Objects modified directly on the APIC that Orchestrator does not model (for example, service graph configurations, unsupported domains, or IPv6 PIM properties) cannot be reconciled through this workflow.
-
Saving changes — Orchestrator updates and saves the template only after you click Save or Deploy at the end of the reconciliation workflow. To undo any choices you made during the workflow, close and reopen the schema to restore the original configuration, then run the workflow again.
-
Choosing the Orchestrator configuration — When you choose the Orchestrator configuration during reconciliation, Orchestrator retains its existing template settings. Orchestrator does not delete nested objects that were created directly on the APIC. For example, if you add a subnet directly on the APIC under a BD that Orchestrator owns, choosing the Orchestrator configuration does not remove that subnet from the APIC.
-
Choosing the APIC configuration — If the APIC contains an object that did not originate from Orchestrator, choosing the APIC configuration imports that object into Orchestrator. On the next deployment, Orchestrator designates the object as Orchestrator-owned.
-
Skipping reconciliation — If you deploy the template without reconciling drift, Orchestrator pushes its configuration to the APIC but does not delete nested objects that were created directly on the APIC. For example, if you add a subnet directly on the APIC under a BD that Orchestrator owns, deploying the template does not remove that subnet.
Follow these steps to reconcile configuration drifts in templates.
-
Navigate to the Tenant templates page.
Go to Manage > Orchestration > Tenant templates.
-
Under the Applications tab, click the schema that contains the template you want to check for configuration drifts.
-
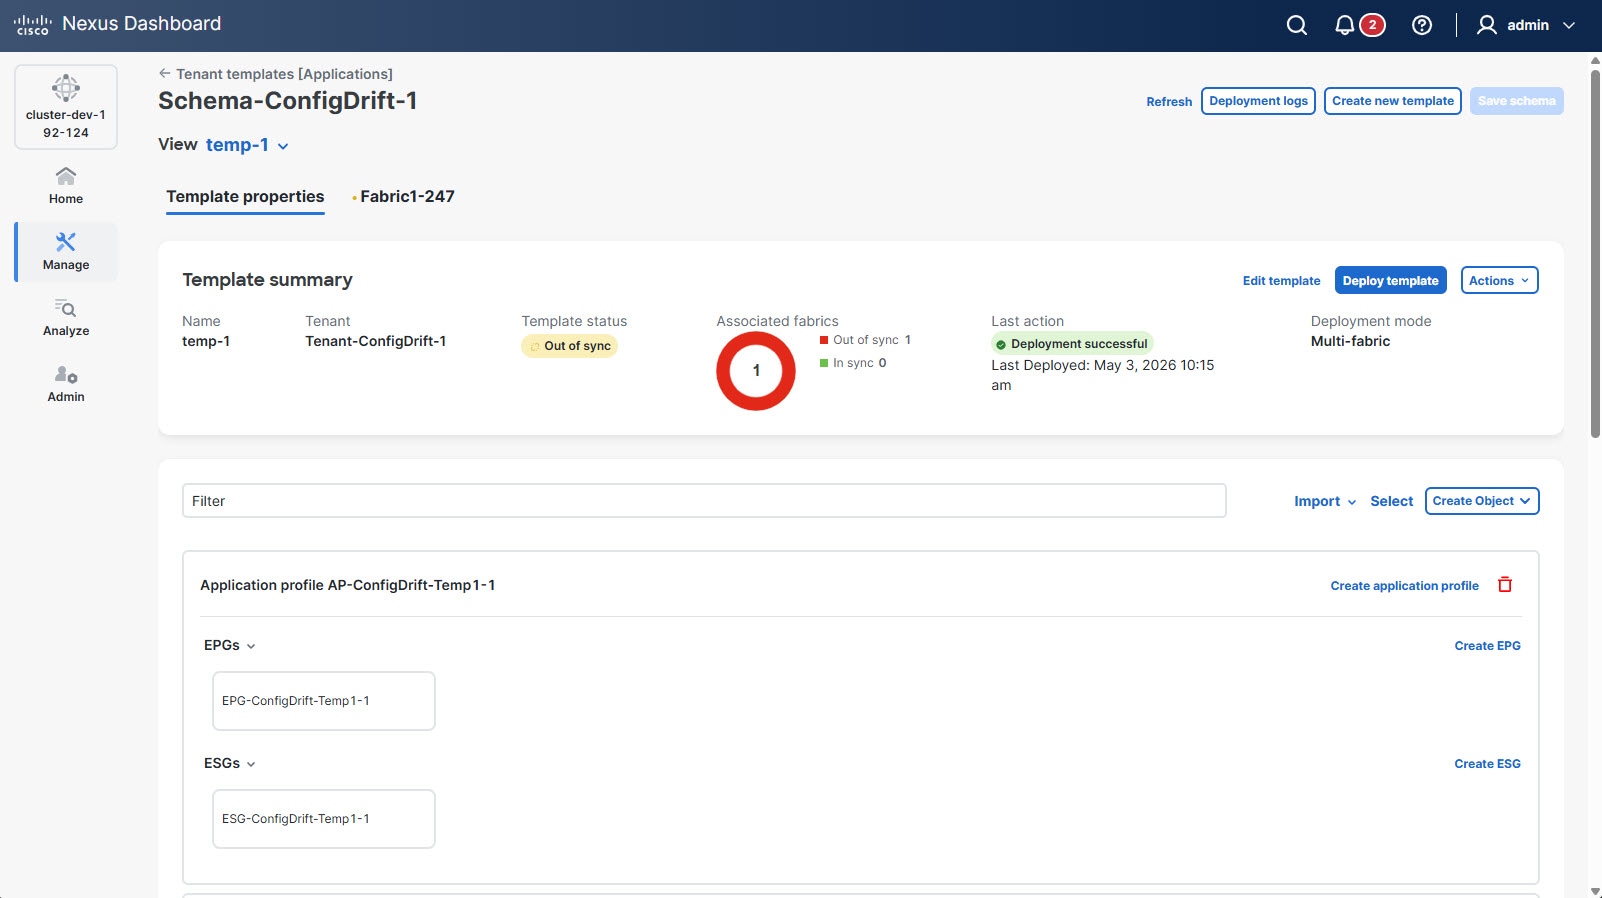
From the View Overview drop-down list, choose the template.
The Template properties page appears.
-
From the Actions drop-down list, choose Reconcile configuration drifts.
The Drift Reconciliation page appears.
-
In the Drift Reconciliation page, compare the template-level configurations for each fabric and choose the configuration you want to keep.
Template-level properties apply to all fabrics associated with the template. Compare the template-level properties in Orchestrator with the configuration on each fabric, and decide which set should become the new template configuration.
-
Choosing the fabric configuration modifies those properties in the Orchestrator template.
-
Choosing the Orchestrator configuration leaves the Orchestrator template settings unchanged.
-
-
Click Go to fabric specific properties to switch to fabric-level configuration.
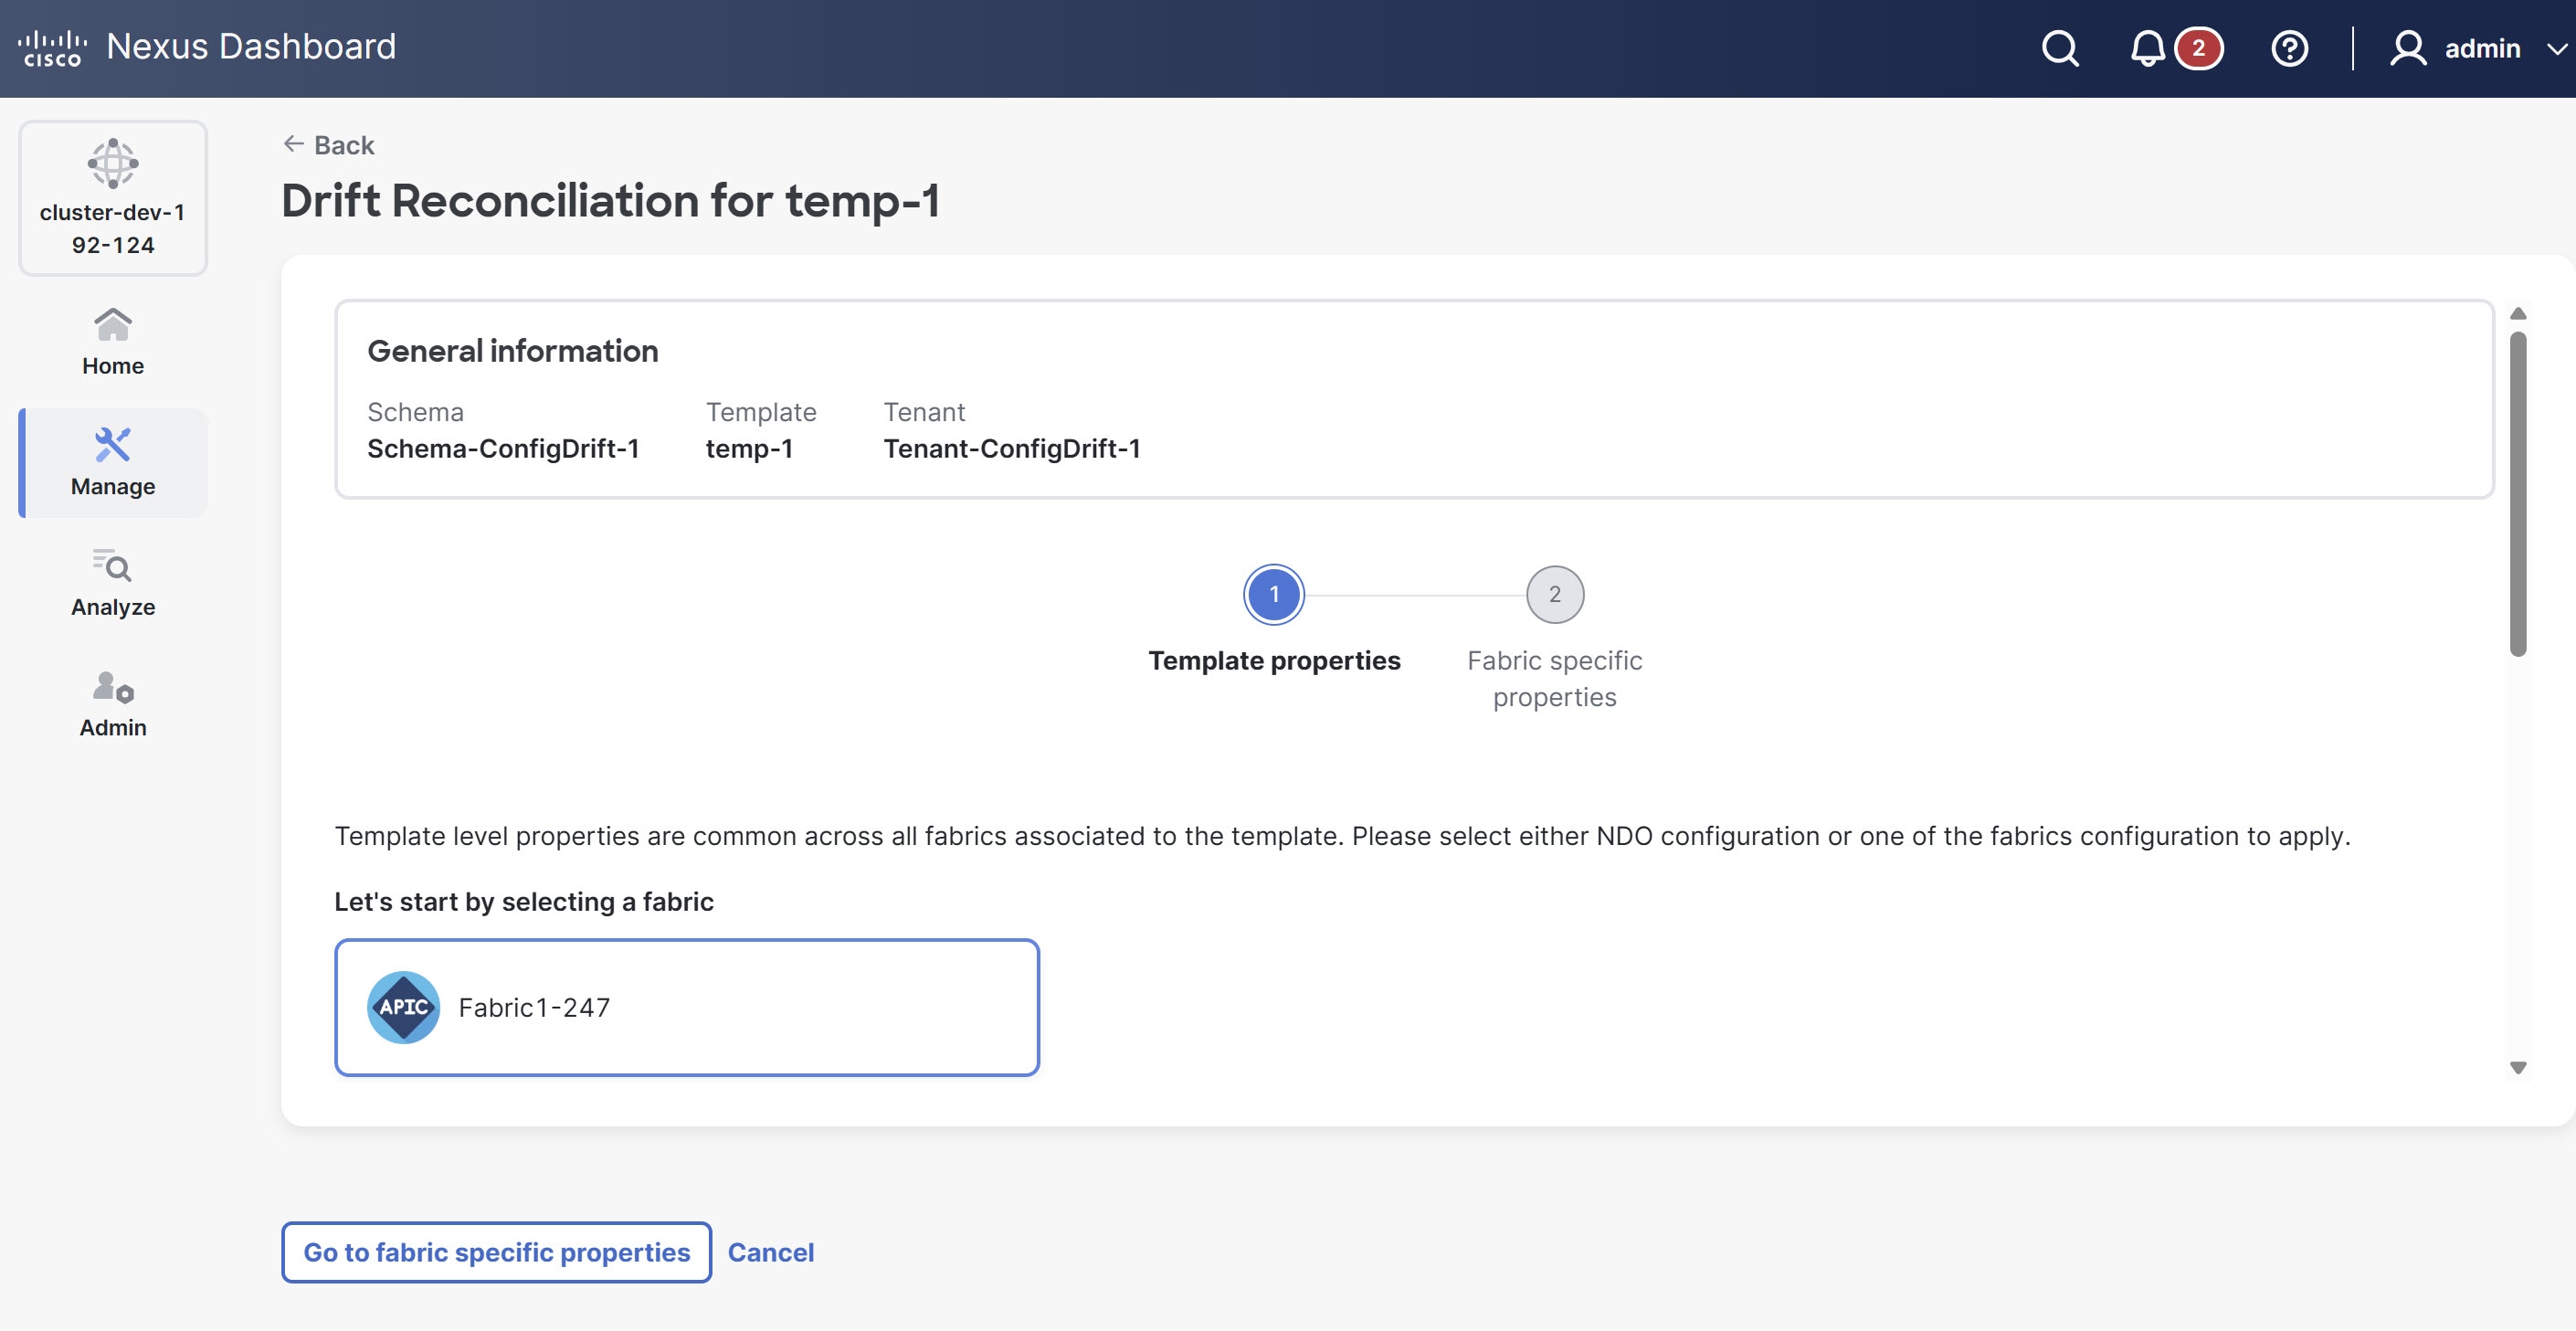
You can choose a fabric to compare its specific configuration. Unlike template-level configuration, you can independently choose either the Orchestrator-defined configuration or the existing fabric configuration for each fabric. Your selection becomes the template’s fabric-local properties for that fabric.
In most cases, you make the same selection at both the template level and the fabric level. However, you can also choose different sources at each level — for example, the APIC configuration at the Template Properties level and the Orchestrator configuration at the Fabric Local Properties level, or the opposite combination.
-
Click Preview changes to verify your choices.
The preview displays the full template configuration based on the choices you made in the Drift Reconciliation page.
-
Click Deploy to fabrics to deploy the reconciled configuration and resolve the drift.
APIC configuration using Nexus Dashboard API Broker
Nexus Dashboard as an API Broker centralizes APIC configuration management. It operates in APIC Proxy Mode, allowing you to directly import, push, retrieve, and manage APIC Managed Objects (MOs) through API calls. Only Super-Admin users can access this functionality.
Use Nexus Dashboard as API Broker to: * Push custom APIC configurations. * Edit or add fields to existing APIC MOs. * Centralize APIC configuration deployments.
Configure APIC Proxy Mode
The APIC Proxy Mode defines how Nexus Dashboard authenticates to your APIC instances when using the API Broker. This setting impacts the credentials used for API calls.
-
Navigate to Admin > System Settings > Fabric Management page.
-
Click Edit in Management.
The Management page appears.
-
From APIC Proxy Mode choose one of the following options:
-
Proxy with ND Service User: Nexus Dashboard uses its internal service account credentials to authenticate with APIC. This provides a consistent identity for API Broker operations.
-
Disable: APIC Proxy Mode is turned off. The Nexus Dashboard as API Broker feature may not function if this mode is disabled.
-
Proxy with remote users credential (default): Nexus Dashboard uses the credentials you provide for the remote APIC instances to authenticate. This is the default behavior and means the API Broker acts as a pass-through for your specified APIC credentials.
-
Accessing the APIC API Proxy page
You can access the APIC API Proxy page to view the endpoints.
-
Go to the Nexus Dashboard homepage.
-
Click the Help Center icon.
-
Choose API reference: Swagger (In-product).
The APIC API Proxy page appears within Nexus Dashboard One Manage.
Request options:
-
Specify the fabric name.
-
POST: Push the user payload to APIC.
-
DELETE: Delete a MO and its child objects.
-
GET: Get the details of a MO.
Request status: POST status shows per site. If an error occurs, the status indicates the error. You can retry after correcting the payload. Sequential POSTs: The system processes multiple POSTs sequentially.
Push configurations
You can execute JSON or XML snippets to push new or modify existing APIC configurations directly from the APIC API Proxy page.
-
Click POST on the APIC API Proxy page.
The POST details section expands.
-
Click Try it out in the Parameters section.
-
Modify or paste the JSON or XML snippets in the Examples text box.
-
Enter the APIC URL and the target site.
-
Click Execute.
-
From the Broker API view, post the entry.
Payloads The Nexus Dashboard as API Broker does not validate your uploaded JSON or XML payload. Ensure your configuration is correctly structured and valid for the target APIC. Retrieve existing Managed Objects (MOs) from APIC using Nexus Dashboard as API Broker.
Retrieve configurations
Retrieve existing MOs from APIC using Nexus Dashboard as API Broker.
-
Go to the Get API page.
-
Enter the MO (Poluni/Tenant/ParentDN) to retrieve.
-
Enter the target site to fetch data from.
Configuration drift and reconciliation
Orchestrator monitors for configuration drift. If the API Broker (or direct APIC configuration) overwrites an orchestrator-pushed MO, orchestrator detects and shows this drift. When drift is detected, orchestrator provides options for you to reconcile it.
APIC identification
The user fields in APIC audit logs for API calls made through Nexus Dashboard depends on the APIC Proxy Mode configuration:
-
Proxy with Nexus Dashboard Service User: The user field contains the Nexus Dashboard service user.
-
Proxy with remote user credential (default): The user field contains the APIC user.
APIC configurations not supported by Orchestrator
Orchestrator does not support all APIC configurations, and even for APIC objects that are supported by Orchestrator, it may not support all attributes or nested child objects. For such configurations, these can be managed locally on APIC, and Orchestrator will not overwrite configurations when deploying templates or detect any configuration drifts for any objects managed locally on APIC that are not supported.
For example, Orchestrator does not support every EPG domain association type, such as Nutanix domains. For domains not supported on Orchestrator, they can be managed locally on APIC.
Details for the APIC object models can be found in Cloud APIC & APIC Object Model Documentation, Release 6.1(x).
Cloning Templates
This section describes how to create a copy of an existing template using the "Clone Template" feature in the Schema view.
Before deploying a cloned template, change its site association. You cannot deploy templates with identical object names to the same site, regardless of their source template. To avoid deployment failure, rename the objects or associate the cloned template with a different site.
-
Navigate to the Orchestration page.
Manage > Orchestration
-
Choose Tenant Templates > Applications.
-
Click the schema that contains the template you want to clone.
-
On the View menu, select a template to open it.
-
From the Actions menu, select Clone Template.
-
Provide the clone destination details.
-
From the Destination Schema dropdown, select the name of the Schema where you want to create the clone of the template.
You can select the same or a different schema to contain the clone of this template. If you want to clone the template into a schema that doesn’t already exist, you can create a new schema by typing in the name of the schema and selecting
Create <schema-name>option from the dropdown.
When cloning across different schemas, the template must not have any objects that reference objects in other templates.
-
In the Cloned Template Name field, provide the name for the new template.
-
Click Save to create the clone.
A new template will be created in the destination schema, with the tenant you selected and the exact same object and policy configurations as the original template.
If the destination schema you chose was the same schema as the source template, the schema view will reload and the new template will be displayed in the left sidebar. If you chose a different schema, you can navigate to that schema to see and edit the new template.
Note that while the template objects and configurations are copied, the fabric association is not preserved and you will need to re-associate the cloned template with any fabrics where you want to deploy it. Similarly, you will need to provide any fabric-specific configurations for the template objects after you associate it with the fabrics.
-
Migrating objects between templates
This section describes how to move objects between templates or schemas. In Nexus Dashboard 4.1.1, you can now manage and migrate VRF, EPG, External EPG, ESG, contracts, filters, and bridge domain objects.
These restrictions apply when moving objects:
-
The source and destination templates can be in the same schema or in different schemas, but the templates must be assigned to the same tenant.
-
The destination template must have been created and assigned to at least one fabric.
-
If the destination template is not deployed and has no other objects, the template will be automatically deployed after the objects are migrated.
-
Within an active migration, you can add more objects from the same source to the same target. However, moving objects from the target back to the source is not supported.
-
Navigate to the Orchestration page.
Manage > Orchestration
-
Choose Tenant Templates > Applications.
-
Click the schema that contains the objects you want to migrate.
-
In the Schema view, choose the template that contains the objects you want to migrate.
-
In the main pane, click Select.
This allows you to choose one or more objects to migrate.
-
Click each object that you want to migrate.
A check mark appears on the chosen objects.
-
In the main pane, click the actions (…) ellipsis icon and choose Migrate objects.
-
In the Migrate Objects wizard, choose the destination schema and template where you want to move the objects.
Only templates with at least one attached fabric are displayed. If your target template is not in the list, exit the wizard and assign the template to at least one fabric.
-
Click OK, and then Yes to confirm object migration.
The selected objects are migrated to the destination template. During configuration deployment, the objects are removed from any fabric using the source template and added to the fabric using the destination template.
-
Bulk deploy both the source and destination templates after migration.
When you migrate a VRF from a stretched template to a newly created un-stretched template, the template modifications for the destination template may incorrectly display as 'Created' instead of 'Migrated' after you deploy the source template.
-
Select the target template and click Deploy template.
-
In the Summary page, click Deploy out of sync templates.
-
In the Deploy out of sync templates page, review the information and click Deploy out of sync templates to bulk deploy both the source and destination templates after migration.
-
-
Viewing Currently Deployed Configuration
You can view all objects currently deployed to fabrics from a specific template. Even though any given template can be deployed, undeployed, updated, and re-deployed any number of times, this feature will show only the final state that resulted from all of those actions. For example, if Template1 contains only VRF1 object and is deployed to Fabric1, the API will return only VRF1 for the template; if you then add BD1 and redeploy, the API will return both objects, BD1 and VRF1, from this point on.
This information comes from the Orchestrator database, so it does not account for any potential configuration drifts caused by changes done directly in the fabric’s controller.
-
Navigate to the Orchestration page.
Manage > Orchestration
-
Choose Tenant Templates > Applications.
-
Click the schema that contains the template you want to view.
-
In the left sidebar, select the template.
-
Open the View Deployed Configuration for the template.
-
Click the Actions menu next to the template’s name.
-
Click Deployed View.
-
-
In the Deployed View screen, select the fabric for which you want to view the information.
You will see a graphical representation of the template configuration comparison between what’s already deployed to the fabric and what’s defined in the template.
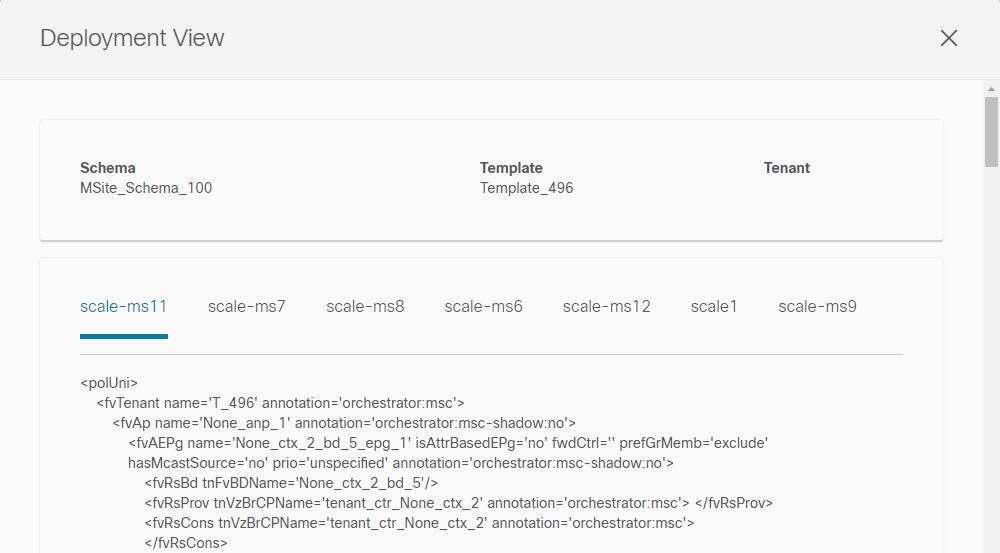 Deployment View
-
The color-coded legend indicates which objects would be created, deleted, or modified if you were to deploy the template at this time.
If the latest version of the template is already deployed, the view will not contain any color-coded objects and will simply display the currently deployed configuration.
-
You can click on a fabric name to show configuration for that specific fabric.
-
You can click View Payload to see the JSON config of all the objects that are deployed to the selected fabric.
-
Schema Overview and Deployment Visualizer
When you open a schema with one or more objects defined and deployed to one or more ACI fabrics, the schema Overview page will provide you with a summary of the deployment.
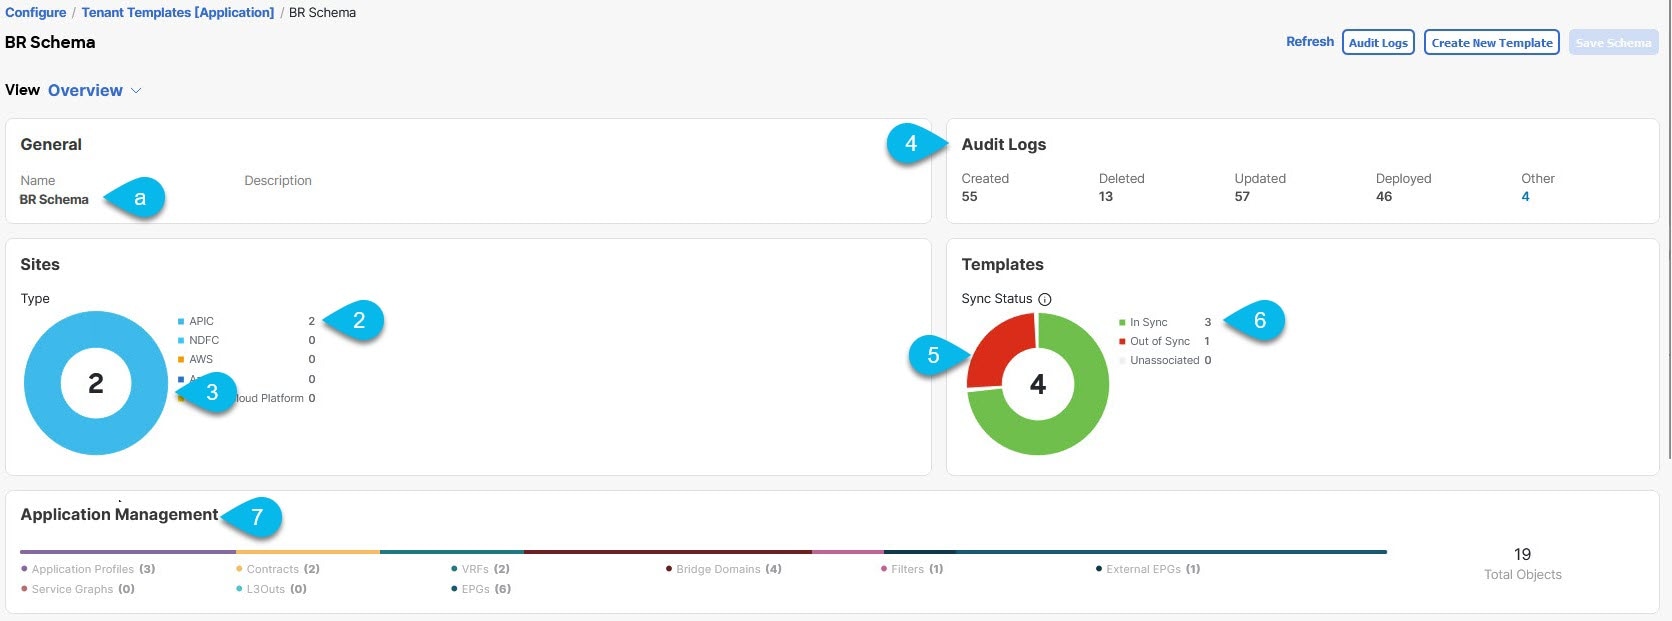
The following details are provided on this page:
-
General — Provides general information of the schema, such the name and description.
-
Deployment Logs — Provides deployment log summary of the actions performed on the schema.
-
Fabrics > Health — Provides the number of fabrics associated with the templates in this schema sorted by the fabric’s health status.
Type — Provides the number of fabrics associated with the templates in this schema sorted by the fabric’s type.
-
Templates > Sync Status — Provides the number of templates in this schema that are associated with one or more fabrics and their deployment status.
Fabric Associations > Consistency — Provides the number of consistency checks performed on the deployed templates and their status.
-
Application Management — Provides a summary of individual objects contained by the templates in this schema.
The Topology tile allows you to create a topology visualizer by selecting one or more objects to be displayed by the diagram as shown in the following figure.
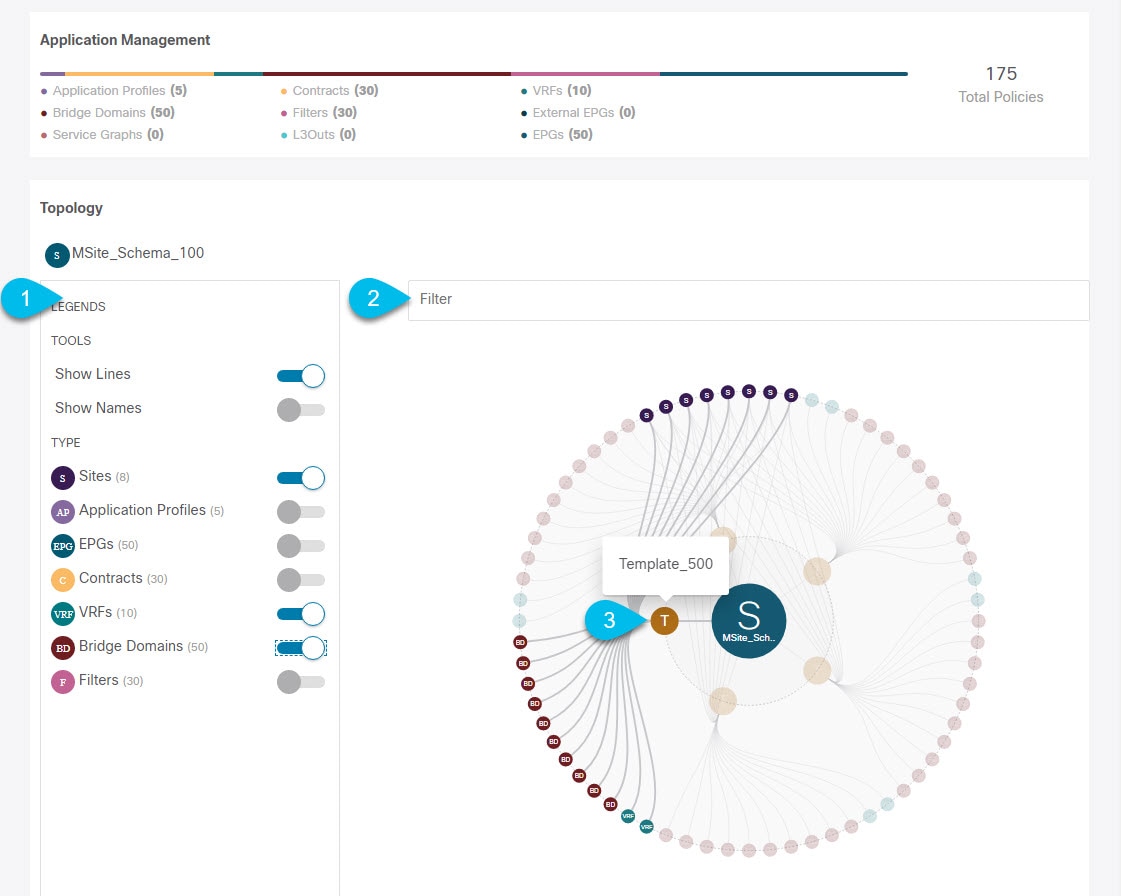
-
Legend — Allows you to choose which policy objects to display in the topology diagram below.
-
Filter — Allows you to filter the displayed objects based on their names.
-
Topology Diagram — Provides visual representation of the policies configured in all of the Schema’s templates that are assigned to fabrics.
You can choose which objects you want to display using the Configuration Options above.
You can also mouse over an objects to highlight all of its dependencies.
Finally, you can click on any object in the diagram to zoom in to see only its relationships with other objects. For example, clicking a Template will display all objects within that specific template only.
Copyright
THE SPECIFICATIONS AND INFORMATION REGARDING THE PRODUCTS IN THIS MANUAL ARE SUBJECT TO CHANGE WITHOUT NOTICE. ALL STATEMENTS, INFORMATION, AND RECOMMENDATIONS IN THIS MANUAL ARE BELIEVED TO BE ACCURATE BUT ARE PRESENTED WITHOUT WARRANTY OF ANY KIND, EXPRESS OR IMPLIED. USERS MUST TAKE FULL RESPONSIBILITY FOR THEIR APPLICATION OF ANY PRODUCTS.
THE SOFTWARE LICENSE AND LIMITED WARRANTY FOR THE ACCOMPANYING PRODUCT ARE SET FORTH IN THE INFORMATION PACKET THAT SHIPPED WITH THE PRODUCT AND ARE INCORPORATED HEREIN BY THIS REFERENCE. IF YOU ARE UNABLE TO LOCATE THE SOFTWARE LICENSE OR LIMITED WARRANTY, CONTACT YOUR CISCO REPRESENTATIVE FOR A COPY.
The Cisco implementation of TCP header compression is an adaptation of a program developed by the University of California, Berkeley (UCB) as part of UCB’s public domain version of the UNIX operating system. All rights reserved. Copyright © 1981, Regents of the University of California.
NOTWITHSTANDING ANY OTHER WARRANTY HEREIN, ALL DOCUMENT FILES AND SOFTWARE OF THESE SUPPLIERS ARE PROVIDED “AS IS" WITH ALL FAULTS. CISCO AND THE ABOVE-NAMED SUPPLIERS DISCLAIM ALL WARRANTIES, EXPRESSED OR IMPLIED, INCLUDING, WITHOUT LIMITATION, THOSE OF MERCHANTABILITY, FITNESS FOR A PARTICULAR PURPOSE AND NONINFRINGEMENT OR ARISING FROM A COURSE OF DEALING, USAGE, OR TRADE PRACTICE.
IN NO EVENT SHALL CISCO OR ITS SUPPLIERS BE LIABLE FOR ANY INDIRECT, SPECIAL, CONSEQUENTIAL, OR INCIDENTAL DAMAGES, INCLUDING, WITHOUT LIMITATION, LOST PROFITS OR LOSS OR DAMAGE TO DATA ARISING OUT OF THE USE OR INABILITY TO USE THIS MANUAL, EVEN IF CISCO OR ITS SUPPLIERS HAVE BEEN ADVISED OF THE POSSIBILITY OF SUCH DAMAGES.
Any Internet Protocol (IP) addresses and phone numbers used in this document are not intended to be actual addresses and phone numbers. Any examples, command display output, network topology diagrams, and other figures included in the document are shown for illustrative purposes only. Any use of actual IP addresses or phone numbers in illustrative content is unintentional and coincidental.
The documentation set for this product strives to use bias-free language. For the purposes of this documentation set, bias-free is defined as language that does not imply discrimination based on age, disability, gender, racial identity, ethnic identity, sexual orientation, socioeconomic status, and intersectionality. Exceptions may be present in the documentation due to language that is hardcoded in the user interfaces of the product software, language used based on RFP documentation, or language that is used by a referenced third-party product.
Cisco and the Cisco logo are trademarks or registered trademarks of Cisco and/or its affiliates in the U.S. and other countries. To view a list of Cisco trademarks, go to this URL: https://www.cisco.com/go/trademarks. Third-party trademarks mentioned are the property of their respective owners. The use of the word partner does not imply a partnership relationship between Cisco and any other company. (1110R)
© 2017-2026 Cisco Systems, Inc. All rights reserved.
Americas Headquarters
Cisco Systems, Inc.
170 West Tasman Drive
San Jose, CA 95134-1706
USA
https://www.cisco.com
Tel: 408 526-4000
800 553-NETS (6387)
Fax: 408 527-0883