
New and Changed Information
The following table provides an overview of the significant changes up to this current release. The table does not provide an exhaustive list of all changes or of the new features up to this release.
| Release Version | Feature | Description |
|---|---|---|
|
Nexus Dashboard 4.3.1 |
Image management in monitor mode. |
Beginning with Nexus Dashboard release 4.3.1, you can perform image management operations for supported fabrics while the fabrics are in monitor mode. This reduces operational friction and risk during software upgrades. For more information, see Image management in monitor mode. |
|
Nexus Dashboard 4.3.1 |
Fabric agent RPM installation in monitor mode. |
Beginning with Nexus Dashboard release 4.3.1, you can install fabric agent RPMs for supported fabrics while the fabrics are in monitor mode. For more information, see Fabric agent RPM installation in monitor mode. |
|
Nexus Dashboard 4.3.1 |
Cisco Nexus 9000 Series name change |
Cisco Nexus 9000 Series is now the Cisco N9000 Series. |
Understand Fabric Software for NX-OS and IOS-XE fabrics
This section provides detailed information for the Fabric Software feature in Nexus Dashboard for NX-OS/IOS-XE fabrics.
Fabric Software deploys Cisco software images to switches which allows network stability and feature consistency. Fabric Software workflows provide these benefits:
-
Image staging, validation, and in-service software upgrade (ISSU) operations which are independent, allowing mass updates and downgrades, and the ability to perform staging and validation in a single step
-
You can perform these operations before the maintenance window.
-
Stage image files
This copies the image files to the switch bootflash.
-
Validate Network Operating System (NOS) and electronic programmable logic device (EPLD) compatibility where possible
This checks if the image is complete, if the image is valid for the individual hardware, and if the update can be non-disruptive.
-
Run Update Analysis reports
-
-
-
The ability to run reports and compare the results
-
The View Logs column provides Live log status to monitor each operation
-
Allows you to make use of maintenance mode to minimize the impact of disruptive updates, especially for multi-reload update situations
-
Update groups allow bulk updates and downgrades. Update groups have checks to avoid unnecessary downtime in redundant fabrics in these cases:
-
Switches belonging to different fabrics are not allowed to form an update group.
-
By default, Virtual Port Channel (vPC) peers are placed in different groups as listed:
-
Switches that have even numbers or VPC role of primary
-
Switches that have odd numbers or VPC role of secondary
-
-
-
Provides visibility into previous and current update details as well as high-level summarization
-
Visibility into current NOS, EPLD and patch consistency at a switch, fabric, and group level
Image management in monitor mode
For External, Classic LAN, Classic IPFM, and IPFM Generic Multicast fabrics in monitor mode, enable Enable fabric software update before you perform switch upgrade-related operations. This setting is disabled by default and must be enabled for each fabric.
For more information, refer to the section "General Parameters" in Editing External Fabric Settings.
When this option is enabled, you can use Fabric Software to:
-
Upload images
-
Prepare and install updates
-
View update reports and logs
-
Resynchronize device software package information
-
Reload switches
-
Run show commands
-
Change switch operating mode.
Other fabric edit and deployment operations remain unavailable while the fabric is in monitor mode.
Fabric agent RPM installation in monitor mode
Connectivity Analysis uses fabric agent packages on switches to perform path analysis. For standalone NX-OS fabrics, the fabric agent is installed on each switch as an RPM package. Switch software includes a base fabric agent package. Nexus Dashboard compares the installed fabric agent package version with the latest compatible version available in metadata, and displays whether the fabric is compatible. You can retrieve metadata from Cisco Intersight Cloud or upload it manually.
If one or more switches in a fabric do not have the latest compatible fabric agent package, Nexus Dashboard displays the fabric as not compatible. You can update fabric agent packages from Connectivity Analysis, including for fabrics in monitor mode when the prerequisites are met. For more information, see Prerequisites.
When you update fabric agent packages, Nexus Dashboard uses fabric software to download the required package, copy it to the switch bootflash, install it, and report the update status. The package file copied to the switch bootflash is removed after installation. The package remains available under Manage > Fabric Software > Images until you delete it.

If you delete files from the switch bootflash using Execute CLI or directly on the switch, the file list on the Bootflash tab might not reflect the change immediately. Nexus Dashboard updates bootflash data periodically, which can take up to 24 hours. To update the data immediately, choose Manage > Fabric Software > Devices, select the switch, and then choose Actions > Resync. Alternatively, resynchronize the switch from Switch Overview by choosing Hardware > Bootflash > Actions > Resync.
Navigate to the Fabric Software page for NX-OS and IOS-XE fabrics
To navigate to the Fabric Software page, click Manage > Fabric Software.
The NX-OS/IOS-XE tab is the default view.
Understand the information provided in the Fabric Software page for NX-OS and IOS-XE fabrics
The Overview tab provides fabric-level update and downgrade options whereas the Devices tab provides these options at the individual device or switch level.
The Overview tab displays the images, platforms, release versions, and fabric information.
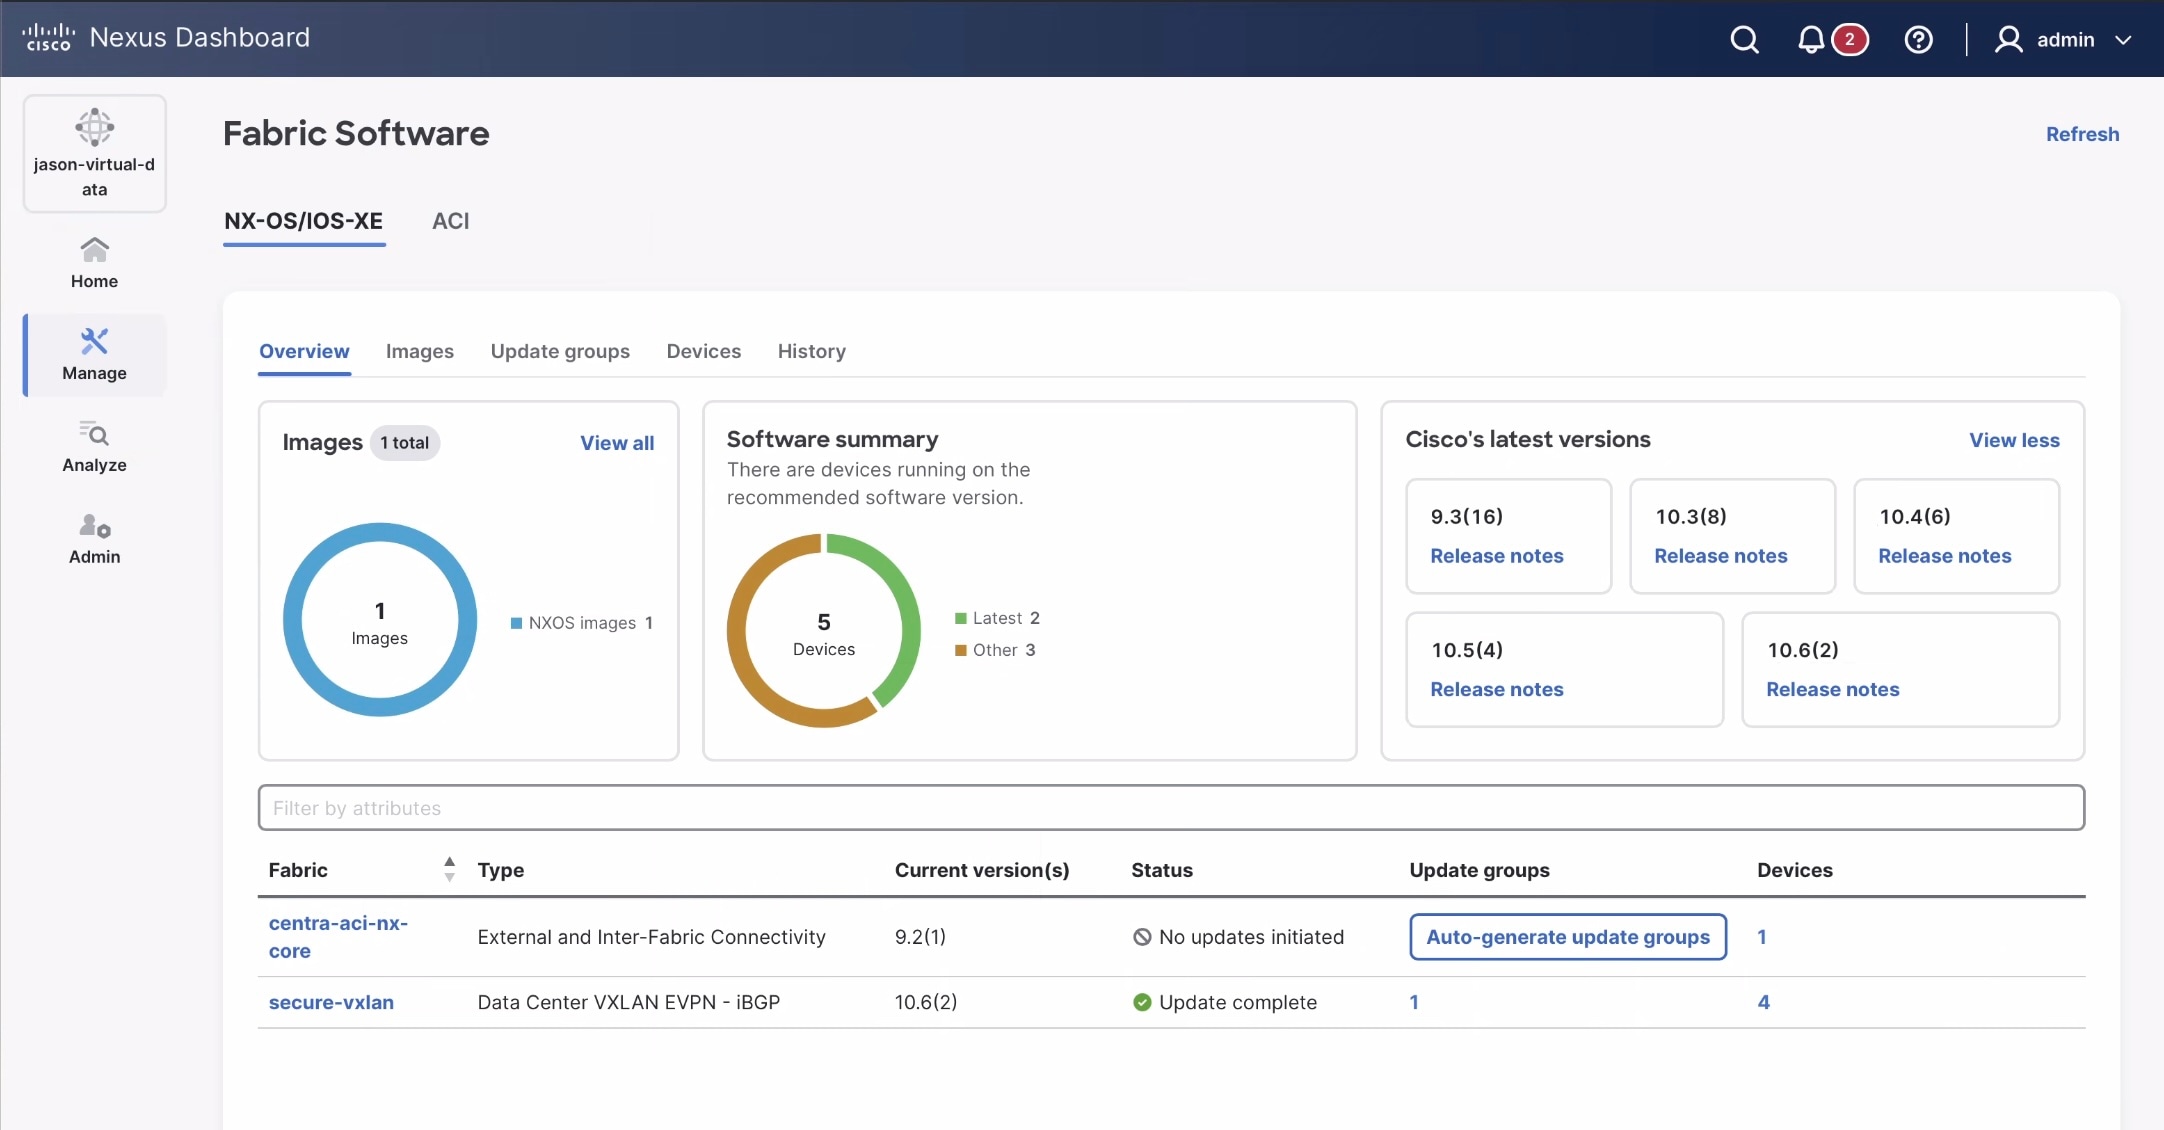
The Fabric Software page has the following functional areas:
-
Overview: Displays the images, platforms, release versions, and fabric information.
-
The Images card displays the number of images and the type of packages or patches. Click View all to see a table with a detailed listing of all the images.
-
The Cisco’s latest versions card displays the latest available switch software versions, the versions that Cisco recommends, and the corresponding release notes.
-
The fabric area displays information about the configured fabrics.
Field
Description
Fabric
The name of the fabric.
Type
The type of fabric.
Current version(s)
The current versions of software running on the switches in the fabric.
Status
The status of the fabric-level software update. The available options are:
-
Preparing update: Indicates either the auto-assignment of the update groups is not complete or that the Prepare stage is in progress.
-
Update pending: Indicates either the Prepare stage is completed or that installation is in progress.
-
Update complete: Indicates either the installation is complete or that the None group is present along with other custom groups.
Update groups
A clickable link to the update groups page for a fabric or an option to Auto-generate update groups, if the update group is not available.
Devices
A clickable link to the devices page with a detailed listing of the number of switches in a fabric.
-
-
-
Images: Displays the details of the uploaded images on Nexus Dashboard. You can upload or delete images.
Field
Description
Image name
Specifies the filename of the image, RPM, or SMU that you uploaded.
Platform
Specifies the name of the platform. Images, RPMs, or SMUs are categorized as follows:
-
n9k/n3k
-
n6k
-
n7k
-
n77k
-
n5k
-
Other
-
SONiC
-
Third Party
-
MDS
-
cat9k
-
cat8k
The images are the same for n9k and n3k platforms.
The platform is Other if the uploaded images are not mapped to any of the existing platforms.
The platform is n9k/n3k for RPMs.
Bits
Specifies the bits of the image
Image type
Specifies the file type. The available options are image, EPLD, RPM, and SMU.
Image sub type
Specifies the file type of the image, EPLD, RPM, or SMU as listed here:
-
EPLD: epld
-
Images: nxos, system, kickstart, or sonic
-
RPMs: feature
-
SMUs: patch.
NOS version
Specifies the NX-OS or IOS-XE image version for Cisco switches only.
Size (Bytes)
Specifies the size of the image, RPM, or SMU files in bytes.
Image present
Shows whether the uploaded image is available in Nexus Dashboard. Values can include:
-
Present: The image is available.
-
Missing: The image record exists, but the image file is not available. This can happen after a backup and restore because image files are not included in the backup.
-
Verified: The image is available and has been verified against the Cisco-provided checksum for the image.
Switch firmware images that were uploaded to Nexus Dashboard in release 3.2.x are not carried over when you update to Nexus Dashboard 4.x. These instances are listed as Absent in the Image Present column. After updating to Nexus Dashboard 4.x, re-upload the switch firmware images. However, images uploaded to Nexus Dashboard in release 4.1.1 are carried over when you update to Nexus Dashboard 4.2.1. For more information, see Upload the image to Nexus Dashboard.
Checksum
Specifies the checksum of the image. The checksum checks if there’s any corruption in the file of the image, RPM, or SMU. You can validate the authenticity by verifying if the checksum value is same for the file you downloaded from the Cisco website and the file you upload in the Image Upload.
-
-
Update groups: Displays switch software update information by fabric and update group. You can prepare update groups, install updates, monitor update status, auto-generate update groups, view pre-update or post-update reports, view update logs, and open device-level details for devices in an update group, including bootflash and hardware information.
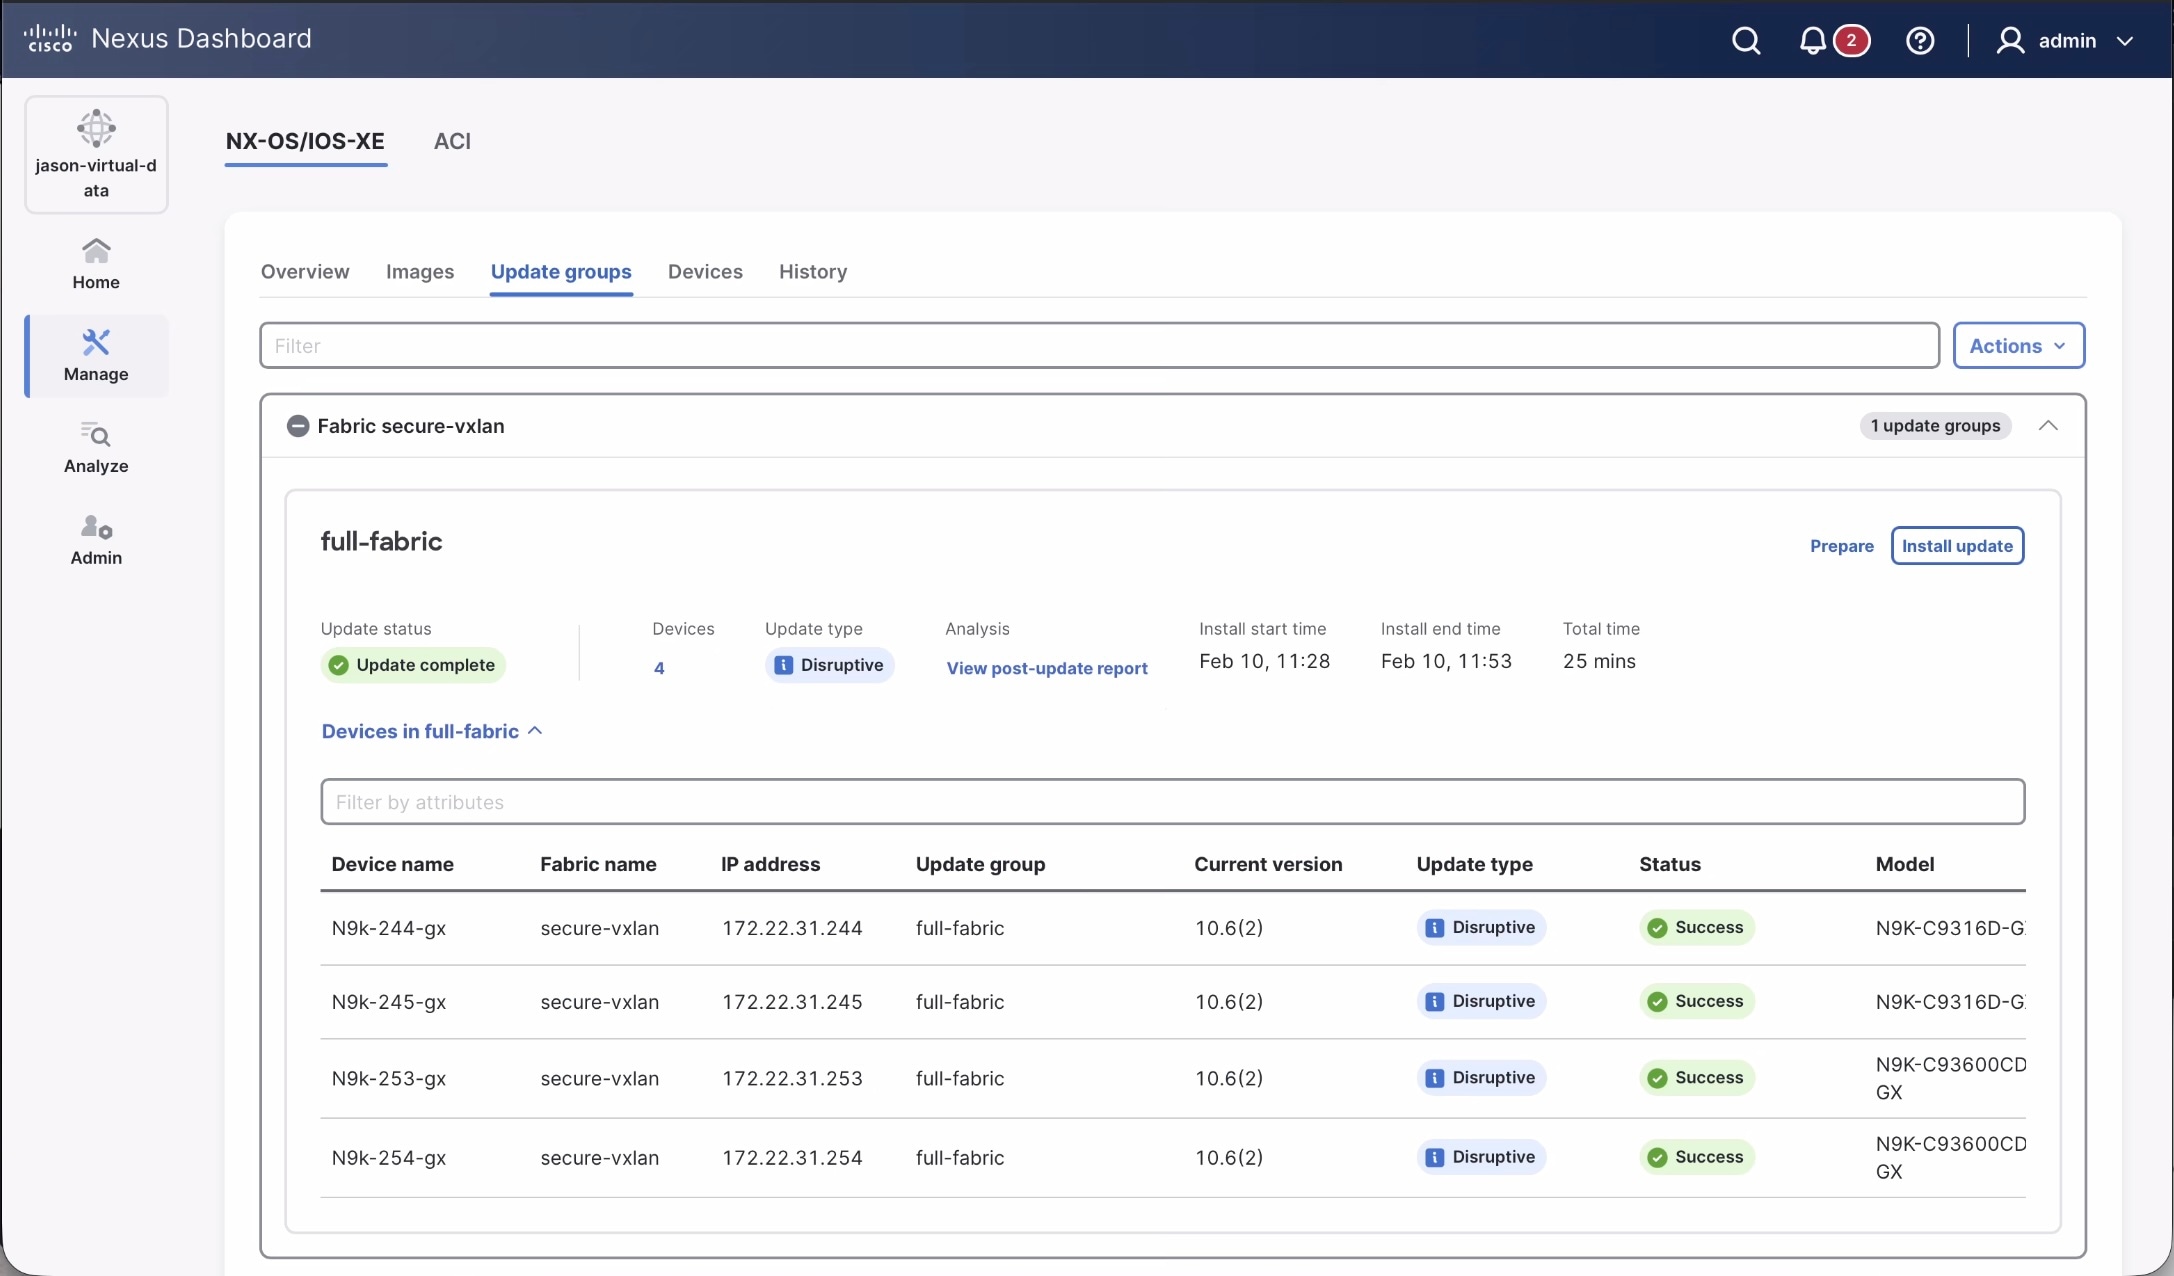
Review the information in the Update groups tab. Each fabric section shows the fabric name and the number of update groups for that fabric. Expand the fabric section to view the update groups. Click the update group name to view update group details, such as version selection, update settings, and update check selection. Click the value in the Devices column or expand Devices in <update-group-name> to view the devices in that update group.
Devices that are not associated with any update group are listed under None. For information about assigning an update group to a device, see Attach or detach update groups to the switches.
Before an operation is run, some default update settings can appear in the update group details even if you have not selected them. After you update the settings, the details reflect your selections.
Field
Description
Update status
Status of the update group.
Devices
Number of devices in the update group. Click the value to view the devices in the update group.
Update type
Type of software update. Values can include Disruptive or Non-disruptive.
Analysis
Pre-update analysis result. Select View pre-update report or View post-update report for details.
Install start time
Time when the update installation starts.
Install end time
Time when the update installation ends.
Total time
Total time taken for the update installation.
-
Devices: This displays the devices in a fabric-level update group. You can Prepare update group, Install update group, Modify groups, or Resync the software on the selected device(s). Use the gear icon to customize the columns displayed in the table.
Field
Description
Device name
Specifies the name of the device. Click the name to view device details.
Fabric name
Specifies the fabric that the device resides in.
IP address
Specifies the IP address of the device.
Update group
Specifies the name of the update group. Click the name to view update group details.
Current version
Specifies the NX-OS or IOS-XE image version currently running on the corresponding Cisco switch.
Update type
Shows the nature of update. This can be either Disruptive or Non-disruptive.
Status
Specifies the configuration status. These include:
-
Success
-
Failed
-
Stage success
-
Stage failed
-
In progress
-
Validate success
-
Validate failed
Model
Specifies the switch model.
Role
Specifies the role for the switch.
Analysis
Shows whether an update analysis report is available for the device. If a report is available, click View report to open it. If no report is available, this column displays None.
System mode
Specifies the mode of the switch at a given instant. These include:
-
Normal
-
Maintenance
-
Inconsistent (either intended normal but discovered maintenance or intended maintenance but discovered normal). Inconsistent states can appear transiently during transition or as a result of a failure.
Logs
Provides a link to View logs after an operation is performed for the update group.
The Devices tab shows logs for the latest operation for the current update group. To view logs for earlier operations, use the History tab.
Version status
Shows how the current software version on the device compares with Cisco software version details for that device model. Values can include:
-
Recommended: The device is running the Cisco recommended version.
-
Latest in train: The device is running the latest version in its release train.
-
Other: The device is not running the recommended version or the latest version in its release train.
-
None: Nexus Dashboard does not have software version details for that device model.
In this release, version status information is listed only for N9K devices.
Recommended version
Specifies the Cisco recommended version of NX-OS images for the specific Cisco switch.
Latest version in train
Specifies the most recent NX-OS image version for the specific Cisco switches on the corresponding release train.
Latest version
Specifies the highest numbered NX-OS image version for the specific Cisco switch on the corresponding release train.
vPC role
Specifies the VPC role, if applicable (Primary or Secondary).
vPC peer
Specifies which switch is the VPC peer with this switch, if applicable.
-
-
History: Displays the history of all the operations performed on the switches.
Field
Description
ID
Specifies the ID number. Click it to open the install log for that operation.
Device name
Specifies the device name.
Update group
Specifies the name of the upgrade group. Click the name to view the update group details.
When you modify an update group, the Update group links for its previous operations on the History tab display the current update group details. They do not preserve the details that were in effect when the operations were performed.
The Update group link displays default install-update settings when the operation type is Stage or Validate, or when an update group is created or modified without performing an install operation.
Setting Default value Type of update
Disruptive
Execution paradigm
Serial
Error handling on failure
Pause
Isolate switches prior to update
Yes
Type of report
No report
For Leaf switches only, Execution paradigm and Error handling on failure display Parallel and Continue, respectively.
From version
Specifies the version of the image on the device.
Status
Displays if the operation was a success or failure.
Operation type
Specifies the type of operation performed.
Software operations such as NOS image updates, EPLD updates, RPM or SMU package installs, and package uninstall operations can appear with the operation type UPGRADE. To identify the specific software operation, review the related update group details or open the device install log from the Devices or Update groups tab.
Fabric name
Specifies the name of the fabric.
Created by
Specifies the username of the user who performed the operation.
Completed time
Specifies the time when the operation was performed.
Terminology
This describes the terms that you must be familiar with:
|
Term |
Acronym |
Description |
|
Electronic Programmable Logic Device |
EPLD |
The EPLD image upgrades to enhance hardware functionality or to resolve known issues. |
|
In-Service Software Upgrade |
ISSU |
ISSU allows you to upgrade the software version of the release on a chassis device with no network downtime. |
|
Local Area Network |
LAN |
LAN consists of a series of computers linked together to form a network in a circumscribed location. |
|
Network Operating System |
NOS |
A specialized operating system designed for a network device such as a router, switch or firewall. Some examples include NX-OS for Nexus switches, IOS XE for Cisco Catalyst switches and so on. |
|
Rendezvous Points |
RP |
RP is a router that acts as the place where sources and receivers of multicast data can find each other. |
|
Route Reflector |
RR |
Route Reflector is a router that acts as a routing information exchange server for all other iBGP routers. |
|
Storage Area Network |
SAN |
SAN refers to the Storage Area Network management and analytics capabilities provided by the SAN Controller persona in Nexus Dashboard. This includes comprehensive management, monitoring, and visualization of SAN fabrics, typically composed of Cisco MDS switches supporting Fibre Channel SAN traffic. |
|
Secure Copy |
SCP |
SCP is used by fabric software to transfer files between devices. |
|
Secure File Transfer Protocol |
SFTP |
SFTP is a network protocol that allows you to securely access, transfer, and manage large files and sensitive data. |
Required software versions
For Cisco Nexus Dashboard services compatibility information, see the Cisco Data Center Networking Applications Compatibility Matrix.
Prerequisites
This section describes the prerequisites. This document assumes that the reader has a fundamental knowledge of Nexus Dashboard.
-
For remote image upload, you can import an image from an SCP or SFTP server.
-
To upload images from a remote location, specify the storage location or path in the System Settings page to configure remote storage settings.
-
Ensure that your user role is super-admin or fabric-admin.
-
Ensure that there is a fabric, its Deployment Enabled flag is set, and the switches are managed by the Nexus Dashboard in this fabric.
-
Ensure you have per-user device credentials set.
-
To perform image management operations while a fabric is in monitor mode, enable Enable fabric software update for the fabric. This setting is disabled by default and must be enabled for each fabric. For more information, refer to the section "General Parameters" in Editing External Fabric Settings.
-
To update fabric agent packages from Connectivity Analysis for a fabric in monitor mode, ensure that:
-
Telemetry is enabled for the fabric.
-
The fabric uses the Premier license tier.
-
Metadata is available through Cisco Intersight Cloud or an uploaded metadata bundle.
-
Guidelines and limitations
This section describes the guidelines and limitations.
-
Update group name character limit: The Nexus Dashboard UI limits update group names to 128 characters. Although the
attachGroupAPI allows names to exceed this limit to maintain backward compatibility for existing groups, you must shorten names to 128 characters or fewer to edit them in the UI. -
Image management in monitor mode supports switch upgrade-related operations only. Fabric configuration and policy changes are not available while the fabric is in monitor mode.
-
Enabling image management in monitor mode is a per-fabric setting. Nexus Dashboard does not enable this option automatically during an upgrade.
-
If files or fabric agent packages are updated directly on a switch, Nexus Dashboard might not display the updated information until the refresh. To refresh the device and package information immediately, choose Manage > Fabric Software > Devices, select one or more switches, and then choose Actions > Resync.
-
Nexus Dashboard has these limitations for image management images stored under Manage > Fabric Software > Images, as described in Upload the image to Nexus Dashboard:
-
12 GB limitation for virtual Nexus Dashboards (vNDs), and physical Nexus Dashboards (pNDs) other than the ND-NODE-G5L (UCS-C225-M8)
-
36 GB limitation for the ND-NODE-G5L (UCS-C225-M8)
-
If you reach the space limit for images in Nexus Dashboard, navigate to Manage > Fabric Software > Images, choose the images that are no longer needed and click Actions > Delete.
-
Nexus Dashboard supports software updates on Cisco Catalyst devices in install mode only not in bundle mode.
-
There is a known issue where Nexus Dashboard is not able to stage or copy an IOS-XE image to Catalyst 9000 switches running IOS-XE 17.12.2 or later, where the image upgrade fails at the SCP image copy point of the process with this error:
Error opening scp://<ND-IP-address>/scp_data/<bin> (Undefined error)
This issue occurs because IOS-XE 17.10.x and later enables ETM (Encrypt-then-MAC) SSH algorithms only by default, whereas the Nexus Dashboard SCP client will attempt the upgrade using non-ETM MAC algorithms, leading to a
no matching mac foundfailure.The workaround for this issue is to push the following configuration to the switch using the freeform configuration in Nexus Dashboard:
ip ssh client algorithm mac hmac-sha2-256 hmac-sha2-256-etm@openssh.com hmac-sha2-512 hmac-sha2-512-etm@openssh.com
For more information on freeform configurations, see "Deploy freeform CLIs on a specific switch" in Working with Inventory in Your Nexus Dashboard LAN or IPFM Fabrics
Upgrade or downgrade switches in a fabric under Overview tab
You can perform switch upgrades or downgrades at the fabric level.
For External, Classic LAN, Classic IPFM, and IPFM Generic Multicast fabrics in monitor mode, you can use fabric software workflows only when image management in monitor mode is enabled for the fabric. The setting is disabled by default and applies only to fabrics in monitor mode.
Prepare a fabric software update
This section describes how to prepare a software update that can be used at the fabric level.
For a supported fabric in monitor mode, enable Enable fabric software update before you use this procedure.
-
Navigate to the Fabric Software page for NX-OS and IOS-XE fabrics.
-
In the Fabric Software page, click the Update groups tab.
See Understand Fabric Software for NX-OS and IOS-XE fabrics for more information on the Overview tab and the other tabs in the Fabric Software page.
-
In the list of fabric-level update groups shown here, locate the update group for which you want to prepare a software update.
-
Click Prepare for the selected update group.
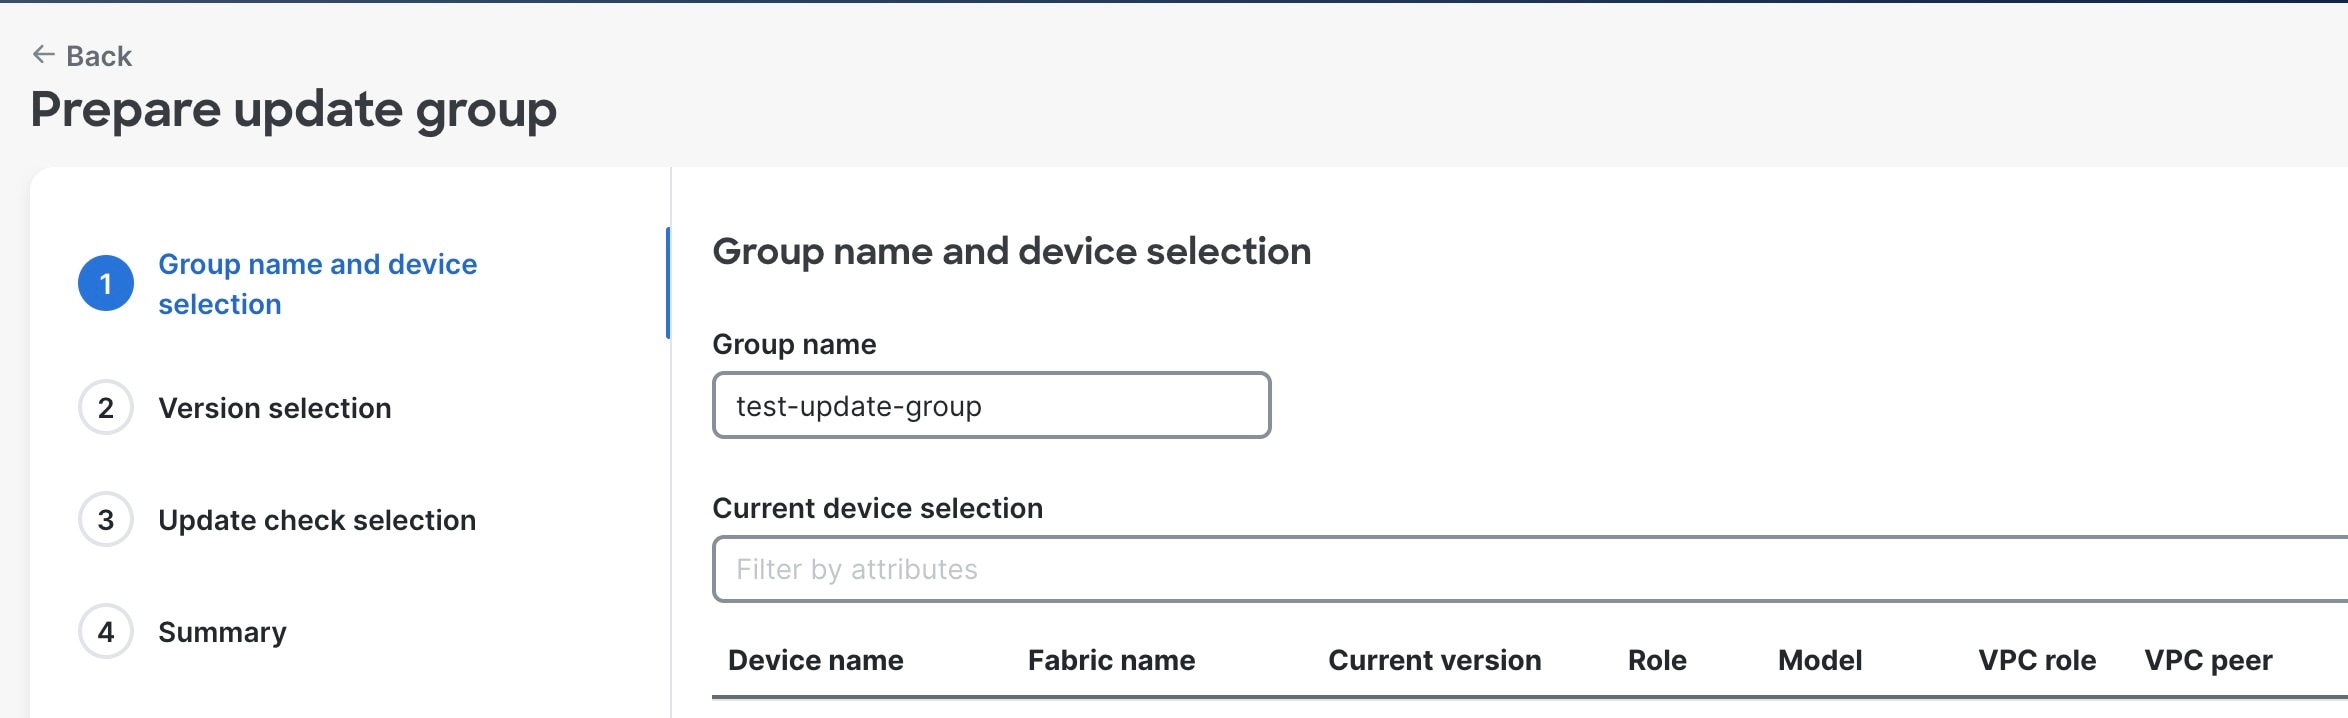
The Prepare update group wizard appears.
-
In the Group name and device selection area, make the required configurations for this update group.
-
If the update group does not have a name, enter a name for the update group.
-
Review the types of devices listed in the devices area.
The list consists of device types that are detected in this fabric. Use this list to verify that the software update that you select in the next step aligns with the type of devices that you have in this fabric.
VPC peers are allowed in the same group. However, if both the VPC peers are part of an update, then a Warning message is displayed. This is applicable to both prepare & install flows.
For example, if you see
CAT8K,N9Klisted in the Devices area, when you select the version in the next step, verify that the image you select aligns with either Catalyst 8000 or Cisco N9000 series switches. -
To move a device to a different update group, click the edit icon and then, in the Modify groups dialog box, select an existing update group or create a new one.
-
To remove a device from the update group, click the delete icon.
The device moves to the None group.
-
-
Click Next.
-
In the Version selection area, choose between Non-disruptive or Disruptive and Select from uploaded images.
You can also choose to upload an image at this stage instead of using a previously uploaded image.
If the device is N9k, then Advanced options such as Select an EPLD and Select RPM(s) are enabled. Advanced options are not available for Cat8k devices.
If you choose the Non-disruptive update type, then Advanced options > Select an EPLD is disabled.
-
In the Update check selection area, choose the Type of report from No report, Basic or Custom report. However, if the device is Cat8k, No report is listed. NOTE: If No report is selected, then the Use existing pre report option is disabled during the Install flow. All other report options continue to be available for selection during the install flow. .
-
Review the configured details in the Summary area and click Stage and validate.
The Preparing update group message is displayed with a progress bar.
If you do not navigate away from this page, you can proceed to Install update once software preparation is completed. Also, the View pre-update report link is displayed during software preparation.
Alternatively, you can click Close to exit this wizard since software preparation for the update group continues to run in the background.
If preparation fails, resolve the reported issue and click Retry to prepare the update group again.
If preparation fails because there is insufficient space on a device, click the device name to open the Switch Overview page. In the Hardware > Bootflash page, delete files that are no longer needed, and then click Retry. If you delete files directly on the device, the page also provides the Actions > Resync option to resynchronize the device information.
Create a report
As you go through the procedures in Prepare a fabric software update or Install or update software on devices in a fabric, you can create a basic or custom report with required checks.
For a supported fabric in monitor mode, pre-update and post-update reports are available only if Image management in monitor mode is enabled for the fabric.
The basic report contains fundamental checks to ensure switches meet the minimum requirements for a software update.
The basic checks are listed below:
-
Diag_module: Executes the
show diagnostic result module <module-number>command for each installed module. It then parses the detailed test results for each diagnostic test and confirms that all tests show a Pass status, which is indicated by aPin the output. -
All filesystem free space: Executes
show system internal flashcommand to retrieve detailed information about all storage partitions, analyzes every active filesystem (such as bootflash, logflash, etc.), calculates the usage percentage for each filesystem, and verifies that no filesystem exceeds the 85% usage threshold. This value is configurable. It excludes the read-only filesystems (ending with_ro). -
General log messages: Executes the
show logging logfile start-time <date>command to retrieve log entries from the past 30 days. It filters log messages with severity levels 1, 2, and 3. are found. -
Management console: Executes the
show line consolecommand and examines the Register Bits section in the output to verify if these three critical control signals are active:-
Request To send (RTS): Indicates the device is ready to send data.
-
Data terminal ready (DTR): Indicates the terminal is connected and ready.
-
Data set ready(DSR): Indicates the serial device is powered on and ready.
-
-
vPC state
-
BGP state
-
Module status
-
Modules health and backup power
-
Interface status
-
vPC sticky bit
-
NVRAM log messages
-
vPC secondary role
-
OSPF state
The custom report allows you to turn checks on or off or even add your own command-line checks to build a report tailored to your needs.
In addition to the basic checks listed above, other checks available for a custom report include: * BGP stability * HSRP mgo state active * Modules health and backup power * OSPF stability * HSRP mgo state standby
Data is available for telemetry-enabled fabrics.
For the pre-report, this includes: * Forecasted cleared anomalies and advisories * Potentially affected endpoints
For the post-report, this includes: * Cleared anomalies and advisories * 13 delta tables that include endpoints, protocol, interface, and hardware-related details similar to telemetry reports in Nexus Dashboard 4.1.1.
Change number of concurrent switches for staging/validating/updating
As you go through the procedures in Install or update software on devices in a fabric, there are points during the staging/validating or updating processes where you might be taking actions on a group of switches concurrently. Following are the default values for the number of switches that are grouped together when you are taking an action on a group of switches concurrently:
-
Staging/validating: Default number of switches is 10
-
Updating: Default number of switches is 20
Follow these procedures if you want to change these default values.
-
Navigate to Admin > System Settings > Fabric management.
-
In the Advanced Settings area, click the Admin tab.
-
Modify the values in the following fields, if necessary:
-
Image update thread pool size: The number of switches that can be updated concurrently.
Default value is 20. Valid range is 10-200.
-
Image stage/validate thread pool size: The number of switches that can be staged and validated concurrently.
Default value is 10. Valid range is 5-200.
-
-
Click Save when you have completed any configuration changes on this page.
Install or update software on devices in a fabric
This section describes how to install or update software on the devices in a fabric through update groups.
For a supported fabric that is in monitor mode, you can use this procedure only if Image management in monitor mode is enabled for that fabric.
-
Navigate to the Fabric Software page for NX-OS and IOS-XE fabrics.
-
In the Fabric Software page, click the Update groups tab.
-
In the list of fabric-level update groups shown here, locate the update group for which you want to install a software update.
-
If the update group has not been prepared, click Prepare for the selected update group. For instructions, refer to Prepare a fabric software update.
-
In the update group area for the desired fabric, click Install update.
The Install Update Group wizard is displayed.
-
In the Group name and device selection area, verify the devices for this update group, and then click Next.
-
Review the device types listed in the devices area.
The list shows the device types detected in this fabric. Use it to verify that the software update you select in the next step aligns with the device types in your fabric.
VPC peers are allowed in the same group. However, if both the VPC peers are part of an update group, then a warning message is displayed. This applies to both prepare and install flows.
-
In the Update options area, verify the settings, and then click Next.
-
For Select the type of update, choose Non-disruptive or Disruptive.
For Catalyst devices, only the Disruptive update is supported.
If you choose Non-Disruptive, the Use Maintenance Mode option is set to No. For more information, see Understanding In-Service Software Upgrades.
-
For Would you like to isolate the switches prior to update using maintenance-mode?, choose Yes or No.
For N9K devices, you can choose Yes or No. For Cat8k devices, this option is set to No.
Maintenance mode, along with normal mode, is part of Graceful Insertion and Removal (GIR). If you choose Yes, Nexus Dashboard places the switches in the update group in maintenance mode during the update, where all configured Layer 3 control-plane protocols are isolated from the network. The switches return to normal mode after the update is complete. For more information, see Configuring Graceful Insertion and Removal.
-
For Execution paradigm, choose Serial or Parallel.
-
Serial: Updates one switch at a time. The update must complete on one switch before it begins on the next switch in the update group.
-
Parallel: Updates multiple switches at the same time, based on the configured number of concurrent switch updates. For example, if the update group has 40 switches and 20 switches can be updated concurrently, Nexus Dashboard updates the first 20 switches together, then updates the next 20 switches after the first set is complete.
-
-
Verify the devices listed under Current device selection.
-
For Error handling, choose Pause or Continue from the On failure list.
This setting determines whether the installation continues or pauses if a failure occurs during the update.
A failure can occur for various reasons, such as a switch failing to come back online or an ssh session is failing to establish between Nexus Dashboard and the switch.
The behavior of this setting can also be affected by settings in other areas.
For example, if On failure is set to Pause and Execution Paradigm is set to Serial: In a serial update of 20 switches, if an issue arises with the sixth switch, the update pauses at that switch. The update does not proceed to the remaining 14 switches until it is manually resumed.
If On failure is set to Pause and Execution paradigm is set to Parallel: If an issue arises with the sixth switch in a set being updated concurrently, the update continues for the other 14 switches in that set. The update then pauses before moving to the next set of switches in the update group.
-
-
In the Update check selection area, choose the report type from No report, Basic or Custom report. For Cat8k devices, No report is the only available option.
If you selected No report during the prepare update flow, all report options remain available here except Use existing pre report which is disabled.
-
Review the configured details in the Summary area, and then click Install update.
The Installing update group message is displayed with a progress bar. Software preparation for the update group continues to run in the background. Click Close to exit this wizard.
The View the post-update report link is also displayed during software preparation.
Update or downgrade switches
This section describes both the disruptive and non-disruptive method of upgrading or downgrading a group of switches.
During disruptive update, the switches go down temporarily. This results in a disruption in your fabric traffic.
During non-disruptive update, the switches run without disruption in your fabric traffic.
Guidelines and limitations: Disruptive update
-
If you are downgrading a group of switches, the process is identical to the process for updating a group of switches, except that the target image that you choose will be earlier than the currently installed image. The text for dialogs, fields, buttons, and other controls in the UI specify “upgrade” even though you are downgrading the software.
EPLD downgrades are not supported and EPLD upgrades are always disruptive.
-
For switches running on NX-OS 9.3(11), there is an issue when upgrading the EPLD along with NX-OS using the
install alloption. This is not an issue with switches running on a release after NX-OS 9.3(11).To resolve this issue, follow these steps for an upgrade in this situation:
-
Install the NX-OS image from 9.3(11) to the destination version.
-
After the NX-OS upgrade, install the EPLD image.
-
Guidelines and limitations: Non-disruptive upgrade
-
Non-Disruptive update is not supported on Catalyst devices.
-
An EPLD upgrade using the
install allcommand when upgrading switches using the non-disruptive option is not supported on these switch platforms on the NX-OS 10.5.3 version for the bundled image:-
N9K-C93180YC-FX
-
N9K-C93108TC-FX
-
N9K-C9348GC-FXP
-
N9K-C93240YC-FX2
-
N9K-C9336C-FX2
-
N9K-C9364C
-
N9K-C9332C
-
N9K-C9232C
-
N9K-SUP-A+
-
N9K-SUP-B+
-
N3K-C36180YC-R
-
N3K-C3636C-R
-
N9K-SUP-A
-
N9K-SUP-B
In these cases, use the
install epldcommand separately to update the EPLD. -
Download an image from the Software Download website
This section describes how to download an image from the software download website.
-
Go to the Software Download Website.
-
Log in with your credentials.
You need to be logged in to download the software.
-
Navigate to Switches, choose a series and a switch.
-
Choose a software type:
-
For Nexus switches:
-
NX-OS EPLD Updates
-
NX-OS Firmware
-
NX-OS Patch Release
-
NX-OS Software Maintenance Upgrades (SMU)
-
NX-OS System Software
-
-
For Cisco Catalyst switches: IOS XE Software
For Cisco Catalyst switches, Nexus Dashboard provides support for software upgrade using CAT9K and CAT9K_LITE image types.
-
-
Choose the software file you want to download and click the download icon.
Upload the image to Nexus Dashboard
This section describes how to upload the image.
-
In some cases, you can download an SMU image from the Software Download website wherein multiple RPMs are bundled together as a .tar file, and Nexus Dashboard allows you to upload this type of bundled .tar file to Nexus Dashboard. However, Nexus Dashboard normally does not allow you to upload any other type of bundled .tar file, so if you try to upload a bundled .tar file and you see an error message, use a .zip format instead for the bundle.
-
If you are about to upload a compacted NX-OS image to the Nexus Dashboard image repository and another NX-OS image with the same name is currently in the repository, you might overwrite the existing (older) NX-OS image with the newer NX-OS image that you are about to upload. You can avoid overwriting the existing image using the following method:
-
Upgrade the switches that can use normal NX-OS image first.
-
Delete the normal NX-OS image from the Nexus Dashboard repository using the Image Upload screen.
-
Upload the compact image and upgrade the other set of switches.
-
-
Nexus Dashboard has these limitations for image management images stored under Images:
-
12 GB limitation for virtual Nexus Dashboards (vNDs), and physical Nexus Dashboards (pNDs) other than the ND-NODE-G5L (UCS-C225-M8)
-
36 GB limitation for the ND-NODE-G5L (UCS-C225-M8)
-
-
You can upload up to three images simultaneously.
-
Navigate to the Fabric Software page for NX-OS and IOS-XE fabrics.
-
In the Fabric Software page, choose Images.
-
From the Actions drop-down list, select Upload.
-
In the Upload Image dialog box, either upload the file from a local device or import it from SCP or SFTP.
-
For Import from SCP/SFTP, choose pre-defined remote servers from the Remote server name drop-down list.
-
Uploading an image to SCP or SFTP server from a non-Unix based device is not supported.
-
-
Click Verify.
Now, the uploaded image is validated, downloaded and copied, and then verified.
Attach or detach update groups to the switches
This section describes how to attach or detach switches to or from an update group. Grouping allows you to track upgrades for a set of switches. You can create several groups and select a switch regardless of the group, role, or type of switch.
We recommend that you create update groups based on the roles of the switches. For example, if a fabric has multiple switches with different roles, such as Leaf, Spine, Border, and more, creating groups based on different roles is recommended. This clearly separates roles and responsibilities during switch image management operations. Switches with different roles perform critical functionality and respond differently based on the control plane, data plane, and system-level convergence.
A user with admin role can create multiple groups as listed:
-
Group-Leaf-Even for Leaf switches that have even numbers or VPC role of primary
-
Group-Leaf-Odd for Leaf switches that have odd numbers or VPC role of secondary
You can automatically assign groups based on these criteria:
-
Role-based: All switches of a given role for a fabric in the same group
-
Even-odd: Switches that are grouped in odd or even groups:
-
Switches that have even numbers or vPC role of primary
-
Switches that have odd numbers or vPC role of secondary
-
Update groups have checks to avoid unnecessary downtime in redundant fabrics in these cases:
-
Switches belonging to different fabrics are not allowed to form an update group.
-
Virtual Port Channel (vPC) peers are placed in different groups by default.
Typically, Spine and Border devices are limited to fabric, while the role of the Leaf is the most common one. Therefore, users with the admin role can upgrade individual Spines followed by Individual Borders, or create different groups for Spines and Borders. Users with the admin role can still leverage groups to divide the Leaf role switches and perform bulk actions.
-
Navigate to the Fabric Software page for NX-OS and IOS-XE fabrics.
-
In the Fabric Software page, choose Devices.
-
In the Devices page, place a checkmark in the checkbox for the devices you want to group.
-
From the Actions drop-down list, select Modify groups.
-
In the Modify groups dialog box, click the radio button to either Attach Group or Detach Group.
-
Select Attach Group and choose Create Group to create a new group or select an existing group from the Group drop-down list.
-
To create a group, enter a group name in the Modify groups dialog box.
-
Click Save.
-
-
Select Detach Group and click Detach to detach the devices from a group. This deletes the Update group, if it is not assigned to any switches.
-
Update group name character limit: Limit update group names to 128 characters. Although the API allows longer names for backward compatibility, the Nexus Dashboard UI prevents you from saving names that exceed this limit.
Auto-generate update groups
This section describes how to auto-generate update groups from the Update groups tab. Devices that are not associated with any update group are listed under None.
For a given fabric, you can create update groups either based on role or odd-even grouping. Creating update groups based on the roles, such as Leaf, Spine, Border, and more, clearly separates roles and responsibilities during switch image management operations. Switches with different roles perform critical functionality and respond differently based on the control plane, data plane, and system-level convergence.
For the odd-even auto-grouping mechanism, devices within each role are assigned to the odd or even group alternately. This ensures that route reflectors and rendezvous are not placed in the same group thereby enabling redundancy.
All vPC primary devices are placed in even groups while all vPC secondary are placed in odd groups.
-
Navigate to the Fabric Software page for NX-OS and IOS-XE fabrics.
-
In the Fabric Software page, choose Update Groups.
-
From the Actions drop-down list, select Auto-generate groups.
-
In the Auto-generate update groups dialog box, choose the Fabric and Type.
-
For Type, choose between Role-based or Even odd.
-
-
Click Save.
Change mode for switches
This section describes how to change mode for one or more switches.
For a supported fabric in monitor mode, the Change Mode action is available only if Image management in monitor mode is enabled for the fabric.
-
Navigate to the Fabric Software page for NX-OS and IOS-XE fabrics.
-
In the Fabric Software page, choose Devices.
-
In the Devices page, place a checkmark in the checkbox for the devices you want.
The selected devices must be in the same fabric.
-
From the Actions drop-down list, select Change Mode.
-
In the Change Mode dialog box, choose either Normal or Maintenance mode.
-
Click Deploy Now or Deploy Later.
To view the deployment details for a Change Mode operation, open the Switch Overview page and choose History > Deployment History.
Understand Fabric Software for ACI fabrics
This section provides detailed information for the Fabric Software feature in Nexus Dashboard for ACI fabrics.
Navigate to the Fabric Software page for ACI fabrics
To navigate to the Fabric Software page:
-
Click Manage > Fabric Software.
-
Click the ACI tab.
-
Cisco’s recommended versions: The software versions that Cisco recommends. These are the latest versions available for upgrade or for running an analysis.
-
Current version: This is the software version that the fabric is currently running.
-
Recommended: Displays the recommended software version to upgrade to. This version is determined based on the current version the fabric is running on.
For example, if the fabric is currently on version 6.0(3d), then the Recommended version indicates 6.0(3d). However, if the Current version is newer than the recommended versions, then this field will be blank.
-
NOTE:
-
Delta analysis is no longer a part of the post-upgrade assist workflow. In Delta analysis, you can only run an analysis per fabric unlike Upgrade assist, where you can choose a subset of devices to analyse.
-
When you initially run an analysis, you can Rerun the report from the Pre-update analysis drawer to collect fresh data. Once your devices are upgraded, you can run a post-upgrade analysis. However, this disables the Rerun the report button in the pre-update analysis drawer.
Understand the information provided in the Fabric Software page for ACI fabrics
-
Connect to Intersight if you are not connected already.
Hover over the link icon in the Software Versions area to see if you are connected to Intersight. Intersight connectivity is required for Nexus Dashboard to automatically check for recommended software versions for the ACI fabrics. See Working with Intersight for more information.
-
Review the information in the Software Versions area.
The Software Versions area provides information on recommended software releases for your ACI fabrics and links to the Release Notes for those software releases.
Copyright
THE SPECIFICATIONS AND INFORMATION REGARDING THE PRODUCTS IN THIS MANUAL ARE SUBJECT TO CHANGE WITHOUT NOTICE. ALL STATEMENTS, INFORMATION, AND RECOMMENDATIONS IN THIS MANUAL ARE BELIEVED TO BE ACCURATE BUT ARE PRESENTED WITHOUT WARRANTY OF ANY KIND, EXPRESS OR IMPLIED. USERS MUST TAKE FULL RESPONSIBILITY FOR THEIR APPLICATION OF ANY PRODUCTS.
THE SOFTWARE LICENSE AND LIMITED WARRANTY FOR THE ACCOMPANYING PRODUCT ARE SET FORTH IN THE INFORMATION PACKET THAT SHIPPED WITH THE PRODUCT AND ARE INCORPORATED HEREIN BY THIS REFERENCE. IF YOU ARE UNABLE TO LOCATE THE SOFTWARE LICENSE OR LIMITED WARRANTY, CONTACT YOUR CISCO REPRESENTATIVE FOR A COPY.
The Cisco implementation of TCP header compression is an adaptation of a program developed by the University of California, Berkeley (UCB) as part of UCB’s public domain version of the UNIX operating system. All rights reserved. Copyright © 1981, Regents of the University of California.
NOTWITHSTANDING ANY OTHER WARRANTY HEREIN, ALL DOCUMENT FILES AND SOFTWARE OF THESE SUPPLIERS ARE PROVIDED “AS IS" WITH ALL FAULTS. CISCO AND THE ABOVE-NAMED SUPPLIERS DISCLAIM ALL WARRANTIES, EXPRESSED OR IMPLIED, INCLUDING, WITHOUT LIMITATION, THOSE OF MERCHANTABILITY, FITNESS FOR A PARTICULAR PURPOSE AND NONINFRINGEMENT OR ARISING FROM A COURSE OF DEALING, USAGE, OR TRADE PRACTICE.
IN NO EVENT SHALL CISCO OR ITS SUPPLIERS BE LIABLE FOR ANY INDIRECT, SPECIAL, CONSEQUENTIAL, OR INCIDENTAL DAMAGES, INCLUDING, WITHOUT LIMITATION, LOST PROFITS OR LOSS OR DAMAGE TO DATA ARISING OUT OF THE USE OR INABILITY TO USE THIS MANUAL, EVEN IF CISCO OR ITS SUPPLIERS HAVE BEEN ADVISED OF THE POSSIBILITY OF SUCH DAMAGES.
Any Internet Protocol (IP) addresses and phone numbers used in this document are not intended to be actual addresses and phone numbers. Any examples, command display output, network topology diagrams, and other figures included in the document are shown for illustrative purposes only. Any use of actual IP addresses or phone numbers in illustrative content is unintentional and coincidental.
The documentation set for this product strives to use bias-free language. For the purposes of this documentation set, bias-free is defined as language that does not imply discrimination based on age, disability, gender, racial identity, ethnic identity, sexual orientation, socioeconomic status, and intersectionality. Exceptions may be present in the documentation due to language that is hardcoded in the user interfaces of the product software, language used based on RFP documentation, or language that is used by a referenced third-party product.
Cisco and the Cisco logo are trademarks or registered trademarks of Cisco and/or its affiliates in the U.S. and other countries. To view a list of Cisco trademarks, go to this URL: https://www.cisco.com/go/trademarks. Third-party trademarks mentioned are the property of their respective owners. The use of the word partner does not imply a partnership relationship between Cisco and any other company. (1110R)
© 2017-2026 Cisco Systems, Inc. All rights reserved.
Americas Headquarters
Cisco Systems, Inc.
170 West Tasman Drive
San Jose, CA 95134-1706
USA
https://www.cisco.com
Tel: 408 526-4000
800 553-NETS (6387)
Fax: 408 527-0883