
New and changed information
The following table provides an overview of the significant changes up to this current release. The table does not provide an exhaustive list of all changes or of the new features up to this release.
| Release Version | Feature | Description |
|---|---|---|
|
Nexus Dashboard 4.2.1 |
Automatic reconciliation of local operational switch changes |
Beginning with Nexus Dashboard 4.2.1, Nexus Dashboard supports the detection and reconciliation of operational (local) configuration changes made directly on managed Nexus switches. This enhancement enables automatic identification of configuration drift, detailed difference review, and user-driven reconciliation actions, ensuring the dashboard remains the single source of truth. This feature is supported only on the Data Center VXLAN EVPN fabric type. For more information, see Reconciliation of local operational switch changes. |
Configuration compliance
The entire intent or expected configuration defined for a given switch is stored in Nexus Dashboard. When you want to push this configuration down to one or more switches, the configuration compliance (CC) module is triggered. Configuration compliance takes the current intent, the current running configuration, and then comes up with the set of configurations that are required to go from the current running configuration to the current expected configuration so that everything will be In-Sync.
When performing a software or firmware upgrade on the switches, the current running configuration on the switches is not changed. Post upgrade, if CC finds that the current running configuration does not have the current expected configuration or intent, it reports an Out-of-Sync status. There is no auto deployment of any configurations. You can preview the differences that will get deployed to get one or more devices back In-Sync.
By default, CC synchronizes configuration from Nexus Dashboard to the switches. If you make a change out-of-band on the switches that conflicts with the defined intent in Nexus Dashboard, CC captures this difference and indicates that the device is Out-of-Sync. The pending differences undo the out-of-band configurations to bring the device back In-Sync.
Beginning with Nexus Dashboard 4.2.1, you can also perform a reverse sync using the reconciliation feature. Reconciliation lets you incorporate supported local operational (out-of-band) changes made directly on a managed Nexus switch into the Nexus Dashboard intent, rather than overwriting them. This capability is supported only on the Data Center VXLAN EVPN fabric type. For more information, see Reconciliation of local operational switch changes.
Note that such conflicts due to out-of-band changes are captured by the periodic CC or when you click the Resync button either on a per fabric or per switch basis. The periodic CC runs every 24 hours.
You can configure the custom interval within a range of 30-3600 minutes. To configure custom interval, navigate to Admin > System Settings > General. Under Advanced Settings enable the Display advanced settings and options for TAC support option. Once the advanced settings are enabled, go to Admin > System Settings > Fabric management > Advanced settings > LAN-Fabric to adjust the configuration compliance time interval.
Note that you can also use the CC REST API to capture out-of-band changes for the switch. For more information, see Cisco Nexus Dashboard REST API Guide.
To improve ease of use and readability of deployed configurations, CC in Nexus Dashboard has been enhanced with the following:
-
All displayed configurations in Nexus Dashboard are easily readable and understandable.
-
Repeated configuration snippets are not displayed.
-
Pending configurations precisely show only the configuration difference.
-
Side-by-side differences has greater readability, integrated search or copy, and difference summary functions.
Top-level configuration commands on the switch that do not have any associated Nexus Dashboard intent are not checked for compliance by CC. However, CC performs compliance checks, and attempts removal, of the following commands even if there is no Nexus Dashboard intent:
-
configure profile
-
apply profile
-
interface vlan
-
interface loopback
-
interface Portchannel
-
Sub-interfaces, for example, interface EthernetX/Y.Z
-
fex
-
vlan <vlan-ids>
CC performs compliance checks, and attempts removal, of these commands only when Data Center VXLAN EVPN and Routed (BGP) templates are used. On External and inter-fabric connectivity and Classic LAN templates, top-level configuration commands on the switch, including the commands mentioned above, that do not have any associated Nexus Dashboard intent are not checked for compliance by CC.
We recommend using the Nexus Dashboard freeform configuration template to create additional intent and deploy these commands to the switches to avoid unexpected behavior
Now, consider a scenario in which the configuration that exists on the switch has no relationship with the configuration defined in the intent. Examples of such configurations are a new feature that has not been captured in the intent but is present on the switch or some other configuration aspect that has not been captured in the intent. Configuration compliance does not consider these configuration mismatches as a difference. In such cases, strict configuration compliance ensures that every configuration line that is defined in the intent is the only configuration that exists on the switch. However, configurations such as boot string, ROM monitor configuration, and other default configurations are ignored during strict configuration compliance checks. For such cases, the internal configuration compliance engine ensures that these configuration changes are not called out as differences. These differences are also not displayed in the Pending config page. The side-by-side difference utility compares the difference in the two text files and does not leverage the internal logic used in the difference computation. As a result, the difference in default configurations are highlighted in red in the Side-by-side Comparison page.
In Nexus Dashboard, the differences in the default configurations are not highlighted in the Side-by-side Comparison page. The auto-generated default configuration that is highlighted in the Running config page is not visible in the Expected config page.
Any configurations that are shown in the Pending Config page are highlighted in red in the Side-by-side Comparison page if the configurations are seen in the Running config page but not in the Expected config page. Also, any configurations that are shown in the Pending config page are highlighted in green in the Side-by-side Comparison page if the configurations are seen in the Expected config page but not in the Running config page. If there are no configurations displayed in the Pending config page, no configurations are shown in red in the Side-by-side Comparison page.
All freeform configurations have to strictly match the show running configuration output on the switch and any deviations from the configuration will show up as a difference during Recalculate & Deploy. You need to adhere to the leading space indentations.
You can typically enter configuration snippets in Nexus Dashboard using the following methods:
-
User-defined profile and templates
-
Switch, interface, overlay, and vPC freeform configurations
-
Network and VRF per switch freeform configurations
-
Fabric settings for Leaf, Spine, or iBGP configurations

The configuration format should be identical to the show running configuration of the corresponding switch. Otherwise, any missing or incorrect leading spaces in the configuration can cause unexpected deployment errors and unpredictable pending configurations. If any unexpected difference or deployment errors are displayed, check the user-provided or custom configuration snippets for incorrect values.
If Nexus Dashboard displays the "Out-of-Sync" status due to unexpected pending configurations, and this configuration is either unable to be deployed or stays consistent even after a deployment, perform the following steps to recover:
-
Check the lines of configuration highlighted under the Pending config in the Config preview page. Nexus Dashboard Pending config is enhanced to display the complete pending configuration.
-
Check the same lines in the corresponding Side-by-side Comparison page. This shows whether the difference exists in "intent", or "show run", or in both with different leading spaces. Leading spaces are highlighted in the Side-by-side Comparison page and is enhanced to display both the Running config and the Expected config with the current status of the configuration.
-
If the pending configurations or switch with an out-of-sync status is due to any identifiable configuration with mismatched leading spaces in "intent" and "running configuration", this indicates that the intent has incorrect spacing and needs to be edited.
-
To edit incorrect spacing on any custom or user-defined policies, navigate to the switch and edit the corresponding policy:
-
If the source of the policy is UNDERLAY, you will need to edit this from the Fabric settings screen and save the updated configuration.
-
If the source is blank, it can be edited from the View/Edit policies page for that switch.
-
If the source of the policy is OVERLAY, but it is derived from a switch freeform configuration. In this case, navigate to the appropriate OVERLAY switch freeform configuration and update it.
-
If the source of the policy is OVERLAY or a custom template, perform the following steps:
-
Choose Admin > System Settings > Fabric management > Advanced settings > LAN-Fabric, set the template.in_use.check property to false and uncheck the Template In-Use Override check box and Save. This allows the profiles or templates to be editable.
-
Edit the specific profile or template from the Manage > Template Library > Edit template properties page, and save the updated profile template with the right spacing.
-
Click Recalculate & Deploy to recompute the difference for the impacted switches.
-
After the configurations are updated, set the template.in_use.check property to true and check the Template In-Use Override check box and Save, as it slows down the performance of the Nexus Dashboard system, specifically for Recalculate & Deploy operations.
-
-
If Nexus Dashboard displays "NA" in the Config Status, the following guidelines apply:
-
It is expected when the switch 'Mode' is 'Migration'. This could be due to some of the Nexus Dashboard work flows. Follow the associated work flow steps to get the switch mode to the 'Normal' state and associated Config Status.
-
In all other cases, it may indicate a transient state where Nexus Dashboard was not able to compute the correct 'Config Status'. Do the following:
-
If seen on one switch, then perform switch level Preview or Deploy.
-
If seen on multiple switches, then select those switches and perform Preview or Deploy.
-
If seen at a fabric level, then select all switches and perform Preview or Deploy.
-
R&D is also an option for fabric level but this does a Config Save operation as well which could take time in a large fabric.
-
To confirm that the differences have been resolved, click Recalculate & Deploy after updating the policy to validate the changes.
Nexus Dashboard checks only leading spaces, as it implies hierarchy of the command, especially in case of multi-command sequences. Nexus Dashboard does not check any trailing spaces in command sequences.
Restrictions and limitations for reconciliation
-
ACL name case-sensitivity: Nexus Dashboard configuration compliance and reconciliation are case-sensitive for ACL names. If the case of an ACL name in the intent does not match the switch configuration, Recalculate and Deploy fails with an
acl_namedoes not match error. To resolve this, ensure consistent casing or see the Resolve differences for case-insensitive commands section. -
Fabric-dependent configurations: The reconciliation process does not honor configurations that depend on fabric settings.
-
Reconciliation does not restore features removed through no feature commands, such as no feature ospf, performed out-of-band.
-
The reconciliation process does not modify the Nexus Dashboard intent based on OOB feature removals.
-
To restore these features, use the Recalculate and Deploy or Push Config workflows to reapply the defined intent.
-
Reconciliation of local operational switch changes is supported only on the Data Center VXLAN EVPN fabric type. Other fabric types do not support automatic reconciliation.
-
In Nexus Dashboard 4.2.1, the reconciliation does not support:
-
Overlays
-
Links
-
Security groups
-
Layer 4 to Layer 7 (L4–L7) services
-
L3Outs
-
ACI-to-NX-OS integrations
-
Change control
-
Multitenancy
-
Roles: border super spine, border gateway super spine, super spine, and Top-of-Rack (ToR)
-
Example 1: Configuration Compliance in Switch Freeform Policy
Let us consider an example with an incorrect spacing in the Switch Freeform Configuration field.
Create the switch freeform policy.
After deploying this policy successfully to the switch, Nexus Dashboard persistently reports the differences.
After clicking Side-by-side Comparison, you can see the cause of the difference. The ip pim rp-address line has 2 leading spaces, while the running configuration has 0 leading spaces.
To resolve this difference, edit the corresponding Switch Freeform policy so that the spacing is correct.
After you save, you can use the Push Config or Recalculate & Deploy option to re-compute differences.
The differences are now resolved. The Side-by-side Comparison page confirms that the leading spaces are updated.
Example 2: Resolving a Leading Space Error in Overlay Configurations
Let us consider an example with a leading space error that is displayed in the Pending Config tab.
In the Side-by-side Comparison tab, search for differences line by line to understand context of the deployed configuration.
A matched count of 0 means that it is a special configuration that Nexus Dashboard has evaluated to push it to the switch.
You can see that the leading spaces are mismatched between running and expected configurations.
Navigate to the respective freeform configs and correct the leading spaces, and save the updated configuration.
Navigate to the Fabric Overview page for the fabric and click Recalculate & Deploy.
In the Deply Configuration page, you can see that all the devices are in-sync.
Network and VRF management
In Nexus Dashboard 4.1.1, you can export network and VRF configuration files for offline bulk editing and then import them. This unified import and export process streamlines bulk setup and provides a consistent workflow.
Configuration compliance in external fabrics
With external fabrics, any Nexus switches, Cisco IOS-XE devices, Cisco IOS XR devices, and Arista can be imported into the fabric, and there is no restriction on the type of deployment. It can be LAN Classic, VXLAN, FabricPath, vPC, HSRP, etc. When switches are imported into an external fabric, the configuration on the switches is retained so that it is non-disruptive. Only basic policies such as the switch username and mgmt0 interface are created after a switch import.
In the external fabric, for any intent that is defined in the Nexus Dashboard, configuration compliance (CC) ensures that this intent is present on the corresponding switch. If this intent is not present on the switch, CC reports an Out-of-Sync status. Additionally, there will be a Pending Config generated to push this intent to the switch to change the status to In-Sync. Any additional configuration that is on the switch but not in intent defined in Nexus Dashboard, will be ignored by CC, as long as there is no conflict with anything in the intent.
When there is user-defined intent added on Nexus Dashboard and the switch has additional configuration under the same top-level command, as mentioned earlier, CC will only ensure that the intent defined in Nexus Dashboard is present on the switch. When this user defined intent on Nexus Dashboard is deleted as a whole with the intention of removing it from the switch and the corresponding configuration exists on the switch, CC will report an Out-of-Sync status for the switch and will generate Pending Config to remove the config from the switch. This Pending Config includes the removal of the top-level command. This action leads to removal of the other out-of-band configurations made on the switch under this top-level command as well. If you choose to override this behavior, the recommendation is that, you create a freeform policy and add the relevant top-level command to the freeform policy.
Let us see this behavior with an example.
-
A switch_freeform policy defined by the user in Nexus Dashboard and deployed to the switch.
-
Additional configuration exists under router bgp in Running config that does not exist in user-defined Nexus Dashboard intent Expected config. Note that there is no Pending Config to remove the additional config that exists on the switch without a user defined intent on Nexus Dashboard.
-
The Pending Config and the Side-by-side Comparison when the intent that was pushed earlier via Nexus Dashboard is deleted from Nexus Dashboard by deleting the switch_freeform policy that was created in the Step 1.
-
A switch_freeform policy with the top-level router bgp command needs to be created. This enables CC to generate the configuration needed to remove only the desired sub-config which was pushed from Nexus Dashboard earlier.
-
The removed configuration is only the subset of the configuration that was pushed earlier from Nexus Dashboard.
For interfaces on the switch in the external fabric, Nexus Dashboard either manages the entire interface or does not manage it at all. CC checks interfaces in the following ways:
-
For any interface, if there is a policy defined and associated with it, then this interface is considered as managed. All configurations associated with this interface must be defined in the associated interface policy. This is applicable for both logical and physical interfaces. Otherwise, CC removes any out-of-band updates made to the interface to change the status to In-Sync.
-
Interfaces created out-of-band (applies for logical interfaces such as port-channels, sub interfaces, SVIs, loopbacks, etc.), will be discovered by Nexus Dashboard as part of the regular discovery process. However, since there is no intent for these interfaces, CC will not report an Out-of-Sync status for these interfaces.
-
For any interface, there can always be a monitor policy associated with it in Nexus Dashboard. In this case, CC will ignore the interface’s configuration when it reports the In-Sync or Out-of-Sync config compliance status.
-
Special configuration CLIs ignored for configuration compliance
The following configuration CLIs are ignored during configuration compliance checks:
-
Any CLI having 'username' along with 'password'
-
Any CLI that starts with ' snmp-server user <username> <role> auth'
Any CLIs that match the above will not show up in pending differences and clicking Save & Deploy in the Fabric Builder window will not push such configurations to the switch. These CLIs will not show up in the Side-by-side Comparison window also.
To deploy such configuration CLIs on a specific switch, perform the following procedure:
-
Choose Manage > Fabrics.
-
Click a fabric in the Name column.
The Overview page for that fabric appears.
-
Click Inventory > Switches.
-
On the Switches tab, click on a switch name to view the Switch Overview page.
-
Click Configuration Policies > Policies to view all the policies applied on the switch within the chosen fabric.
-
In Policies, click Actions > Add policy.
-
In the Add Policy page, enter the necessary information in the Priority and optional Description fields.
-
Click Select policy template, choose the appropriate policy template from the list, then click Select.
You are returned to the Add Policy page, with Configure policy as the action in the page.
-
Enter the necessary information in the Configure policy page, then click Save.
-
Verify the information in the Policy configuration summary page and click Done.
You are returned to the Policies page.
-
Repeat steps 6 - 10 to create additional policies, if necessary.
-
After you have finished creating the necessary policies, choose the created polic(ies) and click Actions > Push config to deploy the configuration to the switch(es).
Alternatively, use these procedures to deploy one or more configuration policies to multiple switches:
-
Choose Manage > Fabrics.
-
Click a fabric in the Name column.
The Overview page for that fabric appears.
-
Click Configuration policies > Policies to view all the policies applied on switches within the chosen fabric.
-
In Policies, click Actions > Add policy.
-
In the Add Policy page, choose one or more switches that you want to add the policy to in the Select switches page, then click Next.
-
In the Configure policy page, enter the necessary information in the Priority and optional Description fields.
-
Click Select policy template, choose the appropriate policy template from the list, then click Select.
You are returned to the Add Policy page, with Configure policy as the action in the page.
-
Enter the necessary information in the Configure policy page, then click Save.
-
Verify the information in the Policy configuration summary page and click Done.
You are returned to the Policies page.
-
Repeat steps 4 - 9 to create additional policies, if necessary.
-
After you have finished creating the necessary policies, choose the created polic(ies) and click Actions > Push config to deploy the configuration to the switch(es).
Note that the policies that you deploy are dependant on the switches that you chose in step 5 of these procedures.
Resolve differences for case-insensitive commands
By default, all differences generated in Nexus Dashboard while comparing intent, also known as the expected configuration, and the running configuration, are case-sensitive. However, a switch has many commands that are case-insensitive, and therefore it may not be appropriate to flag these commands as differences. These are captured in the compliance_case_insensitive_clis.txt template that can be found under Manage > Template Library.
If you apply access control lists (ACLs) out-of-band and exclude them from reconciliation, case-sensitivity can cause failures. Ensure that ACL names use the same case in the intent and the switch configuration, or adjust the case-insensitive Command template.
Enhanced Classic LAN (ECL) fabrics do not support the compliance_case_insensitive_clis.txt template and its defined regex patterns. To perform case-insensitive configuration compliance checks for these fabrics, enable the dedicated setting by following these steps.
-
Navigate to Admin > System Settings > Fabric management > Advanced settings > LAN-Fabric.
-
Check the Enable Case Insensitive Configuration Compliance check for Enhanced Classic LAN Fabrics option.
-
Click Save.
The compliance_case_insensitive_clis.txt file, along with the compliance_strict_cc_exclude_clis.txt and compliance_ipv6_clis.txt files, are part of the shipped templates. You can find all the templates in Manage > Template Library. Modification of templates can be done after disabling Template In-Use Override.
There could be additional commands that are not included in the existing compliance_case_insensitive_clis.txt file that should be treated as case insensitive. If the pending configuration is due to the differences of cases between the expected configuration in Nexus Dashboard and the running configuration, you can configure Nexus Dashboard to ignore these case differences as follows:
-
Navigate to Admin > System Settings > Fabric management > Advanced settings > LAN-Fabric, uncheck Template In-Use Override, and then click Save.
-
Navigate to Manage > Template Library and search for the compliance_case_insensitive_clis.txt file.
-
Check the content of the compliance_case_insensitive_clis.txt file by choosing Actions > Edit.
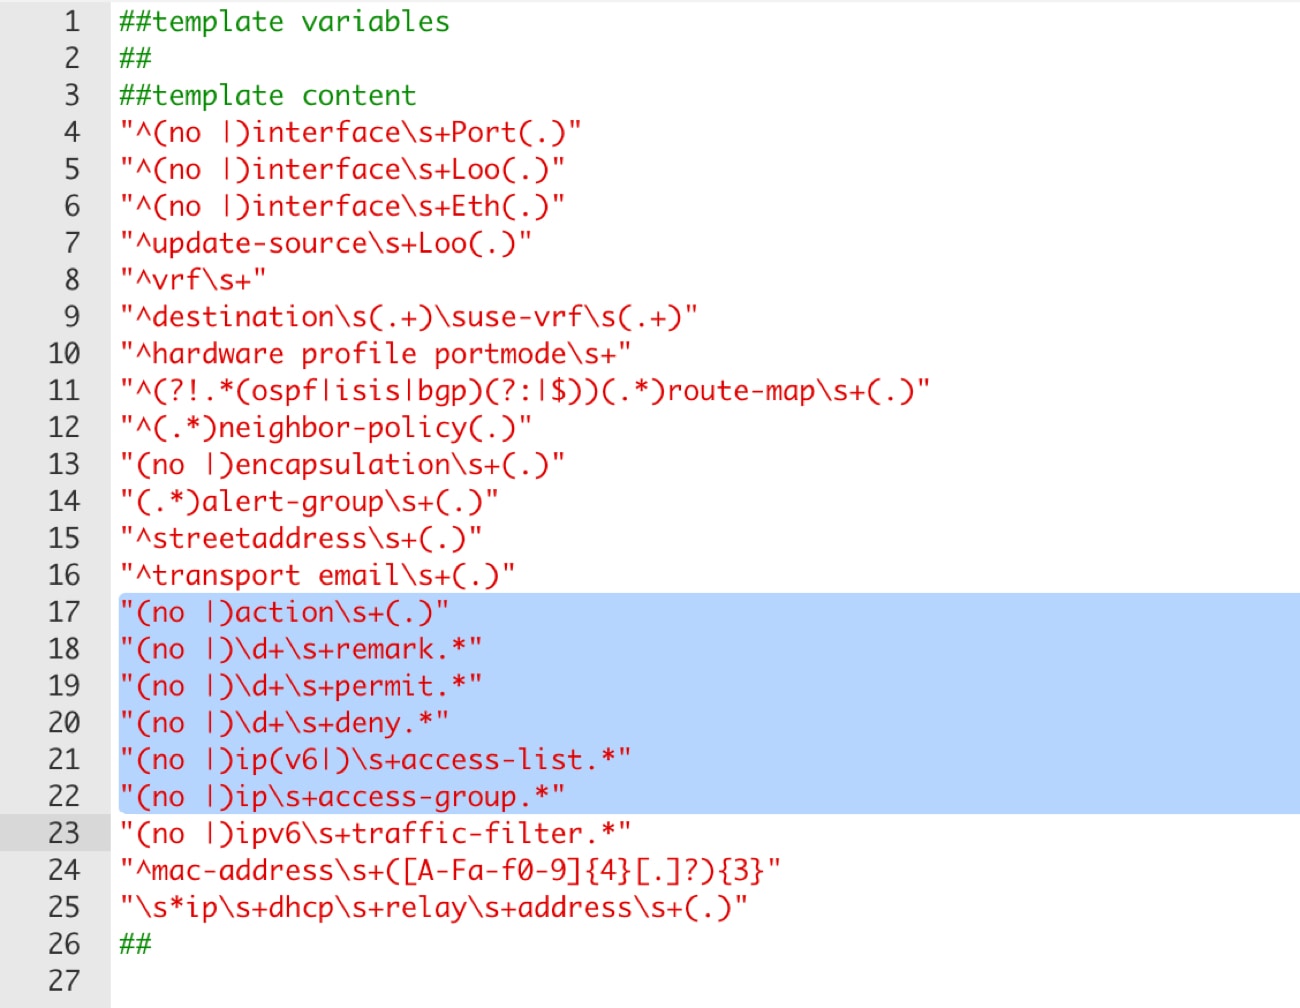
An example of the entries in the compliance_case_insensitive_clis.txt file is displayed in the following figure.
-
Remove the entries highlighted in the figure and click Finish.
The Nexus Dashboard upgrade process adds these two line as comments in the compliance_case_insensitive_clis template. You need to uncomment these lines. If you do not uncomment these two lines, the security group access control lists (SGACL) always displays as out-of-sync due to a mismatch between the VRF name in Nexus Dashboard and the Cisco NX-OS.
-
If newer patterns are detected during deployment, and they are triggering pending configurations, you can add these patterns to this file.
The patterns need to be valid Regular Expressions (regex) patterns. A Regular Expression is a sequence of characters that defines a search pattern. It is used by the Nexus Dashboard to match and identify specific command strings within the configuration that should be treated as case-insensitive. This allows the system to ignore minor formatting differences that do not affect the actual switch operation.
-
Navigate to Admin > System Settings > Fabric management > Advanced settings > LAN-Fabric, check Template In-Use Override, and then click Save.
This enables Nexus Dashboard to treat the documented configuration patterns as case insensitive while performing comparisons.
-
Click Recalculate & Deploy for your fabrics to see the updated comparison outputs.
Resolve configuration compliance after importing switches
After importing switches in Nexus Dashboard, configuration compliance for a switch can fail because of an extra space in the management interface (mgmt0) description field.
For example, before importing the switch:
interface mgmt0
  description SRC=SDS-LB-LF111-mgmt0, DST=SDS-LB-SW001-Fa0/5
After importing the switch and creating a configuration profile:
interface mgmt0
  description SRC=SDS-LB-LF111-mgmt0,DST=SDS-LB-SW001-Fa0/5
Navigate to the Interface Manager and click the Edit icon after selecting the mgmt0 interface. Remove the extra space in the description.
Strict configuration compliance
Strict configuration compliance checks for difference between the switch configuration and the associated intent and generates no commands for the configurations that present on the switch but are not present in the associated intent. When you click Recalculate and deploy, switch configurations that are not present on the associated intent are removed. You can enable this feature by choosing the Enable Strict Config Compliance check box under the Advanced tab in the Create Fabric or Edit Fabric window. By default, this feature is disabled.
The strict configuration compliance feature is supported on the Data Center VXLAN EVPN and Routed (BGP) templates. To avoid generating difference for commands that are auto-generated by the switch, such as vdc, rmon, and so on, a file that has a list of default commands is used by CC to ensure that differences are not generated for these commands. This file is maintained in the Manage > Template Library, compliance_strict_cc_exclude_clis.txt template.
Example: Strict Configuration Compliance
Let us consider an example in which the feature telnet command is configured on a switch but is not present in the intent. In such a scenario, the status of the switch is displayed as Out-of-sync after a CC check is done.
Now, click Preview Config of the out-of-sync switch. As the strict configuration compliance feature is enabled, the no form of the feature telnet command appears under Pending Config in the Preview Config window.
Click the Side-by-side Comparison tab to display the differences between the running configuration and the expected configuration. The Re-sync button is also displayed at the top right corner under the Side-by-side Comparison tab in the Preview Config window. Use this option to resynchronize Nexus Dashboard state when there is a large scale out-of-band change, or if configuration changes do not register in the Nexus Dashboard properly.
The re-sync operation does a full CC run for the switch and recollects "show run" and "show run all" commands from the switch. When you initiate the re-sync process, a progress message is displayed. During the re-sync, the running configuration is taken from the switch. The Out-of- Sync/In-Sync status for the switch is recalculated based on the intent defined in Nexus Dashboard.
Now, close the Preview Config window and click Recalculate and deploy. The strict configuration compliance feature ensures that the running configuration on the switch does not deviate from the intent by pushing the no form of the feature telnet command to the switch. The difference between the configurations is highlighted. The difference other than the feature telnet command are default switch and boot configurations and are ignored by the strict CC check.
You can right-click on a switch in the Fabric Overview window and select Preview Config to display the Preview Config window. This window displays the pending configuration that has to be pushed to the switch to achieve configuration compliance with the intent.
Custom freeform configurations can be added in Nexus Dashboard to make the intended configuration on Nexus Dashboard and the switch configurations identical. The switches are then in In-Sync status. For more information on how to add custom freeform configurations on Nexus Dashboard, refer to the section "Enable freeform configurations on fabric switches" in Working with Inventory in Your Nexus Dashboard LAN or IPFM Fabrics.
Reconciliation of local operational switch changes
Nexus Dashboard detects and reconciles operational changes that users make directly on managed Nexus switches outside the Nexus Dashboard intent model. This capability ensures operational flexibility while maintaining configuration accuracy and compliance.
Nexus Dashboard supports automatic reconciliation for configuration compliance only on Nexus switches.
Reconciliation includes these main capabilities:
-
Automatic detection: Nexus Dashboard automatically, or on demand, compares the running configuration on each managed Nexus switch with the intended configuration stored in Nexus Dashboard templates.
-
Detailed difference review: When the system detects discrepancies (drift), it presents operators with a detailed difference view that highlights the configuration changes.
-
Reconciliation actions: Operators can incorporate local changes into Nexus Dashboard templates (Update Template), overwrite local changes on the switch with the Nexus Dashboard intent (deploy intent), and ignore specific changes as needed.
-
Switch-level reconciliation: Nexus Dashboard allows for the bulk reconciliation of all detected configuration changes on a switch. By clicking Reconcile, operators can incorporate the entire set of out-of-band configurations into the intent model in a single action, streamlining the synchronization process.
-
Granular block and line reconciliation: For precise control, operators can selectively reconcile specific parts of the configuration rather than the entire set. By clicking the ellipsis (…) next to a specific configuration line or a block of code, you can choose Add to reconcile to include only those specific changes.
-
-
Audit and governance: Nexus Dashboard logs all reconciliation actions for compliance and traceability.
-
Scope: Reconciliation supports operational (non-global) changes on Nexus devices only. It does not support overlays, security groups, links reconcile, L4-L7 services, or multi-tenancy.
Reconciliation identifies and corrects configuration drift caused by out-of-band (OOB) additions or modifications on the switch.
-
Supported actions: The reconciliation workflow supports these actions:
-
Identify OOB additions that are not in the intent database.
-
Sync modified OOB configurations to match the intent.
-
The reconciliation workflow follows these main steps:
-
Nexus Dashboard runs compliance checks automatically or on demand
-
When it detects local operational changes, Nexus Dashboard flags the affected switch as Out-of-Sync
-
Operators review the difference, select reconciliation actions, and confirm
-
Nexus Dashboard updates its intent, the switch configuration, or both, based on the selected action
-
The system logs all actions for audit purposes
Reconcile out-of-band configurations
Follow these steps to reconcile configuration drift on managed switches.
-
Choose Actions > Recalculate and Deploy > Resync or Resync All to detect configuration differences.
-
Identify devices with an Out of Sync status in the Configuration sync status column.
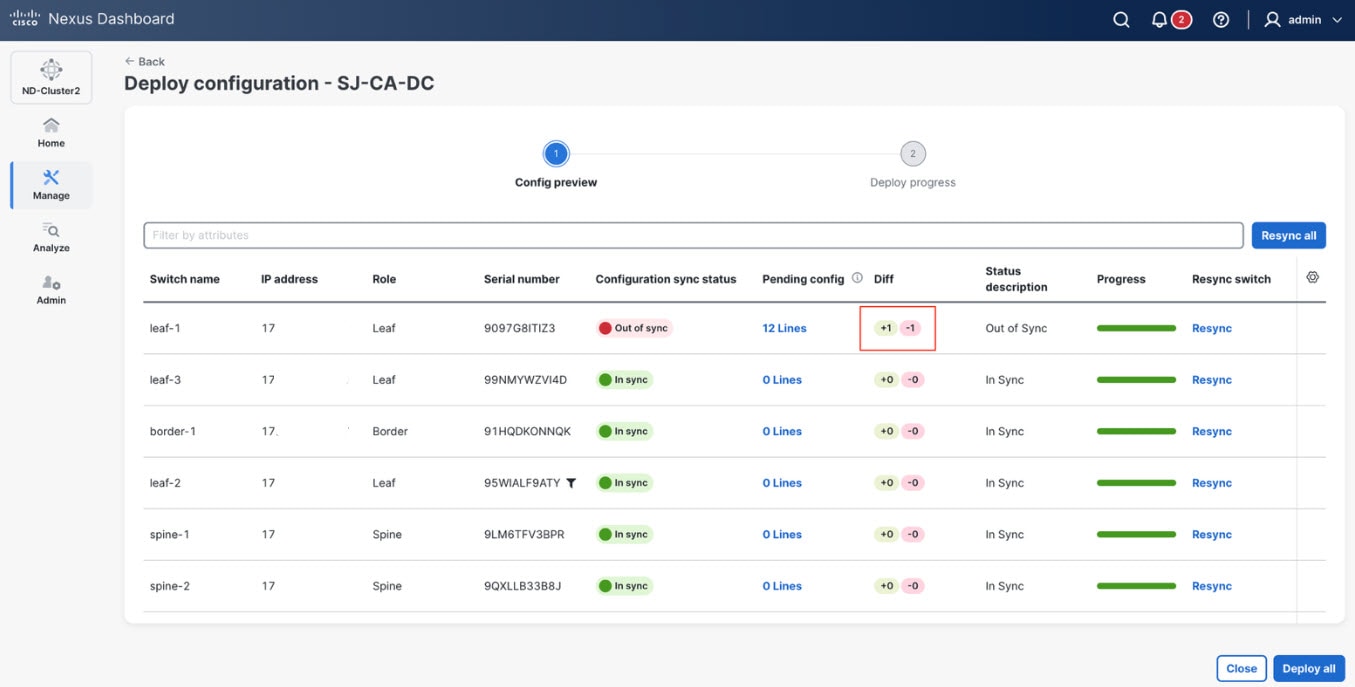
-
In the Diff column, select the value for the device you want to reconcile.
-
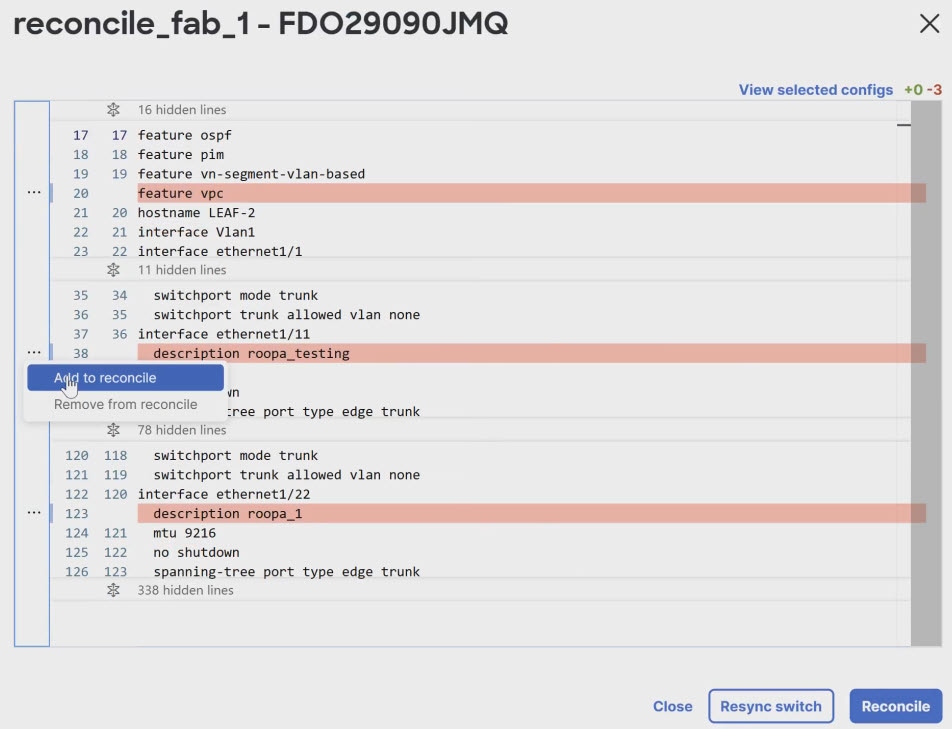
Reconcile the configuration using one of these methods:
-
To reconcile all configurations, click Reconcile.
-
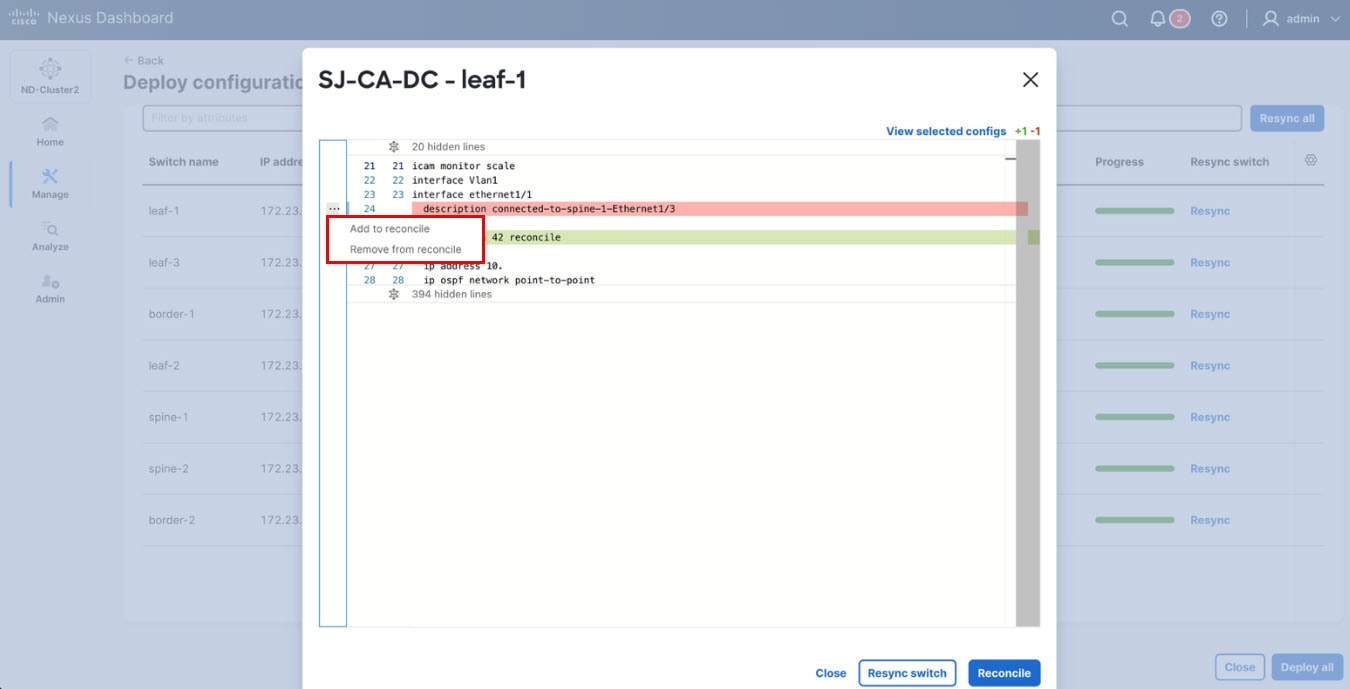
To reconcile specific changes, click the ellipsis (…) and select Add to reconcile to keep the out-of-band (OOB) change, or Remove from reconcile to discard it.
The reconcile page highlights all out-of-band (OOB) changes, including supported and unsupported changes. After you reconcile the supported changes, the unsupported changes remain highlighted, and the system overwrites them during deployment. To prevent the system from overwriting these changes, enter them in the corresponding templates.
-
-
Click Deploy.
Example: Reconciliation of local operational switch changes
Let us consider an example where you configure a new interface description directly on a Nexus switch CLI for troubleshooting. Later, Nexus Dashboard compliance check identifies this local operational change.
Using reconciliation, you can also setup global configuration, ACLs, and route maps.
-
Nexus Dashboard runs a scheduled or on-demand compliance check and detects that the running configuration on Switch A differs from the Nexus Dashboard intent.
-
Open the compliance report to see the difference highlights the new interface description added directly on the switch.
-
Choose Reconcile to add the new interface description into the Nexus Dashboard intent.
-
Audit and confirm the action is logged in system policy history, and Switch A returns to a compliant status.
-
The operational change is reconciled with Nexus Dashboard, ensuring that Nexus Dashboard continues to represent the single source of truth while accommodating necessary local actions.
Copyright
THE SPECIFICATIONS AND INFORMATION REGARDING THE PRODUCTS IN THIS MANUAL ARE SUBJECT TO CHANGE WITHOUT NOTICE. ALL STATEMENTS, INFORMATION, AND RECOMMENDATIONS IN THIS MANUAL ARE BELIEVED TO BE ACCURATE BUT ARE PRESENTED WITHOUT WARRANTY OF ANY KIND, EXPRESS OR IMPLIED. USERS MUST TAKE FULL RESPONSIBILITY FOR THEIR APPLICATION OF ANY PRODUCTS.
THE SOFTWARE LICENSE AND LIMITED WARRANTY FOR THE ACCOMPANYING PRODUCT ARE SET FORTH IN THE INFORMATION PACKET THAT SHIPPED WITH THE PRODUCT AND ARE INCORPORATED HEREIN BY THIS REFERENCE. IF YOU ARE UNABLE TO LOCATE THE SOFTWARE LICENSE OR LIMITED WARRANTY, CONTACT YOUR CISCO REPRESENTATIVE FOR A COPY.
The Cisco implementation of TCP header compression is an adaptation of a program developed by the University of California, Berkeley (UCB) as part of UCB’s public domain version of the UNIX operating system. All rights reserved. Copyright © 1981, Regents of the University of California.
NOTWITHSTANDING ANY OTHER WARRANTY HEREIN, ALL DOCUMENT FILES AND SOFTWARE OF THESE SUPPLIERS ARE PROVIDED “AS IS" WITH ALL FAULTS. CISCO AND THE ABOVE-NAMED SUPPLIERS DISCLAIM ALL WARRANTIES, EXPRESSED OR IMPLIED, INCLUDING, WITHOUT LIMITATION, THOSE OF MERCHANTABILITY, FITNESS FOR A PARTICULAR PURPOSE AND NONINFRINGEMENT OR ARISING FROM A COURSE OF DEALING, USAGE, OR TRADE PRACTICE.
IN NO EVENT SHALL CISCO OR ITS SUPPLIERS BE LIABLE FOR ANY INDIRECT, SPECIAL, CONSEQUENTIAL, OR INCIDENTAL DAMAGES, INCLUDING, WITHOUT LIMITATION, LOST PROFITS OR LOSS OR DAMAGE TO DATA ARISING OUT OF THE USE OR INABILITY TO USE THIS MANUAL, EVEN IF CISCO OR ITS SUPPLIERS HAVE BEEN ADVISED OF THE POSSIBILITY OF SUCH DAMAGES.
Any Internet Protocol (IP) addresses and phone numbers used in this document are not intended to be actual addresses and phone numbers. Any examples, command display output, network topology diagrams, and other figures included in the document are shown for illustrative purposes only. Any use of actual IP addresses or phone numbers in illustrative content is unintentional and coincidental.
The documentation set for this product strives to use bias-free language. For the purposes of this documentation set, bias-free is defined as language that does not imply discrimination based on age, disability, gender, racial identity, ethnic identity, sexual orientation, socioeconomic status, and intersectionality. Exceptions may be present in the documentation due to language that is hardcoded in the user interfaces of the product software, language used based on RFP documentation, or language that is used by a referenced third-party product.
Cisco and the Cisco logo are trademarks or registered trademarks of Cisco and/or its affiliates in the U.S. and other countries. To view a list of Cisco trademarks, go to this URL: https://www.cisco.com/go/trademarks. Third-party trademarks mentioned are the property of their respective owners. The use of the word partner does not imply a partnership relationship between Cisco and any other company. (1110R)
© 2017-2026 Cisco Systems, Inc. All rights reserved.
Americas Headquarters
Cisco Systems, Inc.
170 West Tasman Drive
San Jose, CA 95134-1706
USA
https://www.cisco.com
Tel: 408 526-4000
800 553-NETS (6387)
Fax: 408 527-0883