
New and changed information
The following table provides an overview of the significant changes up to this current release. The table does not provide an exhaustive list of all changes or of the new features up to this release.
| Release Version | Feature | Description |
|---|---|---|
|
Nexus Dashboard 4.1.1 |
Improved navigation and workflow when configuring external connectivity (L3Out) |
Beginning with Nexus Dashboard 4.1.1, the navigation and workflow when configuring external connectivity (L3Out) in Nexus Dashboard ACI fabrics have been enhanced. |
L3Out template overview
Nexus Dashboard has a number of policies for creating and configuring L3Out for Cisco ACI fabrics, as well as a template type specifically for IP-based L3Out and SR-MPLS VRF L3Out configurations.
The entire configuration of L3Outs and SR-MPLS L3Outs (including nodes, interfaces, and other settings) can be done directly in Nexus Dashboard and deployed to all fabrics in your Multi-Fabric domain. To achieve this, an L3Out-specific template type is available to contain the L3Out and SR-MPLS VRF L3Out configurations. Similar to Application templates, L3Out templates have a one-to-one association with tenants but unlike Application templates, an L3Out template must be associated to a single fabric only.

-
The legacy L3Out objects in the Application templates remain functional for backward compatibility. However, if you want to define specific L3Out and SR-MPLS L3Out settings from Nexus Dashboard, you must use the new L3Out template type.
-
All SR-MPLS VRF L3Out configurations must be done using the L3Out-specific template. The SR-MPLS Infra L3Out configuration is still performed as part of the fabric connectivity provisioning workflow.
Templates and policy objects dependencies
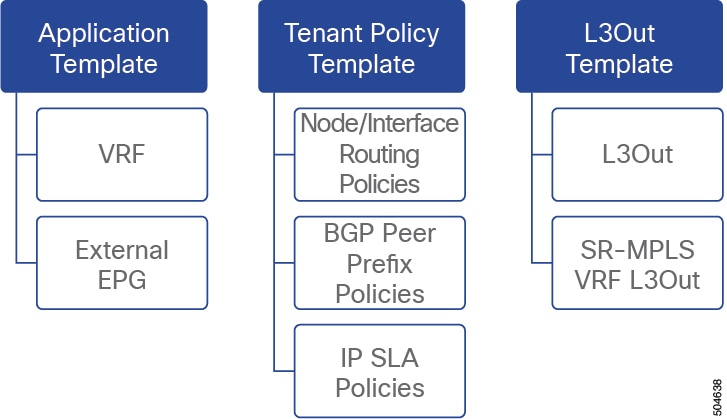
The following diagram illustrates the template and policy hierarchy across multiple templates that’s required for defining a complete L3Out configuration:
-
The VRF used by the L3Out and the External EPGs that are associated to the L3Out continue to be defined in the Application templates.
-
Node or interface routing policies, BGP peer prefix, and IP SLA policies are now defined in the Tenant Policy template.
These policies are used by the L3Out-specific template and the policies defined in that template as described in the following bullet point.
-
For IP-based L3Outs, the template includes the following:
-
Routing Protocol (BGP/OSPF), VRF, L3 Domain and Route Maps for route control.
-
Border leaf switches (nodes) where to deploy the L3Out routing protocol and node-level protocol configurations.
-
Border leaf switch interfaces where to deploy the L3Out routing protocol and interface-level protocol configurations.
-
Node- and interface-level common configuration using Node/Interface Group policies.
Node Group configuration includes BGP peers for loopback interfaces, BFD multi-hop settings, and association with Node Routing Group Policy described below.
Interface Group configuration includes OSPF and BFD protocol settings and association with Interface Routing Group Policy described below.
These policies consume policies defined in Tenant Policy templates mentioned in the previous bullet point. For example, the node and interface group policies require the node and interface routing policies defined in the Tenant Policy templates
-
-
For SR-MPLS VRF L3Outs, the template allows you to define labels and import/export route maps for route control.
Tenant policy template: Node routing group policy
The L3Out Node policy in the tenant policy template is a set of protocol policies that can be applied at a node or border leaf level and can be used by node group policies in L3Out template. It includes the following 3 settings:
-
BFD MultiHop Settings — Specifies BFD parameters for BFD sessions established between devices on interfaces that are not directly connected.
-
BGP Node Settings — Allows you to configure BGP protocol timer and sessions settings for BGP adjacencies between BGP peers.
-
BGP Best Path Control — Enables
as-path multipath-relax, which allows load-balancing between multiple paths received from different BGP ASN.
This policy is configured and deployed using Tenant Policy templates and is used by the L3Outs configured in L3Out templates.
Tenant policy template: Interface routing group policy
The L3Out interface policy in Tenant Policy template is a set of policies that can be applied at an interface level and can be used by interface group policies in L3Out template. It includes the following 3 settings:
-
BFD Settings — Specifies BFD parameters for BFD sessions established between devices on interfaces that are directly connected.
When multiple protocols are enabled between a pair of routers, each protocol has its own link failure detection mechanism, which may have different timeouts. BFD provides a consistent timeout for all protocols to allow consistent and predictable convergence times.
-
BFD MultiHop Settings — Specifies BFD parameters for BFD sessions established between devices on interfaces that are not directly connected.
You can configure these settings at the node level as mentioned in the "Tenant Policy Template: Node Routing Group Policy" section above, in which case the interfaces inherit those settings, or you can overwrite the node-level settings for individual interfaces in the Interface Routing group policy.
BFD multi-hop configuration requires Cisco APIC release 5.0(1) or later.
-
OSPF Interface Settings — Allows you to configure interface-level settings such as OSPF network type, priority, cost, intervals and controls.
This policy must be created when deploying an L3Out with OSPF.
This policy is configured and deployed using Tenant Policy templates and is used by the L3Outs configured in L3Out templates.
Tenant policy template: Individual policies
In addition to the group policies described above, the Tenant Policy templates also contain the following individual policies related to L3Out configuration:
-
BGP peer prefix policy — Defines how many prefixes can be received from a neighbor and what action to take when the number of the allowed prefixes is exceeded.
This policy is configured and deployed using Tenant Policy templates and is used by the L3Outs configured in L3Out templates.
-
IP SLA monitoring policy — Defines the type of probe (ICMP/TCP/HTTP) and respective settings to use for monitoring endpoints. This policy is associated with monitoring probe profiles known as "track members", which represent a network segment to be monitored. You can associate an IP SLA monitoring policy to a track list (which includes multiple track members) and associate this track list to a Static Route for monitoring availability of track list members over the route. In addition, you can associate IP SLA monitoring policy directly to next-hop address of a Static Route for monitoring its availability over the route.
IP SLA monitoring policy of HTTP type requires Cisco APIC release 5.1(3) or later.
-
IP SLA track list — Defines the IP addresses to be tracked, IP SLA Monitoring policy (probe frequency and type), and scope (bridge domain or L3Out). IP SLA track list aggregates one or more track members, defines what percentage or weight of track members must be
up/downfor the route to be considered available or unavailable. Based on the track list, the available routes remain in the routing table and the unavailable routes are removed until the track list recovers.This policy is configured and deployed using Tenant Policy templates and is used by the L3Outs configured in L3Out templates. In addition, an IP SLA track list can be configured in the same Tenant Policy template as the monitoring policy and consumed by it.
L3Out template
The L3Outs defined in L3Out templates allow you to define all the required configurations to enable connectivity from the endpoints inside your ACI fabrics to outside network domains through routing protocols or static routes. The L3Out object in Nexus Dashboard contains settings necessary for the following:
-
Learning external routes via routing protocols or static routes.
-
Distribution of the learned external routes to other leaf switches.
-
Advertisement of ACI internal routes (BD subnets) to the outside networks.
-
Advertisement of learned external routes to other L3Outs (transit routing).
When you create an L3Out template and configure L3Out-specific objects and properties as described in Create an L3Out template, you will:
-
Define a number of common properties, such as the VRF, L3 Domain, and routing protocol (BGP and/or OSPF), for the L3Out.
-
Specify one or more border leaf switches (nodes) and optionally associate each node with a Node Group policy .
-
Specify one or more interfaces on those border leaf switches and optionally associate each interface with an Interface Group policy described above.
-
After you have created an L3Out template and deployed one or more L3Outs (and their associated External EPGs, defined inside Application templates), you can control traffic between the ACI EPGs and external networks using contracts in Application templates as you typically would.
Nexus Dashboard can utilize a single uplink for both the fabric control and data plane connectivity on sub-interface VLAN 4, while also permitting the configuration of additional sub-interfaces for tenant L3Out (VRF-Lite) and SR-MPLS infrastructure L3Outs.
It is important to note that the tenant and SR-MPLS L3Outs cannot utilize sub-interface VLAN 4, as this is reserved for the remote leaf fabric interface. For more information about L3Out from remote leaf, see the section "Configuring Fabrics That Contain Remote Leaf Switches" in Preparing ACI Fabrics.
Guidelines and limitations
The following guidelines apply when using an L3Out template to configure IP-based L3Outs and SR-MPLS VRF L3Outs:
-
Nexus Dashboard can utilize a single uplink for both the fabric control and data plane connectivity on sub-interface VLAN 4, while also permitting the configuration of additional sub-interfaces for tenant L3Out (VRF-Lite) and SR-MPLS infrastructure L3Outs. In order to provide connectivity toward the external network domain using local L3Out(s), you need to create Routed Sub-Interface on the same fabric port, making VLAN-ID a mandatory parameter for the L3Out configuration on the remote leaf.
You can use the same fabric port, used earlier for VXLAN connectivity with ACI Fabric to provide connectivity toward the external network domain using local L3Out(s). It is important to note that the tenant and SR-MPLS L3Outs cannot utilize sub-interface VLAN 4, as this is reserved for the remote leaf fabric interface. For more information about L3Out from remote leaf, see the section "Configuring Fabrics That Contain Remote Leaf Switches" in Preparing ACI Fabrics.
-
Similar to Application templates, L3Out templates have a one-to-one association with tenants but unlike Application templates, an L3Out template must be associated to a single fabric only.
-
The legacy L3Out container objects in the Application templates remain functional for backward compatibility.
To define specific L3Out and SR-MPLS VRF L3Out settings, you must use the L3Out-specific template type. We recommend using the L3Out-specific templates for all new L3Out and SR-MPLS VRF L3Out configurations.
-
All SR-MPLS VRF L3Out configurations must be done using the L3Out-specific template.
-
If you want to configure BFD multi-hop settings, your fabric must be running Cisco APIC release 5.0(1) or later.
-
If you want to configure an IP SLA monitoring policy of HTTP type, your fabric must be running Cisco APIC release 5.1(3) or later.
-
If you want to undeploy the L3Out, adhere to the following sequence of tasks:
-
Delete the all the External EPGs associated with the L3Out template and deploy the template.
-
Delete the L3Out and deploy the template.
For more information about application templates, see Schemas and Application Templates for ACI Fabrics.
-
Greenfield deployment
Create a tenant policy template
-
You must have the fabrics onboarded to your Nexus Dashboard and enabled for orchestration.
-
Ensure you have read and understood the Templates and Policy Objects dependencies that are described in L3Out template overview.
If you want to import existing L3Out configurations from a fabric’s APIC, follow the Import an existing L3Out configuration steps instead.
This section describes how to create a tenant policy template and define the L3Out-specific policies, which you will then consume in an L3Out template as described later in this document. For more information about each policy and how it relates to policies and settings in other templates, see L3Out template overview.
-
Navigate to the Orchestration page.
Manage > Orchestration
-
Click Tenant Templates.
-
Click Tenant Policies.
-
In the main pane, click Create Tenant Policy Template.
If you want to update an existing Tenant Policy template instead, simply click its name. This opens the Tenant Policies page. -
If you created a brand new template, provide the Name for the template and Select a Tenant with which you want to associate this template.
-
Associate the template with one or more fabrics.
-
In the Tenant Policies template view, choose Actions > Add/Remove Fabrics.
-
-
In the Associate Fabrics to <template-name> dialog, select the fabrics to which you want to deploy the template.
-
Create a Route Map Policy for Route Control.
While you can associate BDs to the created L3Out (for example, to advertise out the BDs' subnets), we recommend that you create the Outbound Route Map for the L3Out instead because it can be used for both BDs' subnets and transit routes received from other L3Outs.
Once an Outbound Route Map is associated to the L3Out, it is no longer possible to advertise out BDs' subnets by associating the BD to the L3Out.
-
From the +Create Object drop-down, select Route Map Policy for Route Control.
-
In the right properties sidebar, provide the Name for the policy.
-
(Optional) Click Add Description and provide a description for the policy.
-
Click Create Entry and provide the route map information.
For each route map, you must create one or more context entries. Each entry is a rule that defines an action based on one or more matching criteria based on the following information:-
Context Order — Context order is used to determine the order in which contexts are evaluated. The value must be in the 0-9 range.
-
Context Action — Context action defines the action to perform (permit or deny) if a match is found. If the same value is used for multiple contexts, they are evaluated one in the order in which they are defined.
When the context order and action are defined, choose how you want to match the context:
-
Click +Create Attribute to specify the action that will be taken should the context match.
You can choose one of the following actions:
-
-
-
-
Set Community -
Set Route Tag -
Set Dampening -
Set Weight -
Set Next Hop -
Set Preference -
Set Metric -
Set Metric Type -
Set AS Path -
Set Additional Community
After you have configured the attribute, click Save.-
If you want to associate the action that you defined with an IP address or prefix, click Add Prefix List.
In the Prefix field, provide the IP address prefix. Both IPv4 and IPv6 prefixes are supported, for example,2003:1:1a5:1a5::/64 or 205.205.0.0/16.
If you want to aggregate IPs in a specific range, check the Aggregate check box and provide the range. For example, you can specify0.0.0.0/0prefix to match any IP or you can specify10.0.0.0/8prefix to match any10.x.x.xaddresses. -
If you want to associate the action that you defined with community lists, click Add Community Factor.
In the Community field, provide the community string. For example,regular:as2-nn2:200:300.
Then choose the Scope:Transitivemeans that the community will be propagated across eBGP peering (across autonomous systems) whileNon-Transitivemeans the community will not be propagated.
You must specify an IP address or a Community string to match a specific prefix (even if you do not provide a Set attribute) because it defines the prefixes that must be announced out of the L3Out. This can be either BDs' subnets or transit routes learned from other L3Outs.
-
Repeat the previous substeps to create any additional route map entries for the same policy.
-
Click Save to save the policy and return to the template page.
-
Repeat this step to create any additional Route Map for Route Control policies.
-
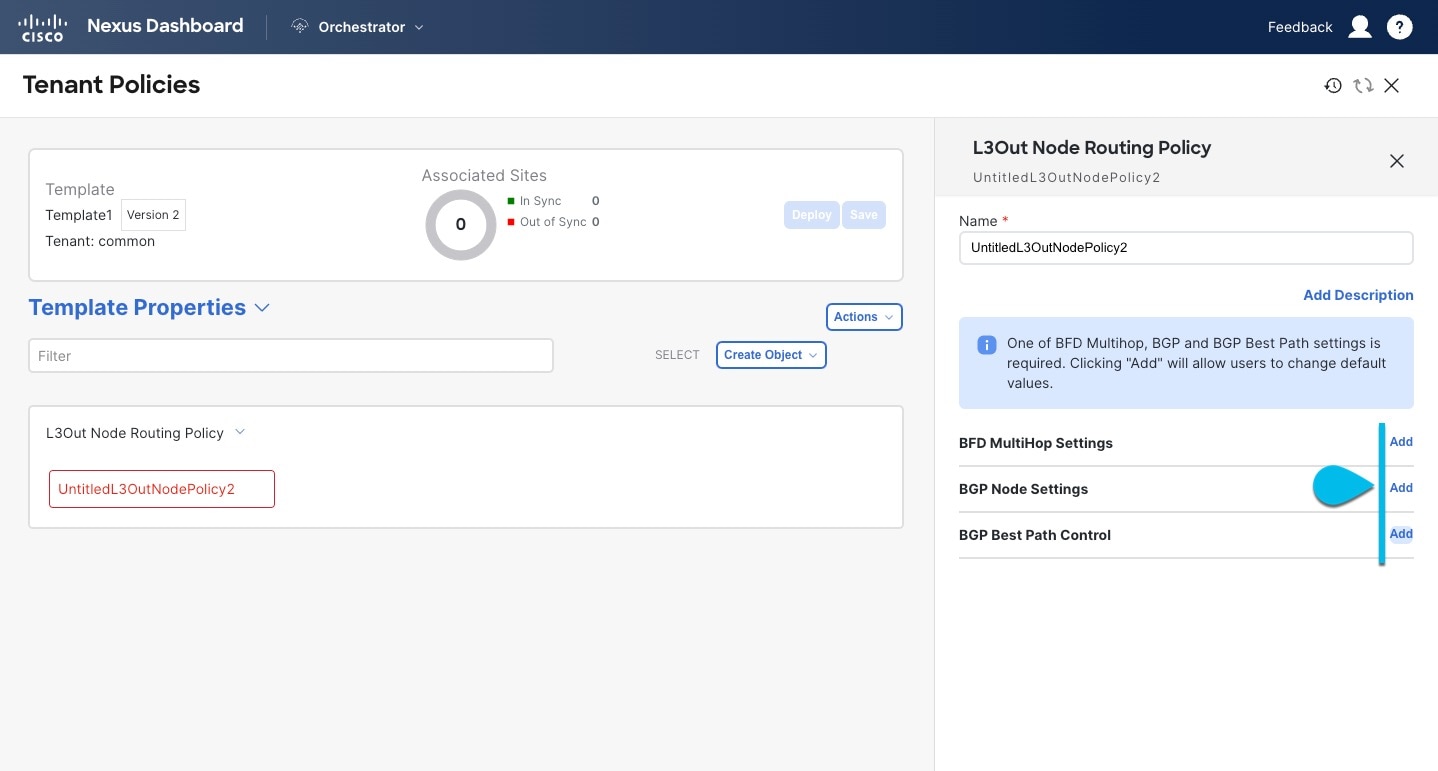
Create an L3Out Node Routing policy.
-
-
In the main pane, choose Create Object > L3Out Node Routing Policy.
-
BFD MultiHop Settings — Provides forwarding failure detection for destinations with more than one hop.
In this case, a MultiHop session is created between the source and destination instead of the interface like in single-hop scenarios.
BFD MultiHop configuration requires Cisco APIC release 5.0(1) or later.
-
BGP Node Settings — Allows you to configure BGP protocol timer and sessions settings for BGP adjacencies between BGP peers.
-
BGP Best Path Control — Enables
as-path multipath-relax, which allows load-balancing between multiple paths that are received from different BGP ASN.-
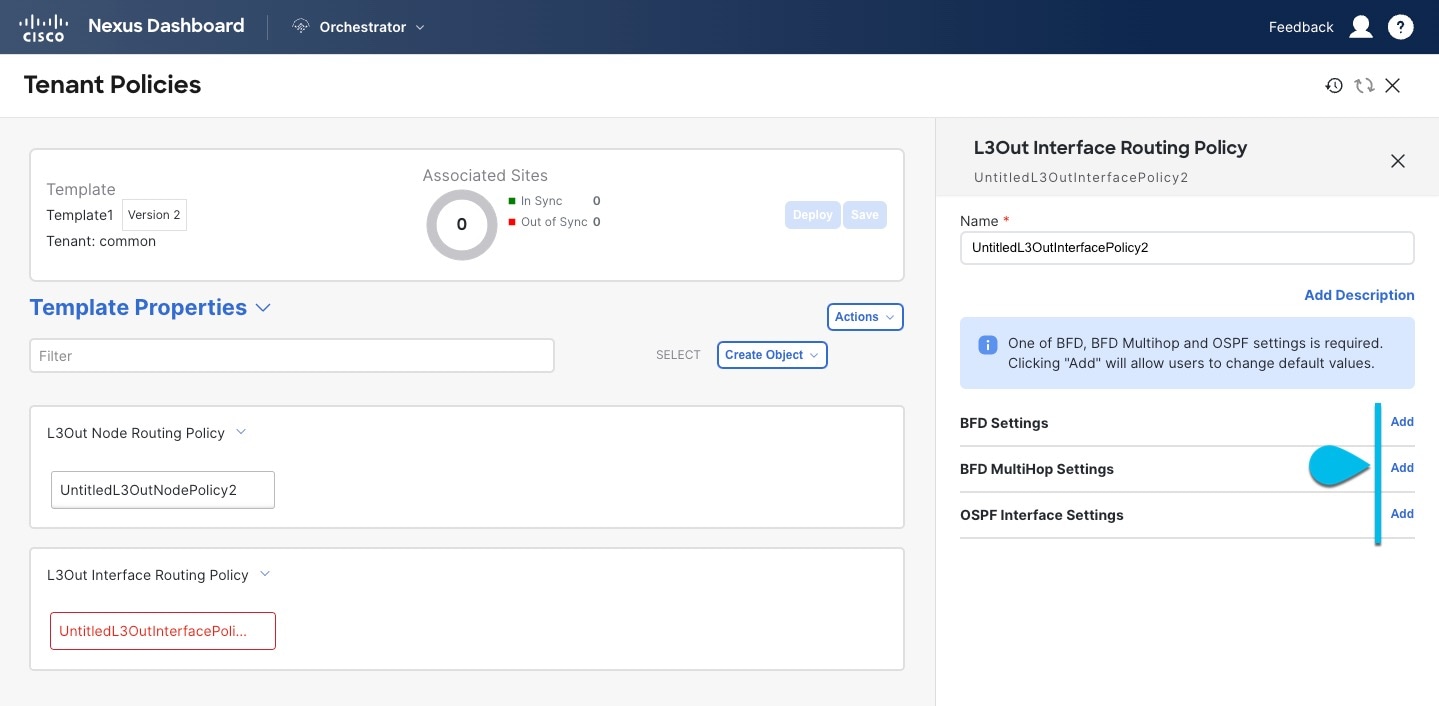
Create an L3Out Interface Routing policy.
-
-
In the main pane, choose Create Object > L3Out Interface Routing Policy.
-
Provide the Name for the policy, and define the BFD Settings, BFD Multi-Hop Settings, and OSPF Interface Settings.
-
-
BFD Settings — Specifies BFD parameters for BFD sessions established between devices on interfaces that are directly connected.
When multiple protocols are enabled between a pair of routers, each protocol has its own link failure detection mechanism, which may have different timeouts. BFD provides a consistent timeout for all protocols to allow consistent and predictable convergence times. -
BFD MultiHop Settings — Specifies BFD parameters for BFD sessions established between devices on interfaces that are not directly connected.
You can configure these settings at the node level as mentioned in the "Tenant Policy Template: Node Routing Group Policy" section above, in which case the interfaces inherit those settings, or you can overwrite the node-level settings for individual interfaces in the Interface Routing group policy.
BFD multi-hop configuration requires Cisco APIC release 5.0(1) or later.
-
OSPF Interface Settings — Allows you to configure interface-level settings such as OSPF network type, priority, cost, intervals and controls.
This policy must be created when deploying an L3Out with OSPF.
-
Click Save to save the template changes.
-
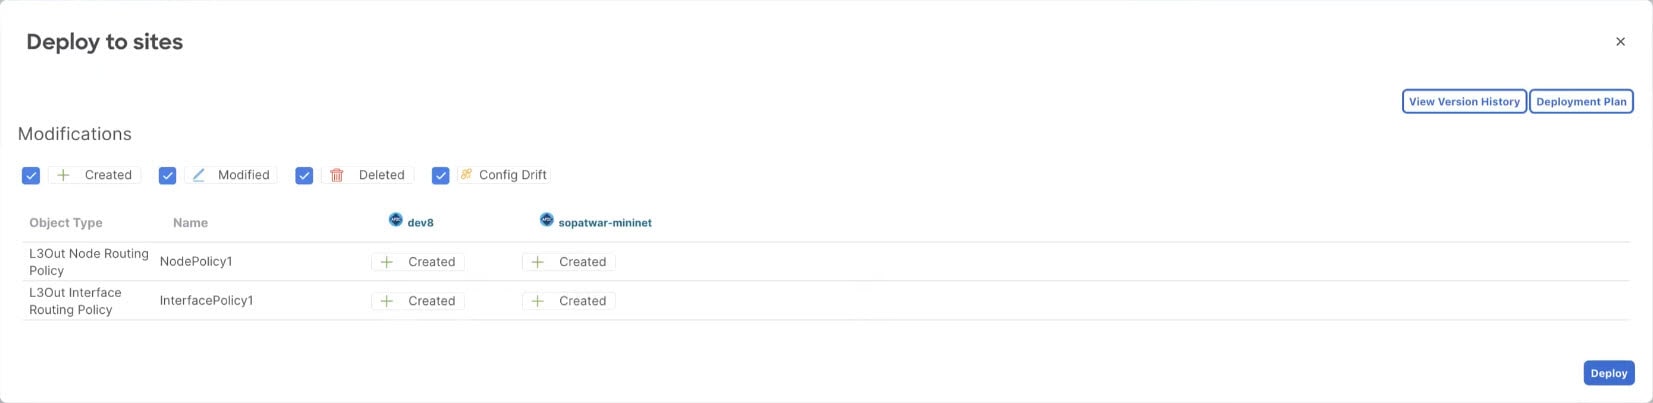
Deploy the template to fabric(s).
At this stage, we can deploy the created group policies to the fabrics and verify them in your APIC as a checkpoint before proceeding with additional configurations.-
In the Tenant Policies template view, click Deploy.
-
In the Deploy to fabrics dialog, confirm the policies being deployed and click Deploy.
-
(Optional) Verify that the policies were deployed correctly.
Before validating on APIC, ensure the template is synchronized with the fabric in Nexus Dashboard. Then verify if the template was correctly deployed to a fabric by navigating to the fabric’s APIC, choosing Tenants > <tenant-name> > Policies > Protocol and checking the BFD, BGP, and OSPF policies.
Note that while each policy is displayed as a separate object in the APIC GUI, Nexus Dashboard simplifies the configuration workflow by combining them into a single template at the node and interface levels.
-
-
Create a BGP Peer Prefix policy.
-
In the main pane, choose Create Object > BGP Peer Prefix Policy.
-
Provide the Name for the policy, and define the Max Number of Prefixes and the Action to take if the number is exceeded.
The following actions are available:
-
-
-
Log
-
Reject
-
Restart
-
Shutdown
-
Create an IP SLA Monitoring policy.
-
In the main pane, choose Create Object > IP SLA Monitoring Policy.
-
Provide the Name for the policy, and define its settings.
If you choose HTTP for the SLA Type, your fabric must be running Cisco APIC release 5.1(3) or later.
-
-
Create an IP SLA Track List.
-
In the main pane, choose Create Object > IP SLA Track List.
-
Provide the Name for the policy.
-
Choose the Type.
The definition of a route being available or not available can be based onThreshold Percentage or Threshold Weight. -
Click +Add Track List to Track Member Relation to add one or more track members to this track list.
You must select a bridge domain or an L3Out to associate with the track member. If you do not already have the bridge domain (BD) or L3Out that is created, you can skip adding a track member, save the policy without assigning one, and come back to it after you have created the BD or L3Out.
In the Add Track List to Track Member Relation dialog, provide the Destination IP, Scope Type, and choose the IP SLA Monitoring Policy.
The scope for the track list can be either bridge domain or L3Out. The IP SLA Monitoring policy is the one you created in the previous step.
-
-
Click Save to save the template changes.
-
Deploy the template to fabric(s).
At this stage, we can create another checkpoint by deploying the defined policies to the fabrics.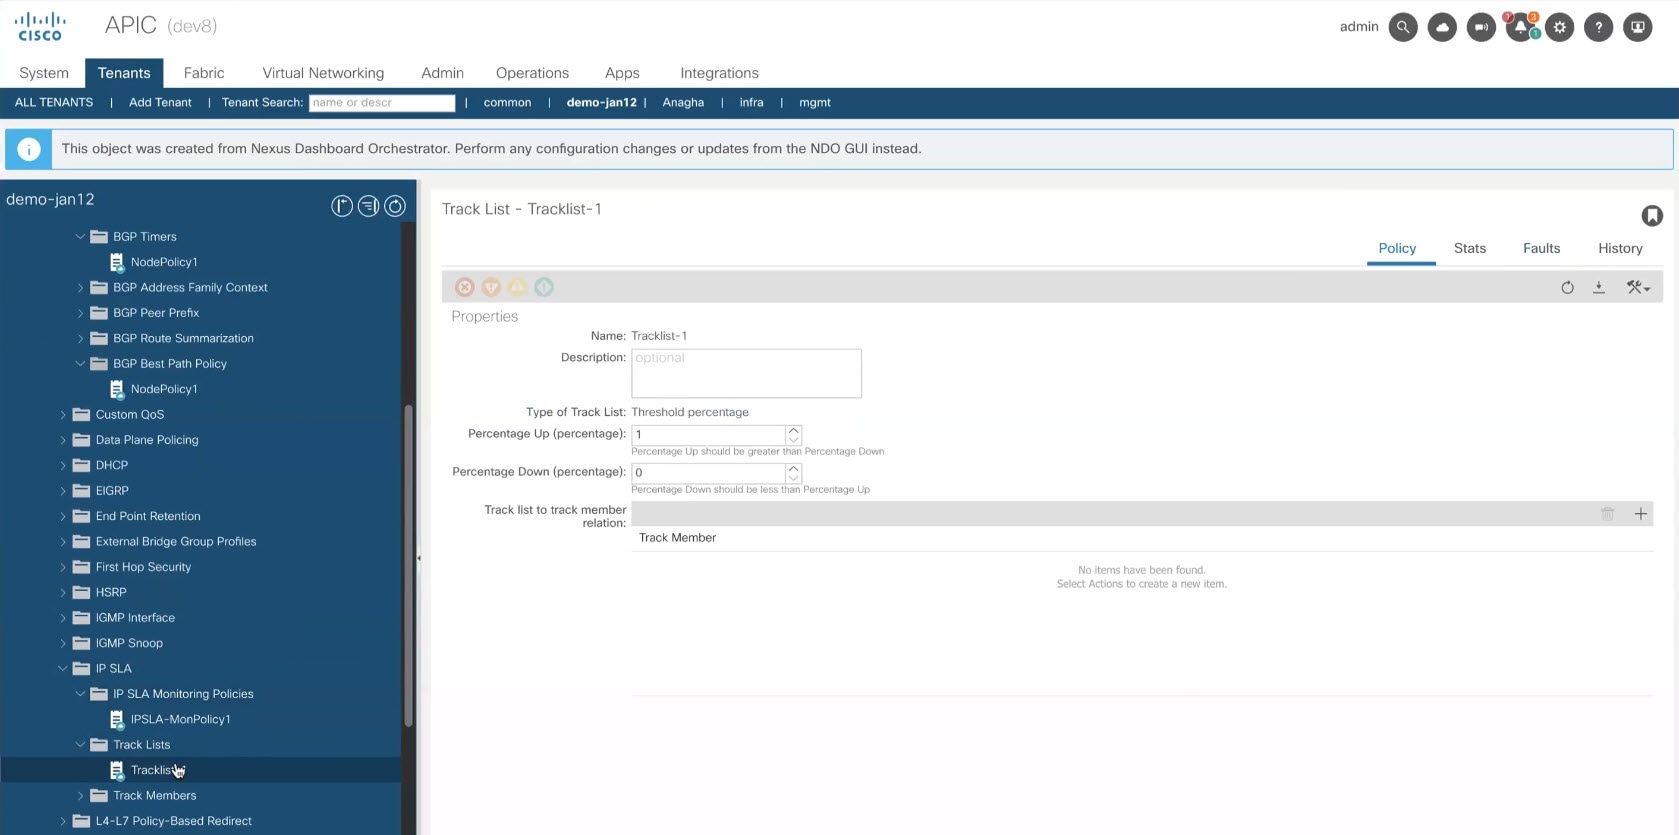
-
In the Tenant Policies template view, click Deploy.
-
In the Deploy to fabrics dialog, confirm the policies being deployed and click Deploy.
-
(Optional) Verify that the policies were deployed correctly.
You can verify that the template was correctly deployed to a fabric by navigating to the fabric’s APIC, choosing Tenants > <tenant-name> > Policies > Protocol and checking the IP SLA policies.
-
-
-
Create an L3Out template
-
You must have created a template policy template and defined any policies specific to your deployment scenario, as described in Create a tenant policy template.
-
Created a VRF that you want to use for the L3Out in one of your Application templates as you typically would.
This section describes how to create an L3Out template and define IP-based L3Out policies, which you will then use with the VRFs and EPGs in an Application template to deploy a complete L3Out configuration to your fabrics. For more information about each policy and how it related to policies and settings in other templates, see L3Out template overview.
If you are looking to create an SR-MPLS VRF L3Out, see the steps described in Create a tenant policy template.
-
Navigate to the Orchestration page.
Manage > Orchestration
-
Click L3Out.
-
In the main pane, click Create L3Out Template.
If you want to update an existing L3Out template instead, simply click on its name. This opens the L3Out Template page. -
If you are creating a brand new template, choose the Tenant and Fabric with which to associate the template, then click Save and go to template.
Each L3Out template is associated with a specific tenant similar to other Nexus Dashboard templates, however it is also assigned to a single fabric only as L3Out configuration is typically fabric-specific.
If you want to define L3Out configuration for multiple fabrics, you must create at least one L3Out template for each fabric, but you can deploy multiple L3Outs per fabric/tenant by defining all of them in the same L3Out template. You may have multiple L3Out templates per fabric as long as they are assigned to different tenants. -
Provide the Name for the template.
-
Create an IP-based L3Out and provide its general configuration.
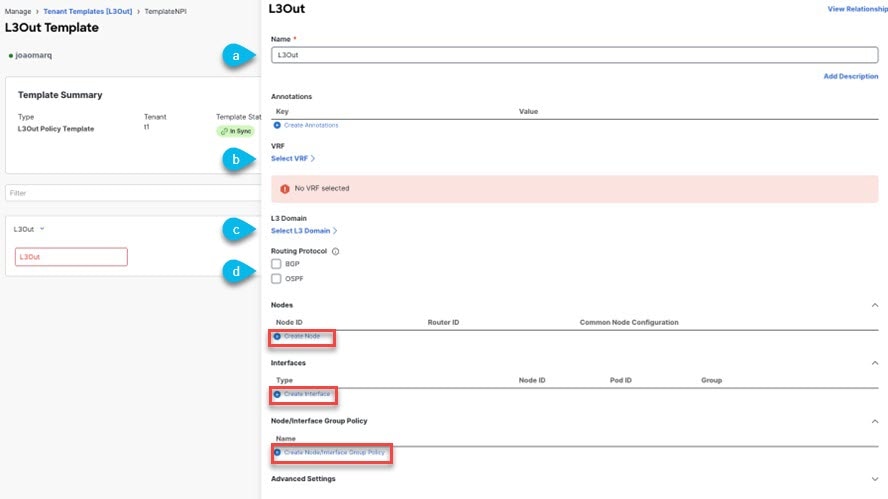
-
In the main pane, choose Create Object > L3Out. Select and update the Name for the L3Out if required.
We recommend providing unique names for all L3Outs across fabric, even if they belong to the same tenant or allow connectivity to the same external resources.
-
Click Select VRF > and choose a VRF to associate with this L3Out.
-
Click Select L3 Domain and choose the L3 domain to associate with this L3Out.
The L3 domains can be created directly in the APIC or in Nexus Dashboard using the Fabric Management > Fabric Policies page, as described in the section "Fabric Management Templates" in Schemas and Application Templates for ACI Fabrics. -
Select the Routing Protocols used by this L3Out.
You can selectBGPorOSPFor both. Alternatively, you can leave both protocols disabled if you plan to use static routing on this L3Out.
If you enable OSPF, you must also provide the OSPF Area ID and OSPF Area Type.
For both OSPF and BGP:-
Provide Outbound Route Map to advertise fabric’s BD subnets or prefixes learned from other L3Outs (transit routing) to the outside.
This is the Route Map Policy for Route Control that you created in the previous section.
While you can associate BDs to the created L3Out (for example, to advertise out the BDs' subnets), we recommend that you create the Outbound Route Map for the L3Out instead because it can be used for both BDs' subnets and transit routes received from other L3Outs.
Once an Outbound Route Map is associated to the L3Out, it is no longer possible to advertise out BDs' subnets by associating the BD to the L3Out.
If an Outbound Route Map is specified here, it must include all prefixes which need to be advertised toward the external network domain. BD subnets configured with BD to L3Out associations and External EPG subnets configured with export route control will not work when this route-map configuration is deployed.
-
(Optional) Enable Import Route Control to control the external prefixes that should be redistributed inside the fabric.
-
-
-
To add one or more border leaf switches (nodes) for the L3Out, click on +Create Node.

-
In the Create Node dialog, choose a Node ID.
You can select a regular or a remote leaf from the list of options available. -
Provide the Router ID.
-
(Optional) the Node Group Policy selection.
You can deploy consistent configuration across all nodes by configuring a Node Group Policy here and applying it to the nodes. -
Choose whether you want to Use Router ID as Loopback.
-
If you want to define one or more static routes, click +Add Static Routes.
For all static routes, you must define an IP address Prefix including the network mask using the ab.cd.ef.gh/xy format, choose whether you want to Create a static route to Null0, and define the Next Hop IP address. When providing the next hop IP, you can also choose the Administrative Distance and the Monitoring Policy which you created in Create a tenant policy template.
Here you can also select the Track Policy, which you defined in Create a tenant policy template.
-
-
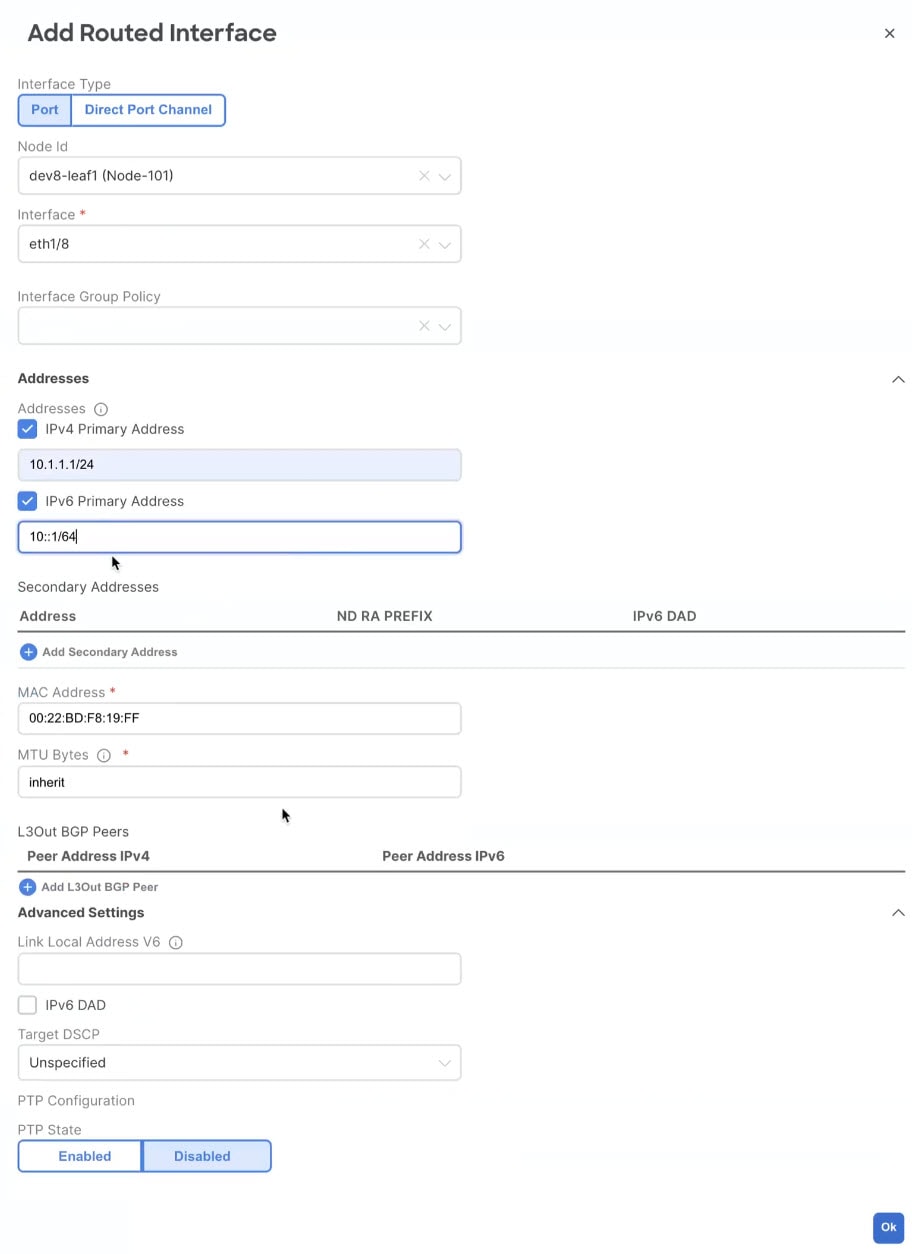
To add one or more interfaces for the L3Out click on +Create interface.
-
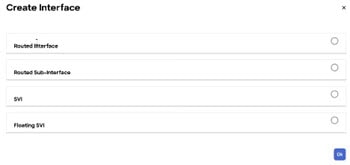
You can choose the type of interface you want to add.
This release supports the same interface types as the APIC:-
Routed Interface
-
Routed Sub-Interface
-
SVI
-
Floating SVI
-
-
You can use the same configuration parameters as you would typically use when configuring an interface directly in the APIC, for example:
-
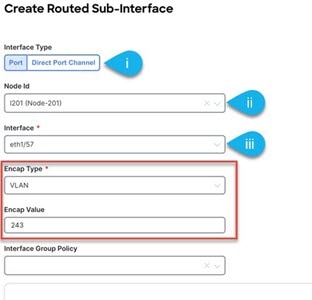
Select between the interfaces Port or Direct Port Channel for routed interfaces, while SVI gives you an additional option to select Virtual Port Channel. While Floating SVI doesn’t allow you to select the interface.
-
Select the Node ID of the leaf.
-
Select the Interface from the list of available fabric port or access port in the drop-down menu.
If you are creating the L3Out template on a remote leaf using a single uplink on the fabric port, you need to create Routed Sub-Interface selecting the same fabric port from Interfaces dropdown menu.
This mandates the Encap Type to VLAN and you need to provide the VLAN ID in the Encap Value field. For more information about remote leaf switches and their configuration in APIC, see the Cisco APIC Layer 3 Networking Configuration Guide.
-
Enter the Encap Value or the VLAN ID.
-
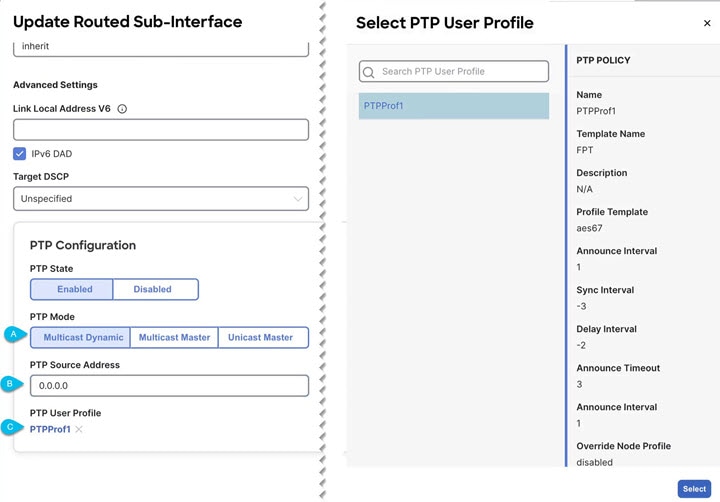
(Optional) PTP State is set to Disabled, click on Enabled to enter PTP Configuration:
-
Select PTP modes: Multicast Dynamic, Multicast Master, Unicast Master.
-
Enter the PTP Source Address.
-
Select PTP User Profile to add a new profile or select a PTP User profile if already created and click on the profile name to review the PTP Policy .
-
-
Click Ok to save the Interface.
-
-
(Optional) Repeat this step for any additional interfaces where you want to deploy this L3Out configuration.
While you can configure each node and interface individually as mentioned in the previous two steps, you can also define one or more node or interface group policies and apply a group policy to multiple nodes or interfaces for consistent configuration across them.
-
-
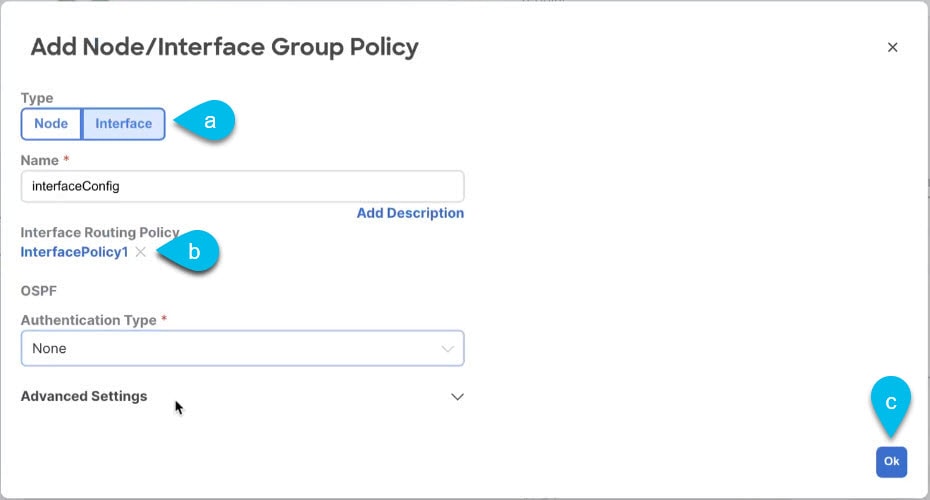
(Optional) To add one or more Interface Group Policy, click on +Create Node/Interface Group Policy.
-
Choose whether you’re defining a Node or Interface group policy and provide a Name for it.
-
Select the Node Routing Policy or Interface Routing Policy respectively.
An Interface Group Policy is mandatory when using OSPF on the L3Out.
Those are the policies you created in Create a tenant policy template.
-
Provide any additional node or interface configurations settings as required by your deployment.
All nodes or interfaces to which you apply this group policy will have exact same configuration as defined in the group policy.
-
Click OK to save the group policy.
-
Repeat this step for any additional node or interface group policies for this L3Out.
-
-
(Optional) Apply a node or interface group policy to one or more nodes/interfaces.
-
Click on one of the nodes or interfaces you configured for this L3Out.
-
From the Node/Interface Group Policy dropdown, select the group policy you defined in the previous step.

-
Repeat this step for all nodes and interfaces to which you want to apply the consistent settings defined by the group policies.
-
-
Click Save to save the template changes.
-
Deploy the template to fabric.
-
In the L3Out Template page, click Deploy.
-
In the Deploy to Fabrics dialog, confirm the policies being deployed and click Deploy.
-
(Optional) Verify that the policies were deployed correctly.
You can verify that the template was correctly deployed to a fabric by navigating to the fabric’s APIC, choosing Tenants > <tenant-name> > Networking > L3Outs and checking the L3Out name you provided in Nexus Dashboard.
Note that while you define all of the L3Out configurations in the same template in Nexus Dashboard, separate individual policies are created in the APIC. For example, separate policies are created for the nodes, interfaces, and even IP address types (providing IPv4 and IPv6 IP addresses for a single L3Out interface creates two separate interface profiles) in the APIC.
-
Import an existing L3Out configuration
Overview of importing L3Out configurations
Nexus Dashboard supports importing existing L3Out configurations from the APIC fabrics. The following sections focus on the guidelines and specific steps required to import an L3Out along with its associated policies.
-
If you want to configure and deploy new IP-based L3Out configurations (Greenfield deployment), see the earlier sections of this chapter.
-
If you want to configure or import SR-MPLS VRF L3Out, see the Multi-Fabric and SR-MPLS L3Out Handoff, instead.
You can import the following policies:
-
Route Maps: may be referenced in the L3Out template’s Outbound Route Map and Inbound Route Map fields to define route import and export policies.
-
L3Out Node Policies:
-
Nodes configured for an L3Out can be associated to a node group, which in turn can refer to a node routing policy.
-
Node groups can also reference BGP Peer Prefix policy when configuring BGP peers for the nodes.
-
-
L3Out Interface Policies:
-
Interfaces configured for an L3Out can be associated to an interface group, which can refer to an interface routing policy and BGP Peer Prefix policy.
-
Interface groups can also reference BGP Peer Prefix policy when configuring BGP peers for the interfaces.
-
-
BGP Peer Prefix: Can be referenced by the node and interfaces groups for BGP peer configuration on all nodes in the group.
-
IP SLA Monitoring policies and IP SLA Track lists: Can be referenced by the static routes defined for a node.
-
Custom QoS policy: Can be referenced by interface group configuration.
Mapping of fabrics' MOs to Nexus Dashboard objects and groups
Note that in some cases there is no 1:1 mapping between the managed objects (MOs) created in the fabric and the policy objects as they are seen on and managed by the Orchestrator. In these cases, when you import an L3Out from APIC, Nexus Dashboard creates Nexus Dashboard-specific logical groups that may contain multiple individual MOs; for example, the following APIC policies are grouped on import:
-
The following MOs are grouped into an L3Out Interface Routing policy on Nexus Dashboard:
-
OSPF Interface Policy
-
BFD Policy
-
BFD Multi-Hop Interface Policy
-
-
The following MOs are grouped into an L3Out Node Routing policy on Nexus Dashboard:
-
BGP Timer Policy
-
BGP Best Path Policy
-
BFD Multi-Hop Node Policy
-
If you import an L3Out configuration and then later change one of these policies directly on the APIC, you must re-import the policies in the Tenant Policy template that contains them on Nexus Dashboard.
The following figure shows the L3Out Node Routing Policy object in Nexus Dashboard that groups together the 3 policies mentioned above.
Automatic import of dependencies
Tenant Policies templates include objects and policies that have local references within the template. For example, an IP SLA track list can contain a list of track members and each track member must refer to a IP SLA monitoring policy. In such cases, importing existing configuration that contains one or more IP SLA track list policies from a fabric will also automatically import the referenced IP SLA monitoring policy. The import workflow displays additional information about the automatically imported policies when you select an object that has such dependencies:
Importing IP SLA policies
Typically, IP SLA track members have a Bridge Domain (BD) or an L3Out scope. When you import an IP SLA track list along with its members, Nexus Dashboard will attempt to automatically assign the correct BD or L3Out to those members. However, at the time of the import, the BD or L3Out objects may not yet exist in Nexus Dashboard.
In such cases, Nexus Dashboard still allows you to import the IP SLA track members with a missing scope object reference. To keep track of the correct reference, Nexus Dashboard sets Scope Type to Local Reference and saves the name of the referenced BD or L3Out in a scopeDn property of the IP SLA track member object:
This allows you to save the template that contains the imported IP SLA track members and re-deploy it back to the fabric, where the scopeDn value is used to correctly program the scope reference for the policy.
To import the entire L3Out configuration, you need to import the L3Out objects after you’ve imported the relevant Tenant policies. So in case where you import the IP SLA track members first, you must manually update their Scope Type and reference after you have also imported the associated L3Out. The scopeDn and scopeType=Local Reference are internal values and can be set only by the configuration import workflow.
References to policies in tenant "common"
Some policies that you import from a fabric may contain references to policies in tenant common. Importing such policies will automatically create a copy of the tenant common policy in the Tenant Policies template where the objects are being imported and as a result of that, in the tenant associated with that Tenant Policies template, for example:
-
If you import an IP SLA track list that contains a track member which refers to an IP SLA monitoring policy from the
commontenant, a copy of the tenant common’s IP SLA monitoring policy will be created in the Tenant Policies template and the imported track member will reference this newly added IP SLA monitoring policy. -
If you import an L3Out that contains node configuration with a static route which references an IP SLA track list from tenant
common, a copy of the tenant common’s IP SLA track list will be created in the Tenant Policies template.
Guidelines and limitations
These are the guidelines and limitations when you import an existing L3Out configuration:
Limitations: Importing L3Out configurations
-
The L3Out and route-map import will be blocked if the referenced route-map/set-rule/match-rule exists without the managed object (MO) creation (for example, if an L3Out is referenced to custom route-map
rpm1butrpm1is deleted under policies, or if a route-map has a reference to set-ruleset_rule_1butset_rule_1is deleted). -
Importing a custom route-map is supported only on the Autonomous template.
-
Importing an L3Out import is blocked if the L3Out’s Layer 3 interfaces are configured with neighbor-discovery protocol or DPP policies.
Unsupported scenarios
If an L3Out contains one or more configuration options that are currently not supported by Nexus Dashboard, you will not be able to import that L3Out. The following configurations are currently not supported by Nexus Dashboard and will prevent you from importing any L3Out that includes them:
-
For IP-based L3Outs:
-
Layer 3 EVPN Services for Fabric WAN (GOLF)
-
Enhanced Interior Gateway Routing Protocol (EIGRP)
-
Fallback Route Group
-
-
For node profiles:
-
Inter-Fabric Loopback Addresses
-
-
For interfaces:
-
DHCP Relay
-
SVI/FSVI External Bridge Group Profile
-
VXLAN Encap
-
-
For interface profiles:
-
Internet Group Management Protocol (IGMP)
-
Hot Standby Router Protocol (HSRP) Interfaces
-
DHCP Relay
-
Enhanced Interior Gateway Routing Protocol (EIGRP)
-
Ingress/Egress Data Plane Policies
-
Neighbor Discovery (ND) Policy
-
PIM and PIMv6 Interface Policies
-
NetFlow Monitor Policies
-
In these cases, the import workflow UI will display an orange exclamation point icon with a message explaining the issue and you will not be able to select that L3Out for import.
Import tenant policy template objects
-
If you want to configure and deploy new L3Out configurations (Greenfield deployment), see the earlier sections of this chapter instead.
-
You must have the fabrics onboarded to your Nexus Dashboard and enabled for management.
-
Ensure you have read and understood the Templates and Policy Objects dependencies that are described in Overview of importing L3Out configurations.
-
Ensure that no changes are made to the tenant policies or the L3Outs which you plan to import into Nexus Dashboard between the time you import the tenant policies as described in this section and when you redeploy the imported L3Out as described in the next section.
There’s no drift notification in Nexus Dashboard in case an imported policy that is used by the L3Out is modified directly in the APIC before all policies that are associated with the L3Out are imported and redeployed to be managed by Nexus Dashboard.
This section describes how to import existing L3Out configuration policies from Cisco APIC into Nexus Dashboard’s Tenant Policies template. For more information about each policy and how it relates to policies and settings in other templates, see Overview of importing L3Out configurations.
-
Navigate to the Orchestration page.
Manage > Orchestration
-
Click Tenant Templates.
-
Click Tenant Policies.
-
In the main pane, click Create Tenant Policy Template.
If you want to update an existing Tenant Policy template instead, simply click its name. This opens the Tenant Policies page. -
If you created a brand new template, provide the Name for the template and Select a Tenant from which you plan to import configuration.
-
Associate the template with the fabric from which you plan to import configuration.
-
In the Tenant Policies template view, choose Actions > Add/Remove Fabrics.
-
In the Associate Fabrics to <template-name> dialog, select the fabrics to which you want to deploy the template.
-
-
Click Save to save the template changes.
-
Import one or more policies into the Tenant Policies template.
When you choose to import L3Out configuration from a fabric, the UI shows the list of L3Out policies that can be imported. You may select one or more L3Out policies and import all the provider policies that are used by the L3Out into this Tenant Policy Template.-
In the Tenant Policies screen’s Template Properties view, choose Import > <fabric-name>.
-
In the Import from <fabric-name> dialog, choose one or more L3Outs and click Import.
If there’s an L3Out already configured in the fabric, its associated policies are available for import in the L3Out Related Tenant Policies category. When you select an L3Out to import, all policies that are referenced by that L3Out in the fabric’s APIC are imported into the Tenant Policies template you are editing.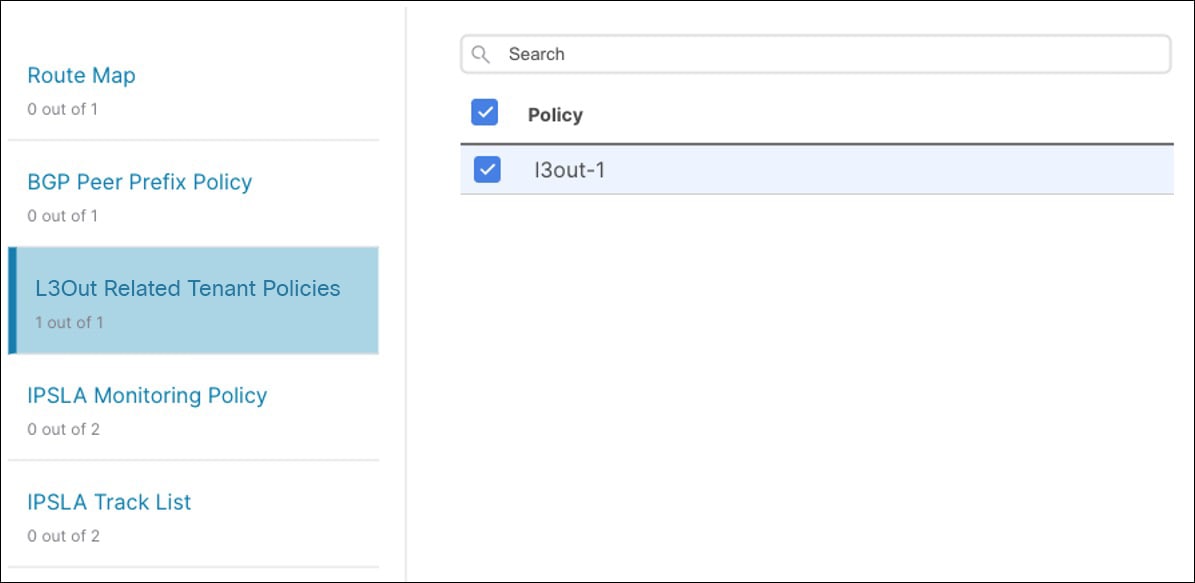
-
Verify that all imported policies are shown in the template and click Save to save it.
All policies configured for the L3Out in the fabric, which you chose to import in the previous step, are added to the Tenant Policies template using the following guidelines:-
Default import route maps are named as
<l3out-name>_imp_<fabric-id>. -
Default export route maps are named as
<l3out-name>_exp_<fabric-id>. -
Node routing policies are numbered, for example
L3OutNodePolicy1, L3OutNodePolicy2, and so forth. -
Interface routing policies are numbered, for example
L3OutInterfacePolicy1, L3OutInterfacePolicy2, and so forth.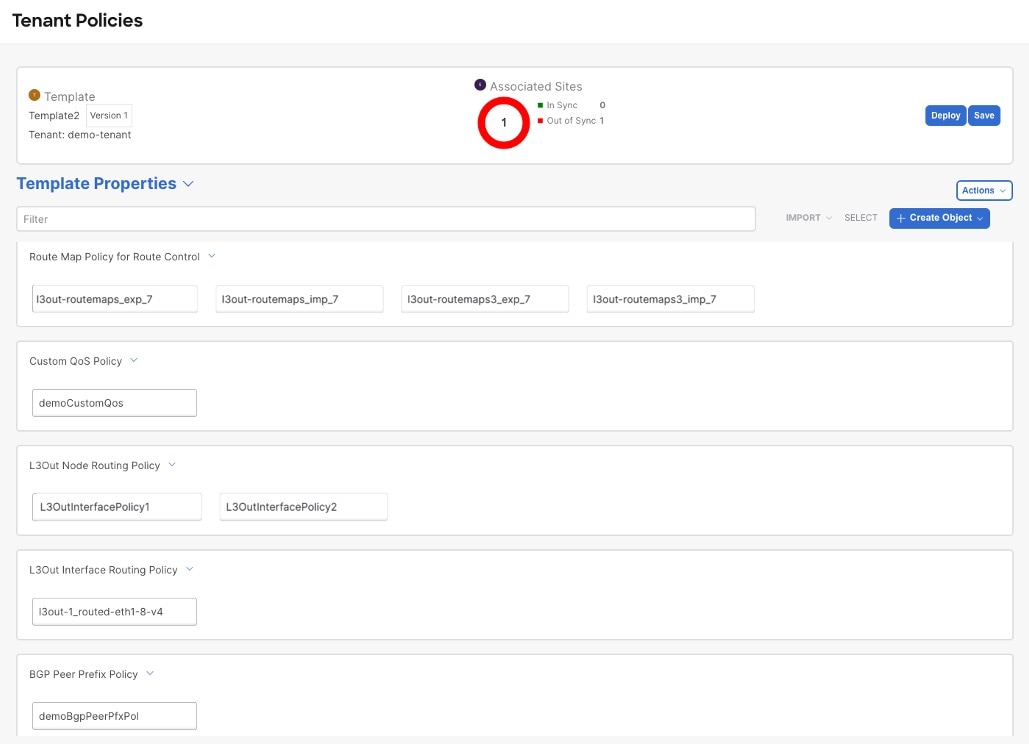
-
-
If necessary, update the policy names and click Save to save the changes.
We recommend keeping the names of the imported policies as they are created. In this case, when you import L3Outs into the L3Out template as described in the next section, the referenced policies will be automatically recognized and configured for the L3Out by Nexus Dashboard.
However, if you have a specific naming convention in your Multi-Fabric domain, you can update the imported objects' names to follow that convention. In this case, you must manually provide object references during L3Out import in the next section.
For some objects, there is no 1:1 mapping between the managed objects (MOs) created in the fabric and the policy objects as they are seen on and managed by the Orchestrator. For information about which MOs are combined into logical groups in Nexus Dashboard, see Overview of importing L3Out configurations.
-
-
Deploy the template to fabrics.
After you have imported the policies and saved the template, you must deploy it back to the fabric.
If the names of the imported objects that are used in Nexus Dashboard do not match the names of those objects in the APIC, Nexus Dashboard does not create new objects in the APIC and simply starts managing the original ones.
However, if you make other changes to a policy object before deploying it back to the fabric, Nexus Dashboard creates a new object in the APIC.
-
In the Tenant Policies template view, click Deploy.
-
In the Deploy to fabrics dialog, confirm the policies being deployed and click Deploy.
After you’ve defined the policies in the Tenant Policy template, proceed to Import L3Out objects.
Import L3Out objects
-
If you want to configure and deploy new L3Out configurations (greenfield deployment), see the earlier sections of this chapter instead.
-
You must have created a Template Policy template and imported the policies that are associated with the L3Out you want to import, as described in Import tenant policy template objects.
This section describes how to import an L3Out template from an APIC fabric into Nexus Dashboard. For more information about each policy and how it related to policies and settings in other templates, see Overview of importing L3Out configurations.
-
Navigate to the Orchestration window.
Manage > Orchestration
-
Click Tenant Templates.
-
Click L3Out.
-
In the main pane, click Create L3Out Template.
If you want to update an existing L3Out template instead, simply click its name. This opens the L3Out Template page. -
If you are creating a brand new template, choose the Tenant and Fabric from which you import the L3Out configuration, then click Save and go to template.
Each L3Out template is associated with a specific tenant similar to other Nexus Dashboard templates, however it is also assigned to a single fabric only as L3Out configuration is typically fabric-specific.
If you want to import L3Out configuration for multiple fabrics, you must create at least one L3Out template for each fabric, but you can import multiple L3Outs per fabric/tenant into the same template or you may choose to have multiple L3Out templates per fabric as long as they are assigned to different tenants. -
If you created a brand new template, provide the Name for the template and click Save.
You must save a brand new template before you can add new or import existing configuration. -
Import an L3Out from the fabric.
-
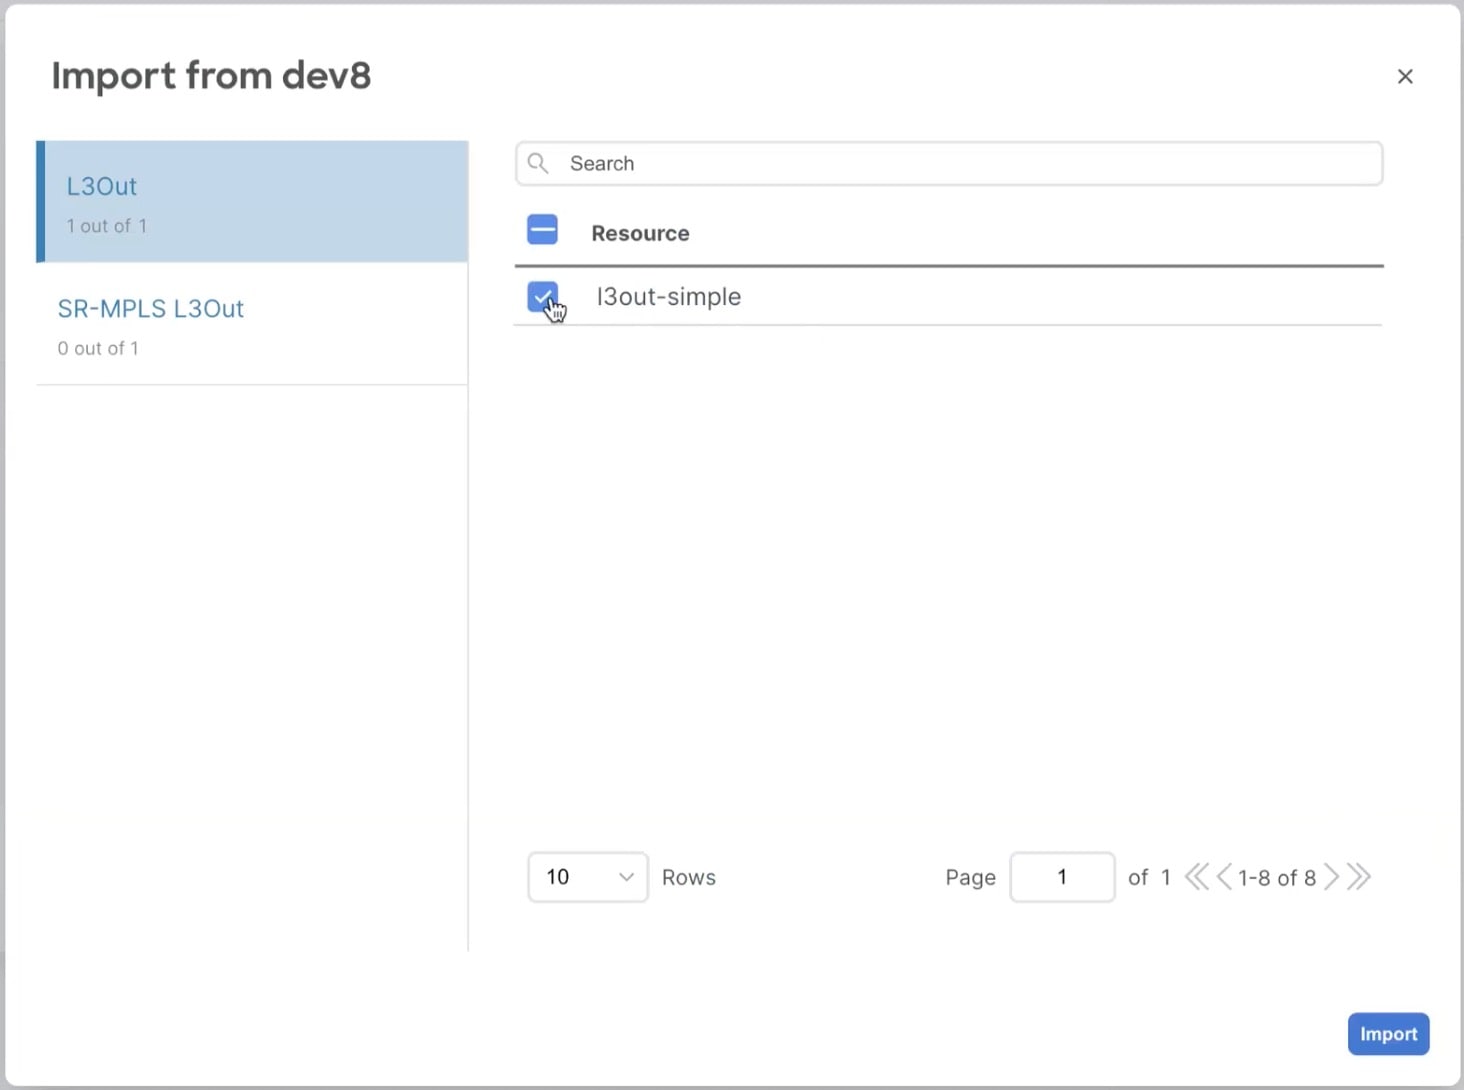
In the main pane, click Import.
-
In the Import from <fabric-name> dialog, select the L3Out you want to import and click Import.
If an L3Out has one or more tenant policy references that are not found in Nexus Dashboard’s tenant policies templates, you cannot import that L3Out and must first import those references as described in Import tenant policy template objects.
-
-
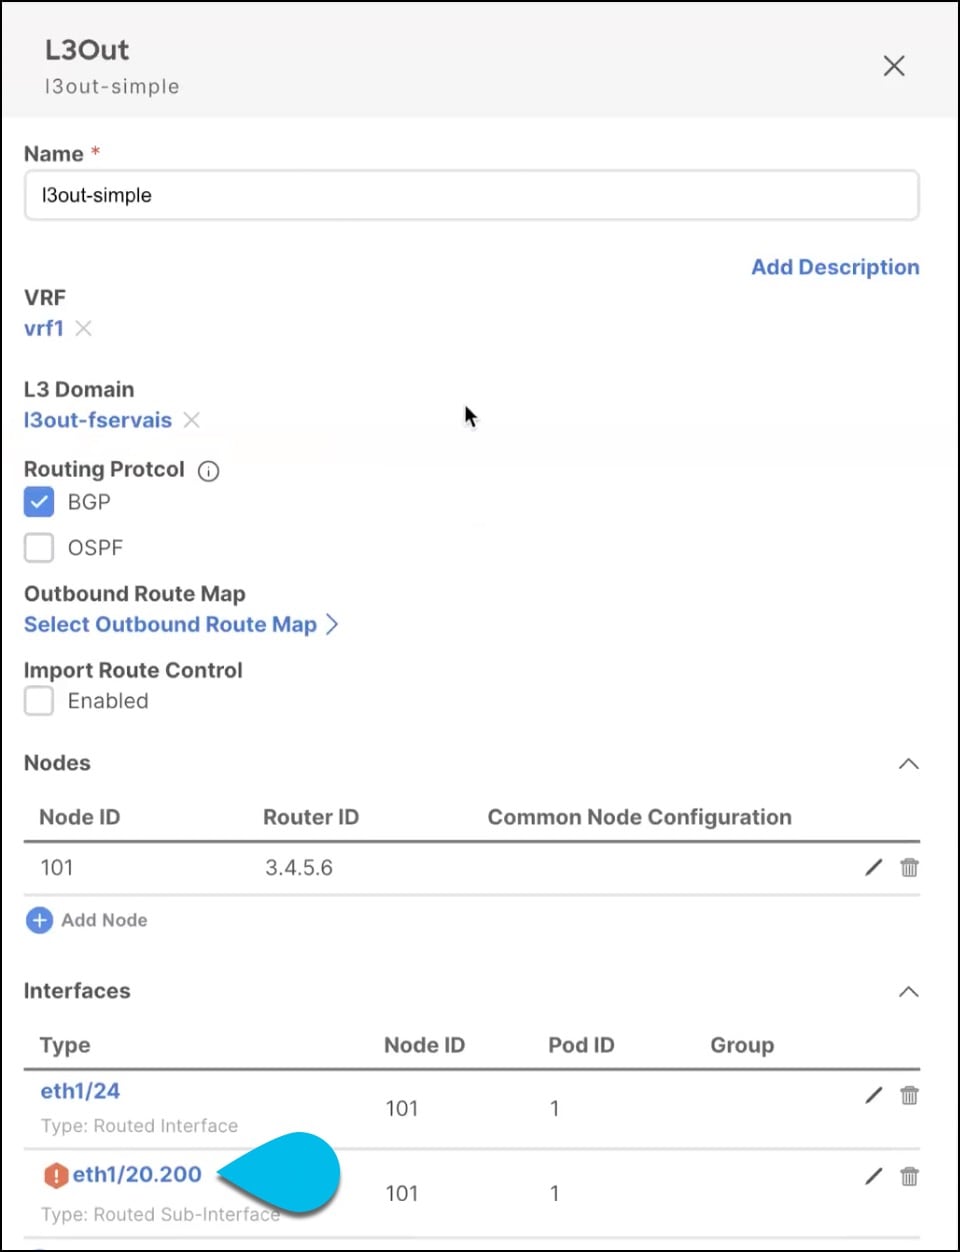
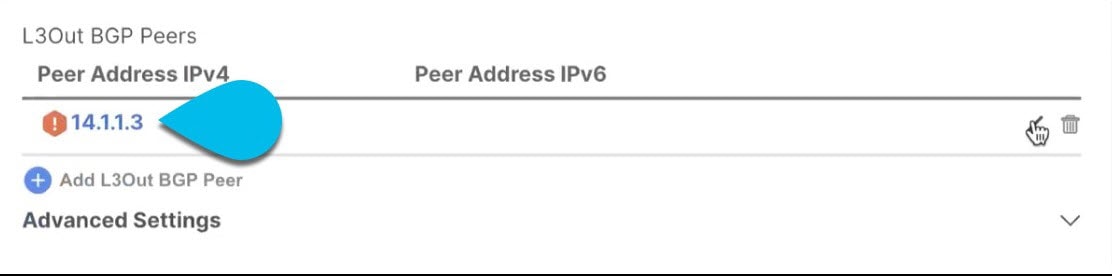
Provide any missing information for the imported L3Out.
When you first import an L3Out, the object in the UI may be shown in red if some of the L3Out settings are not imported and must be provided manually: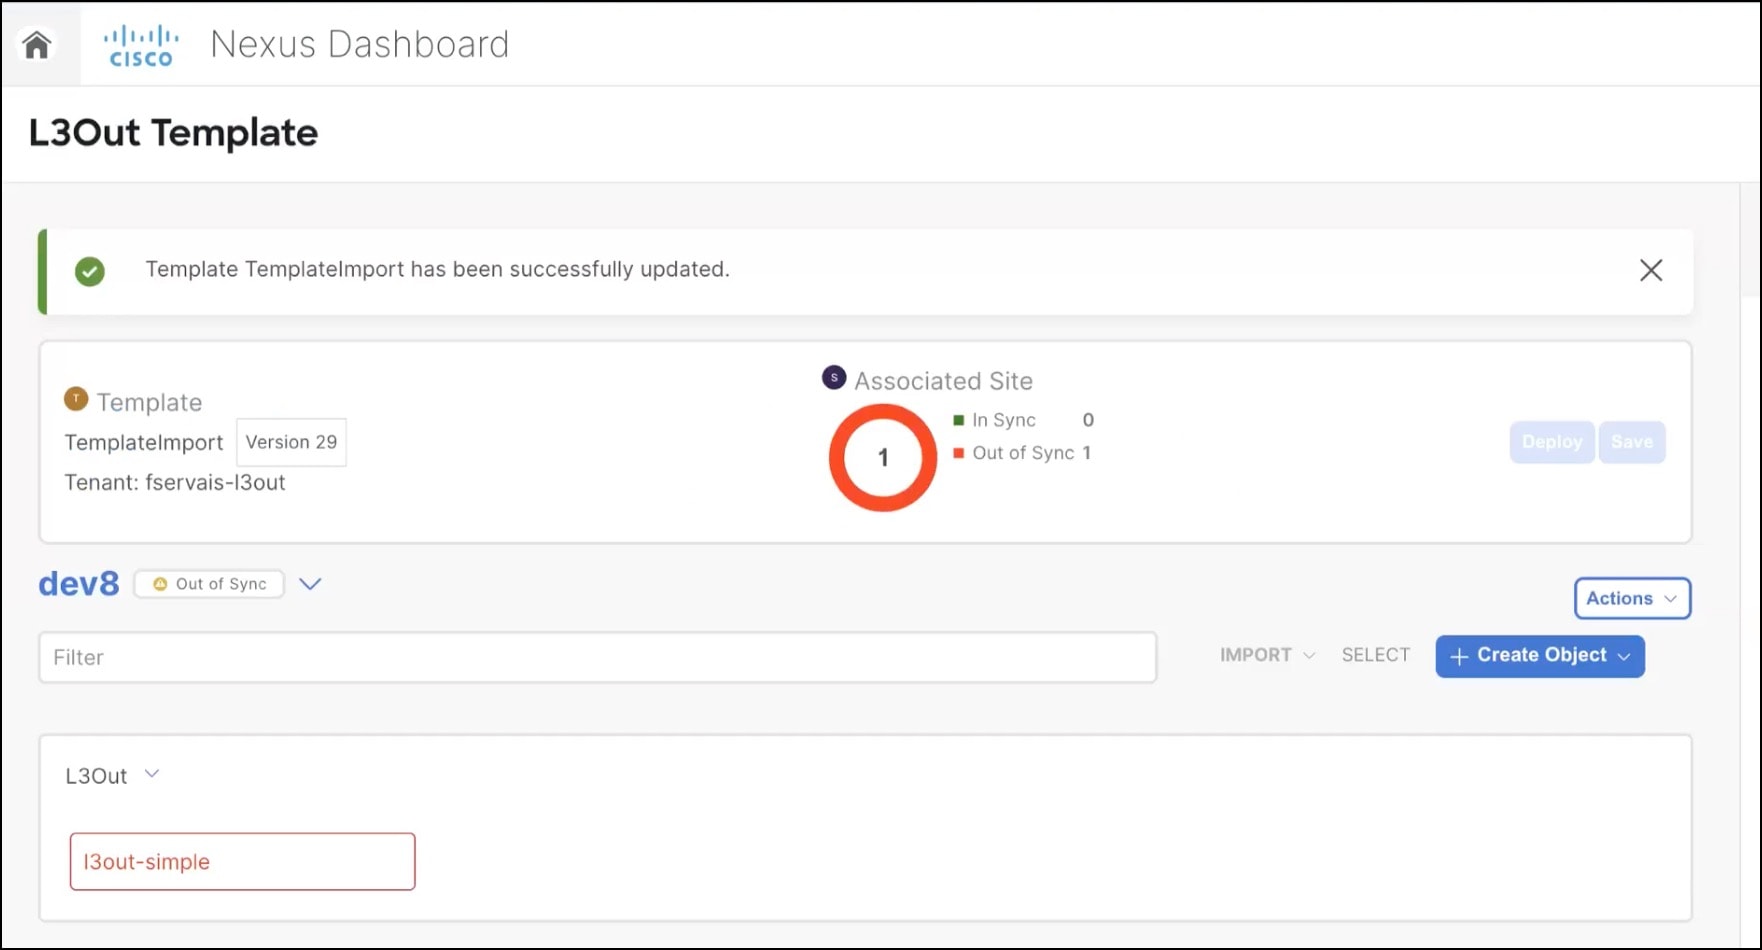
For example, if BGP Peer configuration is present on the L3Out, Nexus Dashboard enforces authentication when the L3Out is imported. In this case, you must manually navigate to the authentication settings and either disable Password Authentication or provide a valid password:
-
Select the imported L3Out.
-
Click the setting that shows a warning.
-
Click the setting that shows a warning again.
-
Provide any missing configuration, such as a password.

-
Repeat this step for all other warnings in the template for the imported objects.
-
-
Click Save to save the template changes.
-
If necessary, update any previously imported IP SLA track members that reference the L3Out you imported in the previous step.
If you have imported one or more IP SLA track members in the previous section which reference the L3Out you are importing, you must manually update the track members' scopes and references after you’ve imported the L3Out. Other details about this behavior are described in L3Out template overview.-
Ensure that you have saved the L3Out template with the imported L3Out objects.
-
Navigate to Configure > Tenant Policies.
-
Choose the Tenant Policies template that contains the IP SLA track members.
-
Choose the IP SLA Track List policy.
-
In the right properties sidebar, click the Edit icon next to the Track Member List you want to update.
-
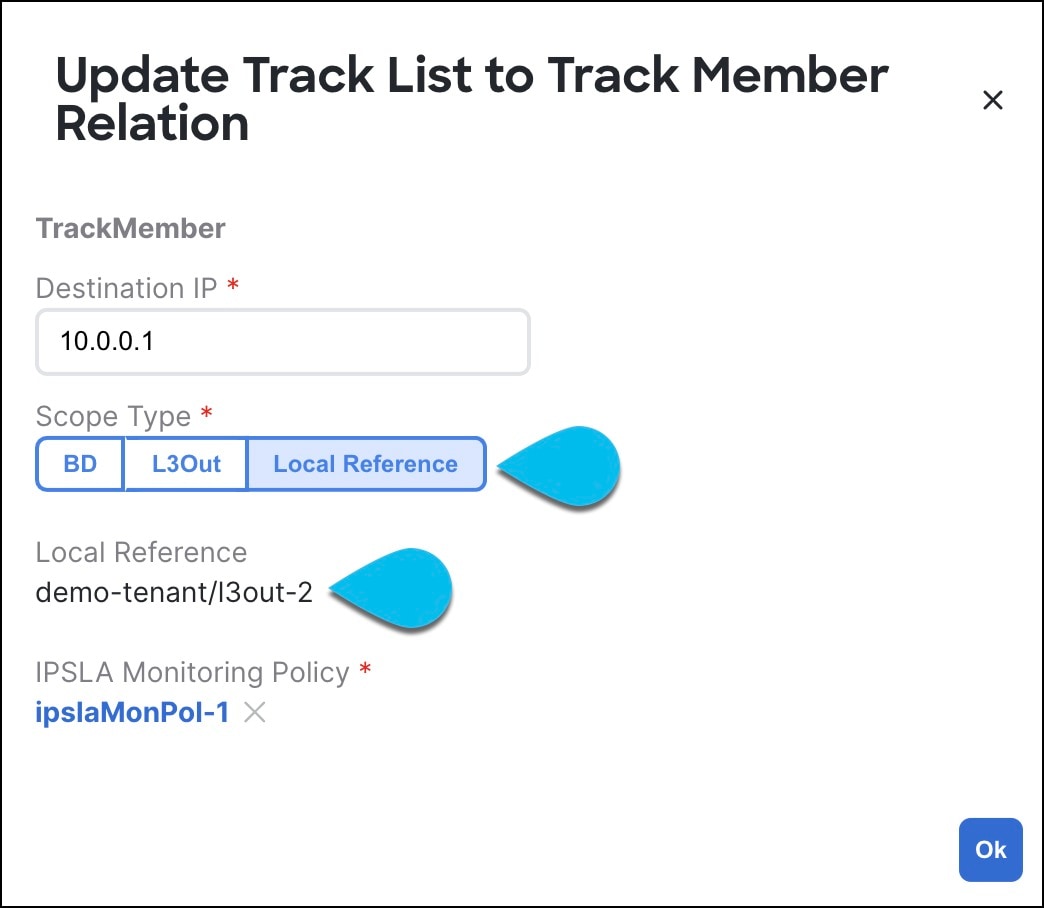
In the Update Track List to Track Member Relation dialog, update the Scope Type and choose the scope object.
The current values are set to Local Reference and the name of the referenced object:
You must update the scope type to L3Out and then choose the L3Out you imported in the previous step.
-
Click Ok to save the changes.
-
Click Save to save the Tenant Policies template.
-
Click Deploy to redeploy the template to the fabric.
-
Return to Configure > Tenant > Tenant Policies and choose the L3Out template that you were editing in the previous step.
-
-
Deploy the L3Out template to fabric.
After you have imported the L3Out and saved the template, you must deploy it back to the fabric.-
In the L3Out Template page, click Deploy.
-
In the Deploy to fabrics dialog, confirm the policies being deployed and click Deploy.
-
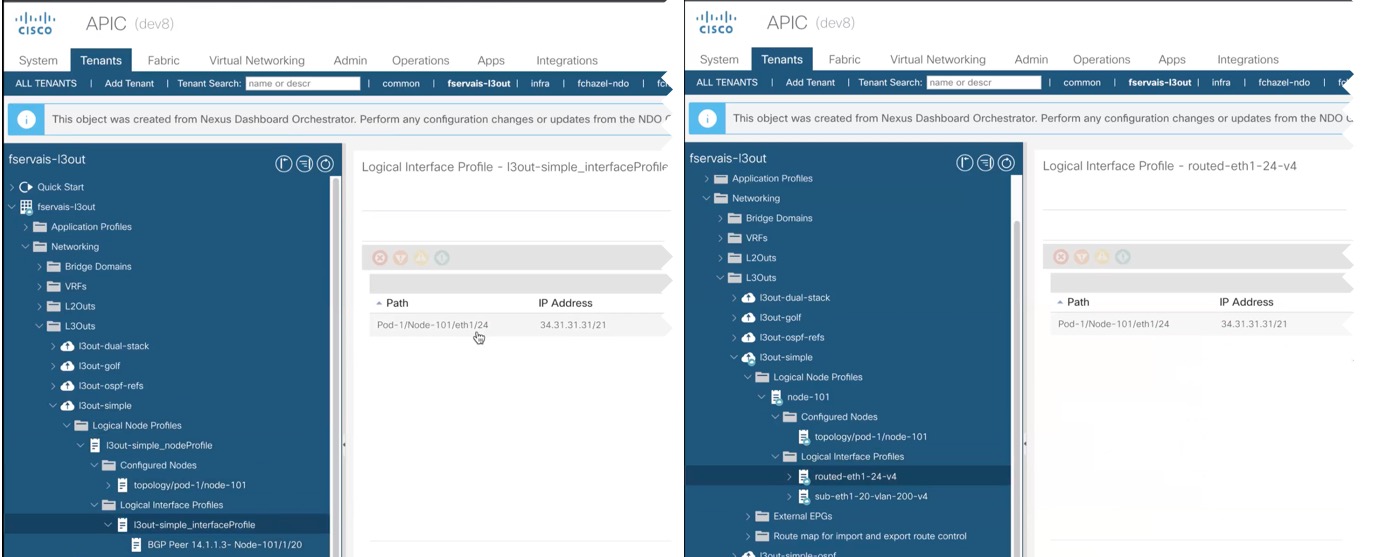
(Optional) Verify that the policies were deployed correctly.
Before validating on APIC, ensure the template is synchronized with the fabric in Nexus Dashboard. Then verify if the template was correctly deployed to a fabric by navigating to the fabric’s APIC, choosing Tenants > <tenant-name> > Networking > L3Outs and checking that the L3Out name is consistent with the one you imported into the Nexus Dashboard template.
-
When the configuration is deployed from Nexus Dashboard back to the fabric, the old MOs are removed and new ones are created with Nexus Dashboard-specific hierarchy, which may cause a brief (up to 1 second) traffic interruption:
Import L3Out set rule and match rule policies
-
Navigate to the Orchestration page.
Manage > Orchestration > Tenant Templates
The Applications page appears by default.
-
Click Tenant policies.
-
Click the tenant template Name.
The Template Properties page appears.
-
From the Import drop-down list, choose the L3Out fabric.
The Import from page appears.
-
Select the L3Out Related Tenant Policies on the left pane.
The L3Out names are displayed on the right pane.
-
Check the L3Out names check box and click Import.
The Template Properties page appears with Set Rule Policy and Match Rule Policy options.
You can create additional rule policies only after completing this import process. Only the Match and Set rules used by the Route Maps associated with the L3Out will be imported.
Import L3Out policy
-
Navigate to the Orchestration page.
Manage > Orchestration > Tenant Templates > L3Out
The L3Out page appears.
-
Click the L3Out template Name.
The Template Summary page appears.
-
From the Import drop-down list choose the fabric.
The Import from fabric page appears.
-
Select the L3Out on the left pane.
The L3Out details are displayed on the right pane.
-
Check the L3Out policy check box and click Import.
The Template Summary page appears.
-
Click the newly imported L3Out policy.
The L3Out policy page appears with the imported policy name and route map details.
Additional route maps can only be created for policies that have been configured on the fabric and successfully imported into Nexus Dashboard.
Import L3Out custom route map policy into existing L3Out
-
Navigate to the Orchestration page.
Manage > Orchestration > Tenant Templates > L3Out
The L3Out page appears.
-
Click the L3Out template Name.
The Template Summary page appears.
-
From the Import drop-down list choose the L3Out.
The Import from page appears.
-
Select the L3Out Route Maps on the left pane.
The L3Out names are displayed on the right pane.
-
Check the L3Out names check box and click Import.
The Template Summary page appears.
The L3Out route map checkbox pertains to an existing L3Out policy within the template and this option is available for L3Outs that have either a custom route map on the fabric or a default-export/import route map with a Match Prefix and Routing Policy type.
-
Click the newly imported L3Out policy.
The L3Out policy page appears with the imported policy name and route map details.
Configuring route profiles on Bridge Domains
-
Ensure that your ACI Multi-Fabric template is deployed in autonomous mode for the Bridge Domain and VRF used by the L3Out to associate the policies between them.
-
If the Bridge Domain configuration already exists in APIC, you can import them to Nexus Dashboard and skip the following procedure.
Follow these steps to configure route profiles on the Bridge Domain.
-
Navigate to the Orchestration page.
Manage > Orchestration > Tenant Templates
The Applications page appears by default.
-
Click a schema Name.
The schema view page appears.
-
From the Overview drop-down list, choose the autonomous template.
The Template Properties page appears.
-
Click the site-name.
The Template Summary page appears.
-
From Bridge Domains, click the bridge domain.
The bridge domain details page appears.
-
From the Select L3Out drop-down list choose the L3Out.
-
From the Route Profile drop-down list choose the L3Out route map.
 Select L3Out
 -
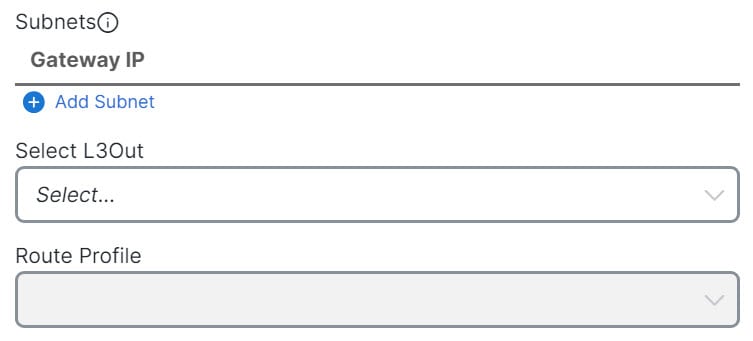
(Optional) Click +Add Subnet.
-
In the Add New Subnet page, you can select the Select L3Out and Route Profile to associate the profiles with the new subnet.
-
Click Save.
-
-
Click Ok.
Configuring route profiles on External EPGs
-
Ensure that your ACI Multi-Fabric template is deployed in autonomous mode for the Bridge Domain and VRF used by the L3Out to associate the policies between them.
-
If the External EPG configuration already exists in APIC, you can import them to Nexus Dashboard and skip the following procedure.
Follow these steps to configure route profiles on the External EPG.
-
Navigate to the Orchestration page.
Manage > Orchestration > Tenant Templates
The Applications page appears by default.
-
Click a schema Name.
The schema view page appears.
-
From the Overview drop-down list, choose the autonomous template.
The Template Properties page appears.
-
Click the site-name.
The Template Summary page appears.
-
From External EPGs, click the external epg.
The external epg details page appears.
-
From the L3Out drop-down lists, choose the L3Out.
-
From the Import Route Profile and Export Route Profile drop-down lists, choose the custom route map.
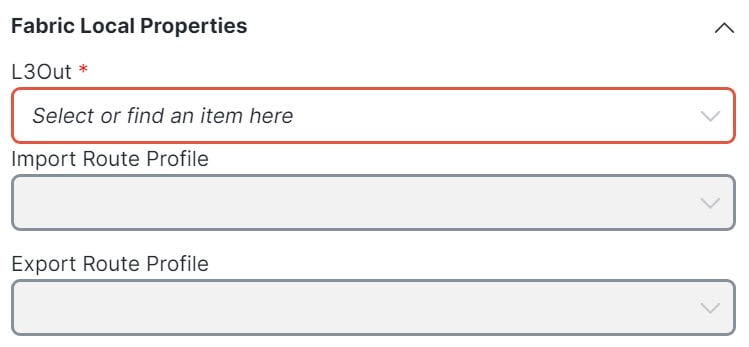 Select L3Out
 -
(Optional) Click +Add Subnet.
-
In the Add New Subnet page, you can select the Import Route Profile and Export Route Profile to associate the profiles with the new subnet.
-
Click Save.
-
-
Click Ok.
The custom route maps in the import and export drop-down lists are based on the already selected L3Out.