Install CWM using Docker Installer Tool

This section contains the following topics:

Install CWM using Docker Installer Tool

The CWM 2.1 is installed on the Cisco Crosswork platform by first deploying the Crosswork OVA file using a Docker image on the VMware vCenter 7.0 (or higher) and then installing the CWM CAPP file using the installation script.

Prerequisites

  • VMware vCenter Server 7.0 (U3p or later) and ESXi 7.0 (U3p or later). Refer to the Crosswork Network Controller 7.1 installation requirements for more details.

  • Docker version 19 or higher.

  • sshpass installed. For Mac, you can use brew install sshpass.

  • jq installed. For Mac, you can use brew install jq.

  • bc (basic calculator), if not preinstalled on your system.

  • Two network interfaces available for the Crosswork VM:

    • One interface for the **management network**

    • One interface for the **data network**

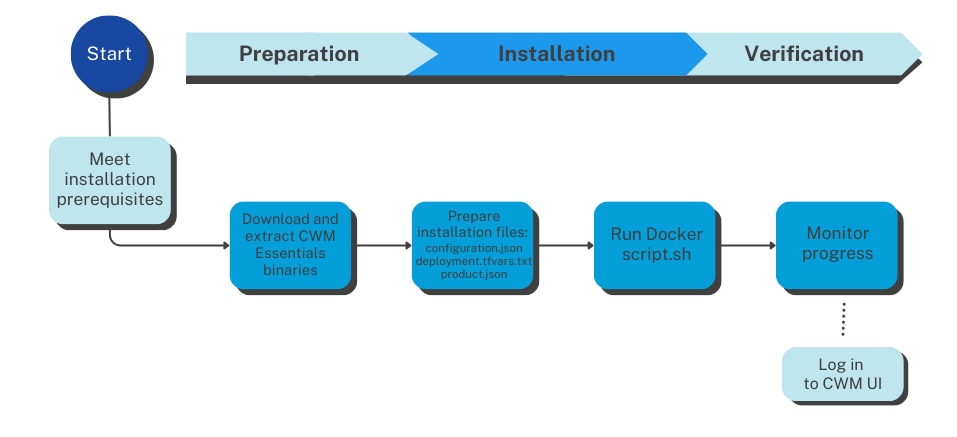
Installation flowchart

The following flowchart outlines the high-level sequence of tasks for installing CWM Essentials in a VMware environment.

Download CWM package

To download the CWM 2.1 package, go to https://software.cisco.com/download/home/286340306/type/286332171/release/2.1.There are four downloadable files there, based on two factors:

  • Virtualization format:

    • OVA files are for VMware

    • QCOW2 files are for KVM

  • Product edition:

    • Either CWM Essentials or CWM Advantage (indicated in the file name).

To install CWM 2.1 Essentials on VMware, download the file with the OVA extension that is labeled for Essentials.


Note


These instructions are specifically for the CWM Essentials package using the OVA file format. If you're using a different edition or format (e.g., CWM Advantage or QCOW2), please refer to the appropriate set of instructions.


Extract CWM Essentials package

Before installing CWM, the software package must be extracted on a system that can access the VMWare environment where CWM will be deployed. This system can be either a local machine or a VM capable of running the installer binaries. For this documentation, we use a Mac laptop for the extraction process.


Note


Alternatively, a Linux-based VM within the same VMWare setup as the target CWM deployment can be used.


Procedure


Step 1

Download the CWM package file named CW-CWM-Standalone-2.1.0-20-SVM-7.2.0-45-ova.signed.bin from software.cisco.com and copy it to a working directory on your Docker-capable machine.

Step 2

Open Terminal and run this command to make the binary executable:

chmod 755 CW-CWM-Standalone-2.1.0-20-SVM-7.2.0-45-ova.signed.bin

Step 3

Run the binary to extract its contents:

./CW-CWM-Standalone-2.1.0-20-SVM-7.2.0-45-ova.signed.bin

Note


Extraction may take a few minutes to complete.

Step 4

After extraction, the folder will contain:

  • The original .signed.bin file

  • An extracted .tar.gz file

  • Additional verification files

Step 5

Untar the tar.gz file:

tar xzf cw-na-cwm-2.1.0-20-releasecwm210-260124.tar.gz

This will create a new folder named CW-CWM-Standalone-2.1.0-20-SVM-7.2.0-45-ova. Rename the folder for convenience.


Use script to Deploy Crosswork and CWM

Procedure


Step 1

In your Docker-capable machine, create a directory where you will store all the files you will use during this installation.

Note

 
If you are using a Mac, ensure that the directory name is in lower case.

Step 2

The downloaded file containing the Crosswork Workflow Manager package from cisco.com includes the following files:

  • Crosswork CAPP package in tar.gz format,

  • Crosswork Workflow Manager OVA file,

  • install.sh installation script,

  • configuration.json configuration file,

  • Docker installer image tar.gz,

  • a set of instructions.

Step 3

Inside the directory, create a .txt file and paste the VMware installation template given below. For this instruction, we'll name the file deployment.tfvars.txt for example purposes.

Cw_VM_Image = ""    # Line added automatically by installer.
ClusterIPStack        = "IPv4"
DataIPNetmask         = "255.255.255.0"
DataIPGateway         = "192.168.1.1"
DNS                   = "DNS"
DomainName            = "domain_name"
CWPassword            = "your_crosswork_password"
VMSize                = "XLarge"
vm_sizes = {
        "xlarge" = {
                vcpus           = 24
                cpu_reservation = 24000
                //Memory in Mbytes
                memory = 128000
        }
}
NTP                   = "ntp.esl.cisco.com"
Timezone              = "Europe/Paris"
EnableSkipAutoInstallFeature = "True"
ManagementVIP     = "your_mgmt_vip"
ManagementIPNetmask = "255.255.255.0"
ManagementIPGateway = "your_mgmt_gateway"
ThinProvisioned = true
IgnoreDiagnosticsCheckFailure = "True"
DataVIP           = "your_data_vip"
CwVMs = {
"0" = {
    VMName                = "your_VM_name",
    ManagementIPAddress = "your_mgmt_ip",
    DataIPAddress       = "your_data_ip",
    NodeType               = "Hybrid"
}
}
VCenterDC = {
VCenterAddress = "your_vcenter_address",
VCenterUser = "your_username",
VCenterPassword = "your_password",
DCname = "your_datacenter_name",
MgmtNetworkName = "VM Network",
DataNetworkName = "SVM Data Network"
VMs = [{
    HostedCwVMs = ["0"],
    Host = "your_VM_host",
    Datastore = "your_VM_datastore",
    HSDatastore = "your_VM_hsdatastore"
  }
]
}
SchemaVersion = "7.2.0" 

Note


Make sure you correctly distinguish between:

  • vCenter Server address (VCenterAddress): This refers to the hostname or IP address of your vCenter server that manages the VMware environment.

  • Datacenter name (DCname): This refers to the specific vSphere Datacenter object within your vCenter inventory where the VM will be deployed.

Step 4

Edit the parameters to match your deployment.

Note

 
To learn more about the installation parameters, please refer to the Single VM chapter in the Cisco Crosswork Network Controller 7.1 Installation Guide.

Step 5

Inside the directory, create another file named product.json file and paste the data below.

{
"product_image_id": "CWM",
"attributes": {
    "key1": "value1"
}
} 

Note


The attributes parameter is used to pass metadata or special configuration flags related to the product image, such as is_arbiter, which designates the VM as an arbiter node in a geo-redundant deployment.

Step 6

Open the configuration.json file and provide the following parameters to match your deployment:

{
    "SVM_NAME": "your_VM_name",
    "host": {
        "remote_user": "your_username",
        "remote_password": "your_password",
        "remote_host": "your_scp_host",
        "remote_port": "22",
        "capp_file": "/path/to/cw-na-cwm-2.1.0-20-releasecwm210-260124.tar.gz"
    },  

    "cwm_login": {
        "ip": "your_mgmt_ip",
        "cwm_user": "admin",
        "cwm_old_password": "admin",
        "cwm_password": "your_new_password"
    },
    "deployment": {
        "tfvars_path": "/path/to/deployment.tfvars.txt",
        "ova_file": "/path/to/cwm.ova",
        "product_json": "/path/to/product.json"
    }
}
  1. for host, provide the details of the SCP server where your Crosswork CAPP file is located like host address and port, your username and password, and the path to the file (change sample filename to your actual filename if needed).

  2. for cwm_login, provide your management IP and the default Crosswork username and password. In cwm_password, provide the new password to replace the default one upon installation completion.

    Note


    Make sure the new password meets the default Crosswork password policy.

  3. for deployment, provide the local paths to the deployment.tfvars.txt created in a previous step, to the CWM OVA file and to the product.json file.

Step 7

From the directory, run the installer script:

bash install.sh

This will start the installation process for the Crosswork platform and then for CWM once the platform is deployed.

Step 8

To monitor the progress of the installation, access the Grafana dashboard which provides a visual summary of each stage (e.g., image unpacking, VM deployment, configuration).

The dashboard is typically accessible at:

https://your_mgmt_vip_address:30602/d/NK1bwVxGk/crosswork-deployment-readiness?orgId=1&refresh=10s

Step 9

After the deployment status reaches 100% in Grafana, SSH to the Crosswork VM using the management IP address and verify that all Crosswork infrastructure pods are running:

kubectl get pods -A

Ensure that all pods are in Running or Completed state before proceeding. If any pods are in Pending or Error, wait until they recover or investigate the issue before accessing the Crosswork UI.

Step 10

Once the installation script is done and the deployment status reaches 100%, go to http://your_mgmt_vip:30603 and log in with the default admin user and the password you provided in configuration.json.