Customize Crosswork Workflow Manager Solutions MOPs

This document covers the following topics:

Export and import MOPs

You can export MOPs as JSON files. This is a handy way to keep backups of MOPs you create. You can also use this with the Import function to share custom MOPs with other locations in your organization that are using CWM Solutions.

Note that, although the exported MOP file is editable, you cannot edit and import it again. The edited MOP will be non-functional.

Procedure


Step 1

To export a MOP:

  1. From the main menu, choose CWM Solutions > MOPs. Crosswork displays the MOP list, listing all existing MOPs.

  2. Follow the steps in Find MOPs to find the MOP you want to export.

  3. At the far right, in the same row as the MOP you want to export, click the More icon (). Crosswork displays a drop down menu.

  4. From the drop-down menu, choose Export (JSON) . MOPs displays a message indicating that the MOP has been exported to a JSON file. Check your local default download folder for a file with a filename that matches the name of the exported MOP, with a JSON filename extension.

    Store or transmit the exported MOP file as needed.

Step 2

To import a MOP JSON file:

  1. From the main menu, choose CWM Solutions > MOPs.

  2. Click Import MOP (JSON).

  3. Browse to and select the exported file, then click Import MOP. When the import is finished, the file appears in the MOP list.


Clone and edit MOPs

The quickest way to create a MOP is to clone one of the default MOPs supplied with Crosswork Workflow Manager Solutions and then modify it as needed. You'll be required to give the cloned MOP a unique name, but you can then work with the cloned MOP as though it were entirely new.

You can create MOPs using other means, such as:

Procedure


Step 1

From the main menu, choose CWM Solutions > MOPs to display the MOP list, listing all existing MOPs.

Step 2

At the far right, in the same row as the MOP you want to clone, click the More icon (). CWM Solutions displays a drop down menu like the one at right in the following figure.

Using a MOP list to clone a MOP

Step 3

From the drop-down menu, choose Clone. CWM Solutions displays an edit window for the MOP you are cloning. All the fields except the MOP name will be filled with exact copies of the values they had in the MOP you cloned. This includes the cloned MO's Selected actions and input configurations.

Step 4

Enter a new, unique name for the cloned MOP and click Save changes.

You can now change the values in the editable fields, add or remove MOP actions, and change action inputs in the cloned MOP as you would for a newly created MOP, as explained Create custom MOPs.

When you are finished, click Save changes.


Create custom MOPs

You can use the MOPs graphic user interface to create MOPs from scratch, in free-form fashion, using the MOP action types that you choose. The steps below show how to do this.

You can also create MOPs using other means, such as:

Procedure


Step 1

From the main menu, choose CWM Solutions > MOPs to display the MOP list, listing all existing MOPs.

Step 2

Click + Create MOP. CWM Solutions displays the Create new MOP window, with most of the first five required identification fields blank.

Step 3

Edit the first three of the five identification fields at the top of the window as shown in the table below:

In this field...

Enter or select...

MOP name *

A new name for the new MOP. You must enter a unique name.

Application Type*

The name of the CWM Solutions application for which the MOP is intended (for example, Device Migration).

Vendor*

The name of the vendor for whose devices the MOP is intended (for example, Cisco Systems)

Product series*

Select one or more product series from the chosen vendor to include in the MOP. Multiple selections allow the MOP to apply to all selected product series.

Tags*

A comma-separated list of tags to be applied to the job whenever a user runs this MOP.

Step 4

As soon as you enter the tags, the Create new MOP window populates the Available actions list with Action Types appropriate for the Vendor and Product series you selected.

Step 5

Add one of the Available actions on the left to the Selected actions list on the right:

  1. In the Action type list on the left, click the + icon next to the Action type you want to add. An Add Action window for the new Action Type appears, like the one shown below.

  2. Enter a Custom name for the newly selected Action, and select the Stage at which you want it to be performed and the Version of the action if multiple versions of the same action are available.

  3. Click Add. The newly added Action appears in the Selected actions list, at the end of the Actions in the Stage you selected for it.

Step 6

To remove one of the Selected actions on the right:

  1. Click the more icon (…) shown to the right on the same row as the name of the selected action you want to delete. Crosswork displays a dropdown menu.

  2. Select Delete. You will be prompted to verify that you want to delete the Action. Click Delete again to remove it.

Step 7

To edit the Custom name, Stage, Position, or Configuration details for one of the Selected actions on the right:

  1. Click the more icon (…) shown to the right on the same row as the name of the selected action you want to edit. Crosswork displays a dropdown menu.

  2. Select Edit. A popup action configuration window for the action appears, with Details and Input tabs, like the one shown below.

    Device Snapshot Configuration edit details and input
  3. To change the selected Action's Custom name, Version, or Stage, edit the respective fields on the Details tab.

  4. For actions that have configurable inputs: To change the action's input configuration, click the Input tab to display the Input Schema tools as shown below.

    Toggle the As form and As JSON payload buttons to toggle the configuration the view.

    Use the Text/View dropdown to toggle between JSON and JavaScript views, and format JSON text. You can also use the + icons to format JMEScript queries and sorts.

    Device Snapshot Configuration toggle between JSON and JavaScript views

Step 8

When you are finished, click Save changes.


Create custom MOP action types

You can create custom MOP actions that you can then use whenever you create a custom MOP from scratch or clone and edit an existing MOP.

Your custom MOP action is a workflow, with outputs, inputs, logic, name and tags. Making the most of this MOP action customization capability, you can extend MOP pre- and post-check functionality for supported devices in any way you wish: providing device health snapshots, making configuration changes to divert traffic while you perform upgrades, and so on.

Creating a custom workflow from scratch is covered in depth in the Cisco Crosswork Workflow Manager 2.1 Workflow Creator Guide. But it is important to remember that MOP actions, default or custom, are not standalone workflows. They are intended to integrate smoothly with other MOP actions into a MOP, and therefore must follow the constraints and guidelines set by the workflow platform.

You can develop workflows independently or generate a MOP action skeleton in the MOP Actions UI. This approach creates a foundational structure that meets the mandatory constraints for versioning and tagging. After you create the skeleton, go to the Workflow Automation interface to refine the logic and execution steps. To complete the integration, go to the MOP Actions UI and select Sync Actions. This step ensures that the updated workflow is recognized as a functional MOP action.

Those constraints are explained in the next section, Guidelines for CWM Solutions MOP actions, followed by additional sections with examples showing how you can follow these guidelines. The examples come from the MOP actions supplied with CWM Solutions's default MOPs. You can see many similar examples by selecting Workflow Automation > Workflows from the main menu. Click on any of the CWM Solutions workflows in the Workflow name list and then click Graph or Code to explore the MOP action code.

Guidelines for MOP actions

In addition to the normal features that all workflows must have, such as a unique name, MOP actions must also incorporate features that allow them to integrate smoothly with other CWM Solutions applications and complete successfully:

  • Version: Each MOP action must be assigned a version number consisting of three digits separated by periods. This standard follows the Semantic Versioning v1.0.0 Specification for major, minor and patch versioning; for details, see the link.

  • Tags: Each MOP action must have tags assigned that will identify it as a type of CWM Solutions MOP action. The tags also identify other MOP action characteristics, such as the vendor and device types with which you want the MOP action to work. Tags allow CWM Solutions to control how it processes the MOP action and to display it properly in the user interface's list of available MOP action types. For a list of the tags you can use and examples of ways to combine them, see the section Tags for CWM Solutions MOP Actions.

  • Data I/O: The MOP action must be designed to accept data input from multiple sources. The MOP action should also generate a response in a pre-defined format to parse and process the workflow outcome. For more information and examples, see the section Data I/O for CWM Solutions MOP actions.

Tags for MOP actions

You can assign any of the tags shown in the table below to a MOP action by entering them in the Tags field when creating or editing a MOP action workflow. Only the mopActivity tag is required. How you use the optional tags will depend on your purpose and the level of generalization you want to achieve using it. For example: The vendor tag is optional, so you do not need to assign a vendor tag value if the MOP action can be used any of the devices of any vendor. However, you may want to assign vendor:Cisco and vendor:Juniper tags if you want to restrict use of the MOP action to just those two vendors.

Table 1. MOP Action Tags

This Tag...

Indicates

Required?

Case Sensitive?

mopActivity This workflow is a MOP activity (aka a MOP action). CWM Solutions uses the mopActivity tag to recognize any workflow that needs to be identified as a MOP action and to distinguish it from general workflows. Yes Yes
noExport

Prevents a MOP action or sub-workflow from being included when a MOP is exported. You can use this tag to exclude specific workflow definitions, such as generic sub-workflows, from the exported JSON file. For example, if a MOP action calls a chain of sub-workflows, only those without the noExport tag are included:

parent-cwm-sol (tags: mopActivity)
  └──child-cwm-sol (tags: )
         └──grandchild-cwm-sol (tags: noExport)

In this case, only the definitions for parent-cwm-sol and child-cwm-sol are exported because the grandchild, grandchild-cwm-sol, is tagged with noExport.

No No

Figure 1, below, shows the internal wftags entry from the installed-summary-xr-cwm-sol Fleet Upgrade MOP action, supplied with the Default XR Upgrade MOP and executed under the name "Capture Package Summary Configuration" during the Default XR Upgrade MOP's post stage. Figure 2 shows the same MOP action's tags when edited in the Tags field in the user interface.

wfTags entry from installed-summary-xr-cwm-sol:

  "wfTags": [
    "mopActivity",
    "noExport",
  ]
Figure 1. Tag Entries in Workflow UI

Data I/O for MOP actions

Prepare MOP actions to accept input from the system and return structured outputs. This enables you to track execution success.

Organize the input data into three primary sections. Each section provides information for a network operation.

  1. CWM Solutions Job Data (app-data): The product framework provides data, including device details, software image selections, and required system metadata, such as jobId, runId, and actionTimeout.

  2. MOP Action-Specific Data (input-key): Enter commands or parameters using the Job Intent form when prompted during MOP job creation.

  3. Stash and Dependencies: When you execute a MOP action in multiple stages (such as pre and post stages), use data from previous stages. The workflow stores output from the pre stage as a stash and automatically includes it in the input for the post stage so you can use results from the pre stage.

    • Stash: Results from a previous stage of the same action. For example, the system can use data captured in a pre stage during a post stage.

    • Passthrough: Data modified by a previous action in the MOP sequence and passed forward by the app-data object.

Execution scope and mode

Before processing data, identify the execution scope of the MOP action using the executionMode field. This determines how the device data is structured in the input.

  • Per-Device (mode 1): The workflow runs for each device. The input includes a single device object.

  • Fleet-Wide (mode 2): The workflow runs once for a group of devices. The input includes a devices object with a list of all targeted resources.

Mandatory input schema

Include these fields in the app-data object for every MOP action:

  • jobId or runId: Unique identifiers for execution tracking within CWM.

  • actionTimeout: The workflow's system-calculated timeout value.

  • executionMode: Integer (1 for Per-Device, 2 for Fleet-Wide).

  • stage: The current MOP stage (pre, distribute, activate, commit, or post).

Mandatory output schema

Return a JSON object with these required fields to ensure correct processing and display of execution results in the Job Details UI:

  • status: The UI uses this value for status reporting. Supported values are success, failed, warning, or terminated.

  • message: Enter a user-readable description of the action outcome.

  • processedResource: List the device UUIDs or resources handled by the action.

  • app-data: Return the modified or original app-data object to continue the workflow for further MOP actions.

Example 1: output structure

{
  "status": <status>, 
  "message": <description_of_outcome>,
  "app-data": { ... },
  "processedResource": [<device_uuid>],
  "stash": { ... }
}

In the example 2, the MOP action is a disk-space pre stage check. There is no workflow-specific input data required beyond data injected directly by the product framework itself: the image and device information, the name of the resource, and the MOP stage. All of this is either specified by the user when setting up the MOP job, or specified in the MOP action itself.

Example 2: MOP Action with framework-only data

{
  "app-data": {
    "data": {
      "imageSize": 1095680,
      "imageVersion": "7.8.2",
      "softwareImages": [
        "ncs540l-7.8.2.CSCwe80628.tar"
      ]
    },
    "device": {
      "host": "NCS540-RON-TSDN.cisco.com",
      "ip": "172.22.141.249",
      "name": "NCS540-RON-TSDN",
      "productSeries": "Cisco Network Convergence System 540L Series Routers",
      "productType": "Cisco NCS 540-24Q8L2DD-SYS-A Router",
      "softwareType": "IOS XR",
      "softwareVersion": "7.8.2",
      "uuid": "fde8fd5d-98cf-4326-bf83-ef319c82223b",
      "vendor": "Cisco Systems"
    },
    "resource": "nso-217"
  },
  "phase": "",
  "stage": "pre"
}

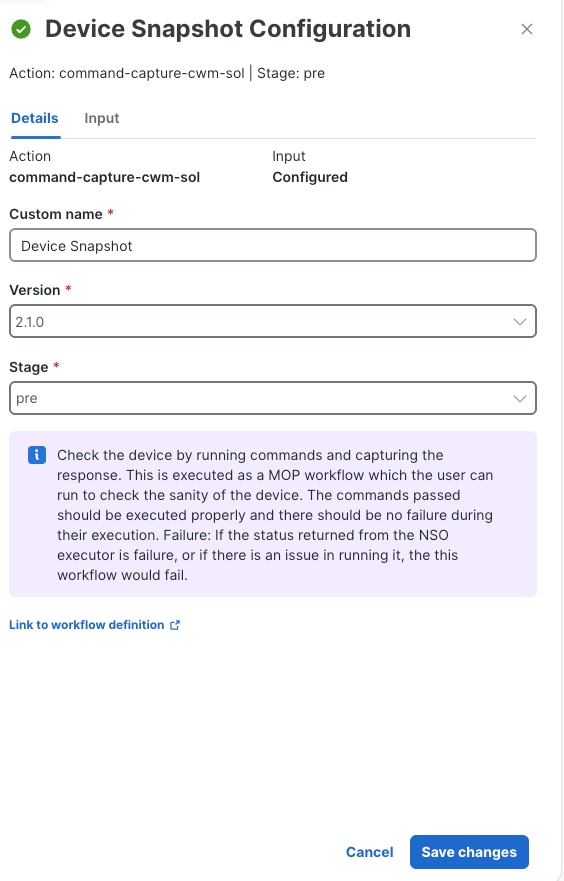
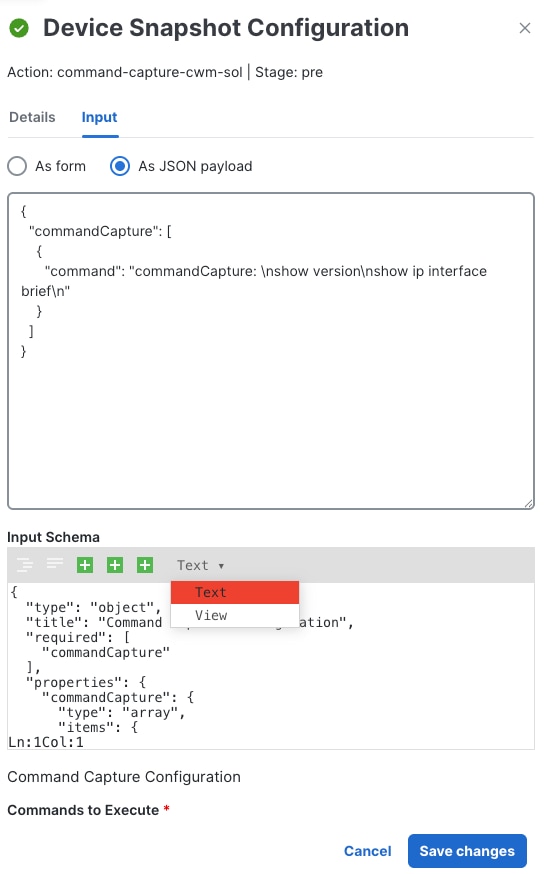
In example 3, the MOP action is a pre stage check on the operational status of the router, which requires as input a couple of commands specified by the user: show version and show ip interface brief. All other the details about the device on which these two commands are to be executed came from the product framework, as in Figure 2.

Example 3: MOP Action with user commands

{
  "app-data": {
    "data": {
      "imageSize": 1095680,
      "imageVersion": "7.8.2",
      "softwareImages": [
        "ncs540l-7.8.2.CSCwe80628.tar"
      ]
    },
    "device": {
      "host": "NCS540-RON-TSDN.cisco.com",
      "ip": "172.22.141.249",
      "name": "NCS540-RON-TSDN",
      "productSeries": "Cisco Network Convergence System 540L Series Routers",
      "productType": "Cisco NCS 540-24Q8L2DD-SYS-A Router",
      "softwareType": "IOS XR",
      "softwareVersion": "7.8.2",
      "uuid": "fde8fd5d-98cf-4326-bf83-ef319c82223b",
      "vendor": "Cisco Systems"
    },
    "resource": "nso-217"
},  
"commandCapture": [
    "show version",
    "show ip interface brief"
 ], 
  "phase": "",
  "stage": "pre"
}

Example 4 shows a MOP action executed in the pre stage, with the idea that the stash data saved during the pre stage will be provided to the workflow job of the post stage. In this example, command-capture is run in both the pre and post stages, and the details stored during the pre stage for the device are injected as stash data by the product framework.

Example 4: MOP Action with stashed pre phase output

{
  "app-data": {
    "data": {
      "imageSize": 1504059392,
      "imageVersion": "7.9.2",
      "softwareImages": [
        "8000-x64-7.9.2.iso"
      ]
    },
    "device": {
      "host": "PE1-UI",
      "ip": "172.20.221.183",
      "name": "PE1-UI",
      "productSeries": "Cisco 8000 Series Routers",
      "productType": "Cisco 8201 Router",
      "softwareType": "IOS XR",
      "softwareVersion": "7.9.2",
      "uuid": "a068190e-31cb-4b21-95fe-306768921a62",
      "vendor": "Cisco Systems"
    },
    "resource": "nso_resource"
  },
  "commandCapture": [
    {
      "command": "show version"
    },
    {
      "command": "show ip interface brief"
    }
  ],
  "phase": "",
  "stage": "post",
  "stash" : [
      "\r\n\rMon Aug  4 10:39:38.489 UTC\r\nCisco IOS XR Software, Version 7.9.2 LNT
\r\nCopyright (c) 2013-2023 by Cisco Systems, Inc.
\r\n\r\nBuild Information:\r\n Built By     : xxxxxxxxx
\r\n Built On     : Thu Jun 29 03:07:05 UTC 2023
\r\n Build Host   : bdb7eb8f4e82\r\n Workspace    : /auto/srcarchive16/prod/7.9.2/8000/ws
\r\n Version      : 7.9.2
\r\n Label        : 7.9.2
\r\n\r\ncisco 8000 (VXR)\r\ncisco 8201-SYS (VXR) processor with 32GB of memory
\r\nPE1-UI uptime is 16 weeks, 4 days, 35 minutes
\r\nCisco 8201 1RU Chassis\r\n\r\nRP/0/RP0/CPU0:PE1-UI#; 
command: show version",
      "\r\n\rMon Aug  4 10:39:38.473 UTC\r\n
\r\nInterface                      IP-Address      Status          Protocol Vrf-Name
\r\nLoopback0                      150.1.1.1       Up              Up       default 
\r\nFourHundredGigE0/0/0/0         10.1.13.1       Up              Up       paris   
\r\nFourHundredGigE0/0/0/1         150.1.12.1      Up              Up       default 
\r\nFourHundredGigE0/0/0/2         unassigned      Shutdown        Down     default 
\r\nFourHundredGigE0/0/0/3         unassigned      Shutdown        Down     default 
...
\r\nFourHundredGigE0/0/0/23        unassigned      Shutdown        Down     default 
\r\nHundredGigE0/0/0/24            unassigned      Shutdown        Down     default 
\r\nHundredGigE0/0/0/25            unassigned      Shutdown        Down     default 
\r\nHundredGigE0/0/0/26            unassigned      Shutdown        Down     default 
...
\r\nHundredGigE0/0/0/35            unassigned      Shutdown        Down     default 
\r\nMgmtEth0/RP0/CPU0/0            192.168.122.58  Up              Up       MGMT    
\r\nRP/0/RP0/CPU0:PE1-UI#; command: show ip interface brief"
    ],
}

In example 5, when the MOP action is executed in the pre and post stages, the stash data saved during the pre stage will be provided to the workflow job of the post stage. In this example, a package summary check is run in both the pre and post stages, and the details stored during the pre stage for the device are injected as stash data by the product framework.

Example 5: MOP Action with package summary

{
  "app-data": {
    "data": {
      "imageSize": 1504059392,
      "imageVersion": "7.9.2",
      "softwareImages": [
        "8000-x64-7.9.2.iso"
      ]
    },
    "device": {
      "host": "PE1-UI",
      "ip": "172.20.221.183",
      "name": "PE1-UI",
      "productSeries": "Cisco 8000 Series Routers",
      "productType": "Cisco 8201 Router",
      "softwareType": "IOS XR",
      "softwareVersion": "7.9.2",
      "uuid": "a068190e-31cb-4b21-95fe-306768921a62",
      "vendor": "Cisco Systems"
    },
    "resource": "nso_resource"
  },
  "phase": "",
  "stage": "post",
  "stash": {
    "activated": [
      {
        "Package": "xr-8000-l2mcast",
        "Version": "7.9.2v1.0.0-1"
      },
      {
        "Package": "xr-8000-mcast",
        "Version": "7.9.2v1.0.0-1"
      },
...
      {
        "Package": "xr-track",
        "Version": "7.9.2v1.0.0-1"
      },
      {
        "Package": "xr-8000-fpd",
        "Version": "7.9.2v1.0.1-1"
      }
    ],
    "committed": [
      {
        "Package": "xr-8000-l2mcast",
        "Version": "7.9.2v1.0.0-1"
      },
      {
        "Package": "xr-8000-mcast",
        "Version": "7.9.2v1.0.0-1"
      },
...
      {
        "Package": "xr-track",
        "Version": "7.9.2v1.0.0-1"
      },
      {
        "Package": "xr-8000-fpd",
        "Version": "7.9.2v1.0.1-1"
      }
    ]
  },
}

For examples 6 and 7, consider a simple MOP action that performs only a validation check on a device and appears to have no "stash" data output, only a status message:

Example 6: output without stash data

{
  "Data": {
    "message": "Device disk check passed.",
    "status": "success"
  }
}

The stash data is useful in two ways. First, it lets users see detailed information about each MOP action that ran during the CWM Solutions job. In the job execution view, when someone clicks on a specific MOP action, the stash shows the actual device configuration or any relevant data used at that step. This gives more context than just a message or status, so users can see exactly what data was involved in the decision.

Second, if that same MOP action is run again in a later stage (such as the post stage), the workflow automatically passes the pre stash data as input for the post stage. This means the workflow can re-use earlier results for post-processing, keeping things connected and efficient.

Example 7: output with stash data

{
  "Data": {
    "message": "Interface pre-upgrade check is successful.",
    "stash": [
      {
        "AdminDown": "0",
        "Down": "0",
        "InterfaceType": "IFT_ETHERNET",
        "Total": "1",
        "Up": "1"
      },
      {
        "AdminDown": "0",
        "Down": "0",
        "InterfaceType": "IFT_LOOPBACK",
        "Total": "1",
        "Up": "1"
      },
      {
        "AdminDown": "0",
        "Down": "0",
        "InterfaceType": "IFT_NULL",
        "Total": "1",
        "Up": "1"
      },
      {
        "AdminDown": "12",
        "Down": "0",
        "InterfaceType": "IFT_HUNDREDGE",
        "Total": "12",
        "Up": "0"
      },
      {
        "AdminDown": "22",
        "Down": "0",
        "InterfaceType": "IFT_FOURHUNDREDGE",
        "Total": "24",
        "Up": "2"
      },
      {
        "AdminDown": "34",
        "Down": "0",
        "InterfaceType": "ALL TYPES",
        "Total": "39",
        "Up": "5"
      }
    ],
    "status": "success"
  }
}

A MOP action should return output using the following JSON schema (the stash element is optional):

{
"status": "string",
"message": "string",
"stash": {output stash}
}