Cisco Crosswork Network Controller 7.2 Fleet Upgrade User Guide
Bias-Free Language
The documentation set for this product strives to use bias-free language. For the purposes of this documentation set, bias-free is defined as language that does not imply discrimination based on age, disability, gender, racial identity, ethnic identity, sexual orientation, socioeconomic status, and intersectionality. Exceptions may be present in the documentation due to language that is hardcoded in the user interfaces of the product software, language used based on RFP documentation, or language that is used by a referenced third-party product. Learn more about how Cisco is using Inclusive Language.
Fleet Upgrade in Crosswork Network Controller lets users manage, distribute, and commit software images and image upgrades
to multiple devices at the same time, including to third-party devices.
Fleet Upgrade is automated, customizable, extensible, provides strong error checking, and supports devices from Cisco and
other vendors.
To get started using Fleet Upgrade, see the next topic, Onboard devices.
Pre-requisites
Fleet Upgrade is part of the Cisco Crosswork Network Controller Premier tier. You must install the Premier tier package as
a CAPP (CrossworkAPPlication) on a cluster deployment of Cisco Crosswork Network Controller. Your cluster deployment must be supported by Crosswork
Data Gateway, Cisco Network Services Orchestrator (NSO), Workflow Automation, and an adequate number of server node resources.
Before you can test devices for compliance with software image standards, or upgrade them, the devices must be part of your
Cisco Crosswork managed inventory.
The Cisco Crosswork Network Controller 7.2 Administrator Guide chapter Onboard Devices contains complete instructions on how to add devices to your managed inventory, using a wide variety of methods. Two of the
mostly commonly used are:
Adding devices in bulk by importing device information from a CSV template file. For help with this method, see the topic,
Add Devices by Importing from CSV File
Once you have populated your managed device database, it is also a good idea to export it as a CSV file backup. For help with
this task, see the topic Export Device Information to a CSV File.
Populate the image repository
Before you use Fleet Upgrade to standardize, test conformance, and upgrade the images installed on your network devices, you
must first populate the Fleet Upgrade image repository with the images you need. You can then use these images set up the
software image policies that establish your standards for image compliance.
The Fleet Upgrade image repository lets you browse, choose and load ISO images, SMUs and GISOs directly from Cisco.com using
your Cisco customer login, via a proxy server, or from local storage resources.
When installed with Crosswork Network Controller, the Fleet Upgrade image repository is the same as, and has the same contents
as, the Crosswork Network Controller software image repository. All the software repository image-management features you
use with Crosswork Network Controller are available to you, in addition to the automated device image-upgrade workflow that
Fleet Upgrade provides.
The topics in this section explain how to work with images in the repository:
Load SMUs from the Cisco catalog
Follow these steps to populate the image repository with images directly from the Cisco.com repository.
You can also use Crosswork Network Controller's Device Management > Software Management > Images functions to load SMUs.
Procedure
Step 1
From the main menu, choose Device Management > Fleet Upgrade > Image Repository. The Fleet Upgrade window's Image repository tab displays the list of images loaded to the local image repository.
Figure 1. Image Repository - Local repository tab
Step 2
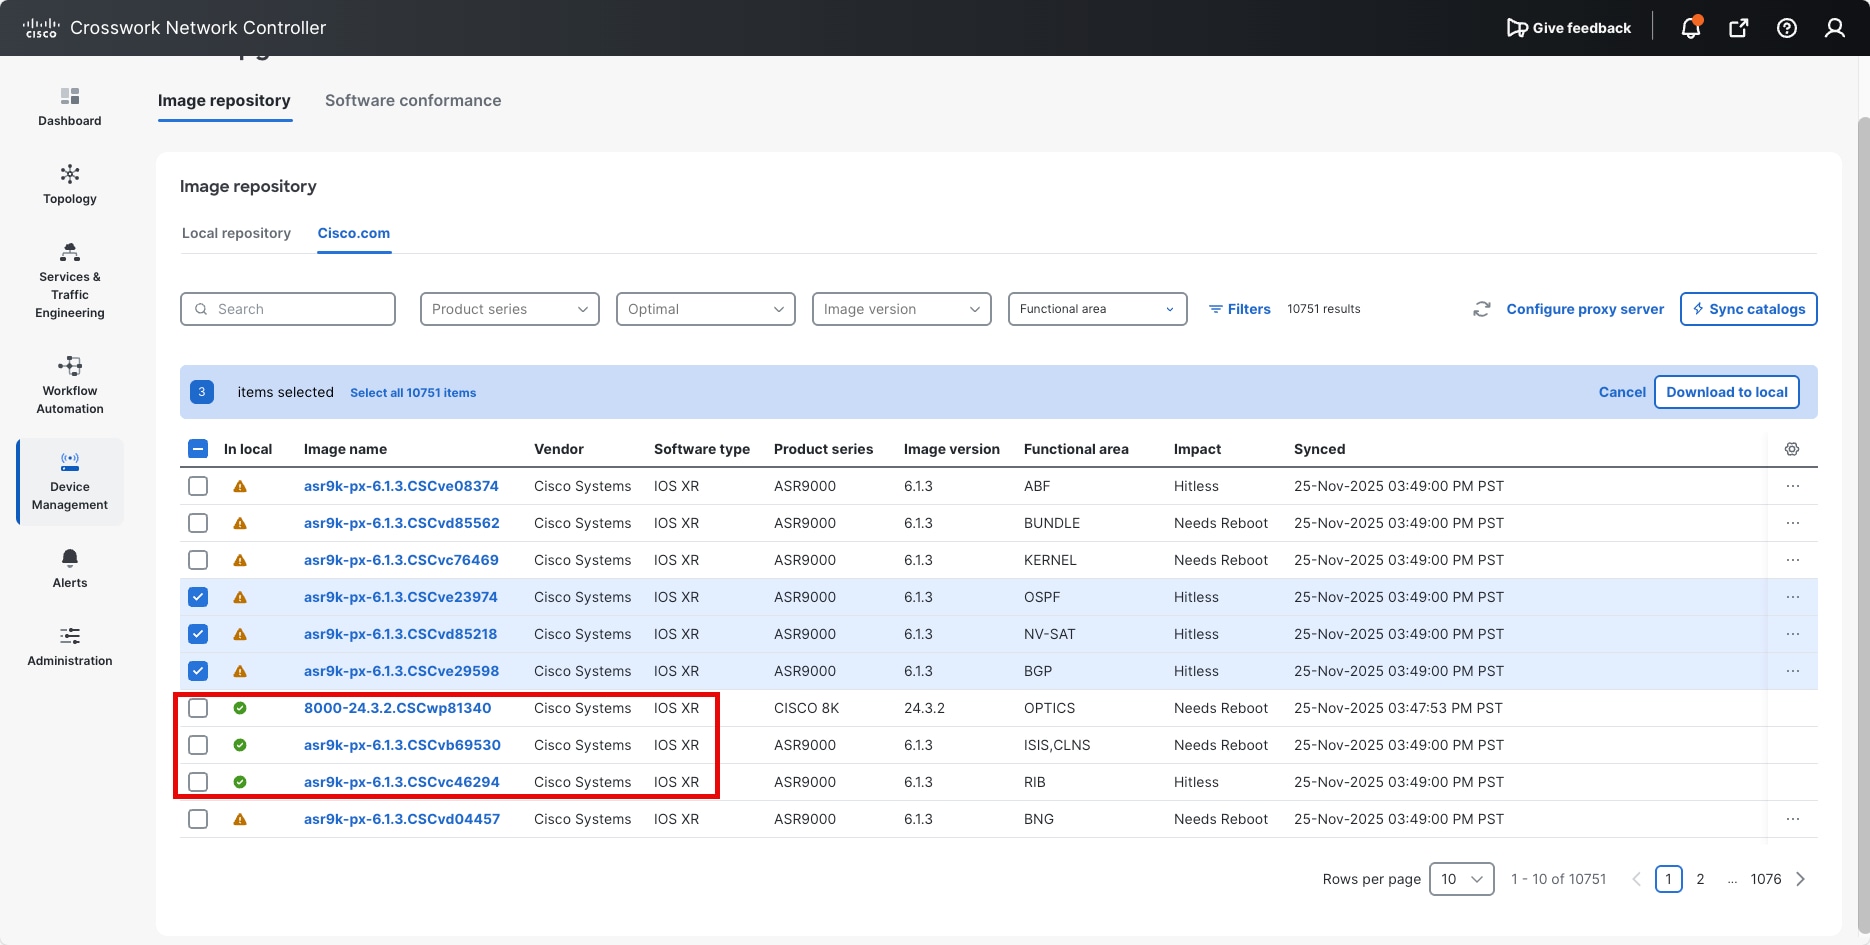
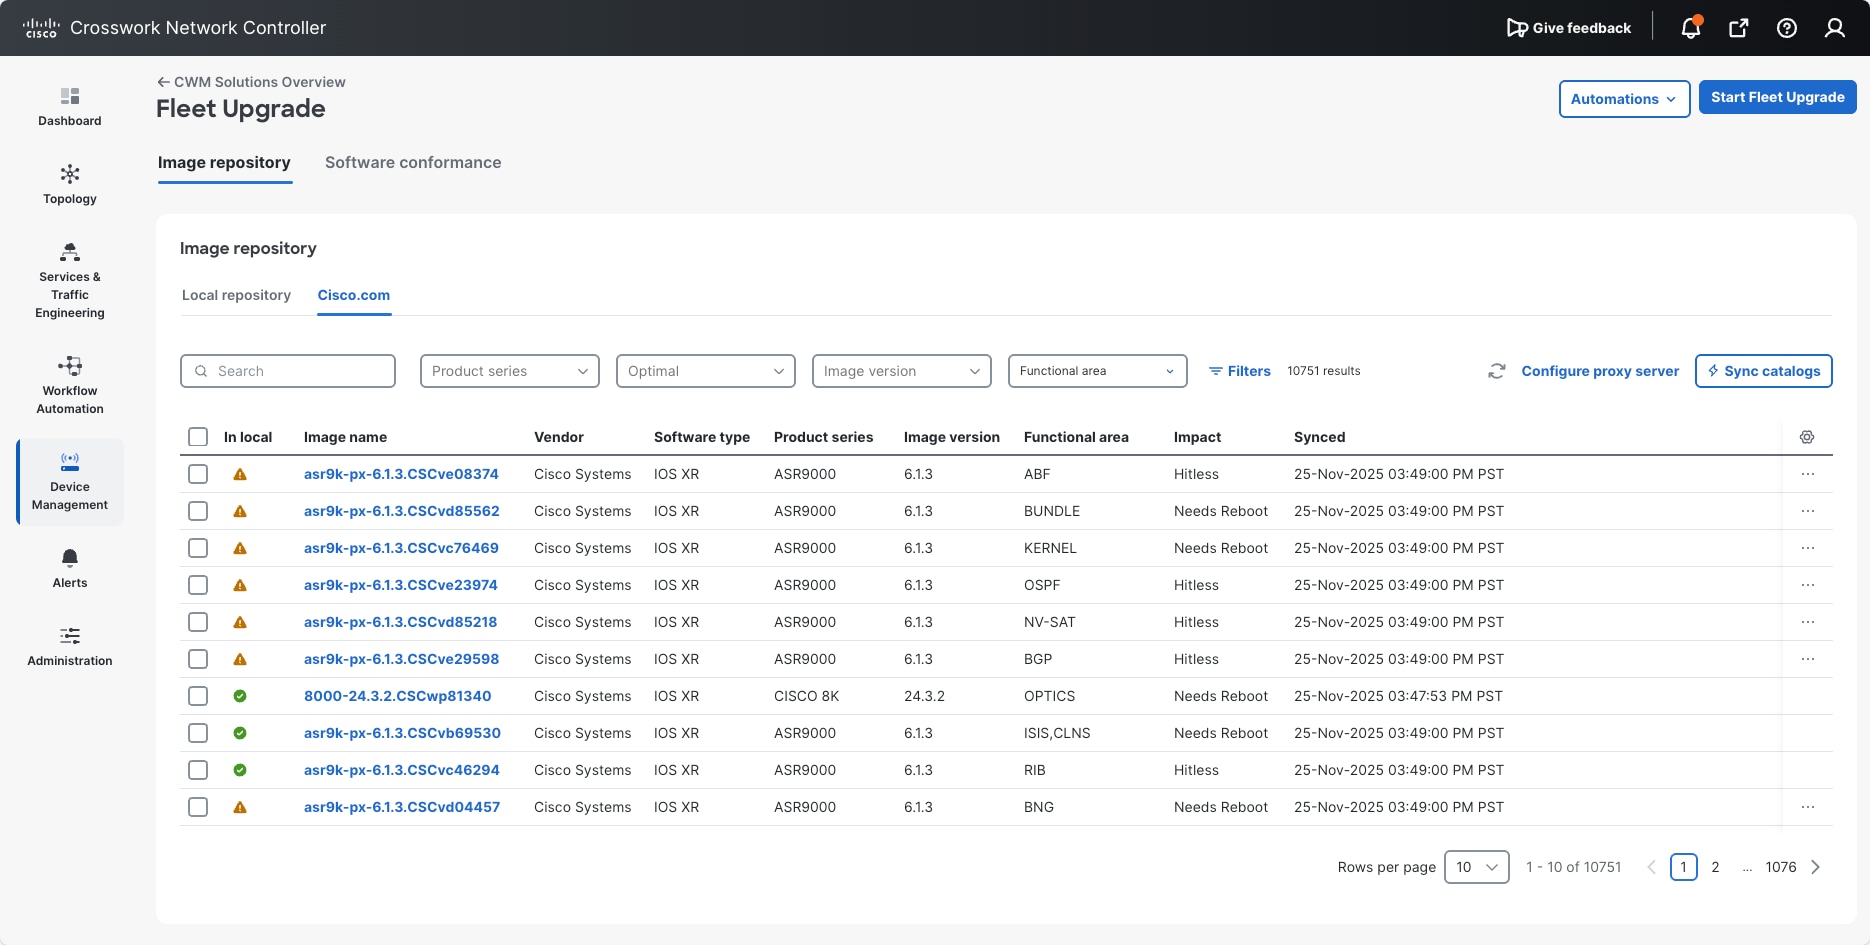
Click the Cisco.com tab. The window's Image repository section now displays the catalog of packages available from the Cisco.com software image download site.
Figure 2. Image Repository - Cisco.com tab
Tip
Cisco releases many new SMUs each quarter. Use Filters to limit the display to the images of interest to you, as explained in Find images. If you don't see the images you want, or the timestamps shown under Synced are more than three months old, follow the steps in Update the Fleet Upgrade catalog. You may also want to Inspect Cisco image details before downloading.
Step 3
Choose one or more of the images you want to download by clicking the checkboxes shown in the far left column in the same
row as the Image name.
A green circle with a check mark shown next to the image's name under the In local column indicates that the image is already in the local repository.
Figure 3. Green icon indicating image in the repository
Step 4
Choose Download to local.
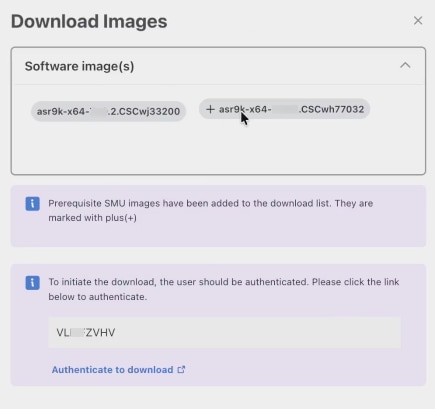
Crosswork displays a Download Images popup window, listing the Software Image(s) you chose to download.
If any image you chose has dependent SMU images, they will be listed along with the main image. Each dependent image will
be marked with a plus (+) sign. The popup will also display a user authentication code.
Figure 4. Download images
Step 5
Click the popup's Authenticate to download link to display a separate browser window. Then click Next to log in to Cisco.com with the authentication code and initiate the download(s).
The Download Images window remains displayed until you click X to exit.
Step 6
To check on download progress:
From the main menu, choose Workflow Automation > CWM Solutions Systems Tasks. Crosswork displays the list of running and completed systems tasks.
Look for an Image Download task you've recently initiated near the top of the list (or use the Search field to limit the display to this task type).
For details, click on the task's link in the Type column to display an Image Download popup with information on the task and its progress.
When the download task is complete, the popup will list causes for any downloads that failed.
Figure 5. Image download popup
Upload ISO images from a storage resource
Follow these steps to upload Cisco or third-party network ISO software images you have previously downloaded to a storage
resource.
You can also use Crosswork Network Controller's Device Management > Software Management > Images functions to load images from a storage resource.
Procedure
Step 1
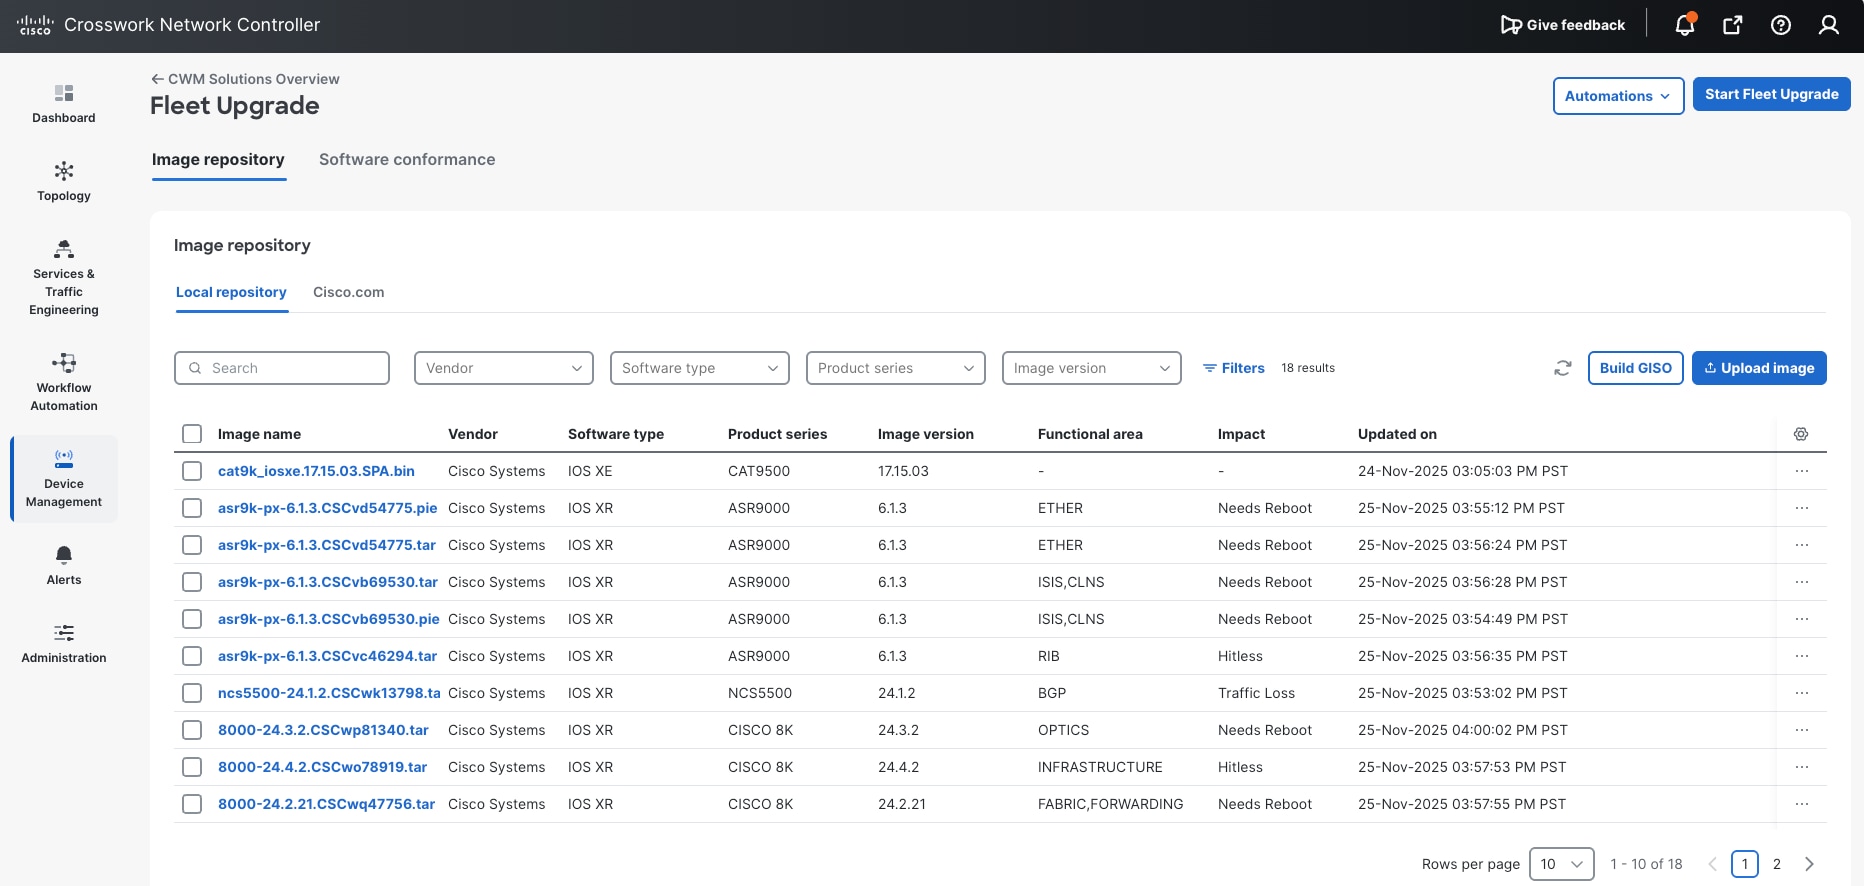
From the main menu, choose Device Management > Fleet Upgrade > Image Repository.
The Fleet Upgrade window's Image repository tab displays the list of images loaded to the local image repository.
Figure 6. Image repository tab
Step 2
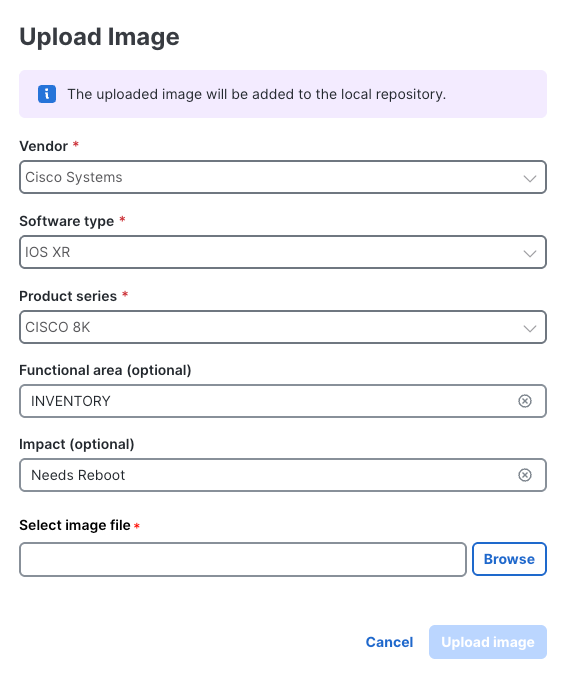
Click Upload image to display the Upload Image window.
Figure 7. Upload image to local repository
Step 3
Complete the fields on the Upload Image window as shown in the following table (the name of the image file, as well as values for the Vendor, Software type, and Product series fields are all required):
In this field...
Enter or choose:
Vendor *
Cisco or Juniper.
Software Type *
If Vendor is Cisco, IOS XR or IOS XE. If Vendor is Juniper, MX 960.
Product Series *
A supported Product Series for the chosen Vendor and Software Type (for example, CAT2000for Cisco and IOS XE).
Functional area (optional)
A description of the OS functional area affected by the upgrade (for example: ACL or Infrastructure).
Impact (optional)
A description of the operational impact of the upgrade installation (for example: Requires reboot or Hitless)
Select image file *
Enter the path and filename of, or click Browse to choose, the software image file to be uploaded.
Step 4
Once you have specified the image file, click Upload image to begin uploading the image to the repository.
Find images
Follow these steps to find an image downloaded to the local repository or in the Cisco.com catalog.
If you're looking for an image and can't find it in your local repository or in the Cisco.com catalog, synchronize the Fleet
Upgrade catalog with the Cisco.com catalog and then search again. See Update the Fleet Upgrade catalog.
Procedure
Step 1
From the main menu, choose Device Management > Fleet Upgrade > Image Repository.
Crosswork displays the list of images downloaded to the local repository, as shown below. If the image you want is not already
loaded in the local repository, go to the next step.
Figure 8. Image respository - local repository tab
Step 2
Click the Cisco.com tab to display the catalog of all SMUs available from the Cisco.com software image download site, as shown below.
Figure 9. Image respository - cisco.com tab
Step 3
Once you are viewing the image catalog you want, use any of the following quick methods to find the image you want:
Scroll the Image repository table until you see the name of the image you want to find.
Begin entering characters in the Search field to narrow the table listing to only those images with names that match your search string.
Click on any of the table column headings, such as Image Name, Vendor, Software type, Product series, Image version, and so on, to sort the table listing by the values in that column.
Step 4
Enter or select values in one or more of the filter fields (Product series, Optimal, and so on) at the top of the Image repository table. The filters you set will narrow the table listing to just those images that match the values you set.
Depending on which of the two Image repository tabs you are viewing and the Filters visible on your screen, you can filter on:
the image Vendor
the image operating system Software type
the device Product series for which the image is intended
the Image version
whether the image is Optimal for the device or not
the network Functional area the image affects
the Impact the image will have on the device when applied
the date and time the local copy of the image was Last Updated
the date and time the Cisco.com image was last Synced with your local copy.
Step 5
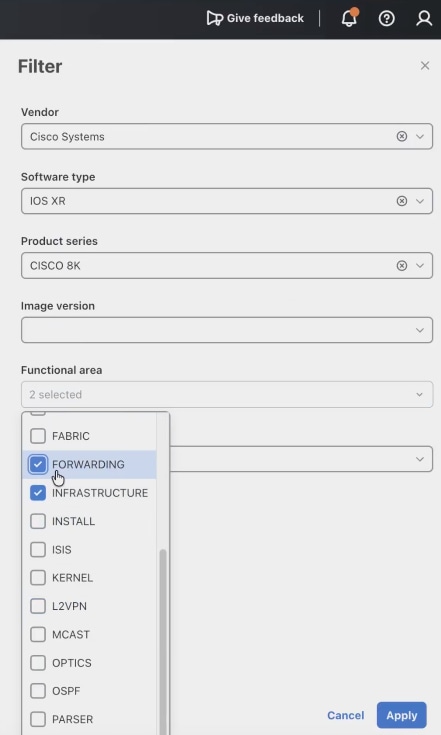
If you want to use all of the filter fields at once, click on the Filters icon to display all the Filter fields in a Filter popup list at the right side of the table, as shown in the figure below.
Figure 10. Filter popup
When you have chosen all the filter values you want, click Apply to narrow the table listing to only those images with matching values. Click Cancel or the X icon. to exit the popup but retain the filters you set.
Click Reset all on the Image Repository window to clear the filters you set.
Step 6
If there is more than one page of listings: Use the Rows per page and page number controls at the bottom of the table to scroll to the page containing the image you want.
You can also click the Table settings icon (in the table heading row at far right) to change the table display density and the number of table columns shown.
Inspect Cisco image details
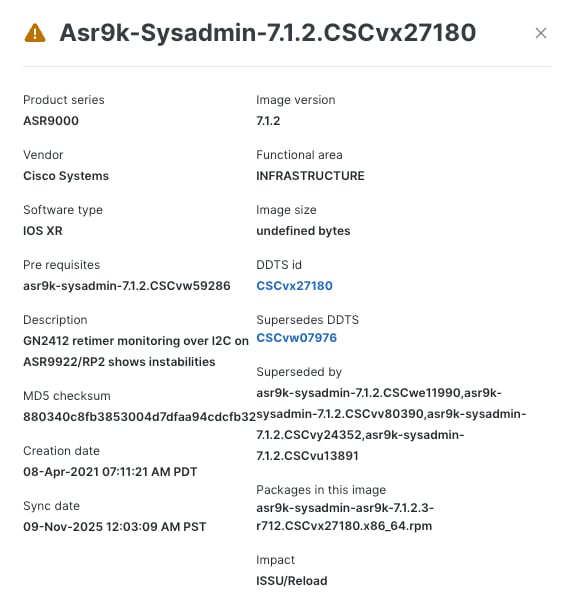
In addition to the information available to you in the Image Repository table view, you can click on the name of any image to see detailed metadata for the image, including a description, associated
pre-requisites, lists of the packages included in it, related issue reports, the packages it supersedes, and much more.
Procedure
Step 1
From the main menu, choose Device Management > Fleet Upgrade > Image Repository.
Step 2
Optional: If you want to view metadata for images in the Cisco.com repository, click the Cisco.com tab to display the Cisco.com image catalog.
Step 3
Under the Name column, click the name of the image whose details you want to see. Crosswork displays a popup details window like the one
shown below. The popup title matches the name of the image.
Figure 11. Image details
Step 4
Some packages will contain links to Cisco Distributed Defect Tracking System (DDTS) software bugs and enhancement requests
addresssed in a particular release. When links these links are included: Click on the DDTS id and Supersedes DDTS links to view web pages documenting these software issues.
Step 5
When you are finished, click the X icon to close the popup.
Update the Fleet Upgrade catalog
Cisco releases SMUs and related packages frequently. The catalog provided with Fleet Upgrade is a copy of the Cisco.com catalog
and it is not updated automatically. It is a good idea to ensure that the Fleet Upgrade copy of the catalog is in sync with
Cisco.com, especially if you're having trouble finding an image that you want to download to the local repository, or you
are creating image policies that include SMUs you have not yet downloaded.
Verify the results of the synchronization before continuing.
Procedure
Step 1
From the main menu, choose Device Management > Fleet Upgrade > Image Repository.
Step 2
Click the Cisco.com tab to display the Fleet Upgrade copy of the Cisco.com image catalog.
Figure 12. Image repository - cisco.com tab
Step 3
Click Sync catalogs. Crosswork displays a confirmation warning.
Step 4
Click Sync catalogs again. Crosswork displays a message indicating that it has started the synchronization operation.
Step 5
To verify the results:
From the main menu, choose Alerts > Alarms & Events to display the Alarms and Events page.
Set the page to display Events. Look for events in the System category, with an Information severity level, that include the text CCO sync.
Create image policies
Software image policies are a critical part of the Fleet Upgrade workflow. Whenever you create a software image policy, you
choose one or more software image versions and make them part of the standard set of images to be installed on your devices.
As different types of devices run different types of software images, you'll need to establish image policies for each type
of device. Whenever you run a Fleet Upgrade conformance report against a particular type of device, you will also need to
pick the appropriate image policy for that device type. The Fleet Upgrade workflow will then check the software actually installed
on those devices against the standard image established in the policy. If the installed and standard image versions don't
match, then the device is non-conformant.
Fleet Upgrade will rate as conformant only those devices that have installed on them all of the target images and versions in the image policy at the time you run the conformance report. If you run a conformance
report against a device that does not have one or more of the policy's images or versions installed, the report will rate
that device as non-conformant.
Note
With this release of Fleet Upgrade, you do not need to load into the local repository all the SMUs for a particular software
version beforehand in order to add them to a software image policy. As long as your local Fleet Upgrade SMU catalog is in
sync with the Cisco.com catalog, you can select both local and non-local SMUs for inclusion in an image policy. See Update the Fleet Upgrade catalog.
Procedure
Step 1
From the main menu, choose Device Management > Fleet Upgrade > Software conformance > Image policies. Crosswork displays the Image policies window, listing all the image policies.
Step 2
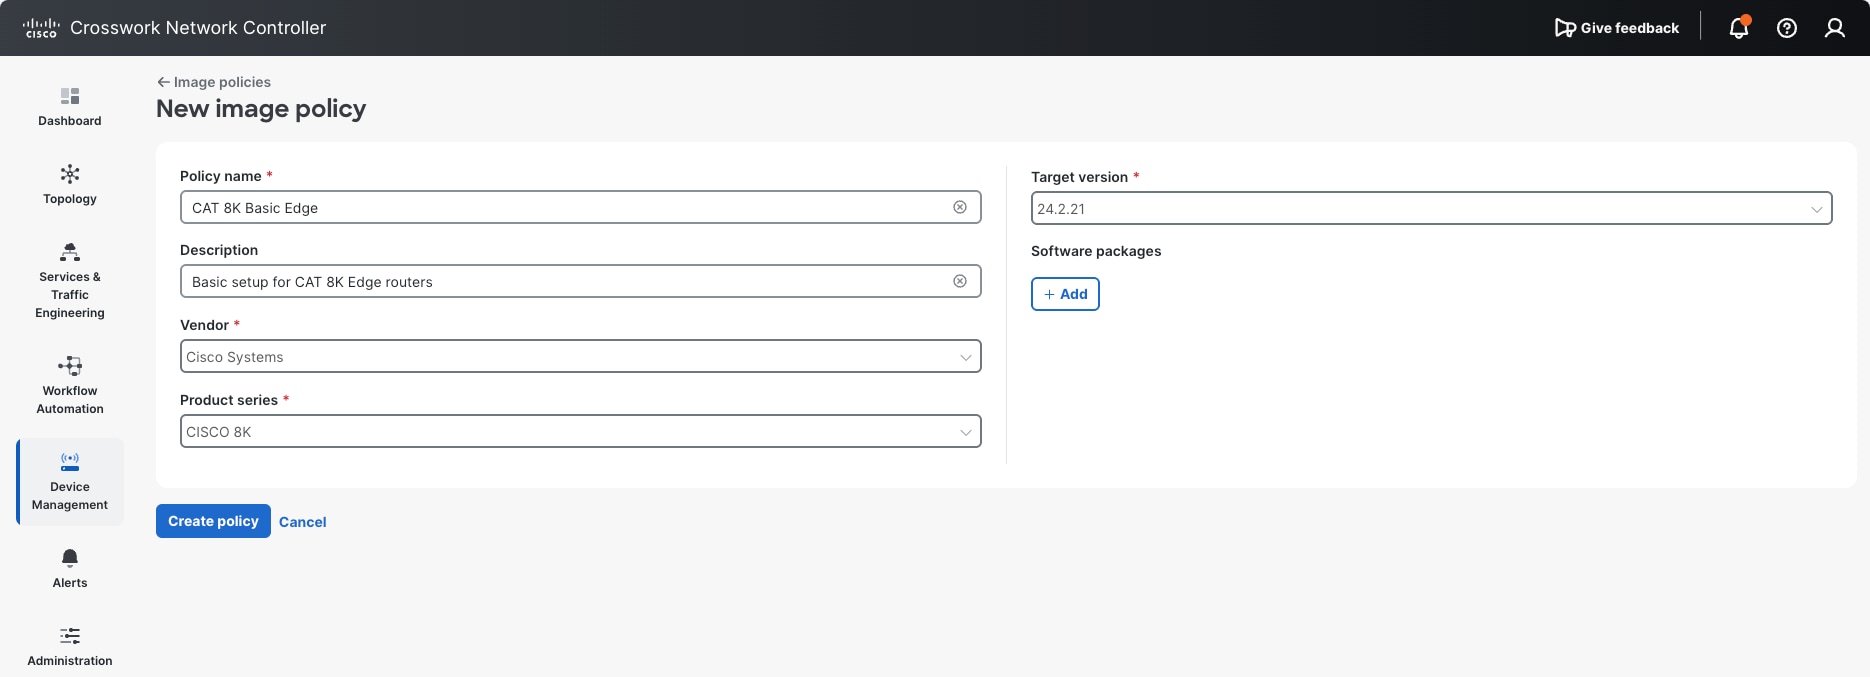
Click + Add image policy to display the New image policy window.
Figure 13. New Image Policy Window
Step 3
Complete the first five fields in the New image policy window as shown in the following table:
In this field...
Enter or choose...
Policy name
A unique name for the image policy, such as ASR 1K Basic SMU Mix.
Description
An optional description of the policy's purpose, such as Standard minimum SMU level for all Cisco ASR 1000 routers.
Vendor *
The name of the software vendor, such Cisco Systems.
Product series *
The network device product series, such as the Cisco ASR1000.
Target version *
The target version of the product series, such as 17.09.04a for the Cisco ASR1000. Supported target versions are pre-selected for you based on the Vendor and Product series you choose. Note that you cannot
change the Vendor and Product series value once you have chosen a Target version.
Step 4
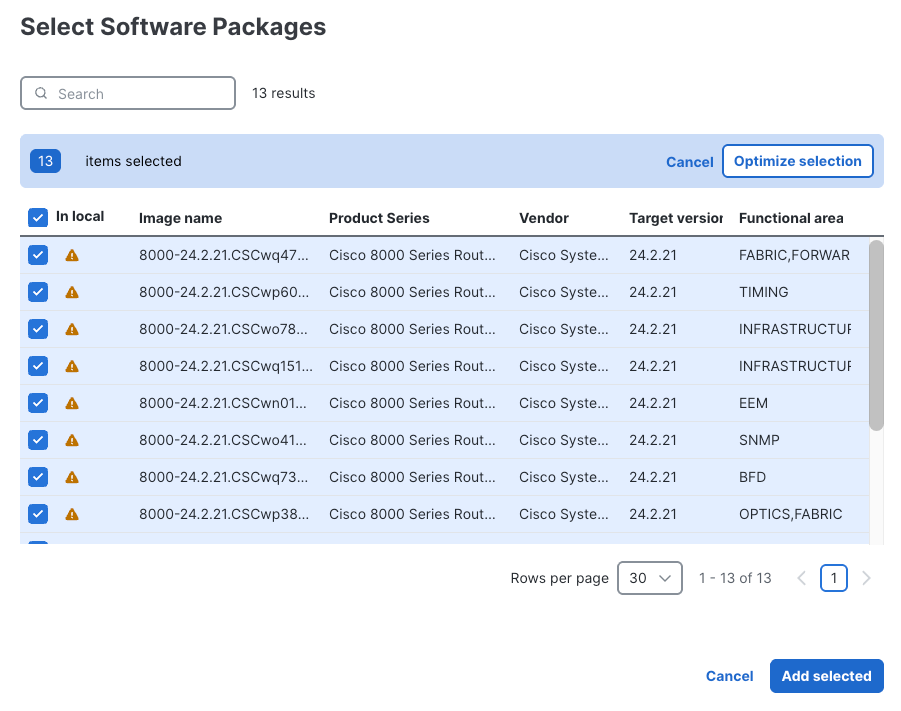
In the Software packages field, click the + Add button. The Select Software Packages window lists all the software images that can be installed on the network device product series you specified (including
images not locally downloaded).
Step 5
Click the check box in the same row as the Image name of each software image you want to make part of this image policy.
Figure 14. Select Software Packages
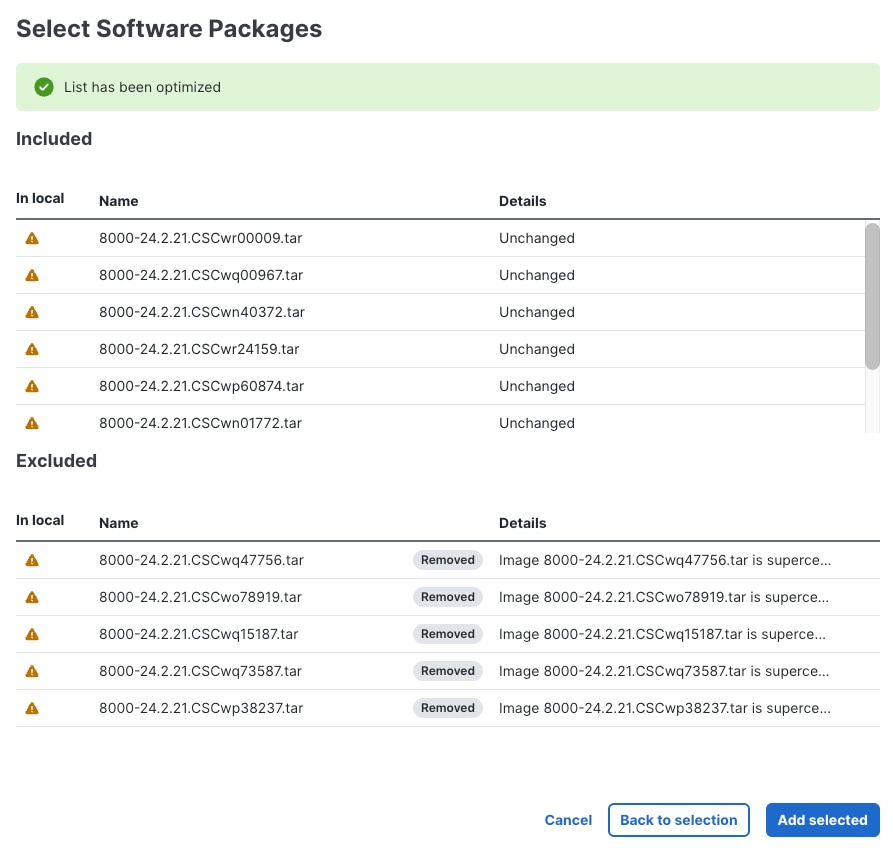
Step 6
Optional: If you have selected multiple packages and want to ensure that only those that are actually required are included, click
Optimize selection. Crosswork displays an optimized version of your list, with essential packages in an Included section at the top and non-essential packages in an Excluded section at the bottom.
If you click Add selected now, only the Included packages will be part of the policy. To revise your selections further, click Cancel or Back to selection.
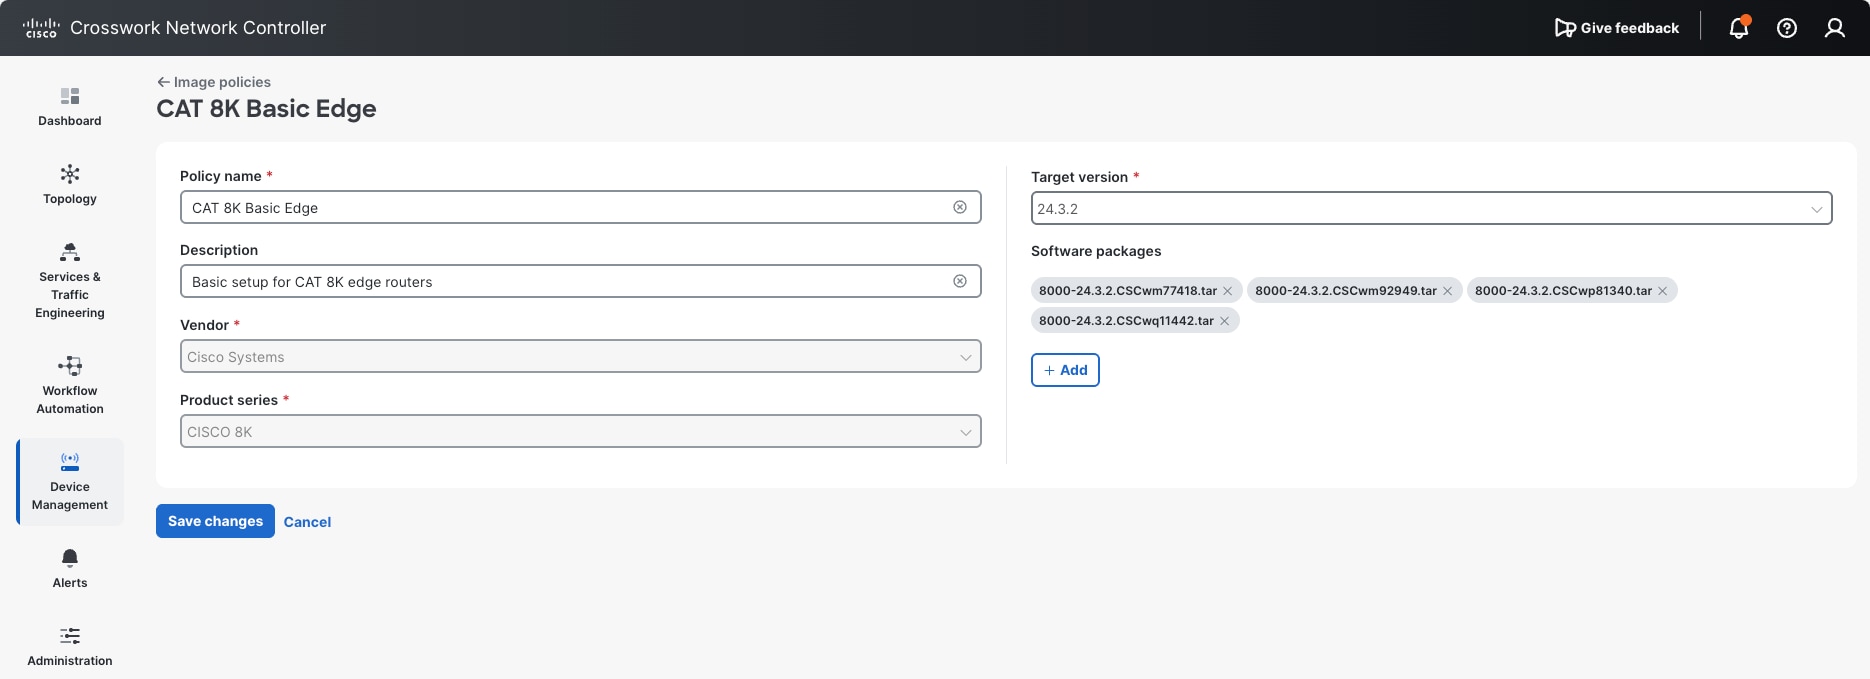
Step 7
When you are finished selecting packages, click Add selected. Crosswork displays your policy settings and the list of packages you selected.
Figure 16. Image policy created
You can revise the Policy name, Description, and Target version, or click + Add to change your package selections.
Step 8
When you are finished, click Save changes to create and save the new policy. Crosswork displays the Image policies window with your new policy listed in the table.
Use the policy conformance report to determine when you need to perform a Fleet Upgrade on one or more of your network devices.
You can create Fleet Upgrade conformance reports to check software image conformance for any device type and any combination
of software images and versions. The core of the report is the software image policy you choose. The software image policy
specifies the standard software images your devices should have installed on them. In addition, you can choose to run Fleet
Upgrade conformance reports against devices on demand, at a future date or time you choose, or at regular recurring intervals.
Each time the report runs, it will compare the software image installed on the devices with the software images specified
in the image policy. The report will identify as "conformant" every device with all the policy's images installed. The report
will flag as "non-conformant" any devices missing one or more of the policy images.
Tip
You may find that the image policy that forms the basis of the conformance report you ran is out of date or otherwise incorrect.
If that's the case, you can easily edit the policy and then run the report again.
To edit an existing image policy, select Device Management > Fleet Upgrade > Software Conformance > Image policies to display the list of image policies. Scroll or use Search to find the policy you want, then click the More (…) menu at the far right in the same row as the report you want and select Edit report.
Before you begin
Ensure you have created one or more software image policies, as explained in Create image policies.
Procedure
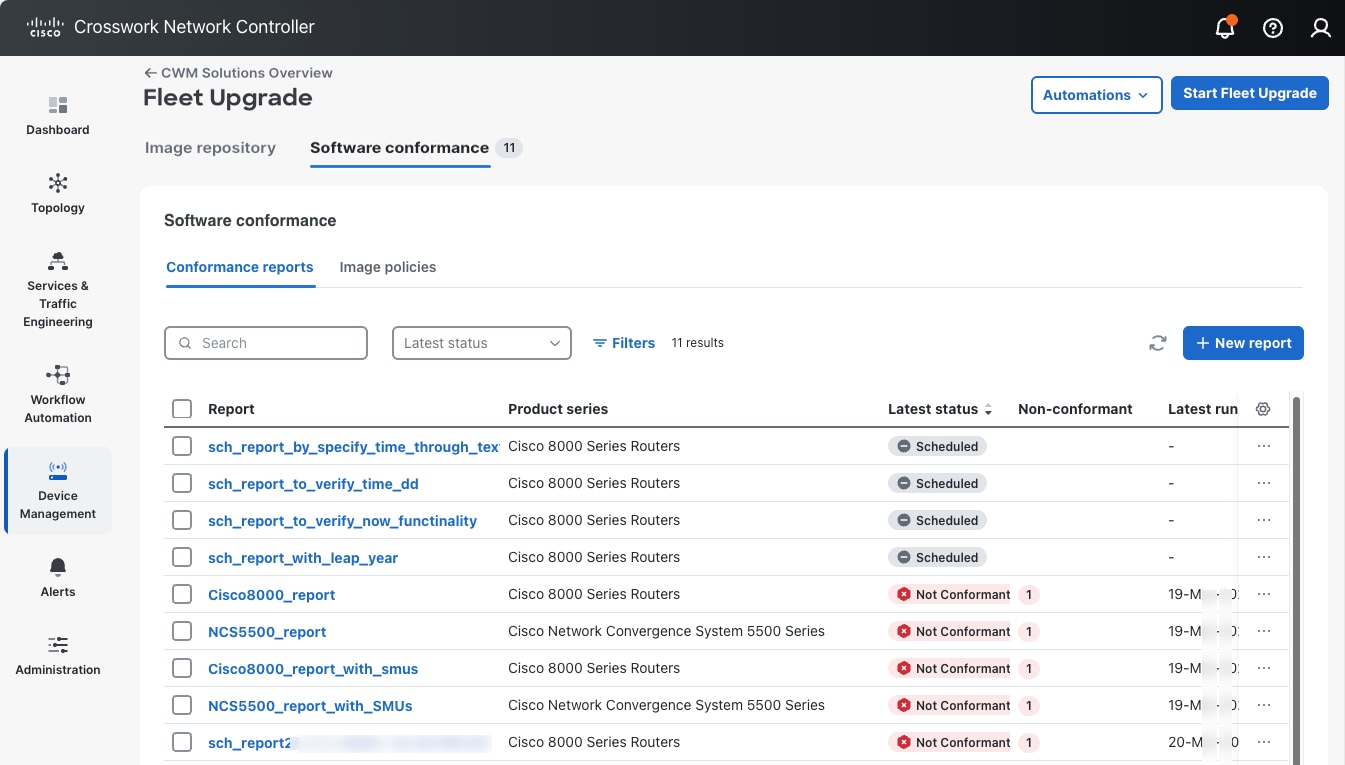
Step 1
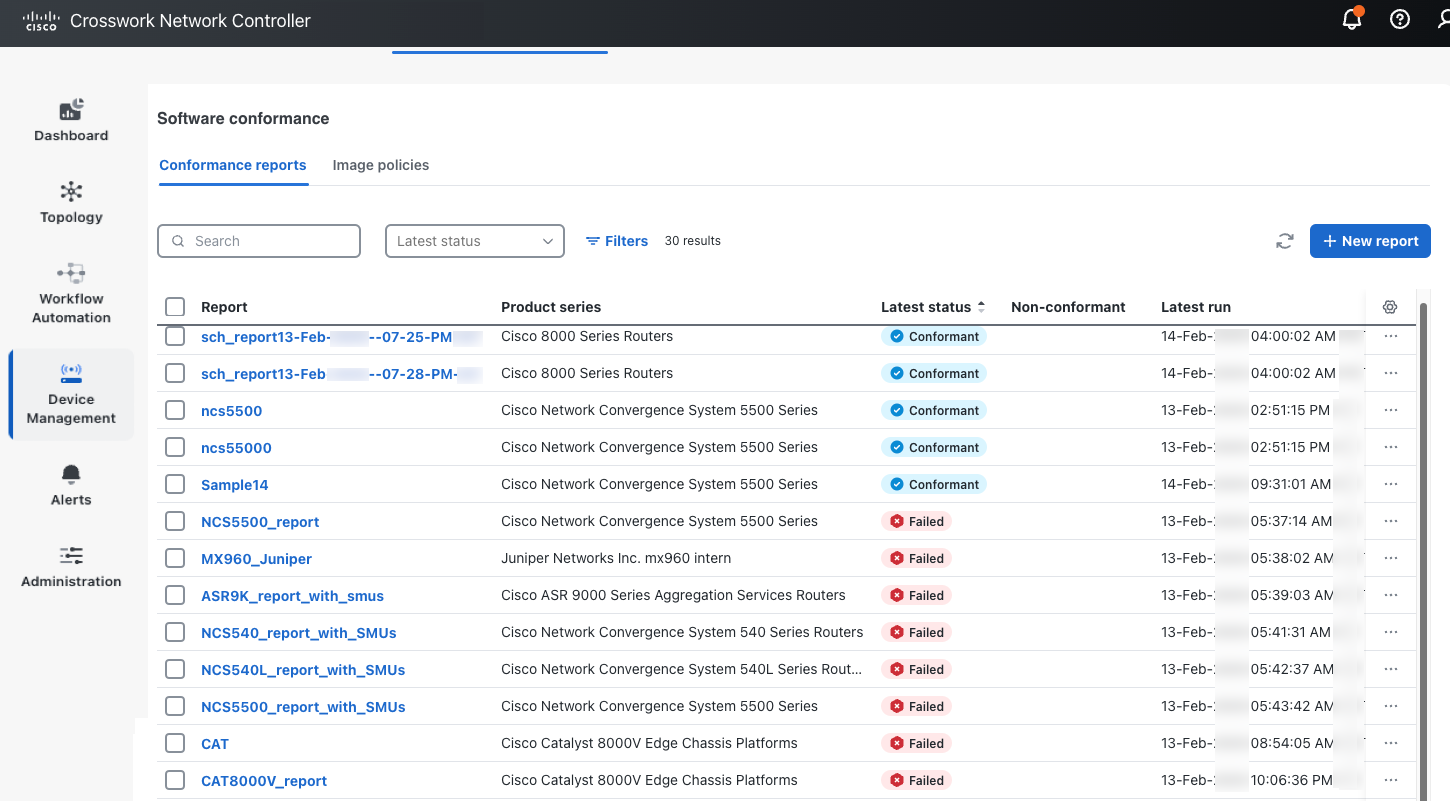
From the main menu, select Device Management > Fleet Upgrade > Software conformance > Conformance reports. The Conformance reports tab displays the status of all completed software conformance reports.
Figure 17. Conformance reports
Step 2
Click + New report.
Step 3
Complete the first five fields in the New image policy window as shown in the table:
In this field...
Enter or select...
Report name
A unique name for the conformance report, such as ASR1KStandard.
Select image policy
An optional description of the policy's purpose, such as Cisco ASR 1000 edge router SMU status.
Current version
The device software version number, such as 24.2.2.
Run schedule
One of the following:
Run now.
Schedule for specific data and time. If you select this option, you must also specify a Time and Date.
Run recurring report. If you select this option, you must also specify an Interval between runs, or the Days of the week or Days of the month you want the recurring report to run on.
Step 4
When you are finished, click Create Report to save the new report. If you selected Run now, you will also run the new report.
Clicking Create Report will return you to the Conformance reports tab, where you can review the status of any report you have already run.
What to do next
If you're still viewing the results of a report and you see non-conforming devices, consider running a Fleet Upgrade using
the steps in Run a Fleet Upgrade job.
Use the Conformance reports tab to monitor the results of a conformance report, including any failures that occur. The status details for failures will
help you diagnose the cause and correct it.
Procedure
Step 1
From the main menu, choose Device Management > Fleet Upgrade > Software Conformance > Conformance reports.
Step 2
Click the Latest status column header to sort the column alphabetically. Reports with "Conformant" and "Failed" results will be sorted and displayed.
Figure 18. Conformance reports tab
Step 3
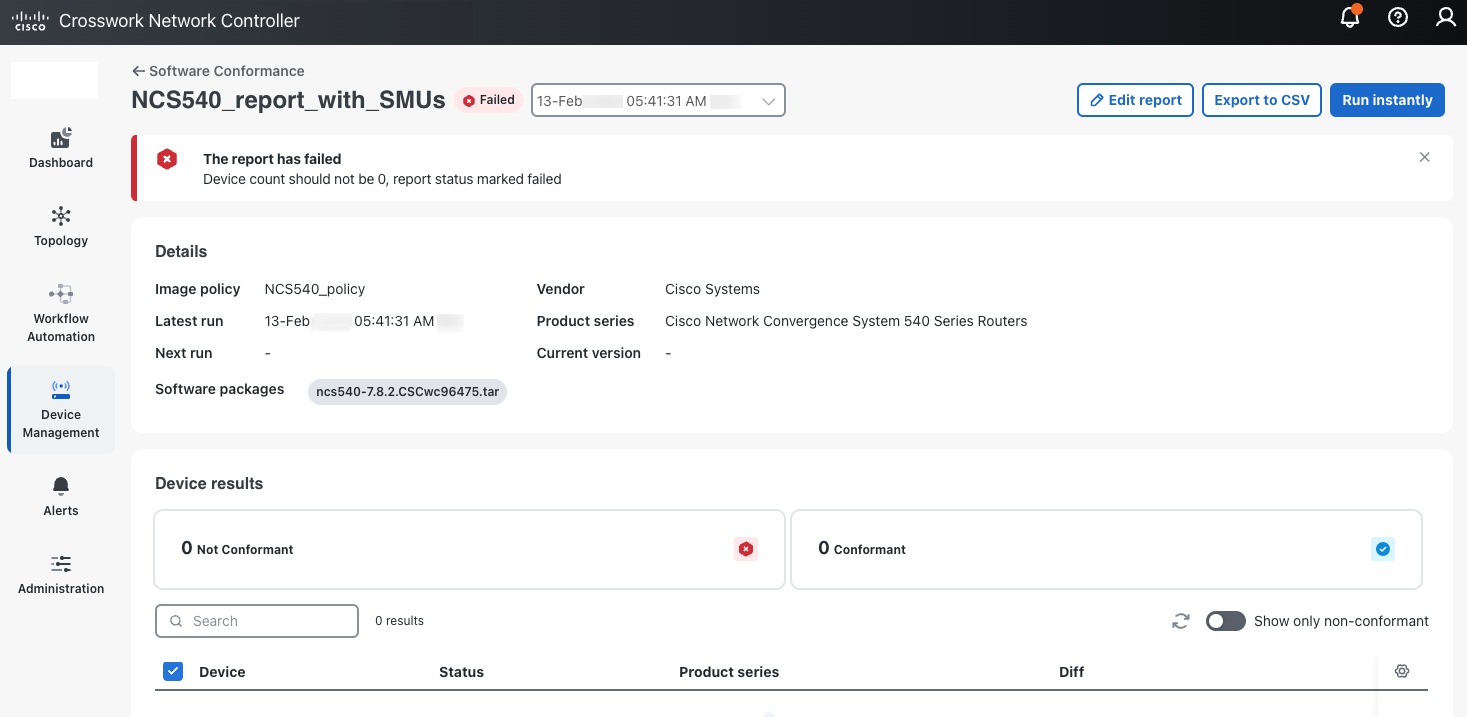
For any report that failed: Click the Report name. Crosswork displays a detail screen like the one shown below, giving the reason for the report failure. In this example,
no existing devices were specified, so there was nothing against which to compare the software image policy. You can easily
correct this by ensuring that the next run includes devices.
Figure 19. Failed Conformance report
Tip
For any software conformance report whose details you're viewing:
Click on the date field to see details for other runs of the same report.
Click Edit report to change the report settings and re-run or re-schedule it.
Click Export to CSV to save the report as a CSV file in your default downloads directory.
Click Run instantly to re-run the report immediately with the same settings as before.
Step 4
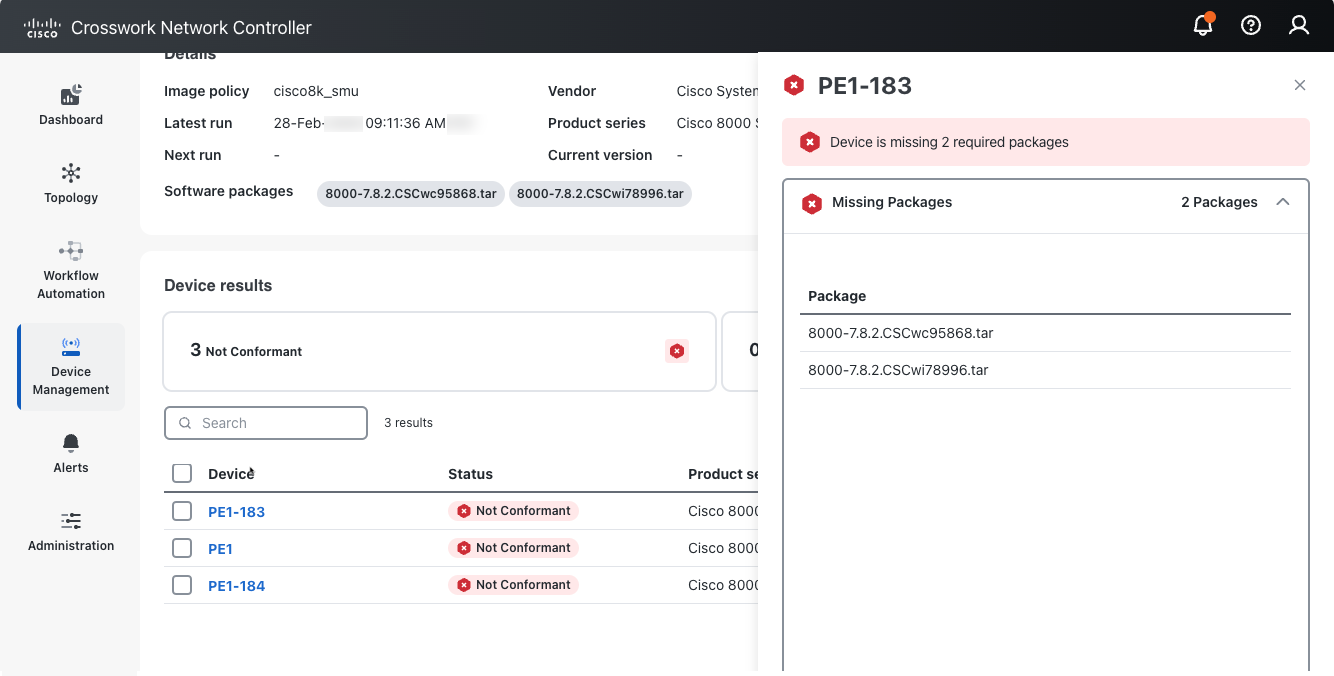
For any report showing non-conformant devices: Click the Report name. Crosswork displays a detail screen like the one shown below, listing the non-conformant devices. If needed, click the
Device name to see details for each non-conforming device. In this example, the first of the three devices was missing both of the
required software packages.
Any non-conforming device will also be identified as non-conformant on the Fleet Upgrade > Devices page.
Figure 20. Report with non-conformant devices
Run a Fleet Upgrade job
Fleet Upgrade uses Methods Of Procedure (MOPs) to perform automated device upgrades. The term "MOP" as used in Fleet Upgrade
refers to a set of pre-programmed actions that are performed in sequenced phases. Each Action in the MOP is selected and (where
needed) customized to deliver a complete, successful upgrade for the combination of software image and device for which it
is intended. Fleet Upgrade provides default MOPs for the devices and software it supports, as well as facilities for creating
custom versions of the default MOPs, and entirely new MOPs with mixtures of default and new Actions. At runtime, you have
the opportunity to select which MOP your Fleet Upgrade job will use, as well as customizing other variables (such as the job
name and the execution schedule). For more on these topics, see Use the default MOPs.
Before you begin
The easiest way to run a Fleet Upgrade is, first, to run a conformance report, as explained in Run a policy conformance report, and then select the non-conforming device and click Start Fleet Upgrade. Running the conformance report first not only ensures that the Fleet Upgrade is really needed, it also lets you launch the
upgrade automatically.
The steps below assume that you will want to launch a Fleet Upgrade from the Software conformance > Conformance report window. But you can also launch an upgrade by clicking the Start Fleet Upgrade button on any of the other Fleet Upgrade windows where it appears: Devices, Image repository > Local repository, Image repository > Cisco.com, Software conformance > Image policies, MOPs, and Jobs,
Procedure
Step 1
Choose Device Management > Fleet Upgrade > Software conformance to display the Conformance reports list. The list should show a Report with one or more devices with a Latest status that is Not Conformant.
Step 2
Click the selection checkbox shown next to the name of the Report. Click Start Fleet Upgrade. The New Software Update window displays a list of all the devices that were checked for conformance. The non-conformant devices are already selected
for you.
Step 3
For each additional device you want Fleet Upgrade to update, click the check box shown next to the device Host name. Or click the check box shown next to the Host name column title to select all of them.
You can select a maximum of 50 devices to be upgraded in the same Fleet Upgrade job.
Step 4
Click Next to display the Select software image window. If the software image policy you used to create the conformance report specified a target version and software packages,
the list of software packages to be installed on the devices will be pre-selected for you.
Step 5
If the image policy did not specify packages, or you want to install more packages, click +Add, then click the check box shown next to each package's Image name. Then click Select to display the list of all packages to be installed.
Step 6
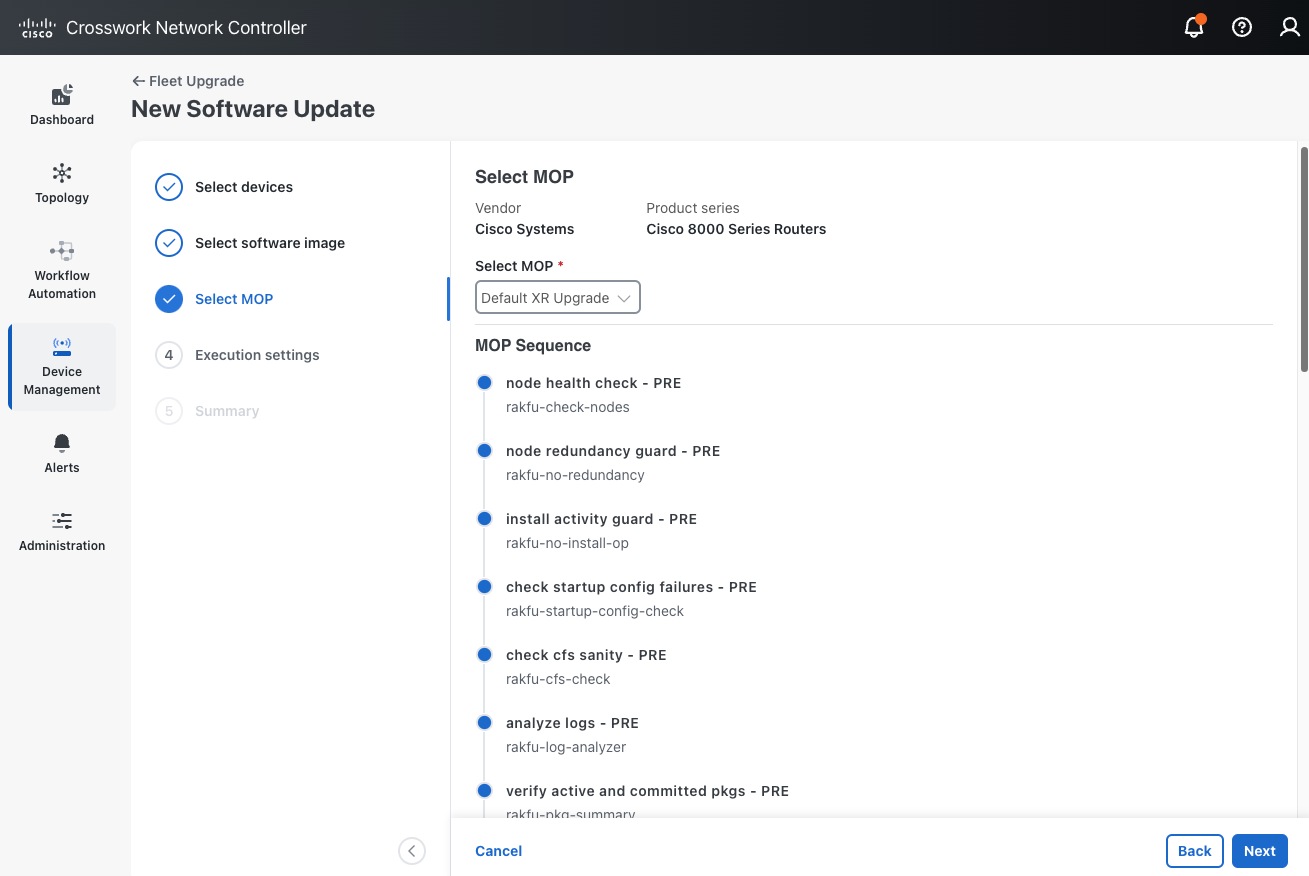
Click Next and then click the Select MOP drop down list to select the MOP you want to use to install the chosen software packages on the selected devices.
The drop down list will always display one or more MOPs pre-selected for the type of device series you are trying to upgrade.
Unless you have a special purpose in mind, use the pre-defined MOPs supplied with Fleet Upgrade, such as the Default XR Upgrade MOP as shown in the figure.
Figure 21. New software update - Select MOP
Step 7
Click Next and fill the fields in the Execution settings window.
In this field...
Enter or select...
Job name
A unique name for the job, such as ASR1KStandard.
Job tags
An optional, comma-separated list of search tags to help you find the job in the job listing, ASR1000, ASRUpdates.
Parallel upgrades
Specify the number of device upgrades to be executed at the same time, in parallel. Defaults to 1. For help with setting this
and the Acceptable failures value, see Use parallel upgrades with acceptable failures.
Acceptable failures
Specify the number of installation failures to be allowed before further upgrades are canceled. Defaults to 1.
Execution time
Specify one of the following:
Run now. Fleet Upgrade will begin executing the upgrade as soon as you click Submit.
Schedule for specific data and time. If you select this option, you must also specify a Time and Date.
Step 8
Click Next to display the Summary window.
Step 9
When you are finished, make sure the confirmation checkbox is selected. Then click Submit to save the new update job and either schedule or (if you selected Run now) run it.
Use the Fleet Upgrade Jobs page to monitor the results of a Fleet Upgrade job run, including any failures that occur. The status details for failures
will help you diagnose their cause.
Procedure
Step 1
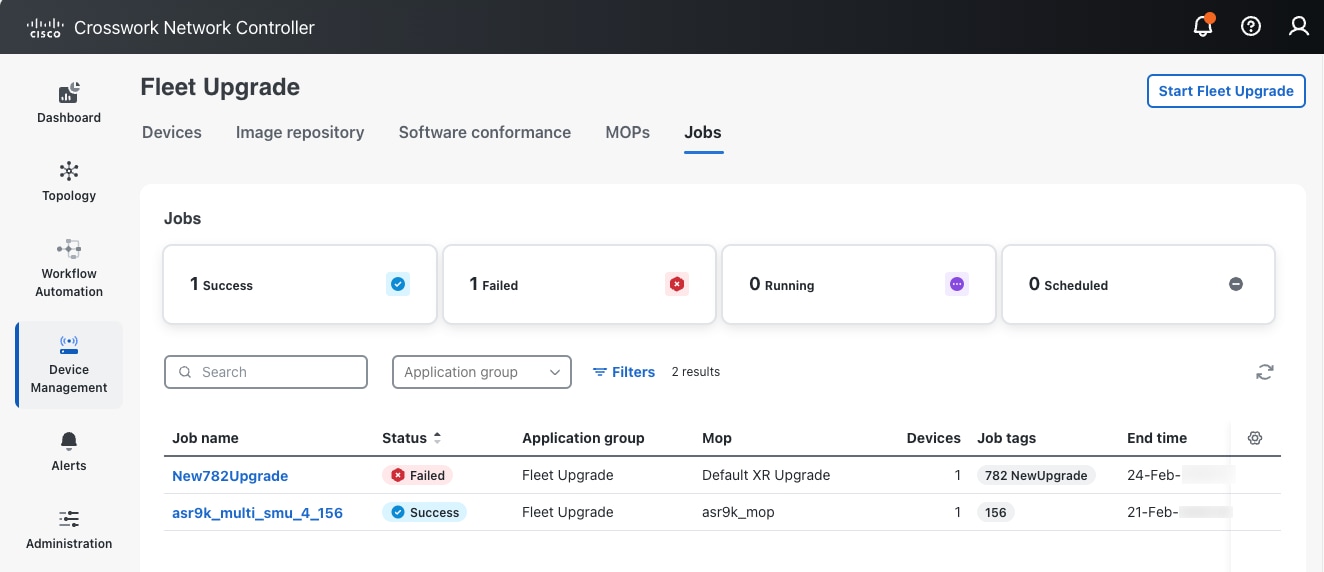
Choose Device Management > Fleet Upgrade > Jobs to display the list of upgrade jobs and their status.
Step 2
Click the Status column header to sort the column alphabetically.
Figure 22. Fleet Upgrade jobs
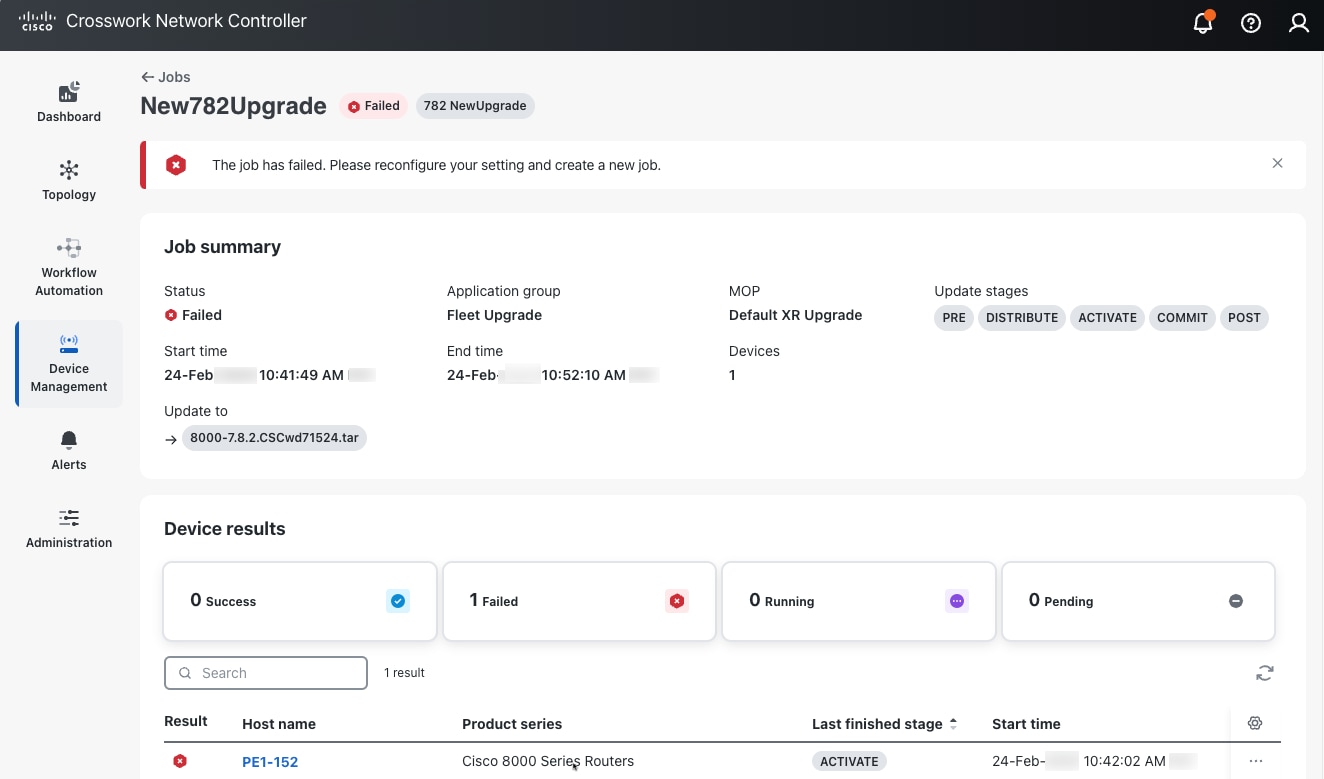
Step 3
Click the Job name for a job that failed. A Job Summary page is displayed. Under Device results, the page lists the Host name of the device where the update failed and the Last finished stage where the failure occurred.
Figure 23. Failed Job
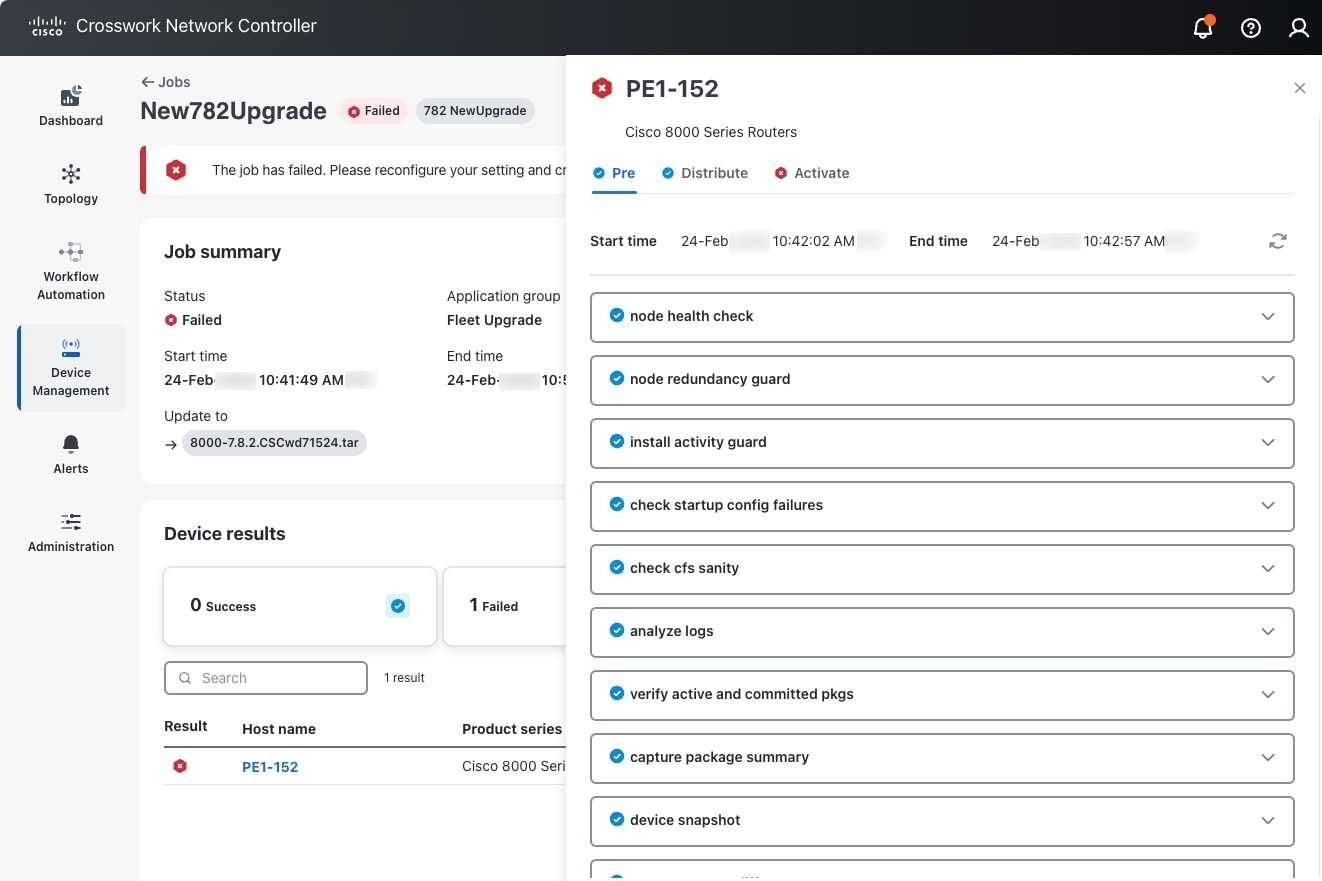
Step 4
Click the Host name to display a pop up screen with tabs representing the stages of the upgrade, and for each stage, the actions performed during
that stage.
As we can see in the following example, all the actions performed during the Pre-check stage passed.
Figure 24. Actions performed in different stages of upgrade
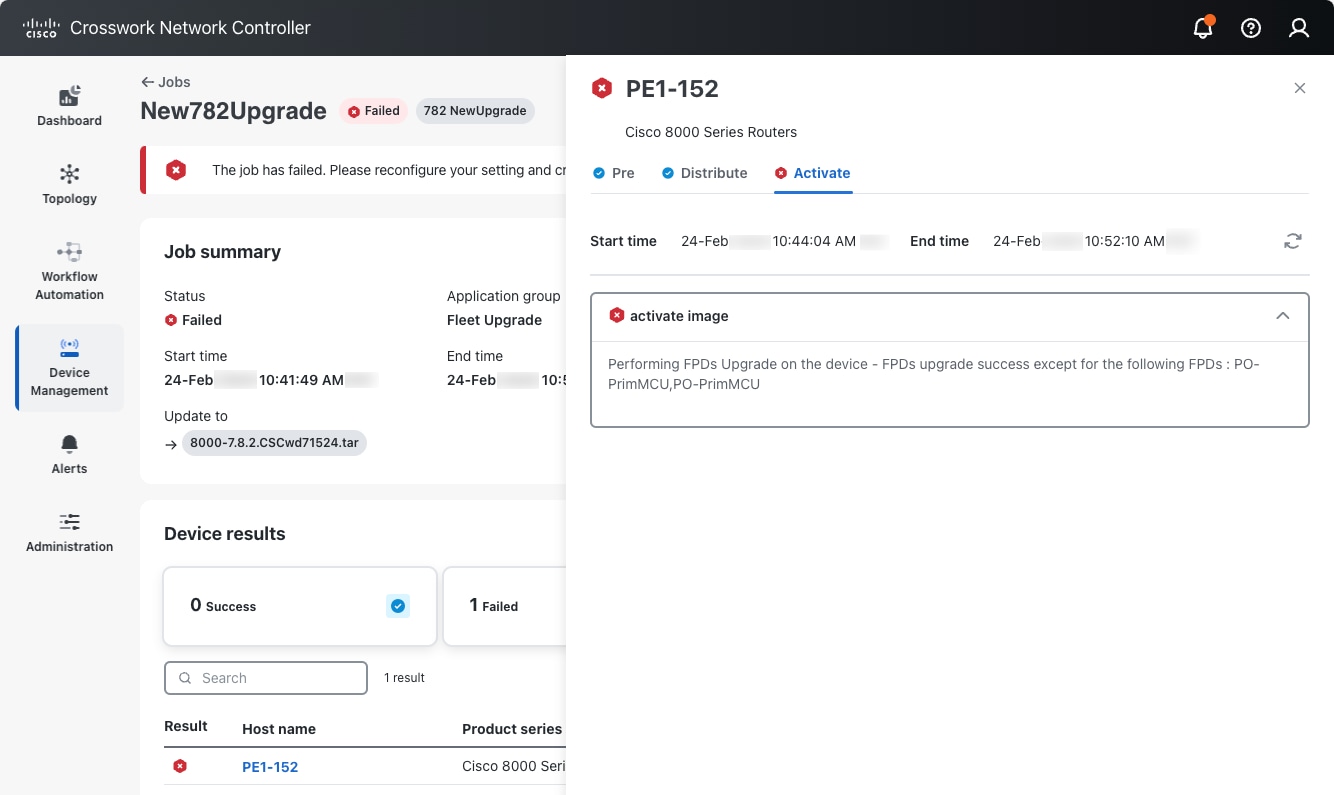
Step 5
Click the tab for the stage where the upgrade failed and expand the action where the failure occurred to see more details.
In this example, the failure occurred during the Activate stage. The image activation action succeeded for all but two of the Field Programmable Devices (FPDs) in this release.


 Feedback