Upgrade Cisco Crosswork

This chapter contains the following topics:

Upgrade Overview

This section provides the high-level overview for upgrading Cisco Crosswork Network Controller to the latest version. This includes upgrading Cisco Crosswork cluster, Crosswork Data Gateway and Crosswork Applications within a single maintenance window.


Note


Supported migration scenarios in Crosswork 7.0 (non-geo HA deployments):

  • Crosswork 6.0 (IPv4 stack) to Crosswork 7.0 (IPv4 stack)

  • Crosswork 6.0 (IPv6 stack) to Crosswork 7.0 (IPv6 stack)

  • Crosswork 6.0 (IPv4 stack) to Crosswork 7.0 (dual stack)

  • Crosswork 6.0 (IPv6 stack) to Crosswork 7.0 (dual stack)


You can upgrade Cisco Crosswork in the following methods:

  1. Upgrade Using Existing Hardware

  2. Upgrade Using Parallel Hardware

The time taken for the entire upgrade window can vary based on size of your deployment profile and the performance characteristics of your hardware.


Warning


Migration of Cisco Crosswork from an earlier version has the following limitations:

  • License tags are not auto-registered as part of the upgrade operation. You must register them manually after the upgrade.

  • Third-party device configuration in Device Lifecycle Management (DLM) and Cisco NSO is not migrated, and needs to be re-applied on the new Cisco Crosswork version post migration.

  • Custom user roles (Read-Write/Read) created in earlier version of Cisco Crosswork are not migrated, and need to be updated manually on the new version post migration.

  • Any user roles with administrative privileges in the earlier version of Cisco Crosswork must be assigned new permissions after the upgrade to continue being administrative users. 

  • Crosswork Health Insights KPI alert history is not retrieved as part of the migration.

  • For the upgrade from Crosswork 6.0 to 7.0, the Health Insights alert checkbox will be disabled, and an alarm will be raised for the KPI profile having custom KPI.

  • Before to attempting to load a KPI, ensure that it complies with the requirements of the current release. If you try to load a KPI that was created for a previous release and is not compatible, you will receive an error message.

  • After a successful migration, you must perform a hard refresh or browser cache deletion before proceeding to use the system. Failing to do this step can result in data discrepency.


Crosswork applications can be independently updated from the Cisco Crosswork UI in case of minor updates or patch releases. For more information, see Update Crosswork Network Controller applications (standalone activity).

Upgrade Requirements

You must perform these tasks prior to upgrading Cisco Crosswork.

Save AWS EC2 configuration

Record the configuration parameters used in the previous Crosswork cluster and Crosswork Data Gateway deployments. These parameters include:

  • VM Node IP addresses

  • Elastic Network Interface (ENI) ID mapped to the respective nodes (found under Networking tab > ENI ID)

  • Subnet ID

  • Security Group

  • Availability Zone (AZ)

Disable Network Bandwidth Management feature packs

If you have enabled Local Congestion Mitigation, SR Circuit Style Manager, or Bandwidth on Demand in your current version of Crosswork and want to upgrade to the latest version, you must complete these tasks prior to upgrading.

Disable Local Congestion Mitigation (LCM)

Follow these steps to disable LCM and save configuration options:

Procedure

Step 1

Navigate to Services & Traffic Engineering > Local Congestion Mitigation.

Step 2

From a LCM domain card, click More icon and select Configuration.

Step 3

From the LCM Configuration page:

  1. Set the Delete Tactical SR Policies when Disabled option to False. This task must be done prior to disabling LCM so that tactical polices deployed by LCM remain in the network after the upgrade.

  2. Set the Enable option to False. If LCM remains enabled, there is a chance that tactical policies may be deleted after the upgrade.

  3. Record all options (Basic and Advanced) in the LCM Configuration page so that you can confirm the same configuration has been migrated after the upgrade.

Step 4

Repeat steps 2 and 3 for each LCM domain.

Step 5

Export the current list of interfaces managed by LCM (Services & Traffic Engineering > Local Congestion Mitigation > Export icon). Confirm the interfaces are valid by reimporting the CSV file without errors. For more information, see "Add Individual Interfaces".


What to do next
After the upgrade, it is important to verify LCM data migration before enabling LCM.
Existing LCM policy behavior during and after an upgrade

Although LCM is in a disabled state during an upgrade, existing LCM policies remain active in the network. Congestion detection for existing or new interfaces will resume after the upgrade completes and LCM is enabled.

Disable Bandwidth on Demand (BWoD)

Follow these steps to disable BWoD and save configuration options:

Procedure

Step 1

Navigate to Services & Traffic Engineering > Bandwidth on Demand.

Step 2

From the Configuration page:

  1. Set the Enable option to False. If BWoD remains enabled, there is a chance that tactical policies may be deleted after the upgrade

  2. Record all options (Basic and Advanced) in the Configuration page so that you can confirm the same configuration has been migrated after the upgrade.


What to do next

After the upgrade, wait until the Traffic Engineering page shows all the nodes and links before enabling BWoD.

Disable SR Circuit Style Manager (CSM)

Follow these steps to disable CSM and save configuration options:

Procedure

Step 1

Navigate to Services & Traffic Engineering > Circuit Style SR-TE.

Step 2

From the Configuration page:

  1. Set the Enable option to False.

  2. Note all options (Basic and Advanced) in the CSM Configuration page so that you can confirm the same configuration has been migrated after the upgrade.

Note


Circuit Style SR-TE policies will go to an operation down (Oper Down) state if CSM is not enabled within 8 hours after disabling.


What to do next

After the upgrade, wait until the Traffic Engineering page shows all the nodes and links before enabling CSM.

Upgrade Using Existing Hardware

This section explains how to migrate to the latest version of Crosswork Network Controller using the existing cluster.

Each stage in this upgrade workflow must be executed in sequence, and is explained in detail in later sections of this chapter. The stages are:

  1. Shut Down the Data Gateway VMs

  2. Create Backup and Shut Down Cisco Crosswork

  3. Install the latest version of the Crosswork Network Controller Cluster


    Important


    While the cluster installation is in progress, you must upgrade NSO and SR-PCE. Please see the Crosswork Network Controller 7.0 Release Notes to know the NSO and SR-PCE versions compatible with Crosswork Network Controller. The process to upgrade NSO or SR-PCE is not covered in this document. For install instructions, please refer to the relevant product documentation.


  4. Install the Crosswork Network Controller Applications


    Note


    You are recommended to download and validate the application CAPP files before starting the actual upgrade process. This will reduce your system downtime as opposed to downloading the CAPP files midway through the upgrade process.


  5. Migrate Crosswork Network Controller Backup

  6. Upgrade Crosswork Data Gateway

  7. Post-upgrade Checklist

After you complete the upgrade steps, you must install the NSO function packs. For the installation instructions, you can either refer to Install Cisco NSO Function Pack Bundles from Crosswork UI or Install NSO Function Packs Manually, depending on your preference.

Shut Down the Data Gateway VMs

This is the first stage of the upgrade workflow.


Note


When the data gateway VMs are shut down, data will not be forwarded to data destinations. Check with the application providers to determine if any steps are needed to avoid alarms or other problems.


Before you begin

Take screenshots of all the tabs in the Data Gateway Management page to keep a record of the list of data gateways, Attached Device Count in the Cisco Crosswork UI. In the Pools tab, for each pool listed here, take a screenshot to make a note of the active, spare, and unassigned VMs in the pool. This information is useful during Upgrade Crosswork Data Gateway.

Procedure


Step 1

Check and confirm that all the VMs are healthy and running in your cluster.

Step 2

Shut down the data gateway VMs.

  1. Log in to the data gateway VM. See Access Crosswork Data Gateway VM from SSH.

    Crosswork Data Gateway launches an Interactive Console after you log in successfully.

  2. Choose 5 Troubleshooting.

  3. From the Troubleshooting menu, choose 5 Shutdown VM to shut down the VM.

Step 3

For cloud-based deployment:

  1. Terminate the Crosswork Data Gateway instances for all the previous Crosswork nodes. Do not delete the associated cluster stack.

  2. Manually delete the associated ENI IDs.

    Note

     
    Since you are terminating the EC2 instances and not the stack, you must manually delete the associated ENI IDs.

Create Backup and Shut Down Cisco Crosswork

This is the second stage of the upgrade workflow. Creating a backup is a prerequisite when upgrading your current version of Crosswork Network Controller to a new version.


Note


We recommend that you create a backup only during a scheduled upgrade window. Users should not attempt to access Crosswork Network Controller while the backup operation is running.


Before you begin

Follow these guidelines whenever you create a backup:

  • Cisco Crosswork will back up the configuration of the system to an external server using SCP. Before you begin you need to have the following configuration in place and information about the SCP server available:

    • The hostname or IP address and the port number of a secure SCP server.

    • A preconfigured path on the SCP server where the backup will be stored.

    • User credentials with file read and write permissions to the directory.

    • The SCP server storage requirements will vary slightly but you must have at least 25 GB of storage.

  • Ensure that you have configured a destination SCP server to store the backup files. This configuration is a one-time activity.

  • After the backup operation is completed, navigate to the destination SCP server directory and ensure that the backup file is created. You will require this backup file in the later stages of the upgrade process.

  • Both the Crosswork Network Controller cluster and the SCP server must be in the same IP environment. For example: If Crosswork Network Controller is communicating over IPv6, so must the backup server.

  • Keep a record of the list of Crosswork applications you have installed in the current version of Cisco Crosswork, as you can only install those applications after migrating to the new version of Cisco Crosswork.

  • If you have onboarded a custom MIB package in the current version of Cisco Crosswork, download a copy of the package to your system. You will need to upload the package after you complete migrating to new version of Cisco Crosswork. See Post-upgrade Checklist for more information.

  • If you have modified the current version of Cisco Crosswork to include third-party device types, you must download the third-party device configuration file, and re-apply it to the new version of Cisco Crosswork. The device configuration file is located on the cluster node (at /mnt/cw_glusterfs/bricks/brick3/sys-oids.yaml) and on the pod (at /mnt/backup/sys-oids.yaml).

  • If Local Congestion Mitigation (LCM), SR Circuit Style Manager (CSM), and Bandwidth on Demand (BWoD) are enabled, you must disable them before proceeding. You must also, if available, export the current list of interfaces managed by LCM (Traffic Engineering > Local Congestion Mitigation > Domain Identifier <domain_id> > Interface Thresholds > Export). Follow the steps documented in Upgrade Requirements.

Procedure


Step 1

Check and confirm that all the VMs are healthy and running in your cluster.

Step 2

Configure an SCP backup server:

  1. From the Crosswork Network Controller main menu, choose Administration > Backup and Restore.

  2. Click Destination to display the Edit Destination dialog box. Make the relevant entries in the fields provided.

  3. Click Save to confirm the backup server details.

Step 3

Create a backup:

  1. From the Crosswork Network Controller main menu, choose Administration > Backup and Restore.

  2. Click Actions > Data Backup to display the Data Backup dialog box with the destination server details prefilled.

  3. Provide a relevant name for the backup in the Job Name field.

  4. If any of the VMs or applications are not in Healthy state, but you want to create the backup, check the Force check box.

    Note


    The Force option must be used only after consultation with the Cisco Customer Experience team.

  5. Uncheck the Backup NSO checkbox if you don't want to include Cisco NSO data in the backup.

    Note


    To use the Backup NSO option during backup, you must configure the SSH connectivity protocol in the NSO provider; otherwise, the backup will fail. Follow the instructions given in Backup Cisco Crosswork with Cisco NSO section in the Cisco Crosswork Network Controller 7.0 Administration Guide instead of the instructions here.

  6. Complete the remaining fields as needed.

    If you want to specify a different remote server upload destination: Edit the prefilled Host Name, Port, Username, Password and Remote Path fields to specify a different destination.
  7. (Optional) Click Verify Backup Readiness to verify that Crosswork Network Controller has enough free resources to complete the backup. If the verifications are successful, Crosswork Network Controller displays a warning about the time-consuming nature of the operation. Click OK.

    If the verification is unsuccessful, please contact the Cisco Customer Experience team for assistance.

  8. Click Start Backup to start the backup operation. Crosswork Network Controller creates the corresponding backup job set and adds it to the job list. The Job Details panel reports the status of each backup step as it is completed.

  9. To view the progress of a backup job: Enter the job details (such as Status or Job Type) in the search fields in the Backup and Restore Job Sets table. Then click on the job set you want.

    The Job Details panel displays information about the selected job set, such as the job Status, Job Type, and Start Time. If there’s a failed job, hover the mouse pointer over the icon near the Status column to view the error details.

    Note


    After the backup operation is completed, navigate to the destination SCP server directory and ensure that the backup file is created. You will require this backup file in the later stages of the upgrade process.

    Note


    If you do not see your backup job in the list, refresh the Backup and Restore Job Sets table.

  10. If the backup fails during upload to the remote server: In the Job Details panel, just under the Status icon, click the Upload backup button to retry the upload.

    Note


    Upload can fail due to connectivity problems with the SCP backup server (for example, incorrect credentials, missing directory or directory permissions, missing path and so on). This is indicated by failure of the task uploadBackupToRemote). If this happens, check the SCP server details, correct any mistakes and try again. Alternatively, you can use the Destination button to specify a different SCP server and path before clicking Upload backup.

Step 4

After a successful backup, shut down the Crosswork Network Controller cluster by powering down the VMs hosting each node (start with the Hybrid VMs):

  • For on-premise deployment:
    1. Log into the VMware vSphere Web Client.

    2. In the Navigator pane, right-click the VM that you want to shut down.

    3. Choose Power > Power Off.

    4. Wait for the VM status to change to Off.

    5. Wait for 30 seconds and repeat the above steps (a to d) for each of the remaining VMs.

  • For cloud-based deployment:
    1. Terminate the EC2 instance for all the previous Crosswork nodes. Do not delete the associated cluster stack.

    2. Manually delete the associated ENI IDs.

      Note


      Since you are terminating the EC2 instances and not the stack, you will need to manually delete the associated ENI IDs.

Step 5

Move Cisco NSO into read-only mode to avoid any unintended updates to Cisco NSO during the upgrade.

Use the following command to move NSO to read-only mode:
ncs_cmd -c maapi_read_only

Install the latest version of the Crosswork Network Controller Cluster

After the successful backup of the old version of Crosswork Network Controller, proceed to install the latest version of the Crosswork Network Controller cluster.


Note


The number of VM nodes installed in the new version of Crosswork Network Controller must be equal or more than the number of VM nodes in the old version of Crosswork Network Controller.


Before you begin

Procedure


Step 1

Install Crosswork Network Controller cluster on your preferred platform (see Install Crosswork Cluster on VMware vCenter for VMware and Install Cisco Crosswork Network Controller on AWS EC2 for AWS).

Note


During installation, Cisco Crosswork will create a special administrative ID (virtual machine (VM) administrator, with the username cw-admin, and the default password cw-admin). The administrative username is reserved and cannot be changed. The first time you log in using this administrative ID, you will be prompted to change the password. Data center administrators use this ID to log into and troubleshoot the Crosswork application VM. You will use it to verify that the VM has been properly set up.

Step 2

After the installation is completed, log into the Crosswork Network Controller UI and check if all the nodes are up and running in the cluster.

  1. From the Crosswork Network Controller main menu, choose Administration > Crosswork Manager > Crosswork Summary.

  2. Click Crosswork Cluster tile to view the details of the cluster such as resource utilization by node, the IP addresses in use, whether each node is a Hybrid or Worker, and so on.


Install the Crosswork Network Controller Applications

After successfully installing the new version of the Crosswork Network Controller cluster, proceed to install the latest version of the Crosswork Network Controller applications.


Note


The Crosswork Network Controller applications that you install must be the same ones that were backed up during Create Backup and Shut Down Cisco Crosswork.


Procedure


Step 1

Install the Crosswork Network Controller applications using the steps described in Install Crosswork Applications.

Step 2

After the applications are successfully installed, check the health of the new Crosswork Network Controller cluster.

  1. From the Crosswork Network Controller main menu, choose Administration > Crosswork Manager > Crosswork Summary.

  2. Click Crosswork Cluster tile to view the health details of the cluster.


Migrate Crosswork Network Controller Backup

After successfully installing the new versions of the Crosswork Network Controller applications, proceed to migrate the Crosswork Network Controller backup taken earlier to the new Crosswork Network Controller cluster.

Before you begin

Before you begin, ensure that you have:

Procedure


Step 1

Check and confirm that all the VMs are healthy and running in your cluster.

Step 2

Configure an SCP backup server:

  1. From the main menu, choose Administration > Backup and Restore.

  2. Click Destination to display the Edit Destination dialog box.

  3. Make the relevant entries in the fields provided.

    Note


    In the Remote Path field, please provide the location of the backup created in Create Backup and Shut Down Cisco Crosswork.

  4. Click Save to confirm the backup server details.

Step 3

Migrate the previous Crosswork Network Controller backup on the new Crosswork Network Controller cluster:

  1. From the Crosswork Network Controller main menu, choose Administration > Backup and Restore.

  2. Click Actions > Data Migration to display the Data Migration dialog box with the destination server details prefilled.

  3. Provide the name of the data migration backup (created in Create Backup and Shut Down Cisco Crosswork) in the Backup File Name field.

  4. If you want to perform the data migration backup despite any Crosswork Network Controller application or microservice issues, check the Force check box.

  5. Click Start Migration to start the data migration operation. Crosswork Network Controller creates the corresponding data migration job set and adds it to the Backup and Restore Job Sets table. The Job Details panel reports the status of each backup step as it is completed.

    Note


    If you do not see your job in the list, please wait for a few minutes and refresh the Backup and Restore Job Sets table.

  6. To view the progress of a data migration job: Enter the job details (such as Status or Job Type) in the search fields in the Backup and Restore Job Sets table. Then click on the job set you want.

    The Job Details panel displays information about the selected job set, such as the job Status, Job Type, and Start Time. If there’s a failed job, hover the mouse pointer over the icon near the Status column to view the error details.

    Note


    Crosswork UI might become temporarily unavailable during the data migration operation. When the Crosswork UI is down, you can view the job status in the Grafana dashboard. The Grafana link is available as View Data Migration Process Dashboard option on the right side of the Job Details window.

  7. If the data migration fails in between, you need to restart the procedure from step 1.

Step 4

After the data migration is successfully completed, check the health of the new Crosswork Network Controller cluster.

  1. From the Crosswork Network Controller main menu, choose Administration > Crosswork Manager > Crosswork Summary.

  2. Click Crosswork Cluster tile to view the health details of the cluster.


Upgrade Crosswork Data Gateway

This is the final stage of the upgrade workflow. Ensure that the migration is complete and the new Cisco Crosswork UI is available before you proceed with installing the latest version of Crosswork Data Gateway.


Note


The upgrade procedure is required only for data gateway Base VM upgrade. Upgrade of other components, such as collectors, is performed by Cisco Crosswork.


Crosswork Data Gateway functions as a passive device in the network. The Data Gateway upgrade process consists of the following steps replacing all the old Data Gateway VMs with the Data Gateway VMs in the network.


Important


Step 8 in this procedure requires you to log out of Cisco Crosswork and log in again after verifying the deployment and enrollment of the latest data gateway VMs with Cisco Crosswork. After you log in, an Action to be taken window appears prompting you to confirm that the upgrade is complete. Do not click Acknowledge unless you have completed all the verification steps mentioned in Step 3, Step 4, and Step 5 in the procedure.


Before you begin

The administrators must assign the Crosscluster API to the user roles. This permission is required for a user to access the Data Gateway Management page.

To assign the API permissions, from the Crosswork UI, go to Administration > Users and Roles > Roles > Global API permissions > Crosscluster Infra. For more information on Roles, see the User Roles, Functional Categories, and Permissions section in Cisco Crosswork Network Controller 7.0 Administration Guide.

Procedure


Step 1

Log out of Cisco Crosswork and log in again.

Step 2

After you log in, an Action to be taken window appears. Close this window and do not click Acknowledge.

Step 3

Install new data gateway VMs with the same number and the same information (management interface importantly) as the old data gateway VMs.

The installation procedure for the new data gateway VMs may vary depending on your data center.
  • For on-premise deployment:

    Follow the steps in the Crosswork Data Gateway Installation Workflow.

  • For cloud-based deployment:

    1. Install the data gateway VM nodes using the sample Crosswork Data Gateway templates (.yaml) which you can download from cisco.com. Deploy the templates sequentially for each data gateway VM, ensuring a minimum interval of 10 minutes between each deployment.

      Important

       
      • Ensure that you update the parameters (such as VM Node IP addresses, ENI ID, Subnet ID, Security Group, AZ, etc.) in the sample template to match the values used in the previous cluster deployment.

      • Each script run should have a unique stack name. Do not use the stack name of the previous cluster. Ensure that you use a unique stack name when deploying each VM.

    2. After a few minutes, verify if the data gateway is operational.

Step 4

Wait for about 5 minutes and navigate to Administration > Data Gateway Management.

Step 5

Check the Data Gateway Instances tab to verify that the new data gateway VMs are enrolled with Cisco Crosswork and have the Admin State as Up and Operational State as Not Ready.

Figure 1. Data Gateway Instances Window

Step 6

After the Operational State of the VMs changes to Ready, navigate to the Pools tab and verify that all the data gateway pools from the previous version of Cisco Crosswork, are listed here. Edit each data gateway pool to verify that the active data gateway is the same as one that you noted in the previous version of Cisco Crosswork. To view the pool details, click the pool name.

Important


If you are upgrading the Crosswork Data Gateway from a single stack deployment to a dual stack deployment, edit the pool and specify the VIP IP address of the additional stack. For example, if the pool was created with an IPv4 address, you must provide the IPv6 address. For information on editing a pool, see the Edit or Delete a Crosswork Data Gateway Pool section in Cisco Crosswork Network Controller 7.0 Administration Guide.

Step 7

Verify that devices are attached to the data gateways in the Cisco Crosswork UI.

  1. Navigate to the Administration > Data Gateway Management page.

  2. Check the Attached Device Count of the data gateway.

    Figure 2. Data Gateway Window
    Data Gateway Window

Step 8

Log out of Cisco Crosswork.


After the upgrade is complete:

  • The data gateway VMs are enrolled with Cisco Crosswork.

  • All destinations, data gateway pools, device-mapping information can be viewed on the Cisco Crosswork UI with the upgraded data gateway VMs.

  • Collection jobs start again automatically with the new data gateway VMs.

  • After upgrading the data gateway VM, you must reconfigure the collector resources and the disabled containers. Global Parameter resources that were configured before the upgrade are not retained. To configure the resource parameters, on the Crosswork UI, navigate to Administration > Data Gateway Global Settings > Data Gateway > Resource. For more information on the resources, see Cisco Crosswork Network Controller 7.0 Administration Guide.

What to do next

  1. After you log in to the Crosswork Network Collection UI, a window appears prompting for confirmation is displayed. In the pop-up that appears, click Acknowledge.


    Important


    Do not click Acknowledge unless you have verified that the VMs are in the Up/Not Ready state. Doing so results in VMs having the state as Error. See Troubleshoot Crosswork Data Gateway Upgrade Issues.
  2. To move Cisco NSO out of maintenance or read-only mode, use:

    ncs_cmd -c maapi_read_write

Troubleshoot Crosswork Data Gateway Upgrade Issues

The following table lists common problems that might be experienced when upgrading Crosswork Data Gateway, and provides approaches to identifying the source of the problem and solving it.

Issue Recommended Action

Some of the data gateway VMs are in Error or Degraded state because you clicked Acknowledge before the VMs came to the Up/Not Ready state

  1. Wait for the data gateway VMs to have the state as Up or Not Ready state.

  2. Once the VMs have the state as Up or Not Ready, delete all data gateway pools and create them again.

Some of the data gateway VMs are in Error or Degraded state because you clicked Acknowledge before the VMs came to the Up/Not Ready state. The state of the VMs did not change to Up/ Ready and they are still in Error.

  1. Delete all data gateway pools.

  2. Check if the VMs now have the state as Up or Not Ready.

  3. If the VMs are still in a state of Error, manually re-enroll the VMs with the new version of Cisco Crosswork. See Re-enroll Crosswork Data Gateway for more information.

The data gateways VMs are stuck in the Degraded state with Image manager being in exited state. The list of components for the data gateway either do not show Image manager or show it in an exited state.

  1. In the Cisco Crosswork UI, navigate to Data Gateway Management > Virtual Machines.

  2. Click the data gateway that is degraded.

  3. Click Actions and click Reboot.

Post-upgrade Checklist

After you upgrade Cisco Crosswork to the latest version, check the health of the new cluster. If your cluster is healthy, perform the following activities:

  • Perform a hard refresh or browser cache deletion before proceeding to use the system. Failing to do this step can result in data discrepancy.

  • Navigate to Administration > Collection Jobs in Cisco Crosswork UI and delete the duplicate system jobs.

    Figure 3. Collection Jobs Window
    Collection Jobs Window
  • Verify that the collection jobs are running on the data gateway VMs in the Administration > Collection Jobs page.

  • Verify the restored AAA data by logging in using default credentials, and configure custom user roles (Read-Write/Read) in the upgraded Cisco Crosswork.

  • (Optional) Based on your network requirements, download the relevant map files from cisco.com and re-upload them to the upgraded Cisco Crosswork.

  • (Optional) If any NSO device onboarding policy was set in the previous version of Cisco Crosswork, you must update the policy with new Network Element Drivers (NED) on the NSO.

  • (Optional) Re-apply any third-party device configurations (used in the previous version of Cisco Crosswork) to the new version of Cisco Crosswork.

  • (Optional) If you have saved views in your topology, you may need to re-apply certain settings (such as map configuration, table filters, etc.) as this data might not be fully migrated.

  • If you are using Crosswork Change Automation, verify that all the stock and custom playbooks are migrated successfully.

  • If you are using Crosswork Health Insights, verify that the collection to the external destination is working. Also, check if the alert dashboard is displaying the correct data.

  • For Traffic Engineering, perform the following actions:

    • Upgrade the software versions in your devices as per the supported Cisco IOS XE/XR versions documented in the Traffic Engineering Compatibility Information.

    • If you have upgraded Local Congestion Mitigation (LCM), Verify LCM data migration before enabling LCM.

    • If you have upgraded SR Circuit Style Manager or Bandwidth on Demand, wait until the Traffic Engineering page shows all the nodes and links, and confirm configuration options match the ones you recorded prior to the upgrade before enabling feature packs.

If you encounter errors in any of the above activities, please contact the Cisco Customer Experience team.

Verify LCM data migration

Once the system is stable following an upgrade, and prior to enabling domains for LCM, confirm that the migration of previously monitored interfaces has completed and that each domain has the expected configuration options. Follow these steps to verify LCM data migration:

Procedure

Step 1

After the upgrade, wait until the Traffic Engineering page shows all the nodes and links.

Step 2

Navigate to Alerts > Alarm and Events and enter LCM to filter the Source column.

Step 3

Look for the following event: "Migration complete. All migrated LCM interfaces and policies are mapped to their IGP domains". If this message does not appear wait for the Congestion Check Interval period (set in the LCM Configuration page), then restart LCM (Administration > Crosswork Manager > Optimization Engine > optima-lcm > ... > Restart).

Step 4

Wait until the optima-lcm service changes from Degraded to Healthy state.

Step 5

For each domain, navigate to the Configuration page and verify the options have been migrated successfully. If the domain configurations are incorrect, restart LCM (Administration > Crosswork Manager > Optimization Engine > optima-lcm > ... > Restart).

Step 6

Check the Alarms and Events page for the event mentioned above and the Configuration page to verify the options.

Note

 
  • If the confirmation message does not appear or domain configuration options are incorrect, then contact Cisco Technical support and provide them with showtech information and the exported Link Management CSV file.

  • You can also manually add missing interfaces that were previously monitored or update domain configuration options after the system is stable.


Upgrade Using Parallel Hardware

This section explains how to migrate to the latest version of Crosswork Network Controller using new hardware. This method relies on installing the new Cisco Crosswork cluster on new hardware in parallel while the data from the old Cisco Crosswork cluster is being backed up. This method is faster but requires twice the amount of resources for creating the new cluster in parallel.


Attention


Upgrade using parallel hardware is only supported for on-premise deployments. For cloud-based deployments, please follow the instructions in Upgrade Using Existing Hardware.


The stages of the parallel upgrade workflow are:

  1. Deploy a new Crosswork Network Controller Cluster


    Important


    While the cluster installation is in progress, you must upgrade NSO and SR-PCE. Please see the Crosswork Network Controller 7.0 Release Notes to know the NSO and SR-PCE versions compatible with Crosswork Network Controller. The process to upgrade NSO or SR-PCE is not covered in this document. For install instructions, please refer to the relevant product documentation.


  2. Backup Cisco Crosswork Cluster

  3. Update DNS Server and Run Migration

  4. Add Crosswork Data Gateway to Cisco Crosswork

  5. Shut Down the old Cisco Crosswork Cluster

After you complete the upgrade steps, you must install the NSO function packs. For the installation instructions, you can either refer to Install Cisco NSO Function Pack Bundles from Crosswork UI or Install NSO Function Packs Manually, depending on your preference.

Deploy a new Crosswork Network Controller Cluster

Install the latest version of Crosswork Network Controller cluster and applications on a new set of VMs in parallel.


Note


The new Crosswork Network Controller cluster must be installed with the same FQDN and same number of nodes as in the old version of Crosswork Network Controller.


Before you begin

Procedure


Step 1

Install the new Crosswork Network Controller cluster on your preferred platform (see Install Crosswork Cluster on VMware vCenter for VMware and Install Cisco Crosswork Network Controller on AWS EC2 for AWS).

Note


During installation, Cisco Crosswork will create a special administrative ID (virtual machine (VM) administrator, with the username cw-admin, and the default password cw-admin). The administrative username is reserved and cannot be changed. The first time you log in using this administrative ID, you will be prompted to change the password. Data center administrators use this ID to log into and troubleshoot the Crosswork application VM. You will use it to verify that the VM has been properly set up.

Step 2

After the installation is completed, log into the Crosswork Network Controller UI by navigating to https://<NEW_VIP>:30603.

Step 3

Check if all the nodes are up and running in the cluster.

  1. From the Crosswork Network Controller main menu, choose Administration > Crosswork Manager > Crosswork Summary.

  2. Click Crosswork Cluster tile to view the details of the cluster such as resource utilization by node, the IP addresses in use, whether each node is a Hybrid or Worker, and so on.

Step 4

Install the applications which were part of the old version of Crosswork Network Controller. For more information, see Install Crosswork Applications.

Step 5

After the applications are successfully installed, check the health of the new Crosswork Network Controller cluster.


Backup Cisco Crosswork Cluster

Before you begin

Follow these guidelines whenever you create a backup:

  • Cisco Crosswork will back up the configuration of the system to an external server using SCP. Before you begin you need to have the following configuration in place and information about the SCP server available:

    • The hostname or IP address and the port number of a secure SCP server.

    • A preconfigured path on the SCP server where the backup will be stored.

    • User credentials with file read and write permissions to the directory.

    • The SCP server storage requirements will vary slightly but you must have at least 25 GB of storage.

  • Ensure that you have configured a destination SCP server to store the backup files. This configuration is a one-time activity.

  • Both the Crosswork Network Controller cluster and the SCP server must be in the same IP environment. For example: If Crosswork Network Controller is communicating over IPv6, so must the backup server.

  • Keep a record of the list of Crosswork applications you have installed in the current version of Cisco Crosswork, as you can only install those applications after migrating to the new version of Cisco Crosswork.

  • If you have onboarded a custom MIB package in the previous version of Cisco Crosswork, download a copy of the package to your system. You will need to upload the package after you complete upgrading Cisco Crosswork. See Post-upgrade Checklist for more information.

  • If you have modified the previous version of Cisco Crosswork to include third-party device types, you must download the third-party device configuration file, and re-apply it to the upgraded Cisco Crosswork. The device configuration file is located on the cluster node (at /mnt/cw_glusterfs/bricks/brick3/sys-oids.yaml) and on the pod (at /mnt/backup/sys-oids.yaml).

  • For Traffic Engineering, perform the following actions:

    • Upgrade the software versions in your devices as per the supported Cisco IOS XE/XR versions documented in the Traffic Engineering Compatibility Information.

    • If you have upgraded Local Congestion Mitigation (LCM), Verify LCM data migration before enabling LCM.

    • If you have upgraded SR Circuit Style Manager or Bandwidth on Demand, wait until the Traffic Engineering page shows all the nodes and links, and confirm configuration options match the ones you recorded prior to the upgrade before enabling feature packs.


Note


We recommend that you create a backup only during a scheduled upgrade window. Users should not attempt to access Crosswork Network Controller while the backup operation is running.


Procedure


Step 1

Launch the Cisco Crosswork UI by using a browser and navigating to https://<FQDN>:30603

Step 2

Check and confirm that all the VMs are healthy and running in your cluster.

Step 3

Configure an SCP backup server:

  1. From the Crosswork Network Controller main menu, choose Administration > Backup and Restore.

  2. Click Destination to display the Edit Destination dialog box. Make the relevant entries in the fields provided.

  3. Click Save to confirm the backup server details.

Step 4

Create a backup:

  1. From the Crosswork Network Controller main menu, choose Administration > Backup and Restore.

  2. Click Actions > Backup to display the Backup dialog box with the destination server details prefilled.

  3. Provide a relevant name for the backup in the Job Name field.

  4. If any of the VMs or applications are not in Healthy state, but you want to create the backup, check the Force check box.

    Note


    The Force option must be used only after consultation with the Cisco Customer Experience team.

  5. Uncheck the Backup NSO check box if you don't want to include Cisco NSO data in the backup.

    Note


    To use the Backup NSO option during backup, you must configure the SSH connectivity protocol in the NSO provider; otherwise, the backup will fail. Follow the instructions given in Backup Cisco Crosswork with Cisco NSO section in the Cisco Crosswork Network Controller 7.0 Administration Guide instead of the instructions here.

  6. Complete the remaining fields as needed.

    If you want to specify a different remote server upload destination: Edit the prefilled Host Name, Port, Username, Password and Remote Path fields to specify a different destination.
  7. (Optional) Click Verify Backup Readiness to verify that Crosswork Network Controller has enough free resources to complete the backup. Crosswork Network Controller will also confirm that none of the applications are being updated, if the remote destination is correctly defined and if the applications are healthy. If the verifications are successful, Crosswork Network Controller displays a warning about the time-consuming nature of the operation. Click OK.

    If the verification is unsuccessful, please contact the Cisco Customer Experience team for assistance.

  8. Click Start Backup to start the backup operation. Crosswork Network Controller creates the corresponding backup job set and adds it to the job list. The Job Details panel reports the status of each backup step as it is completed.

  9. To view the progress of a backup job: Enter the job details (such as Status or Job Type) in the search fields in the Backup and Restore Job Sets table. Then click on the job set you want.

    The Job Details panel displays information about the selected job set, such as the job Status, Job Type, and Start Time. If there’s a failed job, hover the mouse pointer over the icon near the Status column to view the error details.

    Note


    If you do not see your backup job in the list, refresh the Backup and Restore Job Sets table.

  10. If the backup fails during upload to the remote server: In the Job Details panel, just under the Status icon, click the Upload backup button to retry the upload.

    Note


    Upload can fail due to connectivity problems with the SCP backup server (for example, incorrect credentials, missing directory or directory permissions, missing path and so on). This is indicated by failure of the task uploadBackupToRemote). If this happens, check the SCP server details, correct any mistakes and try again. Alternatively, you can use the Destination button to specify a different SCP server and path before clicking Upload backup.


Update DNS Server and Run Migration

Before you begin

Before you begin, ensure that you have:

  • The hostname or IP address and the port number of a secure SCP server.

  • The name and path of the backup file created in .

  • User credentials with file read and write permissions to the directory.

Procedure


Step 1

Update the DNS server to point the FQDN of the previous version of Crosswork Network Controller cluster to the <VIP> of the new Crosswork Network Controller cluster.

Step 2

Navigate to the upgraded Cisco Crosswork UI using https://<new_VIP>:30603.

Step 3

Configure an SCP backup server:

  1. From the main menu, choose Administration > Backup and Restore.

  2. Click Destination to display the Edit Destination dialog box.

  3. Make the relevant entries in the fields provided.

    Note


    In the Remote Path field, please provide the location of the backup created in Backup Cisco Crosswork Cluster.

  4. Click Save to confirm the backup server details.

Step 4

Migrate the old Crosswork Network Controller backup:

  1. From the Crosswork Network Controller main menu, choose Administration > Backup and Restore.

  2. Click Actions > Data Migration to display the Data Migration dialog box with the destination server details prefilled.

  3. Provide the name of the data migration backup (created in Backup Cisco Crosswork Cluster) in the Backup File Name field.

  4. If you want to perform the data migration backup despite any Crosswork Network Controller application or microservice issues, check the Force check box.

  5. Click Start Migration to start the data migration operation. Crosswork Network Controller creates the corresponding data migration job set and adds it to the Backup and Restore Job Sets table. The Job Details panel reports the status of each backup step as it is completed.

    Note


    If you do not see your job in the list, refresh the Backup and Restore Job Sets table.

  6. To view the progress of a data migration job: Enter the job details (such as Status or Job Type) in the search fields in the Backup and Restore Job Sets table. Then click on the job set you want.

    The Job Details panel displays information about the selected job set, such as the job Status, Job Type, and Start Time. If there’s a failed job, hover the mouse pointer over the icon near the Status column to view the error details.

    Note


    Crosswork UI and Grafana monitoring might become temporarily unavailable during the data migration operation.

  7. If the data migration fails in between, you need to restart the procedure from step 1.

Step 5

After the data migration is successfully completed, check the health of the new Crosswork Network Controller cluster.

  1. From the Crosswork Network Controller main menu, choose Administration > Crosswork Manager > Crosswork Summary.

  2. Click Crosswork Cluster tile to view the health details of the cluster.

Note


After a successful migration, please perform a hard refresh or browser cache deletion before proceeding to use the system. Failing to do this step can result in data discrepancy.


Add Crosswork Data Gateway to Cisco Crosswork

Ensure that the migration is complete and the new Cisco Crosswork UI is available before you proceed with installing the new version of Crosswork Data Gateway.


Note


This procedure is required only for a data gateway Base VM upgrade. Upgrade of other components, such as collectors, is performed by Cisco Crosswork.


Crosswork Data Gateway functions because a passive device in the network. The Crosswork Data Gateway upgrade process consists of replacing all old data gateway VMs with the new data gateway VMs (latest version) in the network.


Important


Step 6 in this procedure requires you to log out of Cisco Crosswork and log in again after verifying the deployment and enrollment of the new data gateway VMs with Cisco Crosswork. After you log in, an Action to be taken window appears prompting you to confirm that the upgrade is complete. Do not click Acknowledge unless you have completed all the verification steps that are mentioned in Step 3, Step 4 and Step 5 in the procedure.


Procedure


Step 1

Log out of the upgraded Cisco Crosswork and log in again.

Step 2

After you log in, an Action to be taken window appears. Close this window and do not click Acknowledge.

Step 3

Install new data gateway VMs (latest version) with the same number and the same information (management interface importantly) as the old data gateway VMs. Follow the steps in the Crosswork Data Gateway Installation Workflow.

Step 4

Wait for about 5 minutes and navigate to Administration > Data Gateway Management.

Step 5

Check the Data Gateway Instances tab to verify that the new data gateway VMs are enrolled with the new Cisco Crosswork, and have the Admin State as Up and Operational State as Not Ready.

Figure 4. Data Gateway Instances Window

Step 6

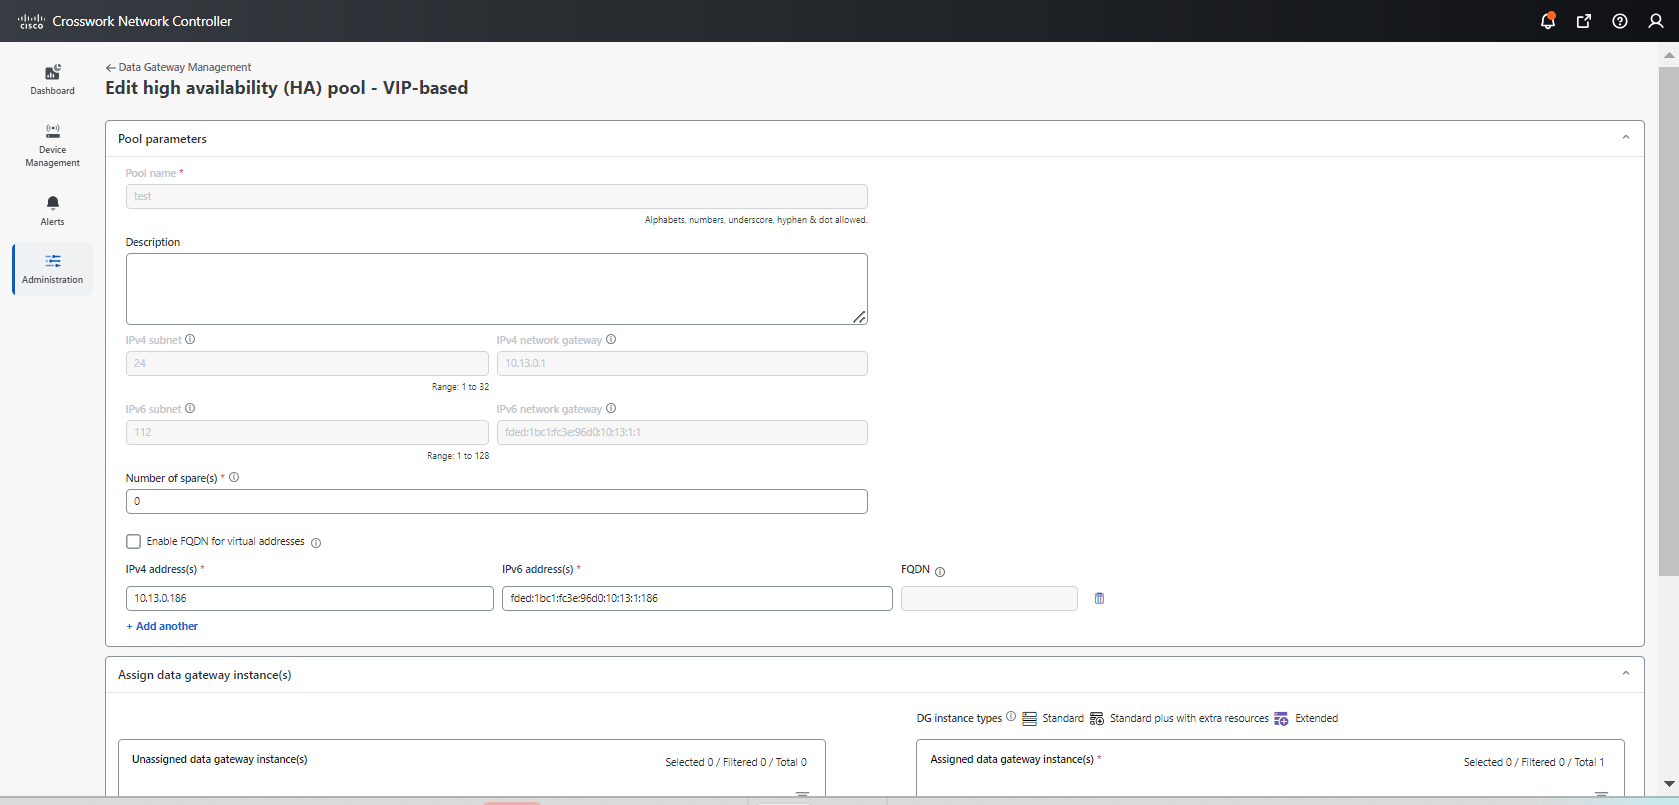
After the Operational State of the VMs changes to Ready, navigate to the Pools tab and verify that all the Crosswork Data Gateway pools from the old Cisco Crosswork, are listed here. Edit each Crosswork Data Gateway pool to verify that the active Crosswork Data Gateway is same as one that you noted in the older version of Cisco Crosswork.

For example, the Crosswork Data Gateway pool in the following image contains two VMs, where the active VM is 172.23.247.78

Figure 5. Edit HA Pool Window

Step 7

Verify that devices are attached to the new data gateways in the upgraded Cisco Crosswork UI.

  1. Navigate to the Administration > Data Gateway Management page.

  2. Check the Attached Device Count of the data gateway.

Step 8

Log out of Cisco Crosswork and log in again.

Step 9

After you log in, Cisco Crosswork presents you with a window prompting for confirmation that the VMs. In the pop up that appears, click Acknowledge.

Important

 
Do not click Acknowledge unless you have verified that the VMs are in the Up/Not Ready state. Doing so will result in VMs having the state as Error. See Troubleshoot Crosswork Data Gateway Upgrade Issues.

Step 10

To move Cisco NSO out of maintenance or read-only mode, use:

ncs_cmd -c maapi_read_write

After the upgrade is complete:

  • The new data gateway VMs are enrolled with upgraded Cisco Crosswork.

  • All destinations, HA Pools, device mapping information can be viewed on the Cisco Crosswork UI with the upgraded data gateway VMs.

  • Jobs start again automatically with the new data gateway VMs.

Shut Down the old Cisco Crosswork Cluster

Before you begin

Gather the following information before shutting down the older version of Cisco Crosswork:

  • All the IP addresses in the cluster.

  • All the IP addresses of the CDGs.

Procedure


Step 1

After a successful backup, shut down the Crosswork Network Controller cluster by powering down the VMs hosting each node (start with the Hybrid VMs):

  1. Log into the VMware vSphere Web Client.

  2. In the Navigator pane, right-click the VM that you want to shut down.

  3. Choose Power > Power Off.

  4. Wait for the VM status to change to Off.

  5. Wait for 30 seconds and repeat steps 1a to 1d for each of the remaining VMs.

Step 2

Shut down the data gateway VMs.

  1. Log in to the previous version of the data gateway VM. See Access Crosswork Data Gateway VM from SSH.

    Crosswork Data Gateway launches an Interactive Console after you login successfully.

  2. Choose 5 Troubleshooting.

  3. From the Troubleshooting menu, choose 5 Shutdown VM to shut down the VM.

Step 3

(Optional) Move Cisco NSO into read-only mode to avoid any unintended updates to Cisco NSO during the upgrade.

Use the following command to move NSO to read-only mode:
ncs_cmd -c maapi_read_only
For more information, please refer to the relevant Cisco NSO documentation.

Update Crosswork Network Controller applications (standalone activity)

This section explains how to independently update Crosswork Network Controller applications from the Cisco Crosswork UI in case of minor updates or patch releases. This procedure is not part of the upgrade workflow discussed in the earlier sections.

The Crosswork Network Controller applications are offered as Essentials, Advantage, and Add-on packages. Every package contains crosswork applications in a particular format unique to Crosswork known as CAPP (Crosswork APPlication).

Before you begin, ensure that you:

  • Take a backup of your data (using the backup/restore functionality) before any critical upgrade.

  • Download the latest version of the Crosswork Network Controller package to your local machine.


Note


Crosswork does not support the downgrade operation of a CAPP file. However, if you want to go back to an older application version, you can uninstall the application and install the older version of the application. You are advised to take a backup of your data prior to the operation.


Procedure


Step 1

Download and validate the CAPP files:

  1. Navigate to cisco.com and locate the CAPP files (.tar.gz) that you require.

  2. Hover over the file and copy the MD5 or SHA512 checksum to your clip board.

  3. Download the CAPP files to a server that can be reached from the Crosswork server.

  4. Run a tool of your choice to calculate the checksum, and compare the checksum value in your downloaded file with the value you copied in the clip board.

    For example, on a MAC you can use the md5 command to calculate the MD5 sum on a file:

    md5 signed-cw-na-coe-7.0.0-78-release700-240816.tar.gz
    
    ff47a72ed7dc4fc4be388db3a43fa13f

    Verify that the result value matches with the posted value on cisco.com.

Step 2

Click on Administration > Crosswork Manager, and select the Application Management tab.

The Crosswork Platform Infrastructure and any applications that are added are displayed here as tiles.

Step 3

Click on the Add File (.tar.gz) option to add the application CAPP file that you had downloaded.

Step 4

In the Add File dialog box, enter the relevant information and click Add.

Step 5

To upgrade, click the Upgrade prompt and the new version of the application is installed. Alternately, click on the tile, and select the Upgrade option from the drop down list.

In the Upgrade screen, select the new version that you want to upgrade to, and click Upgrade.

Step 6

(Optional) Click on Job History to see the progress of the upgrade operation.

Note


During an upgrade operation, typically only the components that have changed between the existing CAPP file and the new CAPP file are installed, as the new version may continue to use the most of the resources of the older version. This ensures a quick operation that happens without disruption to the current system and session.

Note


During an upgrade, the application that is being updated will be unavailable until the update is completed. During this time, any other users using the application will be notified via an alarm about the upgrade.