
Deep Network Troubleshooting
This document explains how to use Crosswork AI Deep Network Troubleshooting and how to extend its troubleshooting knowledge for an environment. It describes the investigation workflow, hypothesis generation and validation, customization options, and the process for testing and maintaining extensions. This guide is intended for network engineers and administrators who use or customize Deep Network Troubleshooting.
What is Deep Network Troubleshooting?
Deep Network Troubleshooting is an AI-powered network troubleshooting agent in Crosswork AI. Deep Network Troubleshooting (DNT) helps users investigate network issues by analyzing a natural language problem description, generating candidate root-cause hypotheses, validating those hypotheses using available network data, and presenting root cause analysis (RCA) when enough evidence is available.
DNT is designed to guide network operators through complex troubleshooting scenarios. Instead of requiring users to manually decide where to begin, DNT uses the provided issue description and available network context to identify possible causes, collect supporting evidence, and explain the most likely failure chain.
For example, if a user reports that a Layer 2 VPN service is down, DNT can generate hypotheses such as an underlay routing issue, tunnel failure, signaling issue, resource constraint, or local device fault. The user can review the generated hypotheses, add custom hypotheses, and start validation. DNT results are intended to guide investigation. The findings should be reviewed with operational knowledge and other network data before taking corrective action.
Deep Network Troubleshooting capabilities
Deep Network Troubleshooting helps network operators investigate complex network issues by providing:
-
Natural language issue input: Accepts a network problem described in plain language, together with relevant symptoms and context.
-
Structured hypothesis prioritization: Uses network dependencies, available symptoms, observed anomalies, and collected evidence to prioritize hypotheses with diagnostic value.
-
Hypothesis generation: Generates candidate root-cause hypotheses based on the issue description and available network context.
-
User-guided hypothesis selection: Allows users to review generated hypotheses, remove hypotheses from the current iteration, and add custom hypotheses.
-
Evidence-based validation: Collects and evaluates available network data to determine whether the evidence supports, weakens, or rules out each selected hypothesis.
-
Parallel hypothesis evaluation: Evaluates multiple hypotheses concurrently when the investigation allows it.
-
Iterative investigation: Uses evidence collected during one iteration to refine subsequent hypotheses and continue the investigation when more analysis is required.
-
Root cause analysis: Presents the likely root cause when sufficient evidence is available.
-
Cause-effect timeline: Explains the likely sequence of events that led to the reported issue.
-
Extensible troubleshooting knowledge: Supports customer-specific Network Stack concepts, CLI knowledge, probe intents, recipes, and reusable problem and hypothesis patterns.
Deep Network Troubleshooting workflow
The Deep Network Troubleshooting workflow consists of the following stages:
-
Start an investigation: Open Deep Network Troubleshooting and provide the issue description, affected service or device, time window, observed symptoms, and troubleshooting mode.
-
Generate and prioritize hypotheses: DNT agent analyzes the information you provided and the available network context. It uses network dependencies, symptoms, anomalies, and relevant evidence to generate and prioritize candidate root-cause hypotheses.
-
Review the hypotheses: Review the generated hypotheses before validation. You can remove hypotheses from the current iteration and add custom hypotheses based on your operational knowledge.
-
Validate the selected hypotheses: DNT agent collects relevant network data and evaluates the selected hypotheses. The collected evidence can support, weaken, or rule out each hypothesis.
-
Review the results: Review the hypothesis verdicts, supporting evidence, root cause analysis, and cause-effect timeline. If the available evidence does not identify a likely root cause, you can continue to another investigation iteration.
During a subsequent iteration, DNT agent uses the evidence collected previously to refine the investigation. A hypothesis removed during an earlier iteration can appear again if new evidence indicates that it may be relevant.
Guidelines and Limitations
Consider the following when using Deep Network Troubleshooting:
-
The quality of the troubleshooting results depends on the availability, accuracy, and freshness of the network data available to Crosswork AI.
-
Provide a clearly defined problem whenever possible, including the affected service, device, or endpoint, the observed symptoms, and the applicable time window.
-
DNT agent investigates a reported network issue. It is not intended to discover every unavailable service, link, or device or to answer broad network-status queries.
-
DNT agent may not identify a root cause during the first investigation iteration. Additional iterations can use previously collected evidence to refine the investigation.
-
The selected troubleshooting mode controls the number of hypotheses generated automatically. You can add custom hypotheses before validation, up to the supported maximum.
-
The Network Stack guides hypothesis generation and prioritization but does not restrict the investigation to the concepts represented in the Stack.
-
Root cause analysis is available only when the collected evidence is sufficient to support a likely cause.
-
Troubleshooting results are intended to guide the investigation. Review the findings with your operational knowledge and other available network data before taking corrective action.
-
Customer-created troubleshooting content can affect hypothesis generation and evidence collection. Test and review custom content before using it in a production environment.
-
On the Large deployment profile, complete or close all active Deep Network Troubleshooting investigations before changing the LLM configuration associated with DNT agent. An LLM configuration change includes associating DNT agent with a different model, refreshing or replacing model-provider credentials, or refreshing or replacing an expired session token, even when the associated model does not change.
-
Changing the LLM configuration associated with DNT agent can temporarily create a new DNT runtime while the previous runtime continues serving existing sessions. The overlapping runtimes consume additional capacity from the shared resource pool and can affect other agents that require those resources. For example, on the Large profile, the additional resource consumption can prevent the third concurrent Configuration Drift Detection run from starting. It can also interrupt active DNT investigations. Confirm that the previous DNT runtime has stopped before starting a new DNT investigation or another agent run that requires shared capacity.
DNT context documents
Deep Network Troubleshooting provides the Context Service collections that DNT agent requires for its default operation. No additional configuration is required to use the delivered content.
The following collections store the troubleshooting knowledge used by DNT agent:
| Collection | Purpose | Customization use |
|---|---|---|
|
|
Stores CLI and platform-specific troubleshooting knowledge. |
Add stable, scoped command guidance for a supported platform. |
|
|
Stores the Network Stack concepts and their diagnostic relationships. |
Add or remove concepts and relationships that are relevant to the customer environment. |
|
|
Stores vendor-neutral descriptions of evidence that DNT agent can request. |
Add a probe intent for a specific and repeatable evidence requirement. |
|
|
Stores platform-specific procedures for retrieving evidence required by a probe intent. |
Add a recipe for a stable, bounded retrieval pattern. |
|
|
Provides the current schemas and seeded examples for DNT customization content. |
Use this read-only collection to retrieve the current authoring contract before creating or modifying content. |
|
|
Stores reusable problem, hypothesis, and known root-cause patterns. |
Add validated and appropriately scoped incident knowledge. |
When a required collection is absent, DNT agent initializes it with delivered content. If the collection already contains content, normal initialization does not overwrite it.
Treat modified collection content as customer-owned data. Export the current content before making a material change, document the reason for the change, and prepare a rollback plan.
Start a troubleshooting session
Use Deep Network Troubleshooting agent to investigate a specific network issue. Provide enough information to identify the affected service, device, or endpoint and the period during which the problem occurred.
DNT agent uses the investigation details and available network context to generate and prioritize candidate root-cause hypotheses. After you review the hypotheses, DNT agent validates the selected hypotheses and presents the troubleshooting findings.
Access Deep Network Troubleshooting agent
To launch Crosswork AI, click the Launch AI Assistant icon  .
.
The Crosswork AI user interface opens.
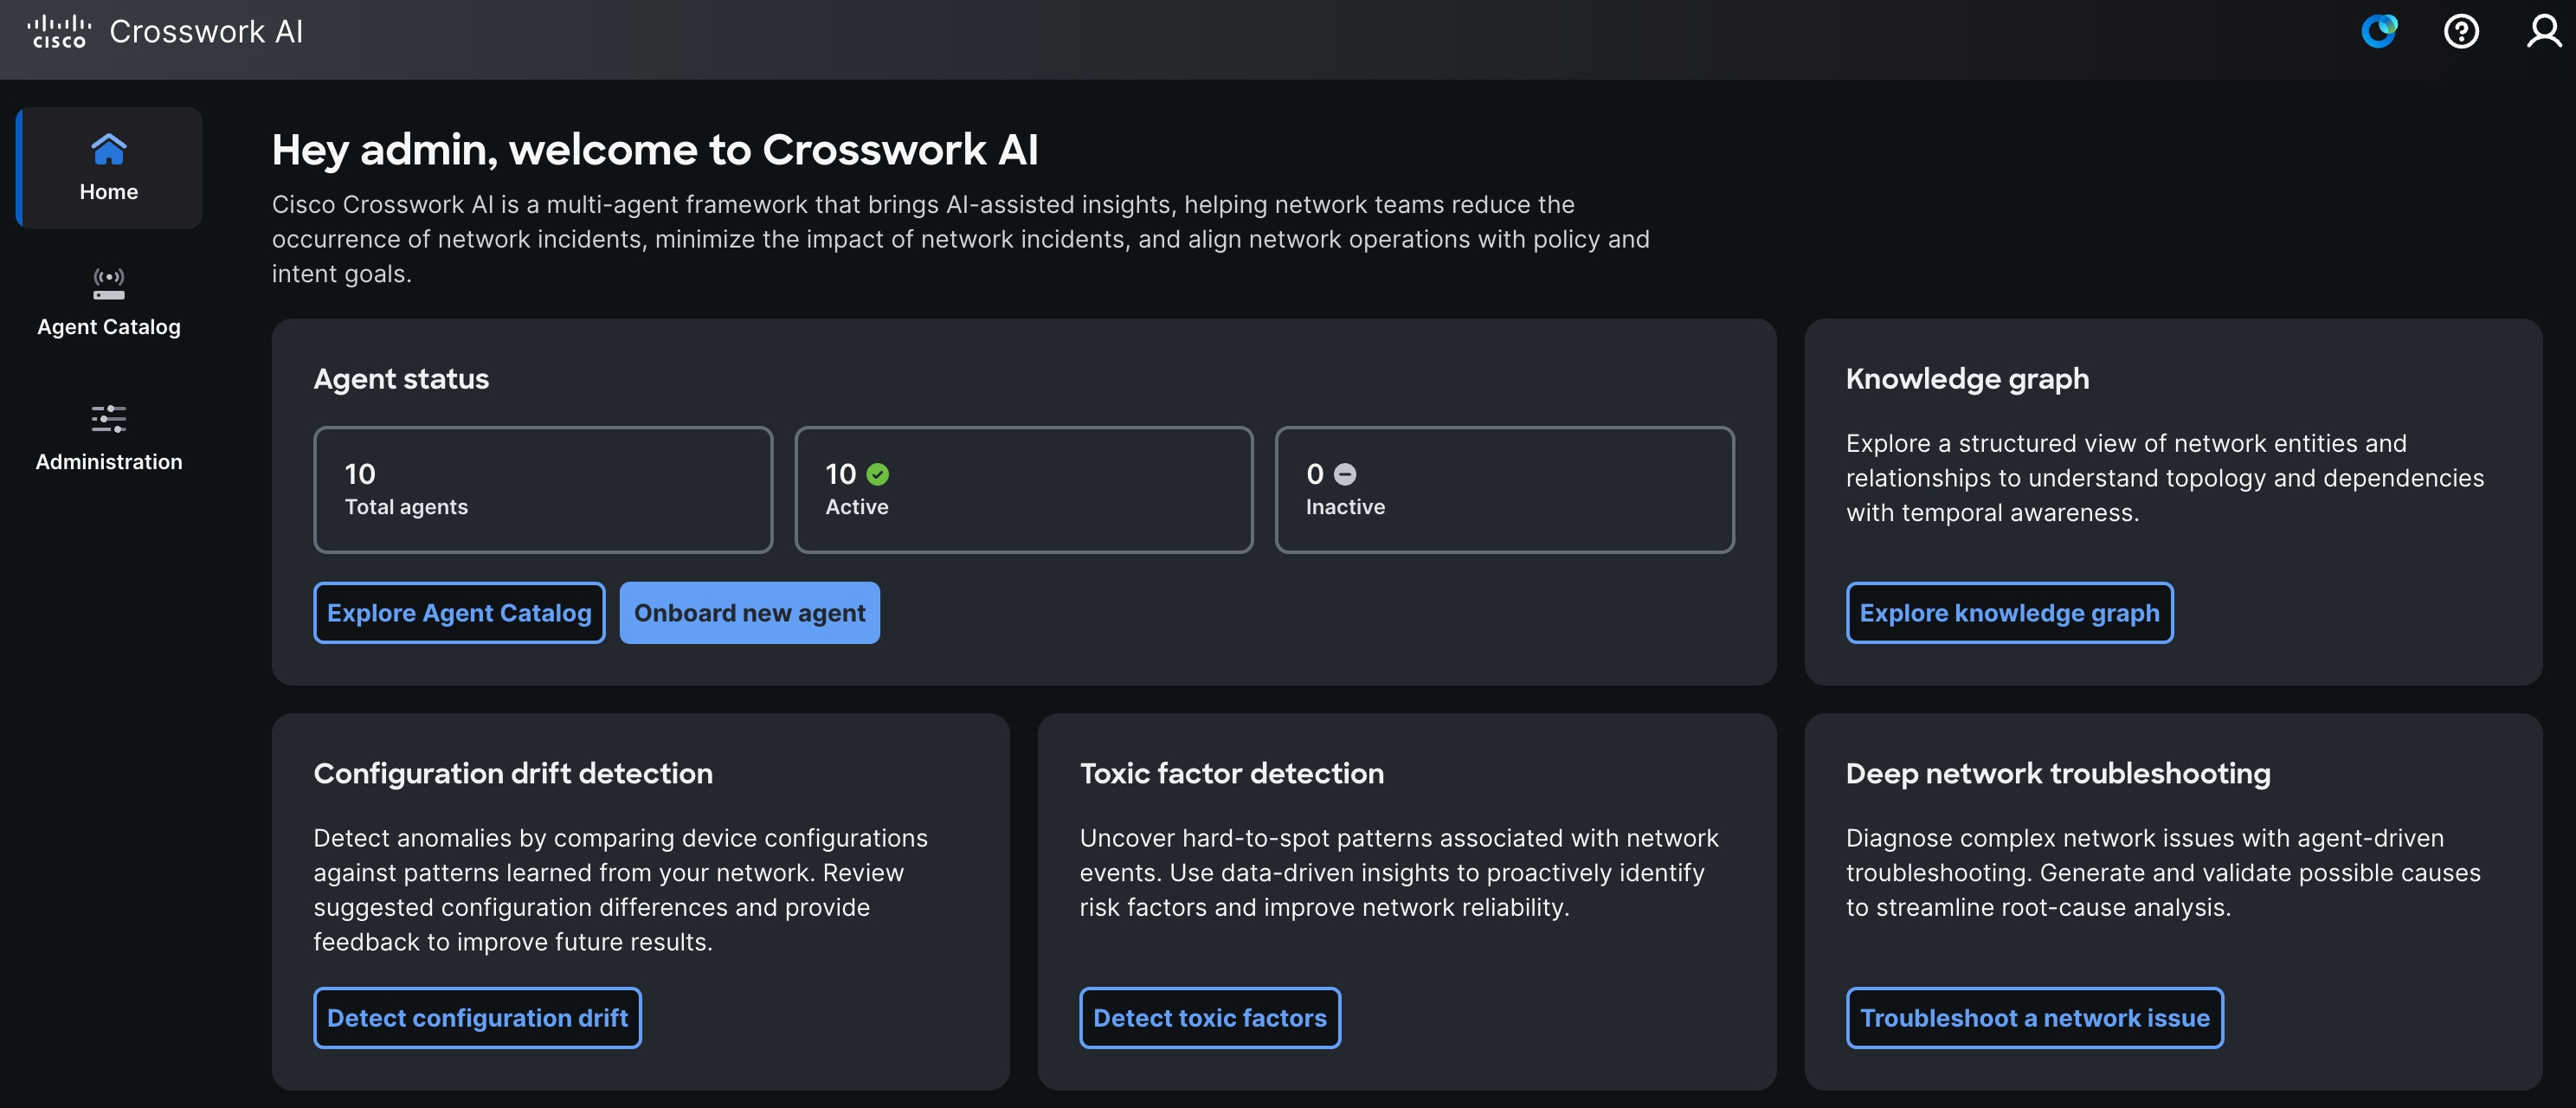
Crosswork AI provides pre-defined suggestion tiles for interacting with the agent. All actions performed through the AI assistant are specific to your user account.
You can access the Deep Network Troubleshooting agent in one of the following ways:
-
From the Crosswork AI home page, select Troubleshoot a network issue.
-
Click
to open AI Assistant. Select I want to run deep network troubleshooting, and then click  to send the request.
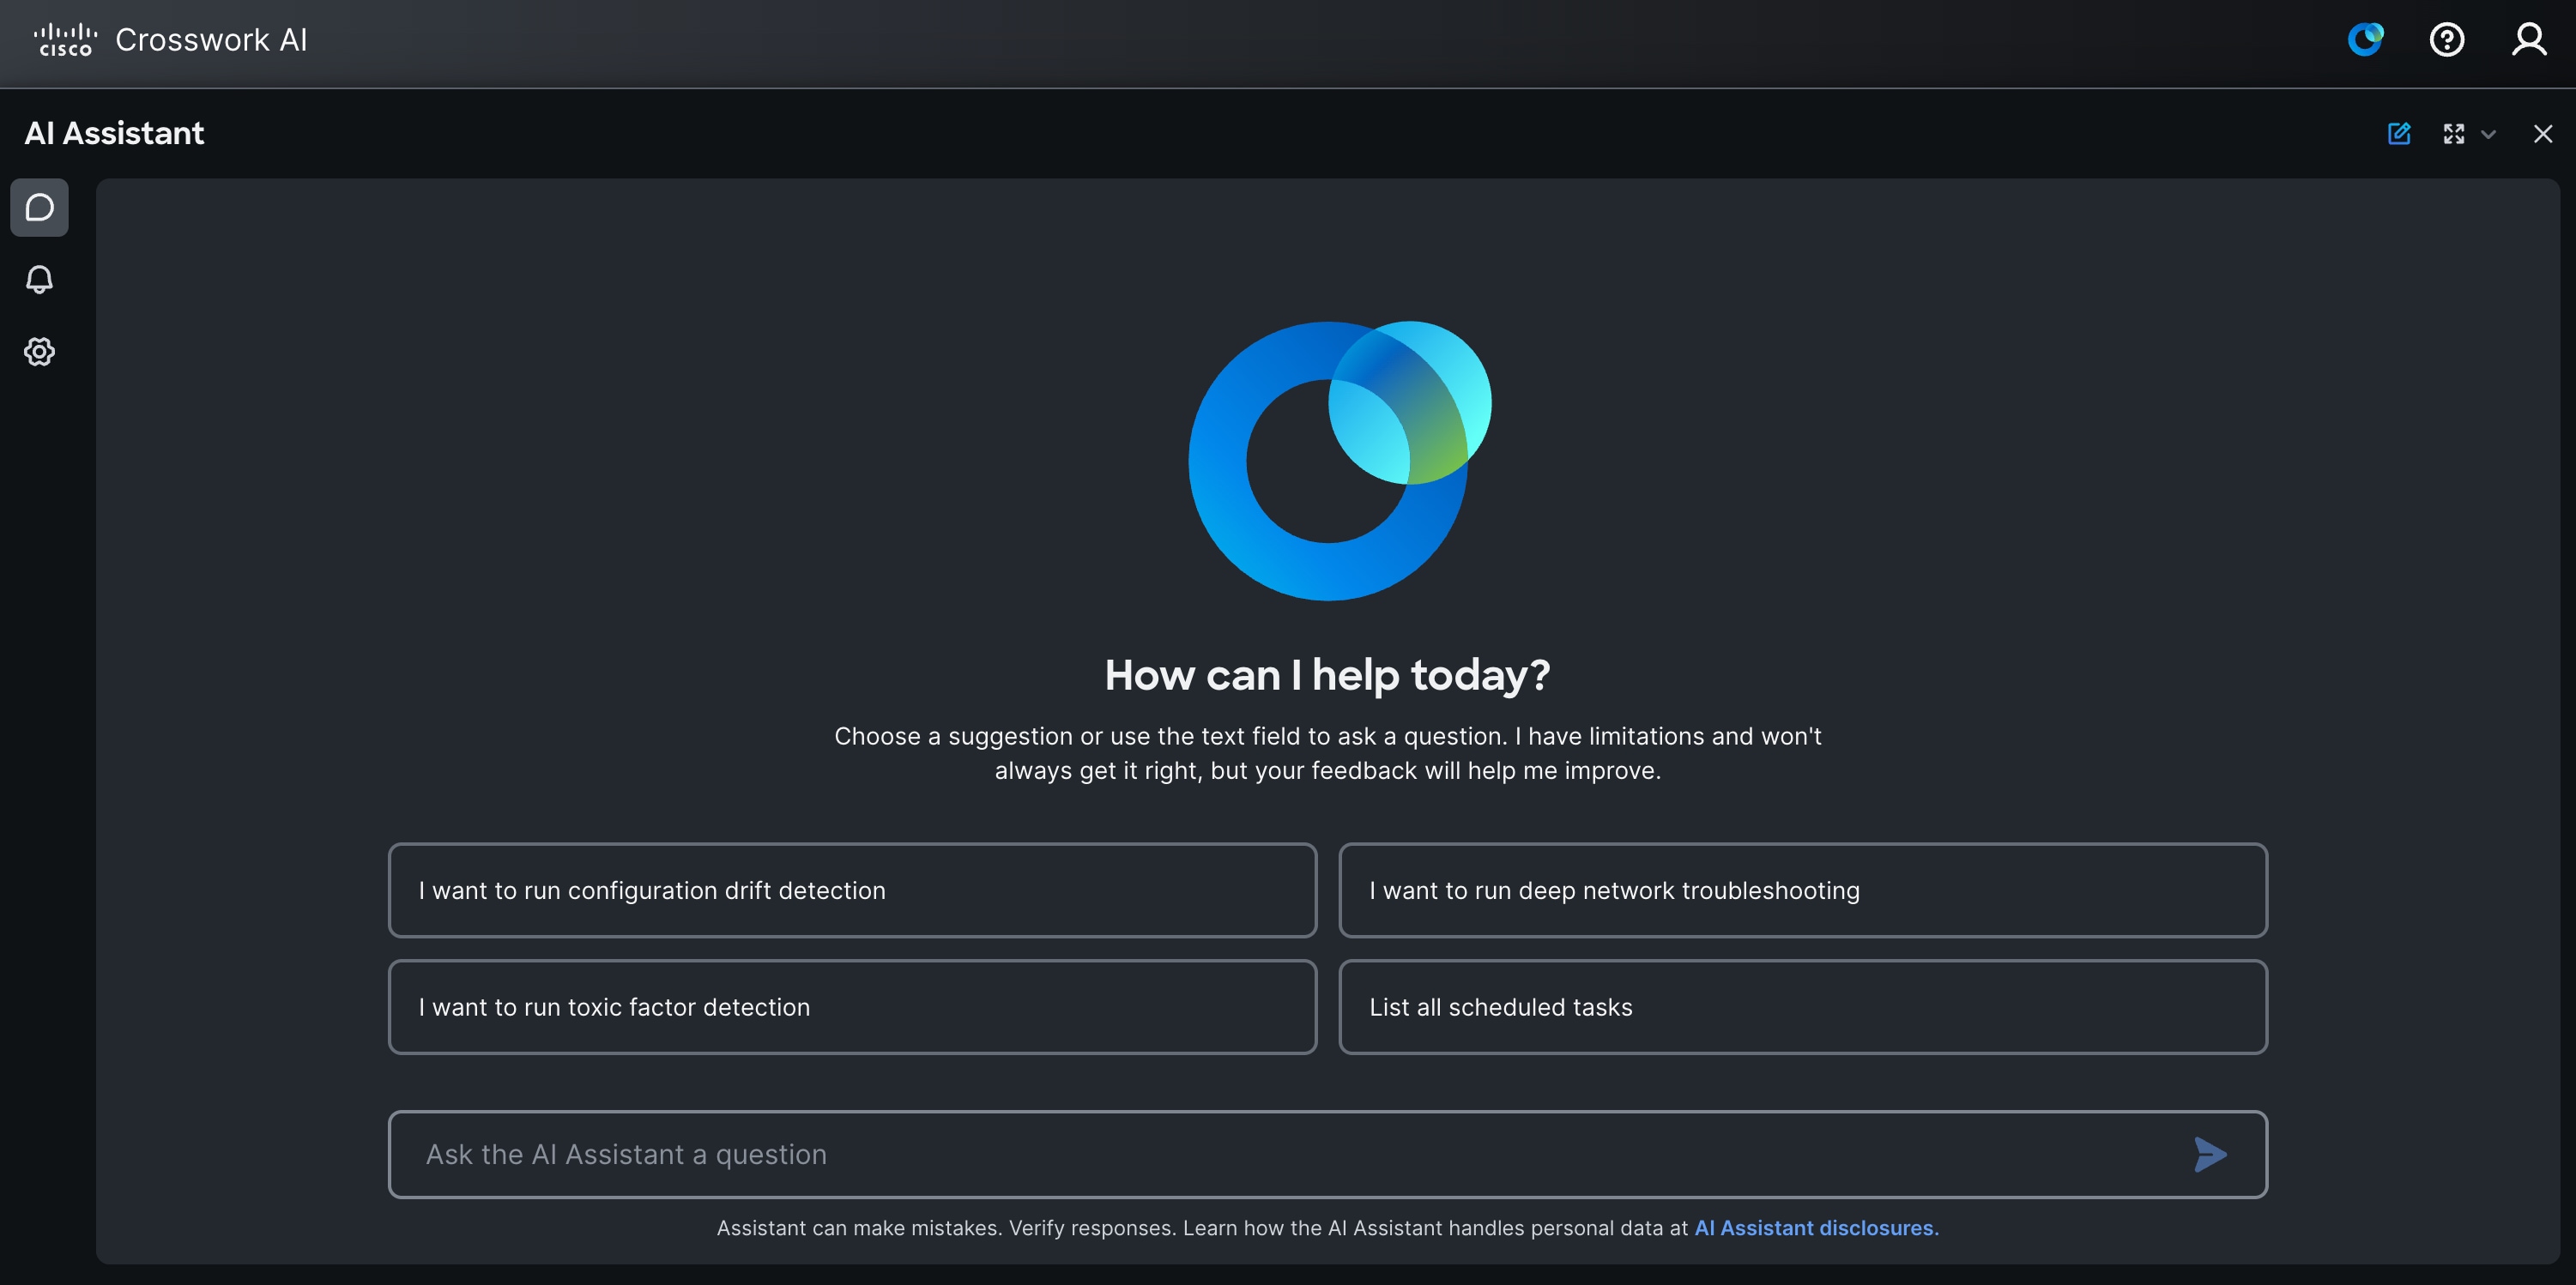 Figure 2. Crosswork AI Assistant page
Begin an investigation
When you start the Deep Network Troubleshooting agent, a troubleshooting session begins and the agent displays the investigation details form.
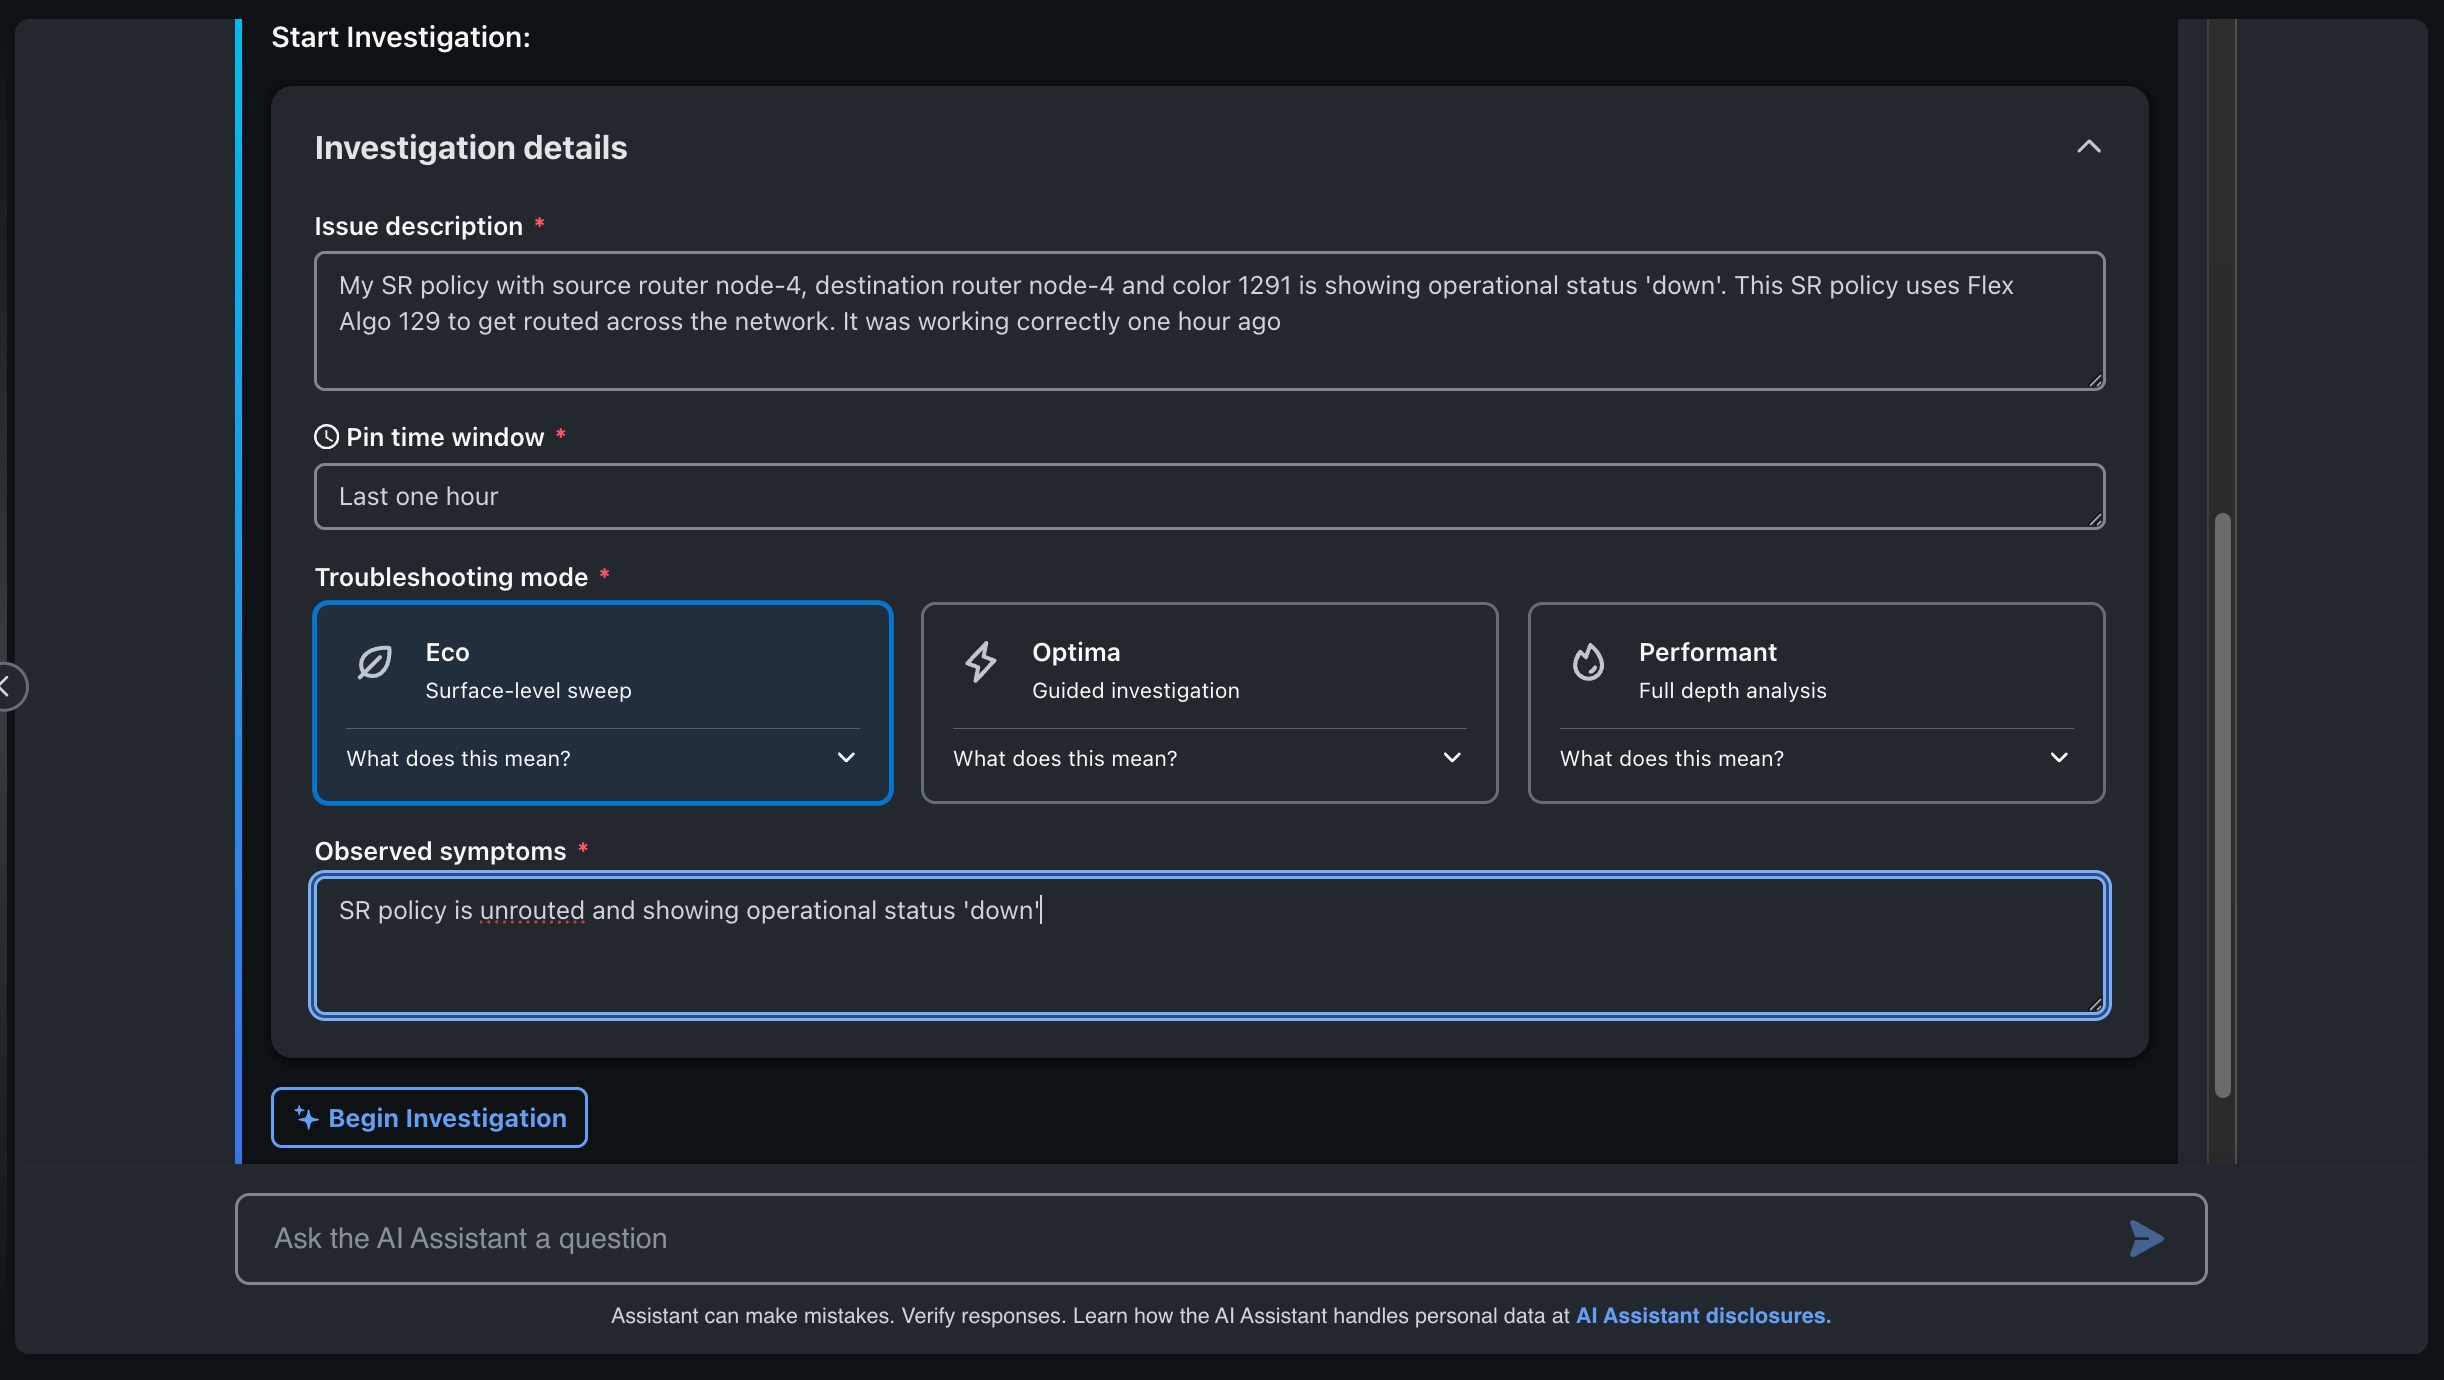
To begin an investigation:
-
In the Issue description field, describe the network problem that you want the DNT agent agent to investigate.
Provide enough context for the agent to identify the affected service, device, endpoint, and time period. Include details such as:
-
The affected service or network function.
-
The affected device or endpoint.
-
The observed problem.
-
Relevant service, policy, interface, or device identifiers.
-
The approximate time when the problem began.
-
Any additional information that can help identify the affected network context.
Example:
The SR policy from <source-node> to <destination-node> with color 1291 is operationally down. The policy uses Flex-Algo 129. Investigate the cause of the failure.The Deep Network Troubleshooting agent uses the information in the issue description to understand the reported problem and identify relevant network context.
-
-
For Pin time window, specify a time period that includes when the issue occurred or when the symptoms were observed.
-
Select a Troubleshooting mode.
The troubleshooting mode determines the number of hypotheses that DNT agent generates automatically. You can add custom hypotheses before validation, up to the supported maximum.
The available troubleshooting modes are:
-
Eco: Uses fewer hypotheses and resources for a focused initial investigation. Generates 3 hypotheses automatically.
-
Optima: Provides a balanced investigation scope. Generates 5 hypotheses automatically.
-
Performant: Uses a broader set of hypotheses for a deeper initial investigation. Generates 10 hypotheses automatically.
-
-
Starting with fewer hypotheses can be useful because DNT agent can continue the investigation in additional iterations. Later iterations use previously collected evidence to refine the investigation.
-
In the Observed symptoms field, enter known symptoms or supporting details.
-
-
Include relevant alarms, state changes, measurements, error messages, or other observations. Avoid entering unverified conclusions as symptoms.
-
Click Begin investigation.
-
DNT agent analyzes the information you provided and the available network context, then generates candidate root-cause hypotheses for your review.

If you not provide enough information to identify the affected network context, DNT agent may ask a clarification question before generating hypotheses. For example, if you enter A service is down, the agent may ask you to identify the affected service, devices, or endpoints. Provide the requested details so that the investigation can continue.
Review and validate hypotheses
After you submit the investigation details, the Deep Network Troubleshooting analyzes the issue description and available network context, then generates candidate root-cause hypotheses. Each hypothesis represents a possible explanation for the reported issue.
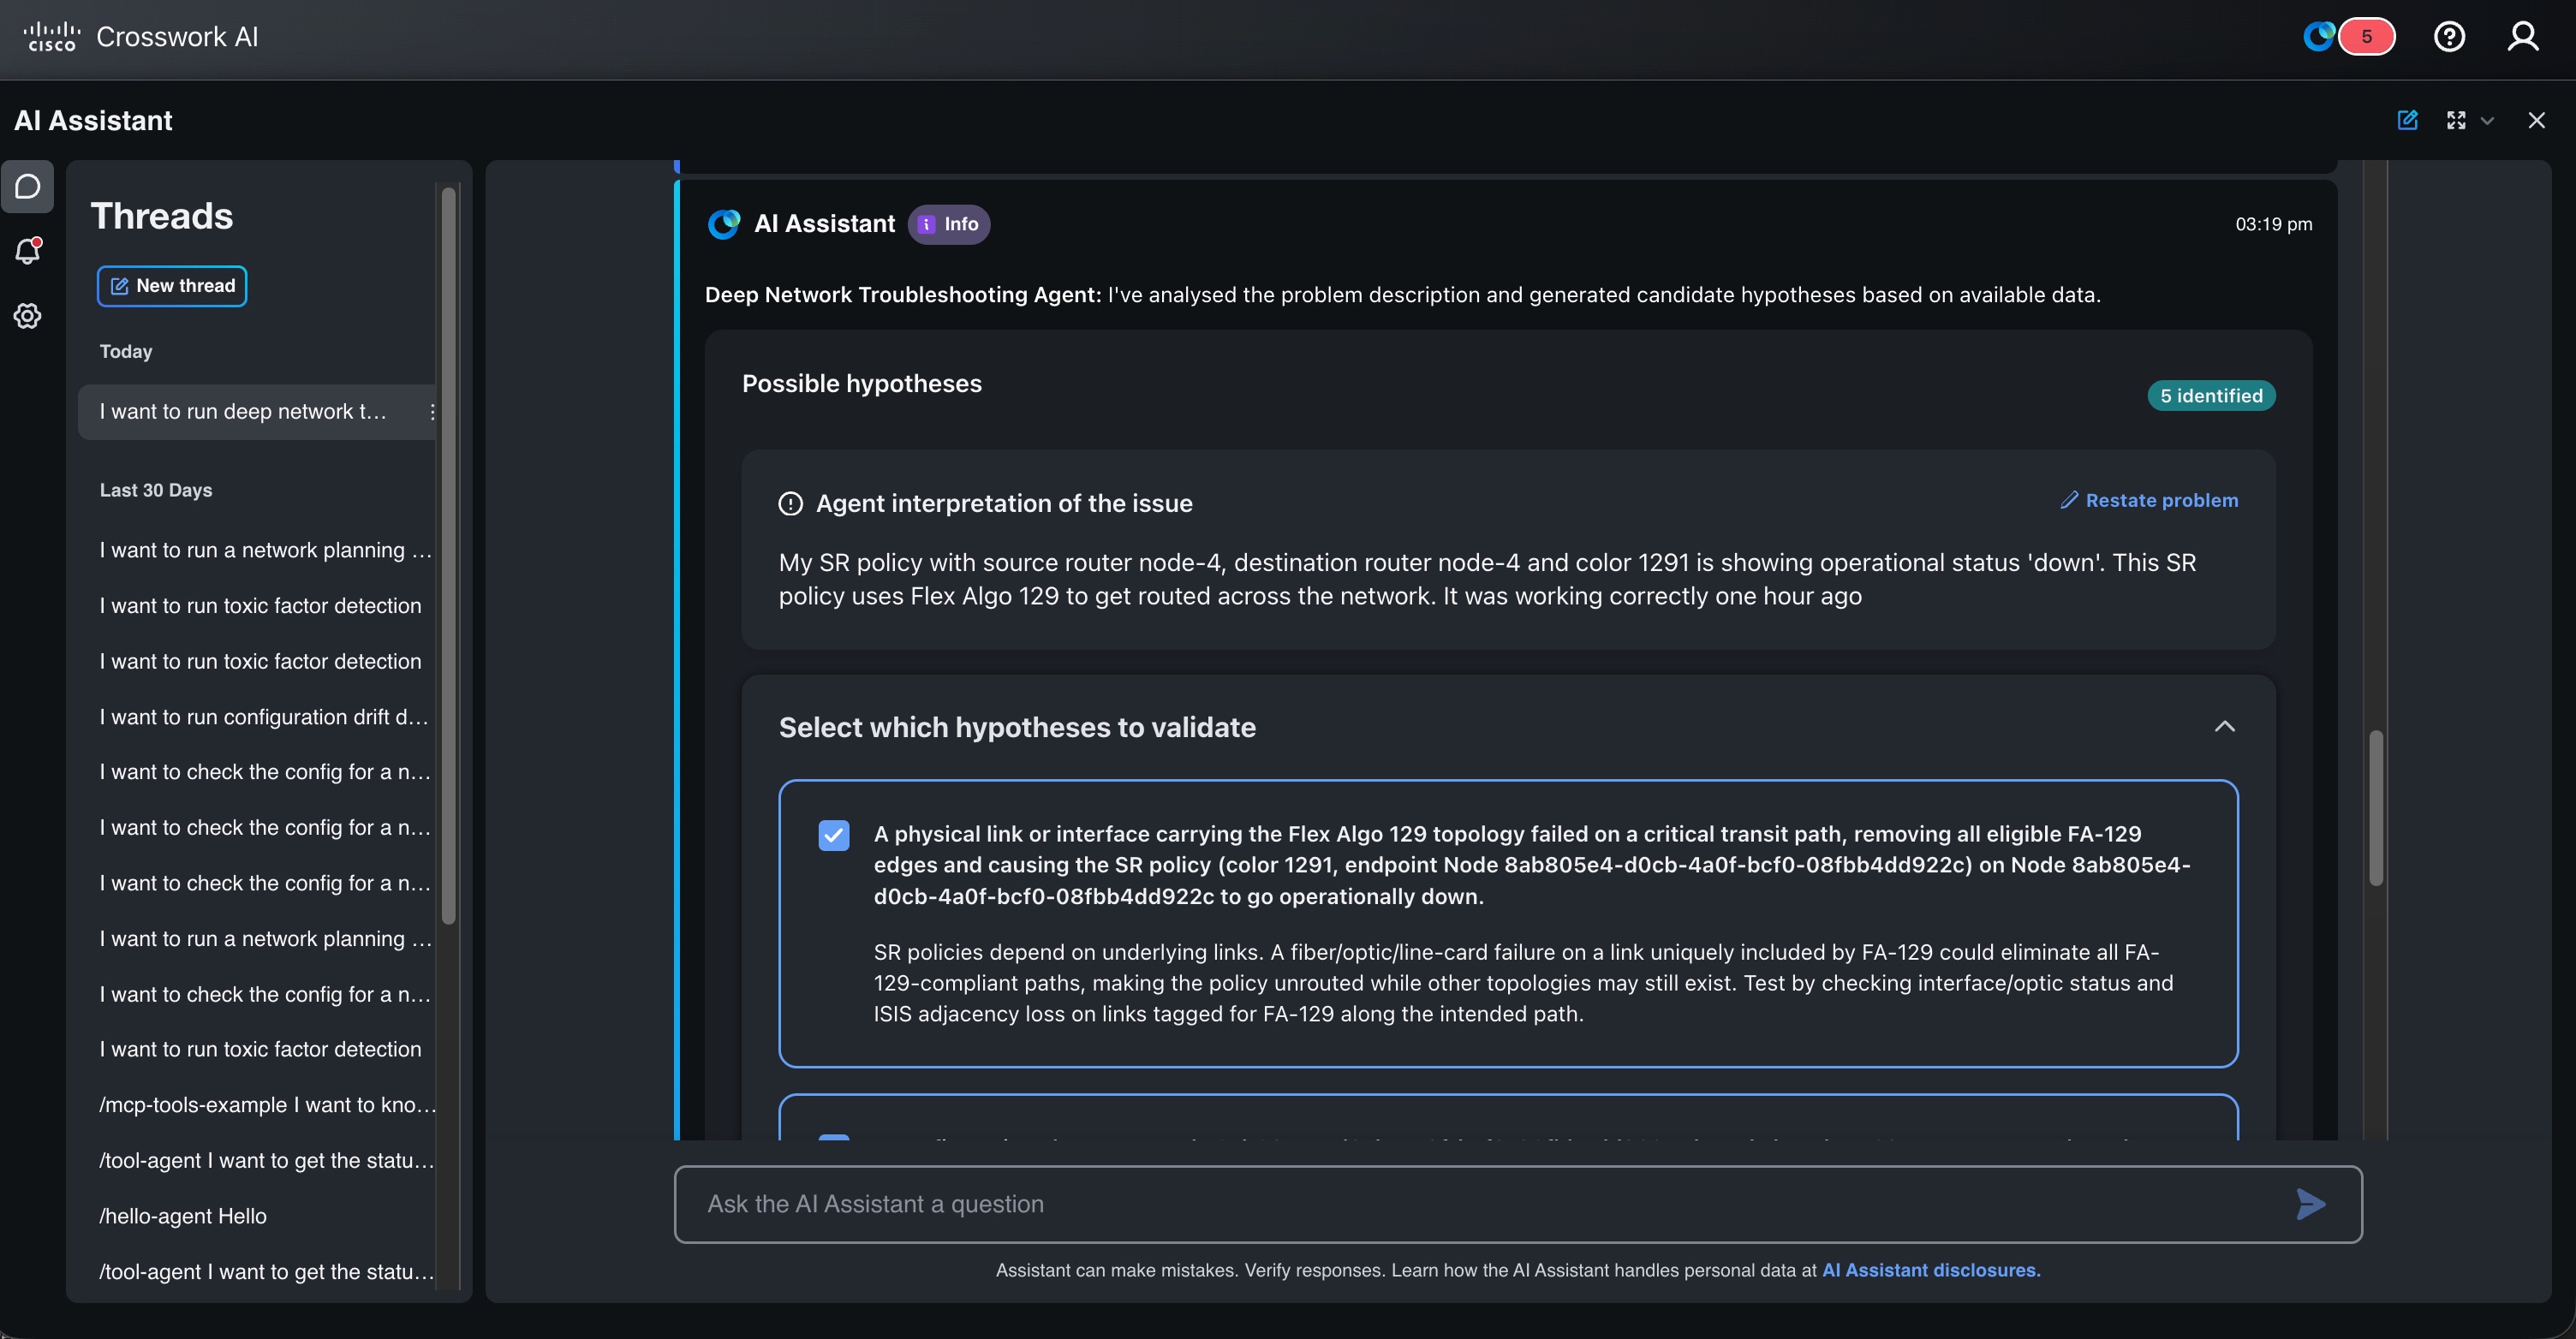
To review and validate hypotheses:
-
Review the generated hypotheses.
For example, if an SR policy is operationally down, DNT agent might generate hypotheses such as:
-
The SR policy has no valid candidate path.
-
The destination is not reachable through the underlying IGP.
-
A required segment identifier is unavailable or stale.
-
A policy configuration or signaling issue is preventing path resolution.
-
-
The hypotheses generated for an investigation depend on the issue description, available network context, and collected evidence. Remove any hypotheses that you do not want to validate.
-
Add custom hypotheses, if needed.
You can validate both generated and custom hypotheses in the same investigation.
-
Click Validate.
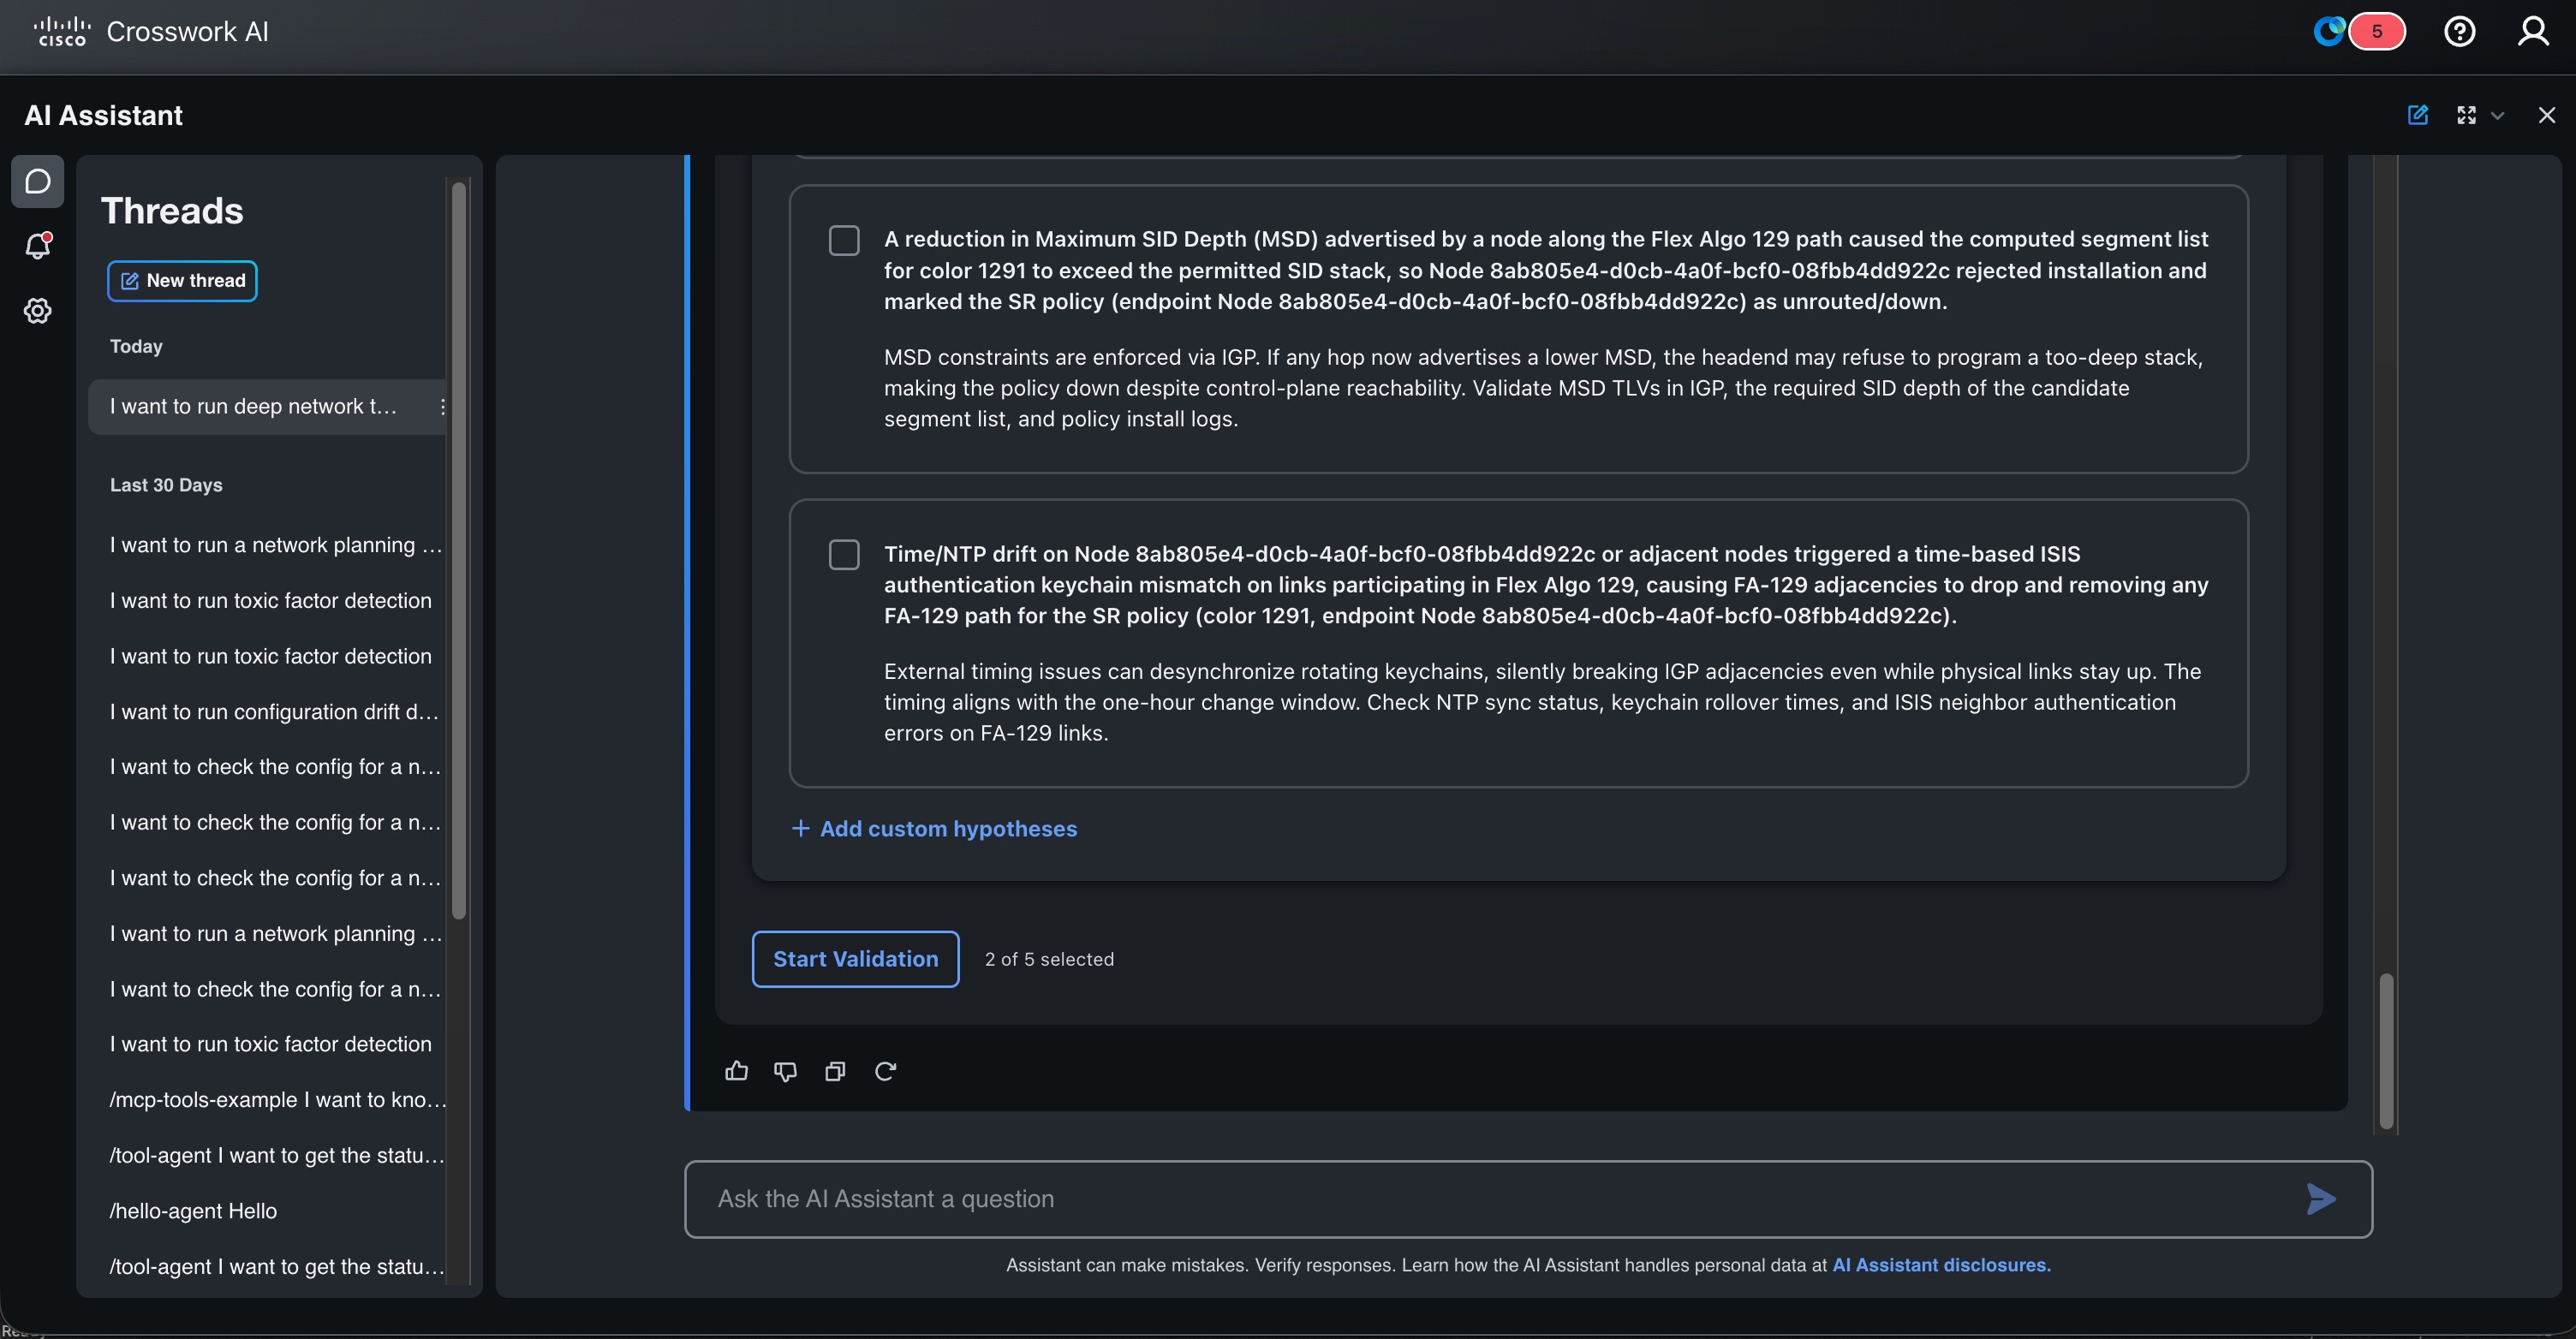
During validation, the Deep Network Troubleshooting agent collects relevant evidence and evaluates each selected hypothesis. It analyzes the available network context and operational data to determine whether the evidence supports, weakens, or rules out each hypothesis.
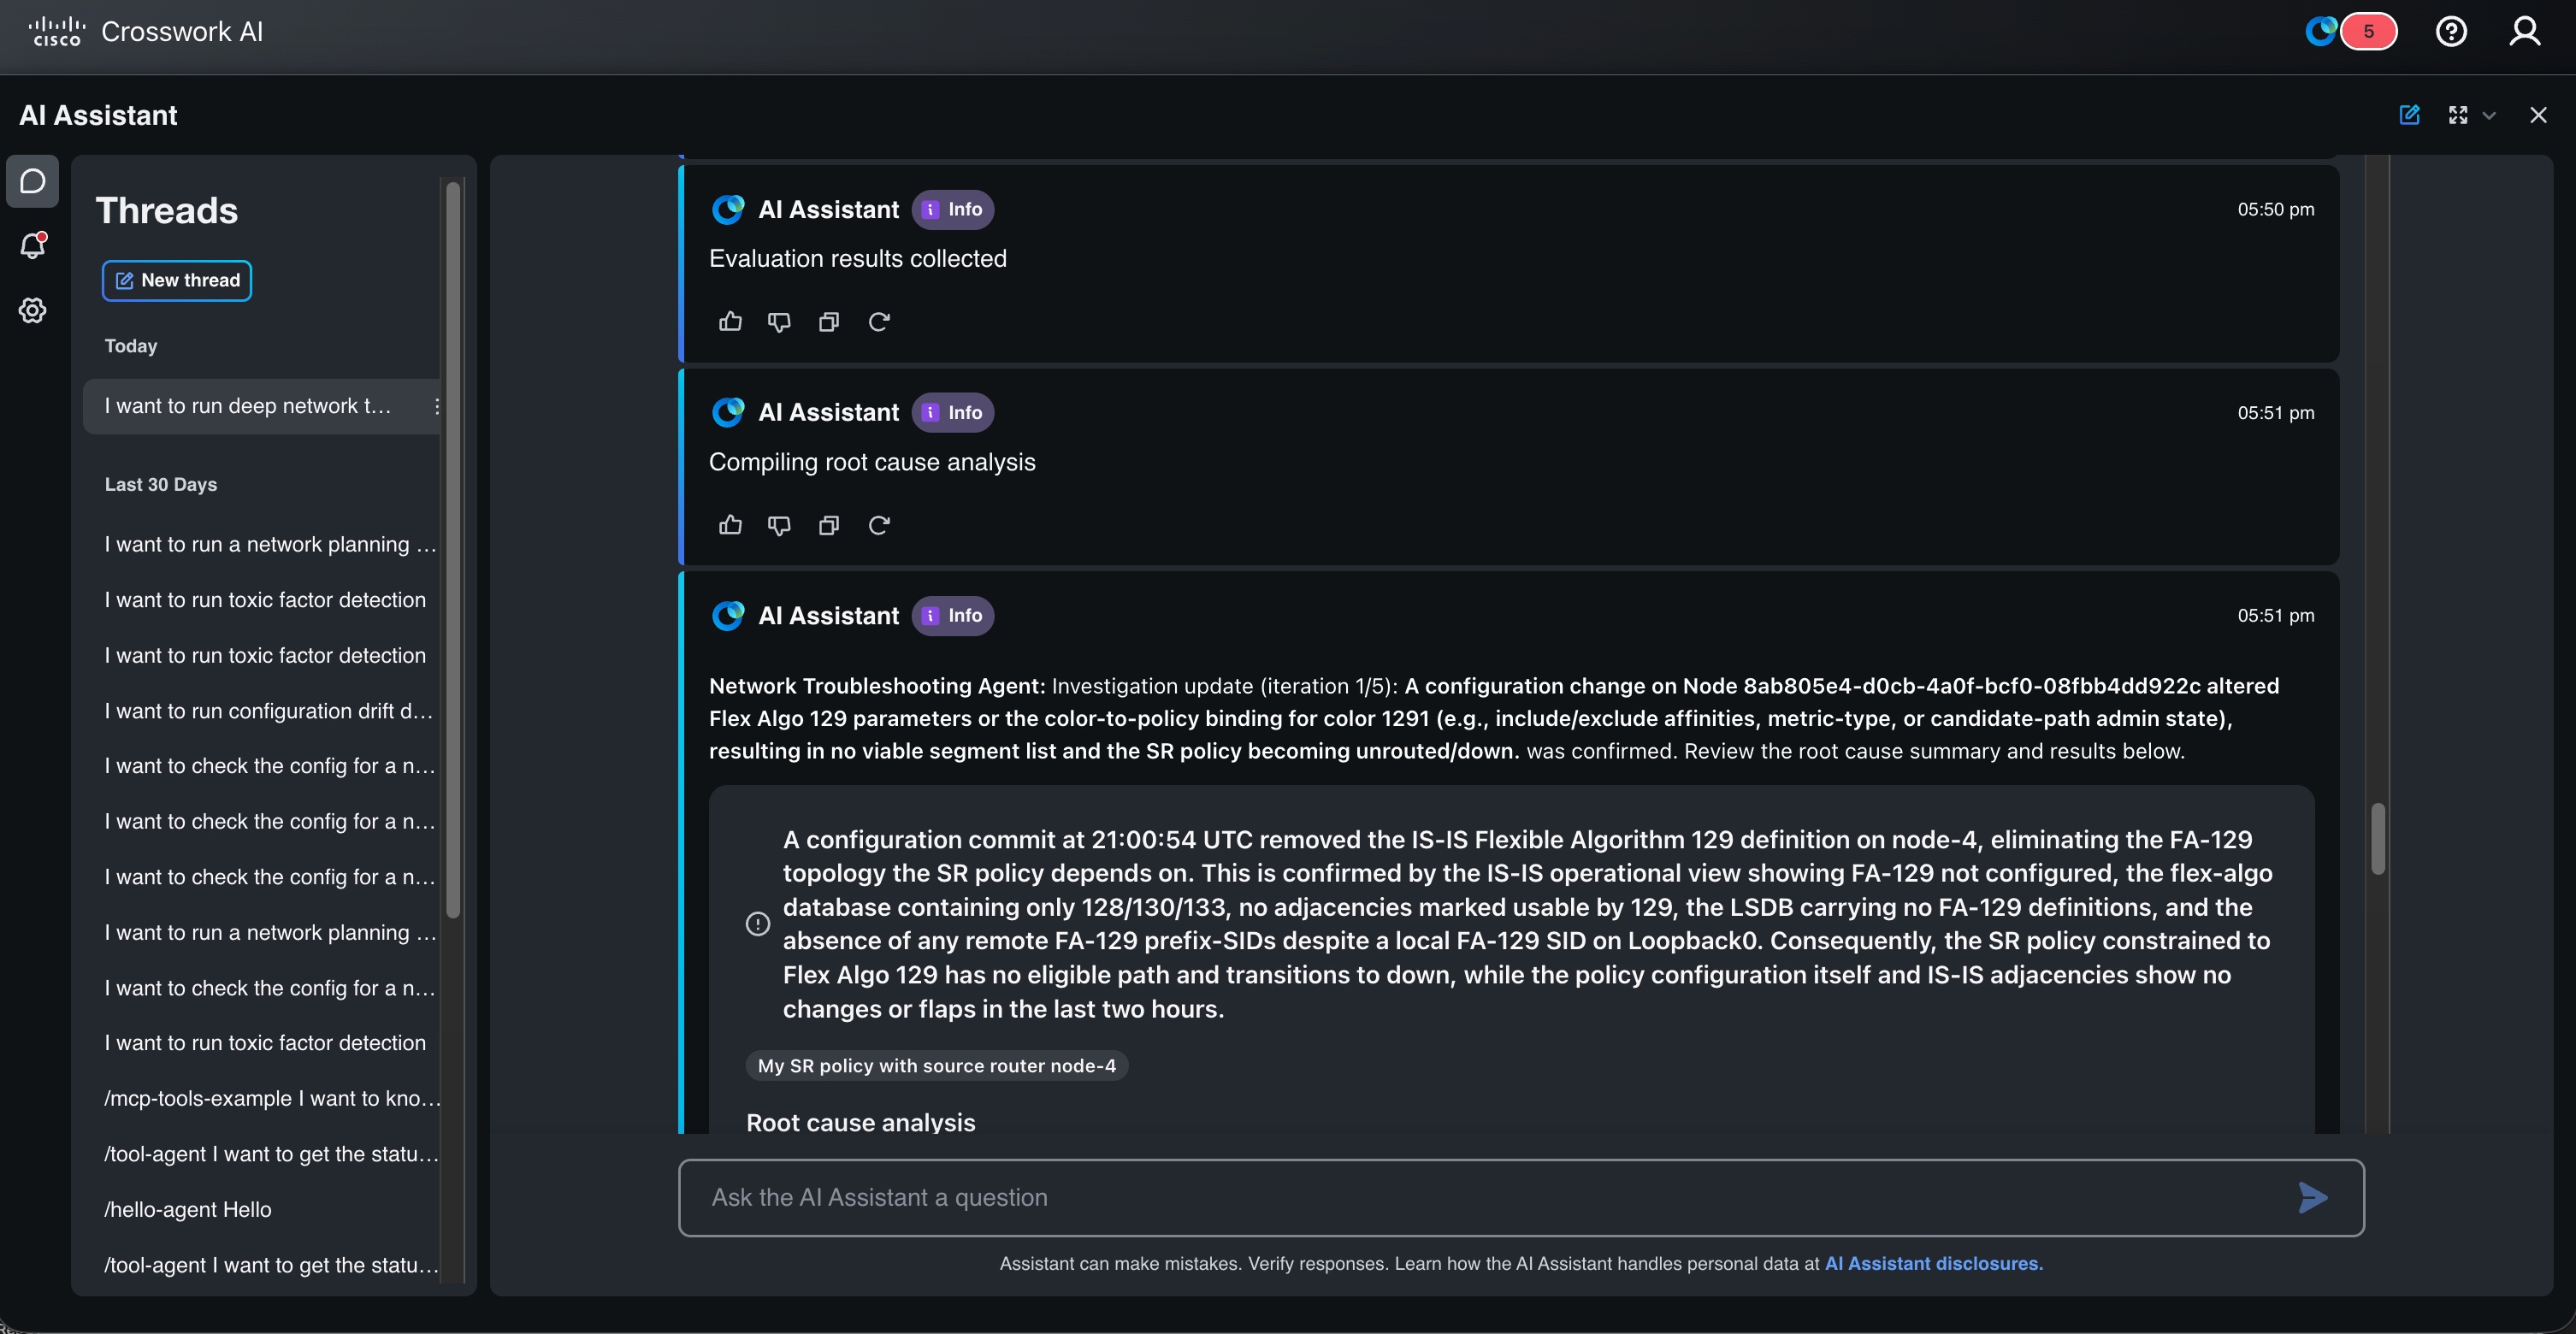
The validation process includes the following tasks:
-
Identifying validation questions for each selected hypothesis.
-
Collecting relevant network data.
-
Evaluating the evidence for each hypothesis.
-
Comparing findings across hypotheses.
-
Summarizing the validation results.
-
Export Summary
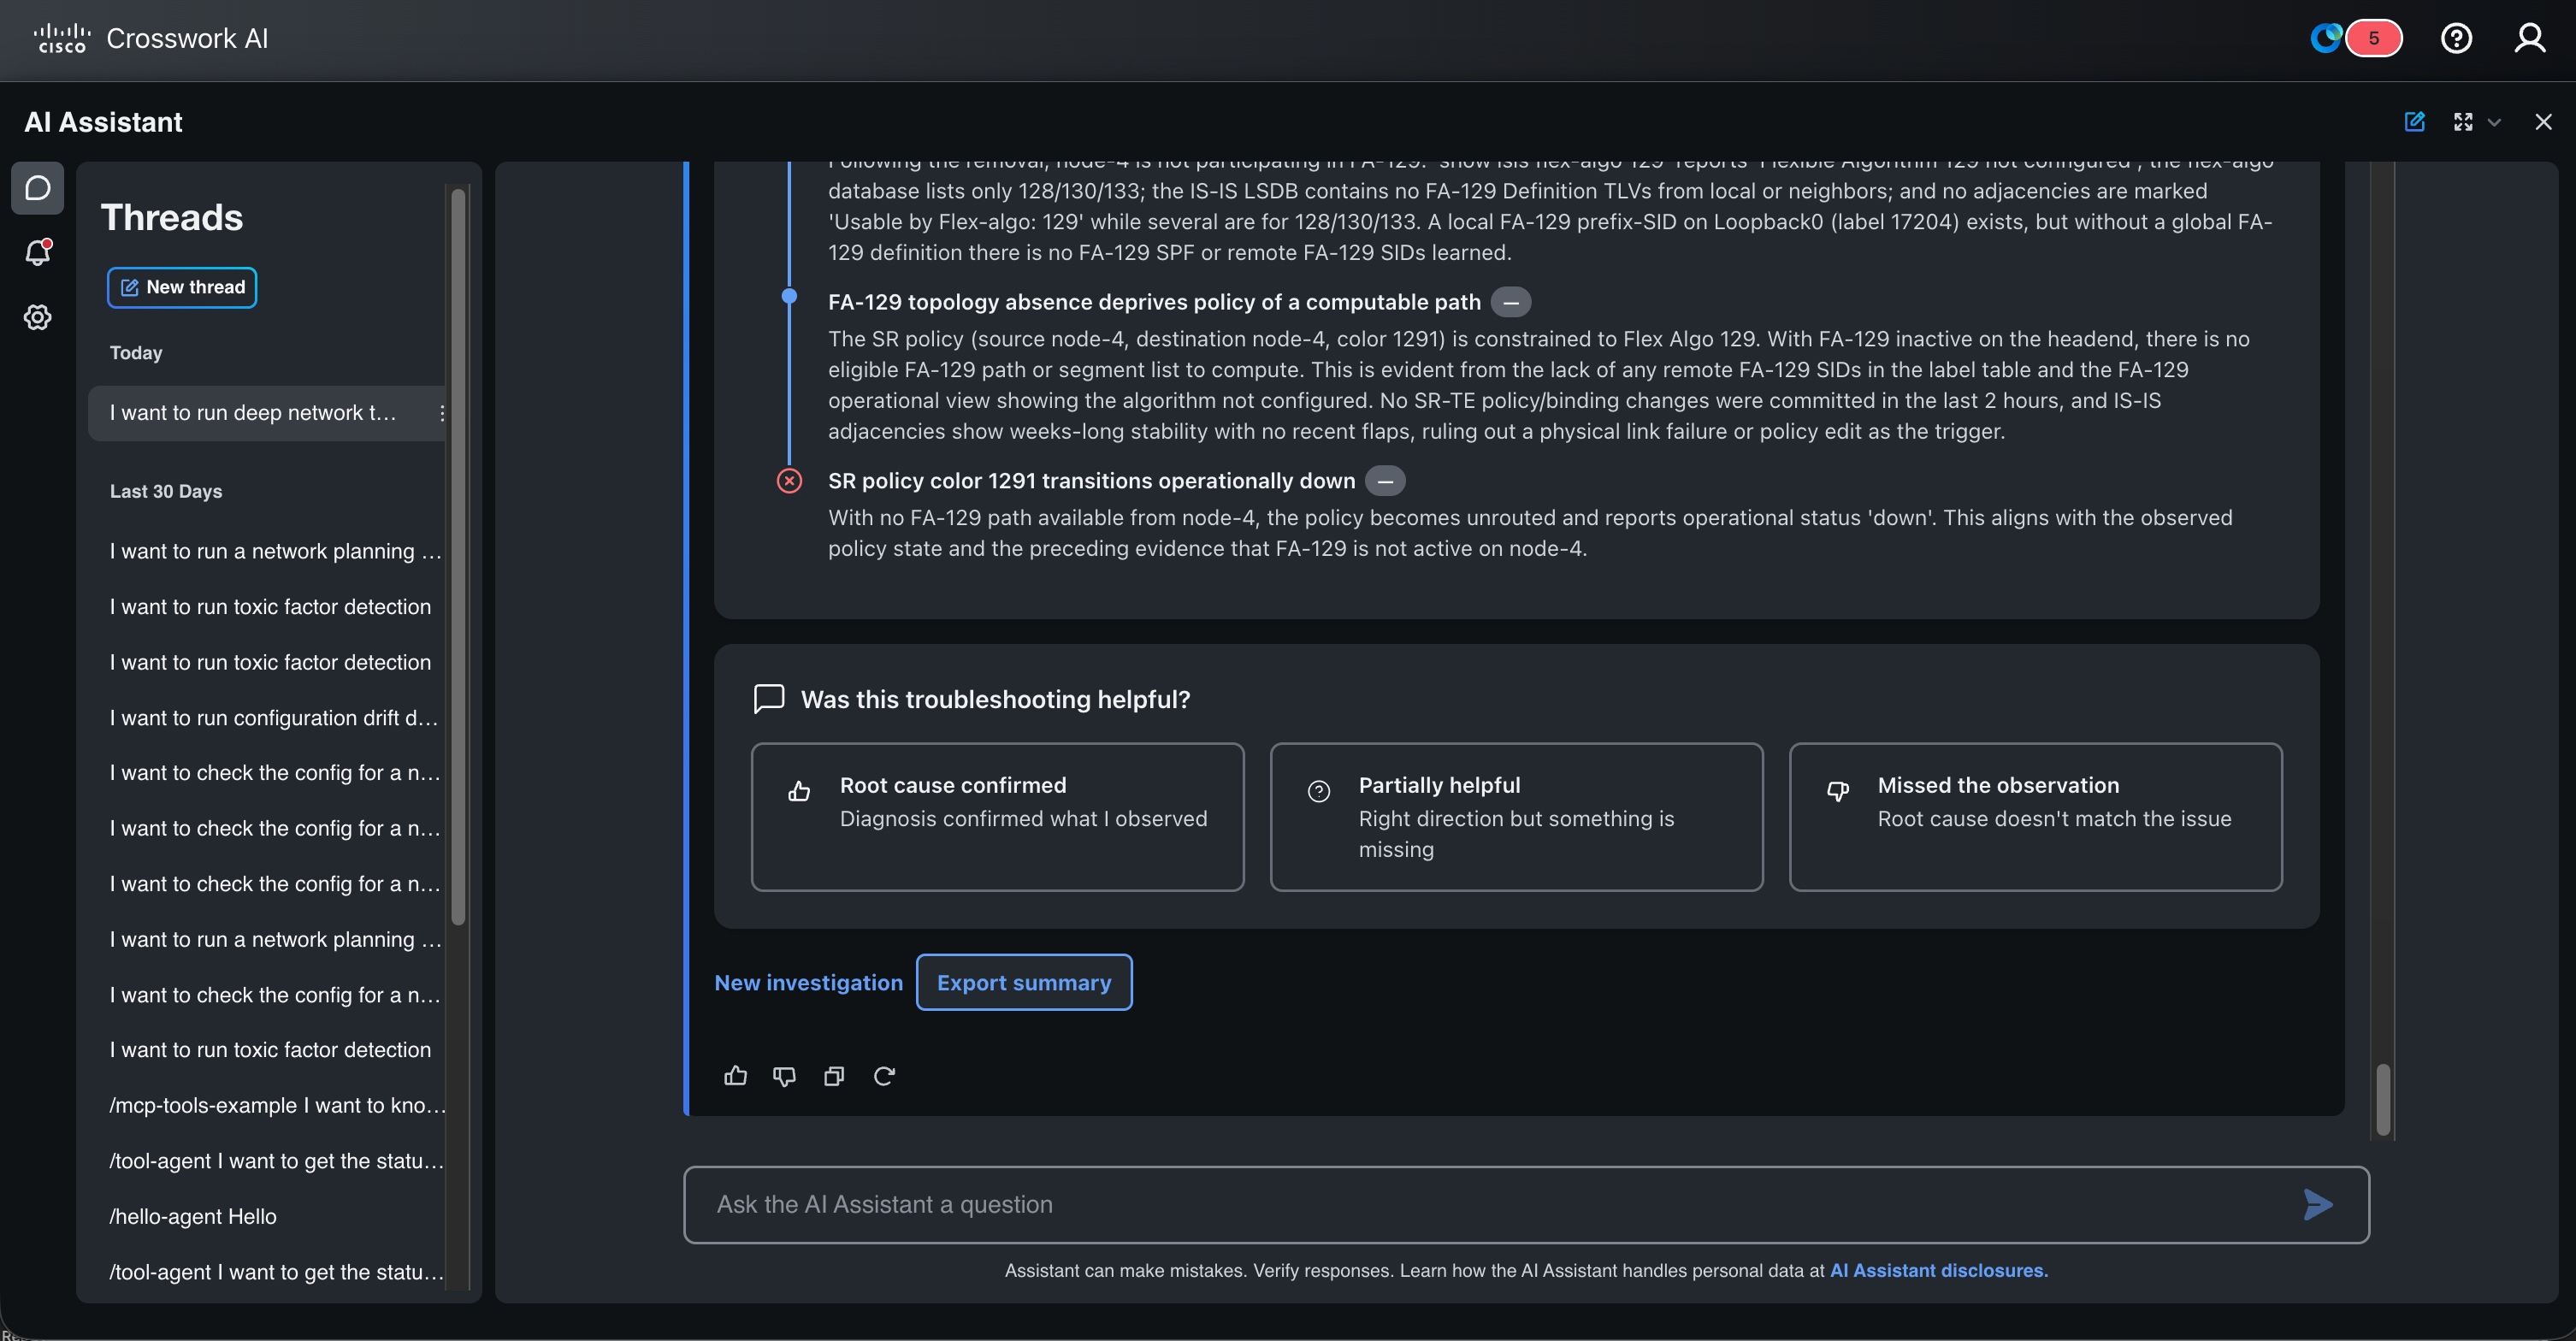
When the validation is complete, the Deep Network Troubleshooting agent presents the findings for your review.
The troubleshooting mode controls the number of hypotheses generated automatically. You can add custom hypotheses before validation, but the total number of hypotheses is limited to the supported maximum.
How the agent prioritizes hypotheses
DNT agent agent uses an advisory Network Stack to organize network concepts and their diagnostic relationships. The Network Stack helps the agent understand how a problem in one part of the network can affect dependent services and resources.
When generating and prioritizing hypotheses, DNT agent can:
-
Identify the network concepts associated with the affected service, device, or endpoint.
-
Use available topology and inventory data to determine which concepts apply to the customer environment.
-
Associate reported symptoms, observed anomalies, and collected evidence with relevant areas of the Network Stack.
-
Exclude branches that available evidence shows are not deployed or are not applicable to the reported issue.
-
Prioritize hypotheses that can provide useful diagnostic information and narrow the investigation.
-
Consider an alternative cause outside the strongest evidence path to reduce the risk of focusing too narrowly on one explanation.
The Network Stack guides hypothesis generation but does not restrict the investigation. If a component or possible cause is not represented in the Network Stack, DNT agent can still investigate it by using the available network context, tools, and evidence.
During additional investigation iterations, DNT agent agent uses previously collected evidence to adjust the areas it investigates and refine the next set of hypotheses.
Review troubleshooting results
After validating the hypotheses, DNT agent presents the investigation results. Depending on the available evidence, the results can include:
-
A summary of the investigation
-
A verdict for each evaluated hypothesis
-
Evidence supporting or weakening each hypothesis
-
The most likely root cause, when sufficient evidence is available
-
A cause-effect timeline showing the likely sequence of events
-
A recommendation to continue the investigation when further analysis is needed
To review the results:
-
Review the investigation summary.
-
Examine the verdict and supporting evidence for each hypothesis.
-
Review the root cause analysis and cause-effect timeline, if available.
-
If the root cause has not been identified, continue with another investigation iteration. DNT agent can generate or refine hypotheses, collect additional evidence, and reevaluate the findings.
A hypothesis that you removed from an earlier iteration can reappear if evidence collected during validation indicates that it might lead to the root cause.
-
To save a copy of the results, click Export Summary.
-
Review the findings before taking corrective action or making changes to the network.
The results provided by DNT agent support the troubleshooting process. Validate the findings in the context of your network before taking corrective action.
Example troubleshooting result
This example shows how the Deep Network Troubleshooting agent may present the result of a troubleshooting investigation.
In this scenario, a Layer 2 VPN service is reported as down. The Deep Network Troubleshooting agent analyzes the issue, validates selected hypotheses, and identifies an underlay routing issue as the likely cause.
The result may include a root cause analysis similar to the following:
The Layer 2 VPN service outage occurred because of an underlay routing issue. The underlay routing issue was caused by an IS-IS misconfiguration on one of the devices, which resulted in IS-IS adjacency loss. Because the adjacency was not established, the devices did not learn each other's loopback routes. As a result, the SR policy could not resolve the required path, the pseudowire went down, and the Layer 2 VPN service became unavailable.The cause-effect timeline may show the failure chain as:
-
IS-IS misconfiguration.
-
IS-IS adjacency loss.
-
IGP reachability issue.
-
SR policy down.
-
Pseudowire down.
-
Layer 2 VPN service down.
This output helps you understand how the initial network condition affected dependent services and led to the reported issue.
Customize Deep Network troubleshooting knowledge
You can extend the troubleshooting knowledge available to DNT agent so that investigations reflect your network environment, operational practices, and supported technologies.
Customization can include:
-
Extending the Network Stack with additional technologies, protocols, services, dependencies, and failure relationships
-
Adding CLI knowledge that describes commands and their diagnostic purpose
-
Defining probe intents that specify the network information required during validation
-
Adding recipes that describe how to collect and process evidence
-
Adding known problem and hypothesis patterns based on operational experience
These customization elements work together during an investigation. The Network Stack provides troubleshooting context, CLI knowledge identifies relevant commands, probe intents define the required evidence, and recipes describe how that evidence is collected and processed.
Before deploying customized content:
-
Confirm that the content follows the supported schema.
-
Test the content in a nonproduction environment.
-
Verify that the associated commands and data sources are available.
-
Export the existing collection before modifying or replacing its content.
-
Maintain a rollback copy of the last validated configuration.
Customized content extends the knowledge available to DNT agent. It does not guarantee that a particular hypothesis will be generated or selected during every investigation. The hypotheses and validation steps depend on the reported issue, available network context, and evidence collected during the investigation.
Manage Context Service collection content
Use the Crosswork AI Context Service REST APIs and the authentication method configured for your deployment to export, update, and restore DNT collection content.
DNT collection content is managed through REST APIs. A user interface is not available for these operations.
For API endpoints, request parameters, response schemas, and examples, see Crosswork AI API documentation on Cisco DevNet.
Before modifying a collection:
-
Identify the collection that contains the content you want to change.
-
Retrieve the applicable schema and example from the
dnt_schema_examplescollection. -
Export the complete contents of the target collection.
-
Verify that the exported file is readable and retain an unchanged rollback copy.
-
Record the purpose, owner, and scope of the proposed change.
Update a collection
-
Create or modify the content according to the retrieved schema.
-
Apply tags that identify the applicable technology, platform, environment, or operational scope.
-
Validate the content before importing it.
-
Add the content by using the approved Context Service interface.
-
Retrieve the added content and confirm that its fields and tags are correct.
-
Run a representative DNT investigation to verify that the content is retrieved and used as intended.
Restore customized content
If an update causes unexpected results:
-
Stop further changes to the affected collection.
-
Restore the previously exported and validated content by using the approved Context Service interface.
-
Confirm that the restored documents and tags are present.
-
Run a representative investigation to verify the restored behavior.
Reset a collection to its delivered baseline
Reset a collection only when you intend to remove all customized content and restore the content delivered with DNT agent.
Resetting a collection is destructive. It removes every document in the selected collection. Export and verify all customer-owned content before proceeding.
-
Confirm the exact collection name.
-
Export and preserve its current content.
-
Delete only the intended collection by using the approved Context Service interface.
-
Restart DNT agent according to the documented operational procedure.
-
Verify that the collection has been re-created with its delivered content.
-
Reapply validated customer content only when required.
Extend the Network Stack
The Network Stack is an advisory representation of network concepts and their diagnostic relationships. It helps DNT agent identify relevant troubleshooting areas and prioritize the next questions to investigate.
The Network Stack does not restrict the investigation to the concepts it contains. DNT agent can investigate another cause when the available evidence supports it.
When to extend the Network Stack
Extend the Network Stack only when a recurring customer-specific technology, service, or dependency is not represented by the delivered content.
Examples include:
-
A customer-specific service or network function
-
An additional transport technology
-
A dependency between an existing service and an external system
-
A diagnostic domain that is repeatedly relevant to investigations
Add a Network Stack concept
-
Retrieve the current
dnt_ndoschema and example from thednt_schema_examplescollection. -
Confirm that the concept is not already represented in the Network Stack.
-
Define the concept name and provide a concise description of what it represents.
-
Identify the diagnostic characteristics that can be evaluated for the concept.
-
Define how the concept depends on or relates to existing concepts.
-
Validate the content against the retrieved schema.
-
Add the concept to the
dnt_ndocollection by using the approved Context Service interface. -
Retrieve the updated content and confirm that the concept and its relationships are present.
-
Run representative investigations to verify that the extension improves troubleshooting without excluding other evidence-supported causes.
A new concept must participate in the Network Stack through a meaningful relationship with an existing concept. Do not add disconnected concepts or alter the Network Stack schema.
Add a CLI knowledge entry
-
Retrieve the current
cli_knowledge_baseschema and example from thednt_schema_examplescollection. -
Define the specific diagnostic question that the command answers.
-
Specify the applicable platform and, when relevant, the software version.
-
Use parameters for device-specific or incident-specific values.
-
Limit the command output to the information required for the investigation.
-
Describe the expected output and any important usage restrictions.
-
Add tags that identify the platform, technology, and troubleshooting purpose.
-
Validate the entry against the retrieved schema.
-
Add the entry to the
cli_knowledge_basecollection. -
Test the entry in a representative investigation.
CLI knowledge entries should:
-
Use read-only diagnostic commands.
-
Be scoped to a specific troubleshooting question.
-
Require values for parameters such as a peer, interface, policy, or prefix.
-
Avoid commands that return unnecessarily large datasets.
-
Explain the relevant output fields.
-
Identify applicable platforms and versions.
-
Exclude credentials and other sensitive values.
Example: Check a specific BGP neighbor
The following example describes a scoped NX-OS command for checking one BGP neighbor without retrieving the complete BGP routing table.
{
  "search_column": "Check one NX-OS BGP neighbor state and received prefix count without listing all BGP routes.",
  "tags": [
    "platform:nx-os",
    "domain:bgp",
    "intent:troubleshooting"
  ],
  "content": {
    "command_template": "show bgp ipv4 unicast neighbors {peer} | include BGP state|Prefixes Current",
    "platform": [
      "NX-OS"
    ],
    "parameters": [
      {
        "name": "peer",
        "meaning": "Neighbor IPv4 address",
        "example": "192.0.2.10"
      }
    ],
    "example_output": "BGP state and current prefix information for the specified neighbor.",
    "notes": "Always provide the peer value. Do not use this command to retrieve the complete BGP routing table."
  }
}
This example is illustrative. Validate the command syntax on the applicable platform and follow the schema retrieved from dnt_schema_examples for the installed release.
Define a probe intent
A probe intent defines one item of evidence that DNT agent can request while validating a hypothesis. It describes what information is required without specifying the platform-specific method used to retrieve it.
Use a probe intent when the same diagnostic evidence is required repeatedly across investigations.
A probe intent includes:
-
intent_id—A stable, unique identifier shared by the probe and its associated recipes. -
description—The diagnostic purpose of the probe. -
inputs—The values required to perform the query, listed in the order expected by the query template. -
associated_concept—The Network Stack concept that the evidence helps evaluate. -
role—The purpose of the probe, such asdiagnostic,existence, oraggregate. -
nl_query_template—A vendor-neutral description of the information to retrieve. -
example_output_contract—The evidence fields expected in the response.
Probe roles
-
diagnostic—Collects evidence for evaluating a specific condition or hypothesis. -
existence—Confirms that an entity or resource exists and provides grounding information. -
aggregate—Collects summarized information across multiple network entities.
Add a probe intent
-
Retrieve the current
dnt_intent_probesschema and example from thednt_schema_examplescollection. -
Define one specific diagnostic question.
-
Assign a stable and descriptive
intent_id. -
Identify the required inputs.
-
Associate the probe with the relevant Network Stack concept.
-
Select the appropriate probe role.
-
Define the vendor-neutral query and expected evidence.
-
Validate the probe against the retrieved schema.
-
Add it to the
dnt_intent_probescollection. -
Create and test at least one applicable recipe that can fulfill the probe.
Example: Check destination reachability
intent_id: ip_reachability.destination
description: >
  Determine whether a named device has a route to one
  destination prefix.
inputs:
  - device_id
  - destination_prefix
associated_concept: IGPRoute
role: diagnostic
nl_query_template: >
  On device {device_id}, determine reachability to
  {destination_prefix} and report the selected next hop,
  route source, metric, and any equal-cost paths.
example_output_contract: >
  Route lookup containing the destination, presence or
  absence of a route, next hop, protocol, metric, and
  equal-cost next hops.
Keep each probe focused on one diagnostic purpose. Do not include platform-specific commands, credentials, or access details in the probe intent. Define those details in the associated recipe or approved data-source configuration.
The example is illustrative. Field names and permitted values must match the contract retrieved from dnt_schema_examples for the installed release.
Create a recipe for a probe intent
A recipe defines how DNT agent retrieves the evidence requested by a probe intent. A probe describes what evidence is required; a recipe describes how to obtain it for a specific platform or input type.
A recipe can contain one or more ordered steps. Supported step kinds can include:
-
kg_query—Retrieves inventory or topology information. -
cli_command—Runs a scoped diagnostic command on a network device. -
mcp_tool—Calls a registered custom tool. This is a schema value and does not require the tool provider to operate a separate MCP server.
Important recipe fields include:
-
intent_id—Associates the recipe with its probe intent. -
applicability.platform—Identifies the applicable platform, such asnxosoriosxr. -
applicability.input_shape—Identifies whether the primary input is an ID, name, or IP address. -
steps—Defines the operations used to retrieve the evidence. -
input_template—Maps probe inputs or results from earlier steps into an operation. -
depends_on—Defines the required execution order. -
output_extraction—Selects the relevant values from a step response. -
extractor—Optionally parses command output. -
response_shape—Combines the step outputs into the evidence returned to DNT agent.
Add a recipe
-
Retrieve the current
dnt_recipesschema and example from thednt_schema_examplescollection. -
Select the probe intent that the recipe fulfills.
-
Define the platform and input form for which the recipe applies.
-
Use the smallest number of steps required to retrieve the evidence.
-
Define dependencies when one step requires output from another step.
-
Limit commands and tool requests to the entity and time range under investigation.
-
Extract only the fields required by the probe’s output contract.
-
Define the final response shape.
-
Validate the recipe against the retrieved schema.
-
Add the recipe to the
dnt_recipescollection. -
Test successful, empty, large-result, timeout, and access-failure responses.
Example: Resolve a device and check a destination route
intent_id: ip_reachability.destination
applicability:
  platform: nxos
  input_shape: name
pinned: true
steps:
  - id: resolve_device
    kind: kg_query
    binding: >
      query DeviceByName($filter: [FilterInput!]) {
        queryNode(first: 1, filter: $filter) {
          nodeId
          name
        }
      }
    input_template:
      filter:
        - field: name
          op: EQ
          value: "{input.device_id}"
    output_extraction:
      node_id: "$.data.queryNode.0.nodeId"
    depends_on: []

  - id: route_evidence
    kind: cli_command
    binding: "show ip route {destination_prefix}"
    input_template:
      device_id: "{step.resolve_device.node_id}"
      destination_prefix: "{input.destination_prefix}"
    output_extraction:
      cli_raw: "$"
    depends_on:
      - resolve_device

response_shape:
  route: "{step.route_evidence.cli_raw}"
In this example, the first step resolves the device name to its internal identifier. The second step uses that identifier to retrieve a route for only the requested destination prefix.
Use read-only operations and bounded queries. Do not include credentials in a recipe. Confirm that all referenced commands, queries, and registered tools are available to the deployment before promoting the recipe.
The example is illustrative. Retrieve and follow the dnt_recipes contract for the installed release before creating or modifying a recipe.
Integrate an external evidence source
Integrate an external source when evidence required by DNT agent is not available through the delivered data sources or device commands.
Choose the integration approach according to the source and the processing required:
-
Registered custom tool—Use for a focused, well-defined API operation that accepts DNT-relevant identifiers and returns a compact result.
-
Supported data-retrieval integration—Use when the source data requires transformation, aggregation, joining, or identifier mapping.
-
Probe and recipe—Use after the source integration is operational when the same bounded evidence must be retrieved repeatedly during investigations.
Design the integration
-
Define the diagnostic evidence that the source provides.
-
Identify the inputs required to retrieve that evidence.
-
Define a compact and stable response structure.
-
Reconcile source identifiers with the identifiers used by DNT agent.
-
Limit results by entity, scope, and time range whenever possible.
-
Define timeout, no-data, partial-response, and error behavior.
-
Configure authentication by using the approved credential-management mechanism.
-
Register the integration by using the supported procedure for your deployment.
-
Test the integration independently before referencing it from a recipe.
-
If the evidence is required repeatedly, create a probe intent and an associated recipe.
External integrations should:
-
Use read-only access whenever possible.
-
Follow the principle of least privilege.
-
Keep credentials and secrets outside source code and collection content.
-
Validate and sanitize all inputs.
-
Apply response-size and time-range limits.
-
Return clear no-data and error responses.
-
Avoid exposing credentials or sensitive source data in logs.
-
Document the integration owner and review date.
Test the integration
Verify at least the following scenarios:
-
A successful response containing expected evidence
-
A valid request for which no data is available
-
An invalid or unresolved identifier
-
An authentication or authorization failure
-
A source timeout or unavailable service
-
A partial response
-
A response that reaches the configured size limit
Use a registered custom tool in a recipe
A recipe can invoke a registered custom tool by using the mcp_tool step kind.
steps:
  - id: collect_evidence
    kind: mcp_tool
    binding: <registered-tool-name>
    input_template:
      device_id: "{input.device_id}"
      window_start: "{input.window_start}"
      window_end: "{input.window_end}"
    output_extraction:
      records: "$.records"
    depends_on: []

response_shape:
  evidence: "{step.collect_evidence.records}"
[NOTE]: mcp_tool is the required recipe schema value for invoking a registered custom tool. It does not imply that the tool provider must operate a separate MCP server.
Do not create a probe or recipe until the external source can reliably return bounded, correctly identified evidence. Test the source integration first, and then model recurring evidence collection.
Validate and promote customized content
Validate all customized content before introducing it into a production environment. This process applies to Network Stack concepts, CLI knowledge, probe intents, recipes, known-problem patterns, and external source integrations.
Prepare the customization
-
Describe the troubleshooting gap in one sentence.
-
Select the smallest extension that addresses the gap.
-
Retrieve the current schema and example for the target collection.
-
Record the content owner, purpose, applicable scope, tags, and review date.
-
Export the current collection and retain a rollback copy.
-
Validate the new content against the applicable schema.
Test the customization
Test the customization in a nonproduction environment. Verify:
-
A representative successful investigation
-
A valid request for which no evidence is available
-
An invalid or unresolved input
-
An authentication or authorization failure
-
A timeout or unavailable source
-
A partial response
-
A response that reaches the configured size limit
-
Correct handling of platform and environment scope
-
Correct execution order for recipe steps
-
Correct extraction and presentation of evidence
-
Continued consideration of alternative evidence-supported causes
Review the customization
Before promotion, have the content reviewed by:
-
A network subject-matter expert for technical accuracy
-
The relevant data-source or tool owner for query and API behavior
-
The deployment administrator for access, security, and operational impact
-
The documentation owner for naming, purpose, and maintenance information
Promote the customization
-
Export the validated content from the nonproduction environment.
-
Confirm that the production environment uses a compatible schema.
-
Import the content by using the approved Context Service or deployment interface.
-
Retrieve the imported content and verify its fields, tags, and relationships.
-
Run a representative production-safe investigation.
-
Monitor retrieval relevance, response size, execution time, and errors.
-
Retain the previous validated version until the new content has been accepted.
Promotion checklist
-
The customization addresses a demonstrated troubleshooting gap.
-
The content follows the schema for the installed release.
-
Commands and tools use read-only, bounded operations.
-
Empty, failure, timeout, and large-result behavior has been tested.
-
Required permissions and credentials are configured securely.
-
The content has an identified owner and review date.
-
A validated rollback copy is available.
-
Representative investigations confirm that the customization is useful.
-
The customization does not prevent consideration of other evidence-supported causes.
Do not promote customized content based only on schema validation. Verify its behavior in a representative DNT investigation and review the evidence that it causes DNT agent to collect.
Maintain and retire customized content
Review customized content regularly to confirm that it remains accurate, relevant, secure, and compatible with the deployed DNT agent release.
Maintain customized content
For each customization, retain:
-
A designated owner
-
A description of its purpose and supported use case
-
Applicable platform, software version, environment, and technology tags
-
The date of the last validation
-
The scheduled review date
-
A validated export and rollback copy
-
References to associated probes, recipes, tools, and Network Stack concepts
During each review:
-
Confirm that the original troubleshooting need still exists.
-
Verify that commands, APIs, queries, and output formats have not changed.
-
Confirm that tags and applicability information remain accurate.
-
Run representative investigations and review the retrieved evidence.
-
Check for excessive output, timeouts, access failures, or irrelevant retrieval.
-
Update the content or retire it when it is no longer useful.
Review customizations after an upgrade
After upgrading DNT agent:
-
Retrieve the latest contract from
dnt_schema_examples. -
Compare it with the schema used to create the customized content.
-
Validate all customized records against the current schema.
-
Verify that referenced tools, commands, and data sources remain available.
-
Test representative investigations before returning the customization to production use.
Do not assume that customized content remains compatible after an upgrade. Always validate it against the schema and behavior of the installed release.
Retire customized content
Identify the record and any probes, recipes, tools, or Network Stack relationships that depend on it.
Troubleshoot customized content
Use the following checks when customized content is rejected, cannot be retrieved, or does not behave as expected.
Content is rejected during import
-
Retrieve the latest schema from
dnt_schema_examples. -
Confirm that all required fields are present.
-
Verify field names, data types, permitted values, and nesting.
-
Remove unsupported fields.
-
Confirm that the payload targets the correct collection.
-
Validate the payload again before retrying the import.
Content is not returned by a search
-
Confirm that the content exists in the expected collection.
-
Review the
search_columntext for terms relevant to the intended investigation. -
Confirm that the search uses the correct collection.
-
Review the record tags and search tags.
-
Remember that multiple search tags use AND matching; the record must match every requested tag.
-
Verify any validity dates or environment restrictions defined by the record.
-
Test with a representative query that closely matches the intended use case.
A probe intent is not fulfilled
-
Confirm that the probe exists in
dnt_intent_probes. -
Verify that its
intent_idexactly matches the associated recipe. -
Confirm that all required probe inputs are available.
-
Verify that
associated_conceptrefers to a valid Network Stack concept. -
Confirm that an applicable recipe exists for the target platform and input form.
A recipe is not selected
-
Verify that the recipe
intent_idmatches the probe intent. -
Confirm that
applicability.platformmatches the target device. -
Confirm that
applicability.input_shapematches the supplied identifier. -
Verify that the recipe follows the current
dnt_recipesschema. -
Confirm that referenced commands, queries, and registered tools are available.
A recipe step fails
-
Confirm that all required input placeholders resolve to values.
-
Verify that
depends_ondefines the correct execution order. -
Confirm that output paths from earlier steps match the actual responses.
-
Verify that the account used by the integration has the required permissions.
-
Test each command, query, or tool operation independently.
-
Check timeout, no-data, partial-response, and error handling.
-
Review diagnostic logs by using the supported administrative procedure.
A recipe returns too much data or times out
-
Restrict the request to a specific device, service, interface, peer, policy, or prefix.
-
Add an appropriate time window.
-
Use a filtered command or focused API operation.
-
Extract only the fields required by the probe.
-
Replace an unbounded command with a registered custom tool when server-side filtering or identifier resolution is required.
A Network Stack concept does not influence an investigation
-
Confirm that the concept exists in
dnt_ndo. -
Verify that it has a meaningful relationship with an existing concept.
-
Confirm that associated probes use the exact concept identifier.
-
Verify that the reported issue or collected evidence is relevant to the concept.
-
Remember that the Network Stack provides advisory guidance; it does not force DNT agent to generate or select a particular hypothesis.
A known-problem pattern is retrieved for unrelated incidents
-
Narrow the
search_columndescription. -
Add more specific technology, platform, service, or environment tags.
-
Remove ambiguous or overly broad symptoms.
-
Confirm that the record represents a reusable, confirmed pattern.
-
Retest it with both representative and unrelated incidents.
Do not resolve a content problem by deleting the entire collection. Export the collection first, identify the affected record, and modify or remove only the intended content.
Customization security and operational guidelines
Apply the following controls when creating, testing, and operating customized DNT content.
Access and authentication
-
Use the approved authentication method for the deployment.
-
Grant only the permissions required to read or manage the applicable content and data sources.
-
Use read-only access for evidence collection whenever possible.
-
Store credentials in the approved credential-management system.
-
Do not include credentials, tokens, private keys, or passwords in collection content, recipes, source code, or logs.
-
Use trusted certificates and verify TLS connections. Do not disable certificate verification.
Tags improve retrieval precision; they do not provide access control. Enforce authorization through the supported role-based access control and source-permission mechanisms.
Commands, queries, and tools
-
Use read-only diagnostic operations.
-
Restrict each request to the device, service, interface, policy, peer, prefix, or time range under investigation.
-
Validate all user-supplied and dynamically generated inputs.
-
Apply timeout, response-size, and result-count limits.
-
Avoid commands or queries that return complete routing, inventory, telemetry, or service datasets when a filtered operation is available.
-
Do not use configuration-changing or destructive operations in evidence-collection recipes.
-
Register and deploy custom tools only through the supported deployment procedure.
Data protection
-
Include only the information required for troubleshooting.
-
Remove customer-identifying and sensitive information from reusable known-problem records.
-
Avoid recording credentials or sensitive payloads in diagnostic logs.
-
Follow the applicable data-retention and handling requirements for the deployment.
-
Review information returned by an external source before making it available to DNT agent.
Change control
-
Export and verify the current collection before making a material change.
-
Test changes in a nonproduction environment.
-
Maintain an owner, purpose, scope, version, and review date for each customization.
-
Require technical and operational review before promotion.
-
Retain a validated rollback copy.
-
Record additions, modifications, promotions, rollbacks, and retirements.
-
Revalidate customized content after upgrading DNT agent.
Operational monitoring
Monitor customized integrations and content for:
-
Retrieval relevance
-
Command, query, and tool failures
-
Authentication and authorization errors
-
Timeouts and unavailable sources
-
Unexpectedly large responses
-
Changes to source schemas or output formats
-
Stale or unused content
-
Increased investigation time after a customization is introduced
If a customization causes unexpected behavior, stop promoting further changes, restore the last validated content, and run a representative investigation to confirm recovery.
Deleting a Context Service collection removes all delivered and customer-owned content in that collection. Use collection deletion only as an explicitly planned reset operation after exporting and verifying the current content.