
Manage users
In Users, you can view and manage the users who have access to Cisco Cloud Control and connected products.

If you are using an external Identity Provider (IdP) and notice stale administrator entries, those entries are not a security vulnerability. This behavior occurs because Cisco Cloud Control does not currently integrate with your IdP lifecycle management feature. Cisco defers to your IdP as the authoritative source for user access control.
Add a user
Complete these steps to add a user to Cisco Cloud Control.
-
Select
 and choose Admin Console. Users is displayed by default.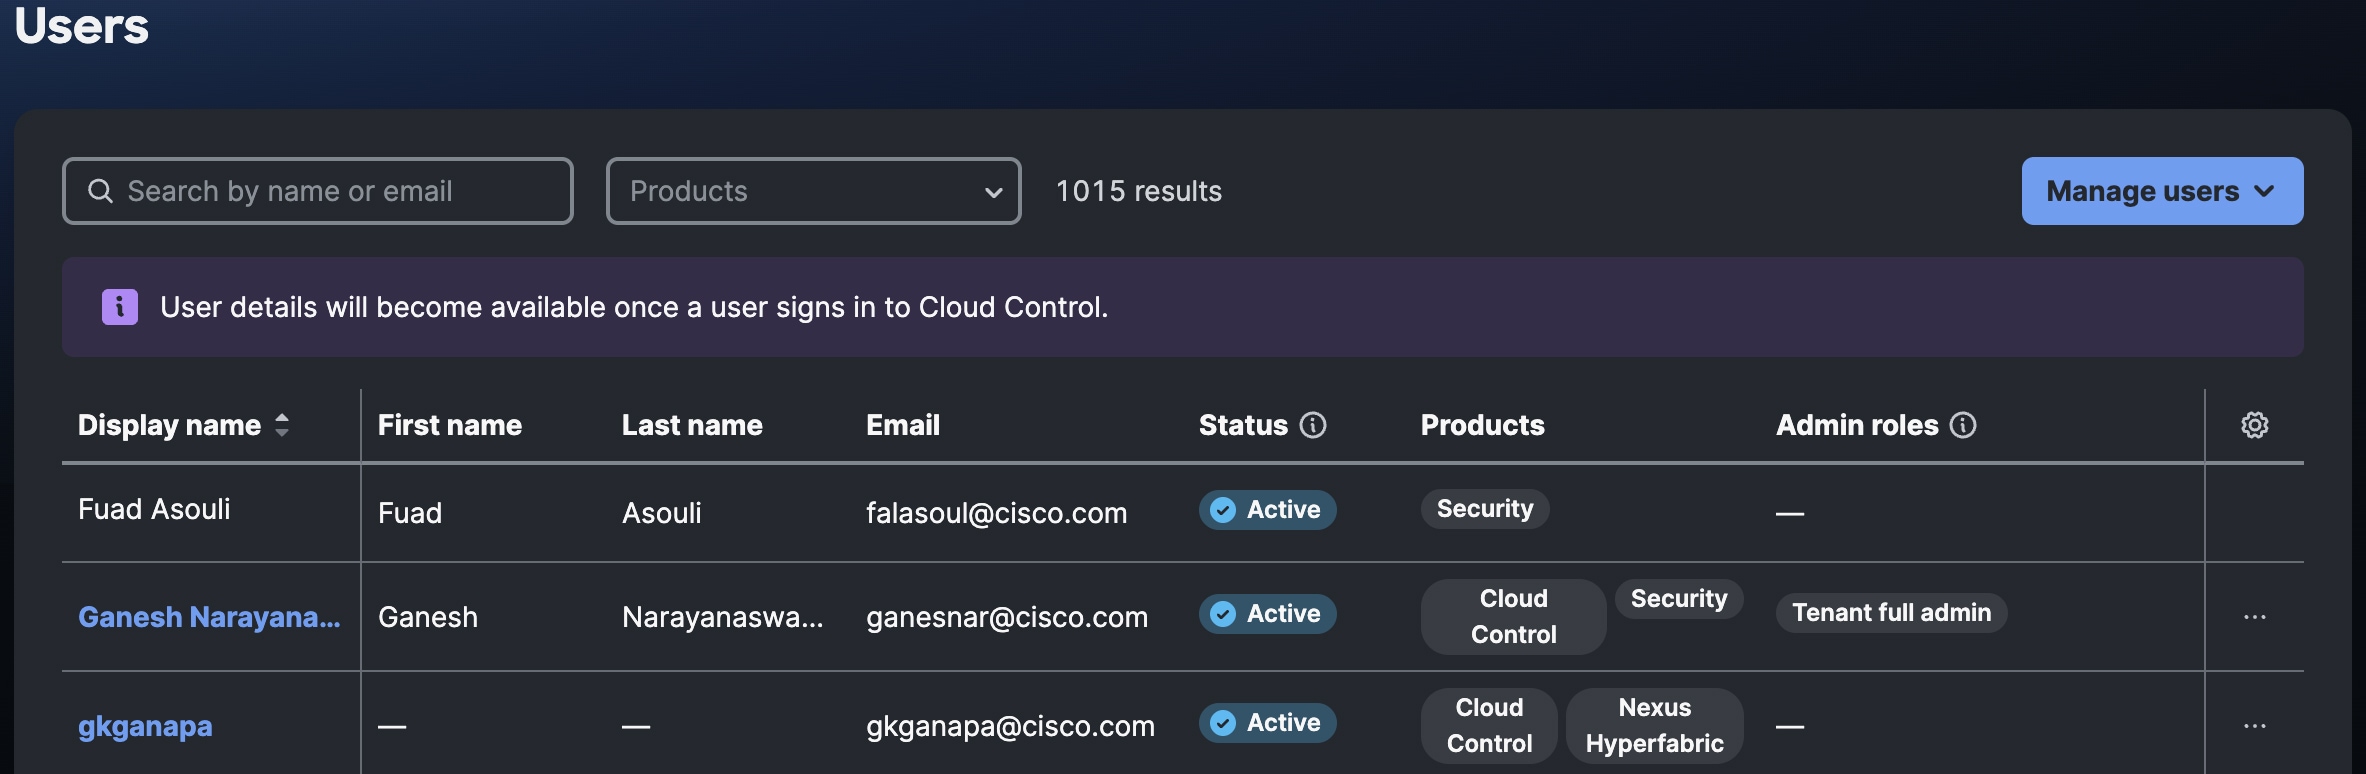
-
Select Manage users > Add user.
-
In Add user, complete these steps:
-
Enter the email address of the user you are adding. Then select Next.
-
(Optional) Enter the first and last name of the user. Then select Next.
-
(Optional) Assign one of these admin roles to the new user:
-
Tenant Full Admin: Can configure and manage all tenant-level settings.
-
Tenant Read-only Admin: Can view all tenant-level settings, but cannot change them.
-
Integration Admin: Can manage cross-product and third-party integrations in Cisco Cloud Control, but does not have platform administration rights.
-
By default, the Member role is configured for all Cisco Cloud Control users. This role allows users to view data across all products they have permissions for, but they cannot execute configurations.
-
Tenant Full Admin users can see all data within the Cisco Cloud Control workspace. However, they cannot access individual product dashboards (such as Meraki or Intersight) for which they do not have explicit product permissions.
-
You can configure the Tenant Read-only Admin and Integration Admin roles for the same user.
-
-
Select Next.
-
In Summary, confirm that the information you entered for the new user is correct. Then select Add user.
Cisco Cloud Control sends the user you added an email that prompts them to activate their account. That user’s details will be available in Users after they sign in for the first time.
-
-
To grant this user access to Nexus Dashboard, follow the steps in Configure Nexus Dashboard access for AI Canvas.
Search for a user
Search for a Cisco Cloud Control users and view their details by completing these steps.
-
Select
and choose Admin Console. -
Use Search to find a user by name or email address.
-
Select the products and roles you want to use to filter the table entries.
-
In Display name, select a user’s link to view their details.
Manage a user
Follow these steps to manage a Cisco Cloud Control user.
-
Select
and choose Admin Console. -
Select
 , then select one of these options:
-
View user details: View the user’s profile, their configured roles, and the products they can access.
You can also select a user’s link in Display name to view this information.
-
Edit profile: Update the user profile information.
-
Edit role assignments: Change the role assignments for that user.
-
Reset MFA: Select this option if an active local user has lost access to their enrolled MFA device.
-
Revoke sessions: Sign this user out of any current Cisco Cloud Control sessions.
-
Remove user: Remove this user from Cisco Cloud Control.
-
Reset MFA for an active local user
When an active local user loses access to their enrolled MFA device, Cisco Cloud Control users configured with the Tenant Full Admin role can reset their MFA settings. An active local user:
-
Has an active account status.
-
Exists only in Cisco Cloud Control, and is not also tied to another product that manages its own identity provider (IdP) and MFA settings.
-
Has enrolled in Duo Security.
Complete these steps to reset an active local user’s MFA settings.
-
In Users, locate the relevant user’s entry.
-
Select
 > Reset MFA.
 -
Select Reset to confirm the operation.
The next time this user signs in to Cisco Cloud Control, they will need to enable MFA again.
MFA may not be set up for legacy user accounts, as they were created before MFA was a requirement. You should enable MFA for these accounts.
Customize the displayed information on Users
Follow these steps to customize the information displayed on Users.
-
Select
and choose Admin Console. -
Select
 to customize the table density and column settings.
Manage tenants
In Tenants, you can view and manage the tenants from products that have been integrated with Cisco Cloud Control.
One-to-many tenant linking
Cisco Cloud Control supports one-to-many tenant linking: a single tenant group can contain tenants from different products, and multiple tenants from the same product if that product supports it. For example, you can create a group that contains three Meraki tenants and two Intersight tenants. Creating a tenant group provides these benefits:
-
You do not need to sign in to multiple products. After you have created a tenant group, you only need to sign in to Cisco Cloud Control to access the relevant products.
-
You collect alert and asset data from the tenants' products. You can then view and act upon this data in one place: within Cisco Cloud Control.
-
You can launch and access a tenant’s underlying product from Cisco Cloud Control.
These products support one-to-many tenant linking:
-
Meraki
-
Intersight
-
Nexus Hyperfabric
-
Collaboration Control Hub
One-to-many tenant linking affects these three areas:
-
Navigate to and launch partner controllers.
-
Inventory and topology, where assets from multiple linked tenants appear together.
-
Roles and entitlements, which control what each user is allowed to see.
Navigate linked tenants
Cisco Cloud Control’s tenant switcher allows you to navigate between different product tenants. The scope of the information that you can view and act upon is dictated by the tenant that’s currently selected here and the permissions that you are configured with.
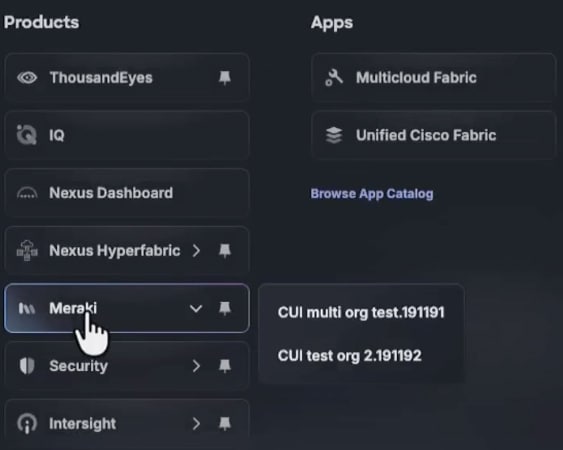
When multiple tenants are configured for the same product, you can switch to one of these tenants in two locations. The first location is the top navigation bar (provided you have pinned the product there).

The second location is under Products in Cisco Cloud Control’s Main menu. Select the product’s tile to view a drop-down list of the available tenants you can launch.
View inventory and topology across linked tenants
A Cisco Cloud Control tenant group displays inventory and topology data received from all of its linked tenants. For example, a tenant group that is linked to multiple Intersight tenants displays the assets from all of these tenants in the same inventory and topology.
Roles and entitlements for linked tenants
When a tenant group is linked to multiple partner tenants, the RBAC settings for each linked tenant is maintained. Cisco Cloud Control only allows you to see and manage the assets you are entitled to:
-
An administrator can see all assets across all linked tenants.
-
A member linked to several tenants may be entitled to only a subset of those assets. For example, a user linked to five Intersight tenants may be entitled to see only some of the assets that belong to those tenants.
Tenant switching considerations
When you switch tenants, consider these factors:
-
Permissions and roles: Access is governed by your assigned permissions. You will only see and be able to switch to tenants for which you have the appropriate access.
-
Session security: For security, your session has a defined timeout. If your token expires, you may be required to re-authenticate regardless of your previous activity.
-
Linked products: The feature is optimized for products linked to Cisco Cloud Control. If you switch to a tenant that is not associated with your current product, you may be redirected to the main Cisco Cloud Control dashboard.
-
Cross-product authentication: When switching tenants, Cisco Cloud Control may open a pop-up window to handle authentication of the product launch. Ensure your browser is configured to allow pop-ups from the Cisco Cloud Control domain.
If you move between linked tenants or products within the same realm, Cisco Cloud Control performs a background token exchange. You are then transitioned to the new environment without needing to re-enter your credentials.
Troubleshoot tenant switching
Use these possible solutions to troubleshoot tenant-switching issues:
-
Switch takes time: A brief loading period is normal while the system verifies your credentials across products.
-
Tenant does not appear: Ask your administrator to verify that your user account is provisioned and linked to the product.
-
Switch fails or hangs: Check your browser pop-up settings and ensure that pop-ups are allowed for Cisco Cloud Control.
View tenants
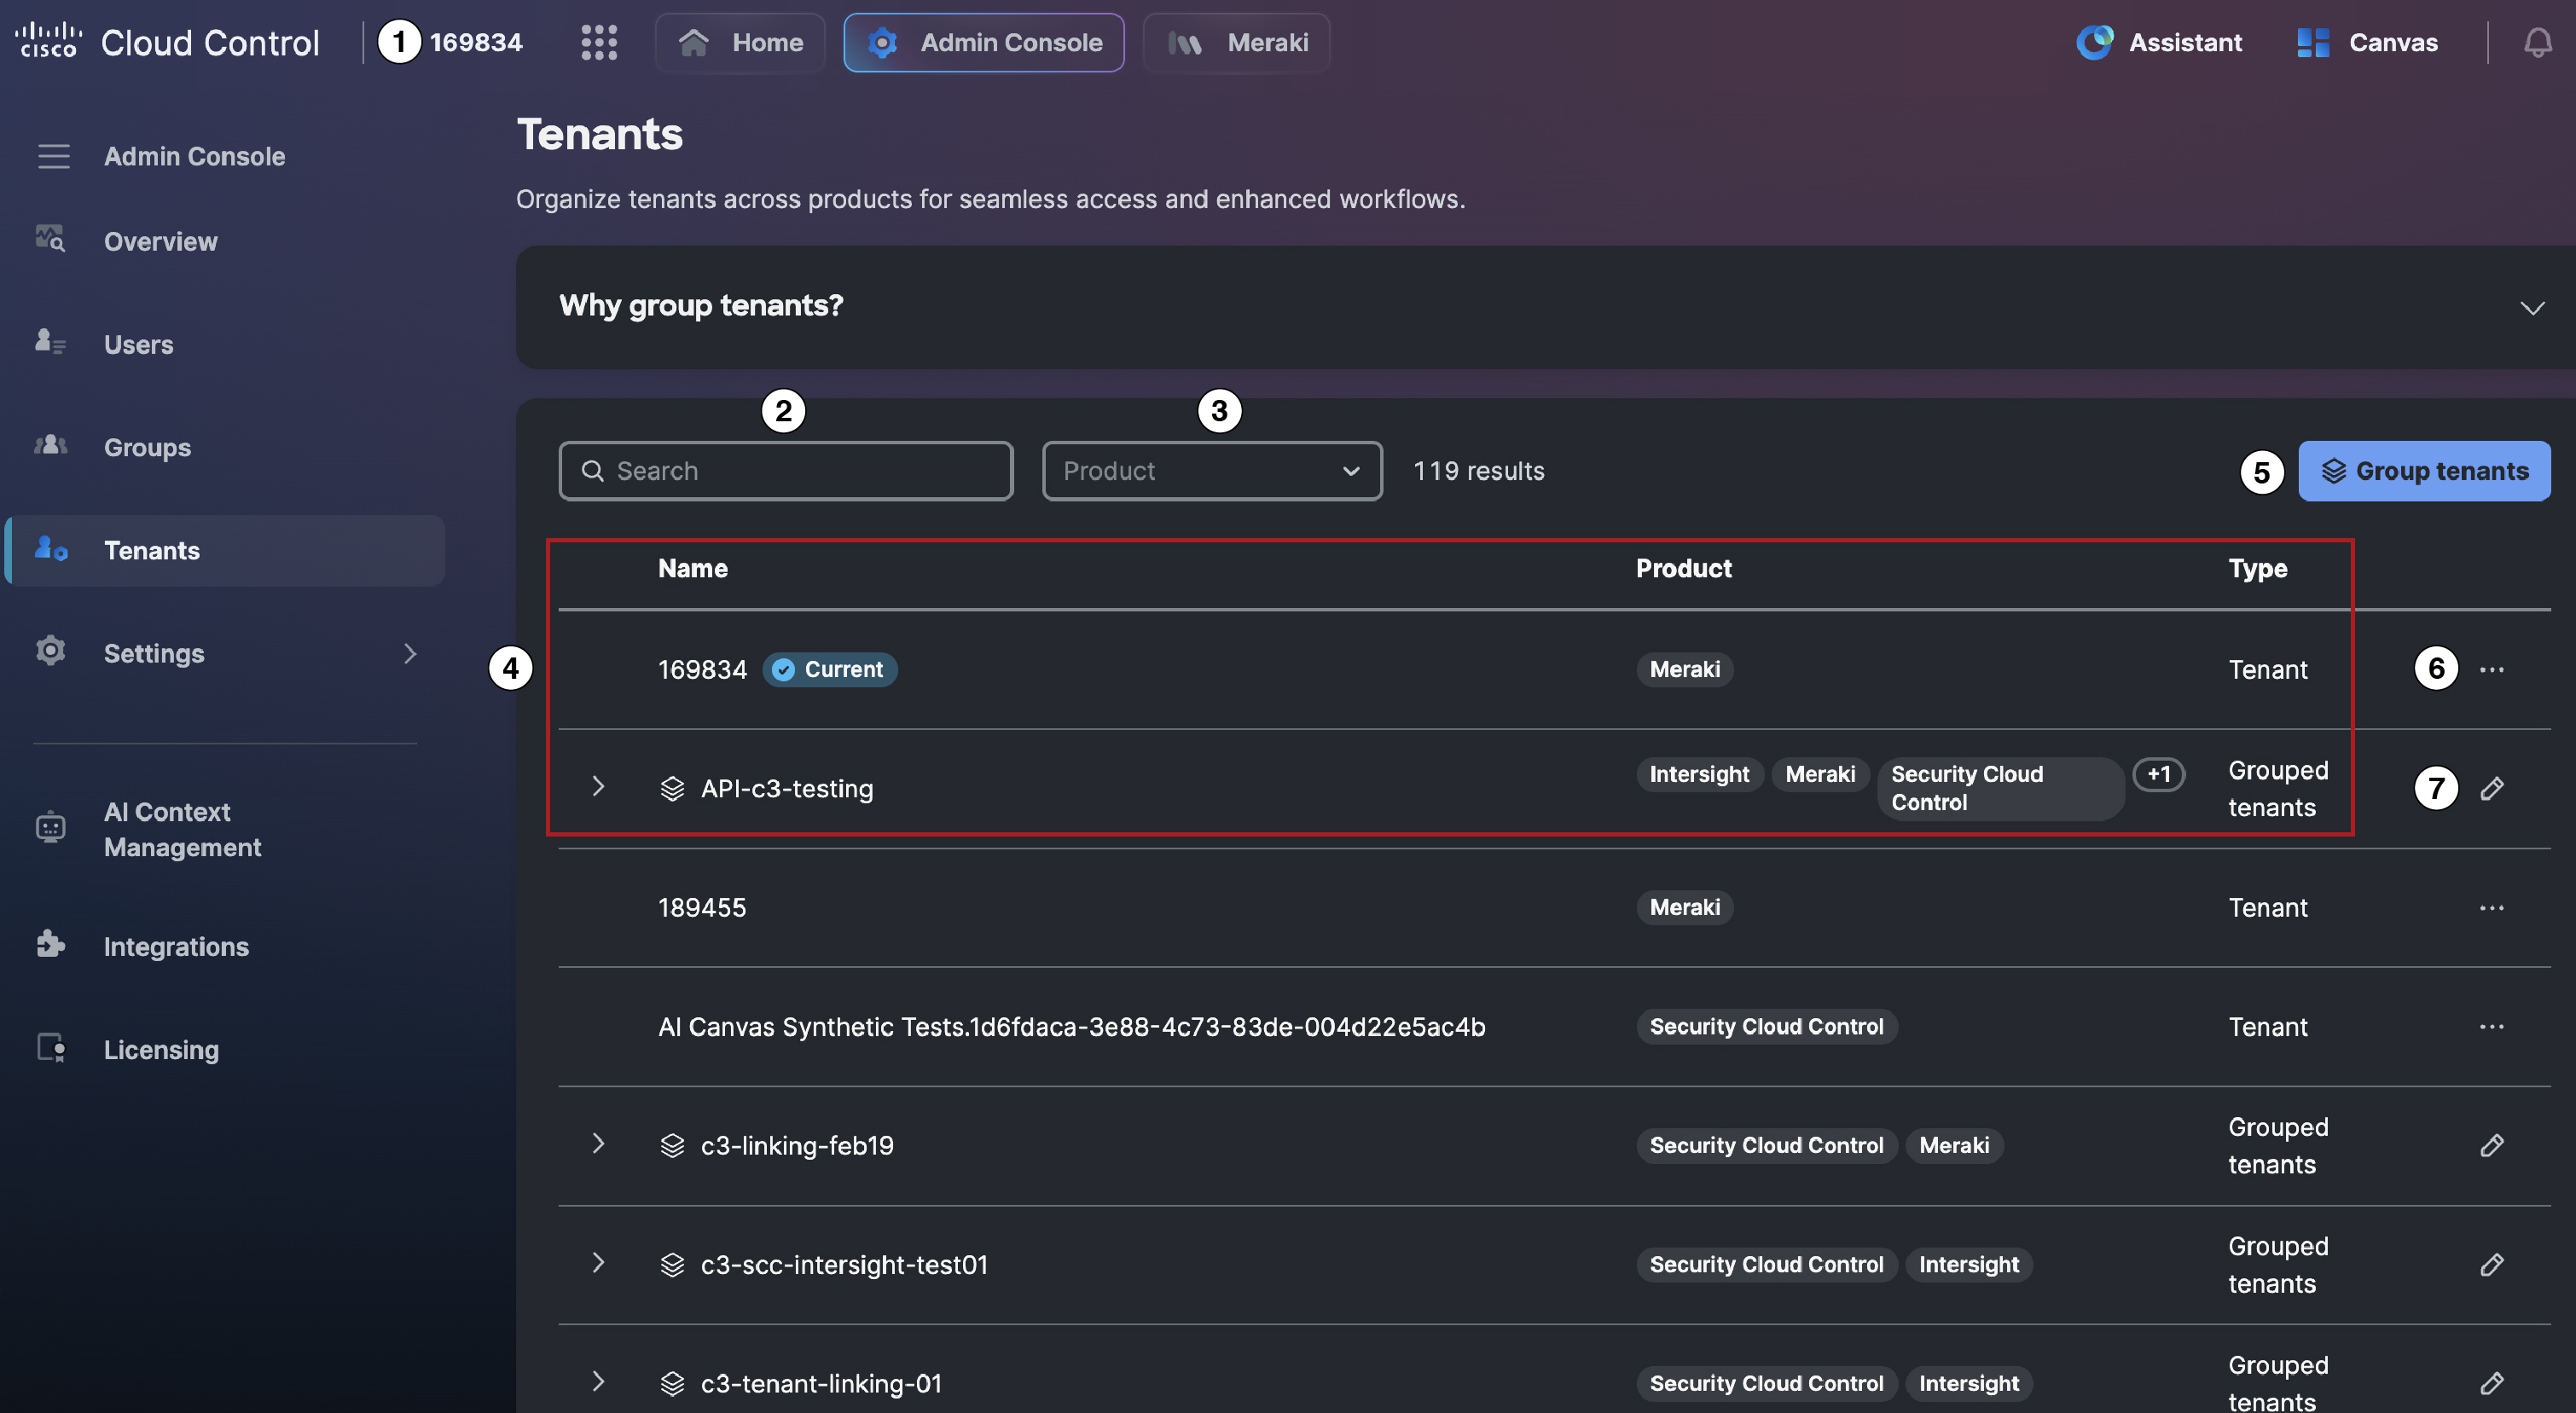
Follow these steps to view the product tenants that are currently accessible from Cisco Cloud Control.
-
Select
and choose Admin Console.By default, Users is displayed.
-
Select Tenants.
-
Find a tenant:
-
Search for a tenant by name.
-
Filter the table by products associated with a tenant.
-
-
Review the tenant information:
-
Name
-
Associated products
If a number is displayed next to a product name, this indicates that the tenant has access to additional products. To view these products, place your cursor over this number or select > to the left of the tenant’s name.
-
Type: Indicates whether a tenant has been grouped
-
Create a new tenant group
Grouping tenants gives administrators one streamlined sign-in, faster data access, and consolidated visibility across related products. Complete these steps to create a tenant group.
-
You can only group tenants for which you have the Tenant Full Admin role. Users configured with the Tenant Read-only Admin role can view all tenant-level settings, but cannot change them.
-
This option is only available when there are two or more ungrouped tenants.
-
Select
and choose Admin Console.By default, Users is displayed.
-
Select Tenants.
-
Select Group tenants.
Cisco Cloud Control displays the tenants associated with the product you authenticated through.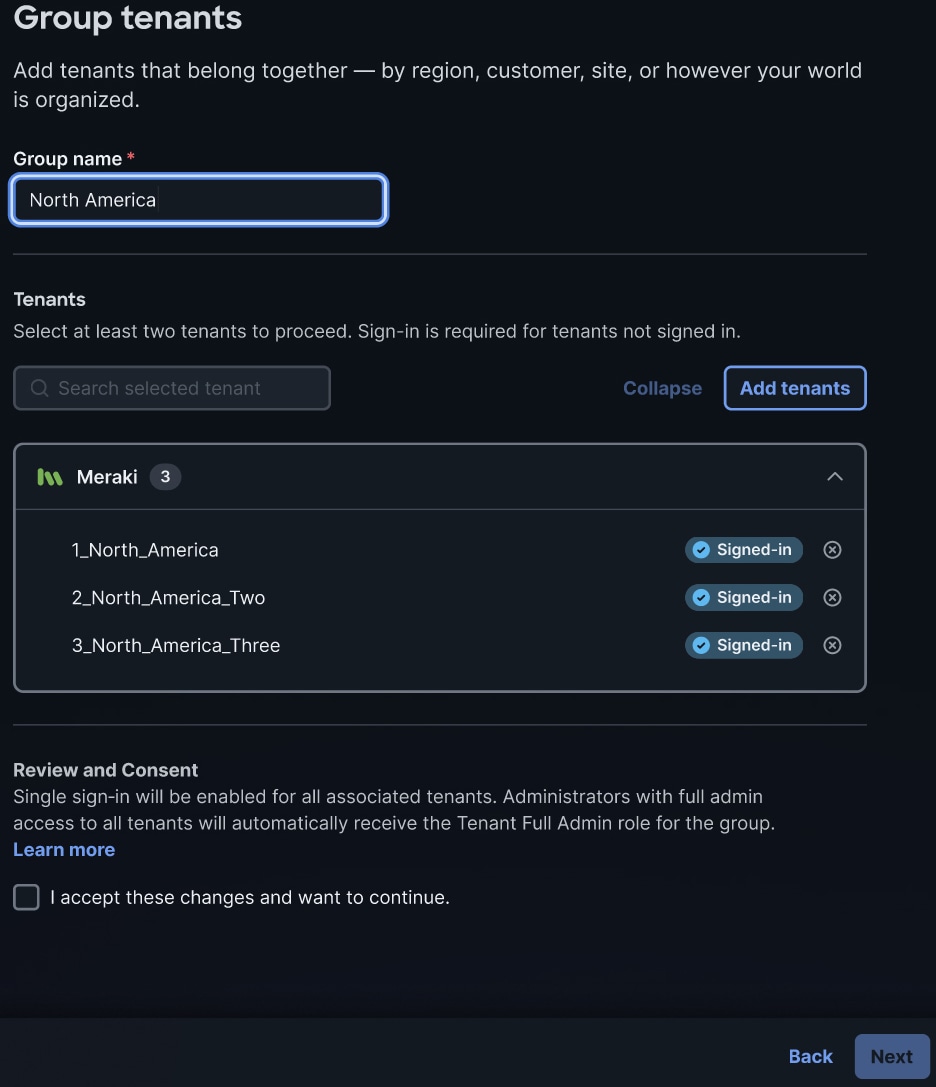
-
Enter a name for the tenant group you are creating.
-
Select Add tenants to specify the tenants you want to group.
You must select at least two tenants.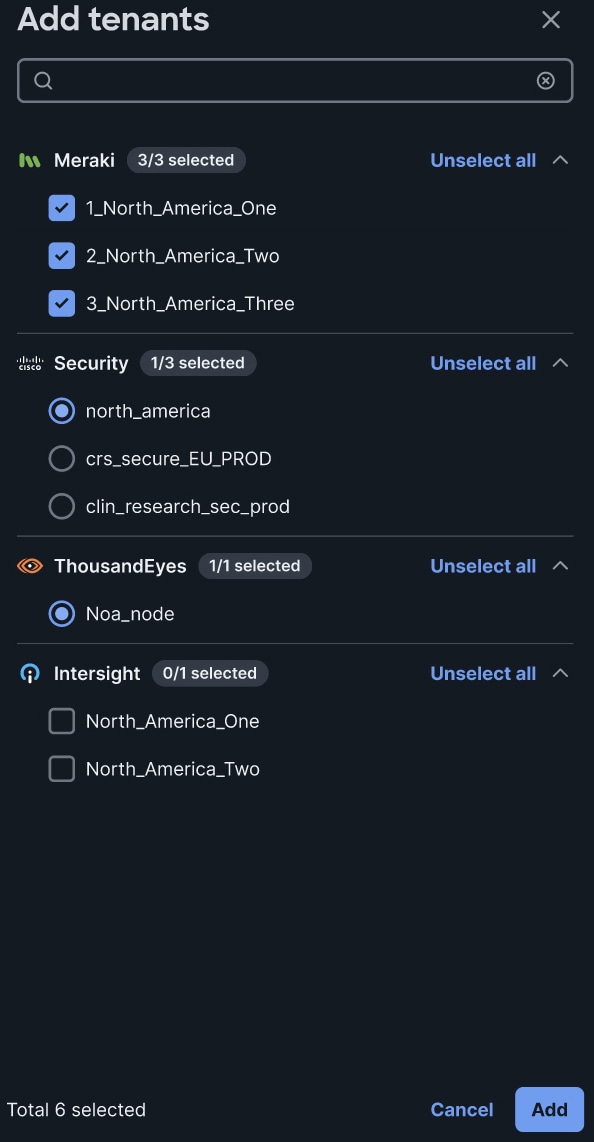
If you see
 displayed for a tenant, this indicates the tenant currently belongs to another group. If you move it to the group you are creating, its existing Cisco Cloud Control data and settings won’t transfer over.
You can select multiple tenants for these products:
-
Meraki
-
Intersight
-
Nexus Hyperfabric
-
Collaboration Control Hub
-
-
Click Add.
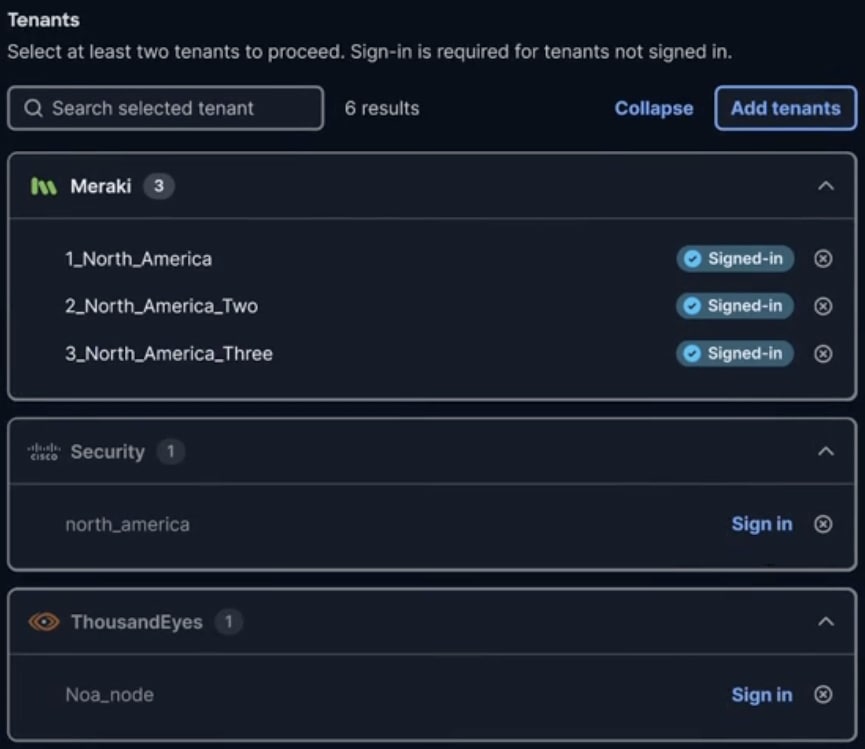
When adding a tenant to a group for the first time, you may need to select Sign in to sign in to each individual tenant. This sign-in step authenticates your identity across different product environments and obtains the necessary tokens.
-
Check the check box to accept the tenant settings you entered.
-
Select Save.
When tenants are grouped, Cisco Cloud Control uses one tenant ID as the primary identifier. Cisco Cloud Control does not automatically delete the IDs of the other tenants that joined the group.
Add tenants to an existing group
Complete these steps to add a tenant to a group that was created previously. You can only add tenants to groups for which you have the Tenant Full Admin role.
Users configured with the Tenant Read-only Admin role can view all tenant-level settings, but cannot change them.
-
Select
and choose Admin Console.By default, Users is displayed.
-
Select Tenants.
-
For the group you want to add tenants to, select
> Add tenants. -
Select Add tenants to specify the tenants you want to group.
If you see
displayed for a tenant, this indicates the tenant currently belongs to another group. If you move it to this group, its existing Cisco Cloud Control data and settings won’t transfer over. You can select multiple tenants for these products:
-
Meraki
-
Intersight
-
Nexus Hyperfabric
-
Collaboration Control Hub
-
-
Click Add.
When adding a tenant to a group for the first time, you may need to select Sign in to sign in to each individual tenant. This sign-in step authenticates your identity across different product environments and obtains the necessary tokens.
-
Check the check box to accept the tenant settings you entered.
-
Select Save.
Rename a tenant group
Follow these steps to rename a tenant group.
-
Select
and choose Admin Console.By default, Users is displayed.
-
Select Tenants.
-
For the tenant group you want to rename, select
> Rename. -
Enter a new name for the tenant group, then select Save.
Invite an administrator to add a tenant to your group
If you and another administrator manage two different products, you can consolidate the tenants associated with these products into a single group. For example, you manage an Intersight tenant, and another administrator manages a Security Cloud Control tenant. By grouping these tenants, both products can contribute inventory and topology data to Cisco Cloud Control.
To group these tenants, invite the other product administrator to Cisco Cloud Control and assign them the permissions required to add their product tenant to your tenant group.
The relevant workflow consists of two steps:
-
You invite the administrator for another product by setting them up as a Cisco Cloud Control user.
-
That administrator adds their product tenant to your tenant group.
Invite an administrator to Cisco Cloud Control
-
Select
and choose Admin Console.By default, Users is displayed.
-
Select Manage users > Add user.
-
Enter the administrator’s email address. Select Next.
-
(Optional) Enter the administrator’s first and last name. Select Next.
-
Assign the administrator the Tenant Full Admin role and then select Next.
-
Confirm that the information you entered for the administrator is correct. Then select Add user.
The administrator receives an email inviting them to activate their Cisco Cloud Control account.
-
If the administrator already has an active Cisco Cloud Control account, they may receive a password reset email instead of an invitation email.
-
Account activation emails may display inconsistent formatting. In the light theme, the Activate Account button may appear disabled, but it remains functional. For assistance, go directly to the Cisco Contact Us website.
-
If the administrator is already an active Cisco Cloud Control user, ensure that they are configured with the Tenant Full Admin role.
-
Add a tenant to a group created by another administrator
After activating their account and logging into Cisco Cloud Control, the invited administrator can see your group in their tenant list, even if they do not have access to the group’s products. They can then add their product tenant to this group or create a new group.
-
When you add an ungrouped tenant to a group, Cisco Cloud Control displays a warning that indicates Cisco Cloud Control data is removed when the tenant is added to another group. This includes users configured with that tenant’s administrator role.
-
Cisco Cloud Control only supports the unlinking of a solo tenant from one group and linking it with another group. When the only tenant configured for a product is associated with a Cisco Cloud Control tenant group, this tenant is considered a solo tenant.
User access after tenant grouping
Grouping the tenants managed by two different administrators does not change user permissions:
-
Users can only see the products they have access to. They cannot launch those products, and no token exchange occurs.
-
Users with access to both products can see both, and Cisco Cloud Control’s Inventory and Topology draw data from both.
Set up SSO
Complete these setup tasks to configure single sign-on (SSO) for Cisco Cloud Control users.
-
Configure an IdP using either SAML or OpenID Connect.
Create a domain
Follow these steps to create a domain.
-
Select
and choose Admin Console.By default, Users is displayed.
-
Select Domains.
-
Select Add a domain.
-
Enter your domain or subdomain name and select Add domain.
-
Copy the verification token into your DNS TXT record.
-
If your DNS host supports only one TXT record, add the token on a separate line.
-
If your DNS host supports multiple records, add your token on a single line in a separate TXT record.
-
-
Choose who adds the DNS TXT record:
-
If you can add the DNS TXT record, add it to your DNS server.
-
If another administrator configures your DNS server, send the DNS TXT record to that administrator.
-
-
Select Done.
Your domain appears in your list of domains with the status Pending. When it’s verified, the status changes to Verified.
After the domain is verified, the TXT record is no longer required, and you can remove the verification token from your DNS server.
If verification fails, the error is cached by your DNS server. Your DNS server clears the cache after the time specified in the Time To Live (TTL) setting. You must wait to try again after the DNS server clears the cache. You can add the verification token again and request verification for the domain.
Configure an IdP using SAML
SAML provides a framework for IdPs and service providers to communicate with each other for federated identity and SSO. You can set up a SAML IdP by manually entering IdP metadata or uploading metadata to the Admin Console.
Follow these steps to configure an IdP using SAML.
-
Select
and choose Admin Console. -
Select Identity Providers.
-
Select Add an IdP.
-
In Add an Identity Provider, select SAML as your IdP and select Next.
-
Select one of these methods to connect your IdP:
-
Fill out configuration form: Manually enter your IdP metadata. Then proceed to Step 7.
-
Upload your IdP’s metadata: Upload an XML file containing your IdP metadata. Then proceed to Step 8.
-
-
If you selected Fill out configuration form:
-
Enter your Entity ID (SAML Identifier).
-
Enter your Single sign-on URL.
-
Select a binding method: HTTP-Post or HTTP-Redirect.
-
(Optional) Enter your Single sign-out URL.
-
(Optional) Select a binding method: HTTP-Post or HTTP-Redirect.
-
Check the check box to enable Sign SAML request.
Select this check box if your IdP requires authentication requests to be signed.
-
Select a NameID format.
You can select one of these options:
-
urn:oasis:names:tc:SAML1.1:nameid-format:emailAddress(default): This format uses your email address as your NameID. -
urn:oasis:names:tc:SAML2.0:nameid-format:transient: This format generates a temporary, one-time NameID for each authentication. -
urn:oasis:names:tc:SAML:1.1:nameid-format:unspecified: This format indicates that no specific NameID format is requested, allowing your IdP to determine or use an appropriate format.
-
-
Upload your IdP certificate files.
If your IdP uses multiple signing certificates, you can upload up to two IdP certificate files in
.pemor.cerformat. -
Select Next.
-
-
If you selected Upload your IdP’s metadata:
-
Upload an XML file containing your IdP metadata.
When uploading the metadata file, there are two ways to validate the metadata from the customer IdP:
-
Not signed, self-signed, or private CA-signed IdP metadata file: Your IdP provides a self-signed private CA or doesn’t provide a signature for its metadata. This option is less secure.
-
Signed by a public certificate authority: Your IdP provides a signature in the metadata that is signed by a Public Root CA.
Only upload metadata generated by your IdP. Uploading the wrong metadata file will cause SSO failure and might lock all administrators out of the account.
-
-
Select Next.
-
-
(Optional) Configure SAML attributes and settings.
By default, the SAML IdP uses the
uidattribute to identify the user when it sends authentication data to Cisco Cloud Control. If the IdP supports other NameID configurations, you can modify this configuration. -
Select Add IdP.
If this is the first IdP you have configured, the IdP is saved as your default IdP, and a default routing rule is created.
Configure an IdP using OpenID Connect
Use OpenID Connect (OIDC) to set up SSO using your identity provider. OIDC is built on the OAuth 2.0 framework and supports secure authentication through encrypted tokens and built-in certificate validation.
When you set up OpenID Connect with Entra ID or an IdP where the email is not a permanent identifier, we recommend that you use the externalId linking attribute to map to a unique identifier. For Entra ID, we suggest mapping OIDC to externalId. If the email you enter does not match the linking attribute, you are prompted to verify your identity or create a new user with the correct email address.
Follow these steps to configure an IdP using OpenID Connect.
-
Select
and choose Admin Console. -
Select Identity Providers.
-
Select Add an IdP.
-
In Add an Identity Provider, select OpenID Connect as your IdP and select Next.
-
Enter your IdP information.
-
Enter your IdP Name.
-
Enter your Client ID. This is the unique ID that identifies you and your IdP.
-
Enter your Client Secret. This is the password that you and your IdP know.
-
Select the scopes you want to associate with your IdP.
OpenID and Email are selected by default.
-
-
Select one of these methods to add endpoints:
-
Use the discovery URL: Enter the discovery URL for your IdP.
This URL automatically populates the necessary endpoints for OIDC single logout (SLO).
-
Manually add all endpoint information: Select this option if your IdP does not support discovery URLs. Provide these details:
-
Issuers (comma-separated): Enter one or more issuer URIs, separated by commas.
-
Authorization endpoint: URL to start the authorization flow.
-
Token endpoint: URL to retrieve access tokens.
-
(Optional) JWKS URI: URL to retrieve the JSON Web Key Set.
-
(Optional) Userinfo endpoint: URL to retrieve user profile information.
-
(Optional) End session endpoint: URL to support single sign-out.
-
-
-
(Optional) Check Allow the session to automatically sign out if you want to enable automatic sign-out.
-
Select Add IdP.
If this is the first IdP you have configured, the IdP is saved as your default IdP, and a default routing rule is created.
Create a routing rule
Follow these steps to create a routing rule.
-
Select
and choose Admin Console. -
Select Identity Providers.
-
Select Routing rules > Add a routing rule.
-
Provide these details for a routing rule:
-
Rule Name: Enter a name for the routing rule.
-
Select a routing type: Select Domain or Group.
If you select Domain, your domain must be verified. For more information, refer to Create a domain.
-
If these are your domains/groups: Select domains or groups within your organization.
-
Then use this identity provider: Select IdP.
-
Allow MFA for this rule: Toggle MFA on or off for this rule.
-
-
Select Add.
-
Select
> Activate.
For any routing rule that has been created, you can select
and complete these tasks:-
Edit routing rule: Allows you to select a different IdP and toggle MFA on or off.
-
Deactivate: Deactivate the selected rule.
-
Service provider certificates
From Service providers, you can manage the service provider certificates used by Cisco Cloud Control.
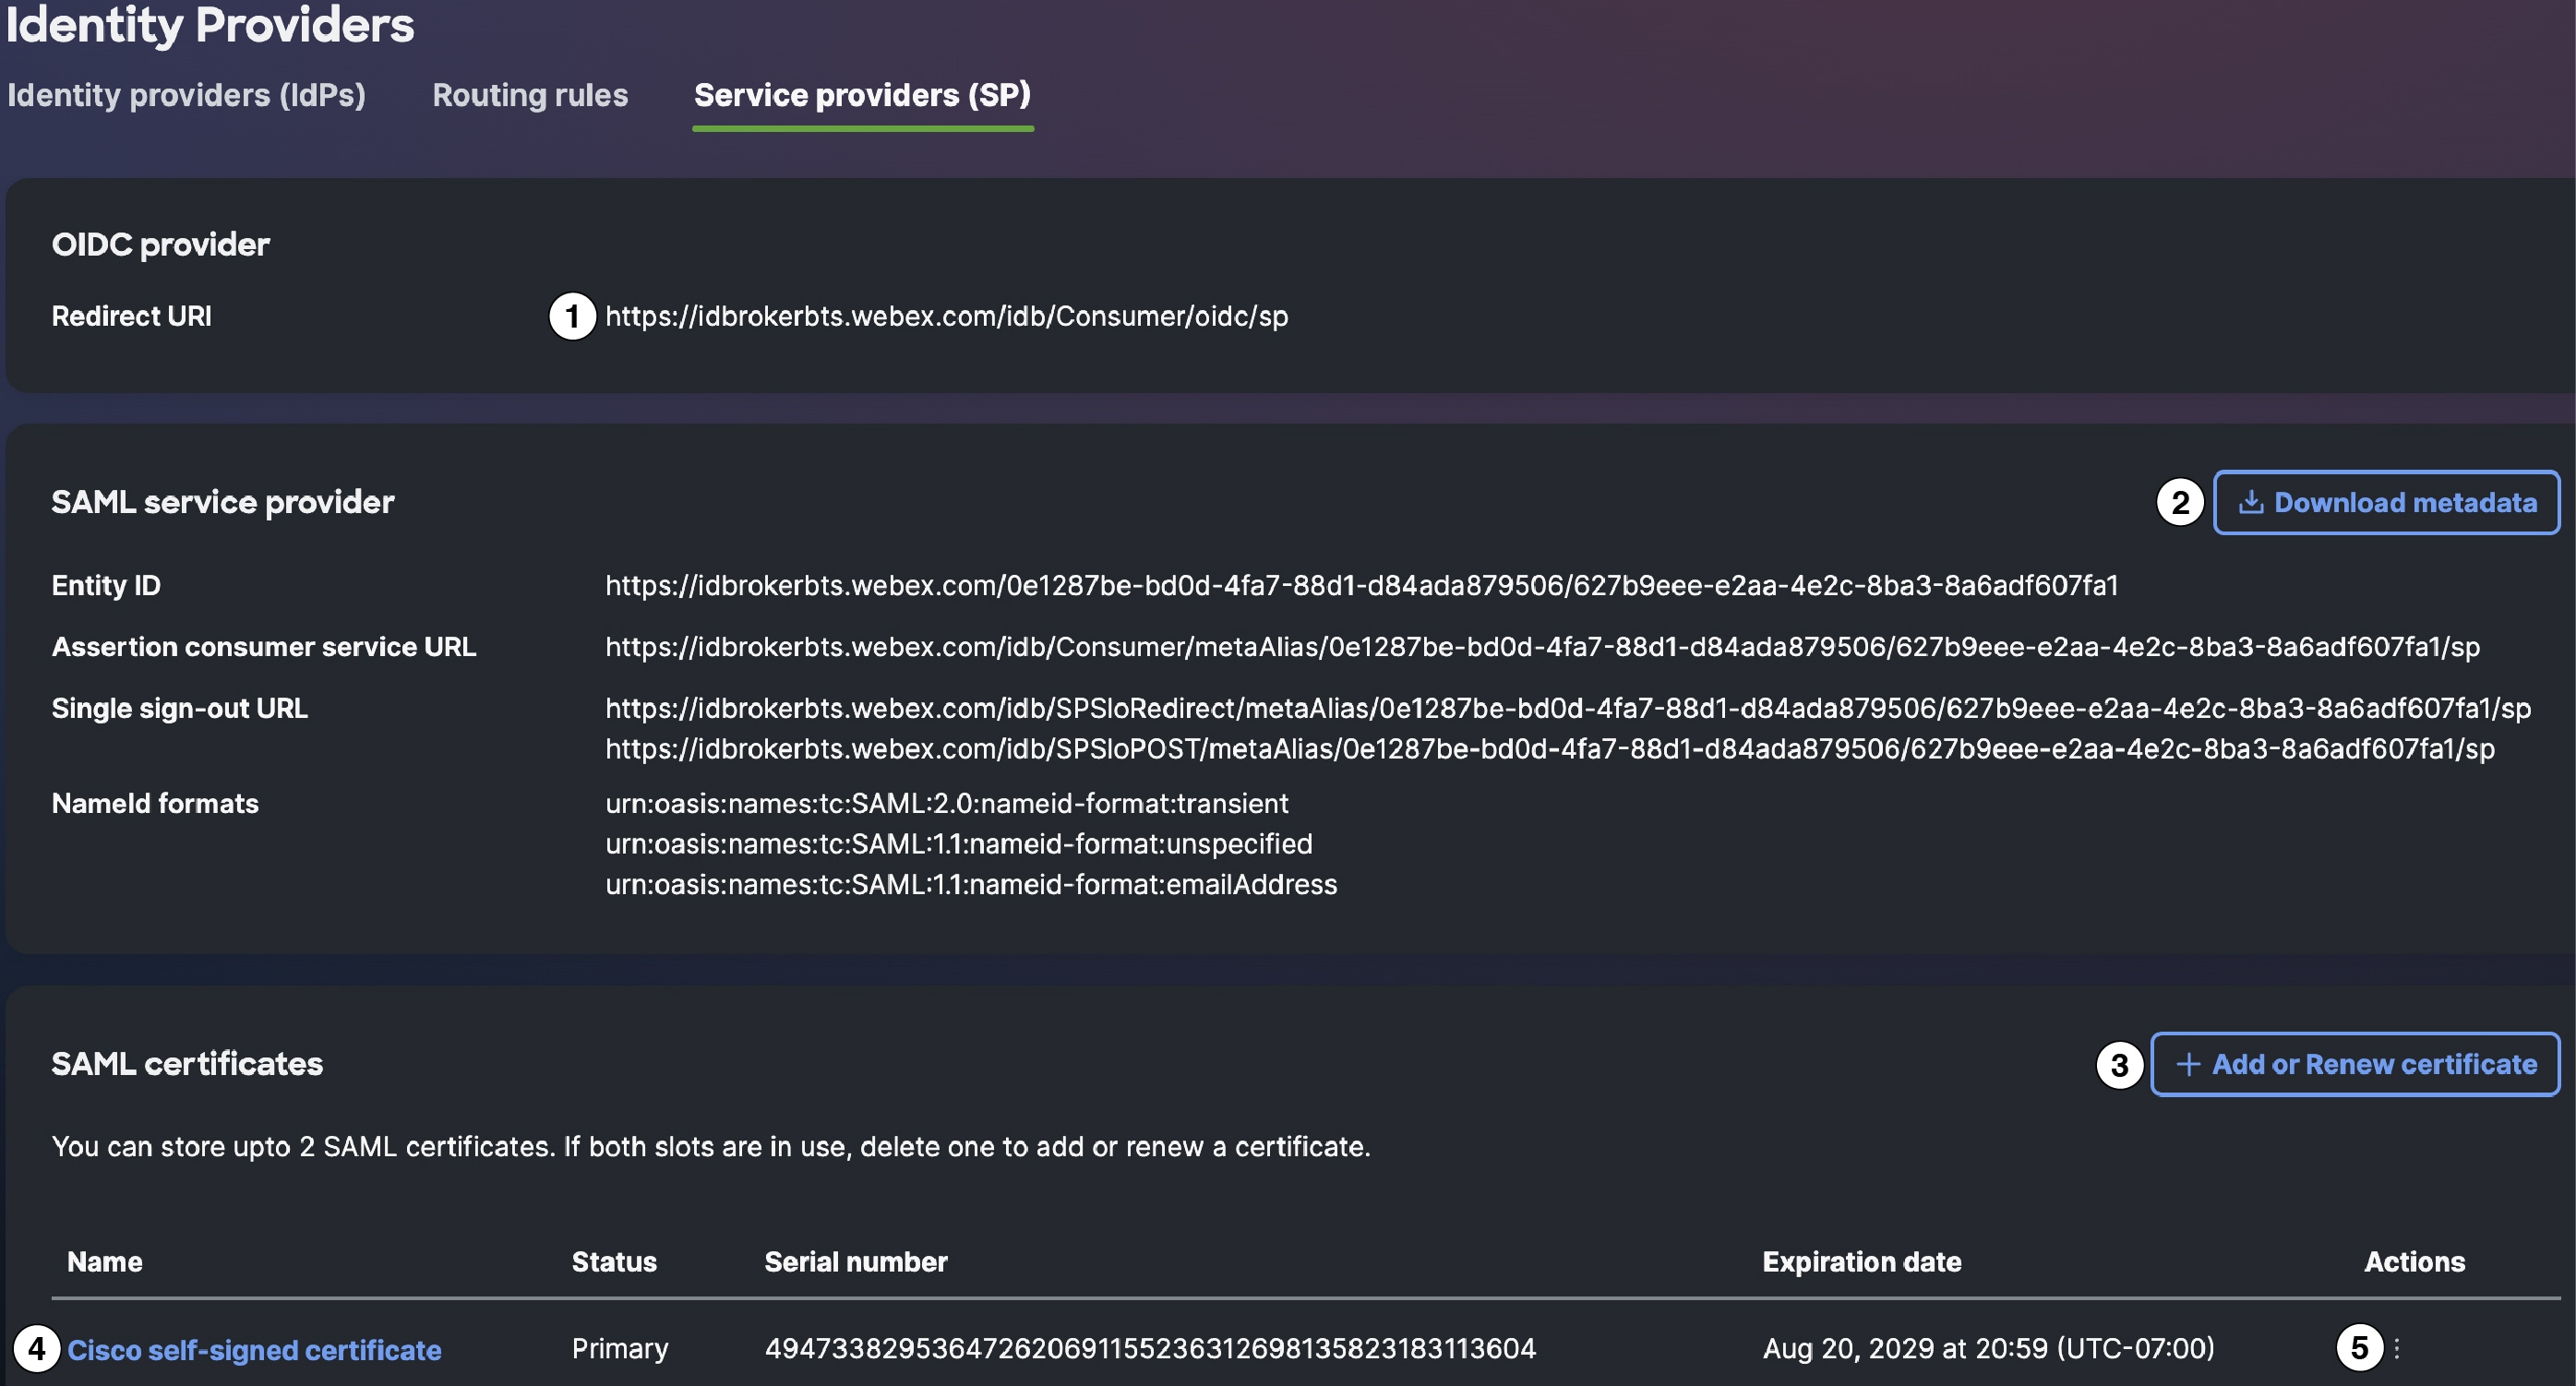
Complete any of these tasks to manage service provider certificates:
The numbered callouts identify where in Service providers you can complete these tasks.
-
1: View the Redirect URI for your OIDC provider.
-
2: Download the metadata for your IdP.
-
4: View your certificate.
-
5: Download the certificate or its metadata.
Add or renew your service provider certificate
Follow these steps to add or renew your service provider certificate.
-
Select
and choose Admin Console. -
Select Identity Providers > Service providers (SP).
-
Select Add or renew certificate.
-
Select one of these options:
-
Self-signed by Cisco: We recommend this choice. Let Cisco sign the certificate so you only need to renew it once every five years.
-
Signed by a public certificate authority: The customer IdP provides a signature in the metadata that is signed by a Public Root CA. This option is more secure, but you need to update the metadata frequently unless your IdP vendor supports trust anchors.
-
-
Select Save.
Enable AI model training
In Data Preferences, you can set whether the data from your tenant’s interactions with AI Canvas and AI Assistant are used to train and improve Cisco Cloud Control’s AI models. This data can include prompts you have run, responses to those prompts, files you have uploaded, and data retrieved from applicable Cisco offers. By enabling this option, you can help improve both the accuracy and relevance of Cisco Cloud Control’s AI experience.
Only users configured with the Tenant Full Admin role can complete this operation. Users configured with the Tenant Read-only Admin role can view this setting, but are not able to change it.
To toggle this setting on or off:
-
Select
and choose Admin Console.By default, Users is displayed.
-
Select Settings.
-
In Data Preferences, toggle AI model training on or off.
By default, this option is enabled. -
When prompted, select either Opt in or Opt out to confirm your setting change.
-
Data Preferences indicates the last time your tenant’s AI model training setting was changed, as well as the user that made this change. Select View change history to open the Audit Log and confirm the change.
-
To get more information on how Cisco uses this data:
-
Open Cisco’s Trust Portal.
-
View the AI Assistant and AI Canvas offer disclosure documents.
-
Audit logs
Cisco Cloud Control creates a log file whenever a user makes a system change or an event takes place. Use Audit Log to view details for these changes and events, as well as export available log files.
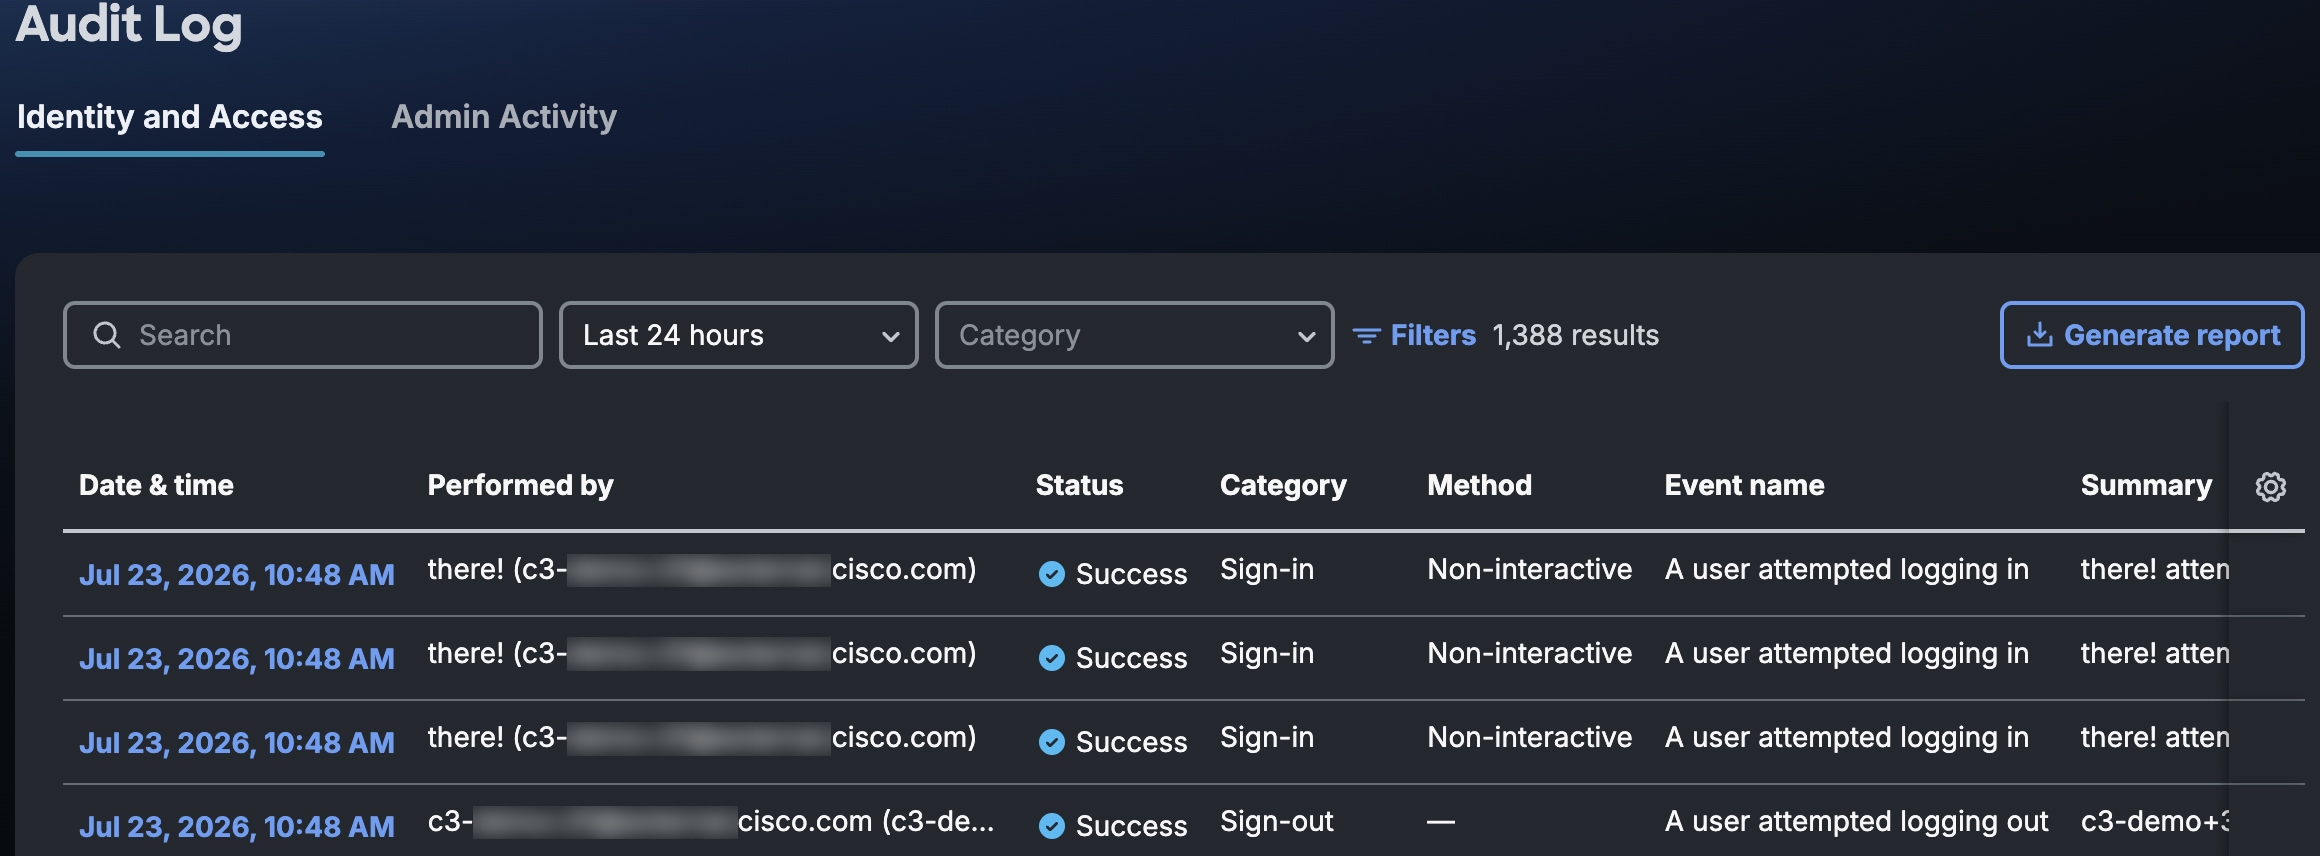
Use these tasks to work with audit logs:
View audit log files
Follow these steps to view audit log files for events or system changes.
-
Select
and choose Admin Console.By default, Users is displayed.
-
Select Audit Log.
-
Filter and customize the information that the audit log displays:
-
In Search, enter a text string.
-
Select values from the available drop-down lists.
You can choose a specific period of time, as well as an event type (likeAuthif you only want to view which users logged in to Cisco Cloud Control and when). -
(Optional) Select
to customize the table density and displayed columns.
-
-
Select a log file’s date and time to view its details.
If a user does not have a display name configured in CUI, the system defaults to their email address.
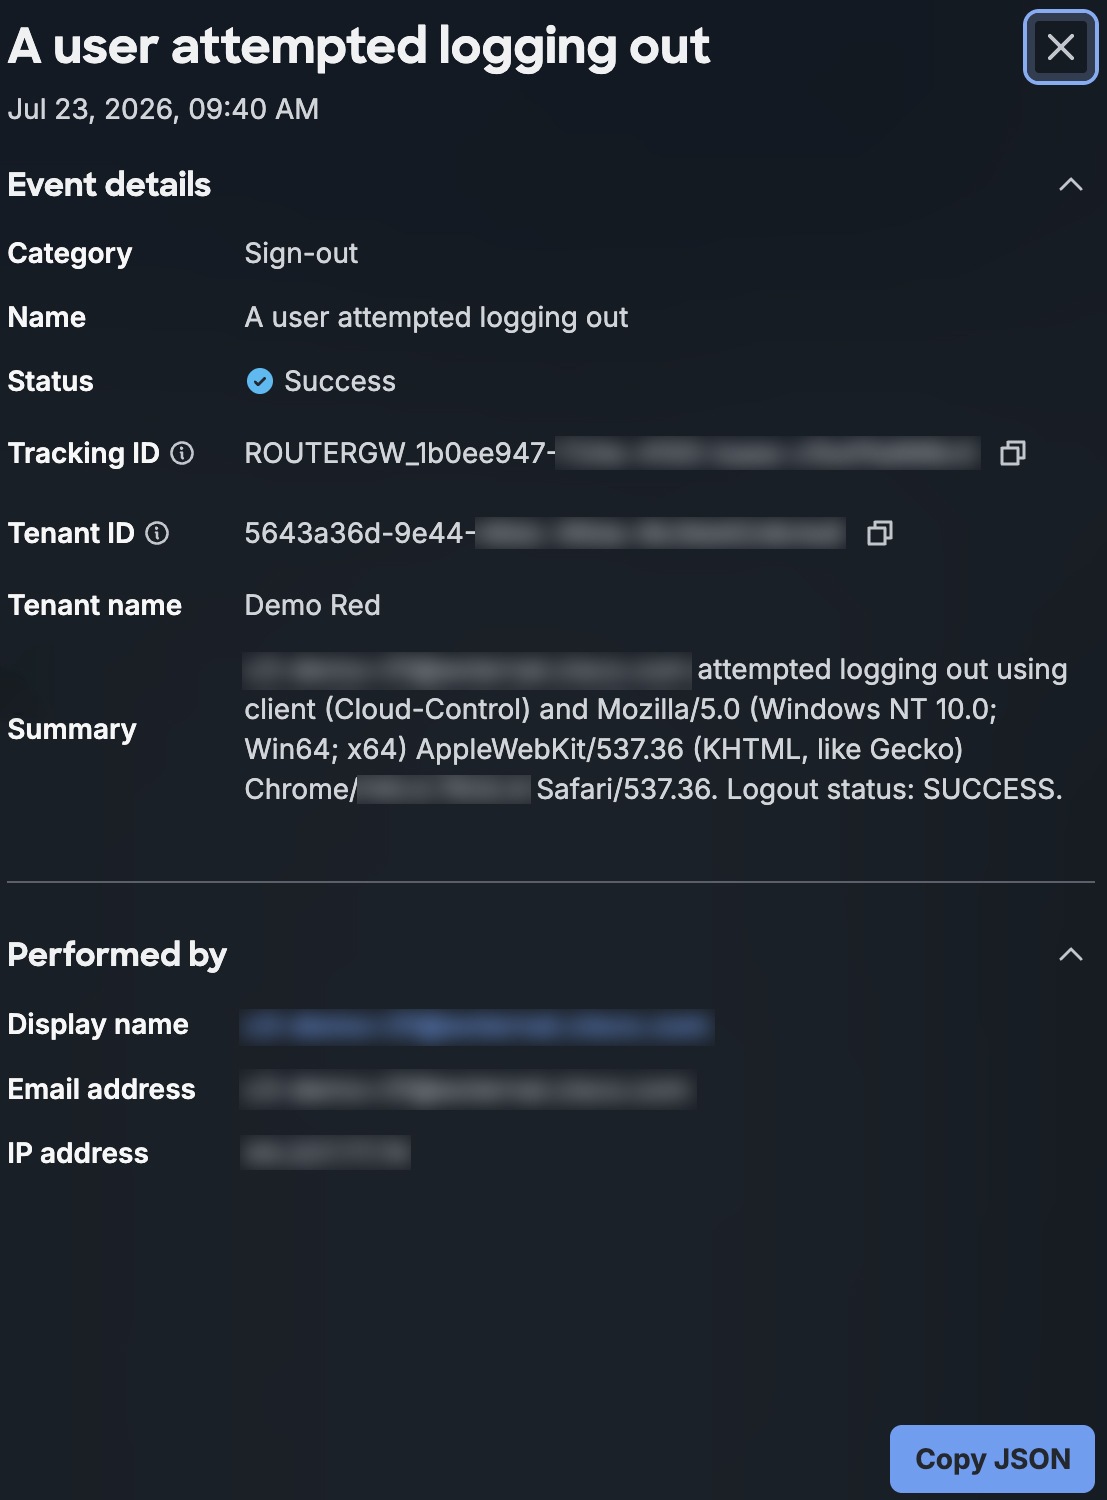
You can also:
-
Copy any of the details associated with this change or event.
-
Select Copy to copy and paste the contents of this log file to a local file.
-
Generate an audit report
Follow these steps to generate an audit report.
-
Select
and choose Admin Console. -
Select Audit Log.
-
Select Generate report to download the audit log data as a CSV file.