Cisco IOS XE installation methods

Provides an overview of the supported procedures for installing Cisco IOS XE software on network devices.

Bundle mode versus install mode

Bundle mode and install mode are BOOT methods that:

  • determine how Cisco IOS XE software loads on IoT routers

  • use different file formats and storage locations for the operating system, and

  • provide different levels of control over the software installation process.

BOOT mode characteristics

Bundle mode uses a single compressed image with the typical naming convention <product>-universalk9.<release>.SPA.bin. This mode provides a consolidated BOOT process, using local (hard disk, flash) or remote (TFTP) .bin image. Booting via a .bin image means that the router would first have to uncompress the image before booting from it. This led to a longer period of time for the router to BOOT.

To upgrade the router to a new version of IOS XE, you would point the "BOOT system" to a new software image. This method is well known and details are available in your products configuration guide.

Starting with IOS XE release 17.9.1, install mode has been added to the IoT routers. Install mode uses packages loaded into bootflash, which are read by a packages.conf file. This method provides more control over the software installation process.

Install mode requires more room in bootflash: for the files. The packages are slightly larger than the .bin images, and they vary per product in size.


Note


If the BOOT variable points to flash:packages.conf, the device is in install mode. If it points to a .bin file, it is in bundle mode.


Installing software using install commands

Installing software using install commands is a software management method that enables users to boot the platform and upgrade or downgrade to Cisco IOS XE software versions using a set of install commands on Cisco IoT routers shipped in install mode by default from Cisco IOS XE 17.9.1.

Restrictions for installing the software using install commands

Be aware of these restrictions when installing software using install commands:

  • Install mode requires a reboot of the system.

  • SMU installation was supported in both bundle boot and install mode. From Cisco IOS XE Release 17.9.x, SMU installation will be stopped if the router is booted up in bundle mode. If the router is booted up in install mode, SMU installation will keep working as it is in previous releases.

Install mode support

This table describes the differences between Bundle mode and Install mode.

Cisco IOS XE running on IoT routers has typically made use of the Bundle boot mode. Bundle boot mode is also known as Consolidated boot, and uses a single compressed image. The typical naming convention is <product>-universalk9.<release>.SPA.bin.

This mode provides a consolidated boot process, using local (hard disk, flash) or remote (TFTP) .bin image. Booting via a .bin image means that the router would first have to uncompress the image before booting from it. This led to a longer period of time for the router to boot.

To upgrade the router to a new version of IOS XE, you would point the "boot system" to a new software image. This method is well known and details are available in your products configuration guide.

Starting with IOS XE release 17.9.1, a new boot mode called Install mode has been added to the IoT routers. Install mode uses packages loaded into bootflash, which are read by a packages.conf file. This method provides more control over the software installation process.


Note


SMU installation was supported in both bundle boot and install mode. From Cisco IOS XE Release 17.9.x, SMU installation will be stopped if the router is booted up in bundle mode. If the router is booted up in install mode, SMU installation will keep working as it is in previous releases.


Table 1. Bundle mode vs install mode

Bundle Mode

Install Mode

This mode provides a consolidated boot process, using local (hard disk, flash) or remote (TFTP) .bin image.

This mode uses the local (bootflash) packages.conf file for the boot process.

This mode uses a single .bin file.

.bin file is replaced with expanded .pkg files in this mode.

CLI:
Router(config)#boot system bootflash:<filename>
CLI:
#install add file bootflash: [activate commit]

To upgrade in this mode, point the boot system to the new image.

To upgrade in this mode, use the install commands.

Image Auto-Upgrade: When a new Field-Replaceable Unit (FRU) is inserted in a modular chassis, manual intervention is required to get the new FRU running with the same version as the active FRUs.

Image Auto-Upgrade: When a new FRU is inserted in a modular chassis, the joining FRU is auto-upgraded to the image version in sync with the active FRUs.

Rollback: Rollback to the previous image with multiple Software Maintenance Updates (SMUs) may require multiple reloads.

Rollback: Enables rollback to an earlier version of Cisco IOS XE software, including multiple patches in single reload.

For additional information, please see Cisco IOS XE Installation Methods.

Information about installing the software using install commands

From the Cisco IOS XE 17.9.1 release, IoT routers will be shipped in install mode instead of bundle mode. So any new router from the factory will boot up in install mode.

Existing installations using previous releases of IOS XE have the option to continue to use their device in Bundle mode if they wish to. Or they can convert their device to Install mode.

Install mode is applicable to both autonomous mode and controller mode.

A new release can be installed in Install mode using vManage.

Table 2. Bundle mode vs install mode

Bundle Mode

Install Mode

This mode provides a consolidated boot process, using local (hard disk, flash) or remote (TFTP) .bin image.

This mode uses the local (bootflash) packages.conf file for the boot process.

This mode uses a single .bin file.

.bin file is replaced with expanded .pkg files in this mode.

CLI:
Router(config)#boot system bootflash:<filename> 
CLI:
#install add file bootflash: [activate commit]

To upgrade in this mode, point the boot system to the new image.

To upgrade in this mode, use the install commands.

Image Auto-Upgrade: When a new Field-Replaceable Unit (FRU) is inserted in a modular chassis, manual intervention is required to get the new FRU running with the same version as the active FRUs.

Image Auto-Upgrade: When a new FRU is inserted in a modular chassis, the joining FRU is auto-upgraded to the image version in sync with the active FRUs.

Rollback: Rollback to the previous image with multiple Software Maintenance Updates (SMUs) may require multiple reloads.

Rollback: Enables rollback to an earlier version of Cisco IOS XE software, including multiple patches in single reload.

Installing software using install mode commands

Summary

The key components involved in the install mode process are:

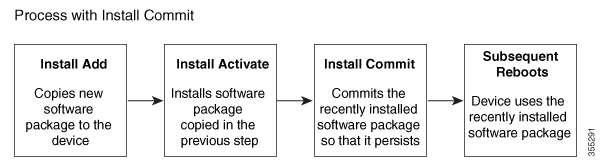
  • install add : Copies software package from local or remote location to platform and validates the image file

  • install activate : Performs validations and provisions packages previously added, triggering system reload

  • install commit : Confirms packages previously activated and makes updates persistent over reloads

The install mode process flow comprises three commands to perform installation and upgrade of software on platforms. Installing an update replaces any previously installed software image, with only one image installed at any time.

Workflow

The install mode process flow illustrates the sequence of commands used to install and upgrade software on platforms, highlighting the roles of install activate, install commit, and install add in managing software packages.

These stages describe how the install mode process works:

  1. The system copies and validates the software package using the install add command.
    • Validates the file–checksum, platform compatibility checks, and so on
    • Extracts individual components of the package into subpackages and packages.conf
    • Copies the image into the local inventory and makes it available for the next steps
    The install add command copies the software package from a local or remote location to the platform. The command extracts individual components of the .package file into subpackages and packages.conf files. It also validates the file to ensure that the image file is specific to the platform on which it is being installed. The location of the software package can be in several places, as shown in the output of this command:
    Router# install add file ?
    bootflash: Package name
    crashinfo: Package name
    flash: Package name
    ftp: Package name
    http: Package name
    https: Package name
    pram: Package name
    rcp: Package name
    scp: Package name
    sftp: Package name
    tftp: Package name
    webui: Package name
  2. The system activates the package using the install activate command and triggers a reload.
    • Use the show install summary command to see which image is inactive. This image will get activated
    • System reloads on executing this command. Confirm if you want to proceed with the activation. Use this command with the prompt-level none keyword to automatically ignore any confirmation prompts
    The install activate command performs the required validations and provisions the packages previously added using the install add command. It also triggers a system reload. The auto-abort timer starts automatically with a default value of 120 minutes. If the install commit command is not executed within the time provided, the activation process is terminated, and the system returns to the last-committed state.
  3. The system commits the activated package using the install commit command to make changes persistent.
    • Use the show install summary command to see which image is uncommitted. This image will get committed
    The install commit command confirms the packages previously activated using the install activate command, and makes the updates persistent over reloads.

Boot the platform in install mode

You can install, activate, and commit a software package using a single command (one-step install) or multiple separate commands (three-step install).

If the platform is working in bundle mode, the one-step install procedure must be used to initially convert the platform from bundle mode to install mode. Subsequent installs and upgrades on the platform can be done with either one-step or three-step variants.

You can see how your device is set up to boot by using the show romvar and show bootvar commands.

Router# show romvar 
ROMMON variables:
PS1 = rommon ! > 
CM = IR1800
DEVICE_MANAGED_MODE = autonomous
LICENSE_SUITE = 
RET_2_RTS = 
THRPUT = 250
BOOT = flash:packages.conf,12;
LICENSE_BOOT_LEVEL = network-advantage,all:IR1800;
BSI = 0
RET_2_RCALTS = 
RANDOM_NUM = 212626522
Router#

Router# show bootvar 
BOOT variable = flash:packages.conf,12;
CONFIG_FILE variable does not exist
BOOTLDR variable does not exist
Configuration register is 0x2102

Standby not ready to show bootvar

Router#

Convert from bundle mode to install mode or upgrade the platform using one-step installation

Use the one-step install procedure to convert a platform running in bundle boot mode to install mode. After the command is executed, the platform reboots in install boot mode. Later, you can also use the one-step install procedure to upgrade the platform.

This procedure uses the install add file activate commit command in privileged EXEC mode to install a software package and to upgrade the platform to a new version.


Note


  • All the CLI actions (for example, add and activate) are executed.

  • The configuration save prompt appears if an unsaved configuration is detected.

  • The reload prompt appears after the second step in this workflow. Use the prompt-level none keyword to automatically ignore the confirmation prompts.

  • If the prompt-level is set to None and there is an unsaved configuration, the install fails. You must save the configuration before reissuing the command.


Follow these steps to convert from bundle mode to install mode, or to upgrade the platform using the one-step installation.

Procedure


Step 1

Use the enable command to enable privileged EXEC mode. Enter your password if prompted.

Example:

Router> enable

Step 2

Use the install add file location: filename [activate commit] command to copy the software install package to the platform and extract its components, validate platform and image compatibility, activate the package, and commit it to make it persistent across reloads.

Example:

Router# install add file bootflash:<router_image>.SSA.bin activate commit

Note

 
  • You can copy the software install package from a local or remote location (through FTP, HTTP, HTTPS, or TFTP).

  • This command extracts the individual components of the .package file into subpackages and packages.conf files.

  • The platform reloads after this command is run.

Step 3

Use the exit command to exit privileged EXEC mode and return to user EXEC mode.

Example:

Router# exit

The platform converts from bundle boot mode to install boot mode and reboots. The platform is now ready for future upgrades using the one-step install procedure.

Three-step installation

This procedure provides more flexibility and control during software installation by using the individual install add, install activate, and install commit commands to install a software package and upgrade the platform to a new version.


Note


  • You can use the three-step installation procedure only after the platform is in install mode.

  • All the CLI actions (for example, add and activate) are executed.

  • The configuration save prompt appears if an unsaved configuration is detected.

  • The reload prompt appears after the install activate step in this workflow. Use the prompt-level none keyword to automatically ignore the confirmation prompts.


Follow these steps to perform a three-step installation.

Procedure


Step 1

Use the enable command to enable privileged EXEC mode. Enter your password if prompted.

Example:

Router> enable

Step 2

Use the install add file location: filename command to copy the software install package to the platform and extract the individual components of the .package file into subpackages and packages.conf files.

Example:

Router# install add file bootflash:<router_image>.SSA.bin

Note

 
You can copy the software install package from a remote location (through FTP, HTTP, HTTPS, or TFTP).

Step 3

(Optional) Use the show install summary command to display an overview of the image versions and their corresponding install state.

Example:

Router# show install summary

Step 4

Use the install activate auto-abort-timer time command to activate the previously added package and reload the platform.

Example:

Router# install activate auto-abort-timer 120

Note

 
  • When you do a full software install, do not provide a package filename.

  • In the three-step variant, the auto-abort-timer starts automatically with the install activate command. The default for the timer is 120 minutes. If the install commit command is not run before the timer expires, the install process is automatically terminated. The platform reloads and boots up with the last committed version.

Step 5

(Optional) Use the install abort command to terminate the software install activation and return the platform to the last committed version.

Example:

Router# install abort

Note

 
Use this command only when the image is in the activated state, not when the image is in the committed state.

Step 6

Use the install commit command to commit the new package installation and make the changes persistent across reloads.

Example:

Router# install commit

Step 7

(Optional) Use the install rollback to committed command to roll back the platform to the last committed state.

Example:

Router# install rollback to committed

Step 8

(Optional) Use the install remove {file filesystem: filename | inactive} command to delete software installation files.

Example:

Router# install remove inactive

Note

 
  • file — Deletes a specific file.

  • inactive — Deletes all the unused and inactive installation files.

Step 9

(Optional) Use the show install summary command to display information about the current state of the system.

Example:

Router# show install summary

Note

 
The output of this command varies according to the install commands run prior to this command.
  1. Use the exit command to exit privileged EXEC mode and return to user EXEC mode.

    Example:

    Router# exit

The software package is successfully installed and activated on the platform. The installation is committed and persistent across reloads.

Upgrading in install mode

Use either the one-step installation or the three-step installation to upgrade the platform in install mode.

Downgrading in install mode

Downgrading in install mode is a platform management process that

  • uses the install rollback command to revert the platform to a previous version by pointing it to the appropriate image

  • requires that the target image was previously installed in install mode

  • reloads the platform and boots it with the previous image.

Downgrade requirements and alternatives

The install rollback command has specific requirements and alternatives:

  • The command succeeds only if you have not removed the previous file using the install remove inactive command

  • Alternatively, you can downgrade by installing the older image using the install commands


Note


The install rollback command succeeds only if you have not removed the previous file using the install remove inactive command.


Software installation termination

Software installation termination is a process that:

  • stops the activation of a software package before completion,

  • returns the platform to the previously running software version, and

  • prevents the new software image from being committed to the system.

Termination methods

You can terminate the activation of a software package in these ways:

  • When the platform reloads after activating a new image, the auto-abort-timer is triggered (in the three-step install variant). If the timer expires before issuing the install commit command, the installation process is terminated, and the platform reloads and boots with the last committed version of the software image.

    Alternatively, use the install auto-abort-timer stop command to stop this timer, without using the install commit command. The new image remains uncommitted in this process.

  • Using the install abort command returns the platform to the version that was running before installing the new software. Use this command before issuing the install commit command.

Configuration examples

This section shows examples of using install commands.

One step installation

This example demonstrates the one-step installation process or converting from bundle mode to install mode.

Router# 
install add file flash:ir1800-universalk9.SSA.bin activate commit


install_add_activate_commit: START Mon May 30 20:45:11 UTC 2022
install_add: Adding IMG
--- Starting initial file syncing ---
Copying flash:ir1800-universalk9.SSA.bin from  R0 to  R0
Info: Finished copying to the selected
Finished initial file syncing

--- Starting Add ---
Performing Add on all members
 [1] Finished Add package(s) on  R0
Checking status of Add on [R0]
Add: Passed on [R0]
Finished Add

Image added. Version: 17.09.01.0.157857

install_activate: Activating IMG
Following packages shall be activated:
/flash/ir1800-mono-universalk9.SSA.pkg
/flash/ir1800-rpboot.SSA.pkg

This operation may require a reload of the system. Do you want to proceed? [y/n]y


--- Starting Activate ---
Performing Activate on all members
Building configuration...
[OK] [1] Activate package(s) on  R0
 [1] Finished Activate on  R0
Checking status of Activate on [R0]
Activate: Passed on [R0]
Finished Activate

--- Starting Commit ---
Performing Commit on all members
 [1] Commit package(s) on  R0
 [1] Finished Commit on  R0
Checking status of Commit on [R0]
Commit: Passed on [R0]
Finished Commit operation

SUCCESS: install_add_activate_commit Mon May 30 20:48:01 UTC 2022
%PMAN-5-EXITACTION: R0/0: pvp: Process manager is exiting: reload action requested
watchdog: watchdog0: watchdog did not stop!
reboot: Restarting system


System Bootstrap, Version 3.3(REL), RELEASE SOFTWARE
Copyright (c) 1994-2021  by cisco Systems, Inc.

IR1800-K9 platform with 4169728 Kbytes of main memory

MCU Version - Bootloader: 4, App: 6
MCU is in application mode.


........


Loading: bootflash:packages.conf
#

#####################################################################################
#####################################################################################
#################################

%BOOT-5-OPMODE_LOG: R0/0: binos: System booted in AUTONOMOUS mode
Press RETURN to get started!

Router# show install summary
[ R0 ] Installed Package(s) Information:
State (St): I - Inactive, U - Activated & Uncommitted,
            C - Activated & Committed, D - Deactivated & Uncommitted
--------------------------------------------------------------------------------
Type  St   Filename/Version
--------------------------------------------------------------------------------
IMG   C    17.09.01.0.157857

--------------------------------------------------------------------------------
Auto abort timer: inactive
--------------------------------------------------------------------------------


Complete three-step software installation

The three-step installation process provides a controlled method for upgrading router software by allowing verification at each stage before proceeding to the next step. Use this installation method when you need to upgrade router software with the ability to verify and roll back at each stage if needed.

Follow these steps to complete the three-step software installation.

Procedure


Step 1

Use the install add file filesystem:filename command to add the software image to the router.

Example:

Router# install add file flash:ir1101-universalk9.17.09.01.SPA.bin

Step 2

(Optional) Use the show install summary command to verify that the image is added and in the Inactive (I) state.

Example:

Router# show install summary
            [ R0 ] Installed Package(s) Information:
            State (St): I - Inactive, U - Activated & Uncommitted,
            C - Activated & Committed, D - Deactivated & Uncommitted
            --------------------------------------------------------------------------------
            Type  St   Filename/Version
            --------------------------------------------------------------------------------
            IMG   I    17.09.01.0.1
            --------------------------------------------------------------------------------
            Auto abort timer: inactive
            --------------------------------------------------------------------------------

Step 3

Use the install activate command to activate the software image. When prompted, enter y to proceed with the reload.

Example:

Router# install activate

Step 4

(Optional) After the system reloads, use the show install summary command to verify that the image is in the Activated & Uncommitted (U) state.

Example:

Router# show install summary
            [ R0 ] Installed Package(s) Information:
            State (St): I - Inactive, U - Activated & Uncommitted,
            C - Activated & Committed, D - Deactivated & Uncommitted
            --------------------------------------------------------------------------------
            Type  St   Filename/Version
            --------------------------------------------------------------------------------
            IMG   U    17.09.01.0.1
            --------------------------------------------------------------------------------
            Auto abort timer: inactive
            --------------------------------------------------------------------------------

Step 5

Use the install commit command to commit the software installation.

Example:

Router# install commit

Step 6

(Optional) Use the show install summary command to verify that the image is in the Activated & Committed (C) state.

Example:

Router# show install summary
            [ R0 ] Installed Package(s) Information:
            State (St): I - Inactive, U - Activated & Uncommitted,
            C - Activated & Committed, D - Deactivated & Uncommitted
            --------------------------------------------------------------------------------
            Type  St   Filename/Version
            --------------------------------------------------------------------------------
            IMG   C    17.09.01.0.1
            --------------------------------------------------------------------------------
            Auto abort timer: inactive
            --------------------------------------------------------------------------------

The software image is successfully installed and committed. The install summary shows the image state as "C" (Activated & Committed), confirming that the installation is complete and permanent.

Example

The following is an example of the three-step installation.

This example shows adding the image for various platforms:

install add file flash:ir1101-universalk9.17.09.01.SPA.bin
        install add file flash:ir1800-universalk9.17.09.01.SPA.bin
        install add file flash:ir8140-universalk9.17.09.01.SPA.bin
        install add file flash:ir8340-universalk9.17.09.01.SPA.bin
        install add file flash:c6300-universalk9.17.09.01.SPA.bin

This example shows the output of the add operation:

install_add: START Tue May 31 01:35:40 UTC 2022
        install_add: Adding IMG
        --- Starting initial file syncing ---
        Copying flash:ir1101ir1800ir8140ir8340c6300-universalk9.17.09.01.SPA.bin from R0 to R0
        Info: Finished copying to the selected
        Finished initial file syncing
        
        --- Starting Add ---
        Performing Add on all members
        [1] Finished Add package(s) on R0
        Checking status of Add on [R0]
        Add: Passed on [R0]
        Finished Add
        
        Image added. Version: 17.09.01.0.1
        
        SUCCESS: install_add /flash1/ir1101ir1800ir8140ir8340c6300-universalk9.17.09.01.SPA.bin Tue May 31 01:37:10 UTC 2022
        Router#

This example shows the output of the activate operation:

install_activate: START Tue May 31 01:37:14 UTC 2022
        install_activate: Activating IMG
        Following packages shall be activated:
        /flash/ir1101ir1800ir8140ir8340c6300-mono-universalk9_iot.17.09.01.SPA.pkg
        /flash/ir1101ir1800ir8140ir8340c6300-rpboot.17.09.01.SPA.pkg
        
        This operation may require a reload of the system. Do you want to proceed? [y/n]y
        
        --- Starting Activate ---
        Performing Activate on all members
        [1] Activate package(s) on R0
        [1] Finished Activate on R0
        Checking status of Activate on [R0]
        Activate: Passed on [R0]
        Finished Activate
        
        SUCCESS: install_activate Tue May 31 01:41:03 UTC 2022
        Router#
        May 31 01:41:08.684: %PMAN-5-EXITACTION: R0/0: pvp: Process manager is exiting: reload action requested
        
        watchdog: watchdog0: watchdog did not stop!
        reboot: Restarting system
        
        System Bootstrap, Version 3.3(REL), RELEASE SOFTWARE
        Copyright (c) 1994-2021 by cisco Systems, Inc.
        
        IR1101IR1800IR8140IR8340C6300-K9 platform with 4169728 Kbytes of main memory
        
        MCU Version - Bootloader: 4, App: 6
        MCU is in application mode.
        
        ........
        
        Loading: bootflash:packages.conf
        #
        
        #########################################################################
        #########################################################################
        #######################
        
        Press RETURN to get started!

This example shows the output of the commit operation:

install_commit: START Tue May 31 01:47:56 UTC 2022
        --- Starting Commit ---
        Performing Commit on all members
        [1] Commit packages(s) on R0
        [1] Finished Commit packages(s) on R0
        Checking status of Commit on [R0]
        Commit: Passed on [R0]
        Finished Commit operation
        
        SUCCESS: install_commit Tue May 31 01:48:04 UTC 2022

Show the installed packages

Use these commands to display detailed information about installed packages on your router and identify which package is currently active.

Use the following command to display detailed information about an installed package:

Router# 
show install package flash:ir1800-universalk9.17.09.01.SPA.bin


  Package: ir1800-universalk9.17.09.01.SPA.bin
    Size: 674114352
    Timestamp:
  Canonical path: /flash1/ir1800-universalk9.17.09.01.SPA.bin

    Raw disk-file SHA1sum:
      e54ba5a59824156af7515eaf4367ebe51b920316
  Header size:     1148 bytes
  Package type:    30000
  Package flags:   0
  Header version:  3

  Internal package information:
    Name: rp_super
    BuildTime: 2022-04-27_00.47
    ReleaseDate: 2022-04-27_07.05
    BootArchitecture: arm64
    RouteProcessor: IR1800
    Platform: IR1800
    User: mcpre
    PackageName: universalk9
    Build: 17.09.01
    CardTypes:

  Package is bootable from media and tftp.
  Package contents:

  Package: ir1800-mono-universalk9_iot.17.09.01.SPA.pkg
    Size: 673776700
    Timestamp:

    Raw disk-file SHA1sum:

    Header size:     1084 bytes
    Package type:    30000
    Package flags:   0
    Header version:  3

    Internal package information:
      Name: mono
      BuildTime: 2022-04-27_00.47
      ReleaseDate: 2022-04-27_07.05
      BootArchitecture: arm64
      RouteProcessor: IR1800
      Platform: IR1800
      User: mcpre
      PackageName: mono-universalk9_iot
      Build: 17.09.01
      CardTypes:

    Package is bootable from media and tftp.
    Package contents:

You can determine which package is active using the show install active command.

Router# show install active 
[ R0 ] Active Package(s) Information:
State (St): I - Inactive, U - Activated & Uncommitted,
C - Activated & Committed, D - Deactivated & Uncommitted
--------------------------------------------------------------------------------
Type St Filename/Version
--------------------------------------------------------------------------------
IMG C 17.09.01.0.1193

--------------------------------------------------------------------------------
Auto abort timer: inactive
--------------------------------------------------------------------------------

Show committed and uncommitted packages

These two show commands provide information on which packages are committed and uncommited.

Router# show install committed
[ R0 ] Committed Package(s) Information:
State (St): I - Inactive, U - Activated & Uncommitted,
            C - Activated & Committed, D - Deactivated & Uncommitted
--------------------------------------------------------------------------------
Type  St   Filename/Version
--------------------------------------------------------------------------------
IMG   C    17.09.01.0.1

--------------------------------------------------------------------------------
Auto abort timer: inactive
--------------------------------------------------------------------------------
Router# show install uncommitted
[ R0 ] Uncommitted Package(s) Information:
State (St): I - Inactive, U - Activated & Uncommitted,
            C - Activated & Committed, D - Deactivated & Uncommitted
--------------------------------------------------------------------------------
Type  St   Filename/Version
--------------------------------------------------------------------------------
No Uncommitted Packages

Remove inactive packages

This command will remove unused installation files (.conf/.pkg/.bin) from installation media.


Note


This command is used to clean up the boot directory of unused installation files. This will not remove the bootable image.


Router#install remove inactive
install_remove: START Tue May 31 01:49:10 UTC 2022
install_remove: Removing IMG
Cleaning up unnecessary package files
No path specified, will use booted path /bootflash/packages.conf

Cleaning /flash
  Scanning boot directory for packages ... done.
  Preparing packages list to delete ...
    [R0]: /flash/packages.conf File is in use, will not delete.
    [R0]: /flash/ir1800-mono-universalk9_iot.17.09.01.SPA.pkg File is in use, will not delete.
    [R0]: /flash/ir1800-universalk9.17.09.01.SPA.conf File is in use, will not delete.
    [R0]: /flash/ir1800-rpboot.17.09.01.SPA.pkg File is in use, will not delete.

The following files will be deleted:
    [R0]: /flash/ir1800-universalk9.17.09.01.SPA.bin
    [R0]: /flash/ir1800-mono-universalk9_iot.SSA.pkg
    [R0]: /flash/ir1800-universalk9.SSA.conf
    [R0]: /flash/ir1800-rpboot.SSA.pkg

Do you want to remove the above files? [y/n]y


Deleting file /flash/ir1800-universalk9.17.09.01.SPA.bin ... done.
Deleting file /flash/ir1800-mono-universalk9_iot.SSA.pkg ... done.
Deleting file /flash/ir1800-universalk9.SSA.conf ... done.
Deleting file /flash/ir1800-rpboot.SSA.pkg ... done.
Deleting /bootflash/.images/17.09.01.0.1.1651045630 ... done.
SUCCESS: Files deleted.

--- Starting Post_Remove_Cleanup ---
Performing REMOVE_POSTCHECK on all members
Finished Post_Remove_Cleanup
SUCCESS: install_remove Tue May 31 01:49:14 UTC 2022

Router#show install inactive
[ R0 ] Inactive Package(s) Information:
State (St): I - Inactive, U - Activated & Uncommitted,
            C - Activated & Committed, D - Deactivated & Uncommitted
--------------------------------------------------------------------------------
Type  St   Filename/Version
--------------------------------------------------------------------------------
No Inactive Packages


Troubleshoot software installation using install commands

Troubleshooting the software installation and resolving other installation issues.

Software installation troubleshooting commands

Use these show commands to view installation summary, logs, and software versions.

  • show install summary

  • show install log

  • show version

  • show version running

Other installation issue resolution

Use these commands to resolve installation issue:

  • dir < install directory>

  • more location: packages.conf

  • show tech-support install : this command automatically runs the show commands that display information specific to installation.

  • request platform software trace archive target bootflash < location> : this command archives all the trace logs relevant to all the processes running on the system since the last reload, and saves this information in the specified location.