How to Purchase and Set Up Web Filter Licensing on the RV34x Series Routers
Available Languages
Objective
This article explains how to purchase and register a Cisco Smart Software RV Security License on the RV34x series router.
At the time of publication, the only Cisco Business license that requires a Smart Account is the Security License.
Click if you are looking for information on AnyConnect Licensing for your VPN.
There are two types of security licenses available for the RV34x series routers:
Type |
Product ID |
Description |
|---|---|---|
|
RV Security License |
LS-RV34X-SEC-1YR= |
RV Security: 1 year: Dynamic Web Filter, Application Visibility, Client Identification and Statistics, Gateway Antivirus, and Intrusion Prevention System IPS. |
|
Umbrella RV Branch License |
UMB-BRAN-RV |
1-Year Cisco RV-Branch license. Uses Cisco Umbrella Licensing. Provides detailed security reporting for all hosts behind the router. For customers using only the RV series of routers, an affordable Cisco Umbrella branch license is available. |
The focus of this article is on the RV Security License. If you prefer to purchase the Umbrella RV Branch License, click here.
The licensed security features are available without charge for the first 90 days you use your router. Should you wish to continue using the advanced security features on your router after the evaluation period, then you must acquire and activate a license.
The RV Security License provides Web Filtering. Web Filtering is a feature that allows you to manage access to inappropriate websites. It can screen a client’s web access requests to determine whether to allow or deny that website.
Other RV Security License features that protect your network from attacks from the Internet:
- Intrusion Prevention System (IPS): Inspects network packets, logs and/or blocks a wide range of network attacks. It delivers increased network availability, faster remediation and comprehensive threat protection.
- Antivirus: Protection from viruses by scanning the applications for various protocols like HTTP, FTP, SMTP Email attachments, POP3 Email attachments and IMAP Email attachments going through the router.
- Web Security: Enables business efficiency and security while connecting to the Internet, allows Internet access policies for end devices and Internet applications to help ensure performance and security. It is cloud based and contains more than 80 categories with more than 450 million domains classified.
- Application Identification: Identify and assign policies to Internet applications. 500 unique applications are automatically identified.
- Client Identification: Identify and categorizes clients dynamically. The ability to assign policies based on end device category and operating system.
To learn more about the RV Security License features, click here.
Applicable Devices
- RV340
- RV340W
- RV345
- RV345P
Software Version
- 1.0.03.20
Table of Contents
- Obtain a CCO ID
- Create a Smart Account
- Purchase a Security License
- Set Up the RV Security License on your RV34x Series Router
Obtain a CCO ID
If you already have an account, you can skip to the next section of this article.
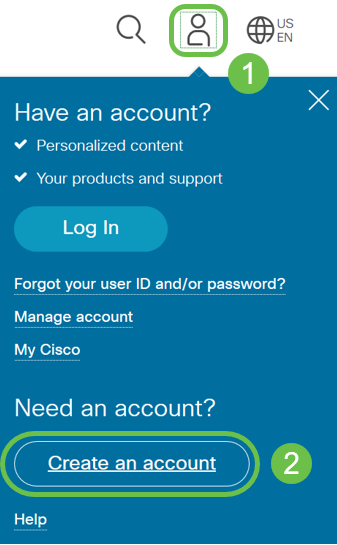
If you do not have a Cisco Connection Online Identification (CCO ID), go to Cisco.com. Click the person icon and then Create an account.
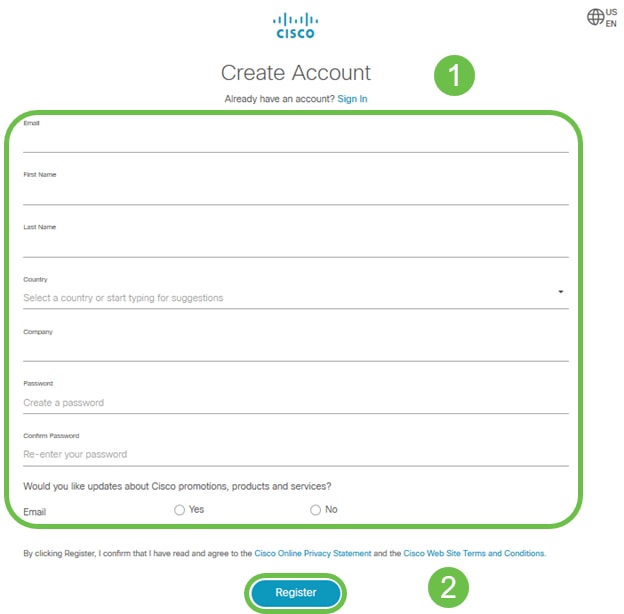
Enter the required details to create the account and click Register. Follow the instructions to complete the registration process.
Create a Smart Account
When you access your general Cisco account using your CCO ID, you may be greeted by a message to create a Smart Account.
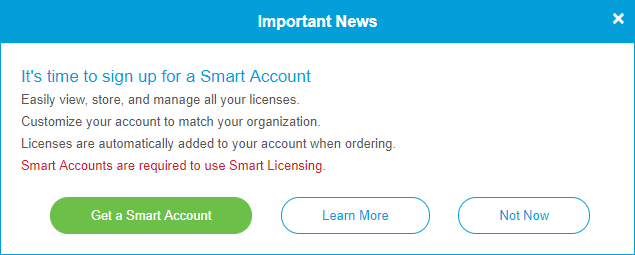
If you haven’t seen this pop-up, you can click to be taken to the Smart Account creation page. You may need to log in with your CCO ID credentials.
For additional detail on the steps involved in requesting your Smart Account, click here.
Be sure to take note of your account name along with other registration details.
Quick Tip: If you are required to enter a domain and you do not have one, you can enter your email address in the form of name@domain.com.
Purchase a Security License
You must purchase a license from your Cisco distributor or your Cisco partner. To locate a Cisco partner, click here.
The table below displays the part number for the license.
Type |
Product ID |
Description |
|---|---|---|
|
RV Security License |
LS-RV34X-SEC-1YR= |
RV Security: 1 year: Dynamic Web Filter, Application Visibility, Client Identification and Statistics, Gateway Antivirus, and Intrusion Prevention System IPS. |
Set Up the RV Security License on the RV34x Series Router
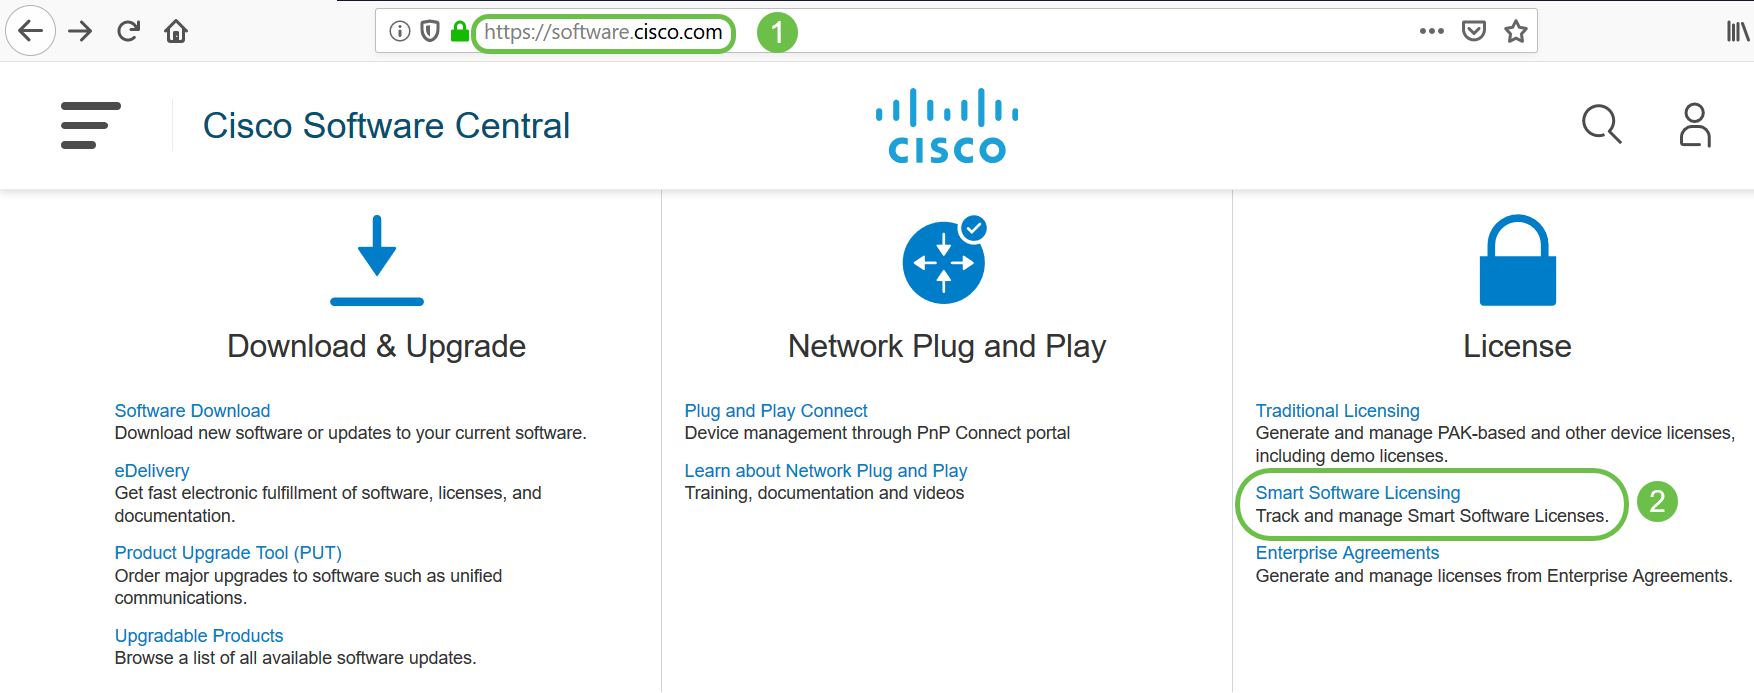
Step 1. Access Cisco Software and navigate to Smart Software Licensing.
Step 2. Enter your Username or email and Password to log into your Smart Account. Click Log in.

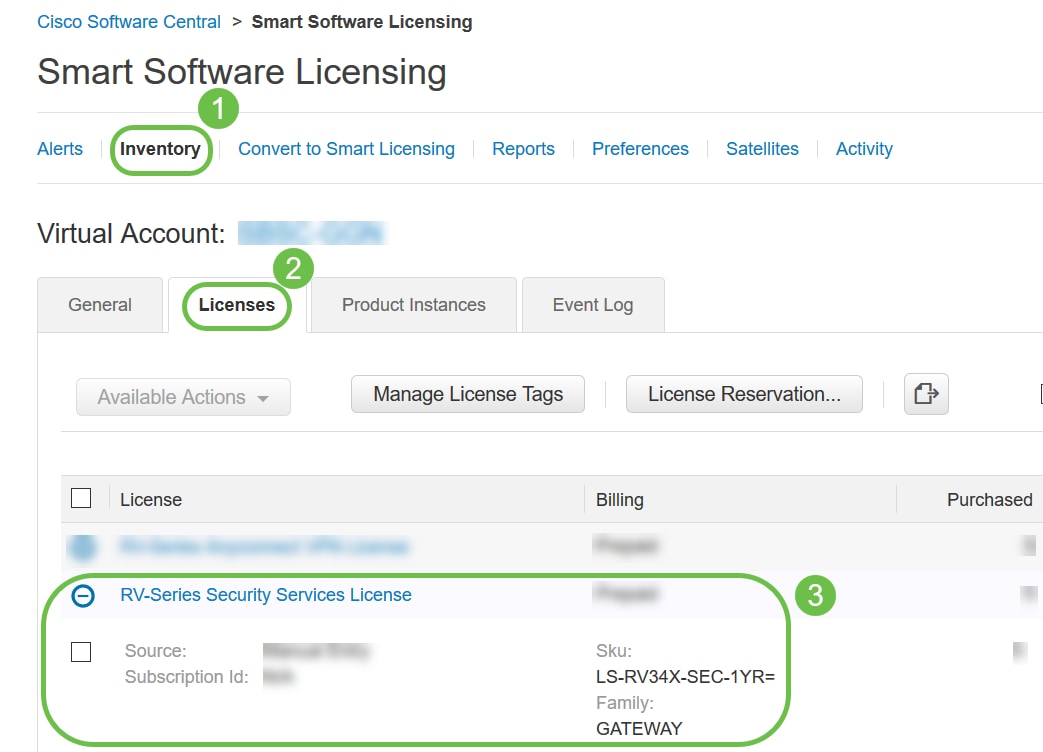
Step 3. Navigate to Inventory > Licenses and verify that the RV-Series Security Services License is listed on your Smart Account. If you do not see the license listed, contact your Cisco partner.
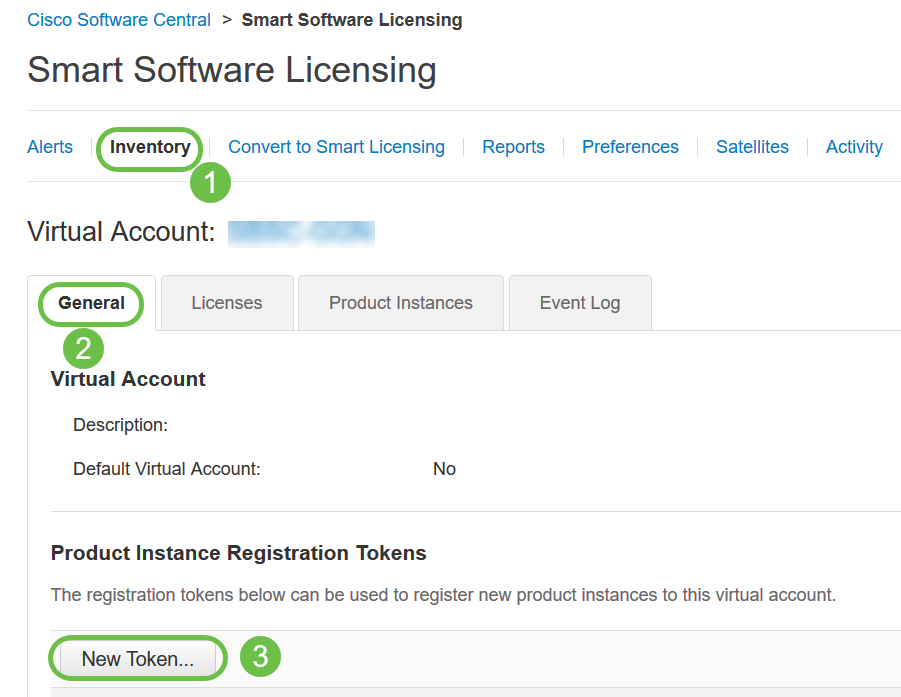
Step 4: Navigate to Inventory > General. Under Product Instance Registration Tokens click on New Token.
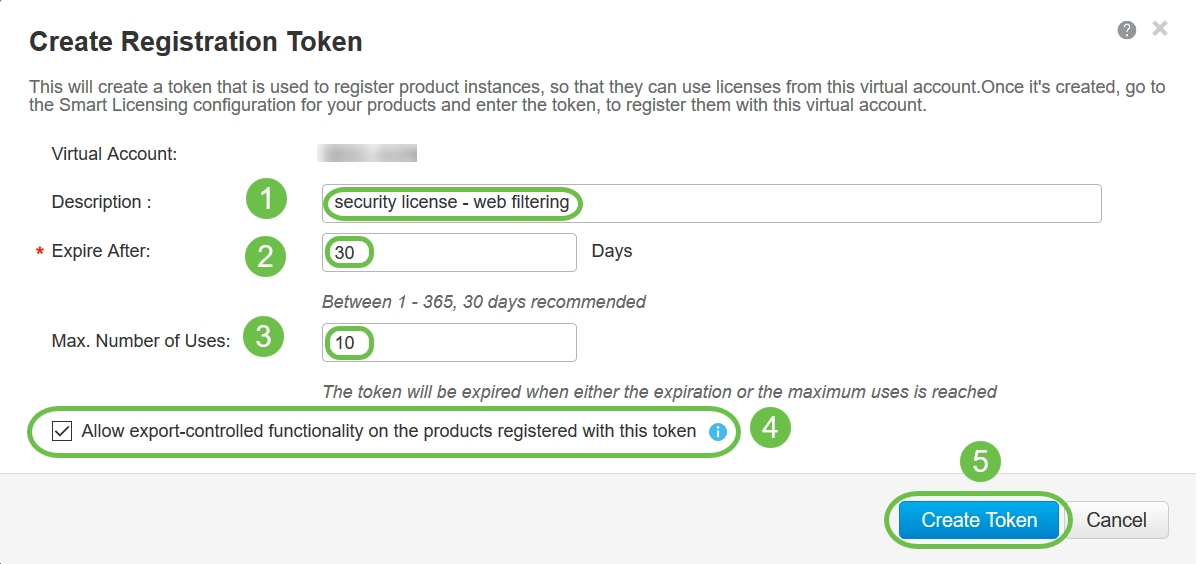
Step 5. A Create Registration Token window will appear. The Virtual Account area displays the virtual account under which the registration token will be created. On the Create Registration Token page, complete the following:
- In the Description field, enter a unique description for the token. In this example, security license – web filtering is entered.
- In the Expire After field enter a value between 1 to 365 days. Cisco recommends the value 30 days for this field; however, you may edit the value to fit your needs.
- In the Max. Number of Uses field enter a value to define the number of times you want to use that token. The token will expire when either the amount of days or the maximum number of uses is reached.
- Check the Allow export-controlled functionality on the products registered with this token check box to enable the export-controlled functionality for tokens of a product instance in your virtual account. Uncheck the check box if you do not want to allow the export-controlled functionality to be made available for use with this token. Use this option only if you are compliant with the export-controlled functionality. Some export-controlled features are restricted by the United States Department of Commerce. These features are restricted for products registered using this token when you uncheck the check box. Any violations are subjected to penalties and administrative charges.
- Click Create Token to generate the token.
You have now successfully generated a product instance registration token.

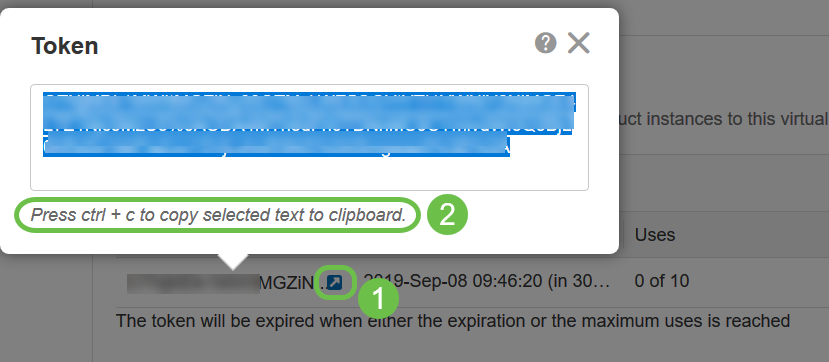
Step 6. Click the arrow in the Token column, to copy the token to the clipboard press ctrl + c on your keyboard.
Step 7. (Optional) Click the Actions drop-down menu, choose Copy to copy the token to the clipboard or Download… to download a text file copy of the token from which you may copy.

Step 8. Log in to the web-based utility of the RV34x router using the login credentials; the default username and password is cisco. If you have pre-configured the username and password, use that to log into the router. Click Login.
For detailed information, click how to access the web-based setup page of Cisco RV340 series VPN routers.

Step 9. Navigate to License and verify the Registration Status is showing as Unregistered and License Authorization Status is showing as Evaluation Mode.

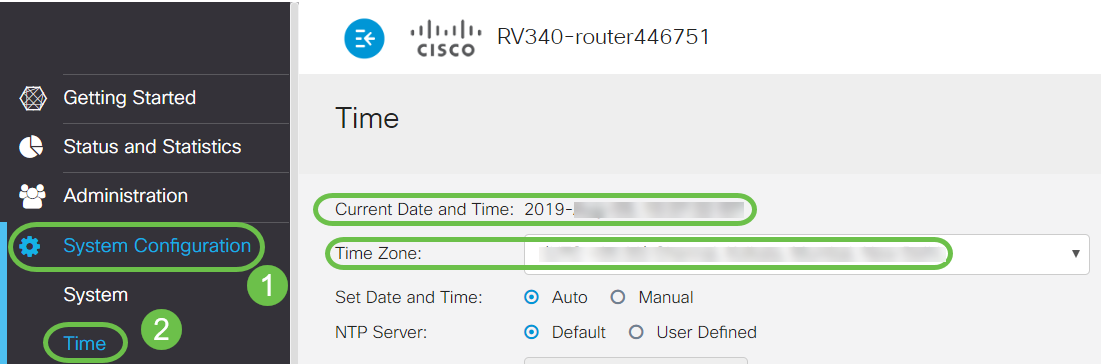
Step 10. Navigate to System Configuration > Time menu and verify the Current Date and Time and Time Zone are reflecting correctly as per your time zone.
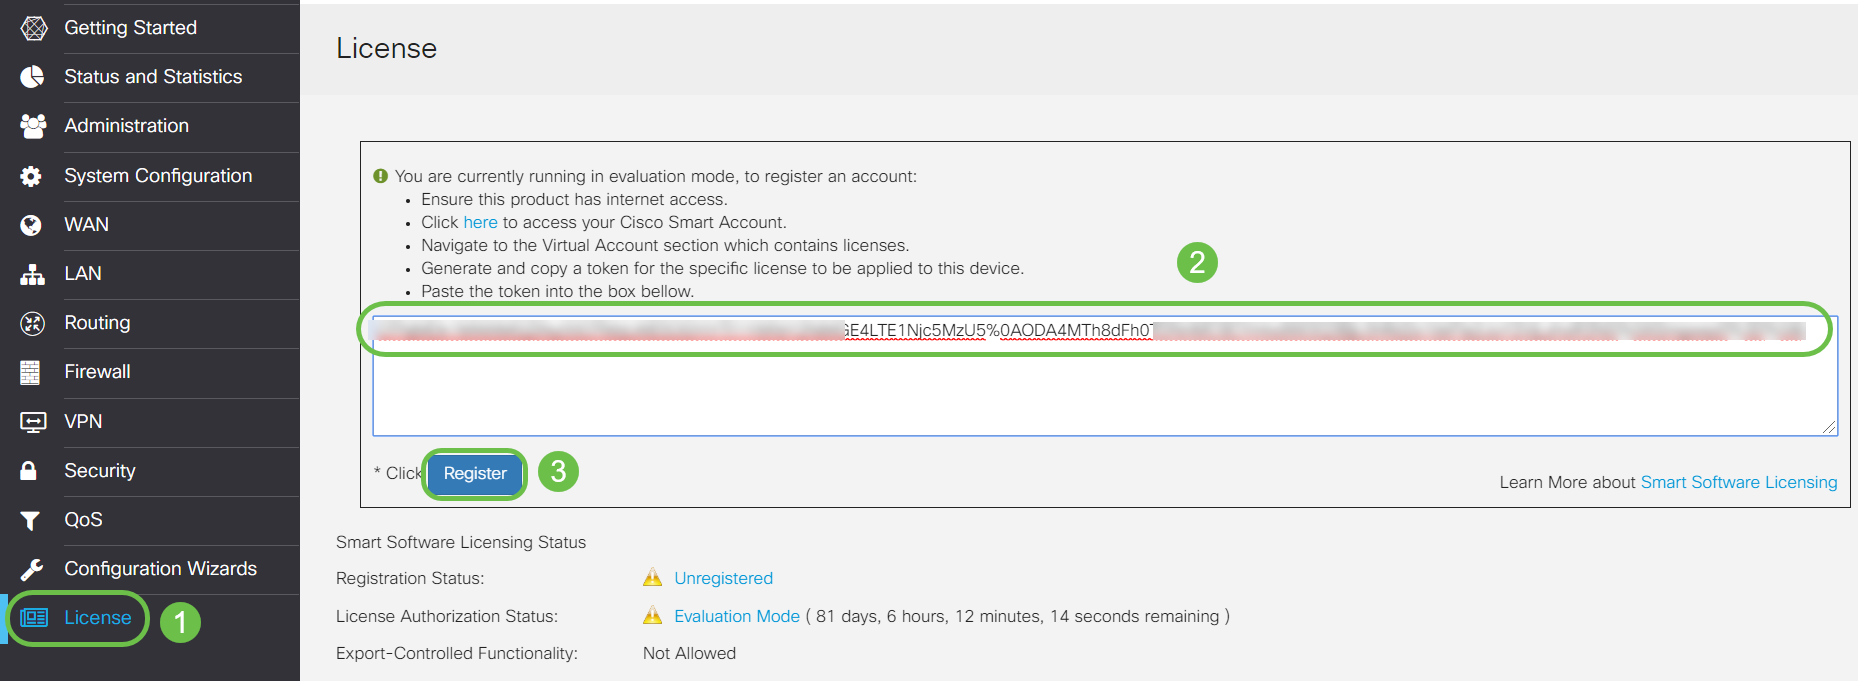
Step 11. Navigate to License. Paste the copied token in step 6 on the text box under the License tab by selecting ctrl + v on your keyboard. Click Register.
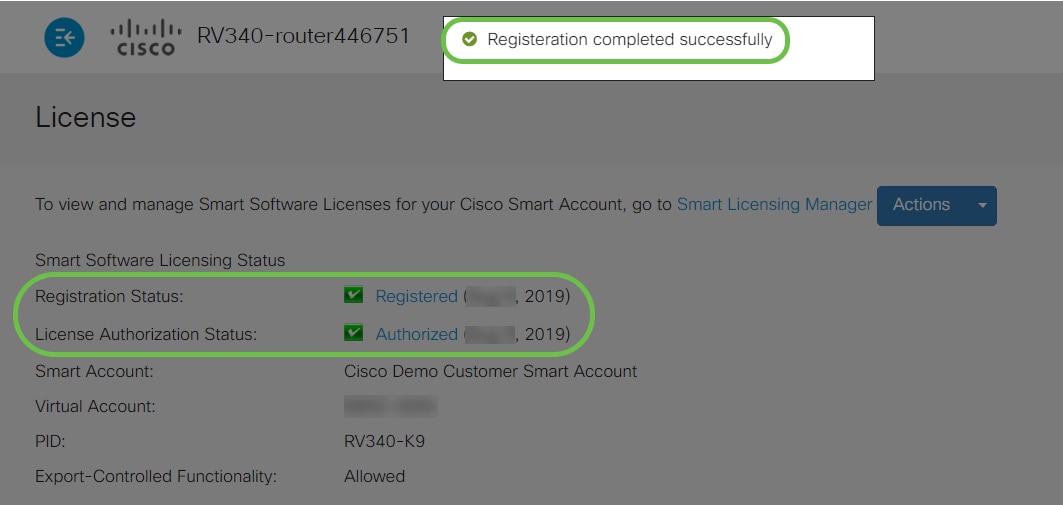
Step 12. You should now have successfully registered and authorized your RV34x Series router with a Smart License. You will get a notification on the screen Registration completed successfully. Also, you will be able to see that the Registration Status is showing as Registered and License Authorization Status is showing as Authorized.
Step 13. (Optional) To view more detail of the Registration Status of the license, hover your pointer over the Registered status. A dialog message appears with the following information:
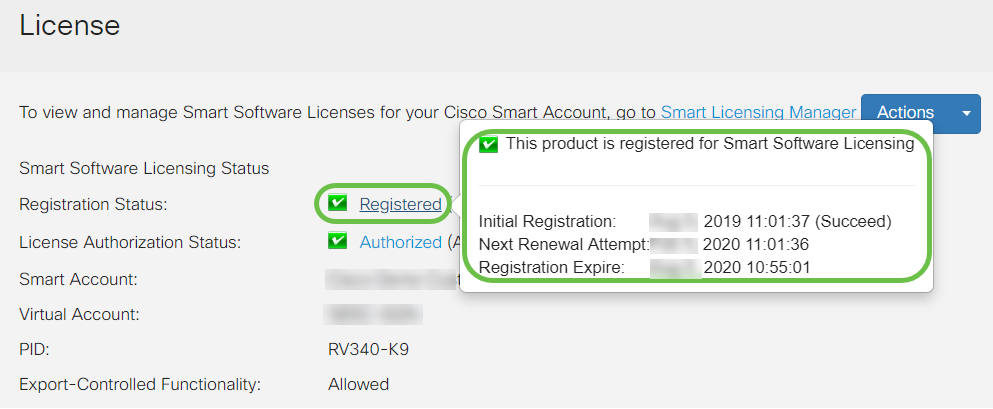
- Initial Registration — This area indicates the date and time the license was registered.
- Next Renewal Attempt — This area indicates the date and time the router will attempt to renew the license.
- Registration Expire — This area indicates the date and time the registration expires.
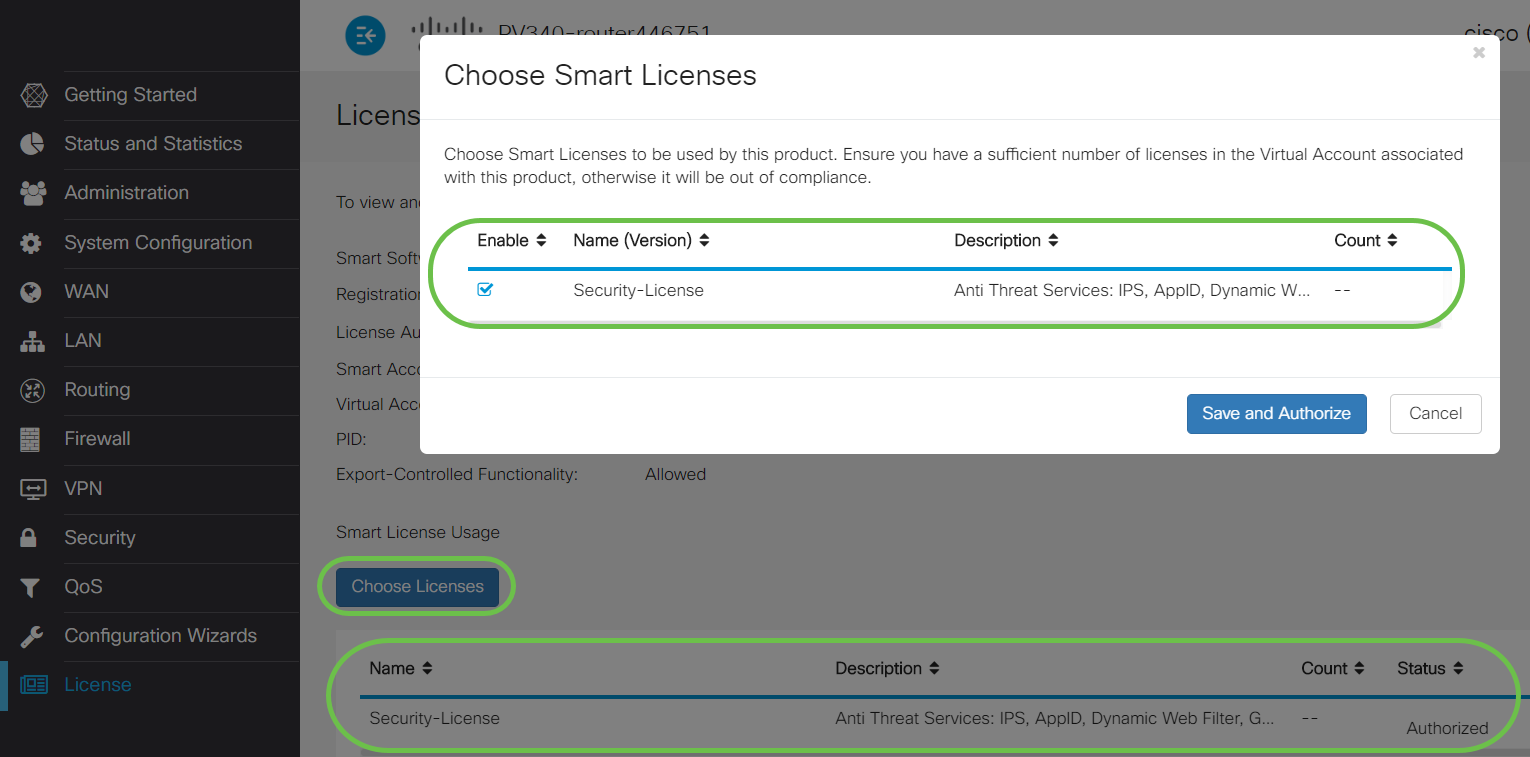
Step 14. On the License page verify the Security-License status is showing Authorized. You may also click on the Choose License button to verify the Security-License is enabled.
Step 15. (Optional) To Refresh License State or Deregister the license from the router, click on the Smart Licensing Manager Actions drop-down menu and select the action item as per your needs.

Conclusion
Congratulations! You have now successfully registered a security license on an RV34x series router.