Configure LDAP on UCS Manager & CIMC Using Linux OpenLDAP and 389-DS Servers
Available Languages
Contents
Introduction
This document describes a variety of options to configure LDAP as an authentication method for UCS Manager and CIMC using Linux based OpenLDAP and 389 Directory Servers.
Background Information
Due to the extensive variability of OpenLDAP server configurations, an exhaustive treatment is beyond the scope of this document. This article instead emphasizes commonly implemented configurations spanning multiple Linux distributions, LDAP server packages, and attribute schemas. For the purpose of clarity and simplicity, this document addresses standard LDAP configurations. Configuration of Secure LDAP (LDAPS) is not covered in this document.
Prerequisites:
Knowledge of these topics is highly recommended:
- UCS B series
- UCS C series
- Linux Sever administration
Components Used
The information in this document is based on these software and hardware versions:
- UCS Manager firmware version: 4.3(2c)
- Fabric Interconnect model: UCS-FI-6454
- UCS C Series Standalone Server model: UCSC-C240-M5
- UCS C Series Standalone firmware version: 4.3(2.250045)
- Ubuntu 20.04
- CentOS Stream 10
Settings used for this demonstration:
- LDAP Server hostname: test
- Server domain: xxxxxxxxx.com
- Server FQDN: test.xxxxxxxxx.com
- Linux Server (Ubuntu and CentOS) IP address: X.X.X.19
- OpenLDAP Users(s): testuser1, testuser2
- OpenLDAP Group(s): it
- OpenLDAP Bind User account: bind_user
Note: the linux Nano text editor was used in this lab.
The information in this document was created from the devices in a specific lab environment. All of the devices used in this document started with a cleared (default) configuration. If your network is live, ensure that you understand the potential impact of any command.
Scenario 1: Ubuntu - Debian
LDAP server configuration can be performed using either a graphical interface, such as LDAP Account Manager, or command-line tools, depending on administrative preference and required level of control. This scenario examines configuration using Linux-based OpenLDAP, beginning with a GUI-based deployment and subsequently transitioning to command-line utilities to explore advanced capabilities, including overlay plugins (commonly utilized in integrations with Cisco UCS Manager).
Option 1: Configure OpenLDAP using Ubuntu LDAP Account Manager (LAM)
Step 1: Initial Configuration of the Linux server hostname and net-tools.
Update ubuntu and install the net-tools package for access to tools like ifconfig, netstat etc:
sudo apt update
sudo apt install net-tools
Use the “ifconfig” command to verify the server IP address, then add it to the “/etc/hosts” file along with the server domain name (For Example: "test.xxxxxxxxx.com" used in this lab) and hostname (For Example: "test") in the specified format.
sudo nano /etc/hosts
Additionally, update the “/etc/hostname” file by replacing its contents with the hostname (test).
sudo nano /etc/hostname
A server reboot is required for these changes to take effect.
sudo rebootStep 2: Install SLAPD, Apache, PHP and their dependencies
Next, Install Apache, PHP and their dependencies. These are used to enable GUI interaction over a web page :
sudo apt install apache2 php php-cgi libapache2-mod-php php-mbstring php-common php-pear -yInstall Open LDAP server package ”slapd” and its dependencies (ldap-utils)
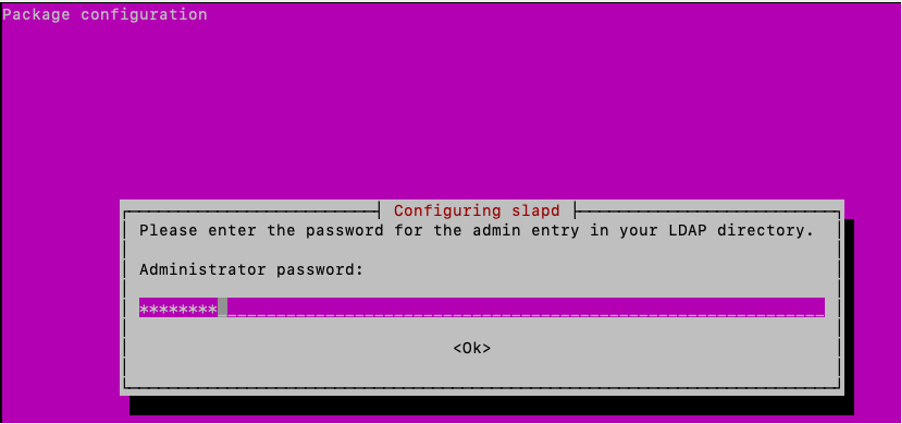
sudo apt install slapd ldap-utils -yDuring slapd installation, in the GUI pop up presented - enter the extra required SLAPD package configuration.

Note: Loosing password requires a reinstall of the LDAP server.
The “administrator” (admin) in this context is an account that is used to manage the OpenLDAP service, modules and configurations.
Add the LDAP package “administrator” password and hit enter on the keyboard to select “OK”.
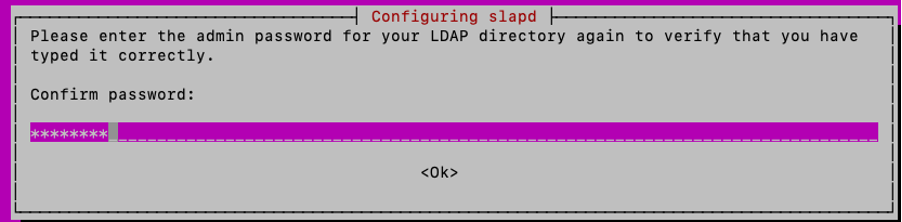
Confirm the password:
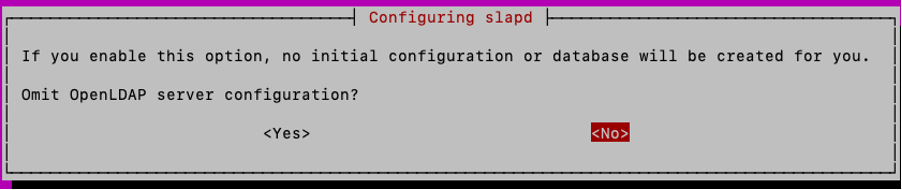
Once the installation is completed, you can use the specified command to reconfigure the SLAPD package, adding domain information:
sudo dpkg-reconfigure slapdYou can accept the default “No” option for the “Omit OpenLDAP server Configuration” and hit enter:
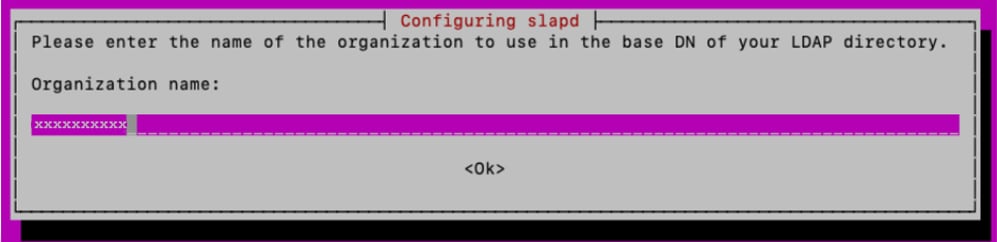
Type in the domain name and press enter:
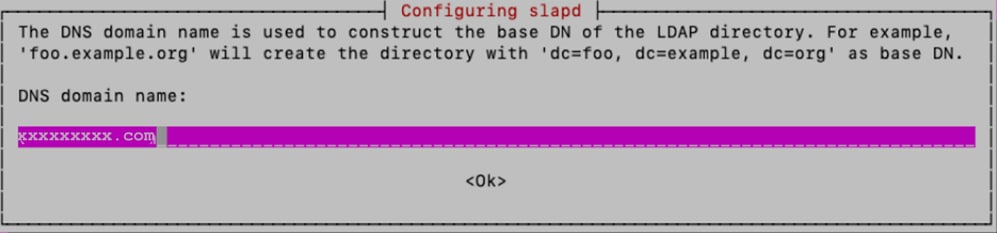
For this lab, “xxxxxxxxx” is used as “Organization name”:
Next, type the “Administrator password”, confirm it
For the other configuration options, keep the defaults and press the Enter key on the keyboard to complete configuration.
Verify SLAPD installation using the command:
sudo slapcat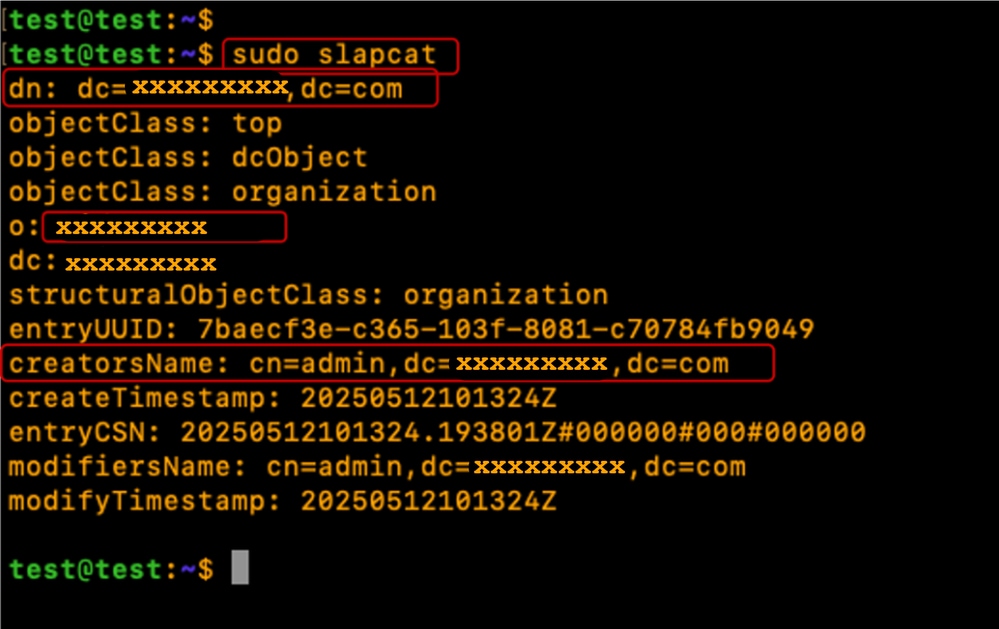
Step 3: Install LDAP Account Manager
Install LDAP Account Manager (LAM) for the creation and management of LDAP Users and Groups:
sudo apt -y install ldap-account-managerEnable PHP-CGI PHP extension, required by LAM.
sudo a2enconf php*-cgiReload Apache to activate the new configuration.
Restart and Enable Apache service to auto-start at boot time:
sudo systemctl reload apache2
sudo systemctl restart apache2
sudo systemctl enable apache2
Verify the Apache Server status is “Running" and "Active”
sudo systemctl status apache2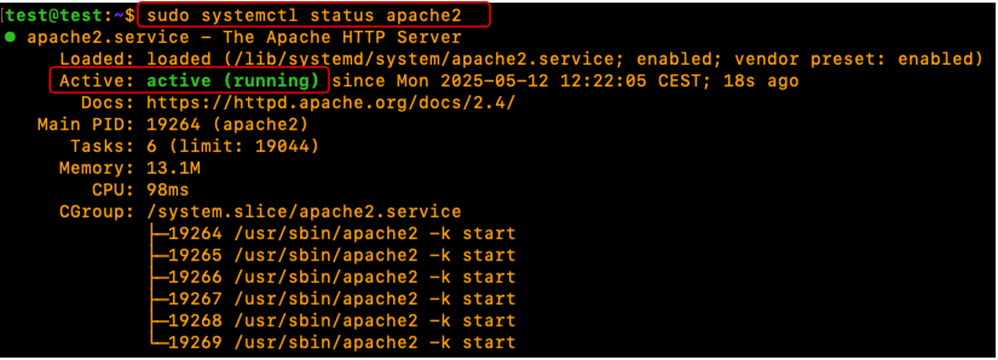
Configure Ubuntu Firewall to allow Port 80(Web), 443 (secure Web), 389(LDAP) and 636 (Secure LDAP if required)
sudo ufw enable
sudo ufw allow 22 <optional>
sudo ufw allow 80
sudo ufw allow 443
sudo ufw allow 389 <LDAP port number>
sudo ufw allow 636 <Secure LDAP port number - optional>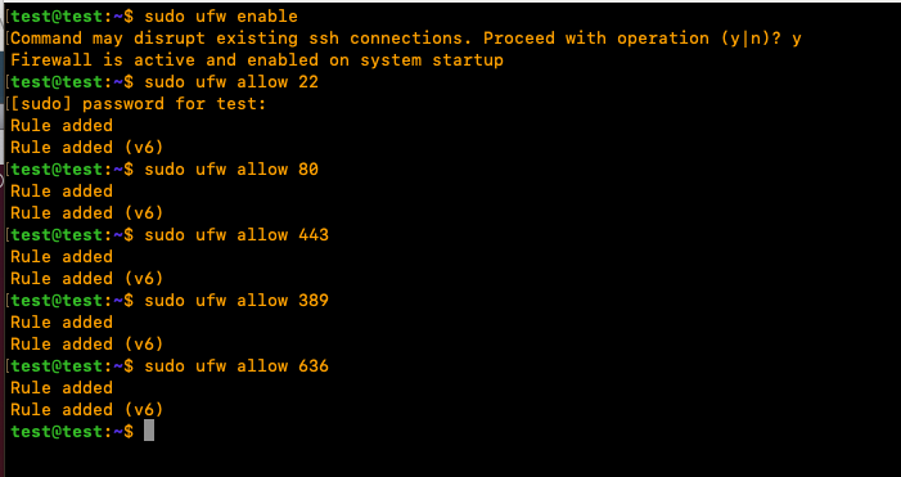
Verify the Ubuntu Firewall status:
sudo ufw status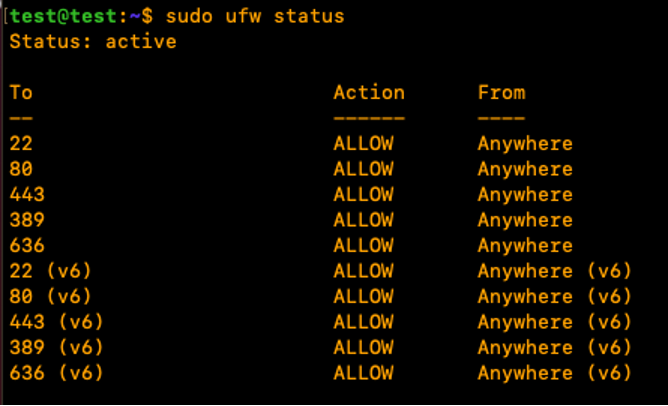
Step 4: Configure LDAP Account Manager
To configure LDAP Account Manager (LAM) from the GUI, open a web browser, enter the Linux server IP address and add the 'lam' path to it as shown:
http://X.X.X.19/lam
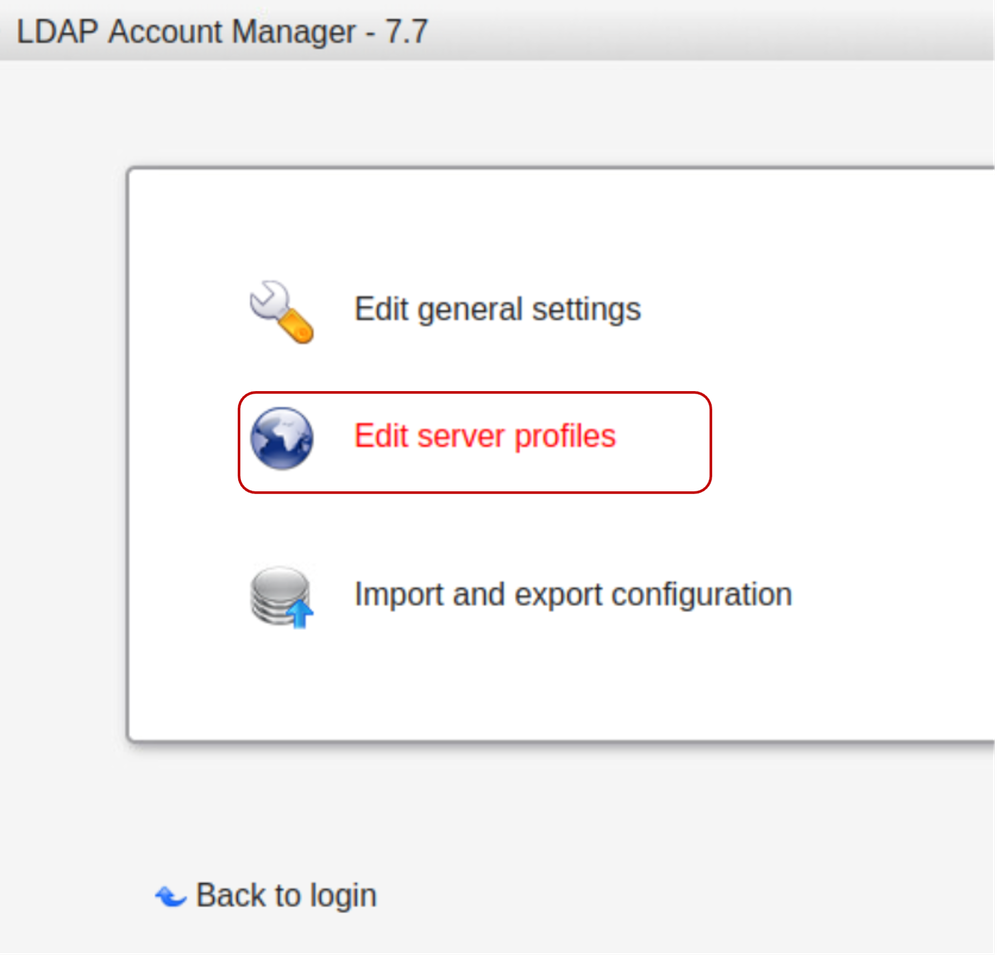
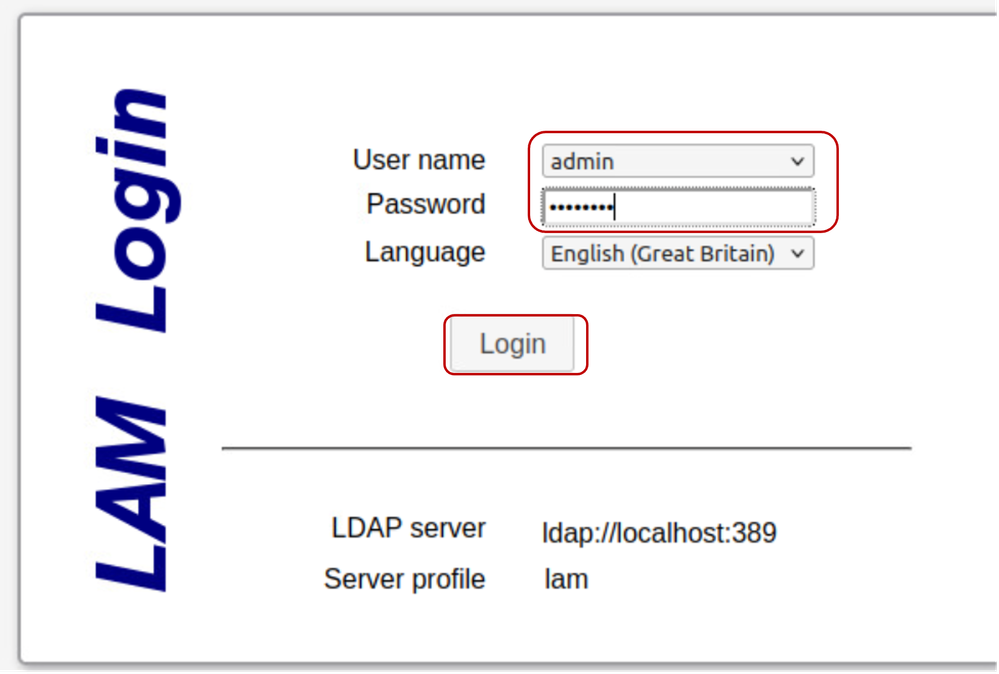
Click on"LAM configuration” then select “Edit server profiles”.
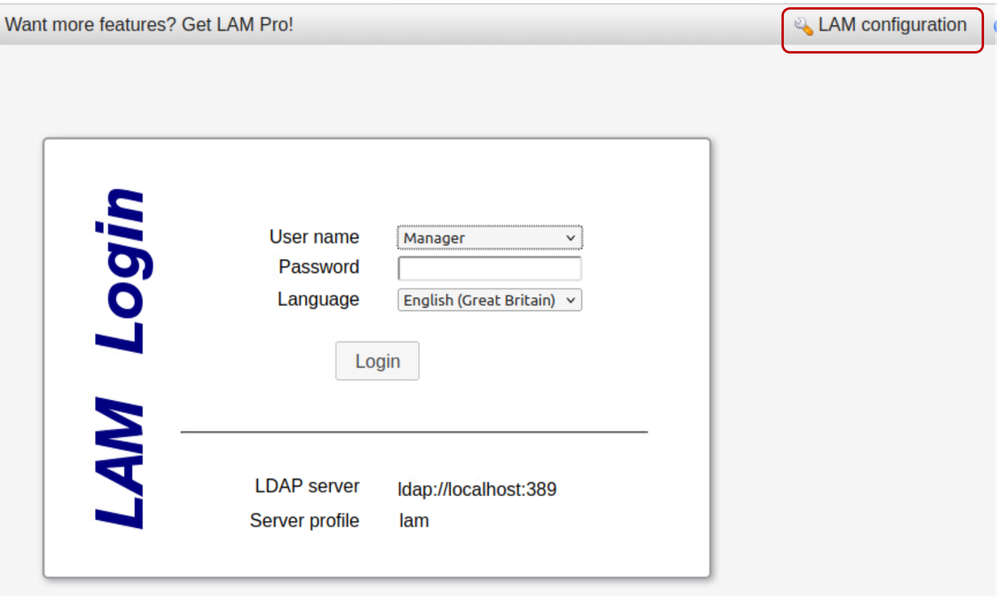
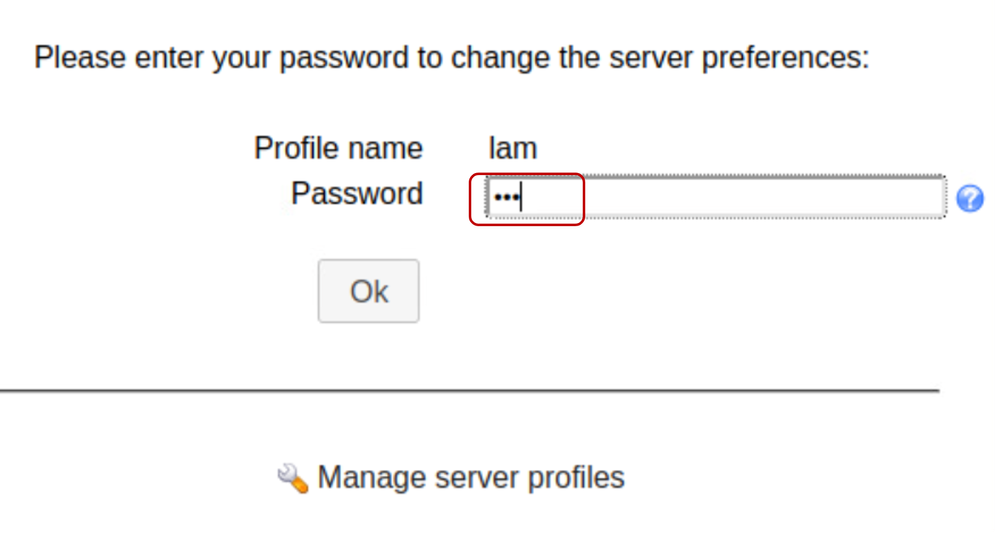
Type in the default lam password “lam” to log in.
Within the General Settings tab, verify the Server settings, “Language” and “Timezone”.
In the Tool settings section, edit and add the required domain name in the Tree suffix field as shown below:

Edit the Security settings section to include an “admin” user used to manage the SLAPD service.

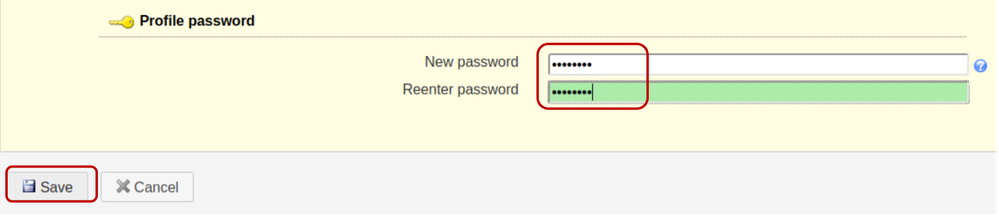
Set a “Profile Password”. This password is used for subsequent logins to the LAM configuration interface, for this example "cisco123" is configured instead of the default “lam” password.
Save the configuration:
The session is then restarted on the LAM configuration GUI interface.
Log back in (LAM configuration >> Edit server profiles) using the new password created.
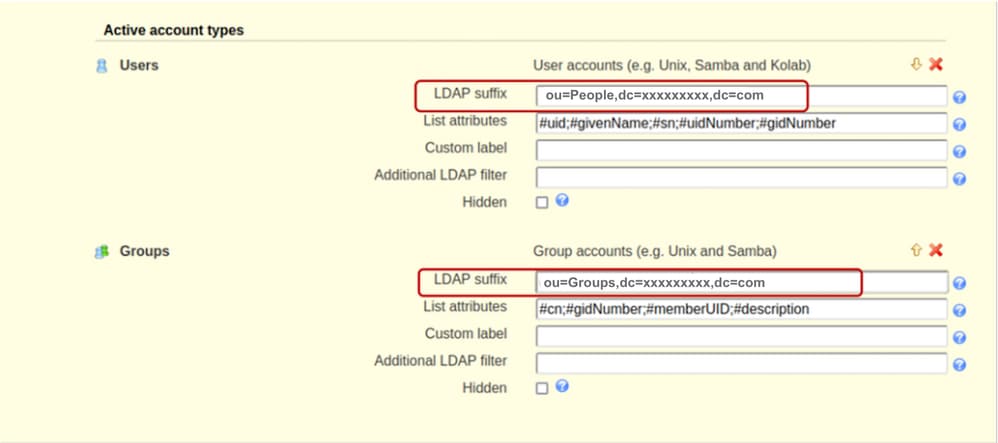
Click on the “Account types”,

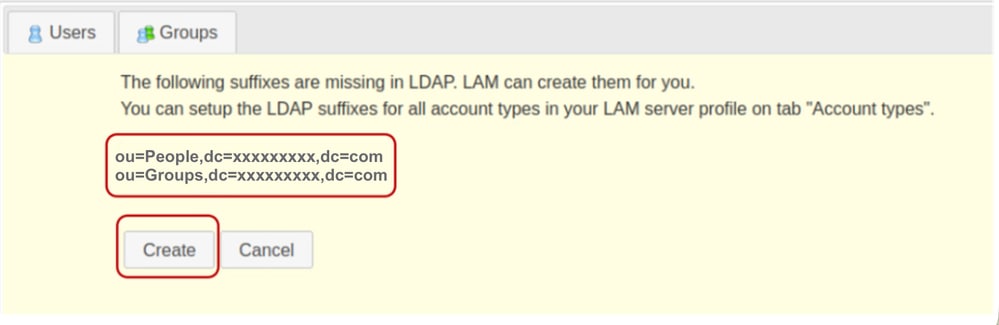
Scroll down and edit the default Active account types with the domain name information in the LDAP suffix field. As an example, the default content of the “LDAP suffix” field displays a value as “ou=People,dc=my-domain,dc=com”.
In the case there is a need to create new Organisational Units, replace the content of the “LDAP suffix” field to contain the name of the Organisational Unit.
The format is shown as “ou=<organizational_unit>,dc=xxxxxxxxx,dc=com”.
For this demonstration, the OU for Users is “People” and the OU for Groups is “Groups”.
Save the configuration.
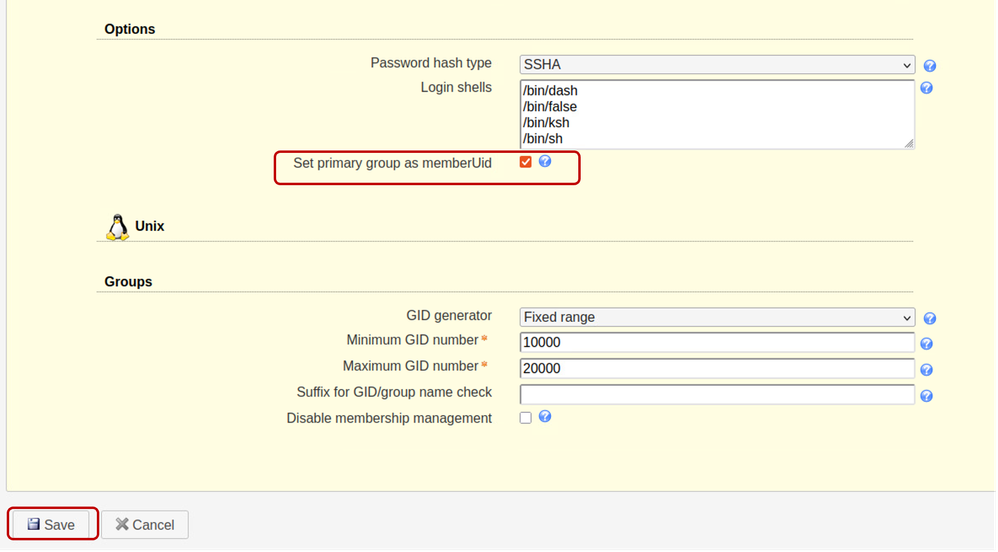
Scroll down to Options section and ensure to check the “Set primary group as memberUid”.
By default the “Set primary group as memberUid” option is not set on group objects. Activating this allows for the use of OpenLDAP “Primary group” like a standard LDAP group, where the “memberUid” can be referenced (For Example: In the UCS C series server configuration). If this option is unchecked, login for users that belong to any Primary group fails.
Save the Configuration.
Step 5: Create OUs, Groups and Users
Log into LAM as the “admin” user with the same password created during installation, to create Users and Groups belonging to the earlier created OUs (People and Groups) respectively:
Create the earlier specified OUs in the LAM Configuration section.
Click on Create.
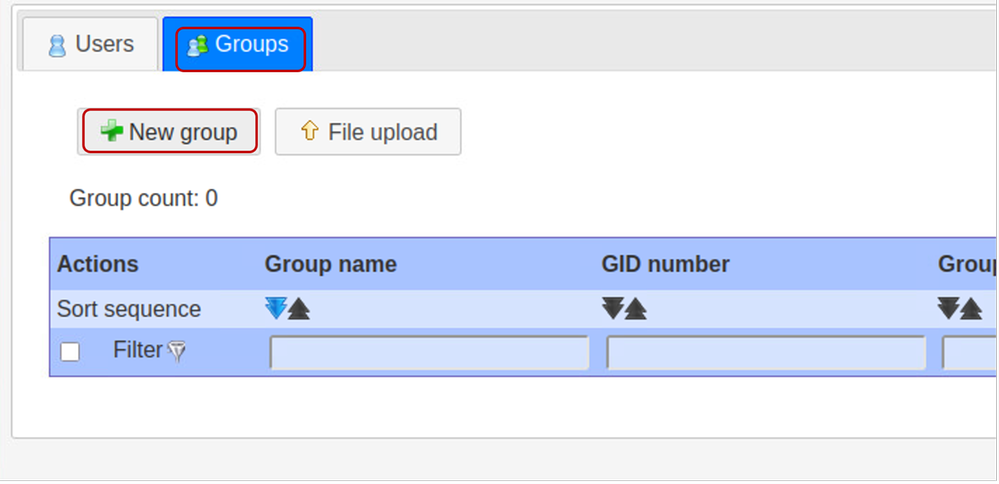
Next, in LDAP Account Manager, create the "it" Group:
Select the Groups tab and click on New group
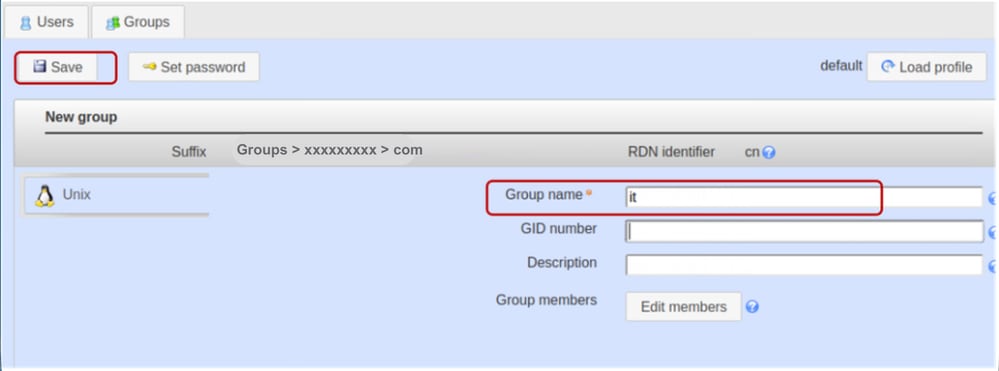
Set the Group name as “it”.
Note: While Cisco UCS systems are generally resilient to case variations, maintaining lowercase naming conventions is a best practice to ensure long-term interoperability across diverse LDAP server infrastructure environments.
Leave the GID Number field blank. LDAP Account Manager (LAM) is designed to automatically populate this field with the next available value.
Provide a description if desired and click on Save
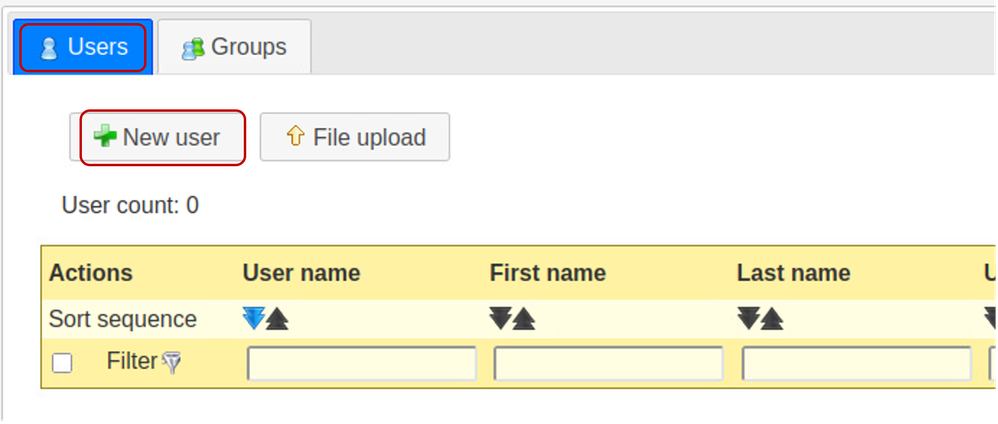
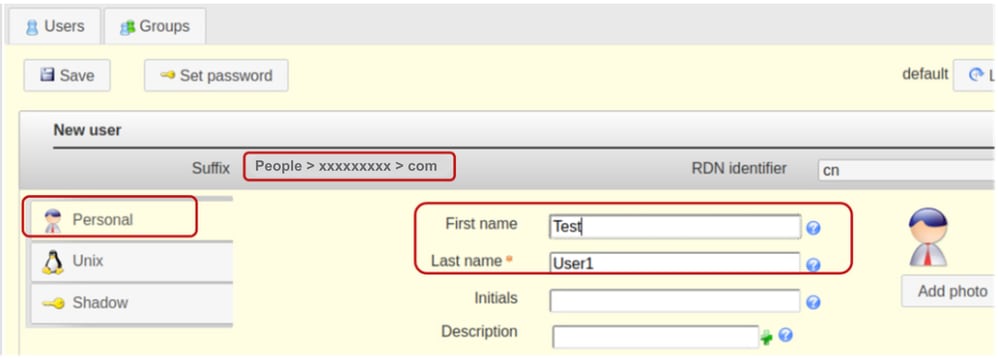
Click on the “Users” tab to create User accounts and select “New user”.
Populate the required fields for “testuser1” user in the Personal tab.
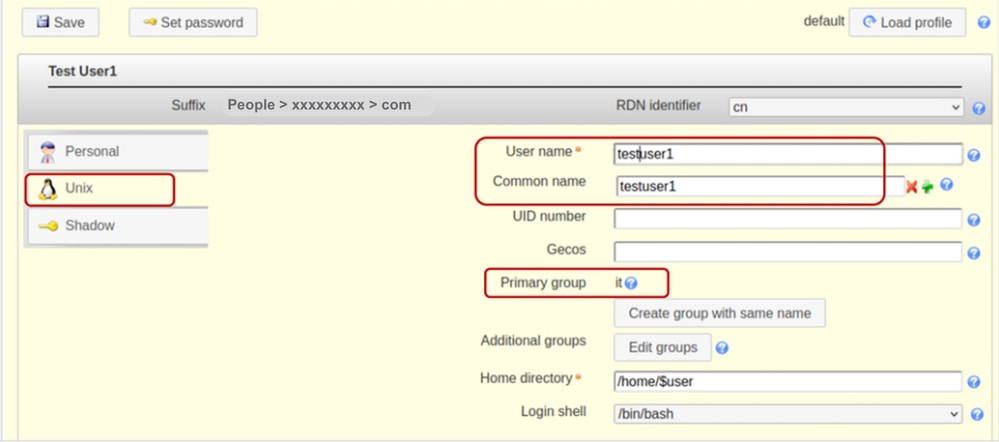
Select the Unix tab, add testuser1 in the User name field. Include user in the “it” group.
For this demonstration, only the “it” group exists so it is already pre-populated.
Maintain the RDN identifier as the “Common Name” (cn). This enables the system to automatically populate the "Common name" field using the value specified in the "User name" field.
Leave the UID Number field blank as LAM automatically populates the field with available values.
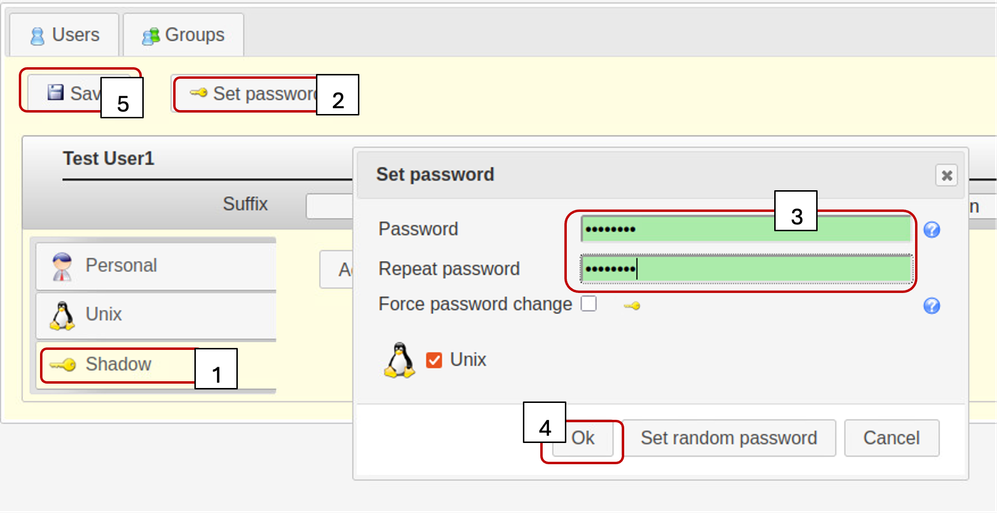
Select the Shadow tab,
Shadow account extension is not used.
Click on “Set Password”.
Set the user password
Click OK and Save
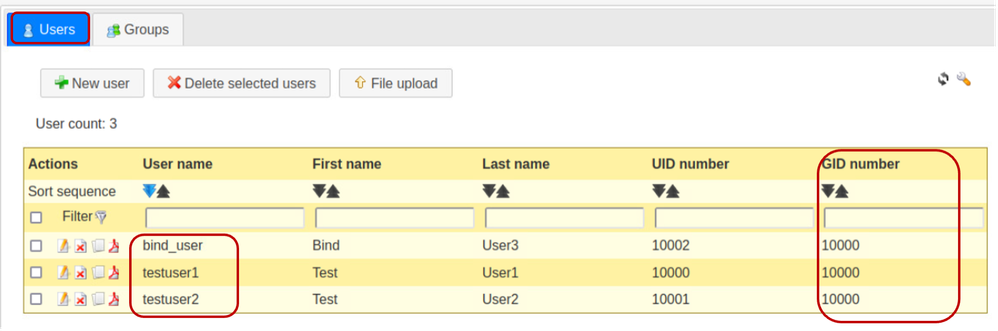
Repeat the specified steps described previously in order to create “testuser2” User Account and the “bind_user” account.
Click on “Users” tab to verify the creation of all desired users. (Having the same value in the gidNumber column confirms that the created users belong to the same Group - it)
Step 6: Tests local LDAP login
Log into another Linux based system, having reachability to the OpenLDAP server.
Run the specified ldapsearch command to verify that LDAP works:
ldapsearch -x -h X.X.X.19 -p 389 -b "dc=xxxxxxxxx,dc=com" "uid=testuser1" sn cn givenName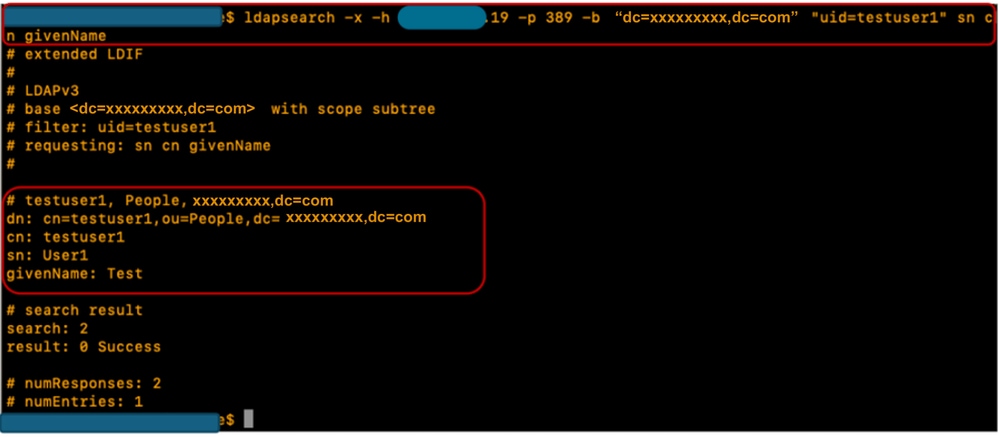
Configuration parameters on CIMC
Log into CIMC.
In the Navigation pane, select Admin, User Management and LDAP.
Populate the LDAP configuration parameters as shown below:
- Enable LDAP: Checked
- Base DN: dc=xxxxxxxxx,dc=com
- Domain: xxxxxxxxx.com
- LDAP Server: <ldap_server_IP or FQDN> X.X.X.19
- Bind Parameters: “Login Credentials” or “Configured Credentials”
- When using Configured Credentials, add the bind_user DN exactly as configured on the LDAP server:
- Eg: cn=bind_user,ou=People,dc=xxxxxxxxx,dc=com
- When using Configured Credentials, add the bind_user DN exactly as configured on the LDAP server:
- Search Parameters:
- Filter Attribute: “cn” or “uid”
- Group Attribute: memberUID
- LDAP Group Authorisation - Checked
- Group Name: it
- Group domain: xxxxxxxxx.com
- Role: read-only (any desired role)
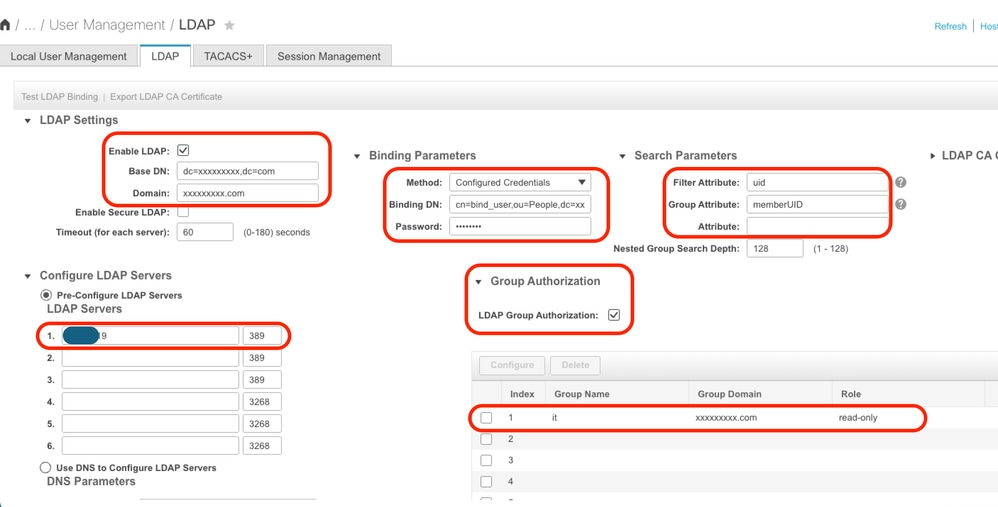
Save the configuration and test LDAP user login.
Configuration parameters on UCS Manager
Log into UCS Manager.
In the Navigation pane, select Admin, User Management and LDAP.
Populate the LDAP configuration parameters as shown below:
- LDAP Providers:
- Hostname: <FQDN or IP Address of LDAP server>
- Bind DN: cn=bind_user,ou=People,dc=xxxxxxxxx,dc=com
- Base DN: dc=xxxxxxxxx,dc=com
- Port: 389
- Enable SSL: Disabled
- Filter: uid=$userid
- Group Authorization: Enabled
- Group Recursion: Non Recursive
- Target Attribute: gidNumber
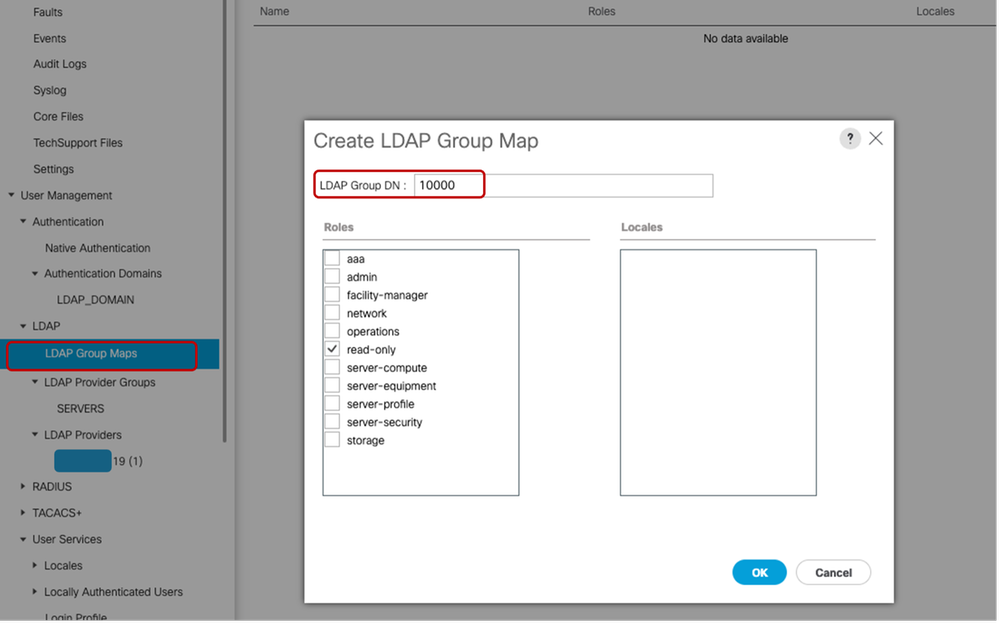
- LDAP Group Maps:
- LDAP Group DN: 10000 <gidNumber for "it" group>
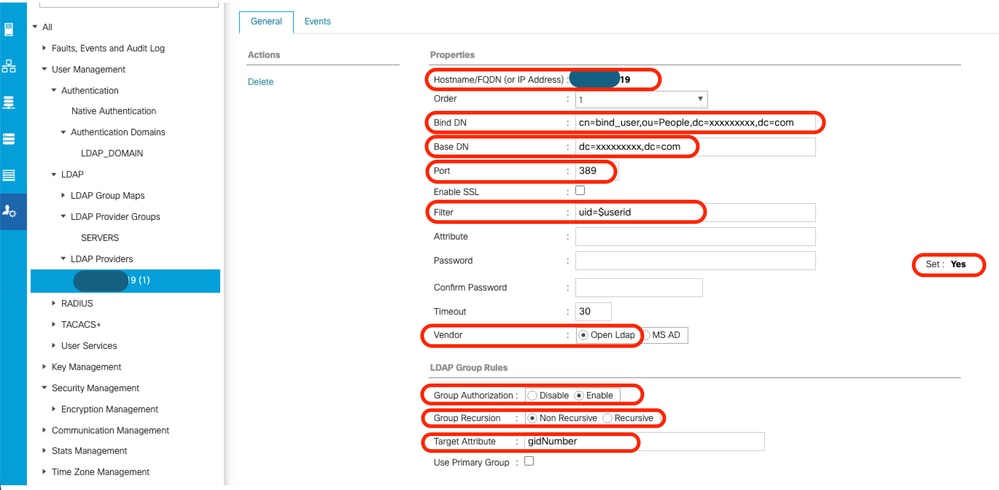
Under All >> User Management >> LDAP >> LDAP Providers>> LDAP Group Rules, the default Target Attribute for UCS Manager is “memberOf”. By default, OpenLDAP servers do not have that attribute enabled, hence setting the Target Attribute value to “memberOf” (or leaving it blank) causes user logins to fail because the OpenLDAP server does not recognize the requested Attribute value.
In this example, the “Target Attribute” value has been set to “gidNumber”.
Add the configured LDAP Provider to an LDAP provider Group. For this demonstration, the "SERVERS" LDAP Provider Group has been created.
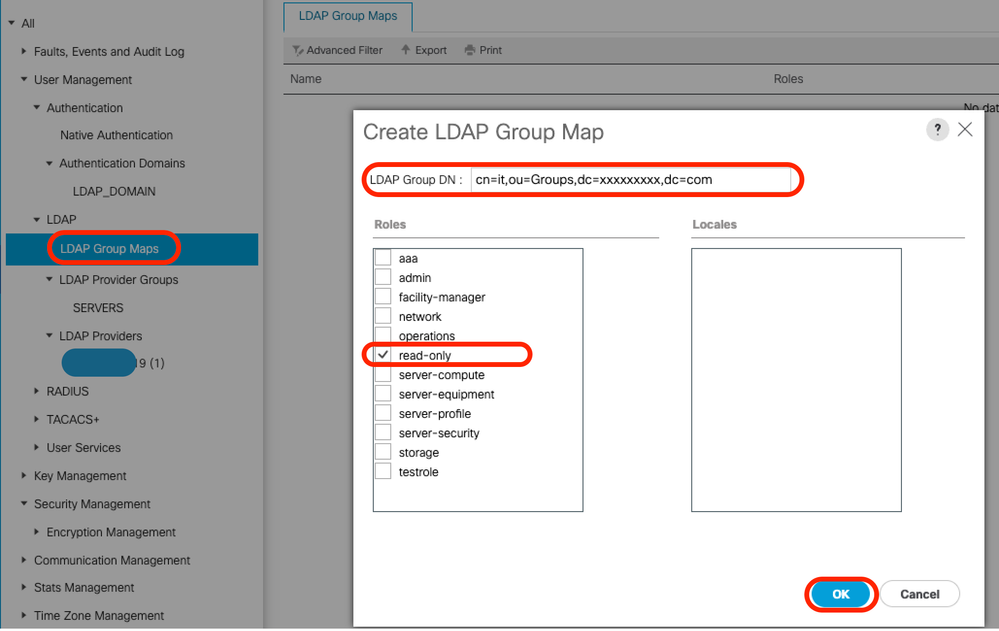
When configuring the “LDAP Group Maps” in “All >> User Management >> LDAP >> LDAP Group Maps>>”, the gidNumber value (in this case “10000”) is used as the “Group DN Map” as shown:
Configure an LDAP Authentication Domain (LDAP_DOMAIN) in “All >> User Management >> Authentication >> Authentication Domains” referencing the LDAP Provider Groups and test LDAP user login.
Note: If the memberOf attribute is required to satisfy specific environmental requirements or to implement the "Group Recursion" feature, it is recommended to use the second configuration option below, which requires LDAP with Overlay extensions enabled.
While LDAP Account Manager (LAM) supports overlay configuration, please be advised that this feature requires appropriate licensing.
For further information on configuring LDAP using LAM, refer to the official LDAP Account Manager documentation.
Option 2: Configure OpenLDAP using Ubuntu CLI tools and Overlays
In order to use OpenLDAP for UCS Manager authentication, two overlays are required that ensure the groups are associated with users in a way that the UCS system (UCS Manager and CIMC) can understand.
The configuration on the OpenLDAP side requires:
- "memberof" overlay: This overlay creates mapping between users and groups so that if a user DN is queried, the memberOf attribute can be requested as part of that query. By default, no attribute for users for group membership unless the memberof overlay is added to openLDAP
- "refint" overlay: This overlay is configured to validate that entries in the member attribute in group objects remain syncronized with the memberOf attribute of user objects. Without this service, if a user is deleted without also modifying the group, orphaned DNs can remain in the group object. The refint service ensures consistancy in both directions.
Step 1: Initial net-tools and configure Linux server hostname
Repeat Step 1 within Option 1.
Step 2: Install SLAPD
Repeat Step 2 within Option 1. (With the exception of PHP and Apache installation as Option 2 does not require them to work - no LAM)
Ensure to allow the required ports through the Ubuntu Firewall.
Step 3: Install 'memberOf' Overlay on the LDAP server
Check if the "memberOf" overlay is installed
sudo ldapsearch -Q -LLL -Y EXTERNAL -H ldapi:/// -b cn=config '(olcModuleLoad=*)'
To install the "memberOf" overlay, create a .ldif file named ldap.memberof.load.ldif (use any desired naming convention) and add the specified configuration:
cat <<EOF > ./ldap.memberof.load.ldif
dn: cn=module,cn=config
objectClass: olcModuleList
cn: module olcModuleLoad: memberof
EOF
Add the configuration in the ldap.memberof.load.ldif file to the LDAP profile using the specified command:
sudo ldapadd -Q -Y EXTERNAL -H ldapi:/// -f ./ldap.memberof.load.ldifConfigures the memberOf module and the olcDatabase entry to match the deployment requirements, depending on the linux distributions.
Two compulsory attribute values are "olcDatabase={1}mdb" and "groupOfNames" as shown below.
Create the ldap.memberof.config.ldif file, populate its attributes and import its content into the LDAP profile.
cat <<EOF > ./ldap.memberof.config.ldif
dn: olcOverlay=memberof,olcDatabase={1}mdb,cn=config
objectClass: olcMemberOf
objectClass: olcOverlayConfig
olcOverlay: memberof
olcMemberOfGroupOC: groupOfNames
olcMemberOfMemberAD: member
olcMemberOfMemberOfAD: memberOf
olcMemberOfRefInt: TRUE
olcMemberOfDangling: ignore
EOF
sudo ldapadd -Q -Y EXTERNAL -H ldapi:/// -f ./ldap.memberof.config.ldifStep 4: Install 'refint' Overlay on the LDAP server
Next, Install refint to openldap:
create a .ldif file named ldap.refint.load.ldif (use any desired naming convention) and add the specified configuration:
cat <<EOF > ./ldap.refint.load.ldif
dn: cn=module,cn=config
objectClass: olcModuleList
cn: module
olcModuleLoad: refint
EOF
Import the configuration in the ldap.refint.load.ldif file to the LDAP profile using the specified command:
sudo ldapadd -Q -Y EXTERNAL -H ldapi:/// -f ./ldap.refint.load.ldifConfigure refint, which maintains referencial integrity between groups and users.
Configures the refint module and its olcDatabase entry to match the deployment requirements.
Create the ldap.refint.config.ldif file and import its content into the LDAP profile.
cat <<EOF > ./ldap.refint.config.ldif
dn: olcOverlay=refint,olcDatabase={1}mdb,cn=config
objectClass: olcConfig
objectClass: olcOverlayConfig
objectClass: olcRefintConfig
olcOverlay: refint
olcRefintAttribute: memberOf member
EOF
sudo ldapadd -Q -Y EXTERNAL -H ldapi:/// -f ./ldap.refint.config.ldifUpon installation of both plugins/extensions, the output to the specified ldapsearch command is similar to the output shown below:
sudo ldapsearch -Q -LLL -Y EXTERNAL -H ldapi:/// -b cn=config '(olcModuleLoad=*)'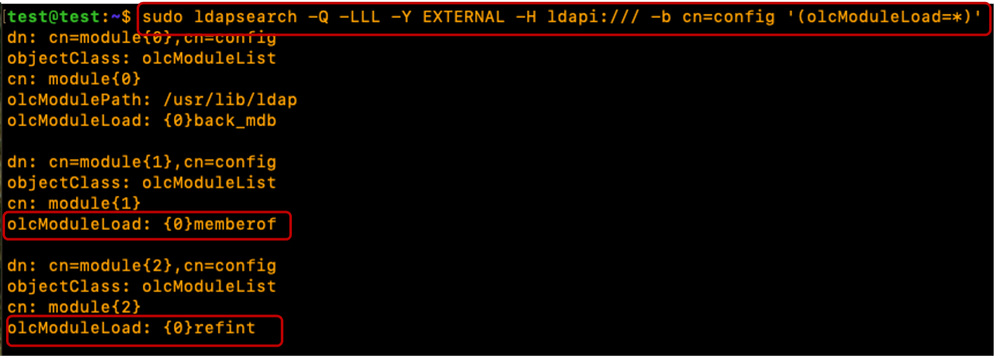
When both plugins/extensions are configured, the output to the specified ldapsearch command is similar to the output shown:
sudo ldapsearch -Q -LLL -Y EXTERNAL -H ldapi:/// -b cn=config '(olcOverlay=memberof)'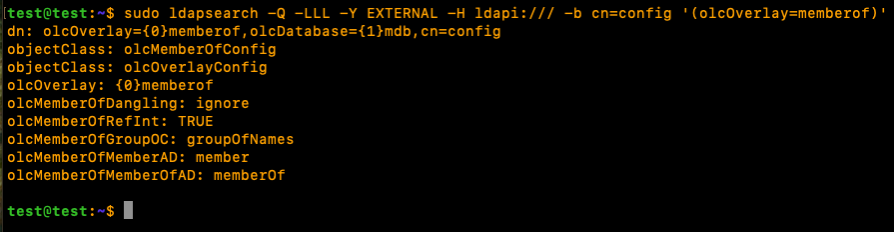
sudo ldapsearch -Q -LLL -Y EXTERNAL -H ldapi:/// -b cn=config '(olcOverlay=refint)'
Restart the slapd service for the newly installed plugins/modules to be usable:
sudo systemctl restart slapdStep 5: Create OUs, Users and Groups
Create Organizational Units (for Users and Groups), Users and Groups.
Create the Users (People) and Groups (Groups) OUs and import them into the LDAP profile. This requires the "admin" account password:
cat <<EOF > ./ldap.ou.add.ldif
dn: ou=People,dc=xxxxxxxxx,dc=com
objectClass: organizationalUnit
ou: People

dn: ou=Groups,dc=xxxxxxxxx,dc=com
objectClass: organizationalUnit
ou: Groups
EOF
sudo ldapadd -xcWD cn=admin,dc=xxxxxxxxx,dc=com -f ./ldap.ou.add.ldif
Create the Users (testuser1, testuser2 and bind_user), map them to their respective OUs (People), add them to their Groups using gidNumbers (good practice), and import the users into the LDAP profile.
cat <<EOF > ./ldap.users.ldif
dn: uid=testuser1,ou=People,dc=xxxxxxxxx,dc=com
objectClass: inetOrgPerson
objectClass: posixAccount
objectClass: shadowAccount
uid: testuser1
sn: User1
givenName: Test
cn: testuser1
displayName: Test User1
gidNumber: 10000
uidNumber: 10000
userPassword: cisco123
gecos: Test User1
loginShell: /bin/bash
homeDirectory: /home/testuser1

dn: uid=testuser2,ou=People,dc=xxxxxxxxx,dc=com
objectClass: inetOrgPerson
objectClass: posixAccount
objectClass: shadowAccount
uid: testuser2
sn: User2
givenName: Test
cn: testuser2
displayName: Test User2
gidNumber: 10000
uidNumber: 10001
userPassword: cisco123
gecos: Test User2
loginShell: /bin/bash
homeDirectory: /home/testuser2

dn: uid=bind_user,ou=People,dc=xxxxxxxxx,dc=com
objectClass: inetOrgPerson
objectClass: posixAccount
objectClass: shadowAccount
uid: bind_user
sn: User3
givenName: Bind
cn: bind_user
displayName: Bind User3
gidNumber: 10001
uidNumber: 10002
userPassword: cisco123
gecos: Bind User3
loginShell: /bin/bash
homeDirectory: /home/bind_user
EOF
sudo ldapadd -xcWD cn=admin,dc=xxxxxxxxx,dc=com -f ./ldap.users.ldif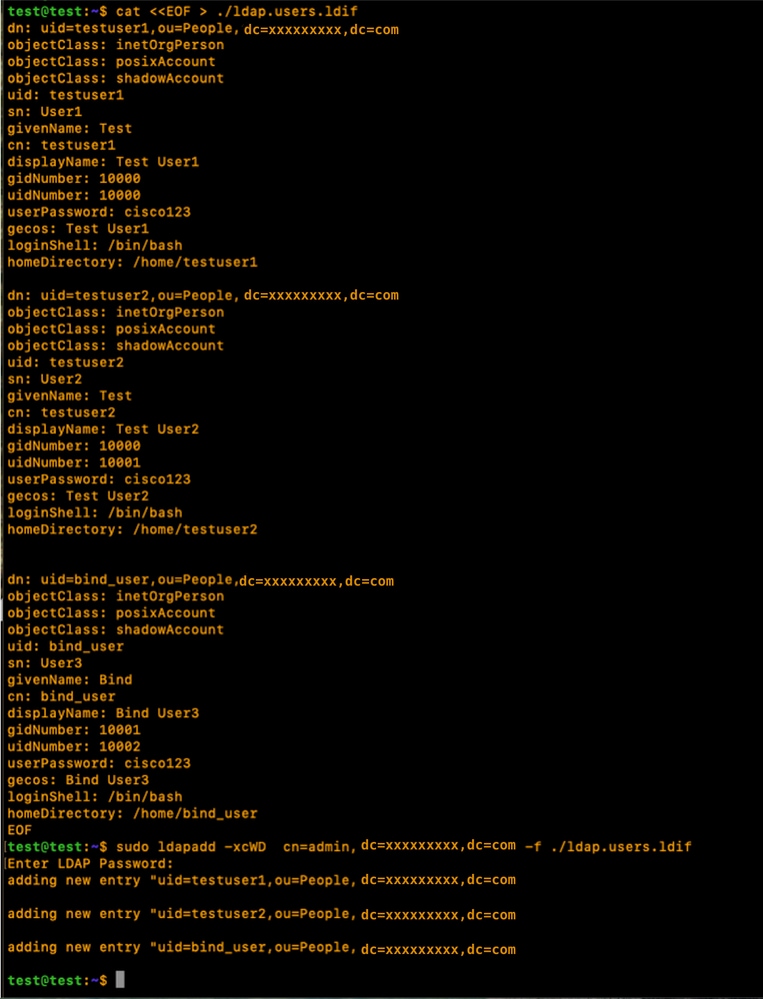
Create the Groups (it), map them to their respective OUs (Groups), associate group members (testuser1, testuser2), and import them into the LDAP profile:
cat <<EOF > ./ldap.group.create.ldif
dn: cn=it,ou=Groups,dc=xxxxxxxxx,dc=com
objectClass: groupofnames
cn: it
member: uid=testuser1,ou=People,dc=xxxxxxxxx,dc=com
member: uid=testuser2,ou=People,dc=xxxxxxxxx,dc=com
EOF
sudo ldapadd -xcWD cn=admin,dc=xxxxxxxxx,dc=com -f ./ldap.group.create.ldif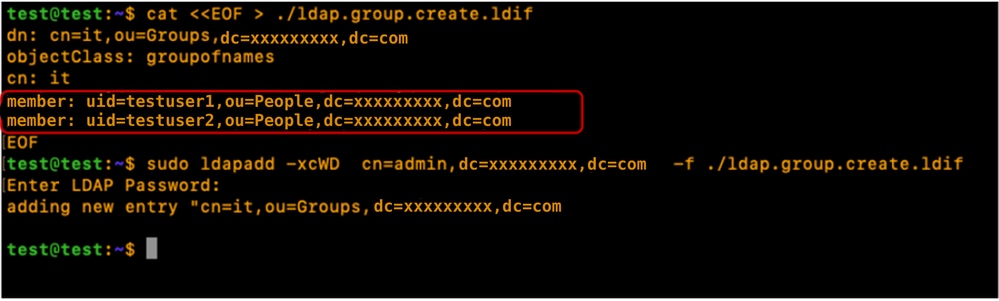
Note: Even if the memberOf attribute is not explicitly defined during the creation of Users or Groups, the system automatically generates and maintains this reference. Once the user is associated with a group, the memberOf attribute reflects these memberships automatically, ensuring the directory remains synchronized with the current access structure.
Step 6: Tests local LDAP login
Verify user login to the LDAP server using the specified command (replace login parameters depending on your environment):
sudo ldapsearch -x -LLL -b uid=testuser1,ou=People,dc=xxxxxxxxx,dc=com memberOf
Configuration parameters on CIMC
Log into CIMC.
In the Navigation pane, select Admin, User Management and LDAP.
Populate the LDAP configuration parameters as shown below:
- Enable LDAP: Checked
- Base DN: dc=xxxxxxxxx,dc=com
- Domain: xxxxxxxxx.com
- LDAP Servers: <ldap_server_IP or FQDN> X.X.X.19
- Bind Parameters: Could be “Login Credentials” or “Configured Credentials”
- When using Configured Credentials, add the bind_user DN exactly as configured on the LDAP server:
- Eg: "cn=bind_user,ou=People,dc=xxxxxxxxx,dc=com" or "uid=bind_user,ou=People,dc=xxxxxxxxx,dc=com"
- Search Parameters:
- Filter Attribute: “cn” or “uid”
- Group Attribute: member
- LDAP Group Authorization - Checked
- Group Name: it
- Group domain: xxxxxxxxx.com
- Role: read-only (any preferred role)

Save the configuration and test LDAP user login.
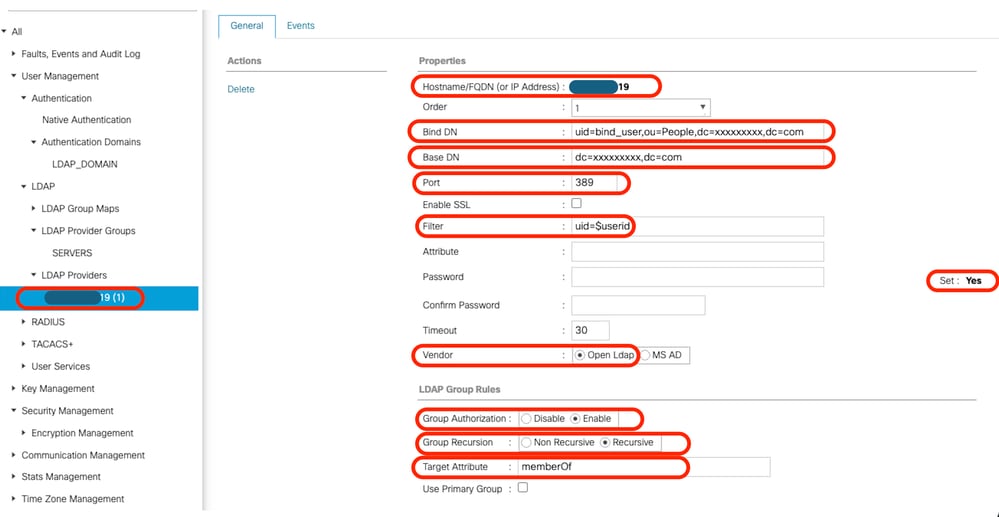
Configuration parameters on UCS Manager
Log into UCS Manager.
In the Navigation pane, select Admin, User Management and LDAP.
Populate the LDAP configuration parameters as shown below:
- LDAP Providers:
- Hostname: <FQDN or IP Address of LDAP server>
- Bind DN: uid=bind_user,ou=People,dc=xxxxxxxxx,dc=com
- Base DN: dc=xxxxxxxxx,dc=com
- Port: 389
- Enable SSL: Disabled
- Filter: uid=$userid
- Group Authorization: Enabled
- Group Recursion: Recursive
- Target Attribute: memberOf
- LDAP Group Maps:
- LDAP Group DN: cn=it,ou=Groups,dc=xxxxxxxxx,dc=com
Add the configured LDAP Provider to an LDAP provider Group. For this demonstration, the "SERVERS" LDAP Provider Group is used.
Configure the LDAP Group Maps adding an "LDAP Group DN", retrieved from the LDAP server.

Configure an LDAP Authentication Domain (LDAP_DOMAIN) in “All >> User Management >> Authentication >> Authentication Domains” referencing the LDAP Provider Groups(SERVERS) and test LDAP user login.
Next lets look at setting up the same (with Overlay) in a separate Linux Distribution (CentOS 10)
Scenario 2: CentOS Stream 10 - Fedora
The configuration procedures for Lightweight Directory Access Protocol (LDAP) vary depending on the underlying operating system version. This section focuses on the implementation of LDAP on CentOS Stream 10.
While many Linux distributions utilize OpenLDAP, CentOS Stream 10 and contemporary Fedora-based systems utilize the 389 Directory Server (389 DS) as the default LDAP provider.
Note: Although 389 DS is considered the successor to OpenLDAP within the CentOS and Red Hat ecosystems, the two solutions are not directly interchangeable. Their respective directory structures, configuration files, and operational environments differ significantly.
This guide provides the necessary steps to successfully configure LDAP using 389 DS within a CentOS Stream 10 environment.
Option 1: Configure LDAP using 389 Directory Server on CentOS Stream 10
Step 1: Initial setup
Repeat Step 1 in Scenario 1, Option 1.
CentOS systems do not utilize the APT package management suite. To perform the necessary software installations on CentOS Stream 10, use the dnf (Dandified YUM) or yum package managers
sudo yum update
sudo yum install net-tools
Verify the server IP address using the “ifconfig” command.
Add the Server IP address to the “/etc/hosts” file along with the server fully qualified domain name (For Example: test.xxxxxxxxx.com used in this lab) and hostname (For Example: test) in the specified format below:
sudo nano /etc/hosts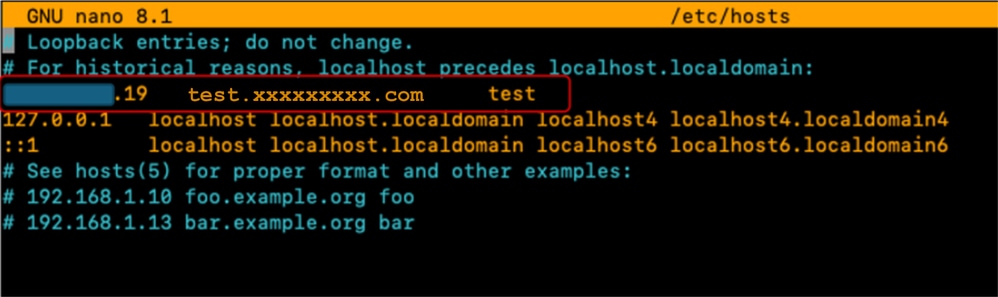
Update the “/etc/hostname” file by replacing its contents with the hostname (test).
sudo nano /etc/hostname
A server reboot is required for these changes to take effect.
sudo rebootStep 2: Install EPEL repo and 389 Server package
Install and Update the EPEL repository.
Install the 389 Directory Server package.
sudo dnf install -y epel-release
sudo dnf update -y epel-release
sudo dnf install 389-ds-base
Create a Directory Template file which contains the desired LDAP Server settings parameters:
sudo dscreate create-template ldapconfig.confVerify the content of the created template file (ldapconfig.conf)
sudo cat ldapconfig.confEdit the ldapconfig.conf template file.
sudo nano ldapconfig.confInsert the specified configuration entries into the file and save your changes.
Note:Different modifications can be required according to the specific needs or requirements of each environment.
This example cover the baseline configurations for this demonstration.
[general]
config_version = 2
selinux	= True


[slapd]
instance_name = localhost
root_dn = cn=admin
root_password = cisco123

[backend-userroot]
sample_entries = yes
suffix = dc=xxxxxxxxx,dc=com
The template file defines the configuration parameters for the "localhost" directory instance. This includes setting the administrative user ("admin"), the associated password, and the domain context ("xxxxxxxxx.com").
Create the "localhost" directory instance using the template edited earlier. The specified command creates and starts the LDAP Directory server:
sudo dscreate -v from-file ldapconfig.confVerify that the LDAP service is running on the server
ss -ntl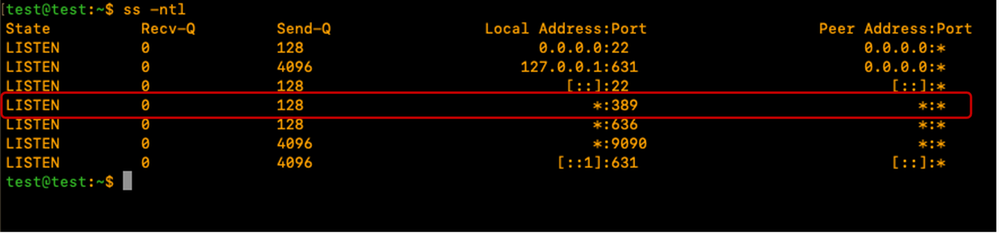
Adjust the CentOS firewall to allow the required port(s) for LDAP (389 and/or 636).
For this demo, the firewall is turned off.
sudo systemctl stop firewalldVerify that LDAP works locally on the LDAP server by running the specified command and ensure that it returns LDAP output as shown:
sudo ldapsearch -x ldap://localhost -b "dc=xxxxxxxxx,dc=com"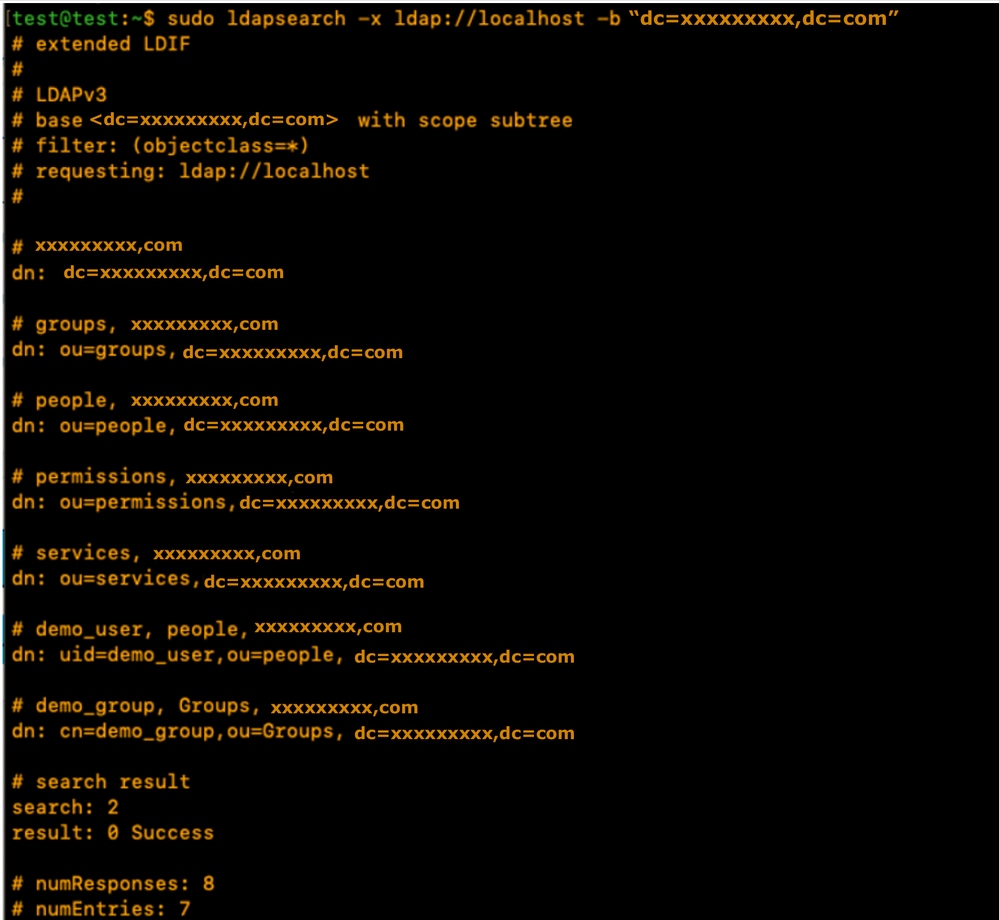
The output contains demo accounts created by 389DS server. The LDAP server automatically created default OUs.
The people OU for Users and the Groups OU for Groups. Additional OUs can be created depending on the requirement.
For this demonstration, the default/auto-created OUs are used.
Check the official 389DS documentation for details about extensive use of the 389DS package:
Step 3: Create LDAP Groups and Users
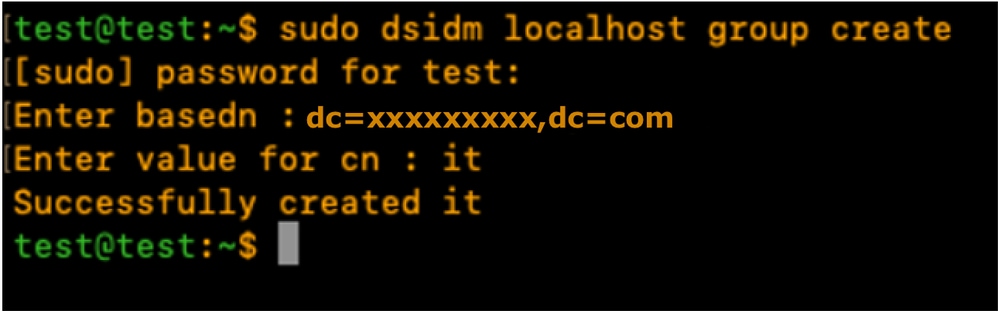
Create a Group (it) using the specified command: sudo dsidm <instance_name> group create.
For this demonstration, the instance name is "localhost".
sudo dsidm localhost group createEnter the terminal prompt to populate the Group details as shown:
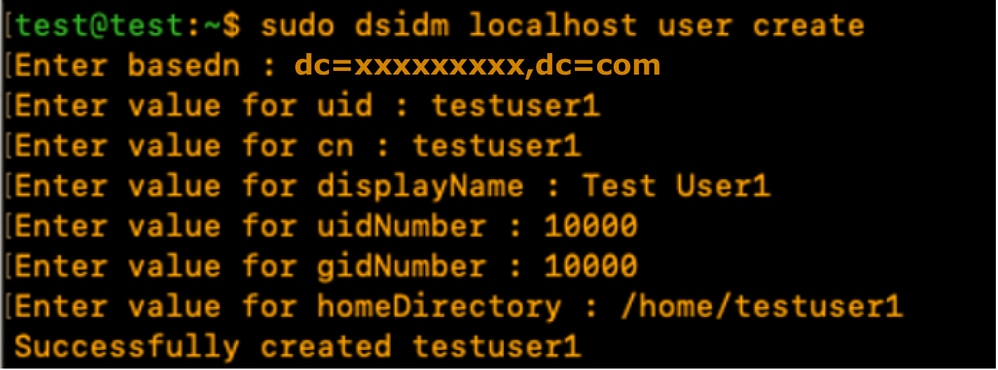
Create testuser1 User account using the command:
sudo dsidm localhost user createEnter the terminal prompt to populate the user details as shown
Create a password for testuser1 using the specified command and enter the CLI prompt:
sudo dsidm localhost account reset_password uid=testuser1,ou=people,dc=xxxxxxxxx,dc=com
Add the User to a Group using the specified command: "sudo dsidm <directory_instance> group add_member <group_cn> <user_dn>"
sudo dsidm localhost group add_member it uid=testuser1,ou=people,dc=xxxxxxxxx,dc=comRepeat the User creation steps to create testuser2 and bind_user.
Note:Ensure that each user is explicitly added to their intended groups.
Omitting this step, can result in restricted access or authorization failures.
The bind_user account does not need to be a member of an specific group, as it can be configured as a standalone account, providing flexibility to manage administrative and service-level access within the directory environment.
Restart the Directory instance:
sudo dsctl localhost restart Step 4: Install memberOf overlay
Install the "memberOf" plugin and restart the Directory instance:
sudo dsconf localhost plugin memberof status
sudo dsconf localhost plugin memberof enable
sudo dsctl localhost restart
Configure the "memberOf" plugin using the specified command: "sudo dsconf <directory_instance> plugin memberof set --scope <base_dn>"
sudo dsconf localhost plugin memberof set --scope dc=xxxxxxxxx,dc=comMark Users as valid "memberOf" targets using the specified command: "sudo dsidm <directory_instance> user modify <uid> add:objectclass:nsmemberof"
sudo dsidm localhost user modify testuser1 add:objectclass:nsmemberof
sudo dsidm localhost user modify testuser2 add:objectclass:nsmemberof
Generate "memberOf" fixup for the base DN: "sudo dsconf <directory_instance> plugin memberof fixup <base_dn>"
sudo dsconf localhost plugin memberof fixup dc=xxxxxxxxx,dc=com
Verify the user configuration:
sudo dsidm localhost user get testuser1
sudo dsidm localhost user get testuser2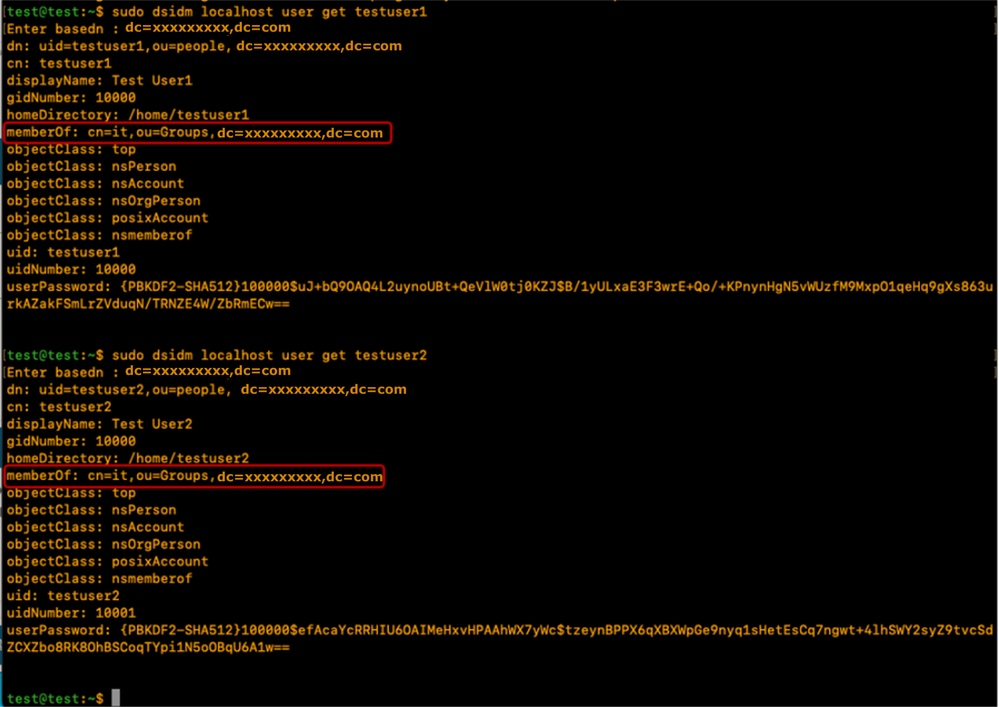
The 389DS LDAP server is configured with memberOf plugin to support the memberOf attribute.
Configuration parameters on CIMC
Log into CIMC.
In the Navigation pane, select Admin, User Management and LDAP.
Populate the LDAP configuration parameters as shown below:
- Enable LDAP: Checked
- Base DN: dc=xxxxxxxxx,dc=com
- Domain: xxxxxxxxx.com
- LDAP Servers: <ldap_server_IP or FQDN> X.X.X.19
- Bind Parameters: Could be “Login Credentials” or “Configured Credentials”
- When using Configured Credentials, add the bind_user DN exactly as configured on the LDAP server:
- Eg: "cn=bind_user,ou=People,dc=xxxxxxxxx,dc=com" or "uid=bind_user,ou=People,dc=xxxxxxxxx,dc=com"
- When using Configured Credentials, add the bind_user DN exactly as configured on the LDAP server:
- Search Parameters:
- Filter Attribute: “cn” or “uid”
- Group Attribute: memberOf
- LDAP Group Authorisation - Checked
- Group Name: it
- Group domain: xxxxxxxxx.com
- Role: read-only (any preferred role)
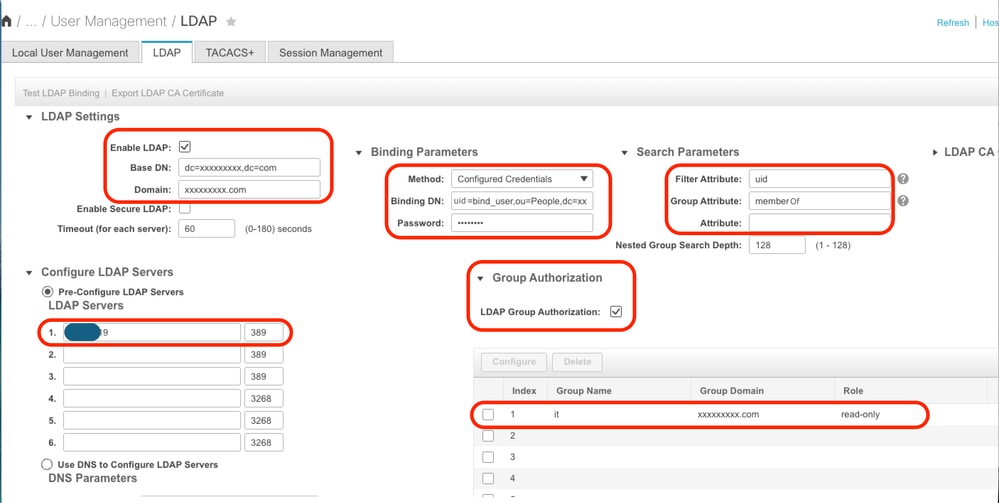
Save the configuration and test LDAP user login.
Configuration parameters on UCS Manager
Log into UCS Manager.
In the Navigation pane, select Admin, User Management and LDAP.
Populate the LDAP configuration parameters as shown below:
- LDAP Providers:
- Hostname: <FQDN or IP Address of LDAP server>
- Bind DN: uid=bind_user,ou=people,dc=xxxxxxxxx,dc=com
- Base DN: dc=xxxxxxxxx,dc=com
- Port: 389
- Enable SSL: Disabled
- Filter: uid=$userid
- Group Authorization: Enabled
- Group Recursion: Recursive
- Target Attribute: memberOf
- LDAP Group Maps:
- LDAP Group DN: cn=it,ou=Groups,dc=xxxxxxxxx,dc=com

Add the configured LDAP Provider to an LDAP provider Group. For this demonstration, the "SERVERS" LDAP Provider Group is used.
Configure the LDAP Group Maps adding an "LDAP Group DN", retrieved from the LDAP server.
Configure an LDAP Authentication Domain (LDAP_DOMAIN) in “All >> User Management >> Authentication >> Authentication Domains” referencing the LDAP Provider Groups and test LDAP user login.
Conclusion
While this guide covers essential deployment scenarios, further exploration of LDAP capabilities can significantly enhance directory performance and security.
For additional information, best practices, and advanced configuration details, refer to the specified resources:
Revision History
| Revision | Publish Date | Comments |
|---|---|---|
1.0 |
11-May-2026
|
Initial Release |
 Feedback
Contact Cisco
- Open a Support Case

- (Requires a Cisco Service Contract)