Introduction
This document describes how to configure SecureLDAP on C Series Servers.
Prerequisites
Requirements
Cisco recommends that you have knowledge of these topics:
- Basic understanding of Cisco UCS and CIMC.
Components Used
- Cisco UCS C Series Server in standalone mode.
The information in this document was created from the devices in a specific lab environment. All of the devices used in this document started with a cleared (default) configuration. If your network is live, ensure that you understand the potential impact of any command.
Background Information
The example in this guide demonstrates secure LDAP configuration on UCS C Series servers:
- Set up a DNS Server, allowing the use of domain names for the LDAP server instead of an IP address on the UCS Server. Ensure that the appropriate A records have been configured to point to both the LDAP server and the UCS C Series Server IP addresses.
- Configure Windows Certificate Services on the LDAP Server, enabling Certificate Generation for secure LDAP communication. The generated Certificates (Root and Intermediate) are uploaded to the UCS C Series server.
Configuration on the UCS C Series Server Side
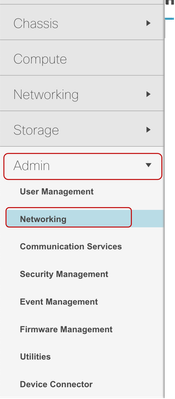
To configure UCS C Series Server to interact with a preconfigured DNS server, access the CIMC Interface of the UCS server, then click on the Navigation Icon located in the top left corner.
Navigate to Admin and choose Networking.
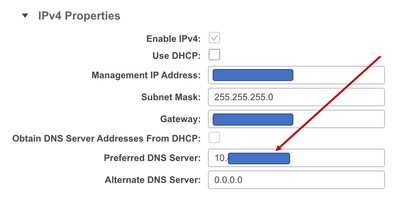
Under the IPV4 properties section, input the previously configured DNS Server FQDN or IP Address in the Preferred DNS Serverfield and click on Save Changes in the bottom right corner.

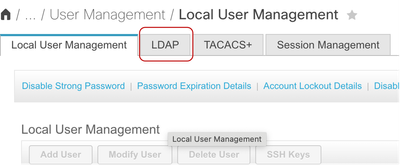
Next, in the Navigation Pane, select Adminand choose User Management.
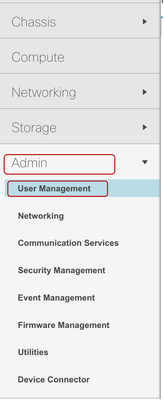
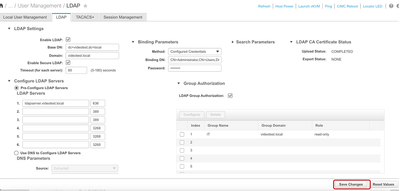
On theUser Management page, select LDAP.
In the Configure LDAP Servers section, under Pre-Configured LDAP Servers, add the FQDN of the LDAP server. The example used in this video is ldapserver.videotest.local.
Change the port number from 389 to 636, which is the well-known port number for Secure LDAP.
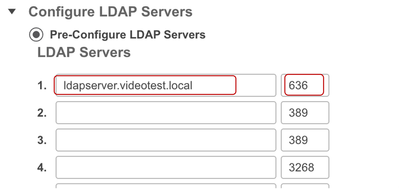
Ensure that access to this port (636) is allowed on your firewall.
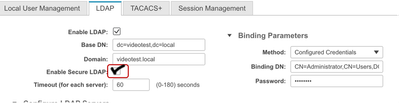
In the LDAP Settings section, configure the BaseDN, Domain, Timeout and Bind Parameters in alignment with standard LDAP configuration practices.
Next, check the Enable Secure LDAP check box.
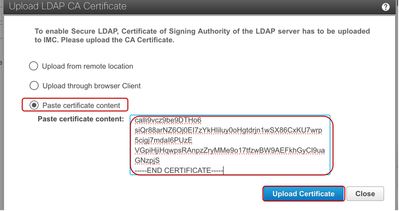
In the pop-up window, select the Paste Certificate Content option.
For this demonstration, a Self-Signed Certificate is used, generated from the Windows Server instance running active directory and saved in a text file. This Self-Signed Certificate has also been concatenated with the Root Certificate from the same server to form a Certificate Chain.

Note: Note that the entire contents of the Base64 encoded X.509 (CER) file starting from the -----BEGIN CERTIFICATE----- to the -----END CERTIFICATE----- needs to be copied, then immediately on the next line, must be the next certificate starting from the -----BEGIN CERTIFICATE----- to the -----END CERTIFICATE----- in cases where multiple certificates are used.
Paste the copied content in the Paste Certificate Content field and click on Upload Certificate.
All other settings in Secure LDAP remain the same as the standard LDAP configuration for C Series Servers, therefore, click on Save Changes on the overall LDAP configuration page.
Now secure LDAP has been successfully configured on the UCS C Series Server.
Verification
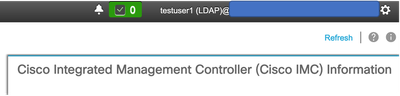
To verify this, attempt to log into the UCS C Series Serverusing one of the configured user accounts in Active Directory. Select your domain and proceed to log in.

Test User1 log in is successful over Secure LDAP
 Feedback