Deployment Guide of RHOSP on UCS for Mobility Workload in Disconnected Mode
Available Languages
Contents
Introduction
This document describes a framework for deploying RHOSP on C220 M6 UCS Servers in order to support Cisco VPC-DI.
Prerequisites
Requirements
Cisco recommends that you have knowledge of Red Hat OpenStack Platform (RHOSP) and possess strong skills in Red Hat Enterprise Linux (RHEL). Additionally, a solid understanding of virtualization and networking concepts is required.
Components Used
This document is not restricted to specific software and hardware versions.
The information in this document was created from the devices in a specific lab environment. All of the devices used in this document started with a cleared (default) configuration. If your network is live, ensure that you understand the potential impact of any command.
Background Information
This guide outlines the integration of RHOSP with Unified Computing System (UCS) infrastructure, emphasizing on scalability, reliability, and performance optimization.
It details best practices and uses ansible script-based automation for deploying OpenStack TripleO comprising of Undercloud and Overcloud architecture.
By using this deployment guide, organizations can achieve a robust and efficient RHOSP cloud infrastructure tailored to serve Cisco Virtual Packet Core - Distributed Instance (VPC-DI) based Mobility Virtual Network Functions (VNF).
Understanding RHOSP
RHOSP is an enterprise-grade private cloud solution built on the open-source OpenStack project, integrated and supported by Red Hat. It allows organizations to deploy and manage Infrastructure-as-a-Service (IaaS) for Virtual Machines (VMs), networking, and storage on demand.
It provides features such as High Availability (HA), network functions virtualization, and customizable deployments.
RHOSP Architecture
The RHOSP is based primarily on the OpenStack TripleO project. Openstack uses Director which acts as a toolset for installing and managing a complete RHOSP environment.
RHOSP is designed to provide a scalable and flexible cloud infrastructure. Its architecture consists of two main components: Undercloud and Overcloud.
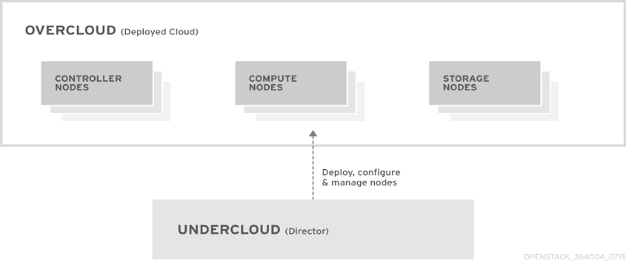
Undercloud
The undercloud is the main management node that contains the RHOSP director toolset. It is a single-system OpenStack installation that includes components for provisioning and managing the OpenStack nodes that form the OpenStack environment (the overcloud).
Undercloud Components
The undercloud uses OpenStack components as its base tool set. Each component operates within a separate container on the undercloud:
- OpenStack Identity (keystone) - Provides authentication and authorization for the director components
- OpenStack Bare Metal (ironic) - Manages bare metal nodes
- OpenStack Networking (neutron) and Open vSwitch - Control networking for bare metal nodes
- OpenStack Orchestration (Ephemeral Heat) - Provides the orchestration of nodes after director writes the overcloud image to disk
Overcloud
The overcloud is the resulting RHOSP environment created using the undercloud. This includes different node roles that are defined based on the OpenStack Platform (OSP) environment the customer aims to create.
Controller
Controller nodes provide administration, networking, and HA for the OpenStack environment. A recommended OpenStack environment contains three Controller nodes together in a HA cluster.
Compute
Compute nodes provide computing resources for the OpenStack environment. Compute nodes can be Scale-In/Scale-Out based on network requirement over time. A default compute node contains these mentioned components:
- OpenStack Compute (nova)
- Kernel-based VM (KVM)/Quick Emulator (QEMU)
- Open vSwitch
Storage
Storage nodes provide storage for the OpenStack environment.

Note: There are multiple approaches for deployment of Undercloud/Director and Offline Repository (REPO) in Customer network - can be deployed directly on baremetal node or as VM on top of KVM hypervisor. In current deployment guide, the Director UCS server hosts KVM (Hypervisor) to deploy multiple VMs on top. The RHOSP Director node and Offline-REPO nodes are deployed as VM on KVM Hypervisor.
Local Repository (REPO Server)
Redhat provides a utility called reposync which can be used to download the packages from the Content Delivery Network (CDN). In order to download all packages from a specific channel, the system must be subscribed to that channel. If the system is not subscribed to the required channel, then reposync is unable to download and sync those packages on local system.
Repositories are configured in /etc/yum.repos.d/ path by files that ending with .repo extension. Multiple repositories can be defined in the same file.
RHOSP Networking
The networking service (neutron) is the software-defined networking (SDN) component of RHOSP. The RHOSP Networking service manages internal and external traffic to and from VM instances and provides core services such as routing, segmentation, DHCP, and metadata. It provides the API for virtual networking capabilities and management of switches, routers, ports, and firewalls.
RHOSP director maps OpenStack services to different isolated networks. The networks that carry each traffic type are: Cisco Integrated Management Controller (CIMC), Provisioning, Internal API, Storage Data, Storage Management, Tenant and External (Secure Shell (SSH) and Operations, Administration, and Maintenance (OAM)).
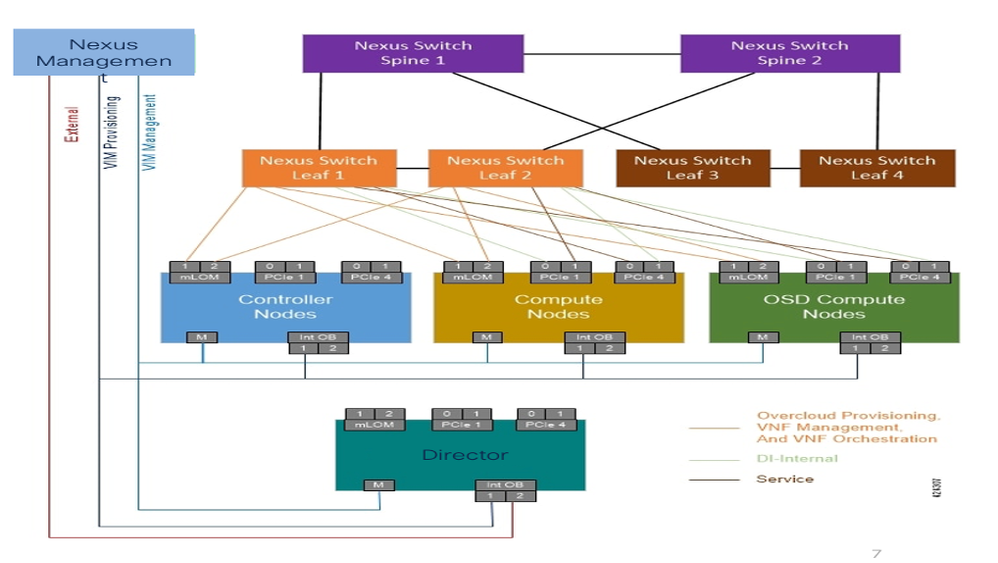
RHOSP Physical Connectivity
The RHOSP deployment uses different physical ports of Cisco UCS C220 M6 servers for different connectivity purposes.

| Serial Number |
Physical Ports |
Details |
| 1. |
CIMC |
CIMC provides Out-of-Band connectivity for server Provisioning and Management. |
| 2. |
Single Root I/O Virtualization (SR-IOV)/Peripheral Component Interconnect Express (PCIe) |
The PCIe Network Interface Card (NIC) are used on the compute nodes for the DI-internal and Service networks for the VNF. |
| 3. |
Modular Lan on MotherBoard (MLOM) |
MLOM Ports are configured as a bonds. osp_external, osp_internal, osp_tenant, osp_external, osp_storage_data, osp_storage_mgmt uses MLOM port for internal communication. |
| 4. |
Lan on MotherBoard (LOM) |
The director uses LOM1 and LOM2 ports, while Computes and Controllers use only LOM1 Port. LOM1 is used to deploy or provision the Openstack on all servers. LOM2 is used as OAM (External Network) on the director. |
The diagram shows the physical connectivity with the servers.
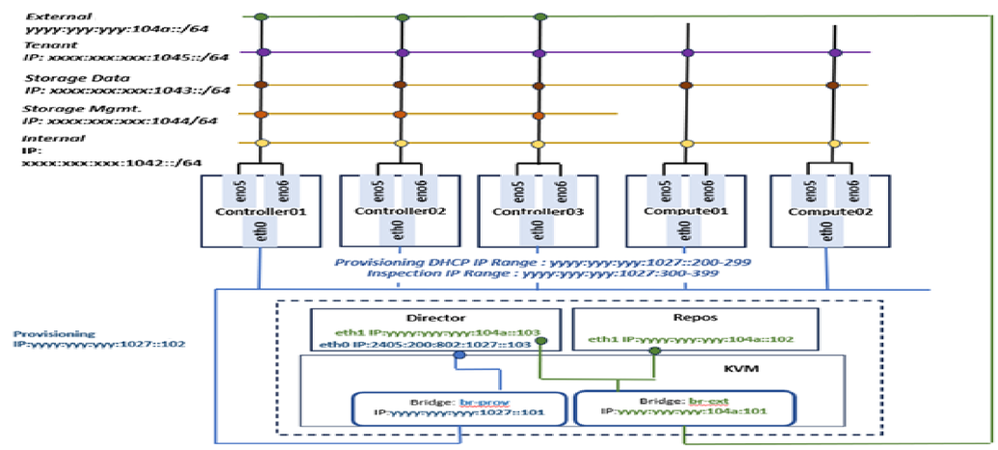
RHOSP Logical Connectivity
The RHOSP network has multiple subnets catering to different services within the cloud.
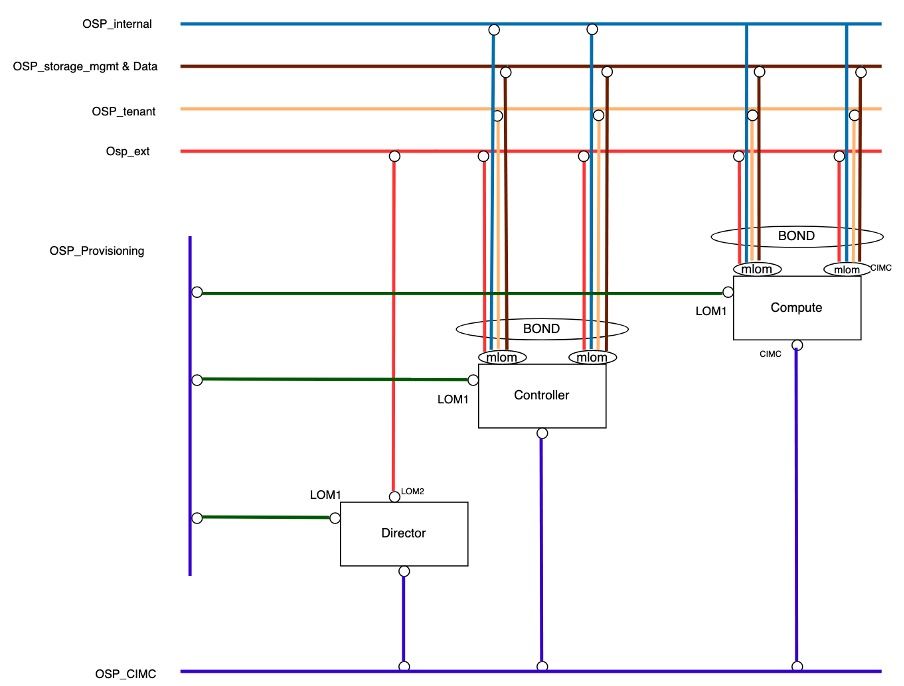
- OSP_CIMC:
CIMC is the Intelligent Programming Management Interface (IPMI) that controls the management of all UCS servers. This CIMC network is configured on the standalone CIMC Port of all UCS Servers.
- OSP_Provisioning:
This network is responsible for the provisioning and Preboot Execution Environment (PXE) boot management of the computes and controller servers during Overcloud deployment and also to get the DHCP IP. The Provisioning network is configured as Native VLAN on LOM1 Port of all UCS Servers for simplicity and compatibility. This provisioning network is responsible for deployment of the cloud on all servers.
Due to virtualization on the Director Server a bridge network needed to be created on the KVM for the Director VM to communicate with the other servers.
- OSP_Internal:
The Internal API network is used for communication between the OpenStack services like neutron, nova, keystone, and so on.
The OSP_Internal network is configured on bonded MLOM Ports on Controller and Compute nodes.
- OSP_Tenant:
The Tenant network is created by default within cloud projects for VNF management. In current setup, Only Single Openstack Project is created for VNF deployment.
The OSP_Tenant network is configured on bonded MLOM Ports on Controller and Compute nodes.
- OSP_External:
The External network is used for all external access (like SSH) and API networks.
The OSP_External network is configured on LOM2 Port on Director node and on bonded MLOM Ports on Controller and Compute nodes.
- OSP_Storage_Data:
The OSP_Storage network is used for all the operations which are related to access the storage. This is required for communication between CEPH service and VNF that have requirement to access the storage. It is used by Controller, Compute nodes, and CEPH.
The OSP_Storage_Data network is configured on bonded MLOM Ports on Controller and Compute nodes.
- OSP_Storage_Management:
OpenStack Object Storage uses this network to synchronize data objects between participating replica nodes in storage cluster, formed between controller-Compute nodes.
The OSP_Storage_Mgmt network is configured on bonded MLOM Ports on Controller and Compute nodes.
The diagram shows how the undercloud logical networks are connected to each type of nodes in the RHOSP cluster.
Hardware Parameter Tuning
- Ensure IP is enabled and configured with correct management address as per the design.
- Ensure admin user and its password must be same for all the CIMC login access.
- Ensure the Bootstrap (Boot) mode set to Unified Extensible Firmware Interface (UEFI).
- Ensure to set the BIOS setting with recommended parameters.
- Set Boot-Order to:
- LOM-PXE (eno1)
- BOOT-Hard Disk Drive (HDD)
- Set the mac-address of LOM1 (eno1).
- Ensure all the UCS/CIMC Servers are upgraded with latest recommended firmware version.
Hypervisor-KVM Installation and Network Creation
There are several methods for deploying the Undercloud/Director and Offline REPO in the customer network. These can either be deployed directly on a bare-metal node or as VMs running on a KVM hypervisor.
In the current deployment guide, the Director UCS server is configured to host the KVM hypervisor, which facilitates the creation of multiple VMs. The RHOSP Director node and the Offline REPO node are deployed as VMs on this KVM hypervisor.
Note: Standard RHEL KVM installation steps must be observed in order to deploy KVM Hypervisor.
- Once the KVM is up, update the hostname:
hostnamectl set-hostname <hostname> --static
- Configure the external and provisioning bridges and bind the interfaces.
br-prov : eth0
br-ext : eth1
These bridges must be created via Network Manager Text User Interface (NMTUI) GUI.
- By default, eno1 and eno2 ports gets created in KVM for physical LOM1 and LOM2 ports, cross-verify the same using MAC address from CIMC logging.
- Create bridge network and add slave ports in it by mapping correct MAC address.
- Post bridge network creation, ensure that the provisioning and external gateway is reachable from KVM.
REPO and Director VM Creation
Prerequisites for REPO and Director VM Creation
# dnf install qemu-kvm libvirt virt-install virt-manager virt-viewer libguestfs-tools
- Install the required packages in KVM for REPO and Director VM Creation.

- Create required directories on KVM.
# mkdir /data # mkdir /data/offlineRepos # mkdir /data/isoImages # mkdir /data/qcow2Images # mkdir /data/images
- Copy the files to the directories.
# scp -r root@[remote-IP]:/root/rhel-8.4-x86_64-dvd.iso /data/isoImages/
# scp -r root@[remote-IP]:/root/offlineRepos/RHEL8.4 /data/offlineRepos/
# scp -r root@[remote-IP]:/etc/yum.repos.d/offlinedvd.repo /etc/yum.repos.d/
# scp -r root@[remote-IP]:/root/rhel-8.4-x86_64-kvm.qcow2 /data/qcow2Images/
# scp -r root@[remote-IP]:/root/OSREPO_RHEL_84.qcow2 /data/images/
# scp -r root@[remote-IP]:/root/OSREPO_DIRECTOR_84.qcow2 /data/images/
- Mount the ISO to /mnt/iso.
# mount -t iso9660 -o loop /data/isoImages/rhel-8.4-x86_64-dvd.iso /mnt/iso
- Create the REPO file at /etc/yum.repos.d path.
# cat /etc/yum.repos.d/offlinedvd.repo

[RHEL8.4_Appstream]
name=Red Hat Enterprise Linux 8.4.0 Appstream
mediaid=None
metadata_expire=-1
gpgcheck=0
enabled=1
baseurl=file:///data/offlineRepos/RHEL8.4/AppStream/

[RHEL8.4_BaseOS]
name=Red Hat Enterprise Linux 8.4.0 BaseOS
mediaid=None
metadata_expire=-1
gpgcheck=0
enabled=1
baseurl=file:///data/offlineRepos/RHEL8.4/BaseOS/
- Check the repolist and ensure the Appstream and Baseos REPOs are mapped.
# dnf repolist

REPO VM Creation
$ cd /var/lib/libvirt/images/
$ export LIBGUESTFS_BACKEND=direct
$ virt-customize -a /var/lib/libvirt/images/rhel-8.4-x86_64-kvm.qcow2 --root-password password:Cisco@123

$ virt-filesystems --long -h --all -a /var/lib/libvirt/images/rhel-8.4-x86_64-kvm.qcow2

- Create the image of REPO server.
$ qemu-img create -f qcow2 /var/lib/libvirt/images/rhel_84_osprepo.qcow2 500G

$ virt-resize --expand /dev/sda3 /var/lib/libvirt/images/rhel-8.4-x86_64-kvm.qcow2 /var/lib/libvirt/images/rhel_84_osprepo.qcow2
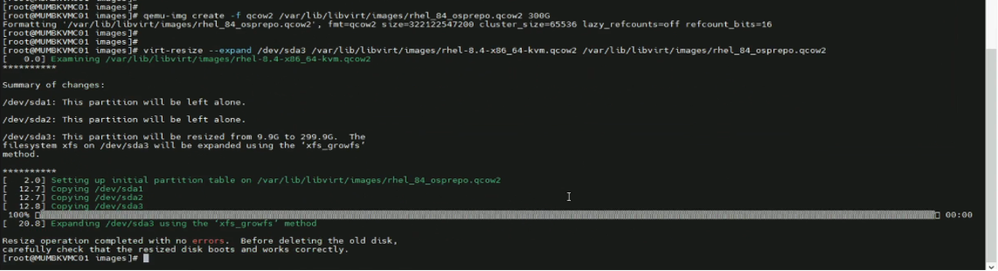
$ qemu-img create -f qcow2 -b /var/lib/libvirt/images/rhel_84_osprepo.qcow2 -F qcow2 /data/images/OSPREPO_RHEL_84.qcow2

$ guestfish -a /data/images/OSPREPO_RHEL_84.qcow2 -i ln-sf /dev/null /etc/systemd/system/cloud-init.service

$ osinfo-query os | grep rhel8

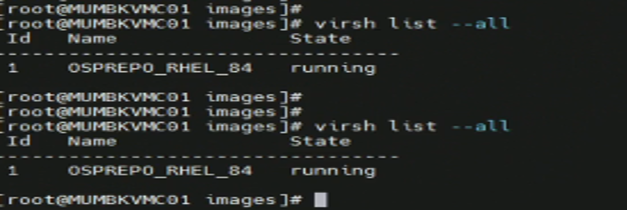
$ virt-install --cpu host --memory 32768 --vcpus 16 --os-variant rhel8.4 --disk path=/data/images/OSPREPO_RHEL_84.qcow2,device=disk,bus=virtio,format=qcow2 --import --noautoconsole --vnc --network bridge:br-ext --name OSPREPO_RHEL_84

$ virsh list --all
Director VM Creation
- Create the image of director server.
# qemu-img create -f qcow2 /var/lib/libvirt/images/rhel_84_ospdirector.qcow2 500G

# virt-resize --expand /dev/sda3 /var/lib/libvirt/images/rhel-8.4-x86_64-kvm.qcow2 /var/lib/libvirt/images/rhel_84_ospdirector.qcow2
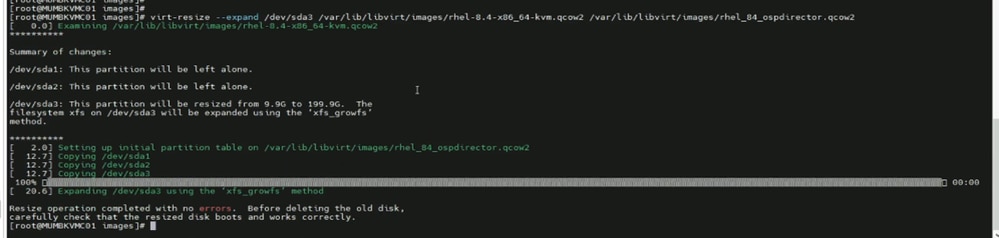
# qemu-img create -f qcow2 -b /var/lib/libvirt/images/rhel_84_ospdirector.qcow2 -F qcow2 /data/images/OSPDIRECTOR_RHEL_84.qcow2

# guestfish -a /data/images/OSPDIRECTOR_RHEL_84.qcow2 -i ln-sf /dev/null /etc/systemd/system/cloud-init.service
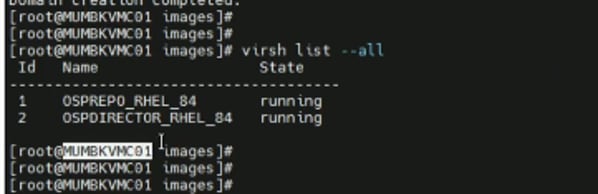
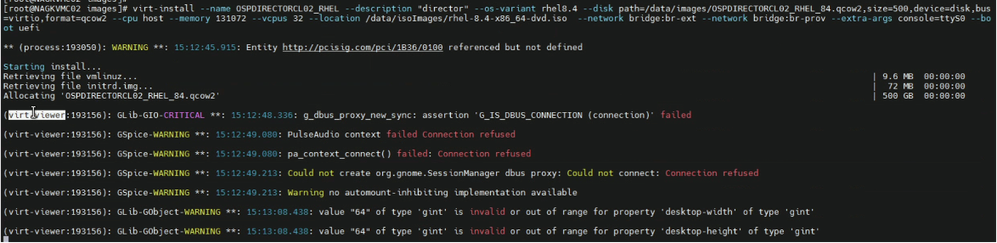
# virt-install --cpu host --memory 131072 --vcpus 32 --os-variant rhel8.4 --disk path=/data/images/OSPDIRECTOR_RHEL_84.qcow2,device=disk,bus=virtio,format=qcow2 --import --noautoconsole --vnc --network bridge:br-prov --network bridge:br-ext --name OSPDIRECTOR_RHEL_84

# virsh list --all
- Open new window and take console login of the VM.
# virsh list –all
# virsh console <domain-id>
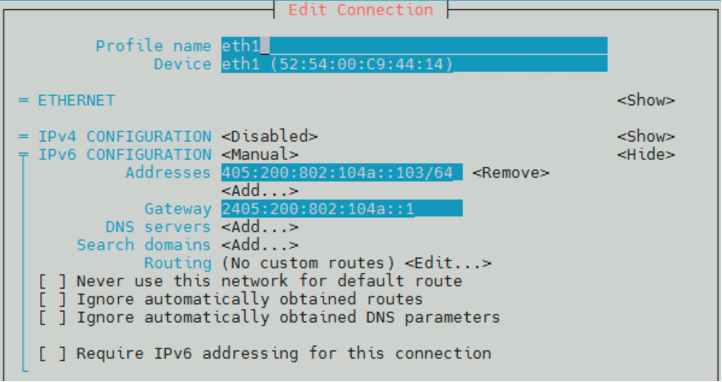
- Post Director VM deployment, two eth interfaces eth0 and eth1 are created.
- eth0 is used for OSP_provisioning networking, in which during br-ctlplane network are created during Undercloud deployment.
- eth1 is used for external connectivity for SSH Access. So, OSP_external subnet IP address is assigned.
Local Offline REPO Creation
REPO Server must be registered with Redhat CDN and must have the repository of all available packages of RHOSP 16.2 needed for deployment. RHEL RPM Packages and RHOSP container images must be downloaded to REPO VM using proxy.
RHOSP Cloud Deployment
RHOSP 16.2 is deployed in customer network through automation. Ansible scripts are used to automate Undercloud and Overcloud deployment.
Prerequisites
Steps to be followed before starting actual cloud deployment:
- Ensuring connectivity of KVM node with Local REPO VM and Director VM on OSP_EXT network.
- Ensure all the ansible scripts and automation scripts uploaded to KVM host at designated folder.
- Create folders with names as 'cisco' and 'automation' and put the tarball of ansible scripts.
# cd /home
# mkdir cisco
# cd /home/cisco
# mkdir automation
# cd /home/cisco/automation
The tarball will consist of three folder directory structures, named as:
- scripts: consists of shell scripts used for baremetal node configuration.
- rpms: consists of Intel Ethernet Connection (ICE) drivers, intel drivers, and Red-hat Package Manager (RPM) packages.
- ansible: consists of Input vars file, ansible yaml files for deployment, and jinja-templates.
4. Install sshpass package. sshpass is a command-line utility used to provide passwords to ssh non-interactively. It is primarily used in scripting or automation scenarios where manual password entry is not feasible.
- Download sshpass package sshpass.tar.gz from internet/existing server.
- Install GNU Compiler Collection (GCC) package.
# yum install gcc
- Install make packages.
# yum install make
- Untar the sshpass package and install SSH pass.
# tar -xvzf sshpass.tar.gz
# cd sshpass-1.10/
# ./configure
# sudo make install
# sshpass -V
5. The director installation process requires a non-root user to execute commands. 'Stack' user must be created in Director VM with sudo access.
# useradd stack
# passwd stack

Disable password requirements for the ‘stack’ user when using sudo.
# echo "stack ALL=(root) NOPASSWD:ALL" | tee -a /etc/sudoers.d/stack
# chmod 0440 /etc/sudoers.d/stack
6. Copy the rootCA.crt file from REPO server to the Director VM and KVM at the given path. Also, update the REPO VM certificate in the trust list.
# /etc/pki/ca-trust/source/anchors
# update ca-trust
7. Update local REPO-server hostname details in Director VM and KVM in /etc/hosts file.
8. On KVM and Director VM, install additional packages like python, ansible, and so on to execute ansible automation scripts.
# dnf install python3 python3-devel ansible httpd -y
# update-alternatives --set python /usr/bin/python3
9. CIMC Subnet must be reachable from provisioning network of Director in order to enable provisioning during cloud deployment. If required, add static route for same.
# ip -6 route add <CIMC Subnet> via <Provisioning Subnet>
10. In KVM and Director VM, create a host file under /ansible folder and add stack specific details as required.
[ospd]
# <PODNAME> ansible_host=<OSPD IP> ansible_ssh_user=stack ansible_ssh_pass='<STACKPASSWD>' ansible_ssh_common_args='-o StrictHostKeyChecking=no'

<podname> - Stack Name of the Cloud.
<OSPD IP> - Baremetal OSPD Node IP Address
<STACKPASSWD> - OSPD Node password for ‘stack’ user
11. Ensure all the ansible playbooks and input files must be kept in Director VM under /home/stack folder.
Updation of Input Files
There is an input variable file consisting of customer network specific details that must be prepared for cloud deployment.
Path: /home/cisco/automation/ansible/podvars
Filename: <stack-name>_vars.yml
Update the highlighted parameters as per the site specific IP plan/low-level design document.
Note: Dummy IP addresses are used for representation purpose only.
# #############################
# XR21 Specific Variables
# #############################

# ===========================
# Common Variables
# ===========================

# UCS hardware type: 'm4/m5/m6'
hardware: m6

# Platform type: 'epc/pcrf'
platform: epc

# RHEL version
rhel: { version: 84, tag: 8.4 }

# Openstack version
osp: { version: 16, major: 2 }

# Container version
container: { tag: 16.2, tools: 3.0 }

# Overcloud stack name
stack_name: '<stack name>'

# OSPD full hostname
fqdn_hostname: '<stack name>.epdg.ap.hamb.a6.cloud.com’

# OSPD host login
ospd_host: { ip: '2405:XXXX:089:1054::11', username: 'stack', password: '*******' }

# OSPD cimc login
ospd_cimc: { ip: '2405:XXXX:089:1054::11', username: 'admin', password: '********' }

# CIMC username and pasword must be same across all Overcloud nodes
cimc: { username: 'admin', password: '********', ip_pool: '2405:XXXX:089:1055::/64' }

# Undercloud-Overcloud provision
internal_network: {
   ip_type: 'v6',
   local_interface: 'eth0',
   local_ip: ‘2405:XXXX:089:1041::103',
   undercloud_public_host: ‘2405:XXXX:089:1041::105',
   undercloud_admin_host: ‘2405:XXXX:089:1041::104',
   cidr: ‘2405:XXXX:089:1041::/64',
   dhcp_start: ‘2405:XXXX:089:1041::200',
   dhcp_end: ‘2405:XXXX:089:1041::299',
   gateway: ‘2405:XXXX:089:1041::199',
#   nexthop: ‘2405:XXXX:089:1041::1',
   inspection_iprange_start: ‘2405:XXXX:089:1041::300',
   inspection_iprange_end: ‘2405:XXXX:089:1041::399',
}

# DNS
dns_ips: [ '2405:YYYY:a10:f100::1' ]
dns_search_domains: [ 'cloud.com' ]

# NTP
ntp_ips: [ '2405:YYYY:801:700::afa', '2405:YYYY:801:700::afb' ]

# Deployment type: 'offline/online'
repos: { rhel: 'offline', container: 'offline' }

# Offline details if repos is 'offline'
offline: {
    environment: 'v01_00',
    deliverymedia: '/home/stack/deliverymedia/'
}

# Satellite details if repos is 'online'
satellite: {
    fqdn_name: 'rh-satellite2.mitg-bxb300.cisco.com',
    ip: '10.XX.XX.XX',
    org: 'MITG',
    user: 'admin',
    password: '*******',
    environment: 'production',
    activation_key: 'ak-rhel{{rhel.version}}-osp{{osp.version}}{{osp.major}}',
    repos_file: 'rhel{{rhel.version}}osp{{osp.version}}{{osp.major}}.yaml'
}

# Offline container registry details
offline_registry: {
    ip: '2405:XXXX:089:1055::100',
    name: '<Cloud-name>.<domain-name>',
    port: '5000',
    container_tag: '16.2.6',
    user: 'ciscoadmin',
    password: '******'
}

# Custom cloud domain details
domain_name: {
    domain: '<domain-name>',
    cloudshortname: 'nl'
}

# Container images namespace
container_namespace: 'mitg-{{satellite.environment}}-cv-rhel{{rhel.version}}-osp{{osp.version}}{{osp.major}}-rhel{{rhel.version}}-osp{{osp.version}}{{osp.major}}'

# List of cimc IPs
ctrl_cimc_ip:
  - 2405:XXXX:YYYY:1036::12
  - 2405:XXXX:YYYY:1036::13
  - 2405:XXXX:YYYY:1036::14

osdc_cimc_ip:
cmpt_cimc_ip:
  - 2405:XXXX:YYYY:1037::17
  - 2405:XXXX:YYYY:1038::18
  - 2405:XXXX:YYYY:1038::19
  - 2405:XXXX:YYYY:1038::20

mgmt_cimc_ip:
  - 2405:XXXX:YYYY:1051::15
  - 2405:XXXX:YYYY:1051::16

# ===========================
# Hardware Specific Variables
# ===========================

# Isolcpu for cpu pinning
isolcpus: { osdc: '4-31,36-63', cmpt: '2-31,34-63', mgmt: '2-31,34-63' }

# Hugepages in 1G Pages
hugepages: { osdc: 428, cmpt: 448, mgmt: 448 }

# Reserved host memory in MB
reserved_host_memory: { osdc: 84000, cmpt: 64000, mgmt: 64000 }

# Number of VFs per SR-IOV port
sriov_vfs_per_port: 16

# List of SR-IOV ports
sriov_port_list: [ens1f0, ens1f1, ens9f0, ens9f1]

# List of OVS bonding interface
ovs_bond_interface: [eno5, eno6]

# Physical networks
physical_network: [phys_pcie1_0, phys_pcie1_1, phys_pcie2_0, phys_pcie2_1]

# Boot disk size
boot_disk_mb_size: { ctrl: 761985, osdc: 761985, cmpt: 761985, mgmt: 1524925 }

# Boot disk PD slot number
boot_disk_pd_slot: { ctrl: [1,2], osdc: [1,2], cmpt: [1,2], mgmt: [1,2] }

# Boot disk VD slot number
boot_disk_vd_slot: { ctrl: 237, osdc: 235, cmpt: 239, mgmt: 239 }

# Storage backend 'swift' or 'ceph'
storage_backend: 'swift'

# Storage disk size
storage_disk_mb_size: { swift: 761985, ceph: 914573, journal: 0 }

# Storage disk PD slot number
storage_disk_pd_slot: { swift: [6,7], ceph: [3,4,5,6], journal: [0] }

# Storage disk VD slot number
storage_disk_vd_slot: { swift: [238,239], ceph: [236,237,238,239], journal: [0] }

# Firmware version 'yes' or 'no' ???
firmware: { check: 'no', bios_version: '4.2.3c', cimc_version: '4.2(3e)' }

# ===========================
# OSP Specific Variables
# ===========================

# Timezone for overcloud nodes
timezone: 'Asia/Kolkata'

# Overcloud node count to deploy
node_count: { ctrl: 3, osdc: 0, cmpt: 11, mgmt: 2 }
local_network: {
   ip_type: 'v6',
   tenant_vlan_id: 1045,
   tenant_net_cidr: '240f:ppp:rr:1045::/64',
   tenant_alloc_pools_start: '240f:ppp:rr:1045::10',
   tenant_alloc_pools_end: '240f:ppp:rr:1045:ffff:ffff:ffff:fffe',

   storage_vlan_id: 1043,
   storage_net_cidr: '240f:ppp:rr:1043::/64',
   storage_alloc_pools_start: '240f:ppp:rr:1043::10',
   storage_alloc_pools_end: '240f:ppp:rr:1043:ffff:ffff:ffff:fffe',

   storage_mgmt_vlan_id: 1044,
   storage_mgmt_net_cidr: '240f:ppp:rr:1044::/64',
   storage_mgmt_alloc_pools_start: '240f:ppp:rr:1044::10',
   storage_mgmt_alloc_pools_end: '240f:ppp:rr:1044:ffff:ffff:ffff:fffe',

   internal_api_vlan_id: 1042,
   internal_api_net_cidr: '240f:ppp:rr:1042::/64',
   internal_api_alloc_pools_start: '240f:ppp:rr:1042::10',
   internal_api_alloc_pools_end: '240f:ppp:rr:1042:ffff:ffff:ffff:fffe'
}

# External VLAN and IP configs
external_network: {
   ip_type: 'v6',
   vlan_id: 1046,
   default_route: '2405:XXXX:YYYY:1055::1',
   network_cidr: '2405:XXXX:YYYY:1055::/64',
   alloc_pool_start: '2405:XXXX:YYYY:1055::100',
   alloc_pool_end: '2405:XXXX:YYYY:1055::200',
   horizon_ip: '2405:XXXX:YYYY:1055::107'
}

# Neutron mechanism driver 'ovs' or 'ovn'
neutron: {
   driver: 'ovs',
   dvr: false,
   datacenter_vlan_start: 1050,
   datacenter_vlan_end: 1070
}


# ===========================
# OS Specific Variables
# ===========================

# RHEL kernel version
kernelversion: '4.18.0-305.88.1.el8_4.x86_64'

# E810 ICE driver
ice_driver: { check: 'yes', version: 1.12.6, intel_aux_version: 1.0.1 }

# ENIC and FNIC verison
nic_version: { enic: '2.3.0.53', fnic: '1.6.0.53' }

# IPMI watchdog timer config
watchdog: { action: enabled, version: '2.0.31-3.el8.x86_64', timer: 250 }

# StorCLI raid management
storcliver: '007.2612.0000.0000-1.noarch'

# ===========================
# Platform Specific Variables
# ===========================

# Buffer pool size based on platform type
innodb_buffer_pool_size: 1610
# ##################################
# END - XR21 Specific Variables
# ##################################
Undercloud Deployment
Undercloud is deployed using ansible scripts in seven steps. All the steps must be executed from KVM host that acts as jump-host in this case.
| Step |
Tag |
Description |
Playbook YAMLs |
| Step 1. |
checkfiles |
Verify required playbooks, scripts, and RPMs on Openstack Platform Director (OSPD). |
osp16_published_playbooks_verify.yml |
| Step 2. |
genpodvars |
Generate POD specific variable files related to hardware, RHEL, and so on, like common_vars.yml (hardware, software, network details), hw_m6_vars.yaml (CPU, memory, hugepages, disk, NIC, and so on), rhel_84_vars.yml (RHEL, kernel, ICE driver, NIC version), pf_esc_vars.yml (Elastic Services Controller (ESC) details), osp_16_vars.yml (OSP version, timezone, IP type, VLAN ID, IP, neutron details). |
osp16_generate_pod_specific_vars.yml |
| Step 3. |
preucdeploy |
Configure Fully Qualified Domain Name (FQDN), Network Time Protocol (NTP), and update all packages on director node. |
osp16_pre_undercloud_deploy.yml |
| Step 4. |
firstreboot |
Performs first reboot of the Undercloud director node after the earlier configuration and package install. |
osp16_undercloud_deploy.yml |
| Step 5. |
ucdeploy |
Install Undercloud stack on director |
osp16_undercloud_tuning.yml |
| Step 6. |
cstate |
Configure BIOS CPU C-state settings on director node. |
osp16_cstate.yml |
| Step 7. |
secondreboot |
Second reboot on Undercloud director after BIOS changes. |
N/A |
File with name osp16_auto_undercloud_deploy.yml is main ansible-playbook that can run in single iteration but it is advisable to execute the playbook in step-wise manner using different tags to ease troubleshooting in case of any deployment issues.
# cd /home/stack/ansible/
# ansible-playbook -i hosts osp16_auto_undercloud_deploy.yml -e podname=<> --tags= TAG

For Ex –

# ansible-playbook -i hosts osp16_auto_undercloud_deploy.yml -e podname=<> --tags=checkfiles
# ansible-playbook -i hosts osp16_auto_undercloud_deploy.yml -e podname=<> --tags=genpodvars
# ansible-playbook -i hosts osp16_auto_undercloud_deploy.yml -e podname=<> --tags=preucdeploy
# ansible-playbook -i hosts osp16_auto_undercloud_deploy.yml -e podname=<> --tags=firstreboot
# ansible-playbook -i hosts osp16_auto_undercloud_deploy.yml -e podname=<> --tags=ucdeploy
# ansible-playbook -i hosts osp16_auto_undercloud_deploy.yml -e podname=<> --tags=cstate
# ansible-playbook -i hosts osp16_auto_undercloud_deploy.yml -e podname=<> --tags=secondreboot

Note :- Deployment Logs would be generated in “/home/stack/autologs” in Director-VM.

Post-Checks for Verification of Undercloud Deployment.
“stackrc” & “undercloud.conf” file must be generated in /home/stack folder.

# sudo podman ps -a
# source stackrc
# openstack stack list
# openstack stack show <stack-name> --fit
# openstack server list
# openstack network list
# openstack subnet list
Overcloud Deployment
Overcloud is deployed with minimum three controllers in HA-mode and one compute. Overcloud is deployed using ansible scripts in 17 steps. All the steps must be executed from Director-VM that acts as Jump-host in this case.
| Step |
Tag |
Description |
Playbook YAMLs |
| Step 1. |
genpodvars |
Generate POD specific variable files for Overcloud related to hardware, RHEL, and so on, like common_vars.yml (hardware, software, network details), hw_m6_vars.yaml (CPU, memory, hugepages, disk, NIC, and so on), rhel_84_vars.yml (RHEL, kernel, ICE driver, NIC version), pf_esc_vars.yml (ESC details), osp_16_vars.yml (OSP version, timezone, IP type, VLAN ID, IP, neutron details). |
osp16_generate_pod_specific_vars.yml |
| Step 2. |
geninstack |
Generate Instackenv JSON file from /var/common_vars.yml created in the earlier step. The director requires a node definition template, which is created manually. This file instackenv.json uses JSON format, and contains all the hardware and power management details for the nodes. This step also validates the hardware configuration on the UCS server before generating the file. |
osp16_generate_instackenv.yml |
| Step 3. |
cimcvd |
Configure CIMC setting and Virtual Disks (VDs) on each servers referring the common_vars.yml, hw_m6_vars.yaml, and rhel_84_vars.yml. |
osp16_cimc_vd_configure.yml |
| Step 4. |
preocdeploy |
This step performs all prerequisites to deploy the Overcloud. It sets the FQDN, NTP, and update all packages, push image to path for deployment. |
osp16_pre_overcloud_deploy.yml |
| Step 5 |
importnodes |
In this step, the server CPU is introspected, memory, NIC along with the interface, and ports on the network switches. Introspection is performed on the connected network switches for all controllers and computes. |
osp16_import_ironic_nodes.yml |
| Step 6. |
gentemplates |
Generate custom template files for controllers and computes. In the custom template, define controller and compute roles for all the services running on them. It also does system hardening by applying certificates, routes, and so on. |
osp16_generate_custom_templates.yml |
| Step 7. |
ocdeploy |
In this step, an Openstack Overcloud deploy is done. Run deploy.sh provided by Red Hat for RHOSP deployment. |
osp16_overcloud_deploy.yml |
| Step 8 |
geninventory |
In this step, an inventory yml file for use by ansible is generated where Provisioning IP, IPMI (CIMC) IP, and credentials are stored and mapped with controller and computes for automation to login in the system and execute the further steps. |
osp16_build_inventory_v3.py |
| Step 9. |
offlinerepo |
Configure Overcloud Offline REPO in the file /etc/yum.repo.d/offline.repo point to repo server via the external network. |
osp16_config_offline_repo.yml |
| Step 10. |
fencing |
Configure fencing on all controller node with Shoot The Other Node In The Head (a fencing technique in HA clusters) (STONITH). |
osp16_config_fencing.yml |
| Step 11. |
raidcache |
Configure Raid Cache setting for all controllers and computes also configure SWIFT storage settings. |
osp16_raid_cache_tuning.yml |
| Step 12. |
dnfupdate |
Run DNF updates for all packages on all nodes. |
dnf_update_all_packages.yml |
| Step 13. |
setiplink |
In this step, trust mode control for SR-IOV ports is enabled for Evolved Packet Data Gateway (EPDG) internal and data traffic. The support for SR-IOV ports is available in neutron and allows VMs to access network via SR-IOV virtual functions. |
osp16_setIpLink.yml |
| Step 14. |
watchdog |
In this step, IPMI setting on director node is configured for management task on all server over out-of-band connection. |
osp16_config_ipmi_watchdog.yml |
| Step 15. |
icedriver |
Update the intel E810 ICE driver for Peripheral Component Interconnect (PCI) cards to the version 1.12.6 for EPDG to use Intel NIC ports as SR-IOV. |
osp16_ice_driver_install.yml |
| Step 16. |
reboot |
Reboot all Overcloud nodes after execution of the earlier steps. |
osp16_reboot_overcloud_hosts.yml |
| Step 17. |
verifyrhosp |
Verify RHOSP deployment configuration and health. |
osp16_rhosp_verify.yml |
For provisioning of Overcloud nodes, Undercloud uses 'overcloud-hardened-uefi-full.qcow2'. So before beginning Overcloud deployment, the image must be stored in designated path in undercloud/director.
Copy the Overcloud qcow2 file from remote site.
# su - stack
# cd /home/stack
# mkdir deliverymedia
# cd deliverymedia

### Copy overcloud-hardened-uefi-full.qcow2 to deliverymedia ###
# scp overcloud-hardened-uefi-full.qcow2 stack@[Director-IP]:/home/stack/deliverymedia
[stack@[stack@ Undercloud ~]$ cd /home/stack/ansible/
[stack@[stack@ Undercloud ansible]$ ansible-playbook osp16_auto_overcloud_deploy.yml -e podname=POD_NAME –tags= TAG

For Ex –
# ansible-playbook -i hosts osp16_auto_overcloud_deploy.yml  -e podname=<> --tags=genpodvars
# ansible-playbook -i hosts osp16_auto_overcloud_deploy.yml  -e podname=<> --tags=geninstack
# ansible-playbook -i hosts osp16_auto_overcloud_deploy.yml  -e podname=<> --tags=cimcvd
# ansible-playbook -i hosts osp16_auto_overcloud_deploy.yml  -e podname=<> --tags=preocdeploy
# ansible-playbook -i hosts osp16_auto_overcloud_deploy.yml  -e podname=<> --tags=importnodes
# ansible-playbook -i hosts osp16_auto_overcloud_deploy.yml  -e podname=<> --tags=gentemplates
# ansible-playbook -i hosts osp16_auto_overcloud_deploy.yml  -e podname=<> --tags=ocdeploy

#### Push & Update the rootCA.pem in all the Controllers & Computes ####
# for node in $(nova list | grep -i active | awk '{print $12}' | awk -F "=" '{print $2}' ); do scp -o StrictHostKeyChecking=no rootCA.pem heat-admin@[$node]:/home/heat-admin; ssh heat-admin@$node " sudo mv /home/heat-admin/rootCA.pem /etc/pki/ca-trust/source/anchors/ ; sudo chown root:root /etc/pki/ca-trust/source/anchors/rootCA.pem ; sudo update-ca-trust"; echo "" ; done

#### Append the Director Entry in "/etc/hosts" file ########
# for node in $(nova list | grep -i active | awk '{print $12}' | awk -F "=" '{print $2}' ); do ssh -o StrictHostKeyChecking=no heat-admin@$node "hostname; echo '2405:200:1412:9999::1:217  gujrjmngdcurp101co.qalabs.com gujrjmngdcurp101co' | sudo tee -a /etc/hosts" echo "" ; done

# ansible-playbook -i hosts osp16_auto_overcloud_deploy.yml  -e podname=<> --tags=geninventory
# ansible-playbook -i hosts osp16_auto_overcloud_deploy.yml  -e podname=<> --tags=offlinerepo
# ansible-playbook -i hosts osp16_auto_overcloud_deploy.yml  -e podname=<> --tags=fencing

### In case of Fencing Failures, please check the reachability of CIMC Subnet from Controllers ######

## If CIMC Subnet is not pinging, Do add the static Route ###
# ip -6 route add <CIMC Subnet> via <Provisioning Subnet>
Ex: ip -6 route add 2405:XXXX:YYY:9999::/64 via 2405:XXXX:YYY:9999:1

# ansible-playbook -i hosts osp16_auto_overcloud_deploy.yml  -e podname=<> --tags=raidcache
# ansible-playbook -i hosts osp16_auto_overcloud_deploy.yml  -e podname=<> --tags=dnfupdate
# ansible-playbook -i hosts osp16_auto_overcloud_deploy.yml  -e podname=<> --tags=setiplink
# ansible-playbook -i hosts osp16_auto_overcloud_deploy.yml  -e podname=<> --tags=watchdog
# ansible-playbook -i hosts osp16_auto_overcloud_deploy.yml  -e podname=<> --tags=icedriver
# ansible-playbook -i hosts osp16_auto_overcloud_deploy.yml  -e podname=<> --tags=reboot
# ansible-playbook -i hosts osp16_auto_overcloud_deploy.yml  -e podname=<> --tags=verifyrhosp
In order to monitor the deployment logs, use the latest log file.
# tail -F </home/stack/autologs/osp16_auto_overcloud_deploy_*.log>
Ensure that all the 17 steps have passed.
Checks failed => The count must be 00.
Logs => /home/stack/autologs/osp16_rhosp_verify.yml _20200703T042257.log
#====================================================================================================================
# STEP | TAG | DESCRIPTION | PLAYBOOK
#====================================================================================================================
# step1 | genpodvars | Generate POD Specific Variable Files | osp16_generate_pod_specific_vars.yml -e podname=
# step2 | geninstack | Generate Instackenv JSON File | osp16_generate_instackenv.yml -e podname=
# step3 | cimcvd | Configure CIMC VDs | osp16_cimc_vd_configure.yml
# step4 | preocdeploy | Configure Pre Overcloud Deploy | osp16_pre_overcloud_deploy.yml
# step5 | importnodes | Import Openstack Baremetal Ironic Nodes | osp16_import_ironic_nodes.yml
# step6 | gentemplates | Generate Custom Templates | osp16_generate_custom_templates.yml
# step7 | ocdeploy | Openstack Overcloud Deploy | osp16_overcloud_deploy.yml
# step8 | geninventory | Generate Inventory File | osp16_build_inventory_v3.py --ipmipass
# step9 | offlinerepo | Configure Overcloud Offline Repo from Offline TAR File | osp16_config_offline_repo.yml
# step10 | fencing | Post Deploy MOP Before Reboot - Configure Fencing | osp16_config_fencing.yml
# step11 | raidcache | Post Deploy MOP Before Reboot - Raid Cache and PR Tuning | osp16_raid_cache_tuning.yml
# step12 | dnfupdate | Post Deploy MOP Before Reboot - Dnf Update Packages | dnf_update_all_packages.yml
# step13 | setiplink | Post Deploy MOP Before Reboot - Set VF IP Link Trust ON | osp16_setIpLink.yml
# step14 | watchdog | Post Deploy MOP Before Reboot - Config IPMI Watchdog | osp16_config_ipmi_watchdog.yml
# step15 | icedriver | Post Deploy MOP Before Reboot - Update E810 ICE Driver | osp16_ice_driver_install.yml
# step16 | reboot | Reboot All Overcloud Nodes | osp16_reboot_overcloud_hosts.yml
# step17 | verifyrhosp | Verify RHOSP Deplpoyment Configuration and Health | osp16_rhosp_verify.yml -e podname=
#====================================================================================================================
ALL HOSTS REACHABLE
====================================================================================================================
CHECKS DONE => 17
CHECKS PASSED => 17
CHECKS FAILED => 00
====================================================================================================================
OVERALL STATUS => PASSED !!
====================================================================================================================
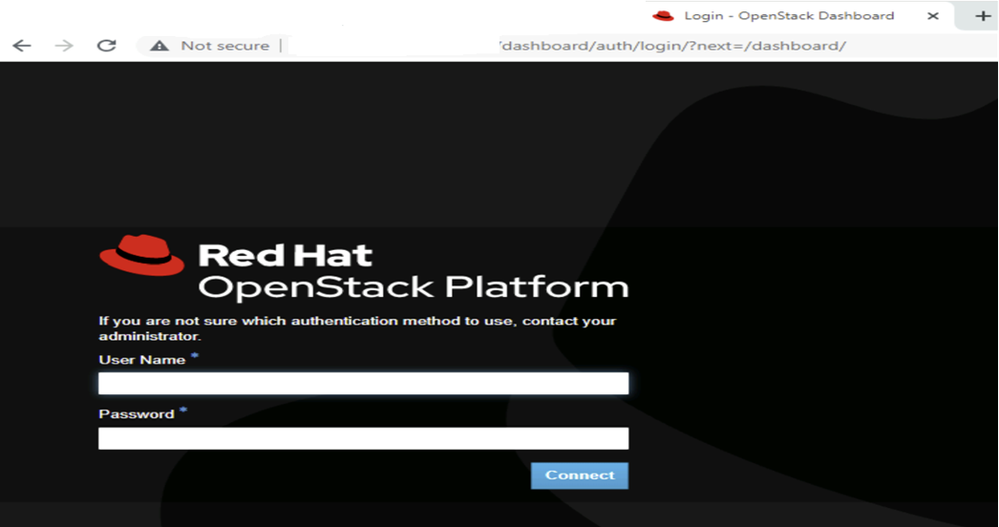
Post successful deployment of Overcloud, ensure that the Horizon dashboard is accessible.
Accessing the Horizon Dashboard
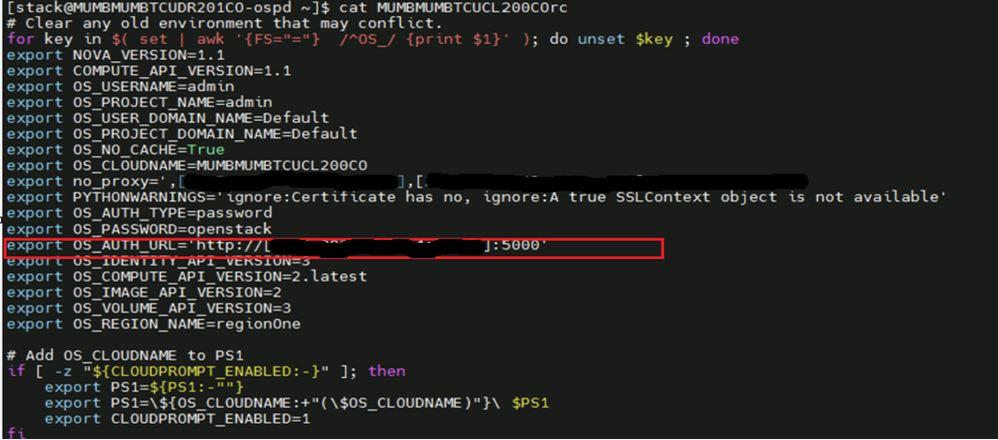
For horizon dashboard URL, use 'OS_AUTH URL'from 'overcloudrc'.
Horizon Dashboard:
Health Check of RHOSP Cluster
### Check OpenStack Services Status ###
# openstack compute service list
# openstack network agent list
# openstack volume service list
# openstack orchestration service list
# openstack identity service list
# openstack endpoint list
# openstack server list
# openstack image list
Summary
The RHOSP 16.2 deployment guide provides comprehensive, step-by-step instructions for deploying a scalable and production-ready OpenStack cloud environment using the proven tools and methodologies by Red Hat. This guide is tailored for system administrators and cloud architects and focuses on deploying RHOSP 16.2 using the OpenStack director, which is based on TripleO (OpenStack on OpenStack).
The guide covers all critical phases of deployment, including:
- Infrastructure planning and prerequisites
- Environment preparation and network configuration
- Undercloud installation and configuration
- Overcloud deployment and post-deployment steps
- HA, storage, and service scaling options
This guide is essential for teams seeking a reliable, enterprise-grade cloud platform with the ecosystem integration and support of Red Hat.
Revision History
| Revision | Publish Date | Comments |
|---|---|---|
1.0 |
27-Apr-2026
|
Initial Release |
 Feedback
Contact Cisco
- Open a Support Case

- (Requires a Cisco Service Contract)