Introduction
This document describes how to configure the Cisco Cloud Security app with IBM QRadar for log analysis.
Overview
QRadar from IBM is a popular SIEM for log analysis. It provides a powerful interface for analyzing large chunks of data, such as the logs provided by Cisco Umbrella for your organization's DNS traffic. The Cisco Cloud Security App for IBM QRadar provides insight from multiple security products (Investigate, Enforcement, and CloudLock) and integrates them with QRadar. It also helps the user to automate security and contain threats faster and directly from QRadar.
When you set up Cisco Cloud Security app for QRadar, it integrates all the data from Cisco Cloud Security platform and allows you to view the data in graphical form in the QRadar console. From the application, analysts can:
- Investigate domains, ip addresses, email addresses
- Block and Unblock domains (enforcement)
- View the information of all the incidents of the network.
This article outlines the basic how-to of getting QRadar set up and running so that it is able to pull the logs from your S3 bucket and consume them. For information on navigating the Cisco Cloud Security App, see Manage the Cloud Security App for IBM QRadar.
Requirements
Cisco Umbrella requirements
This document assumes that your Amazon AWS S3 bucket has been configured in Umbrella (Settings > Log Management) and is showing green with recent logs having been uploaded.
For more information on how to configure this feature, read here: Manage Your Logs.
IBM Security QRadar SIEM requirements
The administrator is required to have administrative rights to the QRadar appliance(s), the Amazon S3 configuration and Umbrella dashboard, these instructions assume that the QRadar administrator is familiar with creating LSX (Log source Extension) files.
Please be aware that the Cisco Cloud Security App v1.0.3 only works up to IBM QRadar 7.2.8. The new version, v1.0.6, works with the current QRadar version from 7.4.2 and later.
Installing Cisco Cloud Security App for IBM QRadar
- Download and install the Cisco Cloud Security App for IBM QRadar found here: Cisco Cloud Security App v1.0.3 (for IBM QRadar v7.2.8) or Cisco Cloud Security App v1.0.6 (for IBM QRadar v7.4.8).
- After the installation, deploy changes in QRadar.
Cisco Cloud Security App Configuration: Adding Log Source

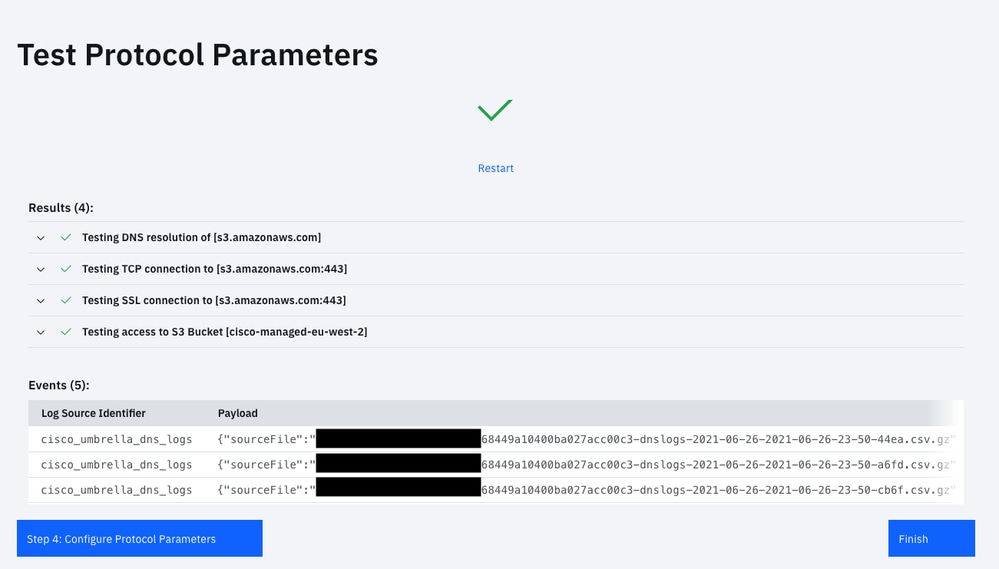
Note: You can see other logs in S3 such as Audit and Firewall, but they are not supported. Only set up the three listed here. Any attempts to configure those other logs results in failure.
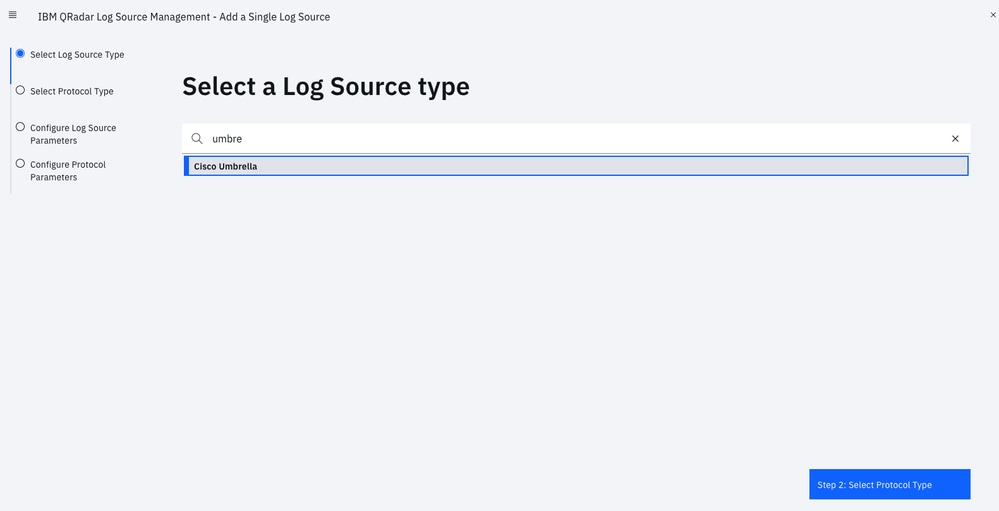
To add a log source, click on the Admin tab on the QRadar navigation bar, scroll down and click on QRadar Log Source Management, then click the button +New Log Source:
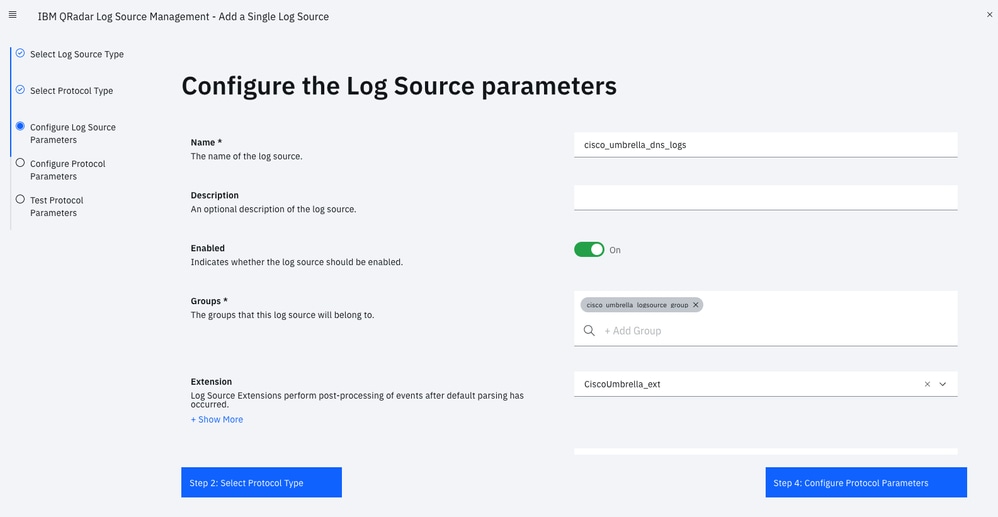
- Log Source Name (entry names must match exactly as listed):
- Cisco DNS Logs: cisco_umbrella_dns_logs
- Cisco Umbrella IP Logs: cisco_umbrella_ip_logs
- Cisco Umbrella Proxy Logs: cisco_umbrella_proxy_logs
- Event Format: Cisco Umbrella CSV
- Log Source Type: Cisco Umbrella
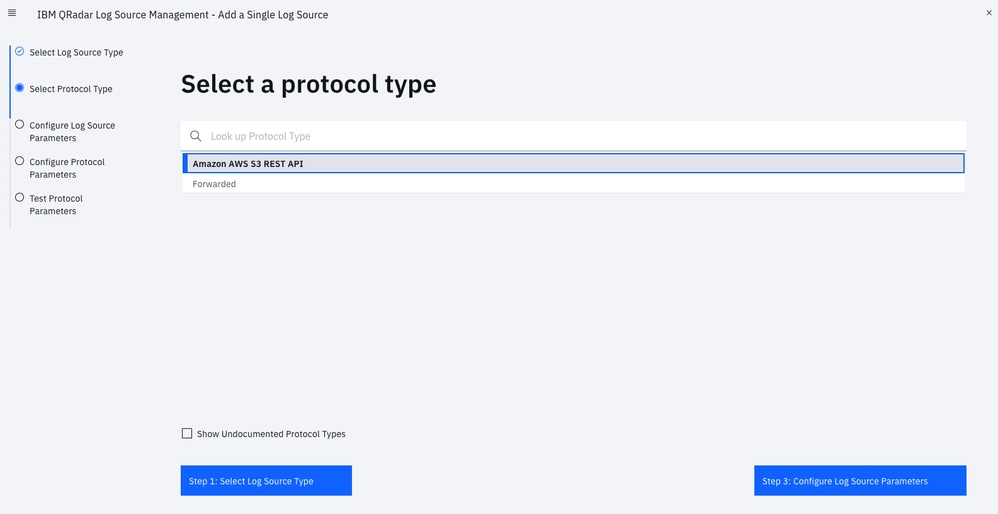
- Protocol Configuration: Amazon AWS S3 REST API
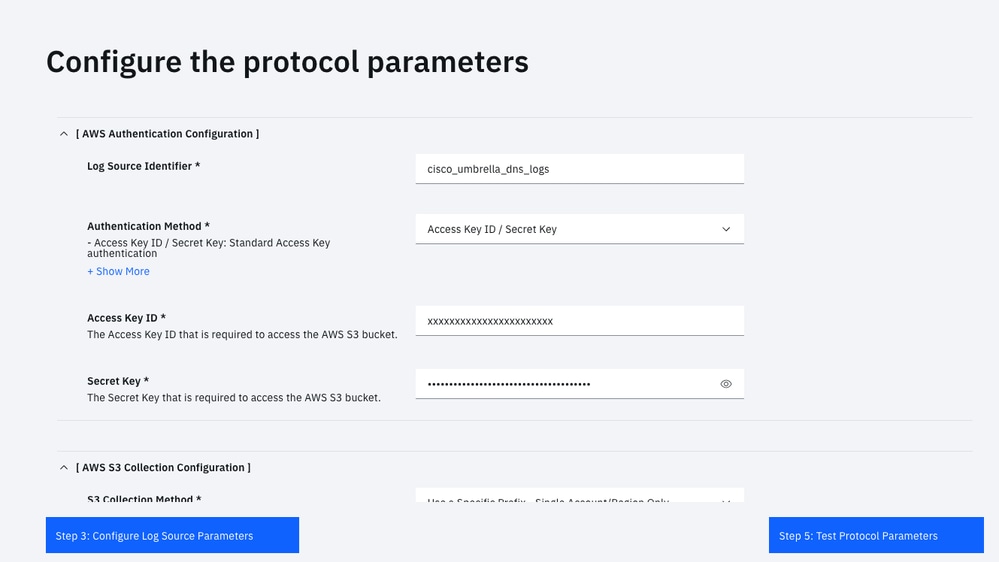
- File Pattern: .*?\.csv\.gz
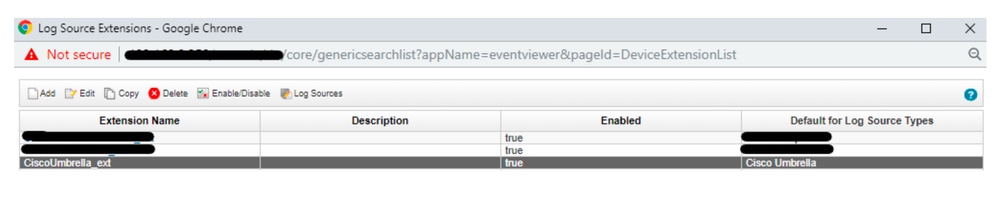
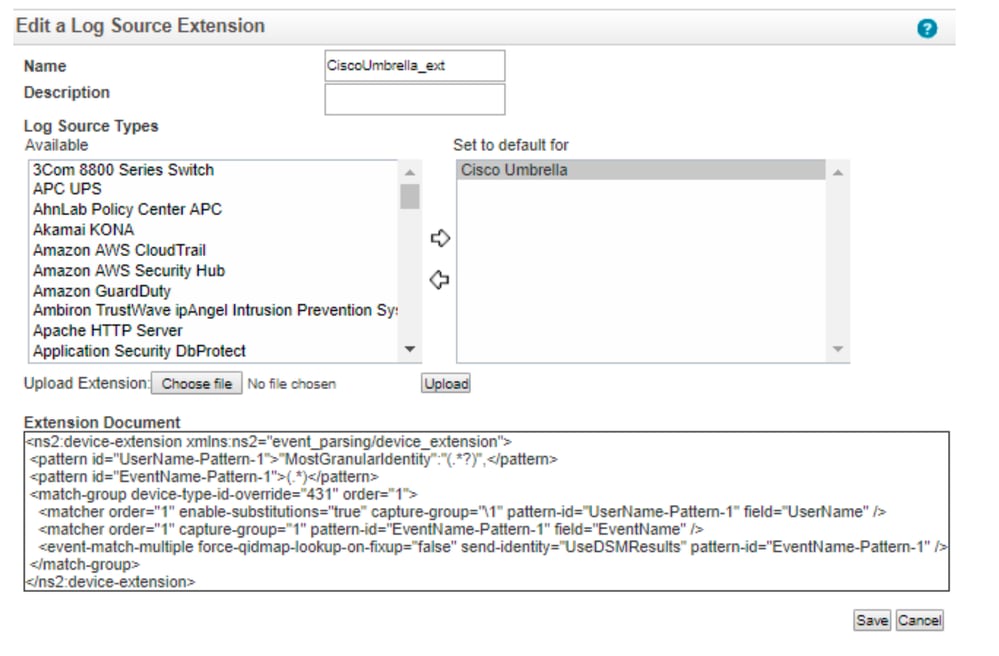
- Log Source Extension: CiscoUmbrella_ext **
- Please select any groups you would like this log source to be a member of: cisco_umbrella_logsource_group
Go through the Add a Single Log Source Wizard:
 4404306773524
 4404306773268
 4404313505300
 4404306774164
 4404306897556
 4404306881812
Note: If the Log Source Extension is not mapped to "CiscoUmbrella_ext", please choose the Log Source Name from the list:
 360071157752
 360071326791
Here is an example of what a Cisco Managed Bucket looks like:
Bucket name: cisco-managed-us-west-1
ACCESS_KEY_ID: xxxxxxxxxxxxxx
SECRET_ACCESS_KEY: xxxxxxxxxxxxxx
Region: us-west-1
Your Directory Prefix is the key part of this. This is the customers folder,
followed by the appropriate log folder.
For example: xxxxxxx_cfa37bd906xxxxxx3aff94e205db7bxxxxxxx/dnslogs
Navigate back to Cisco Cloud Security App Settings and set the Panel refresh rate in hours to a minimum value of "1" in order for the graphs to display data.
Generating Authentication Token
The administrator needs to generate a service token to add to your Cisco Security App. As best practice, recreated the Authorized Service Token every 90 days:
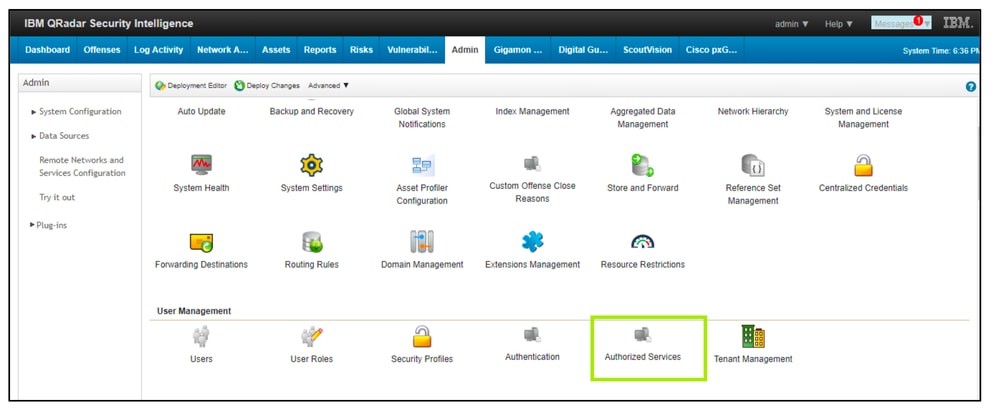
- Login to QRadar > Admin Tab > Authorized Services.
 360071965571
- Add Authorized Services.
 360071965551
- Enter the details and generate authentication token.
- After generating the token, click "Deploy Changes".
Configuring the Cisco Cloud Security App
- From the Admin tab on the QRadar navigation bar, scroll down and open Cisco Cloud Security App Settings.
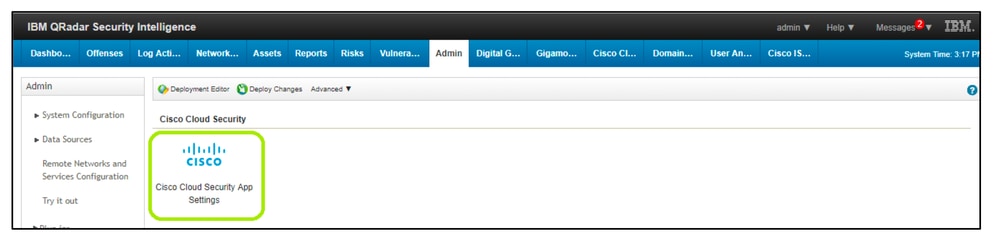 360071754732
- Enter the Authentication Token generated in previous step.
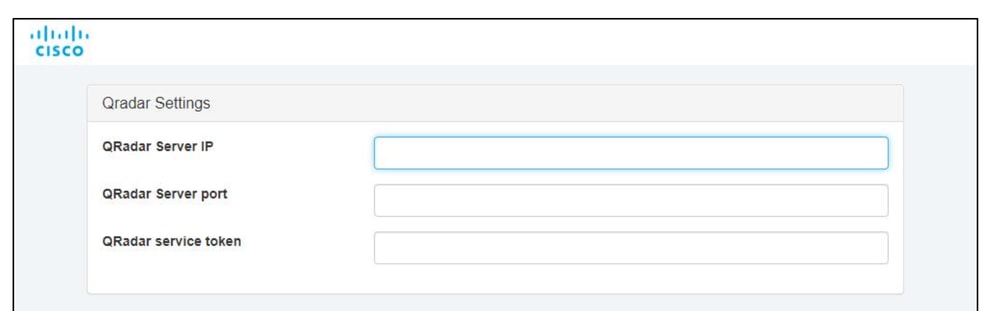 360072462992
- Edit the Api Settings as follows:
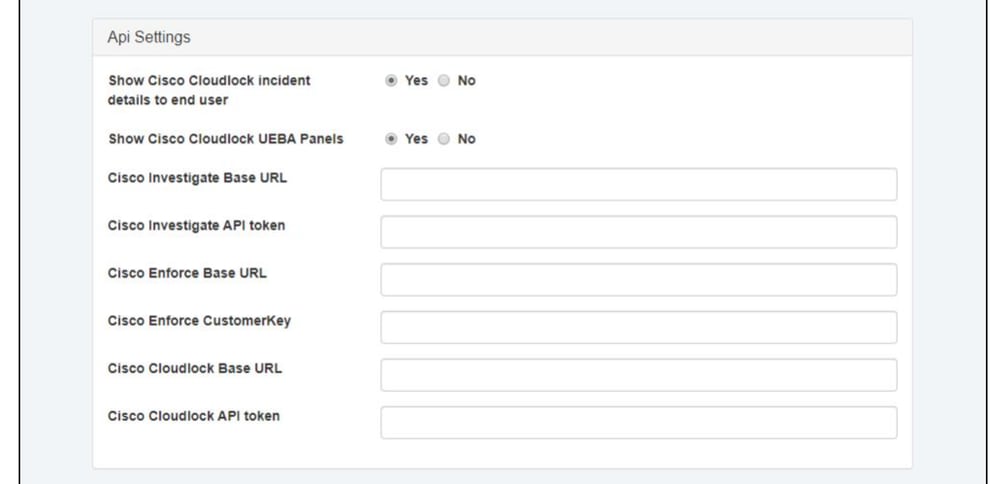 360072703611
A popup indicates that the application settings have been successfully updated.
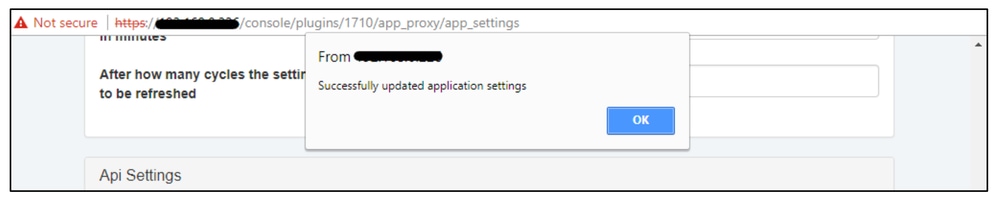 360071986151
Indexing in QRadar
- Navigate to the Admin tab, then click on Index Management.
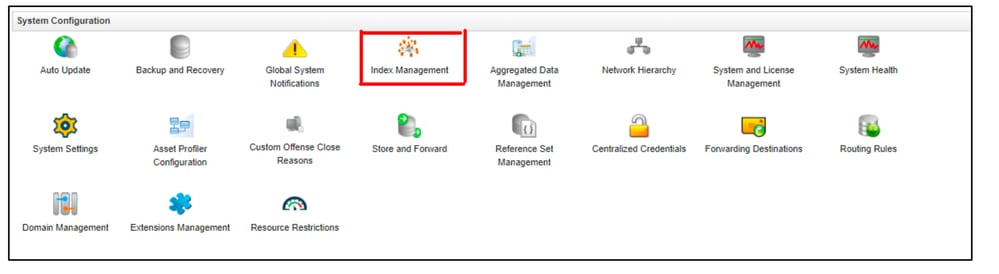 360071780112
- Index the CEPs Packaged with the app.
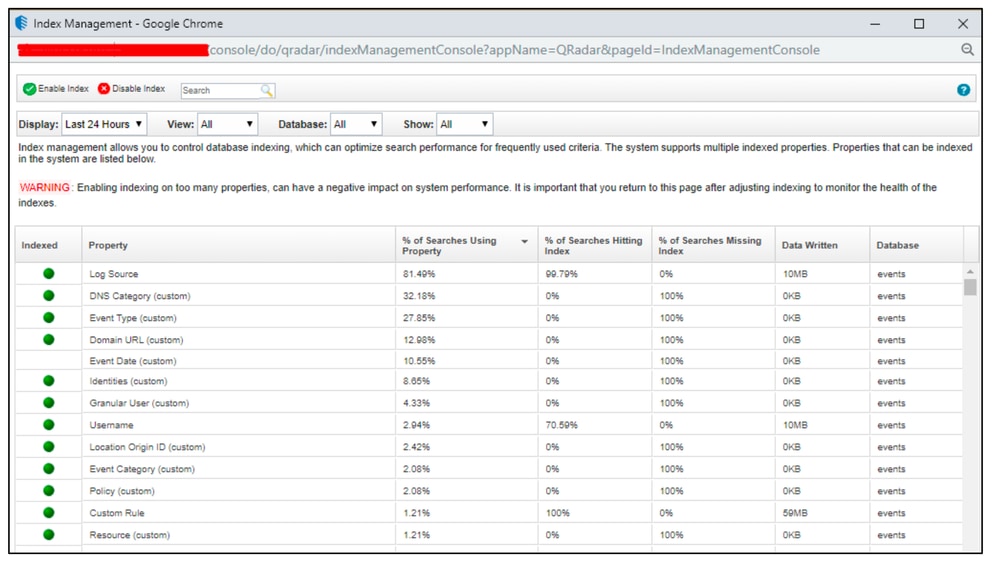 360071988811
These are the recommended CEPs to be indexed:
- Log Source
- DNS Category
- Event Type
- Domain URL
- Identities
- Granular User
- Username
- Location Origin ID
- Event Category
- Policy
- Resource
Now you are ready to use QRadar to start monitoring activities for Cisco Umbrella, Investigate, and CloudLock details. More instructions on how to navigate QRadar can be found here.
 Feedback