Generate Diagnostics Pack for Secure Network Analytics Appliances
Available Languages
Introduction
This document describes the different procedures available to generate a Diagnostics Pack for Secure Network Analytics (SNA) Appliances.
Procedure
There are four methods to generate the Diagnostics Pack for the SNA appliances. The recommended method is Method 1. Via SystemConfig Menu.
The remaining methods are an option in case your appliance does not have Internet connectivity directly or via proxy.
Available methods vary based on the software release.
Method 1. Via SystemConfig Menu (Recommended Method)
- Log in to the appliance console as sysadmin.
- Select Recovery > Diagnostics Pack > Create.
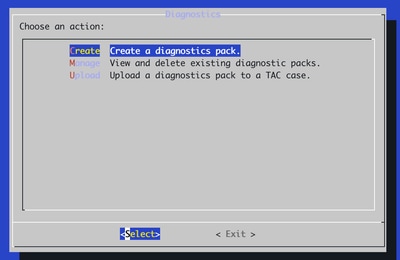
- To customize your diagnostics pack, highlight a desired option and then click Edit.
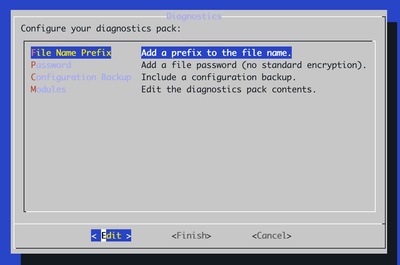
File Name Prefix - Add a file name prefix for your diagnostics pack (maximum of 127 characters).
Options:
Password - Create a file password for your diagnostics pack. If you do not create a file password, the diagnostics pack is encrypted with the default method (Cisco key).
Configuration Backup - Select this option and complete the onscreen prompts to include a configuration backup in your diagnostics pack. For more information about backups, refer to Backup Configuration Files in the Help.
Modules - Edit the diagnostic pack contents by selecting the specific modules you want to include. - Click Finish. Complete the on-screen prompts to create the diagnostics pack.
- You are able to upload the Diagnostic Pack directly to your TAC case from SystemConfig. Select Upload.
- Select the Diagnostic Pack you wish to upload and select Select.
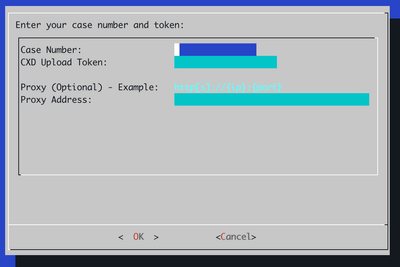
- Enter the TAC Case Number in the Case Number field.
- Enter the Case number token CXD Upload Token field. If you do not have this token, generate one using the steps here: https://www.cisco.com/c/en/us/support/web/tac/tac-customer-file-uploads.html#cxduploadtoken
- If a proxy is needed, enter it in the Proxy Address field.
- Select OK when complete.
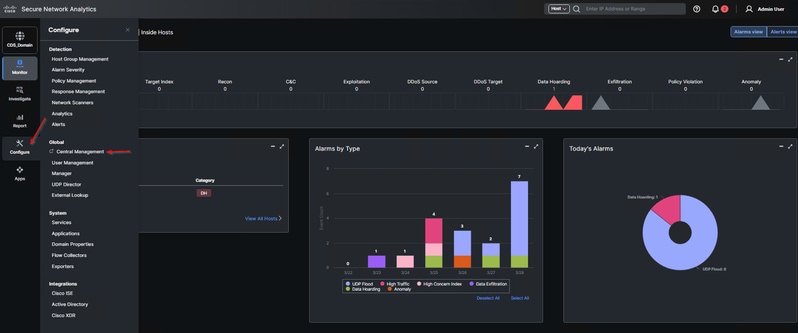
Method 2. Central Management
- Log in to the Web UI of the SNA Manager.
- Select Configure >Global > Central Management

- A browser tab opens for Central Management and shows the Inventory tab. From the Inventory tab, click the ellipsis icon for the appliance you wish to create a diagnostic pack for. Select Support.
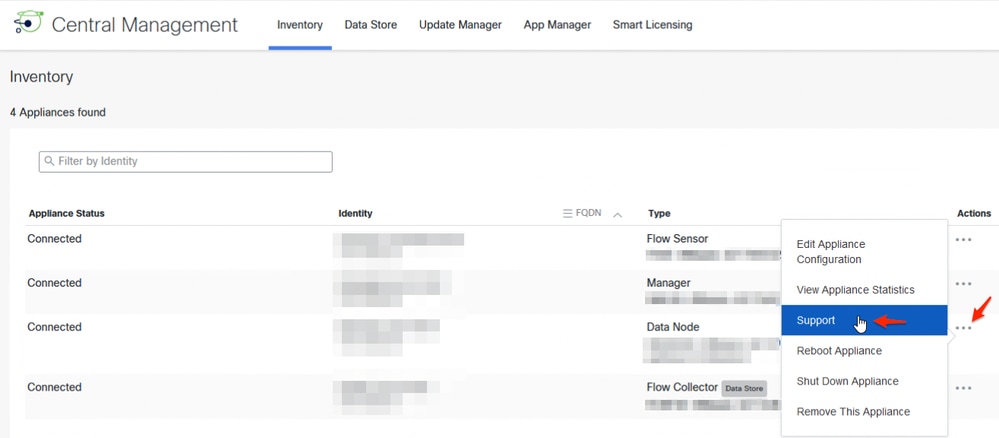
- This takes you to that appliances support page within Central Management. Click "Diagnostics Packs" tab > Create to start the process of creating a new diagnostic pack. Previously completed Diagnostic Packs can be downloaded.

Method 3. Admin Web UI
The are two methods of accessing the Admin UI of an SNA appliance, either through the SNA Managers Central Management feature, or directly.
If you know your appliances FQDN or IP Address, start at step 4.
- Log in to the Web UI of the SNA Manager.
- Select Configure >Global > Central Management
- A browser tab opens for Central Management and shows the Inventory tab. From the Inventory tab, click the ellipsis icon for the appliance you wish to create a diagnostic pack for. Select View Appliance Statistics. Another new browser tab opens for that appliances Admin UI.
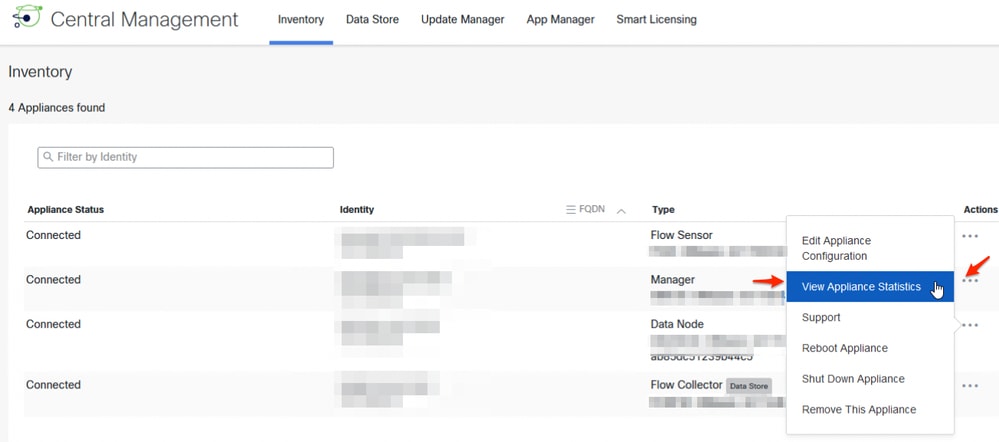
- Log in to the appliance Admin UI with admin credentials. If you are not using the SNA Managers Central Management function, navigate to the log in page of the desired device via either its DNS resolvable FQDN or by its IP Address https://{IP_or_FQDN_here} and log in using the built in Admin user.

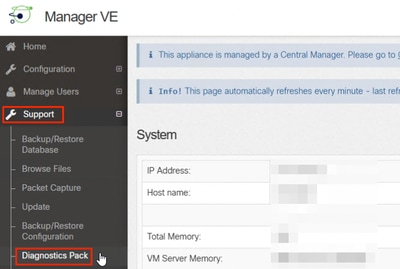
Note: To access the Managers Admin UI after logging in, change the URL: https://{Manager_IP_or_FQDN}/smc/index.html

- Click Support > Diagnostics Pack from the left menu.
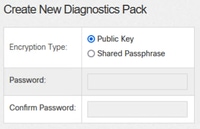
- Once in the Diagnostics Pack page, For Encryption Type either leave the default Public Key selected, or select Shared Passphrase and enter it in the Password and Confirm Password fields.
Note: Please provide shared passphrases to TAC in the file description field when you upload the Diagnostics pack to the Support Case Manager. Enter the description as a key:value pair with 'passphrase' being the key, and the value being set to the shared passphrase used to encrypt the file. Example: passphrase:<your_shared_passphrase>. This allows for the most effecient processing and analysis of the diagnostic bundle.
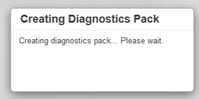
- Select Create Diagnostics Pack to generate the diagnostics pack of the appliance. While it is being created, the focus is on a pop-up on the page.
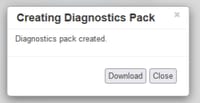
- Once finished, you are presented with a pop-up box which includes the Download button to download the Diagnostics Pack. Previously completed diagnostic packs can be downloaded from this page.
Note: If you do not have access to the Web UI, please use option 1. Via SystemConfig Menu
Method 4. From Each Appliances Command Line Interface (CLI)
Note: This method is only available to users prior to software release 7.5.0.
There are times when it is not possible to generate the Diagnostics Pack of an appliance with the use of the previously described methods, however it can be generated directly from the Appliances CLI. The steps to complete this task are:
- Connect to the desired SNA appliance via Secure Shell Protocol (SSH) or directly via console access.
Note: In case that you need to collect the diagnostics pack from a hardware appliance with no SSH access, the Kernel-based Virtual Machine (KVM) console from the Cisco Integrated Management Controller (CIMC) interface can be used as well.
- Log in with root credentials.
- Run the commands for the SNA software release in use:
SNA software release 7.1.x to 7.3.x run the doDiagPack command.
SNA software release 7.4.x run the diagnostics start command.
- Wait for the task to complete. On
- The Diagnostics pack file is saved in the /lancope/var/admin/diagnostics/ directory with a name scheme of "diagnostic-<Device_type>-<Device_ID>.<YYYMMDD>.<HHMM>-*.tgz.gpg"

- Transfer the generated file from the appliance to your local computer or to a file server with Secure Copy Protocol (SCP) or with a SSH File Transfer Protocol (SFTP) client like WinSCP.
Troubleshoot
This section provides information you can use in order to troubleshoot failures generating diagnostic packs.
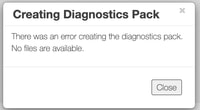
For Method 3, the error "There was an error creating the diagnostics pack. No files are available" appears after the Create Diagnostics Pack button is clicked in the Admin UI of an appliance if there is a permissions error or a specific directory is missing.
Steps to correct this error:
- Log in to the appliance that has this behavior with root credentials via SSH.
- Run the
ls -l /lancope/var/database/dbs/hsqldb/admin/command to verify the content of the directory.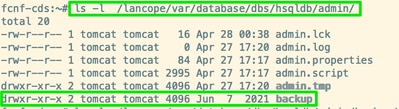
- Ensure that the backup child directly exists and that its user/group owner is tomcat. If the backup child directory does not exist in the /lancope/var/database/dbs/hsqldb/admin/ directory, it must be created and the correct ownership must be assigned. To create this directory, run the
install -d -m 0755 -o tomcat -g tomcat /lancope/var/database/dbs/hsqldb/admincommand. - Run the ll /lancope/var/admin/ command to verify that the backups and diagnostics subdirectories exist and that their user/group owner is root.
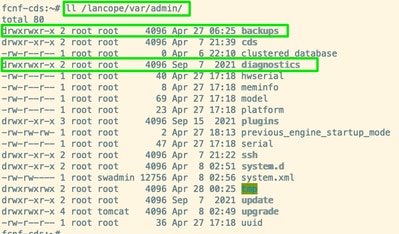
- If either of the backups and diagnostics subdirectories do not exist in the /lancope/var/admin/ directory, they must be created with the relevant command:
mkdir /lancope/var/admin/backups
mkdir /lancope/var/admin/diagnostics
- Once they have been created or verified to exist, try to generate the Diagnostics Pack of the SNA appliance again.
Related Information
For additional assistance, please contact Cisco Technical Assistance Center (TAC). A valid support contract is required: Cisco Worldwide Support Contacts.
Technical Support & Documentation - Cisco Systems
Revision History
| Revision | Publish Date | Comments |
|---|---|---|
3.0 |
05-May-2026
|
Updated preferred upload method and added more detailed screenshots for other sections. |
1.0 |
29-Apr-2022
|
Initial Release |
 Feedback
Contact Cisco
- Open a Support Case

- (Requires a Cisco Service Contract)