Customer File Uploads to Cisco Technical Assistance Center
Available Languages
Contents
Introduction
Overview
Support Case Manager File Upload
Uploading a File to a Case
Customer eXperience Drive
Service Summary
Supported Protocols
CXD Upload Token
Retrieving the Upload Token for an SR
Using SCM
Uploading Files to CXD
Using Desktop Clients
Directly from a Cisco Device
File Upload API
Sample Python Code to use the PUT API
Email File Attachment Uploads
Encrypting Files
Encrypting Files Using WinZip
Encrypting Files Using Tar and OpenSSL
Encrypting Files Using Gzip and GnuPG
Communicating the Password to the TAC Customer Support Engineer
Customer Case Attachments Data Management
Summary
Additional Information
Introduction
This document describes how to upload files to Cisco Technical Assistance Center (TAC).
Overview
The TAC customer support engineers can assist you with resolving an issue in a timely manner when they have relevant files attached to the issue. You have several options to upload the files related to your issue. Some of these options are less secure, and can lead to certain inherent risks, and each option has limitations that you need to consider before deciding on an appropriate upload option. Table 1 summarizes the available upload options with details on file encryption capabilities, recommended files size limits, and other relevant information.
Table 1. Available Upload Options
| Available Option (In Order of Preference) | Files are Encrypted in Transit | Files are Encrypted at Rest | Recommended File Size Limit | |
|---|---|---|---|---|
| Support Case Manager (SCM) | Yes |
Yes |
No limit | |
| Customer eXperience Drive | Yes* |
Yes |
No limit | |
| Email to attach@cisco.com | No** |
Yes |
20 MB or less based on customer mail server limits |
|
*Applies to all protocols and FTP is no longer supported. **You must encrypt prior to transit. Secure transit is guaranteed only from the point where the email/attachment reaches the Cisco network, not on the customer network or email provider side. | ||||
Support Case Manager File Upload
The Support Case Manager (SCM) file upload method is a secure option for uploading files to cases. The communication channel between your computing device and Cisco is encrypted. Files uploaded through SCM are immediately linked to the associated case and stored in an encrypted format.
Uploading a File to a Case
After you submit the case, you can upload files.
Step 1. Log in to SCM.
Step 2. In order to view and edit the case, click the case number or case title in the list. The Case Summary page opens.
Step 3. Click Add Files in order to choose a file and upload it as an attachment to the case. The system displays the SCM File Uploader tool.

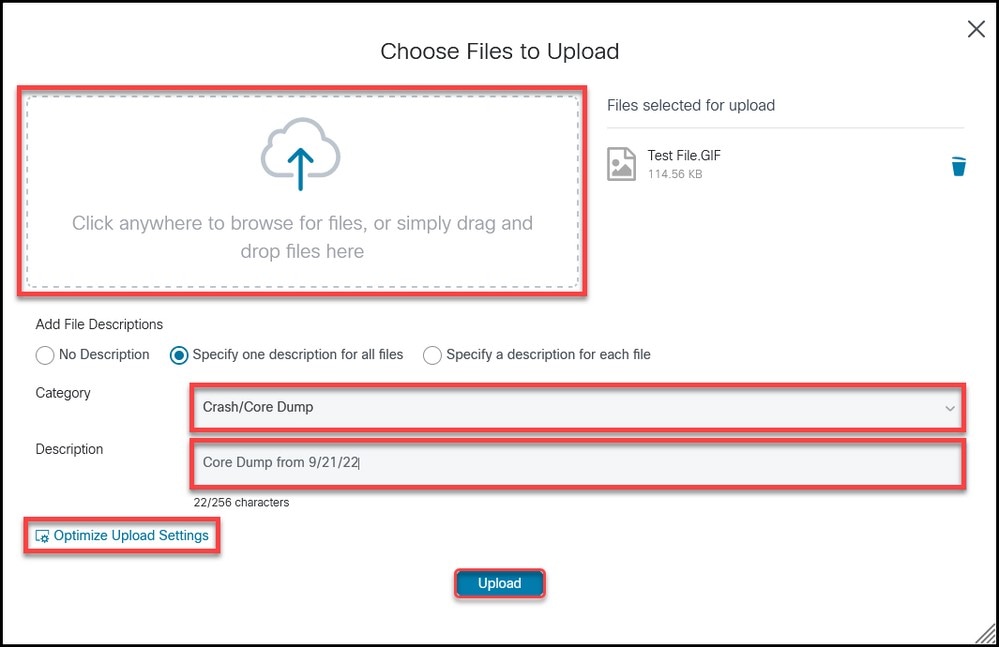
Step 4. In the Choose Files to Upload dialog box, drag the files that you want to upload or click inside to browse your local machine for files to upload.
Step 5. Add a description and specify a category for all files, or individually.
Step 6. Click Upload in order to start the upload process.
Step 7. Once all uploads are complete, you can close the window or click Add More Files in order to upload more files.
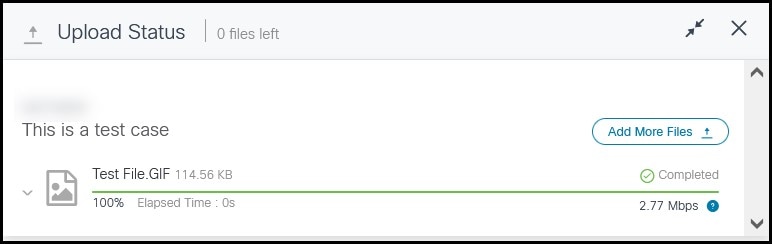
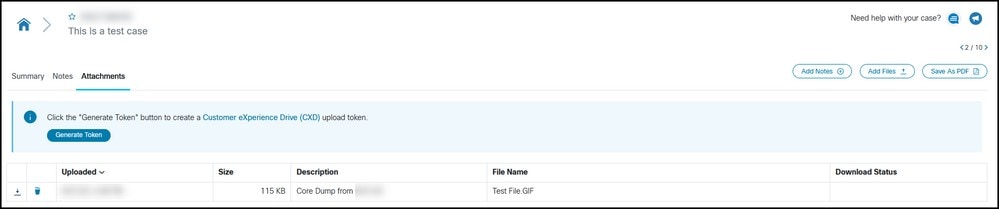
Step 8. Uploaded files can be managed in the Attachments tab.
Customer eXperience Drive
Service Summary
The Customer eXperience Drive (CXD) is a multi-protocol file upload service with no limitation on the uploaded file size. It helps Cisco customers with active Service Requests (SRs) to upload data directly to a case using a unique set of credentials created per SR. The protocols supported by CXD are natively supported by Cisco products which allows for uploading directly from Cisco devices to SRs.
Supported Protocols
Table 2 summarizes the protocols supported by CXD. It is worth noting that regardless of the protocol used, there is no limit set on the uploaded file size.
Table 2. CXD Supported Protocols
| Name | Protocol/Port | Encrypted | Data Channel Ports | Notes |
|---|---|---|---|---|
| Secure File Transfer Protocol (SFTP) | TCP/22 |
Yes |
N/A |
|
| Secure Copy Protocol (SCP) | TCP/22 |
Yes |
N/A |
|
| Hyper Text Transfer Protocol over SSL (HTTPS) | TCP/443 |
Yes |
N/A |
Only API-based uploads are supported. |
| File Transfer Protocol of SSL (FTPS) Implicit | TCP/990 |
Yes |
30000-40000 |
Firewalls cannot inspect FTPS, as the control channel is encrypted. Hence, the firewall needs to allow outbound connectivity to the entire data channel port range. |
CXD Upload Token
CXD creates unique upload tokens per SR. The SR number and the token are used as the username and password to authenticate to the service and subsequently upload files to the SR.
Retrieving the Upload Token for an SR
Using SCM
When an SR is opened, users must create the upload token to upload the attachment.
In order to retrieve/generate the upload token, complete these steps:
Step 1. Log in to SCM.
Step 2. In order to view and edit a case, click the case number or case title in the list. The Case Summary page opens.
Step 3. Click the Attachments tab.
Step 4. Click Generate Token. Once the token is generated it is displayed next to the Generate Token button.
Uploading Files to CXD
Using Desktop Clients
In general, all the user needs to do is use a client, depending on the protocol, to connect to cxd.cisco.com, authenticate using the SR number as the username and the upload token as the password, and eventually upload a file. Depending on the protocol and the client, the user steps can be different. It is always recommended to refer to the client documentation for more details.
Directly from a Cisco Device
All Cisco devices have built-in file transfer clients, usually utilized using a copy or redirect command. Cisco equipment running on a Linux distribution usually supports one or more of scp, sftp, and curl for SCP, SFTP, and HTTPS integrations.
File Upload API
The file upload API utilizes the HTTP PUT verb to upload files to CXD. For maximum compatibility and simplicity of integration, the API is kept simple.
HTTP Method: PUT
URL: https://cxd.cisco.com/home/<destination file name>
Headers:
Table 5. CXD File Upload API Headers
| Key | Type | Value |
|---|---|---|
Authorization |
String |
Basic HTTP Auth String |
The body is the file data itself. There are no fields or forms here, which makes the request very simple.
Sample Python Code to use the PUT API
Note that the code assumes that the file is stored in the same path you are running it from.
import requests
from requests.auth import HTTPBasicAuth

username = 'SR Number'
password = 'Upload Token'
auth = HTTPBasicAuth(username, password)

filename = 'showtech.txt'  # Destination filename
url = f'https://cxd.cisco.com/home/{filename}'

headers = {"Expect": "100-continue"}

file_path = 'Local Path to the File'

with open(file_path, 'rb') as f:
    r = requests.put(url + filename, f, auth=auth, headers=headers)
    if r.status_code == 201:
        print("File Uploaded Successfully")
Email File Attachment Uploads
If SCM and CXD do not work for you, another alternate file upload method is email file attachment upload. Note that this method is fundamentally insecure and does not encrypt the file or the communication session used to transport the file between the customer and Cisco. It is incumbent upon the customer to explicitly encrypt files before the files are uploaded through email file attachments. As an additional security best practice, any sensitive information such as passwords need to be obfuscated or removed from any configuration file or log that is sent over an insecure channel. For more information, see Encrypting Files.
After the files are encrypted, upload additional information and files to the case by sending the information via an email message to attach@cisco.com with the case number in the subject line of the message, for example, subject = Case xxxxxxxxx.
Attachments are limited to 20 MB per email update. Attachments submitted by using email messages are not encrypted in transit, but are immediately linked to the specified case and stored in an encrypted format.
Attach the file to an email message and send the message to attach@cisco.com as shown in this screenshot.
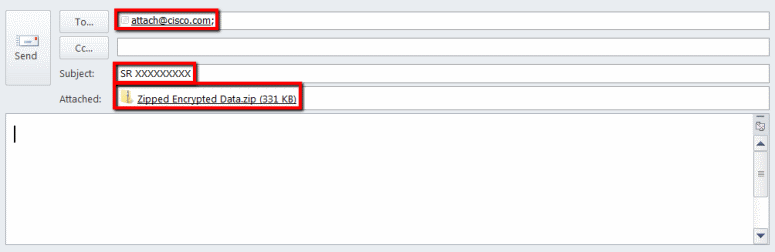
The previous screenshot displays a Microsoft Outlook email that has an encrypted ZIP file attachment, the correct To address, and a properly formatted Subject. Other email clients need to provide the same functionality and perform just as well as Microsoft Outlook.
Encrypting Files
The following examples show how to encrypt files by using three of the many available options such as WinZip, Linux tar and openssl commands, and Linux Gzip and GnuPG. A strong encryption cipher such as AES-128 needs to be used in order to properly protect the data. If you are using ZIP, an application that supports AES encryption must be used. Older versions of ZIP applications support a symmetric encryption system that is not secure and is not to be used.
Encrypting Files Using WinZip
This section demonstrates how to encrypt files by using the WinZip application. Other applications provide the same functionality and perform as well as WinZip.
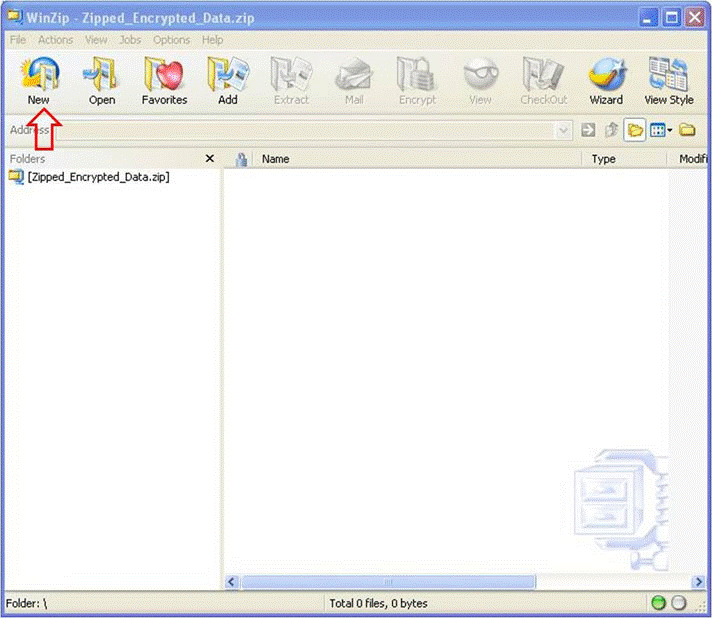
Step 1. Create a ZIP archive file. In the WinZip GUI, click New and follow the menu prompts in order to create an appropriately named, new ZIP archive file. The system displays the newly created ZIP archive file.
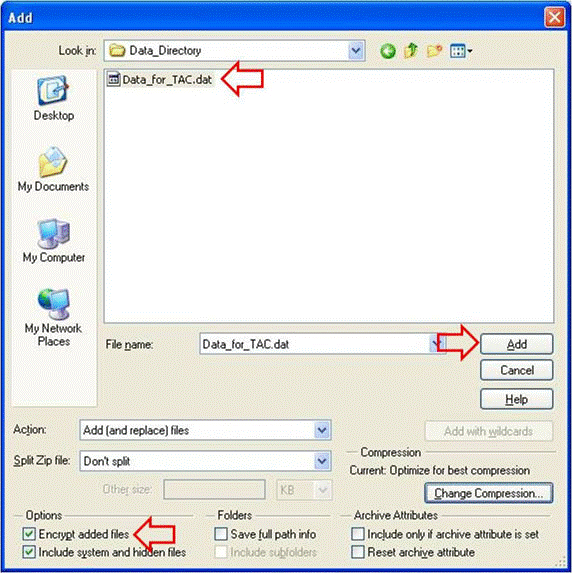
Step 2. Add the file(s) to be uploaded to the ZIP archive file and check the Encrypt added files check box. From the main WinZip window, click Add and then choose the file(s) to upload. The Encrypt added files check box must be checked.
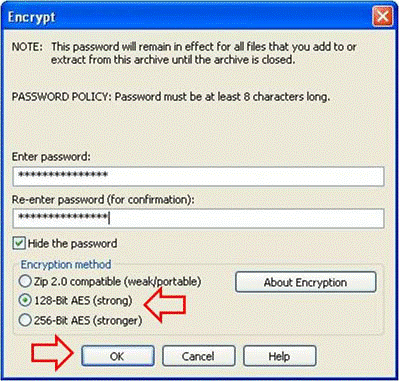
Step 3. Encrypt the file by using the AES encryption cipher and a strong password:
- Click
Addin the file selection window in order to open theEncryptwindow. - In the
Encryptwindow, create an appropriately strong password. The password is shared with the case Customer Support Engineer owner, as discussed in Communicating the Password to the TAC Customer Support Engineer. - Choose one of the AES Encryption methods.
- Click
OKin order to encrypt the file(s) and display the main WinZip window.
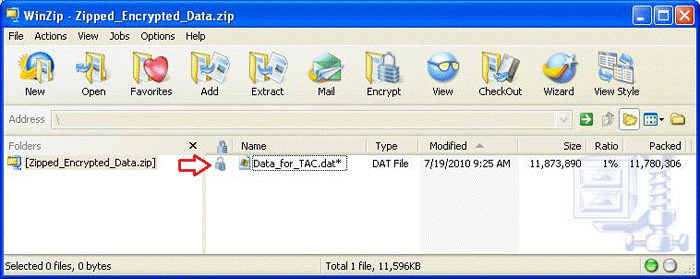
Step 4. Verify that the file is encrypted. Encrypted files are marked with an asterisk following the file name or a lock icon in the Encryption column.
Encrypting Files Using Tar and OpenSSL
This section shows how to encrypt files by using the Linux command-line tar and openssl commands. Other archive and encryption commands provide the same functionality and perform just as well under Linux or Unix.
Step 1. Create a tar archive of the file and encrypt it through OpenSSL using the AES cipher and a strong password as demonstrated in the following example. The command output shows the combined tar and openssl command syntax to encrypt the file(s) using the AES cipher.
[user@linux ~]$ tar cvzf - Data_for_TAC.dat | openssl aes-128-cbc -k
Str0ng_passWo5D |
dd of=Data_for_TAC.aes128 Data_for_TAC.dat
60+1 records in
60+1 records out
Encrypting Files Using Gzip and GnuPG
This section demonstrates how to encrypt files by using the Linux command-line Gzip and GnuPG commands. Other archive and encryption commands provide the same functionality and perform just as well under Linux or Unix. The command output shows how to use the gzip and gpg command syntax to encrypt the file(s) using the AES cipher.
Step 1. Compress the file by using Gzip:
[user@linux ~]$ gzip -9 Data_for_TAC.dat
Step 2. Encrypt the file through GnuPG using the AES cipher and a strong password:
user@linux ~]$ gpg –cipher-algo AES –armor –output Data_for_TAC.dat.gz.asc –symmetric Data_for_TAC.dat.gz
Step 3. Enter and confirm the strong password at the passphrase prompt:
Enter passphrase:
Repeat passphrase:
Communicating the Password to the TAC Customer Support Engineer
When encrypting attachments, share the encrypting password with the case Customer Support Engineer owner. As a best practice, use a method other than the one used to upload the file. If you used an email message or FTPS to upload the file, communicate the password out-of-band such as by telephone or SCM case update.
Customer Case Attachments Data Management
Files uploaded to the CXD folder are managed in accordance with Cisco’s policies. Documentation regarding data controls and retention can be found in the TAC Privacy Data Sheet.
Summary
Multiple options exist for uploading information to TAC to help them resolve cases. SCM offers secure uploads through a browser, while CXD supports uploads through a browser, Web API, and multiple protocols compatible with different types of clients and Cisco devices. If you cannot use SCM or a CXD-supported protocol other than FTP for your file upload, the least preferred option is to send an email message to attach@cisco.com. If you use either of these options, it is strongly advised that you encrypt your files before transit. For more information, see Encrypting Files. You need to employ a strong password and communicate the password to the case Customer Support Engineer out-of-band such as by telephone or SCM case update.
For the duration that a case is open and for a period up to 18 months following final closure of a case, all files are instantly accessible from within the case tracking system to authorized Cisco personnel.
- After 18 months the files can be moved to archival storage.
- At any time, an authorized customer contact can expressly request that a specific file be purged from a case.
- Files in the CXD folder are retained for only four days.
Additional Information
- Accessing Cisco Technical Services
- Cisco Worldwide Support Contacts
- Cisco Technical Services Resource Guide
- Cisco Conferencing Products
- The GNU Privacy Guard
- The OpenSSL Project
- WinZip
This document is part of the Cisco Security Research & Operations.
This document is provided on an "as is" basis and does not imply any kind of guarantee or warranty, including the warranties of merchantability or fitness for a particular use. Your use of the information on the document or materials linked from the document is at your own risk. Cisco reserves the right to change or update this document at any time.
Revision History
| Revision | Publish Date | Comments |
|---|---|---|
3.0 |
12-Apr-2024
|
Removed the Customer File Retention section and added the Customer Case Attachments Data Management section. |
2.0 |
01-Nov-2023
|
Removed the Case File Uploader section and updated the Customer eXperience Drive section. |
1.0 |
14-Nov-2017
|
Initial Release |
 Feedback
Contact Cisco
- Open a Support Case

- (Requires a Cisco Service Contract)
This Document Applies to These Products
- Collaboration Endpoints - Retired Products
- Conferencing - Retired Products
- Contact Center - Retired Products
- Optical Networking - Retired Products
- Routers - Retired Products
- Security - Retired Products
- Servers - Unified Computing (UCS) Retired Products
- Storage Networking Retired Products
- Switches - Retired Products
- Video - Retired Products
- Wireless - Retired Products