Configure Secure Client NAM Profile on Windows Using ISE
Available Languages
Contents
Introduction
This document describes how to deploy the Cisco Secure Client Network Access Manager (NAM) profile through Identity Services Engine (ISE).
Prerequisites
Requirements
Cisco recommends that you have knowledge of these topics:
- Posture Policy
- Identity Services Engine (ISE)
- AnyConnect NAM and Profile Editor
- Cisco Catalyst Configuration for 802.1x Services
Components Used
The information in this document is based on these software and hardware versions:
- Active Directory 2016
- Cisco ISE, Release 3.3 and later
- Cisco Catalyst 9200 Switch with Cisco IOS® XE 17.6.5 and later
- Windows 10 with Cisco Secure Mobility Client 5.1.4.74 and later
The information in this document was created from the devices in a specific lab environment. All of the devices used in this document started with a cleared (default) configuration. If your network is live, ensure that you understand the potential impact of any command.
Background Information
EAP-FAST authentication occurs in two phases. In the first phase, EAP-FAST employs a TLS handshake to provide and authenticate key exchanges using Type-Length-Values (TLV) objects to establish a protected tunnel. These TLV objects are used to convey authentication-related data between the client and server. Once the tunnel is established, the second phase begins with the client and ISE node engaging in further conversations to establish the required authentication and authorization policies.
The NAM configuration profile is set up to use EAP-FAST as the authentication method and is available for administratively defined networks. In addition, both machine and user connection types can be configured within the NAM configuration profile. The corporate Windows device gains full corporate access using NAM with Posture check. The personal Windows device gains access to a restricted network using the same NAM configuration.
This document provides instructions for deploying the Cisco Secure Client Network Access Manager (NAM) profile via the Identity Services Engine (ISE) Posture Portal using web deployment, along with Posture Compliance Check.
Configuration
Network Diagram
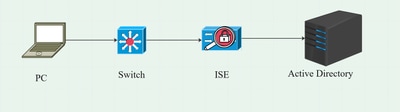
Data Flow
When a PC connects to the network, the ISE provides the authorization policy for redirection to the Posture Portal. The HTTP traffic on the PC is redirected to the ISE Client Provisioning Page, where the NSA application is downloaded from ISE. The NSA then installs the Secure Client agent modules on the PC. After the agent installation is completed, the agent downloads the Posture profile and the NAM profile is configured on ISE.
The installation of the NAM module triggers a restart on the PC. After the restart, NAM module performs EAP-FAST authentication based on the NAM profile.
The Posture scan is then triggered and compliance is checked based on the ISE Posture Policy.
Configure Switch
Configure the access switch for dot1x authentication and redirection.
| aaa new-model aaa authentication dot1x default group radius aaa session-id common dot1x system-auth-control |
Configure the Redirect ACL to redirect users to the ISE Client Provisioning Portal:
| ip access-list extended redirect-acl |
Enable device tracking and HTTP redirection on the switch:
| device-tracking policy <device tracking policy name> ip http server |
Download the Secure Client Package
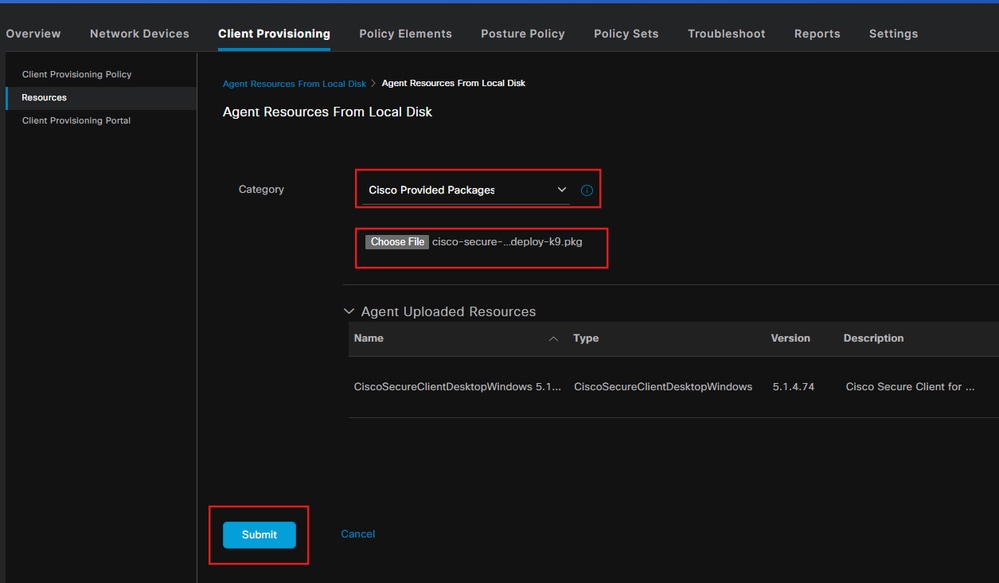
Download the Profile Editor, Secure Client Windows, and Compliance Module webdeploy files manually from the Cisco Software Download Page. On the product name search bar, type Secure Client 5. Downloads Home > Security > Endpoint Security > Secure Client (including AnyConnect) > Secure Client 5 > AnyConnect VPN Client Software
- cisco-secure-client-win-5.1.x-webdeploy-k9.pkg
- cisco-secure-client-win-4.3.x-isecompliance-webdeploy-k9.pkg
- tools-cisco-secure-client-win-5.1.x-profileeditor-k9.msi
ISE Configuration
Step 1. Upload the Package on ISE
1. To upload the Secure Client and Compliance Module webdeploy packages on ISE, navigate to Workcenter > Posture > Client Provisioning > Resources > Add > Agent Resources from Local Disk.
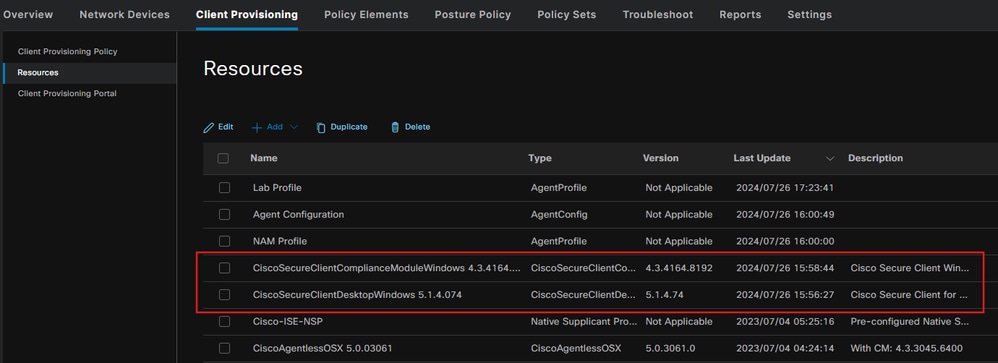
Step 2. Create a NAM Profile from Profile Editor Tool
For information on how to configure a NAM profile refer to the Configure Secure Client NAM for Dot1x Using Windows and ISE 3.2 guide.
Step 3. Upload the NAM Profile on ISE
1. To upload the NAM Profile Configuration.xml on ISE as the Agent Profile, navigate to Client Provisioning > Resources > Agent Resources From Local Disk.
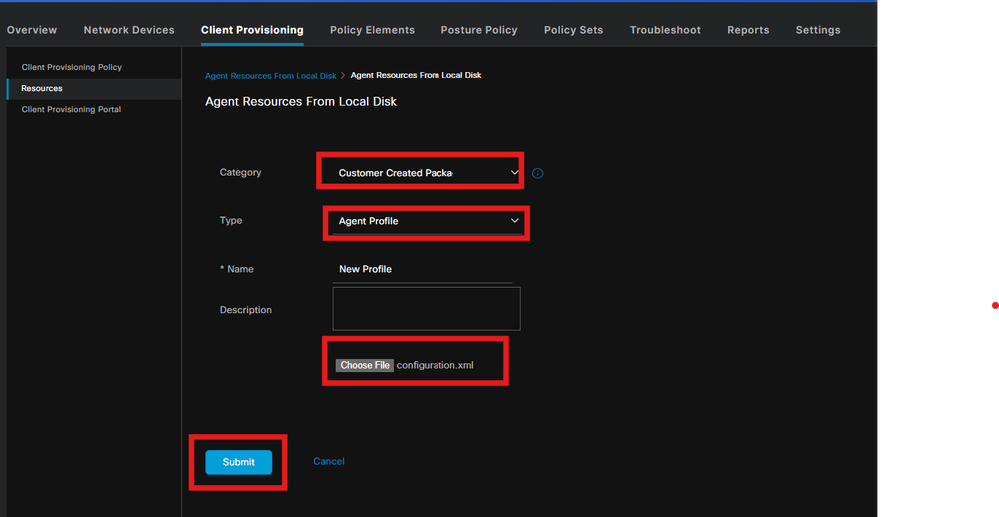
Step 4. Create a Posture Profile
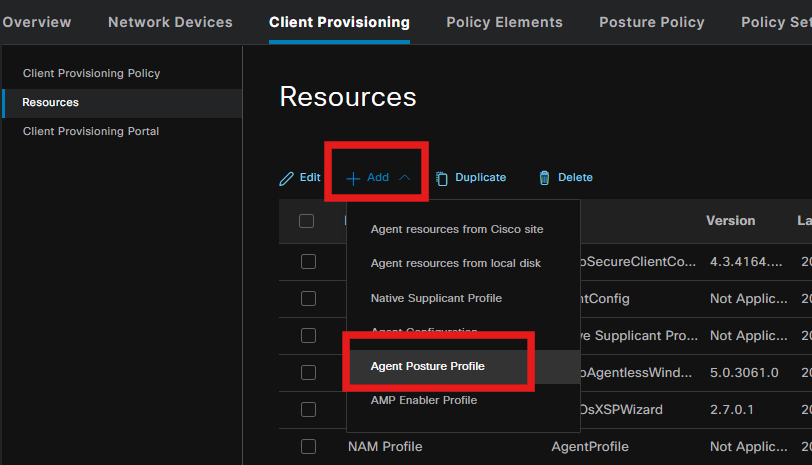
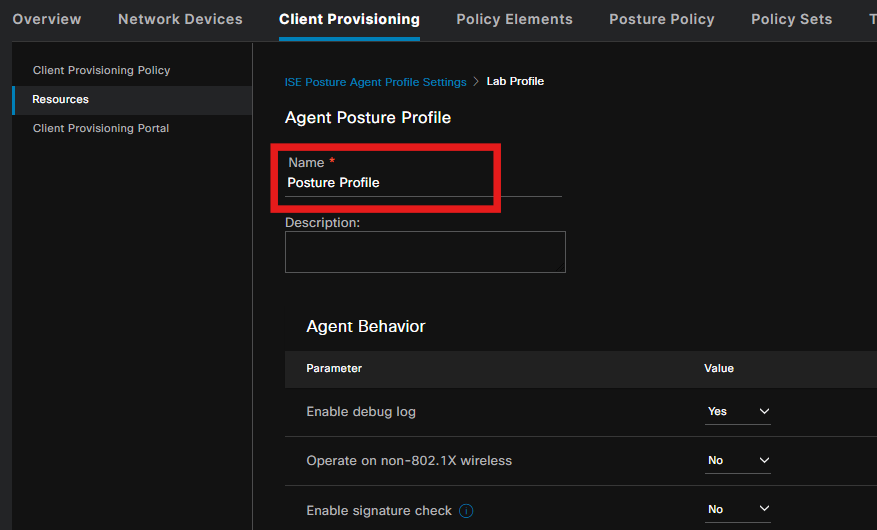
1. From the Posture Protocol section, do not forget to add an asterisk (*) to allow the Agent to connect to all servers.
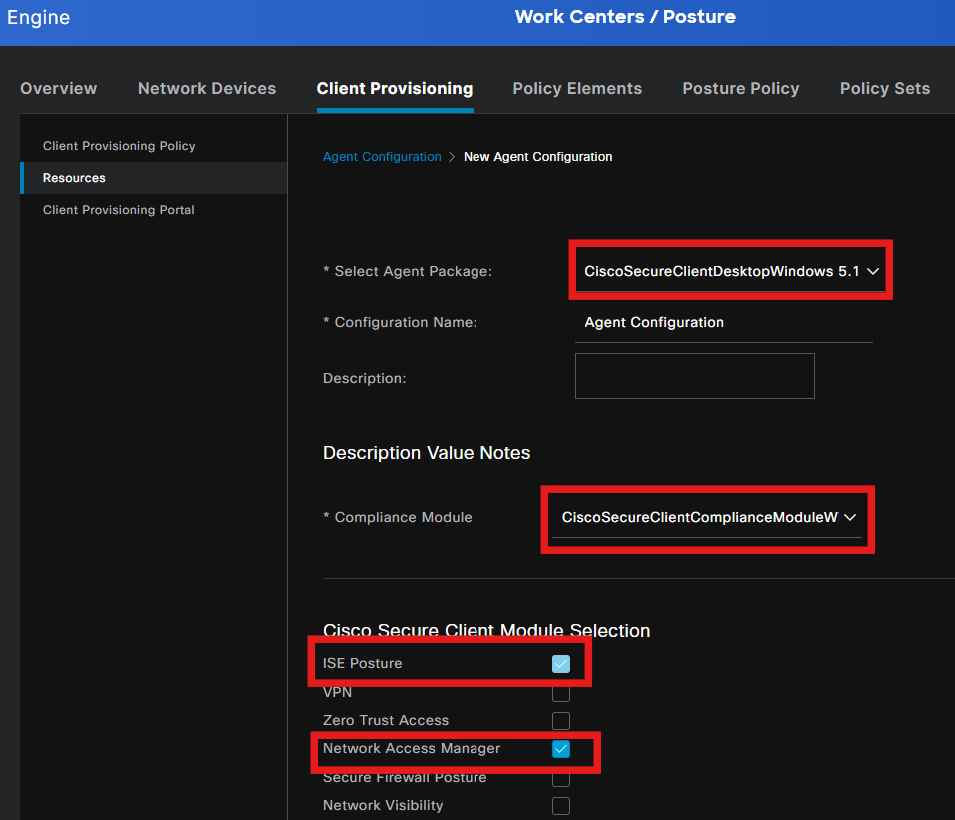
Step 5. Create Agent Configuration
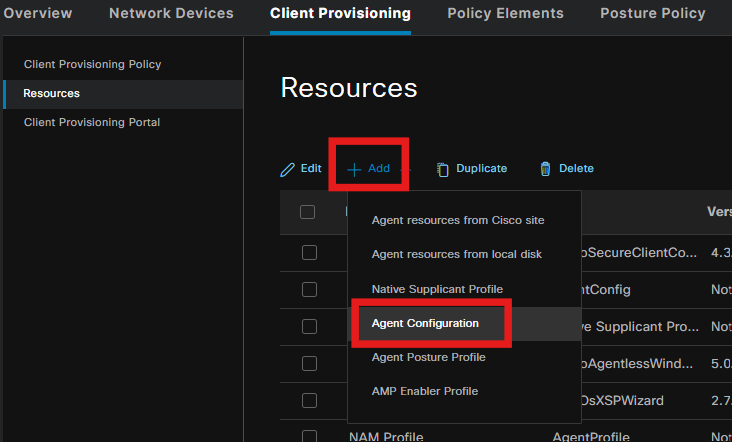
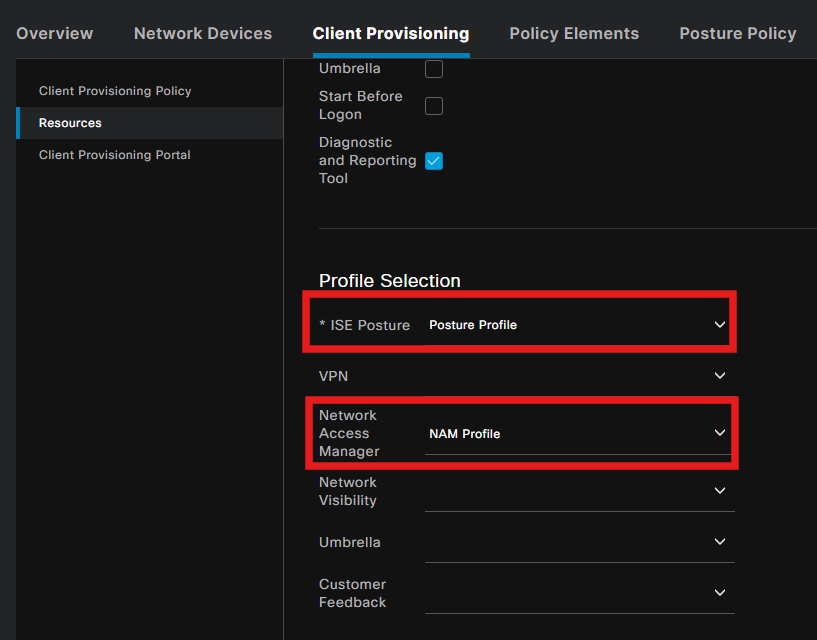
1. Select the uploaded secure client and compliance module package and under the Module selection, select the ISE Posture, NAM and DART modules.
2. Under Profile Selection, choose the Posture and NAM Profile and click Submit.
Step 6. Client Provisioning Policy
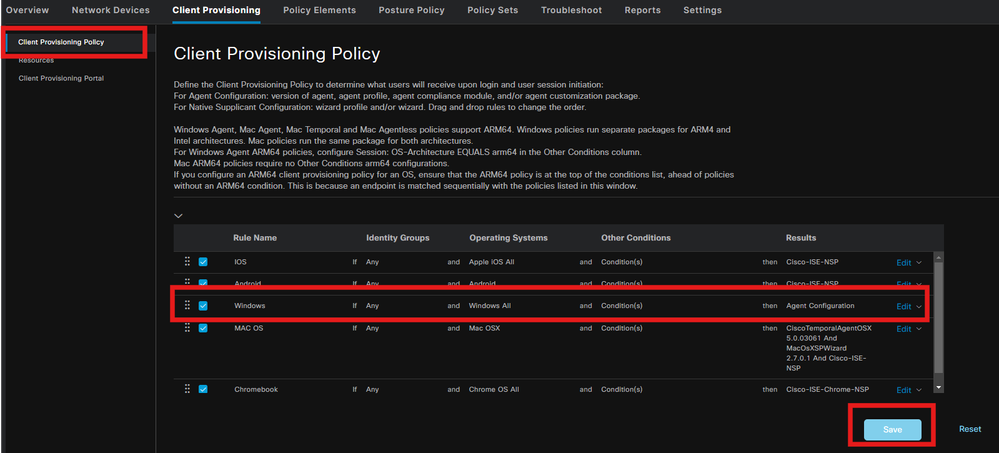
1. Create a client Provisioning Policy for Windows OS and select the Agent Configuration created in the previous step.
Step 7. Posture Policy
For information on how to create the Posture Policy and conditions, refer to the ISE Posture Prescriptive Deployment Guide.
Step 8. Add Network Device
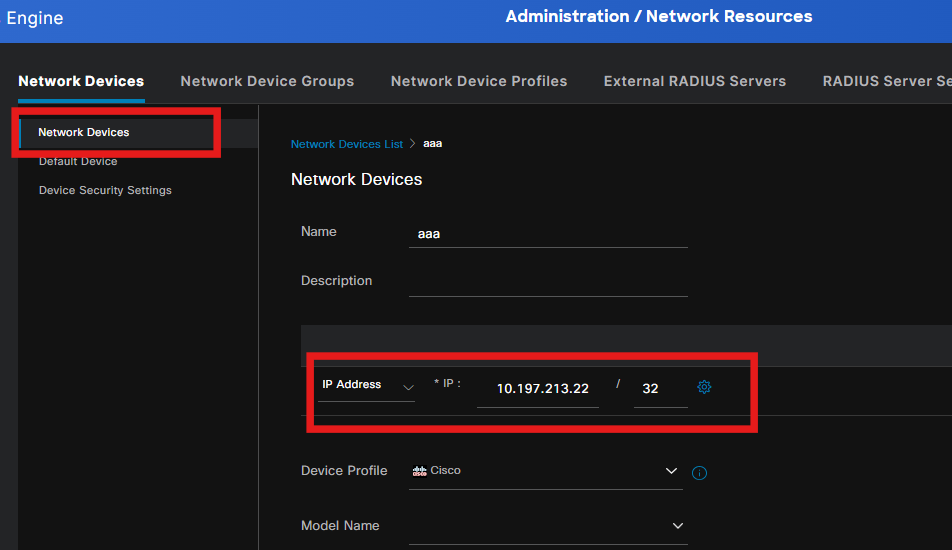
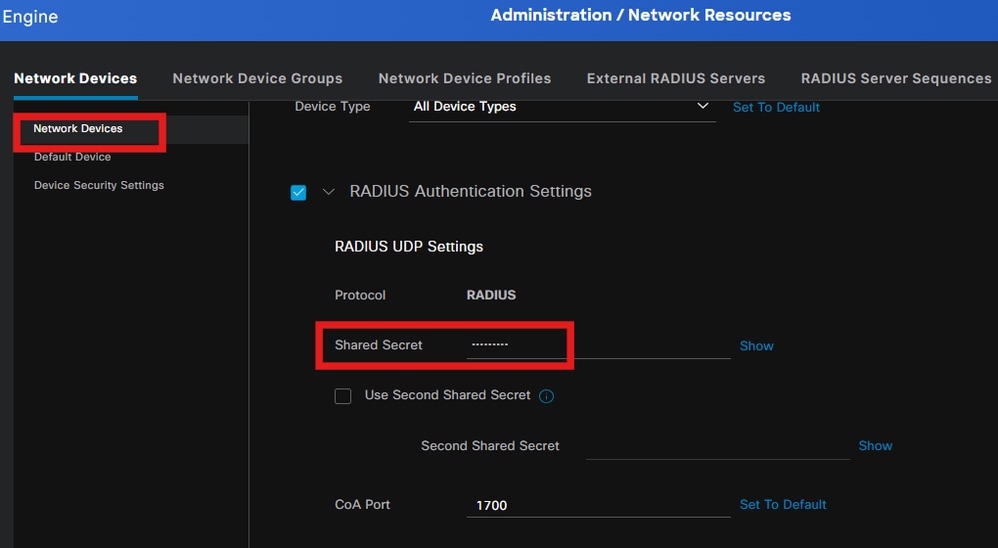
To add the switch IP address and the radius shared secret key, navigate to Administration > Network Resources.
Step 9. Authorization Profile
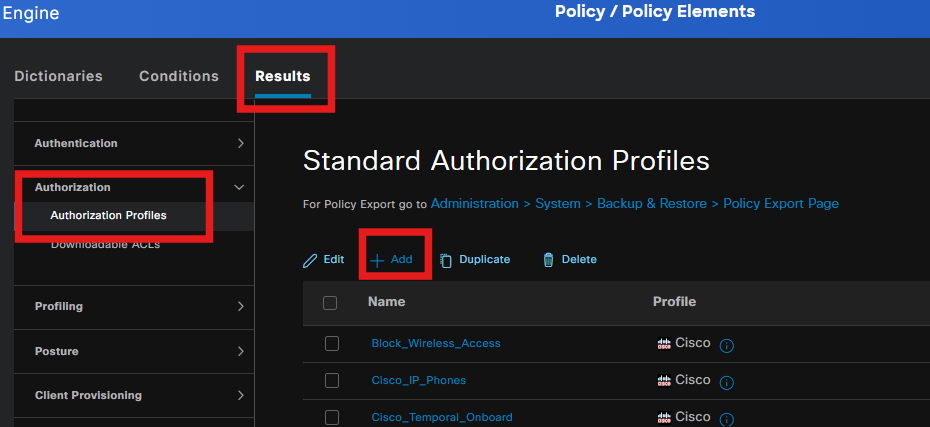
1. To create a Posture redirection profile, navigate to Policy > Policy Elements > Results.
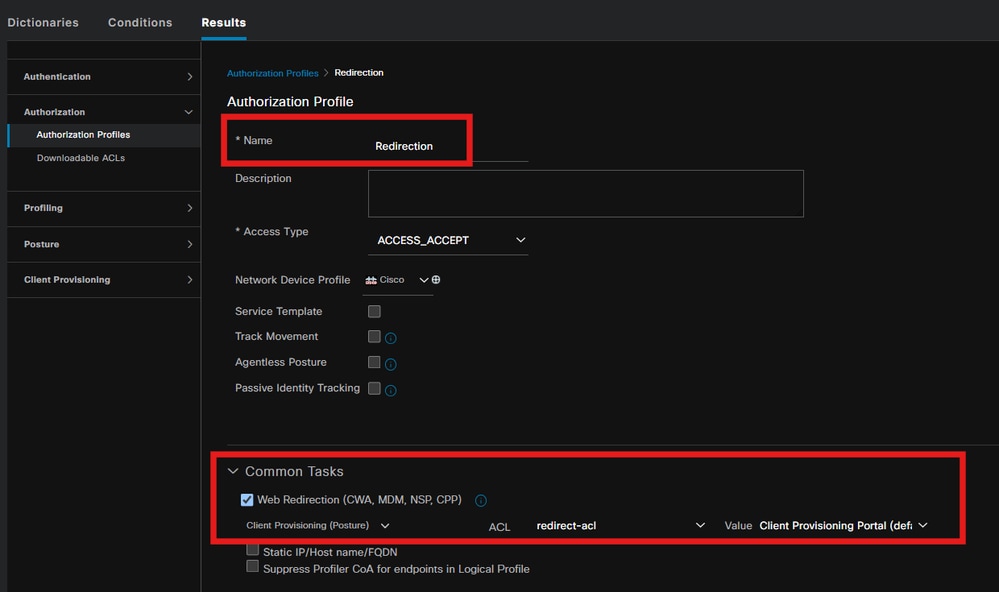
2. Under Common Tasks, select the Client Provisioning Portal with Redirect ACL.
Step 10. Allowed Protocols
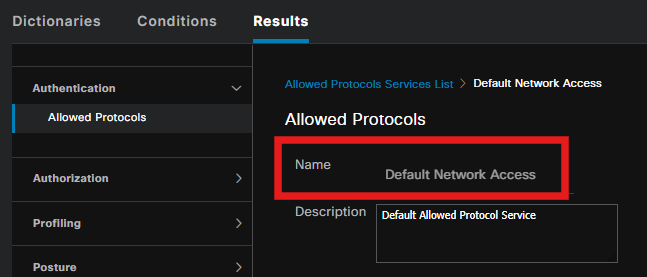
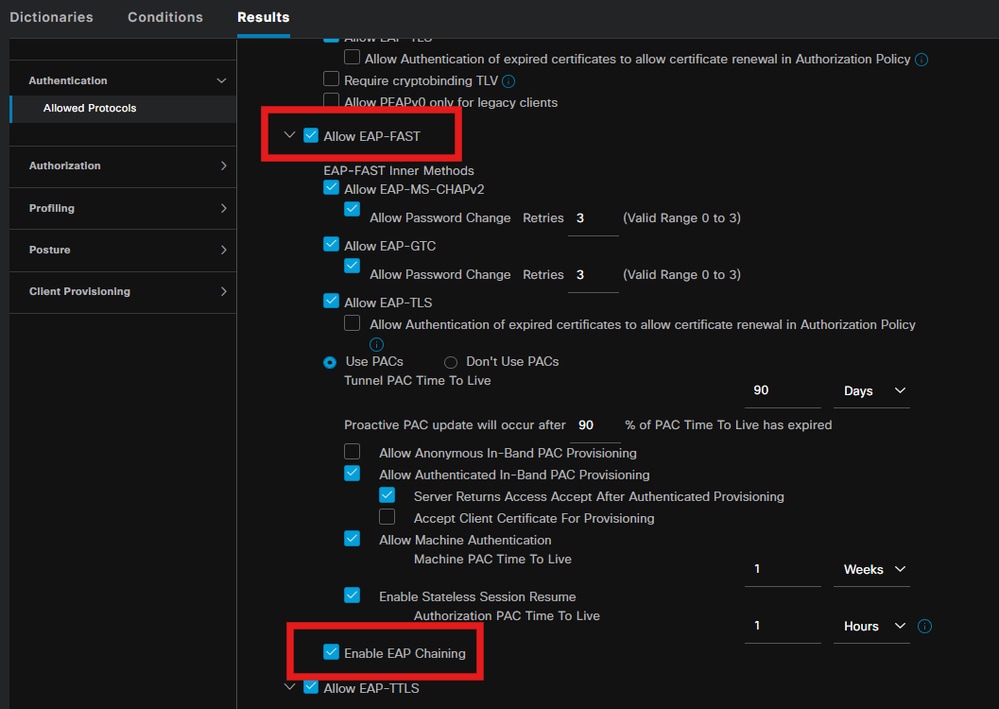
1. Navigate to Policy > Policy Elements > Results > Authentication > Allowed Protocols, select the EAP Chaining settings.
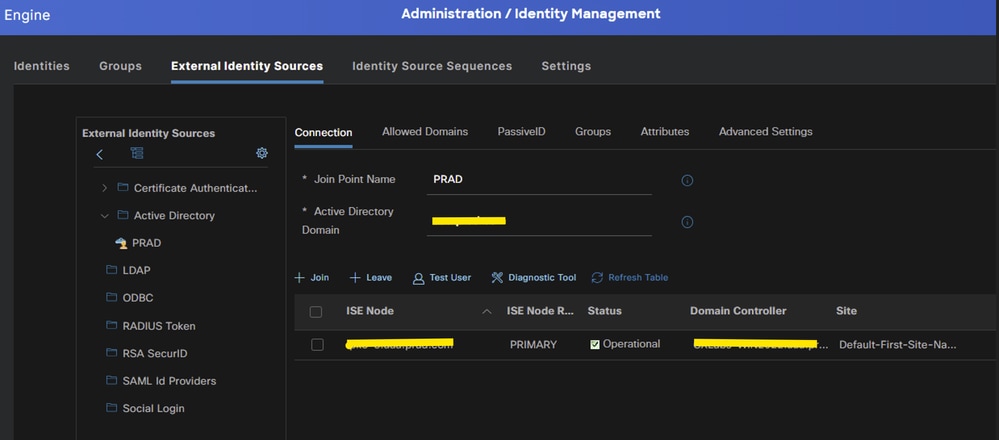
Step 11. Active Directory
1. Validate ISE is joined with the Active Directory domain and domain groups are selected, if needed for the authorization conditions.
Administration > Identity Management > External Identity Sources > Active Directory
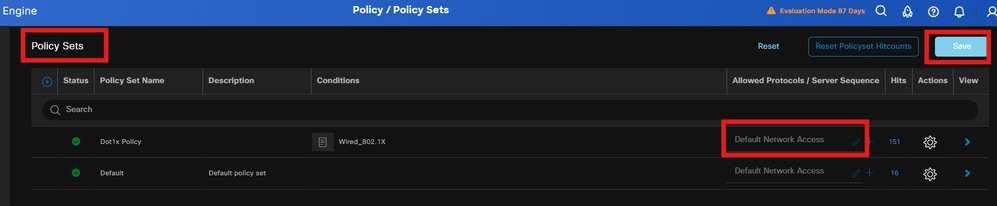
Step 12. Policy Sets
1. Create a Policy set on ISE to authenticate the dot1x request. Navigate to Policy > Policy Sets.
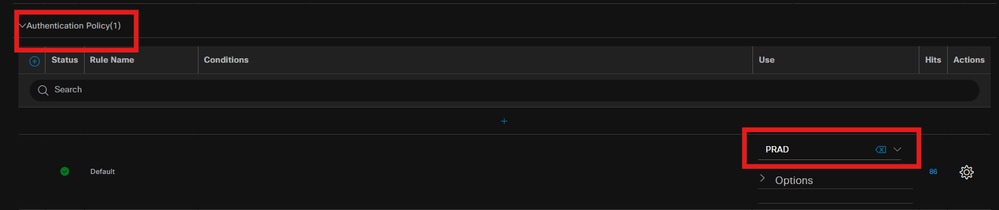
2. Select Active Directory as the identity source for the Authentication Policy.
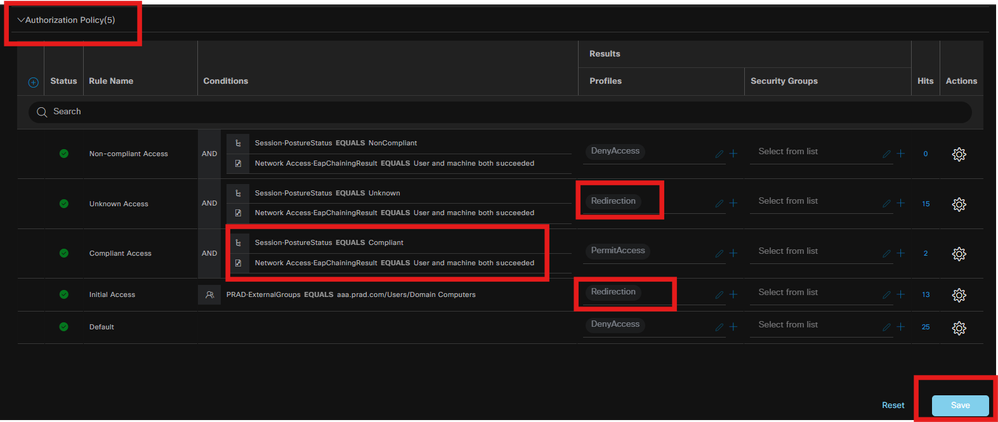
3. Configure the different Authorization rules based on the posture status of unknown, non-compliant, and compliant.
In this use case:
- Initial Access: Redirection to the ISE Client Provisioning Portal to install the Secure Client Agent and NAM Profile.
- Unknown Access: Access to the Client Provisioning Portal for redirection based on Posture discovery.
- Compliant Access: Full network access.
- Non-Compliant: Deny Access.
Validation
Step 1. Download and Install Secure Client Posture/NAM Module from ISE
1. Select the authenticated endpoint through dot1x, hitting the Initial Access Authorization rule. Navigate to Operations > Radius > Live Logs.

2. On Switch, specify the redirection URL and ACL that is applied for the endpoint.
| Switch#show authentication session interface te1/0/24 details
Server Policies:
Switch#sh device-tracking database interface te1/0/24 Network Layer Address Link Layer Address Interface vlan prlvl age state Time left |
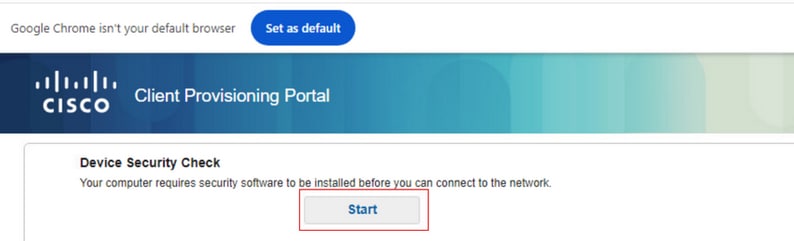
3. On the Endpoint, verify the traffic redirected to ISE Posture Posture and click Start to download the Network Setup Assistant on the endpoint.
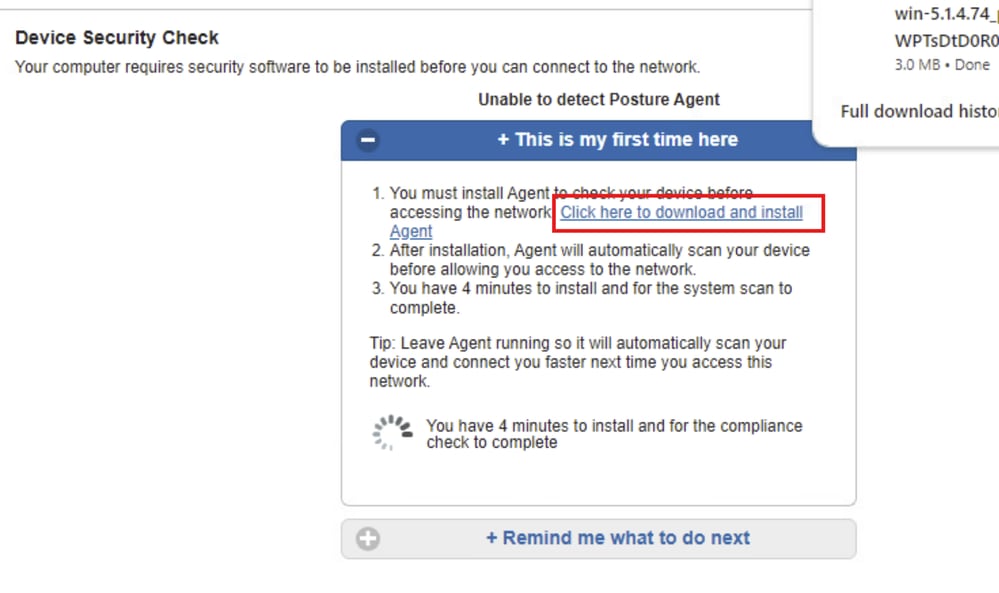
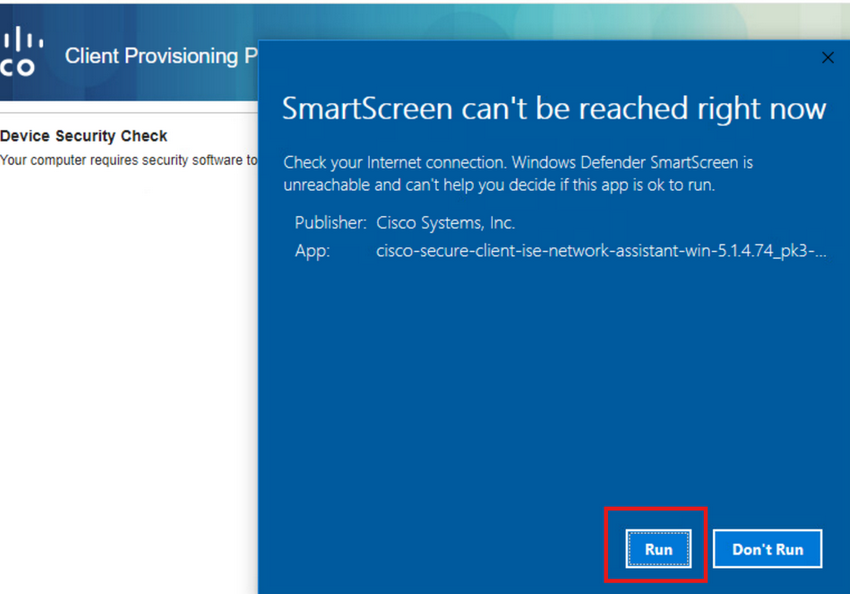
4. Click Run to install the NSA application.
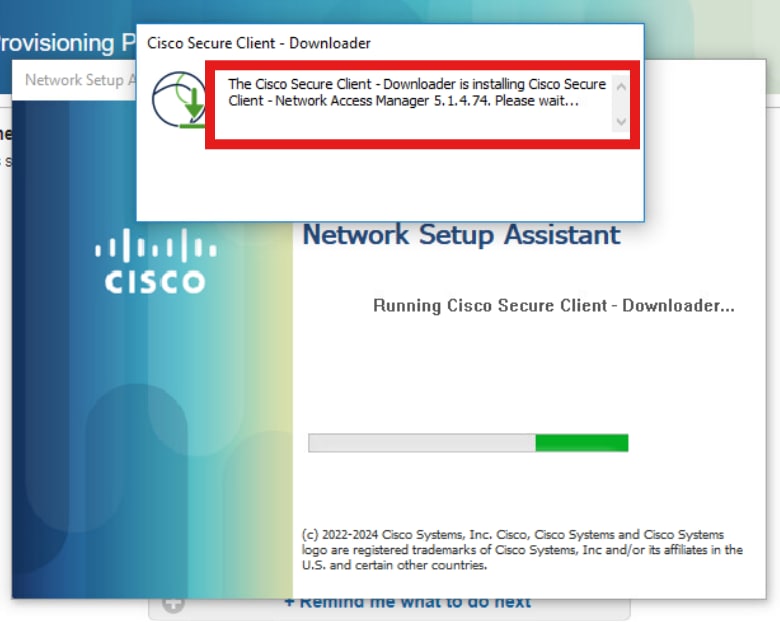
2. Now, the NSA invokes the Secure Client Agent download from ISE and installs the Posture, NAM module, and NAM Profile configuration.xml.
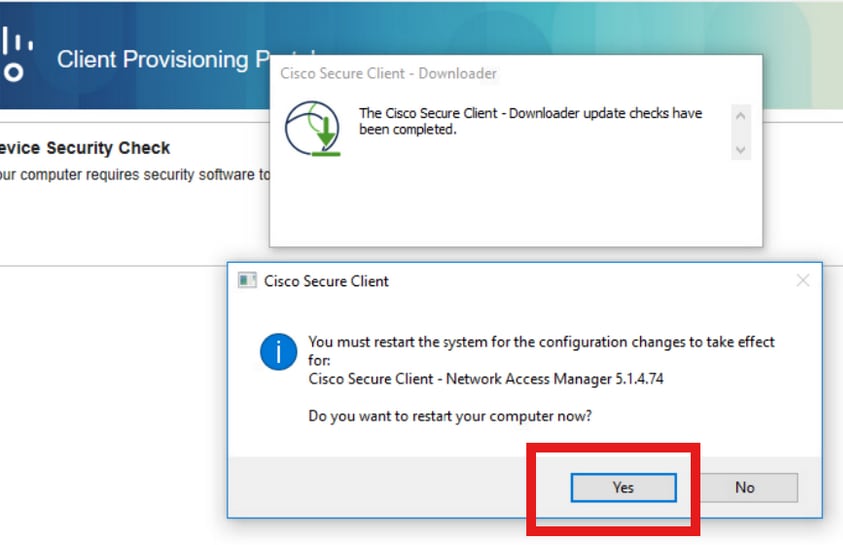
3. A restart prompt triggers after the NAM installation. Click Yes.
Step 2. EAP-FAST
1. Once the PC restarts and the user loggs in, the NAM authenticates both user and machine through EAP-FAST. If the endpoint authenticates correctly, NAM displays it is connected and the Posture Module triggers the Posture Scan.
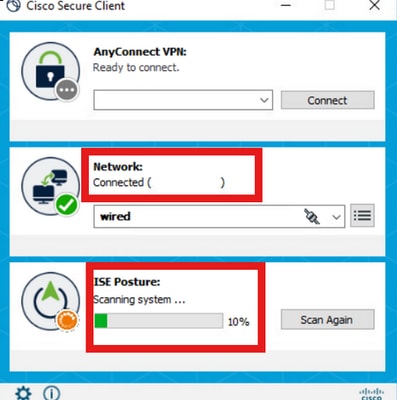
2. On ISE Live Logs, the endpoint now is hitting the Unknown Access Rule.

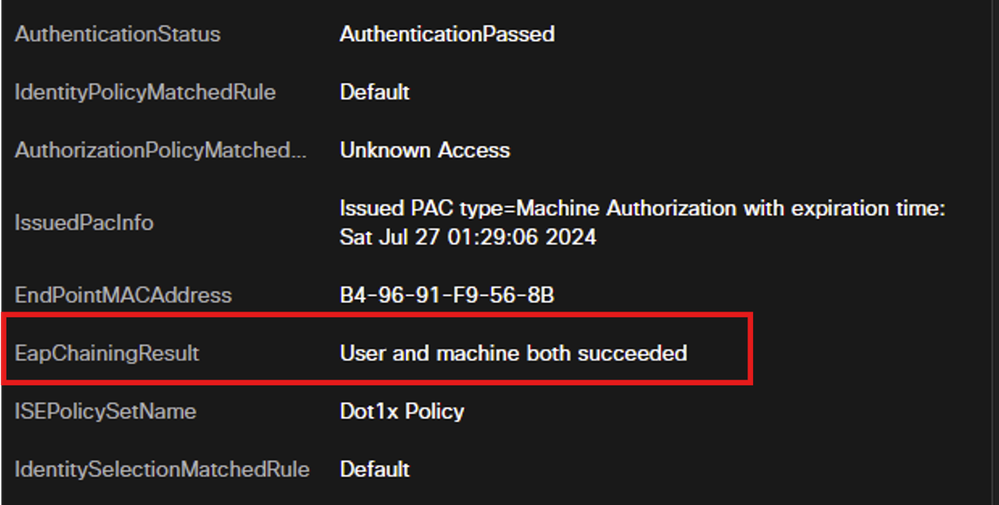
3. Now, the Authentication Protocol is EAP-FAST based on the NAM Profile configuration and the EAP-Chaining result is Successful.
Step 3. Posture Scan
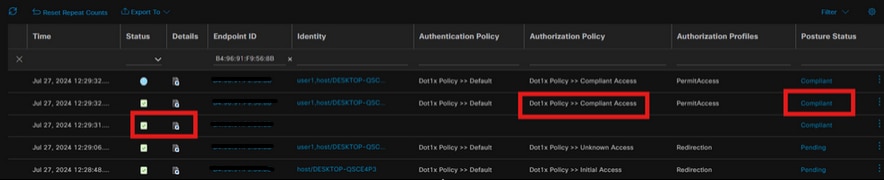
1. The Secure Client Posture Module triggers the Posture Scan and is marked as Complaint based on the ISE Posture Policy.
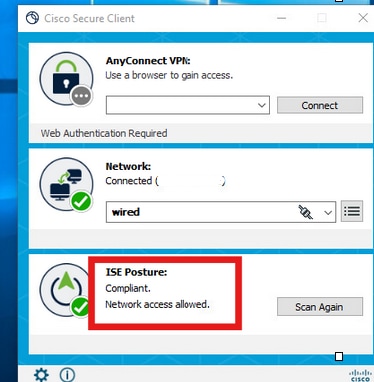
2. The CoA is triggered after the Posture Scan and the Endpoint now hits the Complaint Access Policy.
Troubleshoot
Step 1. NAM Profile
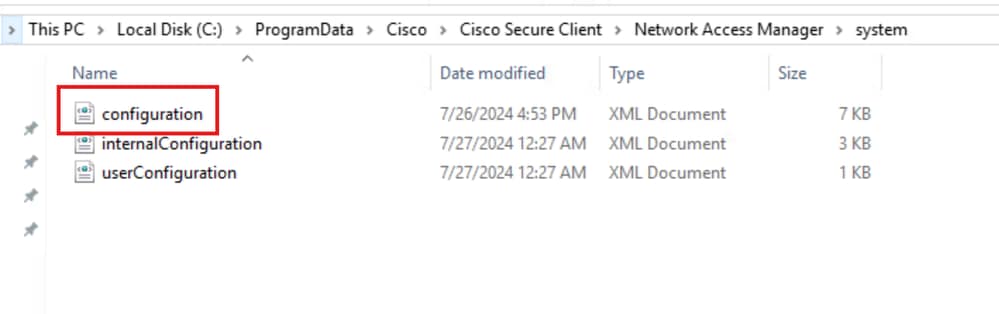
1. Verify the NAM Profile configuration.xml is present in this path on your PC after the NAM module installation: C:\ProgramData\Cisco\Cisco Secure Client\Network Access Manager\system
Step 2. NAM Extended Logging
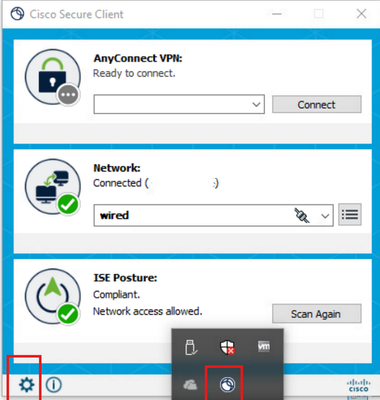
1. Click the Secure Client icon from the task bar and select the settings icon.
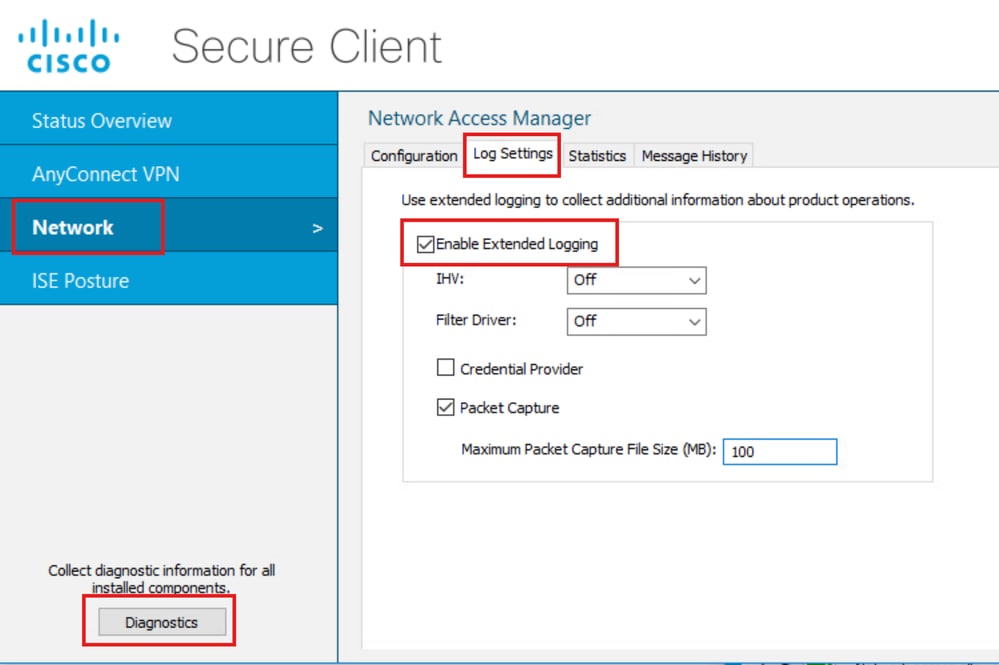
2. Navigate to the Network > Log Settings tab. Check the Enable Extended Logging checkbox.
3. Set the Packet Capture File Size to 100 MB. After reproducing the issue, click Diagnostics to create the DART Bundle on the endpoint.
4. The Message History section displays the details of each step NAM completed.
Step 3. Debugs on Switch
1. Enable these debugs on the switch to troubleshoot dot1x and the redirection flow:
- debug ip http all
- debug ip http transactions
- debug ip http url
- set platform software trace smd switch active R0 aaa debug
- set platform software trace smd switch active R0 dot1x-all debug
- set platform software trace smd switch active R0 radius debug
- set platform software trace smd switch active R0 auth-mgr-all debug
- set platform software trace smd switch active R0 eap-all debug
- set platform software trace smd switch active R0 epm-all debug
- set platform software trace smd switch active R0 epm-redirect debug
- set platform software trace smd switch active R0 webauth-aaa debug
- set platform software trace smd switch active R0 webauth-httpd debug
To view the logs:
- show logging
- show logging process smd internal
Step 4. Debugs on ISE
1. Collect the ISE support bundle with these atributes to be set at the debug level:
- posture
- portal
- provisioning
- runtime-AAA
- nsf
- nsf-session
- swiss
- client-webapp
Related Information
- Configure Secure Client NAM for Dot1x Using Windows and ISE 3.2
- ISE Posture Prescriptive Deployment Guide
- Troubleshoot Dot1x on Cisco IOS® XE Catalyst 9000 Series Switches
Revision History
| Revision | Publish Date | Comments |
|---|---|---|
3.0 |
26-Aug-2026
|
Updated spelling, grammar, inserted horizontal lines to separate sections for readability. |
2.0 |
30-May-2025
|
Updated Title, Alt Text, Style Requirements, and Formatting. |
1.0 |
29-Jul-2024
|
Initial Release |

 Feedback
Contact Cisco
- Open a Support Case

- (Requires a Cisco Service Contract)