Configure Secure Client NAM for Dot1x Using Windows and ISE 3.2
Available Languages
Contents
Introduction
This document describes how to configure Secure Client Network Analysis Module (NAM) on Windows.
Prerequisites
Requirements
Cisco recommends that you have knowledge of these topics:
- Basic understanding of a RADIUS supplicant
- Dot1x
- PEAP
- PKI
Components Used
The information in this document is based on these software and hardware versions:
- Windows 10 Pro Version 22H2 Built 19045.3930
- ISE 3.2
- Cisco C1117 Cisco IOS® XE Software Version 17.12.02
- Active Directory 2016
The information in this document was created from the devices in a specific lab environment. All of the devices used in this document started with a cleared (default) configuration. If your network is live, ensure that you understand the potential impact of any command.
Background Information
This document describes how to configure Secure Client NAM on Windows. The pre-deploy option and Profile Editor to perform dot1x authentication are used. Also, some examples of how this is achieved are provided.
In networking, a supplicant is an entity at one end of a point-to-point LAN segment, which seeks to be authenticated by an authenticator attached to the other end of that link.
The IEEE 802.1X standard uses the term supplicant to refer to either hardware or software. In practice, a supplicant is a software application installed on the computer of an end-user. The user invokes the supplicant and submits credentials to connect the computer to a secure network. If the authentication succeeds, the authenticator typically allows the computer to connect to the network.
Network Access Manager
Network Access Manager is client software that provides a secure Layer 2 network in accordance with its policies. It detects and selects the optimal Layer 2 access network and performs device authentication for access to both wired and wireless networks. The Network Access Manager manages user and device identity and the network access protocols required for secure access. It works intelligently to prevent end users from making connections that are in violation of administrator-defined policies.
The Network Access Manager is designed as single-homed, allowing only one network connection at a time. Also, wired connections have higher priority than wireless, so if you are plugged into the network with a wired connection, the wireless adapter becomes disabled with no IP address.
Configure
Network Diagram
It is crucial to understand for dot1x authentications there are 3 parts required:
- The supplicant which can use dot1x.
- The authenticator also known as the NAS/NAD, which serves as a proxy encapsulating the dot1x traffic inside the RADIUS.
- And the authentication Server.
In this example, the supplicant is installed and configured in different ways. Later, a scenario with the Network device config and the authentication server is shown.
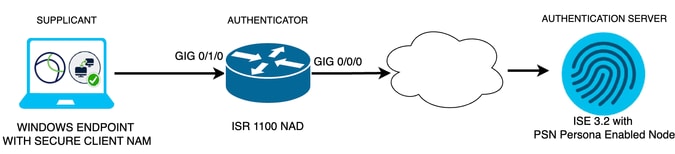 Network Diagram
Configurations
- Download and install Secure Client NAM (Network Access Manager).
- Download and install Secure Client NAM Profile Editor.
- General default configurations.
- Scenario 1: Configure the Secure Client NAM Supplicant for PEAP (MS-CHAPv2) User Authentication.
- Scenario 2: Configure the Secure Client NAM Supplicant for EAP-FAST simultaneously as User and Machine Authentication are configured.
- Scenario 3 Part 1: Configure the Secure Client NAM Supplicant for EAP-TLS.
- Scenario 3 Part 2: Configure the NAD and ISE Demonstration.
Download and Install Secure Client NAM (Network Access Manager)
Cisco Software Download
1. On the product name search bar, type Secure Client 5.
Downloads Home > Security > VPN and Endpoint Security Clients > Secure Client (including AnyConnect) > Secure Client 5 > AnyConnect VPN Client Software.
2. In this configuration example, Version 5.1.2.42 is used.
There are multiple ways to deploy Secure Client to Windows devices; from SCCM, from the Identity service engine, and from the VPN headend. However, in this article, the installation method used is the pre-deploy method.
3. On this page, search for the file Cisco Secure Client Headend Deployment Package (Windows).
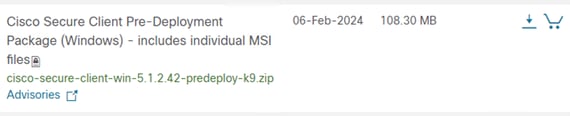 Msi zip file
4. Once downloaded and extracted, click Setup.
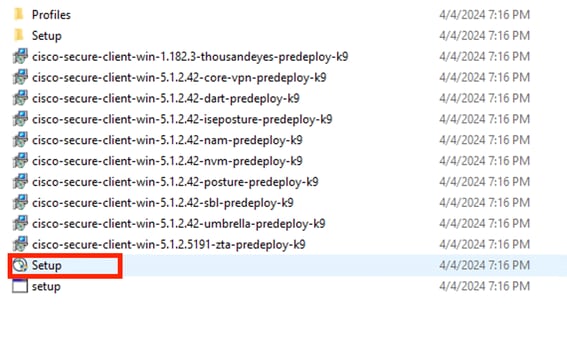 Secure Client Files
5. Install the Network Access Manager and the Diagnostics and Reporting Tool modules.

Warning: If you use the Cisco Secure Client Wizard, the VPN module is installed automatically, and hidden in the GUI. NAM does not work if the VPN module is not installed. If you use individual MSI files or a different installation method, ensure you install the VPN module.
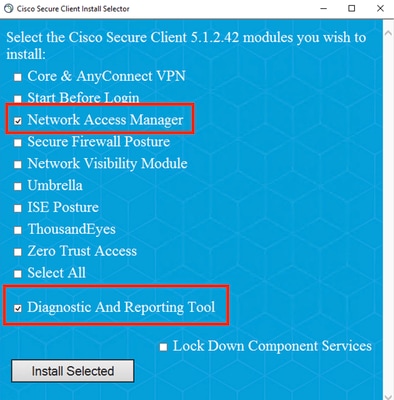 Install Selector
6. Click Install Selected.
7. Accept the EULA.
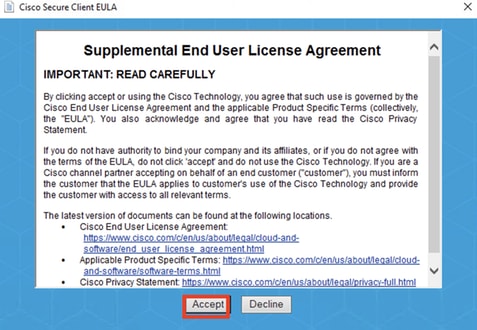 EULA Window
8. A restart is required after installing NAM.
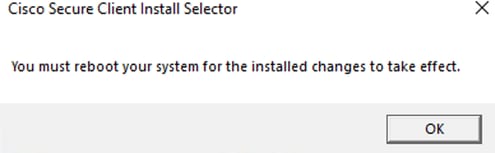 Reboot Requirement Window
9. Once installed, it can be found and opened from the Windows Search bar.
 Secure Client Program
Download and Install the Secure Client NAM Profile Editor
1. Cisco Network Access Manager Profile Editor is required to configure the Dot1x preferences.
2. From the same page where the Secure Client is downloaded, the Profile Editor option is found.
3. This example uses the option with Version 5.1.2.42.
 Profile Editor
4. Once downloaded, proceed with the installation.
5. Run the msi file.
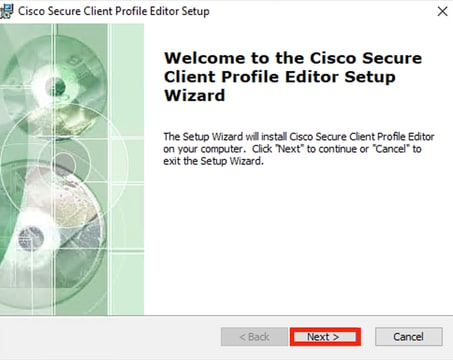 Profile Editor Setup Window
6. Use the Typical setup option.
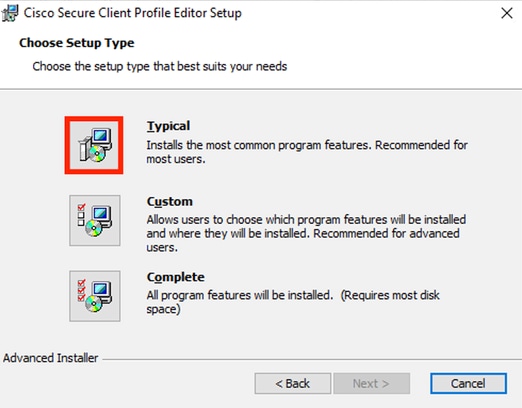 Profile Editor Setup
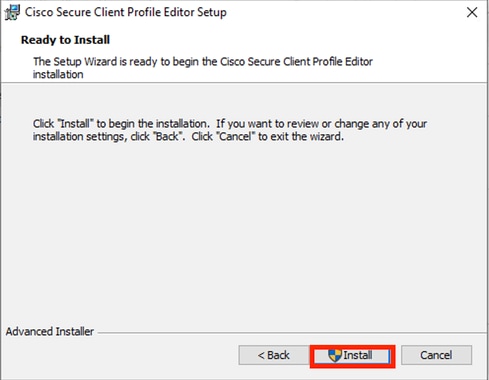 Installation Window
7. Click Finish.
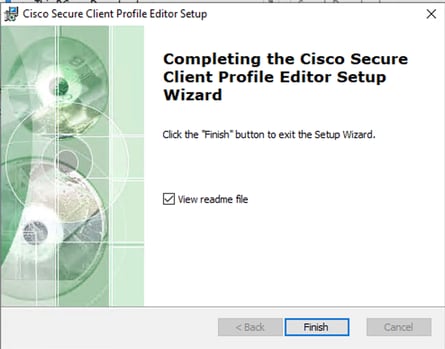 End of Profile Editor Setup
8. Once installed, open the Network Access Manager Profile Editor from the search bar.
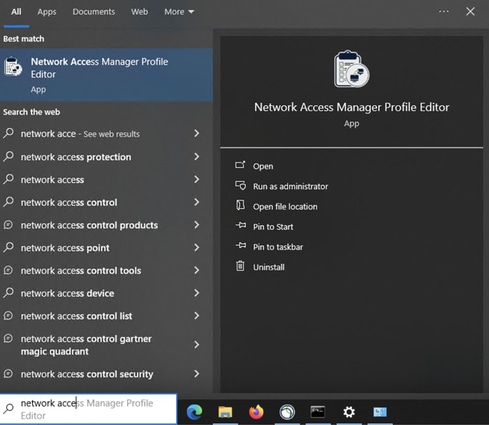 Profile Editor for NAM on Search Bar
9. Installation of Network Access Manager and Profile Editor is completed.
General Default Configurations
1. All scenarios presented in this article contain configurations for:
- Client Policy
- Authentication Policy
- Network Groups
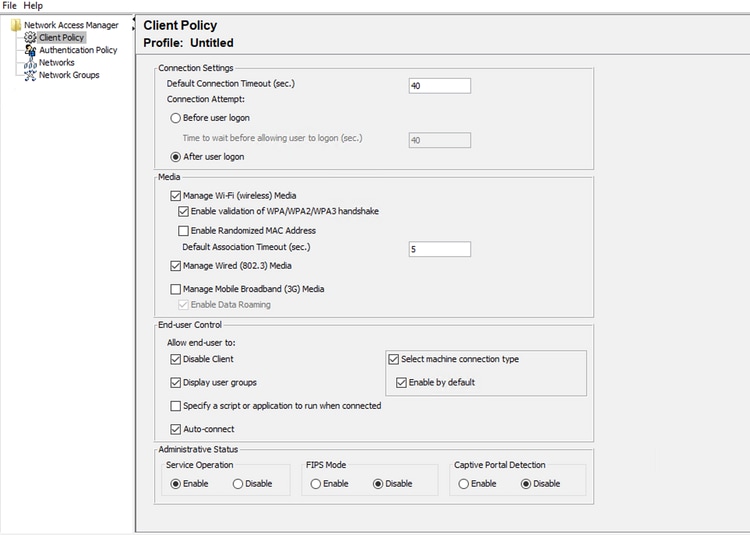 NAM Profile Editor Client Policy
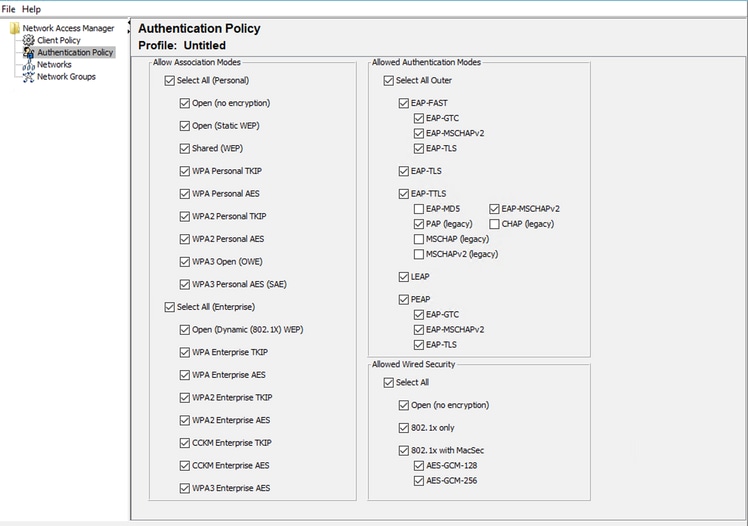 NAM Profile Editor Authentication Policy
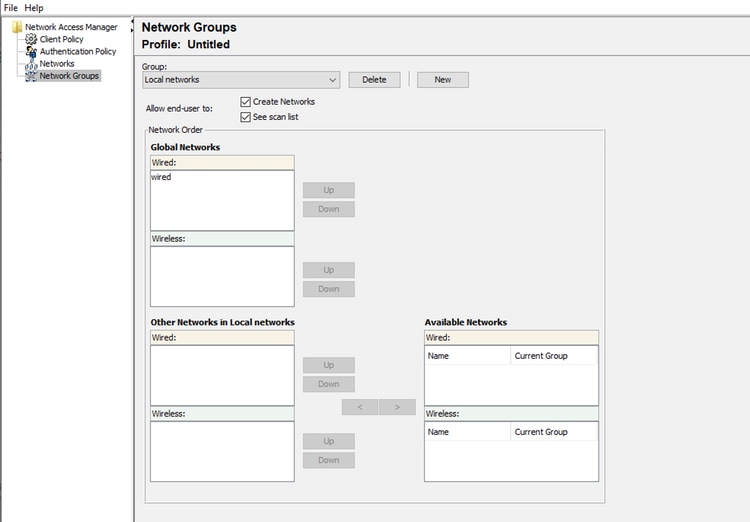 Network Groups Tab
Scenario 1: Configure Secure Client NAM Supplicant for PEAP (MS-CHAPv2) User Authentication
1. Navigate to the Networks section.
2. The default Network profile can be deleted.
3. Click Add.
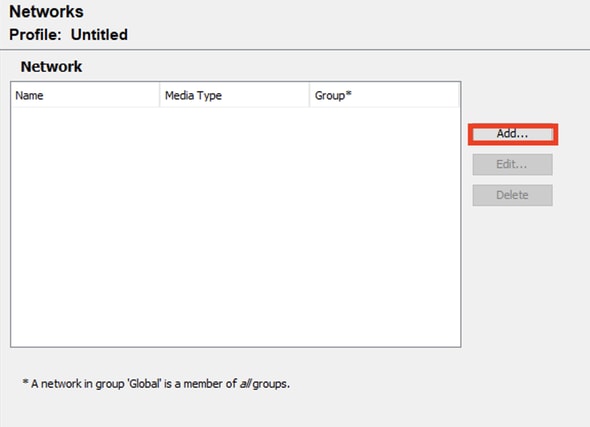 Network Profile Creation
4. Name the Network profile.
5. Select Global for Group Membership. Select Wired Network media.
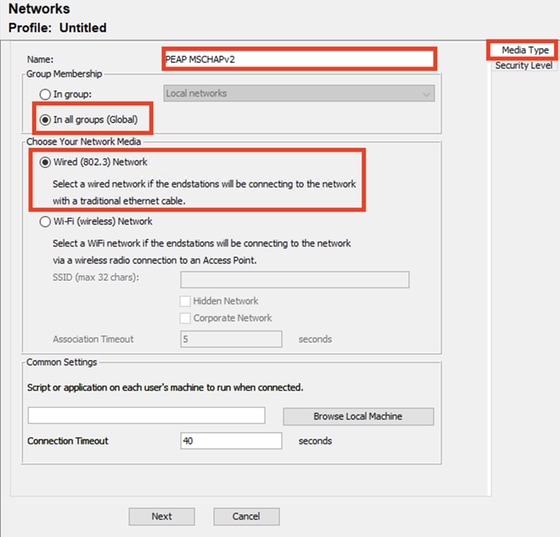 Network Profile Media Type Section
6. Click Next.
7. Select Authenticating Network and use default for the rest of the options in the Security Level section.
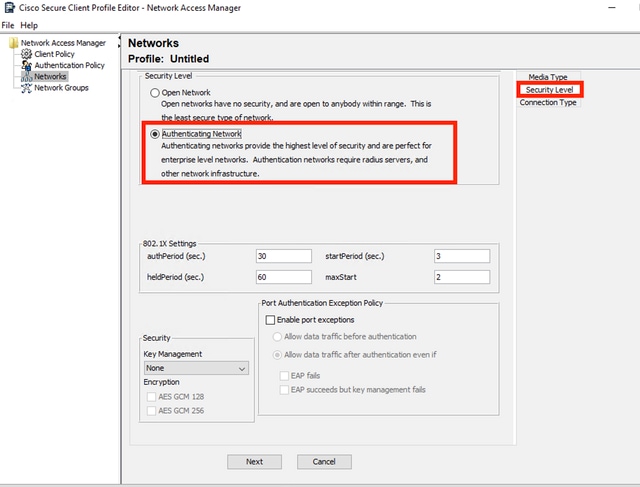 Network Profile Security Level
8. Click Next to continue with the Connection Type section.
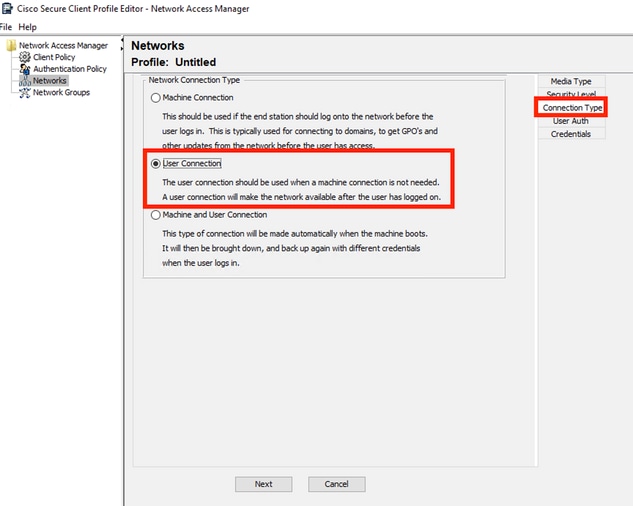 Netowork Profile Connection Type
9. Select the User Connection connection type.
10. Click Next to continue with the User Auth section, which is now available.
11. Select PEAP as the general EAP Method.
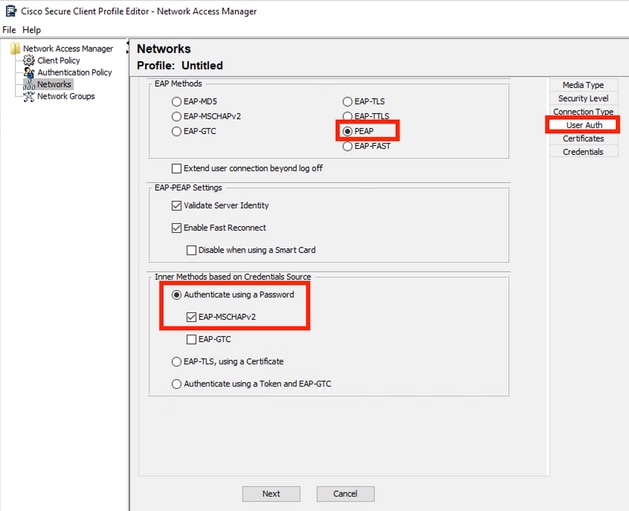 Netowork Profile User Auth
12. Do not change the default values in the EAP-PEAP Settings.
13. Continue with the Inner Methods based on Credentials Source section.
14. From the multiple inner methods that exist for EAP PEAP, select Authenticate using a Password and select EAP-MSCHAPv2.
15. Click Next to continue to the Certificate section.

Note: The Certificate section is displayed as the Validate Server Identity option in the EAP-PEAP Settings is selected. For EAP PEAP, it does the encapsulation using the server certificate.
16. In the Certificates section, the Certificate Trusted Server Rules, the rule Common Name ends with c.com is used. This section of the configuration refers to the certificate the server uses during the EAP PEAP flow. If the Identity Service Engine (ISE) is used in your environment, you can use the common name of the Policy Server Node EAP Certificate.
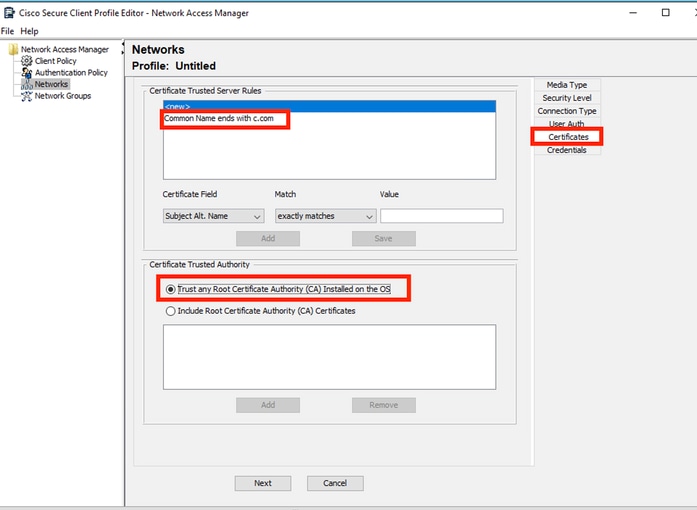 Network Profile Certificate Section
17. Two options can be selected in the Certificate Trusted Authority. For this scenario, instead of adding a specific CA Certificate that signed the RADIUS EAP cert, the option Trust Any Root Certificate Authority (CA) Installed on the OS is used.
18. With this option the Windows device trusts any EAP cert that is signed by a cert included in Manage User Certs program Certificates — Current User > Trusted Root Certification Authorities > Certificates.
19. Click Next.
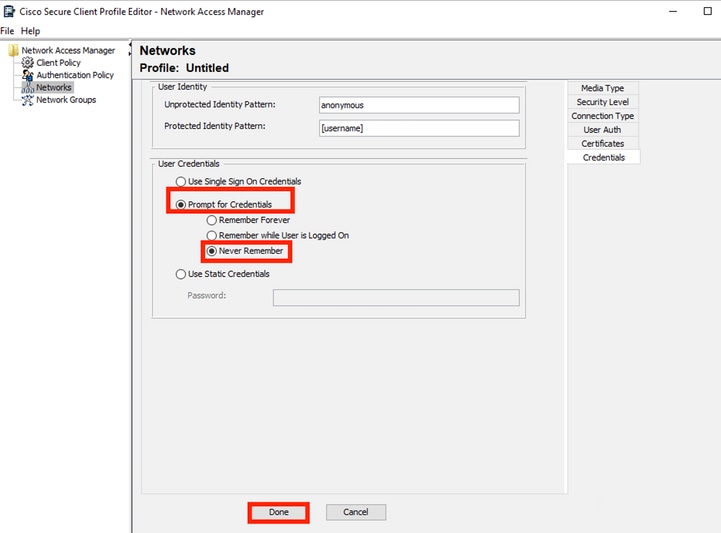 Network Profile Credentials Section
20. In the Credentials section, only the User Credentials section is changed.
21. The option Prompt for Credentials > Never Remember is selected, in each authentication, the user selecting the authentication must enter their credentials.
22. Click Done.
23. Save the Secure Client Network Access Manager profile, as configuration.xml with the File > Save As option.
24. To ensure Secure Client Network Access Manage uses the profile just created, replace the configuration.xml file in the next directory with the new one:
C:\ProgramData\Cisco\Cisco Secure Client\Network Access Manager\system
Note: The file must be named configuration.xml, otherwise it does not work.
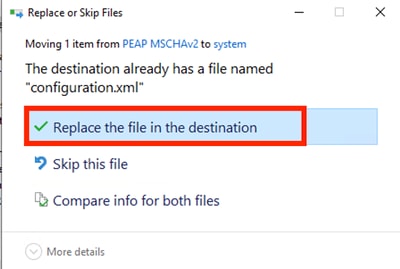 Replace File Section
Scenario 2: Configure Secure Client NAM Supplicant for EAP-FAST Simultaneous User and Machine Authentication
1. Open the NAM Profile Editor and navigate to the Networks section.
2. Click Add.
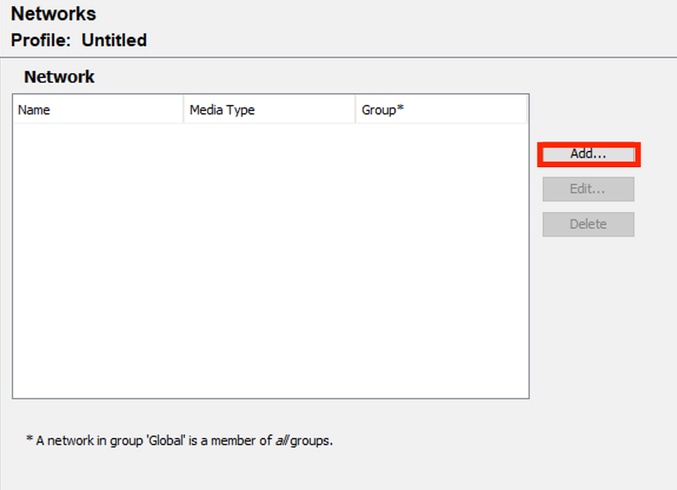 NAM Profile Editor Network Tab
3. Enter a name in the network profile.
4. Select Global for Group Membership. Select WiredNetwork Media.
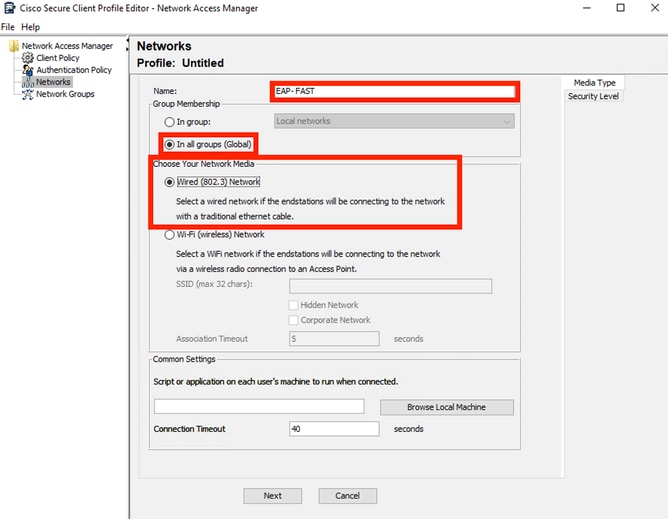 Media Type Section
5. Click Next.
6. Select Authenticating Network and do not change the default values for the rest of the options in this section.
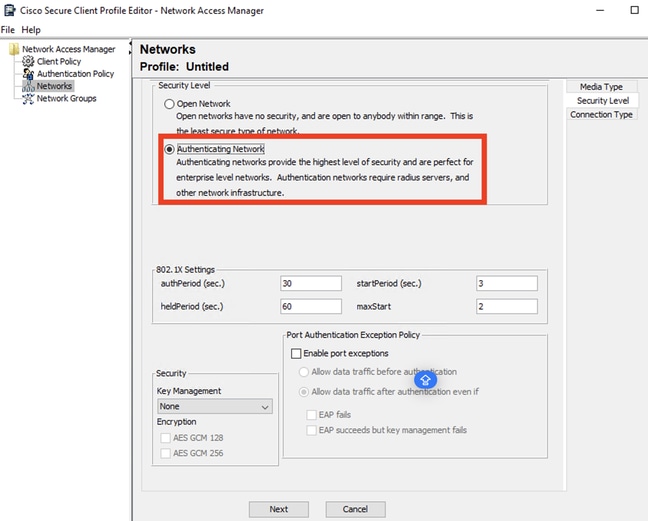 Security Level Profile Editor Section
7. Click Next to continue with the Connection Type section.
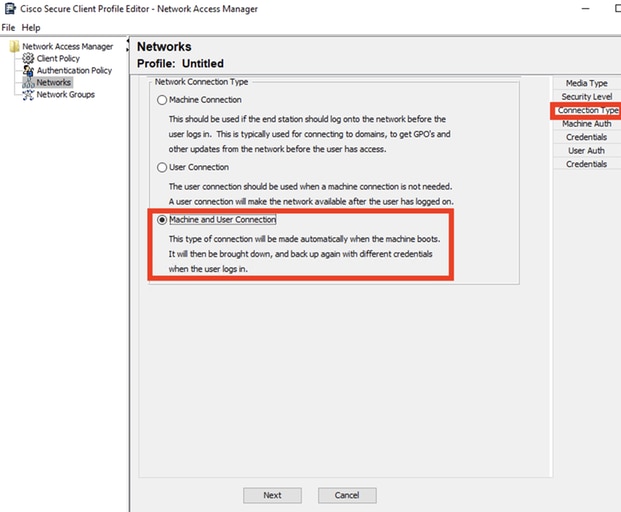 Connection Type Section
8. Configure the user and machine authentication simultaneously by selecting the third option.
9. Click Next.
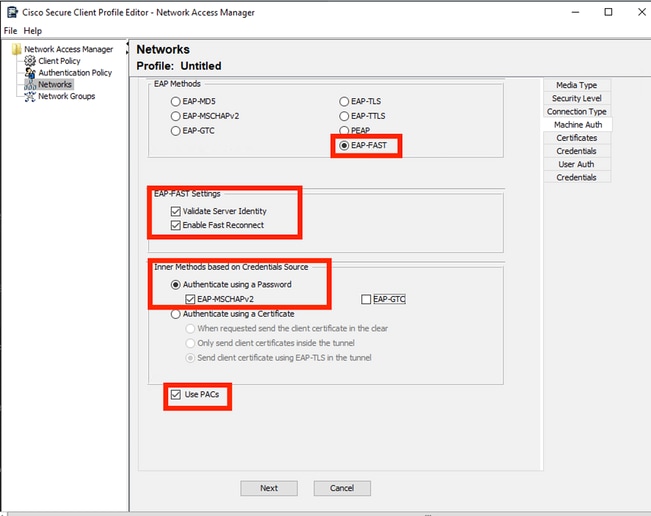 Machine Auth Section
10. In the Machine Auth section, select EAP-FAST as the EAP method. Do not change the EAP FAST Settings default values.
11. For the Inner methods based on Credentials Source section, select Authenticate using a Password and EAP-MSCHAPv2 as the method. Then, select Use PACs option.
12. Click Next.
13. In the Certificates section, the Certificate Trusted Server Rules, the rule is common name ends with c.com. This section refers to the certificate the server uses during the EAP PEAP flow. If Identity Service Engine (ISE) is used in your environment, the common name of the Policy Server Node EAP Certificate can be used.
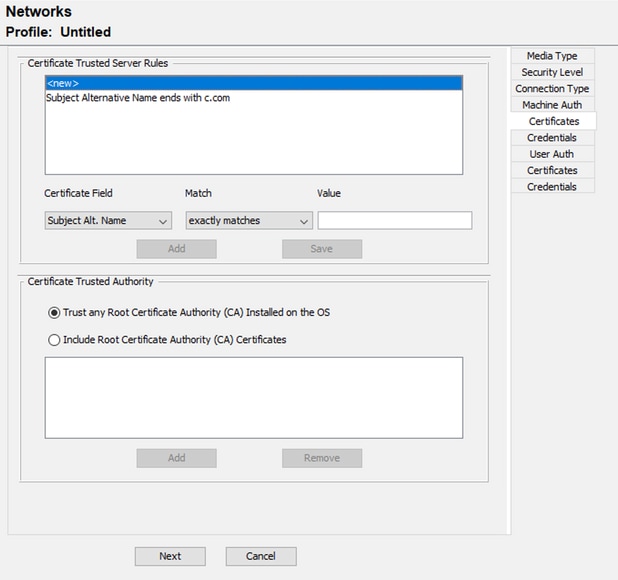 Machine Auth Server Certificate Trust section
14. Two options can be selected in the Certificate Trusted Authority. In this scenario, instead of adding a specific CA Certificate that signed the RADIUS EAP cert, use the option, Trust Any Root Certificate Authority (CA) Installed on the OS.
15. With this option, Windows trusts any EAP cert that is signed by a cert included in the Manage User Certs program (Current User > Trusted Root Certification Authorities > Certificates).
16. Click Next.
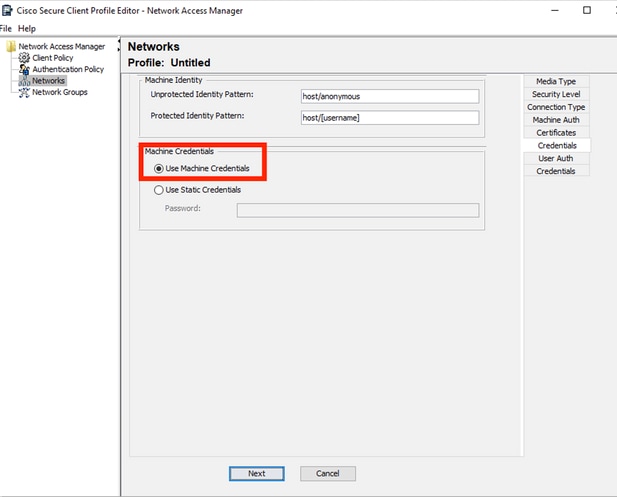 Mahine Auth Credentials Section
17. Select Use Machine Credentials in the Machine Credentials section.
18. Click Next.
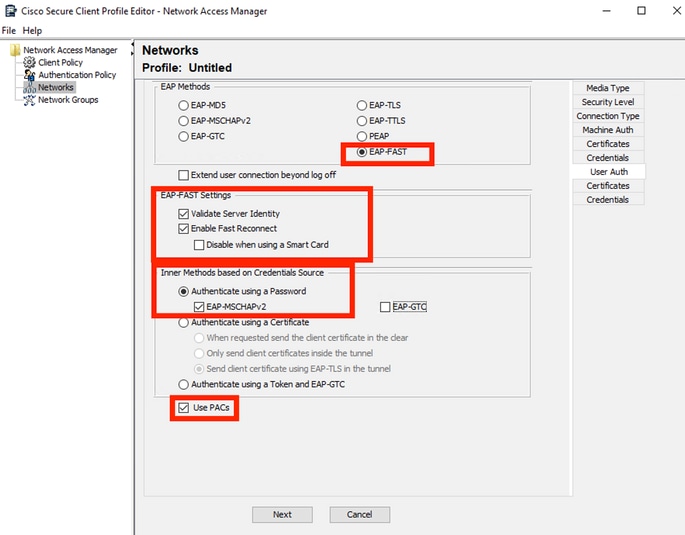 User Authentication Section
19. For User Auth, select EAP-FAST as the EAP Method.
20. Do not change the default values in the EAP-FAST settings section.
21. For the Inner Method based on credentials source section, select Authenticate using a Password and EAP-MSCHAPv2 as the method.
22. Select Use PACs.
23. Click Next.
24. On the Certificates section, the Certificate Trusted Server Rules, the rule is common Name ends with c.com. These configurations are for the certificate the server uses during the EAP PEAP flow. If ISE is used in your environment, the common name of the Policy Server Node EAP Certificate can be used.
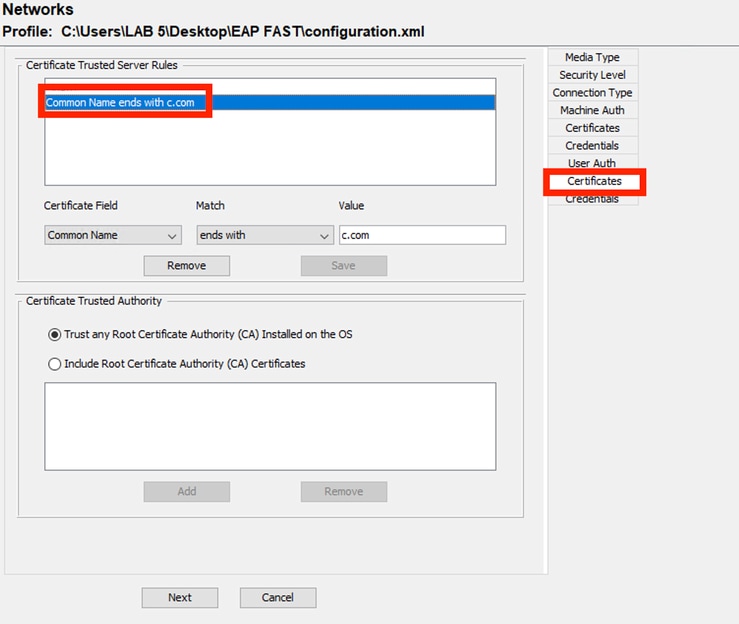 User Auth Server Certificate Trust Section
25. Two options can be selected in the Certificate Trusted Authority. In this scenario, instead of adding a specific CA Certificate that signed the RADIUS EAP cert, the option Trust Any Root Certificate Authority (CA) Installed on the OS is used.
26. Click Next.
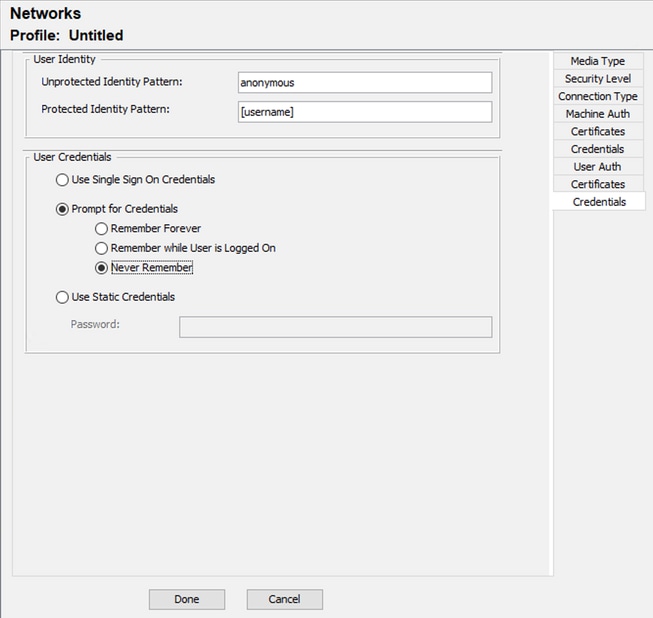 User Auth Credentials
27. In the Credentials section, only the User Credentials section is changed.
28. The option Prompt for Credentials > Never Remember is selected. So, in each authentication, the user authenticating must enter their credentials.
29. Click the Done button.
30. Select File > Save as and save the Secure Client Network Access ManagerProfile as configuration.xml.
31. To make the Secure Client Network Access Manager, use the profile you just created and replace the configuration.xml file in the next directory with the new one:
C:\ProgramData\Cisco\Cisco Secure Client\Network Access Manager\system
Note: The file must be named configuration.xml, otherwise it does not work.
Scenario 3: Configure Secure Client NAM Supplicant for EAP TLS User Certificate Authentication
1. Open the NAM Profile Editor and navigate to the Networks section.
2. Click Add.
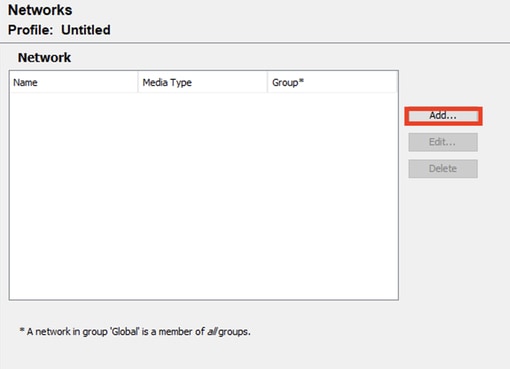 Network Creation Section
3. Name the network profile, in this case, the name is the EAP protocol.
4. Select Global for Group Membership. And Wired Network Media.
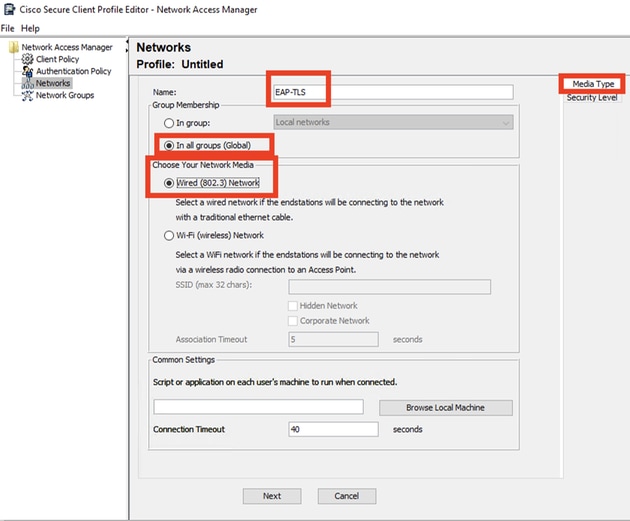 Media Type Section
5. Click Next.
6. Select Authenticating Network and do not change the default values for the rest of the options in the Security Level section.
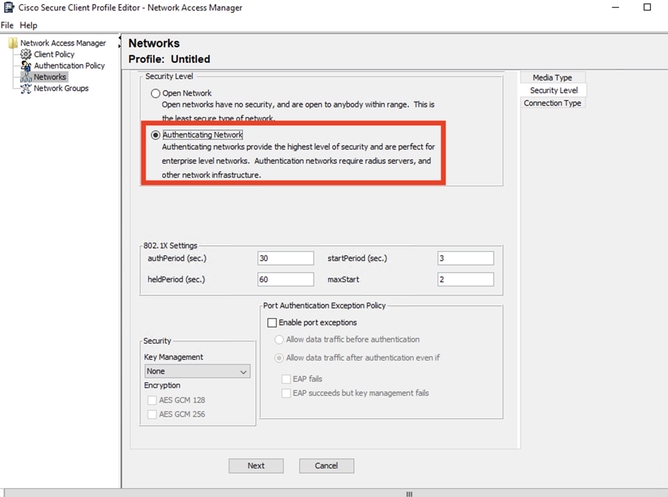 Security Level
7. This scenario is for user authentication using a certificate. For this reason, the option User Connection is used.
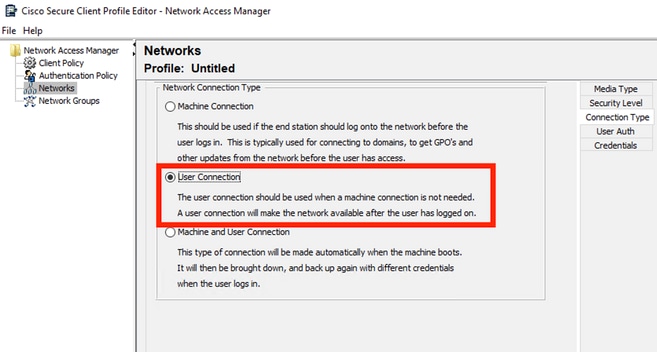 Conenction Type
8. Configure EAP-TLS as the EAP method and do not change the default values in the EAP-TLS settings section.
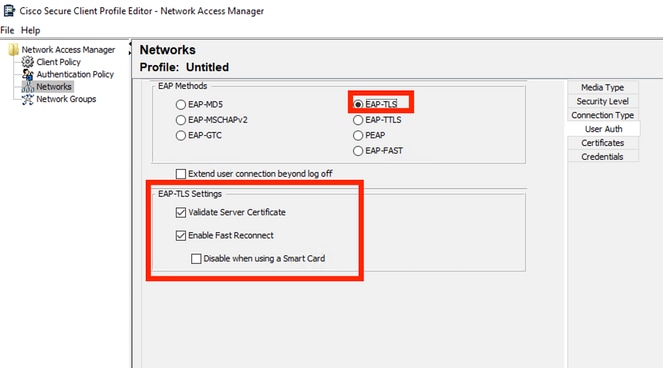 User Auth Section
9. For the Certificates section, create a rule that matches the AAA EAP-TLS certificate. If you are using ISE, find this rule in the Administration > System > Certificates section.
10. For the Certificate Trusted Authority section, select Trust any Root Certificate Authority (CA) installed on the OS.
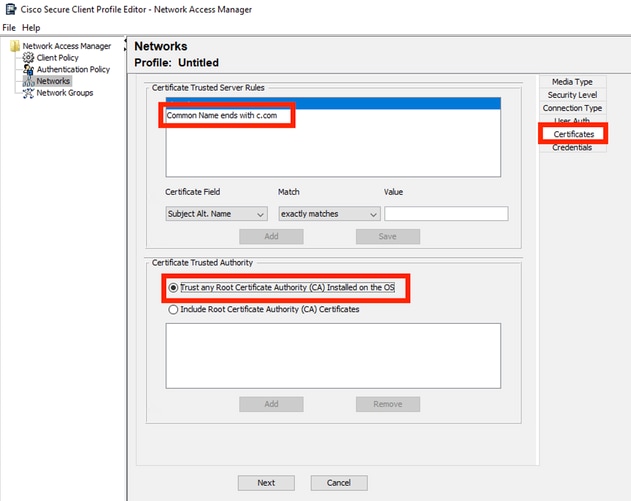 User Auth Server Certificate Trust Settings
11. Click Next.
12, For the User Credentials section, do not change the default values in the first section.
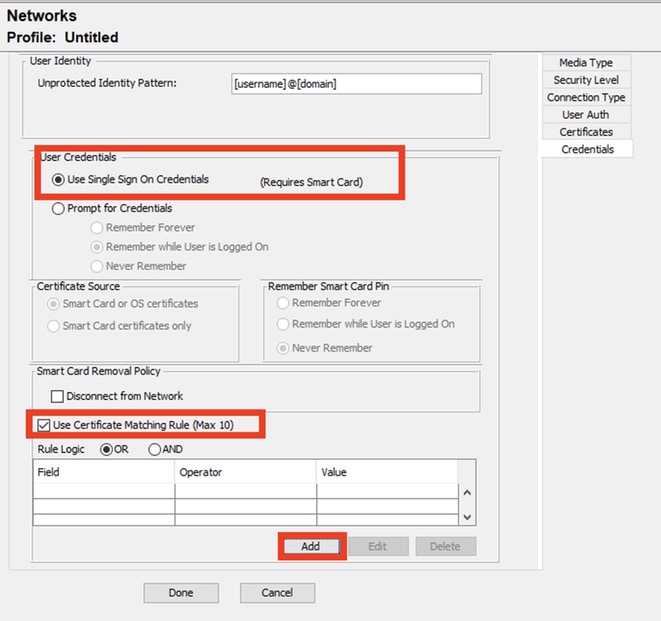 User Auth Credentials Section
13. It is important to configure a rule that matches the identity certificate the user sends during the EAP TLS process. To do this, click the checkbox next to the Use Certificate Matching Rule (Max 10).
14. Click Add.
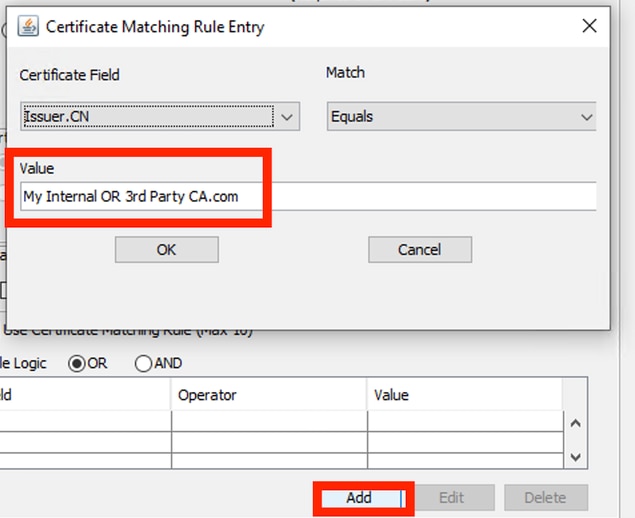 Certificate Matching Rule Window
15. Replace the value for My Internal OR 3rd Party CA.com string with the CN of the user certificate.
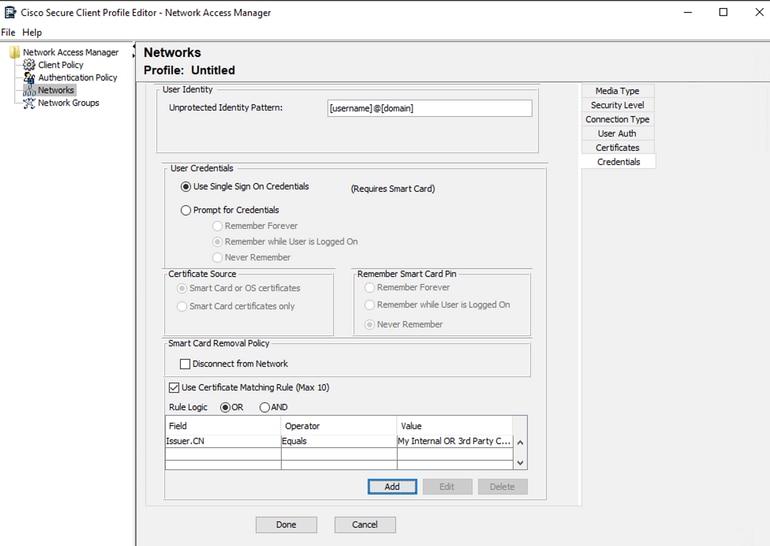 User Auth Certificate Credentials Section
16. Click Done to finish the configuration.
17. Select File > Save as to save the Secure Client Network Access Manager Profile as configuration.xml.
18. To add the Secure Client Network Access Manager, use the profile you just created and replace the configuration.xml file in the next directory with the new one:
C:\ProgramData\Cisco\Cisco Secure Client\Network Access Manager\system
Note: The file must be named configuration.xml, otherwise it does not work.
Configure ISR 1100 and ISE to Allow Authentications Based on Scenario 1 PEAP MSCHAPv2
1. Configure the ISR 1100 Router.
2. This section covers the basic configuration that NAD must have to ensure dot1x functions as expected.
Note: For multinode ISE deployments, point to any node that has the Policy Server Node persona enabled. This can be checked by navigating to the ISE in the Administration > System > Deployment tab.
aaa new-model
aaa session-id common
!
aaa authentication dot1x default group ISE-CLUSTER
aaa authorization network default group ISE-CLUSTER
aaa accounting system default start-stop group ISE-CLUSTER
aaa accounting dot1x default start-stop group ISE-CLUSTER
!
aaa server radius dynamic-author
 client A.B.C.D server-key  <Your shared secret>
!
!
radius server  ISE-PSN-1
 address ipv4 A.B.C.D auth-port 1645 acct-port 1646
 timeout 15
 key <Your shared secret>
!
!
aaa group server radius ISE-CLUSTER
 server name ISE-PSN-1
!
interface GigabitEthernet0/1/0
 description "Endpoint that supports dot1x"
 switchport access vlan 15
 switchport mode access
 authentication host-mode multi-auth
 authentication order dot1x mab
 authentication priority dot1x mab
 authentication port-control auto
 dot1x pae authenticator
 spanning-tree portfast
3. Configure the Identity Service Engine 3.2.
4. Configure the Network Device.
5. Add the ISR NAD to ISE Administration > Network Resources > Network Devices.
6. Click Add.
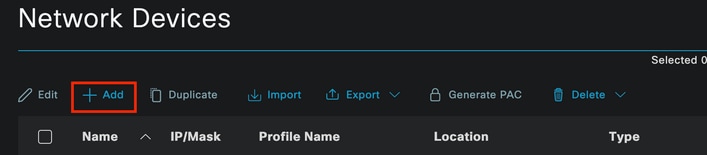 Network Device Section
7. Assign a name to the NAD you are creating. Add the Network Device IP.
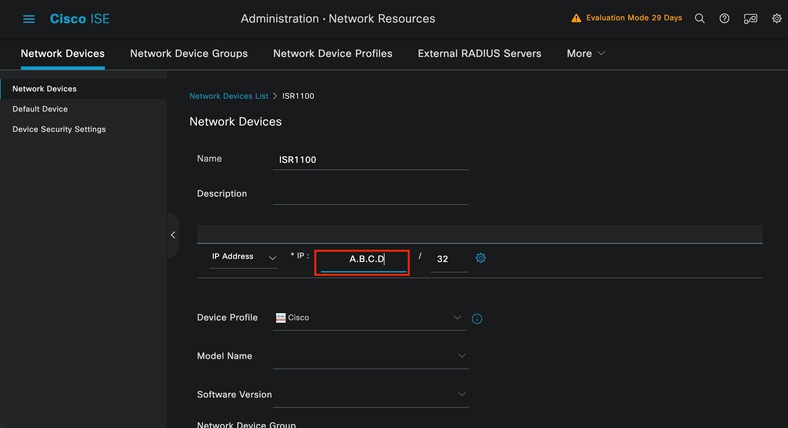 Network Device Creation
8. At the bottom of the same page, add the same Shared Secret used in your network device configuration.
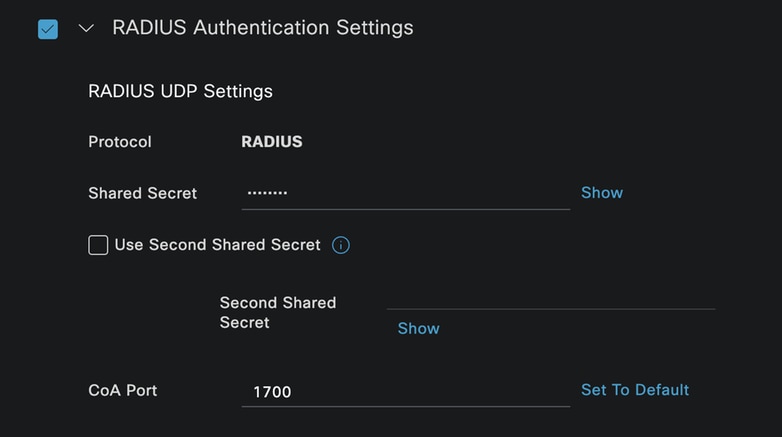 Network Device Radius Settings
8. Save the changes.
9. Configure the identity used to authenticate the endpoint.
10. ISE local authentication is used and external ISE authentication is not explained in this article.
11. Navigate to the Administration > Identity Management > Groups tab and create the group your user is a part of. The identity group created for this example is iseUsers.
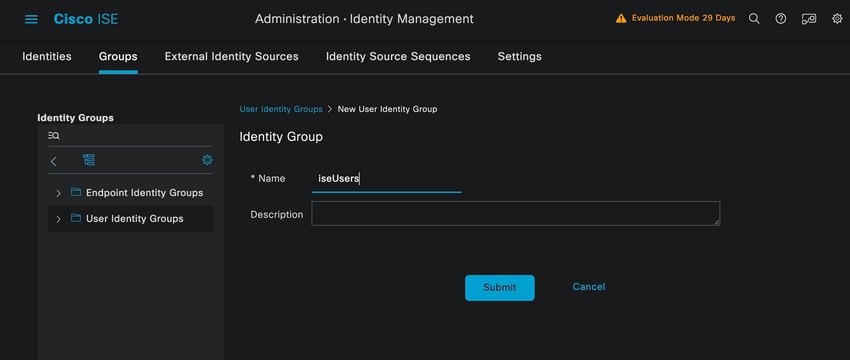 Identity Group Creation
12. Click Submit.
13. Navigate to the Administration > Identity Management > Identity Tab.
14. Click Add.
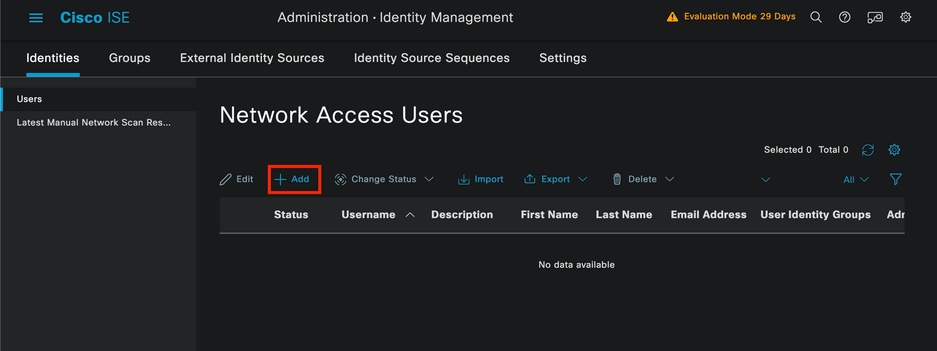 Network Access Users Section
15. As part of the mandatory fields. start with the name of the user. The username iseiscool is used in this example.
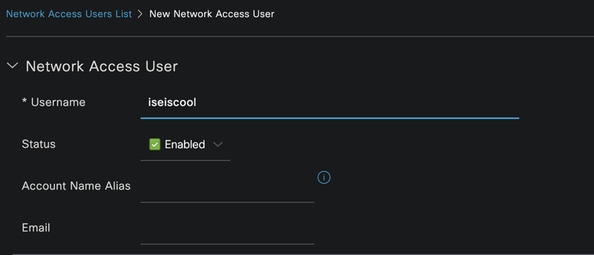 Network Access User Creation
16. Assign a password to the user, in this example, VainillaISE97 is used.
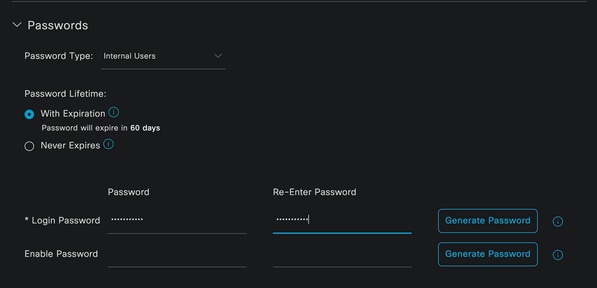 User Creation Password Section
17. Assign the user to group iseUsers.
 User Group Assignation
18. Configure the Policy set.
19. Navigate to ISE Menu > Policy > Policy Sets.
20. The default Policy set can be used. However, one called Wired is created for this example.
Note: Classifying and differentiating the policy sets helps when troubleshooting,
If the add or plus icon "+" is not visible, the gear icon of any policy set can be clicked, and then select Insert new row above.
 Gear Icon Options
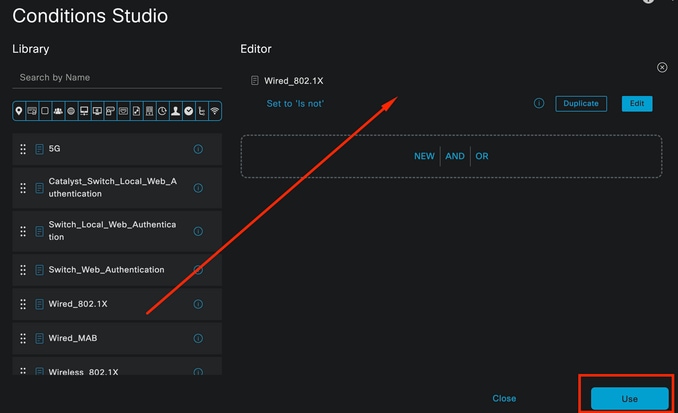
21. The condition used is Wired 8021x, drag it. then click Use.
 Authentication Policy Condition Studio
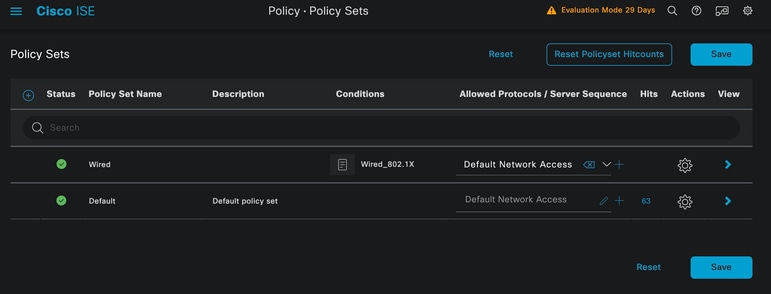
22. Select Default Network Access in the Allowed Protocols section.
 Policy Sets General View
23. Click Save.
Configure the Authentication and Authorization Policies
1. Click the > icon.
 Wired Policy Set
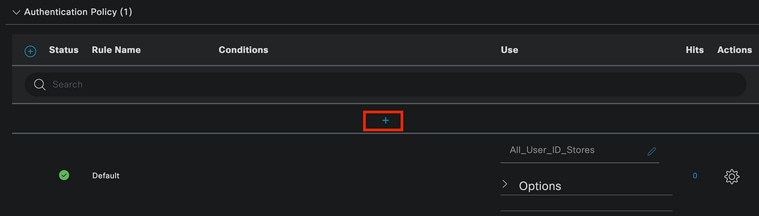
2. Expand the Authentication Policy section.
3. Click the "+" icon.
 Authentication Policy
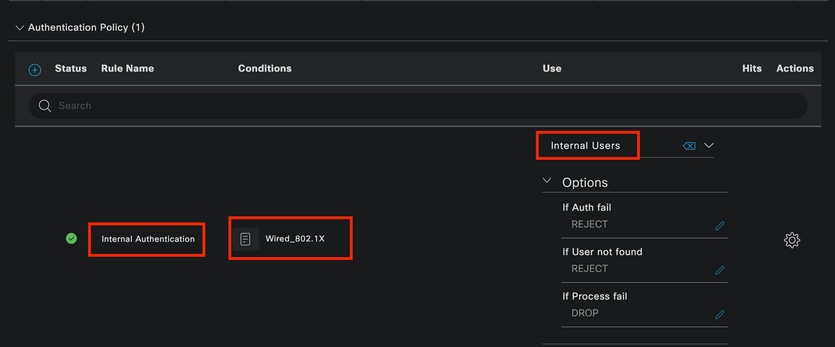
4. Assign a name to the Authentication Policy; Internal Authentication is used in this example.
5. Click the "+" icon on the conditions column for this new Authentication Policy.
6. The preconfigured condition Wired Dot1x is used.
7. In the Use column, select Internal Users.
 Authentication Policy
Authorization Policy
1. The Authorization Policy section is at the bottom of the page. Expand it and click the + icon.
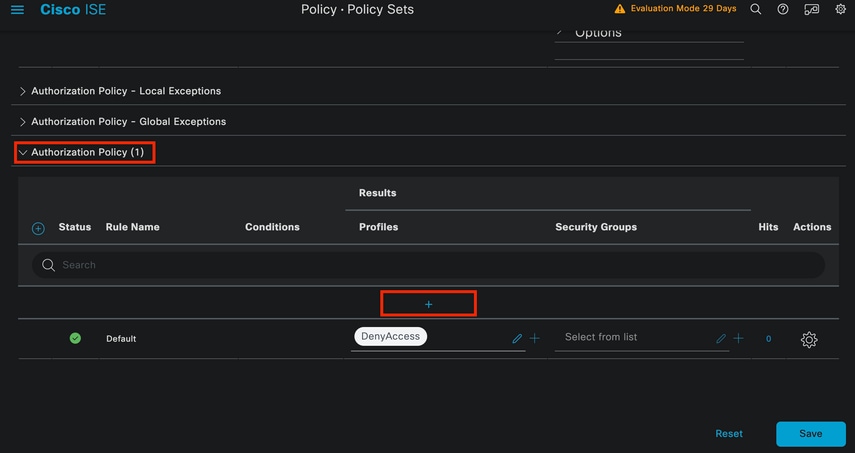 Authorization Policy
2. Name the recently created Authorization Policy. In this configuration example, the name Internal ISE Users is used.
3. To create a condition for this Authorization Policy, click the "+" icon in the Conditions column.
4. The group IseUsers is used.
5. Click the Attribute section.
6. Select the IdentityGroup icon.
7. From the dictionary, select the InternalUser dictionary that comes with the IdentityGroup attribute.
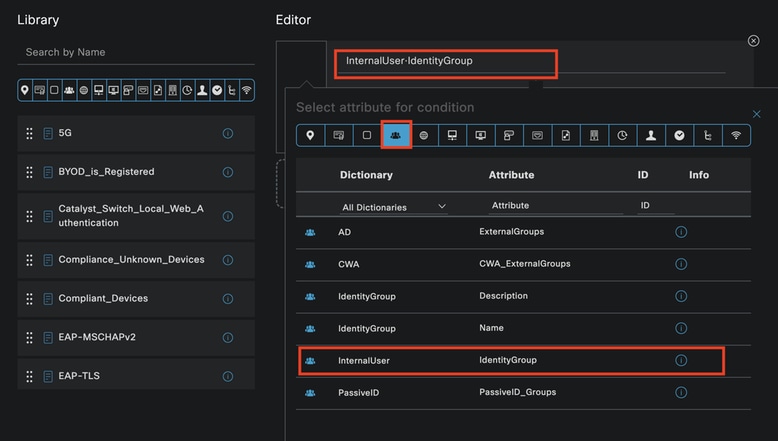 Condition Creation
8. From the drop-down menu, select the Equals operator.
9. From User Identity Groups drop-down menu, select the IseUsers group.
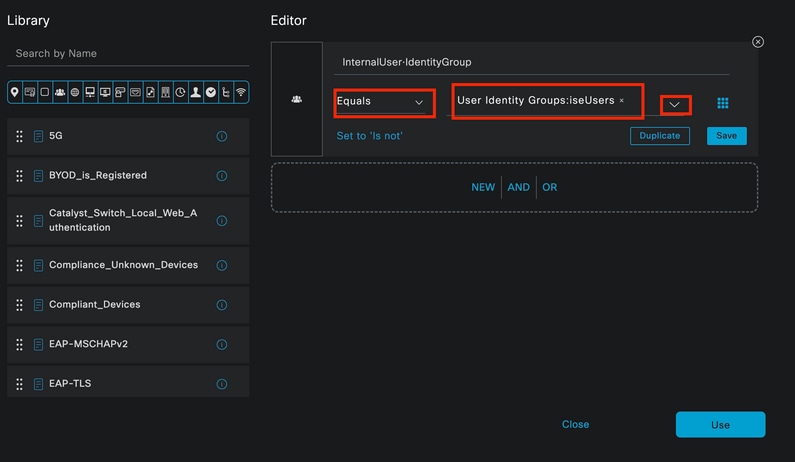 Condition Creation
10. Click Use.
11. Add the Result Authorization Profile.
12. The pre-configured profile Permit Access is used.
Note: The authentications coming to the ISE hitting the Wired Dot1x Policy set are not part of the Users Identity Group ISEUsers. Hit the default Authorization Policy, which results in DenyAccess.
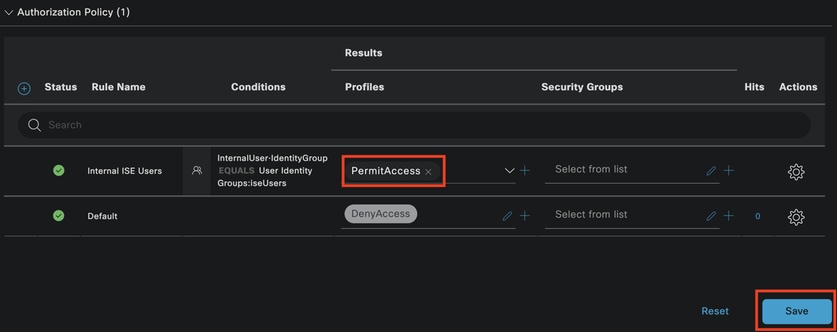 Authorization Policy
13. Click Save.
Verify
1. Once the configuration is finished, Secure Client prompts for the credentials and it specifies the usage of the PEAP MSCHAPv2 profile.
2. The credentials previously created are entered.
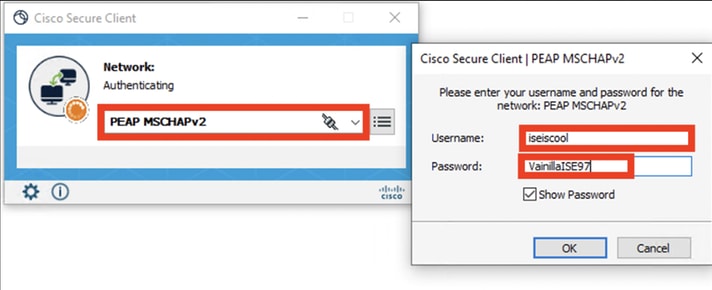 Secure Client NAM
3. If the endpoint authenticates correctly, NAM displays it is connected.
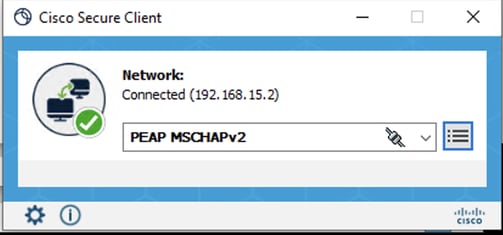 Secure Client NAM
4. By clicking the information icon and navigating to the Message History section, the details of every step NAM completed are displayed.
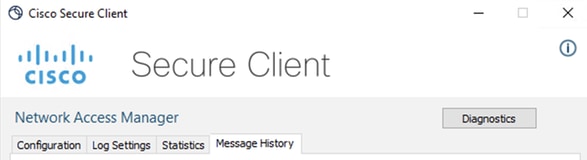 Secure Client Message History
 Secure Client Message History
5. From ISE, navigate to Operations > Radius LiveLogs to view the details of the authentication. As seen in the next image, the username that was used is displayed.
Additional details are available such as:
- Timestamp
- Mac Address
- Policy Set Used
- Authentication Policy
- Authorization Policy
- Other Relevant Information
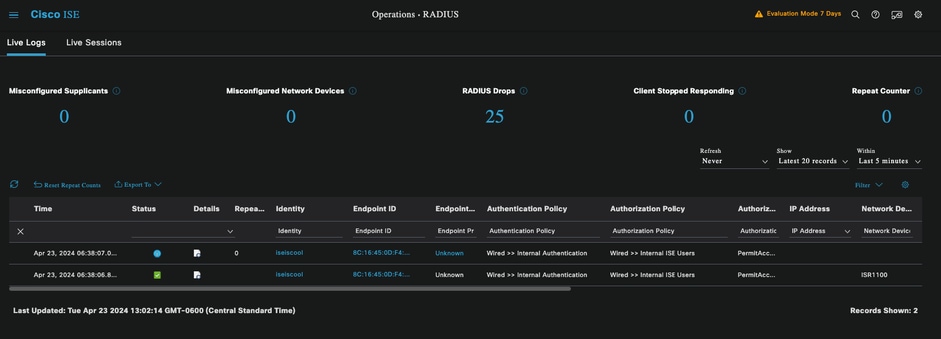 ISE RADIUS Live Logs
6. In this view, it displays all the correct policies are shown, and the result is a successful authentication status. This concludes the configuration is correct.
Troubleshoot
Problem 1: NAM Profile is not Used by Secure Client
1. If the new profile was created in the Profile Editor is not used by NAM, use the Network Repair option for Secure Client.
2. You can find this option by navigating to the Windows Bar > Clicking the circumflex icon > Right-Click Secure Client Icon > Click Network Repair.
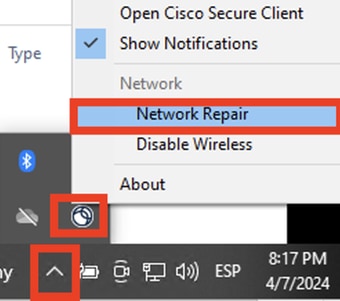 Network Repair Section
Problem 2: Logs must be Collected for Further Analysis
1. Enable NAM extended logging
2. Open NAM, and click the gear icon.
 NAM Interface
3. Navigate to the Log Settings tab. Check the Enable Extended Logging checkbox.
4. Set the Packet Capture File Size to 100 MB.
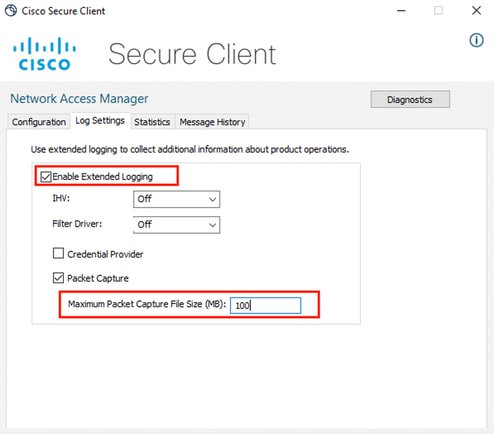 Secure Client NAM Log Settings
Reproduce the Issue
5. Once extended logging is enabled, reproduce the issue multiple times to ensure the logs are generated and the traffic is captured.
Collect Secure Client DART Bundle
6. From Windows, navigate to the search bar and type: Cisco Secure Client Diagnostics and Reporting Tool.
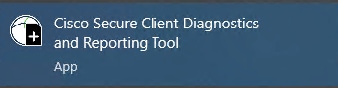 DART Module
7. During the installation process, you also installed this module. It is a tool that assists during troubleshooting processes by collecting logs and relevant dot1x session information.
8. Click Next in the first window.
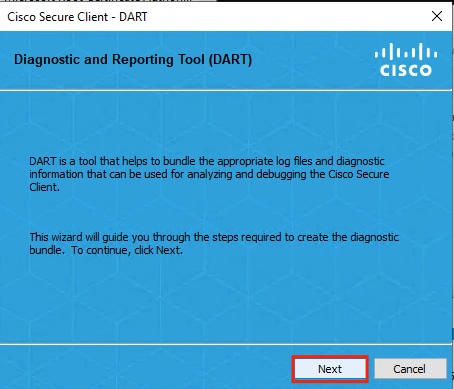 DART Module
9. Click Next, this allows the log bundle to be saved on the desktop.
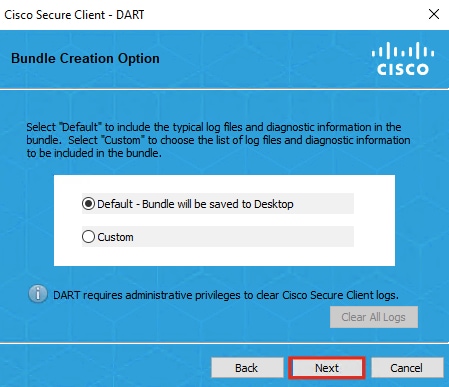 DART Module
10. If necessary, click the checkbox Enable Bundle Encryption.
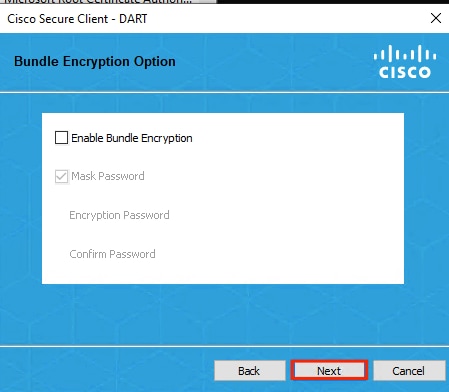 DART Module
11. The DART log collection starts.
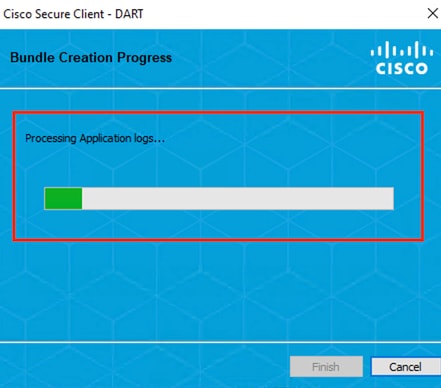 DART Log Collection
12. It can take 10 minutes or so until the process finishes.
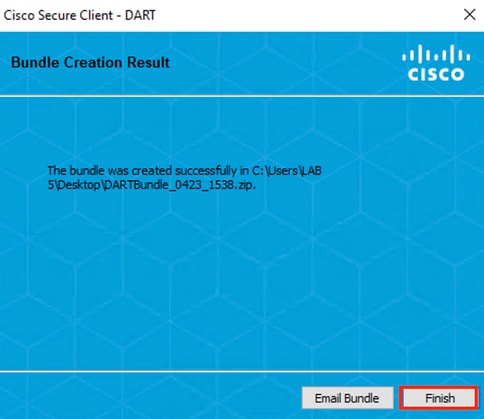 DART Bundle Creation Result
13. The DART results file can be found in the desktop directory.
 DART Result File
Related Information
Revision History
| Revision | Publish Date | Comments |
|---|---|---|
2.0 |
02-Jul-2026
|
Updated spelling, spacing, grammar, sentence structure, and CCW alerts. |
1.0 |
29-Apr-2024
|
Initial Release |

 Feedback
Contact Cisco
- Open a Support Case

- (Requires a Cisco Service Contract)