Configure ISE Self Registered Guest Portal
Available Languages
Download Options
Bias-Free Language
The documentation set for this product strives to use bias-free language. For the purposes of this documentation set, bias-free is defined as language that does not imply discrimination based on age, disability, gender, racial identity, ethnic identity, sexual orientation, socioeconomic status, and intersectionality. Exceptions may be present in the documentation due to language that is hardcoded in the user interfaces of the product software, language used based on RFP documentation, or language that is used by a referenced third-party product. Learn more about how Cisco is using Inclusive Language.
Contents
Introduction
This document describes how to configure and troubleshoot ISE Self Registered Guest Portal functionality.
Prerequisites
Requirements
Cisco recommends that you have experience with ISE configuration and basic knowledge of these topics:
- ISE deployments and Guest flows
- Configuration of Wireless LAN Controllers (WLC)
Components Used
Self Registered Guest Portal, allows guest users to self-register along with employees to use their AD credentials to gain access to network resources. This Portal allows you to configure and customize multiple features.
The information in this document is based on these software and hardware versions:
- Microsoft Windows 10 Pro
- Cisco WLC 5508 with version 8.5.135.0
- ISE Software, Version 3.0
The information in this document was created from the devices in a specific lab environment. All of the devices used in this document started with a cleared (default) configuration. If your network is live, ensure that you understand the potential impact of any command.
Topology and Flow
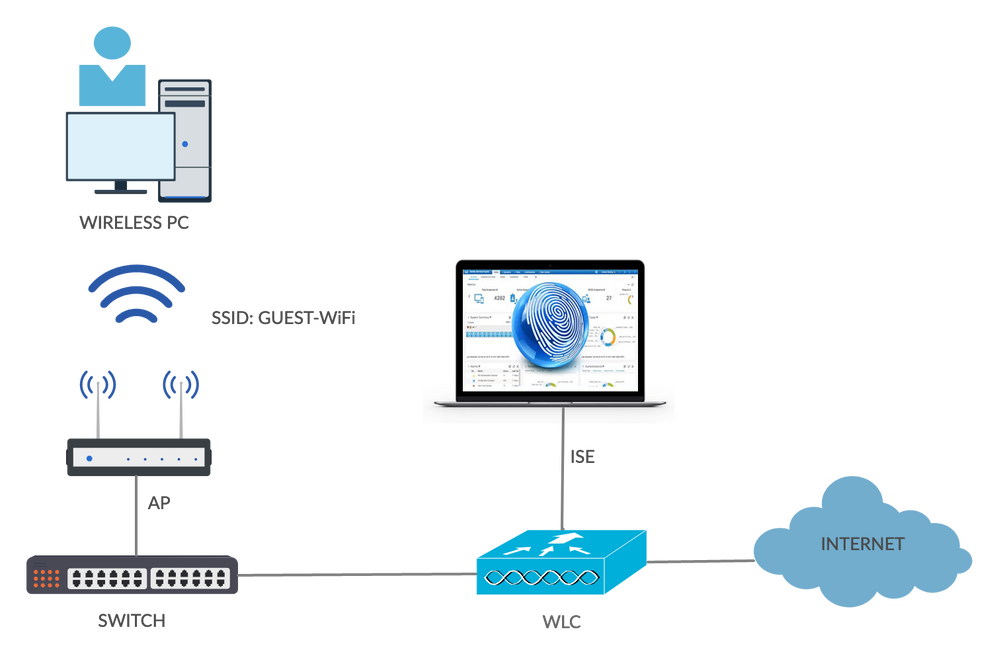
This scenario presents multiple options available for guest users when they perform self-registration.
Here is the general flow:
Step 1. Guest user associates to Service Set Identifier (SSID): Guest-WiFi. This is an open network with MAC filtering with ISE for authentication. This authentication matches the second authorization rule on the ISE and the authorization profile redirects to the Guest Self Registered Portal. ISE returns a RADIUS Access-Accept with two cisco-av-pairs:
- url-redirect-acl (which traffic must be redirected, and the name of Access Control List (ACL) defined locally on the WLC)
- url-redirect (where to redirect that traffic- to ISE)
Step 2. The guest user is redirected to ISE. Rather than provide credentials in order to log in, the user clicks Register for Guest Access. The user is redirected to a page where that account can be created. An optional secret registration code can be enabled in order to limit the self-registration privilege to people who know that secret value. After the account is created, the user is provided credentials (username and password) and logs in with those credentials.
Step 3. ISE sends a RADIUS Change of Authorization (CoA) Reauthenticate to the WLC. The WLC re-authenticates the user when it sends the RADIUS Access-Request with the Authorize-Only attribute. ISE responds with Access-Accept and Airespace ACL defined locally on the WLC, which provides access to the Internet only (final access for guest user depends on the authorization policy).
Note: Extensible Authentication Protocol (EAP) sessions, ISE must send a CoA Terminate in order to trigger re-authentication because the EAP session is between the supplicant and the ISE. But for MAB (MAC filtering), CoA Reauthenticate is enough; there is no need to de-associate/de-authenticate the wireless client.
Step 4. The guest user has desired access to the network.
Multiple additional features like posture and Bring Your Own Device (BYOD) can be enabled (discussed later).
Configure
WLC
- Add the new RADIUS server for Authentication and Accounting. Navigate to Security > AAA > Radius > Authentication in order to enable RADIUS CoA (RFC 3576).
There is a similar configuration for Accounting. It is also advised to configure the WLC to send SSID in the Called Station ID attribute, which allows the ISE to configure flexible rules based on SSID: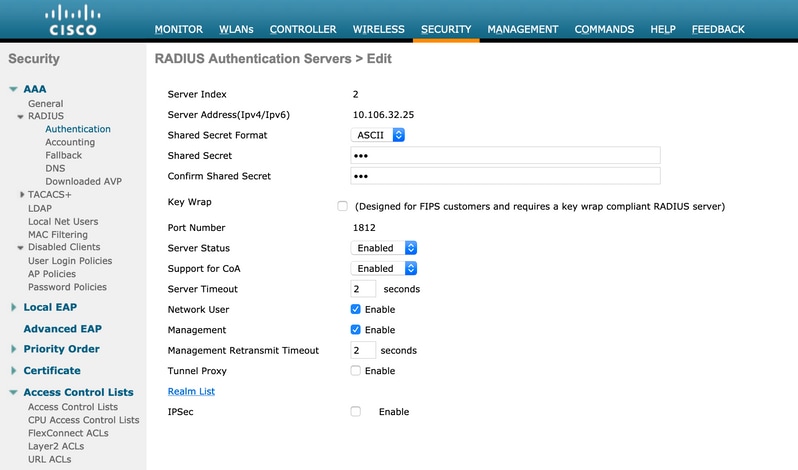


- Under the WLANs tab, create the Wireless LAN (WLAN) Guest-WiFi and configure the Correct Interface. Set Layer2 security to None with MAC filtering. In Security/Authentication, Authorization, and Accounting (AAA) Servers, select the ISE IP address for both Authentication and Accounting. On the Advanced tab, enable AAA Override and set the Network Admission Control (NAC) State to ISE NAC (CoA support).
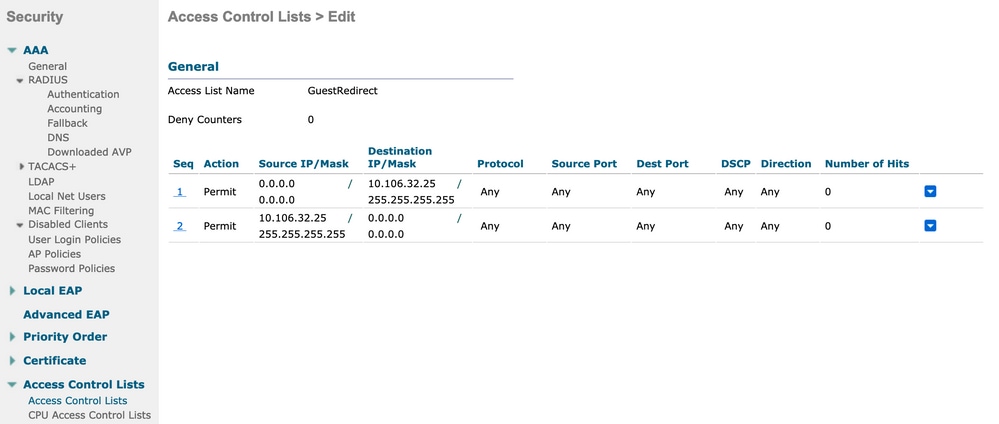
- Navigate to Security > Access Control Lists > Access Control Lists and create two access lists:
- GuestRedirect, which permits traffic that must not be redirected and redirects all other traffic
- Internet, which is denied for corporate networks and permitted for all others
Here is an example for GuestRedirect ACL (need to exclude traffic to/from ISE from redirection):
ISE
- Add the WLC as a Network Access Device from Work Centers > Guest Access > Network Devices.
- Create Endpoint Identity Group. Navigate to Work Centers > Guest Access > Identity Groups > Endpoint Identity Groups.
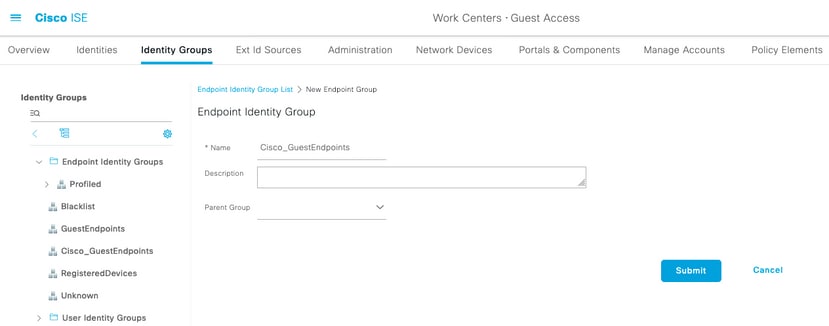
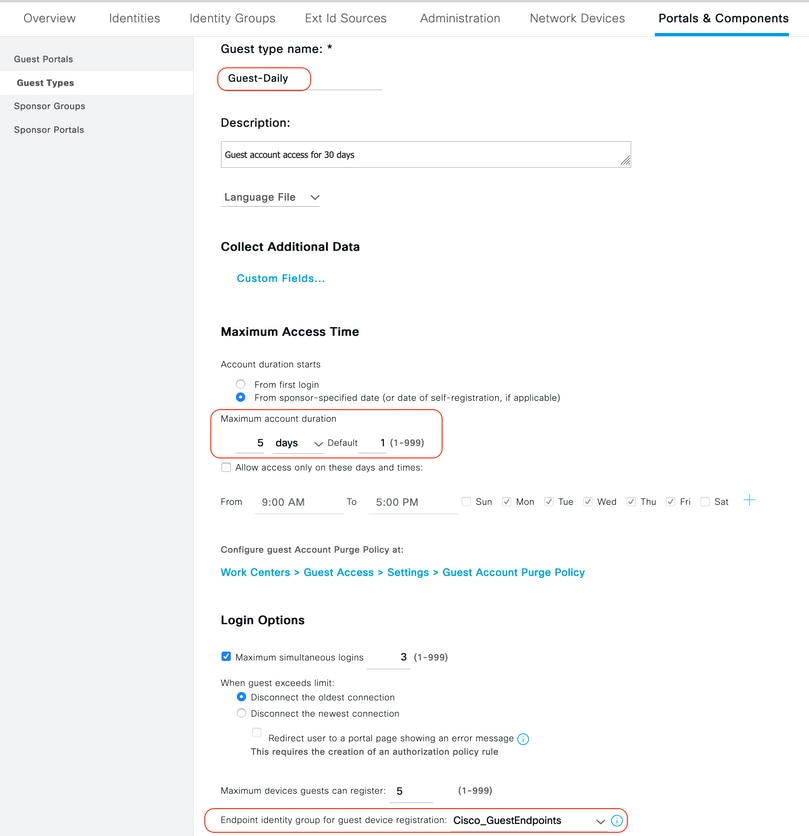
3. Create a Guest Type by navigating to Work Centers > Guest Access > Portal & Components > Guest Types. Refer to the previously created Endpoint Identity Group under this new Guest Type and Save.
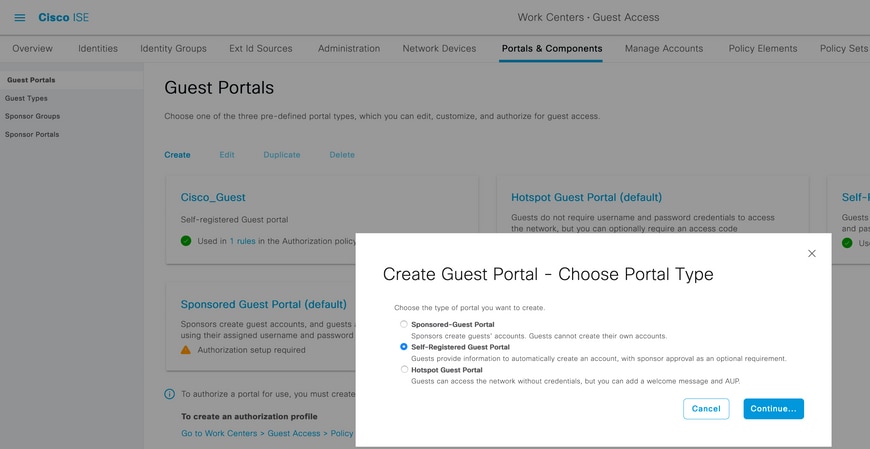
4. Create a new Guest Portal Type: Self-Registered Guest Portal. Navigate to Work Centers > Guest Access > Guest Portals.
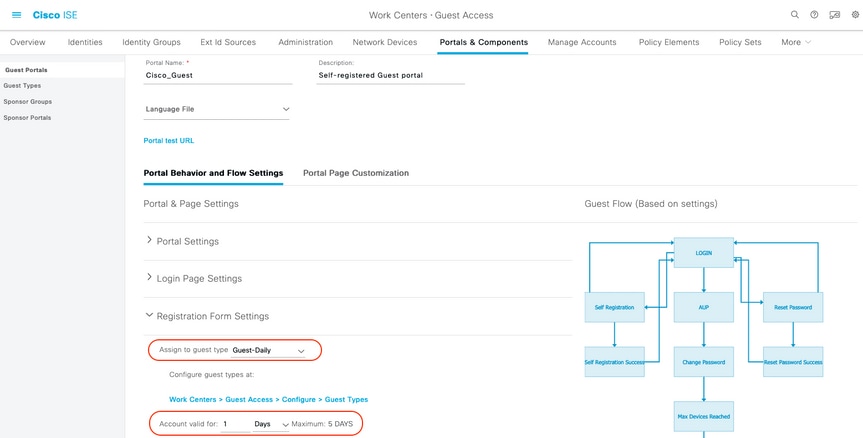
5. Choose the portal name, refer to the Guest Type created before and send credential notification settings under Registration Form settings to send the credentials via Email.
Refer to this document on how to configure the SMTP server on ISE:
Leave all of the other settings to default. Under Portal Page Customization, all pages presented can be customized. By default, the Guest account is valid for 1 day and it can be extended to the number of days configured under the specific Guest Type.
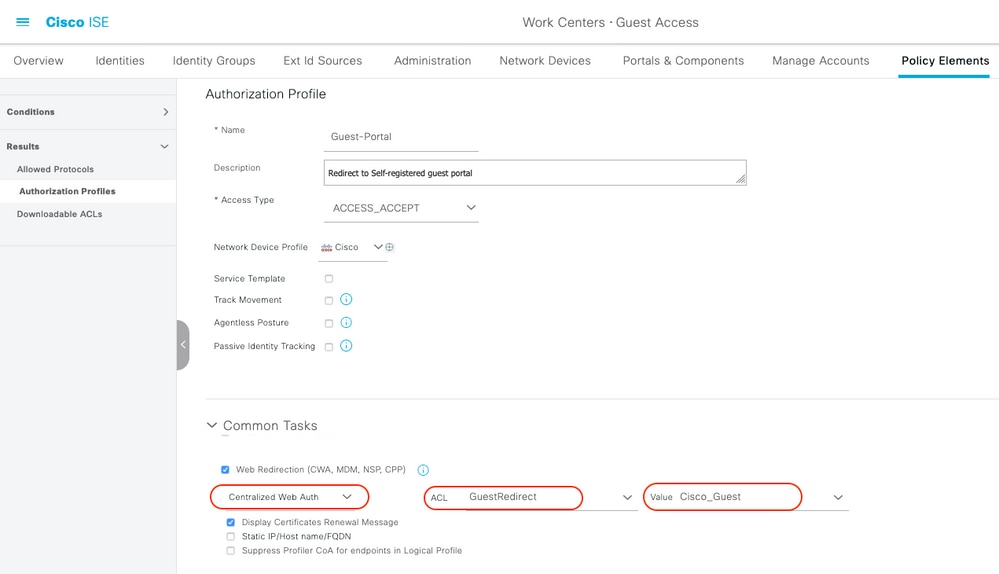
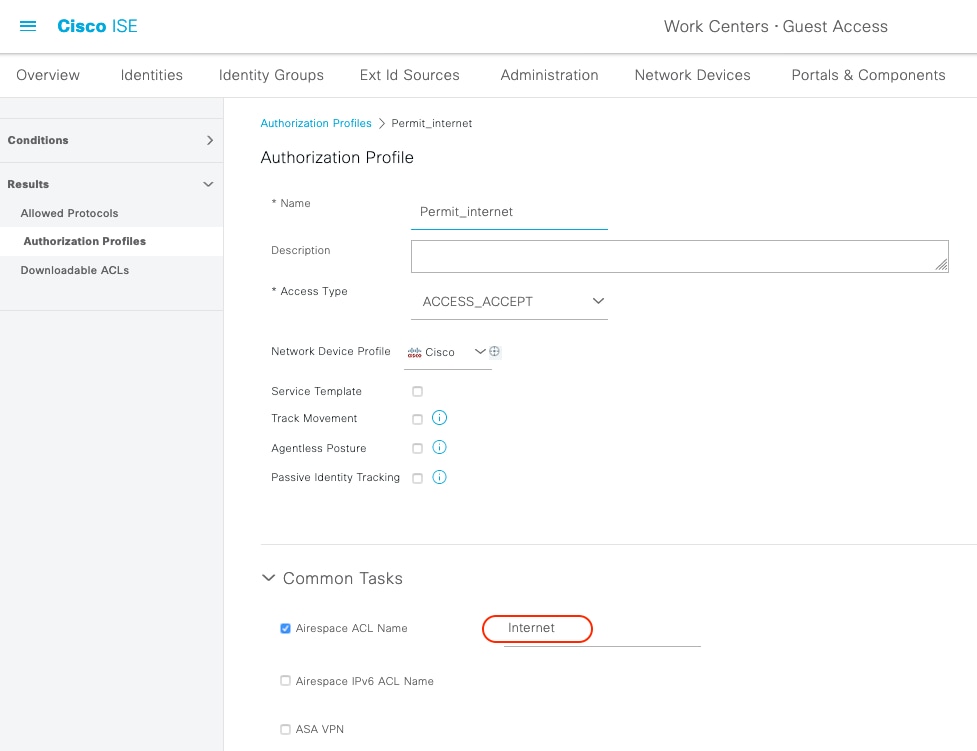
6. Configure these two Authorization Profiles by Navigating to Work Centers > Guest Access > Policy Elements > Results > Authorization Profiles.
- Guest-Portal (with redirection to Guest portal Cisco_Guest and a Redirect ACL named GuestRedirect). This GuestRedirect ACL was created earlier on WLC.
- Permit_Internet (with Airespace ACL equal Internet)
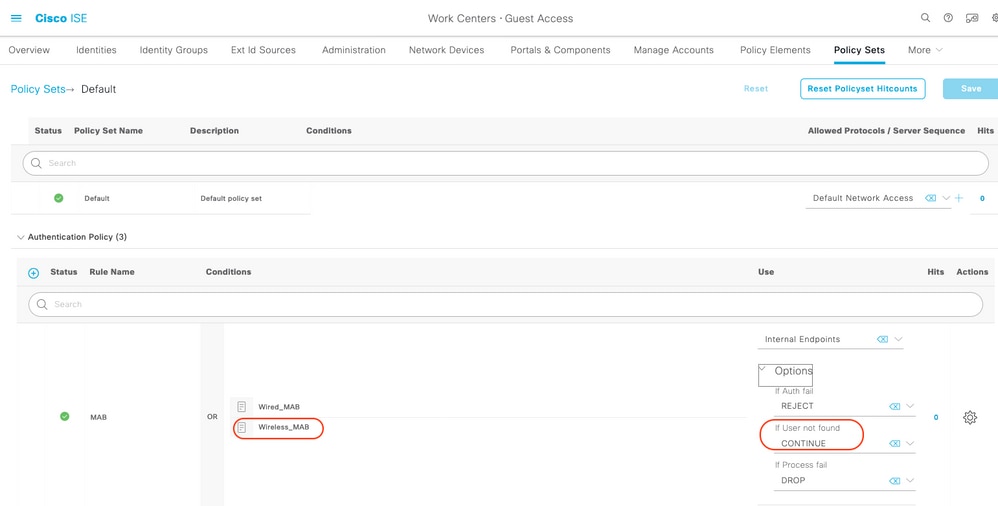
7. Modify Policy Set named Default. The default policy set is preconfigured for Guest portal access. An authentication policy named MAB is present, which allows MAC Authentication Bypass (MAB) authentication to continue (not reject) for unknown Mac address.
8. Navigate to Authorization policy on the same page. Create this Authorization Rules, as shown in this image.

New users when associate with the Guest SSID are not yet part of any identity group and therefore match the second rule and get redirected to Guest Portal.
After the user logs in successfully, ISE sends a RADIUS CoA and the WLC performs re-authentication. This time, the first authorization rule is matched (as endpoint becomes part of defined endpoint identity group) and the user gets Permit_internet authorization Profile.
9. We can also provide Temporary Access to the Guests by using the condition Guest flow. That condition is checking active sessions on ISE and it is attributed. If that session has the attribute indicating that previously guest user has authenticated successfully condition is matched. After ISE receives Radius Accounting Stop message from Network Access Device (NAD), session is terminated and later removed. At that stage the condition Network Access:UseCase = Guest Flow is not satisfied anymore. As a result, all subsequent authentications of that endpoint hits generic rule redirecting for guest authentication.

Note: At a time, you can use either the Temporary Guest access or Permanent Guest Access but not the both.
Refer to this document for ISE Guest Temporary and Permanent access configuration in detail.
Verify
Use this section in order to confirm that your configuration works properly.
- After you associate with the Guest SSID and type a URL, then you are redirected to the Guest Portal page, as shown in the image.
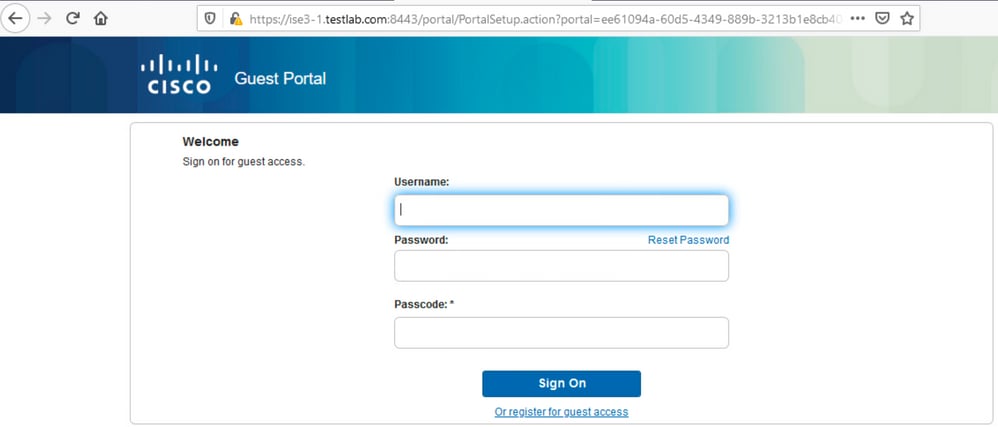
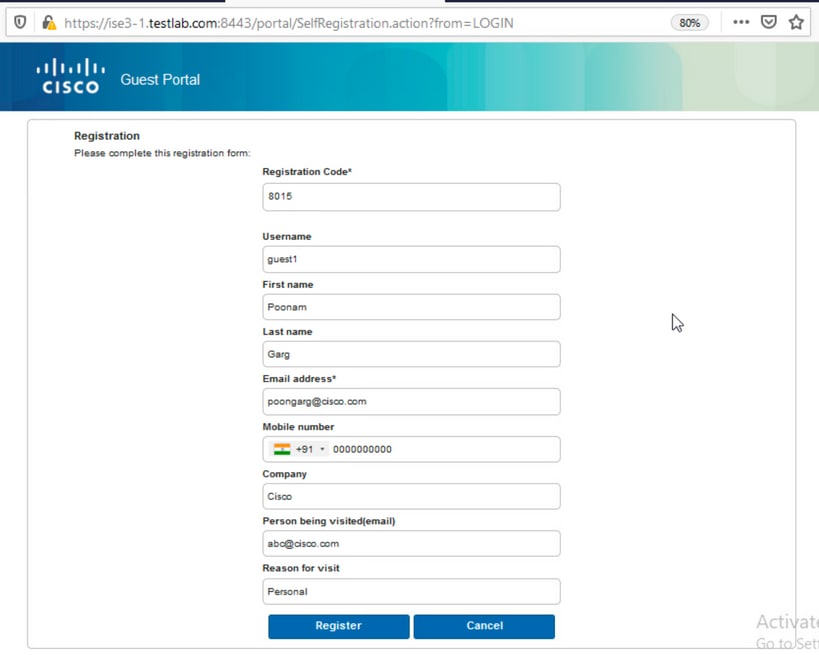
- Since you don’t have any credentials yet, you must choose the option Register for Guest access. You are presented with the Registration form to create the account. If the Registration Code option was enabled under the Guest Portal configuration, that secret value is required (this ensures that only people with correct permissions are allowed to self-register).
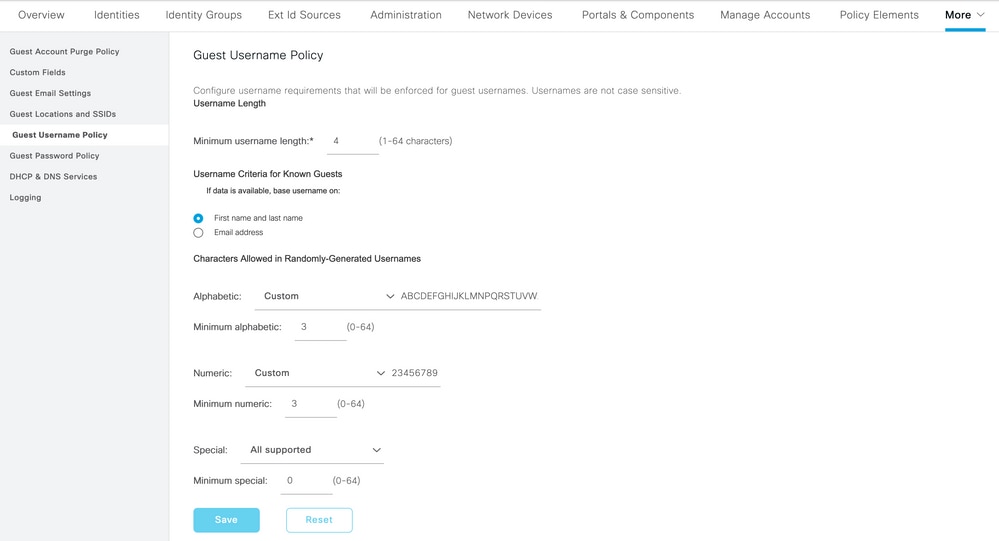
3. If there are any problems with the password or the user policy, navigate to Work Centers > Guest Access > Settings > Guest Username Policy in order to change settings. Here is an example:
4. After successful account creation, you are presented with credentials (password generated as per guest password policies) also guest user gets the email notification if it is configured:
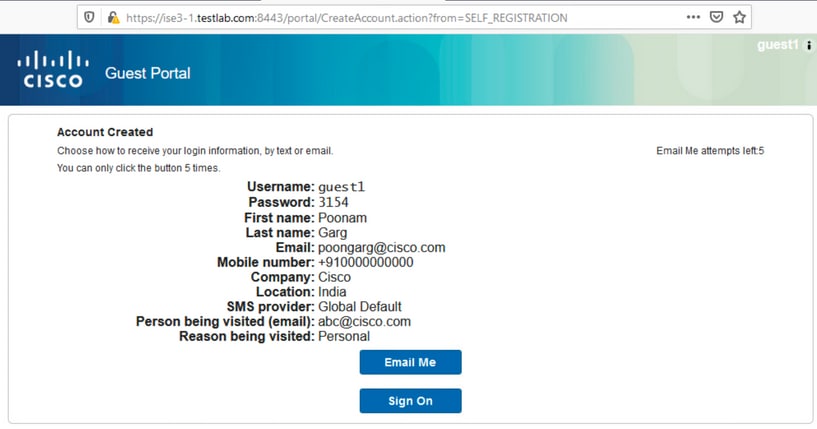
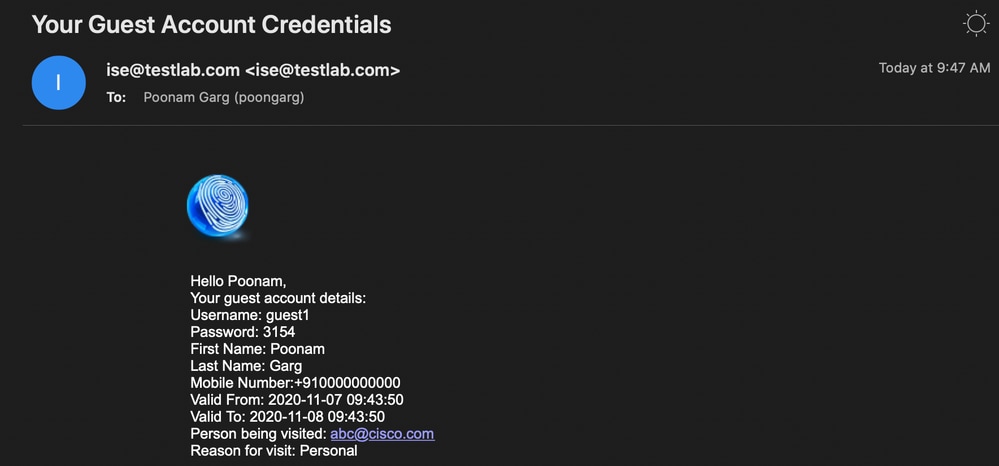
5. Click Sign On and provide credentials (additional Access Passcode can be required if configured under the Guest Portal; this is another security mechanism that allows only those who know the password to log in).
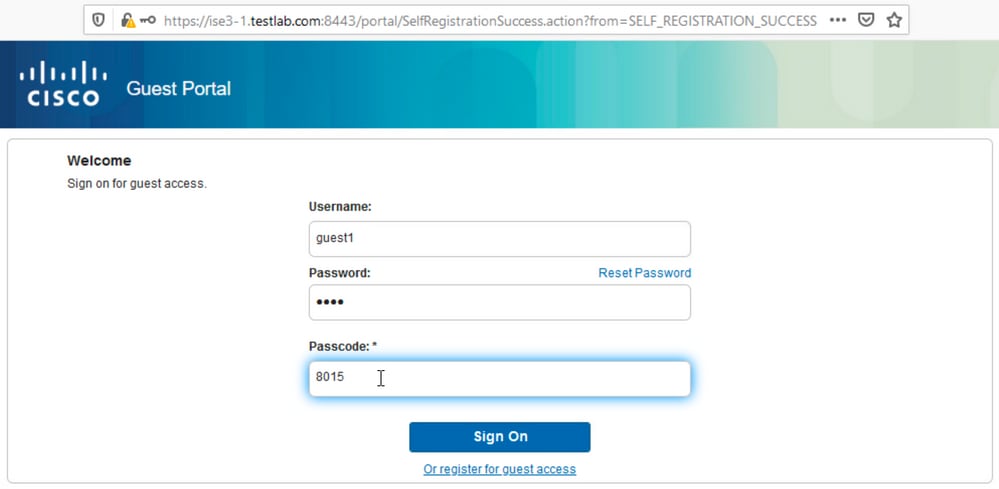
6. When successful, an optional Acceptable Use Policy (AUP) can be presented (if configured under the Guest Portal). The user is presented with a change password option and the Post-Login Banner (also configurable under Guest Portal) can also display.
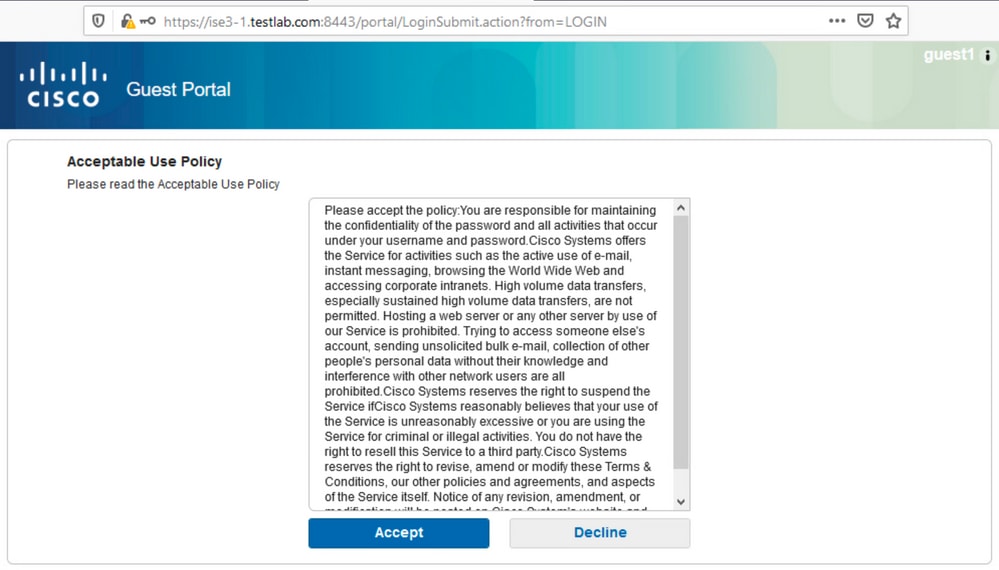
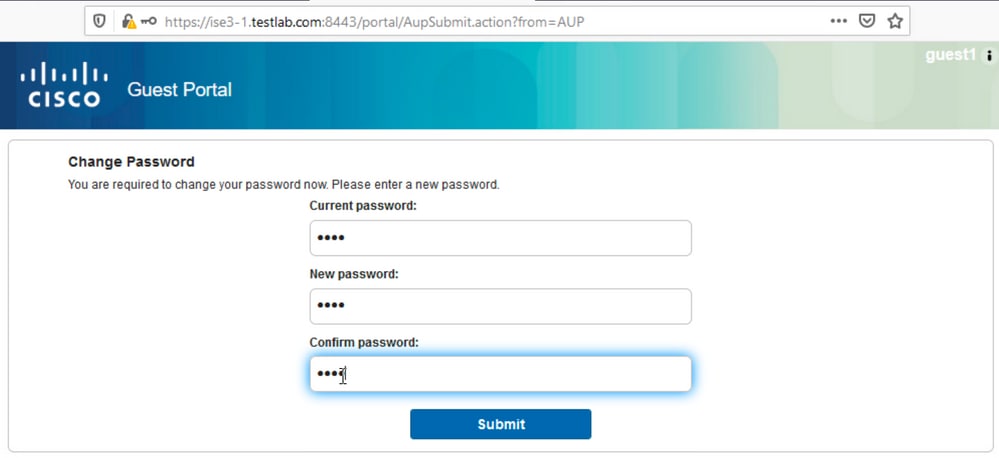

7. The last page (Post-Login Banner) confirms that access has been granted:

Troubleshoot
This section provides information you can use in order to troubleshoot your configuration.
At this stage, ISE presents these logs under Operations > RADIUS > Live Logs, as shown in the image.

Here is the flow:
- The guest user encounters the second authorization rule (Wifi_Redirect_to_Guest_Portal) and is redirected to Guest-Portal (Auhentication succeeded).
- The guest is redirected for self-registration. After successfully login (with the newly-created account), ISE sends the CoA Reauthenticate, which is confirmed by the WLC (Dynamic Authorization succeeded).
- The WLC performs re-authentication with the Authorize-Only attribute and the ACL name is returned (Authorize-Only succeeded). The guest is provided the correct network access.
Reports (Operations > Reports > Guest > Master Guest Report) also confirms that:

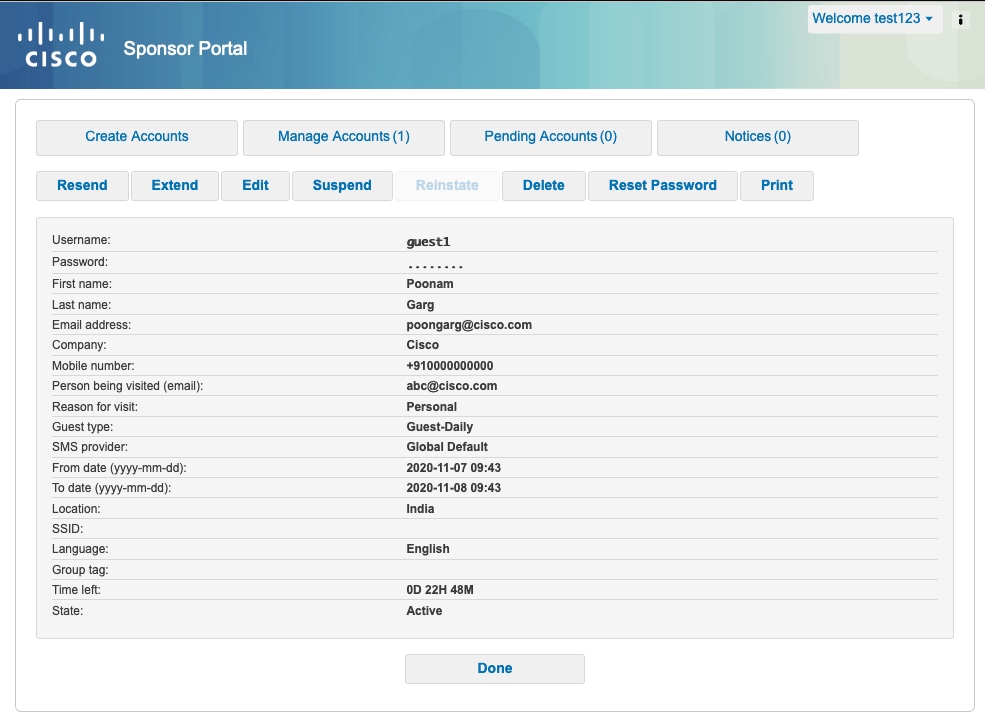
A sponsor user (with correct privileges) is able to verify the current status of a guest user.
This example confirms that the account is created, and the user has been logged in to the portal:
Optional Configuration
For every stage of this flow, different options can be configured. All of this is configured per the Guest Portal at Work Centers > Guest Access > Portals & Components > Guest Portals > Portal Name > Edit > Portal Behavior and Flow Settings. More important settings include:
Self-Registration Settings
- Guest Type - Describes how long the account is active, password expiry options, logon hours, and options (this is mixture of Time Profile and Guest Role)
- Registration code - If enabled, only users who know the secret code are allowed to self-register (must provide the password when the account is created)
- AUP - Accept Use Policy during self-registration
- The requirement for the sponsor to approve/activate the guest account.
Login Guest Settings
- Access code - If enabled, only guest users who know the secret code are allowed to log in.
- AUP - Accept Use Policy during self-registration.
- Password change option.
Device Registration Settings
- By default, the device is registered automatically.
Guest Device Compliance Settings
- Allows for a posture within the flow.
BYOD Settings
- Allows corporate users who use the portal as guests to register their personal devices.
Sponsor-Approved Accounts
If the Require guests to be approved option is selected under Registration Form Settings, then the account created by the guest must be approved by a sponsor. This feature can use email in order to deliver a notification to the sponsor (for guest account approval):
If the Simple Mail Transfer Protocol (SMTP) server is misconfigured, then the account is not created:
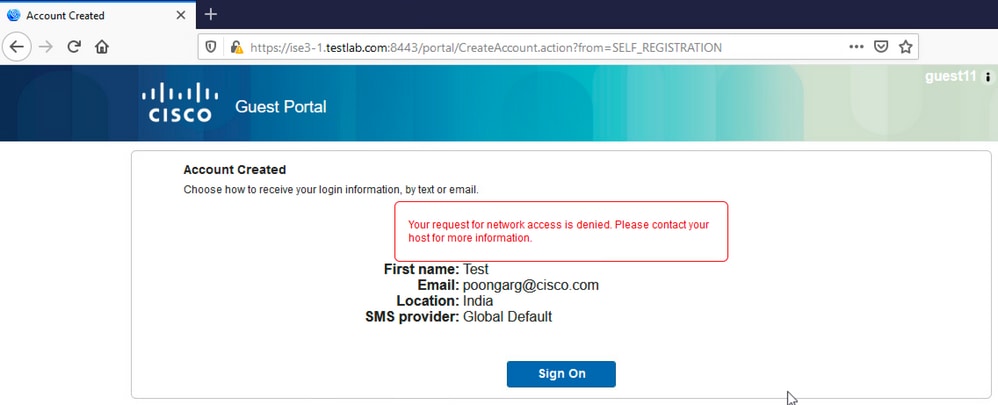
The log from guest.log confirms that there is an issue with sending Approval Notification to the Sponsor email as the SMTP server is misconfigured:
2020-11-07 07:16:38,547 ERROR [GUEST_ACCESS_SMTP_RETRY_THREAD][] cpm.guestaccess.apiservices.util.SmtpMsgRetryThreadUtil -::- An exception occurred while sending email :
javax.mail.MessagingException: Could not connect to SMTP host: outbound.cicso.com, port: 25, response: 421

2020-11-07 07:16:38,547 ERROR [https-jsse-nio-10.106.32.25-8443-exec-1][] cpm.guestaccess.apiservices.notification.NotificationService -::- sendApprovalNotification
com.cisco.cpm.guestaccess.exception.GuestAccessSystemException: com.cisco.cpm.guestaccess.exception.GuestAccessSystemException: Unable to send mail. Failure occured
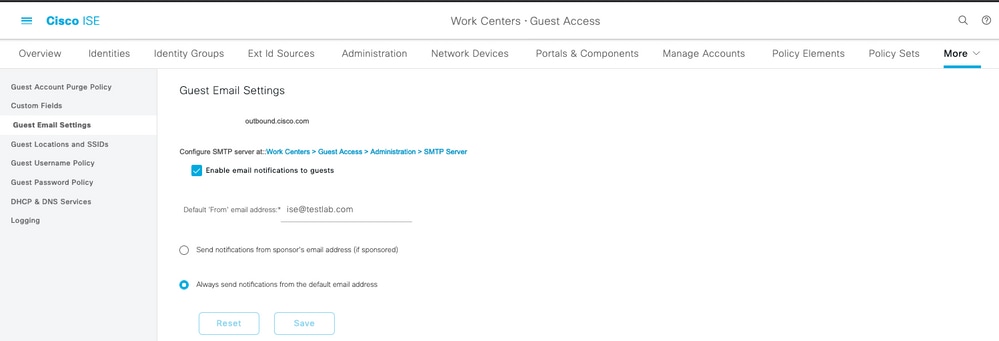
When you have the proper email and SMTP server configuration, the account is created:
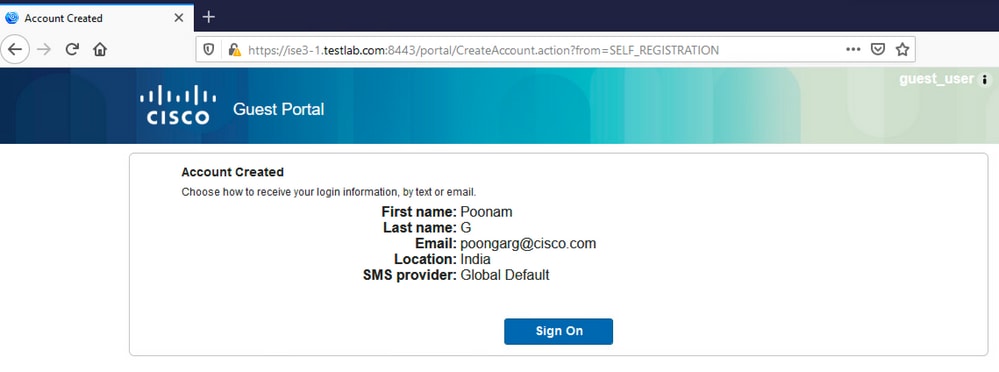
After you enable the Require guests to be approved option, the username and password fields are automatically removed from the Include this information on the Self-Registration Success page section. This is why, when sponsor approval is needed, credentials for guest users are not displayed by default on the web page that presents information to show that the account has been created. Instead, they must be delivered by Short Message Services (SMS) or email. This option must be enabled in the Send credential notification upon approval using section (mark email/SMS).
A notification email is delivered to the sponsor:
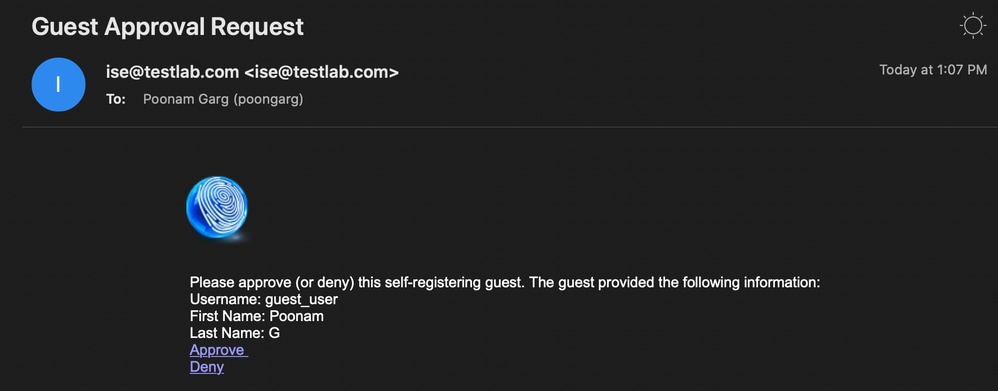
The sponsor click the Approval link and logs into the Sponsor portal and the account is approved:

From this point on, the guest user is allowed to log in (with the credentials received by email or SMS).
In summary, there are three email addresses used in this flow:
- Notification "From" address. This is defined statically or taken from the sponsor account and used as the From address for both: notification to sponsor (for approval) and credential details to the guest. This is configured under Work Centers > Guest Access > Settings > Guest Email Settings.
- Notification "To" address. This is used in order to notify the sponsor that it has received an account for approval. This is configured in the Guest Portal under Work Centers > Guest Access > Guest Portals > Portals and Components > Portal Name > Registeration Form Settings > Require guests to be approved > Email approval request to.
- Guest "To" address. This is provided by the guest user during registration. If Send credential notification upon approval using Email is selected, the email with credential details (username and password) is delivered to the guest.
Deliver Credentials via SMS
Guest credentials can be also delivered by SMS. These options must be configured:
- Choose the SMS service provider under Registration Form Settings:
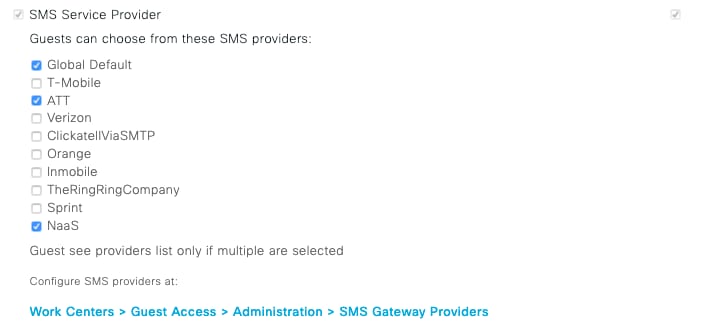
- Check the Send credential notification upon approval using: SMS check box.

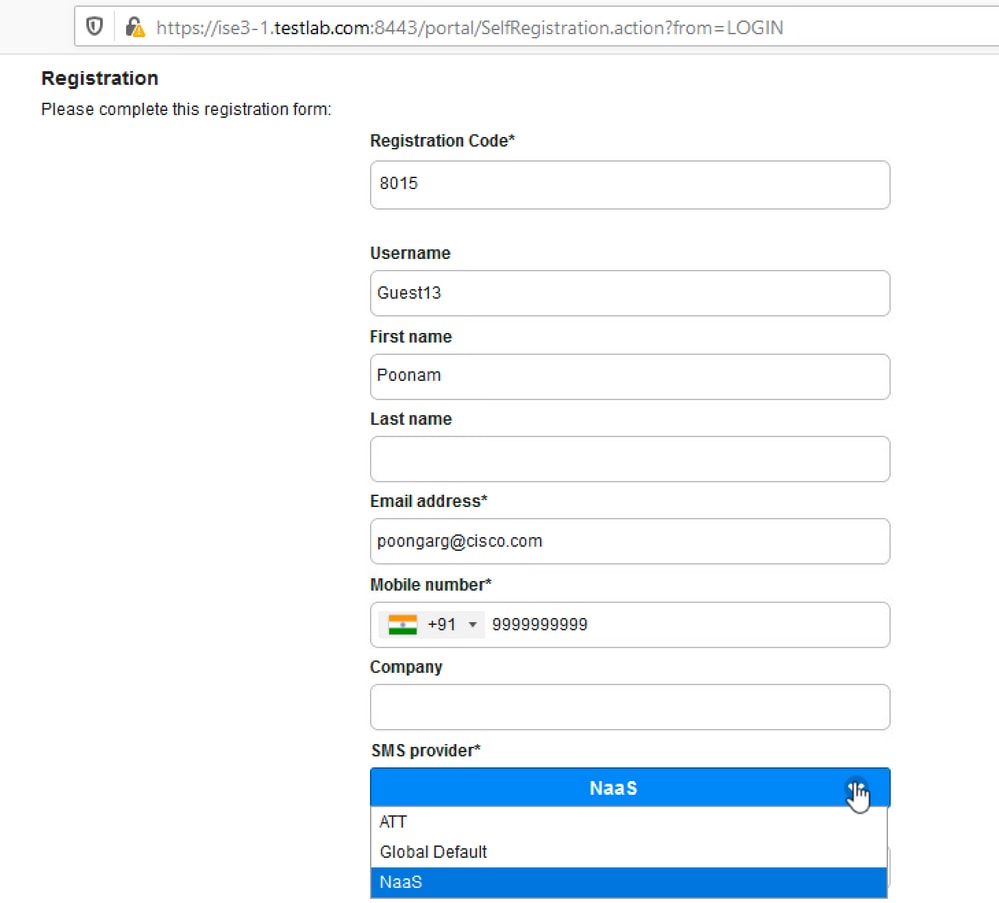
- Then, the guest user is asked to choose the available provider when he creates an account:
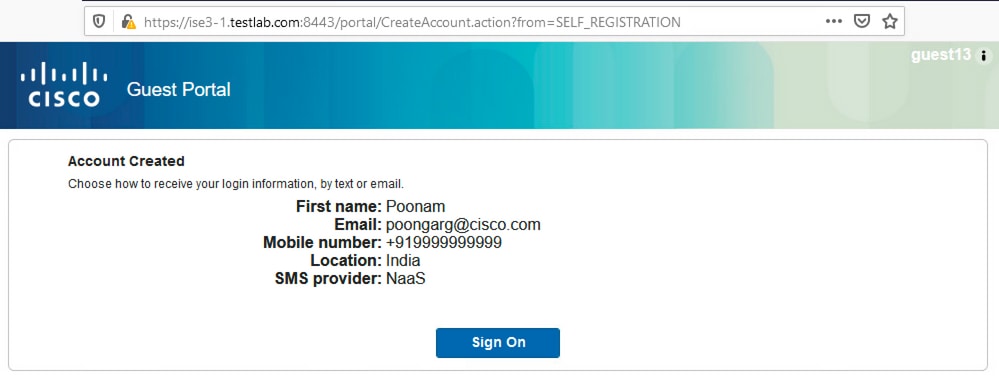
- An SMS is delivered with the chosen provider and phone number:
- You can configure SMS Providers under Administration > System > Settings > SMS Gateway.
Device Registration
If the Allow guests to register devices option is selected after a guest user logs in and accepts the AUP, you can register devices:
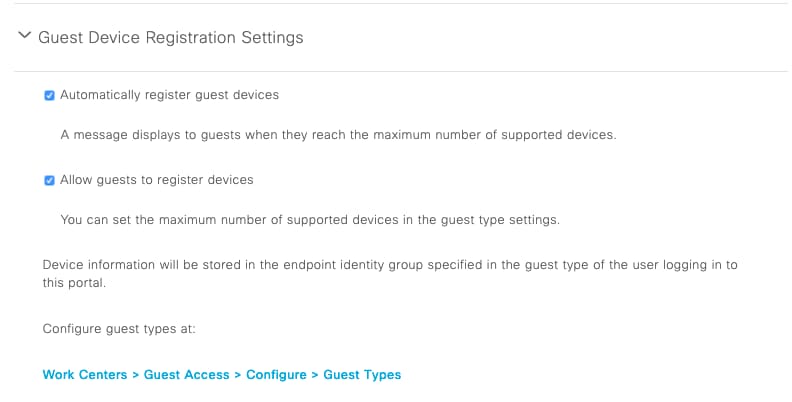
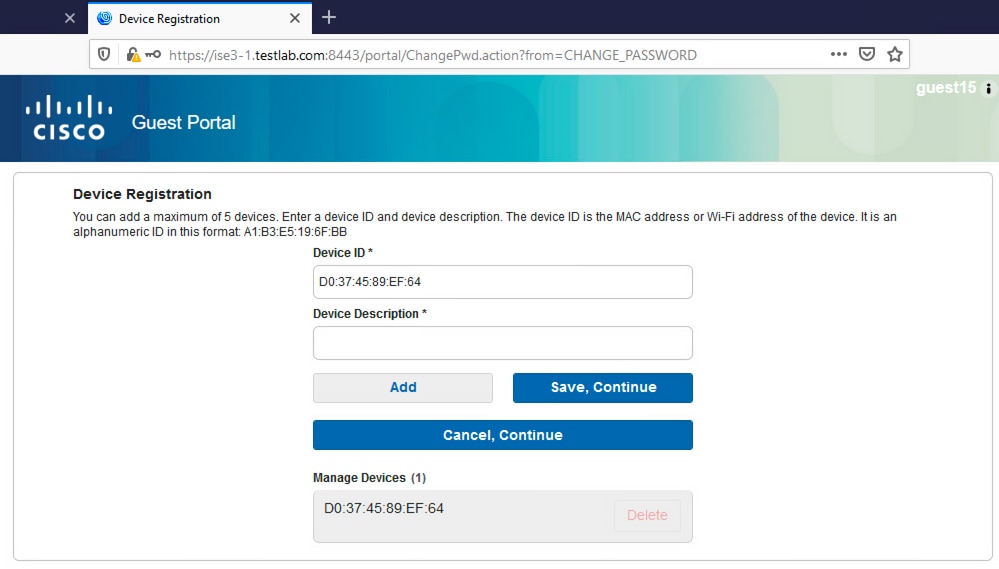
Notice that the device has already been added automatically (it is on Manage Devices list). This is because Automatically register guest devices were selected.
Posture
If the Require guest device compliance option is selected, then guest users are provisioned with an Agent that performs the posture (NAC/Web Agent) after they log in and accept the AUP (and optionally perform device registration). ISE processes Client Provisioning rules to decide which Agent must be provisioned. Then the Agent that runs on the station performs the posture (as per Posture rules) and sends results to the ISE, which sends the CoA reauthenticate to change authorization status if needed.
Possible authorization rules can look similar to this:

The first new users who encounter Guest_Authenticate rule redirect to the Self Register Guest portal. After the user self-registers and logs in, CoA changes authorization status and the user is provided with limited access to perform posture and remediation. Only after the NAC Agent is provisioned and the station is compliant does CoA change authorization status once again in order to provide access to the Internet.
Typical problems with posture include lack of correct Client Provisioning rules:

This can also be confirmed if you examine the guest.log file:
2020-11-09 09:23:32,157 ERROR [https-jsse-nio-10.106.32.25-8443-exec-7][] guestaccess.flowmanager.step.guest.ClientProvStepExecutor -:guest18:- CP Response is not successful, status=NO_POLICY
BYOD
If Allow employees to use personal devices on the network option is selected, then corporate users who use this portal can go through BYOD flow and register personal devices. For guest users, that setting does not change anything.
What does "employees using portal as guest" mean?
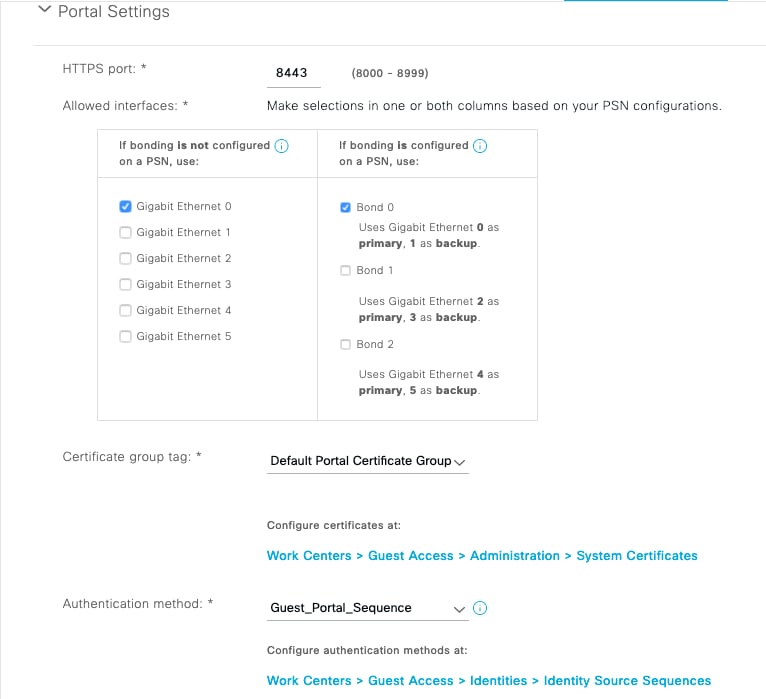
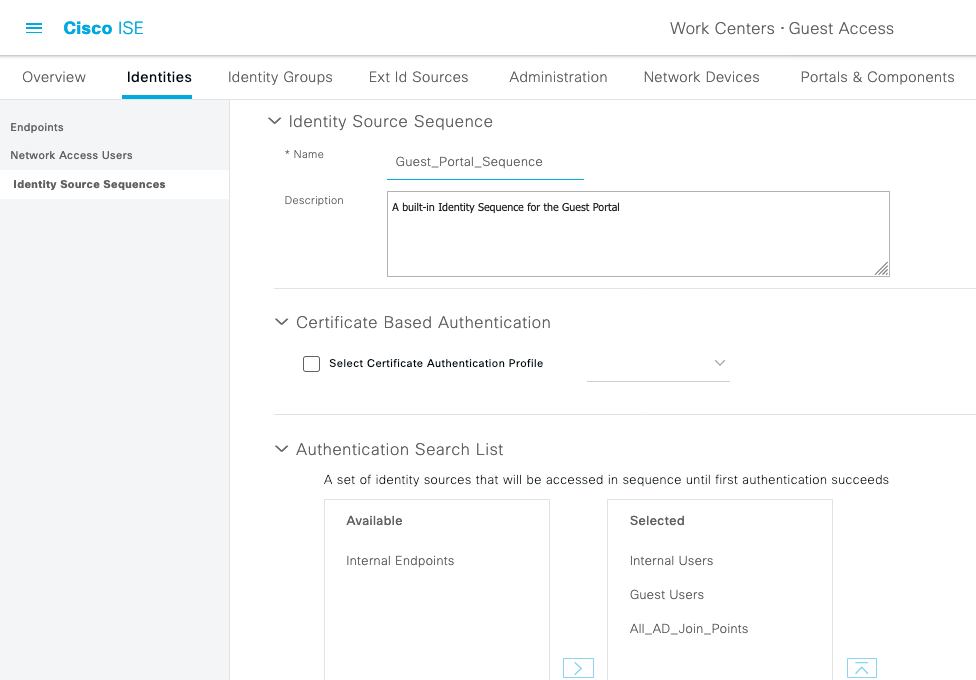
By default, guest portals are configured with the Guest_Portal_Sequence identity store:
This is the internal store sequence that tries the Internal Users first (before Guest Users) and then AD credentials, Since the Advanced settings is to proceed to the next store in the sequence when a selected identity store cannot be accessed for authentication, an Employee with internal credentials or AD credentials is able to login to the portal.
When at this stage on the guest portal, the user provides credentials that are defined in the Internal Users store or Active Directory and the BYOD redirection occurs:
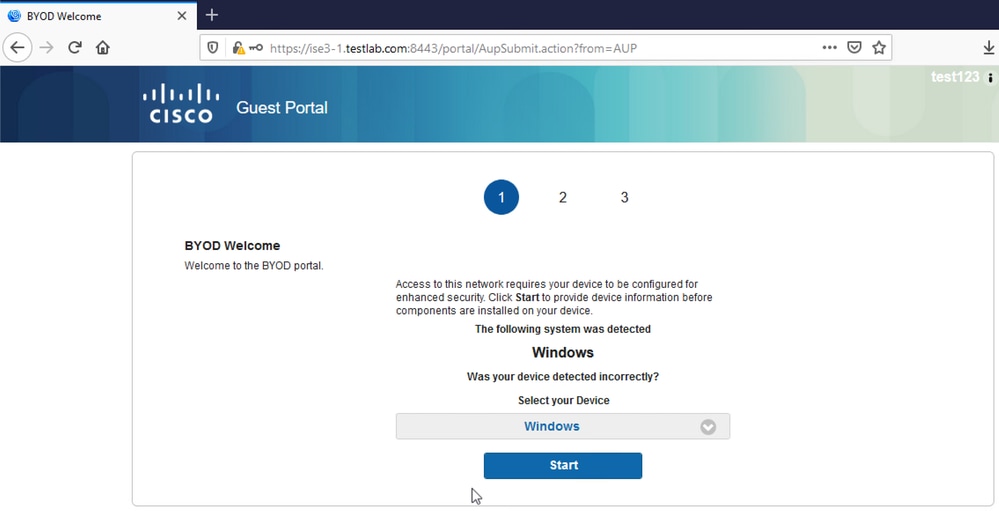
This way corporate users can perform BYOD for personal devices.
When instead of Internal Users/AD credentials, Guest Users credentials are provided, normal flow is continued (no BYOD).
VLAN Change
It allows you to run activeX or a Java applet, which triggers DHCP to release and renew. This is needed when CoA triggers the change of VLAN for the endpoint. When MAB is used, the endpoint is not aware of a change of VLAN. A possible solution is to change VLAN (DHCP release/renew) with the NAC Agent. Another option is to request a new IP address via the applet returned on the web page. A delay between release/CoA/renew can be configured. This option is not supported for mobile devices.
Related Information
- Posture services on Cisco ISE Configuration Guide
- Wireless BYOD with Identity Services Engine
- ISE SCEP support for BYOD Configuration Example
- Central Web Authentication on the WLC and ISE Configuration Example
- Central Web Authentication with FlexConnect APs on a WLC with ISE Configuration Example
- Technical Support & Documentation - Cisco Systems
Revision History
| Revision | Publish Date | Comments |
|---|---|---|
3.0 |
10-Jul-2023
|
Recertification. |
1.0 |
24-Nov-2020
|
Initial Release |
Contributed by Cisco Engineers
- Michal GarcarzCisco TAC Engineer
- Nicholas DarchisCisco TAC Engineer
- Poonam GargCisco TAC Engineer
Contact Cisco
- Open a Support Case

- (Requires a Cisco Service Contract)
 Feedback