Configure Smart License XRv 9000 via Smart Software Manager Satellite
Available Languages
Contents
Introduction
This document describes the procedure to enable Cisco Smart License on XRv 9000 when no direct access to the Internet from the VM hosting the XRv 9000.
Prerequisites
Requirements
Cisco recommends that you have knowledge of these topics:
- Basic knowledge of Virtual Machines.
- Knowledge about Cisco IOS® XRv 9000 Router installed either on VMware or KVM Hypervisors.
- Basic Knowledge of Cisco IOS XRv 9000 Router Licensing Model.
- Basic knowledge of Cisco Smart Software Manager (SSM) satellite.
Components Used
The information provided in this document is based on these software and hardware versions:
- Cisco IOS XRv 9000 Router -xrv9k-xr-6.0.1
- Smart Software Manager satellite- Version 3.0.4
The information in this document was created from the devices in a specific lab environment. All of the devices used in this document started with a cleared (default) configuration. If your network is live, ensure that you understand the potential impact of any command.
Cisco Smart Licensing
Cisco Smart Licensing is a cloud-based, software license management solution which enables you to automate manual licensing tasks. It assists you in purchasing, management and reporting functions. Cisco Smart Licensing uses Cisco Smart Call Home feature to communicate with the Cisco Smart Software Manager. Smart Call Home is auto-configured for default Smart Licensing Setup.
In Cisco IOS XRv 9000 Router, the licensing would be Smart Licensing only. Therefore, you need to enable Smart Licensing, and it would not include a Node Locked Licensing implementation at all. The XRv 9000 Router communicates to the Cisco Licensing Cloud to provide a report of which features and to what scale the system is being used.
These are the benefits of using Cisco Smart License:
- You can automatically self-register the software installed in your network without Product Activation Key (PAKs).
- You do not have to install the license file on every node. You can create license pools (logical grouping of licenses) to reflect your organization structure. Smart Licensing offers you Cisco Smart Software Manager, a centralized portal that enables you to manage all your Cisco software licenses from one centralized website.
- You can have an integrated view of the licenses you have purchased, and what has been actually deployed in your network via the portal.
Cisco IOS XRv 9000 Router Licensing Model
The Cisco IOS XRv 9000 Router (Sunstone) licensing model includes demo and production modes. This table gives a short description of each mode:
| Mode |
Description |
| Demo |
· This is the default mode when the router is launched. · No cloud connectivity is required. · No feature level enforcement. · Rate limitations of 200 Kbps |
| Production |
· This mode requires registration. · No enforcement applied. |
This table shows Cisco IOS XRv Router Licensing Mode (Source: Cisco IOS XRv 9000 Router Installation and Configuration Guide- Chapter: Cisco IOS XRv 9000 Router Smart Licensing)
XRv 9000 (Sunstone) by default is running in Demo mode, which applies high scale limit on the number of supported routes and amount of throughput. It expires after certain number of days and keeps showing the warning alarm.
You can utilize all the available capacity of your XRv 9000 when it is in production mode. However to enable the production mode, router’s license needs to be registered with back-end (Cisco Software Central) and purchased entitlements (directly, through a proxy, or through a Smart Licensing Satellite).
This image shows the basic state transitions between Demo and Production mode.
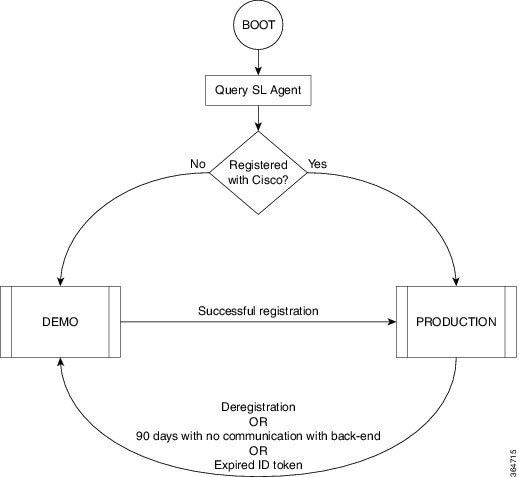
Transition between Demo and Production mode is shown in the image
A default Smart Call Home configuration on Cisco IOS XRv 9000 (XRv9k) Router is enough to run Smart Licensing. This configuration is triggered by Smart Licensing internally, using a built-in CiscoTAC-1 profile. However, you need to ensure that there is connectivity to Cisco.com via traffic or management ports on XRv9k Router. Therefore the only requirement is to configure IP connectivity to have access to the Cisco cloud from XRv9k Router.
By default, Smart Licensing is always enabled on XRv9k routers and to use the router in production mode, you must register with Cisco. Using the ID token, the license agent on the router registers the product with Cisco and receives an identity certificate. This certificate is used for all future communications with Cisco. The license agent on the router automatically renews the registration information with Cisco every 30 days. You can refer to the following link for further information about registering XRv9k Router:
Problem: No Internet Access to Register XRv9k Router License
Due to security reason or corporate policy, you cannot connect the XRv9k or VM host to the Internet or even Cisco Cloud. Therefore the license agent on XRv9k Router cannot reach Cisco Software Central to register the product and renew it every 30 days. Therefore, you cannot enable production mode. Is there any other solution?
Solution
Depending on the requirements with respect to security, manageability, and operational mode of your network, you can deploy Smart Licensing in several ways:
- You can choose not to allow the XRv9K to connect directly with Cisco Cloud/Backend servers. In this case, you can use a proxy server on your premises and manage the firewall, traffic flow, and how the Smart Licensing application fits in the organization's security needs. This can be easily set up via Open Source Apache software that runs on Windows or Linux Operating Systems.
- You can want to have all your XRv9K devices connected to an aggregator host, which can receive all the local requests from all the XRv9K devices before you forward them to Cisco Backend Servers. This is a job for Transport Gateway software that runs on Linux and Windows and is available for download at Cisco Transport-Gateway download: Cisco Transport Gateway – Release and General Information
- You can want to operate totally offline with On-Premise software that runs on Linux and Windows and allows you to have only this On-Premise host to do the talking for licensing information exchange with the Cisco Cloud and in turn provide information to the end devices as to their state of compliance. This software can be available in Release 5.3.1 or later.
This discussion describes a scenario which includes Smart Software Manager Satellite as an On-Premise software to communicate with Cisco cloud and register the XRv9k Router in Production mode as well as renew the license.
Implementing Smart Software Manager Satellite
Smart Software Manager Satellite is a component of Cisco Smart Licensing. It works in conjunction with Cisco Smart Software Manager (SSM) to intelligently manage your product licenses. It is providing near real-time visibility and reporting of Cisco licenses that you purchase and consume. The image shows Smart Software Manager Satellite implementation:
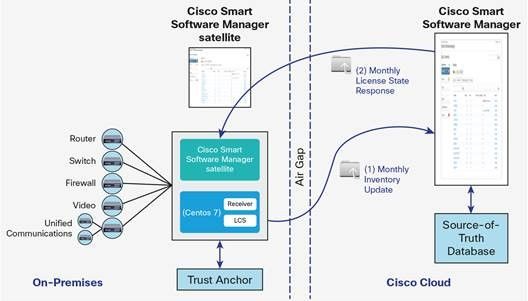
This image shows Smart Software Manager Satellite Deployment (Source: Cisco Smart Software Manager satellite Data Sheet)
If you decide to install the XRv9k Router totally, offline, without direct connection to the Internet, you can use Cisco Smart Software Manager Satellite to communicate with the Cisco cloud. You can implement this solution as per the topology shown in the image :

Install Smart Software Manager Satellite
Smart Software Manager Satellite is packaged as an Open Virtual Appliance (OVA) and requires these configurations:
- 50GB - 200GB hard disk
- 8 GB memory
- 4 vCPUs
Smart Software Manager Satellite supports these web browsers:
- Chrome 32.0 and later versions
- Firefox 25.0 and later versions
- Safari 6.0.5
When you open the OVA file, Smart Software Manager satellite extracts the VM and imports it into whatever virtualization software you have installed on your computer.
You must provide, install, and configure these external components before you install the OVA file:
- ESXi v5.x or higher host with sufficient OVA resources
- vSphere Client v5.x
To deploy and install the Smart Software Manager Satellite OVA, there is a document which guides you through the installation step by step:
Smart Software Manager satellite Installation Guide
Configure the IP Address on Smart Software Manager Satellite
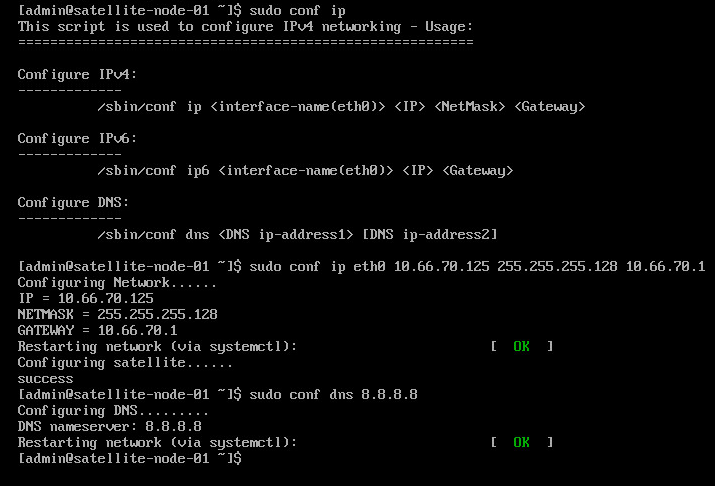
After you deploy the Satellite successfully, power it on and open the console of the Satellite on your vSphere client.
You are asked for default User name and Password:
- Default User: admin
- Default Password: Admin!23
You must configure IP address for the Satellite to have access to it via a Web browser.
- To configure IPv4: sudo conf ip <interface-name(eth0)> <IP> <NetMask> <Gateway>
- To configure DNS: sudo conf dns [DNS ip-address2]
This is an example:
Access to Smart Software Manager Satellite via Web Browser
After you configure IP address on Satellite via CLI then you can log in to it via a Web browser:
Step 1. Open the web browser and enter the address: http://<ip-address>:8080 or https://<ip-address>:8443
For example: https://10.66.70.125:8443
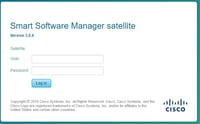
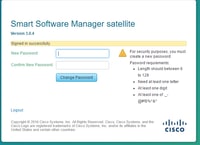
Step 2. The log in window as shown in the image appears. Log in to Satellite using default User and Password.
Step 3. As it is the first time, you are prompted to change the password. Enter your new password as shown in the image:
Then this is the procedure to continue Satellite configuration:
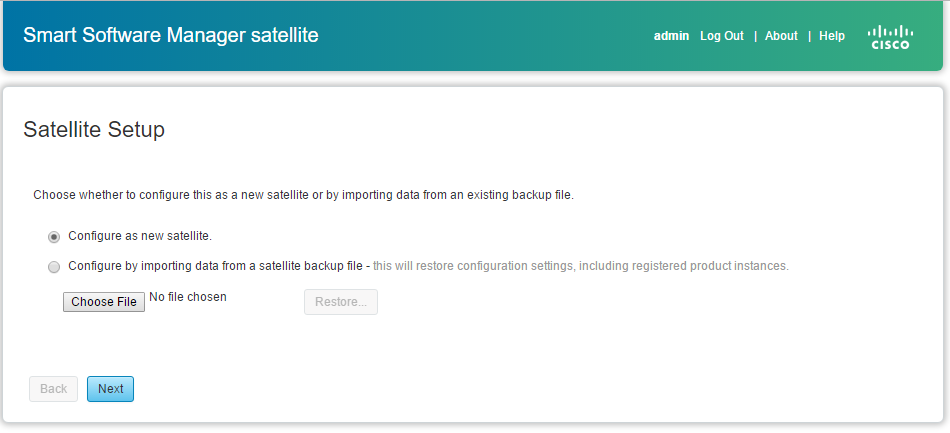
Step 1. To install new Satellite, check Configure as new Satellite, as shown in the image:
Step 2. The next window shows the initial configuration that you have done via CLI.
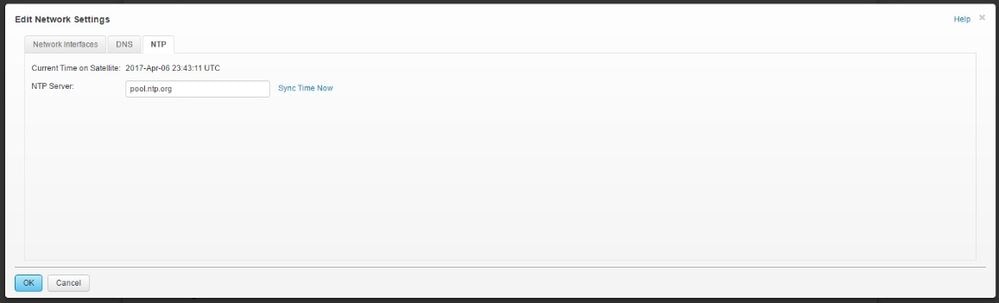
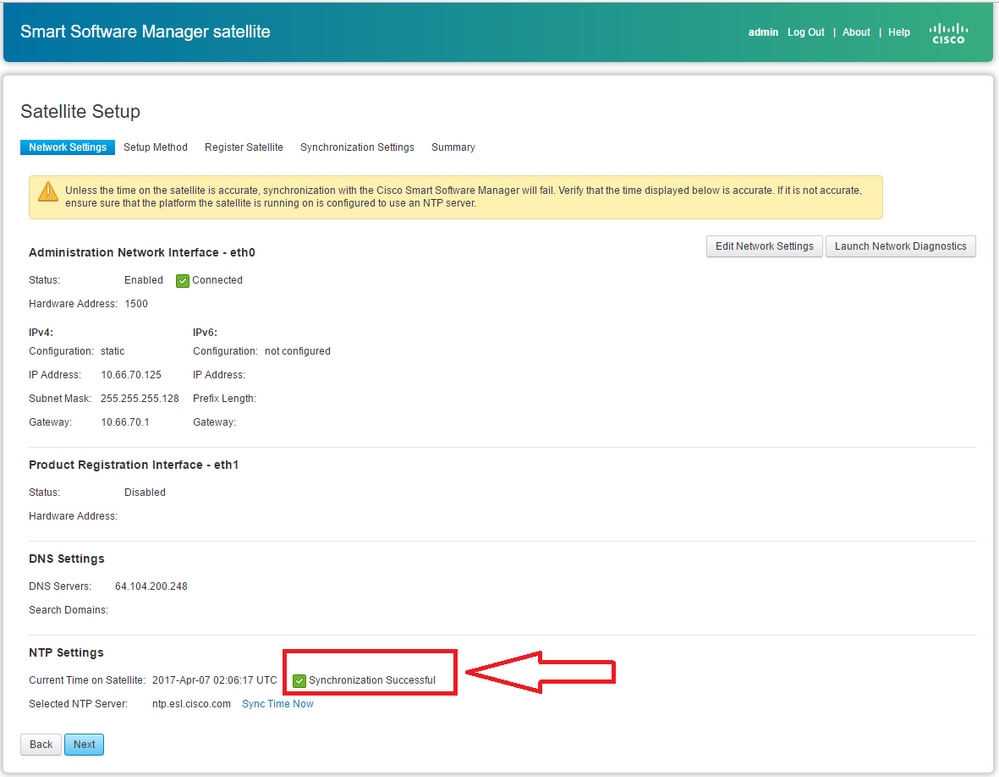
Step 3. Verify the clock setting and if it is not synchronized, you must edit the NTP Settings.
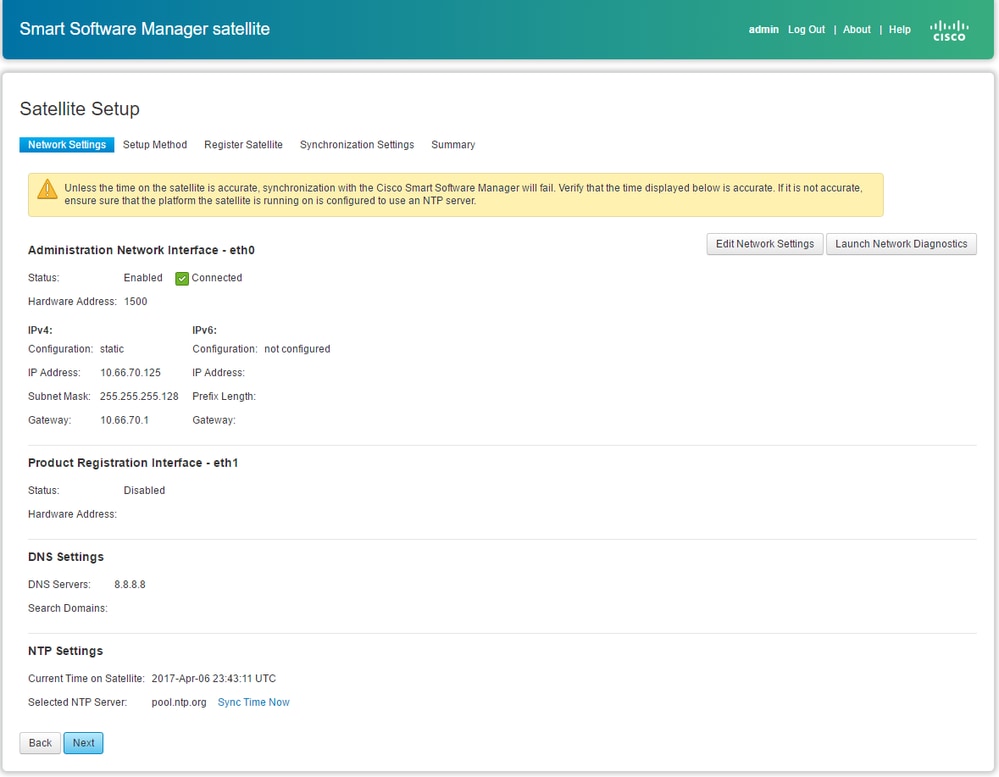
Step 4. Select Sync Time Now. You receive a successful message as shown image:
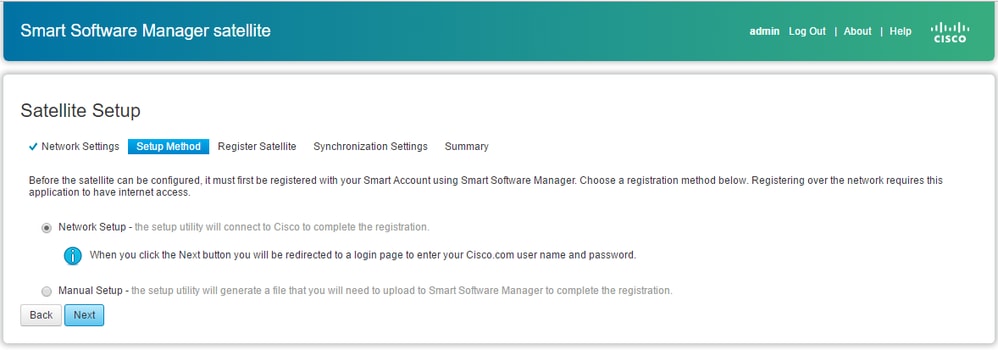
You can choose setup method:
- Network setup
- Manual setup
In this scenario, network Setup has been selected, as shown in the image:
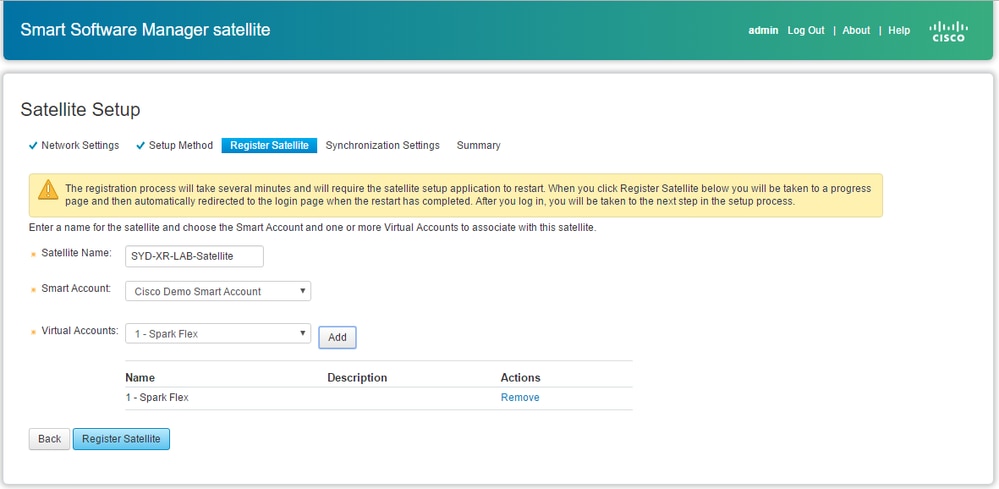
Smart Licensing requires products to be associated withSmart Accounts, which can be created onCisco Software Central. A Smart Account is associated with a unique company ID and is like an online banking account containing Cisco License Central and devices for that customer. From the Cisco Smart Software Manager, sub-accounts (also calledvirtual accounts) can be created to represent various sub-divisions or buying centers of the company.
Step 1. To register Satellite, you must select a name for Satellite, then enter Smart account and Virtual account information. Click Register Satellite to continue, as shown in the image:
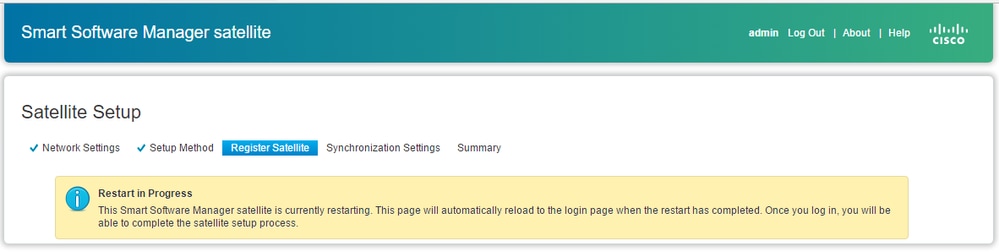
Step 2. Satellite restarts automatically after registration, then the log in prompt appears again, as shown in the image:
You can register the satellite using the online or offline method through the GUI. The online (network) option requires a network connection; you would use the offline (manual) when you are disconnected from the Cisco Smart Software Manager portal. After you complete the satellite registration process, you receive an immediate response, confirming the registration, from Cisco Smart Software Manager.
Step 1. As shown in the image, check Network synchronization, if you have internet access from Satellite.
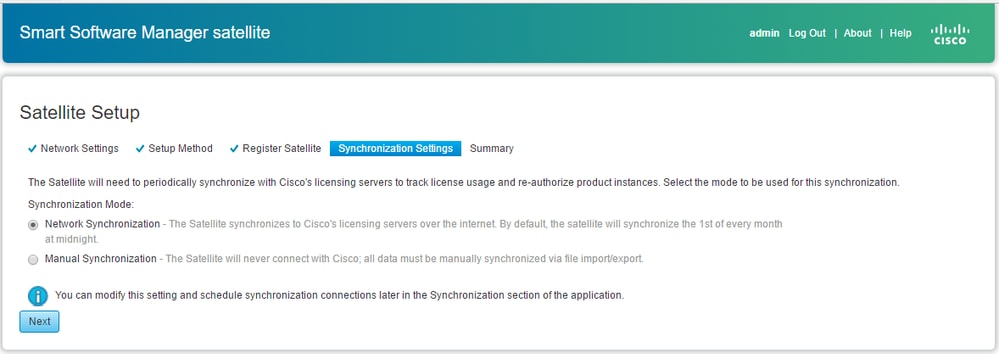
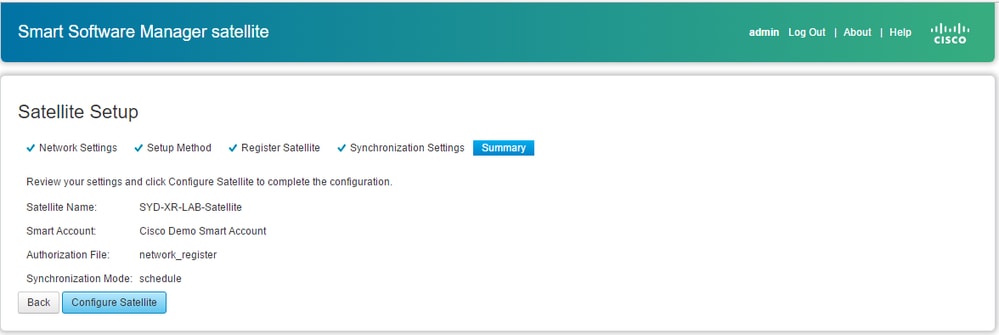
Step 2. As shown in the image, click Configure Satellite to be synchronized with Cisco Smart Software Manager.
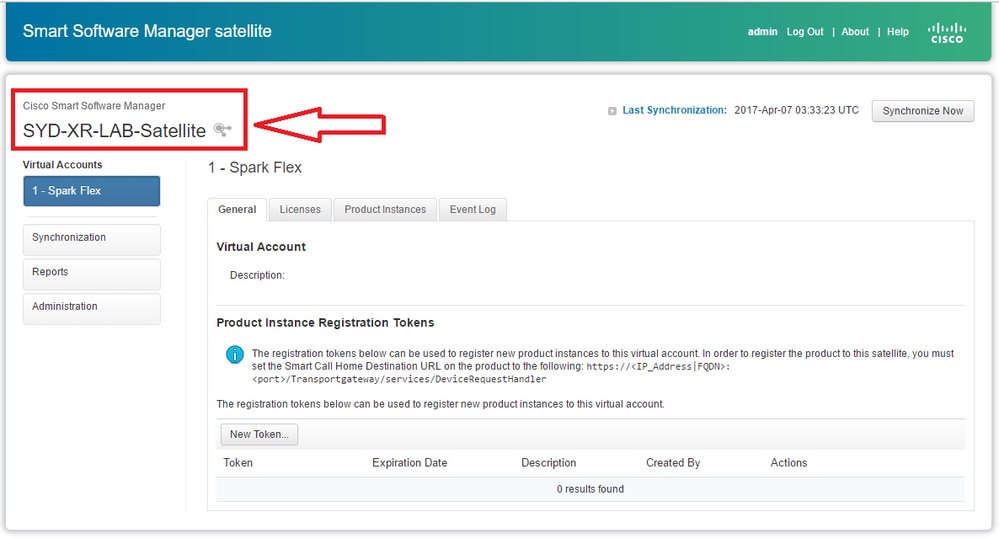
When Satellite is registered with Smart Software Manager (SSM), you can see the link icon in the main page, as shown in the image:
Verify on Cisco Smart Software Manager
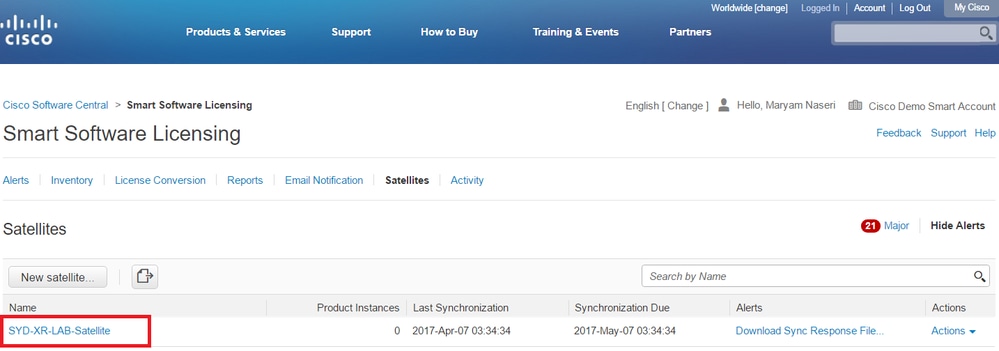
Step 1. Log in to your Smart account then click the Satellite tab. You can see the linked Satellite in the list, as shown in the image.
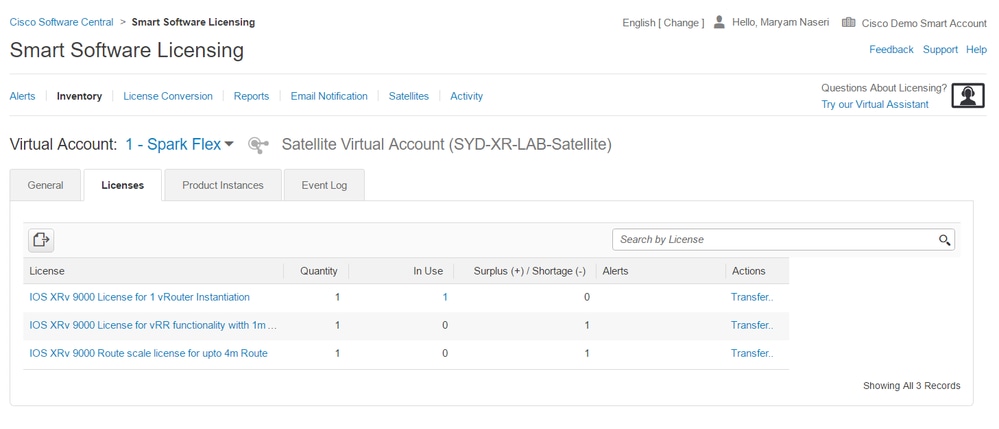
Step 2. When you order a license, you can see the available license for specific smart account and virtual account in Inventory > License as shown in the image:
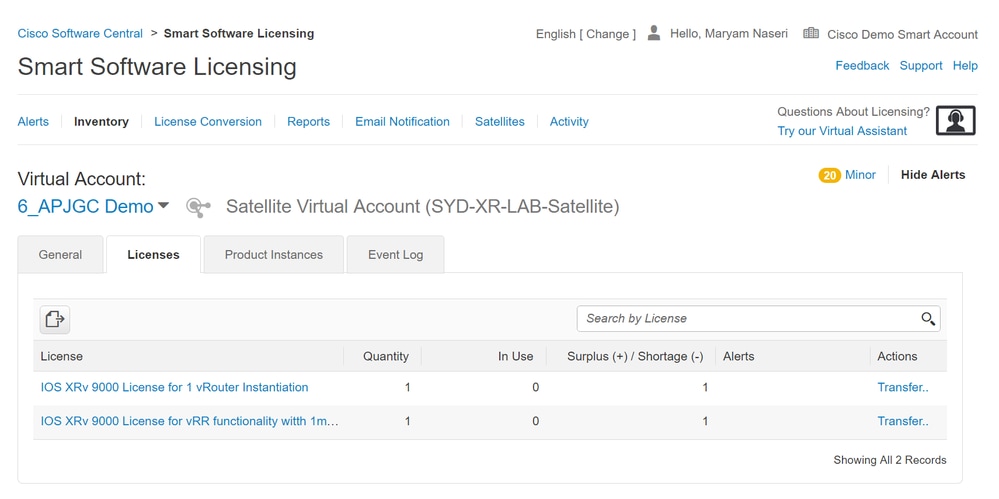
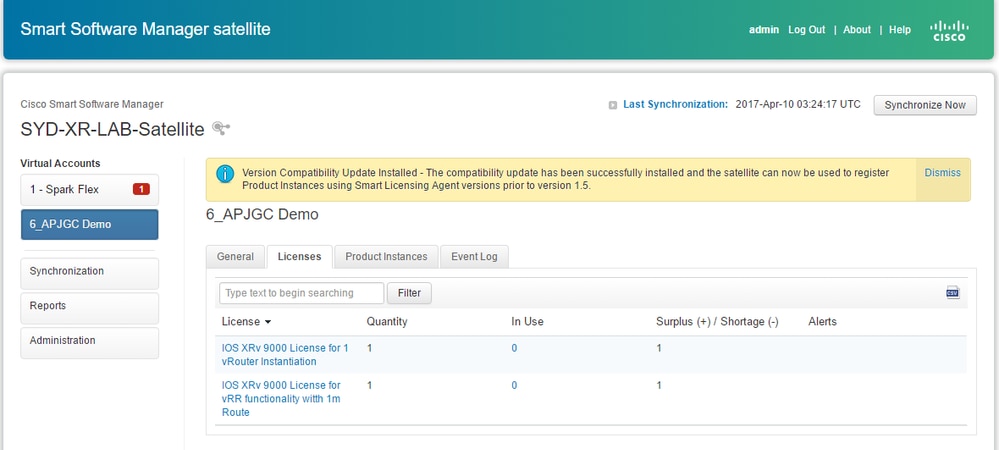
Step 3. After Satellite synchronization, the license is available at Satellite Licenses tab, as shown in the image:
Create Registration Token at Satellite
In the general tab of the Satellite, click the New Token. then enter a description of the token in the Create Registration Token dialog box.
Step 1. Enter the # of days you want the token to be valid for.
Step 2. Click Create Token button, as shown in the image.
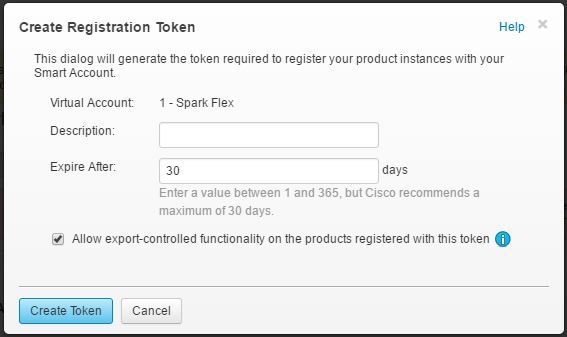
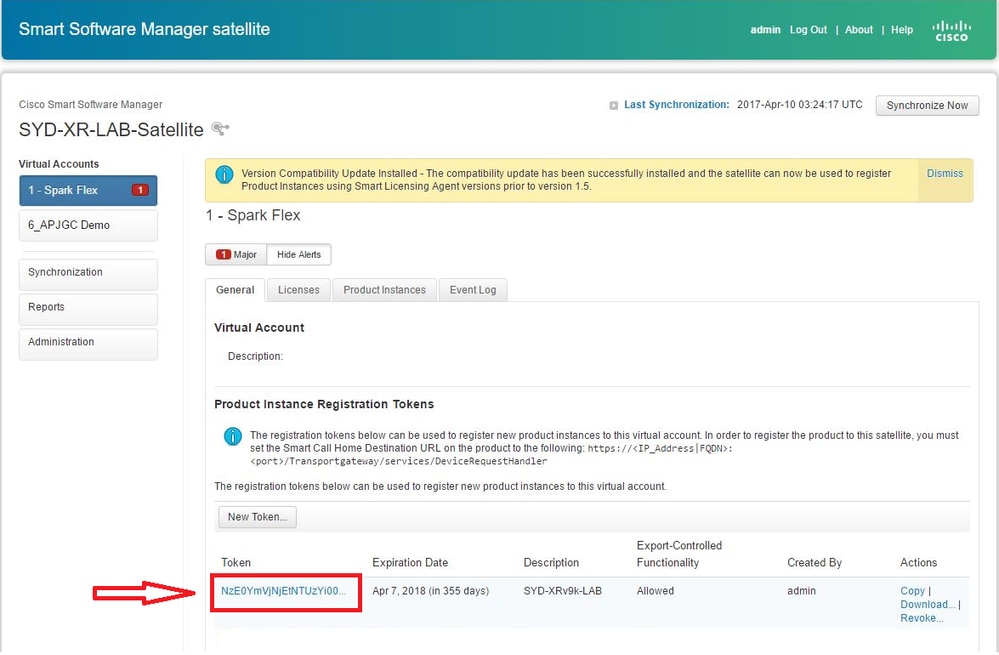
Step 3. You can see the generated Token in the list which is needed for XRv9k configuration.
XRv9k Router Configuration
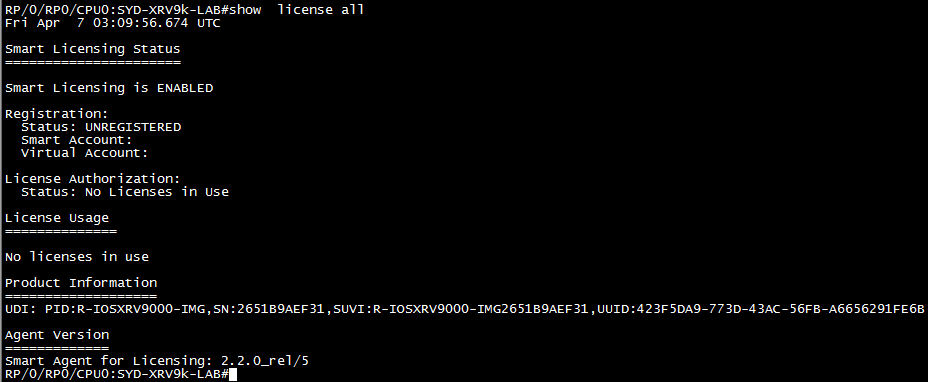
This default configuration is already available in XRv9k as shown in the image:

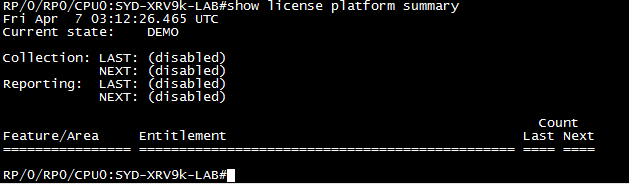
If you check the license, you can see Smart Licensing is enabled by default. However, it is not registered. Therefore XRv9k state is also in DEMO state:
Configuring Connectivity between XRv9k and Satellite
Configure required route to have connectivity between Satellite and XRv9k.
You can configure static route to satellite as this:
RP/0/RP0/CPU0:XRv9000(config)#router static
RP/0/RP0/CPU0:XRv9000(config-static)# address-family ipv4 unicast
RP/0/RP0/CPU0:XRv9000(config-static-afi)#  10.66.70.0/25 MgmtEth0/RP0/CPU0/0 1
RP/0/RP0/CPU0:XRv9000(config-static-afi)#commit
Ping Satellite IP address to ensure about the connectivity.
Configuring Call-home Profile to Use Smart Software Manager Satellite on the XRv9k
You must add the destination address which points to Satellite as this:
RP/0/RP0/CPU0:XRv9000(config)#call-home
RP/0/RP0/CPU0:XRv9000(config-call-home)# service active
RP/0/RP0/CPU0:XRv9000(config-call-home)# profile CiscoTAC-1
RP/0/RP0/CPU0:XRv9000(config-call-home-profile)#  active
RP/0/RP0/CPU0:XRv9000(config-call-home-profile)# destination address http http://10.66.70.125:80/Transportgateway/services/DeviceRequestHandler    << ==========
RP/0/RP0/CPU0:XRv9000(config-call-home-profile)#  destination transport-method http
RP/0/RP0/CPU0:XRv9000(config-call-home-profile)#  no destination address http https://tools.cisco.com/its/service/oddce/services/DDCEService   << =======
RP/0/RP0/CPU0:XRv9000(config-call-home-profile)#commit
Registration of XRv9k with Cisco Smart Software Manager Satellite
Register the XRv9000 with CSSM Satellite with the token ID generated at CSSM Satellite.
Example:
RP/0/RP0/CPU0:XRv9000#license smart register idtoken ZTZlMDE5ODgtOTIzZC00MDd

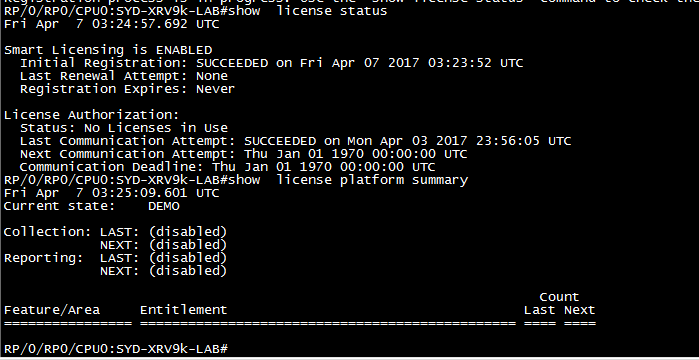
Step 1.You can see initial registration is successful. It can take time to find the license.
Step 2. You can log in to the Satellite and synchronise it manually. Then, you see the status is changed to Registered, as shown in the image:
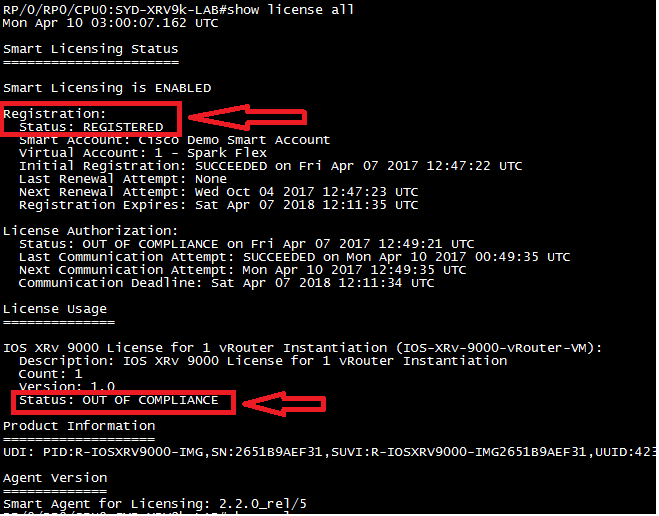
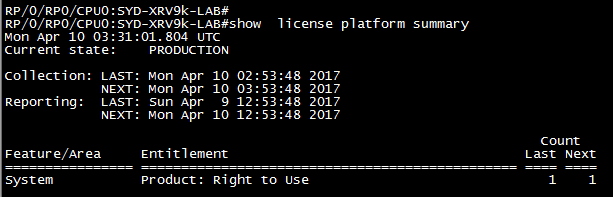
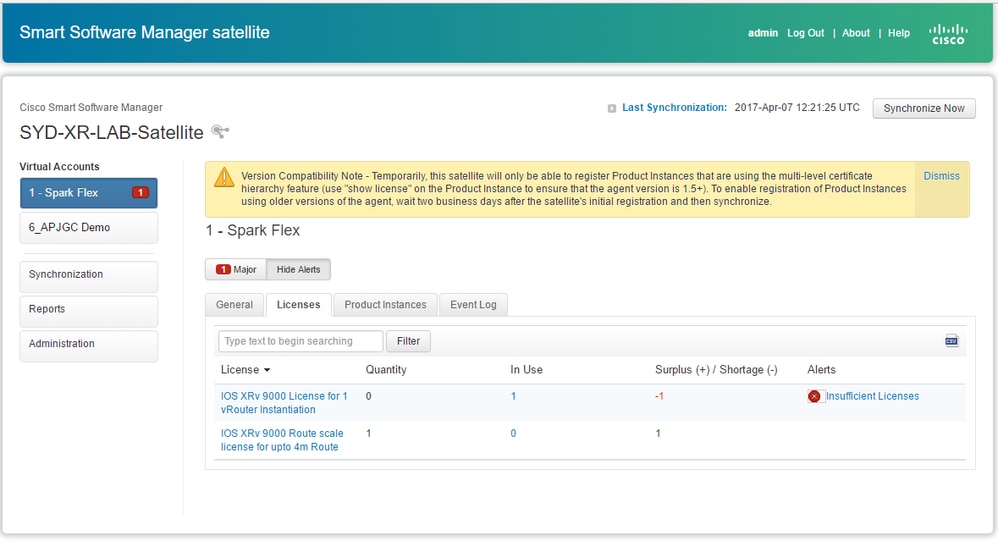
Step 3. If the required licence is not in your Smart account or your defined virtual account, the status of the license usage shows Out Of Compliance. However, the current state is changed to PRODUCTION, as shown in the image:
Step 4. The Smart Software Manager Satellite also shows the major alarm as "Insufficient Licenses" and shortage of one license (-1).
Transfer Required License to the Related Virtual Account
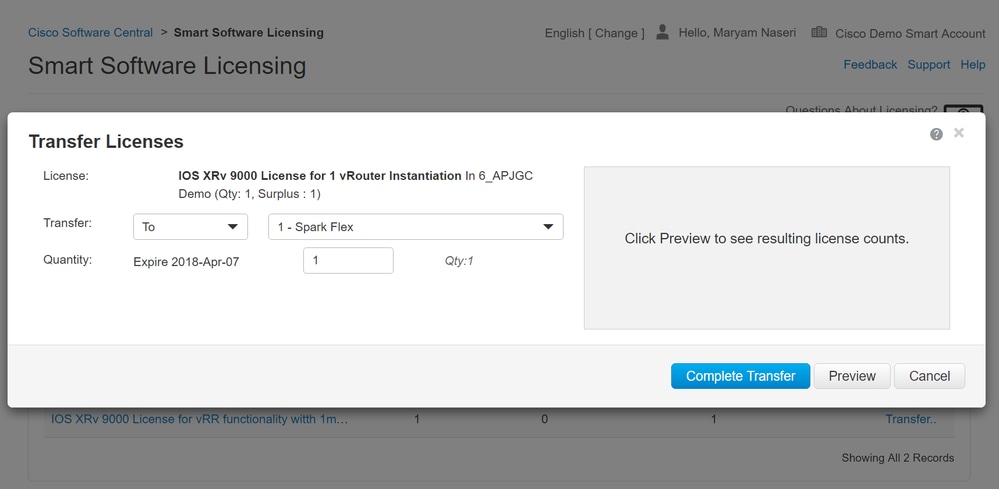
You must transfer the required license to the related smart account and virtual account to be able to use it.
Step 1. In case you ordered a license and it is in a different virtual account, you can lo gin to your Smart Software Licensing account and transfer it to the virtual account where you have generated token for XRV9k router and then click Transfer, as shown in the image:

Step 2. Enter the information about correct virtual account and the quantity of the license, then click Complete Transfer, as shown in the image.
Step 3. When License is transferred, you can manually synchronize the Satellite and the Major alarm is cleared.
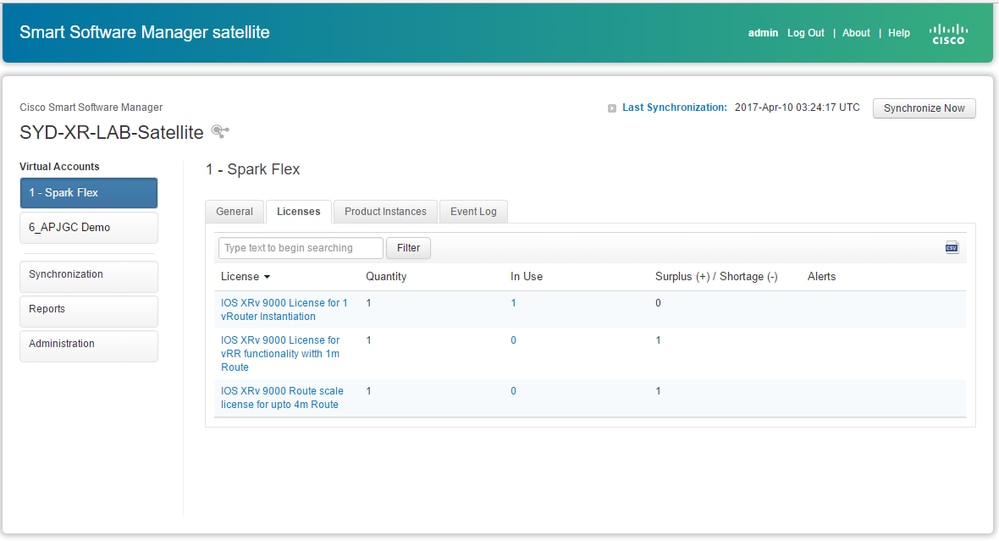
Step 4. You can also verify on the Smart Software Licensing and ensure the number of In-use licenses.
Verify the License Status in XRv9k
You can verify the license status of the XRv9k router by using these commands:
RP/0/RP0/CPU0:SYD-XRV9k-LAB#show  license all
RP/0/RP0/CPU0:SYD-XRV9k-LAB#show license platform summary
The status of the license is changed to Authorized after communicating with Satellite and finding required license.
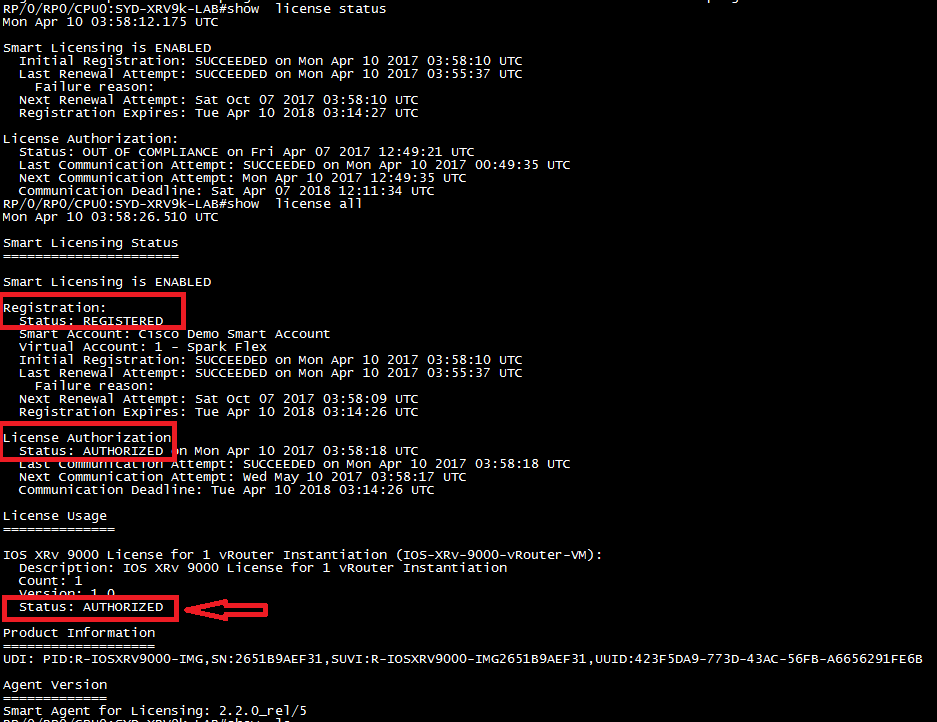
Your XRv9k Router is using the license and the Satellite synchronizes itself with Smart software account.
Related Information
- You can refer to this link for more information about provisioning the VM:
Cisco IOS XRv 9000 Router Installation and Configuration Guide-Chapter: Preparing for Installation
- You can refer to this link for more information about system requirements for XRv 9000 release 6.0.0:
- You can refer to this link to get more information about Cisco IOS XRv 9000 Router Installation and Configuration Guide:
- You can refer to this link for further information:
- You can refer to these links for further information:
Smart Account Manager Satellite
Cisco Smart Software Manager Satellite Data Sheet
Revision History
| Revision | Publish Date | Comments |
|---|---|---|
2.0 |
05-Jun-2026
|
Updated Title, Introduction, SEO, Alt Text, Legal Disclaimer, Style Requirements, and Formatting. |
1.0 |
07-May-2017
|
Initial Release |
 Feedback
Contact Cisco
- Open a Support Case

- (Requires a Cisco Service Contract)