Configure Smart Licensing Using Policy on IOS XE Routers
Available Languages
Contents
Introduction
This document describes the steps required for configuring and registering a Cisco IOS® XE router with Smart Licensing with the Policy feature.
Prerequisites
Requirements
Cisco recommends that you have knowledge of these topics:
- Smart Licensing Using Policy registration
- Smart Licensing Using Policy transport methods
Components Used
The information in this document is based on these software versions:
- Cisco Smart License Utility version 1.0.0-2 installed on Windows Personal Computer (PC) with Smart Account and Virtual Account configured.
- On Integrated Services Routers (ISR4000), Aggregation Services Routers (ASR1000), Catalyst 8300, 8500 and 9000: Cisco IOS XE 17.3.2 (if available for the platform)
- On Catalyst 8200 and ISR1100: Cisco IOS XE 17.4.1
- Cloud Services Router (CSR) and ISR virtual require an upgrade to Catalyst 8000v and Cisco IOS XE 17.4.1.
- Legacy Cisco License Central portal. The new portal view has a similar distribution.
The information in this document was created from the devices in a specific lab environment. All of the devices used in this document started with a cleared (default) configuration. If your network is live, ensure that you understand the potential impact of any command.
Configure
This document describes the four available topologies and configurations required when you use Smart Licensing Using Policy. These options depend on how the router is connected to the network and sync licensing information with Cisco Licensing backend.
- Router connected to Cisco License Central through Cisco Smart License Utility (CSLU).
- Router directly connected to Cisco License Central.
- Router connected to CSLU and CSLU disconnected from Cisco License Central.
- Router not connected to the Cisco License Central and without CSLU in place.
Router Connected to Cisco License Central Through CSLU
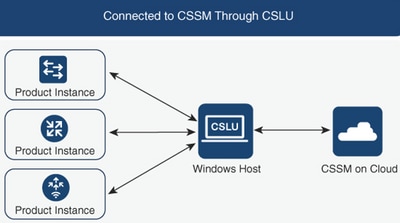
On this topology, the product instances in the network are connected to Cisco License Central through CSLU. CSLU becomes the single point of communication with Cisco License Central.
In this section, it is explained Pull and Push methods and their respective configuration.
Network Diagram
Push Method Configuration
On this method, the product instance initiates the communication with CSLU, by a connection to a Representational State Transfer (REST) endpoint in CSLU.
The data that is sent includes Real User Monitoring (RUM) reports and requests for authorization codes, trust codes and policies.
Configuration Steps
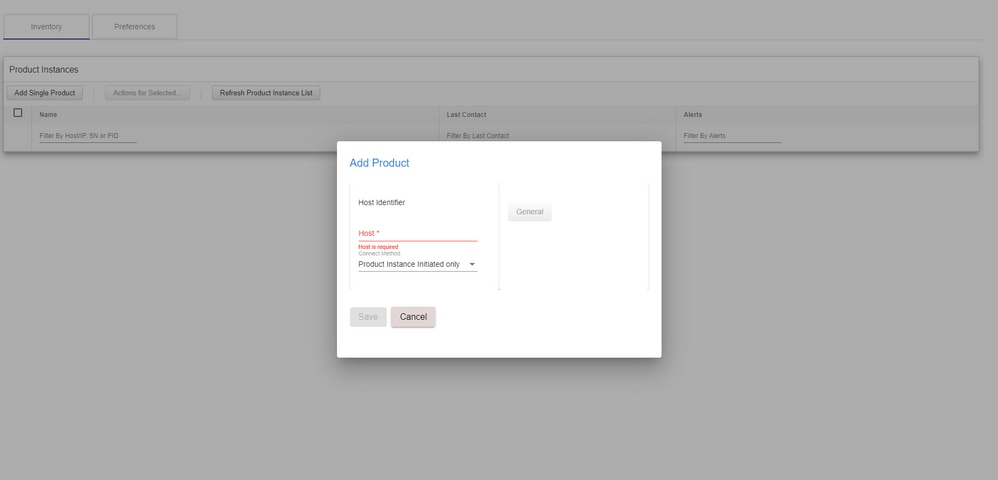
Step 1. Log in to CSLU Interface and choose Add Single Product.
Step 2. Choose Product Instance Initiated only, and define the IP address of the product instance to be registered.
Step 3. On the router, configure the transport method to cslu.
Device(config)# license smart transport cslu
Step 4. Enter the CSLU URL with the CSLU IP address.
Device(config)# license smart url cslu http://<cslu-ip>:8182/cslu/v1/pi
Step 5. Configure the interface by which the HTTP message is sent.
5.1. Configure the interface by which the HTTP message is sent with this command:
Device(config)# ip http client source-interface interface-type-number
5.2. If a VRF is used to reach CSLU, and instead of an IP address it is used cslu-local to resolve, it is needed to add the hostname resolution for cslu-local with this command:
Device(config)# ip host vrf Name_VRF cslu-local cslu-ip-address
Step 6. Initiate the communication and report of usage. Verify logs for correct policy installation.
Device# license smart sync

*Apr 14 12:08:06.235: %SMART_LIC-6-POLICY_INSTALL_SUCCESS: A new licensing policy was successfully installed
Pull Method Configuration
On this method, CSLU initiates the communication with the product instance in order to retrieve its information. CSLU uses Network Configuration Protocol (NETCONF), Representational State Transfer Configuration Protocol (RESTCONF), google Remote Procedure Calls (gRPC) with Yet Another Next Generation (YANG) models, or REST Application Programming Interfaces (APIs) to connect to the product instances.
Configuration Steps
Step 1. On the router, configure your preferred method of connectivity (NETCONF, RESTCONF, or REST API).
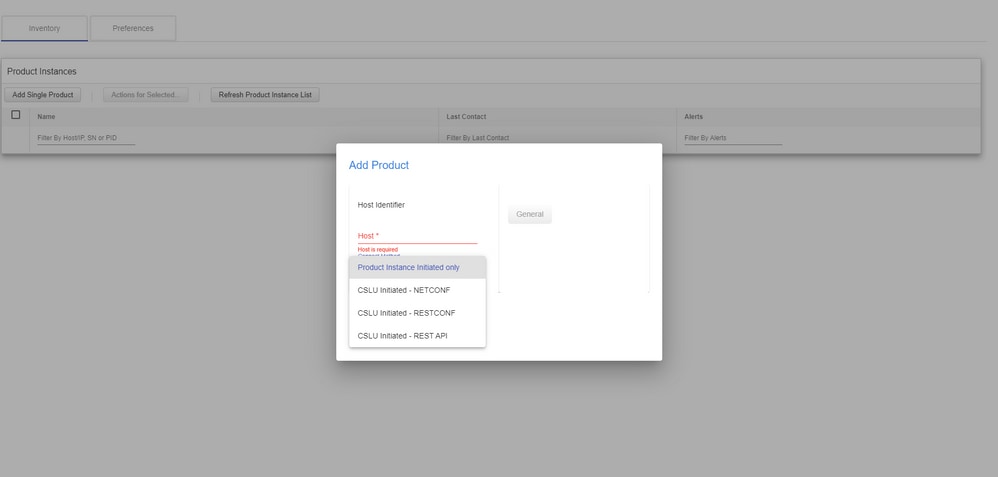
Step 2. Log in to CSLU Interface and choose Add Single Product.
Step 3. Choose any of the CSLU Initiated options related to the desired connection method (NETCONF, RESTCONF, or REST API), and define the IP address of the product instance to be registered.
Step 4. Choose from the list of Product Instances, the device to be registered, and navigate to Actions for Selected and Collect Usage.
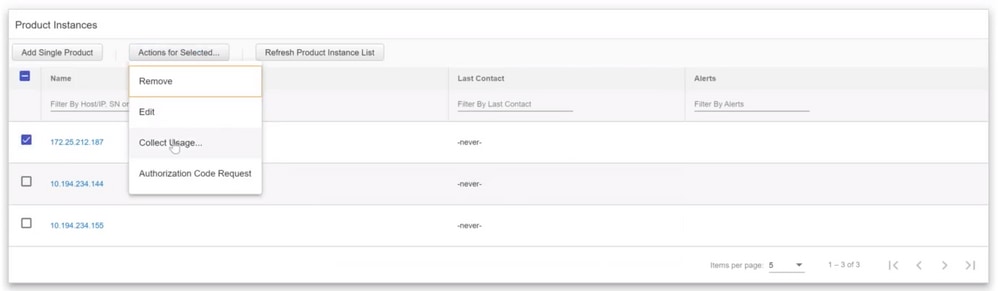
Step 5. Verify the completion of the collection of license usage under that product instance.
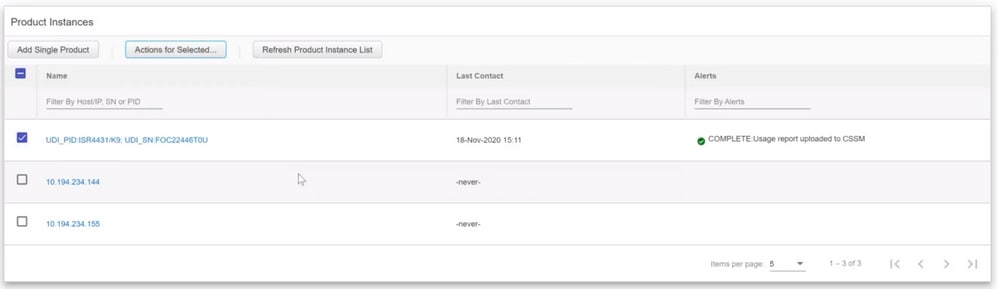
Step 6. On the registered device, it is expected to see a licensing policy installation successful log.
*Nov 18 23:22:12.929: %SMART_LIC-6-POLICY_INSTALL_SUCCESS: A new licensing policy was successfully installed
Router Directly Connected to Cisco License Central
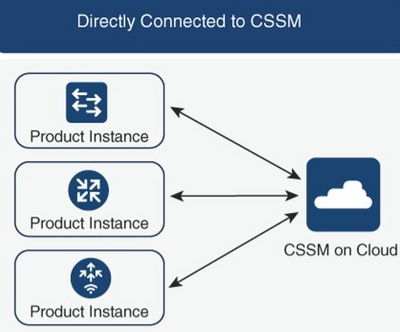
On this topology, it is established a direct and trusted connection from a product instance to Cisco License Central, and there are 2 possible transport methods:
- Smart Transport Method. A Smart Licensing JavaScript Object Notation (JSON) message is contained within a HyperText Transfer Protocol (HTTP) message and exchanged between a product instance and the Cisco License Central.
- Call-home Transport Method. Call-home provides e-mail-based and web-based notification of critical system events. Call-home support is limited and must not be used in newer Cisco IOS® XE versions as it is expected to be decommissioned in the near future.
Network Diagram
Smart Transport Method Configuration
Configuration Steps
Step 1. Configure the interface by which the HTTP message is sent.
Device(config)# ip http client source-interface interface-type-number
Step 2. Define smart transport method, as the desired license transport method.
Device(config)# license smart transport smart
Step 3. Set the license smart Uniform Resource Locator (URL) as default.
3.1. In order to set license smart URL as default, use this command:
Device(config)# license smart url default
3.2. If you use a proxy to reach Cisco License Central, you need to add the proxy for smart:
Device(config)# license smart proxy X.X.X.X port XXXX
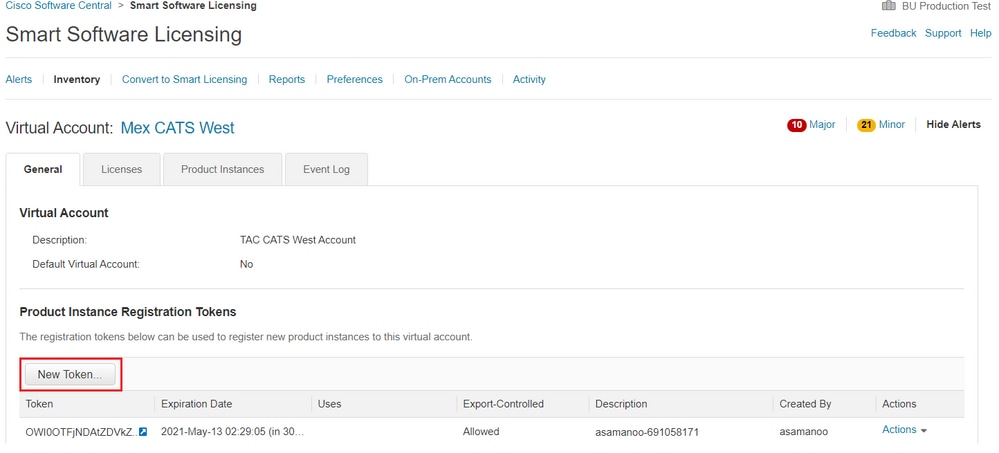
Step 4. Generate a new token from Cisco License Central under your Smart Account and Virtual Account and copy the generated token.
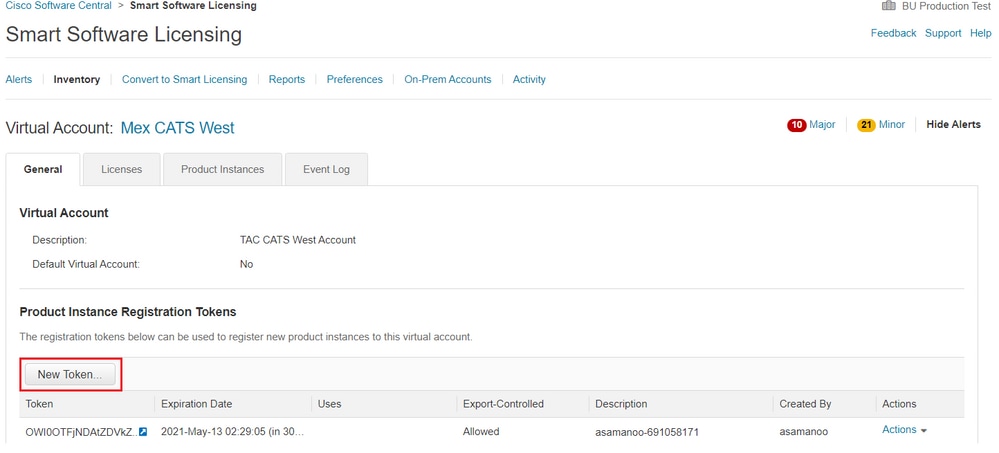
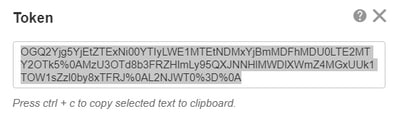
Step 5. Register the device with the token generated.
Device# license smart trust idtoken id_token_value {local| all} [force]
Step 6. Verify in show license status command the correct installation. At the end of the output, on Trust Code Installed section, it must be updated with the registration date.
Device# show license status
Transport:
  Type: Smart
  URL: https://smartreceiver.cisco.com/licservice/license
  Proxy:
    Not Configured
<snippet>
Trust Code Installed: Feb 10 20:56:02 2021 UTC
<snippet>
Call-Home Transport Method Configuration
Configuration Steps
Step 1. Configure the interface by which the HTTP message is sent.
Device(config)# ip http client source-interface interface-type-number
Step 2. Define call-home transport method, as the desired license transport method.
Device(config)# license smart transport callhome
Step 3. Modify the license smart URL.
3.1. In order to set license smart URL, use this command:
Device(config)# license smart url https://tools.cisco.com/its/service/oddce/services/DDCEService
3.2. If you use Virtual Routing and Forwarding (VRF) you must specify the source interface used by the VRF on call-home in addition to the VRF used:
Device(config)# call-home
Device(cfg-call-home)# source-interface interface-type-number
Device(cfg-call-home)# vrf Name_of_VRF
3.3. If you use a proxy to reach Cisco License Central, you need to add the proxy to the call-home configuration, with the interface used to reach the proxy:
Device(config)# call-home
Device(cfg-call-home)# source-interface interface-type-number
Device(cfg-call-home)# http-proxy "X.X.X.X" port XXXX
Step 4. Generate a new token from Cisco License Central under your Smart Account and Virtual Account, and copy the generated token.
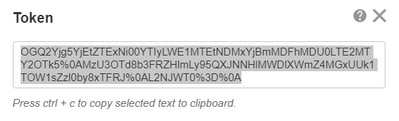
Step 5. Register the device with the token generated.
Device# license smart trust idtoken id_token_value {local| all} [force]
Step 6. Verify in show license status command, the correct installation. At the end of the output, on Trust Code Installed section, it must be updated with the registration date.
Device# show license status
Transport:
  Type: Callhome
  URL: https://tools.cisco.com/its/service/oddce/services/DDCEService
  Proxy:
    Not Configured
<snippet>
Trust Code Installed: Feb 10 20:56:02 2021 UTC
<snippet>
Router Connected to CSLU and CSLU Disconnected from Cisco License Central
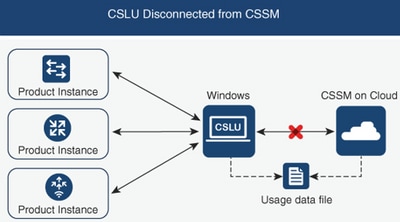
The communication between the CSLU and Cisco License Central is sent and received in the form of signed files that are saved offline and then uploaded to or downloaded from the CSLU or Cisco License Central.
On this topology, CSLU provides you the option to work disconnected from the Cisco License Central.
Network Diagram
Configuration Steps
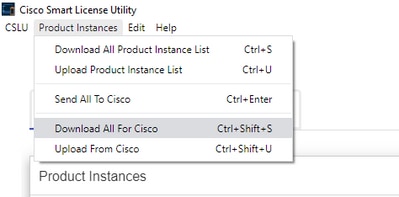
Step 1. On the CSLU navigate to Product Instances and choose Download All For Cisco.
Step 2. On the Cisco License Central, navigate to Reports and choose Usage Data Files.
Step 3. Upload the file downloaded from the CSLU.
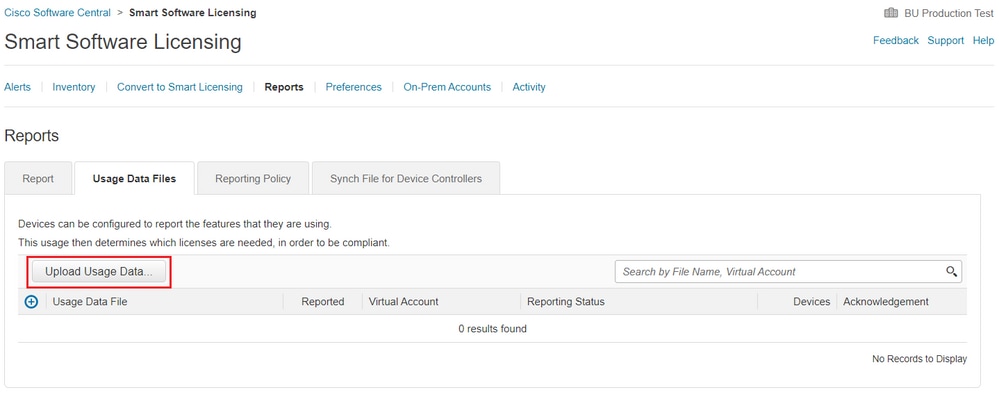
Step 4. Download the Acknowledge file generated. It is presented on the Usage Data Files list.
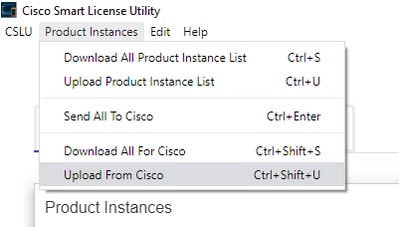
Step 5. On the CSLU, navigate to Product Instances and choose Upload from Cisco. Upload the Acknowledge file downloaded from Cisco License Central.
Router not Connected to the Cisco License Central and Without CSLU in Place
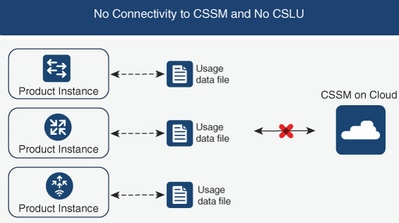
On this topology, you have a product instance that is disconnected from Cisco License Central, and without any other intermediary utilities or components. All communication is in the form of uploaded and downloaded files.
Network Diagram
Configuration Steps
Step 1. Configure on the instance, the smart-off license transport method and save the configuration.
Device(config)# license smart transport off
Device(config)# exit
Device# copy running-config startup-config
Step 2. Save the usage of licenses on a text file inside of the bootflash and extract it out of the router.
Device# license smart save usage all file bootflash:all_rum.txt
Device# copy bootflash:all_rum.txt tftp://X.X.X.X/all_rum.txt
Step 3. On the Cisco License Central, navigate to Reports, choose Usage Data Files, and upload the usage data file created by the router.
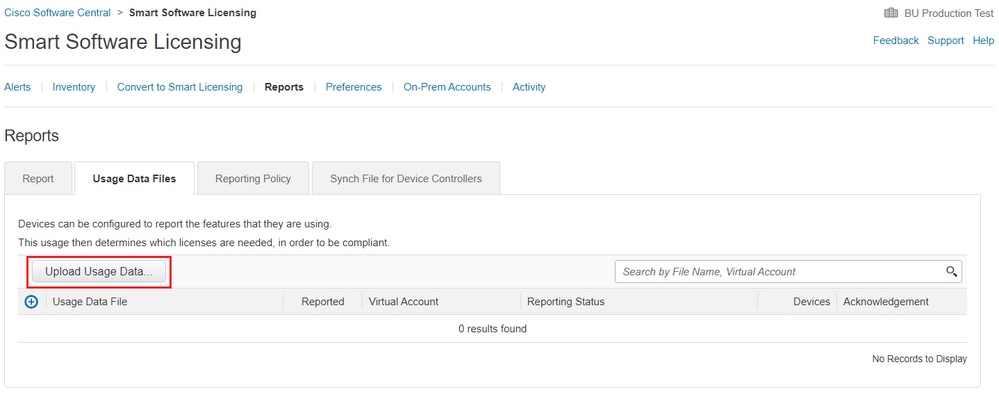
Step 4. Download the Acknowledge file generated, and transfer it to the device.
Step 5. On the router, import the file and verify the correct installation.
Device# license smart import bootflash:ack_usage.txt
Import Data Successful

*Apr 14 12:08:06.235: %SMART_LIC-6-POLICY_INSTALL_SUCCESS: A new licensing policy was successfully installed
Verify
Use this section to confirm that your configuration works properly.
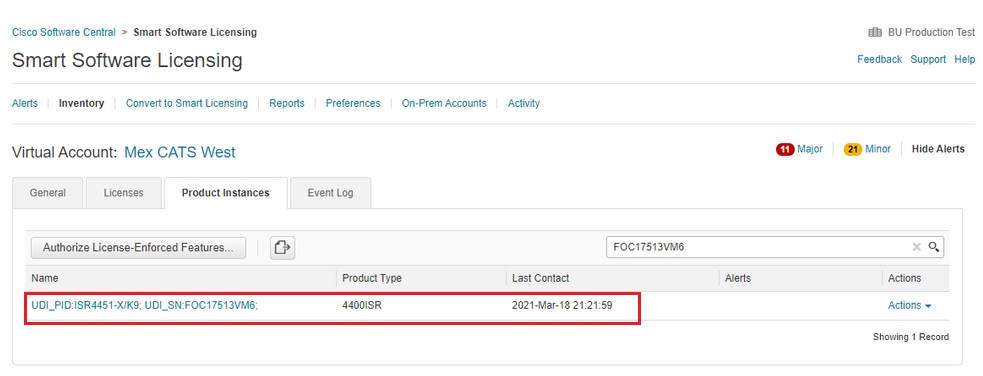
On all of the topologies, you can verify the registered product instances on Cisco License Central. The next options are suggested steps in order to confirm the successful registration of the device.
Step 1. Navigate to Product Instances and in the search box, type the Serial Number of the registered device. You must see the device with its UDI as the name of the instance.
Device# show license udi
UDI: PID:ISR4451-X/K9,SN:FOC17513VM6
Step 2. Verify the correct status of license installation with show license status.
Device# show license status

Smart Licensing Using Policy:
Status: ENABLED

<snippet>

Policy:
Policy in use: Installed On Mar 18 21:20:38 2021 UTC
Policy name: SLE Policy
Reporting ACK required: yes (Customer Policy)
Unenforced/Non-Export Perpetual Attributes:
First report requirement (days): 30 (Customer Policy)
Reporting frequency (days): 60 (Customer Policy)
Report on change (days): 60 (Customer Policy)
Unenforced/Non-Export Subscription Attributes:
First report requirement (days): 120 (Customer Policy)
Reporting frequency (days): 150 (Customer Policy)
Report on change (days): 120 (Customer Policy)
Enforced (Perpetual/Subscription) License Attributes:
First report requirement (days): 0 (CISCO default)
Reporting frequency (days): 90 (Customer Policy)
Report on change (days): 60 (Customer Policy)
Export (Perpetual/Subscription) License Attributes:
First report requirement (days): 0 (CISCO default)
Reporting frequency (days): 30 (Customer Policy)
Report on change (days): 30 (Customer Policy)

Miscellaneous:
Custom Id: <empty>

Usage Reporting:
Last ACK received: Mar 18 21:20:38 2021 UTC
Next ACK deadline: May 17 21:20:38 2021 UTC
Reporting push interval: 30 days
Next ACK push check: Feb 23 20:24:13 2021 UTC
Next report push: Mar 30 15:45:55 2021 UTC
Last report push: Mar 18 21:16:38 2021 UTC
Last report file write: <none>

<snippet>
Troubleshoot
This section provides information you can use to troubleshoot your configuration.
1. Ensure the correct DNS resolution with CSLU (Connected to Cisco License Central through CSLU topology), smartreceiver.cisco.com and tools.cisco.com (Connected Directly to Cisco License Central topology).
Device# nslookup cslu-local
Device# nslookup smartreceiver.cisco.com
Device# nslookup tools.cisco.com
2. Ensure the correct connectivity with CSLU (Connected to Cisco License Central through CSLU topology), smartreceiver.cisco.com and tools.cisco.com (Connected Directly to Cisco License Central topology).
Device# ping cslu-local
Device# ping smartreceiver.cisco.com
Device# ping tools.cisco.com
3. Check that port 443 is open to the Cisco License Central with Connected Directly to Cisco License Central topology.
Device# telnet smartreceiver.cisco.com 443

or

Device# telnet tools.cisco.com 443
4. Use available debugs to verify logs generated on the registration and installation process, and to have further information.
Device# debug license ?
  agent    License agent information
  core     License Core
  errors   License warnings and errors
  events   License Events
  feature  License feature
  ipc      License IPC communication
Related Information
- Enable License Boot Level And Addon On Catalyst 8000V Edge Software
- Technical Support & Documentation - Cisco Systems
Revision History
| Revision | Publish Date | Comments |
|---|---|---|
6.0 |
01-Jul-2026
|
Update information for Call-home transport method. |
5.0 |
28-May-2026
|
Replace references to "Cisco Smart Software Manager (SSM)" with "Cisco License Central." |
4.0 |
07-Apr-2025
|
Recertification - Updated Formatting |
3.0 |
14-Dec-2023
|
Updated branding requirements and formatting. |
2.0 |
18-Nov-2022
|
Updated machine translation, style requirements, SEO and formatting.
Added Alt Text. |
1.0 |
15-Apr-2021
|
Initial Release |

 Feedback
Contact Cisco
- Open a Support Case

- (Requires a Cisco Service Contract)