
Introduction
Cisco IQ™ provides customers with enhancements and features designed to improve asset visibility, deliver smarter insights across their environments, and streamline case management. In addition, AI features such as the Cisco IQ AI Assistant optimizes operational outcomes and the Cisco IQ user experience by providing contextual understanding that empowers users to make proactive, informed decisions and streamlines processes for customer engagement and success.
This document provides information about getting started with Cisco IQ and its applications. For more information, see the Cisco IQ Release Notes or Cisco IQ Frequently Asked Questions documents.
Onboarding
Prerequisites
Ensure that the following prerequisites are met before using Cisco IQ.
Supported Browsers
Cisco IQ is supported on the latest stable releases of the following browsers:
-
Google Chrome
-
Microsoft Edge
-
Apple Safari
-
Mozilla Firefox
Cisco Account
To access Cisco IQ, you must have a Cisco.com account. See Login and Account Help for more information about Cisco accounts.
Account Creation
Creating a New Cisco IQ Account
To create a new Cisco IQ account:
-
Navigate to Cisco IQ. The Cisco Log in page displays.
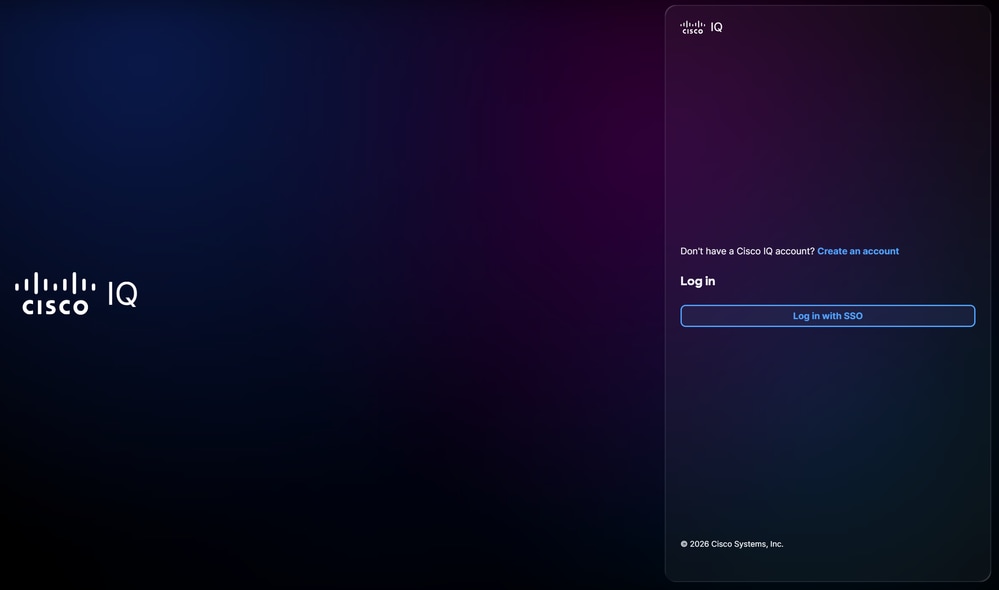 Cisco IQ Log in
-
Click Create an account.
- Enter your Cisco Connection Online (CCO) ID credentials into the Email field.
- Click Next.
- Enter your Password.
-
Click Verify. The Create a Cisco IQ Account page displays.
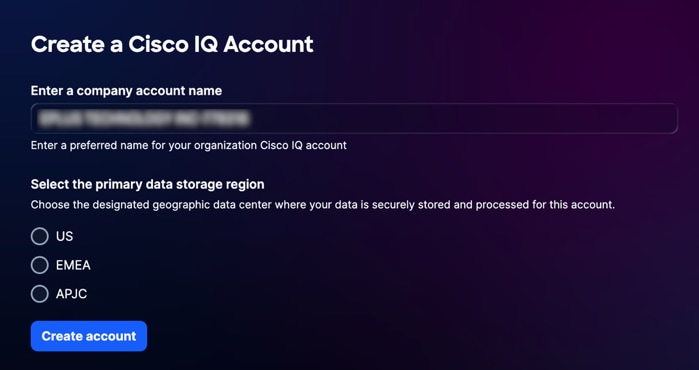 Create a Cisco IQ Account
-
Enter the unique name you want to use for your organization’s Cisco IQ account in the Enter a company account name field.
-
Select the primary data storage region.
-
Click Create account. You are redirected to the Cisco IQ Launchpad.
Migrating CX Cloud Accounts to Cisco IQ
If you have an existing CX Cloud account, you can migrate existing CX Cloud data to Cisco IQ. The following data is automatically migrated from the existing CX Cloud account:
-
Users and user groups (excludes partner users and groups)
-
Contracts
-
Cloud data source addition for Intersight, Webex, Software-Defined Wide Area Network (SD-WAN), and Meraki
To migrate an existing CX Cloud account:
-
Navigate to Cisco IQ. The Cisco Log in page displays.
-
Click Create an account.
- Enter your Cisco Connection Online (CCO) ID credentials into the Email field.
- Click Next.
- Enter your Password.
-
Click Verify. The Create a Cisco IQ Account page displays.
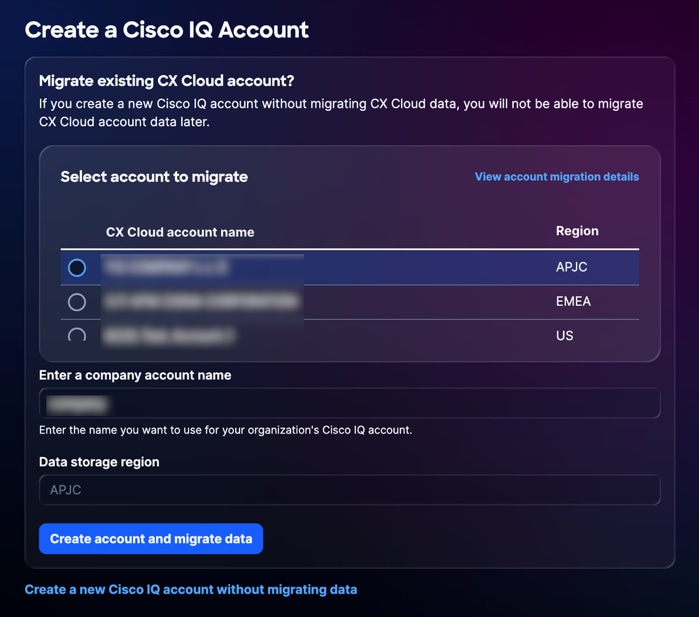 Select CX Cloud Account
-
Select the CX Cloud account you want to migrate data from.
-
Enter the unique name you want to use for your organization’s Cisco IQ account.
-
Click Create account and migrate data. The Migration Status page displays.
The Migration Status page displays the completion status of the data being migrated to Cisco IQ. The following statuses are available:
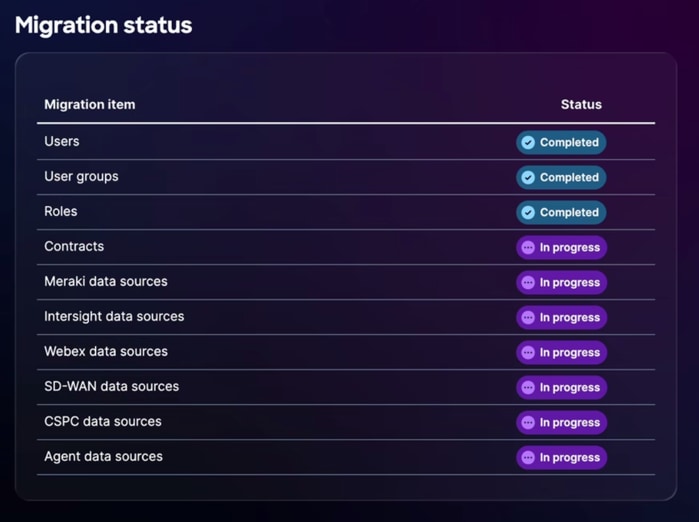 Migration Status
-
In progress: Data is in the process of being migrated
-
Completed: Migration is complete
-
Unable to Migrate: Data migration is incomplete and Cisco IQ is unable to migrate the data
If data is unable to migrate, you must manually migrate the data to the new Cisco IQ company account. See System Settings for more information about adding additional data to Cisco IQ.
-
-
Once the migration process is complete, click Continue. You are redirected to the Cisco IQ Launchpad.
Logging In to Existing Accounts
To log in to an existing account:
-
Navigate to Cisco IQ. The Cisco Log in page displays.
-
Click Log in with SSO.
-
Enter your CCO ID credentials into the Email field.
-
Click Next.
-
Enter your Password.
-
Click Verify.
If you have one account, you are redirected to the Cisco IQ Launchpad.
If you have more than one account, you are redirected to the Welcome to Cisco IQ page.
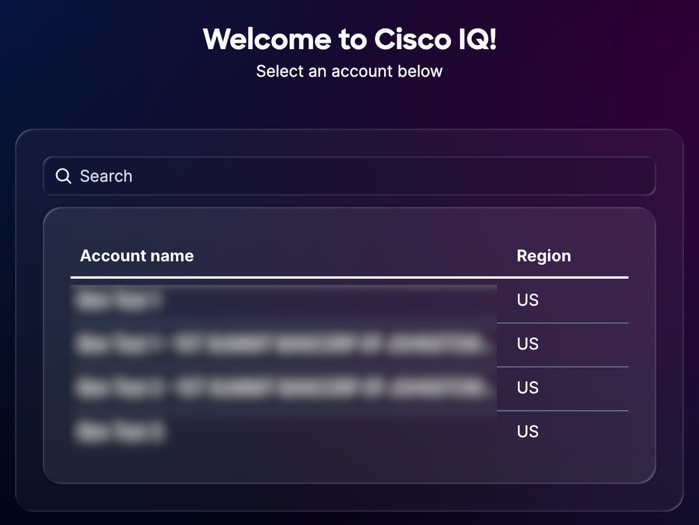 Select Account Name
Getting Started
Support Tiers
Cisco IQ Support Tier levels define the access and capabilities available to you within Cisco IQ and are designed to enhance your support and professional services experience. These levels are tied to your valid Cisco support contract and determine which features and tools you can utilize, from AI-driven insights and troubleshooting to asset and contract management. Understanding your level ensures you can fully leverage Cisco IQ’s capabilities while maintaining compliance with your contractual rights. The following table outlines the Cisco IQ features available for each level.
| Basic Level |
Standard Level |
Signature Level |
|
| Know what you have |
Prioritize for operation resilience |
Accelerate operational excellence |
|
| Complete landscape clarity |
Track every Cisco asset and subcomponent with dynamic high-confidence using the following features.
|
Use the following features to analyze your network’s performance to determine where to allocate resources, helping you make informed decisions about infrastructure investments.
|
|
| Proactive Resilience |
Gain visibility into important notifications that help you identify and address potential risks within your environment using the following features.
|
Cisco IQ turns data into insights by correlating asset risks, allowing you to identify and prioritize the most critical security risks.
|
The following features provide actionable recommendations to help improve security posture and optimize configurations within your environment.
|
| Rapid resolution |
Manage your support cases and track resolution status in one location to resolve issues faster using the following features.
|
Use the following feature to track case trends and efficiency metrics to show continuous operational improvement. Cisco IQ provides a context-aware resolution assistant to help you resolve active issues and investigate underlying root causes.
|
1 Supports device and telemetry connection via Cisco IQ Link, Catalyst Center, Intersight, Meraki, SD-WAN Manager, and WebEx Control Hub.
Basic Capabilities
The Basic support tier provides foundational control through reliable and reactive support, including access to technical product support experts, self-serve troubleshooting, and centralized case management. To ensure full visibility, Cisco IQ unifies asset telemetry, contract information, and support history, providing a comprehensive view of your asset lifecycles, security advisories, and field notices. Additionally, you can strengthen your technical expertise by accessing foundational learning resources available through Cisco U.
The following table outlines the available capabilities for the Basic support tier.
| Capability |
Description |
| Asset Inventory |
Asset Inventory provides an up-to-date list and rich visualizations for Hardware products, model and serial numbers, OS version, installed-at location, and service coverage details. It also provides a way to filter by ‘Last Signal’, which is when Cisco knew the asset was active based on Technical Assistance Center (TAC) Cases, contract renewal, telemetry, and so on. |
| EOL Report |
EOL reports provide an up-to-date list and rich visualizations for Hardware and Software approaching, at, or having passed EOL milestones from End of Sales to LDOS, enabling lifecycle and technology refresh planning. |
| Service Coverage Report |
Service coverage reports provide an up-to-date list and rich visualizations for covered and uncovered assets. |
| LDOS Dashboard |
The LDOS Dashboard provides a centralized view of LDOS milestones, allowing for improved asset planning and budget forecasting before hardware or software reaches end-of-life, enabling operational risk reduction. |
| Security Advisories |
Security advisories provide an automated solution that detects exposures, prioritizes vulnerabilities based on risk severity and criticality, and delivers executive-level insights to accelerate mitigation of critical threats, thereby enhancing enterprise resilience against evolving threats. |
| Field Notices |
Field Notices provide an automated solution that detects non-security related product issues, prioritizes issues based on impact severity and criticality, and delivers executive-level insights to accelerate resolution of critical operational concerns, thereby enhancing enterprise resilience and maintaining optimal performance. |
| Case Management |
Case Management provides an up-to-date list of Cisco TAC cases including case counts, status, severity, and Return Material Authorizations (RMAs) associated with cases. It also provides the ability to open TAC cases (via cross-launch to Support Case Manager (SCM)) and rapidly update case information to facilitate resolution. |
| Self-serve Troubleshooting1 |
Self-serve Troubleshooting provides a way to resolve issues instantly with the Cisco IQ AI Assistant. This interactive tool provides real-time, context-aware troubleshooting and expert recommendations directly from Cisco’s verified knowledge base, allowing you to solve problems without the need to open a support case. |
1 Supports device and telemetry connection via Cisco IQ Link, Catalyst Center, Intersight, Meraki, SD-WAN Manager, and WebEx Control Hub.
Standard Capabilities
The Standard support tier enhances your operational efficiency by providing centralized triaging for solution-level issues and a dedicated case owner who coordinates with the necessary technical experts. You can proactively mitigate risks using AI-powered insights that correlate asset data with business criticality, offering clear visibility into your inventory, security, and configuration assessments. Additionally, you can align your team’s expertise with your specific business needs through personalized learning paths available in Cisco U.
The following table outlines available capabilities for the Standard support tier.
| Capability |
Description |
| EOL Insights1 |
EOL Insights provide intelligent querying, summarization, visualization, and reporting of EOL milestones to enable personalized prioritization of lifecycle and technology refresh planning. |
| Service Coverage Insights1 |
Service Coverage Insights provide a visualization and analysis of service coverage details and renewal milestones, enabling personalized prioritization of coverage updates and renewal planning. |
| Asset Tagging |
Asset Tagging provides a way to organize inventory according to business needs by using Asset Tags, enabling the flexible organization of hardware and software assets by department, location, or project as key-value pairs. |
| LDOS Insights1 |
LDOS Insights provide a visualization and analysis of assets beyond or approaching their LDOS milestones, enabling personalized prioritization of lifecycle and technology refresh planning. |
| Asset Criticality Insights1 |
Asset Criticality Insights enable the evaluation and identification of asset roles and their relative importance in your network for prioritization of risk mitigation efforts and improved operational resilience. |
| Security Advisory Insights1 |
Security Advisory Insights provide intelligent querying, summarization, visualization, and reporting of assets affected by Security Advisories, enabling personalized prioritization of risk and security incident response. |
| Security Hardening Insights1 |
Security Hardening Insights provide an automated solution that assesses device configurations, identifies security hardening gaps based on impact severity and criticality, and delivers executive-level insights to accelerate implementation of critical hardening measures. It enhances enterprise resilience and reduces the attack surface against evolving threats while enabling the personalized prioritization of an improved security posture through intelligent querying, summarization, visualization, and reporting of assets at risk. |
| Field Notice Insights1 |
Field Notice Insights provide intelligent querying, summarization, visualization, and reporting of assets affected by Field Notices, enabling personalized prioritization of risk and response to known issues. |
| Configuration Insights1 |
Configuration Insights provide an automated solution that assesses device configurations against Cisco-recommended best practices based on field-proven expertise. Intelligent querying, summarization, visualization, and reporting of affected assets enable personalized prioritization and accelerate remediation of critical configuration gaps, enhancing infrastructure resilience and reducing operational risk across the network. |
| Case Insights1 |
Case Insights provide intelligent querying, summarization, visualization, and reporting on Cisco TAC cases, enabling personalized monitoring of operational efficiency. |
1 Supports device and telemetry connection via Cisco IQ Link, Catalyst Center, Intersight, Meraki, SD-WAN Manager, and WebEx Control Hub.
Signature Capabilities
The Signature support tier builds upon the Standard support tier to elevate your operational performance through defined restoration Service Level Agreements and access to a dedicated team of experts familiar with your unique environment. This tier focuses on preventing disruptions before they impact your operations by providing proactive security hardening, systematic root-cause elimination, and continuous expert-driven analysis of your assets. Additionally, you can utilize advanced Cisco U. certification training and virtual practice labs to build deep, technical proficiency.
The following table outlines available capabilities for the Signature support tier.
| Capability |
Description |
| Configuration Recommendation1 |
Configuration Recommendation provides actionable recommendations to address potential misconfigurations and inconsistencies. |
| Security Hardening Recommendations1 |
Security Hardening Recommendations provide an automated solution that delivers generic recommendations specific to each failed hardening check, addressing the underlying security issues clearly and concisely. |
1 Supports device and telemetry connection via Cisco IQ Link, Catalyst Center, Intersight, Meraki, SD-WAN Manager, and WebEx Control Hub.
Get Started Journey for Administrators
When logging in to your newly created or migrated Cisco IQ account for the first time, the Welcome page displays a Get Started journey. The Get Started journey differs depending on whether the account was created with or without migrated data.
New Account via Creation
The Get Started journey for newly created accounts guides you through the initial onboarding steps required to configure your Cisco IQ environment and explore Cisco IQ.
Connecting Cisco Cloud Products
Connecting your Cisco cloud product data to Cisco IQ is the fastest way to start using its powerful, personalized features. You can receive tailored insights in minutes after setting up your data connections.
To connect your Cisco cloud products, see Data Connectors.
Linking Service Contracts
Linking contracts unites data from contracts associated with different team members and incorporates assets not connected to your inventory via telemetry, enabling centralized support coverage visibility and preventing renewal surprises.
To link your service contracts, see Service Contracts.
Connecting On-prem Devices
To establish communication with your on-premises devices, you must configure Cisco IQ Link. Cisco IQ Link brings all the power of Cisco IQ to your on-premises devices not already managed by a Cisco cloud platform. Cisco IQ Link can be installed as a Virtual Machine (VM) in your data center and linked to your Cisco IQ account.
To connect your on-prem devices, see Data Connectors.
Managing User Access
Cisco IQ’s simple access control features are designed for both small teams and large organizations. You can add users and assign administrator or view-only roles to groups and individuals.
To add users and assign permissions, see Users.
Exploring Cisco IQ
Explore Cisco IQ’s features and applications that are available to you, including:
-
Launchpad: Access applications, discover new features, and create dashboards
-
Assets Application: See Assets Application for more details
-
Assessments Application: See Assessments Application for more details
-
Support Application: See Support Application for more details
-
Cisco IQ AI Assistant: See AI Assistant for more details
-
System Settings: Manage your account settings, grant users access, configure data connections, and view activity and logs for your account; see System Settings for more details
New Account via Migration
If your new Cisco IQ account was created via migration, information from your previous account is already available. As a result, the Get Started journey for newly migrated accounts is limited to reviewing the migration, detailed below.
Reviewing Migration
To review the migration:
-
Verify your contracts migrated successfully in Home > System Settings > Service Contracts
-
Validate all required data connections are properly configured in Home > System Settings > Data Connectors
-
Verify user data migrated successfully and grant access to migrated users by activating their accounts in Home > System Settings > Identity & Access > Users
-
Verify your assets migrated successfully in Home > Assets > Inventory
Get Started Journey for General Users
When logging in to your Cisco IQ account for the first time, the Welcome page displays a Get Started journey. This journey guides you through Cisco IQ features and common workflows.
Exploring Cisco IQ
Explore Cisco IQ’s features and applications that are available to you, including:
-
Launchpad: Access applications, discover new features, and create dashboards
-
Assets Application: See Assets Application for more details
-
Assessments Application: See Assessments Application for more details
-
Support Application: See Support Application for more details
-
Cisco IQ AI Assistant: See AI Assistant for more details
Generating Your First AI Report
Cisco IQ’s AI-powered Analyze feature generates customizable, targeted reports based on selected assets which can be tailored to your specific business needs.
See Assets Application for more information on generating your first AI report.
Asking the Cisco IQ AI Assistant a Question
The final step of your Get Started journey is to launch the Cisco IQ AI Assistant from anywhere and ask a question about your assets, cases, or assessments.
See AI Assistant for more information on using the Cisco IQ AI Assistant.
Dashboards
The Dashboards tab provides a view of the following available dashboards in Cisco IQ.
LDOS Dashboard
The LDOS dashboard provides comprehensive, detailed insights into LDOS metrics, enabling customer visibility, empowering users to proactively manage risks, and supporting more efficient and informed decision-making.
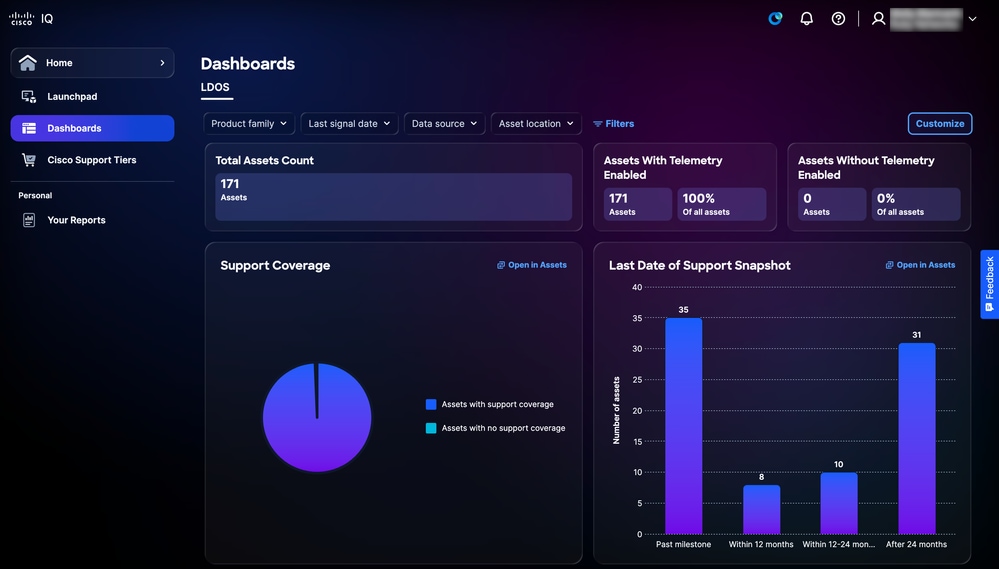 LDOS Dashboard
Filtering Views for LDOS Dashboard
You can filter the dashboard view by choosing a filter from the drop-down lists or click Filters and choose from the list of available filter options.
Viewing Details for LDOS Dashboard
When clicking Open in Assets, the page redirects to the Inventory page. See Inventory for more details.
Cisco Support Tiers
The Cisco Support Tiers page provides an overview of what features are available for the purchased support tier and the number of Assets related to linked support contracts, enabling you to easily understand included support capabilities and take action to manage and review them. See Support Tiers for more detailed information about support tier features.
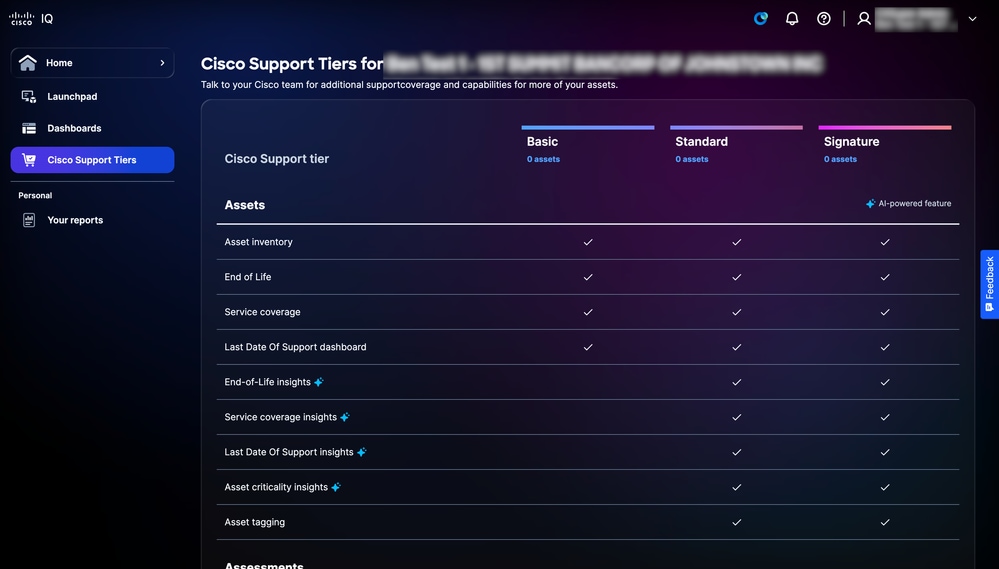 Cisco Support Tiers
Your Reports
The Reports feature allows you to centralize and manage AI-generated insights from across Cisco IQ by saving them to a personalized Your Reports list, ensuring you have quick, secure access to your own data.
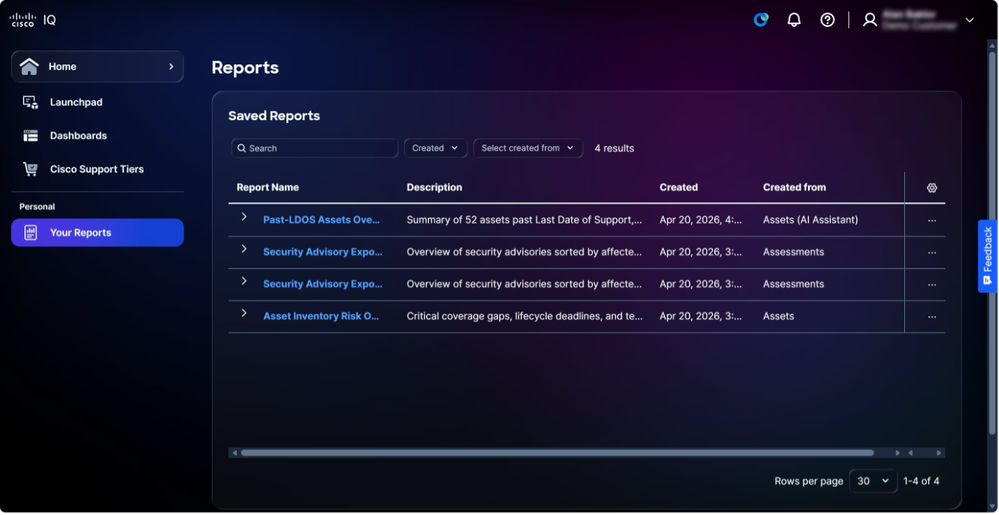 Your Reports
System Settings
To navigate to the System Settings menu, choose Home > System Settings. The Account Details page displays.
Account Details
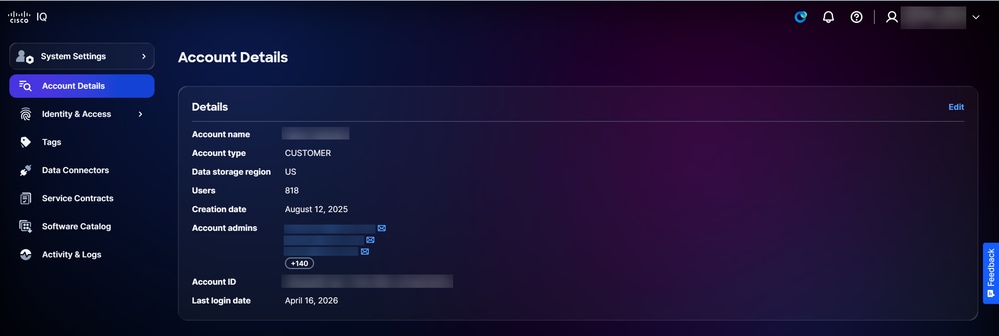
The System Settings feature facilitates easy management, access control, and data allocation, ensuring comprehensive visibility and access for Account Administrators. When viewing the Account Details page, the Details section displays the following information:
-
Account name
-
Account type
-
Data storage region
-
Users
-
Create date
-
Account admins
-
Account ID
-
Last login date
Editing the Account Name
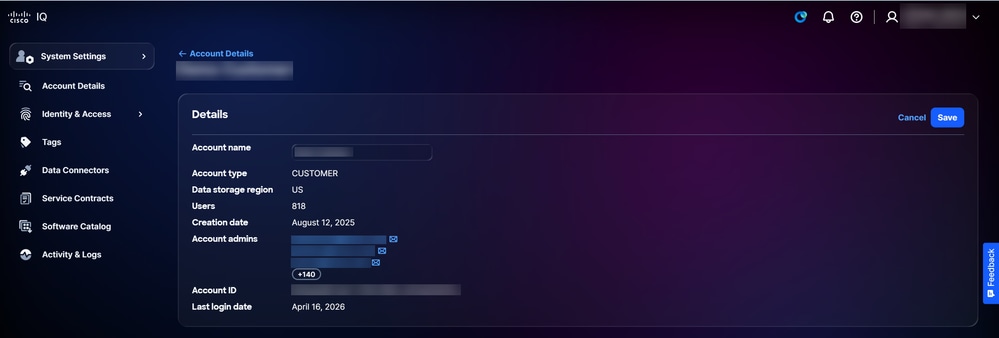
Only the Account name can be changed from the Account Details page.
To edit an account name:
 Account Details
-
Click Edit.
 Edit Account Name
-
Revise the Account Name.
-
Click Save.
Users
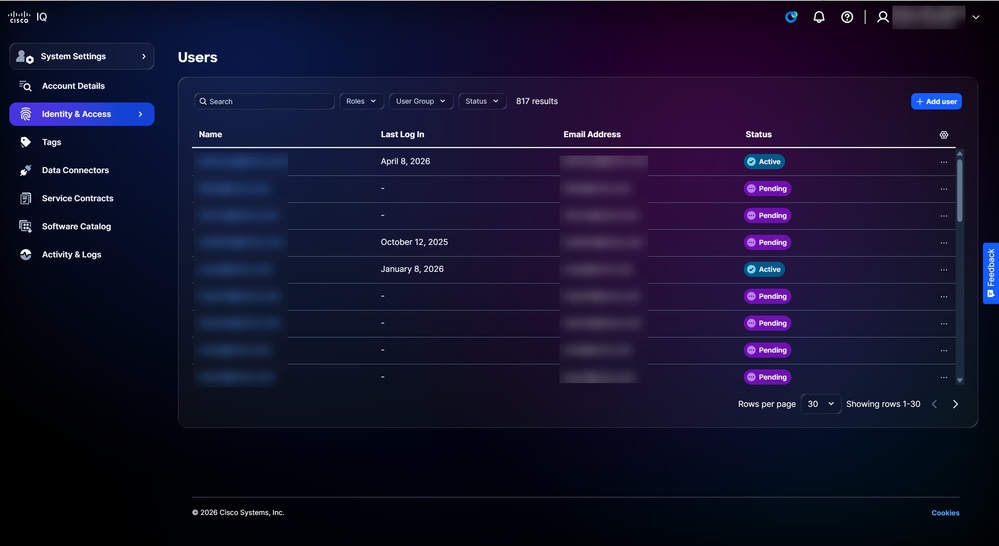
User accounts are created, modified, and deleted on the Users page. To navigate to the Users page, choose System Settings > Identity & Access > Users. The Users page displays.
 Users
Users
You can Search and Filter to narrow the list by using the fields at the top of the page.
Adding New Users
To add a new user:
-
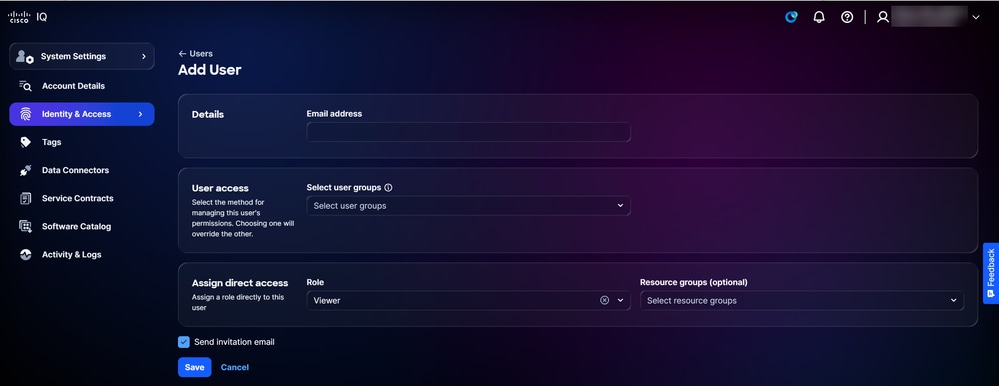
From the Users page, click Add User. The Add User page displays.
 Add User
-
Enter an Email address.
-
Optionally, choose the user group(s) from the Select user groups drop-down list.
-
Choose the Role from the drop-down list.
-
Optionally, choose the Resource groups from the drop-down list.
-
Confirm that the Send invitation email check box is checked.
-
Click Save. A confirmation displays on the Users page.
Users receive an email after being invited by an Account Administrator.
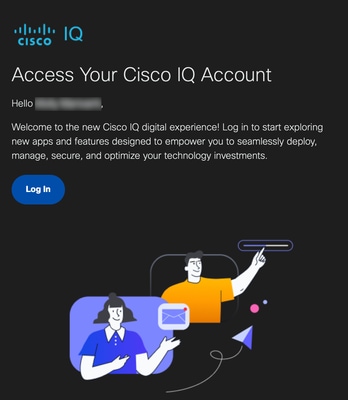 Email Invitation
Invited users can click Log In from the email to log in to their account. After logging in, the user’s status becomes Active.
Editing User Access
To edit the user groups, role, or resource groups of a user account:
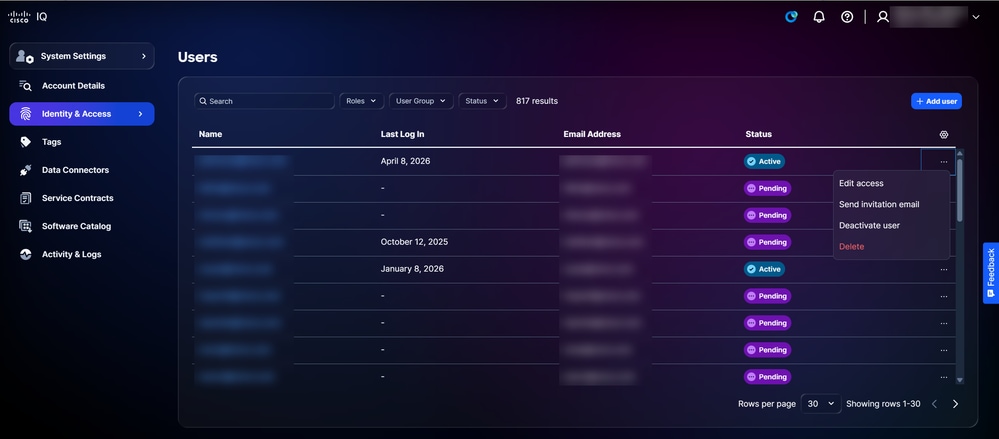 Edit Access
-
From a desired user on the Users page, choose the More Options icon > Edit access. The Edit User Details page displays.
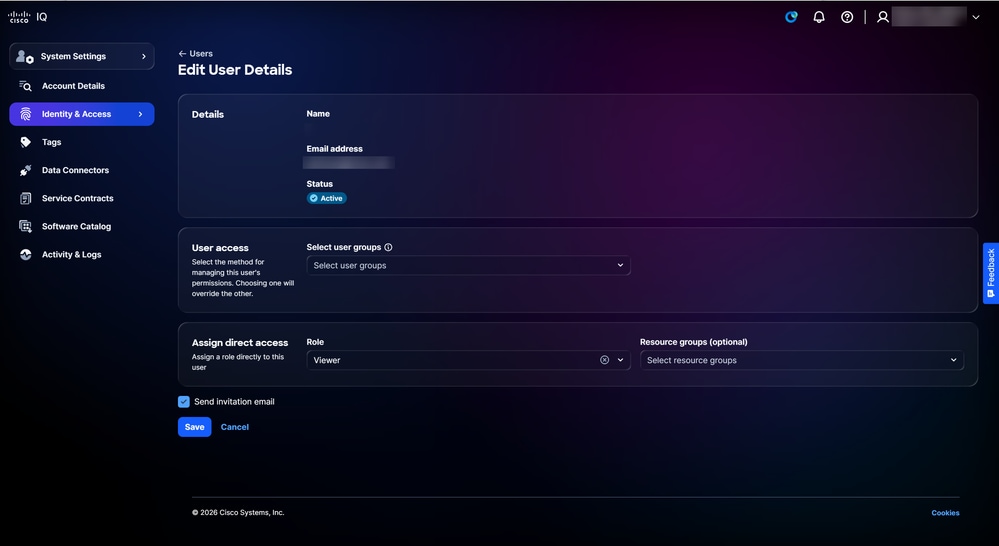 Edit User Details
-
Edit the desired user groups, role, and resource groups.
-
Click Save.
Sending Invitation Emails
To send an invitation email to an existing user account:
-
Navigate to the Users page.
-
From a desired user, choose the More Options icon > Send invitation email. A confirmation displays.
Deactivating Users
To deactivate a user account:
-
From a desired user on the Users page, choose the More Options icon > Deactivate user. The Deactivate user window opens.
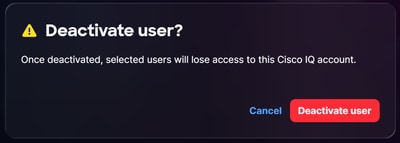 Deactivate User Confirmation
-
Click Deactivate user to confirm. A confirmation displays.
Deleting Users
To delete a user:
-
From a desired user on the Users page, choose the More Options icon > Delete. The Delete user window opens.
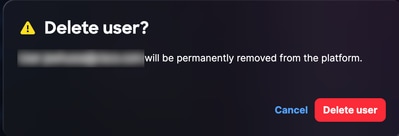 Delete User Confirmation
-
Click Delete user. The user is deleted.
Resource Groups
Resource groups are dynamic collections that specify resources based on their type and attributes. Configuring resource groups enables you to restrict data access of a role to the resources that meet the conditions of the group. Resources can belong to multiple resource groups. As an Account Administrator, you can create, edit, and delete resource groups.
To view resource groups:
-
Choose System Settings > Identity & Access > Resource Groups. The Resource Groups page displays.
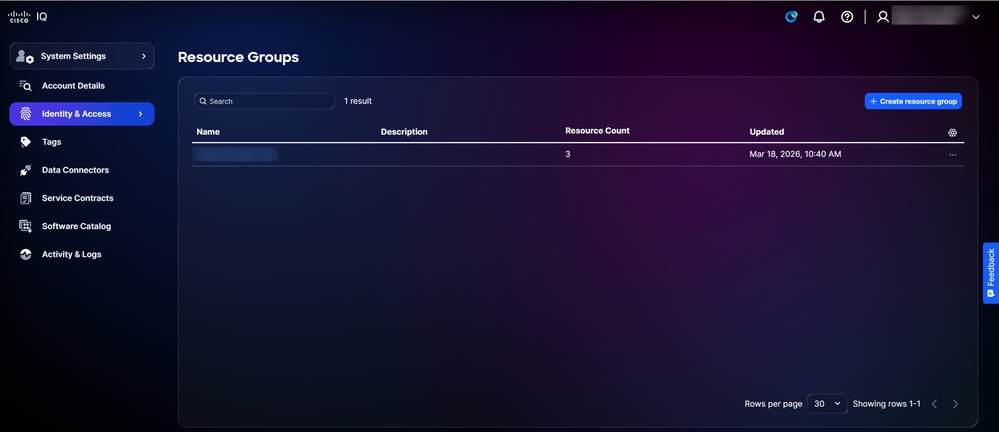 Resource Groups
-
Use the Search and Filter fields to narrow the list.
-
Click a resource group name to display its details.
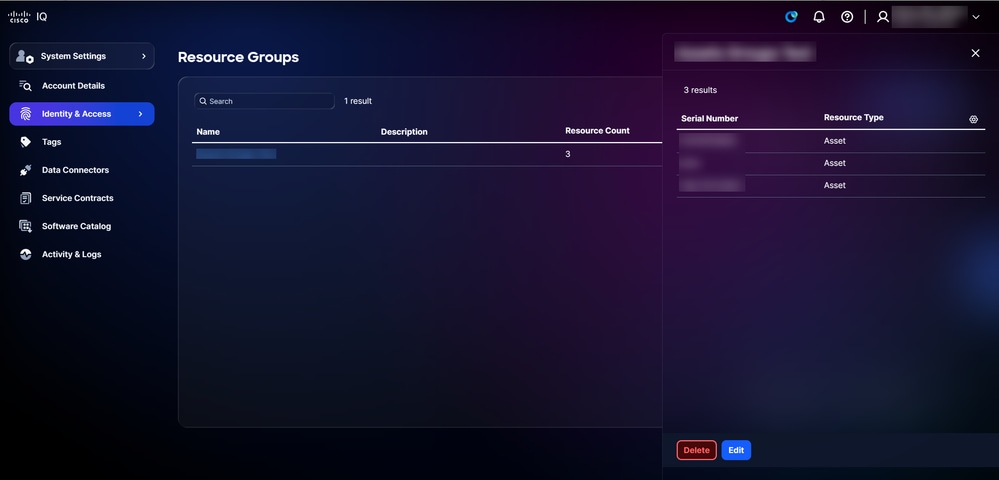 Resource Group Details
Creating Resource Groups
To create a new resource group:
-
From the Resource Groups page, click Create resource group. The Create Resource Group page displays.
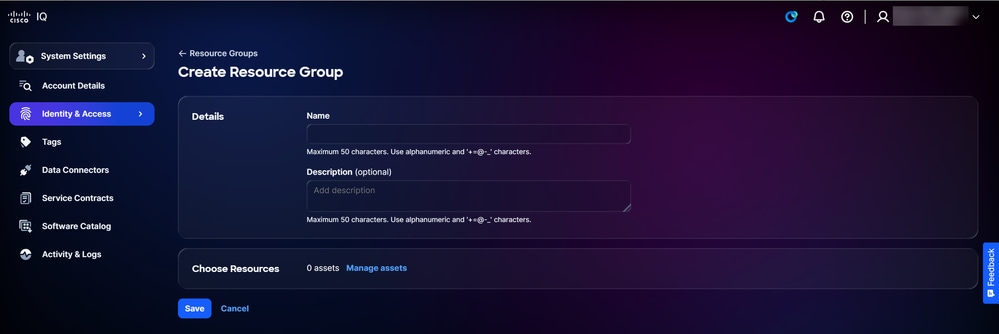 Create Resource Group
-
Enter a Name for the resource group
-
Optionally, enter a Description.
-
Click Manage assets. The Manage assets window opens.
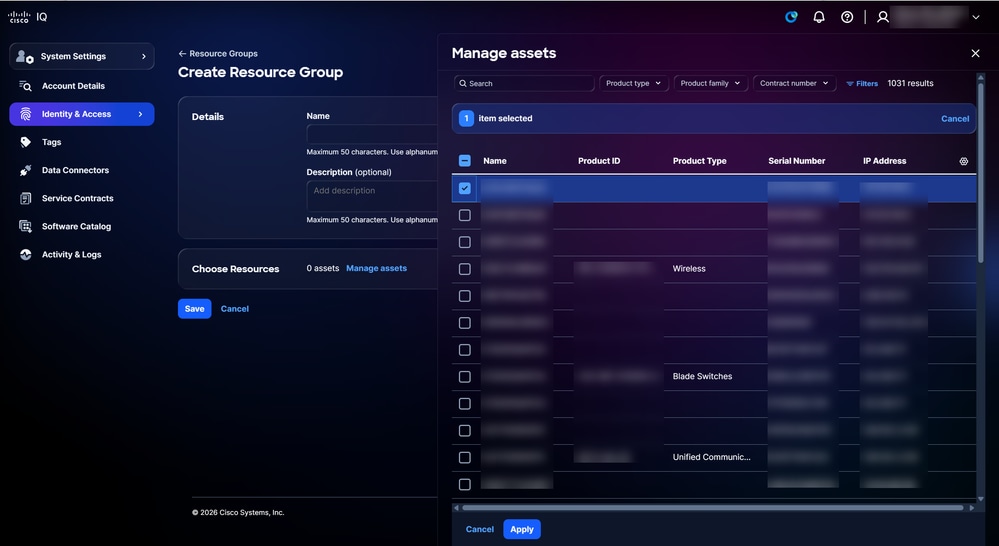 Manage Assets
-
Check the check box of the desired assets.
-
Click Apply.
-
Click Save.
Editing Resource Groups
To edit a resource group:
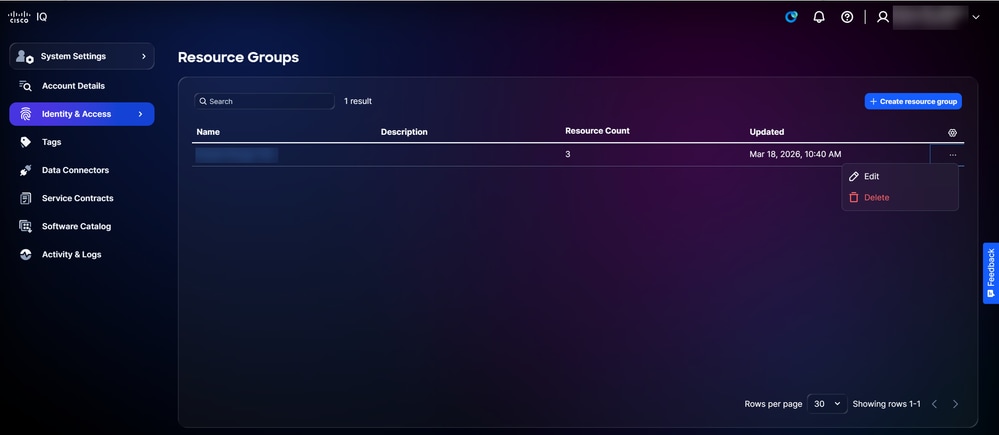 Edit
Edit
-
From a record on the Resource Groups page, choose the More Options icon > Edit. The Edit Resource Group page displays.
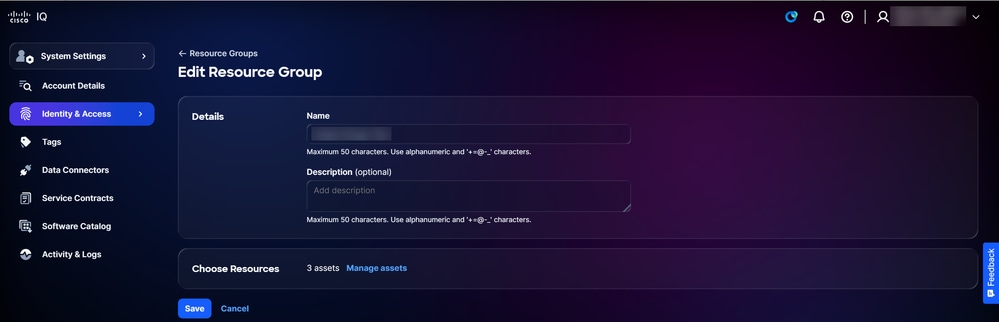 Edit Resource Group
-
Edit the resource group attributes, as desired.
-
Click Save.
Deleting Resource Groups
To delete a resource group:
-
From a record on the Resource Groups page, choose the More Options icon > Delete. The Delete resource group window opens.
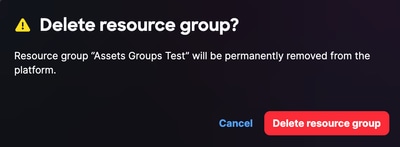 Delete Resource Group
-
Click Delete resource group. The resource group is deleted.
User Groups
User groups enable you to control users effectively across the account by creating, editing, and deleting user groups.
To view user groups:
-
Choose System Settings > Identity & Access > User Groups. The User Groups page displays.
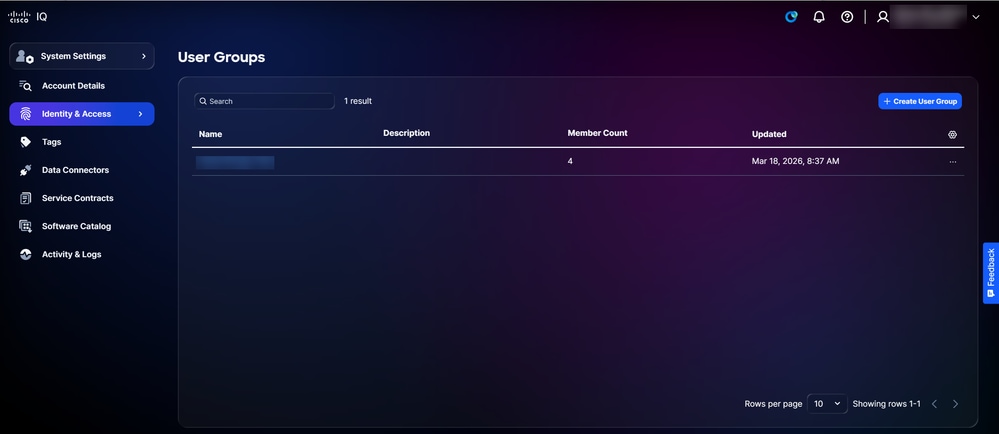 User Groups
-
Use the Search and Filter fields to narrow the list.
-
Click a user group name to display its details.
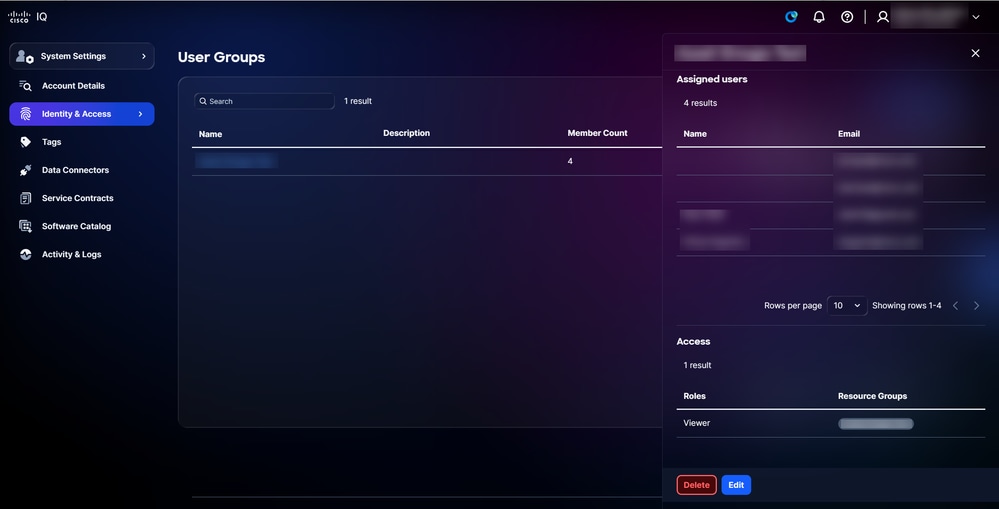 User Group Details
Creating User Groups
To create a new user group:
-
Click Create User Group. The Create user group page displays.
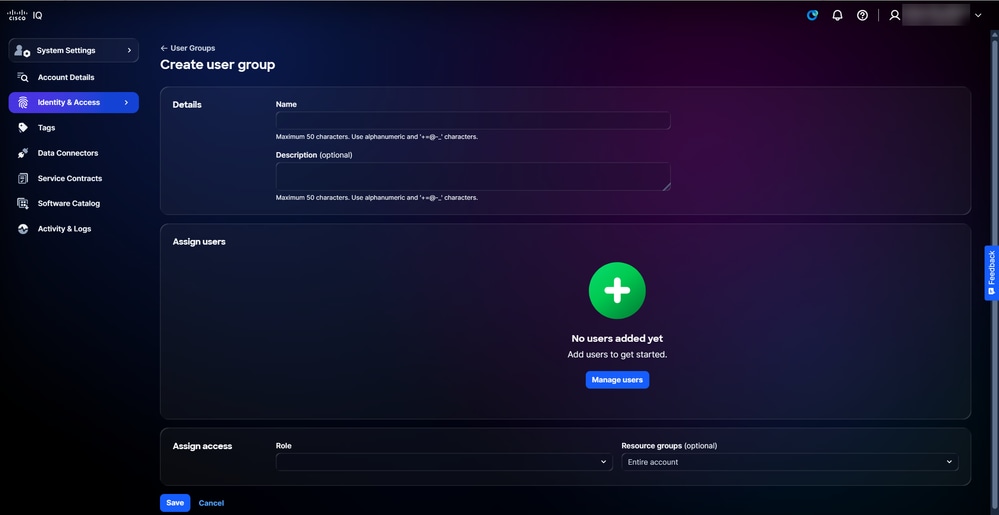 Create User Group
-
Enter a Name for the user group.
-
Optionally, enter a Description.
-
Click Manage users. The Manage users window opens.
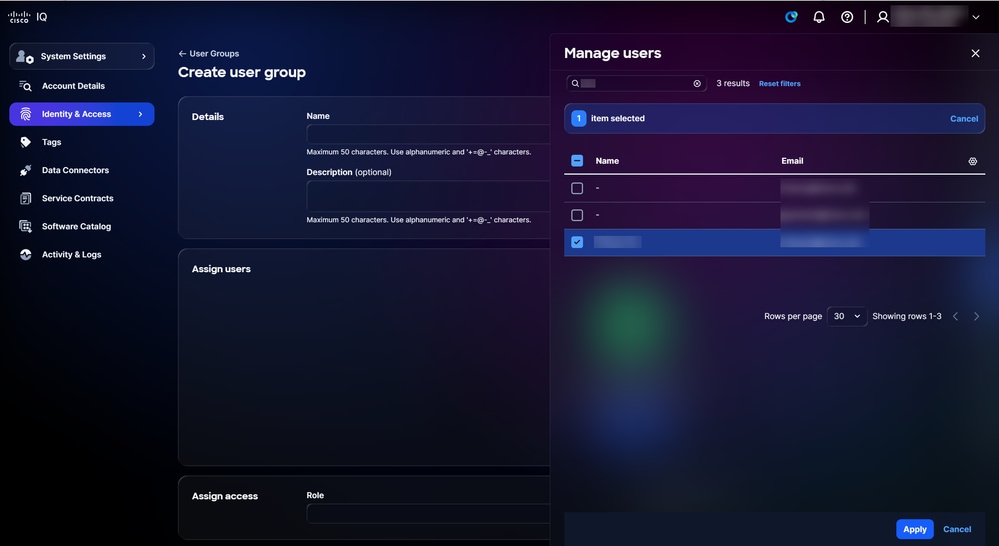 Manage Users
-
Check the check boxes of the desired users.
-
Click Apply.
-
Choose a Role from the drop-down list.
-
Optionally, choose a Resource group from the drop-down list.
-
Click Save. The new user group displays in the User Groups table.
Editing User Groups
To edit a user group:
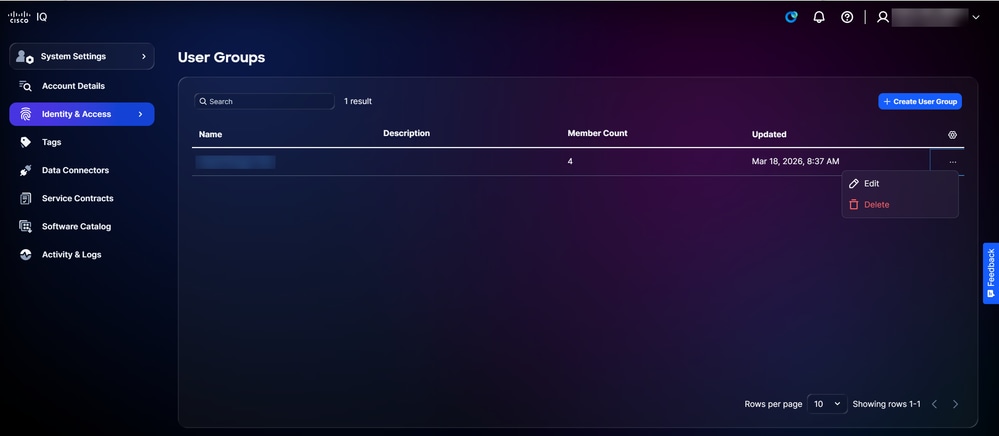 Edit
Edit
-
From a record on the User Groups page, choose the More Options icon > Edit. The Edit user group page displays.
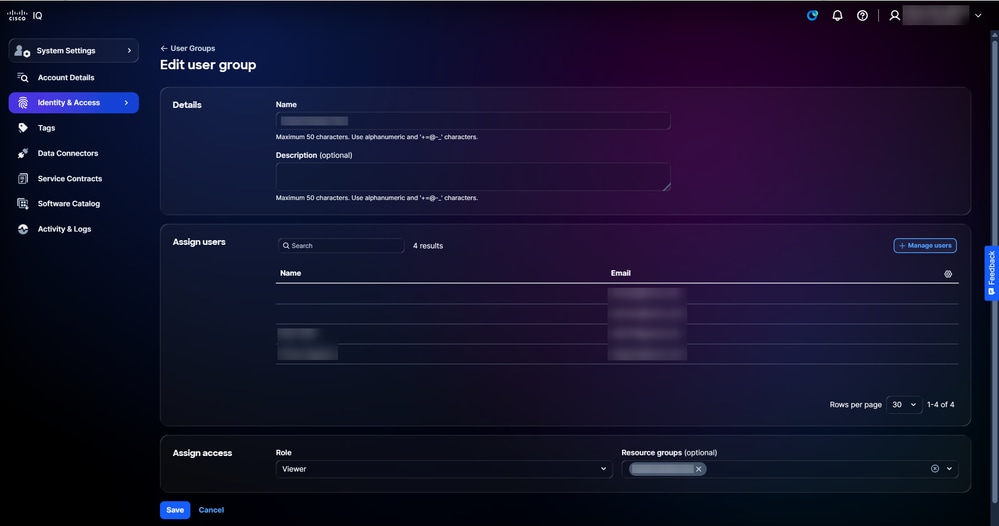 Edit User Group
-
Edit the user group attributes as desired.
-
Click Save.
Deleting User Groups
To delete a user group:
-
From a record on the User Groups page, choose the More Options icon > Delete. The Delete user group window opens.
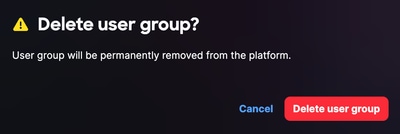 Delete User Group
-
Click Delete user groups. The user group is deleted.
Tags
Asset tags are custom labels you assign to inventory assets in Cisco IQ. A tag is a key:value pair—for example, Environment:Prod or Label:Campus—that you define. Account Administrators can create and delete tags and can assign users to a resource group, enabling them to assign asset tags to a device. See Resource Groups for more information about assigning users to a resource group.
Creating Asset Tags
To create a tag
- Choose Home > System Settings > Tags. The Tags page displays.
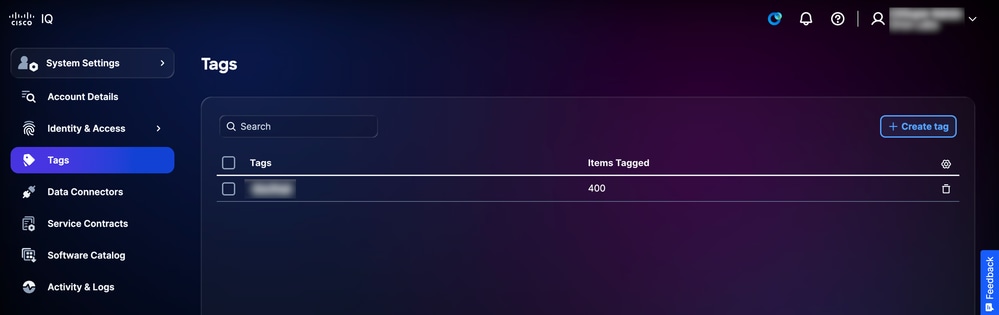 Tags
Tags -
Click Create tag. The Create tag page displays.
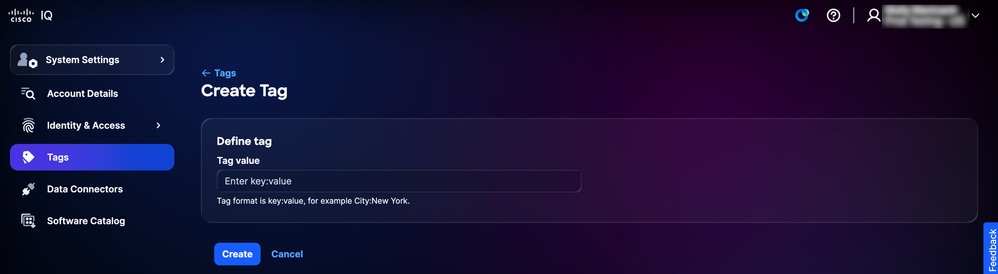 Create Tag
-
Enter the tag value in the Enter key:value field.
-
Click Create. The new tag displays in the tag list on the Tags page.
Deleting Asset Tags
To delete a tag:
-
Choose Home > System Settings > Tags. The Tags page displays.
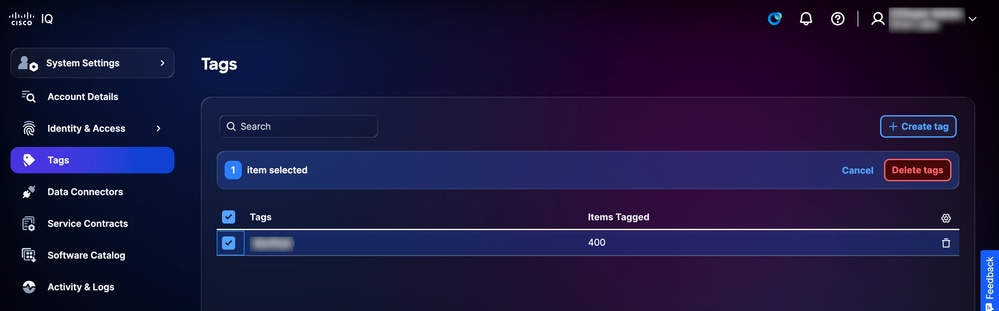 Tags
Tags
-
Check the check box(es) of the tag(s) to delete.
-
Click Delete tags. A confirmation displays.
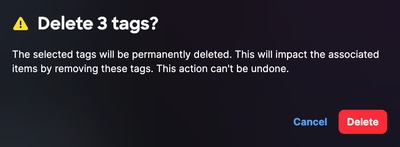 Delete Tag
-
Click Delete to confirm.
Data Connectors
Cisco IQ uses data connectors as part of a multi-layered data ingestion approach to provide comprehensive network insights. Data Connectors gather telemetry from assets on your network, enabling Cisco IQ to deliver relevant insights and trusted expertise.
Adding Cloud Connectors
Connecting your Cisco cloud product data to Cisco IQ is the fastest way to start using its powerful, personalized features. You can receive tailored insights in minutes after setting up your data connections to the following product controllers: Catalyst Center, Intersight®, Meraki Dashboard, SD-WAN Manager, Webex® Control Hub.
To connect your Cisco cloud products:
-
Choose System Settings > Data Connectors. The Data Connectors page displays
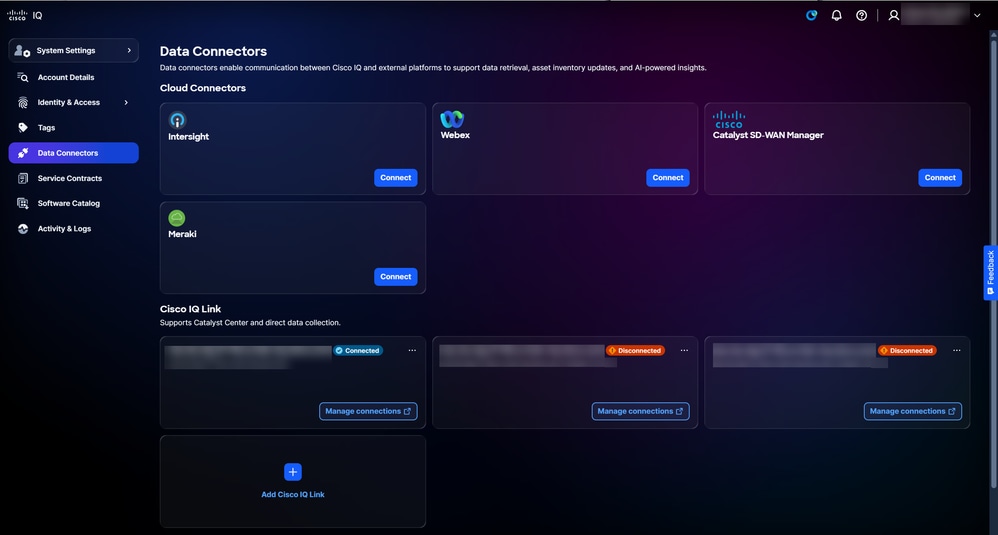 Cloud Connectors
-
Click Connect for the desired cloud connector.
-
Complete the following steps for the selected cloud connector:
-
Intersight
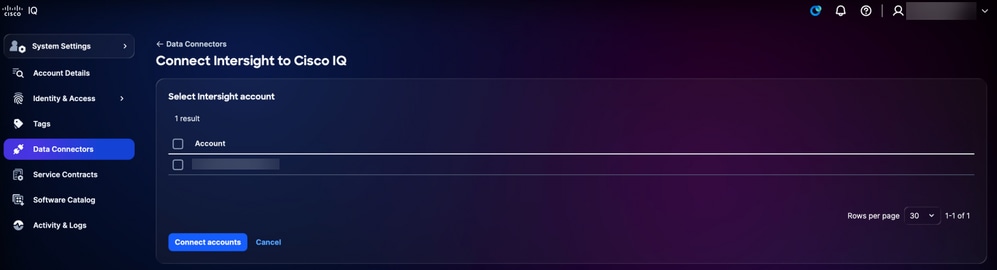 Connect Intersight
-
Check the check box(es) of the desired account(s).
-
Click Connect accounts. You are redirected to the Data Connectors page and a confirmation displays.
-
-
Webex
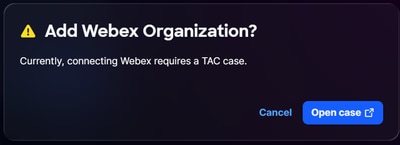 Connect Webex
-
Click Open case from the Add Webex Organization window. You are redirected to SCM.
-
Create a support case in SCM.
-
-
Catalyst SD-WAN Manager
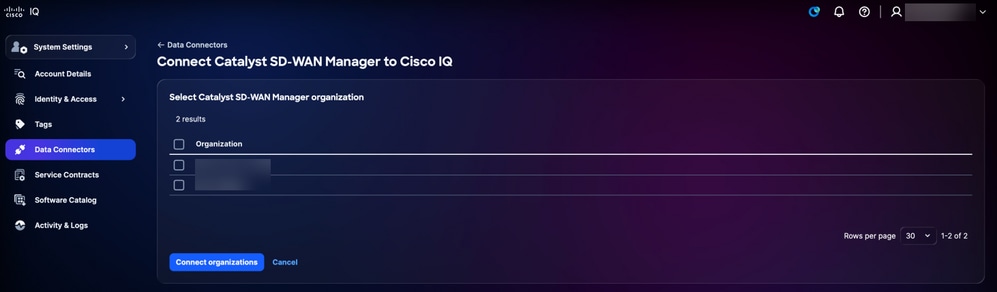 Connect Catalyst SD-WAN Manager
-
Check the check box(es) of the desired organization(s).
-
Click Connect organizations. You are redirected to the Data Connectors page and a confirmation displays.
-
-
Meraki
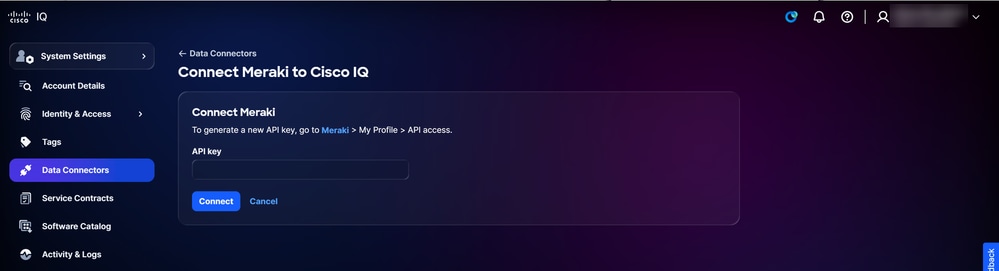 Connect Meraki
-
Follow the on-screen instructions.
-
Enter the API Key.
-
Click Connect. You are redirected to the Data Connectors page and a confirmation displays.
-
-
Adding Cisco IQ Link Instances
Cisco IQ Link is an on-premises component of Cisco IQ designed to provide you with richer and more intelligent insights, such as hardware and software lifecycle and inventory reports. It consolidates previous collectors into a single connector that you install on a Virtual Machine (VM) to gather detailed telemetry data from your devices.
Cisco IQ Link is deployed within your on-premises network to perform automated device discovery and telemetry collection. Cisco IQ Link supports the direct connection and integration with Catalyst Center. In addition, if your account was created via migration, you can leverage your CX Agent or CSPC to connect telemetry.
To add Cisco IQ Link instances Cisco IQ:
-
Navigate to the Data Connectors page.
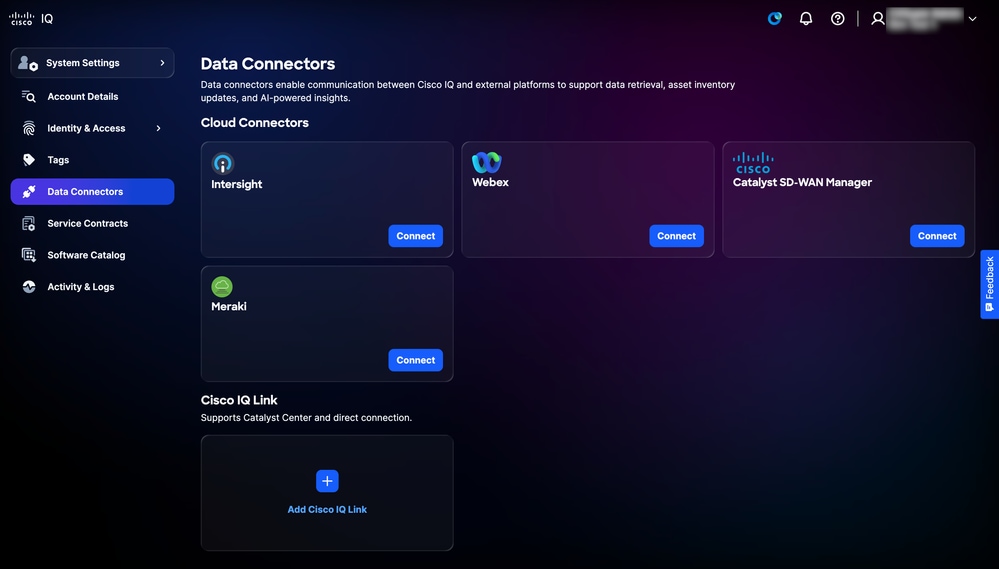 Add Cisco IQ Link
-
Click Add Cisco IQ Link.
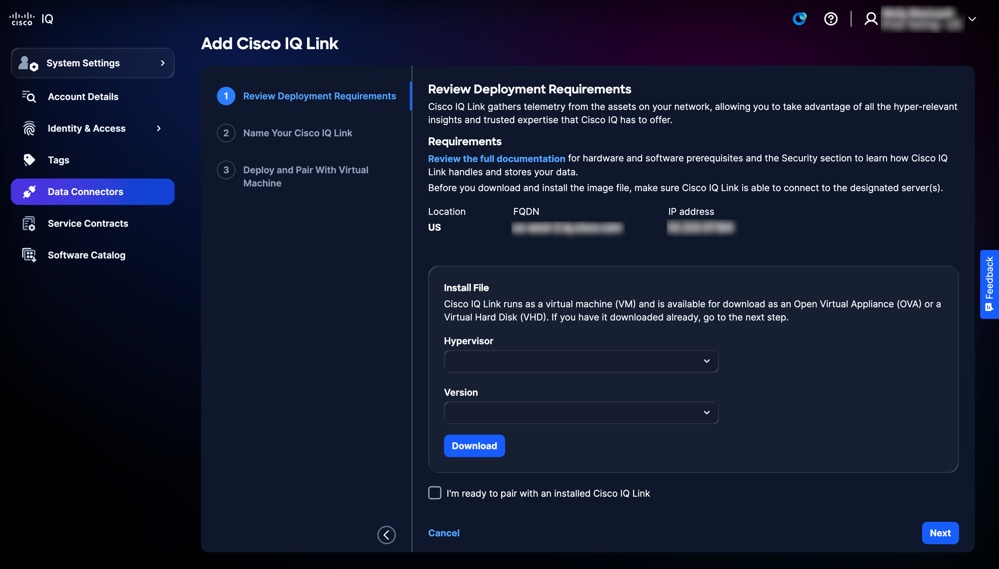 Download the OVA or VHD
 -
Download the Open Virtual Appliance (OVA) or Virtual Hard Disk (VHD):
-
Choose the Hypervisor from the drop-down list.
-
Choose the Version from the drop-down list.
-
Click Download.
-
-
Click Review the full documentation to access the Cisco IQ Link Getting Started Guide. This document provides comprehensive, step-by-step instructions to install Cisco IQ Link using the file downloaded in the previous step. It covers the complete deployment workflow, including all necessary transitions between the Cisco IQ and Cisco IQ Link interface to finalize pairing and configuration.
Editing Cisco IQ Link Instance Names
To edit a Cisco IQ Link instance name:
-
Navigate to the desired Cisco IQ Link instance on the Data Connectors page.
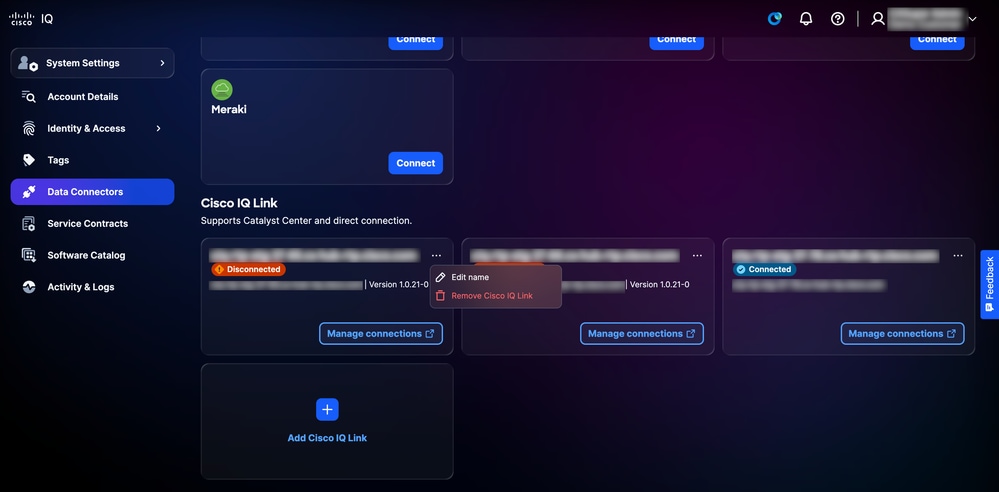 Edit Name
-
Choose the More Options icon > Edit name.
-
Edit the name as desired.
-
Click Update.
Removing Connected Accounts from Cloud Connectors
To remove a connected account from your cloud connectors:
-
Navigate to the desired cloud connector on the Data Connectors page.
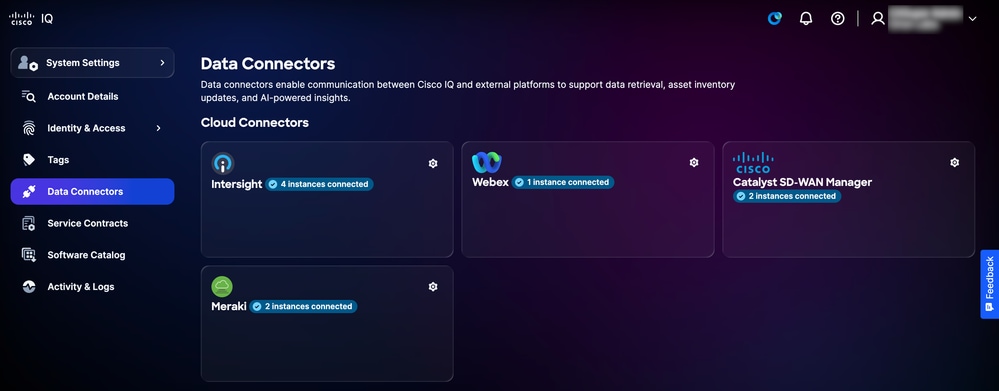 Cloud Connectors Settings
-
Click the Settings icon. The Connected accounts window opens.
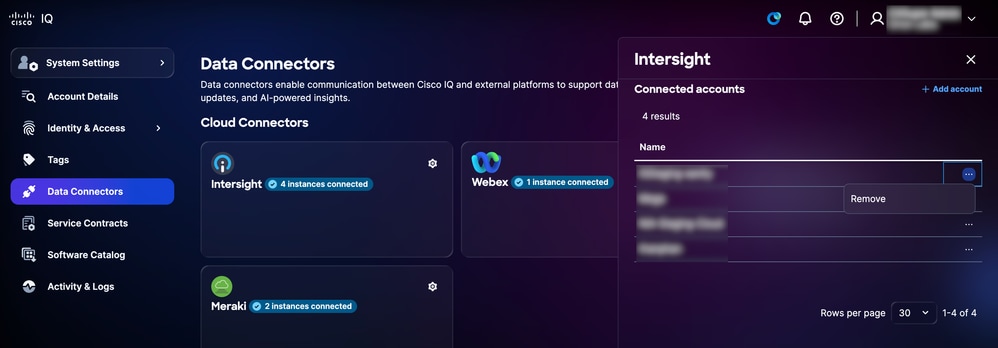 Remove Cloud Connector Connected Account
-
From the desired account, choose the More Options icon > Remove. A confirmation displays.
-
Click Remove to confirm.
Removing Cisco IQ Link Instances
To remove a Cisco IQ Link instance from your data connectors:
-
Navigate to the desired Cisco IQ Link instance on the Data Connectors page.
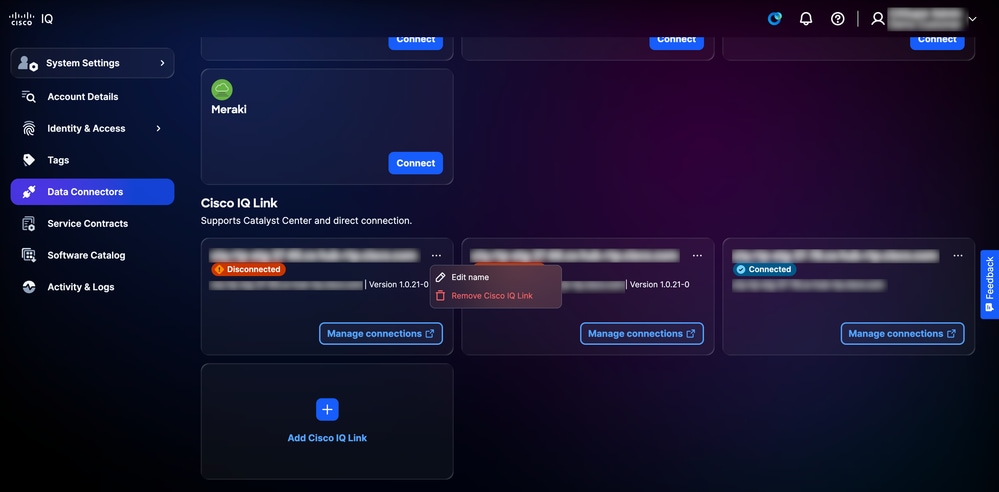 Remove Cisco IQ Link
-
Choose the More Options icon > Remove Cisco IQ Link. A confirmation displays.
-
Click Open case to open a support case to remove Cisco IQ Link.
Removing Legacy Collectors
To remove a connected legacy connector:
-
Navigate to the desired legacy collector on the Data Connectors page.
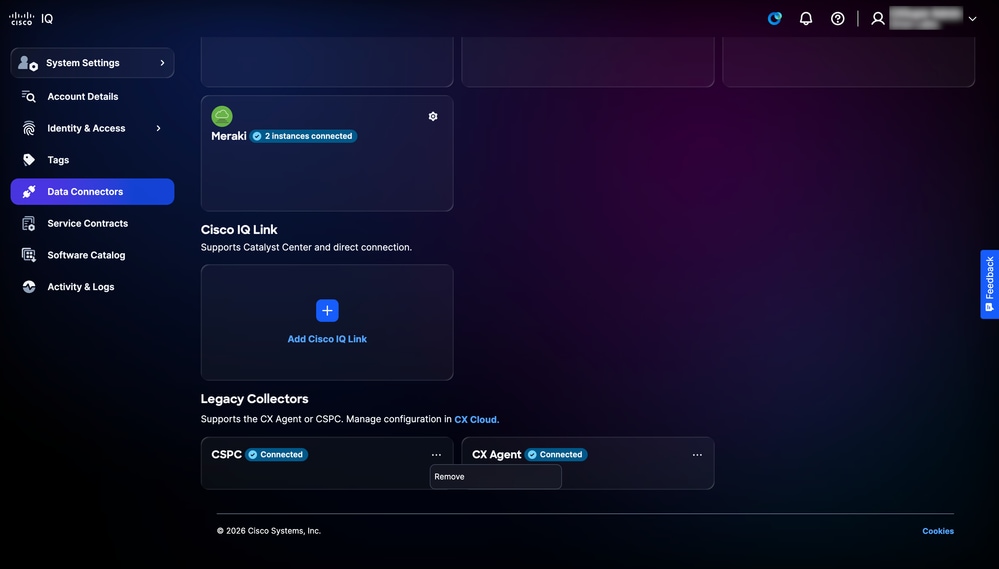 Unlink Legacy Collector
-
Choose the More Options icon > Remove. A confirmation displays.
-
Click Open case to open a support case to remove the legacy collector.
Service Contracts
Linking contracts unites data from contracts associated with different team members and incorporates devices not connected to your inventory via telemetry, centralizing support coverage visibility and preventing renewal surprises. Linking contracts requires the contract number used to open support cases.
Key benefits of Service Contracts include:
-
Creation of a centralized view of your organization’s support coverage
-
Customizable dashboards that allow you to stay ahead of your renewals months in advance
-
Expansion of inventory visibility to include assets not connected to telemetry or part of air-gapped environments
Linking Contracts
To link a contract from the Service Contracts page: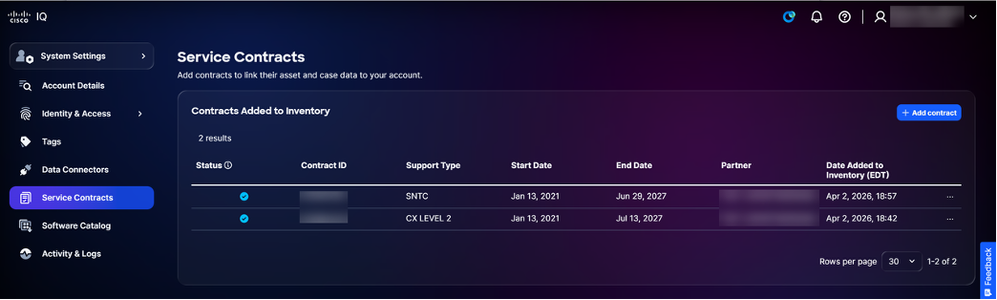 Add Comtract
-
Click Add contract. The Add Contract page displays.
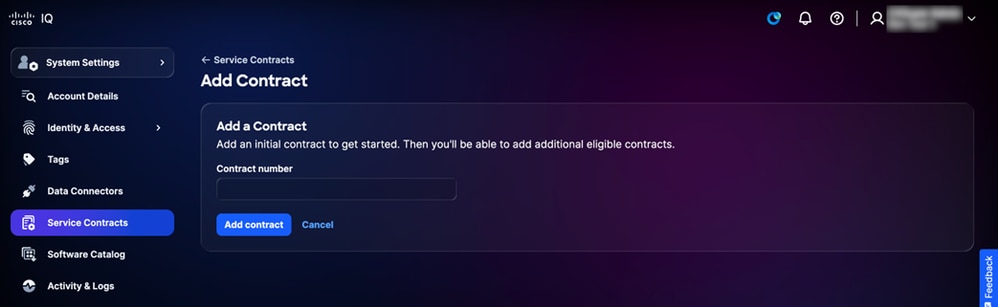 Enter Contract Number
 -
Enter the Contract number.
-
Click Add contract. The contract is added to the account.
Software Catalog
The Software Catalog displays software instances available to you. It empowers you to monitor and manage updates seamlessly, ensuring efficient tracking and management of your system instances.
To access the Software Catalog, navigate to Home > System Settings > Software Catalog. The Software Catalog page displays. On this page, available software instances display as Link collector availability cards. Each Link collector availability card displays a software instance’s name, description, publisher, and version.
Viewing Details for Software Instances
To view release notes for a software instance, click Details. A window opens with the instance’s most recent release notes. To view previous release notes, choose a release version from the drop-down list.
Installing Packages for New Software Instances
To download an installer to create a new instance:
-
From a desired Link collector availability card, choose Download options > Install packages. The install package window opens.
-
Select one of the following Hypervisor options from the drop-down list:
-
ESXi: for VMware ESXi
-
Hyper-V: for Microsoft Hyper-V
-
KVM: for Linux Kernel-based Virtual Machine (KVM)
-
-
Select a Version from the drop-down list.
-
Click Download to save the file locally.
-
Deploy the file on your data center. See the Cisco IQ Link Getting Started Guide for more information.
Activity & Logs
The Activity & Logs service centralizes the tracking of all user actions and system events across Cisco IQ for compliance, troubleshooting, and monitoring. It captures immutable audit records for authentication events, authorization decisions, resource access, configuration changes, and administrative actions with detailed context including user identity, timestamps, source IP addresses, and affected resources. Activity & Logs enforces retention policies and enables flexible querying and filtering of audit events with support for time-range searches, user-based filters, and resource-specific activity tracking.
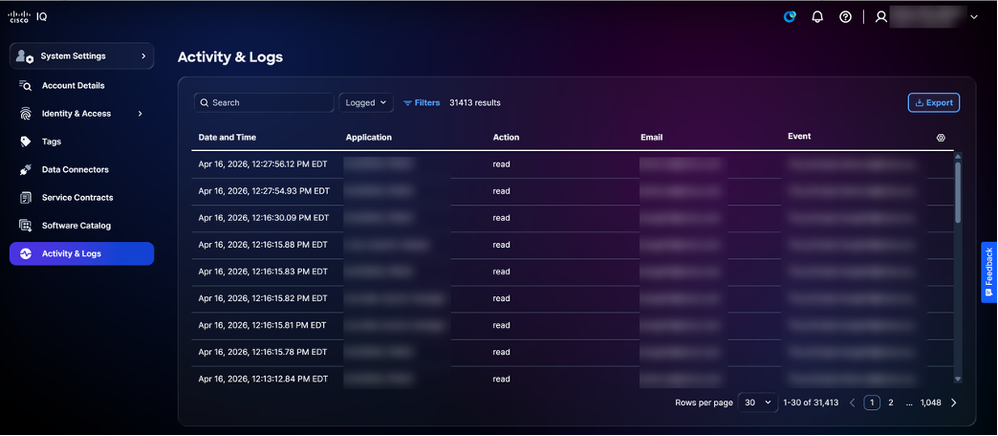 Activity & Logs
Assets Application
The Assets application delivers comprehensive visibility and management capabilities for Cisco assets and serves as the foundation of Cisco IQ, providing a centralized listing of all devices within an organization. By collecting information from multiple sources, it acts as a single source of truth for device inventory. Maintaining a complete and accurate asset list is essential, as other applications within Cisco IQ—such as the Assessments application—rely on this data to assess the health and security of your devices.
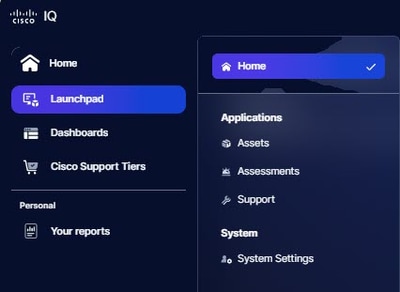 Home Menu
Core Concepts
The Assets Application is built on the following core concepts:
- Asset: Any physical device, hardware, or software that is inventoried and managed as part of Cisco’s service delivery with detailed tracking of its identity, function, service coverage, and lifecycle
- Last Date of Support (LDOS): End-of-life and end-of-support milestone tracking for Cisco products
- Service Coverage: Active support contracts, warranties, and entitlement levels associated with a specific piece of hardware or software
- Asset Tag: A user-defined label assigned to an asset for organization, filtering, and operational workflows
- Device Signal: Refers to when Cisco last observed a device (by its serial number) based on device telemetry, support cases, and contract renewals; asset telemetry data is ingested and enriched through a multi-layer data pipeline
Accessing the Assets Application
To access asset management features in Cisco IQ, choose the Home menu > Assets. The Overview page displays.
Assets Overview
The Overview page displays a dashboard that enables you to quickly evaluate the health and status of devices.
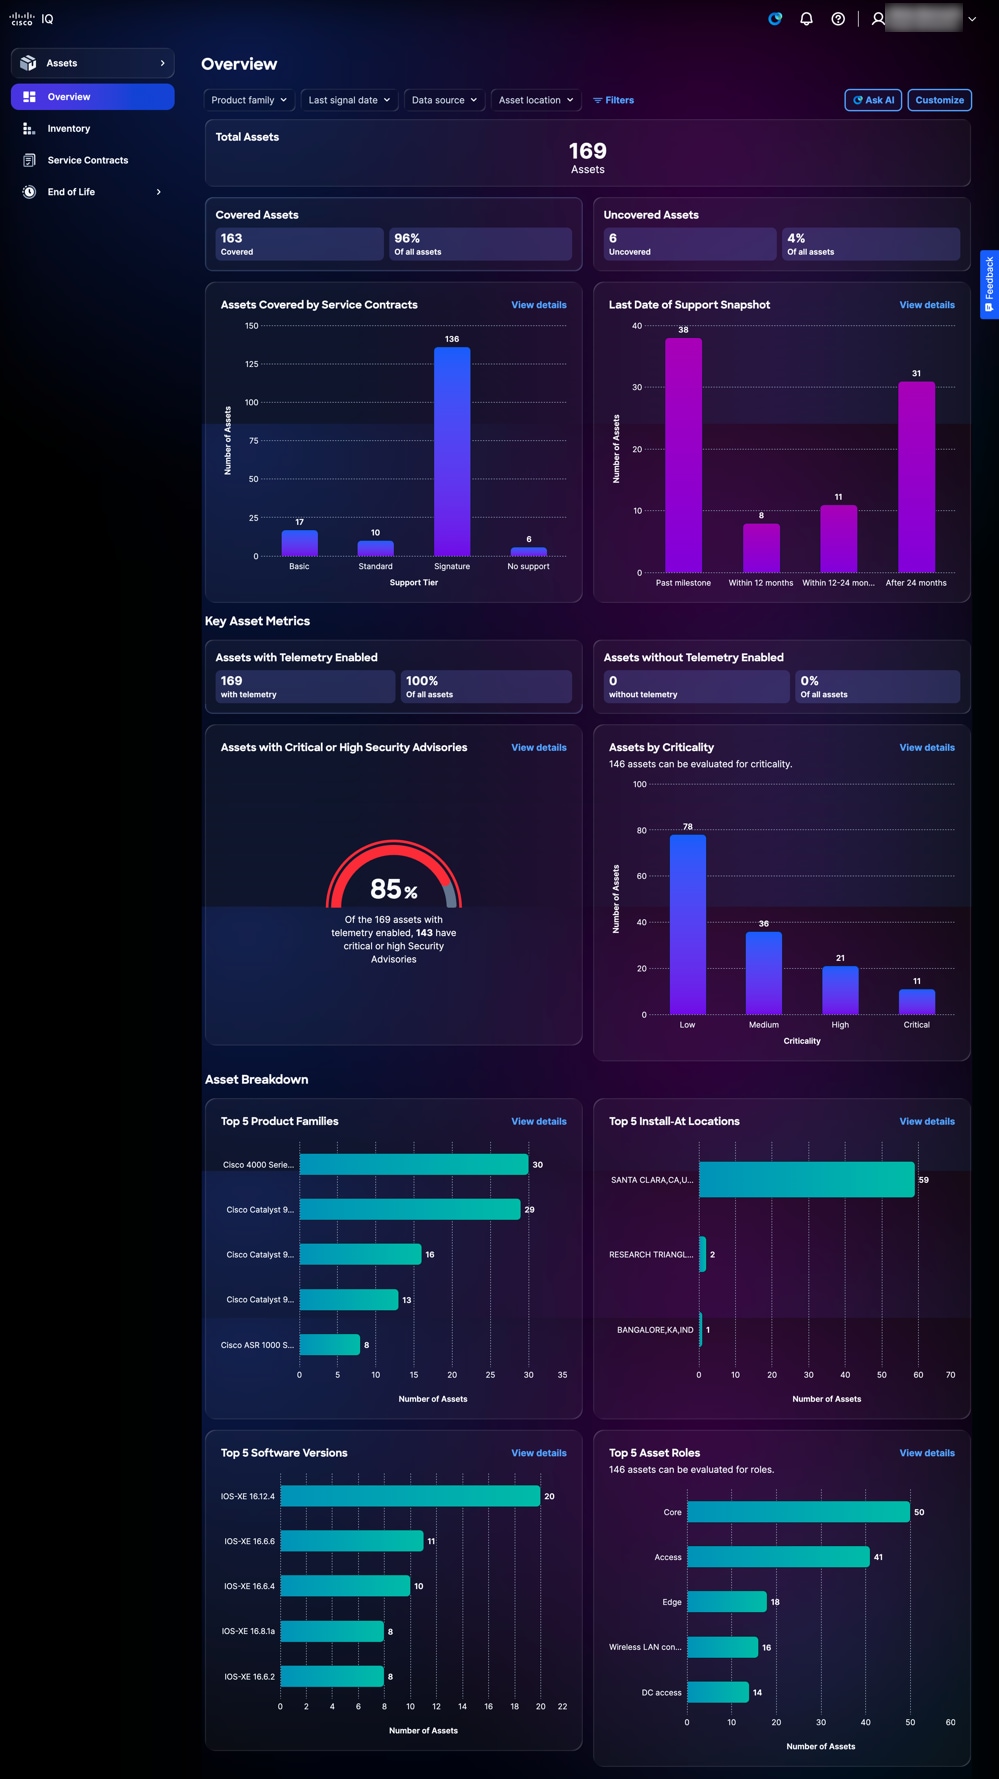 Assets Overview
The dashboard displays the following information:
-
Total Assets: The total number of assets within the Cisco IQ account
-
Covered assets: The total number and percentage of assets covered by service contracts
-
Uncovered assets: The total number and percentage of assets not covered by service contracts
-
Assets Covered by Service Contracts: A breakdown of the number of assets—hardware or software-that service contracts cover, categorized by entitlement level
-
Last Date of Support Snapshot: A breakdown of the number of assets past LDOS or reaching LDOS
-
Key Asset Metrics: Additional key metrics such as telemetry status, critical security advisories, and LDOS information
-
Assets with telemetry: Total number and percentage of assets with telemetry enabled
-
Assets without telemetry: Total number and percentage of assets without telemetry enabled
-
Assets with Critical or High Security Advisories: The percentage of total assets with telemetry enabled and have critical or high security advisories
-
Assets by Criticality: A breakdown of the priority assigned to a device relative to other devices in the network.
-
-
Asset Breakdown: A detailed display of asset information, such as product families, install-at locations, software versions, and asset roles
Filtering Views for Assets
You can filter the dashboard view by choosing a filter from the drop-down lists or clicking Filters and choosing an option from the list of available filters.
Viewing Details for Assets
When clicking View Details, the page redirects to the Inventory page. See Inventory for more information.
Asset Criticality Insights
Cisco IQ includes Asset Criticality Insights, a new capability in the Assets app that predicts the functional role and business importance of network devices. By analyzing device configurations and enabled features, Asset Criticality Insights helps you identify which assets have the greatest impact on your network — so you can prioritize them for security remediation, software upgrades, EOL planning, and coverage decisions.
Asset Criticality Insights are available in the Assets app in the following areas:
-
Assets Overview: Filter and view summary breakdowns by Asset Criticality Insights attributes
-
Assets Inventory: Display, search, filter, and sort devices by Role and Importance
-
Asset Details: View Role and Importance for individual devices, with informational tooltips explaining each value
Inventory
The Inventory page provides a list of all Cisco assets within the Cisco IQ account.
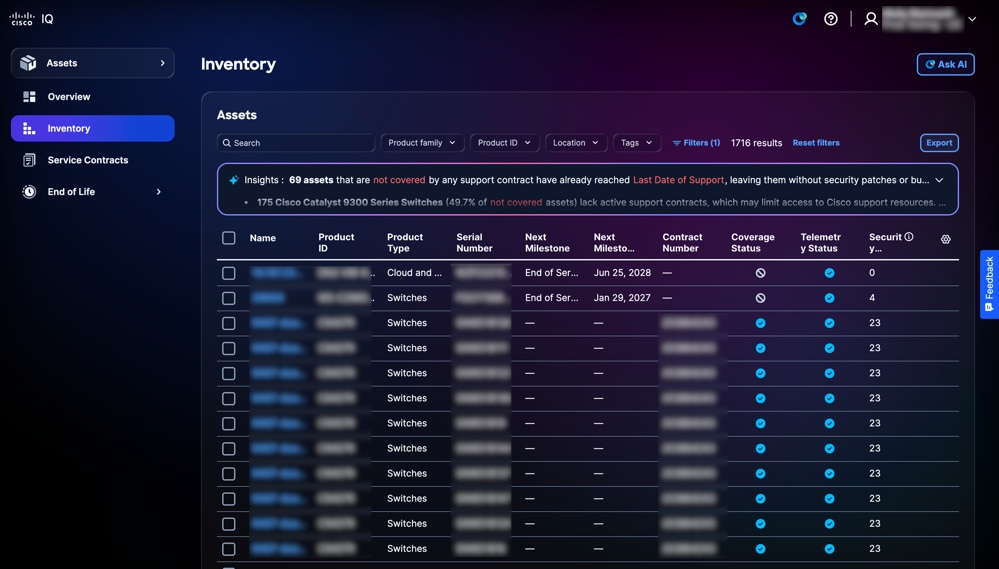 Inventory
Searching and Filtering Views for Asset Inventory
You can filter the list view by choosing a filter from the drop-down lists or clicking Filters and choosing an option from the list of available filters. You can also search for assets by entering the asset name in the Search field.
Inventory Analysis
The Insights panel on the Inventory page displays an AI-driven analysis that provides a summary of assets with a focus on support coverage, connectivity, and milestones. Click Full Analysis for visualizations like graphs, dashboards, and charts which provide additional insights. See Analyzing Data in Common Application Features for more details.
Exporting Inventory
Click Export to save a filtered inventory list in .xls or .csv format. See Exporting Information in Common Application Features for more details.
Viewing Asset Details
Click an asset to view asset details. An asset’s detail view displays with the following tabs:
- Details: Displays asset details such as product, signal data, identity, location, warranty, and coverage information
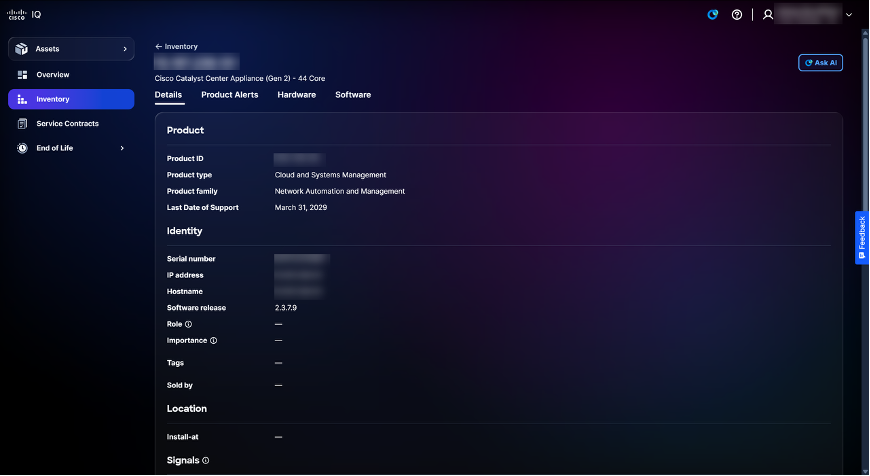 Asset Details
-
Product Alerts: Displays related product alerts such as Security Advisories and Field Notices
-
Hardware: Provides a detailed timeline view for hardware EOL (for example, End of Sale, Last Ship, and Last Date of Support dates)
-
Software: Provides a detailed timeline view for software EOL
Asset Tags
Asset tags are custom labels you assign to inventory assets in Cisco IQ. A tag is a key:value pair—for example, Environment:Prod or Label:Campus—that you define. You can assign tags to individual assets or many assets at once, and you can filter your inventory by tag to quickly find the assets you care about.
Creating and Deleting Asset Tags
See Tags in System Settings for more information about creating and deleting asset tags
Assigning Tags
Assigning tags to selected assets in the Inventory view enables the organization and categorization of assets for enhanced filtering, reporting, and management.
To assign a tag to an asset:
-
Navigate to Assets > Inventory.
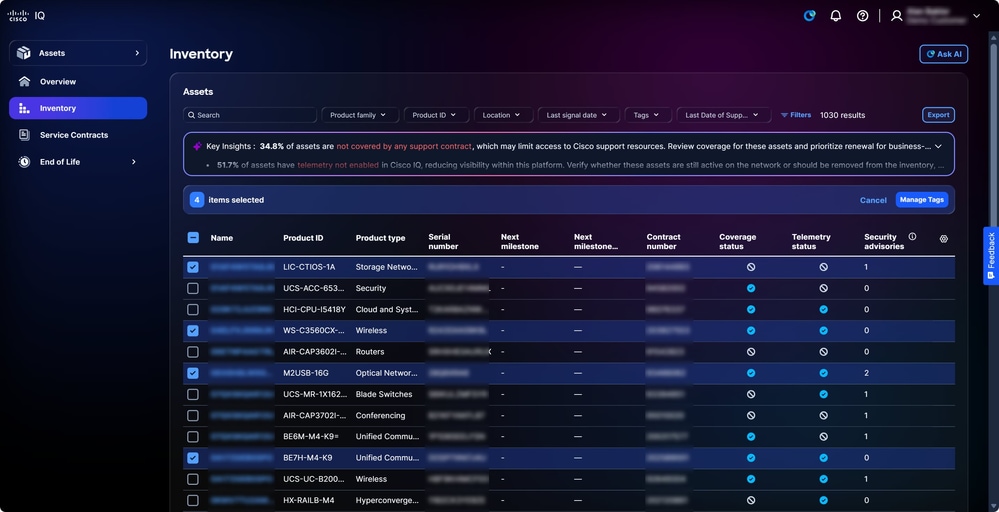 Tagging Assets
-
Select the check boxes of the desired assets.
-
Click Manage Tags. The Manage Tags window opens.
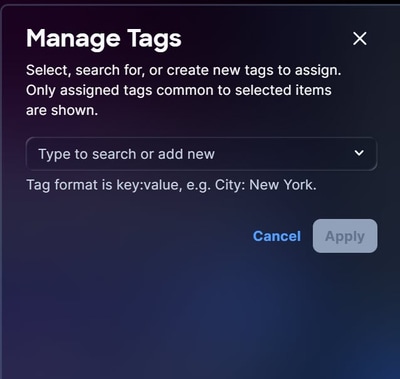 Assigning Tags
-
In the text field, input or select the tag name from the existing options and press Enter.
-
Click Apply.
Removing Asset Tags
To remove a tag from one or more assets:
-
Navigate to Assets > Inventory.
-
Select the check box next to one or more assets.
-
Click Manage tags. The Manage tags window opens.
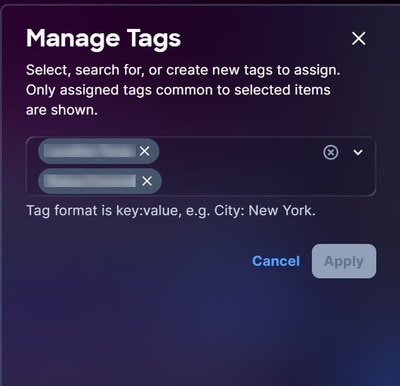 Removing Tags
-
Click the X on any tag to remove it from the selection.
-
Click Apply.
Using Asset Tags as Filters
After creating a tag, you can use the tag as a filter.
To use a tag as a filter:
-
Navigate to the Inventory page.
-
Click Filters. The Filters window opens.
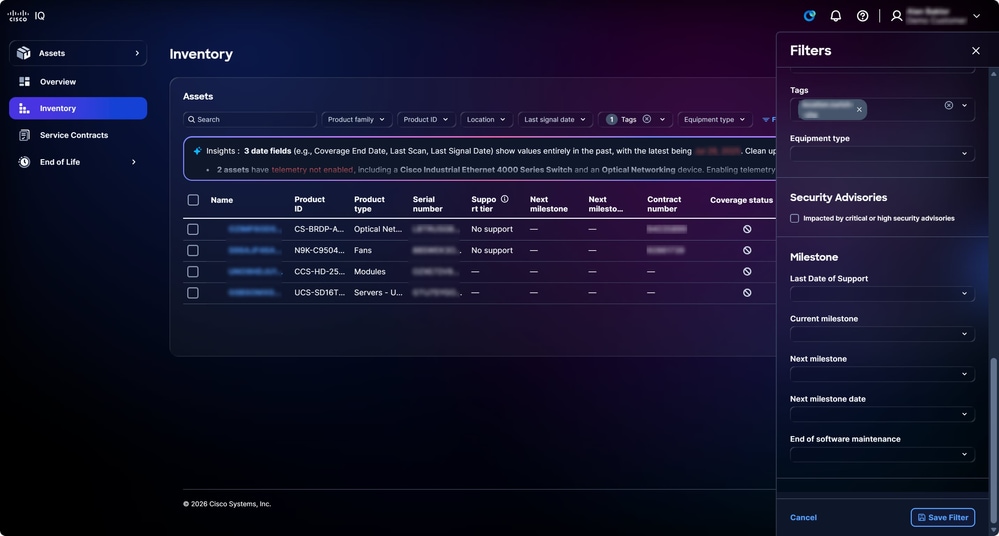 Using Tag as Filter
-
From the Tags drop-down list, check the check boxes of the desired tags. After selecting the tag, the view on the Inventory page updates to the filtered view.
Service Contracts
The Service Contracts page streamlines support contract oversight by providing summaries and detailed contract information, supporting effective renewal planning and coverage strategies.
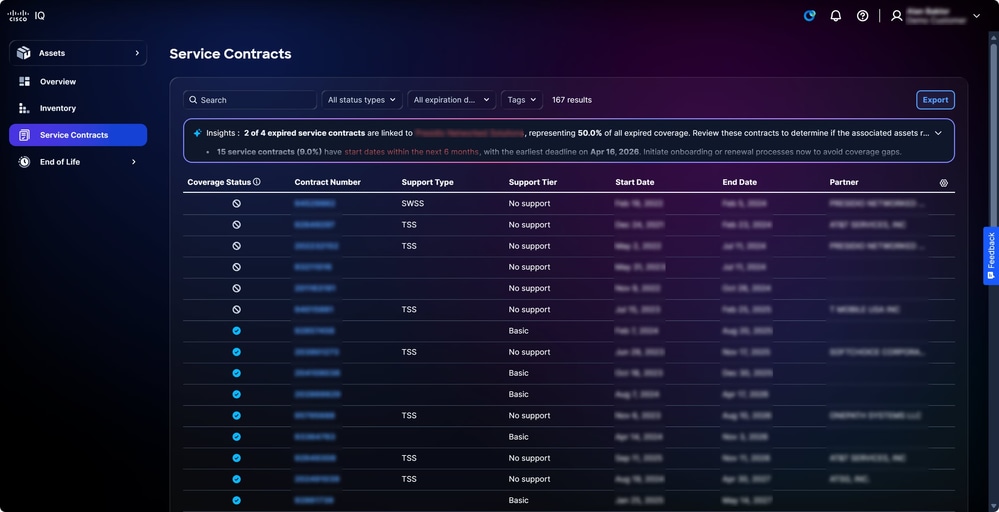 Service Contracts
Searching and Filtering Views for Service Contracts
You can filter the list view by choosing a filter from the drop-down lists. You can also search for service contracts by entering the contract number in the Search field.
Exporting Service Contracts
Click Export to save a filtered list of contracts in .xls or .csv format. See Exporting Information in Common Application Features for more details.
End of Life
The Hardware End of Life and Software End of Life pages provide detailed EOL information, equipping users with the support needed to proactively manage product refresh cycles and support coverage. Clicking an asset on the End of Life pages redirects you to the relevant asset in the Inventory page.
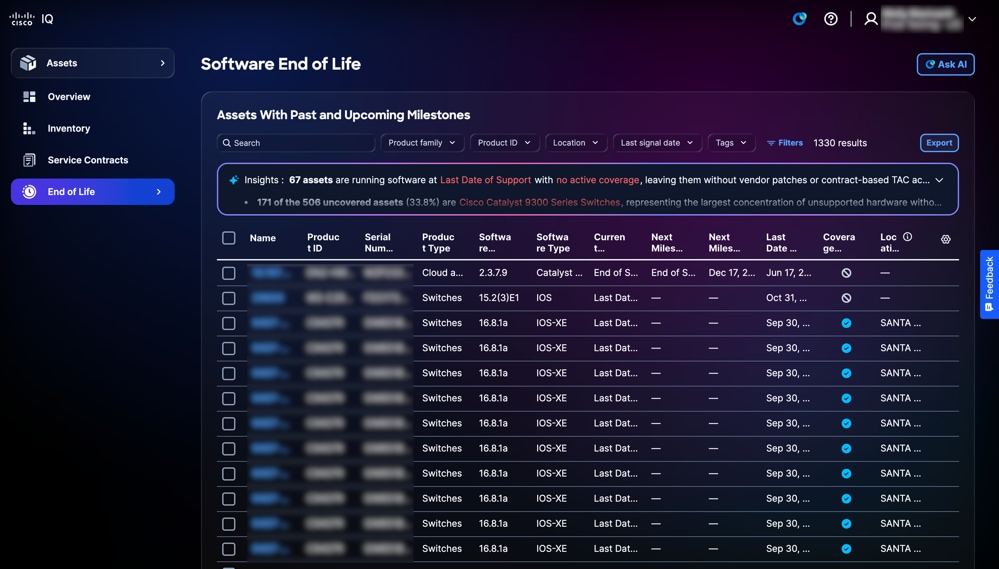 Software End of Life
End of Life Analysis
The Insights panel on the End of Life page displays an AI-driven overview of assets with a defined Last Day of Support. Click Full Analysis for visualizations like graphs, dashboards, and charts which provide additional insights. See Analyzing Data in Common Application Features for more details.
Exporting End of Life
Click Export to save a filtered list of EOL assets in .xls or .csv format. See Exporting Information in Common Application Features for more details.
Assessments Application
The Assessments application provides an assessment framework that enables users to proactively investigate and mitigate risks related to security, stability, capacity, compliance, and aging, keeping networks secure, stable, and reliable.
Core Concepts
The Assessments application is built on the following core concepts:
-
Assessment: A systematic evaluation of infrastructure entities against predefined criteria to measure performance, compliance, security, or operational capability; Assessments are triggered on demand, on a schedule, or by an event
-
Assessment Execution: An instance or single run of an assessment; Each execution creates a new execution record that tracks the scope, trigger mechanism, timestamp, and resulting data produced by the evaluation
-
Finding: A validated, actionable observation identifying a gap, risk, issue, or noteworthy state. Findings represent the ground-level data during an evaluation
-
Insight: A higher-level analytical conclusion derived from patterns or trends across multiple findings. Insights interpret what findings mean in a broader business or operational context
-
Recommendation: A specific, actionable prescription linked to findings or insights; Recommendations provide clear guidance on the necessary steps to address identified issues or capitalize on opportunities
-
Report: A structured document that aggregates findings, insights, and recommendations for a target audience; Reports are the primary deliverable for communicating assessment outcomes to customers, executives, and technical teams
Accessing Assessments Application
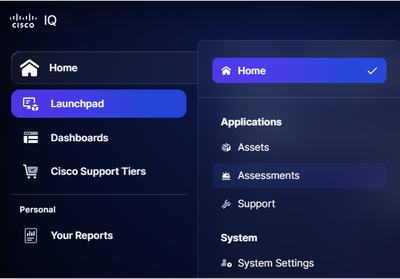 Assessments
To access security and assessment features in Cisco IQ, choose the Home menu > Assessments. The Assessments Overview page displays.
Assessments Overview
The Assessments Overview page displays the following dashboard:
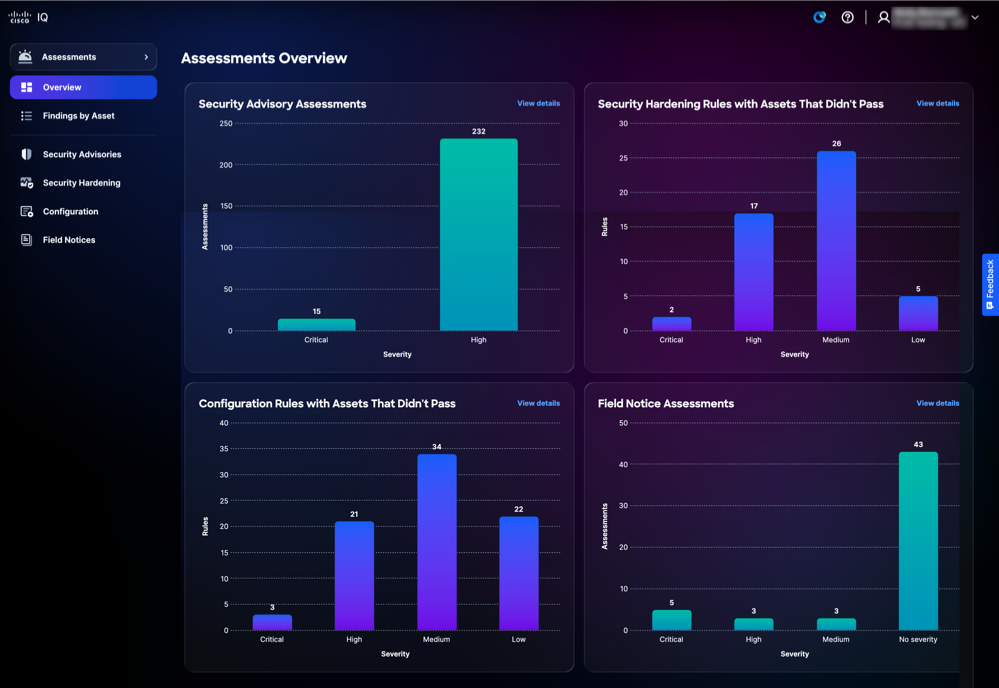 Assessments Overview
The dashboard displays the following information:
-
Security Advisory Assessments: Displays assessments of security advisories, categorized by Critical and High severity
-
Security Hardening Rules With Assets That Didn’t Pass: Displays assets failing security hardening rules, categorized by High, Medium, Low and Informational severity
-
Configuration Rules With Assets That Didn’t Pass: Displays assets failing configuration compliance rules, categorized by Critical, High, Medium, Low and Informational severity
-
Field Notice Assessments: Displays assessments of field notices, categorized by Critical, High, Medium and No severity
Findings by Asset
The Evaluated Assets page provides you with list of assets that have been evaluated using at least one of the following assessments including Security Advisories, Security Hardening, Configuration, and Field Notices.
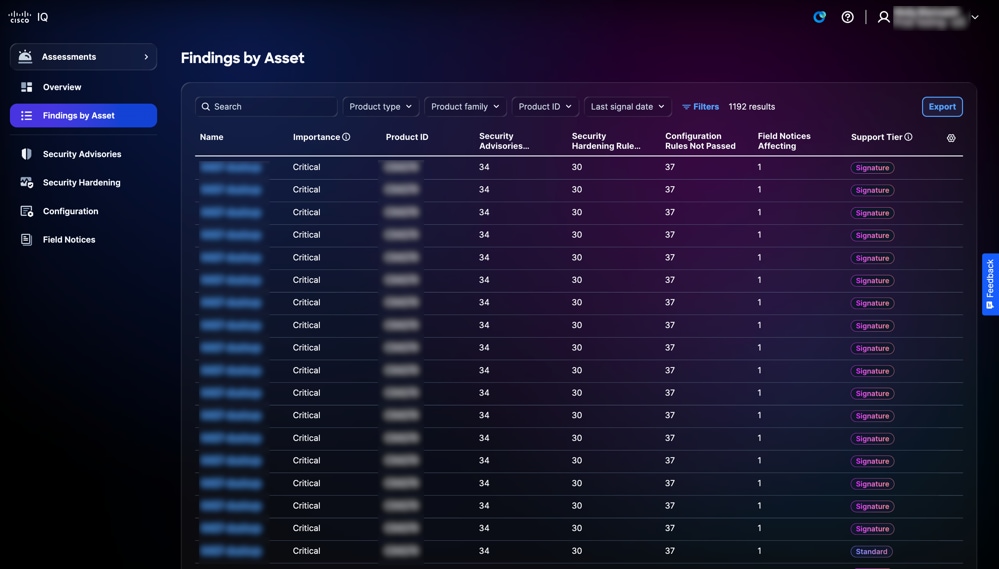 Evaluated Assets
Searching and Filtering Views for Findings by Asset
You can filter the list view by choosing a filter from the drop-down lists or clicking Filters and choosing an option from the list of available filters. You can also search for Evaluated Assets in the Search field.
Exporting Findings by Asset
To export an Evaluated Asset list view, click Export. See Exporting Information for more information about exporting.
Viewing Findings by Asset Details
To view Evaluated Asset details, click an Asset. The following tabs display details for the selected asset:
-
Summary: Provides detailed asset information including the number of Security Advisories, Security Hardening, Configuration, and Field Notices
-
Security Advisories: Provides a list of related Security Advisory assessments
-
Security Hardening: Provides a list of assets failing Security Hardening rules
-
Configuration: Provides a list of assets failing Configuration Best Practice rules
-
Field Notices: Provides a list of related Field Notice assessments
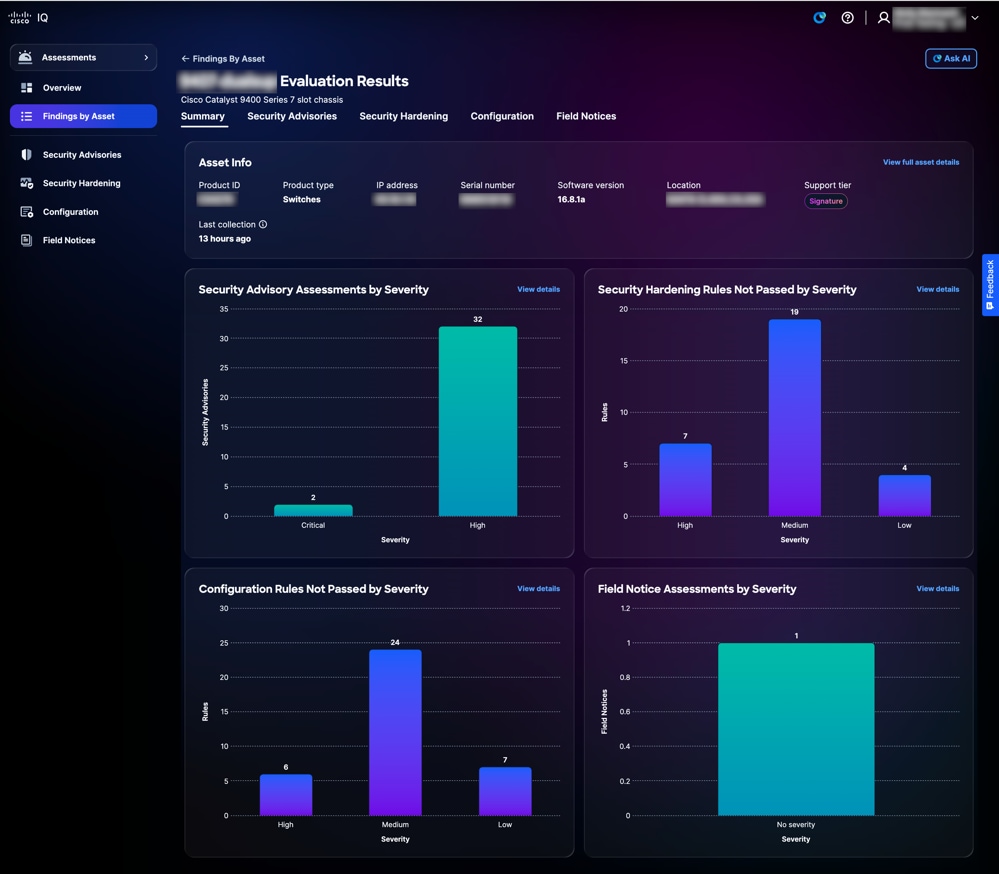 Evaluated Asset Details
When clicking View Details on a tile, the page redirects to the relevant page within the application.
When clicking View full asset details, asset detail view page displays.
Security Advisories
Security Advisory assessments identify vulnerabilities and prioritize them based on their risk, severity, and criticality, thereby enhancing the organization’s risk management capabilities. Security Advisories deliver granular insights into vulnerabilities, help accelerate mitigation of critical threats, and ensure alignment with compliance and business objectives. This strengthens security posture, optimizes resource allocation, and fosters resilience against evolving threats across the enterprise. Security Advisories are automatically updated in Cisco IQ as soon as they are released.
The Security Advisories page provides a list of all Security Advisories with vulnerabilities detected within the organization. Clicking an advisory from the Security Advisory assessments list navigates to the corresponding detail view.
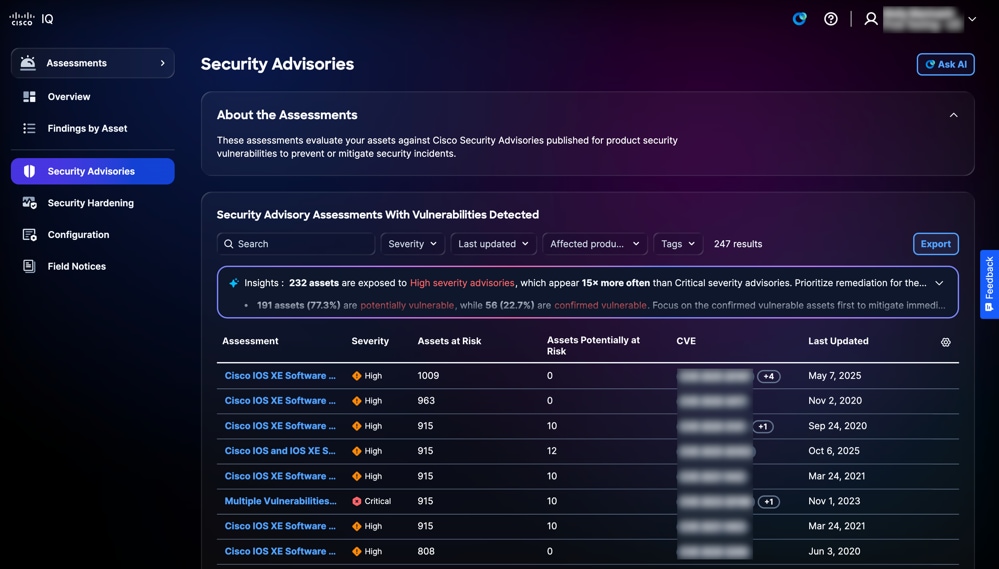 Security Advisories
Searching Filtering Views for Security Advisories
You can filter the list view by choosing a filter from the drop-down list. You can also search for Security Advisory assessments by entering the assessment name in the Search field.
Exporting Security Advisories
To export Security Advisory assessments, click Export. See Exporting Information for more information about exporting.
Viewing Security Advisory Assessment Details
To view additional details about an assessment, click an Advisory. This details page provides information such as Common Vulnerability Scoring System (CVSS) Score, Common Vulnerabilities and Exposures (CVE), Severity, and a link to the referenced Cisco Security Advisory.
You can view the following types of results in the Assessment outcome table:
-
Affected: Indicates that the asset or component has a confirmed vulnerability that can be exploited by an attacker, requiring remediation
-
Potentially Affected: Indicates that the asset or component shows signs that may lead to vulnerability, but it is not definitively confirmed; further investigation may be needed
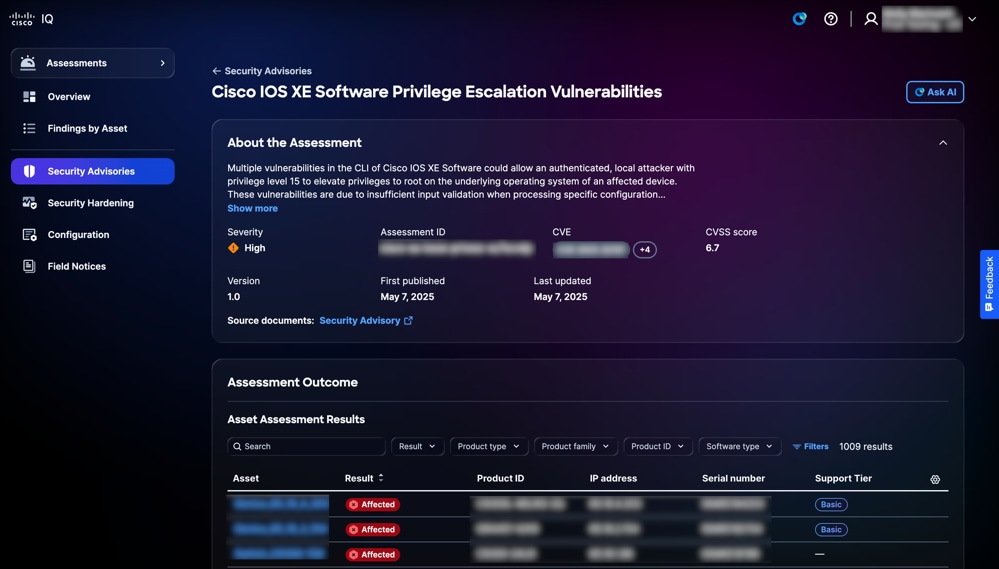 Security Advisories Details
Searching and Filtering Views for Asset Assessment Results
You can filter the list view by choosing a filter from the drop-down lists or clicking Filters and choosing an option from the list of available filters. You can also search for assets by entering the asset name in the Search field.
Viewing Asset Assessment Results
To view details of an assessment result, click an asset from the Asset Assessment Results table. The Assessment Result details page displays.
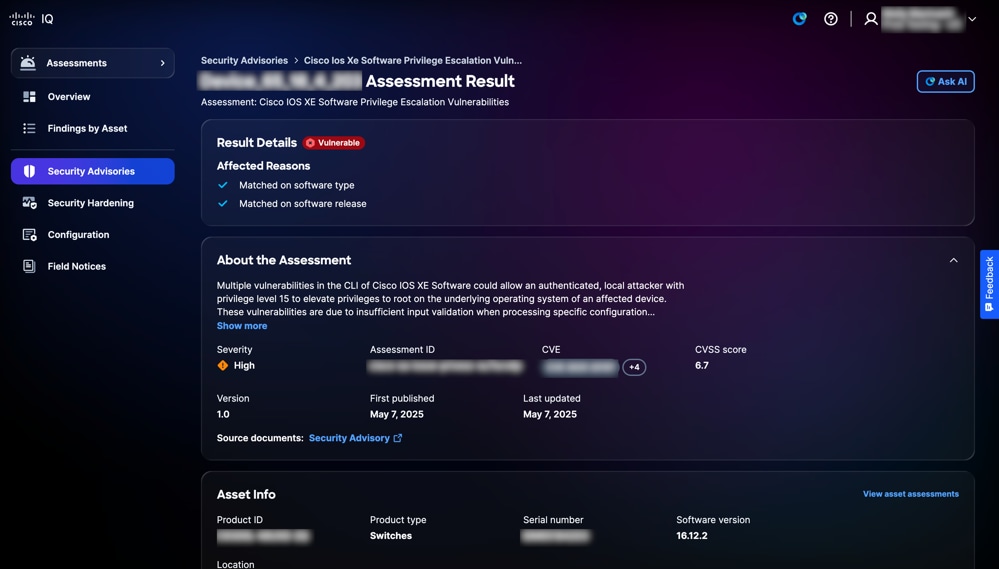 Result Details
Exporting Asset Results for Security Advisories
To export asset results, click Export. See Exporting Information for more information about exporting.
Security Hardening
Security Hardening provides automated, near real-time visibility into the security posture of your network infrastructure by continuously evaluating routers, switches, and firewalls against industry-standard benchmarks. It identifies configuration gaps and provides actionable remediation guidance, enabling administrators to effectively reduce the attack surface and maintain consistent alignment with Cisco’s rigorous security best practices. By centralizing compliance monitoring and simplifying the hardening process, the application transforms security management from a reactive task into a proactive, data-driven strategy, ensuring a resilient and secure enterprise network.
Viewing Security Hardening Assessments
To view additional details about Security Hardening, click an Assessment. The Security Hardening Assessment page displays the following information: 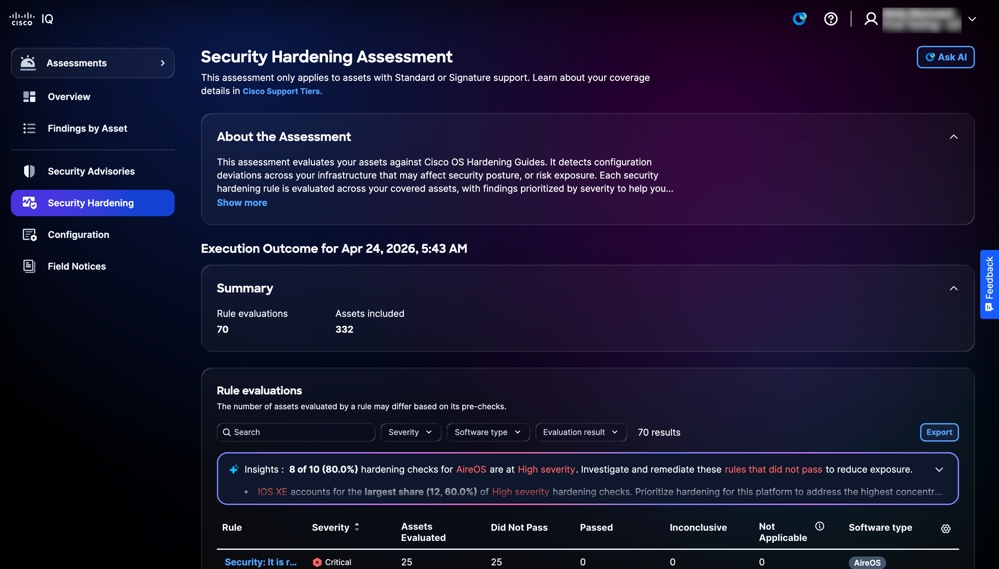 Security Hardening
-
About the Assessment: Provides additional details by summarizing the purpose of the assessment
-
Execution Summary: Provides a summary of asset assessment results, including the total number of Rule evaluations and Assets included
-
Rule evaluations: Provides detailed information about the rule, including Severity, Assets Evaluated, Did Not Pass, Passed, Inconclusive, Not Applicable, and Software type
-
Severity: Provides the level of importance or impact of the rule evaluation
-
Assets Evaluated: Provides the total number of assets that were assessed against the rule criteria
-
Did not Pass: Provides the assets that failed to meet the rule criteria during the assessment
-
Passed: Provides the assets that met the rule criteria during the assessment
- Inconclusive: Provides the assets for which the assessment could not determine failure
-
Not Applicable: Indicates the assets or scenarios where the rule does not apply or is not relevant
- Software type: Provides the software type of assets
-
Searching and Filtering Views for Rules
You can filter the list view by choosing a filter from the drop-down lists or clicking Filters and choosing an option from the list of available filters. You can also search for a rule by entering the rule name in the Search field.
Viewing Rule Evaluation Details
To view additional details about a rule evaluation, click any rule. The rule’s evaluation details page displays with the following information:
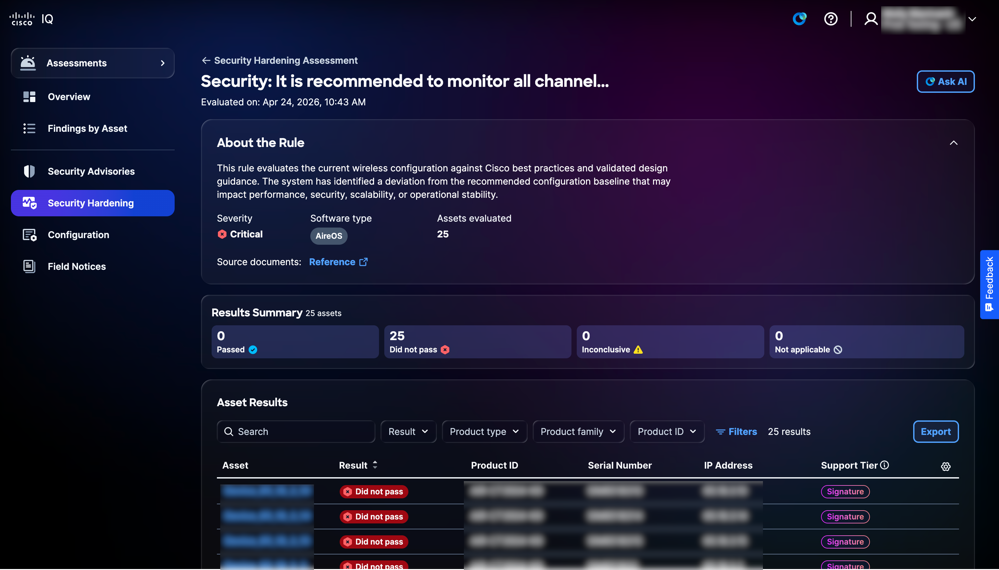 Rule View
-
About the Rule: Provides details about the rule such as Severity, Software type, Version, and Assets evaluated.
-
Results Summary: Provides a summary of asset results related to the rule such as Passed, Did not pass, Inconclusive, and Not applicable
-
Assets Results: Provides a list of assets with details such as Asset, Result, Product ID, Serial Number, IP Address, and Support Tier
Searching and Filtering Views for Asset Rules
You can filter the list view by choosing a filter from the drop-down lists or clicking Filters and choosing an option from the list of available filters. You can also search for asset assessment results by entering the asset name in the Search field.
Exporting Asset Results
To export assessment results for rules, click Export. See Exporting Information for more information about exporting.
Searching and Filtering Views for Asset Results
You can filter the list view by choosing a filter from the drop-down lists or clicking Filters and choosing an option from the list of available filters. You can also search for asset results by entering the asset name in the Search field.
Viewing Asset Results for Security Hardening
To view the details of an asset result, click an asset from Asset results. The asset result’s details page displays information according to your entitlement level or tier.
-
Standard Tier
-
Finding Details: Provides information about the configuration deviations identified during the assessment along with evidence logs
-
Recommendations: Provides guidance to address the findings and ensure configuration consistency
-
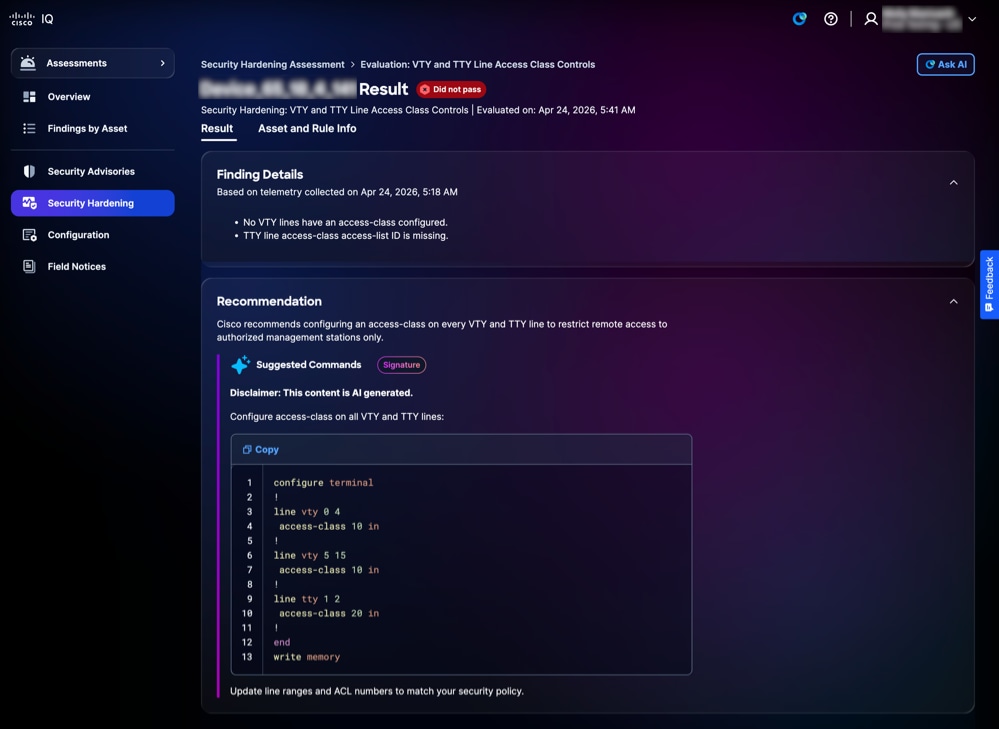 Security Hardening Signature Tier
-
Signature Tier
-
Finding Details: Provides information about the configuration deviations identified during the assessment along with evidence logs
-
Recommendation: Provides device-level, actionable guidance with code snippet to ensure configuration consistency
-
Viewing Asset and Rule Information for Security Hardening
To view the details of an Asset and its rules, click the Asset and Rule Info tab. The Asset and Rule Info page displays.
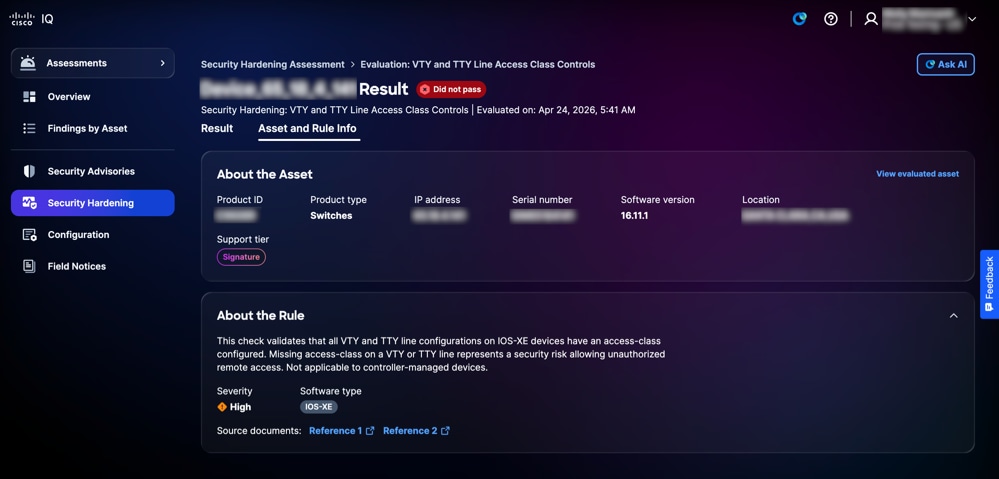 Asset and Rule Info
-
About the Asset: Provides the details of the asset such as Product ID, Product type, IP address, Serial number, Software version, Location, and Support Tier
-
About the Rule: Provides rule details (including Severity and Software type) and the importance of that particular hardening check
Configuration
Configuration assessments evaluate your assets against recommended best practices based on Cisco’s proven expertise to detect configuration deviations that may affect availability, security, or performance across your infrastructure. Each best practice rule is assessed across your covered assets, and findings prioritized by severity to ensure configuration consistency, enhanced resilience, and reduced operational risk.
Viewing Configuration Assessment
To view additional details about configuration, click an Assessment. The Configuration Assessment page displays the following information:
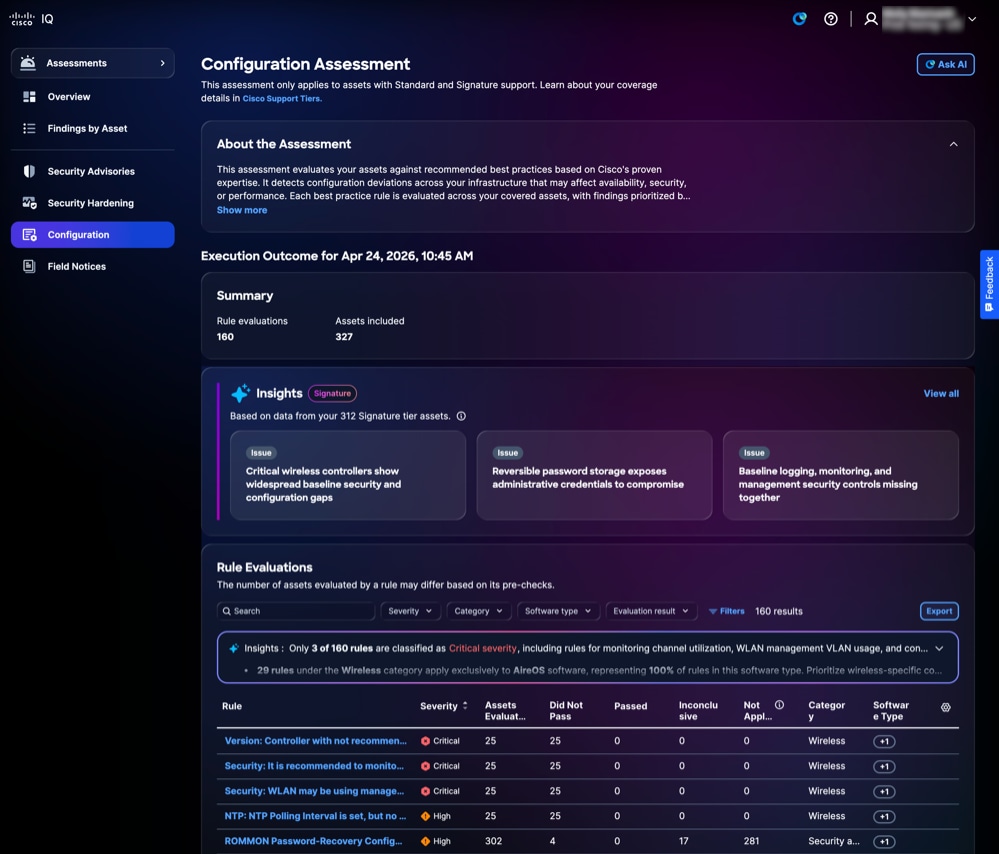 Configuration Assessment
-
About the Assessment: Provides additional details by summarizing the purpose of the assessment
-
Summary: Provides a summary of configuration execution like Rules evaluated and Assets evaluated
-
Insights: Provides insights into identified configuration gaps generated through pattern analysis and a correlation of findings; they are displayed as intelligently grouped key cards to highlight the most critical areas that require attention
-
Rule Evaluations: Provides detailed information about the rule, including Severity, Assets Evaluated, Did Not Pass, Passed, Inconclusive, Not Applicable, Category, and Software type
-
Severity: Provides the level of importance or impact of the rule evaluation
-
Assets Evaluated: Provides the total number of assets that were assessed against the rule criteria
-
Did not Pass: Provides the total number of assets that failed to meet the rule criteria during the assessment
-
Inconclusive: Provides the total number of assets for which the assessment could not run
-
Passed: Provides the assets that met the rule criteria during the assessment
-
Not Applicable: Indicates the assets or scenarios where the rule does not apply or is not relevant
-
Category: Provide the domain area to which the rule belongs
-
Software Type: Indicate the type of software assets to which rule applies to
-
Searching and Filtering Views for Rules
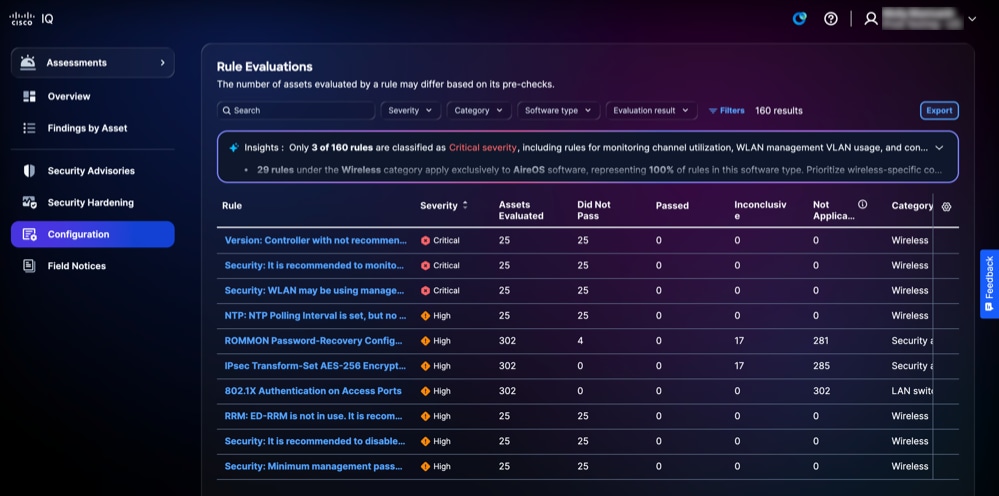 Rule Evaluations
You can filter the list view by choosing a filter from the drop-down lists or clicking Filters and choosing an option from the list of available filters. You can also search for a rule by entering the rule name in the Search field.
Viewing Rule Evaluation Details
To view additional details about a rule evaluation, click any rule. The rule’s evaluation details page displays with the following information:
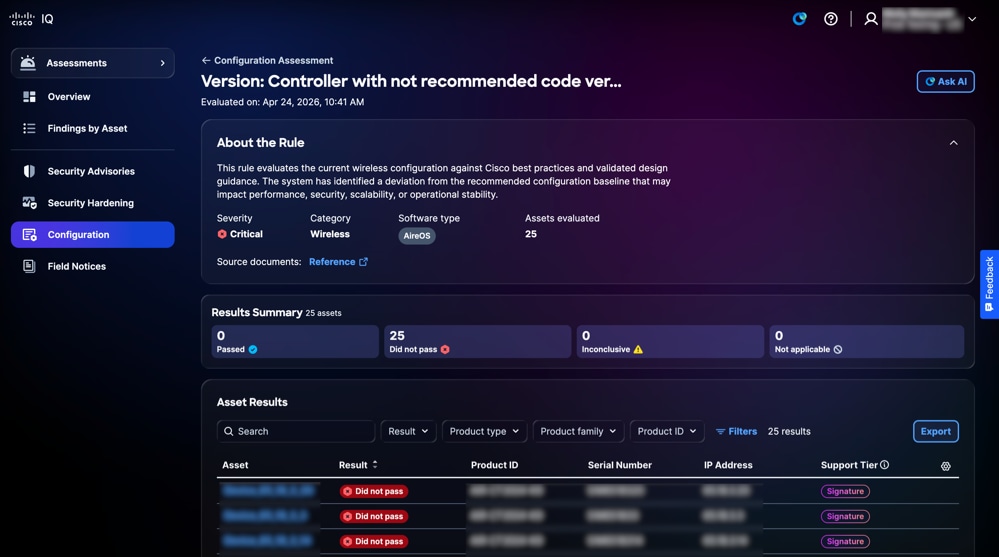 Evaluation
-
About the Rule: Provides details about a rule like Severity, Category, Software type, and Assets evaluated and includes links to relevant source documentation
-
Results Summary: Provides overall asset results by displaying the number of assets in Passed, Did not pass, Inconclusive, and Not applicable statuses
-
Asset Results: Provides a list of assets impacted by the selected rule with result status
Exporting Asset Results
To export asset results for rules, click Export. See Exporting Information for more information about exporting.
Searching and Filtering Views for Asset Results
You can filter the list view by choosing a filter from the drop-down lists or clicking Filters and choosing an option from the list of available filters. You can also search for asset results by entering the asset name in the Search field.
Viewing Asset Results for Configuration Assessments
To view details of asset results, click an asset from the Asset results.
The asset result’s details page displays information according to your entitlement level or tier.
-
Standard Tier
-
Finding Details: Provides information about the configuration deviations identified during the assessment along with evidence logs
-
Recommendations: Provides guidance to address the findings and ensure configuration consistency
-
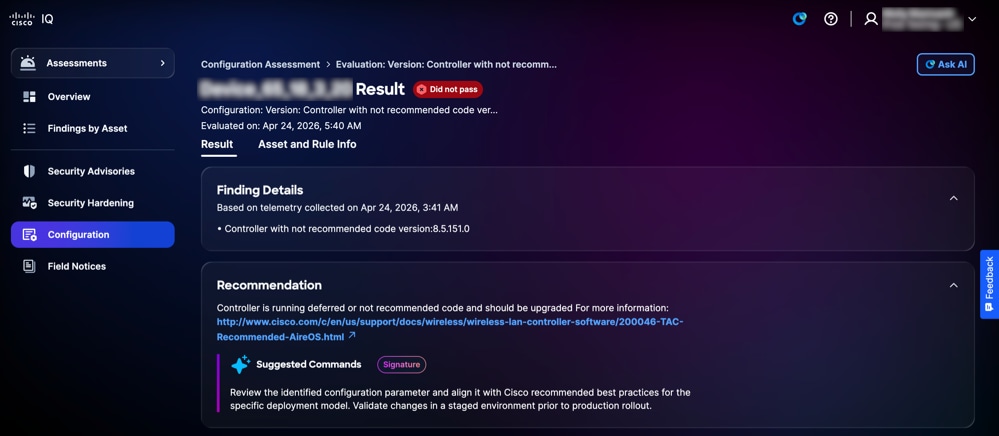 Configuration Signature Tier
-
Signature Tier
-
Finding Details: Provides information about the configuration deviations identified during the assessment along with evidence logs
-
Recommendation: Provides device-level, actionable guidance with code snippets to address the findings and ensure configuration consistency
-
Viewing Asset and Rule Information for Configuration Assessments
To view asset and rule information details, click the Asset and Rule Info tab.
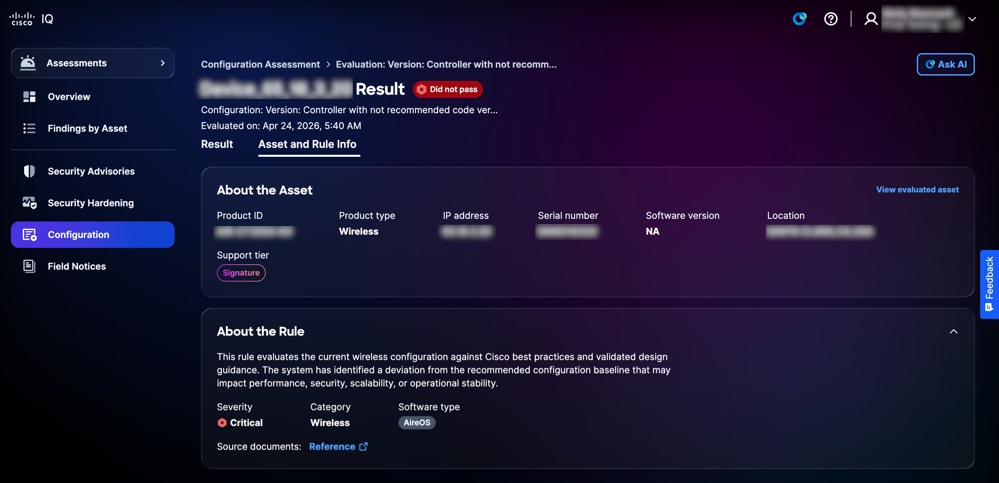 Asset and Rule Info
The Asset and Rule Info page displays with the following information:
- About the Asset: Provides the details of an asset, such as Product ID, Product type, IP address, Serial number, Software version, Location and Support tier
- About the Rule: Provides details of a rule such as Severity, Category, and Software type
Viewing Insights
Insights are AI-generated and serves as an intelligent dashboard that synthesizes assessment data into prioritized key cards, highlighting critical configuration disparities across multiple findings. It enables you to address the most impactful infrastructure risks efficiently by focusing on these urgent areas. It also highlights strengths by identifying areas where your infrastructure is performing well as per best practices.
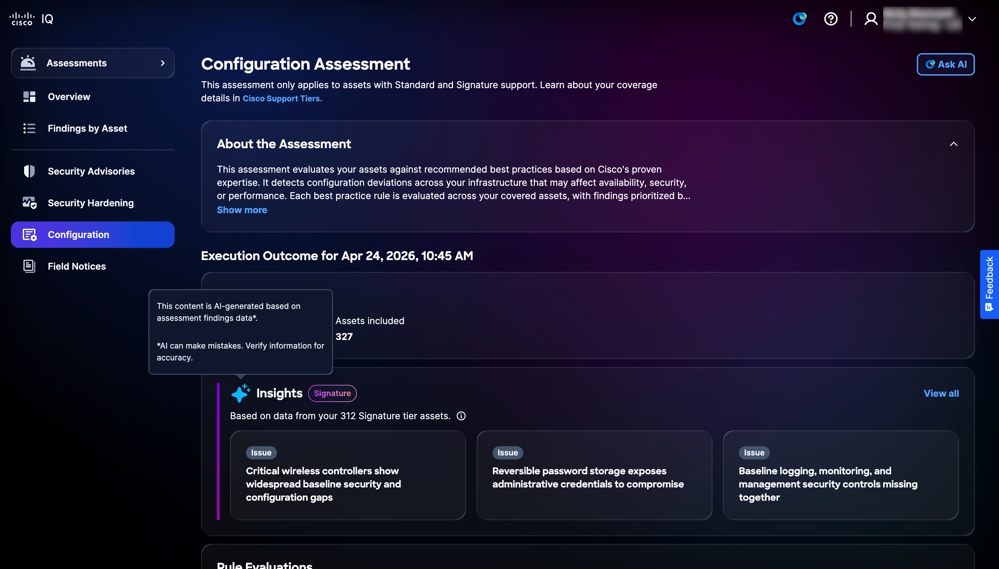 Insights
To view Insights details:
-
From the Insights panel, click View all. The Insights page displays all insights.
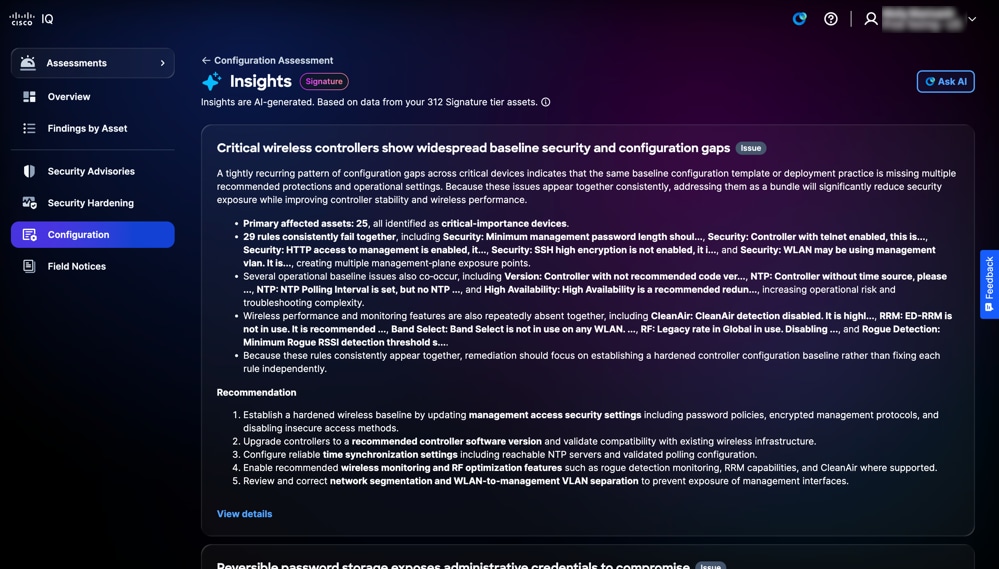 Insights Page
-
Click View details. The Insights detail page displays with the following information: You can also click any card to open the detail page.
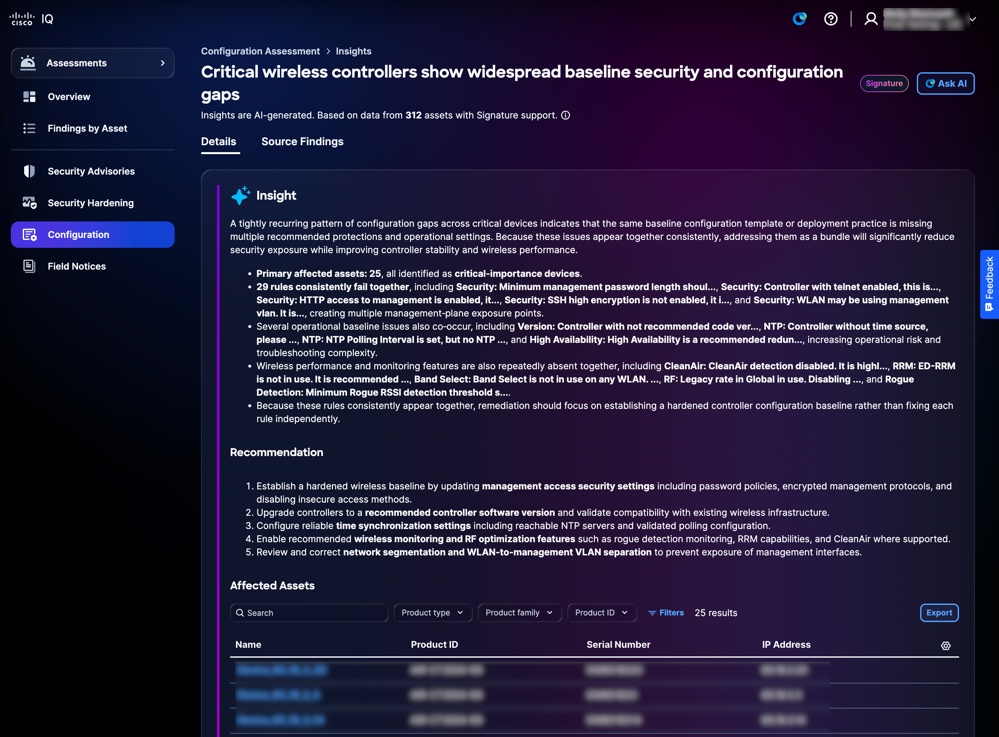 Insights Detail
-
Insight: Provide a summary that highlights recurring patterns of configuration deviations identified through comprehensive analysis across multiple findings, as well as areas of excellence in your infrastructure where configurations align with best practices
-
Recommendation: Provides actionable steps to remediate the identified configuration gaps
-
Affected Assets: Provides a list of specific devices where the configuration deviation has been identified as defined under the Insight section
-
-
Click Source Findings. The Source findings page displays the detailed individual findings that support your insights.
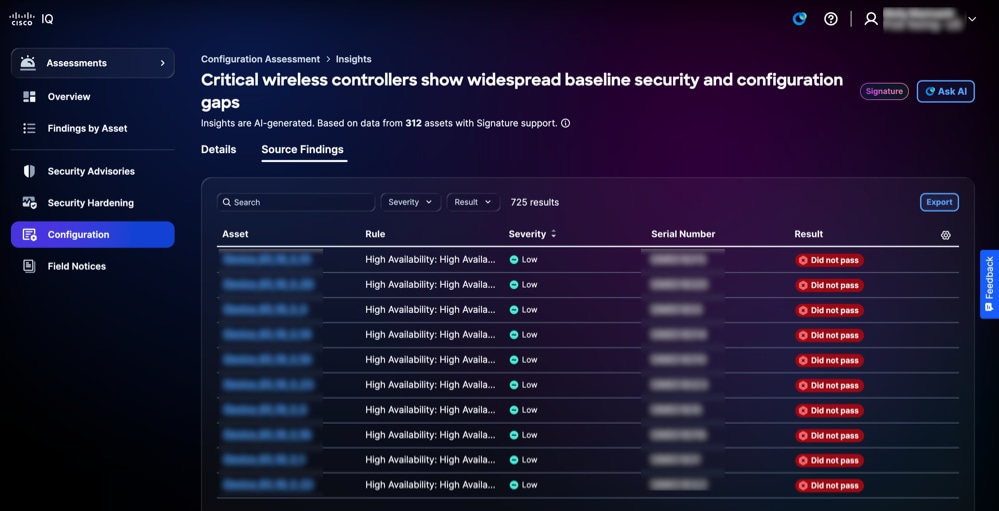 Source Findings
You can filter the table view by choosing a filter from the Severity and Result drop-down lists.
Field Notices
Field Notices identify significant non-security-related product issues and organizes them based on their impact severity and criticality, enhancing the organization’s ability to manage product risks. Field Notices deliver actionable insights into product defects, accelerate mitigation through recommended upgrades or workarounds, and ensure alignment with operational and business objectives. This strengthens product reliability, optimizes resource allocation, and fosters resilience against evolving product challenges across the enterprise.
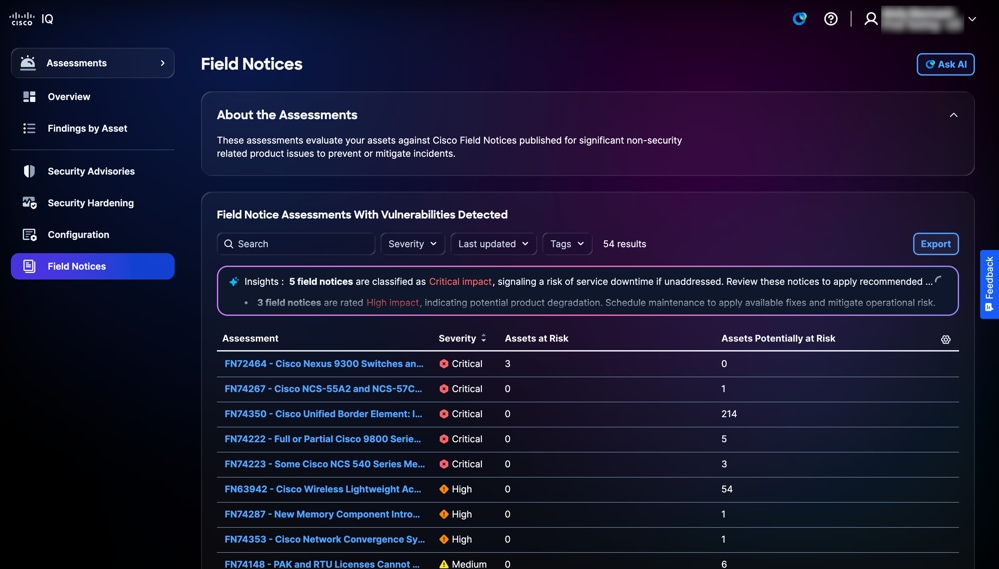 Field Notices
Searching and Filtering Views for Field Notices
You can filter the list view by choosing a filter from the drop-down lists. You can also search for field notice assessments by entering the assessment name in the Search field.
Viewing Assessments for Field Notices
To view additional details about a field notice, click an Assessment. The following asset assessment details display:
-
About the Assessment: Provides additional details by summarizing the purpose of the assessment
-
Field Notice Assessments with Vulnerabilities Detected: Displays a list of assets impacted by the selected field notice, including assets with detected vulnerabilities
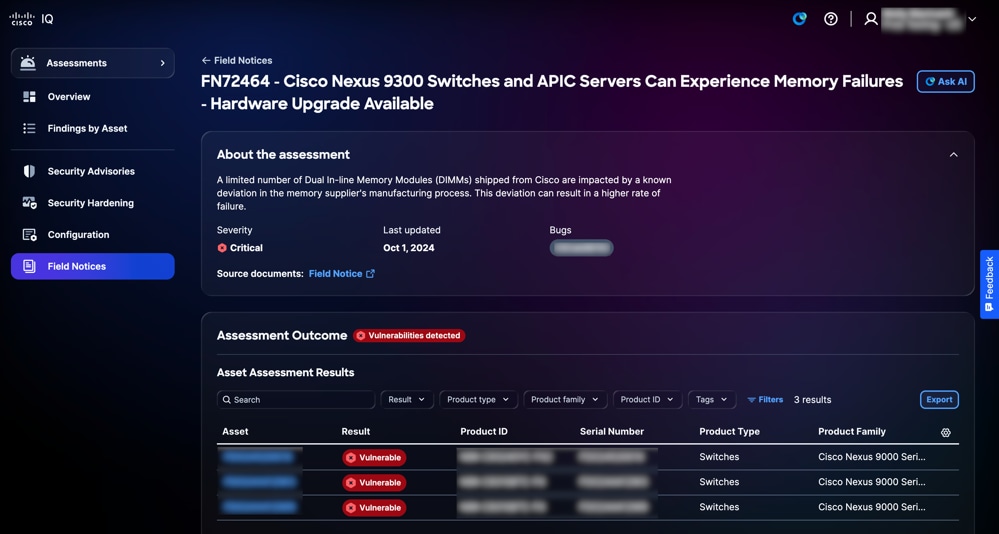 Viewing Assessments for Field Notices
Searching and Filtering Views for Asset Results for Field Notices
You can filter the list view by choosing a filter from the drop-down lists or clicking Filters and choosing an option from the list of available filters. You can also search for asset results by entering the asset name in the Search field.
Exporting Assessment Asset Results for Field Notices
To export assessment asset results for field notices, click Export. See Exporting Information for more information about exporting.
Viewing Assessment Asset Results for Field Notices
To view an assessment asset result’s details, click an asset from Asset Assessment Results. The assessment asset result’s details page displays.
You can view the following types of results:
-
Affected: Indicates assets that meet all the criteria automatically checked for a Field Notice and require no additional manual verification to confirm they are impacted
-
Potentially Affected: Indicates assets that meet all the automatically checked criteria for a Field Notice but require additional manual verification to confirm if they are truly impacted
Support Application
The Support application offers a consolidated view of customer support cases. It enables you to filter, sort, and customize the case list view, providing visibility into both open and closed cases you are entitled to access.
To access the Support application in Cisco IQ, choose Home > Support. The Support Overview page displays.
Support Overview
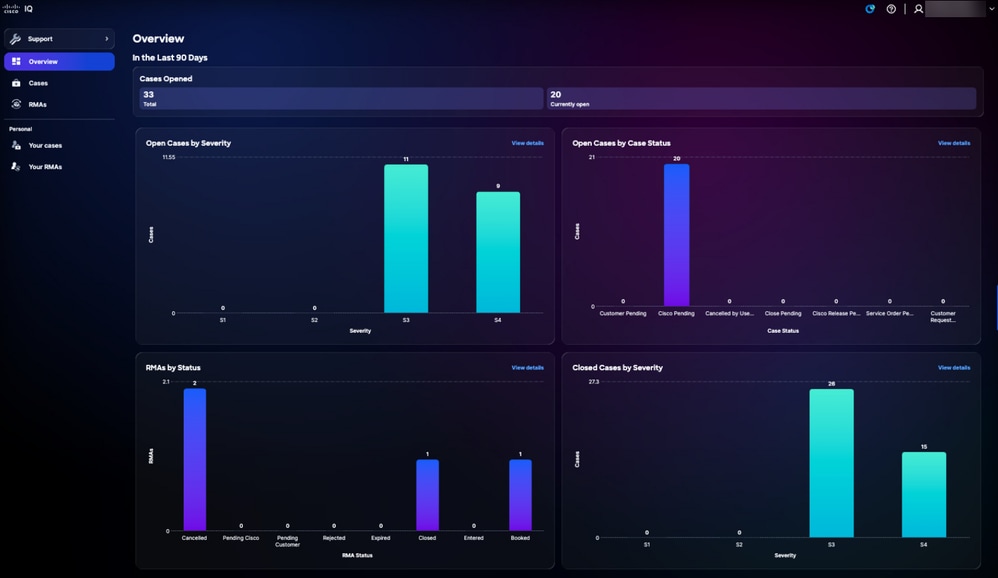 Support Overview
The Support Overview page is an interactive dashboard of graphs with the following information:
-
Open Cases by Severity: All open cases from the last 90 days categorized by S1 through S4 severity
-
Open Cases by Case Status: All open cases from the last 90 days categorized by their case status
-
RMAs by Status: All RMAs from the last 90 days categorized by their status
-
Closed Cases by Severity: The total number of closed cases from the last 90 days categorized by severity
Viewing Details for Cases
Clicking View details redirects the page to the account’s Cases page. Clicking a bar from a graph on the Overview page redirects the page to the account’s Cases page with relevant filters applied. For example, clicking the S1 severity bar from the Open Cases by Severity graph redirects to the account’s Cases page with Case status set to “Open” and Severity set to “S1”. See Cases for more information.
Cases
Account Cases
Navigate to the Cases page by clicking Cases from the left-hand panel.
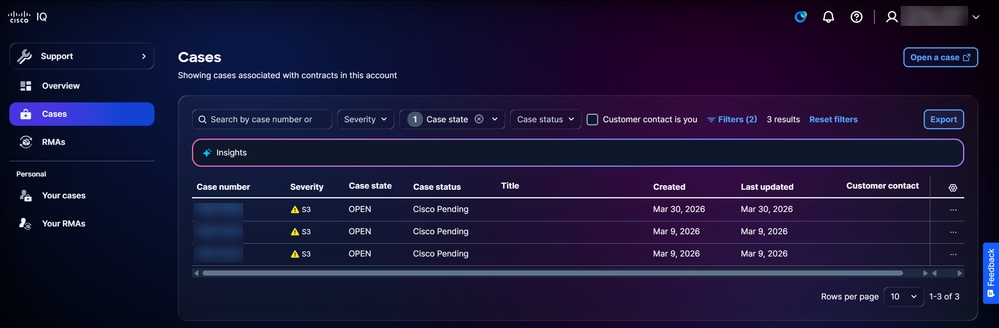 Cases
Cases
The Cases page displays a consolidated list of all cases associated with the contracts in your Cisco IQ account. You can configure the columns displayed in the list by clicking the Settings icon, checking the check boxes of the desired columns, and clicking Apply. The Case number, Severity, Case state, Case status, Title, and Created columns always display and cannot be deselected.
Available Actions
The following actions can be performed from the Cases page:
-
Open a case: Click Open a case to cross launch SCM and create a case
-
Export Data: Click Export to download all data currently displayed in the dashboard as a CSV file
-
View Case Details: Click a case number or a table row to open a case’s detail view (see Case Detail Views for more information)
-
Close a Case: Choose an open case’s More Options icon > Close case to open the Close case window, where you can provide a reason for the closure and close the case
-
Reopen a Case: Choose a closed case’s More Options icon > Reopen case to open the Reopen case window, where you can provide a reason for the reopening and open the case
Filtering Views for Cases
You can filter the list view by choosing a filter from the drop-down lists or checking the Customer contact is you check box. Optionally, click Filters and choose from the list of available filter options. Filters and selections persist across sessions and logins to personalize the dashboard. The default filters applied are:
-
Case state: Opened
-
Created: Created within 90 days
Your Cases
Navigate to the Your Cases page by clicking Your cases from the left-hand panel.
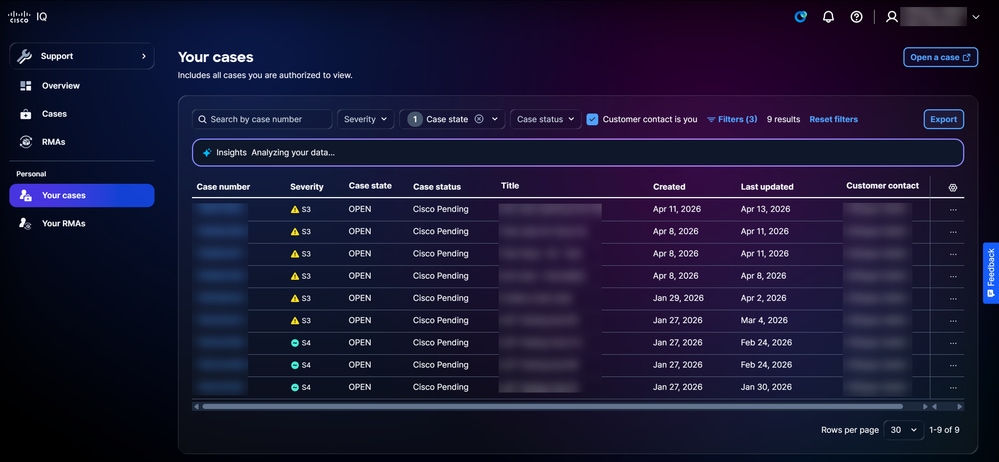 Your Cases
The Your Cases page displays a consolidated list of cases you are entitled to view and manage. You can configure the columns displayed in the list by clicking the Settings icon, checking the check boxes of the desired columns, and clicking Apply. The Case number, Severity, Case state, Case status, Title, and Created columns always display and cannot be deselected.
Available Actions
The following actions can be performed from the Your Cases page:
-
Open a Case: Open a case: Click Open a case to cross launch SCM and create a case
-
Export Data: Click Export to download all data currently displayed in the dashboard as a CSV file
-
View Case Details: Click a case number or a table row to open a case’s detail view (see Case Detail Views for more information)
-
Close a Case: Choose an open case’s More Options icon > Close case to open the Close case window, where you can provide a reason for the closure and close the case
-
Reopen a Case: Choose a closed case’s More Options icon > Reopen case to open the Reopen case window, where you can provide a reason for the reopening and open the case
Filtering Views for Your Cases
You can filter the list view by choosing a filter from the drop-down lists or checking the Customer contact is you check box. Optionally, click Filters and choose from the list of available filter options. Filters and selections persist across sessions and logins to personalize the dashboard. The default filters applied are:
-
Case state: Opened
- Customer contact is you check box
-
Created: Created within 90 days
Case Detail Views
To view a case’s details, click a case from the list.
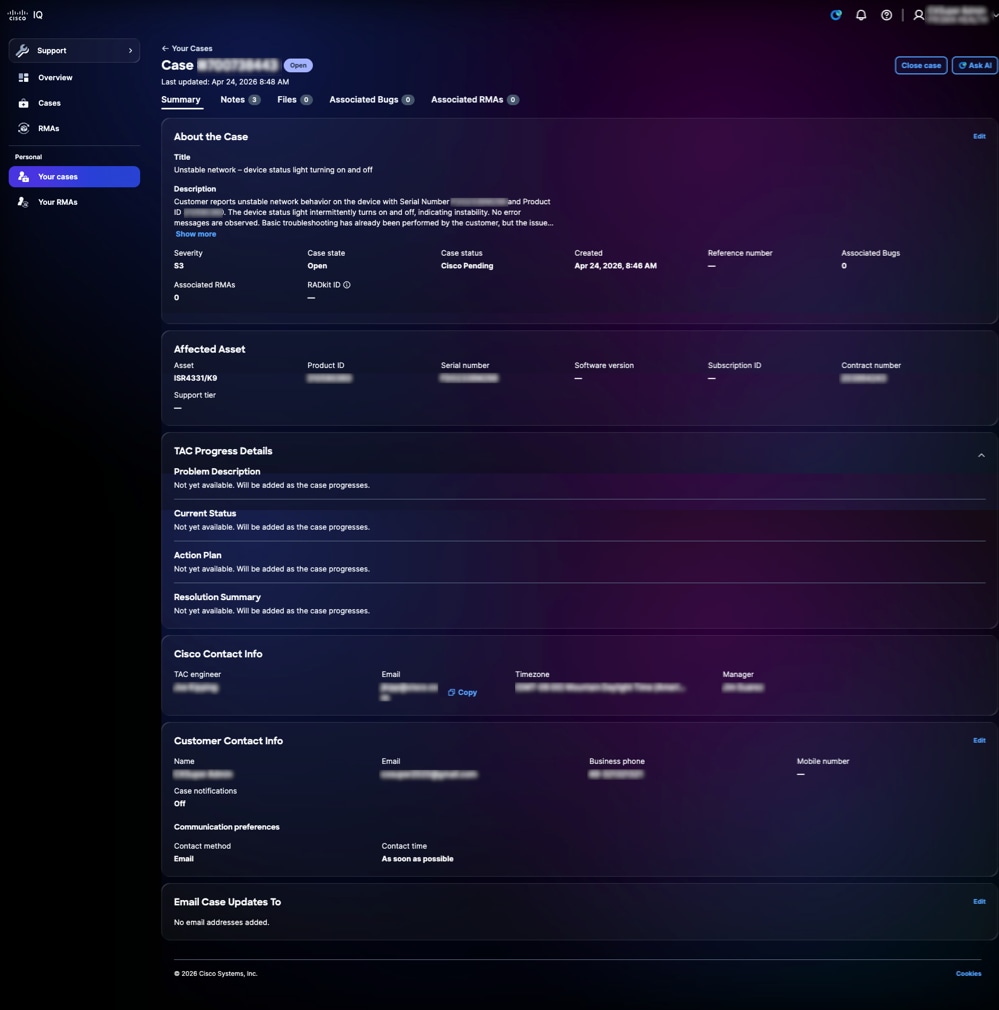 Case Detail View
The case detail view displays and provides a centralized view of a support case, allowing you to review case information, affected asset information, track TAC progress, and access available case actions. Available actions include reopening a closed case by clicking Reopen case, closing an open case by clicking Close case, and launching the AI Assistant with the case’s context by clicking Ask AI. The available tabs are described in the sections below.
 Star Icon
Summary
The Summary tab displays key case information, enabling you to quickly understand the current state, context, and progress of an individual support case. You can review case details and affected assets, monitor the lifecycle of your case through TAC progress details, modify contact information, and specify email addresses to receive case update notifications. Only select fields are editable.
Notes
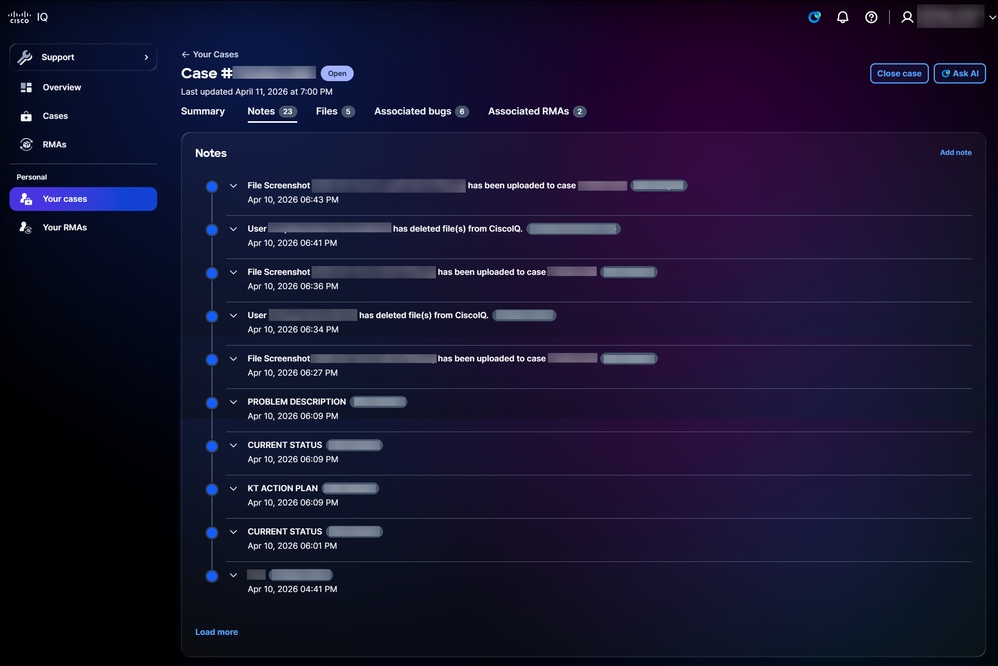 Notes
Notes
Clicking the Notes tab opens the Notes page. You can view all notes associated with a case whether a customer or Cisco Engineer submitted them.
To add a new note:
-
Click Add note. The Add note window opens.
-
Enter a Title.
-
Enter the Details.
-
Click Add.
Files
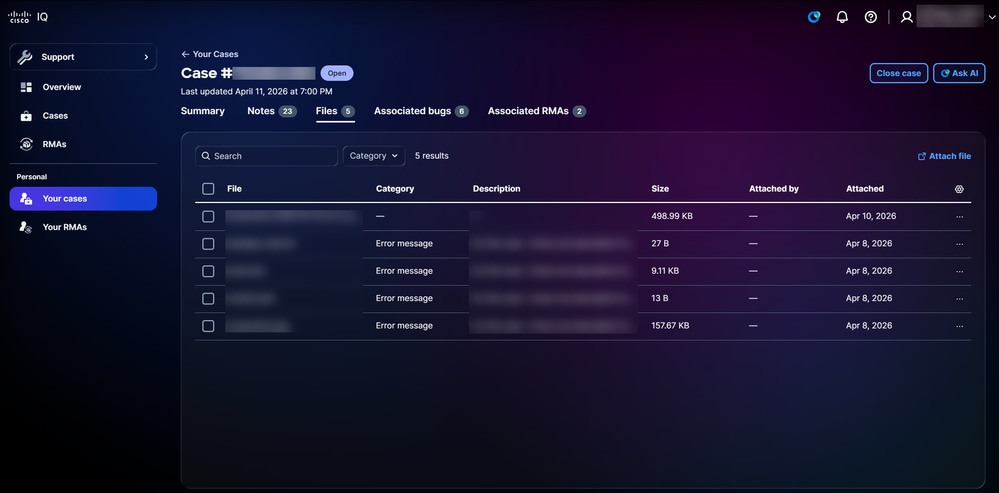 Files
Files
Clicking the Files tab opens the Files page. You can view the name, size, and date of a case’s files as well as add or delete them. Filter files by selecting an option from the Category drop-down list. Optionally, click Filters and choose from the available filter options. You can also configure the columns displayed in the list by clicking the Settings icon, checking the check boxes of the desired columns, and clicking Apply.
To add a file, click Attach file. You are redirected to SCM where you can upload a file for the case.
To delete a file, check the checkbox(es) of the desired file(s) and click Delete. The Delete file(s) window opens. Click Delete file(s).
Associated Bugs
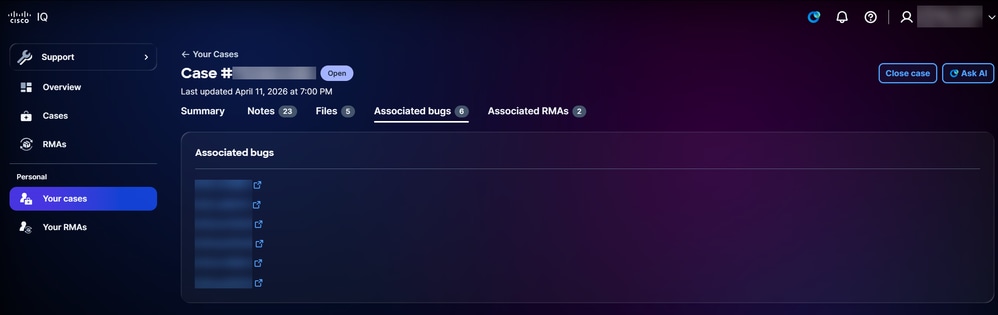 Associated Bugs
Clicking the Associated bugs tab opens the Associated bugs page. You can click a bug’s ID to cross launch detailed bug information in Cisco.com’s Bug Search Tool.
Associated RMAs
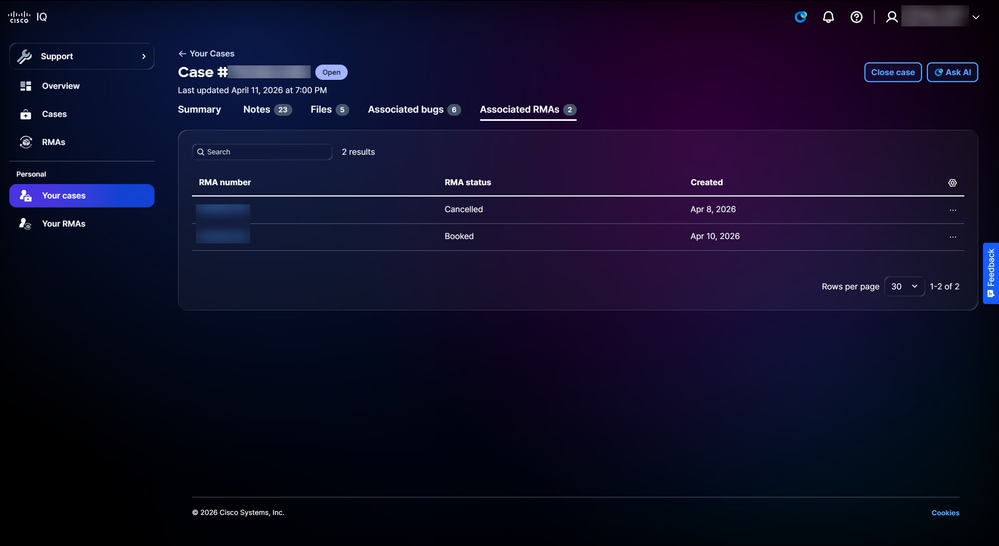 Associated RMAs
Clicking the Associated RMAs tab opens the Associated RMAs page. You can configure the columns displayed in the list by clicking the Settings icon, checking the check boxes of the desired columns, and clicking Apply. The following actions can be performed from the Associated RMAs page:
-
Close a Case: Click Close case to open the Close case window, where you can provide a reason for the closure and close the case
-
View RMA Details: Click an RMA number or table row to open a RMA’s detail view (see RMA Details Views for more information)
-
Contact Cisco Logistics: Choose a row’s More Options icon > Contact Cisco logistics to contact the Cisco Logistics Team
RMAs
Account RMAs
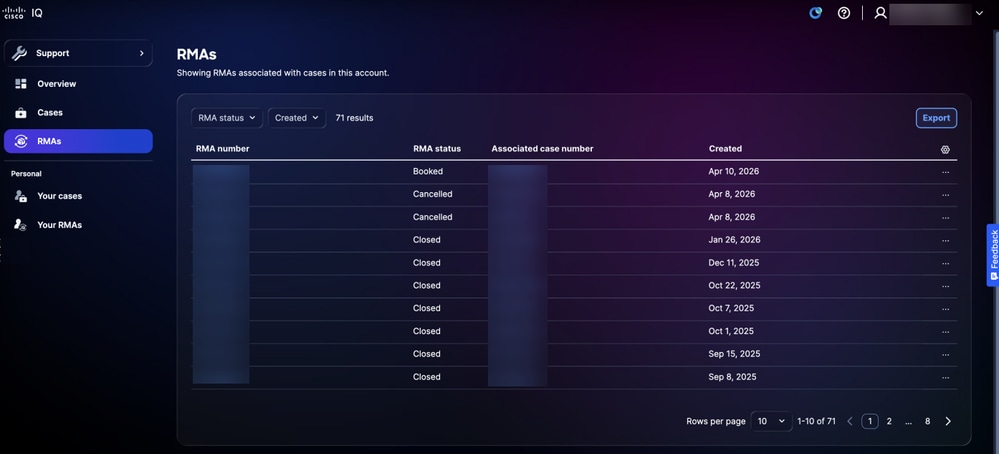 RMAs List
Navigate to the RMAs page by clicking RMAs from the left-hand panel. The RMAs page displays a consolidated list of all RMAs associated with the cases in your Cisco IQ account. You can configure the columns displayed in the list by clicking the Settings icon, checking the check boxes of the desired columns, and clicking Apply.
Available Actions
The following actions can be performed from the RMAs page:
-
Export Data: Click Export to download all data currently displayed as a CSV file
-
View RMA Details: Click an RMA number or table row to open a RMA’s detail view (see RMA Details Views for more information)
-
Contact Cisco Logistics: Choose a row’s More Options icon > Contact Cisco logistics to contact the Cisco Logistics Team
Filtering Views for Account RMAs
You can filter the list view by choosing filters from the drop-down lists.
Your RMAs
Navigate to the Your RMAs page by clicking Your RMAs from the left-hand panel.
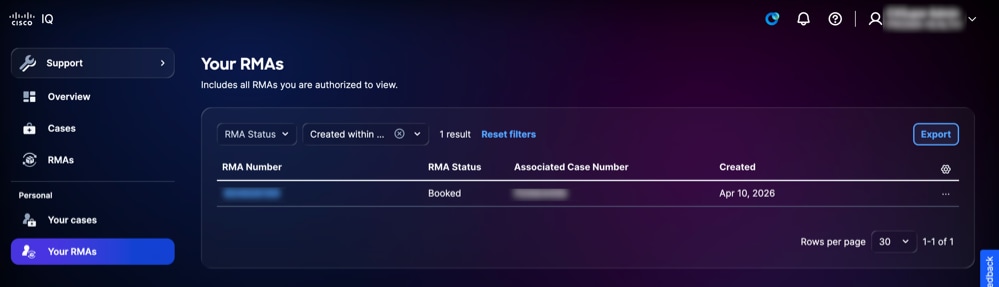 Your RMAs
The Your RMAs page displays a consolidated list of RMAs you have the necessary entitlements to view and manage. You can configure the columns displayed in the list by clicking the Settings icon, checking the check boxes of the desired columns, and clicking Apply.
Available Actions
The following actions can be performed from the Your RMAs page:
-
Export Data: Click Export to download all data currently displayed as a CSV file
-
View RMA Details: Click an RMA number or table row to open a RMA’s detail view (see RMA Details Views for more information)
-
Contact Cisco Logistics: Choose a row’s More Options icon > Contact Cisco logistics to contact the Cisco Logistics Team
Filtering Views for Your RMAs
You can filter the list view by choosing an option from the Created drop-down list.
RMA Details Views
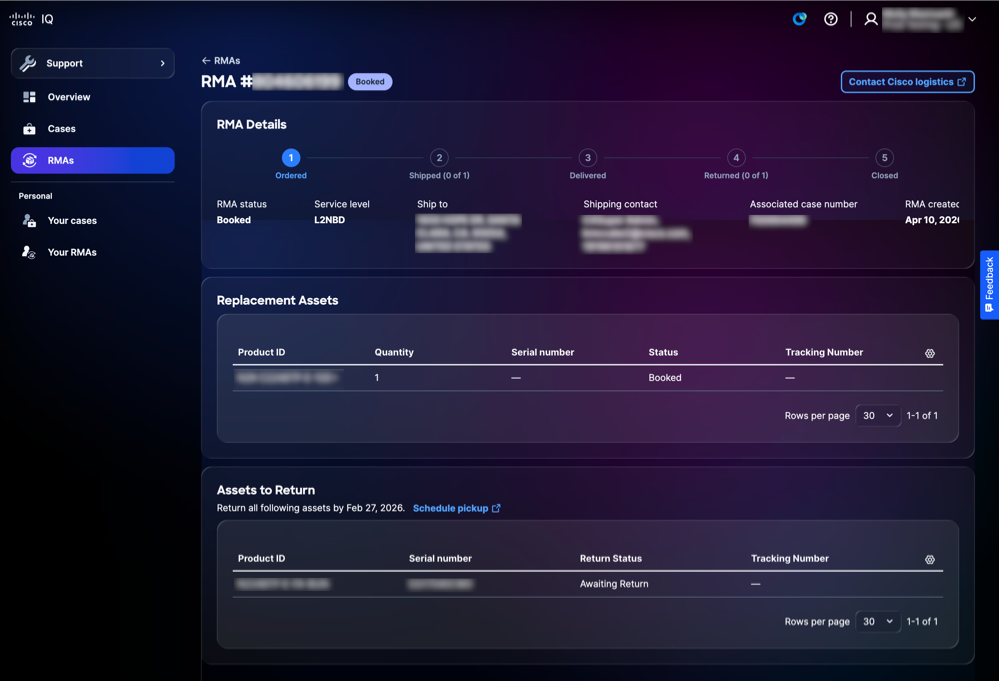 RMA Detail View
The RMA details view provides a centralized view of an RMA, allowing you to review RMA information, track progress, and access available RMA actions. Available actions include contacting the Cisco Logistics Team, accessing tracking numbers, and scheduling asset pickups.
Common Application Features
Analyzing Data
The Insights panel delivers AI-driven analysis of the data on that page, providing actionable insights to improve the security and health of your network environment.
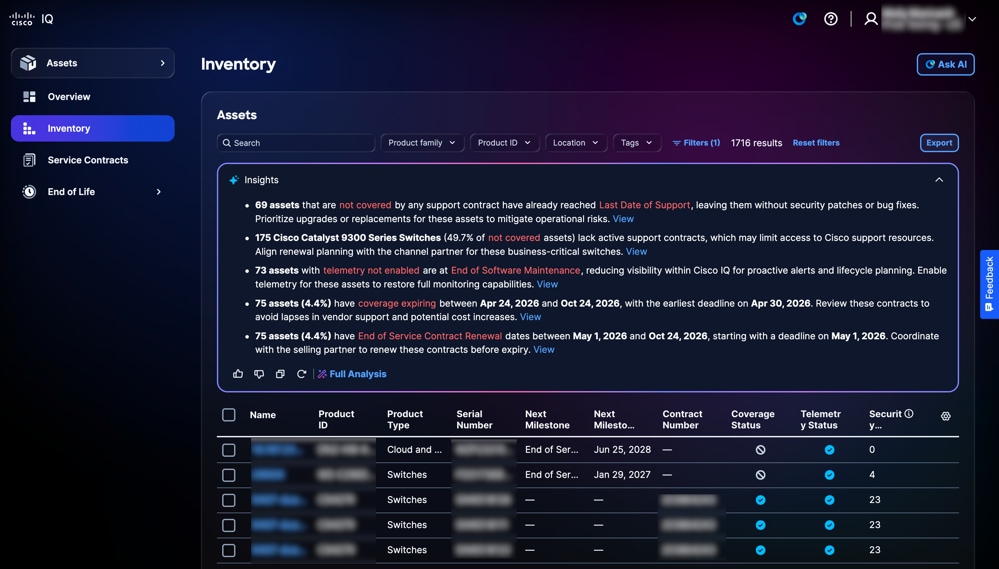 Insights Panel
The following options are available inside the Insights panel:
-
Click the Expand icon to expand the panel and display additional insights
-
Click the Thumbs Up or Thumbs Down icon down to provide feedback on the AI-generated information
-
Click Full Analysis to display additional information, deeper analysis, and visualizations like graphs, dashboards, and charts
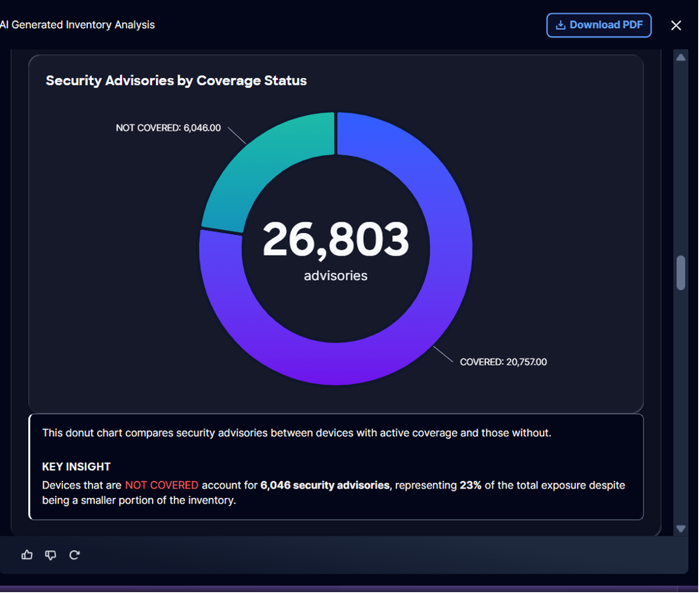 Full Analysis
The following options are available within a full analysis:
-
Click Download PDF to save an offline copy of the analysis, for your records or for collaboration
Exporting Information
The export feature allows you to export custom views for Assets and Security information in .xls or .csv format.
To export information from a page:
-
Navigate to the page.
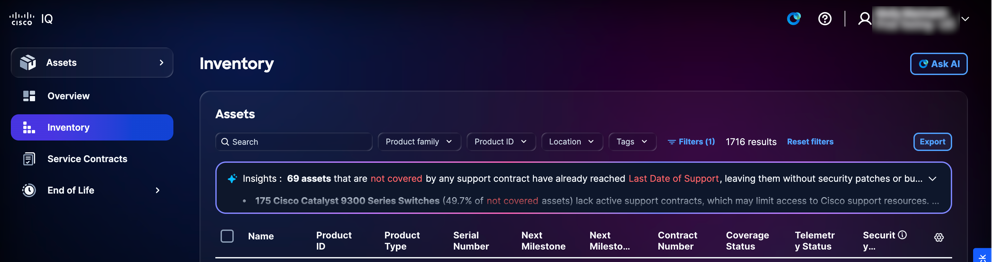 Exporting Inventory in the Assets Application
-
Click Export. The Export Options display.
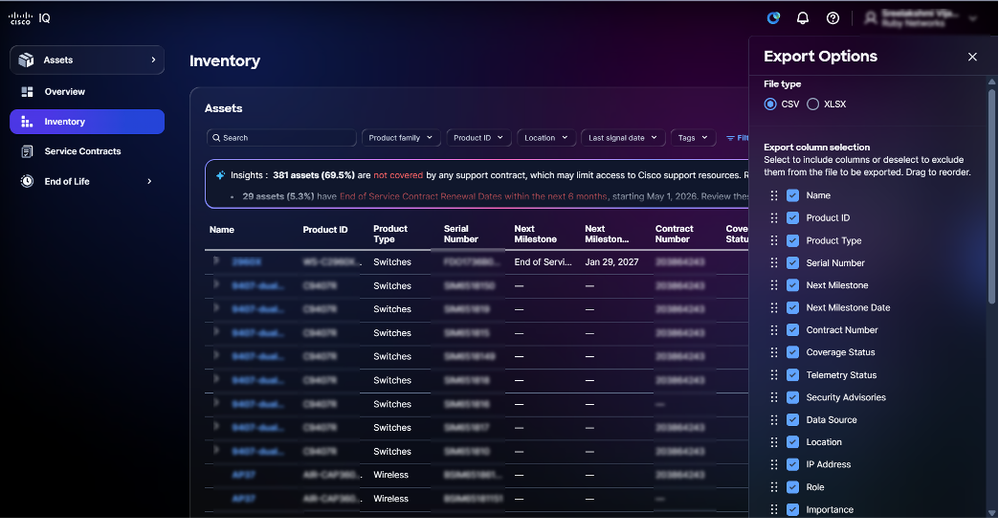 Export Options
-
Select a File type.
-
Check the check box(es) in the desired column(s).
-
Click Export. The file downloads to the browser’s local download folder.
Table Settings
You can configure table settings to create custom and refined views for different application features.
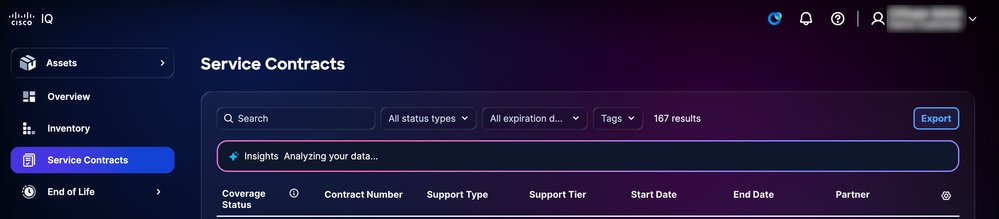 Table Settings
To change the columns that display on selected pages, click the Table Settings icon. The Table settings display.
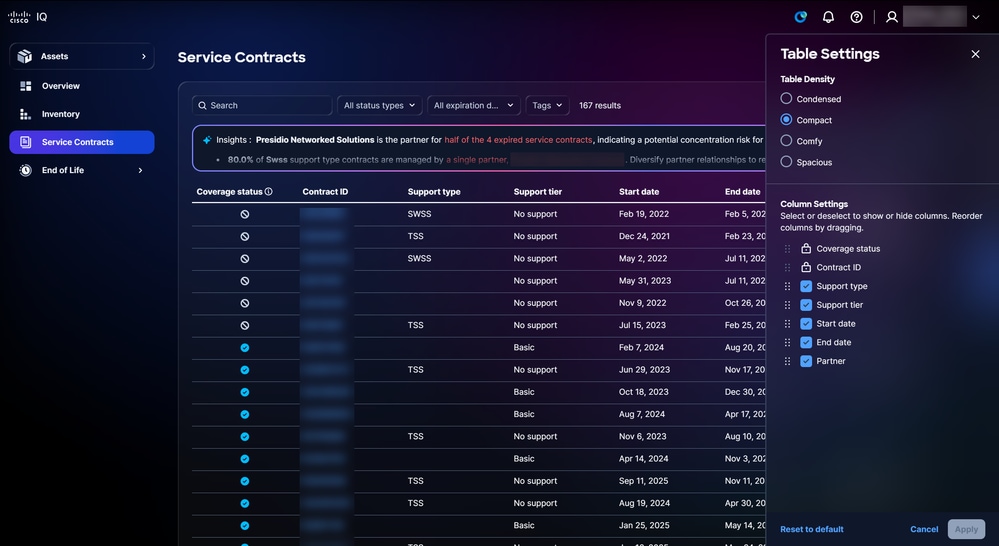 Table Setting Options
Changing Table View
To change the table view:
-
Select one of the following Table Density options:
-
Condensed: Minimizes visual elements and spacing to display more information
-
Compact: Reduces whitespace and tightens spacing between UI elements
-
Comfy: Utilizes more whitespace and larger spacing between elements
-
Spacious: Emphasizes abundant whitespace and larger UI elements
-
-
Click Apply.
Adding and Removing Columns
To add or remove columns:
-
Select or clear the Column Settings check box(es).
-
Click Apply.
Changing Column Order
To change the column order:
-
Drag-and-drop the column name to arrange the items in the desired order.
-
Click Apply.
Customizing Dashboards
The Custom Dashboard feature enables you to personalize standard dashboards through a range of intuitive customization options:
-
Rearrange dashboard widgets or panels using the drag-and-drop functionality
-
Remove any components that are not relevant to your workflow
-
Your personalized dashboard layout is securely stored to your user profile and automatically applied across all sessions and devices
-
Restore the original dashboard layout with a simple reset option
To customize a dashboard:
-
Navigate to the dashboard.
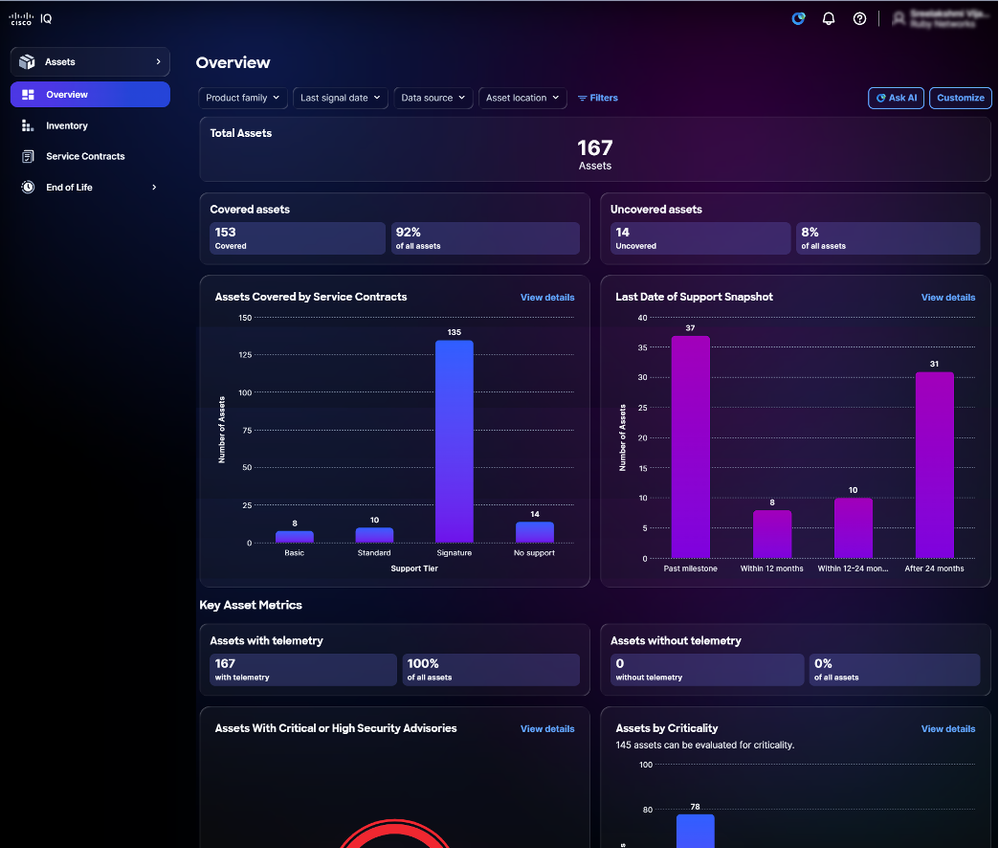 Customize
-
Click Customize.
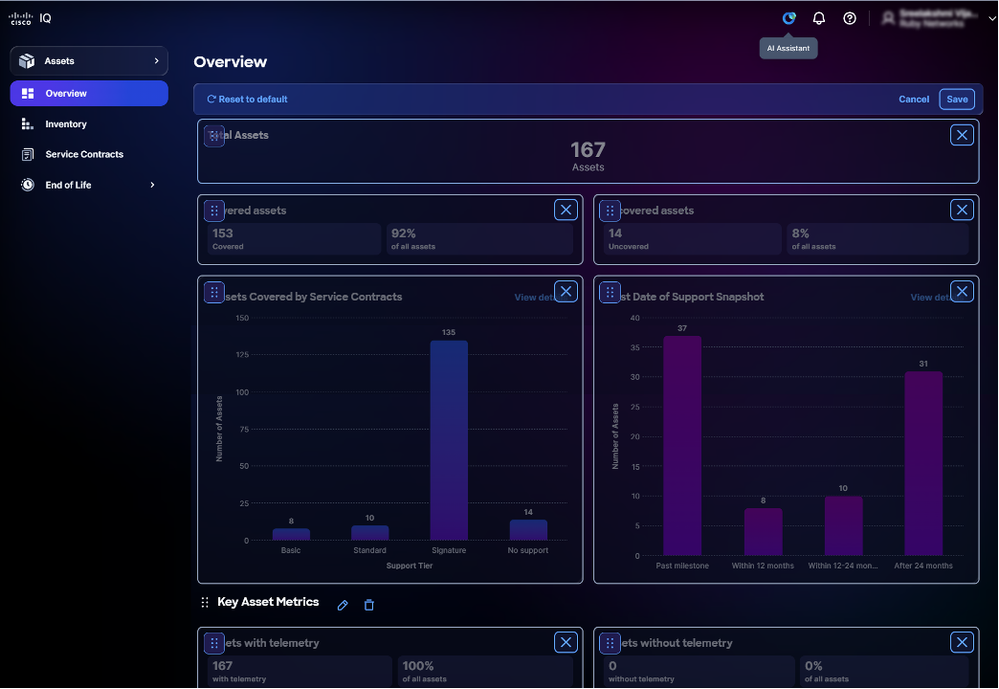 Edit Dashboard
-
Change the dashboard as desired:
-
Rearrange: Drag-and-drop the widgets into the desired layout
-
Remove: Click the Delete icon to remove a widget
-
Reset: Click Reset to default to reset the dashboard to its original layout
-
-
Click Save. A Dashboard Saved message displays.
Your dashboard layout is automatically applied across all sessions and devices.
Customizing Filters
You can save custom filter configurations for any dashboard view, enabling you to easily return to your preferred settings as needed. All filter preferences are securely stored on a per-user, per-account basis, ensuring a personalized and consistent experience each time you access Cisco IQ.
Creating a Filter
To create a custom filter:
-
Navigate to the dashboard.
-
Click Filters.
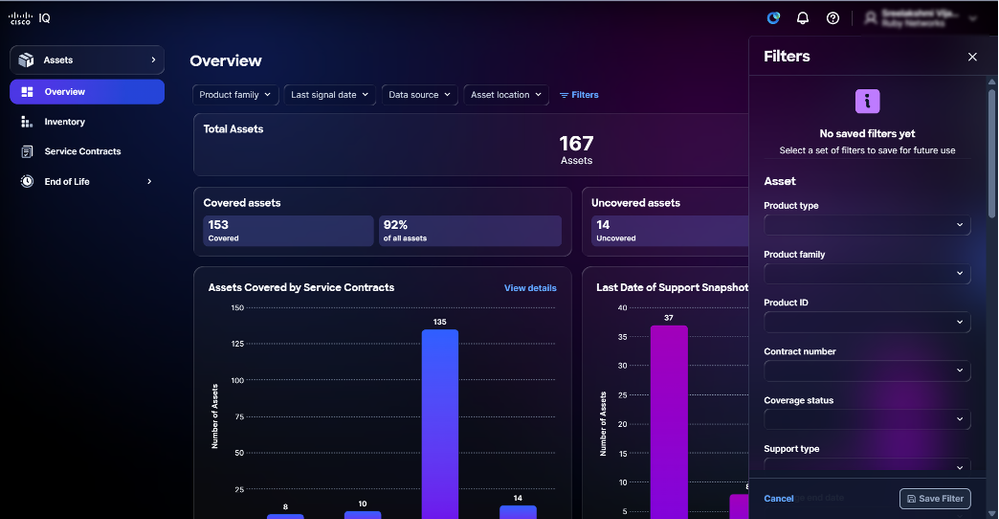 Filters
-
Choose the desired filters from the drop-down lists.
-
Click Save Filter. The Name saved Filter window opens.
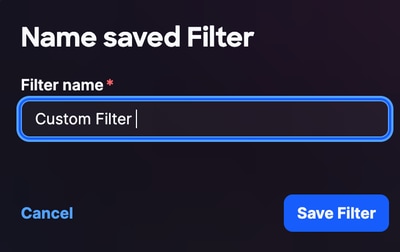 Filter Name
-
Enter a Filter name.
-
Click Save Filter to confirm.
Editing a Filter Name
To edit a custom filter:
-
Click Filters.
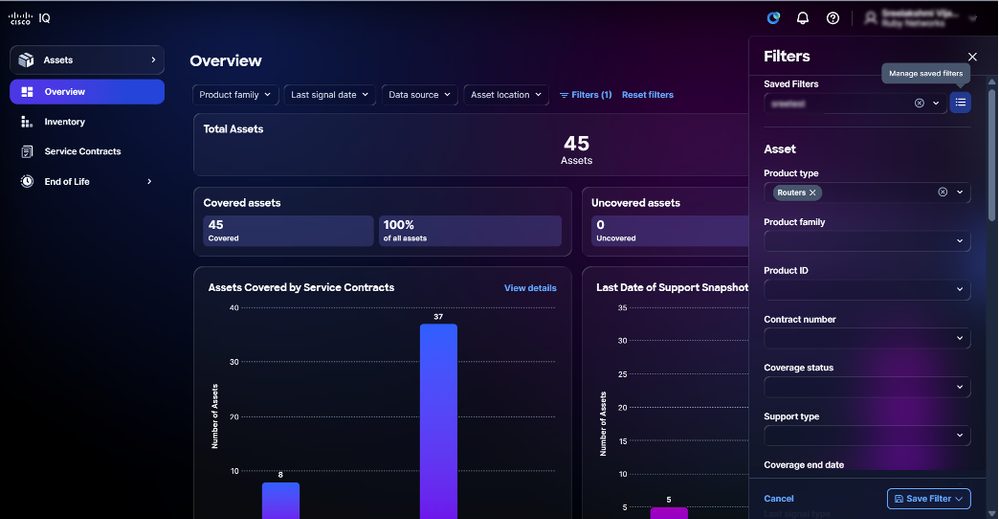 Manage Saved Filters
-
Click the Managed saved filters icon.
-
Navigate to the filter.
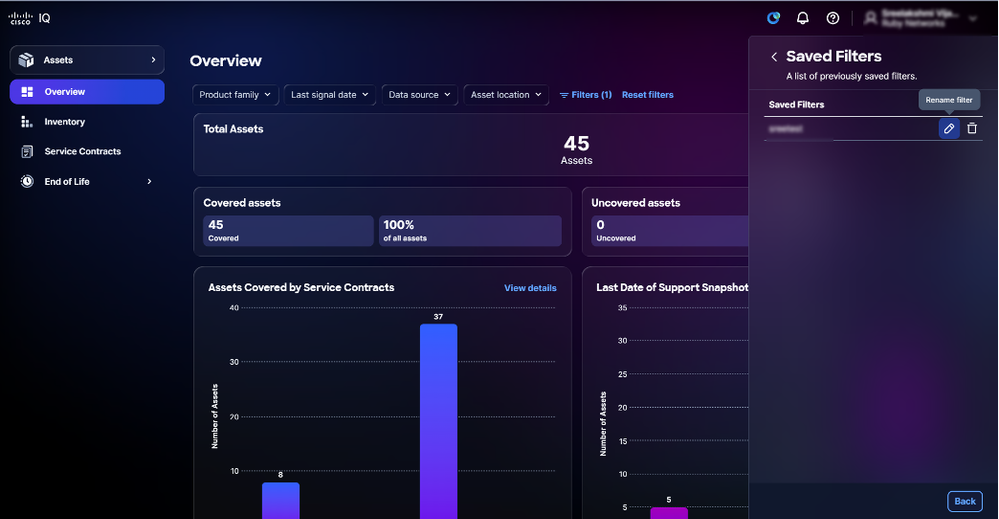 Edit Filter
-
Click the Edit icon. The Name saved Filter window opens.
-
Edit the filter name.
-
Click Save Filter to confirm.
Deleting a Filter
To delete a custom filter:
-
Click Filters.
-
Click the Managed Saved Filters icon
-
Navigate to the filter.
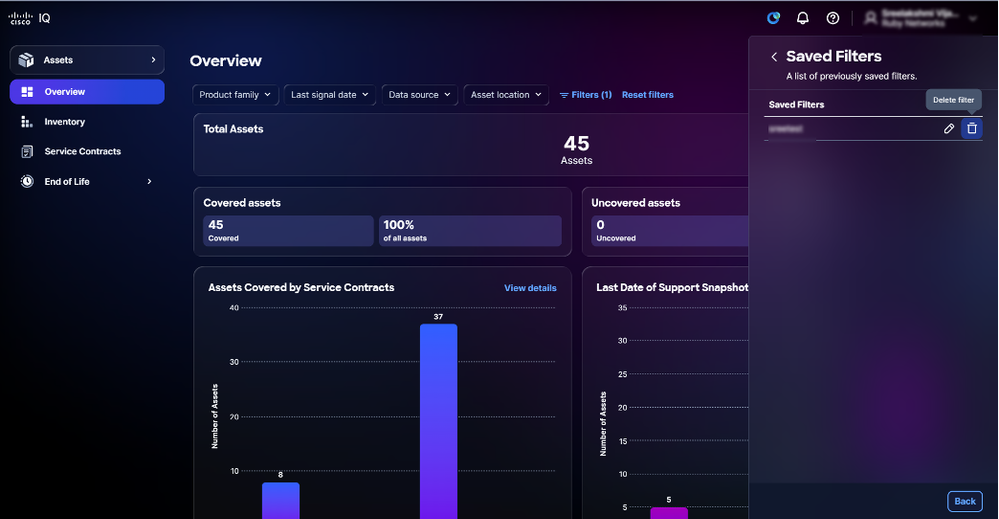 Delete Saved Filter
-
Click the Delete icon. The Delete saved filter window opens.
 Delete Saved Filter
 - Click Yes, delete to confirm.
AI Assistant
Overview
The Cisco IQ AI Assistant is designed to improve the understanding and usage of Cisco IQ by transforming raw data into actionable insights, recommendations, and guided actions. It integrates into existing tools where it leverages individual data sources and synthesizes intelligence across multiple data streams to deliver real-time suggestions. By providing contextual understanding that empowers users to make proactive, informed decisions and streamlining processes for customer engagement and success, the Cisco IQ AI Assistant optimizes operational outcomes and enhances the Cisco IQ user experience.
Cisco IQ AI Assistant capabilities include:
-
Robust Edge Case Handling: Receive transparent explanations and clear re-direction, ensuring a seamless support experience and higher user satisfaction
-
Streaming Capability: View responses as they are generated
-
Enhanced Contextual Data: Dynamic context enables seamless interactions across applications, pages, and sessions
-
Case Management Support: Create, view, and manage cases displayed in the Cases list view
-
Asset Inventory Management: Track, manage, and generate reports for an organization’s assets or resources
-
Asset Criticality: Prioritize assets for risk mitigation activities based on their role and importance within the network
-
Risk Assessment and Management: Assess and manage potential risks associated with an organization’s assets
-
Security Hardening: Compare customer device-running configurations for supported devices to related Cisco and Cybersecurity and Infrastructure Security Agency (CISA) hardening guidelines
-
Configuration: Evaluate customer device-running configurations against recommended best practices, identify configuration deviations and provide actionable recommendations
Accessing the Cisco IQ AI Assistant
To use the Cisco IQ AI Assistant:
 AI Assistant Icon
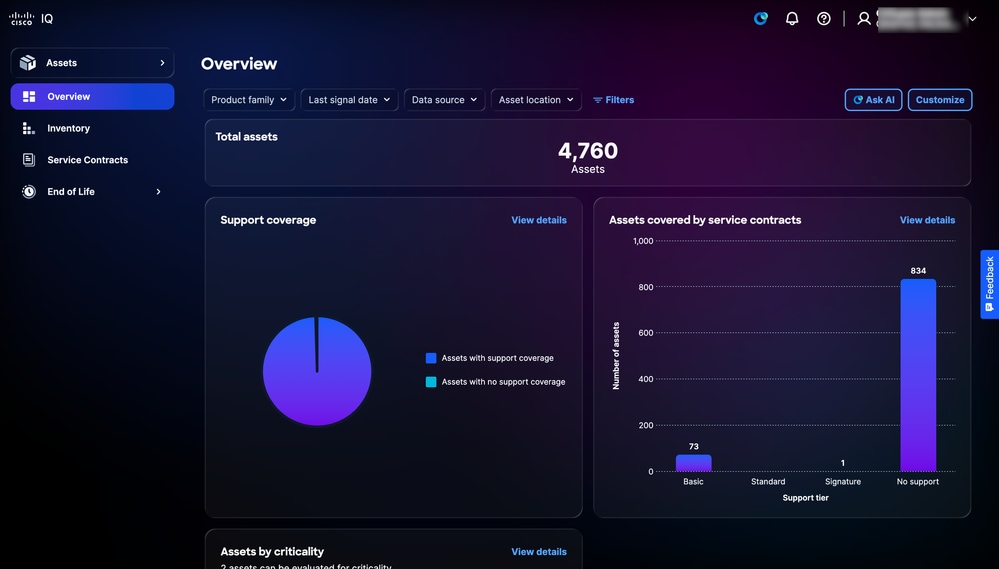 Ask AI
-
Launch the Cisco IQ AI Assistant by clicking the AI Assistant icon or clicking Ask AI.
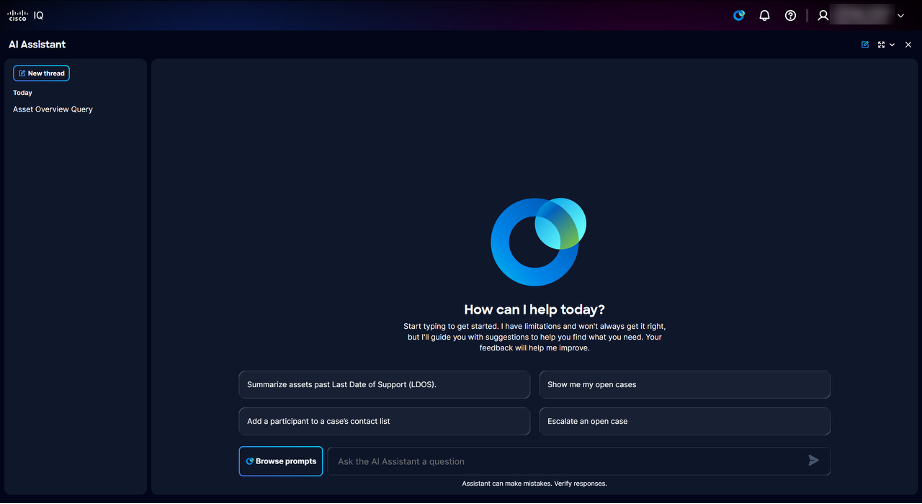 Landing Page
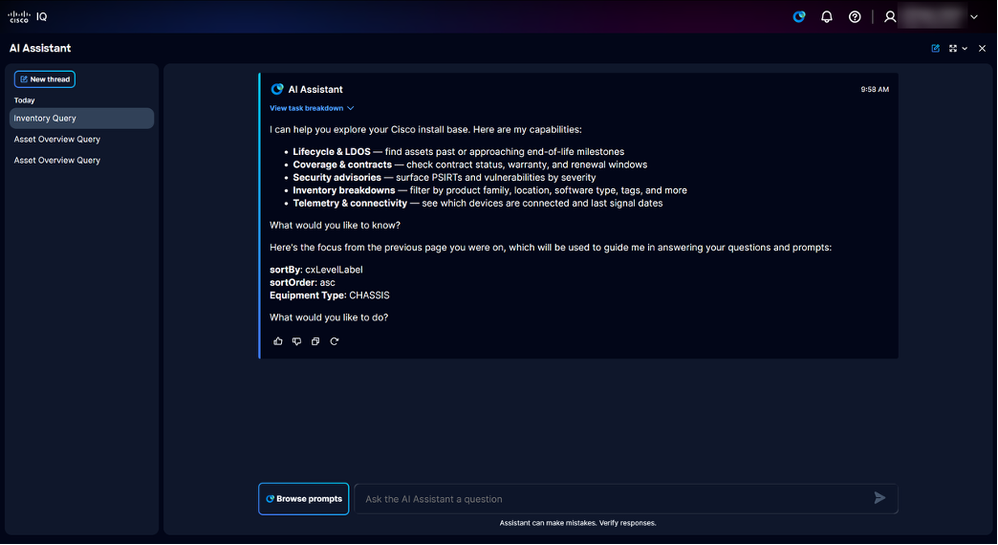 Landing Page with Application Context
The Cisco IQ AI Assistant displays the following available options:
-
Previous threads: Provides 30 days of prompt history
-
Browse Prompts: Opens the prompt library; see Appendix A: Cisco IQ AI Assistant Prompts for a list of all questions available in the prompt library
-
Ask the AI Assistant a question field: Text field to ask the AI Assistant a question; use full, descriptive sentences to receive better responses
-
-
Choose a prompt using one of the following methods:
-
Search for prompts by entering one (1) or more key words into the Ask the AI Assistant a question field and click the prompt
-
Enter a free-form question using descriptive and full sentences into the Ask the AI Assistant a question field
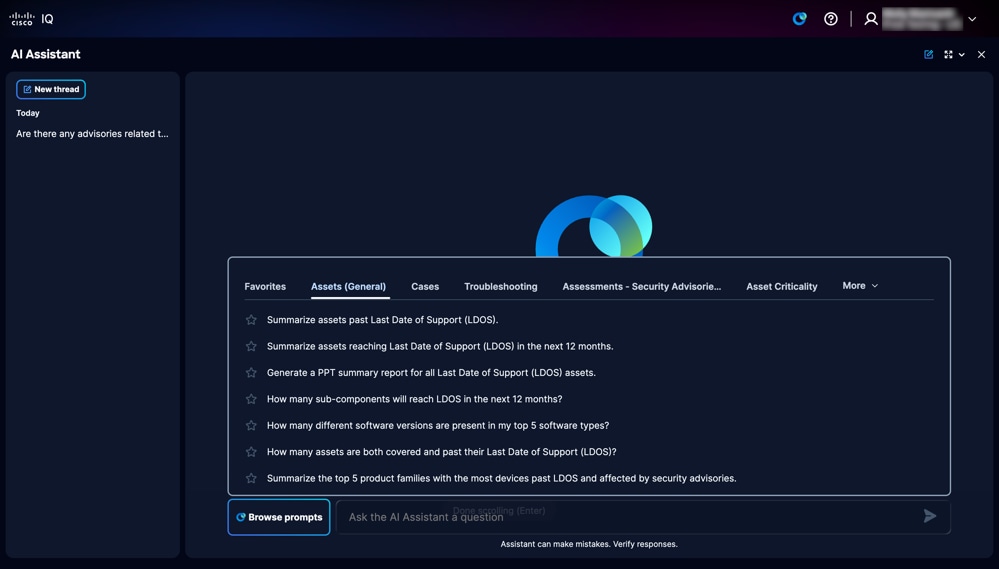 Prompt Library
-
Click Browse Prompts to open the prompt library and choose any of the following prompt category tabs:
-
Assets (General): Prompts related to asset lifecycle, including LDOS and general inventory queries
- Cases: Prompts to support case management actions such as viewing, updating, escalating, and closing cases, enabling efficient tracking and connecting with Cisco support engineer
-
Troubleshooting: Prompts to assist with error syslog messages or configuration questions
- Assessments – Security Advisories: Prompts related to evaluating overall network security posture, identifying critical vulnerabilities, and listing specific assets affected by high-severity security threats or configuration weaknesses
-
Asset Criticality: Prompts related to prioritizing assets for risk mitigation activities based on their role and importance within the network
-
Assessments – Configuration: Prompts related to summarizing configuration assessment results, identifying configuration deviations against recommended best practices, and generating actionable recommendations
-
Assessments – Security Hardening: Prompts related to identifying recommended security baseline configurations, best practices for device hardening, and step-by-step procedures for securing Cisco network infrastructure
-
-
-
Click a prompt. A response generates.
Enhanced Contextual Data for the AI Assistant
The Cisco IQ AI Assistant ensures that context is dynamic, enabling seamless interactions across applications, pages, and sessions. This ensures that every response leverages contextual data to provide highly relevant responses tailored to your question.
LDOS Summarization and Prioritization
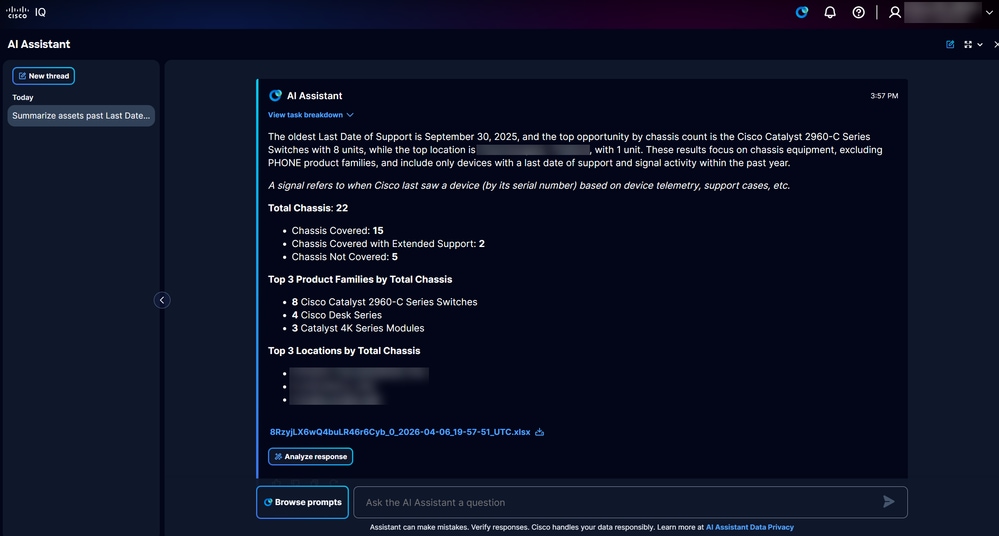 LDOS Report
The LDOS Summarization and Prioritization feature enables you to quickly identify and address risks associated with network assets. This feature classifies assets by their expected network roles and security vulnerability status, enabling vulnerability remediation and enhancing overall service quality.
Key Benefits
Key benefits of the LDOS Summarization and Prioritization feature include:
-
Prioritized Risk View
-
Operational Impact Analysis
-
Actionable Insights
As a part of this feature, you can view a limited set of pre-seeded questions (marked by “*”) in the user interface or when viewing LDOS insights.
Reports
LDOS Report Generation
AI-generated, curated LDOS reports provide summaries of assets approaching or past their LDOS. The reports also highlight refresh options as well as identify security advisories and vulnerabilities to help you quickly understand your network’s risk landscape.
Analyze Response
 Analyze Response
When clicking Analyze Response, you receive an AI-driven summary that summarizes data and generates various visualizations like graphs, dashboards, and charts, providing insightful information.
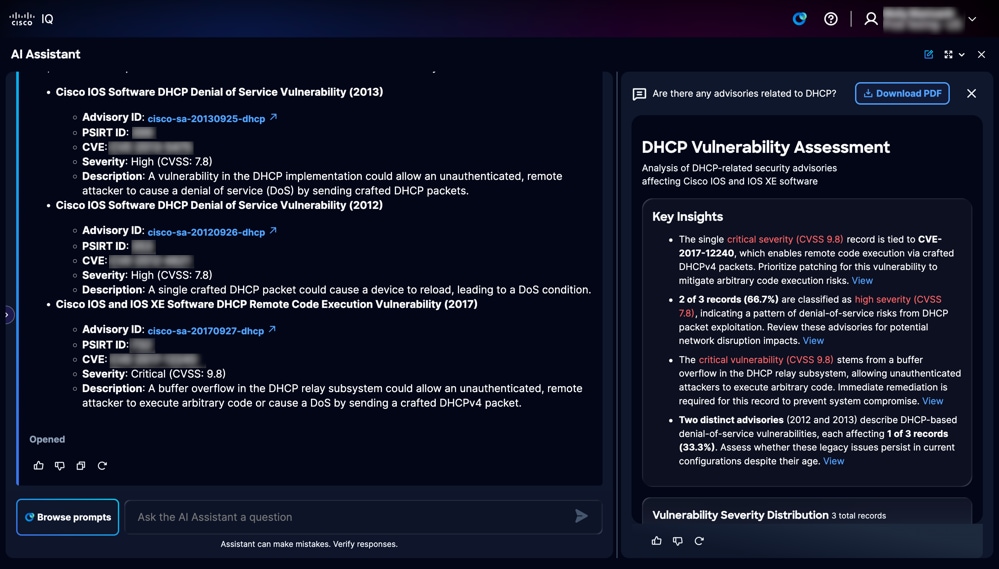 AI Summary
The AI-driven summary contains a Download PDF button to download the report as PDF.
Data Sources for LDOS Summarization and Report Generation
The following key data sources are leveraged by the LDOS Summarization and Prioritization feature:
-
Install Base Assets and Contracts
-
Telemetry Assets and Contracts
-
CX Signal Data
-
EOL Milestones for Hardware and Software Assets
Troubleshooting with the Cisco IQ AI Assistant
Cisco IQ empowers you to resolve device issues independently with the Cisco IQ AI Assistant. Built on Cisco’s certified troubleshooting tools and a proven knowledge base, this intuitive, interactive assistant provides real-time, contextual recommendations.
It’s designed for day-to-day troubleshooting scenarios and helps network Engineers to investigate Cisco product issues, review symptoms, and identify actionable next steps. It interprets technical details such as error messages, syslogs, software defects, release guidance, and configuration-related questions. By addressing challenges instantly, you can maintain optimal performance and save time by resolving issues without the need to open a support case.
Best Practices
When using the Cisco IQ AI Assistant for troubleshooting, use the following best practices:
- Be as specific as possible; include the platform, product family, and software version in your first message
-
Paste the exact error, alarm, or syslog text instead of paraphrasing it
-
Describe what changed before the issue started, such as an upgrade, configuration update, or topology change
-
Share the impact clearly, such as whether the issue affects one (1) device, one (1) site, or multiple users
Cases
The Cases Management feature enables users to manage their support cases through self-service, ensuring that business applications and services are restored promptly. This feature helps you efficiently manage cases and streamline the support experience. See Support Application for more information about Case Management.
With Cases Management, users can quickly view and track their support cases in one place. It helps you check case status, review updates, follow progress, and stay informed on the next steps, making it easier to manage issues and get support faster.
Appendix A: Cisco IQ AI Assistant Prompts
This appendix provides a detailed overview of the prompts available in the Cisco IQ AI Assistant, organized into bullet lists by question themes.
The following prompts are available under the Assets (General) tab:
- Summarize assets past Last Date of Support (LDOS).
- Summarize assets reaching Last Date of Support (LDOS) in the next 12 months.
- Generate a PPT summary report for all Last Date of Support (LDOS) assets.
- How many sub-components will reach LDOS in the next 12 months?
- How many different software versions are present in my top 5 software types?
- How many assets are both covered and past their Last Date of Support (LDOS)?
- Summarize the top 5 product families with the most devices past LDOS and affected by security advisories.
- Summarize cards and modules past LDOS and affected by security advisories.
- How many sub-components are hitting end of life milestones earlier than their parent chassis?
The following prompts are available under the Cases tab:
- Show me my open cases
- Summarize a case
- Show me the status of a RMA
- Show me the status of a bug
- Give me an update on a case
- Give the most recent update and any pending action items for a case
- Close an open case
- Add a participant to a case’s contact list
- Create a Webex space communication about a case
- Connect me with the engineer handling the case
- Raise the severity level of an open case
- Escalate an open case
- Request a new engineer for a case
- Re-queue an open case
- Add note to a case
The following prompts are available under the Troubleshooting tab:
- How do I troubleshoot Syslog error [Error] and identify the root cause?
- How do I troubleshoot configuration issues and identify the root cause for [ABCD]?
- How do I configure [XYZ] on Product ID [ABCD]?
The following prompts are available under the Assessments – Security Advisories tab:
- Are there any advisories related to DHCP?
- Is there a security advisory to check for webUI privilege escalation vulnerabilities related to salt typhoon?
- Before I enable HTTP, can you check for known security advisories or vulnerabilities related to enabling HTTP?
- How many security advisories are vulnerable in my network?
- How many devices are vulnerable to security advisories?
The following prompts are available under the Asset Criticality tab:
- What are my most critical assets by role and importance?
- How many core devices are affected by security advisories?
- Summarize critical and high importance devices with coverage expiring in the next 12 months
- Prioritize LDOS assets for refresh based on role and importance.
- Prioritize uncovered or soon-to-be uncovered assets for renewal based on role and importance.
- Prioritize expiring contracts for renewal based on role and importance of those covered assets.
- Prioritize PSIRT vulnerabilities based on severity and role and importance of affected assets.
The following prompts are available under the Assessments – Configuration tab:
- Can you provide a summary of my recent Configuration Assessment?
- How many configuration best practice rules were evaluated, and how many resulted in at least one asset that did not pass?
- What are the most common configuration deviations across my network?
- Which Cisco product families have the most deviations from configuration best practices?
- How many assets were evaluated, and what percentage did not pass?
- Which categories have the most deviations from configuration best practices?
- Which configuration deviations pose the highest risk to my network, and what corrective actions are recommended?
- Which assets have the maximum of critical and high severity configuration deviations? What corrective actions are recommended?
- Show breakdown of critical and high severity configuration deviations by asset criticality
- Show breakdown of configuration best practice rules deviations by severity, category, and software type
The following prompts are available under the Assessments – Security Hardening tab:
- What are Cisco security hardening best practices for network devices?
- How do I harden my Cisco IOS XE devices?
- List key security hardening steps for routers and switches.
- What are recommended baseline hardening settings for Cisco devices?
- How many assets are in violation of security hardening best practices?
Revision History
| Revision | Publish Date | Comments |
|---|---|---|
6.0 |
August 25, 2026
|
Updated to reflect new collection times. |
5.0 |
August 14, 2026
|
Updated to include new content. |
4.0 |
July 23, 2026
|
Updated with new features and enhancement for July 2026 release. |
3.0 |
June 15, 2026
|
Changes include the newly Reports feature and updates to the Service Contracts section. |
2.0 |
May 22, 2026
|
Changes includes image and content updates to align with updated UI and updates to existing workflows such as Removing Legacy Collectors and Service Contracts. |
1.0 |
April 23, 2026
|
Initial Release |