
Introduction
Cisco IQTM provides customers with enhancements and features designed to improve asset visibility, deliver smarter insights across their environments, and streamline case management. In addition, AI features such as the AI Assistant optimizes operational outcomes and the Cisco IQ user experience by providing contextual understanding that empowers users to make proactive, informed decisions and streamlines processes for customer engagement and success.
Cisco IQ Link is a secure bridge between a customer’s network and Cisco IQ designed to unify telemetry and operational intelligence across diverse technology environments, enabling advanced AI-driven insights and granular control for partners and customers. Cisco IQ Link provides the following key benefits:
- Single source of truth for all collector telemetry
- Avoid a fragmented view of your assets landscape
- More breadth and depth of collections
- Includes controllers, multiple device architectures (Cisco and non-Cisco1), and integrations with Configuration Management Databases and IT Service Management platforms such as SolarWinds and ServiceNow1
- More AI use cases and granular management capabilities for partners and customers
- Fully integrated functionality for troubleshooting and automating workflows
- Support for automated inventory and credentials management through APIs and Vault integrations for remote partner-managed scenarios, extending the platform1
- Ability to support Resilient Infrastructure Services, Quantum Safe Assessments, and other advanced AI-augmented use cases1
- Better end-user experience and scale
- Customer-managed auto-updates with the ability to scale across a growing number of devices
- Growing support for hypervisors and cloud-hosting platforms. VMware ESXi, Microsoft HyperV, and Redhat with Kernel-based Virtual Machine (KVM) are currently supported
- Secure Local Enclave
- Ability to collect data, process it locally, and securely orchestrate local workflows
1These features are part of the Cisco IQ roadmap.
Prerequisites
Ensure the following prerequisites are met before configuring and installing Cisco IQ Link.
Hardware and VM Resource Requirements
Cisco IQ Link offers multiple deployment sizes to support your environment’s scaling needs. Refer to the table below to select the appropriate resource configuration based on your planned device discovery count.
| Resource | 20K Devices | 50K Devices |
|---|---|---|
| vCPU | 16 | 32 |
| RAM | 28 GB | 48GB |
| Storage (SSD) (Recommended for better performance) | 600 GB | 600GB |
| Collection Schedule | 24 hours or more2 | |
| Supported Hypervisors |
|
|
| Server |
|
|
| Additional Recommendation |
|
|
2Actual data collection times may vary depending on the network, number of devices targeted for discovery and environmental conditions.
Resizing the Cisco IQ Link VM
If your device discovery count grows beyond your current deployment size, you must resize the Cisco IQ Link VM to meet the resource requirements for your new scale. See Hardware and VM Resource Requirements to determine the correct vCPU and RAM values for your target deployment size.
Network Requirements
Cisco IQ Link supports single network interface. The associated Virtual Machine (VM) host network must have connectivity to iq.cisco.com, either directly or through a proxy. If your network environment requires a proxy for connectivity to Cisco IQ, you must configure these settings during Cisco IQ Link installation.
IP Address and Hostname Requirements
The following IP address and hostname requirements must be met:
-
Available IPv4 address
-
Domain Name System (DNS): DNS simplifies system management by replacing numeric IP addresses with consistent, human-readable hostnames. This approach facilitates easier maintenance, seamless service integration, and reliable certificate validation in secure environments. Ensure that the IPv4 address is configured in your DNS with the following:
-
A Record: Maps the hostname (such as myciscoiqlink.mydomain.com) to the IPv4 address
-
Associated Pointer (PTR) record: Required to support reverse DNS lookups; if an IP address resolves to multiple hostnames, the first resolved hostname is used to access the UI
-
Connectivity Requirements from Cisco IQ Link to Cisco IQ SaaS
Cisco IQ Link instances in US, EMEA, or APJC regions must connect to their respective regional servers using one of the associated FQDN with TCP 443.
If using installer v1.1.1, you should connect using the following FQDNs:
-
US: us-west-2.iq.cisco.com
-
EMEA: eu-central-1.iq.cisco.com
-
APJC: ap-southeast-2.iq.cisco.com
If using installer v1.1.0, you should connect using the following FQDNs:
-
US: us-west-2.iq.cisco.com, ng.acs.agent.us.csco.cloud
-
EMEA: eu-central-1.iq.cisco.com, ng.acs.agent.emea.csco.cloud
-
APJC: ap-southeast-2.iq.cisco.com, ng.acs.agent.apjc.csco.cloud
Port Requirements from Cisco IQ Link to Customer Network Devices
The following table outlines the network ports required for Cisco IQ Link communication.
| Port(s) |
Protocol |
Description |
| 22 |
TCP |
Used for Administrator CLI and Cisco Support debugging sessions |
| 443 |
TCP |
Used for communication between Cisco IQ Link UI and API |
| 53, 123, 161 |
UDP |
Used to send and receive DNS, Network Time Protocol (NTP), and Simple Network Management Protocol traffic |
Supported Browsers
You must use the latest stable release of one of the following browsers to install and launch Cisco IQ Link:
-
Google Chrome
-
Microsoft Edge
-
Apple Safari
-
Mozilla Firefox
Installing Cisco IQ Link VM
This section outlines the installation procedures for Cisco IQ Link VM. The current scope includes instructions for the following hypervisors:
-
VMware ESXi
-
Microsoft Hyper-V Server
-
Red Hat KVM
Installing Cisco IQ Link on VMware ESXi
Cisco IQ Link is distributed as a deployable VM contained in an Open Virtual Appliance (OVA) file format.
-
Log in to VMware vSphere Web Client with administrator credentials.
-
Right-click on the appropriate vCenter object (datacenter, cluster, or ESXi host) and choose Deploy OVF Template.
-
On the Deploy OVF Template wizard, choose the template page, specify the source location, and click Next. You can specify a URL or browse to any accessible location.
-
On the OVF Template Details page, verify the OVF template details and click Next. No input is necessary.
-
On the Select a name and location page, add or edit the Name and Location for the virtual appliance and click Next.
-
On the Select a resource page, select the specific Host (ESX station), Cluster, or Resource Pool on which you want to deploy and click Next.
-
On the Review details page, verify the OVA template details and click Next.
-
On the Configuration page, choose a deployment configuration and click Next.
-
On the Select storage page, choose the destination storage location for the VM files in the selected ESXi host and click Next.
-
Choose the Disk Format for the VM virtual disks.
-
On the Select networks page, choose a source network and map it to a destination network, then click Next.
-
On the Ready to Complete page, select Power On After Deployment and click Finish.
-
Ensure that VMs are configured with the following additional settings by right-clicking the desired VM in VMware ESXi and clicking Edit Settings.
-
CPU: Select Low from the first Shares drop-down list
-
Memory: Check the Reserve all guest memory (All locked) check box
-
Set CPU and RAM based on your scale size. See Hardware and VM Resource Requirements for more details.
-
- In VMware ESXi, select the desired VM.
-
Click the Summary tab.
-
Click the displayed image or the Launch Console icon to launch the console.
- See Network Configuration for next steps.
Installing Cisco IQ Link on Microsoft Hyper-V Server
The Cisco IQ Link Hyper-V bundle from Cisco is delivered as a .tar.gz file. To install Cisco IQ Link on Hyper-V:
-
Log in to Hyper-V Server Manager with administrator credentials.
- Extract the Cisco IQ Link package to the location defined by the Hyper-V Administrator to store all the virtual hard disks.
- Verify that all the disks from the original Cisco IQ .tar.gz are in the Virtual Hard Disks folder.
-
From the Actions pane of Hyper-V Manager, choose New > Virtual Machine and click Next.
- Enter the Name you want to assign to the Cisco IQ Link VM and click Next.
- Choose Generation 2 and click Next.
- Enter the memory value based on the recommended memory size and click Next.
- Verify Use Dynamic Memory remains unchecked.
- Choose the appropriate network adapter for your Cisco IQ Link VM and click Next
- Add the provided Cisco IQ Link virtual hard disk, ensuring disk one (1) is the first disk and click Next.
- Verify the selections in the Summary and click Finish. Hyper-V displays the newly created Cisco IQ Link VM.
- Right click the VM and choose Settings.
- Under Security, uncheck the Enable Secure Boot check box.
- Add the other two (2) virtual hard disks to the VM by repeating the same steps used for adding the first hard disk.
- In the Advanced Features under the Network Adapter, verify that the Enable device naming is selected.
- Set the number of processors to the recommended vCPUs as listed in Hardware and VM Resource Requirements.
- In the Actions pane, select Start to power on the VM.
- In the Actions pane, select Connect to connect to the VM. The VM Connection console is displayed.
-
See Network Configuration for more details.
Installing Cisco IQ Link on KVM Hypervisor
Ensure that the following supported requirements are met before installing Cisco IQ Link on KVM.
-
RHEL host OS
-
Administrative access on the Red Hat server
To install Cisco IQ Link on a KVM Hypervisor, VM Manager is required.
- Log in to Red Hat host OS server with administrator credentials.
- Download and extract the Cisco IQ Link package on the host.
- Launch the Virtual Machine Manager (VMM) client.
-
Choose File > New Virtual Machine on the menu to install a new Cisco IQ Link VM.
- Choose Import existing disk image and click Forward.
- Under Provide the existing storage path, click Browse.
- Create a new storage pool using the path where you extracted the Cisco IQ Link package.
- Choose the first disk of the Cisco IQ Link from the storage pool created on the previous step and click Choose Volume.
- Under Choose an operating system type and version, choose AlmaLinux 9 and click Forward.
- Under Choose Memory and CPU settings, enter details based on your scale size and click Forward. See Hardware and VM Resource Requirements for more details.
-
In the dialog box, complete the following configuration:
-
Under Ready to begin the installation, enter a Name for the Cisco IQ Link instance.
-
Click the Customize configuration before install option.
-
Under Network selection, ensure that you select the appropriate virtual network.
-
-
Click Finish to complete the addition of the first disk.
-
Add the remaining two (2) disks by following the steps below:
-
On the VMM console, click Add Hardware.
-
Under Storage, ensure that the Select or create custom storage check box is checked and click Manage.
-
Browse to select the second disk of the Cisco IQ Link file that you have extracted on your system.
-
Click Choose volume.
-
- Repeat the same (Add Hardware) steps to add the third Cisco IQ Link disk.
-
Ensure all disk Bus Types are SCSI.
-
Click Finish.
-
Under the Overview section, choose UEFI for Firmware.
-
Click Begin installation.
-
On the VMM console, customize the password configuration and IP properties.
-
See Network Configuration for next steps.
Network Configuration
-
Launch Cisco IQ Link from VM console.
 Log In
-
Log in to the console using the default network credentials by entering “admin” for both the login name and password. The main menu displays.
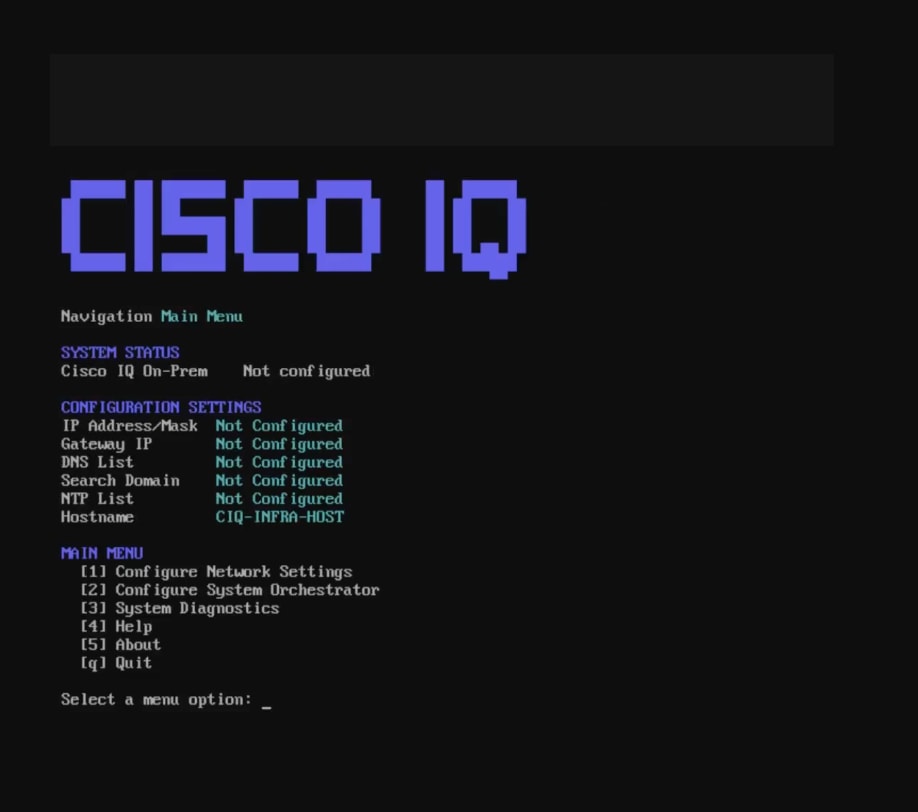 Main Menu
-
Enter “1” and press Enter to configure network settings.
-
Provide the following network settings:
-
IP address
-
Gateway IP
-
DNS IP list
-
Search domain
-
NTP server list
-
-
Configure the NTP authentication by pressing N to proceed without an authentication method
OR
Press Y and enter the corresponding number of an option listed below:
-
Traditional key-based authentication: Uses provided credentials for secure time synchronization; after selecting this option, enter a valid algorithm and a hex key
-
Network Time Security (NTS): Uses the NTS protocol to provide secure NTP communication
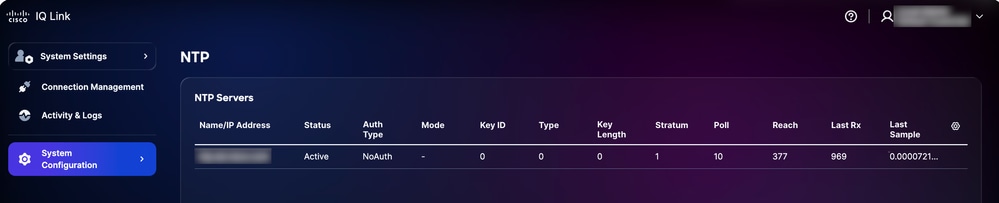 NTP Validation in UI
 -
-
Enter and confirm a password after reviewing the on-screen password requirements.
-
Review the summary and press Y to continue. Setup can take a few minutes.
-
Once a success message is received, press Enter to return to the main menu.
Network settings are now configured, but Cisco IQ Link has not yet been installed. It is recommended to return to vCenter and take a Snapshot of the new VM for future reference. At this point, you can also initiate a Secure Shell connection using the newly configured IP address and credentials.
This completes manual configuration of Cisco IQ Link.
Installing Cisco IQ Link
Before you begin: The Cisco IQ Link installation process begins within Cisco IQ. Ensure you have already initiated the Cisco IQ Link instance addition in Cisco IQ (by navigating to Home > System Settings > Data Connectors > Add Cisco IQ Link). For more context, see Adding Cisco IQ Link Instances in the Cisco IQ Getting Started Guide. This guide is your primary resource for the complete end-to-end deployment workflow.
To install Cisco IQ Link:
-
Navigate to the Cisco IQ Link installer web interface (received after configuring Cisco IQ Link in VMs). The Cisco IQ Link Installer page displays.
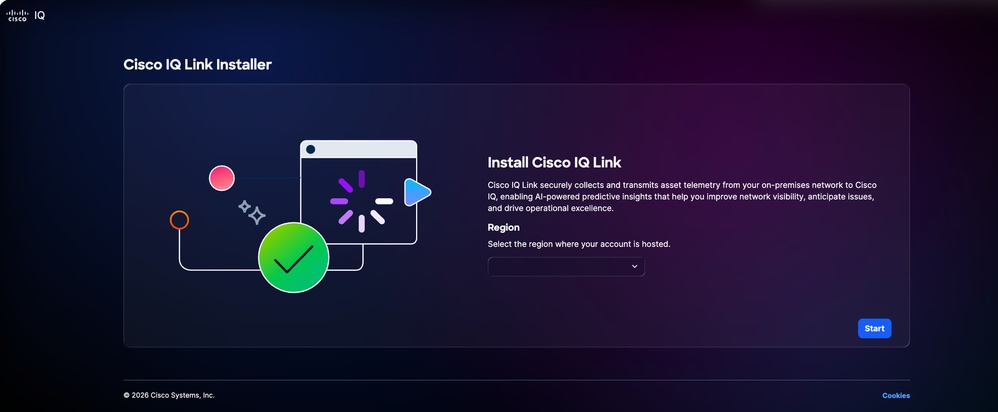 Cisco IQ Link Installer
-
Select an applicable region from the Region drop-down list. The following options are available:
-
AMER
-
APJC
-
EMEA
-
-
Click Start. The Check Internet Connectivity tab displays.
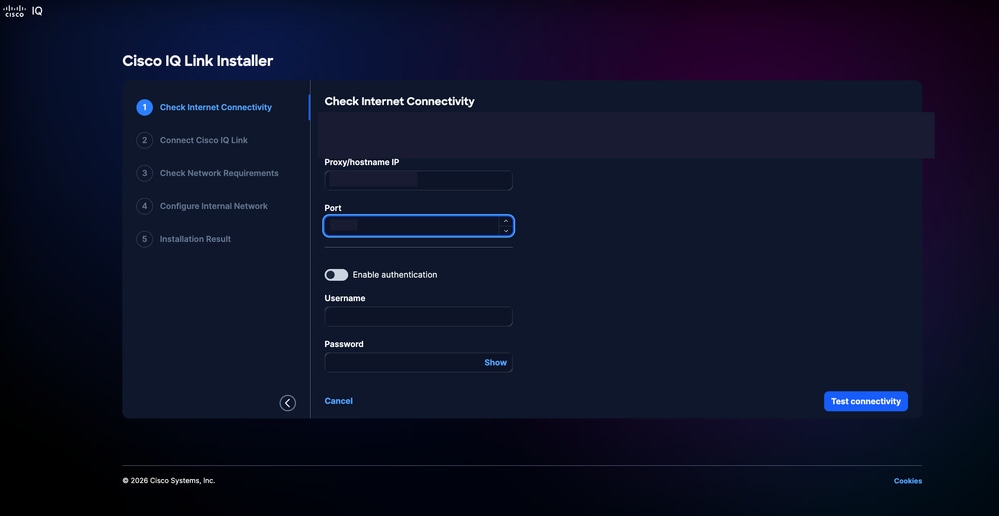 Check Internet Connectivity
-
If proxy configuration is required, enter the Proxy/hostname IP.
-
Enter the Port number.
-
Turn on the Enable Authentication toggle button if required.
-
Enter Username.
-
Enter Password.
-
-
Click Test Connectivity. Internet connectivity is verified.
 Verify Internet Connectivity
 -
Click Next. The Connect Cisco IQ Link tab displays with the Device ID and Claim code.
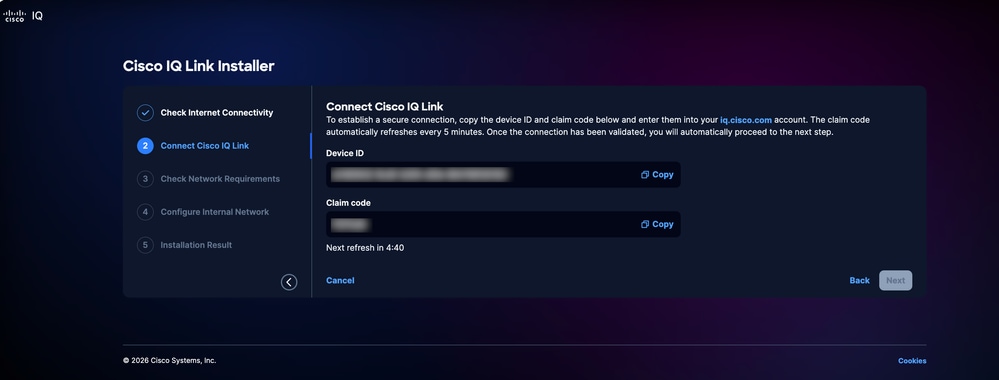 Connect Cisco IQ Link
 -
Navigate back to Cisco IQ and ensure you are still on the Add Cisco IQ Link page.
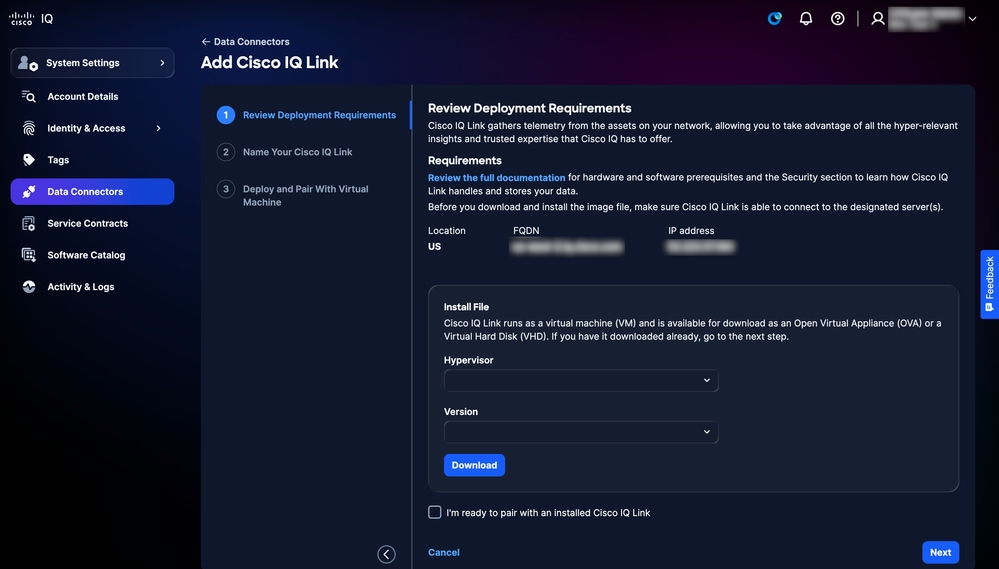 Add Cisco IQ Link
-
Check the I am ready to pair with an installed Cisco IQ Link check box.
-
Click Next.
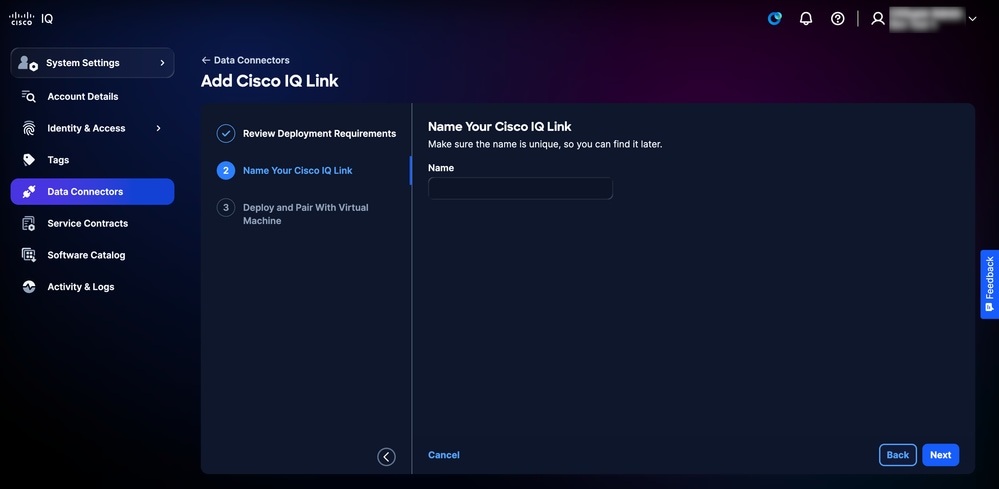 Name Your Cisco IQ Link
-
Enter a unique name for the Cisco IQ Link instance in the Name field.
-
Click Next.
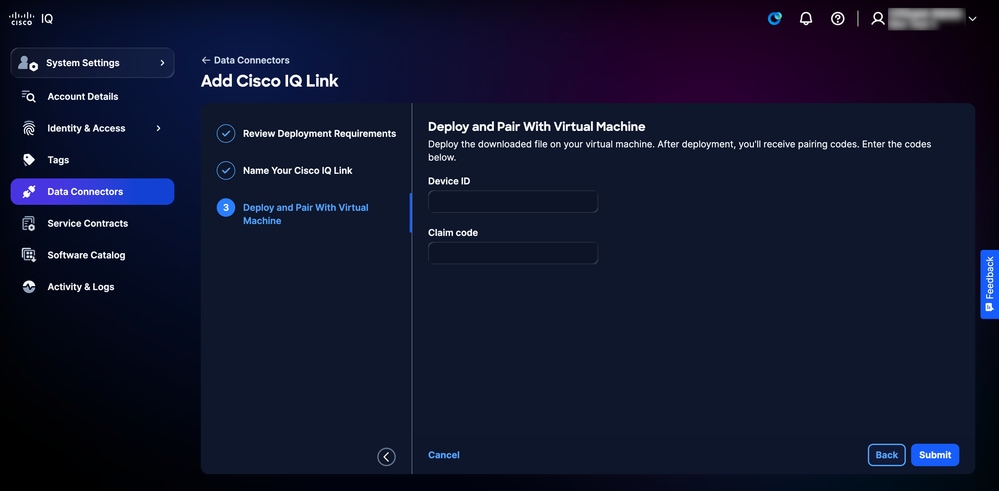 Deploy and Pair
-
Enter the Device ID and Claim code (provided in the Cisco IQ Link installer).
-
Click Submit. You are redirected to the Data Connectors page.
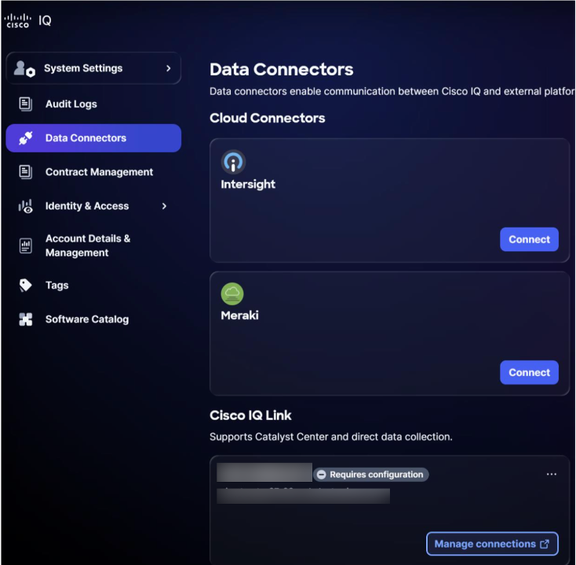 Data Connectors
-
Navigate back to the Cisco IQ Link Installer web page. The Check network requirements page displays.
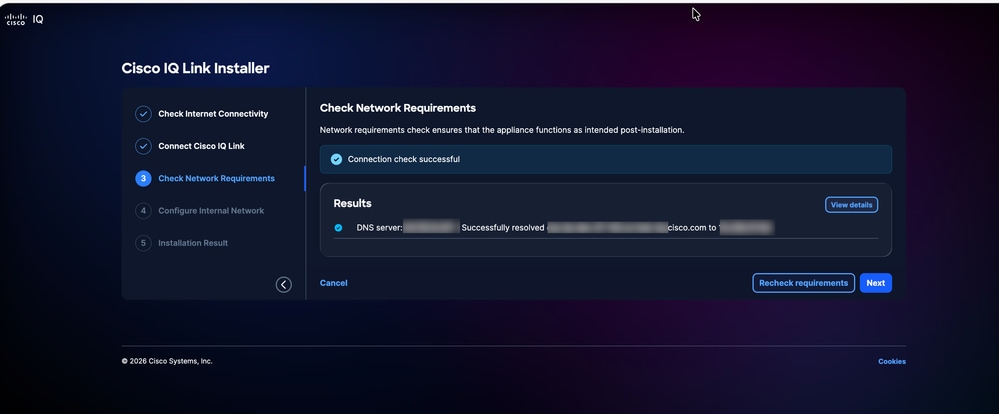 Check Network Requirements
-
Click Next. The Configure Internal Network tab displays.
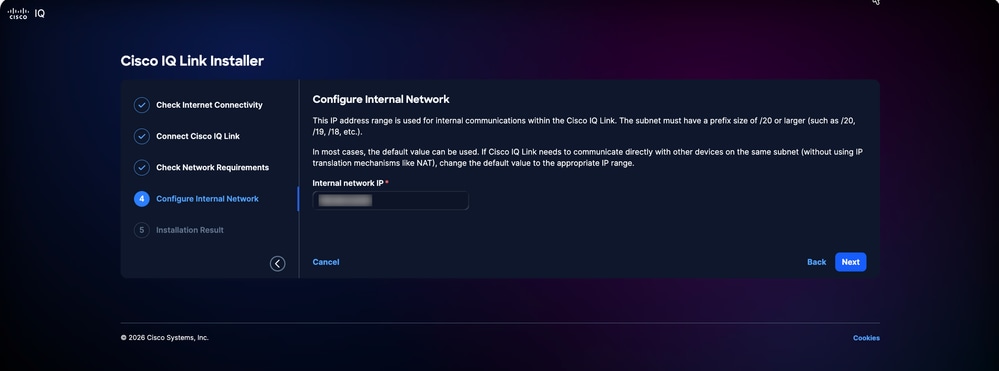 Configure Internal Network
-
Enter the Internal network IP.
-
Click Next. The Installation result page displays.
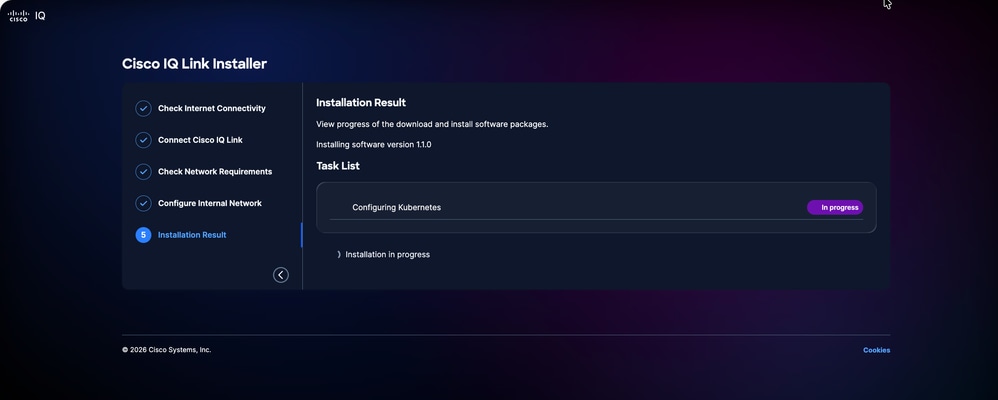 Installation Result
Once the installation is complete, the Cisco IQ login opens in the browser. You can log in using the admin user and password credentials used during the Network configuration.
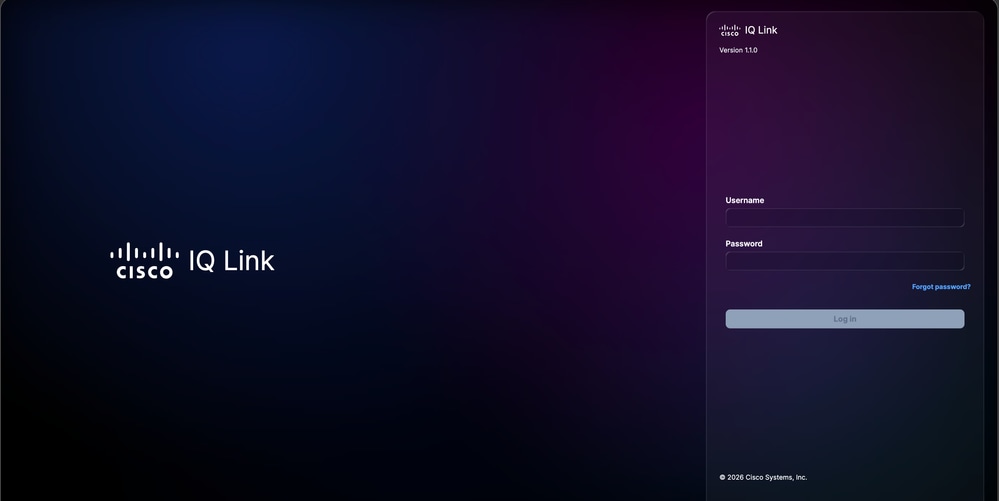 Cisco IQ Link Login
-
Log into Cisco IQ Link. The Home page displays.
 Cisco IQ Link Successful Installation
Revision History
| Revision | Publish Date | Comments |
|---|---|---|
2.0 |
June 30, 2026
|
v1.1.1 |
1.0 |
April 23, 2026
|
Initial Release |