
Introduction
Cisco IQTM provides customers with features designed to improve asset visibility and deliver smarter insights across their environments. In addition, AI features such as the AI Assistant optimize operational outcomes and the Cisco IQ user experience by providing contextual understanding that empowers users to make proactive, informed decisions, and streamlines processes for customer engagement and success.
Cisco IQ On-Prem Air-Gapped is the deployment mode of Cisco IQ built for environments that cannot connect to the cloud. It is delivered as a self-contained Virtual Machine (VM), referred to as the Cisco IQ Virtual Appliance (VA), which runs entirely on the customer's premises in complete isolation from external networks, with software updates and maintenance packages obtained from Cisco IQ SaaS and transferred to the VA through an approved, manual process.
For organizations operating in regulated, high-security, and sovereign environments, the VA removes the trade-off between insight and control. Customers deploy Cisco IQ Assets and Assessments capabilities inside their own network and retain complete ownership of their data, while still getting the insights and recommendations they expect from Cisco IQ. The Air-Gapped deployment mode extends the capabilities of Cisco IQ SaaS to isolated environments, enabling mission-critical teams to operate with the speed and diagnostic intelligence of cloud-connected enterprises.
This guide provides instructions for operating, monitoring, and maintaining the VA, including procedures for managing the network environment and ongoing system administration.
Connection Management (Data Collection)
Cisco IQ VA is an on-premises solution for network data collection to provide deep visibility into your infrastructure. It collects data through Catalyst Center and Direct Connection. It simplifies how you manage network authentication and device discovery. Configuring data collection consists of:
- Creating Credential Sets: Establish the authentication protocols (for example, Simple Network Management Protocol (SNMP) v1/v2c/v3) to communicate with your network devices. Centralizing credentials by security zone or location (for example, "SanJose-SNMPv3") allows you to update passwords in one location, with changes automatically propagating to all associated devices.
- Mapping credentials to Inventory: Map your Credential Sets with your Inventory Assets to automate the authentication process. By creating rules that link specific IP ranges to defined Credential Sets, the system automatically applies the correct authentication during data collection. This eliminates manual entry errors and ensures your configuration remains accurate as your network grows.
Credential Types by Connection Method
| Connection Method |
Protocol/Credentials |
Data Collected |
| Catalyst Center |
HTTP/HTTPS (Admin role) |
Full inventory via Catalyst Center APIs |
| Direct to Device (SNMP + SSH) |
SNMPv2c/v3 (read-only) + SSH |
Full: Management Information Base (MIB) data + CLI output |
| Direct to Device (SNMP only) |
SNMPv2c/v3 (read-only) |
Partial: MIB data only |
Catalyst Center Connection
When Cisco IQ VA collects data through Catalyst Center, it communicates with Catalyst Center using HTTPS credentials. The VA does not connect directly to Catalyst Center-managed devices using SSH or SNMP; instead, Catalyst Center acts as an intermediary and provides the VA with device inventory data through its APIs.
-
Required credential: HTTP/HTTPS with administrator privileges on Catalyst Center. Admin-level access is required for the VA to query Catalyst Center APIs and retrieve full device inventory data
-
Not required: SSH or SNMP credentials for devices managed by Catalyst Center
Adding HTTP/HTTPS Credentials and Configurations for Catalyst Center
-
From System Settings, choose Connection Management.
-
Click the Credentials tab.
-
Click Add credentials.
-
Enter a Name (for example, “CatC-HTTPS-SiteA”).
-
Check the HTTP/HTTPS protocol check box.
-
Click Next.
-
Enter the Catalyst Center login details (username and password with Admin role).
-
Click Next.
-
Enter the Catalyst Center IP address or Fully Qualified Domain Name (FQDN) in Included IPs.
-
Click Save.
-
Configure the Catalyst Center connection:
-
From Connection Management, click the Catalyst Center tab.
-
Click Add Catalyst Center.
-
Enter the IP Address or FQDN.
-
Select the HTTP/HTTPS credential you created from the Select credential drop-down list.
-
Click Submit.
-
Direct Data Connection (Device-Level)
When the VA connects directly to devices without Catalyst Center, it uses SNMP and SSH. The combination of credentials determines the scope of discovery and collections:
| Credentials Provided | Result |
|---|---|
| SNMP + SSH | Success — Full discovery: MIB and CLI collection |
| SNMP + SSH (SSH fails) | Partial — MIB collection only |
| SNMP only (no SSH) | Partial — MIB collection only |
| SSH only (no SNMP) | Fails — Device is unmanaged |
| Neither | Fails — Device is unmanaged |
Adding SNMP Credentials
-
From System Settings, choose Connection Management.
- Click the Credentials tab.
- Click Add credentials.
- Enter a Name (for example, “Direct-SNMPv3-Core”).
- Check the SNMPv2c or SNMPv3 protocol check box.
- Click Next.
- Enter the SNMP community string (v2c) or authentication/encryption details (v3).
8. Click Next.
9. Enter the Included IPs (that is, the IP addresses or ranges of devices where this credential applies).
10. Click Save.
Adding SSH Credentials
-
From System Settings, choose Connection Management.
-
Click the Credentials tab.
-
Click Add credentials.
-
Enter a Name (for example, “Direct-SSH-Core”).
-
Check the SSH protocol check box.
6. Click Next.
7. Enter the SSH username and password (or key-based credentials).
8. Click Next.
9. Enter the Included IPs matching the same devices as your SNMP credential set.
10. Click Save.
Credential Selection and Matching Logic
The telemetry engine employs a priority-based matching logic to determine which credentials to apply during discovery and collection. Understanding this hierarchy ensures that the correct credentials are used for the intended devices.
-
Priority Ranking: When multiple credential sets apply to a device, Cisco IQ evaluates them based on how specifically they match the device; the system applies the following priority, with more specific matches taking precedence:
-
Exact IP match: Highest priority
-
Trailing Wildcard Match: Priority depends on the number of trailing stars; fewer stars indicate a more specific match and therefore higher priority
- Wildcard Formatting Rules: Wildcards (*) are only supported as trailing characters in an IP address; they must be applied from right to left.
- Supported Formats:
- 1.2.3.* (highest priority)
- 1.2.*.*
- 1.*.*.*
- *.*.*.* (lowest priority)
- Unsupported Formats:
- Leading wildcards (for example, *.1.2.3)
- Wildcards between octets (for example, 10.10.*.20)
- Use of dashes or other non-standard delimiters
- Supported Formats:
| Device IP |
|
|
|---|---|---|
| 10.10.1.5 | 10.10.1.5, 10.10.1., 10.10..* |
|
| 10.10.2.15 | 10.10.2., 10.10..* |
|
| 10.10.5.50 | 10.10.., ... |
|
Data Collection Using Catalyst Center
You can connect up to 20 Catalyst Centers (non-cluster) for each instance of Cisco IQ VA.
For data collection using Catalyst Center:
- From System Settings, choose Connection Management. The Connection Management page displays.
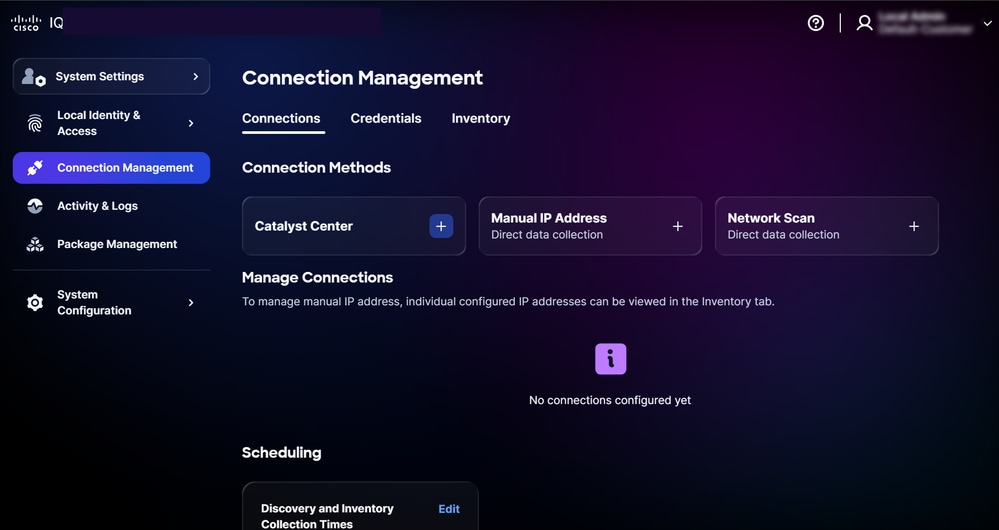 Connection Management
- Click the Catalyst Center option.
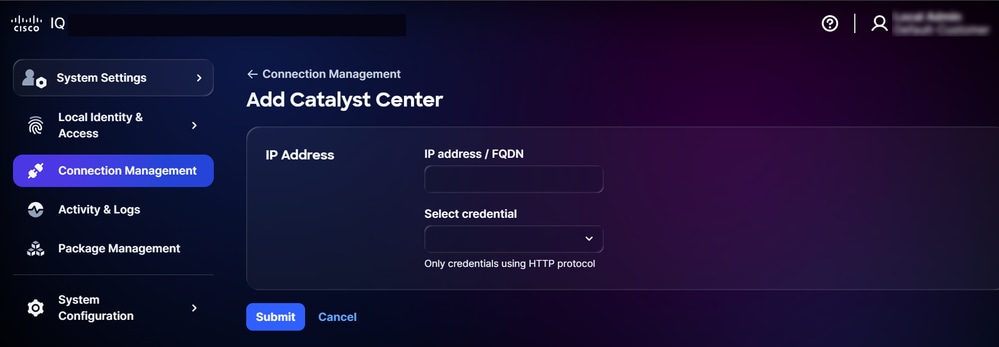 Add Catalyst Center
- Enter the IP Address or FQDN.
- Choose a configured HTTP/HTTPS credential from the Select credential drop-down list.
- Click Submit. A confirmation displays (can take up to 75 minutes). You can view the newly added Catalyst Center under Configured Connections.
- Schedule a collection. See Scheduling for more details.

Note: Note: Cisco IQ VA is pre-configured with an automated scheduling setup and the system initiates a default automated collection schedule. It is highly recommended that you edit the schedule to align with your organization’s requirements and maintenance windows.
Manual Data Collection
To add devices for direct data connection:
- From System Settings, choose Connection Management. The Connection Management page displays.
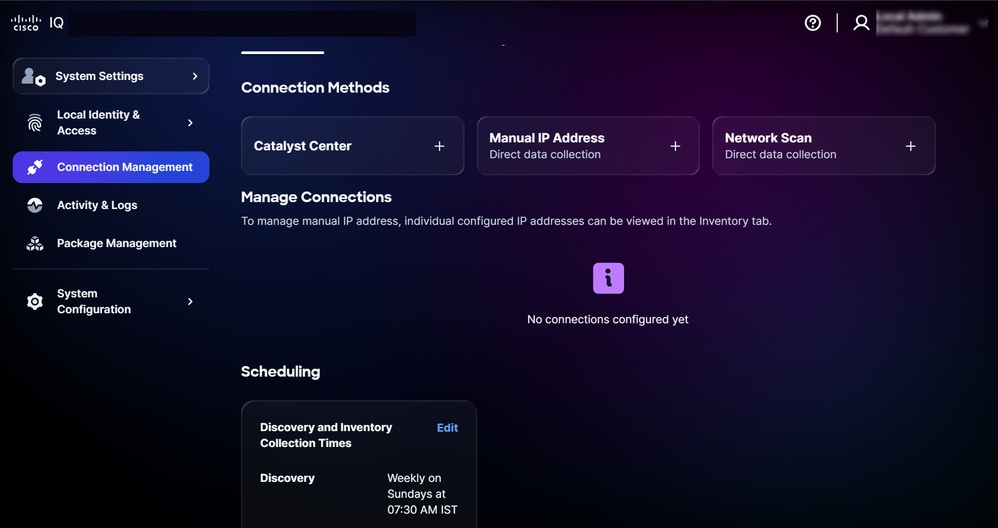 Connection Management
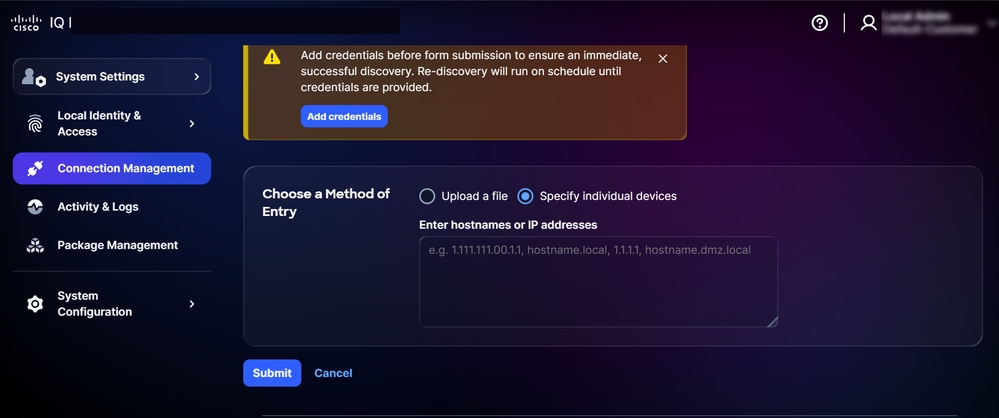
- Click Manual IP Address. The Direct Connection page displays with two (2) options to collect data.
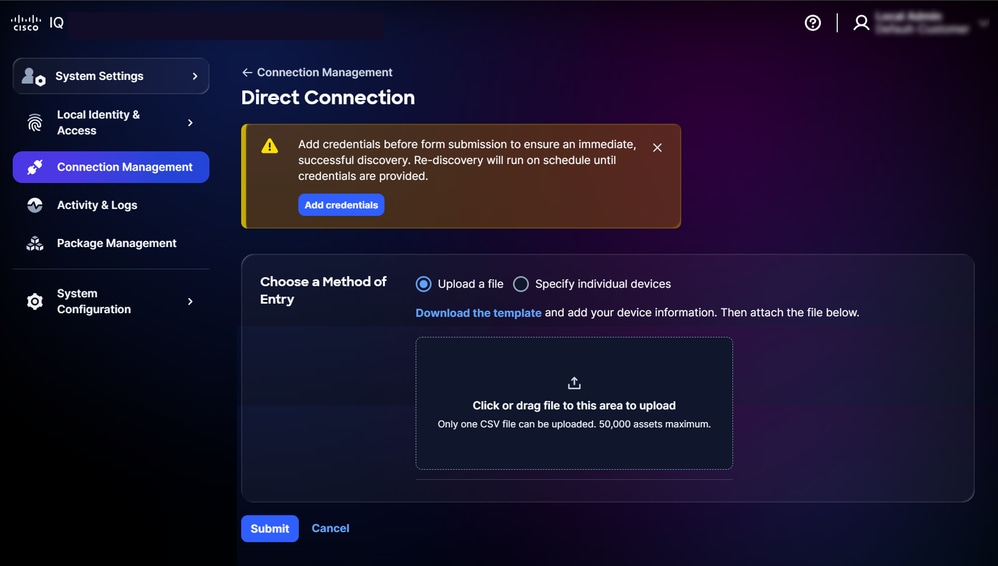 Upload File
- Click the preferred option from Choose a Method of Entry and provide your device information using one of the following methods:
- Upload a file: Click or drag-and-drop the file
 Specify individual devices
- Specify individual devices: Enter either a single hostname, IP address, or a comma-separated list of hostnames and/or IP addresse
- Click Submit. You are redirected to the Assets tab after successful submission.
- Schedule a collection. See Scheduling for more details.
Note: Cisco IQ VA is pre-configured with an automated scheduling setup and the system initiates a default automated collection schedule. It is highly recommended that you edit the schedule to align it with your organization’s requirements and maintenance windows.
Network Scan
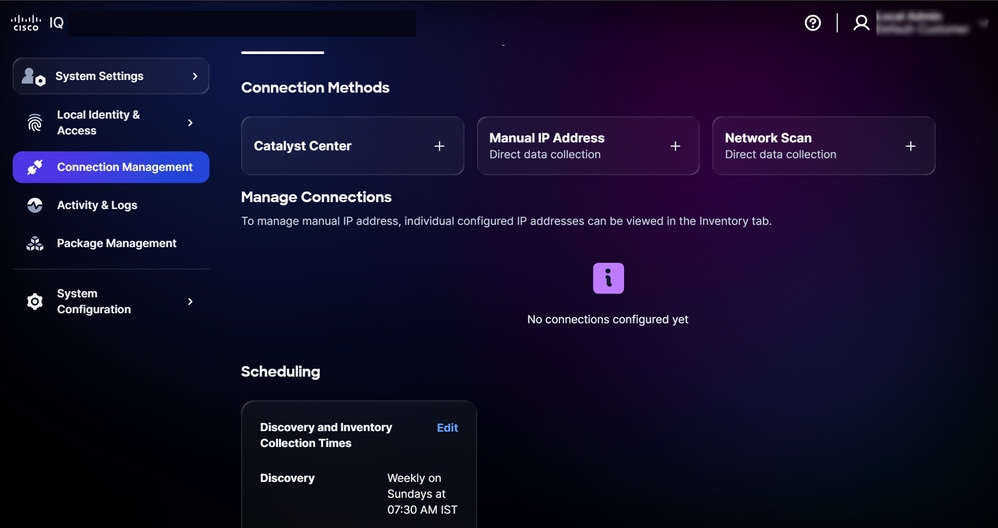
- From System Settings, choose Connection Management. The Connection Management page displays.
 Network Scan
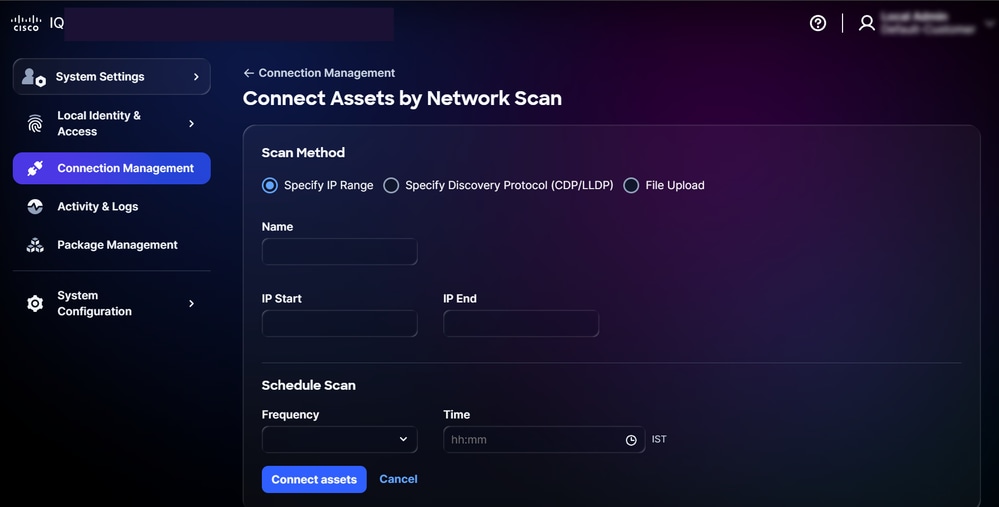
- Click Network Scan. The Connect Assets by Network Scan page displays with three (3) options.
 Connect Assets by Network Scan Using IP Range
- Specify IP Range: Define a range of IP addresses to target devices within that range for network discovery or management tasks
- Specify Discovery Protocol (CDP/LLDP): Choose the network discovery protocol to use
- File Upload: Upload a file, such as configuration files or data
- Enter Name.
- Enter IP Start and IP End.
- Under Schedule Scan, choose Frequency and Time.
- Click Connect assets.
Scheduling
Scheduling allows you to define when Cisco IQ VA performs automated data collection. To schedule collection:
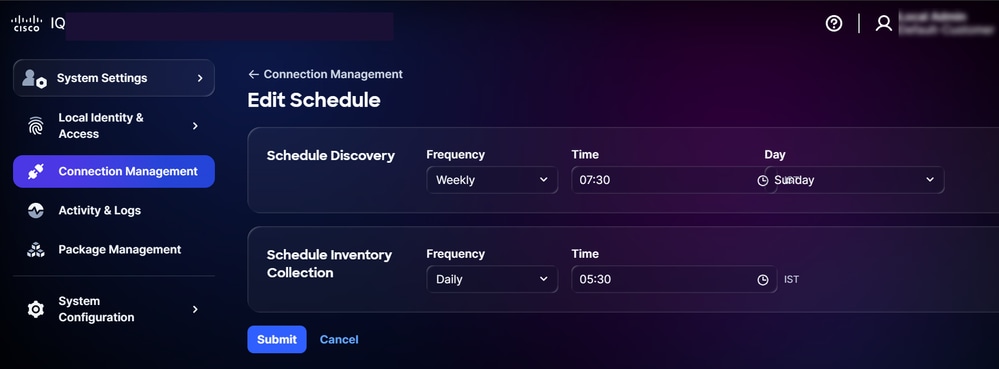
- In the Scheduling section on the Connection Management page, click Edit for the schedule you want to modify. The Edit Schedule page displays.
 Edit Schedule
- In the Schedule Discovery section, choose your preferred Frequency and Day from the drop-down lists and enter your desired start Time.
- In the Schedule Inventory Collection section, choose your preferred Frequency from the drop-down lists and enter your desired start Time.
- Click Submit.
Note: Allow 5–10 minutes for any changes made to discovery or collection schedules to synchronize and reflect accurately within VA.
Installing Packages (Modules, Rules, and Entitlements)
You can manage the software lifecycle (that is, installation and configuration) of operational modules, rules, entitlements, and specialized AI-powered features within the VA. You can install them by downloading the latest versions from Cisco IQ (SaaS) by navigating to the Package Catalog. The Package Catalog displays software instances available to you. It empowers you to monitor and manage updates seamlessly, ensuring efficient tracking and management of your system instances.
Adding Modules
A module is a standalone software package providing core functionality within the VA. It is an independent service with its own lifecycle, allowing for installation, maintenance, and resizing. The resource consumption—including CPU, Graphics Processing Unit (GPU), and RAM—is dynamically assigned based on the deployment size (Small, Medium, or Large) selected during the initial installation. The Assets module is deployed by default.
Note: There are two methods of deploying modules; file upload via local server and Secure Copy Protocol (SCP) download. See Adding SCP Server for details.
- Log in to Cisco IQ (SaaS).
- Navigate to Home > System Settings > Package Catalog.
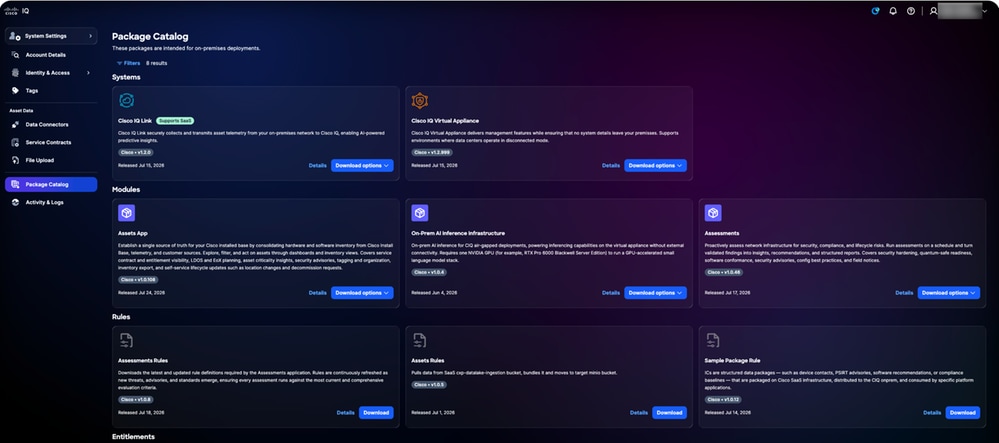 Package Catalog
- From the desired module card, click Download options > Installation packages. The Download window opens.
Note: The Assessment module is used for the example images.
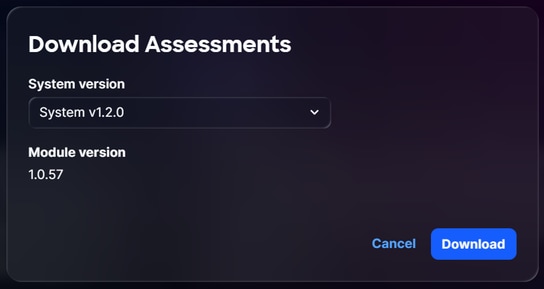 Download
- Choose a System Version from the drop-down list.
- Click Download to save the file locally.
Note: Ensure you have sufficient disk space before downloading.
- Navigate to Cisco IQ VA.
- Navigate to Home > System Settings > Package Management. The Package Management page displays with the following tabs:
- Modules
- Rules
- Entitlements
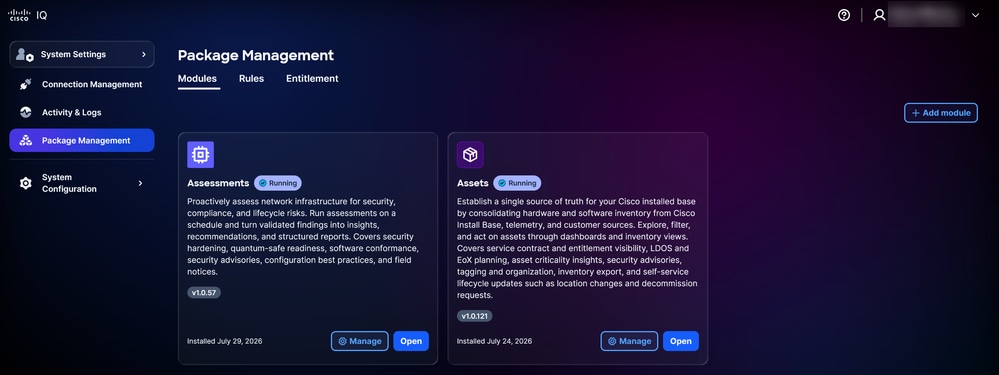 Modules
- Click Add module.
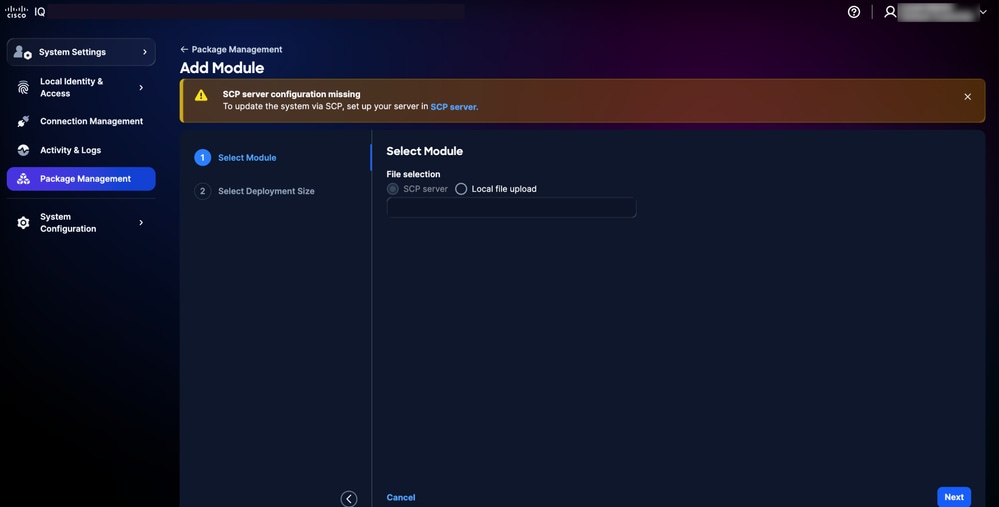 Add Module
- Choose your preferred File selection option:
- SCP server: Enter the exact file name of the installation package (recommended for large files)
- Local file upload: Drag-and-drop the downloaded installation file (not recommended for files 30 GB or larger due to upload time)
- Click Next.
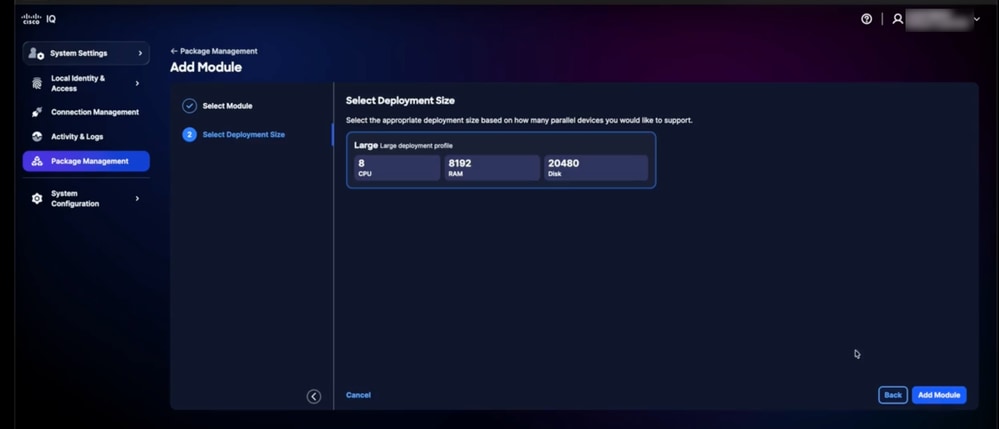 Select Deployment Size
11. Choose the Deployment Size (for example, Small, Medium, or Large). These sizes are pre-defined and dictate the resource requirements.
12. Click Add Module. The newly installed module display on the Modules tab in Package Management. Once complete, the module status changes to "Running," and the Open button becomes available.
Upgrading a Module
The latest modules are continuously being updated in Package Catalog (in Cisco IQ). To upgrade to the latest version:
- Log in to Cisco IQ (SaaS).
- Navigate to Home > System Settings > Package Catalog.
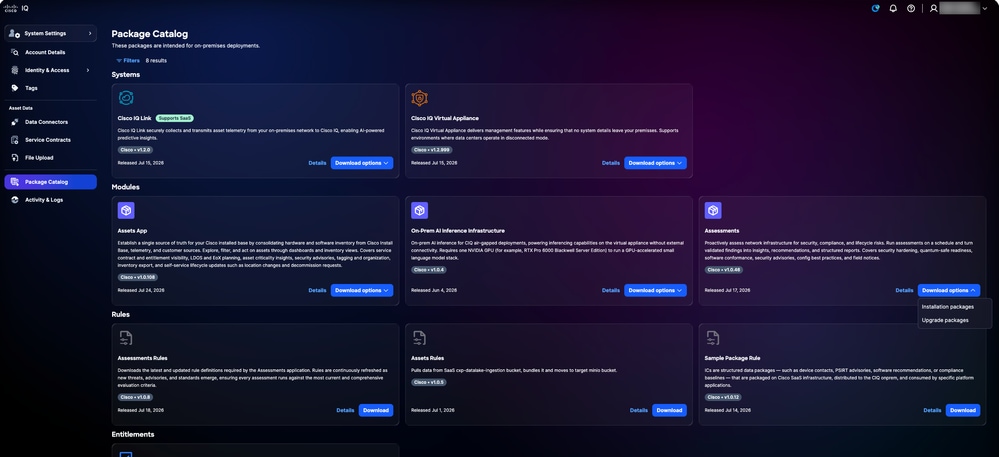 Package Catalog
- From the desired module card, click Download options > Upgrade packages. The Download window opens.
Note: The AI Inference Infra module is used as an example for the images.
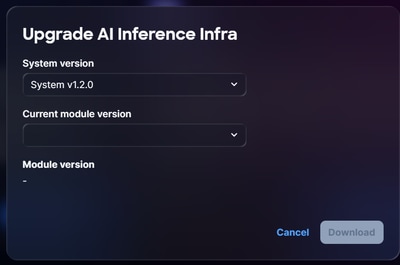 Upgrade
- Choose a System version from the drop-down list.
- Choose a Current module version from the drop-down list
- Click Download to save the file locally.
- Navigate to VA and complete the installation of downloaded file.
Managing Modules
After adding a module, you can modify it from the Package Management page by clicking Manage. The available modification options include resizing and upgrading to a higher version. To manage a module:
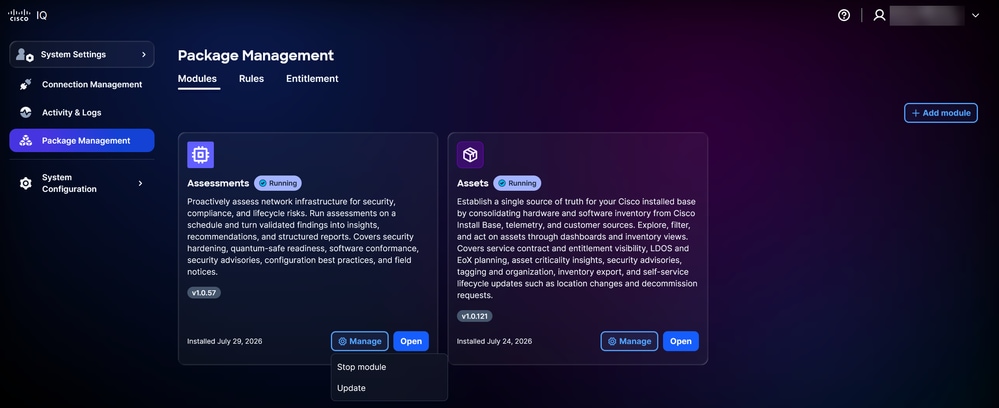 Update Type
- From the Package Management page, click Manage > Update for the desired module.
- Choose the Update type:
- Change deployment size only
- Update version
- If Change deployment size is selected, click Next and choose the new deployment size on following page.
OR
If Update Version is selected, the File selection option displays. Choose either SCP Server and enter the exact file name of the installation package or choose Local file upload and drag-and-drop the downloaded installation file.
- Click Next. The Select Update Schedule page displays.
- Choose from the following radio button options to update the schedule:
- Update Now
- Update Later
Note: Some modules support updates without any downtime. If downtime is required, a banner displays the details.
- If Update later is selected, enter the Date and Time.
- Click Next. The Update Summary displays.
Note: You can access Release Notes from the Update Summary.
- Click Update Module and navigate to the Module tab. The module displays an “update scheduled” status.
Editing Schedules
You can also view, edit, or cancel scheduled updates. To edit or cancel a scheduled update:
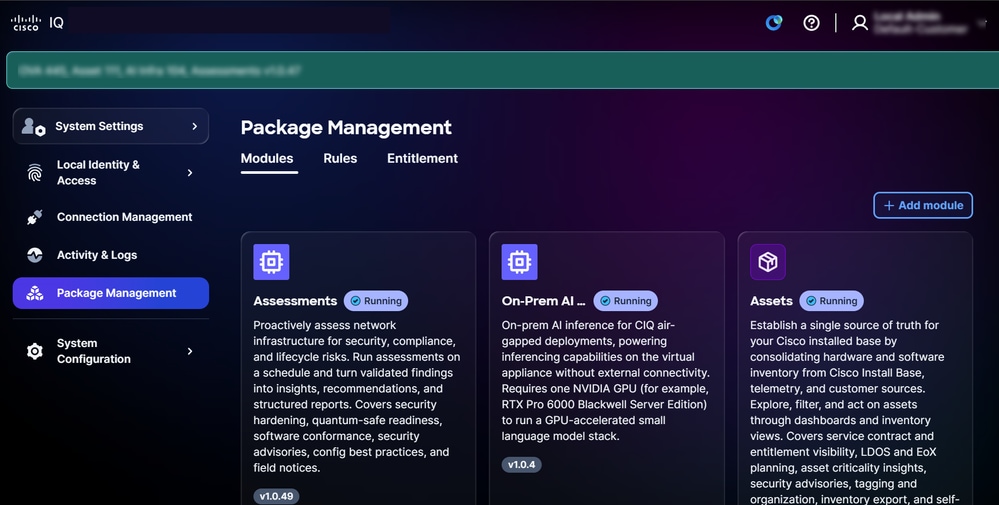 Editing Schedule
- From the Package Management page, click Manage > View Scheduled update of the desired module. The View Scheduled Updates window displays.
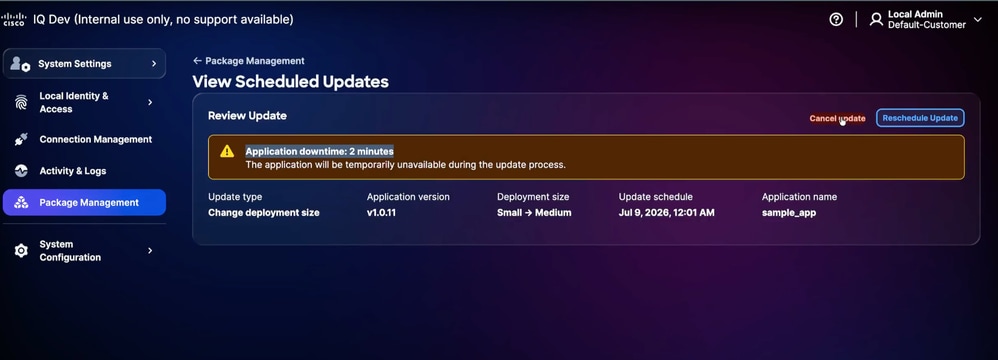 Schedule Updates
- Click Cancel Update or Reschedule Update as required.
- Follow the on-screen instructions to complete the operations.
Note: If a module operation (for example, installation, upgrade, or resize) fails, choose one of the following options:
Retry: The UI displays a Retry button, allowing you to attempt the operation again.
Logs: If an error persists, click Logs to view detailed diagnostic information. This is the primary method for identifying the cause of installation or runtime failures.
Installing Rules
A rule is a specialized component or "add-on" that extends or modifies the functionality of an existing module. Rules are not designed to run as stand-alone programs; they are "plugged into" a module to provide specific rules, logic, or features. Rules are tied to specific modules. When a rule is installed, it is linked to the module it supports. Rules allow the system to be updated or customized without requiring a full upgrade of the core module. If a new set of rules or features is needed, you can simply add a new rule to the existing module. Rules define critical security updates, and customers should plan to proactively update them to stay consistent with security advisories. New rule packages are generally available every two (2) weeks in the SaaS portal.
To download a rule:
- Log in to Cisco IQ (SaaS).
- Navigate to System Settings > Package Catalog.
- From the desired rule card, click Download.
Note: The following example image is for an Assets rule.
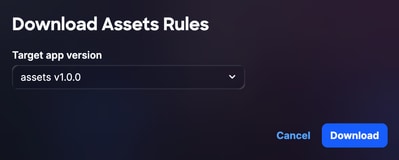 Download
- Choose a Target app version from the drop-down list.
- Click Download to save the file locally.
- Navigate to Cisco IQ VA.
- Navigate to Home > System Settings > Package Management. The Package Management page displays with the following tabs.
- Modules
- Rules
- Entitlements
8. Click the Rules tab.
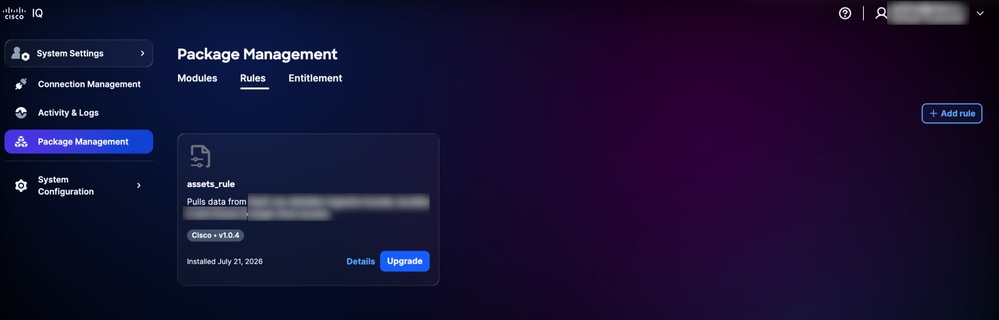 Package Management
9. Click Add rule.
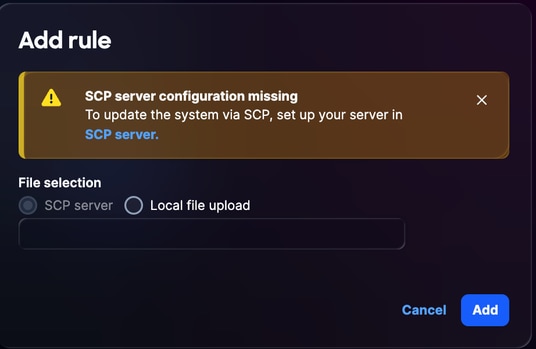 Add Rule
10. Choose your preferred File selection option:
- Secure Copy Protocol (SCP) server: Enter the exact file name of the installation package. This method is recommended for large files.
- Local file upload: Drag-and-drop the downloaded installation file.
11. Click Add. The added rule displays in Package Management.
Upgrading Rules
To upgrade rules:
- Navigate to System Settings > Package Management in VA.
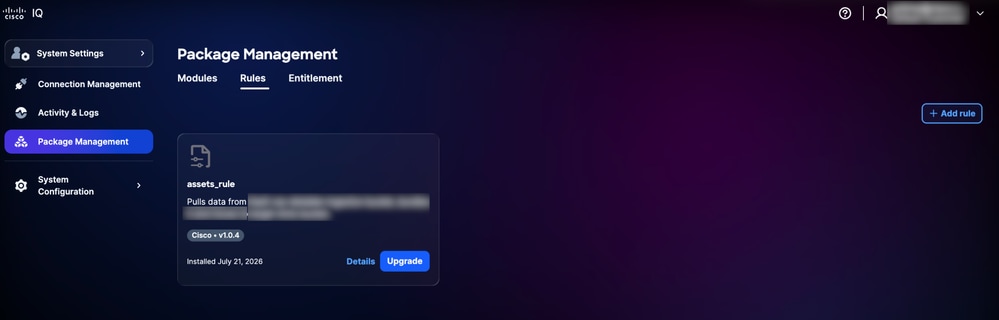 Upgrade
- From the desired rule, click Upgrade. The Upgrade Rule window opens.
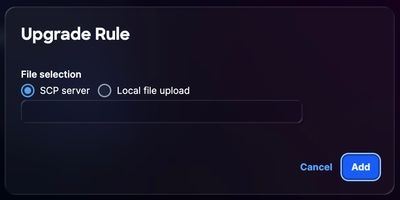 Upgrade Rule
- Choose your preferred File selection option:
- Secure Copy Protocol (SCP) server: Enter the exact file name of the installation package. This method is recommended for large files.
- Local file upload: Drag-and-drop the downloaded installation file.
- Click Add.
Note: These rules are applied at the recurring scheduled device telemetry collection. For immediate application, you can manually initiate device telemetry collection.
Installing Entitlements
An Entitlement provides validation of your organization’s right to use specific software features, modules, or services, enabling the correct support tiers for your assets as well as unlocking capabilities and insights. Without an associated entitlement, an asset displays under “No Support” and has limited capabilities.
To install an entitlement:
- Log in to Cisco IQ (SaaS).
- Navigate to System Settings > Package Catalog.
- From the entitlement card, click Create record. The Create entitlement bundle window opens.
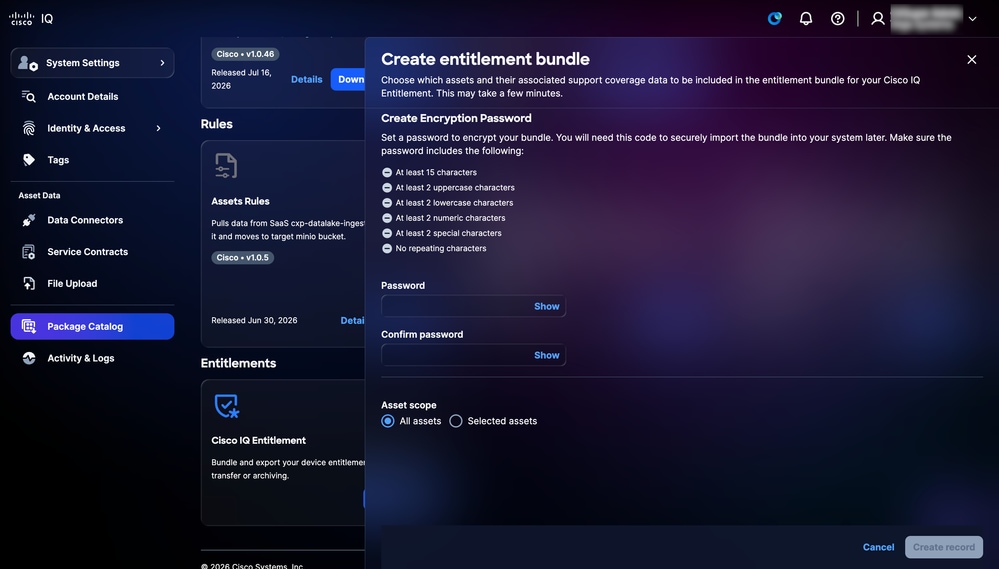 Create Entitlement Bundle
- Enter a Password. Refer to the password creation rules that display on-screen.
- Enter the same password again in Confirm Password.
- Choose the preferred Asset scope radio button.
- All assets: Includes all assets linked to you
- Selected assets: Allows you to pick specific devices aligned with your environment; if this option is selected, check the check boxes of all applicable assets
- Click Create record to save the file locally.
Note: After creating the entitlement bundle, do not navigate away from the current screen. If you navigate to another page, the bundle is invalidated and you must regenerate it to enable the download option.
- Log in to Cisco IQ VA.
- Navigate to Home > System Settings > Package Management. The Package Management page contains the following tabs:
- Modules
- Rules
- Entitlements
- Click Entitlements tab.
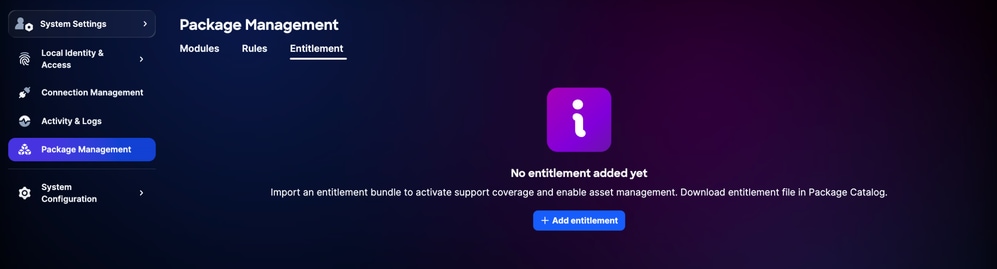 Entitlement Tab
- Click Add Entitlement.
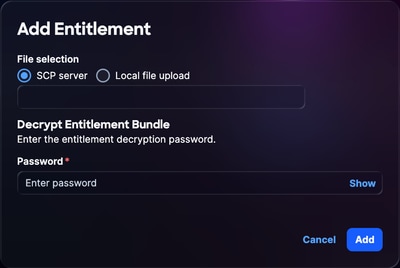 Add Entitlement
- Choose your preferred File selection option.
- Secure Copy Protocol (SCP) server: Enter the exact file name of the installation package; this method is recommended for large files
- Local file upload: Drag-and-drop the downloaded installation file
- Enter a Password.
- Click Add. The newly installed entitlement displays on the Entitlement tab in Package Management.
- To enable entitlements, wait 5 to 10 minutes after adding them, then initiate the device telemetry collection.
Note: Adding a service contract in the entitlement process adds all devices linked to that contract to the on-premises device asset inventory. You have options to filter devices by serial number, use multiple account IDs, or select specific devices to manage entitlements.
Upgrading Entitlements
To upgrade an entitlement:
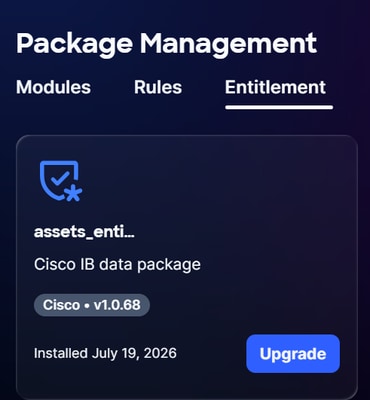 Entitlement Upgrade
- From the desired Entitlement, click Upgrade.
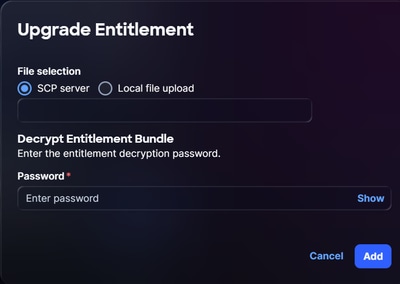 Upgrade Entitlement
- Choose your preferred File selection option:
- Secure Copy Protocol (SCP) server: Enter the exact file name of the installation package; this method is recommended for large files
- Local file upload: Drag-and-drop the downloaded installation file
- Enter a Password.
- Click Add.
Note: Entitlements are version dependent; an error message displays if you try to upload the same or older revision of an entitlement.
AI-Powered Features
The On-Prem AI Inference Infrastructure module enables on-premises AI-powered capabilities in VA. It runs a Small Language Model (SLM) locally, allowing the system to respond to AI-powered prompts. Once installed, you can interact with it directly within the VA interface.
The following query types are supported:
- Assets: Identify assets at risk due to end-of-life status, software currency or non-conformance, security vulnerabilities, and contract coverage gaps
- Inventory: Request AI-driven analysis about assets in your inventory
The On-Prem AI Inference Infrastructure installation package is available from the Cisco IQ Package Catalog and is distributed in the same way as other modules, such as Assets.
Note: The installation takes approximately 40–45 minutes to complete. The installation files are large (approximately 30 GB); ensure you have sufficient disk space before downloading. See Common Features for Modules for more information about module features.
Prerequisites for On-Prem AI Inference Infrastructure
Before installing the On-Prem AI Inference Infrastructure, the following conditions must be met:
- The VA must include a VM with GPU access; the SLM requires a GPU and cannot run without one
- The GPU VM must have 80GB or more of GPU VRAM available
Installing On-Prem AI Inference Infrastructure Module
To install the On-Prem AI Inference Infrastructure on the VA, download the On-Prem AI Inference Infrastructure module from Cisco IQ SaaS:
Note: See the Cisco IQ VA Getting Started Guide for details on GPU requirements.
- Log in to Cisco IQ (SaaS).
- Navigate to System Settings > Package Catalog.
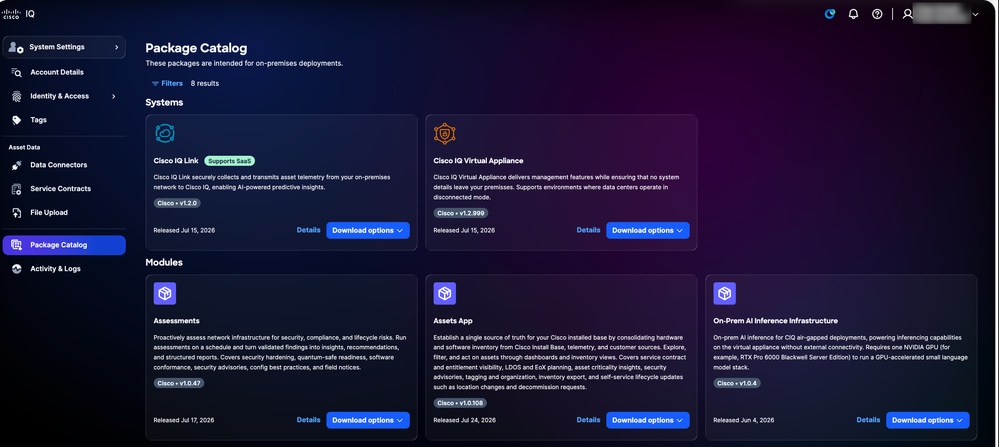 Install Package
- From the On-Prem AI Inference Infrastructure card, click Download options > Installation packages. The Download Application window opens.
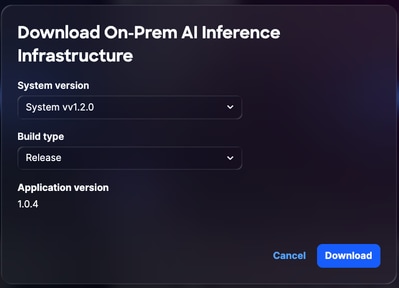 Download AI Inference Infrastructure
- Choose a System version from the drop-down list.
- Choose a Build type from the drop-down list.
- Click Download.
- Navigate to VA.
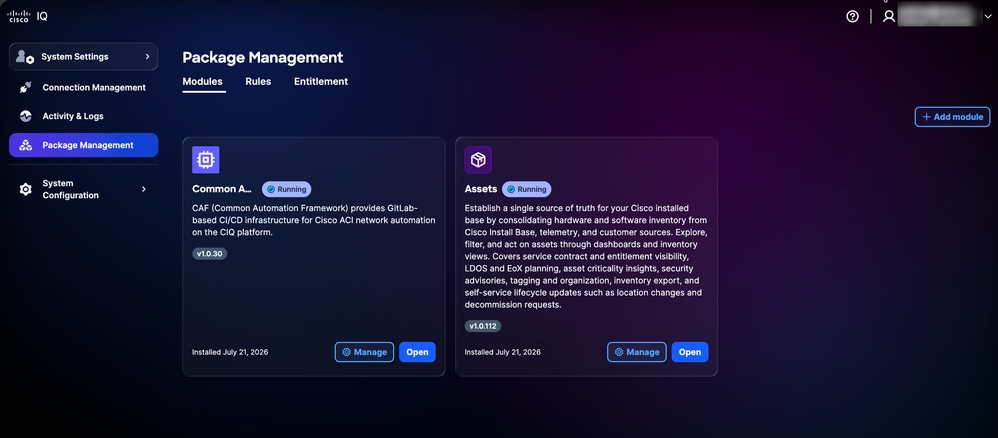 Package Management
- Navigate to Home > System Settings > Package Management. The Package Management page displays with the following tabs:
- Modules
- Rules
- Entitlements
- From the Modules tab, click Add modules.
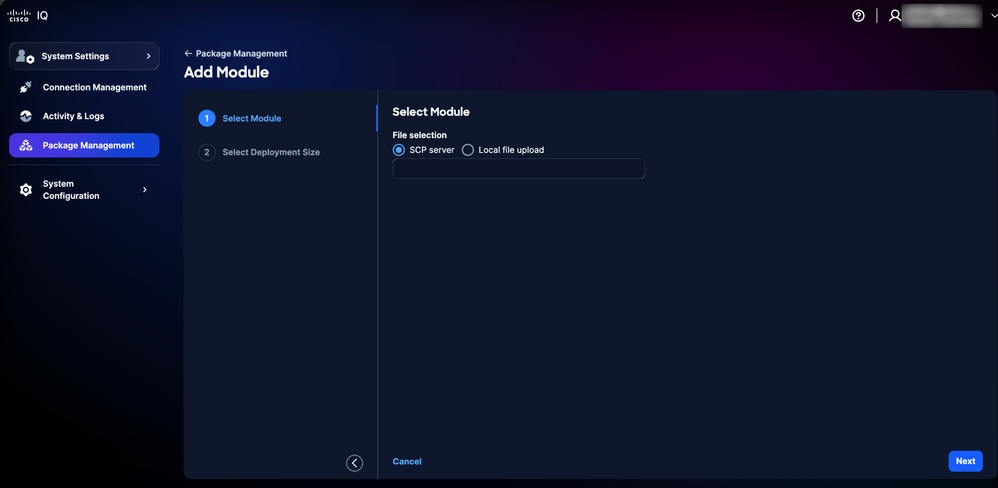 Select Module
- Choose your preferred File selection option:
- SCP server: Enter the exact file name of the installation package (recommended for large files).
- Local file upload: Drag-and-drop the downloaded installation file (not recommended for files 30 GB or larger due to upload time).
Note: The local file upload method has a 20-minute threshold. If the upload process exceeds this duration, the installation fails. Using an SCP server is the preferred method to ensure a successful and stable installation.
- Click Next. The system begins uploading the file.
- Choose a Deployment Size (for example, Small, Medium, or Large).
- Click Add Module. The installation begins and takes approximately 40–45 minutes to complete.
Once the installation is complete, On-Prem AI Inference Infrastructure displays on the Module tab in Package Management.
Note: Only one (1) On-Prem AI Inference Infrastructure module can run per GPU.
Managing the On-Prem AI Inference Infrastructure Module
Once installed, the On-Prem AI Inference Infrastructure module can be managed from the Applications tab in Package Management.
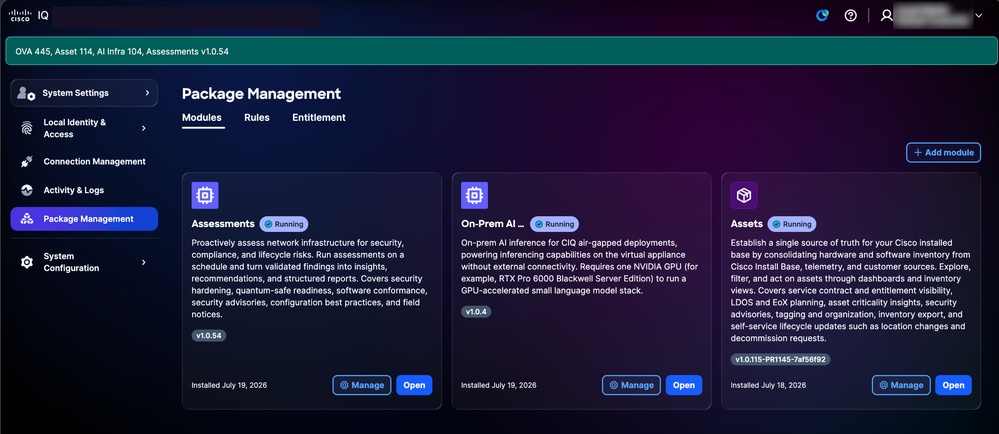 Editing AI Inference Infrastructure
To manage the module, click Manage next to the On-Prem AI Inference Infrastructure module. See Managing Modules for more details.
Using AI-Powered Features
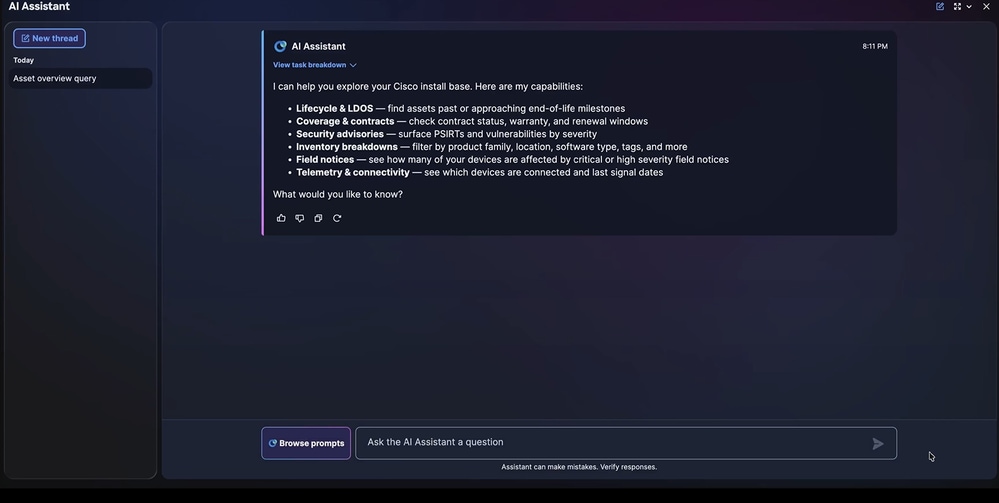
After the On-Prem AI Inference Infrastructure module is successfully installed, the Ask AI button becomes available in the VA interface.
Ask AI in Assets
Note: Ask AI is supported in both the Assets and Assessments modules. The following steps use the Assets module as an example.
To use Ask AI in Assets:
- Choose the Home menu > Assets. The Assets page displays.
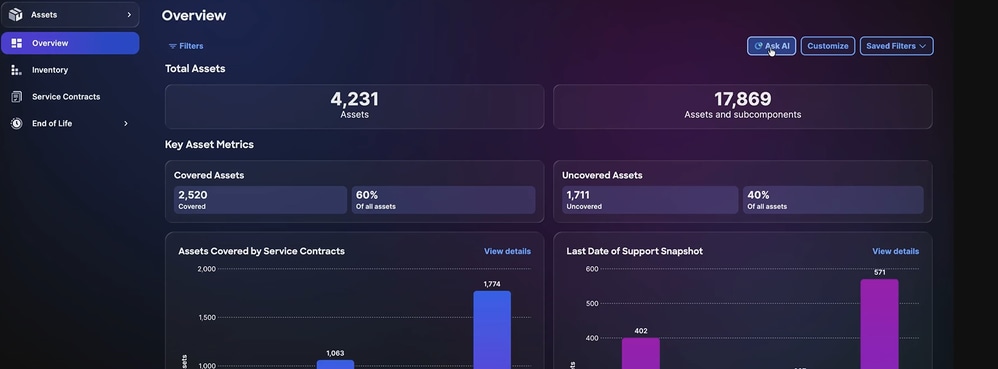 Assets Page
- Click Ask AI. The On-Prem AI Inference Infrastructure launches.
- Either click Browse prompts to view available prompts or enter a custom question in the Ask the AI Assistant a question field.
- Click the desired prompt or press Enter. The on-premises SLM generates a response.
AI Analysis
Note: AI analysis is supported in all Assets and Assessments module tabs, the following example uses the Assets module’s Inventory tab.
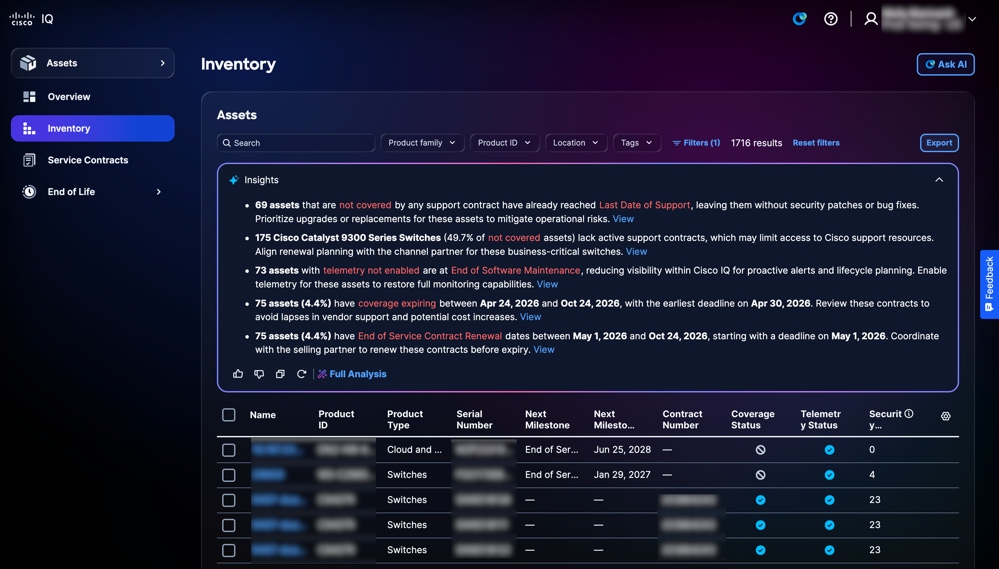
The On-Prem AI Inference Infrastructure module provides automated AI-driven analysis in the Inventory section. Analysis results display automatically once inventory data is populated.
To view AI analysis in Inventory:
- Choose the Home menu > Inventory. The Inventory page displays.
 Inventory
2. View the AI-generated analysis. Results display in the inventory view once data is available.
Note: Click Full Analysis for visualizations like graphs, dashboards, and charts which provide additional insights.
Common Features for Modules
This section details the core functionalities shared across all modules. These features offer a consistent user experience, optimize system performance, and streamline administrative workflows
Analyzing Data
The Insights panel delivers AI-driven analysis of the data on that page, providing actionable insights to improve the security and health of your network environment.
Note: The Analysis feature is only available on select pages.
 Insights Panel
The following options are available inside the Insights panel:
- Click the Expand icon to expand the panel and display additional insights
- Click the Thumbs Up or Thumbs Down icon to provide feedback on the AI-generated information
- Click View to view additional details about a particular insight
- Click Full Analysis to display additional information, deeper analysis, and visualizations like graphs, dashboards, and charts
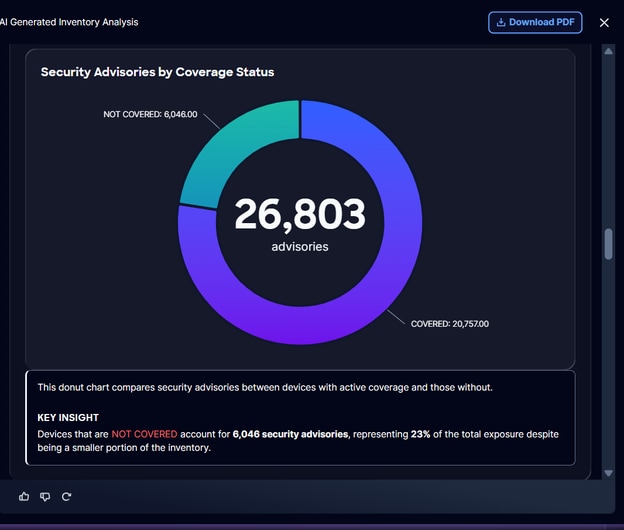 Full Analysis
The following options are available within a full analysis:
- Click Download PDF to save an offline copy of the analysis for your records or for collaboration
Note: This capability is available only for AI-powered deployments where the GPU is enabled on the Cisco IQ VA.
Exporting Information
The export feature allows you to export custom views for Assets and Security information in .xls or .csv format.
Note: The export feature is only available for select pages.
To export information from a page:
- Navigate to the page.
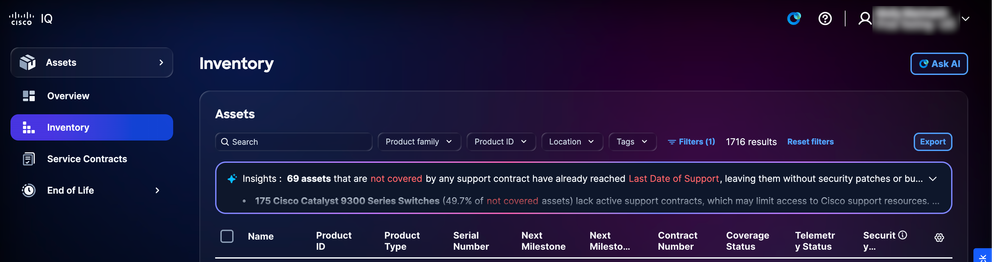 Exporting Inventory in the Assets Module
- Click Export. The Export Options display.
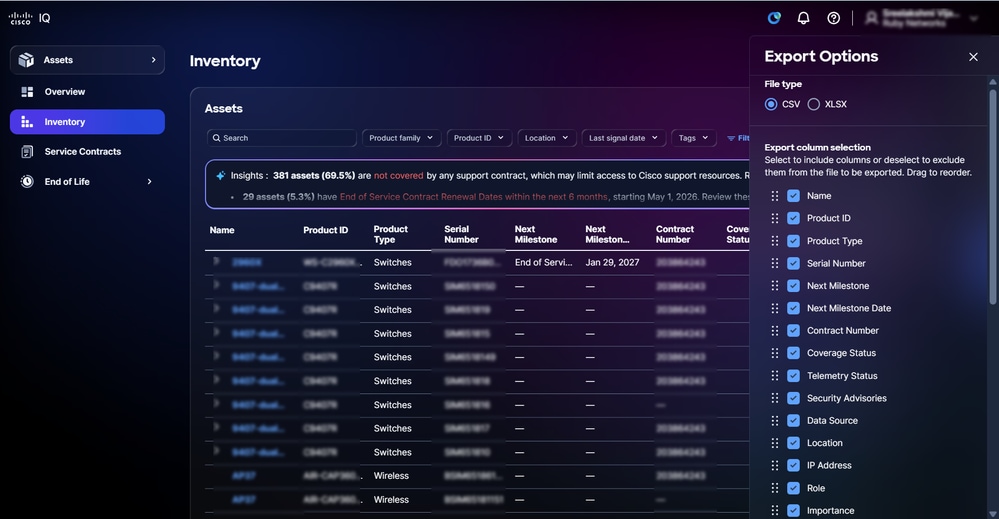 Export Options
- Choose a File type.
- Check the check box(es) in the desired column(s).
- Click Export. The file downloads to the browser’s local download folder.
Table Settings
You can configure table settings to create custom and refined views for different module features.
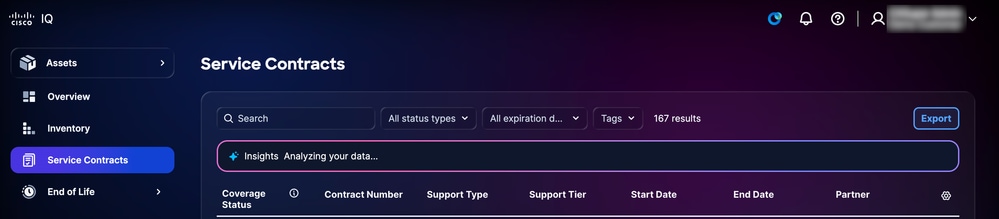 Table Settings
To change the columns that display on selected pages, click the Table Settings icon. The Table settings display.
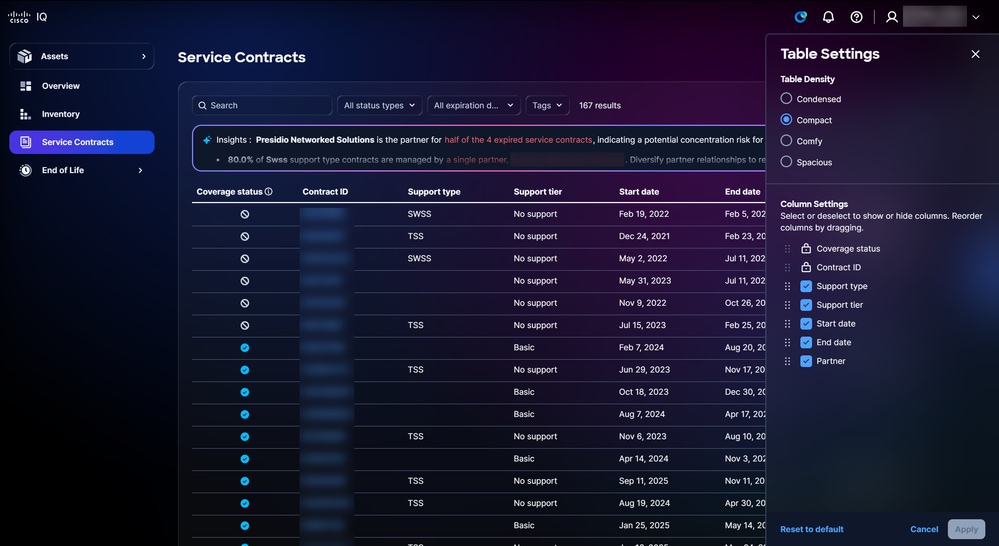 Table Setting Options
Changing Table View
To change the table view:
- Choose one of the following Table Density options:
- Condensed: Minimizes visual elements and spacing to display more information
- Compact: Reduces whitespace and tightens spacing between UI elements
- Comfy: Utilizes more whitespace and larger spacing between elements
- Spacious: Emphasizes abundant whitespace and larger UI elements
- Click Apply.
Adding and Removing Columns
To add or remove columns:
- Check or uncheck the Column Settings check box(es).
- Click Apply.
Note: The Name column cannot be removed from the table view.
Changing Column Order
To change the column order:
- Drag-and-drop the column name to arrange the items in the desired order.
- Click Apply.
Customizing Dashboards
The Custom Dashboard feature enables you to personalize standard dashboards through a range of intuitive customization options:
- Rearrange dashboard widgets or panels using the drag-and-drop functionality
- Remove any components that are not relevant to your workflow
- Your personalized dashboard layout is securely stored to your user profile and automatically applied across all sessions and devices
- Restore the original dashboard layout with a simple reset option
To customize a dashboard:
- Navigate to the dashboard.
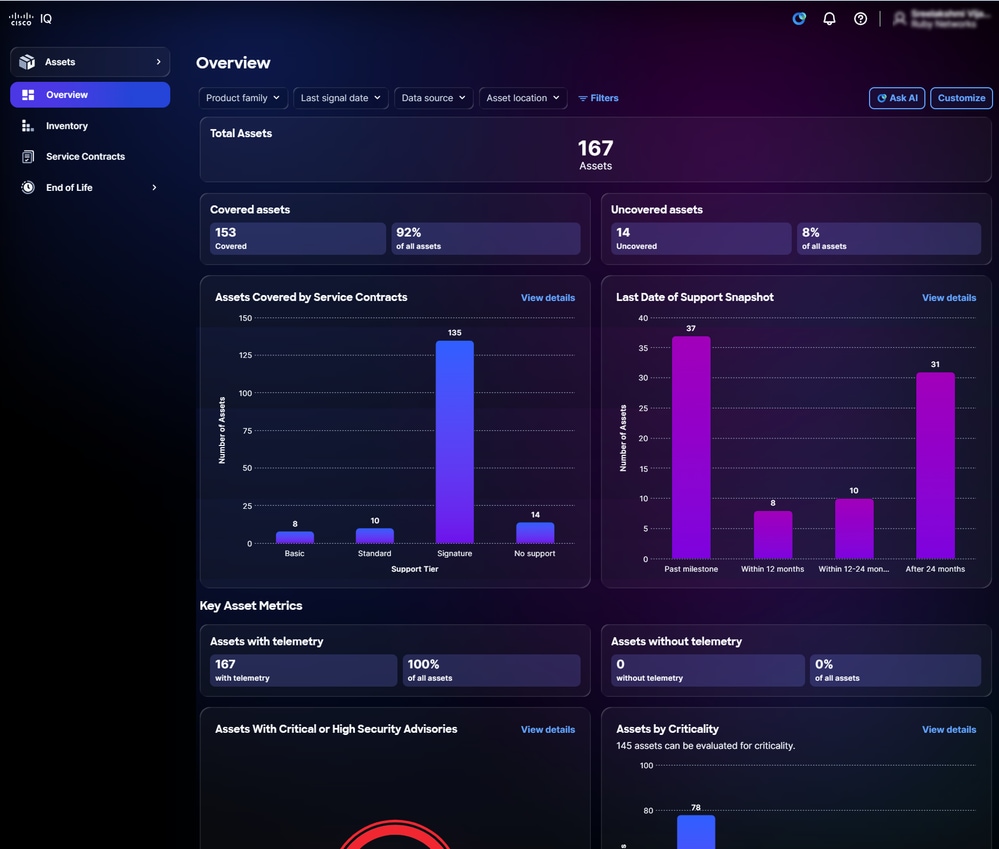 Customize
- Click Customize.
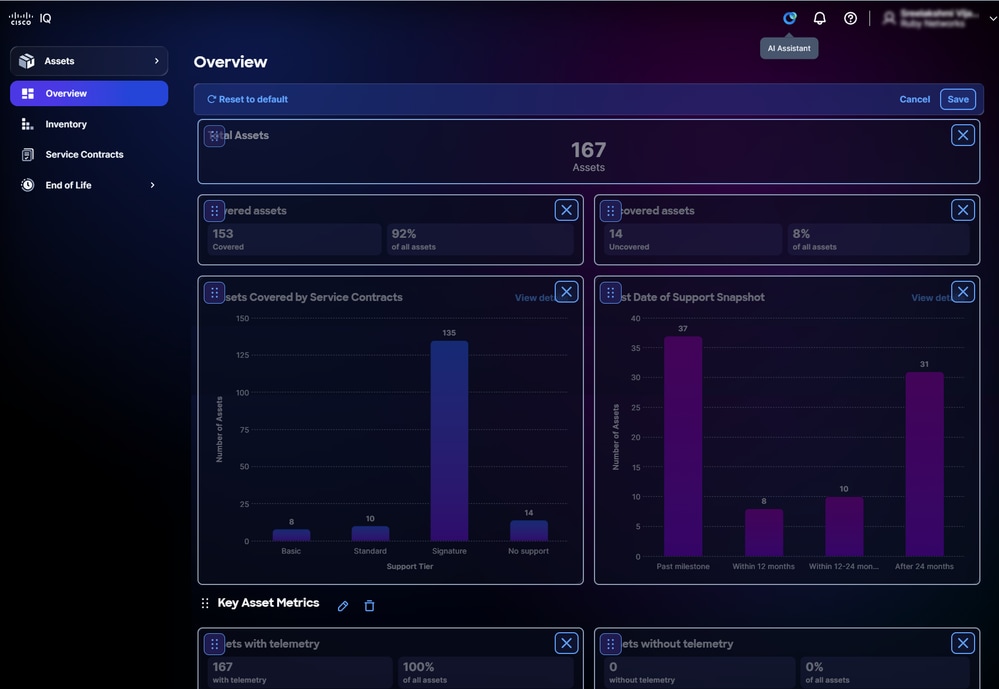 Edit Dashboard
- Change the dashboard as desired:
- Rearrange: Drag-and-drop the widgets into the desired layout
- Remove: Click the Delete icon to remove a widget
- Reset: Click Reset to default to reset the dashboard to its original layout
- Click Save. A Dashboard Saved message displays.
Your dashboard layout is automatically applied across all sessions and devices.
Customizing Filters
You can save custom filter configurations for any dashboard view, enabling you to easily return to your preferred settings as needed. All filter preferences are securely stored on a per-user, per-account basis, ensuring a personalized and consistent experience each time you access Cisco IQ.
Creating a Filter
To create a custom filter:
- Navigate to the dashboard.
- Click Filters.
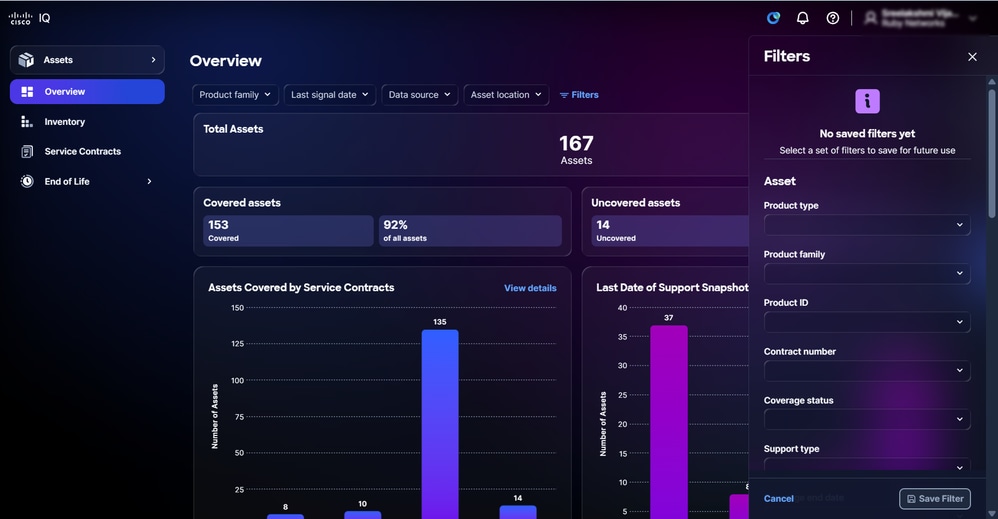 Filters
- Choose the desired filters from the drop-down lists.
- Click Save Filter. The Name saved Filter window opens.
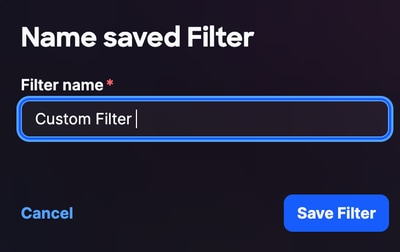 Filter Name
- Enter a Filter name.
- Click Save Filter to confirm.
Editing a Filter Name
To edit a custom filter:
- Click Filters.
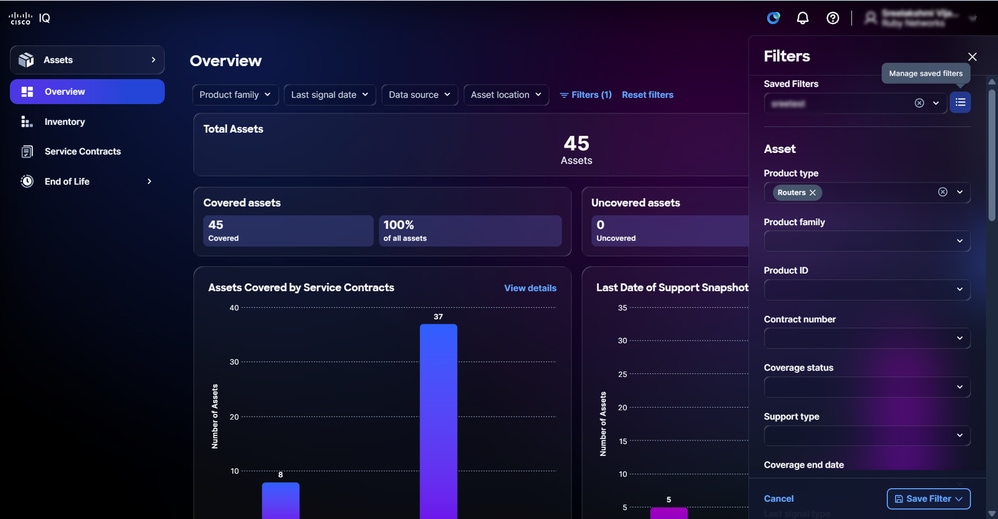 Manage Saved Filters
- Click the Manage saved filters icon.
- Navigate to the filter.
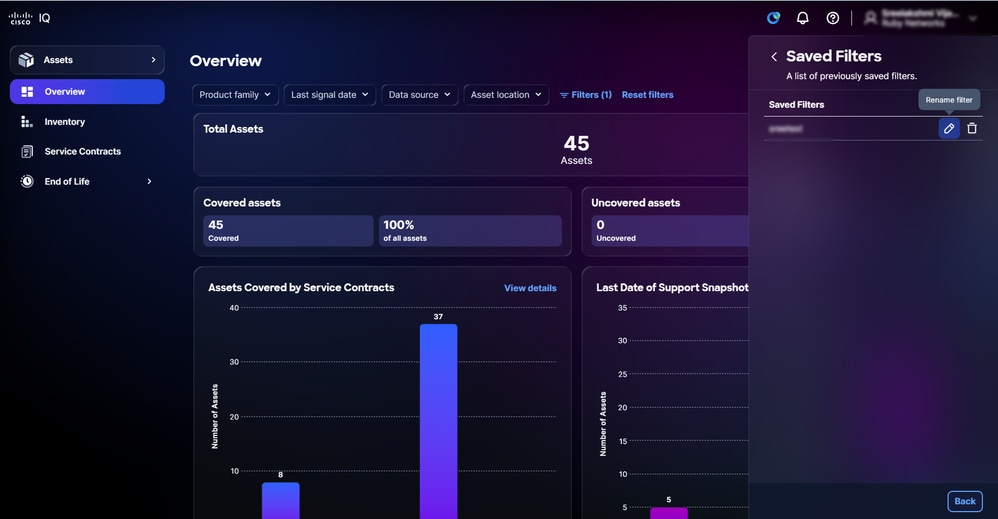 Edit Filter
- Click the Edit icon. The Name saved Filter window opens.
- Edit the filter name.
- Click Save Filter to confirm.
Deleting a Filter
To delete a custom filter:
- Click Filters.
- Click the Managed Saved Filters icon
- Navigate to the filter.
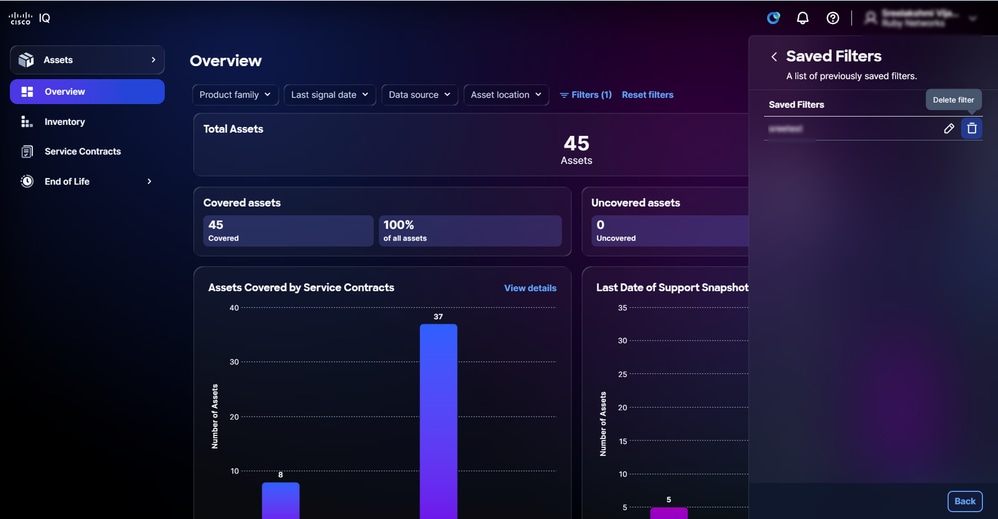 Delete Saved Filter
- Click the Delete icon. The Delete saved filter window opens.
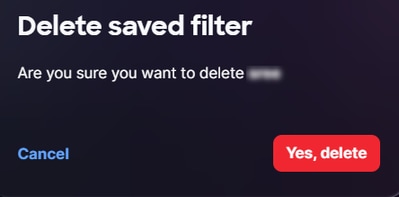 Delete Saved Filter Confirmation
- Click Yes, delete to confirm.
Assets Module
The Assets module delivers comprehensive visibility and management capabilities for Cisco assets and serves as the foundation of Cisco IQ, providing a centralized listing of all devices within an organization. By collecting information from multiple sources, it acts as a single source of truth for device inventory. Maintaining a complete and accurate asset list is essential, as other modules within Cisco IQ—such as the Assessments module—rely on this data to assess the health and security of your devices.
Core Concepts
The Assets module is built on the following core concepts:
- Asset: Any physical device, hardware, or software that is inventoried and managed as part of Cisco service delivery with detailed tracking of its identity, function, service coverage, and lifecycle
- Contract-Sourced Assets: Assets ingested into inventory directly from linked Service Contract data, rather than through telemetry. Cisco IQ ingests the following equipment types from contract data: Chassis, Modules, Power Supplies, and Fans. These assets are visible in the Inventory even if no telemetry connection is present
- Last Date of Support (LDOS): End-of-life and end-of-support milestone tracking for Cisco products
- Service Coverage: Active support contracts, warranties, and entitlement levels associated with a specific piece of hardware or software
- Asset Tag: A user-defined label assigned to an asset for organization, filtering, and operational workflows
- Device Signal: Refers to when Cisco last observed a device (by its serial number) based on device telemetry, support cases, and contract renewals; Asset telemetry data is ingested and enriched through a multi-layer data pipeline
Accessing Assets Module
To access asset management features in Cisco IQ, choose the Home menu > Assets or click Assets from the Application section of the Home page > Launchpad tab. The Overview page displays.
Assets Overview
The Overview page displays a dashboard that enables you to quickly evaluate the health and status of devices.
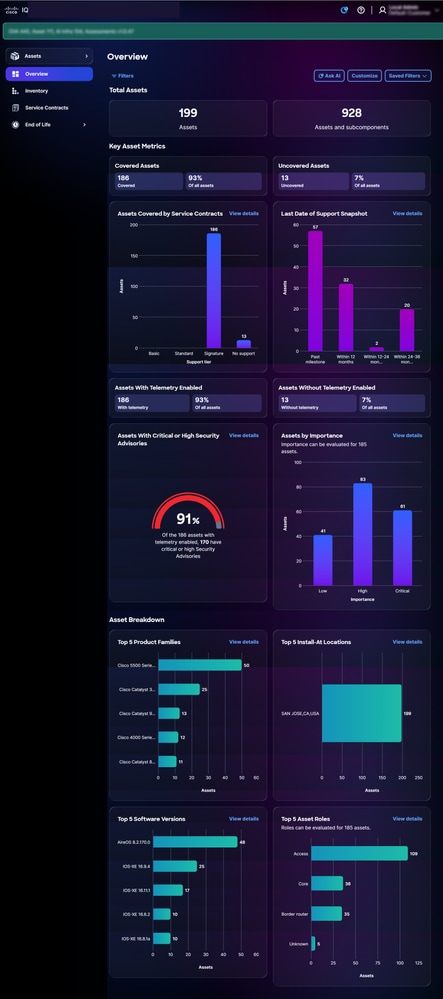 Assets Overview
The dashboard displays the following information:
- Total Assets: The total number of assets within the Cisco IQ account
- Key Asset Metrics: Additional key metrics such as telemetry status, critical security advisories, and LDOS information
- Covered Assets: The total number and percentage of assets covered by service contracts
- Uncovered Assets: The total number and percentage of assets not covered by service contracts
- Assets Covered by Service Contracts: A breakdown of the number of assets—hardware or software—that service contracts cover, categorized by entitlement level
- Last Date of Support Snapshot: A breakdown of the number of assets past LDOS or reaching LDOS
- Assets with Telemetry Enabled: Total number and percentage of assets with telemetry enabled
- Assets without Telemetry Enabled: Total number and percentage of assets without telemetry enabled
- Assets with Critical or High Security Advisories: The percentage of total assets with telemetry enabled and that have critical or high security advisories
- Assets by Importance: A breakdown of the priority assigned to a device relative to other devices in the network.
- Asset Breakdown: A detailed display of asset information, such as product families, install-at locations, software versions, and asset roles
Filtering Views for Assets
You can filter the dashboard view by choosing a filter from the drop-down lists or clicking Filters and choosing an option from the list of available filters.
Note: Some filters may be hidden depending on screen zoom settings. Different filters are available depending on your roles and permissions
Viewing Details for Assets
When clicking View Details, the page redirects to the Inventory page. See Inventory for more information.
Asset Criticality Insights
Cisco IQ includes Asset Criticality Insights, a new capability in the Assets module that predicts the functional role and business importance of network devices. By analyzing device configurations and enabled features, Asset Criticality Insights helps you identify which assets have the greatest impact on your network — so you can prioritize them for security remediation, software upgrades, End-of-Life (EOL) planning, and coverage decisions.
Note: Asset Criticality Insights are available exclusively for assets with Standard or Signature levels that have active telemetry connections. Please ensure your assets meet the configuration requirements to populate these insights within the dashboard.
Asset Criticality Insights are available in the Assets app in the following areas:
- Assets Overview: Filter and view summary breakdowns by Asset Criticality Insights attributes
- Assets Inventory: Display, search, filter, and sort devices by Role and Importance
- Asset Details: View Role and Importance for individual devices, with informational tooltips explaining each value
Overriding Role and Importance Classifications
Cisco IQ automatically predicts the Role and Importance of each asset based on telemetry data. Account Administrators can manually correct these classifications when the automated prediction does not accurately reflect the asset's function or criticality in the network.
Note: Override controls are available to Account Administrators only. Role and Importance values are read-only for all other user roles.
Overriding Classifications from the Inventory Table
To override Role or Importance for one or more assets:
- Navigate to Assets > Inventory.
- Click the check box of the desired asset row. To update multiple assets simultaneously, select multiple check boxes.
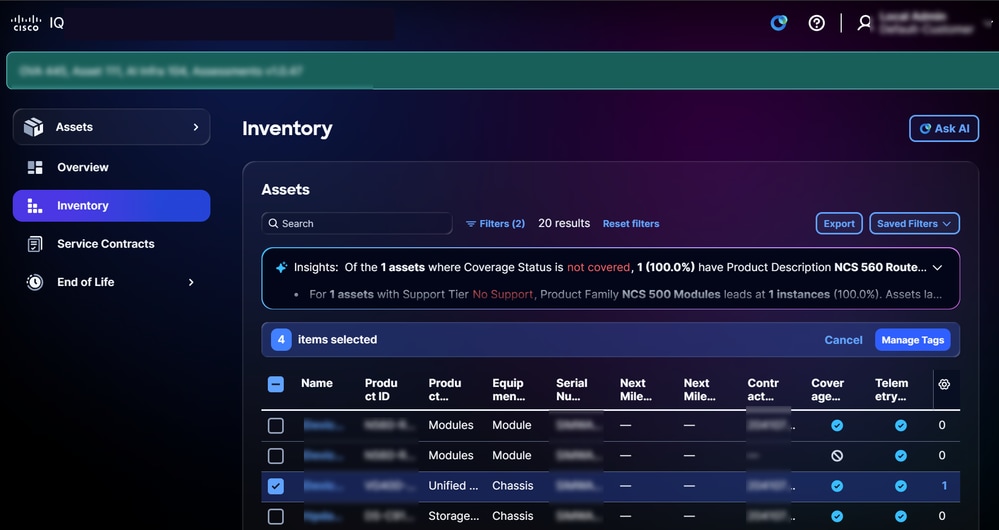 Role and Importance
- In the Role or Importance column, choose the correct value from the asset row drop-down list.
- Click Apply to confirm the override.
Assets with manually overridden values display a visual indicator in the Role or Importance column.
Note: To remove a previously configured override and return to the automated prediction, select the dash (—) option from the Role or Importance drop-down list.
Overriding Classifications from Asset Details
To override Role or Importance from the asset detail view:
- Navigate to Assets > Inventory and click an asset.
- In the asset details panel, locate the Role and Importance fields.
- Click the drop-down for the field you want to update and select the correct value.
- Click Apply to confirm.
An asset’s detail view also displays an explanation of the telemetry attributes that informed the original automated prediction, to assist in determining whether an override is appropriate.
Viewing the Override Audit Trail
All Role and Importance overrides are recorded in an account-level audit trail. To access the audit trail:
- Choose Home > System Settings > Activity & Logs.
- Choose Filters > Action Type > override to display only override events.
The audit trail displays the asset name, the previous and new values, the user who made the change, and the date and time of the change. The audit trail can be exported using the Export option.
Note: The audit trail can be filtered by date range, user, and asset name.
Inventory
The Inventory page provides a list of all Cisco assets within the Cisco IQ account.
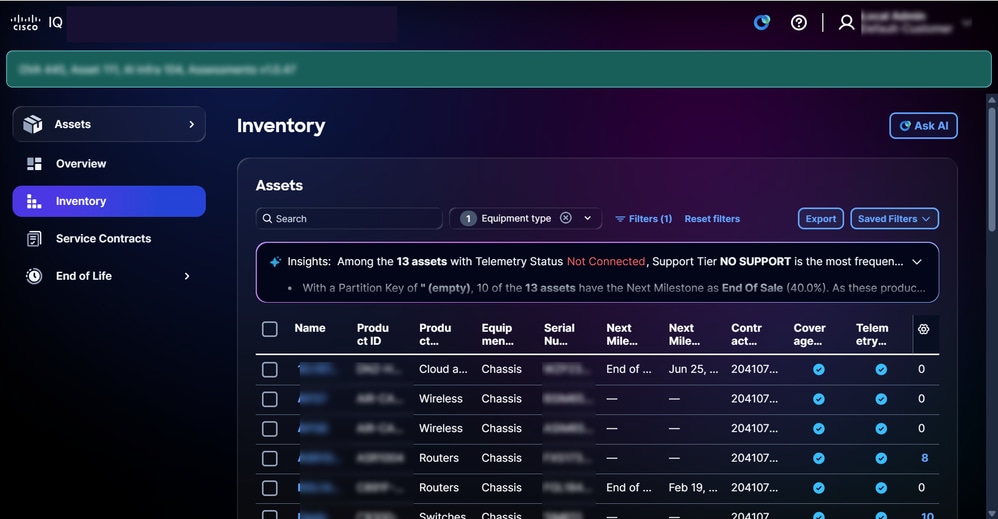 Inventory
Searching and Filtering Views for Asset Inventory
You can filter the list view by choosing a filter from the drop-down lists or clicking Filters and choosing an option from the list of available filters. You can also search for assets by entering the asset name in the Search field.
Note: Some filters may be hidden depending on screen zoom settings. Different filters are available depending on your roles and permissions.
Inventory Analysis
The Insights panel on the Inventory page displays an AI-driven analysis that provides a summary of assets with a focus on support coverage, connectivity, and milestones. Click Full Analysis for visualizations like graphs, dashboards, and charts which provide additional insights. See Analyzing Data in Common Module Features for more details.
Exporting Inventory
Click Export to save a filtered inventory list in .xls or .csv format. See Exporting Information in Common Module Features for more details.
Viewing Asset Details
Click an asset to view asset details. An asset’s detail view displays with the following tabs:
- Details: Displays asset details such as product, signal data, identity, location, warranty, and coverage information
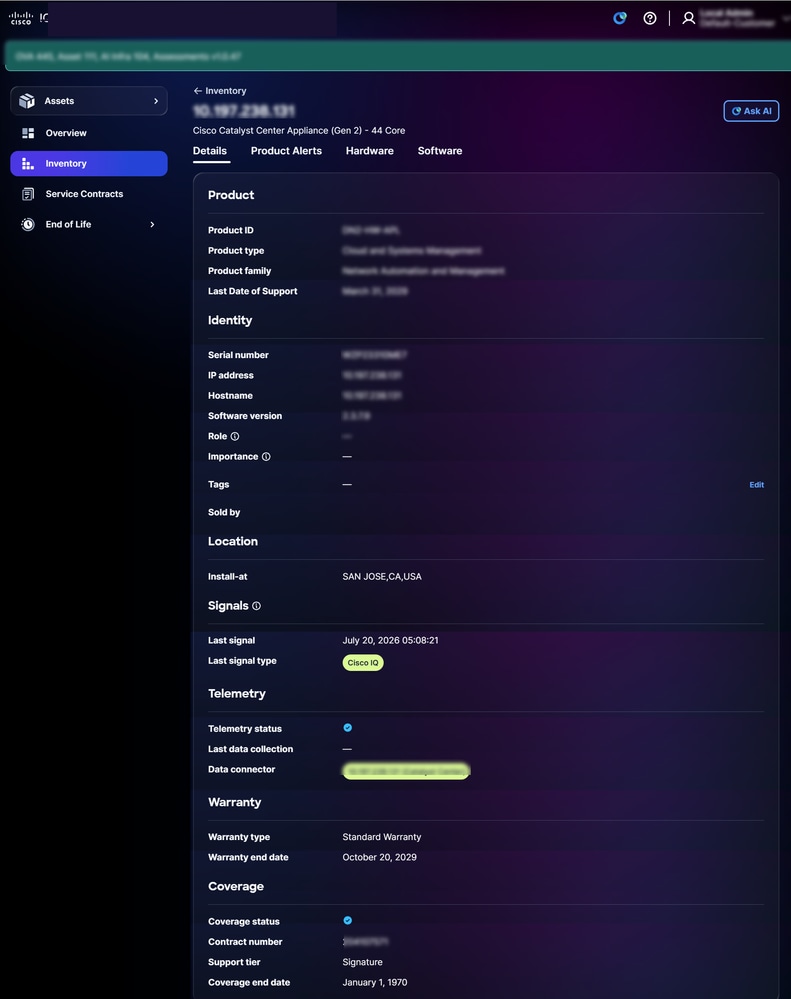 Asset Details
- Product Alerts: Displays related product alerts such as Security Advisories and Field Notices
- Hardware: Provides a detailed timeline view for hardware EOL (for example, End of Sale, Last Ship, and Last Date of Support dates)
- Software: Provides a detailed timeline view for software EOL
Asset Tags
Asset tags are custom labels you assign to inventory assets in Cisco IQ. A tag is a key:value pair—for example, Environment:Prod or Label:Campus—that you define. You can assign tags to individual assets or many assets at once, and you can filter your inventory by tag to quickly find the assets you care about.
Note: After a tag is created by an Account Administrator, users can assign a tag to an asset.
Assigning Tags
Assigning tags to selected assets in the Inventory view enables the organization and categorization of assets for enhanced filtering, reporting, and management.
To assign a tag to an asset:
- Navigate to Assets > Inventory.
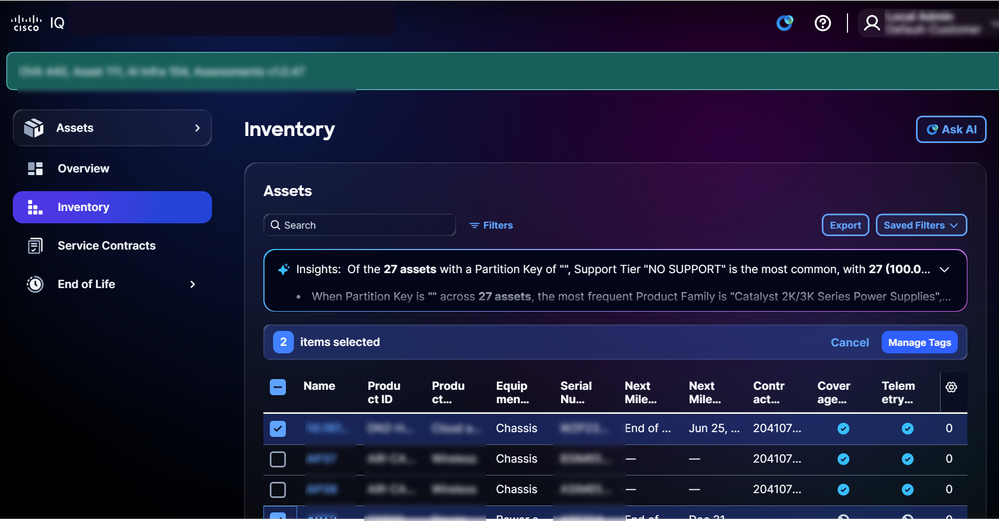 Tagging Assets
2. Select the check boxes of the desired assets.
3. Click Manage Tags. The Manage Tags window opens.
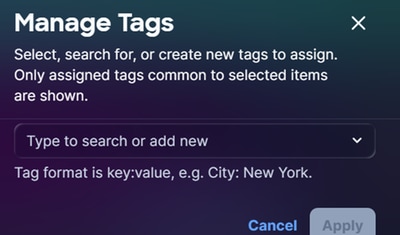 Assigning Tags
- In the text field, enter or select the tag name from the existing options and press Enter.
Note: Tags are in key:value format (for example, City:NYC).
- Click Apply.
Removing Asset Tags
To remove a tag from one or more assets:
- Navigate to Assets > Inventory.
- Select the check box next to one or more assets.
- Click Manage tags. The Manage tags window opens.
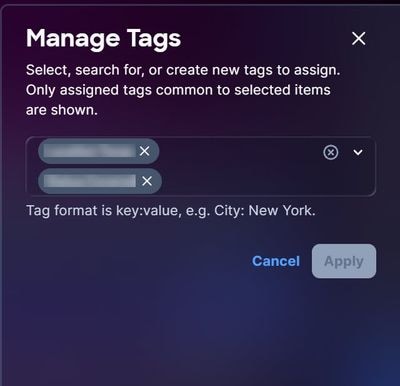 Removing Tags
4. Click the X on any tag to remove it from the selection.
5. Click Apply.
Using Asset Tags as Filters
After creating a tag, you can use the tag as a filter.
To use a tag as a filter:
- Navigate to the Inventory page.
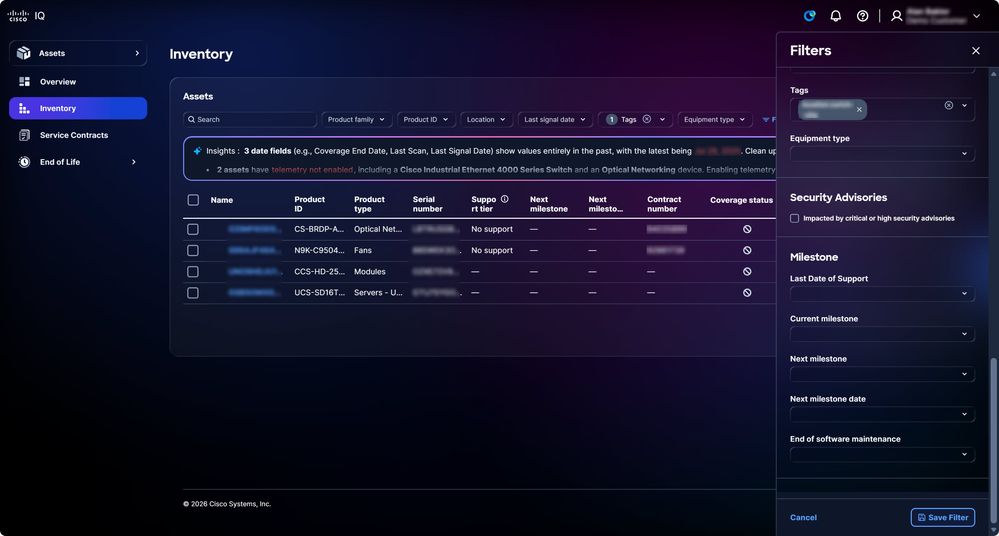 Using Tag as Filter
2. Click Filters. The Filters window opens.
3. From the Tags drop-down list, check the check boxes of the desired tags. After selecting the tag, the view on the Inventory page updates to the filtered view.
Service Contracts
The Service Contracts page streamlines support contract oversight by providing summaries and detailed contract information, supporting effective renewal planning and coverage strategies.
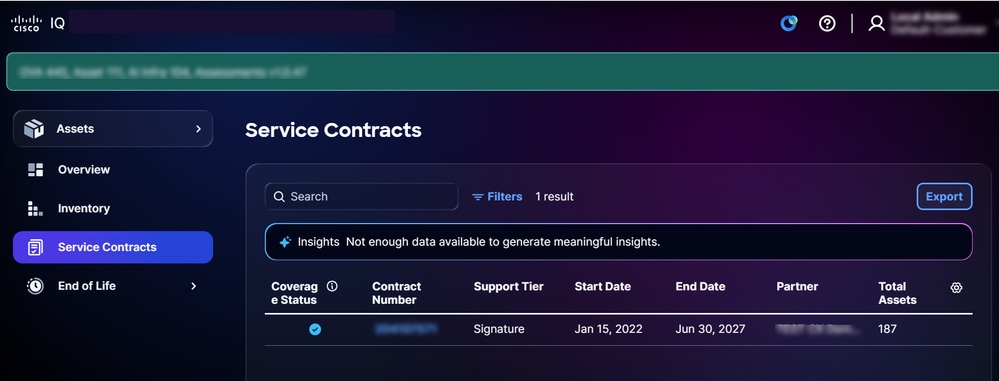 Service Contracts
Searching and Filtering Views for Service Contracts
You can filter the list view by choosing a filter from the drop-down lists. You can also search for service contracts by entering the contract number in the Search field.
Exporting Service Contracts
Click Export to save a filtered list of contracts in .xls or .csv format. See Exporting Information in Common Module Features for more details.
Services EA Summary
The Services Enterprise Agreement (EA) Summary page provides a consolidated view of install Base growth across your asset portfolio. Data is sourced directly from Cisco Install Base records, giving you and Account teams a consistent view of portfolio changes over time.
The Services EA Summary page displays the following information:
- Assets Added: New assets added to the Install Base during the reporting period
- Net Change: The overall change in Install Base size for the reporting period
Note: Access to the Services EA Summary page may be subject to role and permission requirements. Contact your Account Administrator if this page is not visible in your navigation.
End of Life
The Hardware End of Life and Software End of Life pages provide detailed EOL information, equipping users with the support needed to proactively manage product refresh cycles and support coverage. Clicking an asset on the End of Life pages redirects you to the relevant asset on the Inventory page.
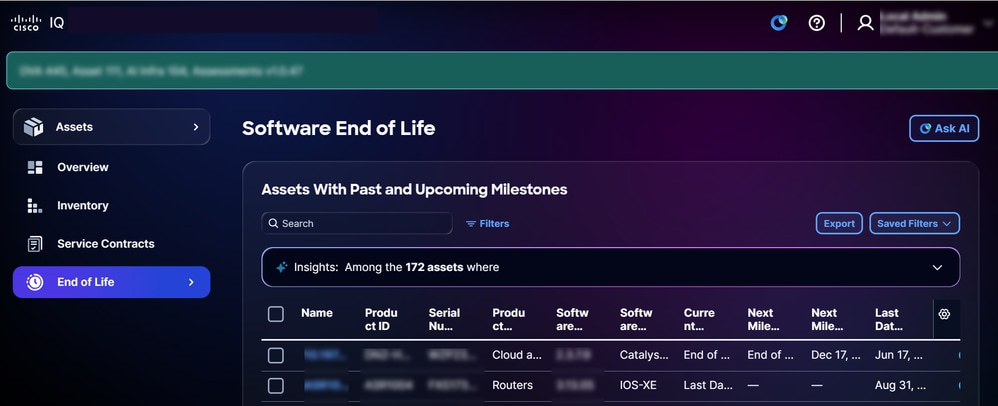 Software End of Life
End of Life Analysis
The Insights panel on the End of Life page displays an AI-driven overview of assets with a defined Last Day of Support. Click Full Analysis for visualizations like graphs, dashboards, and charts which provide additional insights. See Analyzing Data in Common Module Features for more details.
Exporting End of Life
Click Export to save a filtered list of EOL assets in .xls or .csv format. See Exporting Information in Common Module Features for more details.
Assessments Module
The Assessments module provides an assessment framework that enables you to proactively investigate and mitigate risks related to security, stability, capacity, compliance, and aging, keeping networks secure, stable, and reliable.
Core Concepts
The Assessments module is built on the following core concepts:
- Assessment: A systematic evaluation of infrastructure entities against predefined criteria to measure performance, compliance, security, or operational capability; Assessments are triggered on demand, on a schedule, or by an event
- Assessment Execution: An instance or single run of an assessment; Each execution creates a new execution record that tracks the scope, trigger mechanism, timestamp, and resulting data produced by the evaluation
- Finding: A validated, actionable observation identifying a gap, risk, issue, or noteworthy state. Findings represent the ground-level data during an evaluation
- Insight: A higher-level analytical conclusion derived from patterns or trends across multiple findings. Insights interpret what findings mean in a broader business or operational context
- Recommendation: A specific, actionable prescription linked to findings or insights; Recommendations provide clear guidance on the necessary steps to address identified issues or capitalize on opportunities
- Report: A structured document that aggregates findings, insights, and recommendations for a target audience; Reports are the primary deliverable for communicating assessment outcomes to customers, executives, and technical teams
Accessing Assessments Module
To access security and assessment features in Virtual Appliance, choose the Home menu > Assessments or click Assessments from the Application section of the Home page > Launchpad tab. The Assessments Overview page displays.
Note: Assessment module can be also launched from System Configuration > Package Management.
Assessments Overview
The Assessments Overview page displays the following dashboard:
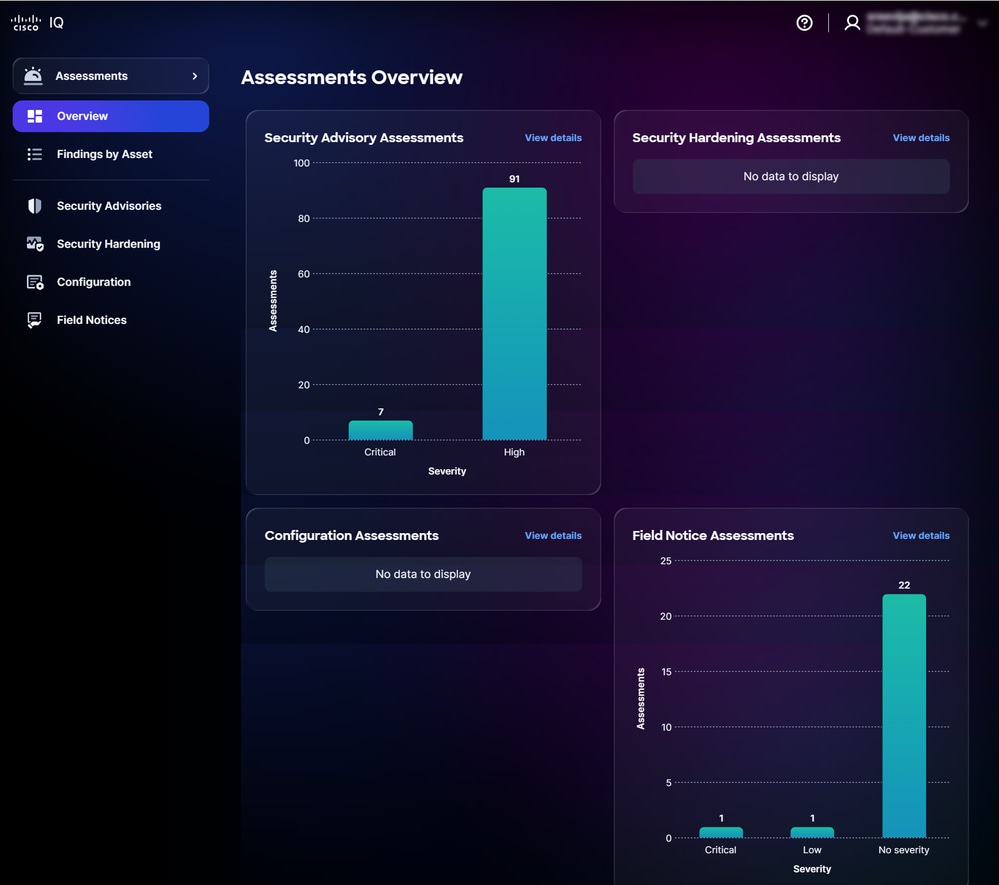 Assessments Overview
The dashboard displays the following information:
- Security Advisory Assessments: Displays assessments of security advisories, categorized by Critical and High severity
- Security Hardening Assessments: Displays assets failing security hardening rules, categorized by High, Medium, Low and Informational severity
- Configuration Assessments: Displays assets failing configuration compliance rules, categorized by Critical, High, Medium, Low and Informational severity
- Field Notice Assessments: Displays assessments of field notices, categorized by Critical, High and Not applicable severity
Note: You can only view the assets that you are entitled to access.
Findings by Asset
The Findings by Asset page provides you with a list of assets that have been evaluated using at least one of the following assessments: Security Advisories, Security Hardening, Configuration and Field Notices.
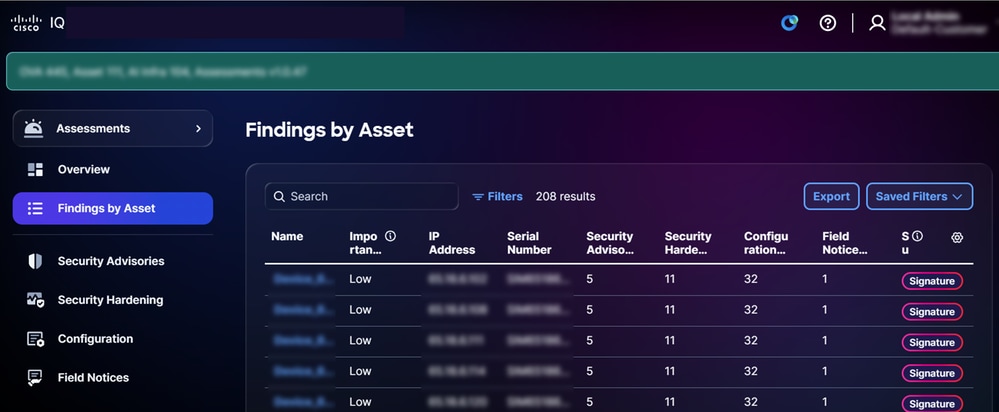 Findings By Assets
Searching and Filtering Views for Findings by Asset
You can filter the list view by choosing a filter from the drop-down lists or clicking Filters and choosing an option from the list of available filters. You can also search for Findings by Asset in the Search field.
Note: Some filters may be hidden depending on screen zoom settings. Different filters are available depending on your roles and permissions.
Exporting Findings by Asset
To export the Findings by Asset list view, click Export. See Exporting Information for more information.
Viewing Findings by Asset Details
To view Findings by Asset details, click an Asset. The following tabs display details for the selected asset:
- Summary: Provides detailed asset information including the number of Security Advisories, Security Hardening, Configuration and Field Notices
- Security Advisories: Provides a list of related Security Advisory assessments
- Security Hardening: Provides a list of assets failing Security Hardening rules (Standard and Signature tier assets only)
- Configuration: Provides a list of assets failing Configuration Best Practice rules (Standard and Signature tier assets only)
- Field Notices: Provides a list of related Field Notice assessments
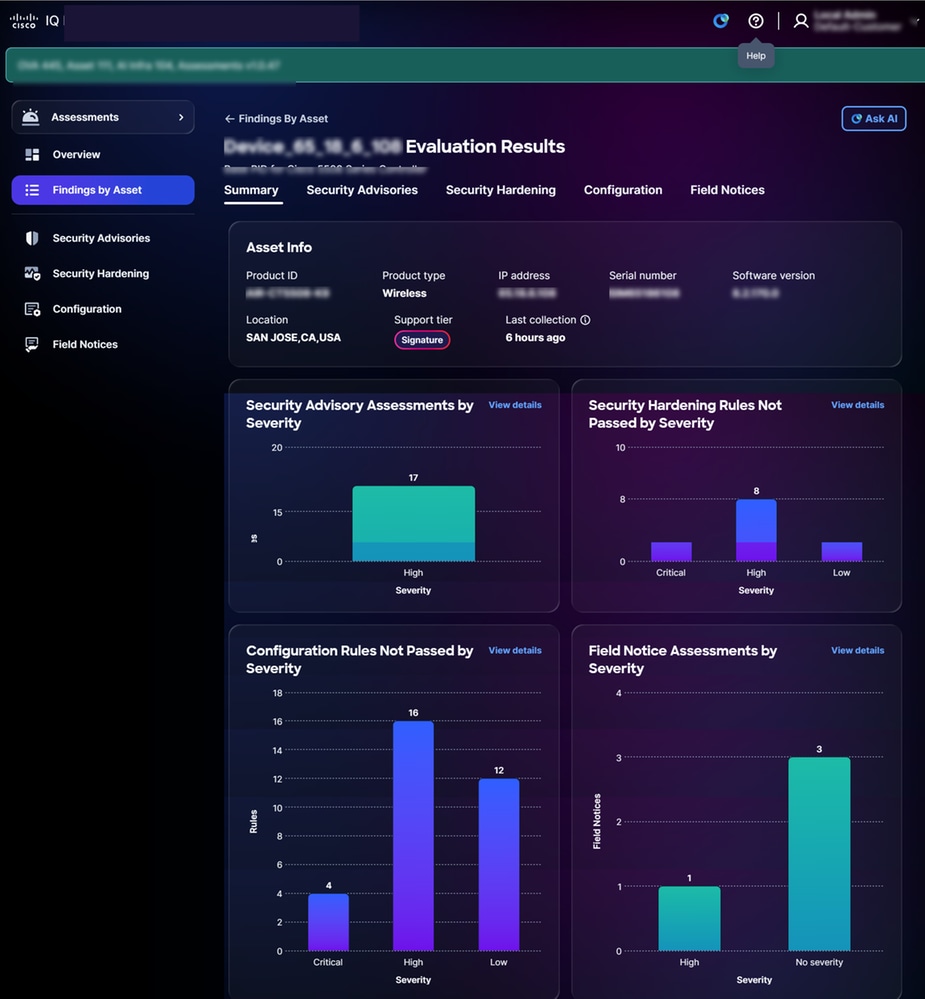 Findings by Asset Details
When clicking View Details on a tile, the page redirects to the relevant page within the module.
When clicking View full asset details, the asset detail view page displays.
Security Advisories
Security Advisory assessments identify vulnerabilities and prioritize them based on their risk, severity, and criticality, thereby enhancing the organization’s risk management capabilities. Security Advisories deliver granular insights into vulnerabilities, help accelerate mitigation of critical threats, and ensure alignment with compliance and business objectives. This strengthens security posture, optimizes resource allocation, and fosters resilience against evolving threats across the enterprise. Security Advisories are automatically updated in Cisco IQ as soon as they are released.
The Security Advisories page provides a list of all Security Advisories with vulnerabilities detected within the organization. Clicking an advisory from the Security Advisory assessments list navigates to the corresponding detail view.
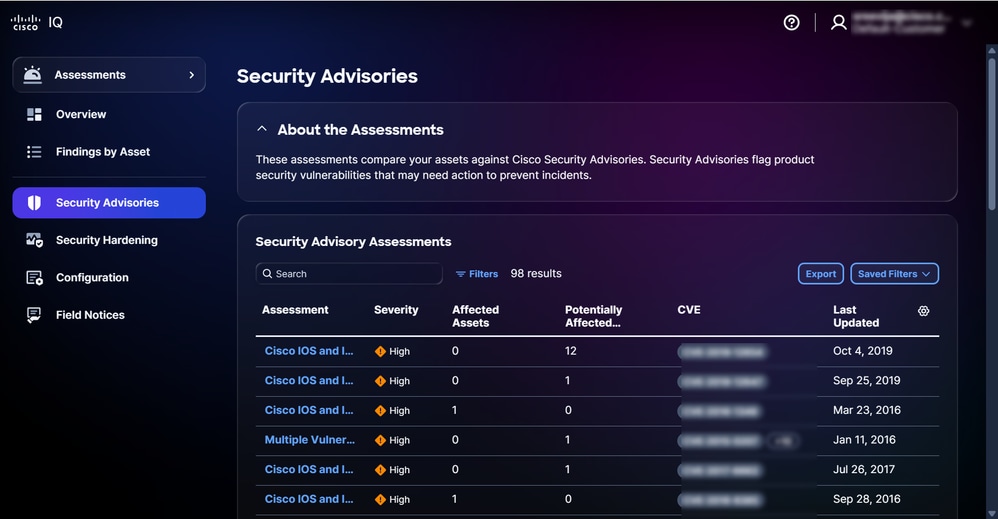 Security Advisories
Searching and Filtering Views for Security Advisories
You can filter the list view by choosing a filter from the drop-down list. You can also search for Security Advisory assessments by entering the assessment name in the Search field.
Note: Some filters may be hidden depending on screen zoom settings. Different filters are available depending on your roles and permissions. Missing severity values display as "–" with a descriptive tooltip.
Exporting Security Advisories
To export Security Advisory assessments, click Export. See Exporting Information for more information.
Viewing Security Advisory Assessment Details
Click an Assessment to view additional details about it. The details page provides information such as Common Vulnerability Scoring System (CVSS) Score, Common Vulnerabilities and Exposures (CVE), Severity, and a link to the referenced Cisco Security Advisory.
You can view the following types of results in the Assessment outcome table:
- Affected: Indicates that the asset or component has a confirmed vulnerability that can be exploited by an attacker, requiring remediation
- Potentially Affected: Indicates that the asset or component shows signs that may lead to vulnerability, but it is not definitively confirmed; further investigation may be needed
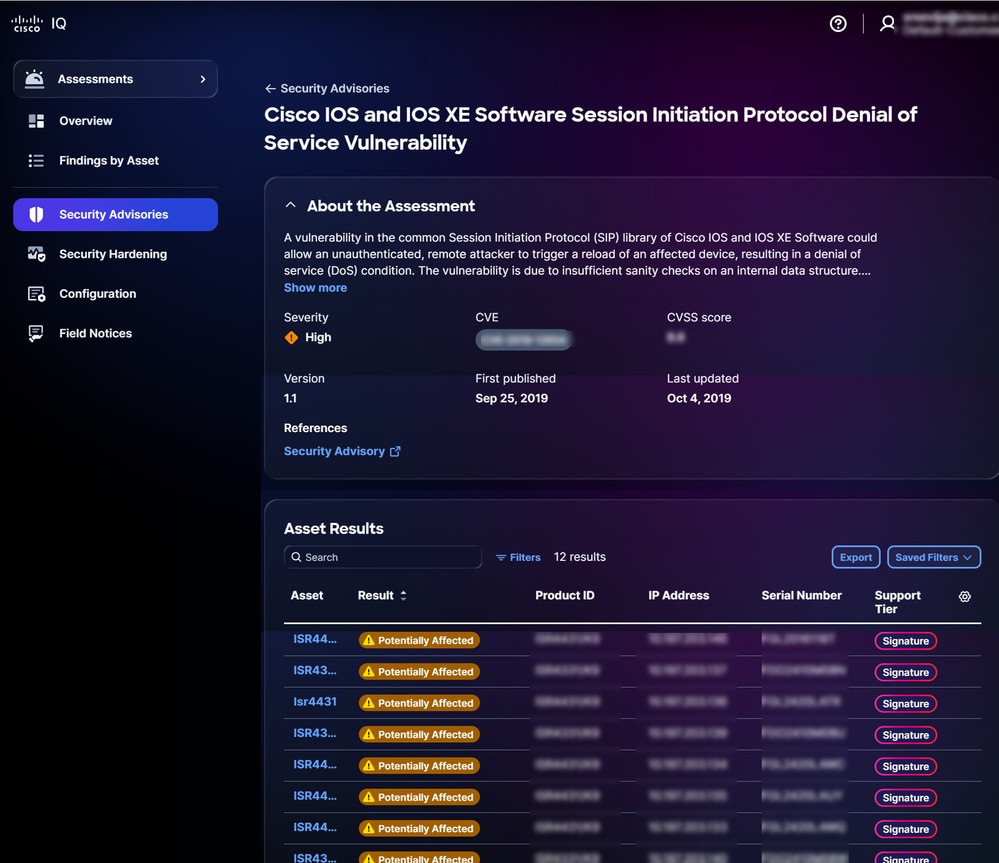 Security Advisories Details
Searching and Filtering Views for Asset Assessment Results
You can filter the list view by choosing a filter from the drop-down lists or clicking Filters and choosing an option from the list of available filters. You can also search for assets by entering the asset name in the Search field.
Note: Some filters may be hidden depending on screen zoom settings. Different filters are available depending on your roles and permissions.
Viewing Asset Assessment Results
To view details of an assessment result, click an asset from the Assessment Outcome table. The asset’s Assessment Result details page displays.
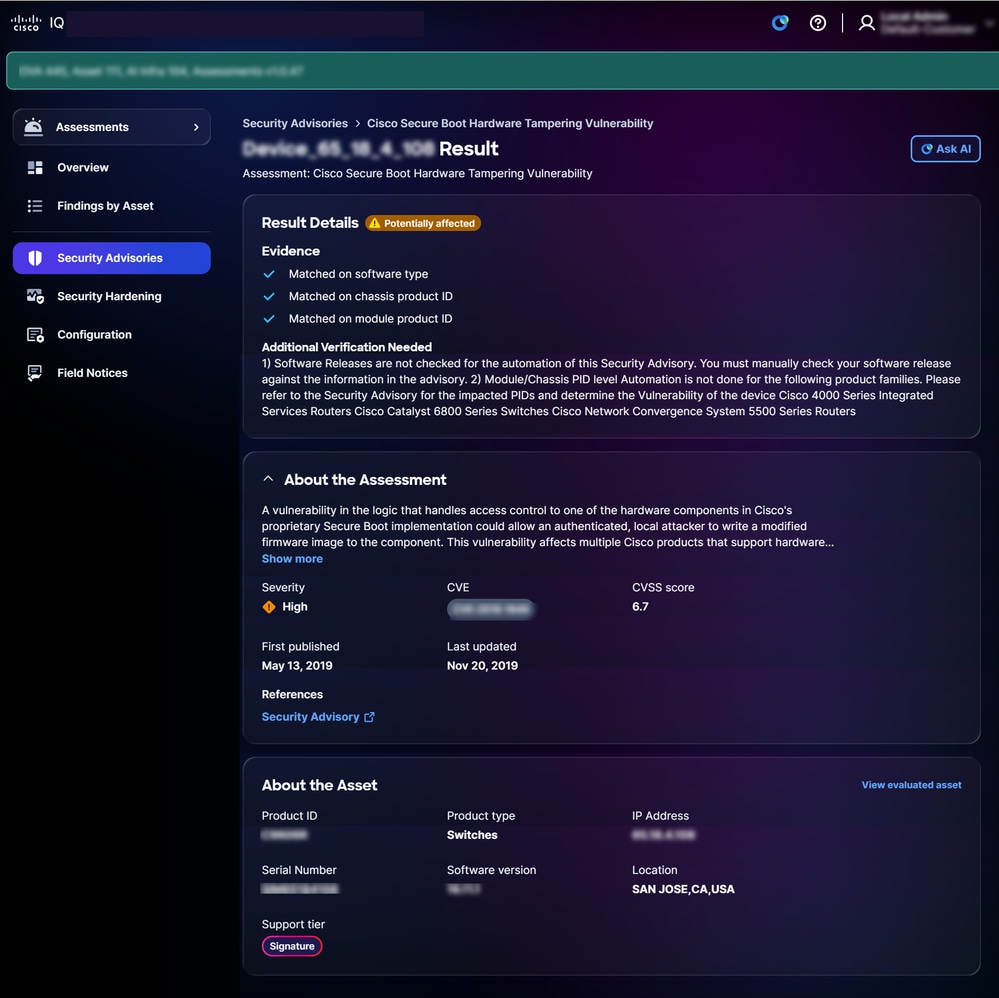 Result Details
Exporting Asset Results for Security Advisories
To export asset results, click Export. See Exporting Information for more information.
Security Hardening
Security Hardening provides automated, near real-time visibility into the security posture of your network infrastructure by continuously evaluating routers, switches, and firewalls against industry-standard benchmarks. It identifies configuration gaps and provides actionable remediation guidance, enabling Account Administrators to effectively reduce the attack surface and maintain consistent alignment with Cisco rigorous security best practices. By centralizing compliance monitoring and simplifying the hardening process, the module transforms security management from a reactive task into a proactive, data-driven strategy, ensuring a resilient and secure enterprise network.
Note: Security Hardening Assessments are available exclusively for assets with Standard support tiers.
Viewing Security Hardening Assessments
The Security Hardening Assessment page displays the following information:
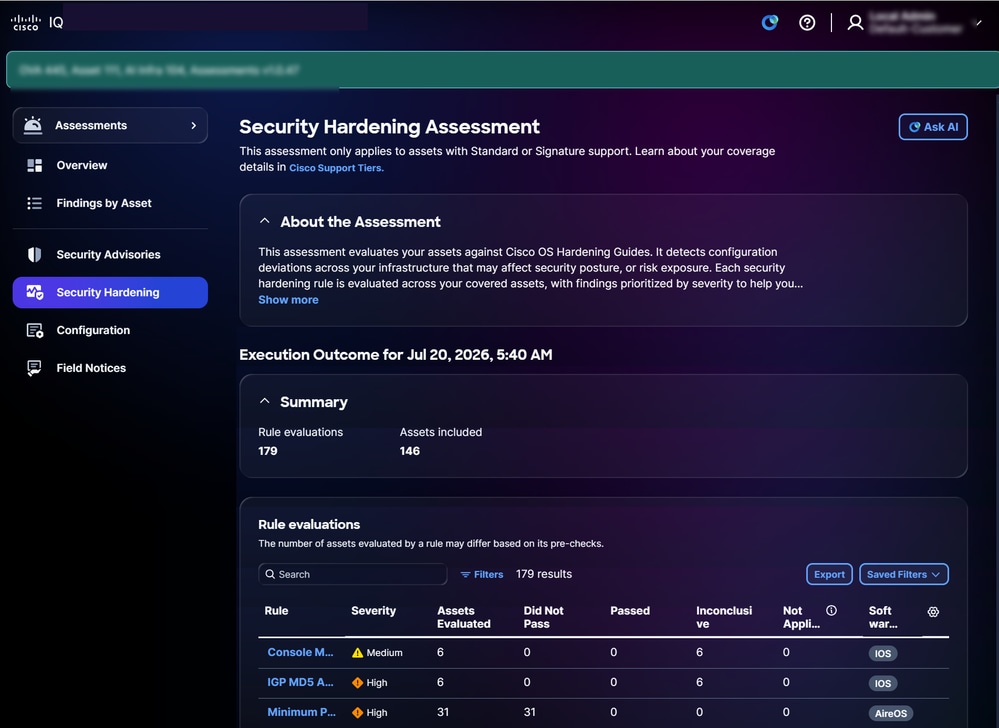 Security Hardening
- About the Assessment: Provides additional details by summarizing the purpose of the assessment
- Execution Outcome: Provides a summary of asset assessment results, including the total number of Rule evaluations and Assets included
- Rule evaluations: Provides detailed information about the rule, including Severity, Assets Evaluated, Did Not Pass, Passed, Inconclusive, Not Applicable, and Software type
- Severity: Provides the level of importance or impact of the rule evaluation
- Assets Evaluated: Provides the total number of assets that were assessed against the rule criteria
- Did Not Pass: Provides the assets that failed to meet the rule criteria during the assessment
- Passed: Provides the assets that met the rule criteria during the assessment
- Inconclusive: Provides the assets for which the assessment could not determine failure
- Not Applicable: Indicates the assets or scenarios where the rule does not apply or is not relevant
- Software type: Provides the software type of assets
Searching and Filtering Views for Rules
You can filter the list view by choosing a filter from the drop-down lists or clicking Filters and choosing an option from the list of available filters. You can also search for a rule by entering the rule name in the Search field.
Note: Some filters may be hidden depending on screen zoom settings Different filters are available depending on your roles and permissions.
Viewing Rule Evaluation Details
To view additional details about a rule evaluation, click a rule. The rule’s evaluation details page displays with the following information:
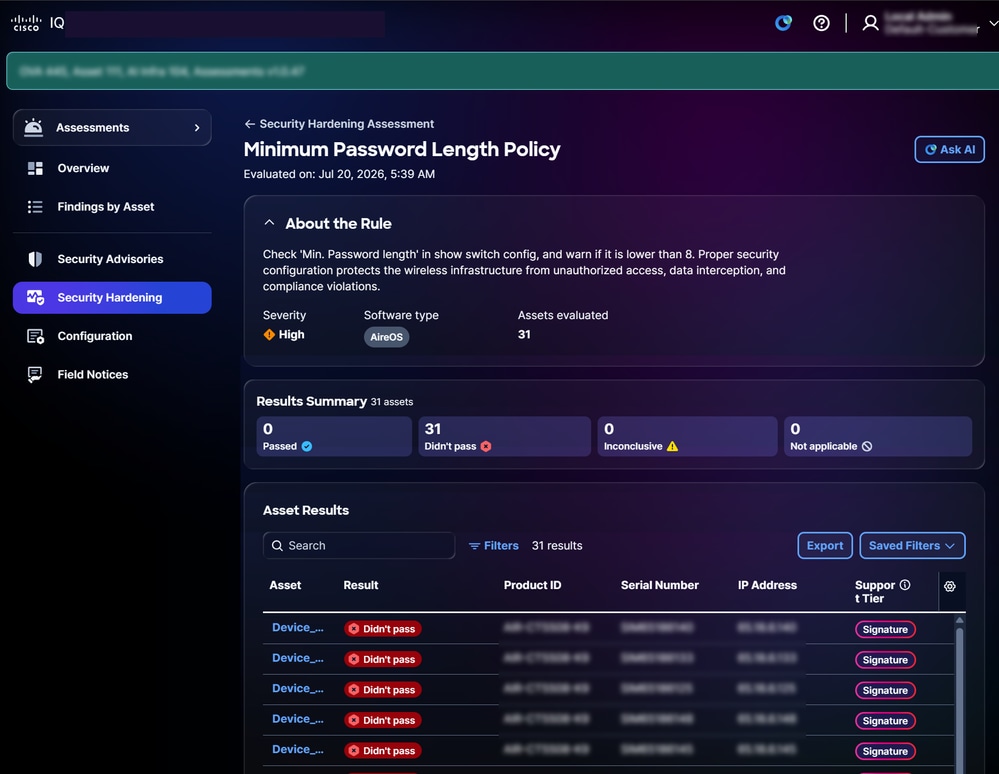 Rule View
- About the Rule: Provides details about the rule such as Severity, Software type, Version, and Assets evaluated and includes descriptive labelled links to relevant source documentation
- Results Summary: Provides a summary of asset results related to the rule such as Passed, Did not pass, Inconclusive, and Not applicable
- Assets Results: Provides a list of assets with details such as Asset, Result, Product ID, Serial Number, IP Address, and Support Tier
Note: Cisco IQ provides clear guidance when an assessment finding is "Inconclusive," explaining the cause (for example, missing telemetry, or unsupported OS) and recommending steps like verifying data collection, updating credentials, or refreshing data. Labelled links to relevant documentation are also provided to help resolve issues.
Searching and Filtering Views for Asset Rules
You can filter the list view by choosing a filter from the drop-down lists or clicking Filters and choosing an option from the list of available filters. You can also search for asset assessment results by entering the asset name in the Search field.
Notes:
- Some filters may be hidden depending on screen zoom settings.
- Different filters are available depending on your roles and permissions.
Exporting Asset Results
To export assessment results for rules, click Export. See Exporting Information for more information.
Searching and Filtering Views for Asset Results
You can filter the list view by choosing a filter from the drop-down lists or clicking Filters and choosing an option from the list of available filters. You can also search for asset results by entering the asset name in the Search field.
Notes:
- Some filters may be hidden depending on screen zoom settings.
- Different filters are available depending on your roles and permissions.
Viewing Asset Results for Security Hardening
Click an asset from Asset Results to view its details. The asset’s result details page displays information according to your entitlement level or tier.
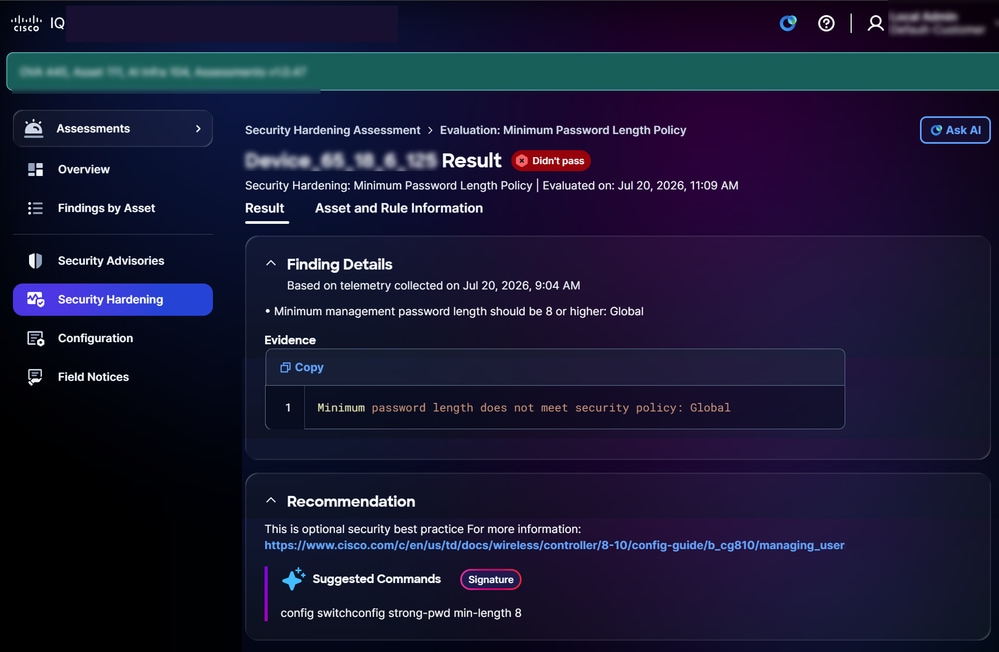 Security Hardening Standard Tier
- Standard Tier
- Finding Details: Provides information about the configuration deviations identified during the assessment along with evidence logs
- Recommendations: Provides guidance to address the findings and ensure configuration consistency
Viewing Asset and Rule Information for Security Hardening
To view the details of an Asset and its rules, click the Asset and Rule Info tab. The Asset and Rule Info page displays.
About the Asset: Provides the details of the asset such as Product ID, Product type, IP address, Serial number, Software version, Location, and Support Tier
- About the Rule: Provides rule details (including Severity and Software type) and the importance of that particular hardening check
Configuration
Configuration assessments evaluate your assets against recommended best practices based on Cisco proven expertise to detect configuration deviations that may affect availability, security, or performance across your infrastructure. Each best practice rule is assessed across your covered assets, and findings are prioritized by severity to ensure configuration consistency, enhanced resilience, and reduced operational risk.
Note: Configuration Assessments are available exclusively for assets with Standard support tiers.
Viewing Configuration Assessments
The Configuration Assessment page displays the following information:
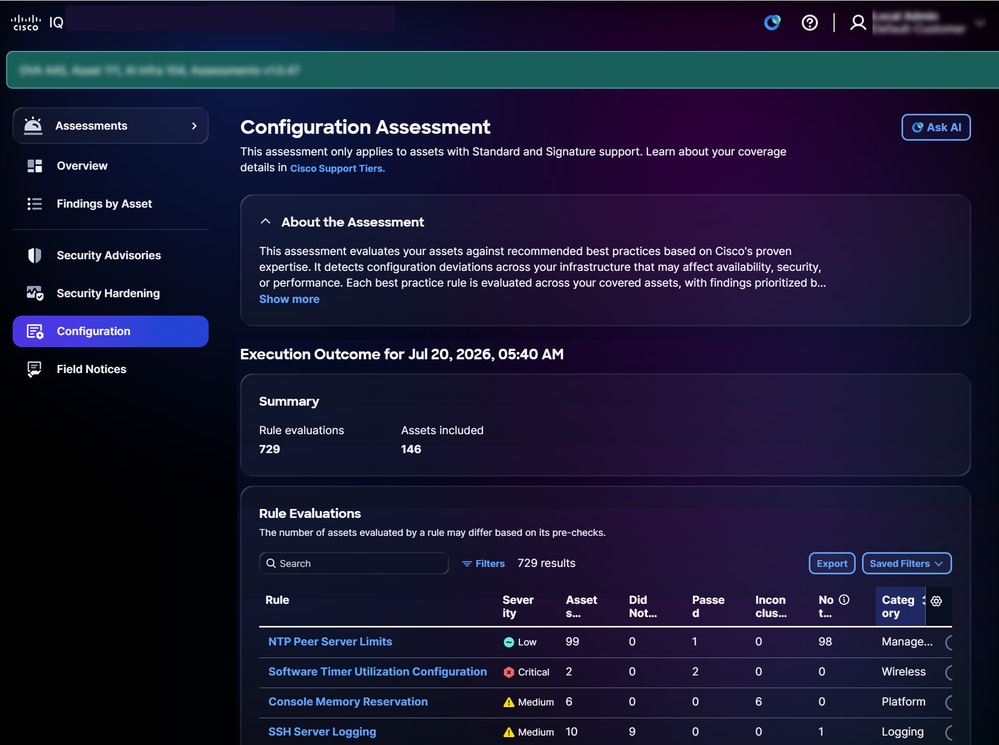 Configuration Assessment
- About the Assessment: Provides additional details by summarizing the purpose of the assessment
- Summary: Provides a summary of configuration execution like Rules evaluated and Assets evaluated
- Insights: Provides insights into identified configuration gaps generated through pattern analysis and a correlation of findings; they are displayed as intelligently grouped key cards to highlight the most critical areas that require attention
- Rule Evaluations: Provides detailed information about the rule, including Severity, Assets Evaluated, Did Not Pass, Passed, Inconclusive, Not Applicable, Category, and Software type
- Severity: Provides the level of importance or impact of the rule evaluation
- Assets Evaluated: Provides the total number of assets that were assessed against the rule criteria
- Did Not Pass: Provides the total number of assets that failed to meet the rule criteria during the assessment
- Inconclusive: Provides the total number of assets for which the assessment could not run
- Passed: Provides the assets that met the rule criteria during the assessment
- Not Applicable: Indicates the assets or scenarios where the rule does not apply or is not relevant
- Category: Provides the domain area to which the rule belongs
- Software Type: Indicates the type of software assets to which the rule applies
Searching and Filtering Views for Rules
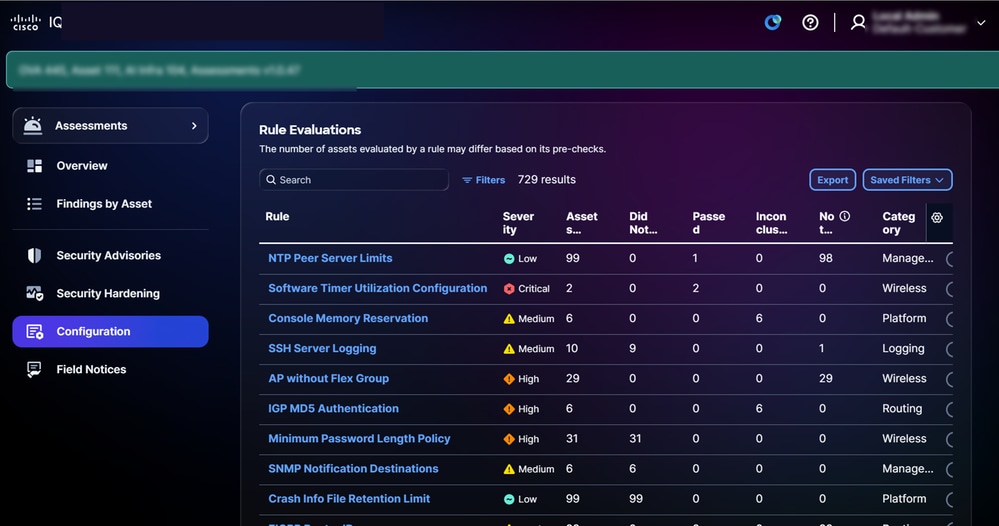 Rule Evaluations
You can filter the list view by choosing a filter from the drop-down lists or clicking Filters and choosing an option from the list of available filters. You can also search for a rule by entering the rule name in the Search field.
Notes:
- Some filters may be hidden depending on screen zoom settings.
- Different filters are available depending on your roles and permissions.
Viewing Rule Evaluation Details
To view additional details about a rule evaluation, click any rule. The rule’s evaluation details page displays with the following information:
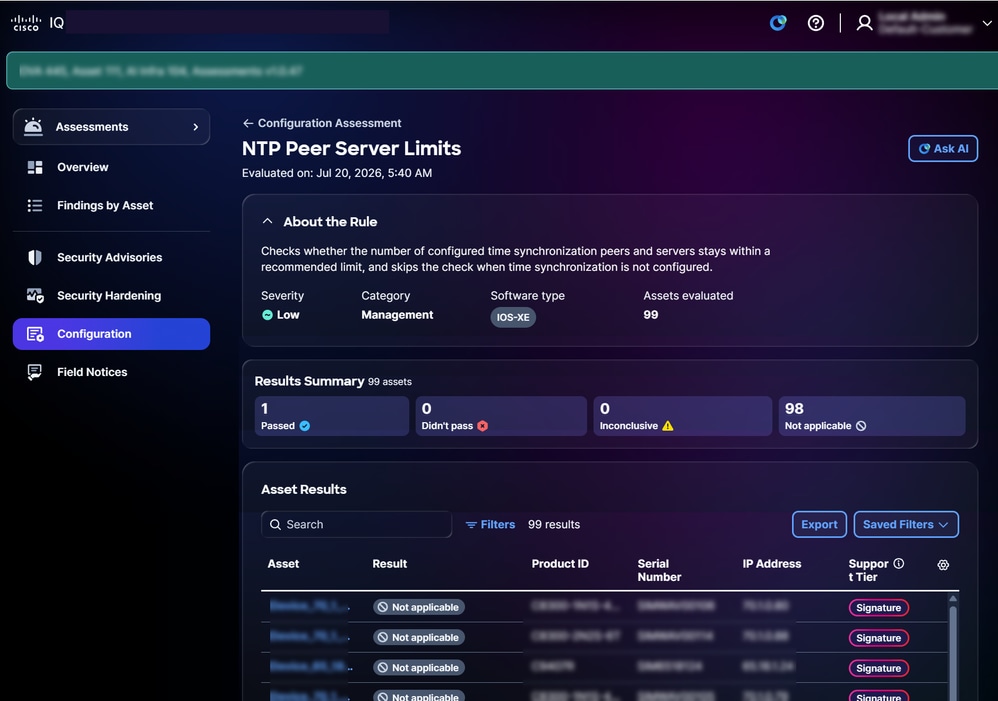 Evaluation
- About the Rule: Provides details about a rule like Severity, Category, Software type, and Assets evaluated and includes descriptive labelled links to relevant source documentation
- Results Summary: Provides overall asset results by displaying the number of assets in Passed, Did not pass, Inconclusive, and Not applicable statuses
- Asset Results: Provides a list of assets impacted by the selected rule with result status
Notes:
- Cisco IQ provides clear guidance when an assessment finding is "Inconclusive," explaining the cause (for example, missing telemetry, or unsupported OS) and recommending steps like verifying data collection, updating credentials, or refreshing data. Labelled links to relevant documentation are also provided to help resolve issues.
- The Assessment module supports multi-category selection for rules, enabling simultaneous processing and evaluation across multiple rule categories.
Exporting Asset Results
To export asset results for rules, click Export. See Exporting Information for more information.
Searching and Filtering Views for Asset Results
You can filter the list view by choosing a filter from the drop-down lists or clicking Filters and choosing an option from the list of available filters. You can also search for asset results by entering the asset name in the Search field.
Notes:
- Some filters may be hidden depending on screen zoom settings
- Different filters are available depending on your roles and permissions
Viewing Asset Results for Configuration Assessments
To view details of asset results, click an asset from the Asset results.
The asset’s result details page displays information according to your entitlement level or tier.
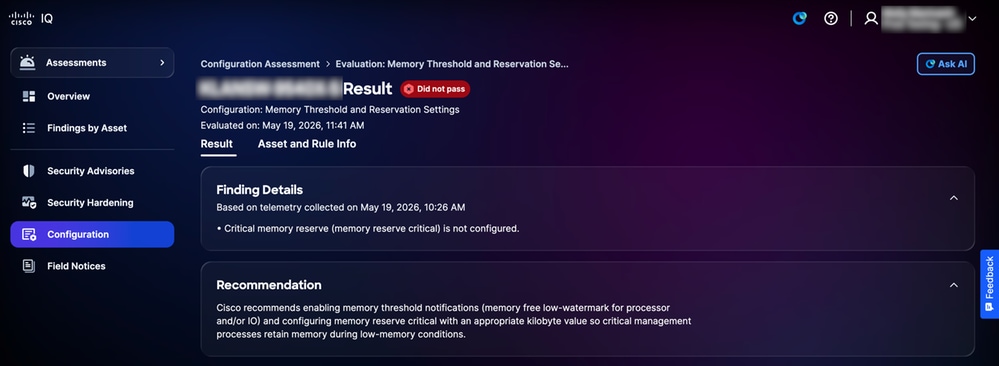 Configuration Standard Tier
- Standard Tier
- Finding Details: Provides information about the configuration deviations identified during the assessment along with evidence logs
- Recommendations: Provides guidance to address the findings and ensure configuration consistency
Viewing Asset and Rule Information for Configuration Assessments
To view asset and rule information details, click the Asset and Rule Info tab.
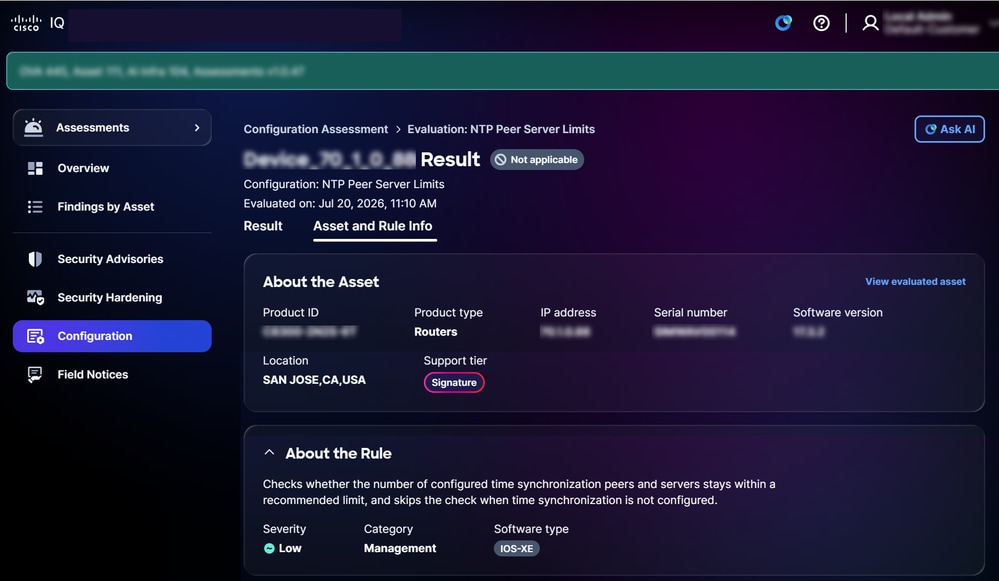 Asset and Rule Info
The Asset and Rule Info page displays with the following information:
- About the Asset: Provides the details of an asset, such as Product ID, Product type, IP address, Serial number, Software version, Location and Support tier
- About the Rule: Provides details of a rule such as Severity, Category, and Software type
Viewing Insights
Insights are AI-generated and serve as an intelligent dashboard that synthesizes assessment data into prioritized key cards, highlighting critical configuration disparities across multiple findings. It enables you to address the most impactful infrastructure risks efficiently by focusing on these urgent areas. It also highlights strengths by identifying areas where your infrastructure is performing well as per best practices.
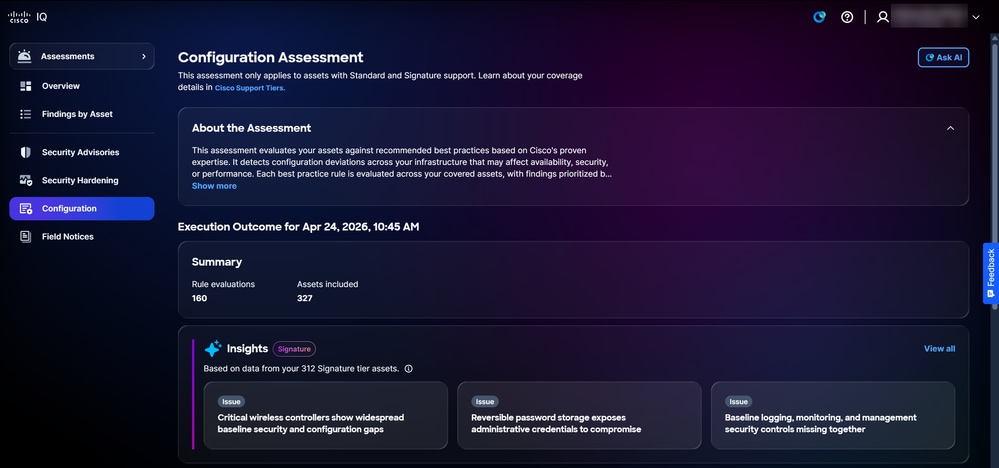 Insights
To view Insights details:
- From the Insights panel, click View all. The Insights page displays all insights.
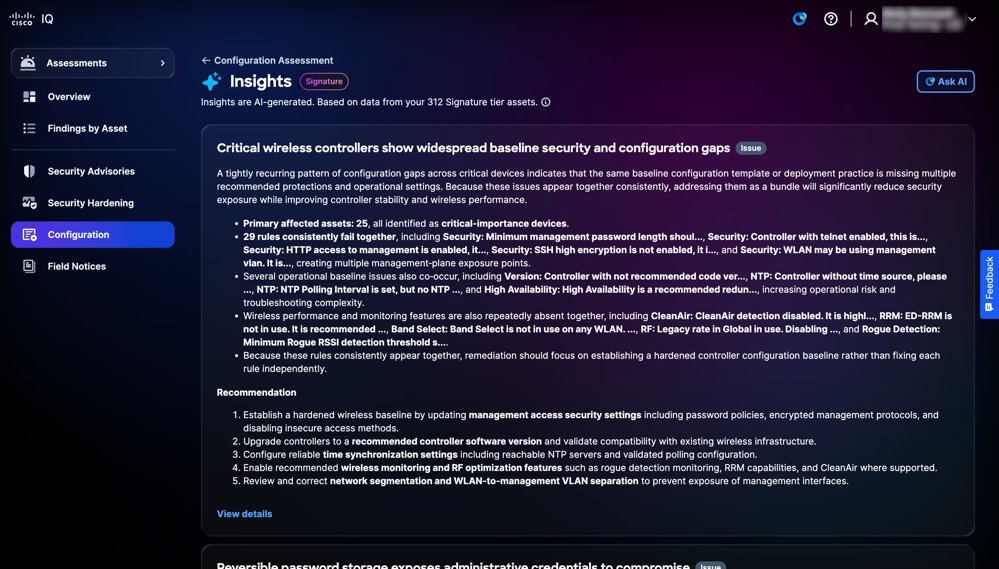 Insights Page
2. Click View details or click any card. The Insights detail page displays with the following information:
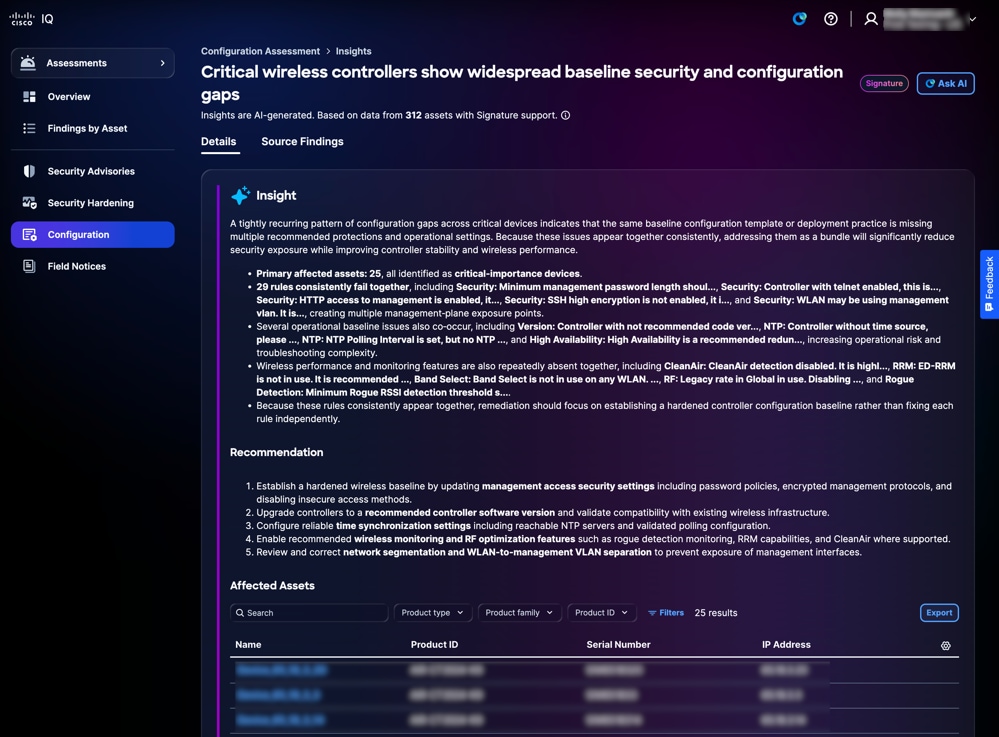 Insights Detail
- Insight: Provides a summary that highlights recurring patterns of configuration deviations identified through comprehensive analysis across multiple findings, as well as areas of excellence in your infrastructure where configurations align with best practices
- Recommendation: Provides actionable steps to remediate the identified configuration gaps
- Affected Assets: Provides a list of specific devices where the configuration deviation has been identified as defined under the Insight section
3. Click Source Findings. The Source Findings page displays the detailed individual findings that support your insights.
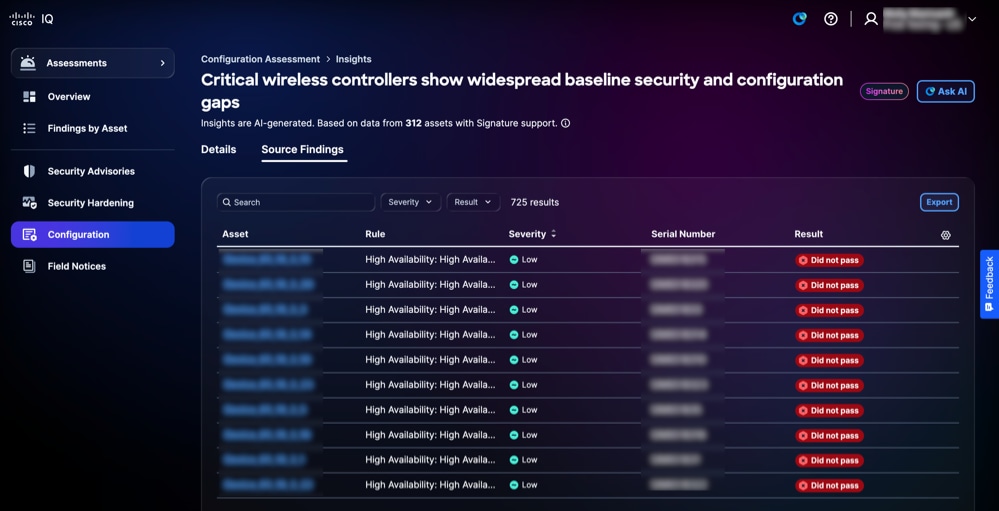 Source Findings
You can filter the table view by choosing a filter from the Severity and Result drop-down lists.
Note: Recommendations and Affected Assets are optional depending on the output of each insight.
Field Notices
Field Notices identify significant non-security-related product issues and organize them based on their impact severity and criticality, enhancing the organization’s ability to manage product risks. Field Notices deliver actionable insights into product defects, accelerate mitigation through recommended upgrades or workarounds, and ensure alignment with operational and business objectives. This strengthens product reliability, optimizes resource allocation, and fosters resilience against evolving product challenges across the enterprise.
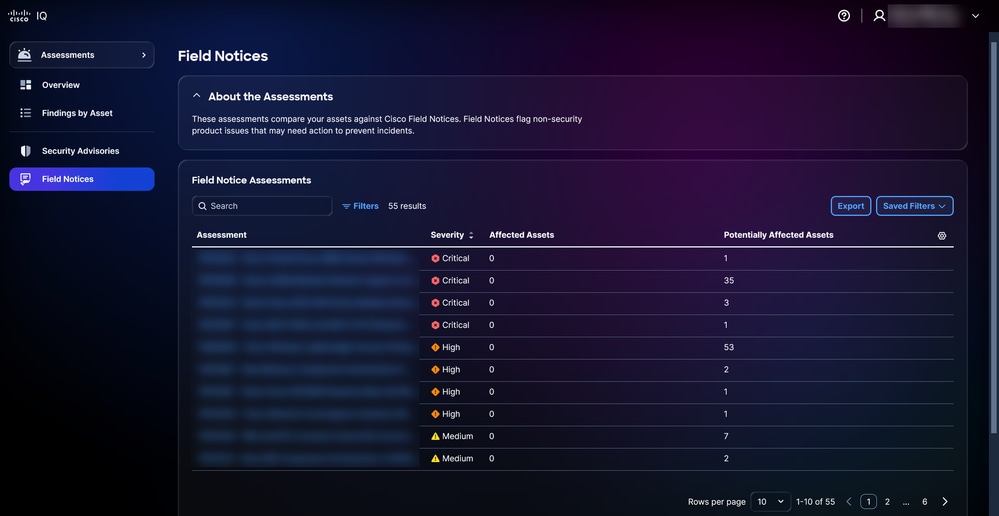 Field Notices
Searching and Filtering Views for Field Notices
You can filter the list view by choosing a filter from the drop-down lists. You can also search for field notice assessments by entering the assessment name in the Search field.
Viewing Assessments for Field Notices
To view additional details about a field notice, click an Assessment. The following assessment details display:
- About the Assessments: Provides additional details by summarizing the purpose of the assessment
- Field Notice Assessments: Displays a list of assets impacted by the selected field notice, including assets with detected vulnerabilities
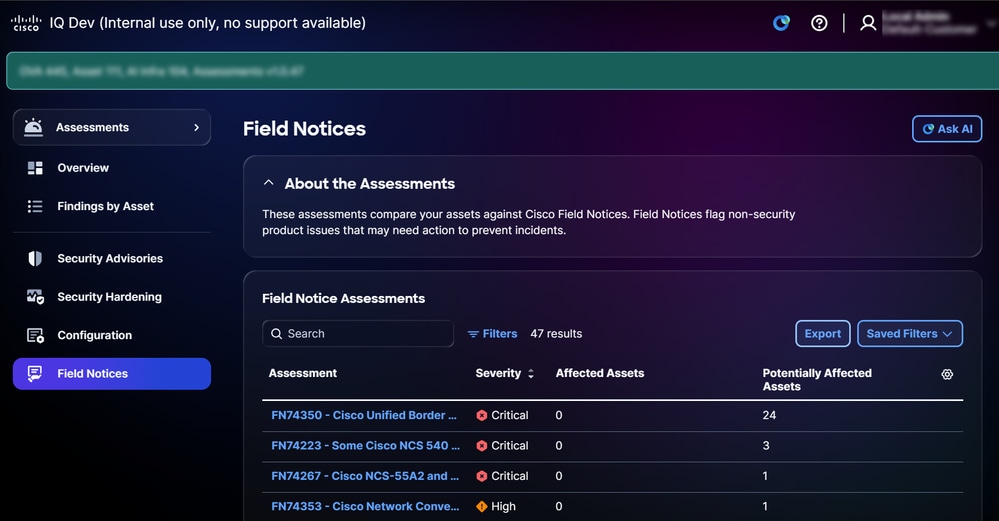 Viewing Assessments for Field Notices
Searching and Filtering Views for Asset Results for Field Notices
You can filter the list view by choosing a filter from the drop-down lists or clicking Filters and choosing an option from the list of available filters. You can also search for asset results by entering the asset name in the Search field.
Notes:
- Some filters may be hidden depending on screen zoom settings.
- Different filters are available depending on your roles and permissions.
Exporting Asset Results for Field Notices
To export assessment asset results for field notices, click Export. See Exporting Information for more information.
Viewing Asset Assessment Results for Field Notices
To view an asset’s assessment result details, click an asset from Asset Assessment Results. The asset’s assessment result details page displays.
You can view the following types of results:
- Affected: Indicates assets that meet all the criteria automatically checked for a Field Notice and require no additional manual verification to confirm they are impacted
- Potentially Affected: Indicates assets that meet all the automatically checked criteria for a Field Notice but require additional manual verification to confirm if they are truly impacted
The following prompts are available under the Assessments – Security Hardening tab:
- What are Cisco security hardening best practices for network devices?
- How do I harden my Cisco IOS XE devices?
- List key security hardening steps for routers and switches.
- What are recommended baseline hardening settings for Cisco devices?
- How many assets are in violation of security hardening best practices?
Local Authentication
Account Administrators should use the following credentials to successfully log in to VA:
- Default Username: admin
- Default Password: The password that is set during the VA installation process; refer to the Getting Started Guide for more information
- Default Account Context: Default-Customer
Upon login, the default user, "admin", and the account name, "Default-Customer" display on the home page.
Setting Local Admin Security
You can change your password and set up security questions through the User Profile menu in Home page.
Lockout Settings
The following account lockout settings are configurable during deployment:
- Lockout Status: Enables or disables the account lockout feature.
- Maximum Login Attempts: Sets the maximum number of consecutive failed attempts allowed before an account is locked (Default: 3; Range: 0–10).
- Rolling Time Window: Defines the time period for tracking failed attempts (Default: 15 minutes; Range: 0–60 minutes).
- Duration: Sets the duration for which an account remains locked after the maximum number of attempts is reached (Default: 30 minutes; Range: 0–60 minutes).
Notes:
You have three (3) attempts to enter the correct password within a 15-minute period. If all three (3) attempts are unsuccessful, your account temporarily locks for 30 minutes to protect your security.
You cannot attempt to log in during the lockout period. The system displays the message: "Account locked due to too many failed attempts. Please try again later.”, including the time the lockout expires.
Your account automatically unlocks after 30 minutes, at which point you may attempt to log in or reset your password.
Setting Up Security Questions and Answers
Security questions help verify your identity if you forget your password. Account Administrators must set up answers to five (5) security questions to enable the password reset feature. This is a one-time setup.
To set up security questions:
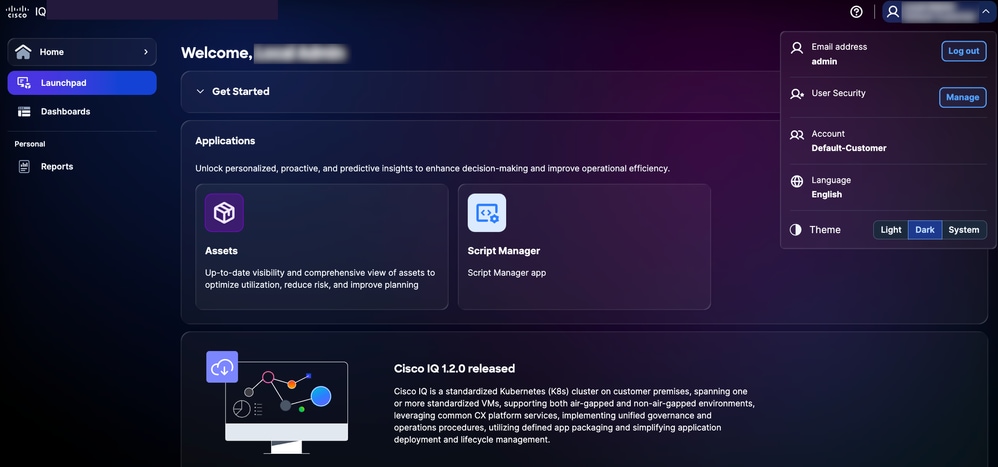
- From Home page, click your User Profile icon. The drop-down menu opens.
 Use Security
- Click Manage in User security. The User Security page displays.
 Security Questions
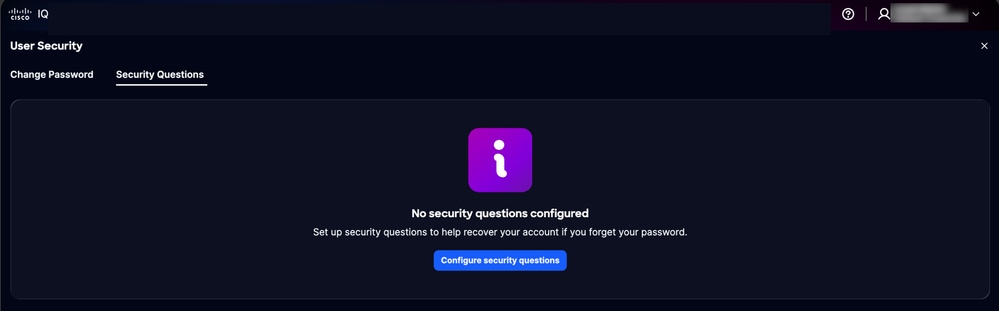
- Click Security Questions to open the tab.
 Security Questions Tab
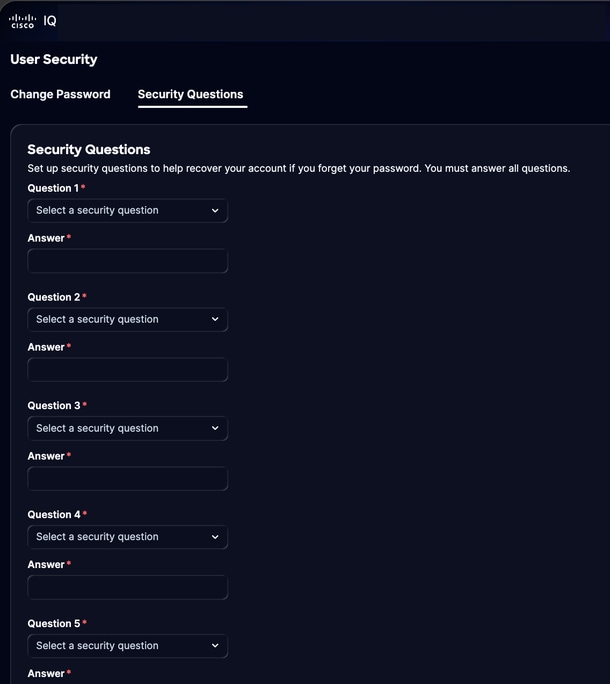
- Click Configure security questions.
 Configure Security Questions
- Choose any five (5) security questions from the drop-down lists.
- Enter your response for each question.
- Click Save.
Notes:
- Answers are not case-sensitive, for example, “SMITH” and “smith” are considered the same
- Extra spaces are ignored, meaning “ Smith “ and “Smith” are treated identically
- Remember how you entered your answer (for example, full names versus nicknames)
- Use straightforward answers you will remember years later
- Pick questions with answers that will not change over time
Note: You can update your answers later if needed. When you update your answers, all previous answers are replaced, so you must provide answers to all five (5) questions again and not just the ones you want to change.
Managing Passwords
Account Administrators and local users can manage the password for Cisco IQ.
To ensure the security of your account, the following password policies are enforced:
- Reuse Restriction: Your new password cannot match any of your previous five (5) passwords. This policy applies to Sign-up, Forgot Password, and Change Password flows.
- Character Variation: When changing your password while authenticated, at least eight (8) characters from your current password must be different in your new password.
- Minimum Change Interval: By default, you must wait 24 hours before changing your password again. If a different interval is configured, you will be unable to update your password until that time has elapsed.
- Password Expiration: Passwords expire every 60 days. Upon your first login following the expiration date, you will be required to set a new password before you can access the system (if configured to 0, password expiration is disabled.)
Prerequisites
To manage passwords, the following conditions must be met:
- You are a local Account Administrator or user
- You are using a local account (not Single Sign-On (SSO) or external authentication)
- You are logged in to Cisco IQ
- You know the current password
Changing Passwords
To change the password:
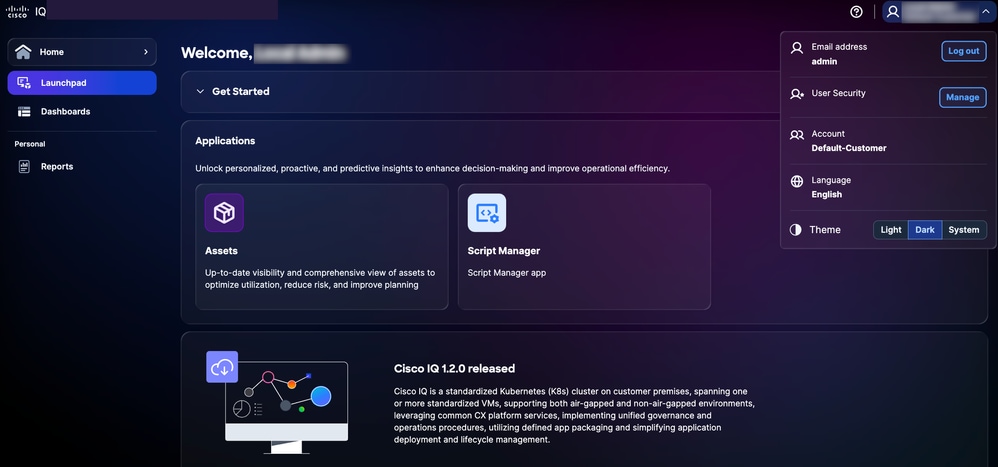
- From Home page, click your User Profile icon. The drop-down menu opens.
 Manage User Security
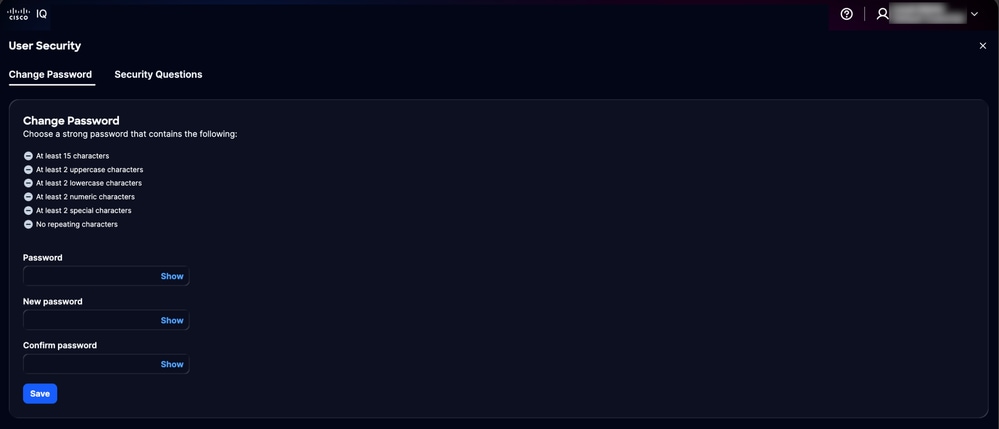
- Click Manage in User security. The User Security page displays.
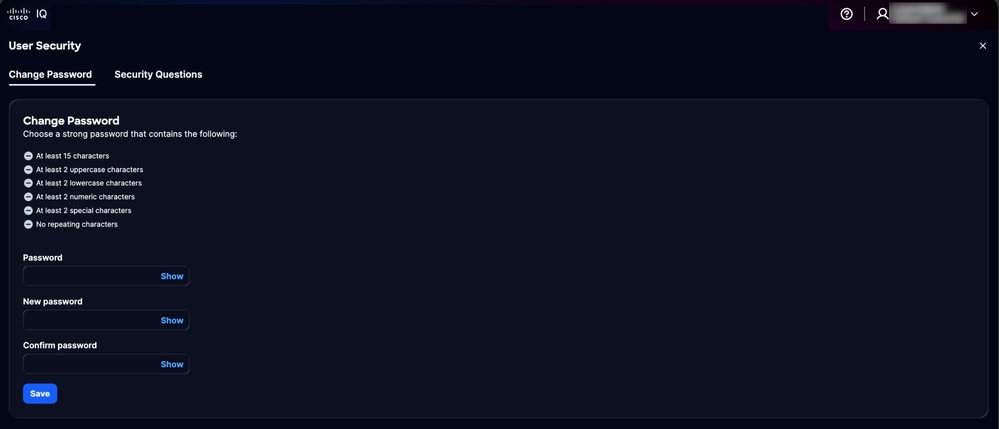
 Change Password
- Enter the current Password.
- Enter the New password.
- Enter the new password again to confirm.
- Click Save.
The password is updated in the Cisco IQ system, including the Cisco IQ VM.
Resetting a Forgotten Password
You can reset a password using the security question verification process.
To reset a forgotten password:
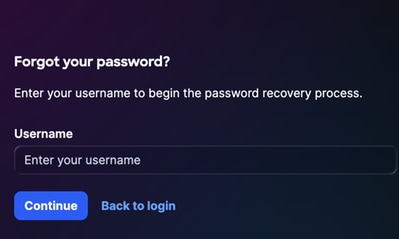
- Navigate to the Cisco IQ VA login page.
- Click Forgot Password.
 Forgot Password
- Enter the Username.
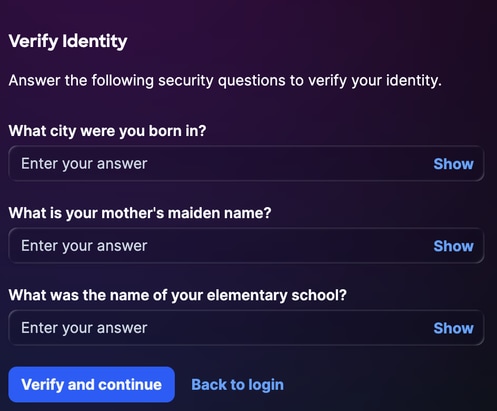
- Click Continue. The Verify Identity page displays three (3) random security questions out of the five (5) questions that were previously configured.
 Verify Identity
- Enter the responses for all three (3) displayed questions.
- Click Verify and continue. If the submitted response matches your previously saved responses, you are prompted to enter a new password.
 Reset Password
Note: You have three (3) attempts to answer the security questions correctly within a 15-minute period. If all three (3) attempts are unsuccessful, your account temporarily locks for 30 minutes to protect your security. You cannot reset your password during the lockout period. The system displays the message: "Account locked due to too many failed verification attempts. Please try again later.”, including the time the lockout expires.
Your account automatically unlocks after 30 minutes, at which point you may attempt to log in or reset your password.
- Enter the new password.
- Enter the password again to confirm.
- Click Submit.
Adding Local Users
Account Administrators can add users to the Cisco IQ account. To add a new user:
- Navigate to System Settings > Local Identity & Access > Users. The Users page displays. It lists all existing local users along with their status.
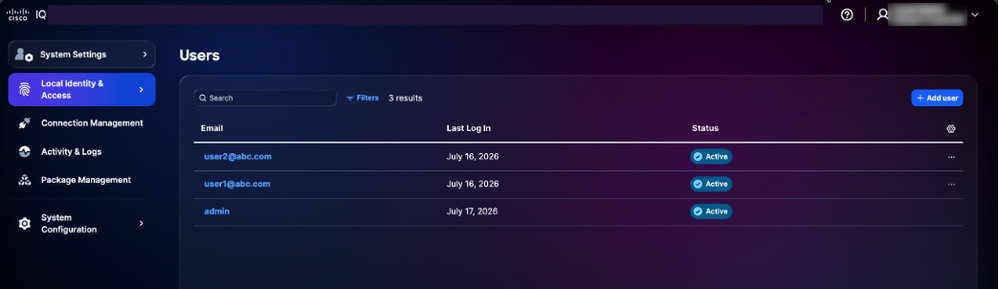 Users Page
Note: The More Options icon is not displayed for Account Administrators.
2. Click Add users. The Add User page displays.
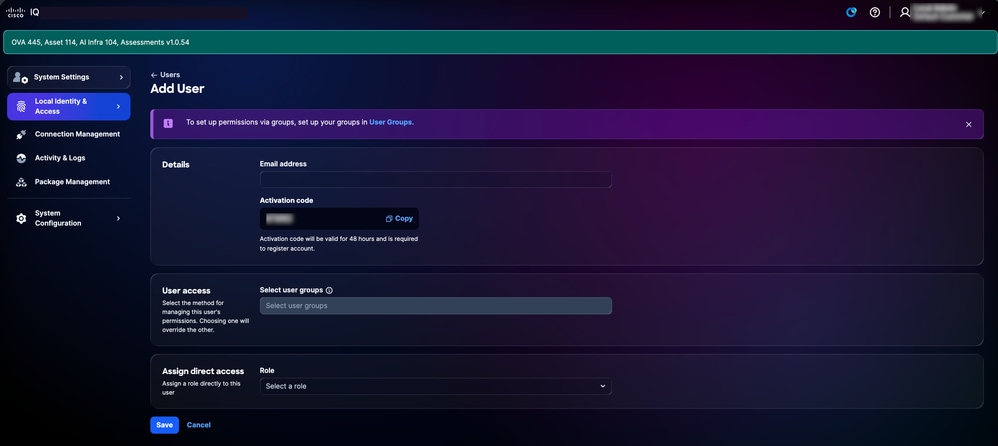 Add User
3. Enter the Email address.
4. Enter Activation code.
Note: The activation code is displayed by default. Share the displayed activation code with the user, as it is required for registration.
5. In User access, choose the user group from the Select user groups drop-down list.
Note: Users inherit access from the selected group.
6. In Assign direct access, choose role from the Role drop-down list. There are two (2) roles available:
- Viewer: View and access applications
- Account Administrator: Access modules and manage system settings except System Management and Identity Provider (IDP)
7. Click Save. The new user is created and displays in the user list in Pending state. Pending indicates the user has not yet completed self-activation.
8. Locate the newly created user in the list and confirm that the Status column displays Pending.
9. Click the More Options Icon next to the newly created user.
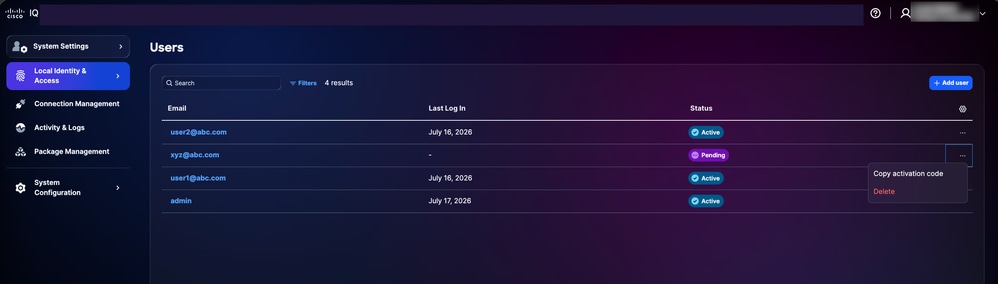 Copy Activation Code
10. Select the Copy activation code from the drop-down list. The activation code is copied to your clipboard.
11. Share this code with the user securely (for example, via a secure internal channel). The activation code is for one-time use and is required to complete registration.
Note: Do not share the activation code over insecure channels. If the code is lost or compromised, use the Menu icon to regenerate a new activation code, which invalidates the previous one. Activation codes are valid for 48 hours. If your code expires, please contact your Account Administrator to request a new one.
12. To logout, click the User Profile icon in the top-right corner and select Logout. You are returned to the Cisco IQ login page.
Registering New User Accounts
To register the new user account:
- On the login page, click the Register a new user account link.
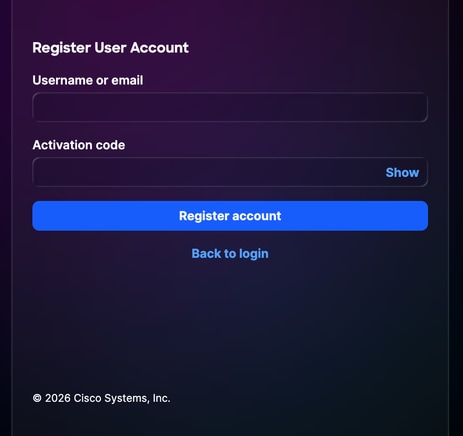 New User Account
- Enter the Username or email address used when the user was created (for example, user1@abc.com).
- Enter the Activation Code shared by the Account Administrator.
- Click Register account. The Set New Password window displays.
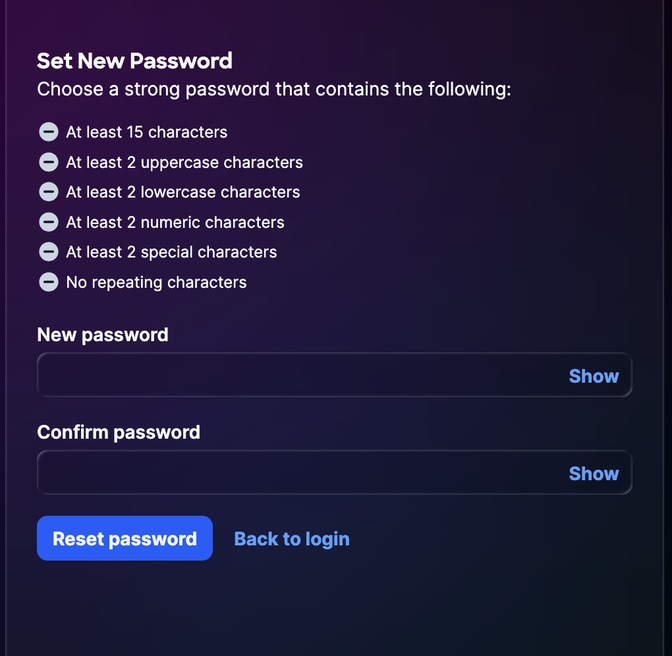 New User Account Password
- Enter a New password.
- Enter the password again in Confirm password.
- On the first successful login, the user is prompted to configure five (5) security questions. (See Setting Up Security Questions and Answers for more information).
Managing Local User Groups
User groups enable the Account Administrator to manage roles for multiple local users at once. Instead of assigning a role to each user individually, you can create a group, attach a role and set of users to it, and update the role or membership in one place. All user group management is performed from the Local Identity & Access page.
Note: Only an Account Administrator can create, edit, or delete user groups. Groups are made up of existing local users; users must be created before they can be added to a group. Refer to Adding Local Users for more information.
Creating a User Group
To create a user group:
- From System Settings, choose Local Identity & Access > User Groups. The User Groups page displays.
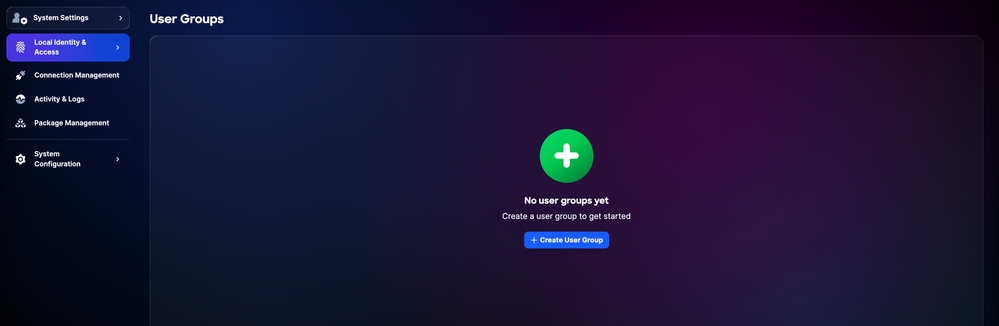 User Groups
- Click Create User Group. The Create user group page displays.
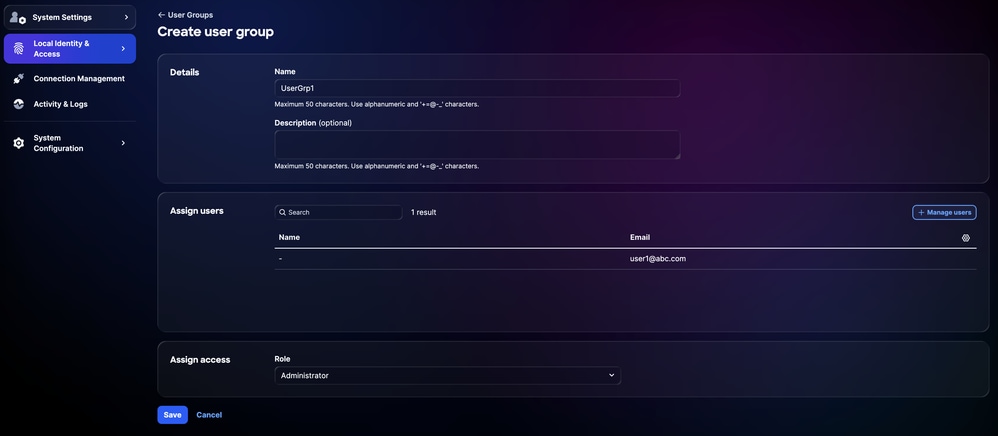 Create User Group
- Complete the following sections:
- Details
- Name: Enter a unique name for the group (for example, Read-Only Operators)
- Description (Optional): A brief description of the group (maximum 50 characters; alphanumeric and + = @ - _ characters are allowed)
- Assign Users: Search for and select one or more existing local users to add to the group.
Note: To add users who are not yet listed, click Manage users.
- Assign access
- Role: Choose the system role to assign to all members of this group. The following roles are available:
- Viewer: View and access modules (read-only)
- Administrator: Access modules and manage system settings
- Click Save.
The new user group displays in the User Groups list along with its assigned role and member count.
Editing a User Group
To edit a user group:
- From the User Groups list, locate the group you want to modify.
- Choose the More Options icon > Edit of the desired group. The Edit user group page displays.
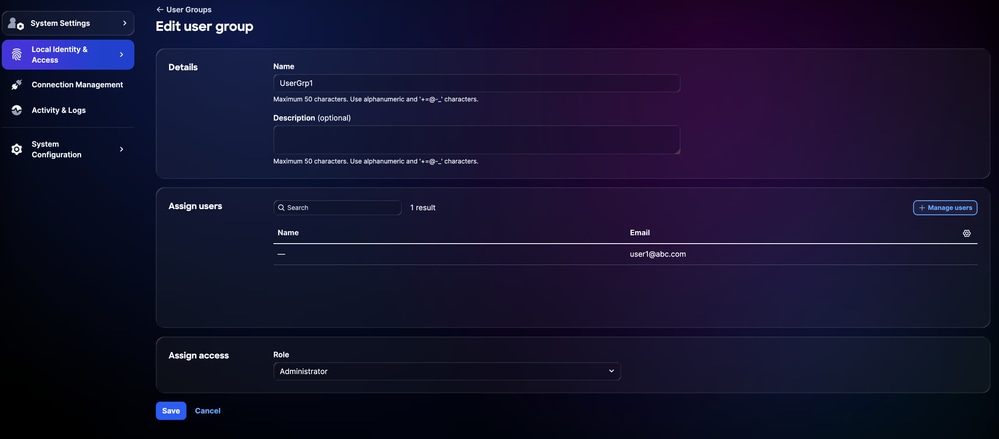 Edit User Group
- Make the desired changes.
- Click Save.
The updated group displays in the User Groups list. The new role takes effect for all members of the group.
Deleting a User Group
To delete a user group:
- From the User Groups list, locate the group you want to delete.
- Click the More Options icon next to the group and select Delete.
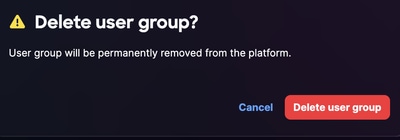 Delete User Group
- Confirm the deletion when prompted.
The group is removed from the User Groups list.
Note: Deleting a user group removes the group-based role assignment from all members. The individual user accounts are not deleted.
Configuring Identity Provider
Once logged in to VA, Account Administrators can configure various settings. Account Administrators can log in using local administration or IDP configuration.
Okta IDP SAML Configuration for SSO
Prerequisites to Configure IDP SAML
- Local Administrator access to Cisco IQ
- Access to IDP portal
IDP SAML Configuration for SSO
To configure IDP Security Assertion Markup Language (SAML) for SSO:
- Navigate to your IDP portal.
- Set the following attributes for the Cisco IQ instance.
| Field |
Value |
| Application Name |
<Application Name> |
| Environment |
ESP business application |
| Application Owner Groups |
Owner of the IDP settings |
| Team Mailer |
Mailer for the team |
| Audience |
Non-workforce |
| Onboarding Category |
Select "New Onboarding" |
| Parameter |
Configuration |
Example |
| Audience (Entity ID) |
FQDN |
mymanagementhost.mydomain.com |
| Single Sign-On URL |
SAML Assertion Customer Service (ACS) endpoint |
https://mymanagementhost.mydomain.com /saml/acs |
| Name ID Format |
Email address |
NA |
| Application Username |
Username |
NA |
- Configure the attribute statements.
Note: IDP attribute changes depend on the specific provider and configuration. Cisco IDP and its attributes are shared below as an example.
- First Entry
- Name: Username
- Value: user.login
- Second Entry
- Name: Primary email
- Value: user.email
- Group Attribute Statements
- Name: groups
- Filter: REGEX
- Value: .*
- Configure the Single Logout (SLO) settings in the application.
- SLO Configuration Settings
| Field |
Value |
| Signature Certificate |
For Okta, this certificate is required only if you choose to enable SLO. Download the Signature Certificate using the Download SP Certificate in Identity Providers. Save the file as sp-public-key.crt. See Single Logout Configuration for more details. |
| SP metadata |
The Service Provider (SP) metadata is required for ADFS IDP only (and not for Okta). |
| Do you want to enable Single Logout |
Yes or No |
| Single Logout URL |
|
| SP Issuer (Audience/Entity ID or ACS URL) |
- Click the Download icon to download the “IDP Metadata XML” file.
- Provision or create the application as required by the provider.
Adding Okta IDP
To add an IDP in Cisco IQ:
- From System Settings, choose System Configuration > Identity Providers. The Identity Providers page displays.
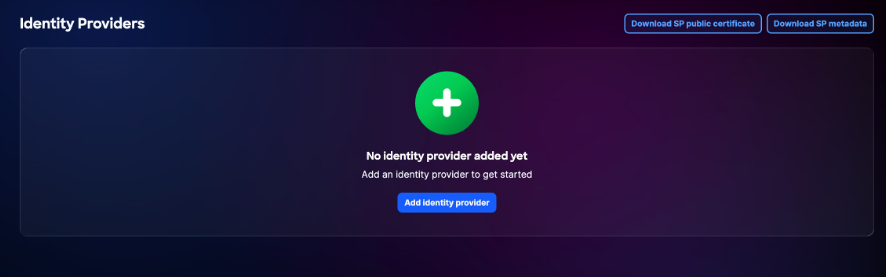 IDP Home Page
Note: Only one (1) IDP can be added at a given time.
- Click Add Identity Provider. The Add Identity Provider page displays.
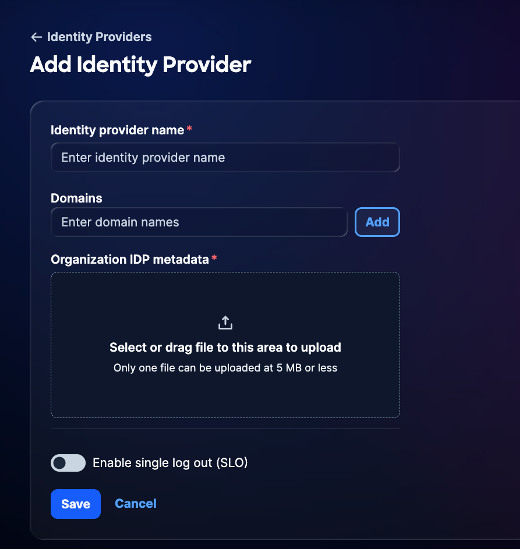 Add Identity Provider
- Enter the Identity provider name.
- Click Add to add a Cisco IQ configured domain name to the Domain(s) field.
- Drag-and-drop or upload the SAML metadata file obtained from the IDP application in the Organization IDP metadata field. This file contains certificate details and SP entity details.
- (Optionally) turn on the Enable single logout toggle button. You can enable the SLO later as well.
- Click Save.
Role Mapping Configuration
- From the added IDP, choose the More Options icon > Map Roles. The Map user roles page displays.
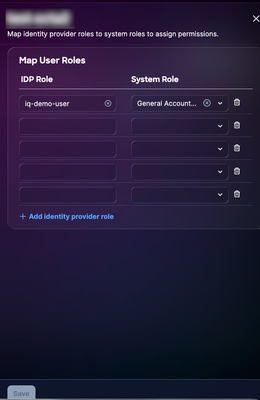 Map User Roles
- Enter an IDP role for the selected System role. The following system roles are supported:
- General Account Administrator: The General Account Administrator has full permissions to perform all the actions in the product
- General Account Viewer: The General Account Viewer has read only access
Note: The IDP role is an open-text field. It must match exactly with the group or role name configured in your organization’s IDP. An example of Okta groups is shared below.
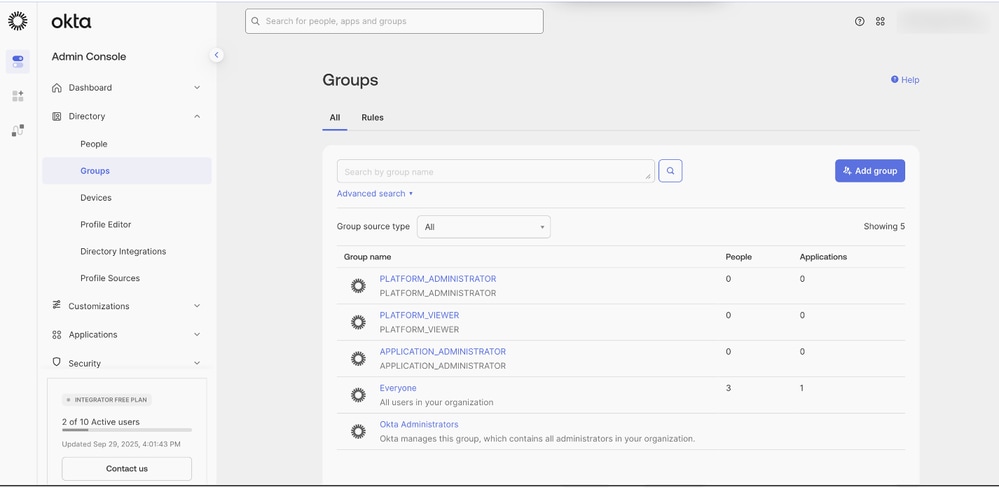 Role Mapping Reference
- Map additional roles as required by clicking Add identity provider role.
- Click Save. Once configured, the login page displays an option to log in with SSO (via IDP).
Single Logout Configuration
If you choose to enable SLO, you must upload metadata that includes the SLO URL. You can configure this by editing your Identity Provider settings and turning the toggle on for Enable Single Log Out. To complete SLO configuration:
- From the Identity Providers home page, click Download SP public certificate.
 SP Public Certificate
- Save the downloaded file as sp-public-key.crt.
- Navigate to your IDP portal.
- Upload the signature certificate file generated in IDP SAML Configuration for SSO.
- Enter the SLO URL (for example, https://<fqdn-of-the-appliance>/saml/logout).
- Enter the SP issuer (for example, <fqdn-of-the-appliance>).
- Click Submit.
- Download the IDP metadata file again.
- On the Identity Providers page, choose the added IDP’s More Options icon > Edit.
- Turn on the Enable single log out (SLO) toggle button.
- Upload the newly downloaded metadata file.
- Use the following checklist to verify SSO and SLO functionality:
Verification Checklist:
- Local administrator login is successful
- IDP portal is configured and provisioned
- IDP is added to Cisco IQ with a "Success" status
- Role mappings are configured and tested
- SP metadata is downloaded and the certificate is extracted
- If SLO is enabled, SLO configuration is complete with the real signature certificate
- End-to-end SSO and SLO flow is tested successfully
Troubleshooting IDP Issues
The following tables lists common issues and possible solutions to help quickly identify and resolve problems related to IDP status, certificate errors, SSO login failures, and SLO configuration:
| Issue |
Solution |
| IDP status shows as “Incomplete” |
Verify the role mapping configurations |
| Certificate errors |
Verify certificate format and validity |
| SSO login failures |
Validate attribute mapping and group assignments |
| SLO not working as expected |
Ensure the certificate is properly uploaded and SLO URLs are configured |
ADFS IDP SAML Configuration for SSO
This section provides guidance to configure Microsoft Active Directory Federation Services (ADFS) as the SAML IDP for Cisco IQ, supporting password-based and Public Key Infrastructure (PKI) or certificate-based authentication.
Prerequisites to Configure ADFS IDP SAML for SSO
- ADFS 6.0+ is recommended
- Windows Server 2022+
- Configured AD integration with user accounts
- SSL/TLS certificates on ADFS server
- Administrator access to Cisco IQ
- Administrative access to ADFS server (Windows Server)
- PowerShell access on ADFS server
- Network connectivity between ADFS and Cisco IQ
- Enterprise Certificate Authority (CA) (installed or reachable)
- Domain Administrator or Enterprise Administrator privileges (required for PKI only)
- ADFS server configuration details (as listed in the table below)
| Item |
Description |
Example |
| Cisco IQ FQDN |
User deployment hostname |
<Your-CIQ-FQDN> For example, dev35-23.cx-xxx-xxx.cisco.com |
| ADFS Server URL |
User ADFS server address |
https://<Your-ADFS-HOSTNAME> For example, https://ad-fs.dev.local |
| Company Domain |
Email domain |
<Your-Domain> |
| AD Groups |
Active Directory group Domain Names (DN) |
CN=Role - CXIQ Developers |
| CA Name (PKI) |
Enterprise CA name |
<Your-CA-Name> |
| Cert Auth Port (PKI) |
ADFS alternate TLS port |
49443 |
| SSL Certificate Thumbprint |
ADFS server SSL certificate |
<Your-SSL-CERT-THUMBPRINT> |
Configuring Base ADFS SAML
To configure ADFS:
- From System Settings, choose System Configuration > Identity Providers. The Identity Providers page displays.
 Download Options
- Click Download SP public certificate and Download SP metadata to download these files.
- Copy and save the service-provider-metadata.xml and service-provider-certificate.crt files to the ADFS server (for example, C:\certs\).
- Log in to the ADFS server.
- From the ADFS Management menu, click Relying Party Trusts.
- From the Relying Party Trusts menu, click Add Relying Party Trusts. The new wizard opens.
- Click the Claims Aware radio button.
- Click Start to proceed with the configuration.
- Click Import data about the relying party from a file to get details from the file which is saved as part of step 3.
- Click Browse to select the service provider metadata file and complete the file upload.
- Click Next.
- Enter a display name (for example, "Cisco IQ"), add any relevant notes, and click Next.
- On the Choose Access Control Policy page, click Permit everyone (or the policy required by your organization’s security configuration).
- Click Next through the remaining screens.
- Click Close to complete the Relying Party Trust configuration.
Note: Do not select “Permit Everyone with MFA” unless your ADFS server has a registered Multi-Factor Authentication (MFA) adapter (for example, Azure MFA, Time-Based One-Time Password (TOTP)) configured. If this policy is enabled without a configured MFA provider, ADFS authenticates the user but ultimately denies the request with status urn:oasis:names:tc:SAML:2.0:status:RequestDenied. Since the SAML response contains no assertion, the plugin fails and reports a “missing email” error.
Issue: “Permit Everyone with MFA” is selected.
Workaround: In PowerShell, check current policy by running the following command.
Get-AdfsRelyingPartyTrust -Name "<YOUR-RP-NAME>").AccessControlPolicyName
To set “Permit everyone” (no MFA requirement), run the following command:
Set-AdfsRelyingPartyTrust -TargetName "<YOUR-RP-NAME>" -AccessControlPolicyName "Permit everyone"
You can also create the trust through PowerShell:
Add-AdfsRelyingPartyTrust `
-Name "<YOUR-RP-NAME>" `
-Identifier "<YOUR-SP-ENTITY-ID>" `
-SamlEndpoint (New-AdfsSamlEndpoint -Binding POST -Protocol SAMLAssertionConsumer -Uri "<YOUR-ACS-URL>") `
-AccessControlPolicyName "Permit everyone" `
-IssuanceAuthorizationRules '=> issue(Type = "http://schemas.microsoft.com/authorization/claims/permit", Value = "true");
Configuring ADFS Claim Rules
To configure ADFS Claim rules, perform the steps listed in the following sections.
Required Claims
Refer to the following table for required claims.
| Claim |
Purpose |
Source |
| |
User identifier |
AD Mail |
| Display Name |
User’s full name |
AD Display Name |
| UPN |
PKI/certificate authentication |
ADFS maps the client certificate to an AD user via UPN |
| NameID |
SAML subject |
Transformed from email |
| Groups |
Role-based access |
AD Group Membership (memberOf) |
Applying Claim Rules
- Define the name of your Relying Party Trust (for example, "Cisco IQ - Production").
$relyingPartyName = "Your-RP-Name"
- Define claim rules to send user information and group membership to Cisco IQ.
$claimRules = @'
@RuleTemplate = "LdapClaims"
@RuleName = "Send Email and Name"
c:[Type == "http://schemas.microsoft.com/ws/2008/06/identity/claims/windowsaccountname", Issuer == "AD AUTHORITY"]
=> issue(store = "Active Directory", types = ("http://schemas.xmlsoap.org/ws/2005/05/identity/claims/emailaddress", "http://schemas.xmlsoap.org/ws/2005/05/identity/claims/name"), query = ";mail,displayName;{0}", param = c.Value);
@RuleTemplate = "LdapClaims"
@RuleName = "Send UPN"
c:[Type == "http://schemas.microsoft.com/ws/2008/06/identity/claims/windowsaccountname", Issuer == "AD AUTHORITY"]
=> issue(store = "Active Directory",
types = ("http://schemas.xmlsoap.org/ws/2005/05/identity/claims/upn"),
query = ";userPrincipalName;{0}", param = c.Value);
@RuleName = "Transform Email to NameID"
c:[Type == "http://schemas.xmlsoap.org/ws/2005/05/identity/claims/emailaddress"]
=> issue(Type = "http://schemas.xmlsoap.org/ws/2005/05/identity/claims/nameidentifier",
Issuer = c.Issuer, OriginalIssuer = c.OriginalIssuer, Value = c.Value, ValueType = c.ValueType,
Properties["http://schemas.xmlsoap.org/ws/2005/05/identity/claimproperties/format"] = "urn:oasis:names:tc:SAML:1.1:nameid-format:emailAddress");
@RuleName = "Send Group Membership"
c:[Type == "http://schemas.microsoft.com/ws/2008/06/identity/claims/windowsaccountname", Issuer == "AD AUTHORITY"]
=> issue(store = "Active Directory",
types = ("http://schemas.xmlsoap.org/claims/Group"),
query = ";memberOf;{0}", param = c.Value);
'@
- Apply the claim rules by running the following command:
Set-AdfsRelyingPartyTrust -TargetName $relyingPartyName -IssuanceTransformRules $claimRules
Write-Host "Claim rules configured successfully!" -ForegroundColor Green

Warning: Each AD user account must have the mail attribute populated. If this attribute is missing, the SAML assertion does not contain an email claim, resulting in an authentication rejection.
To update a user's email address, execute the following PowerShell command:
Set-ADUser -Identity "<USERNAME>" -EmailAddress "<USER-EMAIL>"
Verifying User Groups
- Set the username to check user’s group membership by running the following command:
$username = "username"
- Run the following commands to find the user's account:
$searcher = [adsisearcher]"(samaccountname=$username)"
$user = $searcher.FindOne()
- Display the groups the user belongs to using the following command:
$user.Properties.memberof
Example Output:
CN=Role - CXIQ Developers,OU=Role Groups,DC=dev,DC=local
Configuring ADFS to Trust the SP Signing Certificate
- In the ADFS server, import the SP certificate into the TrustedPeople store:
Import-Certificate -FilePath "C:\certs\service-provider-certificate.crt" -CertStoreLocation "Cert:\LocalMachine\TrustedPeople"
- Choose one of the following options:
Note: The SP certificate is issued by an internal CA that ADFS cannot validate through the standard chain-of-trust.
- Disable chain validation globally for this relying party
Set-AdfsRelyingPartyTrust `
-TargetIdentifier "<Your_sp_entity_id>" `
-SigningCertificateRevocationCheck None `
-EncryptionCertificateRevocationCheck None
- If the SP certificate is issued by a CA (not self-signed), import the issuing CA certificate into the Root certificate store
Import-Certificate -FilePath "C:\certs\issuing-ca.cer" -CertStoreLocation "Cert:\LocalMachine\Root"
- Apply the changes by restarting the ADFS service.
Restart-Service adfssrv
Setting Up PKI/Certificate Authentication
This section describes how to add certificate-based (that is, smart card or software certificate) authentication alongside passwords. This section can be skipped if password-only authentication is sufficient.
Installing the AD CS CA Role
To install the AD Certificate Services (CS) CA role:
- Verify if an Enterprise CA already exists in your domain by running the following command:
certutil -config - -ping
If the command returns a valid response, you can skip the remainder of this section. Your environment is already configured. If the command indicates no CA is found, proceed to step 2.
- Install the CA role by running the following command:
install-WindowsFeature AD-Certificate -IncludeManagementTools
- Configure the CA role by running the following command:
Install-AdcsCertificationAuthority `
-CAType EnterpriseRootCA `
-CACommonName "<YOUR-CA-NAME>" `
-KeyLength 2048 `
-HashAlgorithmName SHA256 `
-CryptoProviderName "RSA#Microsoft Software Key Storage Provider" `
-ValidityPeriod Years `
-ValidityPeriodUnits 10 `
-Force
- Verify the installation by running the following command:
certutil -ca
- Confirm the service is active and reachable by running the following command:
certutil -config - -ping
Configuring a Certificate Template
To configure a certificate template with the Client Authentication Enhanced Key Usage (EKU):
- Open certsrv.msc and expand the CA node.
- Right-click Certificate Templates > Manage.
- Duplicate the User template.
Note: The built-in User template is functional or valid only if the certificate issued from it includes Client Authentication EKU.
- Configure the settings on the following tabs:
- General: Enter “CIQ User Authentication” in the Name field with a validity period of one (1) year
- Request Handling: Select Signature and encryption from the Purpose drop-down list and check the Allow private key to be exported check box
- Subject Name: Select Build from Active Directory Information and include an e-mail in both the Subject and SAN fields
Warning: The Subject and SAN fields must contain a user's User Principal Name (UPN) or an email that matches an AD account. ADFS maps the certificate to an AD user using these fields.
- Extensions: Ensure the Application Policies include “Client Authentication (1.3.6.1.5.5.7.3.2)”
- Security: Add domain users and grant them Read and Enroll permissions
- Publish the template using the following command:
Add-CATemplate -Name "CIQUserAuthentication" -Force
Enrolling a User Certificate
- Log in as the target user.
- Enroll the certificate by running the following command:
certreq -enroll -user "CIQUserAuthentication"
- Verify the certificate installation by running the following command:
Get-ChildItem Cert:\CurrentUser\My | Where-Object {
$_.EnhancedKeyUsageList.ObjectId -contains "1.3.6.1.5.5.7.3.2"
} | Format-Table Subject, Thumbprint, NotAfter -AutoSize
Exporting a User Certificate from Windows and Installing on Client (Mac)
To export a user certificate from Windows to Mac:
- Export the certificate from Windows as a PFX file by running the following commands:
$cert = Get-ChildItem Cert:\CurrentUser\My | Where-Object { $_.Subject -like "*<USERNAME>*" }
$password = ConvertTo-SecureString -String "<EXPORT-PASSWORD>" -Force -AsPlainText
Export-PfxCertificate -Cert $cert -FilePath "C:\temp\user-cert.pfx" -Password $password
- Transfer the user-cert.pfx file to your Mac device.
- Import the certificate into the Mac Keychain by running the following command:
security import user-cert.pfx -k ~/Library/Keychains/login.keychain-db -P "<EXPORT-PASSWORD>"
Note: After importing the certificate, your browser must be closed and reopened for it to be recognized.
- Trust the CA on Mac by running:
sudo security add-trusted-cert -d -r trustRoot \
-k /Library/Keychains/System.keychain ca-certificate.cer
Enabling ADFS Certificate Authentication Endpoints
To enable ADFS certificate authentication endpoints:
- Enable the required ADFS certificate endpoints by running the following commands:
Enable-AdfsEndpoint -TargetAddressPath /adfs/services/trust/2005/certificate
Enable-AdfsEndpoint -TargetAddressPath /adfs/services/trust/2005/certificatetransport
Enable-AdfsEndpoint -TargetAddressPath /adfs/services/trust/13/certificate
Enable-AdfsEndpoint -TargetAddressPath /adfs/services/trust/13/certificatetransport
- Verify that all endpoints are enabled by running the following command:
Get-AdfsEndpoint | Where-Object { $_.AddressPath -like "*cert*" } |
Format-Table AddressPath, Enabled, Proxy -AutoSize
Enabling Certificate Authentication as the Primary
To enable the certificate authentication as the primary:
- Configure the primary authentication providers for intranet and extranet access using the following command:
Set-AdfsGlobalAuthenticationPolicy `
-PrimaryIntranetAuthenticationProvider @("CertificateAuthentication", "WindowsAuthentication", "FormsAuthentication", "MicrosoftPassportAuthentication") `
-PrimaryExtranetAuthenticationProvider @("CertificateAuthentication", "FormsAuthentication", "MicrosoftPassportAuthentication")
- Verify that both lists include CertificateAuthentication and FormsAuthentication using the following commands:
(Get-AdfsGlobalAuthenticationPolicy).PrimaryIntranetAuthenticationProvider
(Get-AdfsGlobalAuthenticationPolicy).PrimaryExtranetAuthenticationProvider
- Check the current TLS client port configuration using the following command:
Get-AdfsProperties | Select-Object HostName, HttpsPort, TlsClientPort
- If the TlsClientPort is not 49443, update the port and restart the ADFS service using the following commands:
Set-AdfsProperties -TlsClientPort 49443
Restart-Service adfssrv
SChannel/TLS Fixes (CRITICAL for PKI)
The steps in the following sections resolve CERT_E_UNTRUSTEDROOT (0x800B0109) errors which prevent certificate authentication from working.
Binding SSL Certificates on Port 49443
To bind SSL certificates on Port 49443:
- Remove any existing SSL certificate binding(s) on port 49443 by using the following command:
netsh http delete sslcert hostnameport=<YOUR-ADFS-HOSTNAME>:49443
- Create a new binding with client certificate negotiation enabled by using the following command:
netsh http add sslcert hostnameport=<YOUR-ADFS-HOSTNAME>:49443 `
certhash=<YOUR-SSL-CERT-THUMBPRINT> `
appid="{5d89a20c-beab-4389-9447-324788eb944a}" `
certstorename=MY `
clientcertnegotiation=enable `
verifyclientcertrevocation=disable
- Verify that client certificate negotiation is enabled using the following command:
netsh http show sslcert hostnameport=<YOUR-ADFS-HOSTNAME>:49443
Cleaning Up the Certificate Store (CRITICAL)
To clean up the certificate store:
Warning: Windows SChannel rejects all client certificates if non-self-signed certificates are present in the Trusted Root store. This is the main root cause of PKI failures.
- Identify non-self-signed certificates in the Trusted Root store by running the following command:
$bad = Get-ChildItem Cert:\LocalMachine\Root | Where-Object { $_.Issuer -ne $_.Subject }
$bad | ForEach-Object { Write-Host "PROBLEM: $($_.Subject) | Issuer: $($_.Issuer)" -ForegroundColor Red }
- Move these certificates to the intermediate CA store by running the following command:
$bad | Move-Item -Destination Cert:\LocalMachine\CA
Write-Host "Moved $($bad.Count) cert(s) from Root to Intermediate CA store" -ForegroundColor Green
- Verify that no non-self-signed certificates remain in the Trusted Root store by running the following command:
Get-ChildItem Cert:\LocalMachine\Root | Where-Object { $_.Issuer -ne $_.Subject }
SChannel Registry Fixes (CRITICAL)
To configure the SChannel registry settings to ensure proper certificate authentication:
- Define the registry path variable using the following command:
$regPath = "HKLM:\SYSTEM\CurrentControlSet\Control\SecurityProviders\SCHANNEL"
- Apply the registry settings defined in the table below using the following commands:
Set-ItemProperty -Path $regPath -Name "ClientAuthTrustMode" -Value 2 -Type DWord
Set-ItemProperty -Path $regPath -Name "SendTrustedIssuerList" -Value 0 -Type DWord
| Setting |
Value |
Purpose |
| ClientAuthTrustMode |
2 |
Enables exclusive CA trust to correct the default validation path. |
| SendTrustedIssuerList |
0 |
Prevents the server from sending the full trusted issuer list during the TLS handshake. |
Verifying the CA Certificate Store
To verify the CA certificate store:
Note: The CA certificate that issues user certificates must be in the SystemCertificates\Root store to ensure it is correctly recognized.
- Define the thumbprint of your CA certificate using the following command:
$caThumbprint = "<YOUR-CA-CERT-THUMBPRINT>"
- Verify the CA certificate is already present in the LocalMachine\Root store using the following command:
$exists = Test-Path "HKLM:\SOFTWARE\Microsoft\SystemCertificates\Root\Certificates\$caThumbprint"
If the certificate is not found, import it into the LocalMachine\Root store:
if (-not $exists) {
Import-Certificate -FilePath "C:\certs\<YOUR-CA-CERT>.cer" `
-CertStoreLocation "Cert:\LocalMachine\Root"
}
Rebooting the ADFS Server (MANDATORY)
Restart the ADFS server by using the following command:
Restart-Computer -Force
Note: The ClientAuthTrustMode registry change only takes effect after the server is restarted.
Exporting ADFS Metadata
You can download your ADFS metadata using either PowerShell or your web browser.
PowerShell
To export ADFS metadata using PowerShell:
- Open PowerShell on your ADFS server.
- Run the following commands to download the metadata file.
$metadataUrl = (Get-AdfsEndpoint | Where-Object {$_.Protocol -eq "Federation Metadata"}).FullUrl
Invoke-WebRequest -Uri $metadataUrl.AbsoluteUri -OutFile "C:\temp\adfs-metadata.xml"
Write-Host "ADFS metadata exported to C:\temp\adfs-metadata.xml" -ForegroundColor Green
After running the commands, the metadata file is saved to C:\temp\adfs-metadata.xml.
Web Browser
To export ADFS metadata using a web browser:
- Navigate to https://<your-adfs-server>/FederationMetadata/2007-06/FederationMetadata.xml, replacing "<your-adfs-server>” with the hostname of your ADFS server.
- Save the metadata XML file to your computer when prompted.
Configuring on Cisco IQ
To configure on Cisco IQ:
- Transfer adfs-metadata.xml to your workstation.
- In Cisco IQ, navigate to System Settings > System Configuration > Identity Providers.
- Upload the ADFS metadata file to automatically extract the IDP certificate, Entity ID, and SSO URL.
- Save the configuration.
Note: If ADFS performs an automatic token-signing certificate rollover, you must re-export the metadata file and upload it to Cisco IQ to ensure continued authentication.
Adding ADFS IDP
- On the Identity Providers page, click Add identity provider.
- Enter the Identity provider name.
- Enter the Domain(s) (for example, company.com).
- (Optionally) turn on the Enable single logout toggle button, if required.
- Drag-and-drop or upload the SAML metadata file obtained from the IDP application in the Upload IDP Metadata field.
- Click Save.
Note: The status displays as “Incomplete” until role mapping is complete; this is expected behavior.
Configuring Role Mapping for System Roles
Before proceeding to configure role mapping, ensure you can find groups from AD to use for mapping. To find groups from AD, run the following PowerShell command:
$searcher = New-Object DirectoryServices.DirectorySearcher
$searcher.Filter = "(&(objectClass=group)(cn=Role - CXIQ*))"
$searcher.PropertiesToLoad.Add("distinguishedName") | Out-Null
$searcher.PropertiesToLoad.Add("cn") | Out-Null
$searcher.FindAll() | ForEach-Object { $_.Properties["distinguishedname"] }
The system queries AD directly via Lightweight Directory Access Protocol (LDAP), requiring no additional modules. Group information is returned in full Distinguished Name format, for example:
CN=Role - CXIQ Developers, OU=Groups, DC=dev, DC=example, DC=com CN=Role - CXIQ Viewers, OU=Groups, DC=dev, DC=example, DC=com
If the required groups are not listed, they must be created in AD by an Account Administrator before you can complete the ADFS role mapping.
To configure role mapping:
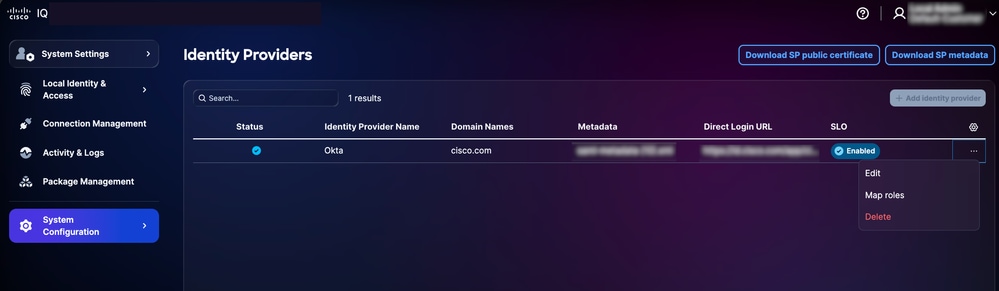 Role Mapping
- From the added IDP, choose the More Options icon > Map Roles. The Map user roles page displays.
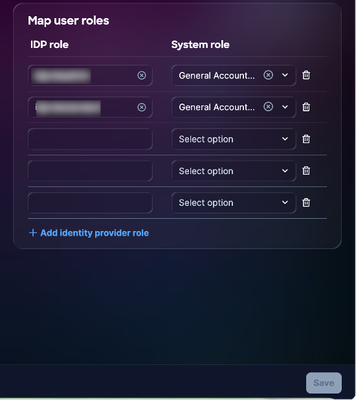 Role Mapping
- Enter an IDP role for the selected System role. The following system roles are supported:
- General Account Administrator: The General Account Administrator has full permissions to perform all actions in the product. The IDP Role (parsed name) is CXIQ Admins.
- General Account Viewer: The General Account Viewer has read-only access. The IDP Role (parsed name) is CXIQ Developers and CXIQ Viewers.
Note: Use parsed names (for example, CXIQ Developers) and not full DNs.
- Click Save. The status updates to Success.
SChannel Client Cert Test
To verify that SChannel is correctly configured to accept client certificates, open a new PowerShell window and execute the following command:
curl.exe --insecure `
--cert "CurrentUser\My\<YOUR-USER-CERT-THUMBPRINT>" `
-v "https://<YOUR-ADFS-HOSTNAME>:49443/adfs/ls/"
The expected output is an HTTP response (for example, a redirect or the ADFS page). If a TLS handshake error occurs, the connection has failed.
End-to-End Browser Testing for PKI Flow
Before you begin end to end browser testing for PKI flow, ensure the user certificate is installed in MacOS Keychain (see Importing the User Certificate on Client Machine (MacOS)). To test:
- Navigate to the application SAML login URL. The ADFS presents certificate and password options.
- Choose Certificate Authentication. The browser prompts for certificate.
- Upload the certificate. The ADFS authenticates the user, redirects the request with a SAML response, and establishes a new session.
End-to-End Browser Testing for Password Flow
Before you begin end-to-end browser testing for password flow:
- Navigate to the application SAML login URL. The ADFS presents certificate and password options.
- Select Password/Forms Authentication.
- Enter Username.
- Enter Password.
- Verify for successful login.
Note: Both the flows must work simultaneously.
Troubleshooting ADFS Issues
The following list outlines common issues and possible solutions to help quickly identify and resolve problems related to ADFS status, certificate errors, SSO login failures, and SLO configuration.
| Issue |
Symptoms / Description |
Causes / Checks / Workarounds and Fixes |
| Groups Not Extracted |
No roles after login |
Missing claim rule: Re-run the instructions in Configuring ADFS Claim Rules |
| Decryption Failed |
"Failed to decrypt assertion" in logs |
Check configuration on ADFS certificate configuration |
| Login Loop |
Stuck in authentication or login loop |
● Invalid ACS URL: Verify: https://your-fqdn/saml/acs ● Cookie mismatch: Check browser cookies for the correct domain |
Diagnostics Commands to Troubleshoot
To ensure a successful integration between your ADFS environment and Cisco IQ, use the following diagnostic commands. These commands help verify metadata accessibility, certificate configurations, and endpoint settings.
- Verify ADFS metadata accessibility: Confirms that the ADFS Federation Metadata is reachable and publicly accessible; this is a critical step for establishing the initial trust
curl -k https://<your-adfs-domain>/FederationMetadata/2007-06/FederationMetadata.xml
- Validate the encryption certificate: Ensures that the correct encryption certificate is associated with the Cisco IQ Relying Party Trust
Get-AdfsRelyingPartyTrust -Name "Cisco IQ - Production" | Select-Object EncryptionCertificate | Format-List
- Review SAML Endpoint Configuration: Verifies the SAML endpoints for the Cisco IQ trust are correctly configured and that authentication requests and assertions are routed to the expected URLs
Get-AdfsRelyingPartyTrust -Name "Cisco IQ - Production" | Select-Object SamlEndpoints
Microsoft Entra ID SAML Configuration for SSO
This section provides guidance to configure Microsoft Entra ID (Entra ID) as the SAML IDP for Cisco IQ, supporting both password-based and PKI or Certificate-Based Authentication (CBA).
Prerequisites to Configure Entra ID SAML for SSO
- Entra ID tenant (for example, “ciqtestdev.onmicrosoft.com”)
- Global Administrator or Application Administrator role access to Cisco IQ
- Connectivity between Entra ID (cloud) and Cisco IQ
- Enterprise CA installed or reachable (required for PKI only)
- Certificate Revocation List (CRL) Distribution Point reachable from the internet (required for PKI only)
| Item |
Description |
Example |
| Tenant ID |
Entra ID tenant identifier |
37352d8f-0ebe-4762-8161-8775ffe897cb |
| Cisco IQ FQDN |
Deployment hostname |
<YOUR-CIQ-FQDN> |
| IDP Entity ID |
Entra ID issuer URL |
https://sts.windows.net/<TENANT-ID>/ |
| IDP SSO URL |
SAML login endpoint |
https://login.microsoftonline.com/<TENANT-ID>/saml2 |
| Company Domain |
Email domain for users |
<YOUR-DOMAIN> |
Configuring Entra ID SAML Application
Creating an Enterprise Application
- Sign in to the Microsoft Entra admin center.
- Navigate to Identity > Applications > Enterprise applications.
- Click New application > Create your own application.
- Enter the name (for example, "Cisco IQ") .
- Choose Integrate any other application you don't find in the gallery (non-gallery).
- Click Create.
Configuring SAML Single Sign-On
To configure SAML single sign-on, you must upload the SP metadata file. You can obtain it by performing the following steps from VA:
- From System Settings, choose System Configuration > Identity Providers. The Identity Providers page displays.
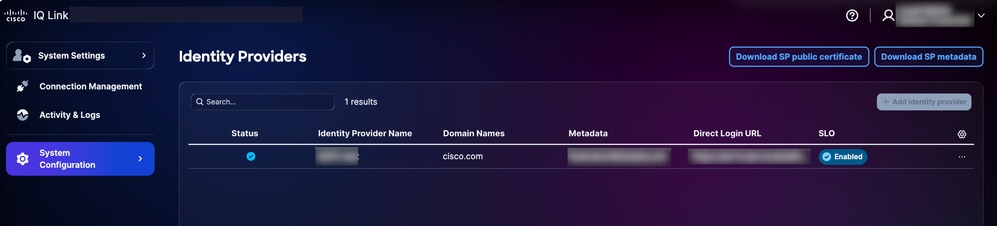 Download Options
- Click Download SP metadata to download. This downloaded SP metadata file is uploaded to complete SAML single sign-on configuration.
- Click Upload Metadata file button to upload SP metadata file. The data from the SP metadata file will auto-populate in SAML-Based Single Sign-on screen after successful upload.
You can also opt to manually enter these details to configure the single sign-on settings. To manually configure SAML Single sign-on:
- In the Enterprise Application, navigate to Single sign-on and choose SAML.
- In the Basic SAML Configuration section, click Edit and enter the following:
- Identifier (Entity ID): <YOUR-CIQ-FQDN>
- Reply URL (ACS URL): https://<YOUR-CIQ-FQDN>/saml/acs
- Sign on URL: https://<YOUR-CIQ-FQDN>/saml/login
- Logout URL :https://<YOUR-CIQ-FQDN>/saml/logout
- Click Save.
Note: The Entity ID must match exactly what Cisco IQ uses as its SP Entity ID. This is typically the FQDN of the deployment.
- To configure SAML Attributes and claims, click Edit in the Attributes and Claims section.
- Configure the following claims:
| Claim |
Source Attribute |
Namespace |
| Unique User Identifier (NameID) |
user.userprincipalname |
*(default)* |
| emailaddress |
user.mail |
|
| givenname |
user.givenname |
|
| surname |
user.surname |
|
| name |
user.userprincipalname |
|
| groups |
user.assignedroles |
(EMPTY — clear the namespace) |
Note: For the groups claim: Use user.assignedroles as the source — not user.groups The Namespace field must be empty. This ensures the attribute name in the SAML assertion is simply groups instead of a full Uniform Resource Identifier (URI) Do not add a duplicate group claim with user.groups as this causes conflicts
Configuring App Roles
App Roles are configured in the App Registration (not the Enterprise Application); to configure App Roles:
- Navigate to Identity > Applications > App registrations.
- Find and choose your application.
- Go to App roles > Create app role.
- For each role needed, configure the following:
- Display name : For example, Cisco IQ Admins
- Allowed member types : Users/Groups
- Value: For example, Cisco IQ Admins
- Description: For example, Cisco IQ Administrators
5. Click Apply.
Note: Create roles matching your Cisco IQ role mapping requirements (for example, CXIQ Admins, CXIQ Developers, or CXIQ Viewers).
App Roles are used instead of group claims for the following reasons:
- Cloud-only tenants cannot send group display names without a P1 or P2 license
- sAMAccountName only works for groups synced from on-premises AD
- Group ID source sends Universally Unique Identifier (UUIDs) which are difficult to map
- App Roles send exact string values matching Cisco IQ role expectations
Assigning Users to App Roles
To assign users to App Roles:
- Go back to the Enterprise Application > Users and groups.
- Click Add user/group.
- Choose the user(s) and assign the appropriate App Role.
- Click Assign. Role values display as readable strings in the SAML assertion groups attribute.
Downloading IDP Metadata and Certificate
To download IDP Metadata and Certificate:
- From the Enterprise Application, choose to Single Sign-On > SAML Signing Certificate.
- Download Federation Metadata XML (save as entra-id-metadata.xml).
Or
Download Certificate (Base64) for manual certificate entry.
- Take note of the following values from the Set up section:
- Login URL (IDP SSO URL)
- Azure AD Identifier (IDP Entity ID)
- Logout URL (IDP SLO URL)
Note: As the Entra ID rotates signing certificates periodically, you must re-download the metadata and upload it to VA whenever the active certificate changes to ensure uninterrupted SSO service.
Adding Entra ID IDP
Note: APISIX routes for SAML are automatically created when an IDP is added in Cisco IQ, eliminating the need for manual route configuration.
To add Entra ID IDP:
- Log in to VA as an Account Administrator.
- Navigate to System Settings > System Configuration > Identity Providers.
- Click Add identity provider.
- Enter the Name of the IDP (for example, "Entra ID").
- Enter the Domain(s) (for example, “ciqtestdev.onmicrosoft.com” or your company domain).
- (Optionally) turn on the Enable single logout toggle button, if required.
- Drag-and-drop or upload the entra-id-metadata.xml file obtained from Entra ID in the Upload IDP Metadata field.
- Click Save.
Note: The status remains "Incomplete" until role mapping is finished; this is the expected behavior.
Configuring Role Mapping
To configure Role Mapping:
- From the added IDP, choose the More Options icon > Map Roles. The Map user roles page displays.
- Enter an IDP role for each System Role. The following system roles are supported:
- System Roles
| System Role |
IDP Role (App Role Value) |
Description |
| general_account_administrator |
CXIQ Admins |
Full permissions for all actions |
| general_account_viewer |
CXIQ Developers |
Read-only access |
| general_account_viewer |
CXIQ Viewers |
Read-only access |
Note: Use the App Role Value strings exactly as configured in Entra ID (see Configuring App Roles for more details).
- Click Save. The status updates to Success.
Verifying the SAML Flow (Password Authentication)
To verify the SAML flow:
- Open a browser in Incognito or Private mode.
- Navigate to https://<YOUR-CIQ-FQDN>/saml/login.
- Verify that you are redirected to the Microsoft login page.
- Authenticate with your credentials (and MFA if configured).
- After authentication, verify that you are redirected back to /saml/acs and that the Cisco IQ application is displayed.
- Verify group extraction by running the following command:
kubectl -ncxue logs deployment/apisix --since=5m | grep -E "authentication successful|Extracted group|Total groups"
Expected Output
SAML 2.0 compliant authentication successful for user: user@domain.com with full name: N/A and 1 groups
Extracted group: CXIQ Admins (original: CXIQ Admins)
Total groups extracted: 1
Configuring Certificate-Based Authentication
This section describes how to add CBA alongside passwords. This section can be skipped if password-only authentication is sufficient.
Prerequisites for CBA
- Windows Server with AD CS with Enterprise CA configured (for example, "DEV-ADCS-CA")
- PowerShell administrator access on the CA server
- Certificate UPN must match the Entra ID userPrincipalName
- CRL Distribution Point must be accessible from the internet
Creating a Certificate Template on AD CS
- Open certtmpl.msc on the CA server.
- Duplicate the User template and name it “EntraUserCert”.
- Configure the template:
- General: Display name EntraUserCert, validity 1–2 years
- Request Handling: Purpose = Signature and encryption
- Subject Name: Select Supply in the request
- Extensions: Application Policies must include Client Authentication (1.3.6.1.5.5.7.3.2)
- Security: Grant Read and Enroll permissions to Authenticated Users
- Publish the template using the following command:
Add-CATemplate -Name "EntraUserCert" -Force
Requesting and Issuing a User Certificate
- Create a Certificate Configuration (INF) file (for example, C:\entra-cert.inf) by using the following PowerShell script:
@"
[Version]
Signature = "`$Windows NT`$"
[NewRequest]
Subject = "CN=<USER-UPN>"
KeyLength = 2048
KeySpec = 1
KeyUsage = 0xa0
MachineKeySet = FALSE
ProviderName = "Microsoft RSA SChannel Cryptographic Provider"
RequestType = PKCS10
[RequestAttributes]
CertificateTemplate = EntraUserCert
[EnhancedKeyUsageExtension]
OID = 1.3.6.1.5.5.7.3.2
OID = 1.3.6.1.4.1.311.20.2.2
[Extensions]
2.5.29.17 = "{text}"
_continue_ = "upn=<USER-UPN>&"
_continue_ = "email=<USER-UPN>"
"@ | Out-File -FilePath C:\entra-cert.inf -Encoding ASCII
- Replace <USER-UPN> with your Entra ID UPN (for example, user@ciqtestdev.onmicrosoft.com).
- To generate the certificate, run the following commands:
certreq -new C:\entra-cert.inf C:\entra-cert.csr
- To submit the request to the CA, run the following command:
certreq -submit -config "<CA-SERVER>\<CA-NAME>" C:\entra-cert.csr C:\entra-cert.cer
- To install certificate to the CA, run the following command:
certreq -accept C:\entra-cert.cer
Exporting Certificates
To export the user certificate as a PFX file (for client), run the following script:
$cert = Get-ChildItem Cert:\CurrentUser\My | Where-Object { $_.Subject -like "*<USER-UPN>*" }
$password = ConvertTo-SecureString -String "<EXPORT-PASSWORD>" -Force -AsPlainText
Export-PfxCertificate -Cert $cert -FilePath C:\entra-cert.pfx -Password $password
To export the CA Root certificate (for Entra ID), run the following script:
Get-ChildItem Cert:\LocalMachine\Root | Where-Object { $_.Subject -like "*<CA-NAME>*" } |
Select-Object -First 1 | Export-Certificate -FilePath C:\ca-root.cer -Type CERT
Importing the User Certificate on Client Machine (MacOS)
To import the user certificate (PFX), run the following command:
security import /path/to/entra-cert.pfx -k ~/Library/Keychains/login.keychain-db -P "<EXPORT-PASSWORD>"
To import the CA root certificate, run the following command:
security import /path/to/ca-root.cer -k ~/Library/Keychains/login.keychain-db
To set the CA certificate to Always Trust in Keychain Access:
- Open Keychain Access.
- Find the CA certificate and click Get Info.
- Under Trust, set to "Always Trust".
Note: After importing, quit and reopen your browser for the certificate to be recognized.
Uploading the CA Root Certificate to Entra ID
- Sign in to the Microsoft Entra admin center.
- Navigate to Protection > Security > Certificate authorities.
- Click Upload and select the ca-root.cer file.
- Mark it as a root CA certificate.
- Enter the CRL Distribution Point URL (must be publicly reachable).
Enabling CBA in Entra ID Authentication Methods
- Navigate to Protection > Authentication methods > Policies.
- Click Certificate-based authentication to configure.
- Enable CBA and add the target users or groups.
- Under Configure, set protection level to Single-factor authentication.
Configuring Username Binding
In the CBA configuration, go to the Username binding tab and set the following binding:
- Certificate Field: PrincipalName
- User Attribute: userPrincipalName
This maps the UPN in the certificate's Subject Alternative Name (SAN) to the Entra ID user.
Verifying the CBA Flow
- Open a browser in Incognito or Private mode.
- Navigate to https://<YOUR-CIQ-FQDN>/saml/login.
- In the Microsoft login page, enter the user's email and click Next.
- Choose Use a certificate or smart card (or it may auto-prompt).
- Choose the applicable user certificate when the browser prompts for certificate selection.
- Verify that Entra ID validates the certificate, redirects with a SAML response, and creates a session.
Note: Ensure you select the correct client certificate. Selecting a wrong certificate (for example, a different user's certificate or an expired certificate) causes authentication failure.
Troubleshooting Entra ID Issues
The following list outlines common issues and possible solutions to help quickly identify and resolve problems related to Entra ID SAML configuration.
| Issue |
Cause |
Fix |
| Invalid SAML Response - missing email |
SAML assertion has no NameID or email attribute |
Verify Entra ID claims configuration (see Configuring SAML Single Sign-On for more details). Check that the user has the mail attribute populated. |
| Total groups extracted: 0 |
Groups claim not configured or wrong source |
Use user.assignedroles as the source. Ensure the user is assigned to an App Role (see Assigning Users to App Roles for more details). |
| Duplicate groups claims |
Both user.groups and user.assignedroles active |
Remove the user.groups claim. Keep only user.assignedroles. |
| Groups showing as UUIDs |
Source attribute is "Group ID" |
Use the App Roles approach (see Configuring App Roles for more details). |
| Attribute Name shows long URI |
Namespace field is not empty |
Clear the Namespace field in the groups claim settings. |
| Invalid SAML signature |
IdP certificate rotated or mismatch |
Re-download the metadata from the Entra ID and re-upload to Cisco IQ. |
| AADSTS500191 |
CRL not reachable from internet |
Publish the CRL to a publicly accessible URL, or use the self-signed CA approach (see CRL Workaround for Reachability Issues for more details). |
| Certificate not prompted |
Certificate not in Keychain, CA not trusted on client, or CBA not enabled |
Verify that the user certificate is imported in MacOS Keychain Access (see Importing the User Certificate on Client Machine (MacOS) for more details), CBA is enabled in Entra ID with the required settings (see Enabling CBA in Entra ID Authentication Methods for more details), and Chrome is restarted to apply changes. |
| SAML assertion expired |
Clock skew between systems |
Increase clock_skew_seconds in the plugin configuration (the default is 300; use 30000 for the lab). |
| Status "Incomplete" in Virtual Appliance |
Role mapping not yet configured |
Complete role mapping (see Configuring Role Mapping for more details). |
CRL Workaround for Reachability Issues
If your CA's CRL Distribution Point is not reachable from the internet (common in lab setups), use a self-signed CA with no CRL requirements:
powershell
# Create self-signed CA
$rootCA = New-SelfSignedCertificate `
-Subject "CN=CIQ-Test-CA" `
-CertStoreLocation "Cert:\CurrentUser\My" `
-KeyUsage CertSign, CRLSign `
-KeyLength 2048 `
-NotAfter (Get-Date).AddYears(5) `
-TextExtension @("2.5.29.19={text}ca=TRUE")
# Create user cert signed by the CA
$userCert = New-SelfSignedCertificate `
-Subject "CN=<USER-UPN>" `
-CertStoreLocation "Cert:\CurrentUser\My" `
-Signer $rootCA `
-KeyUsage DigitalSignature `
-KeyLength 2048 `
-NotAfter (Get-Date).AddYears(2) `
-TextExtension @(
"2.5.29.37={text}1.3.6.1.5.5.7.3.2",
"2.5.29.17={text}upn=<USER-UPN>&email=<USER-UPN>"
)
Upload only the root CA cert to Entra ID. Since it is self-signed with no Cisco Discovery Protocol (CDP), Entra ID does not attempt CRL validation.
Complete Setup Checklist
This section describes a complete setup checklist for configuring VA with Microsoft Entra ID SAML Application and optional CBA.
Entra ID SAML Application Setup
- Create an Enterprise Application (non-gallery) in Entra ID
- Configure a Basic SAML Configuration by manually entering SP metadata
- Configure Attributes & Claims (including email, name, and groups with user.assignedroles)
- Create App Roles in App Registration
- Assign users to App Roles
- Download the Federation Metadata XML
Cisco IQ Configuration
- Add an IDP in Cisco IQ by uploading Entra ID metadata
- Configure the Role Mapping to map App Role values to Cisco IQ system roles
- Verify password-based login works end-to-end
- Verify groups are extracted correctly in logs
Certificate-Based Authentication (optional)
- Create certificate template on AD CS with Client Authentication EKU
- Issue a user certificate with a UPN matching the Entra ID user
- Export a user certificate as a PFX file and install it on the client machine
- Trust the CA certificate on the client machine
- Upload the CA root certificate to Entra ID under Protection > Certificate authorities
- Enable the CBA in Authentication methods
- Configure username binding (PrincipalName and userPrincipalName)
- Verify CBA login works end-to-end
Adding SCP Server
An SCP server is a prerequisite for importing upgrade files that are essential for adding, upgrading, or fixing the Cisco IQ installation.
To add an SCP Server:
- From System Settings, choose System Configuration > SCP Server. The SCP Server page displays.
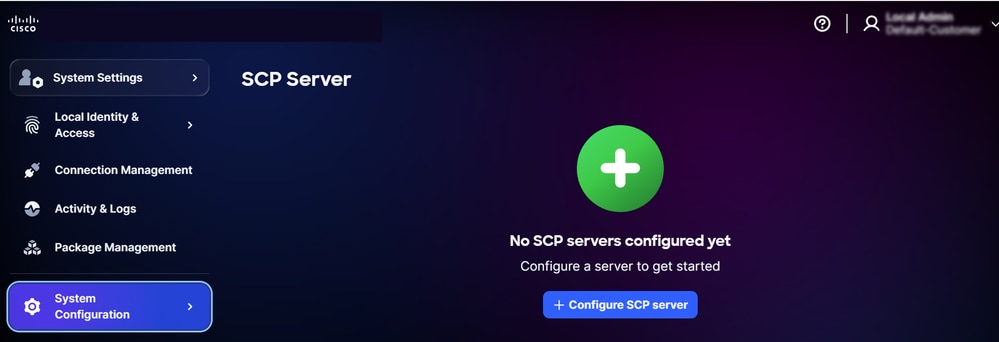 SCP Server Home page
- Click Configure SCP server. The Configure SCP Server page displays.
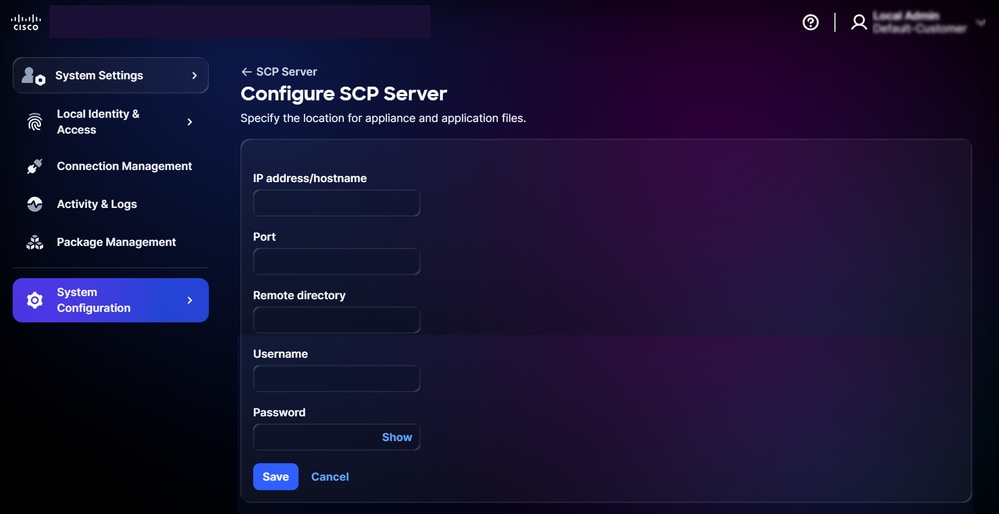 Configure SCP Server
- Enter an IP address/hostname.
- Enter a Port.
- Enter a Remote directory.
- Enter a Username.
- Enter a Password.
- Click Save. A confirmation displays.
Editing an Existing SCP Server
To edit an existing SCP server:
- Navigate to the SCP Server page.
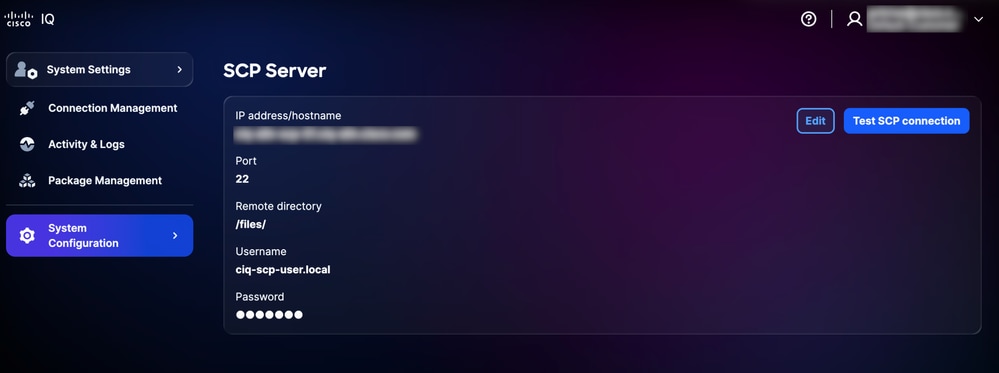 Added SCP Server
- Click Edit of the desired existing SCP server.
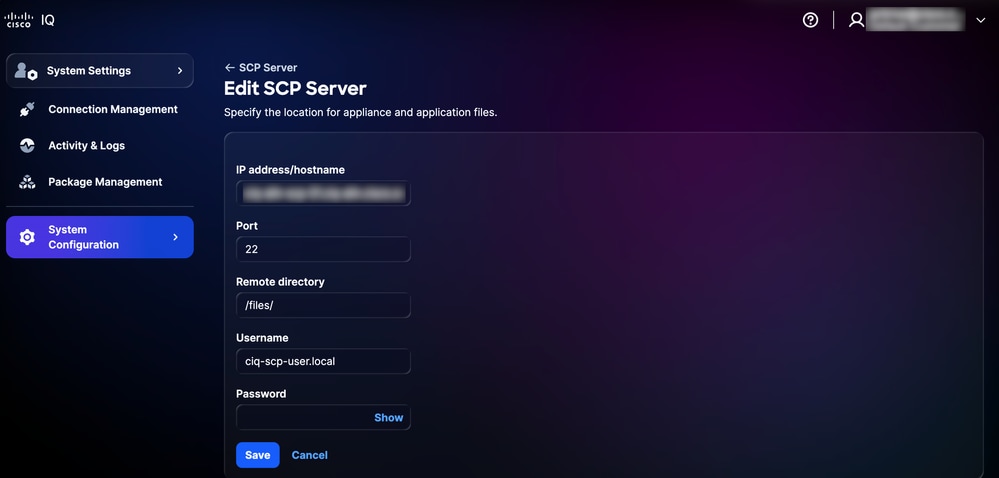 Editing SCP Server
- Modify details as required.
- Click Save.
System Management
You can upgrade to the latest Cisco IQ VA version through the UI. You can also verify from the Cisco IQ Data Connectors page.
Rescheduling System Update
To reschedule the system update:
- From System Settings, choose System Configuration > System Management. The System Management page displays. This page displays the system version that is currently running; if no updates have been configured, the Update History section is empty.
- Click Configure update. The Configure update page displays.
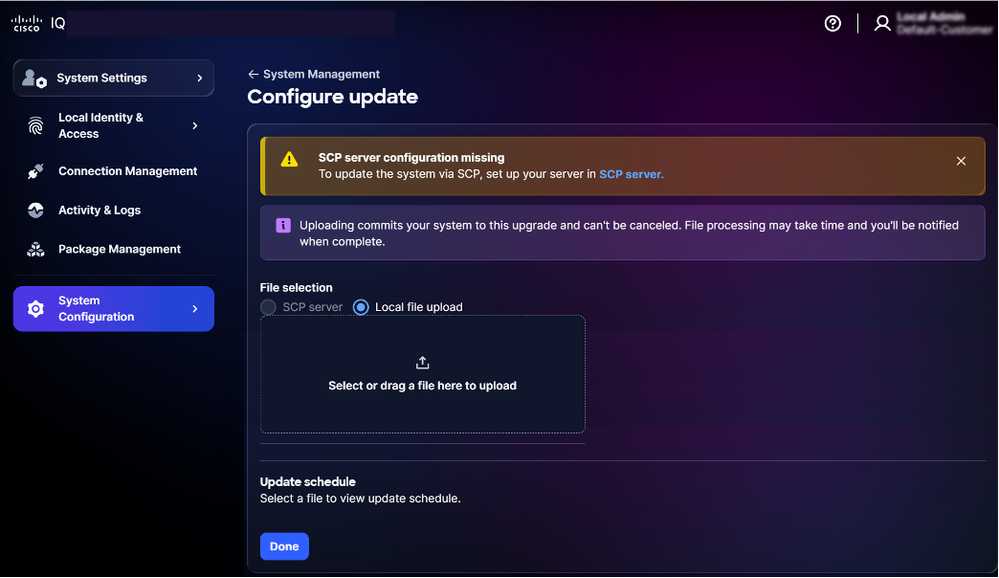 Configure Update
- Choose the Update schedule to schedule another time.
- Wait for the file upload to complete; the duration depends on the bundle size and network speed.
Confirm successful update by verifying the check mark icon displayed under the Update Status column.
Editing System Upgrade Schedules
You can create a custom schedule for system upgrades. If a custom schedule is configured, upgrades occur on user-defined dates provided they remain within the maximum grace period. To create a system upgrade schedule:
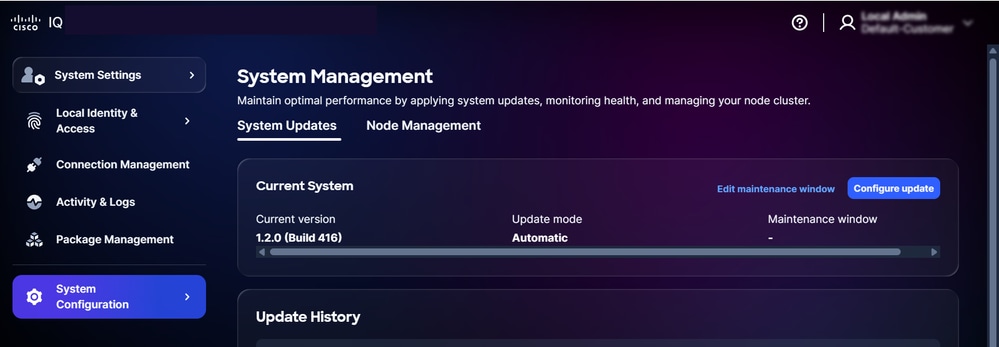 Edit Maintenance
- From the Current System section on the System Management page, click Edit maintenance window.
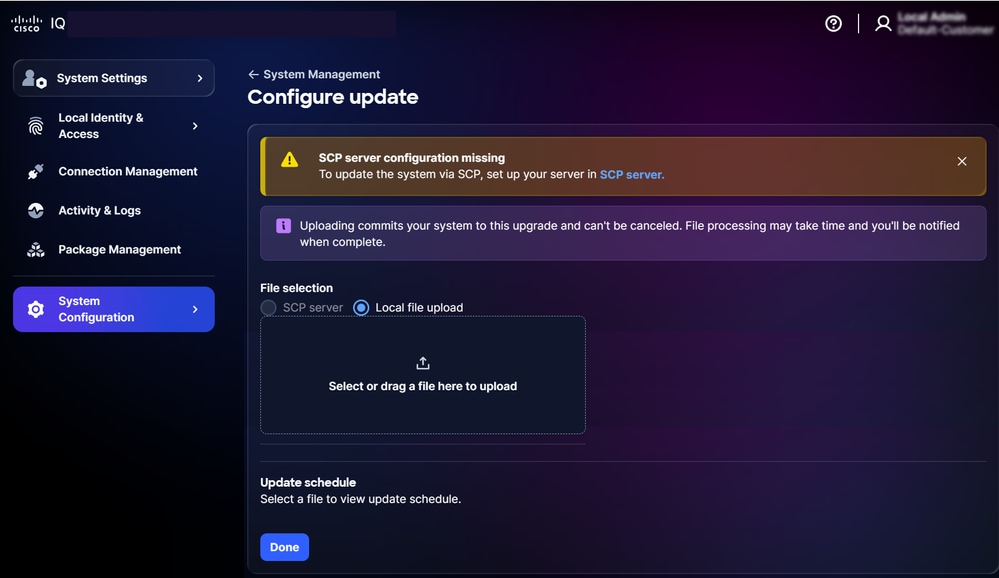 Edit maintenance window
- Choose an option from the Day and Time drop-down lists.
- Click Save. The maintenance window has been successfully scheduled. The update is triggered according to the displayed schedule.
Note: If no upgrade schedule is configured, the system defaults to grace periods of two (2) weeks for non-reboot upgrades and four (4) weeks for upgrades requiring a reboot. After these grace periods, updates must be performed manually. In case of an upgrade failure, the system performs up to two (2) automatic retries. A third attempt is scheduled but requires manual initiation.
Node Management
- Navigate to System Configuration > System Management > Node Management to view and manage the nodes in your cluster.
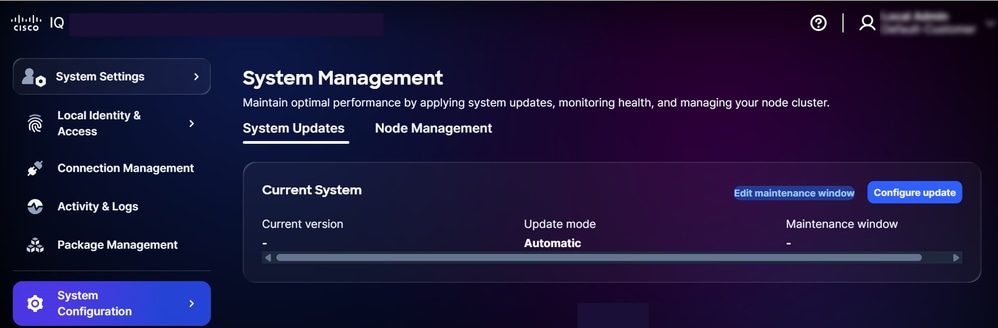 Node Management
- The node list displays each node's status, hostname, node type, IP address, netmask, gateway, and last sync time.
Note: A blue checkmark in the Status column indicates the node is active.
SSL Certificates Configuration
A default self-signed certificate is pre-installed and enabled in Cisco IQ, but you can optionally upload custom SSL certificates. When a custom SSL certificate is enabled, it is used for HTTPS connections; if the certificate is disabled or deleted, the system automatically reverts to the default certificate. The default SSL certificate cannot be edited or deleted.
Note: The certificate must have at least 90 days of validity remaining. A certificate is considered "nearing expiry" when it has less than 90 days remaining until expiration. After adding, editing, or deleting an SSL certificate, you must upload the new SSL certificate as outlined in Completing SLO Configuration for the Okta IDP or the ADFS IDP.
Adding Custom SSL Certificate
To add a custom SSL certificate:
- From System Settings, choose System Configuration > SSL Certificates. The SSL Certificates page displays, listing all SSL certificates for your system.
- Click Add Custom SSL Certificate.
Note: Upload a .txt file that includes both the Privacy-Enhanced Mail-encoded certificate and key as text strings. Only one .txt file can be uploaded at a time. The file must contain both the certificate and the private key.
- Drag-and-drop or upload the custom SSL certificate under the SSL Certificate section.
- Turn on the Enable custom SSL certificate toggle button.
Note: Keep the toggle OFF if you want to upload the certificate without activating it immediately.
- Click Enable certificate.
- Click Save.
The custom SSL certificate is enabled and active. The default system certificate is automatically deactivated.
Editing Custom SSL Certificate
You can edit the custom SSL certificate to upload a new certificate or to disable the currently enabled certificate. To edit:
- Navigate to the desired custom SSL certificate.
- Choose the More Options icon > Edit. The Edit SSL Certificate page displays.
- Edit the certificate details as required.
- Click Save.
Deleting Custom SSL Certificate
Warning: A custom SSL certificate can be deleted at any time, but it is an irreversible action; you can upload a new custom certificate at any time after deletion. To delete:
- Navigate to the desired personal SSL certificate.
- Choose the More Options icon > Delete.
- Click Delete Certificate. The custom certificate is deleted, and the default certificate is automatically reactivated.
Syslog Server Configuration
Users with the Account Administrator role can configure external syslog servers to export system logs. Up to two (2) syslog servers can be configured.
Note: The Syslog server must be specified as an IP address and not as a Fully Qualified Domain Name (FQDN).
Adding Syslog Server
To add a syslog server:
- From System Settings, choose System Configuration > Syslog Server. The Syslog Server page displays.
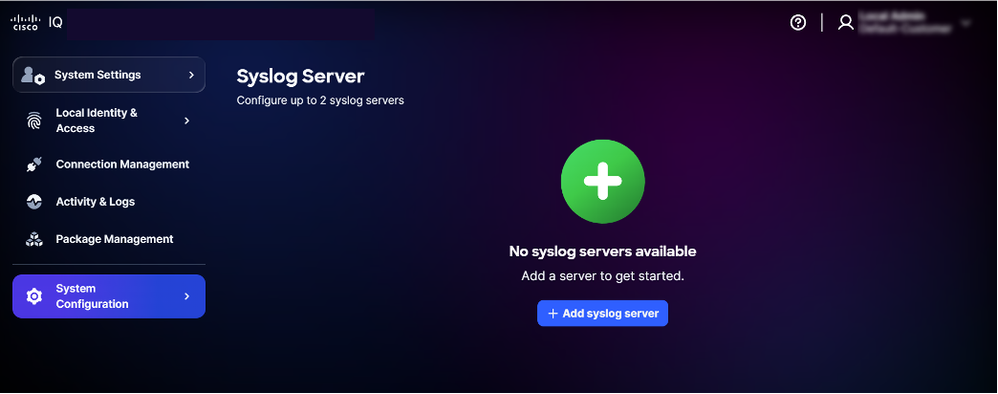 Add Syslog Server
- Click Add syslog server. The Create Syslog Server page displays.
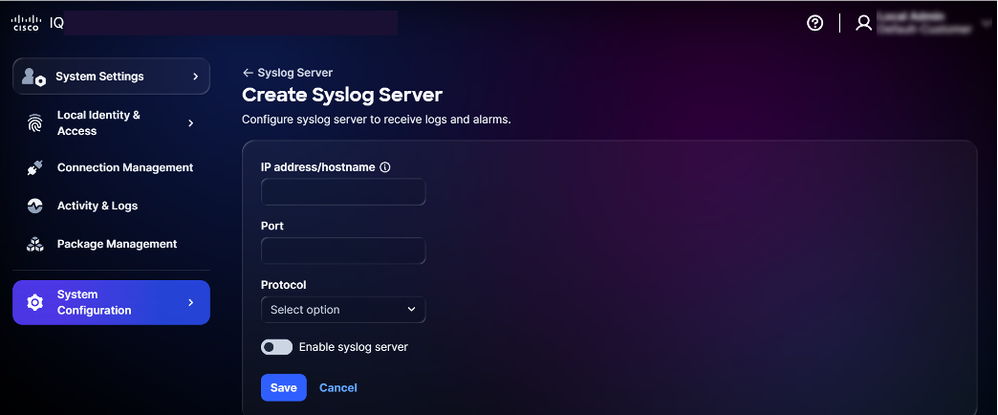 Create Syslog Server
- Enter the IP address/hostname.
- Enter Port.
- Select the applicable protocol from the Protocol drop-down list (for example, UDP, TCP).
- Turn on the Enable syslog server toggle button.
- Click Save. A confirmation displays and the newly added syslog server displays on the Syslog Server home page.
Editing Configured Syslog Server
To edit a configured syslog server:
- Navigate to the desired syslog server.
- Choose the More Options icon > Edit. The Edit Syslog Server page displays.
- Edit details or turn off the Enable syslog server toggle, as required.
- Click Save.
Deleting Configured Syslog Server
To delete a configured syslog server:
- Navigate to the desired syslog server.
- Choose the More Options icon > Delete. A confirmation displays.
- Click Delete syslog server.
Activity & Logs
Activity & Logs provide a detailed record of user actions and changes in Cisco IQ, allowing Account Administrators to track user activities and maintain transparency.
To view activity and logs, select Activity & Logs from the System Settings menu.
Activity & Logs:
- Records all API operations at the gateway level
- Supports filters, pagination, and search capabilities to help you easily find and manage information
The following filter options are available:
- Last logged date: Filters logs to a specific time range
- Log level: Filters logs by severity (for example, error, warning, and info)
- Activity type: Filters logs by the type of system activity
- Error code: Filters for a specific error code
Banners
Account Administrators can configure system-wide banners to meet security and compliance standards.
- Mandatory Login Modal: You must acknowledge the mandatory banner before proceeding to the login screen.
- Application Banner: These are customized banners that display across the application after successful authentication.
Configuring Mandatory Login Modal Banners
To configure a mandatory banner:
- From System Settings, choose System Configuration > Banners. The Banners page displays.
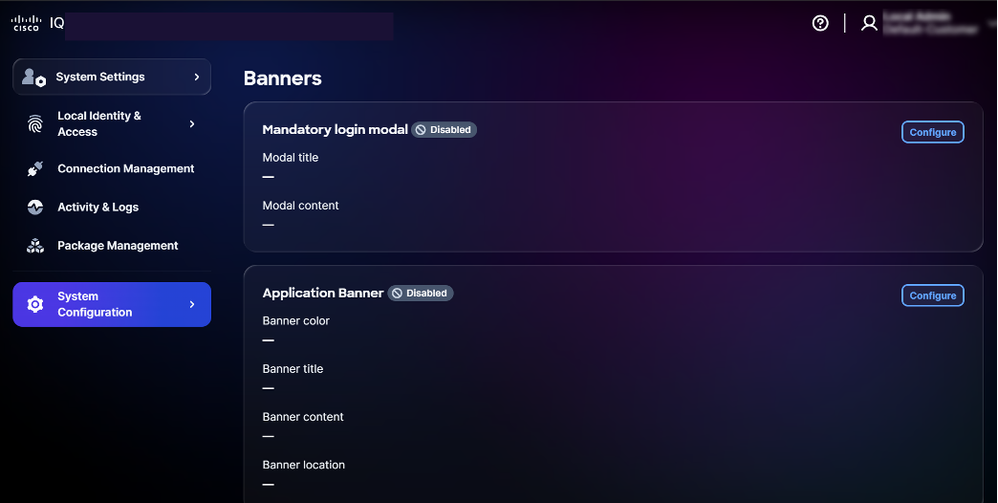 Configure Mandatory Banner
- Click Configure in the Mandatory login modal. The Edit Mandatory login modal page displays.
- Click the toggle to enable or disable the banner.
- Enter the Modal title.
- Enter the Modal content.
- Click Save. The Mandatory login modal is saved.
Configuring Application Banners
To configure an application banner:
- From System Settings, choose System Configuration > Banners. The Banners page displays.
 Configure Banner
- Click Configure in Application Banner. The Edit Application Banner page displays.
- Click the toggle to enable or disable the banner.
- Choose a Banner color.
- Enter the Banner title.
- Enter the Banner content.
- Select a Banner location.
- Click Save. The banner displays across the application.
Editing Banners
To edit a banner:
- From System Settings, choose System Configuration > Banners. The Banners page displays.
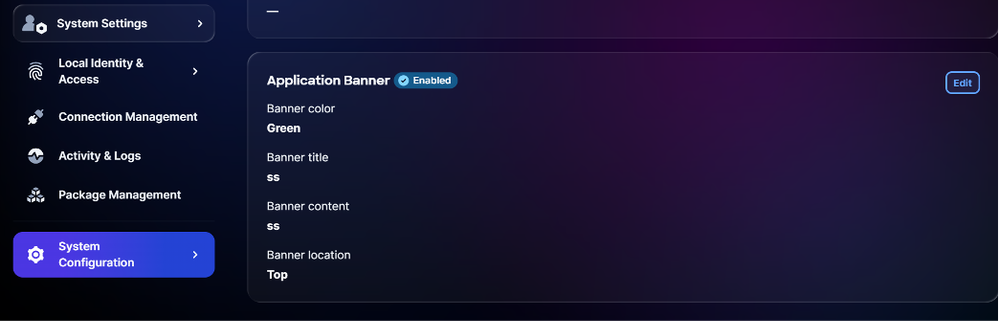 Edit Banners
- Click Edit. The Edit Application Banner page displays.
- Edit the desired details.
- Click the toggle to enable or disable the banner.
- Click Save.
Troubleshooting
You can collect diagnostic and log files from the Cisco IQ system and securely transfer them to a SCP server. These files can be shared with the Support Team when reporting issues to provide valuable context and assist with troubleshooting.
To collect diagnostic and log files:
- Log in to Cisco IQ.
- From the Cisco IQ Main Menu, enter “3” and press Enter to select System Diagnostics.
- Enter the SCP/SFTP Server Address.
- Enter the SCP/SFTP Server Port.
- Enter the SCP/SFTP Server Path.
- Select a protocol.
- Enter the Username.
- Enter the Password.
- Enter “C” and press Enter to continue with system diagnostics.
The system begins the diagnostic process and performs the following actions:
- Checking Reachability
- Collecting System Information
- Collecting Kubernetes Information
- Collecting Logs
- Preparing System Diagnostics Bundle
- Uploading System Diagnostics Bundle
Once complete, a confirmation message displays indicating the generated bundle name.
Support Module
You can create VA and module-specific support cases from Cisco IQ SaaS. The Support module is available in Cisco IQ SaaS and offers a consolidated view of your support cases. It enables you to filter, sort, and customize the case list view, providing visibility into both open and closed cases you are entitled to access. For more detailed information about the Support module in Cisco IQ SaaS, see the Cisco IQ SaaS Getting Started Guide.
Note: Cisco IQ VA customers can access most Cisco IQ SaaS Support module features, including opening Technical Assistance Center (TAC) cases related to Cisco IQ VA and its modules, as well as creating and managing product cases.
Creating a Support Case
You can create VA and module-specific cases in Cisco IQ SaaS. To create a case:
- Log in to Cisco IQ (SaaS).
- Click the Help icon > Report an Issue. The Report an Issue window opens.
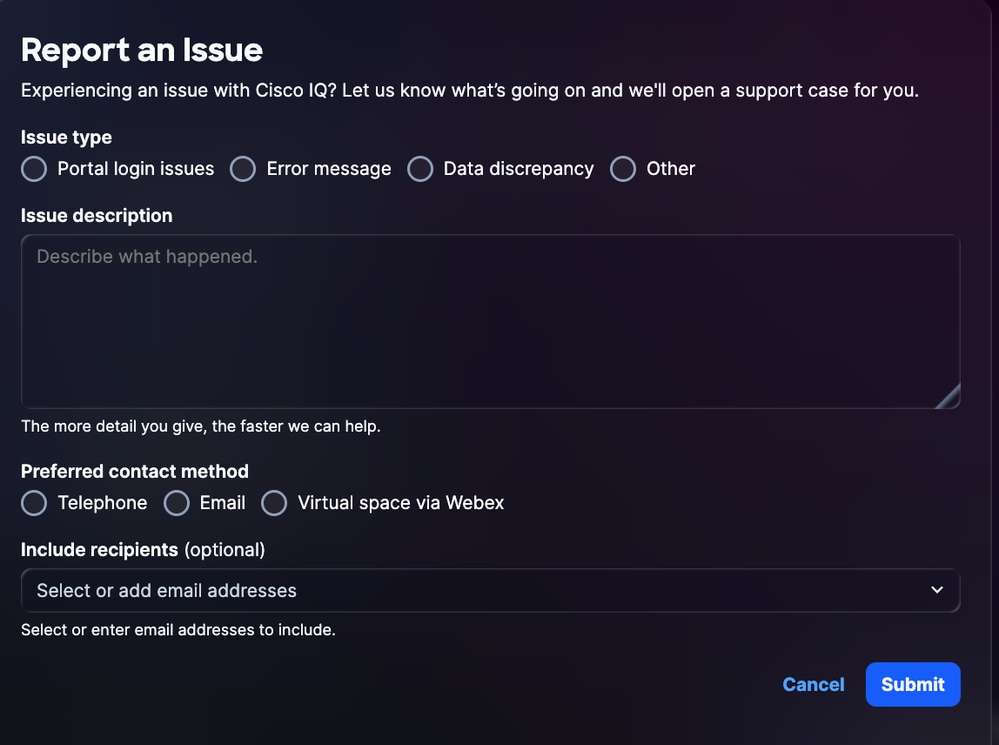 Report an Issue
- Provide the required details.
- Click Submit.
Revision History
| Revision | Publish Date | Comments |
|---|---|---|
1.0 |
August 20, 2026
|
Initial Release |