Introduction
This document describes the In Product Support on FND, the features available, the versions supported, and their use with Field Network Director (FND).
Background Information
The In Product Support assistant on FND is a personal assistant that provides Cisco partners and customers with a self-service experience in several knowledge domains such as:
- Cases, Bugs and RMA Management
- Bug Applicability Checks
- Hardware Troubleshooting
- Licensing
- Webex
Supported Versions
For Field Network Director (FND), the support assistant capability can be used with versions 4.11, 4.12, 5.0, and 5.1 using a browser extension.
System and Browser Requirements
Supported Browsers
Google Chrome: The extension is optimized for Google Chrome, which is the officially recommended browser.
Microsoft Edge: The extension has been tested on Microsoft Edge and confirmed to be functional. It can be made available upon request.
Browser Configuration
Ensure that your browser is updated to the latest version to avoid compatibility issues.
Allow pop-ups and redirects from Cisco domains to ensure that the extension can function without interruptions.
Network Requirements
Ensure stable internet connectivity to facilitate smooth installation and functionality of the extension.
Access Requirements
Cisco Account
You must have an active Cisco.com account to sign in and use the extension. The extension integrates with Cisco Single Sign-On (SSO) for a seamless and secure login experience.
Extension Management
You must be familiar with navigating to “chrome://extensions/” or accessing the extensions tab beside the search bar in your browser to manage installed extensions.
Installation Steps
Download and Install: You can download it from here
Enable the Extension: Ensure the extension is active by checking the Chrome extensions menu and authenticate via Cisco.com to activate the extension.
Use Cases Enabled for FND
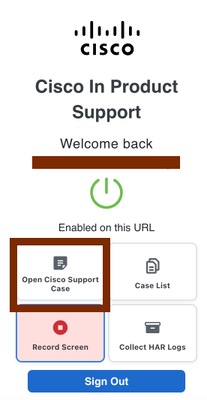
Use Case 1: Open a new Cisco Support Case
A new Cisco Support case can be created by clicking Open Cisco Support Case from the CSA icon.
Step 2. A new pop-up appears requesting additional information that would be added to the new Cisco Support case.
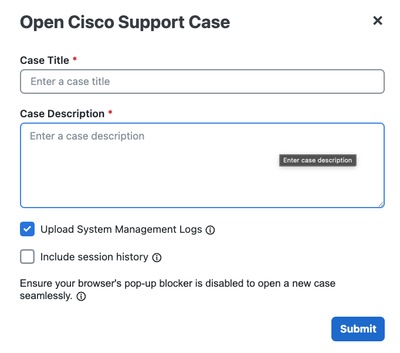
These are the inputs that can be provided:
- Case Title (mandatory)
- Case Description (mandatory)
- Session history (optional) - An option to include the session history of the browser tab, as part of the case description.
- Upload System Management Logs – Enabling this option navigates you back to FND after the TAC SR is created to create and collect the diagnostics.
Use Case 2: Record Screen
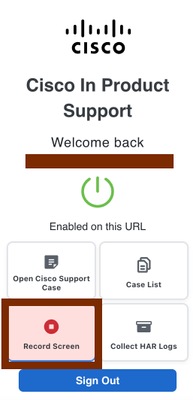
Start Recording: Click on the extension icon in the Chrome toolbar and select the "Record Screen" option to initiate the screen recording process.
Once the recording is stopped, users have the option to upload the video to an existing case or a new case.
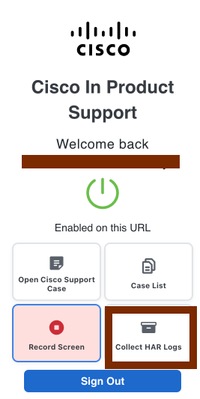
Use Case 3: Collect HAR Logs
HAR (HTTP Archive) logs are JSON-formatted files that record a web browser's interaction with a site, including network requests, response times, and headers. Used for troubleshooting performance issues, errors, or failed logins, they are generated via browser developer tools in the Network tab. This assists with troubleshooting Web GUI related issues.
Initiate Log Capture: To capture HAR logs, click the 'Collect HAR logs' button in the extension pop-up as shown below.
Navigation Instructions: You are prompted with a message to reproduce the steps of your issue to ensure the HAR logs are accurately collected.
Start Capture: Click ‘OK’ on the pop-up to initiate HAR log collection on the product page.
Stop Capture: Once you have reproduced your steps, stop the collection by clicking the ‘Stop collecting’ button on the floating tab or open the extension pop-up and click on the ‘Collect HAR logs’ button again. Confirm the stop action in the prompt.
Upload Logs: After stopping, a modal pop-up appears. You can upload your HAR logs by entering a case number to add them to an existing case or creating a new case for the issue you have captured.
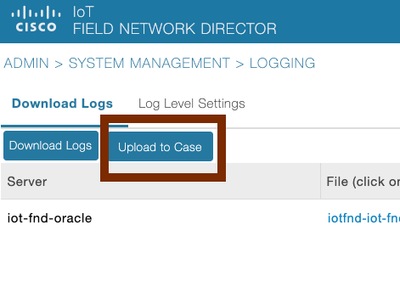
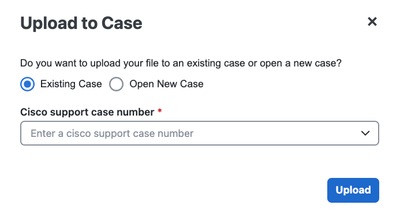
Use Case 4: Uploading Logs from the GUI
Navigate to Admin > System Management > Logging to upload the logs bundle directly to the TAC case.
 Feedback