Deploying Qumulo Data Platform on Cisco UCS Rack Servers White Paper
Available Languages
Bias-Free Language
The documentation set for this product strives to use bias-free language. For the purposes of this documentation set, bias-free is defined as language that does not imply discrimination based on age, disability, gender, racial identity, ethnic identity, sexual orientation, socioeconomic status, and intersectionality. Exceptions may be present in the documentation due to language that is hardcoded in the user interfaces of the product software, language used based on RFP documentation, or language that is used by a referenced third-party product. Learn more about how Cisco is using Inclusive Language.
Organizations today are managing unprecedented growth in data, driven by analytics, AI, observability platforms, and modern applications. However, this growth has also introduced a new challenge: data fragmentation. File and object data are often spread across multiple silos — legacy NAS systems, object storage platforms, and cloud repositories — each optimized for a specific workload. This fragmentation leads to:
● Increased operational complexity.
● Underutilized infrastructure.
● Higher costs due to overprovisioning and duplication.
● Limited visibility into how data is stored, accessed, and used.
As enterprises look to modernize, there is a growing need to consolidate file and object data onto a unified, scalable platform — one that can support diverse workloads while simplifying operations.
Cisco Unified Computing System™ (Cisco UCS®), combined with the Qumulo Data Platform addresses this challenge directly. Together, Cisco and Qumulo deliver a unified data platform that eliminates silos, scales seamlessly, and enables organizations to unlock the full value of their data — regardless of format or location — across on-premises, cloud, and edge environments.
Deployed on Cisco UCS, Qumulo transforms complex, fragmented data environments into a single, scalable data fabric. Customers benefit from low-latency, multi-protocol access for a wide range of workloads—combined with real-time visibility and simplified management. Cisco UCS provides the high-performance compute, I/O throughput, and capacity required for these demanding workloads, and Qumulo enables seamless hybrid and multicloud data mobility.
Key joint solution capabilities and benefits
● Consolidation of fragmented data silos
◦ Integrate dozens of diverse workloads (for example, Splunk® SmartStore, backup, imaging, analytics, CAD, genomics, video, and user files) into a single, unified platform powered by Cisco UCS, delivering high-performance compute and I/O for data-intensive environments.
◦ Get support for multi-protocol access (for example, POSIX, NFS, SMB, and S3) that enables all your applications and users to seamlessly interact with data, regardless of original format or source.
● Consistent infrastructure and data management everywhere
◦ Seamlessly scale from terabytes to tens of petabytes with Cisco UCS rack servers, while Cisco Intersight® enables centralized, policy-driven management for consistent deployment, configuration, and lifecycle operations.
◦ Benefit from seamless cloud integration through Qumulo Cloud Data Fabric, allowing workloads to burst into public cloud, leverage cloud analytics, or repatriate data as needed, thus preserving control and flexibility.
● Unified edge-to-core-to-cloud data fabric
◦ Deploy Qumulo on Cisco UCS at the core and Cisco Unified Edge at remote or branch locations for consistent infrastructure and data management everywhere.
◦ View, protect, and govern all data — no matter where it is generated or consumed — under a single namespace.
This white paper explores the deployment of Qumulo’s scalable, software-defined storage platform on Cisco® rack servers to deliver high-performance storage for file workloads.
Key features of Cisco UCS C240 M8 Rack Server:
● Processors: supports up to two Intel® Xeon® 6700P or Xeon 6500P series processors, providing high performance and flexibility for various workloads.
● Memory: enhances performance for data-intensive applications with up to 8 TB of main memory with 24x 256 GB DDR5 6400 MT/s DIMMs.
● Storage: supports a versatile range of storage options, including hot-swappable Small-Form-Factor (SFF) SAS/ SATA and NVMe drives.
● Management: is managed through Cisco Intersight, including cloud-based lifecycle management
While this white paper was validated on the Cisco UCS C240 M8 Rack Server, as the Qumulo Data Platform is software-defined and hardware-agnostic, these services can run on other suitable servers within the Cisco UCS portfolio, based on workload and performance requirements.
Managing infrastructure at scale requires more than just powerful hardware; it requires intelligent, centralized operations.
Cisco Intersight is a lifecycle management platform that unifies your experience across the entire Cisco Unified Computing System.
● One consolidated dashboard: Whether your infrastructure resides in the enterprise data center, at the edge, or in a remote site, Intersight gives you a single view of your real-time status and interdependencies.
● Intersight Standalone Mode (ISM): Your Cisco UCS servers are managed in standalone mode, providing centralized, cloud-powered management and strict policy enforcement.
● Automation at scale: You can manage your entire system as a single logical entity through an intuitive GUI, or you can automate complex deployments and configurations using a robust API. This allows you to deploy a secure, multitenant AI data cloud in minutes rather than weeks.
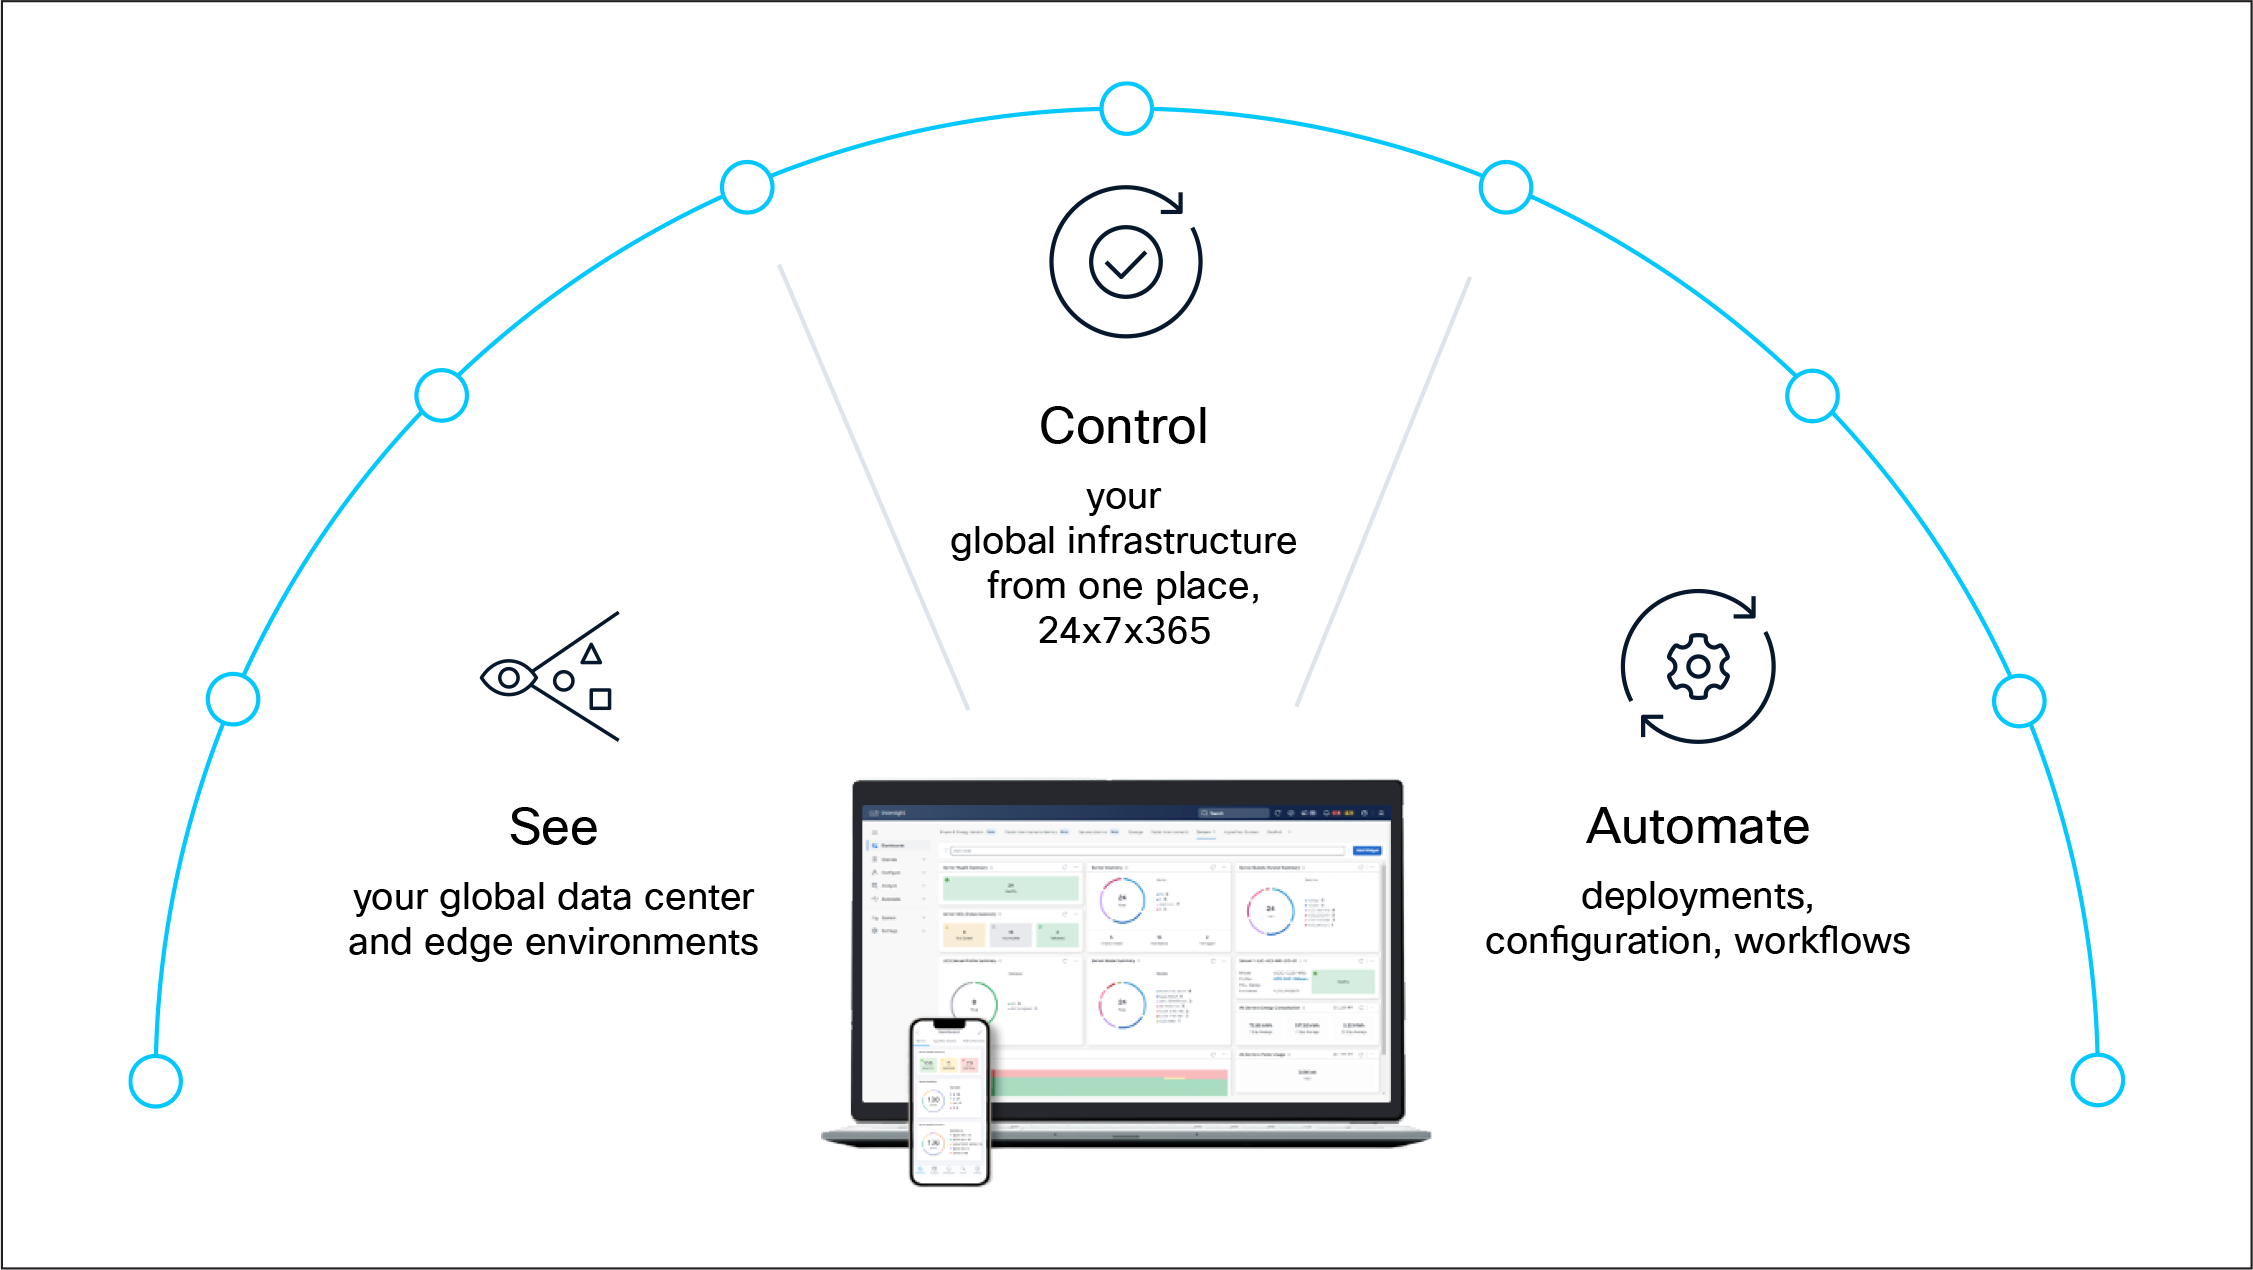
Cisco Intersight. IT operations – simplified
The Qumulo Data Platform is built to make managing large amounts of data simple. It combines an advanced file system with a single global view of data, AI-driven speed, and real-time analytics. Managed through an easy-to-use central portal or an API, Qumulo gives users control over any workload — from demanding, GPU-powered computing to long-term cloud storage. Qumulo can be run exactly where your business needs it: in your own data center; across major public clouds such as Amazon Web Services (AWS), Microsoft Azure, Google Cloud Platform (GCP), and Oracle Cloud Infrastructure (OCI); as a fully managed service in Azure; or at remote edge locations using Qumulo EdgeConnect. No matter where your data resides, Qumulo provides a single, high-performance platform that seamlessly connects your data center, the cloud, and the edge.
For additional details, refer to the Qumulo documentation here.
Qumulo cluster on Cisco UCS rack servers
This section provides an overview of the physical Qumulo cluster setup using Cisco UCS C240 M8 Rack Servers to support generalized file workloads with multi-protocol access, including NFS and SMB. The document highlights the use of the Qumulo platform on Cisco UCS infrastructure and does not cover detailed design or configuration of individual components.
While this paper does not present exhaustive testing, it demonstrates the successful deployment and operation of a Qumulo cluster delivering NFS exports and SMB shares to clients, providing a foundation for customers to begin evaluating and planning their own deployments. Readers are encouraged to reference Qumulo and Cisco documentation for additional guidance during implementation. Cisco has extensive experience supporting a wide range of enterprise workload environments, and this validation shows that Qumulo deployed on Cisco UCS M8 rack servers should be considered a viable infrastructure choice for scalable, high-performance storage for file workloads. We hope you will explore this option further.
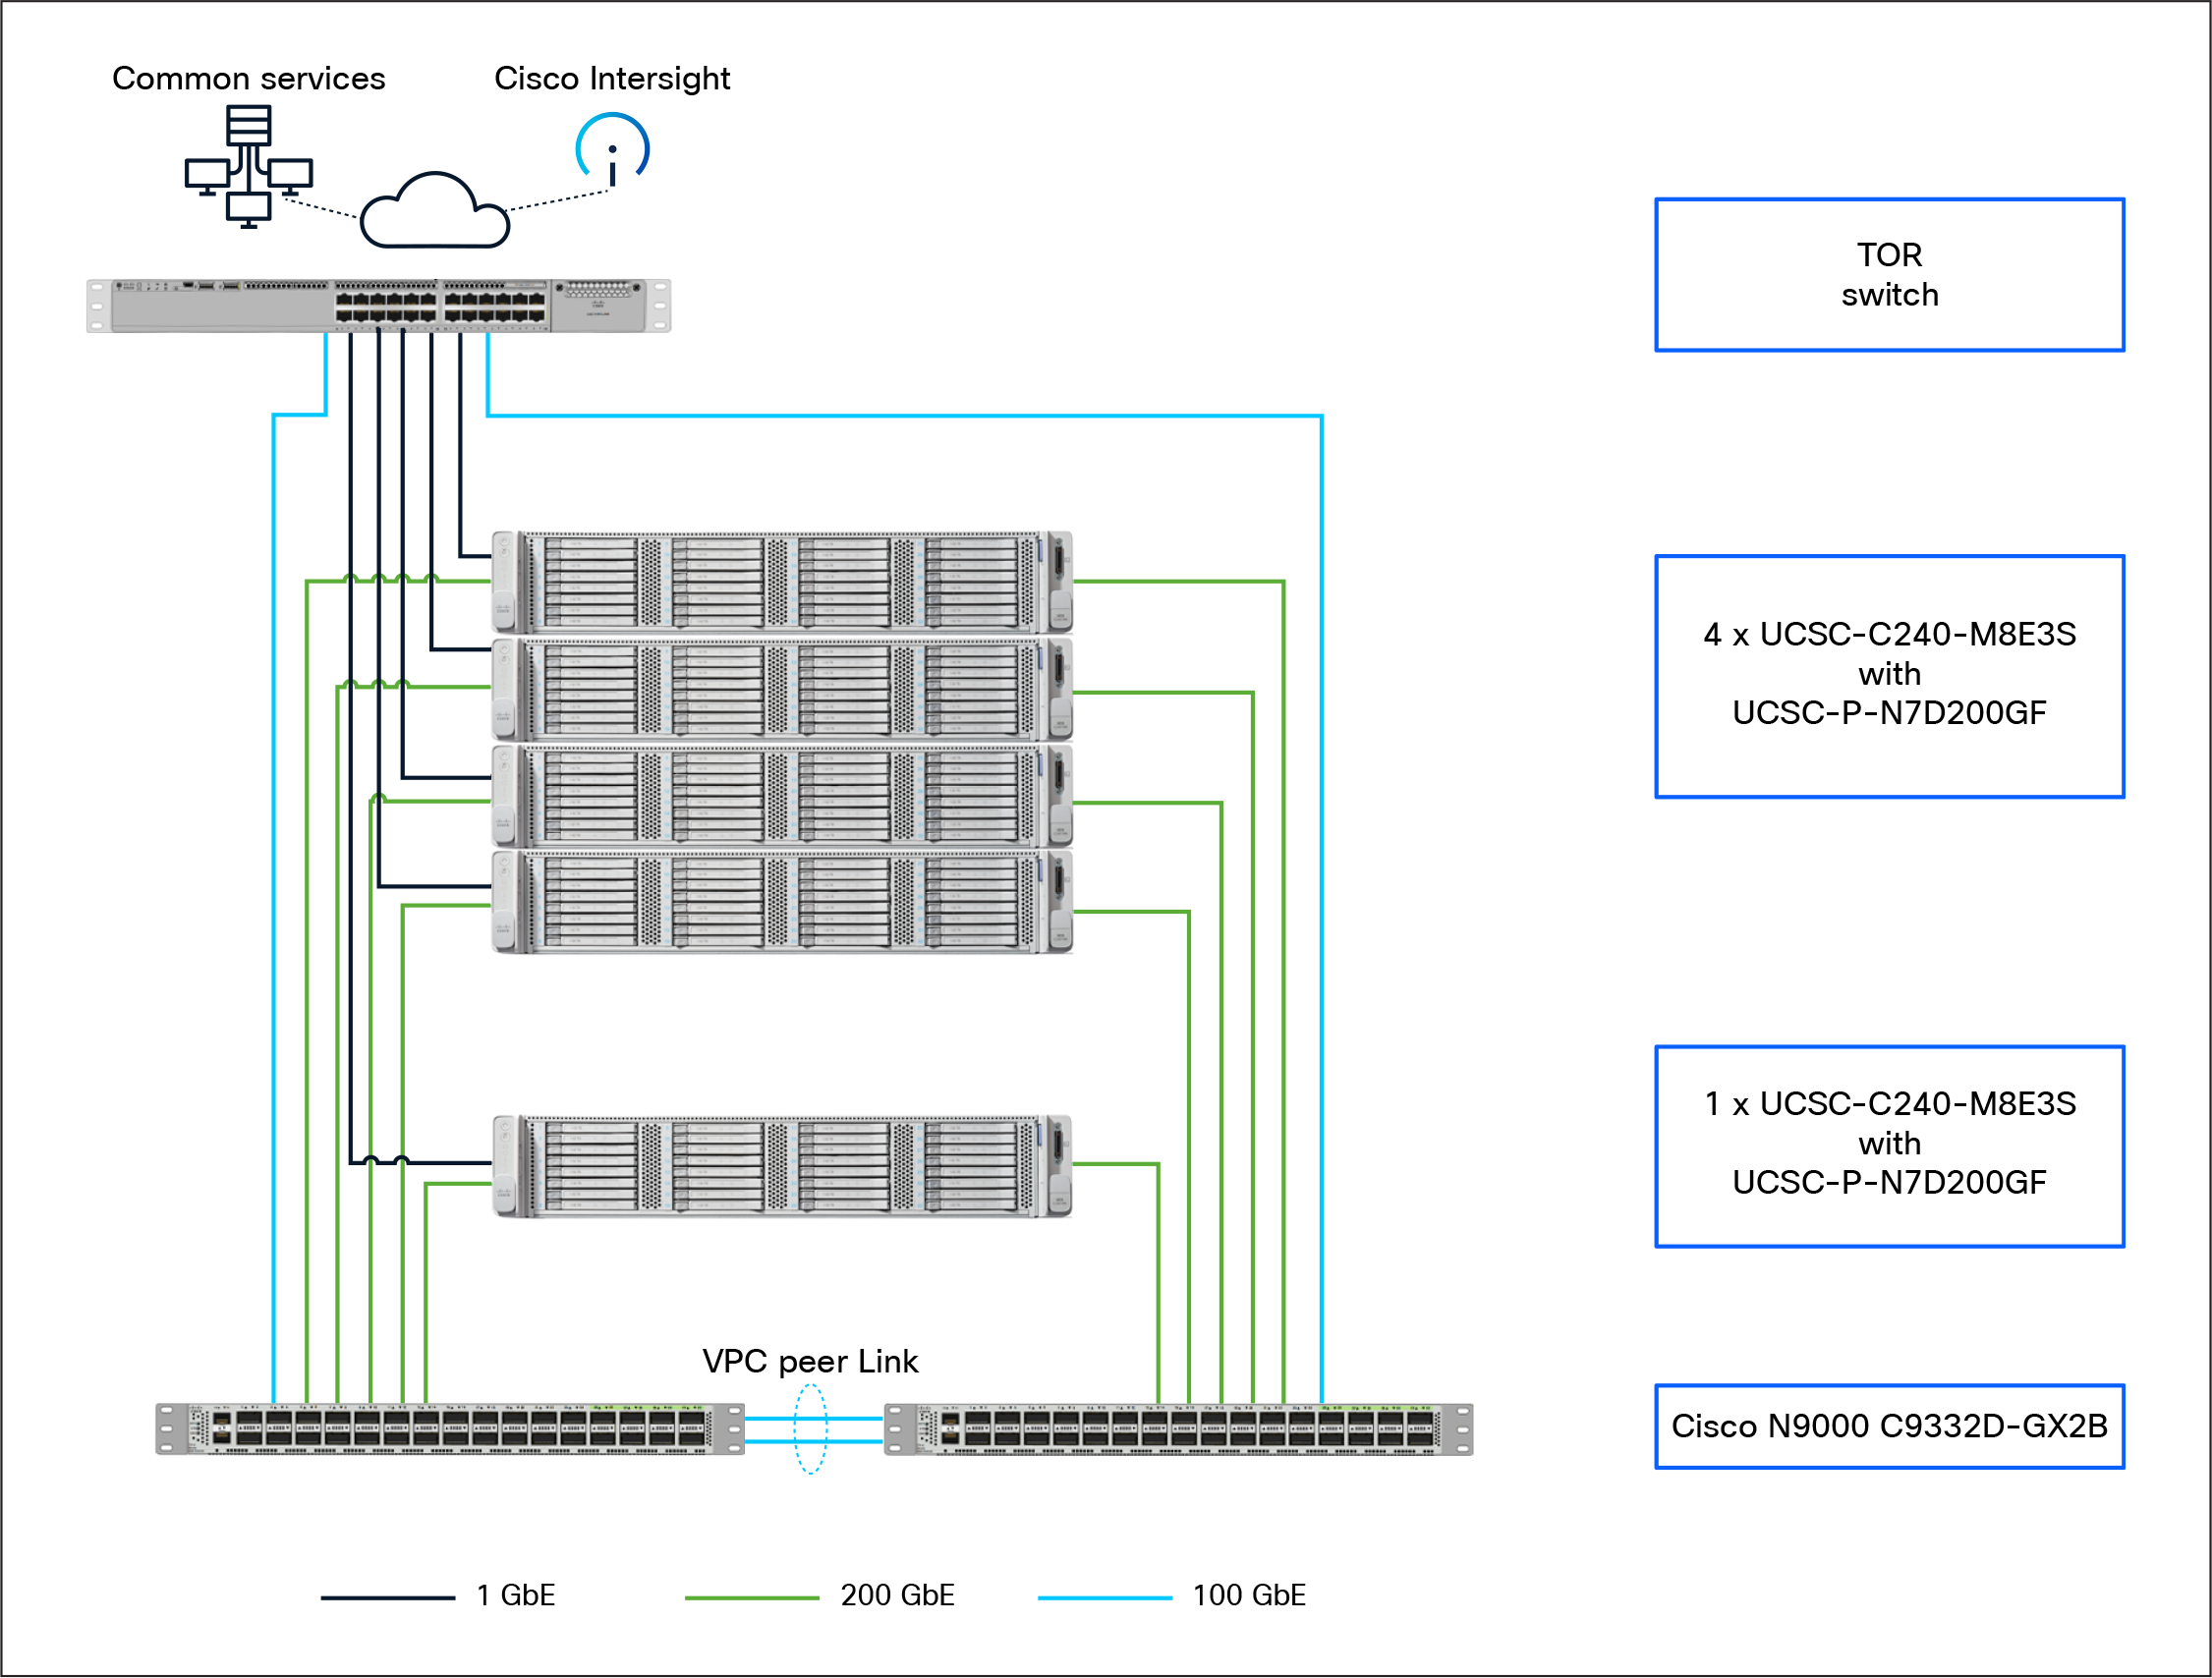
Physical architecture
The physical network connectivity architecture of Qumulo on Cisco UCS is a high-throughput, scalable, and secure system that unifies data access and management across diverse environments, simplifying operations and enabling advanced analytics.
This high-performance architecture leverages Cisco UCS and Nexus infrastructure to support a scalable storage and compute environment. The deployment consists of four Cisco UCS C240-M8E3S servers configured as a Qumulo storage cluster, paired with a fifth Cisco UCS C240-M8E3S server serving as a dedicated client host.
All five nodes utilize 200GbE connections to a pair of Cisco N9000 C9332D-GX2B switches, which provide high-bandwidth, low-latency data paths and hardware-level redundancy through vPCs (virtual port channels). A Top-of- Rack (TOR) switch facilitates 100GbE network uplinks and provides 1 GbE out-of-band management connectivity. The entire stack is integrated with Cisco Intersight, enabling centralized cloud-based orchestration, monitoring, and lifecycle management.
For best practices for networking Qumulo clusters, refer to Qumulo documentation here.
Although each customer environment may vary in its exact configuration, the architecture shown in this document, once built, can easily be scaled as requirements and demands change. Figure 2 provides an overview of physical architecture.
Physical architecture
Table 1 lists the software and hardware versions used in the solution described in this document.
Table 1. Software and firmware versions
| Component |
Version |
| Cisco N9000 C9332D-GX2B |
10.5(3) |
| Cisco UCSC-C240-M8E3 servers with 16 3.8TB E3.S1T KCD8XPJE HgPerf MedEnd Gen5 1X NVMe (SIE SCEF) |
6.0(1.250194) |
| Cisco NVDA MCX755106AS-HEAT 2x200GbE QSFP112 Gen5 x16 PCIe NIC |
28.46.1006 |
| Qumulo Core |
7.6.3 |
Cisco UCS BIOS configuration for Qumulo workloads
A Cisco default BIOS setting on Cisco UCS servers already provide an optimal ratio of performance to energy efficiency. However, you can further optimize your system to suit your specific organization’s needs through BIOS settings to prioritize performance, though this may result in higher power consumption.
Note: For more information, see Performance Tuning for Cisco UCS M8 Platforms with Intel Xeon 6 Processor Family.
Create a boot drive on the M.2 drives for the Qumulo install.
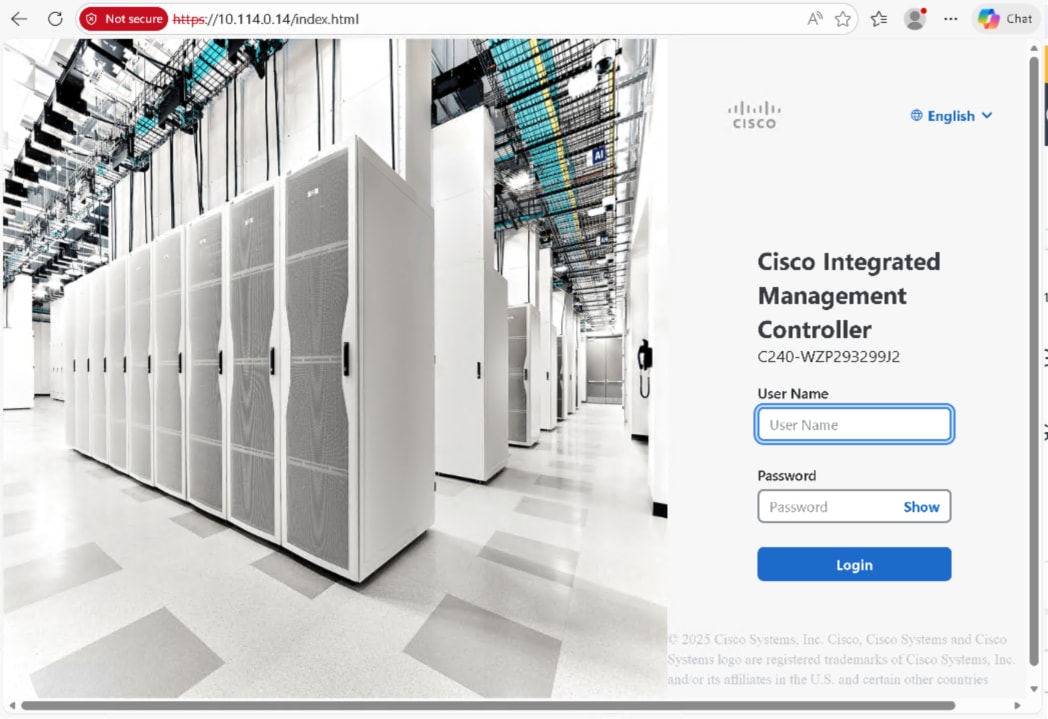
Step 1. Log in to Cisco Integrated Management Controller (IMC).
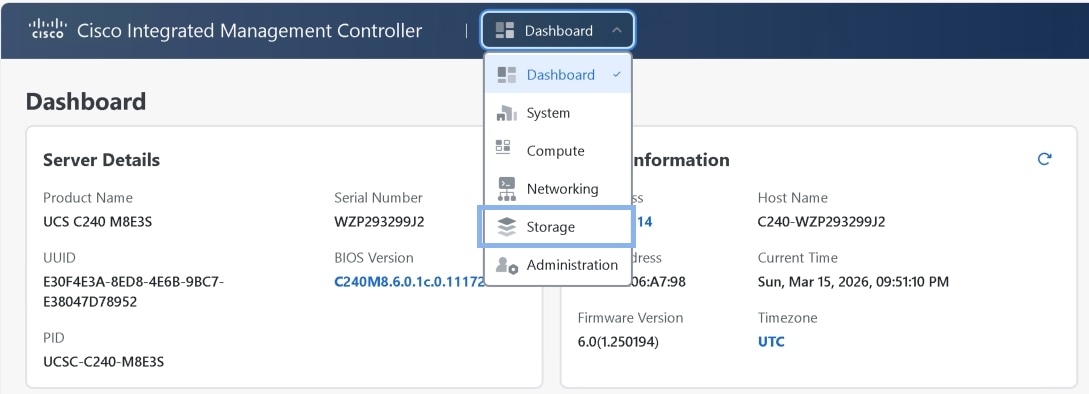
Step 2. Navigate to the Storage menu, then select the Cisco Boot optimized M.2 RAID controller
(MSTOR-RAID).
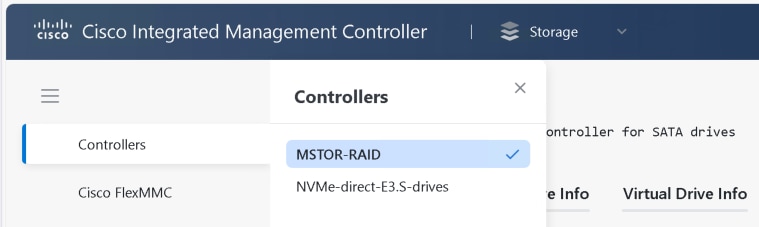
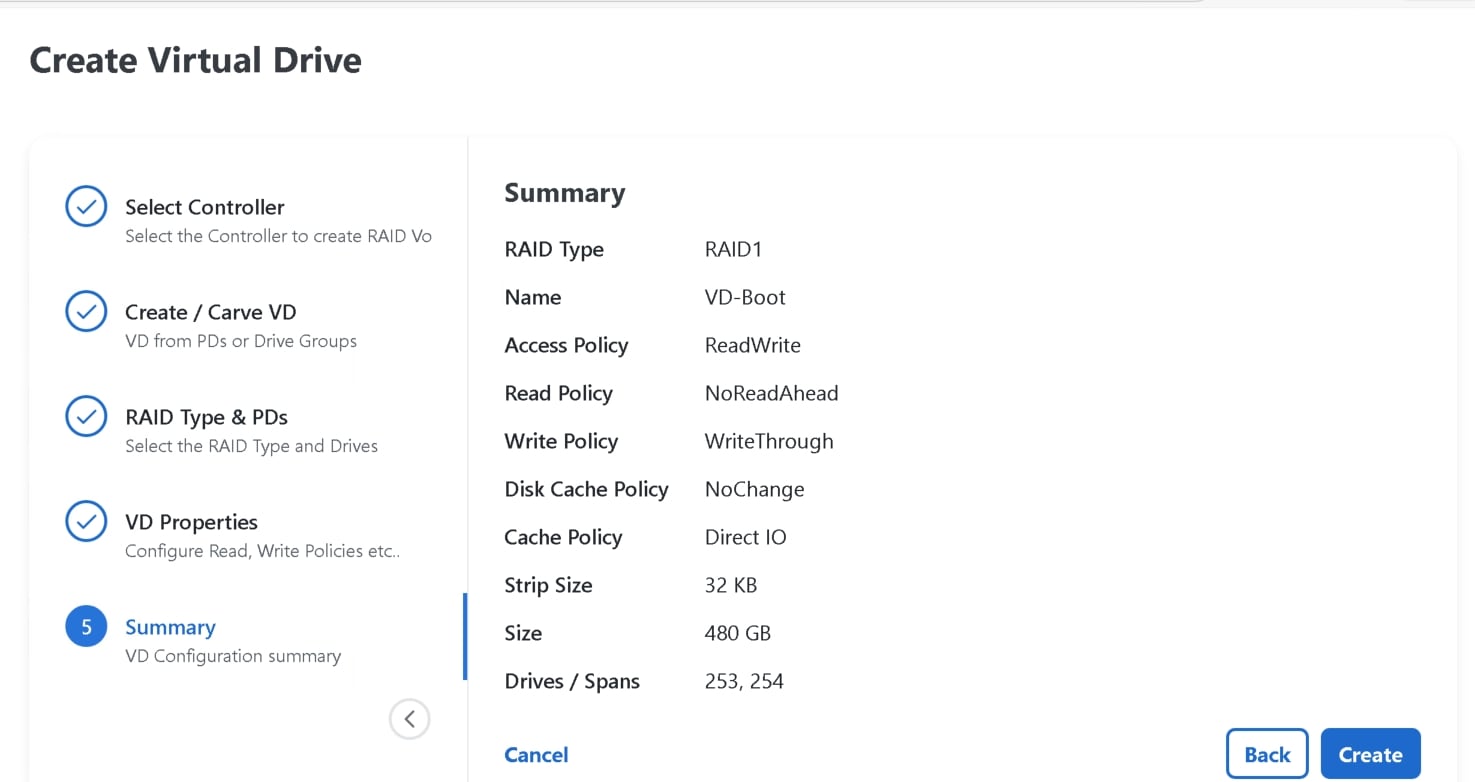
Step 3. To create a virtual drive, from the dropdown list select Storage and Create Virtual Drive.

Step 4. Select MSTOR-RAID as controller.
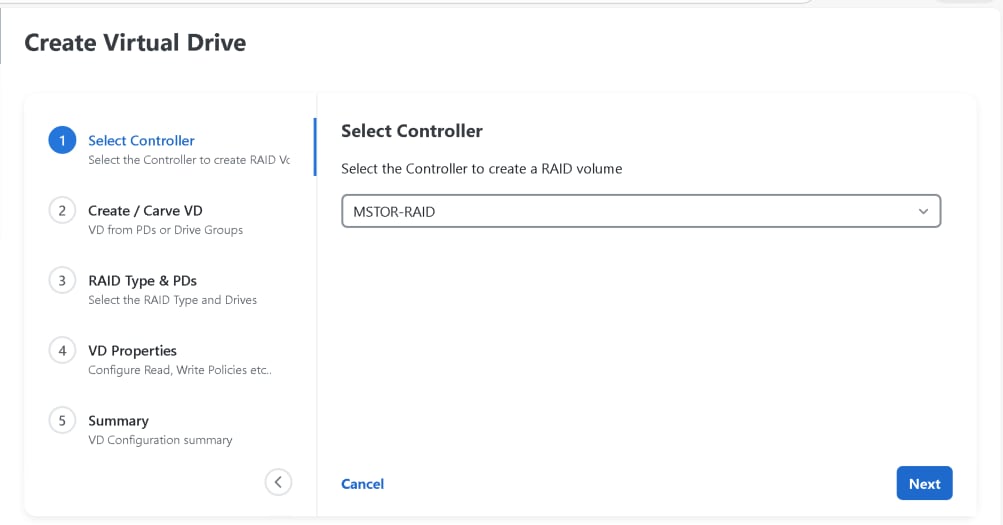
Step 5. Ot Create/Carve VD tab select From Unused Physical Drives.
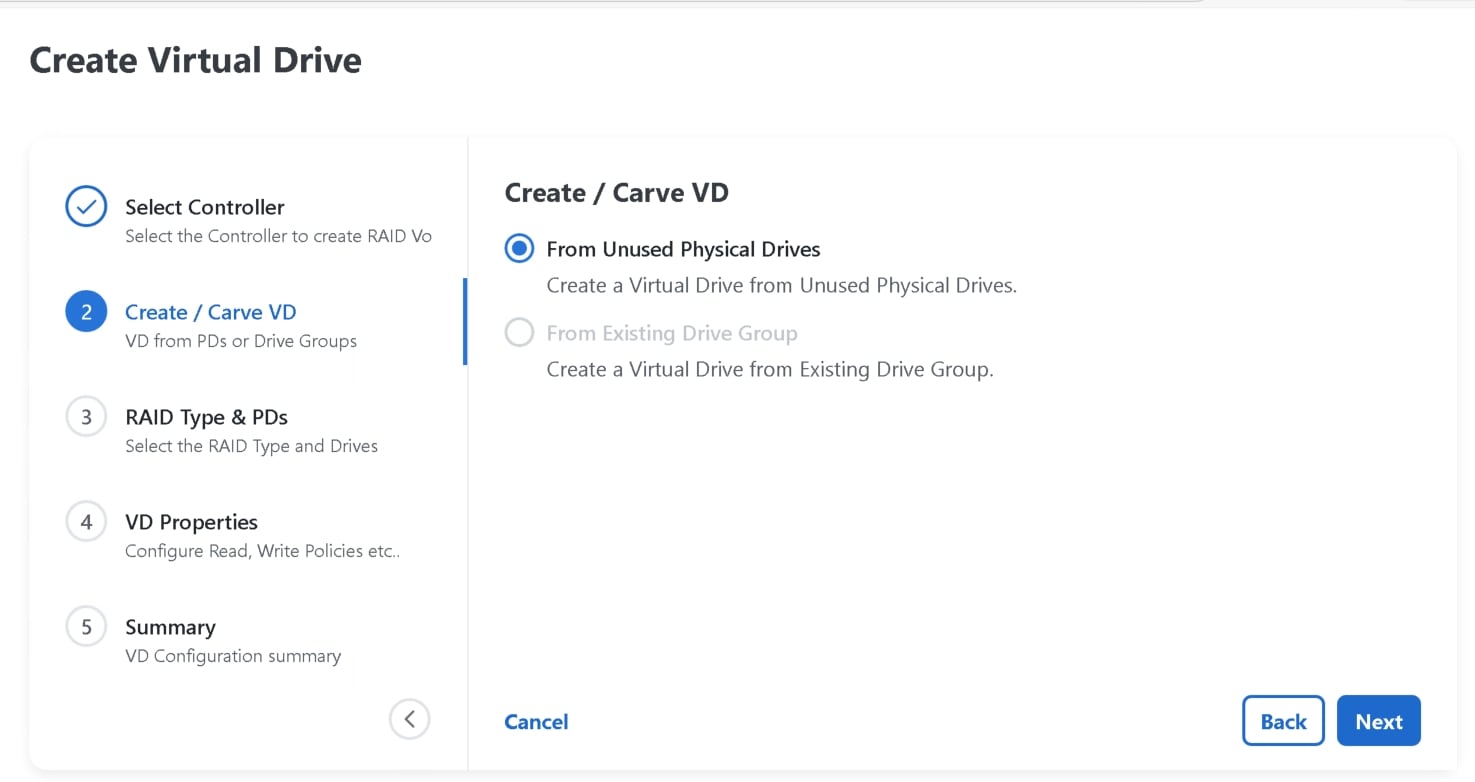
Step 6. Choose the RAID type as RAID 1.
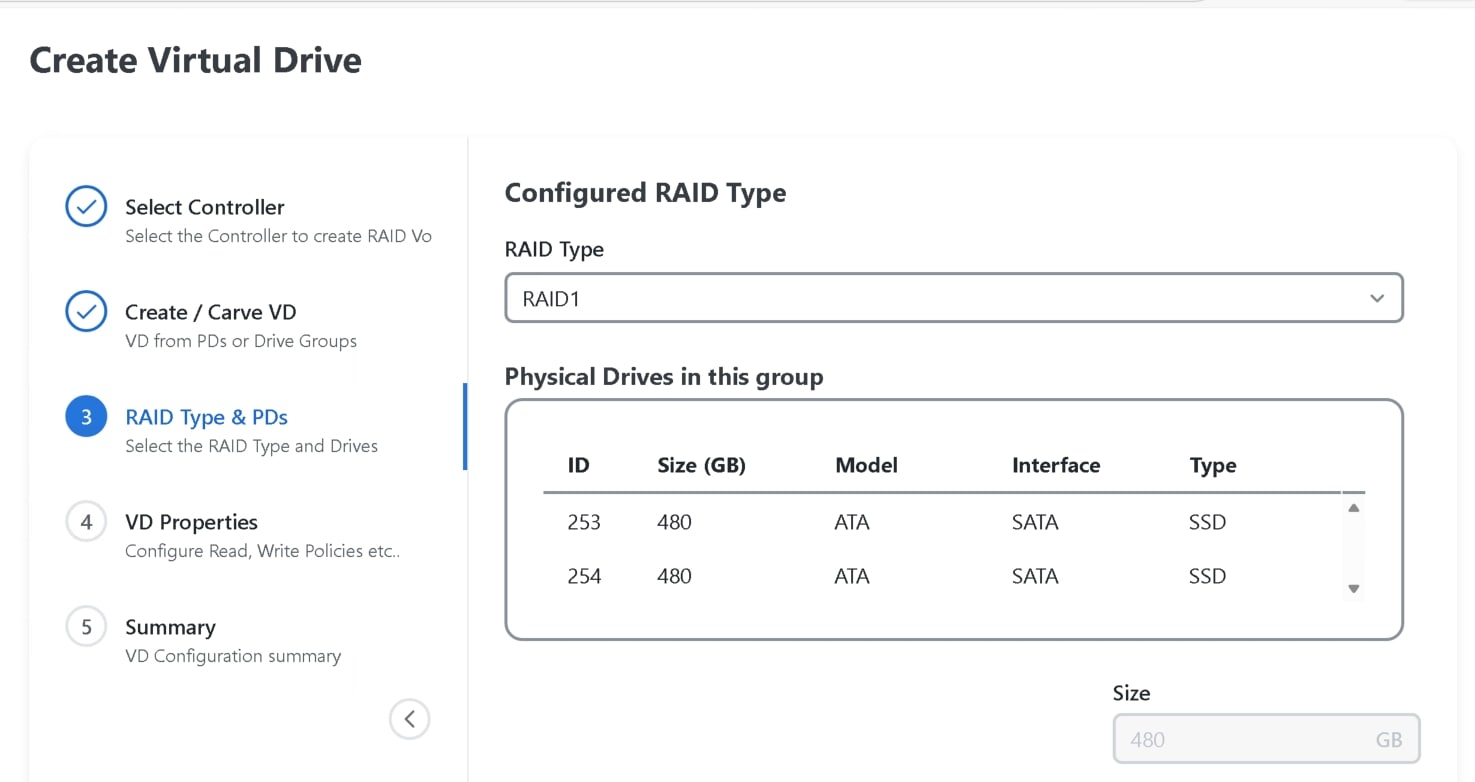
Step 7. Optionally, modify the virtual drive name and strip size.
Step 8. Click Create to finalize the Virtual Drive creation.
Note: All BIOS tokens are not applicable to all servers. If unsupported tokens are pushed to a server, those tokens are ignored.
Cisco Intersight offers a cloud-powered, unified platform for managing servers that significantly simplifies and enhances infrastructure management compared to individually managing servers with Cisco Integrated Management Controller (IMC). Instead of handling each server separately through IMC, Cisco Intersight enables centralized, scalable management across data centers, colocation facilities, and edge environments from a single dashboard.
Creating Cisco UCS storage policy in Intersight
To create a storage policy for MSTOR-RAID-1 (MSTOR-RAID) using Cisco Intersight:
Step 1. Log in to Cisco Intersight with an Account Administrator or Server Administrator role.
Step 2. Navigate to Configure > Policies, then click Create Policy and select Storage.
Step 3. On the General page:
1. Select the appropriate Organization.
2. Enter a Name for the policy.
3. Optionally, add tags and a description.
Step 4. On the Policy Details page:
1. Set Default Drive State to JBOD.
2. Enable M.2 RAID Configuration.
3. Select the appropriate slot for the M.2 RAID controller, choosing MSTOR-RAID-1 (MSTOR-RAID).
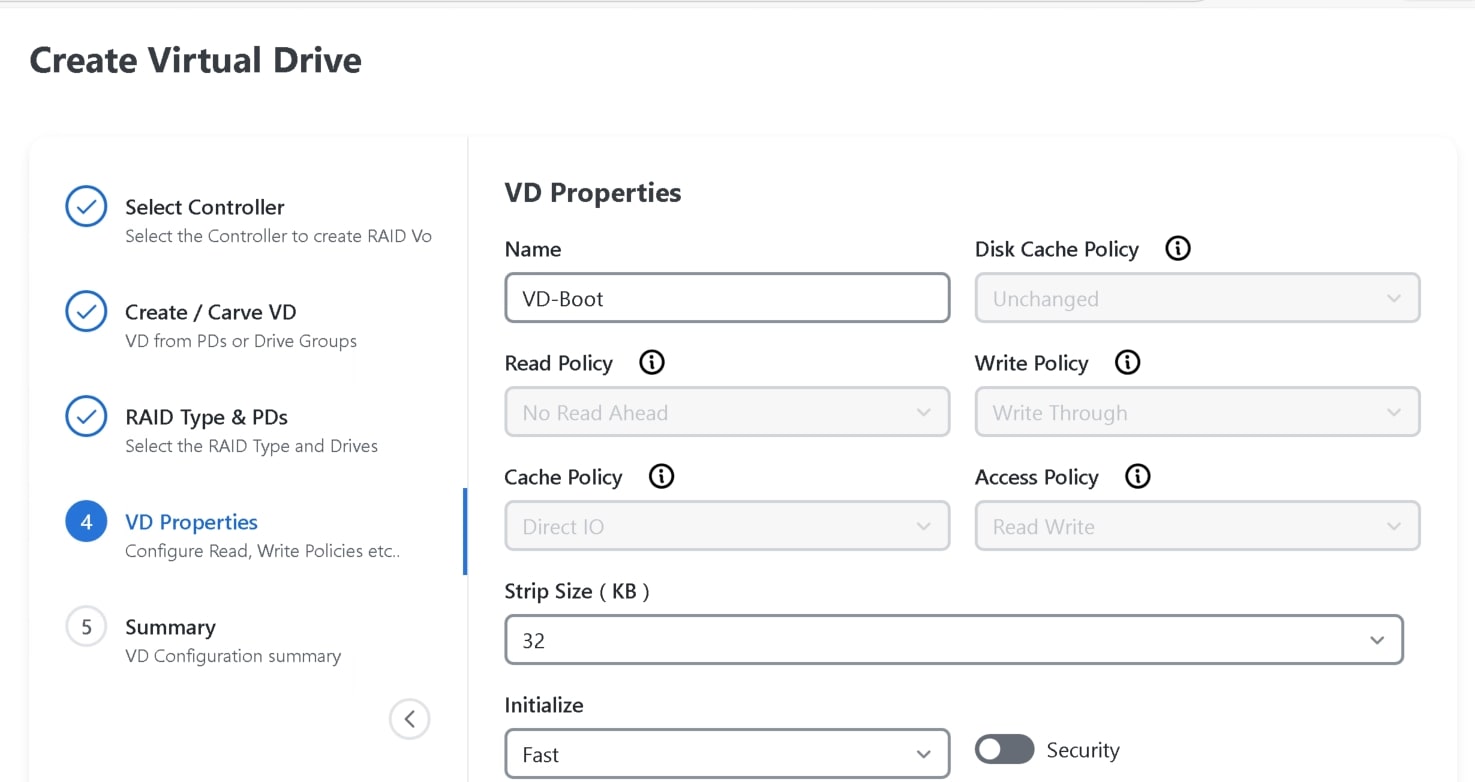
Step 5. Enable MRAID/RAID Controller Configuration to create virtual drives.
Step 6. Click Add Drive Group:
1. Enter a Drive Group Name (for example, VD-Boot).
2. Select RAID Level as RAID1.
3. Specify the drive span (for example, drives 1 and 2).
Step 7. Click Add Virtual Drive:
1. Use the RAID1 drive group created.
2. Enter a Virtual Drive Name.
3. Enable Expand to Available to use all disk capacity.
Step 8. Click Create to finalize the storage policy.
A BIOS policy managed in Intersight automates the configuration of BIOS settings on servers. Multiple BIOS policies that contain a specific grouping of BIOS settings, matching the needs of a server or servers, can be created.
Creating Cisco UCS BIOS policy in Intersight
To create a server BIOS policy, follow these steps:
Step 1. Log in to Cisco Intersight with an Account Administrator or Server Administrator role.
Step 2. Choose Configure > Policies, and then click Create Policy.
Step 3. Select BIOS, and then click Start.
Step 4. On the General page, configure the following parameters:
1. Select the Organization.
2. Enter a name for your policy.
Step 5. On the Policy Details page, configure the BIOS policy options
Step 6. Click Create.
In summary, policies in Cisco Intersight provide automated, policy-driven configuration management for server boot and BIOS settings, allowing for scalable and consistent server provisioning for your Qumulo clusters.
Cisco N9000 configuration
LACP was configured on each cluster node across the pair of Cisco N9000 Series Switches using vPCs to provide increased bandwidth and redundancy in the event of a physical link or interface failure.
Note: Qumulo uses LACP as its default and preferred network bonding configuration. To help ensure proper connectivity, trunk ports with a native VLAN (untagged) are required for internal backend (cluster-only) communications. Untagged traffic on a trunk port is assigned to the native VLAN (VLAN 1 by default). If other native VLAN is used, explicitly set it using switchport trunk native vlan <vlanid> command.
Table 2. Cisco N9000 Series Switch configuration example
| Device |
Configuration |
| N9K-AC04-A |
interface port-channel10 description Cluster-Node1-P1 switchport mode trunk switchport trunk allowed vlan 1,1140-1142 spanning-tree port type edge trunk vpc 10 interface port-channel11 description Cluster-Node2-P1 switchport mode trunk switchport trunk allowed vlan 1,1140-1142 spanning-tree port type edge trunk vpc 11 interface port-channel12 description Cluster-Node3-P1 switchport mode trunk switchport trunk allowed vlan 1,1140-1142 spanning-tree port type edge trunk vpc 12 interface port-channel13 description Cluster-Node4-P1 switchport mode trunk switchport trunk allowed vlan 1,1140-1142 spanning-tree port type edge trunk vpc 13 interface Ethernet1/10 switchport mode trunk switchport trunk allowed vlan 1,1140-1142 channel-group 10 mode active no shutdown interface Ethernet1/11 switchport mode trunk switchport trunk allowed vlan 1,1140-1142 channel-group 11 mode active no shutdown interface Ethernet1/12 switchport mode trunk switchport trunk allowed vlan 1,1140-1142 channel-group 12 mode active no shutdown interface Ethernet1/13 switchport mode trunk switchport trunk allowed vlan 1,1140-1142 channel-group 13 mode active no shutdown |
| N9K-AC04-B |
interface port-channel10 description Cluster-Node1-P2 switchport mode trunk switchport trunk allowed vlan 1,1140-1142 spanning-tree port type edge trunk vpc 10 interface port-channel11 description Cluster-Node2-P2 switchport mode trunk switchport trunk allowed vlan 1,1140-1142 spanning-tree port type edge trunk vpc 11 interface port-channel12 description Cluster-Node3-P2 switchport mode trunk switchport trunk allowed vlan 1,1140-1142 spanning-tree port type edge trunk vpc 12 interface port-channel13 description Cluster-Node4-P2 switchport mode trunk switchport trunk allowed vlan 1,1140-1142 spanning-tree port type edge trunk vpc 13 interface Ethernet1/10 switchport mode trunk switchport trunk allowed vlan 1,1140-1142 channel-group 10 mode active no shutdown interface Ethernet1/11 switchport mode trunk switchport trunk allowed vlan 1,1140-1142 channel-group 11 mode active no shutdown interface Ethernet1/12 switchport mode trunk switchport trunk allowed vlan 1,1140-1142 channel-group 12 mode active no shutdown interface Ethernet1/13 switchport mode trunk switchport trunk allowed vlan 1,1140-1142 channel-group 13 mode active no shutdown |
Qumulo cluster setup
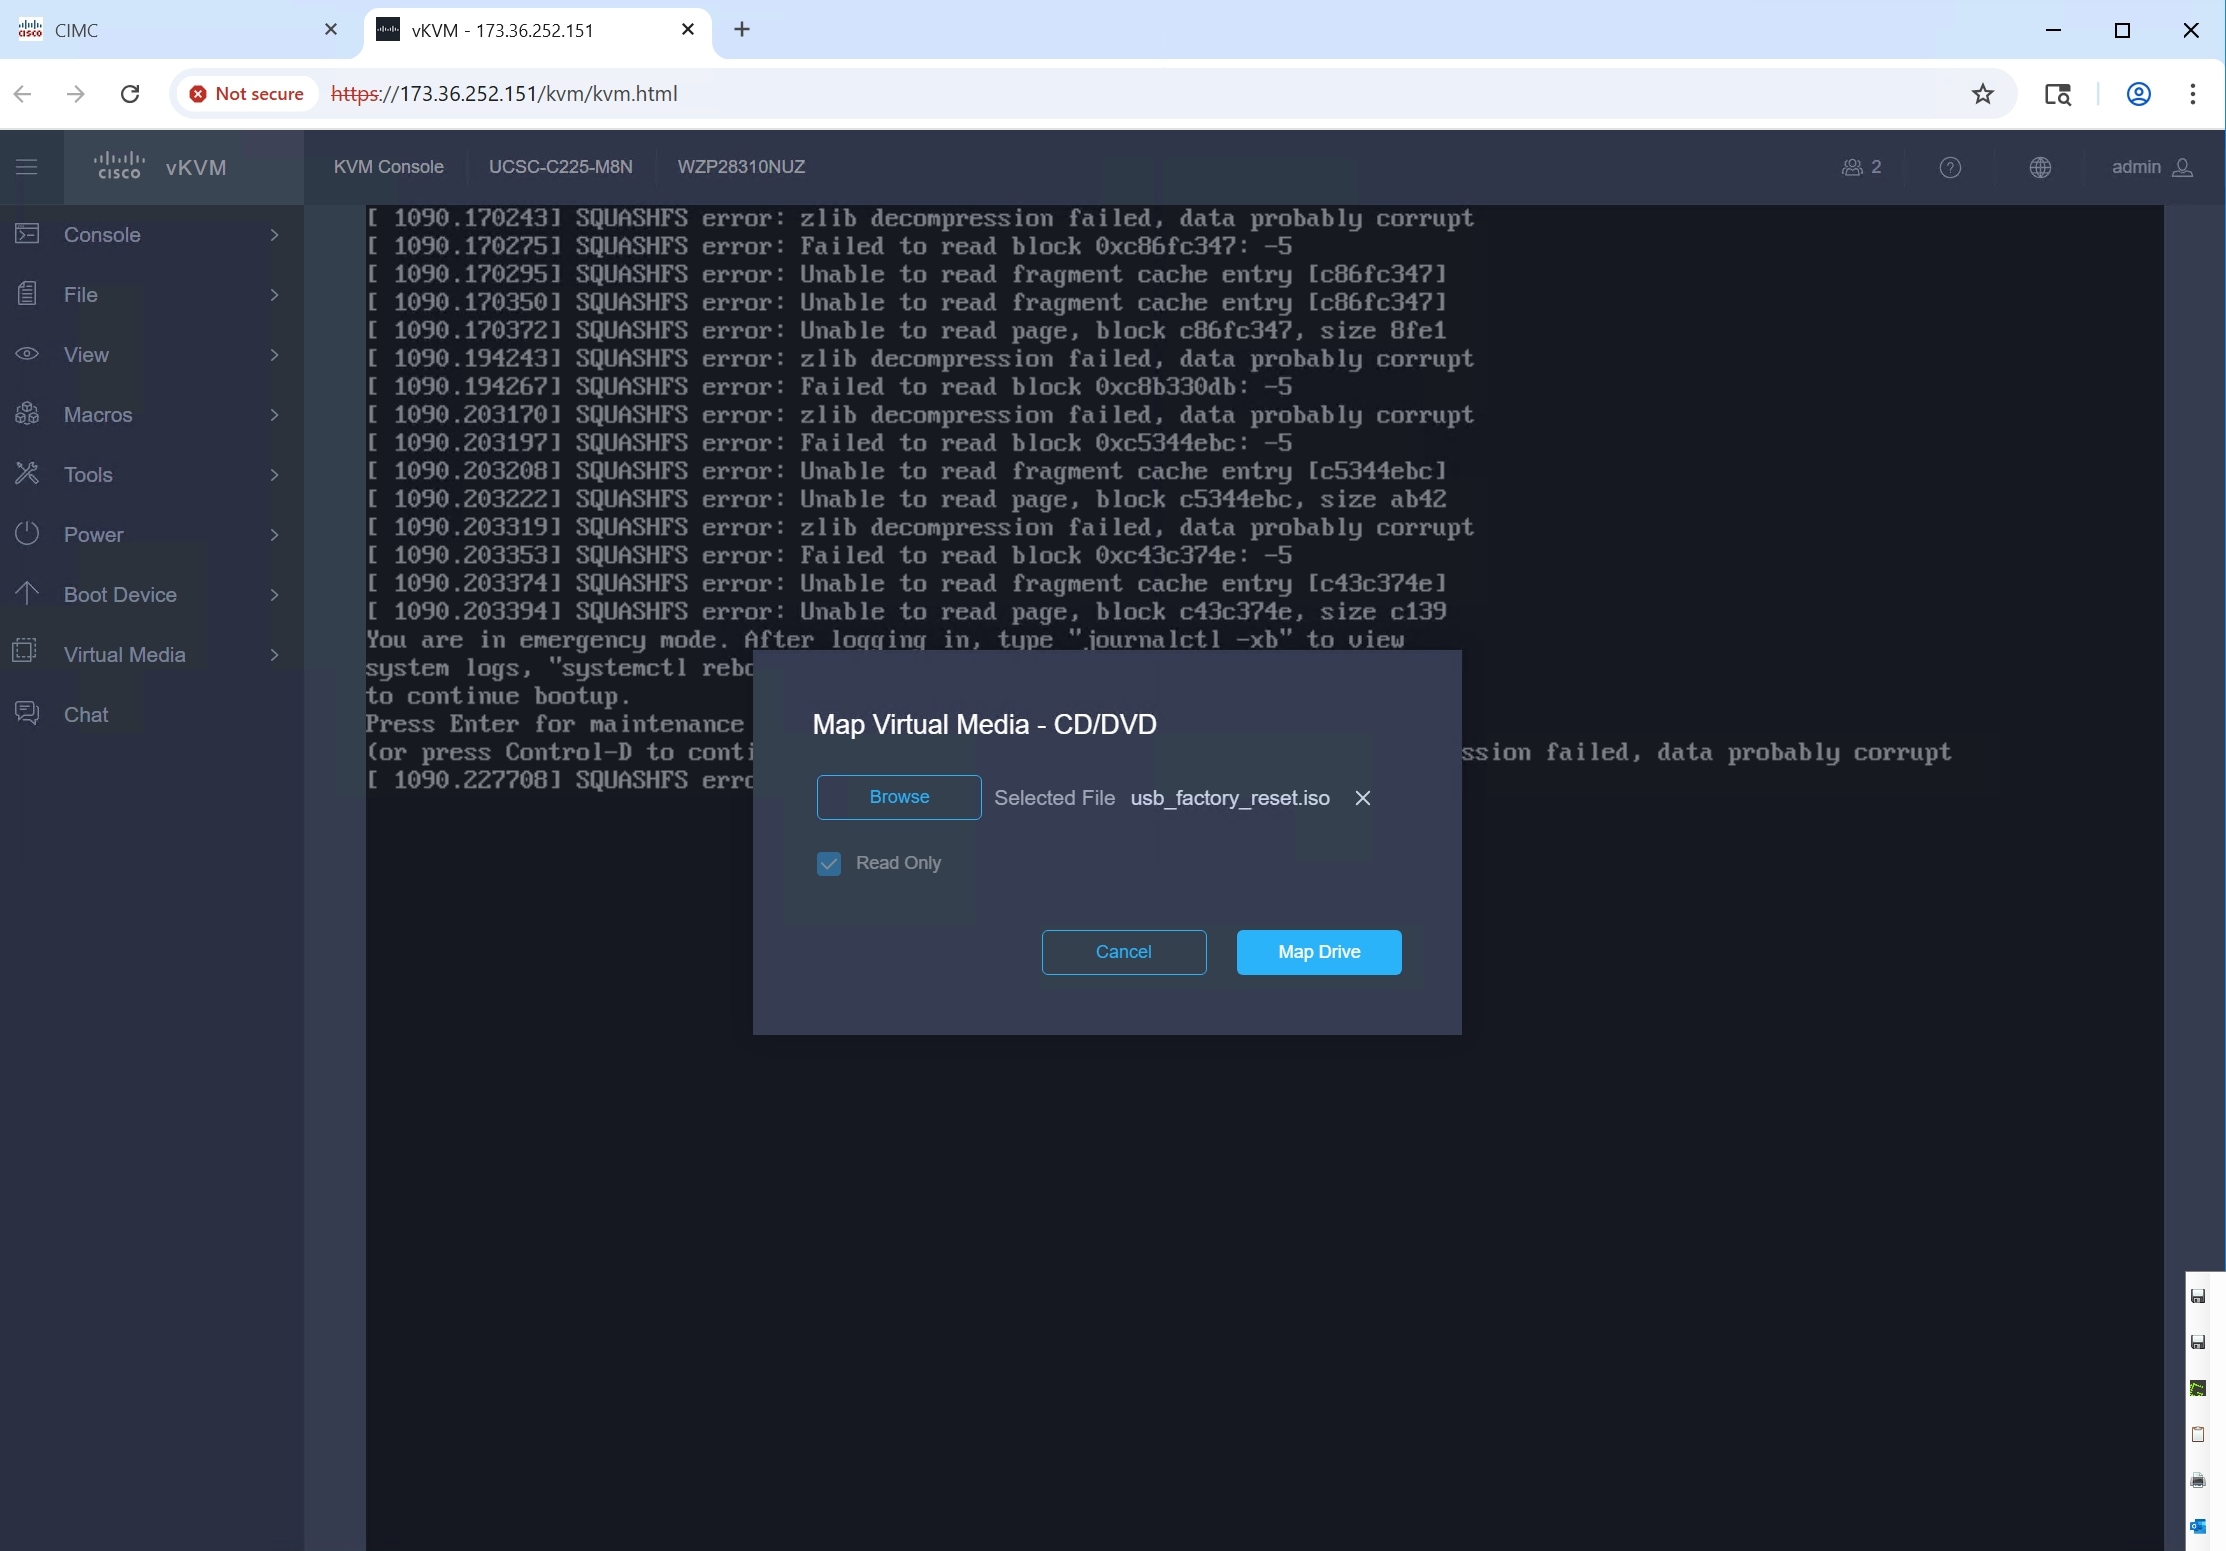
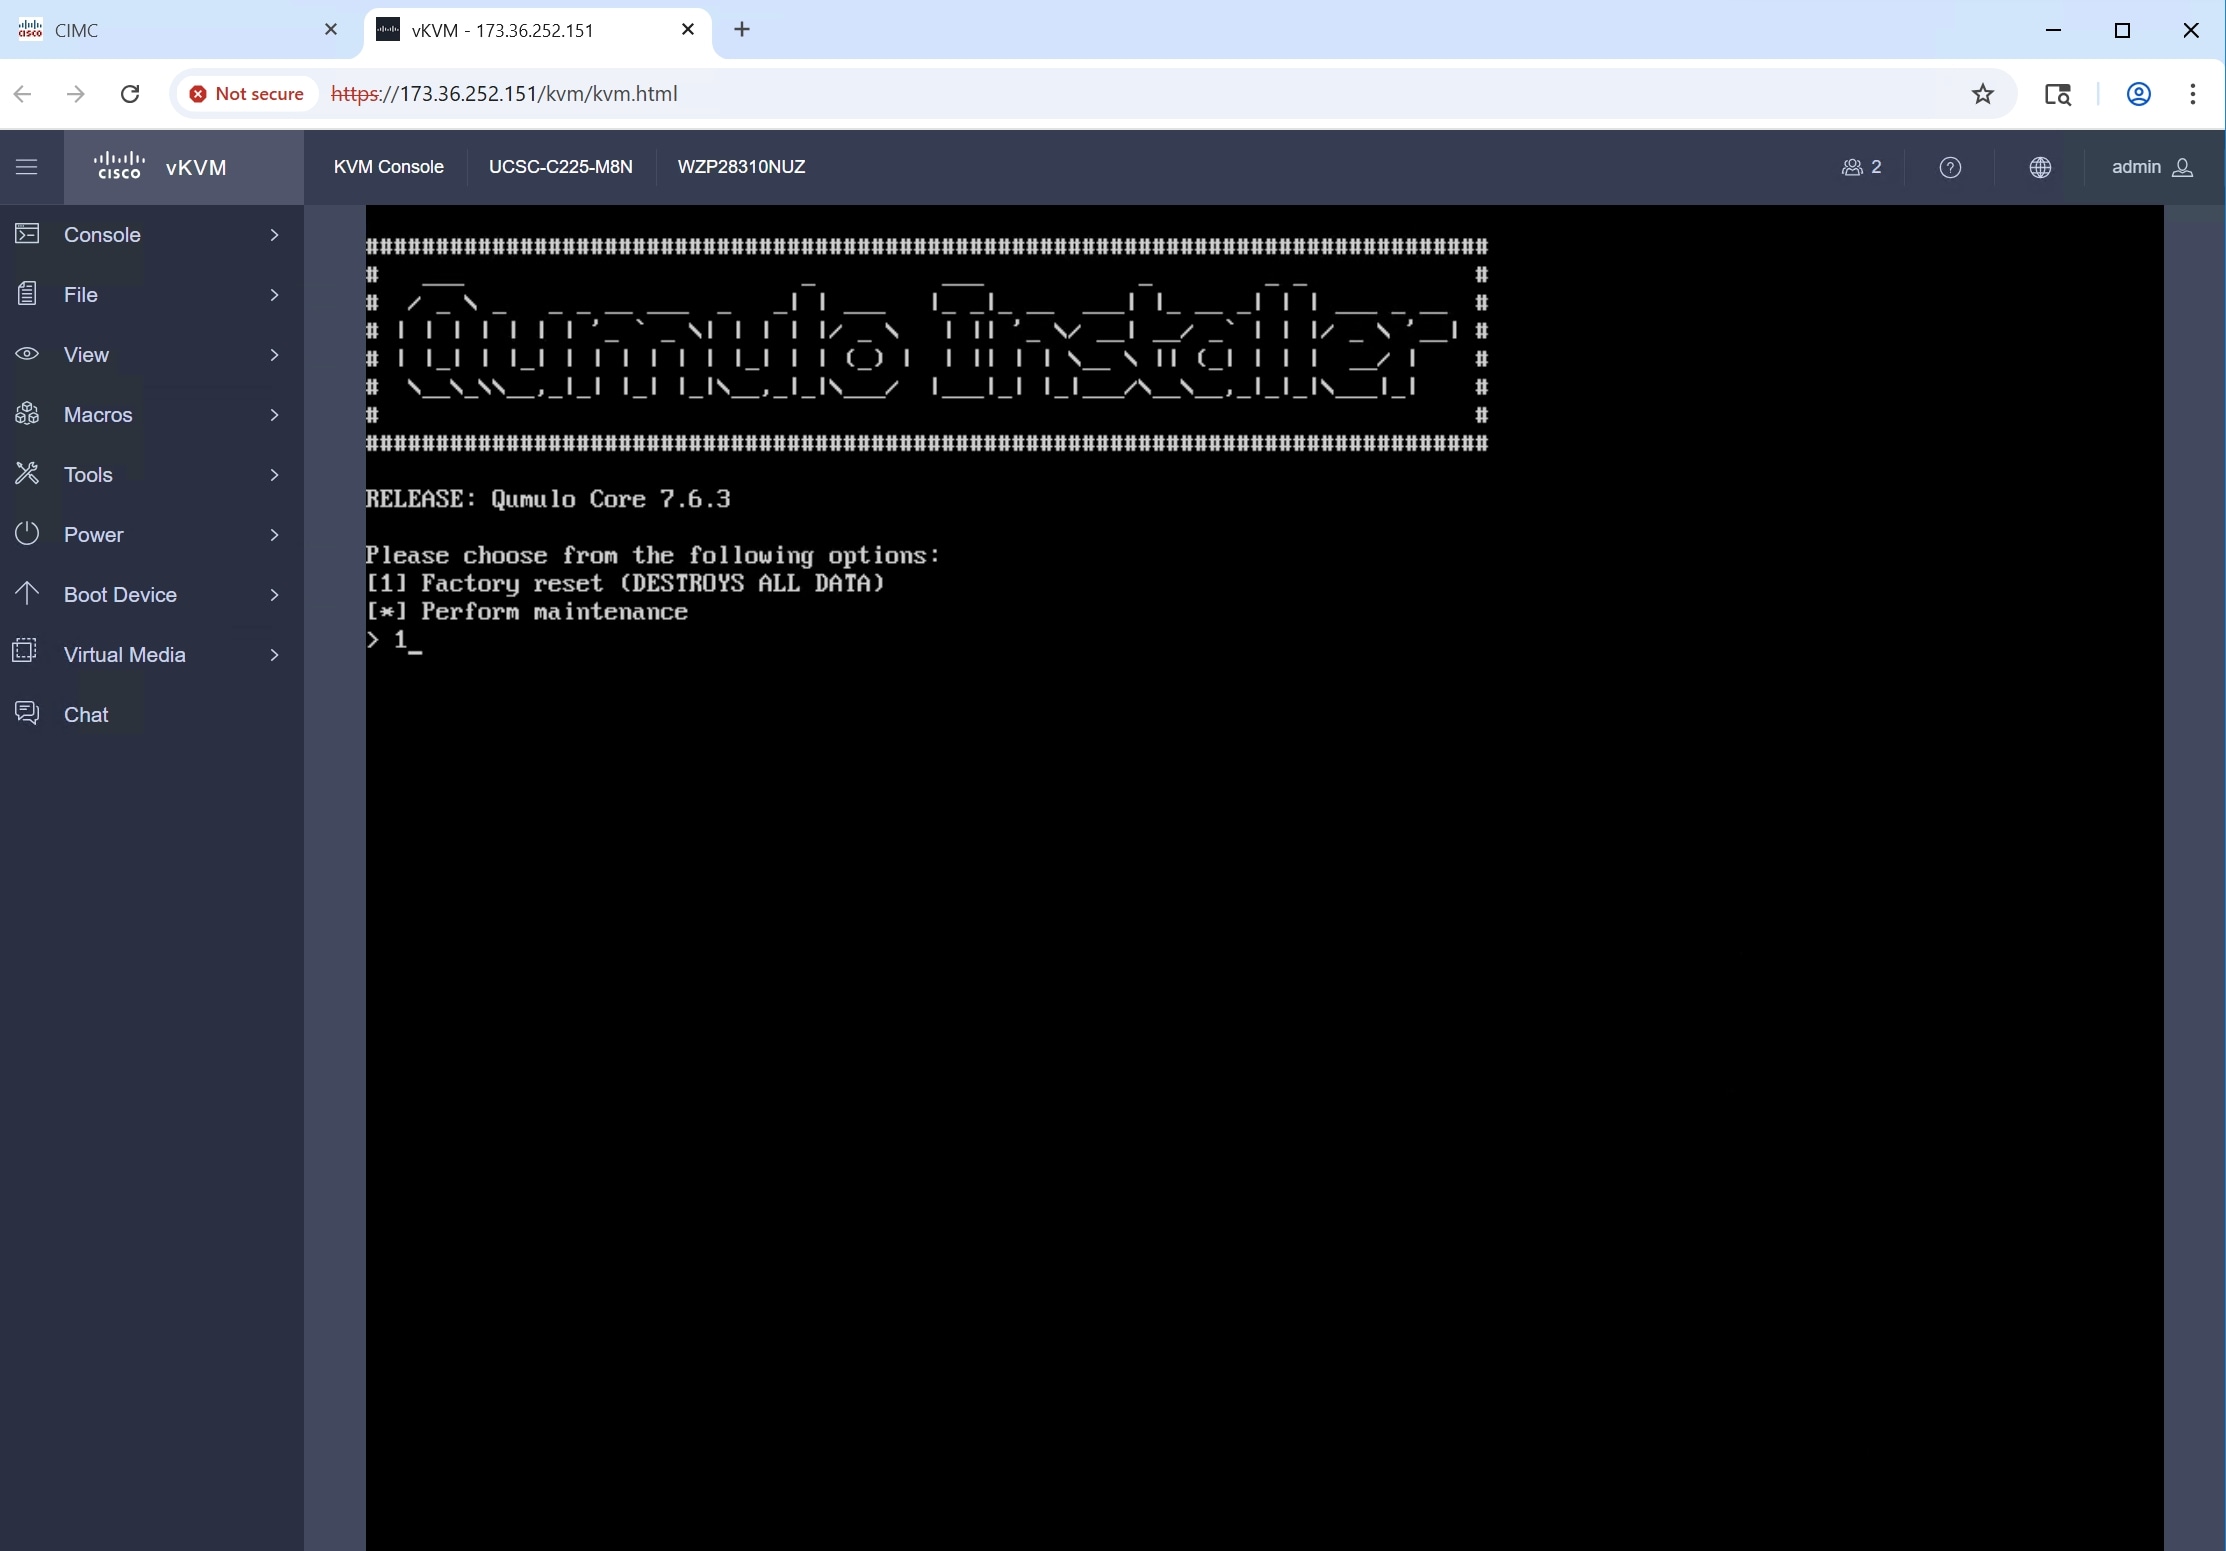
Qumulo Core is typically installed on each node using an installer image.
Download the Qumulo Core Installer (usb_factory_reset.iso) from Qumulo.
Step 1. Log in to IMC and map Qumulo Core Installer into virtual media (vDVD/CD).
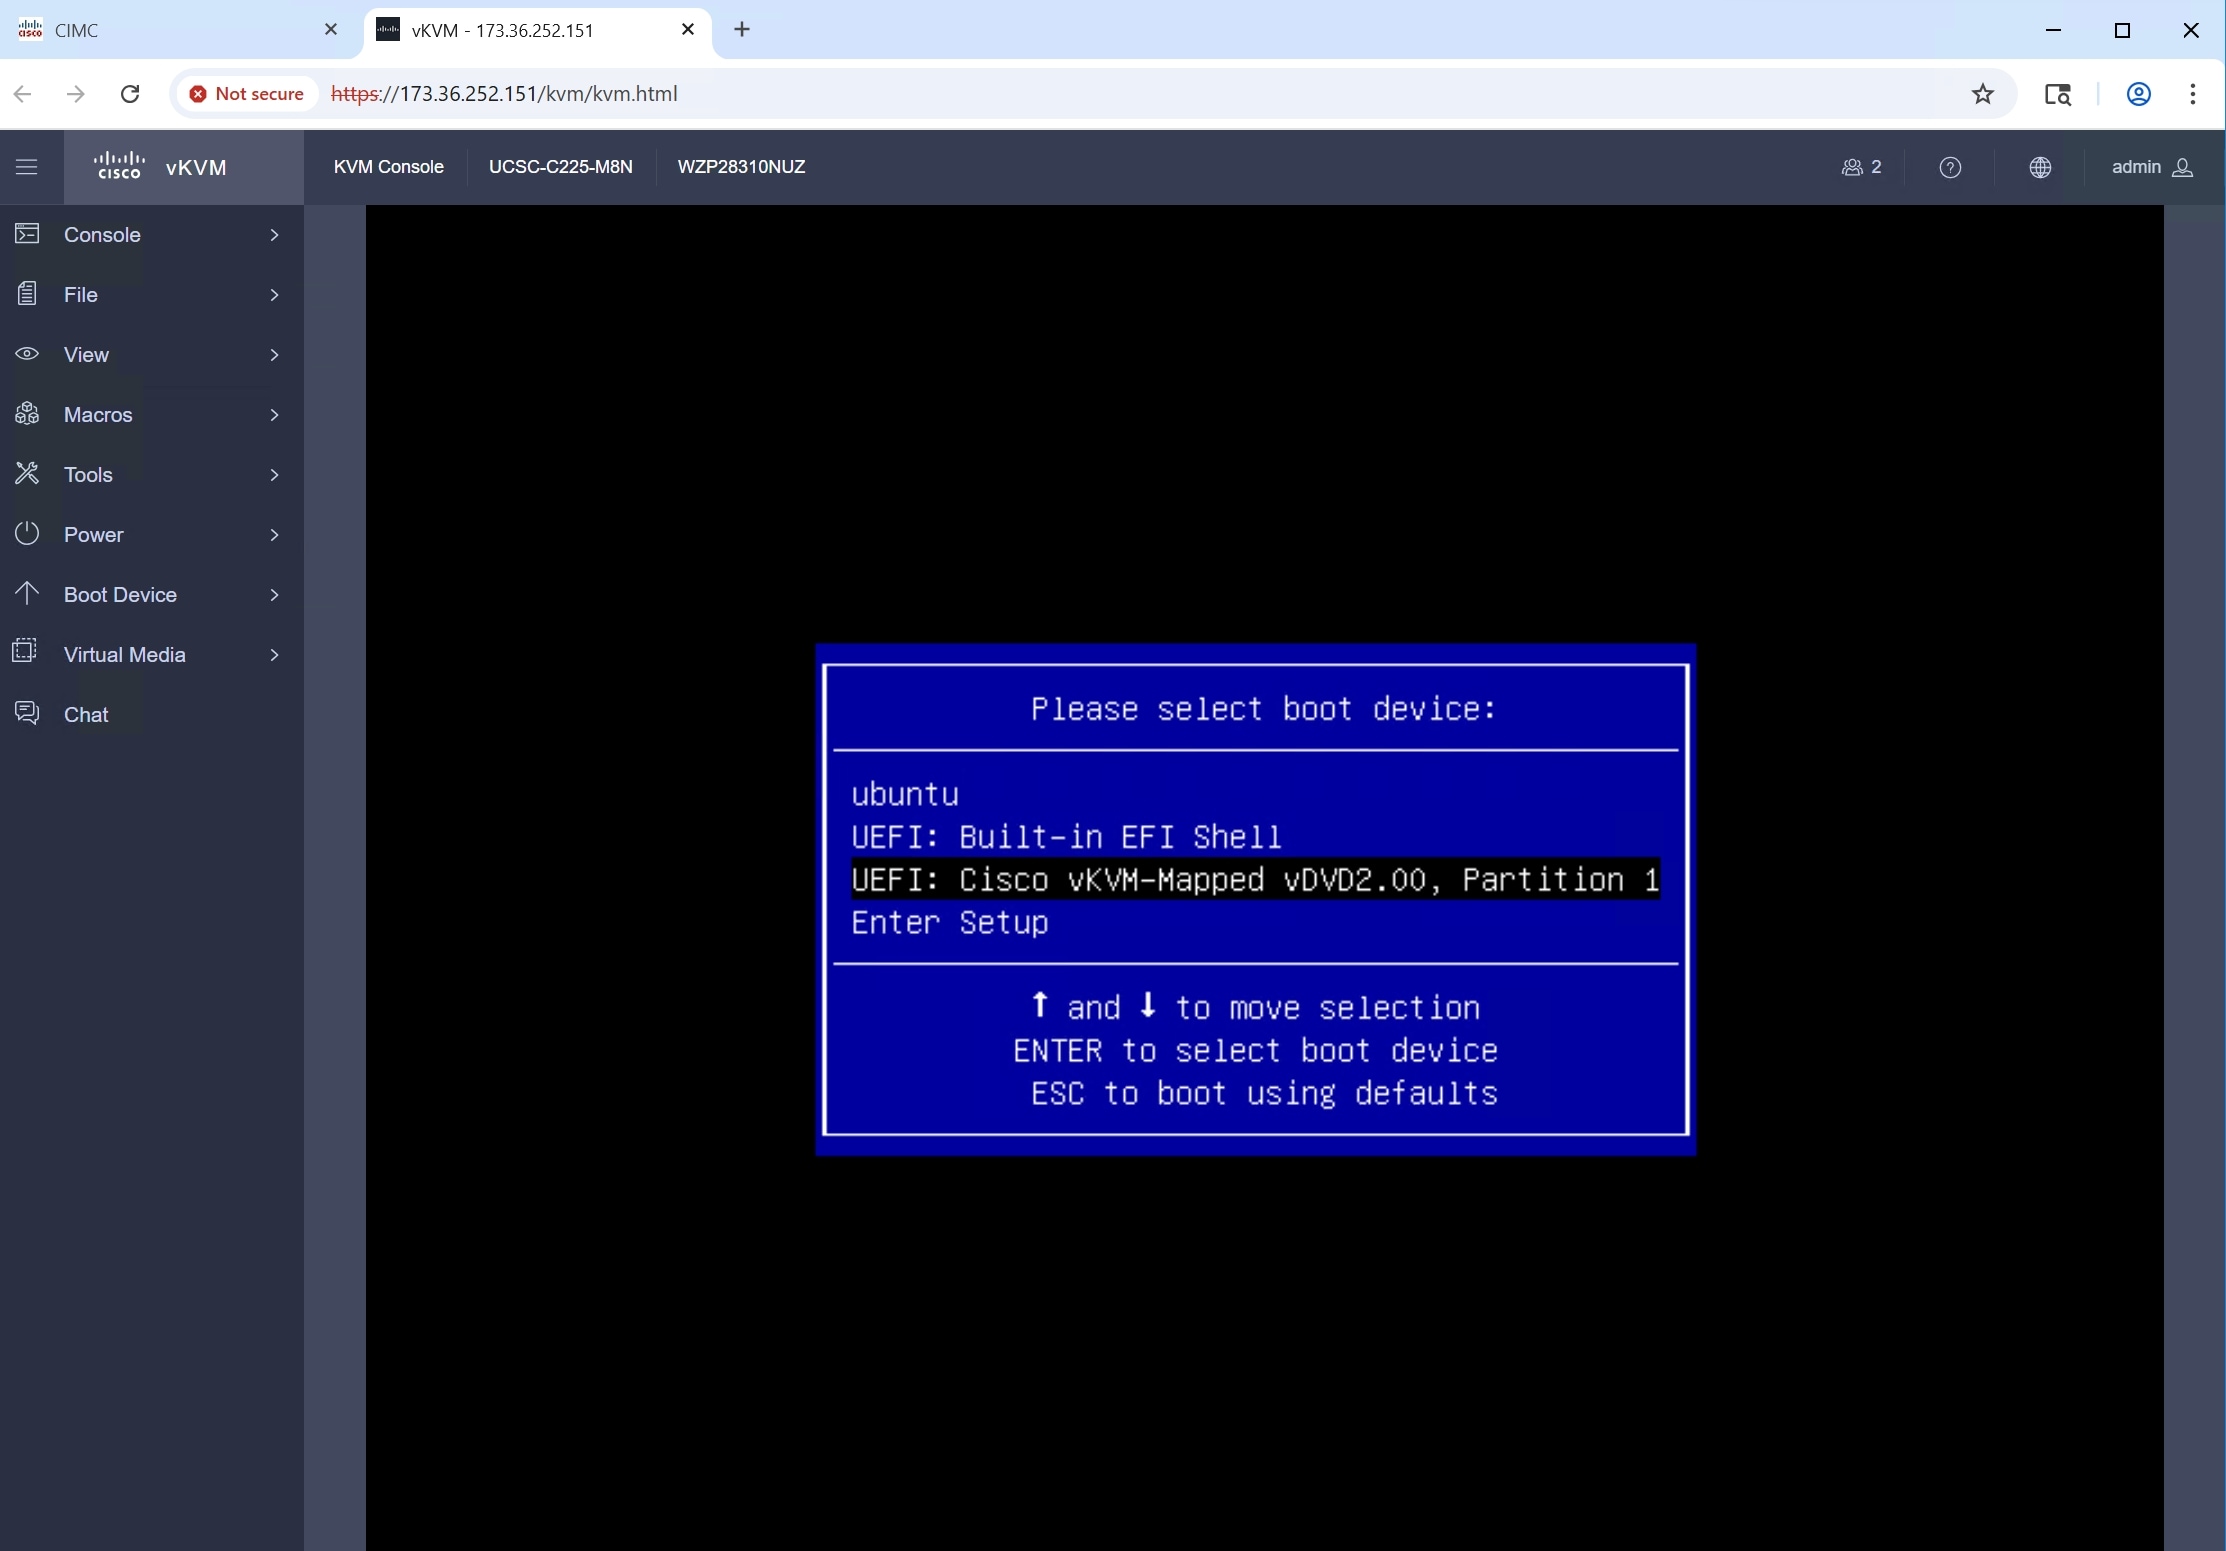
Step 2. Power on the node and enter the boot menu by pressing F6. Select the vKVM Mapped vDVD/CD.
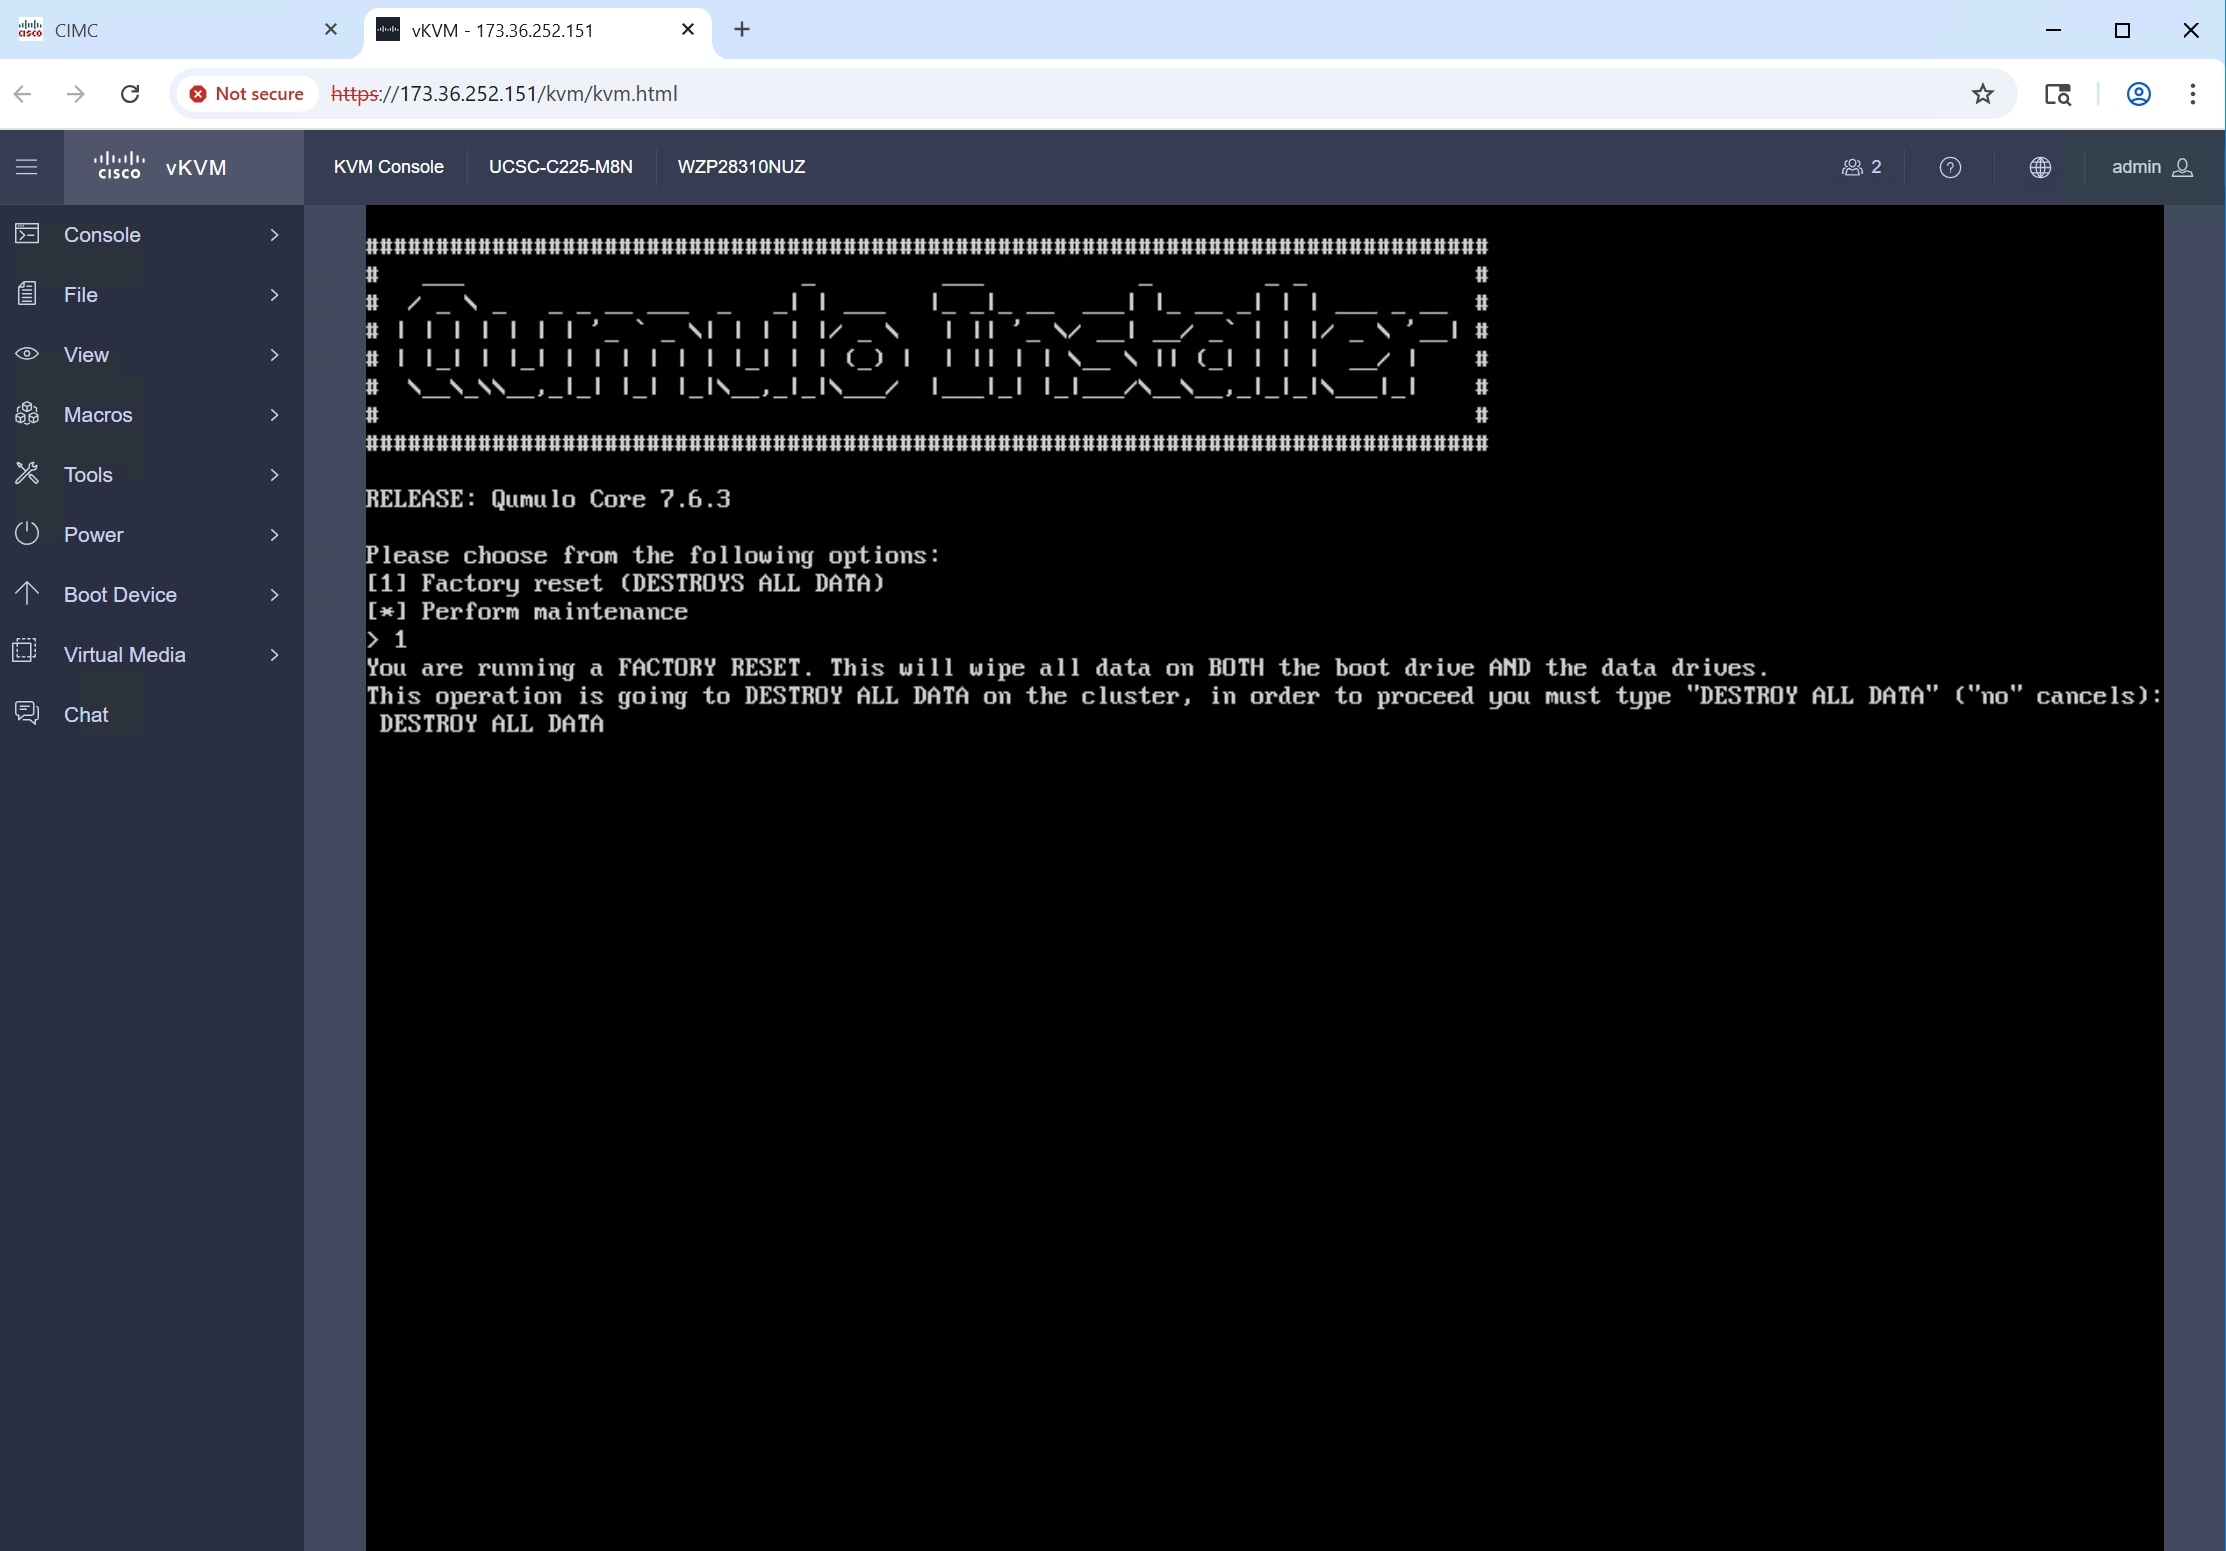
Step 3. Select option 1 “Factory reset (DESTROYS ALL DATA)”.
Step 4. Confirm data destruction by typing “DESTROYS ALL DATA”. Press Enter.
Step 5. Once the installation is complete, the node typically shuts down automatically. Unmap the ISO and power on the node.
Step 6. Perform these steps on every node in your cluster.
Cluster Creation and Initial Configuration
After imaging the nodes, create and configure the cluster from Qumulo Core Web UI on any node:
Step 1. After the nodes reboot, the End User License Agreement screen will appear.
Step 2. Review the End User Agreement, click “I agree to the End User Agreement” and then click “Submit”.

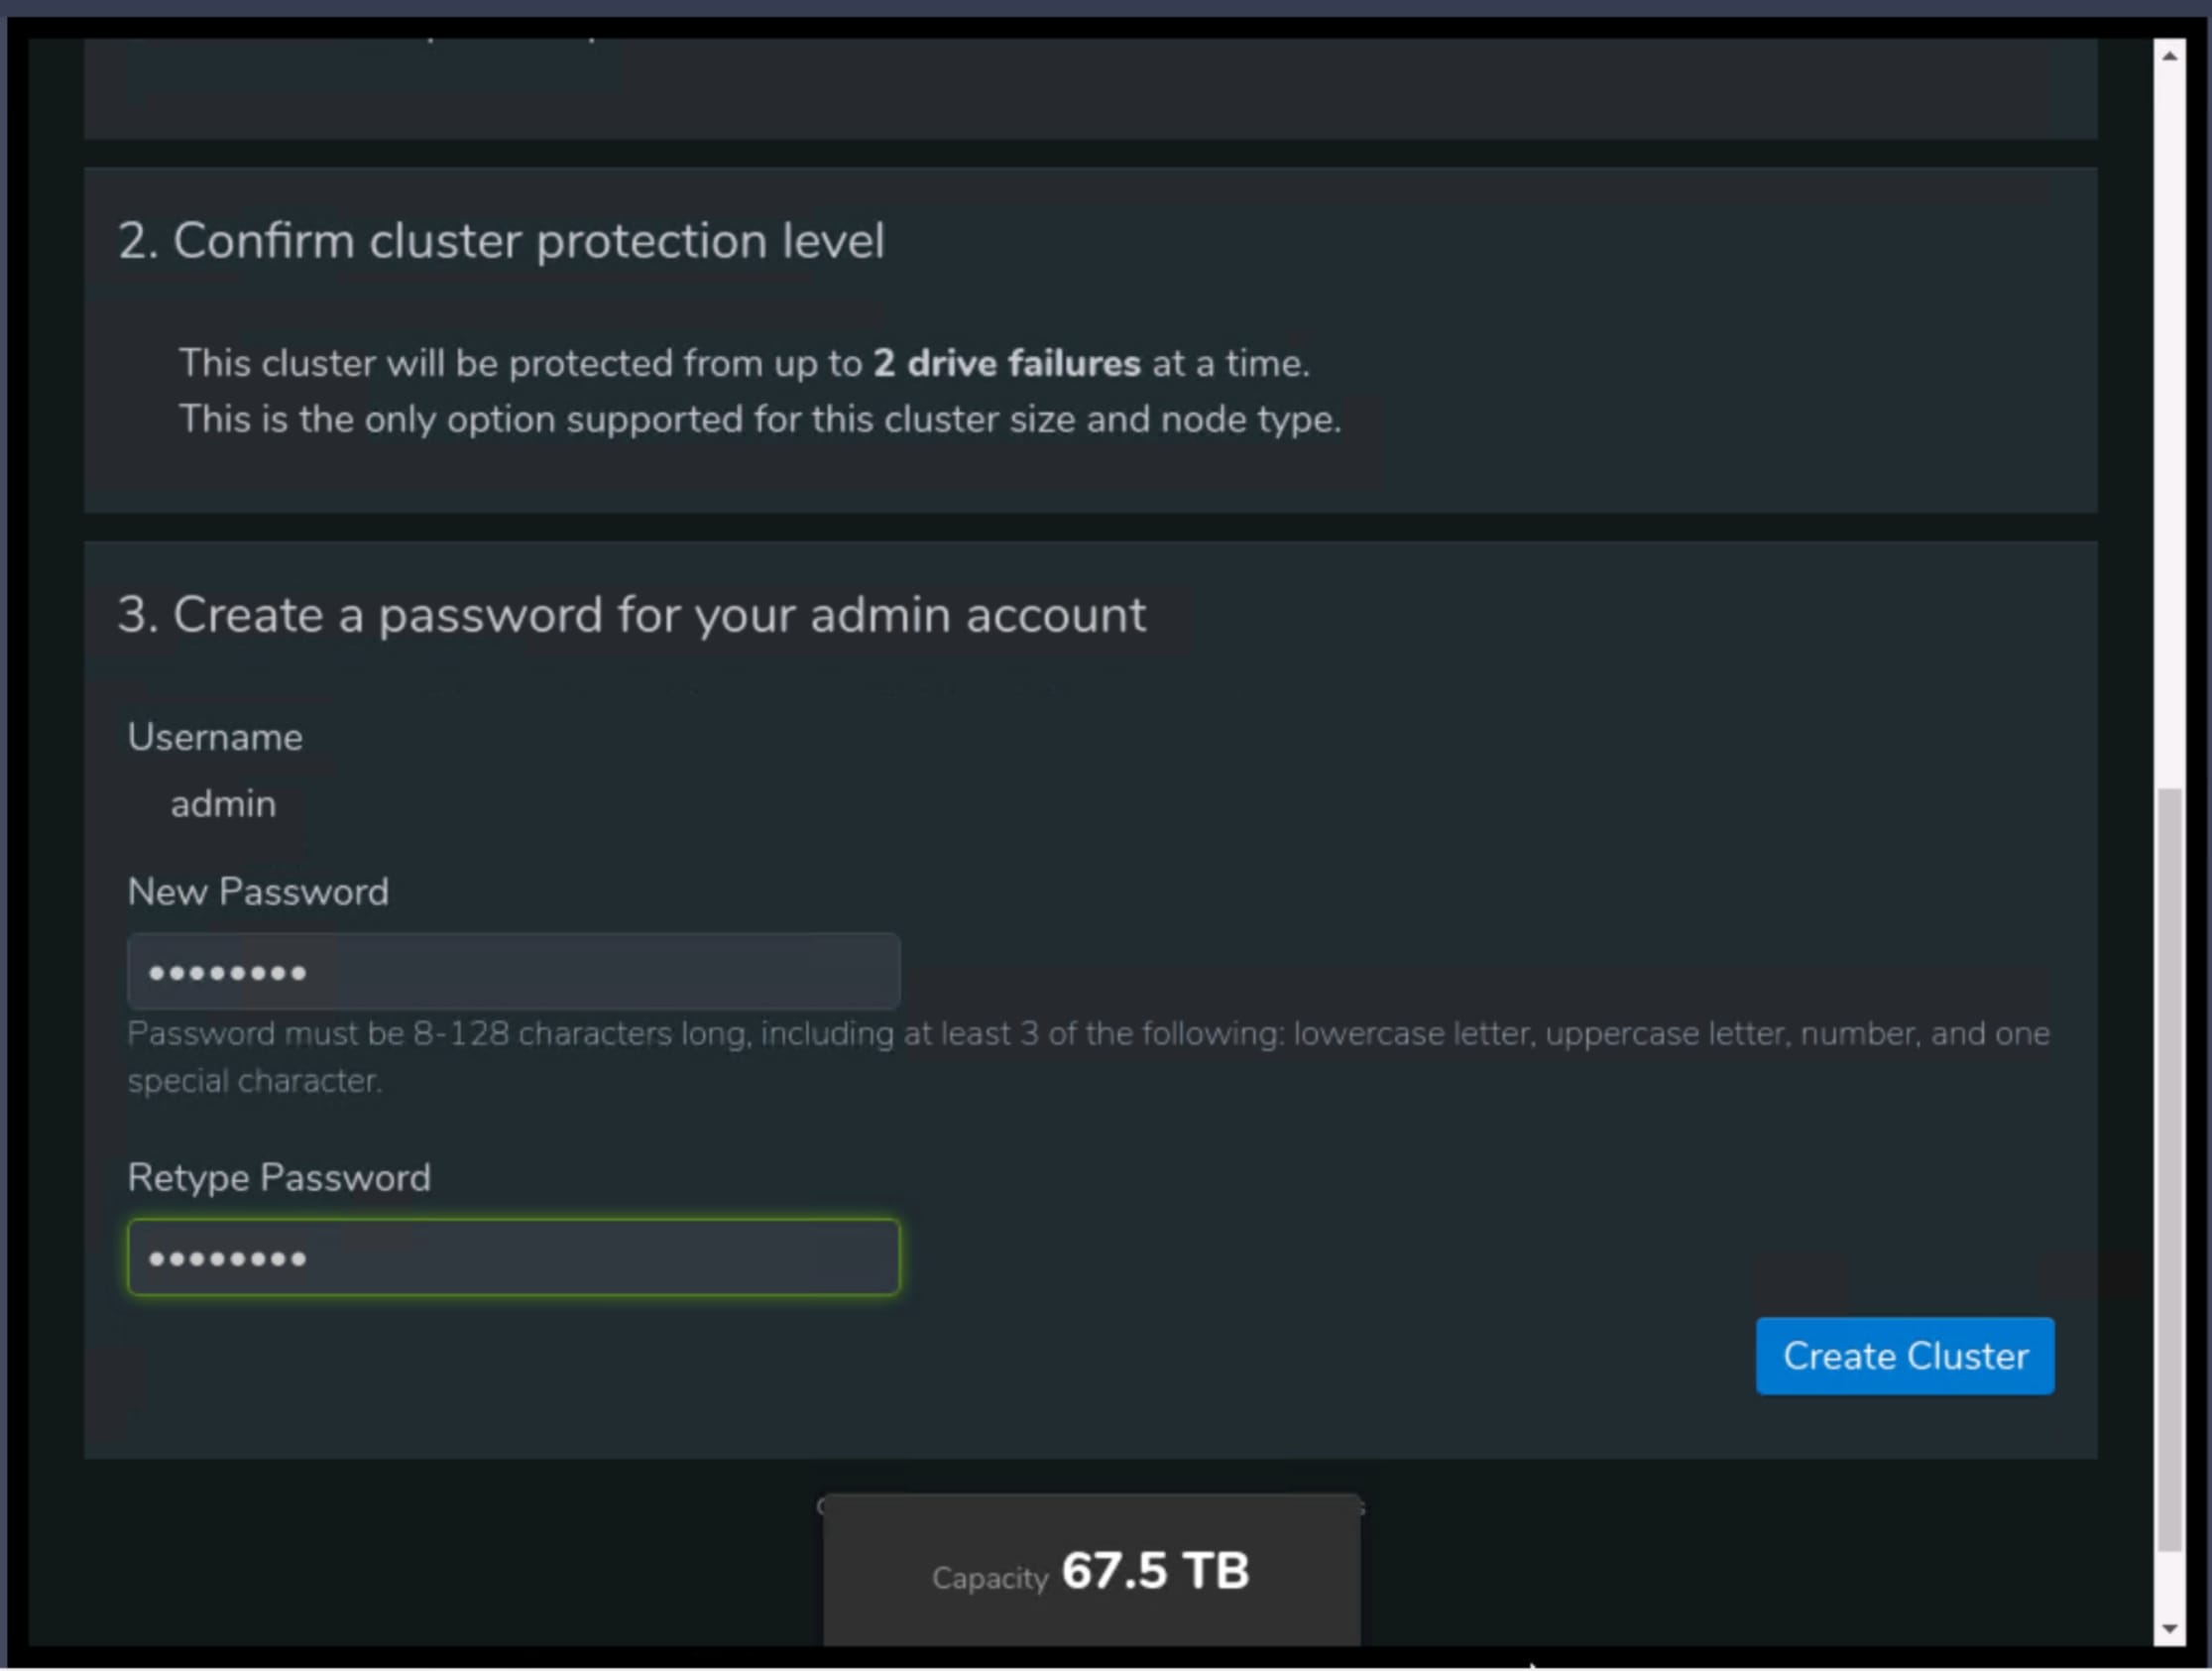
Step 3. On the “Set up cluster” page, select the nodes you want to add to your cluster. Provide a name for your Qumulo cluster.
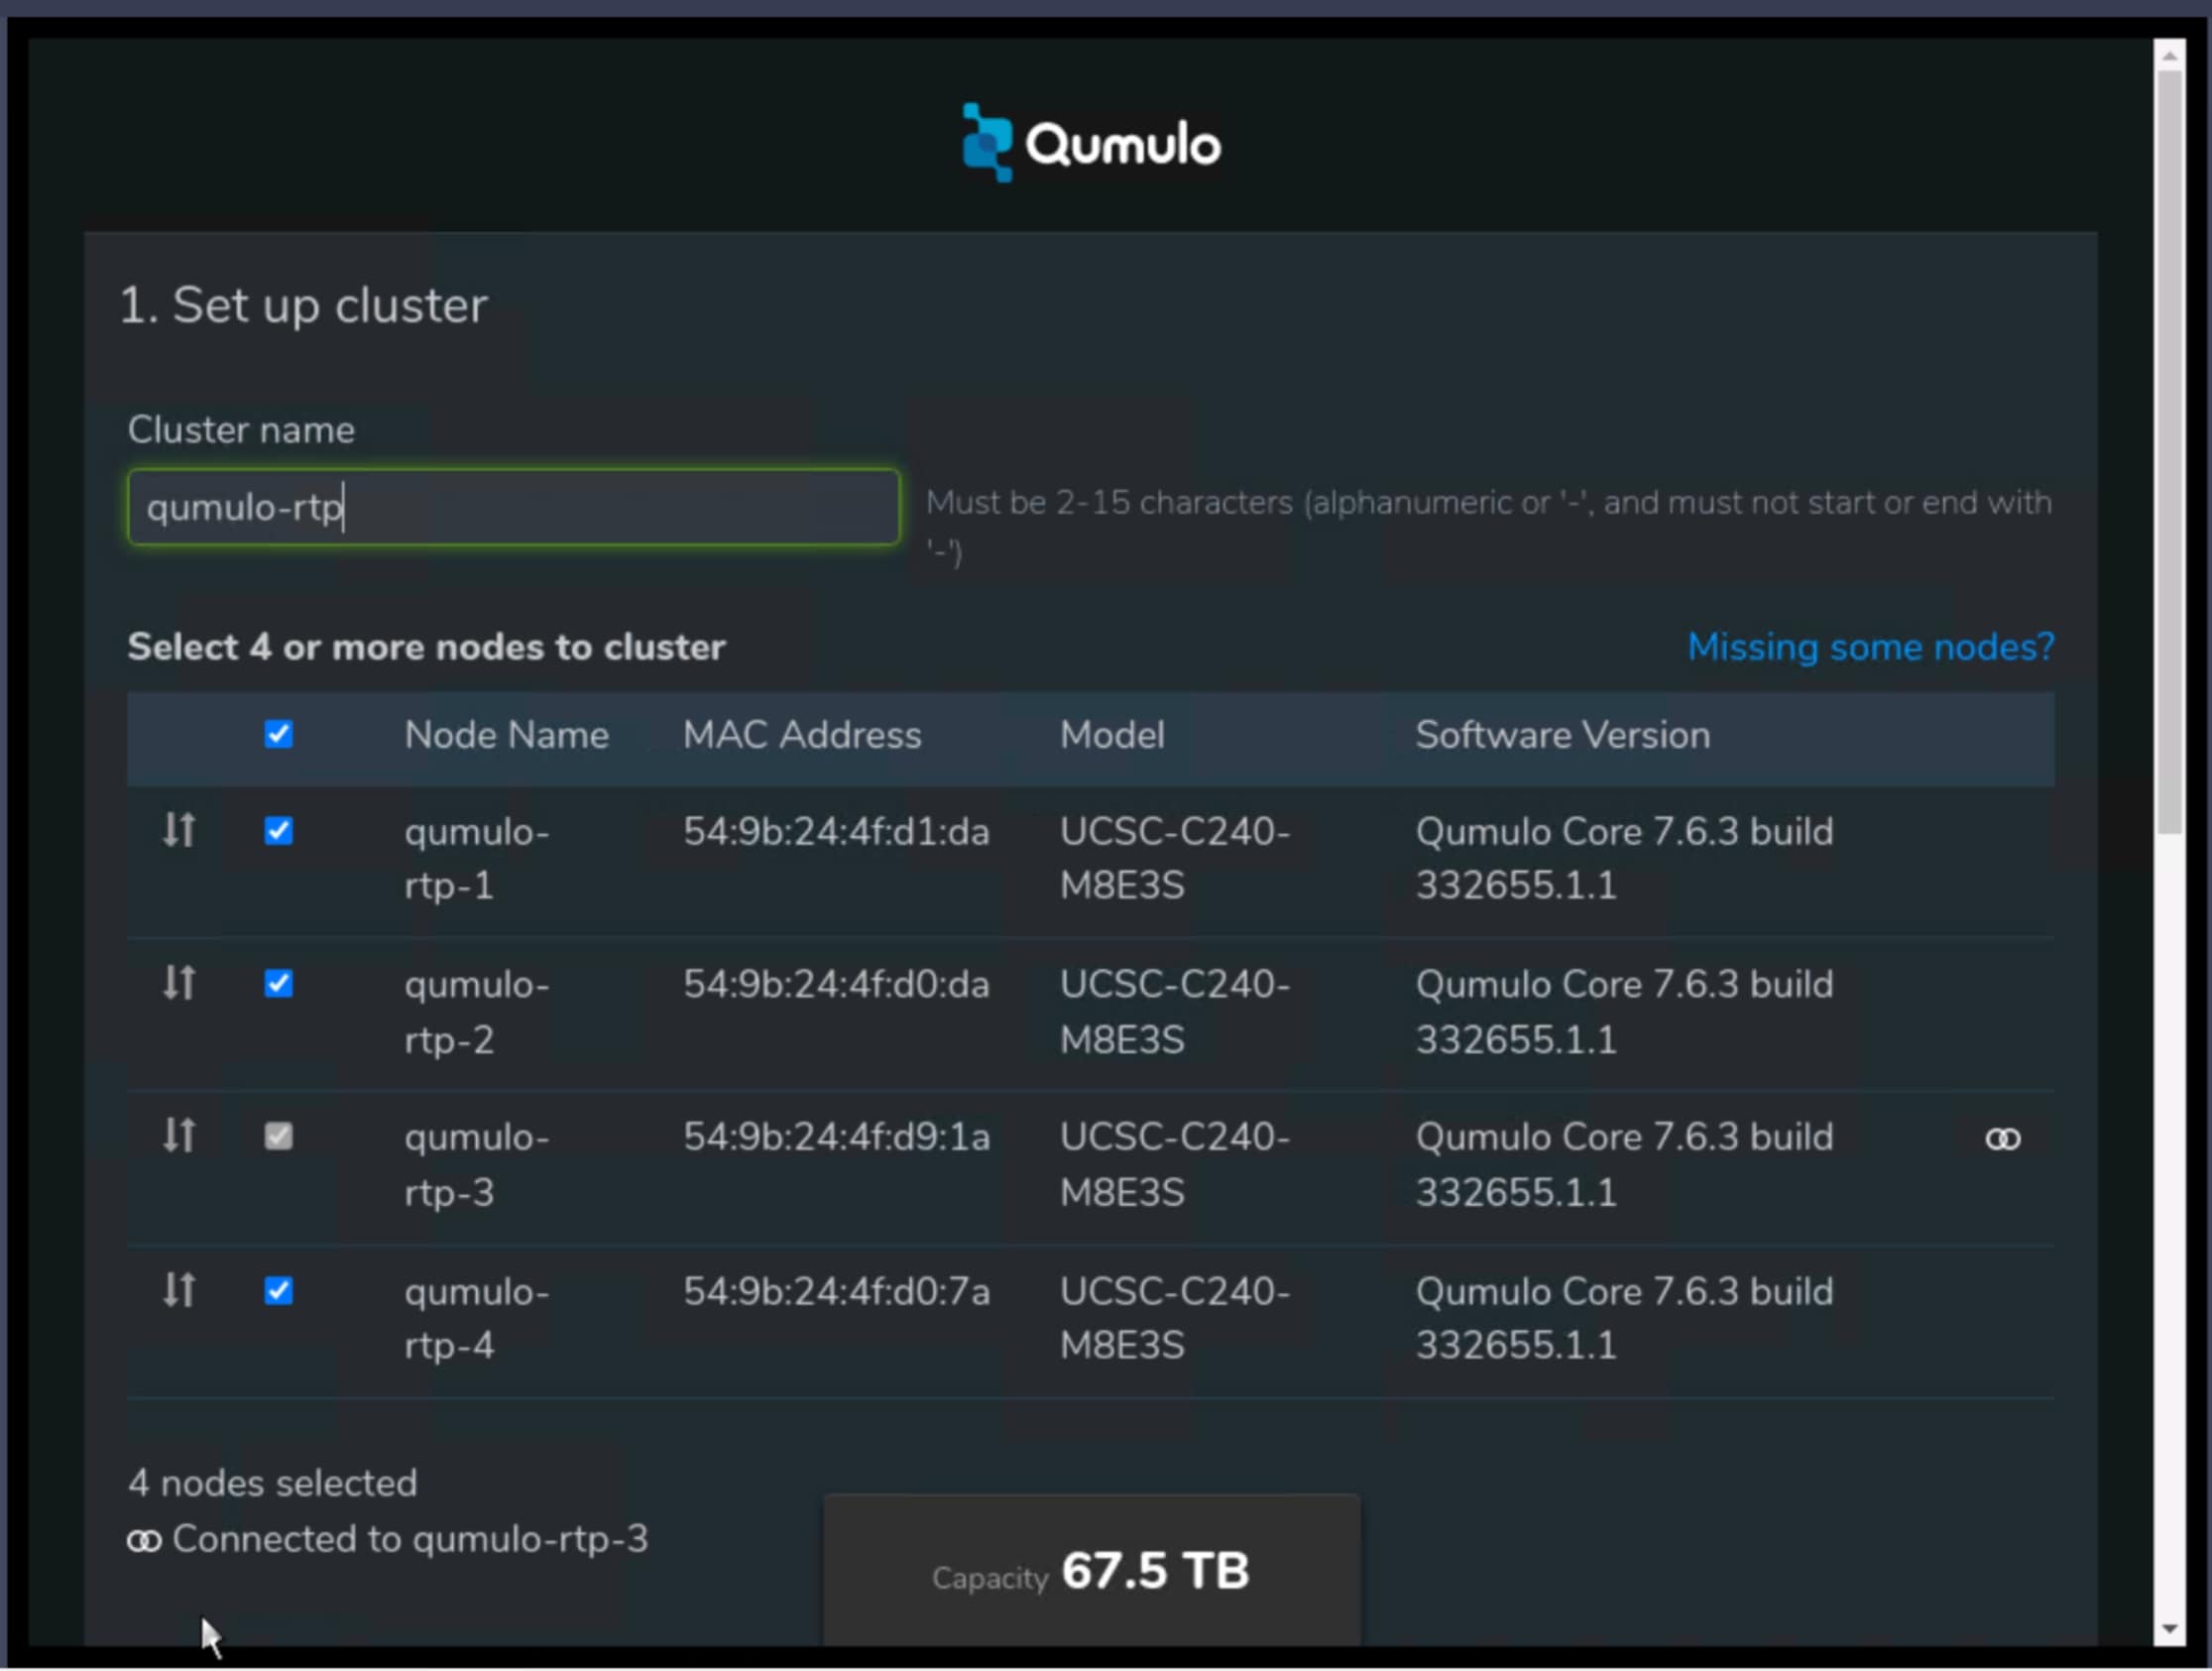
Step 4. Provide a new admin password for your Qumulo cluster.
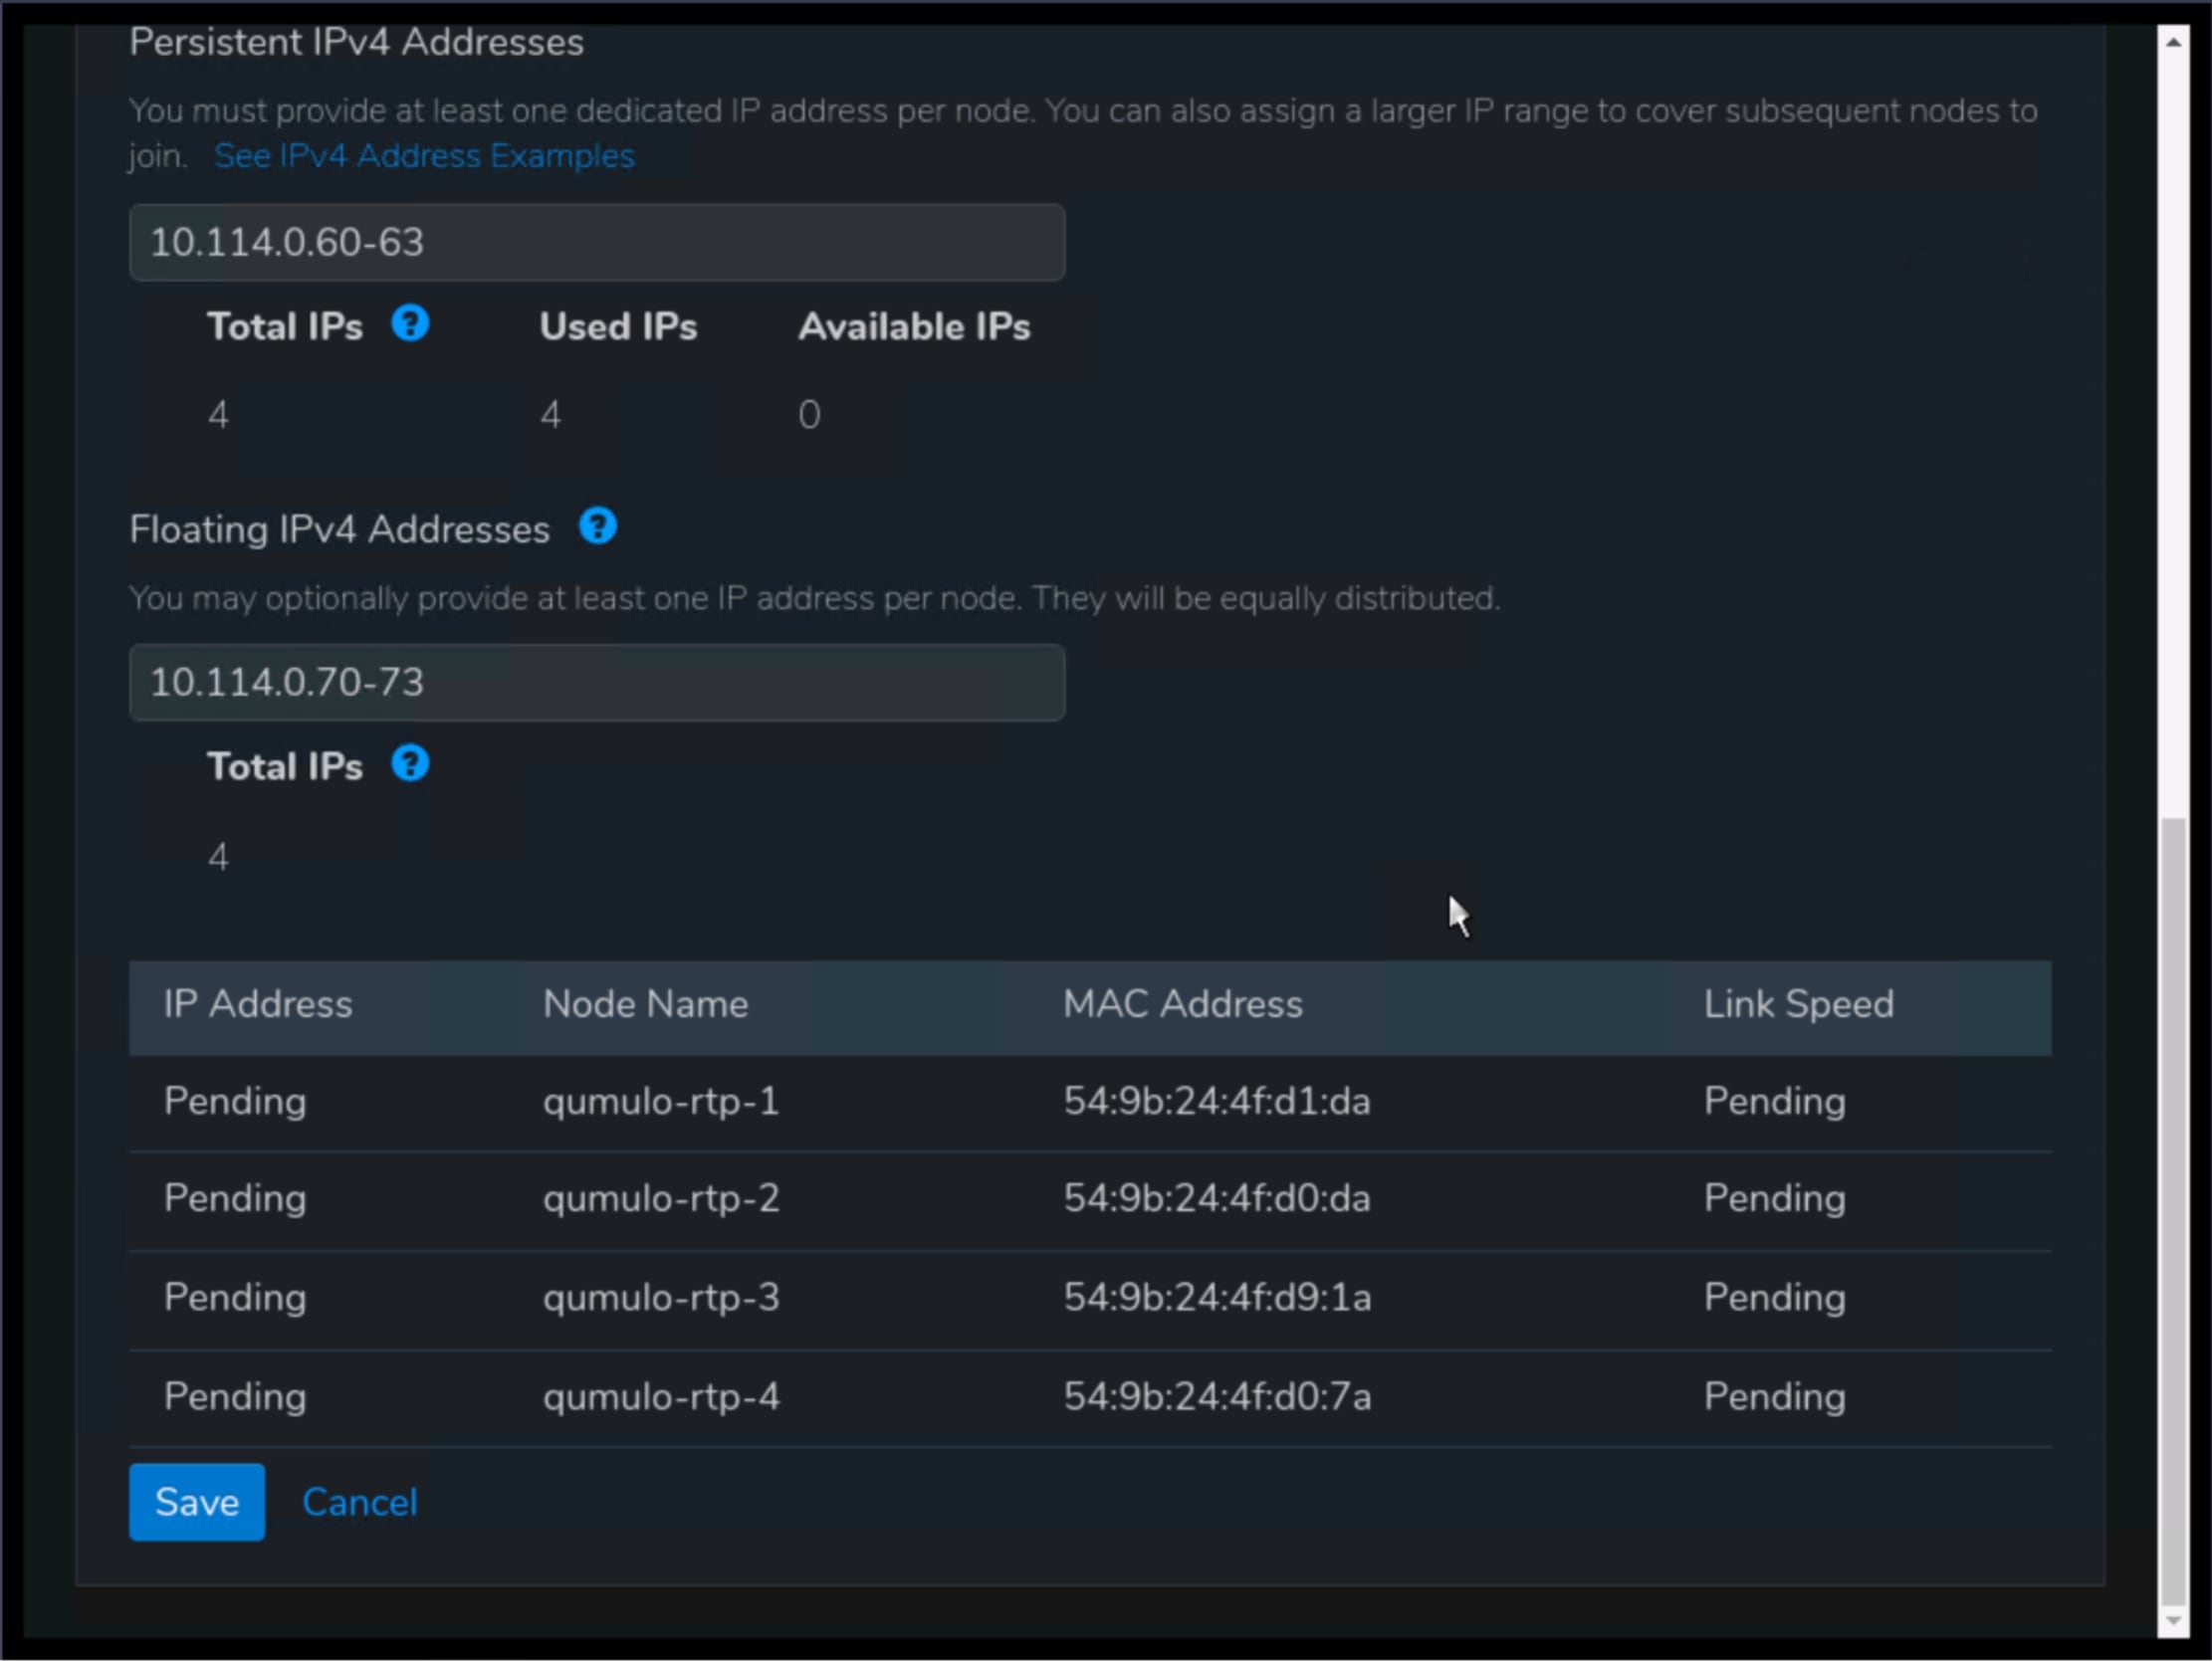
Step 5. Navigate to the Cluster menu, select Network Configuration, and click Switch to Static IP.
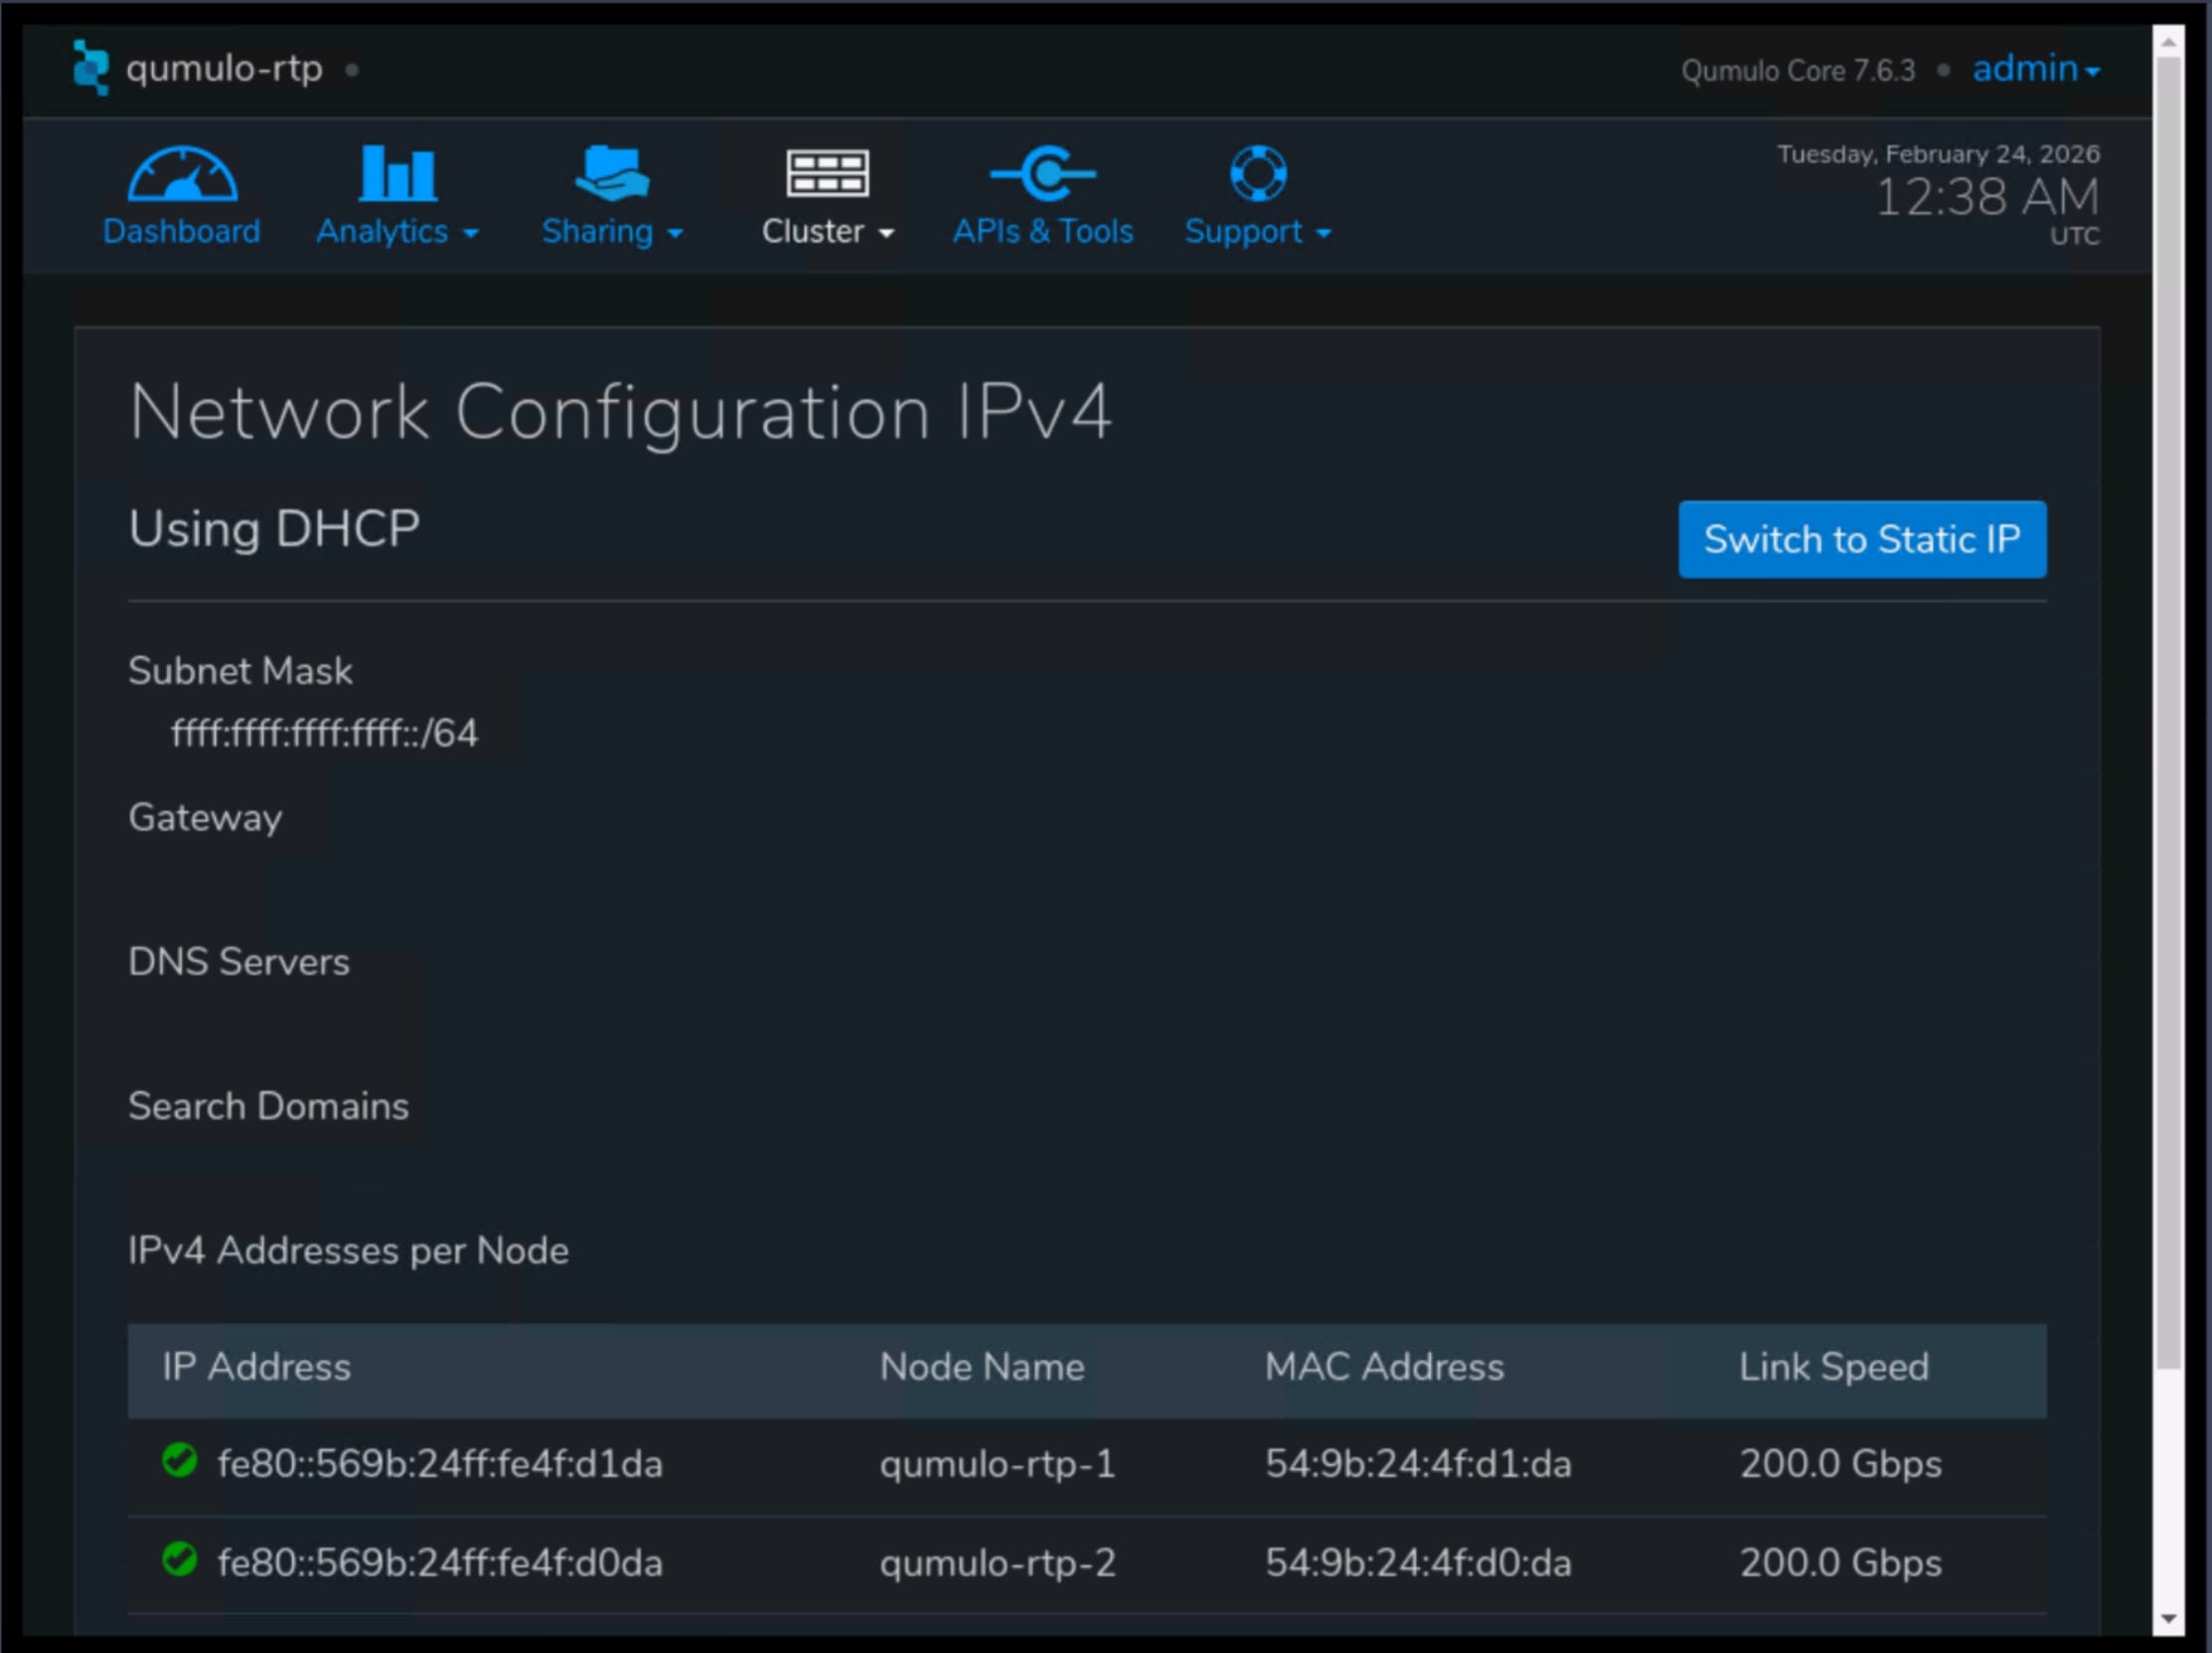
Step 6. Enter the networking details:
1. Subnet mask
2. Gateway
3. IP addresses of your DNS servers
4. Search domains
5. Static IP addresses for use by cluster nodes
6. Floating IP addresses for use by cluster nodes
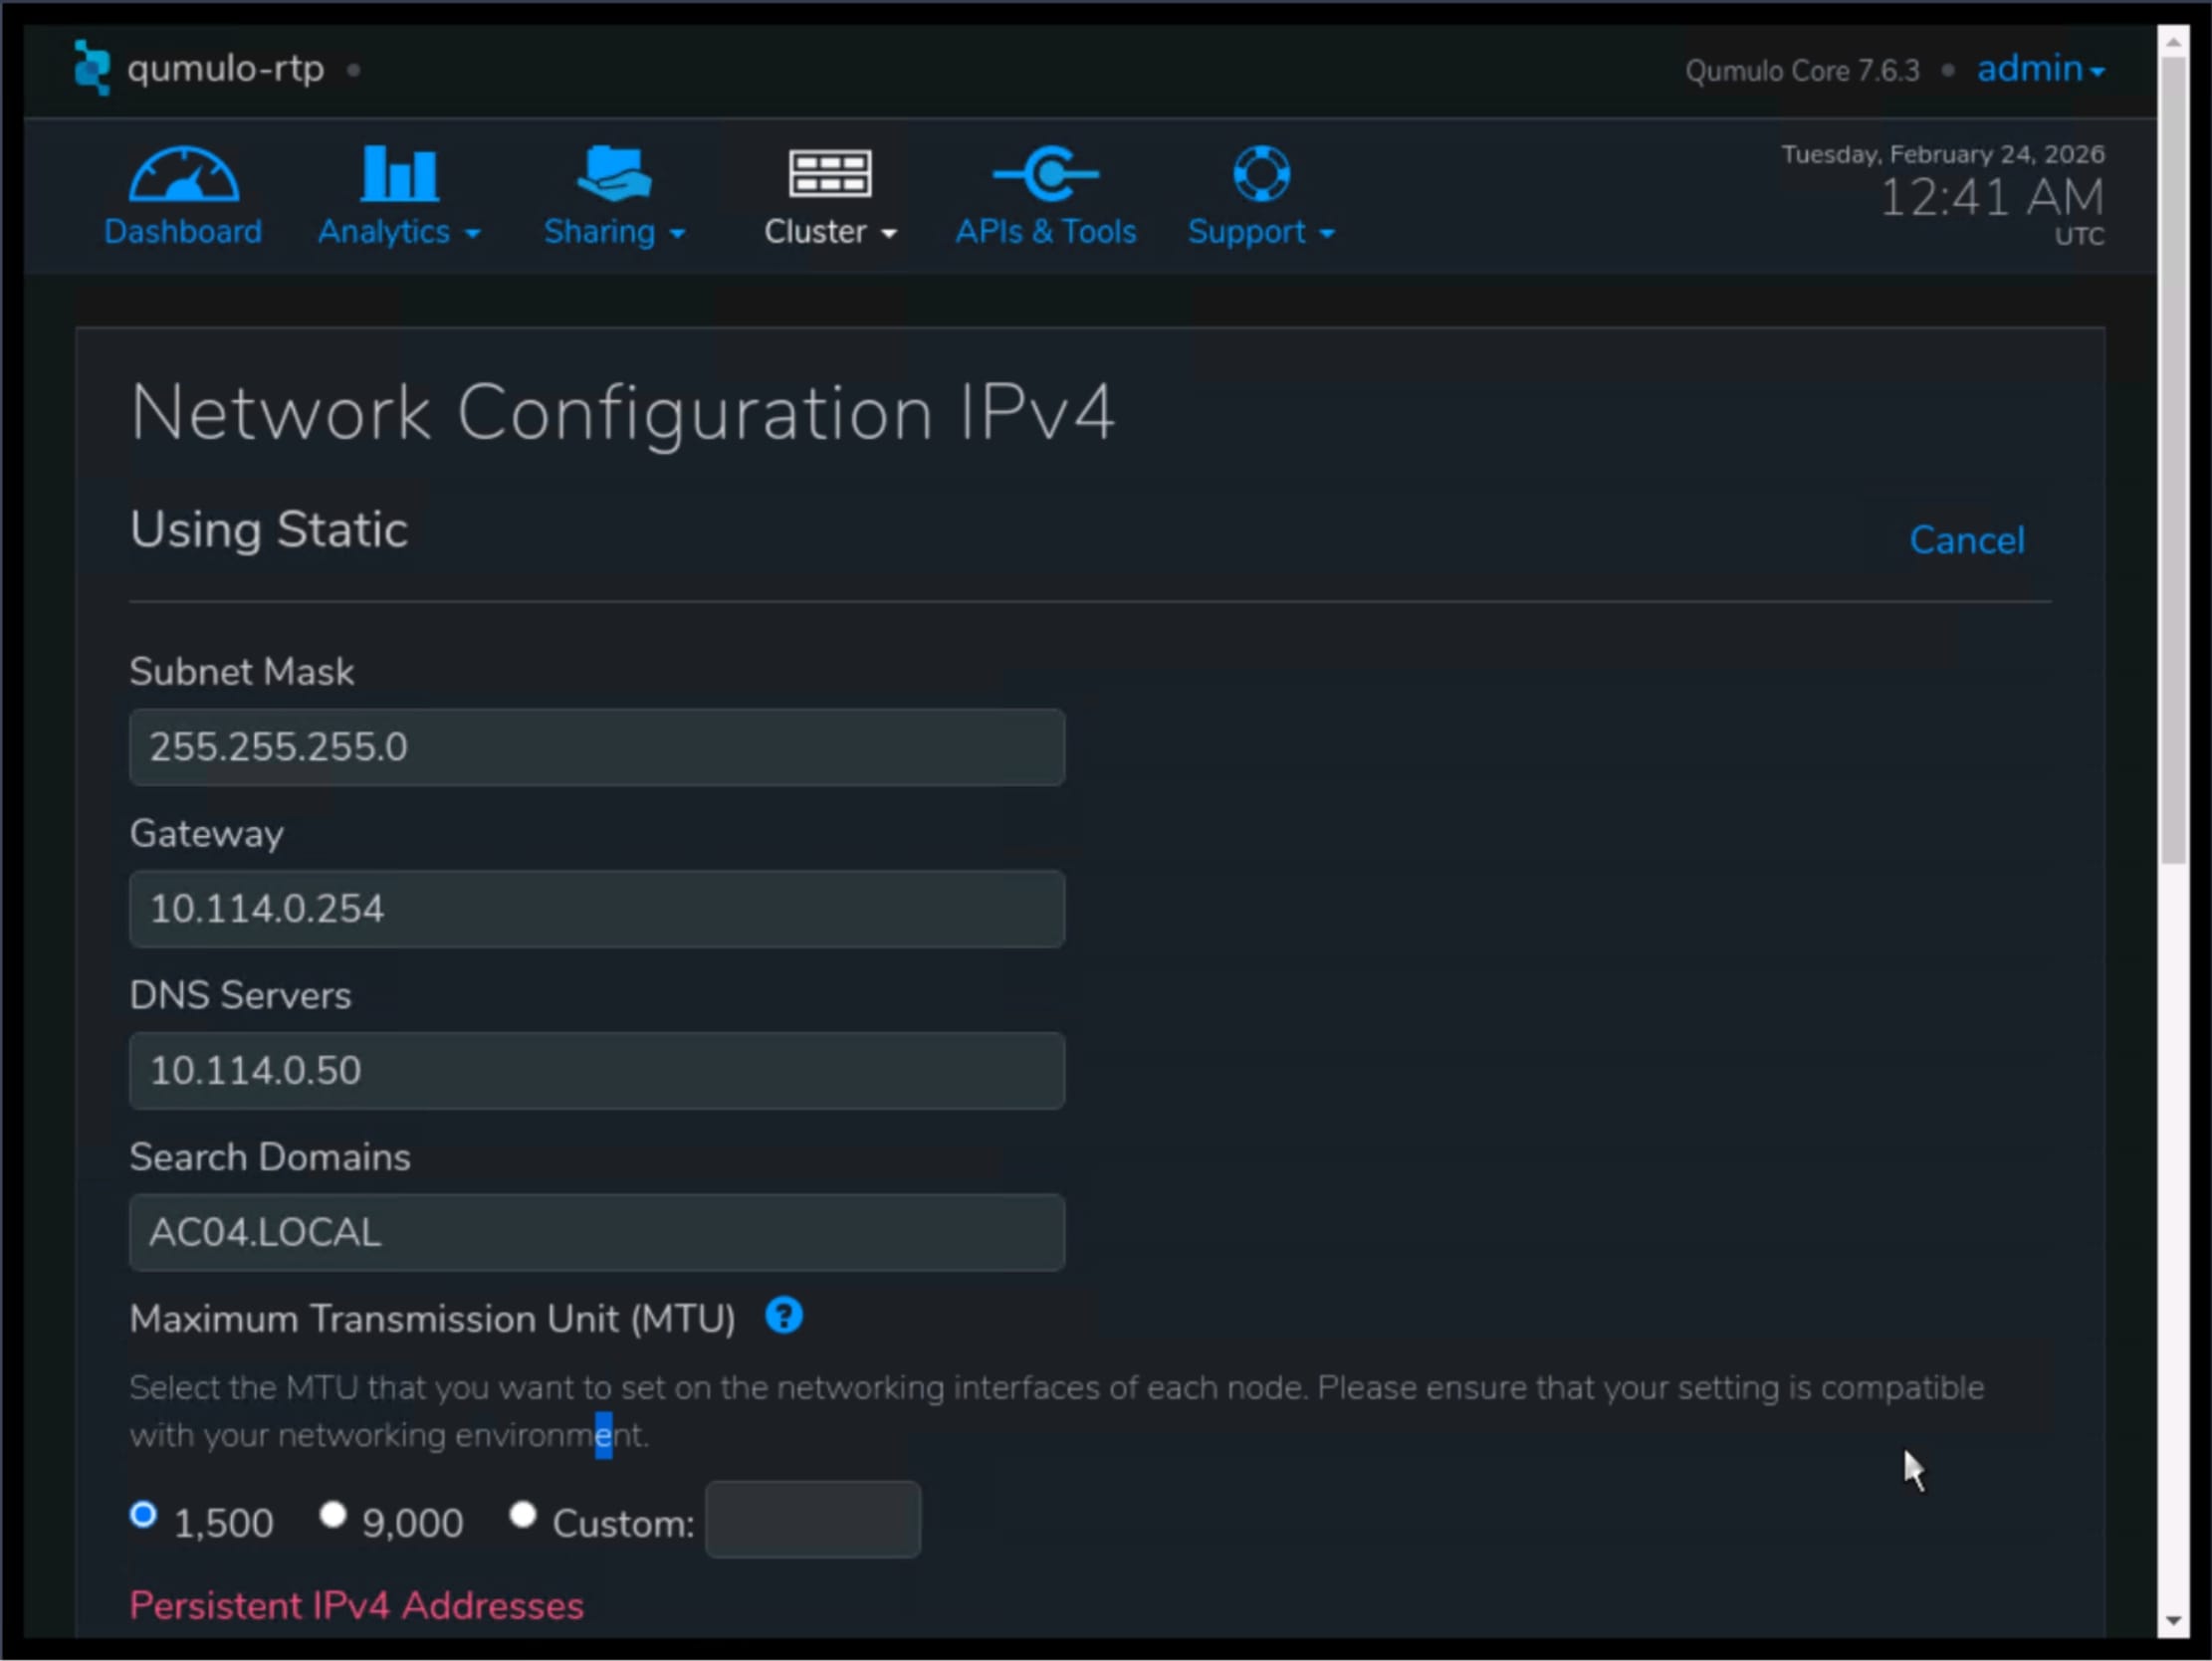
Step 7. Click Save to apply the new network configuration.
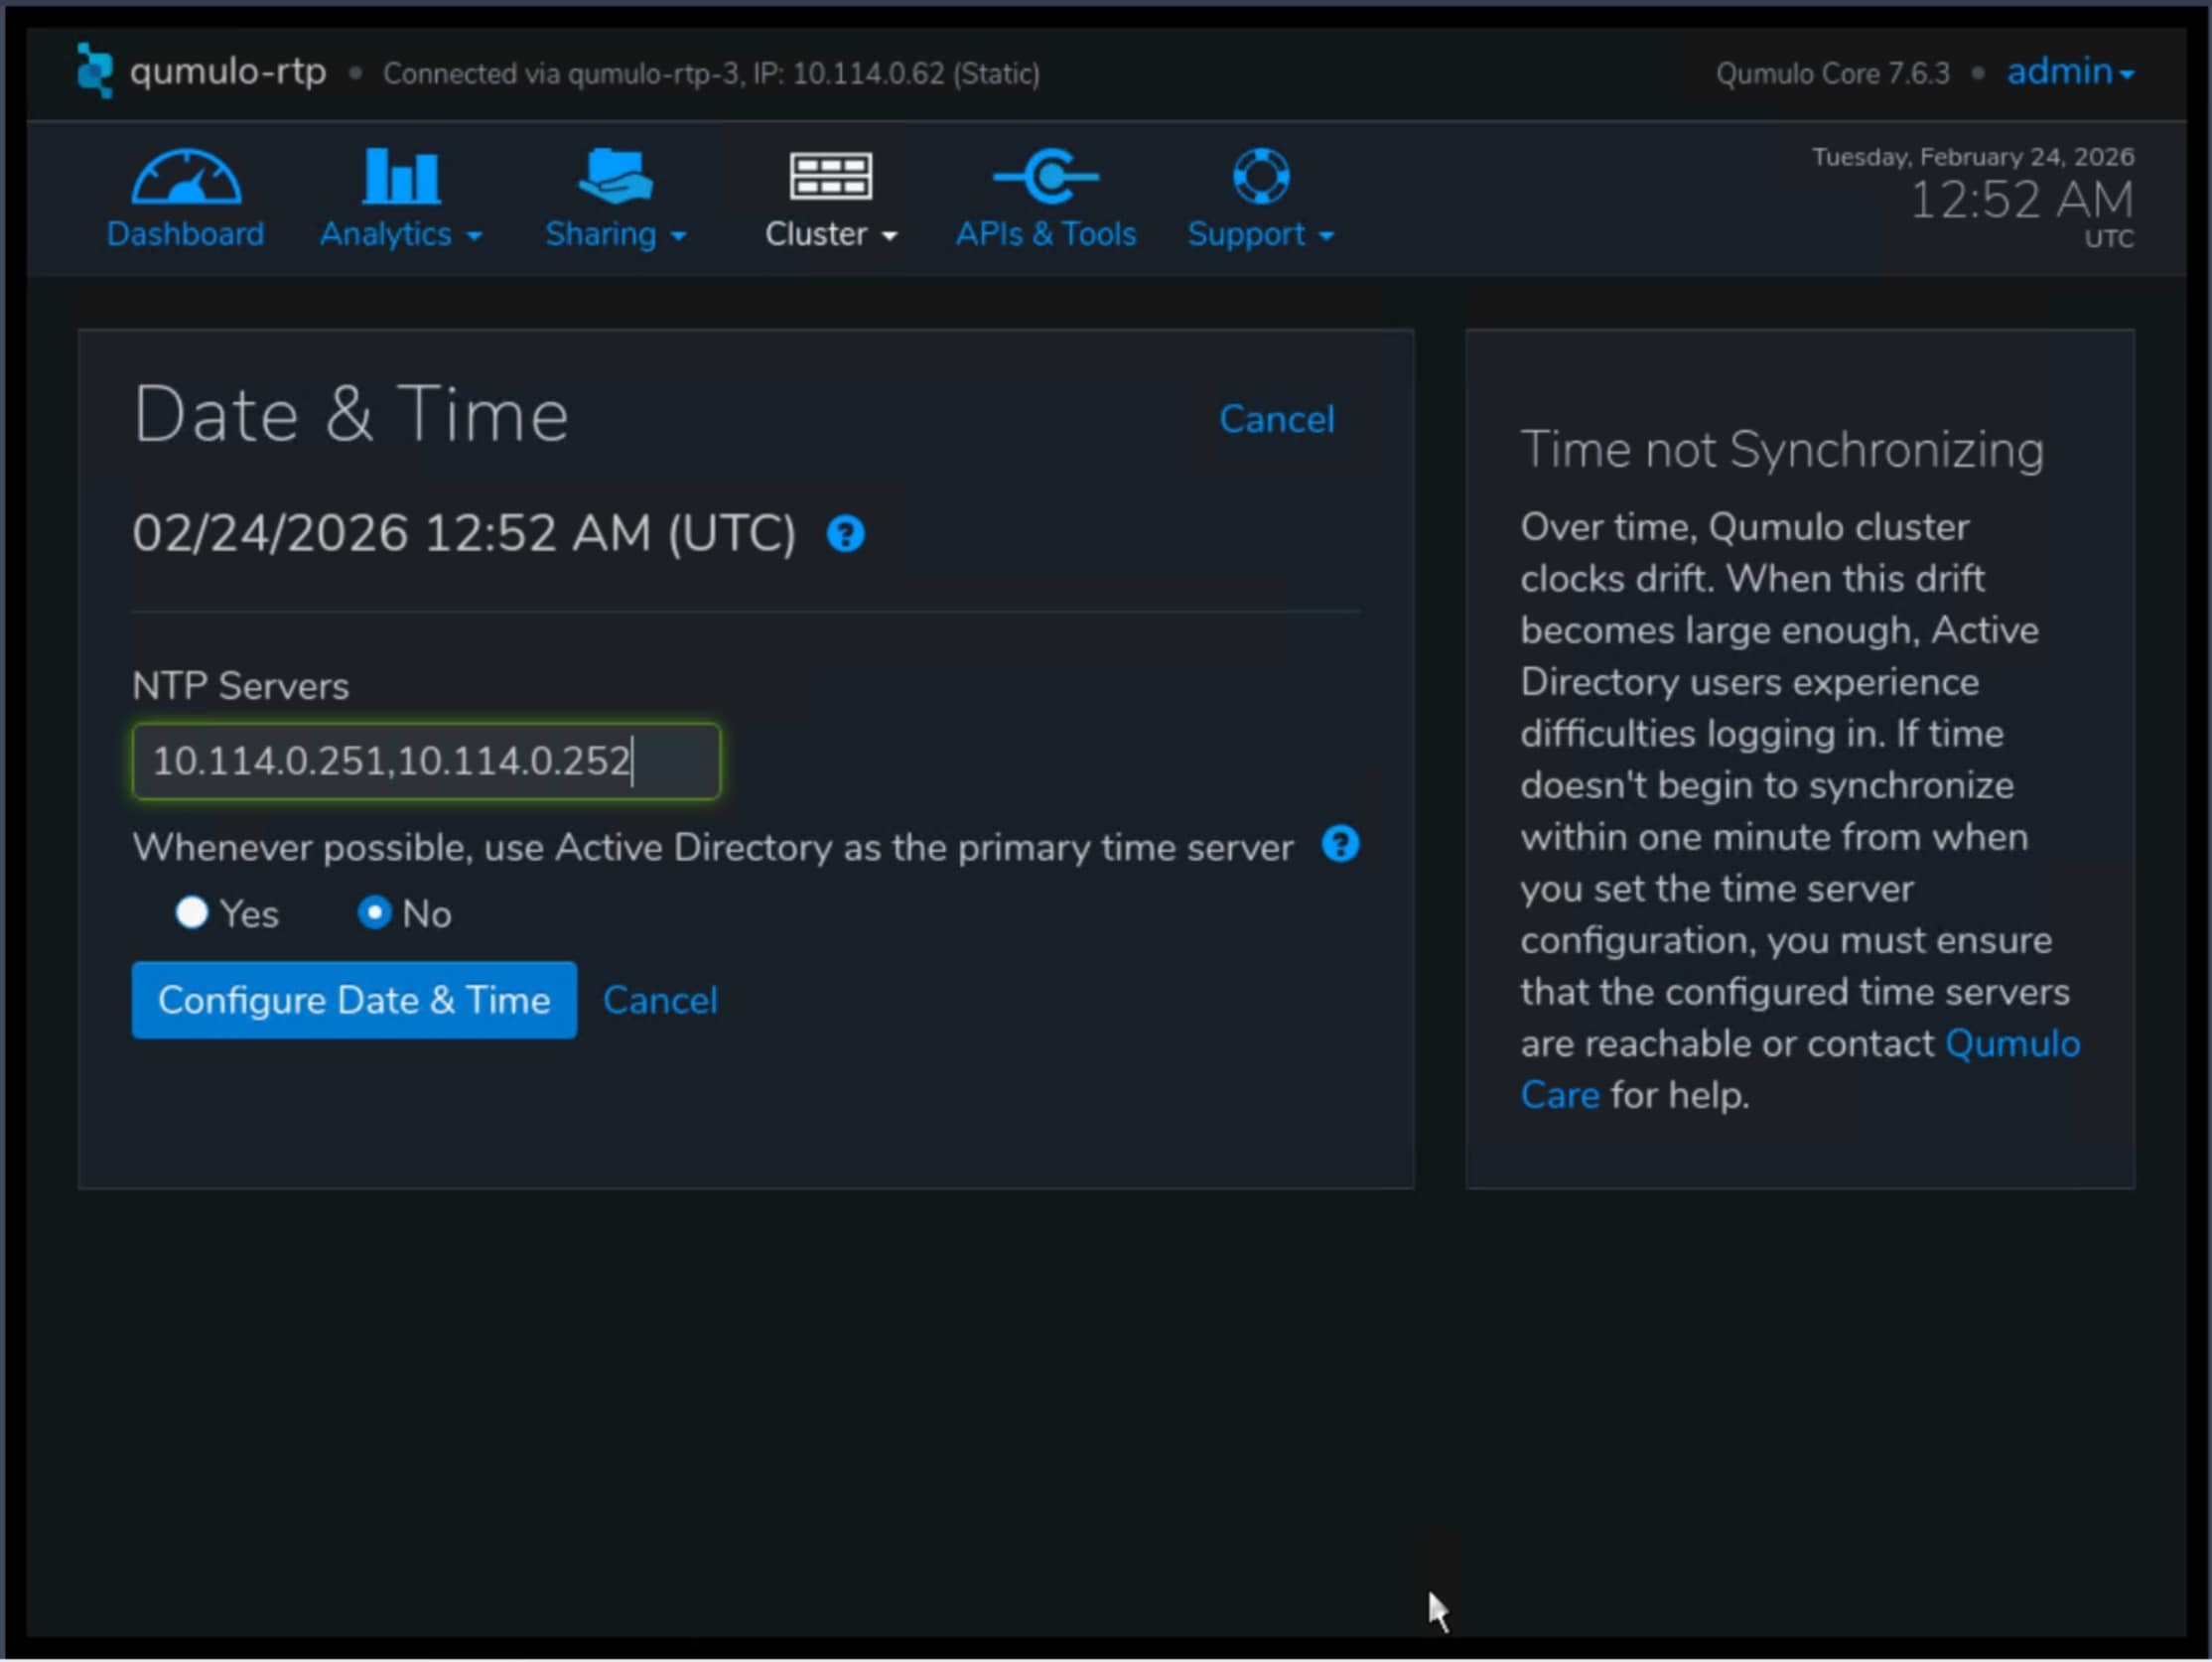
Step 8. Navigate to Cluster menu, select Date and Time and click Edit.
Step 9. Configure appropriate for your environment settings.
Post-installation and advanced configuration
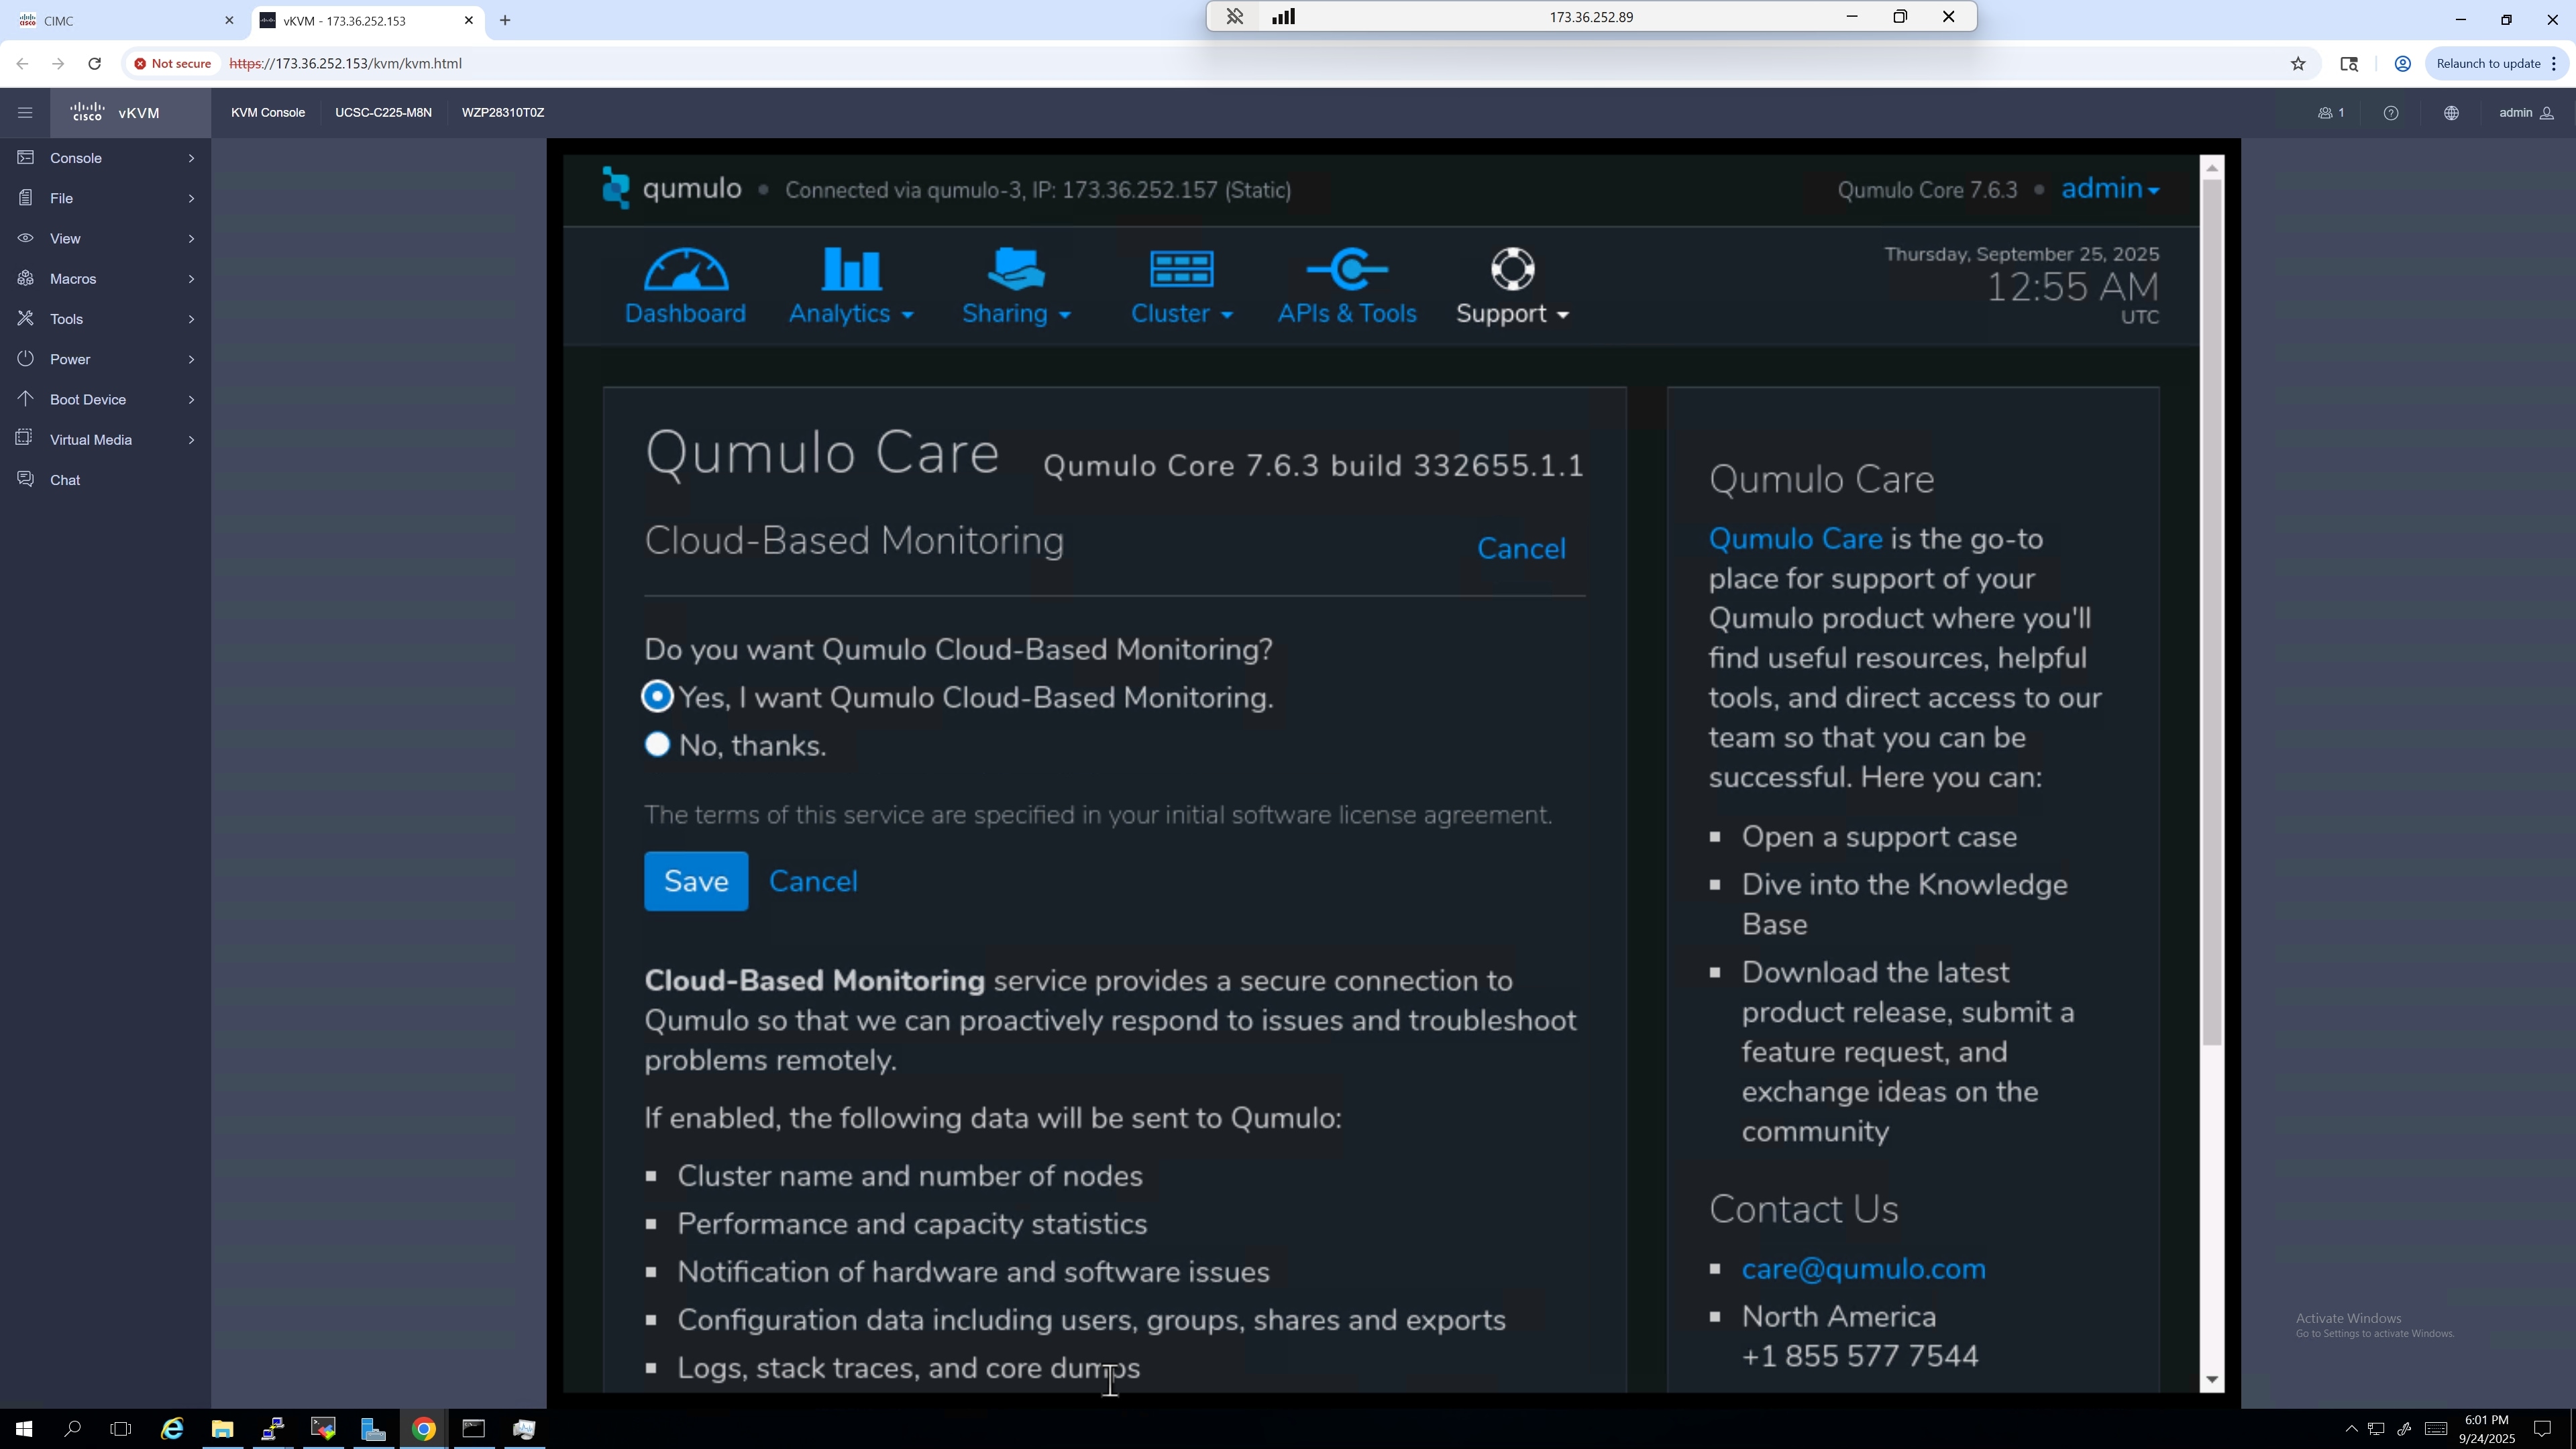
After the initial setup, you can further configure your Qumulo cluster on the Support page:
Step 1. Click Edit for Cloud-Based Monitoring.

Step 2. Enable cloud-based monitoring for proactive alerts on drive errors, failures, capacity, and other incidents.
Configure 802.1Q VLANs on a Qumulo Core 7.6.3 cluster
We used vlan 1140 Out-of-Band (OOB), for all the frontend (user-facing) cluster communication.
To configure 802.1Q VLANs on a Qumulo Core 7.6.3 cluster for VLAN 1140, you can use the qq CLI. Qumulo uses a single logical bond (bond0) for all traffic, and VLAN tagging allows you to segment different types of over that same physical bond.
Note: This operation can only be performed using the qq.
Step 1. Log in to any node as admin.
Step 2. Run the following command:
qq network _ add _ network \
--name “OOB _ VLAN1140” \
--vlan-id 1140 \
--ip-ranges <NODE _ STATIC _ IPS> \
--floating-ip-ranges <CLIENT _ FLOATING _ IPS> \
--netmask <NETMASK> \
--mtu 1500
Step 3. Verify creation on Kiosk Cluster Network Configuration.

Create NFS Share in Qumulo Core using Qumulo Kiosk
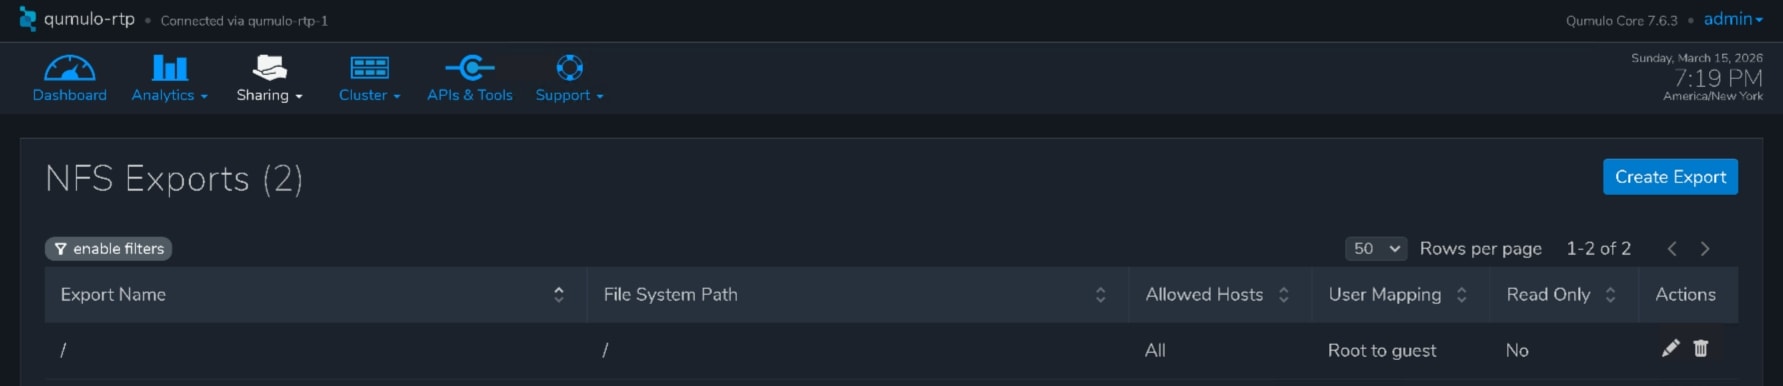
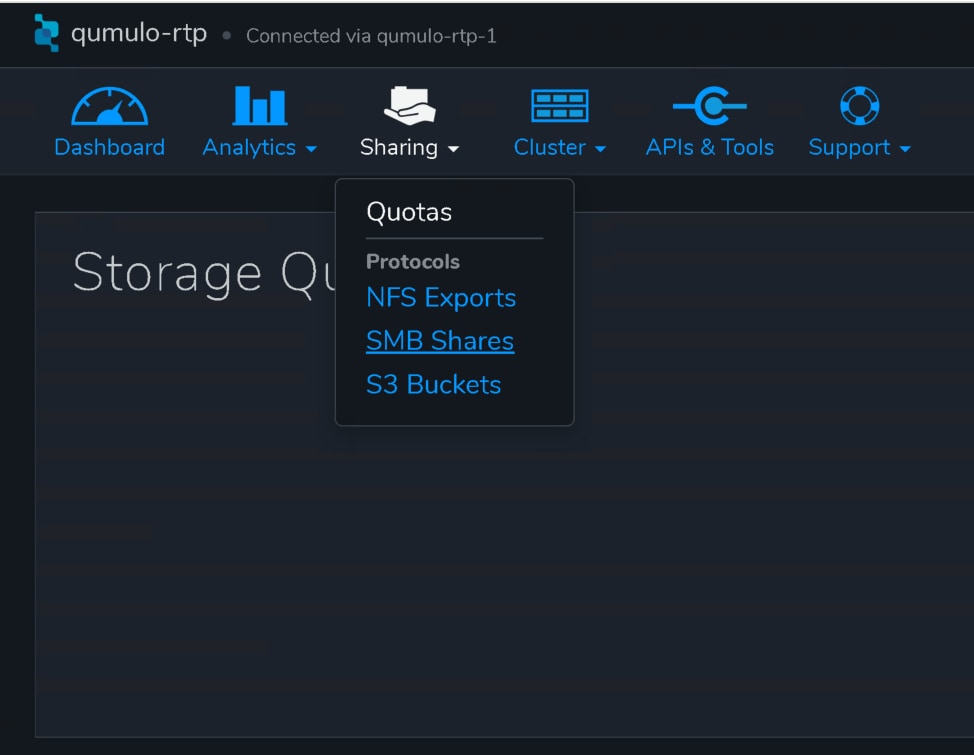
Step 1. In Qumulo Kiosk, navigate to Sharing and select NFS Exports.
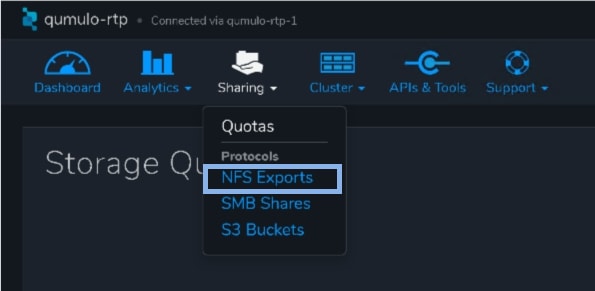
Step 2. Select Create Export.
Step 3. Configure the following parameters:
1. Filesystem path
2. Create new directory, if it doesn’t exist.
3. Export path
4. User Mapping (No mapping)
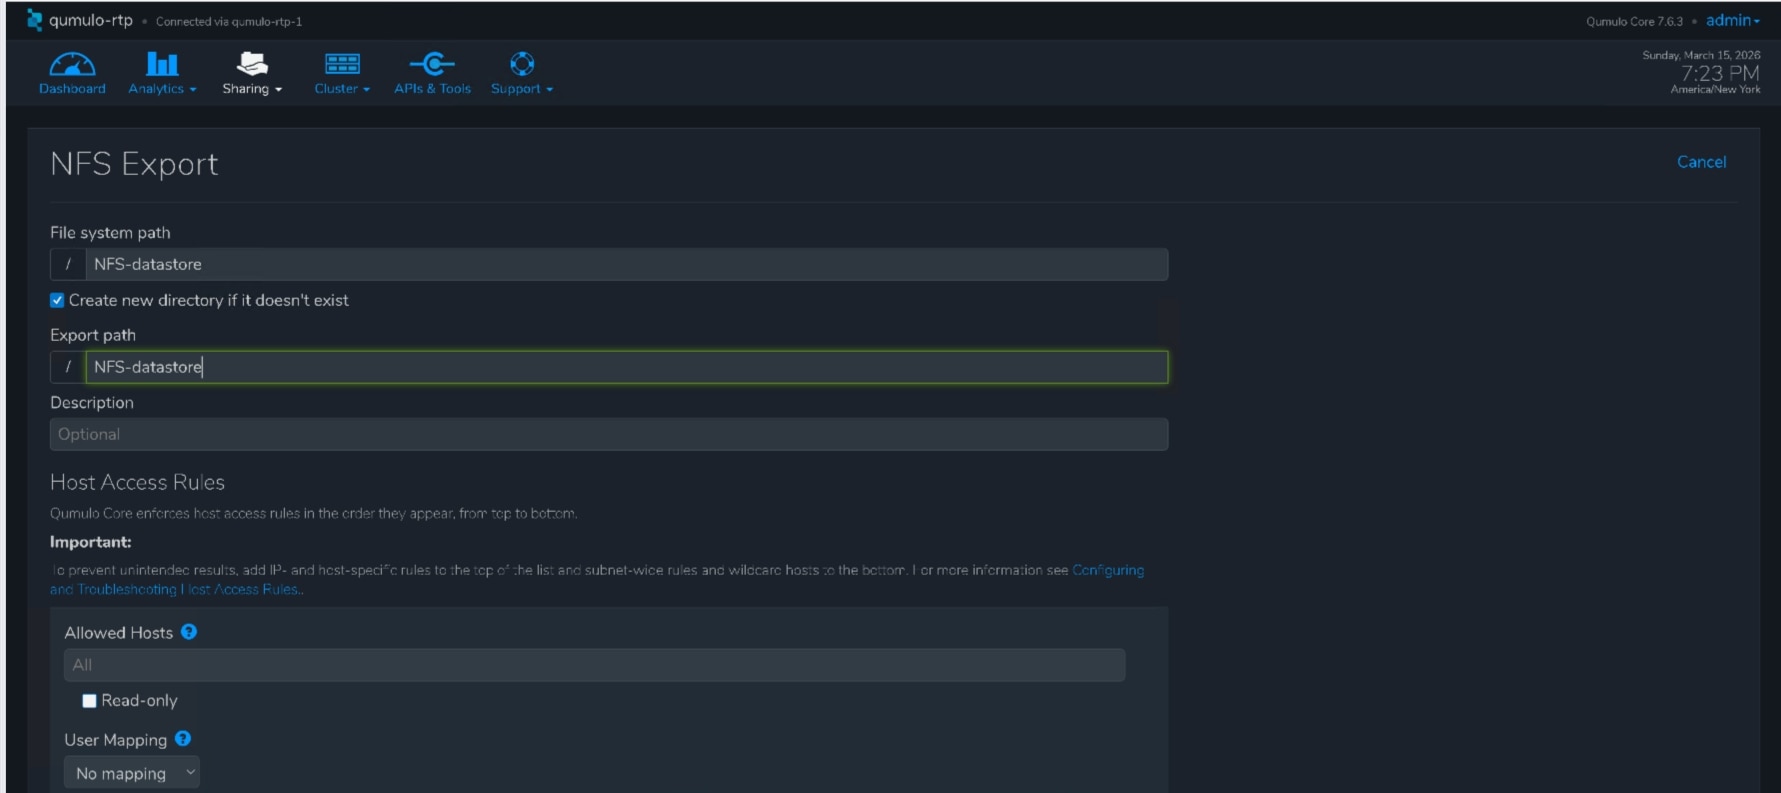
Step 4. Click Save.
Join a Qumulo Cluster to Active Directory in Qumulo Core using Qumulo Kiosk
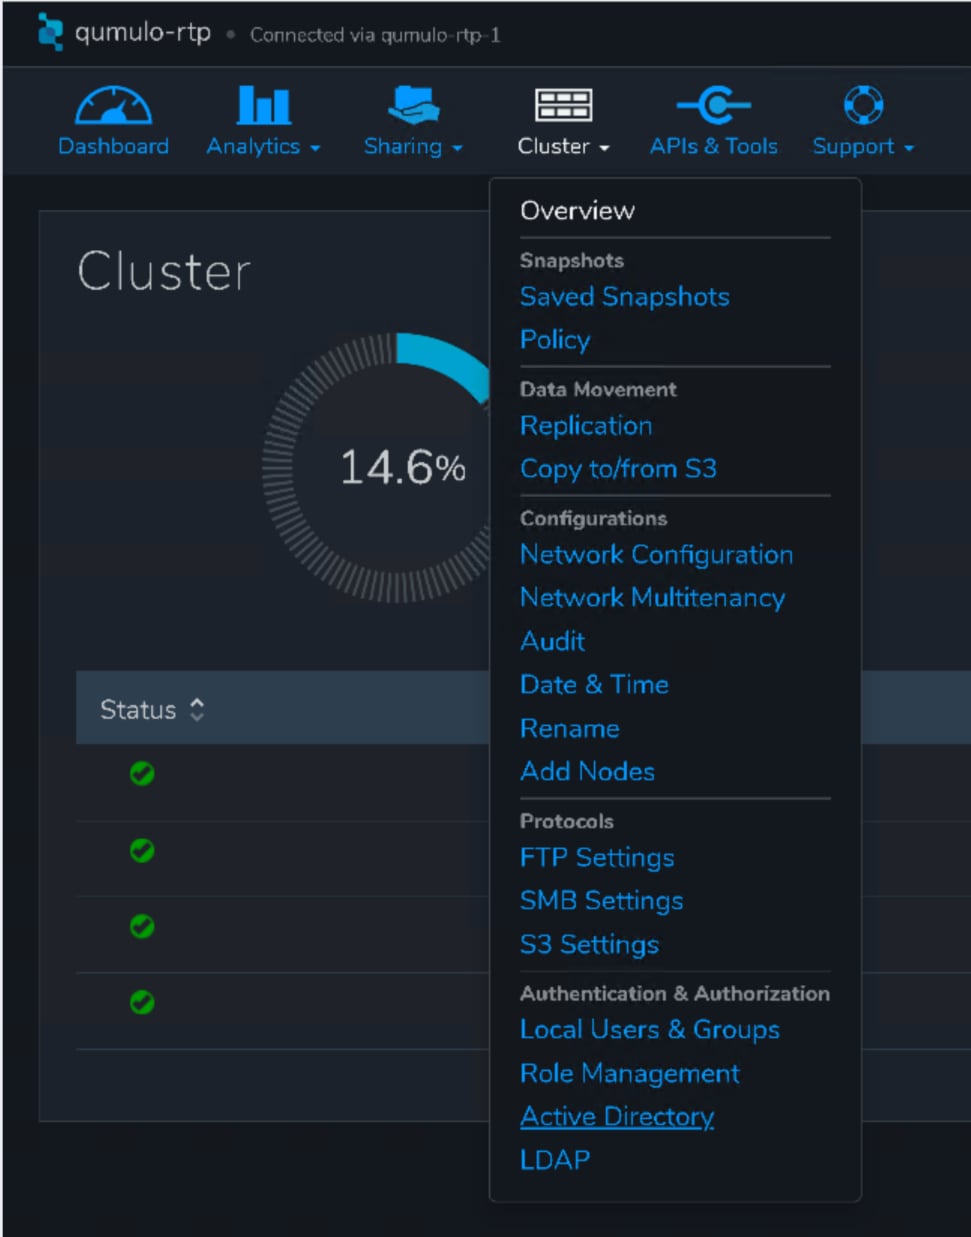
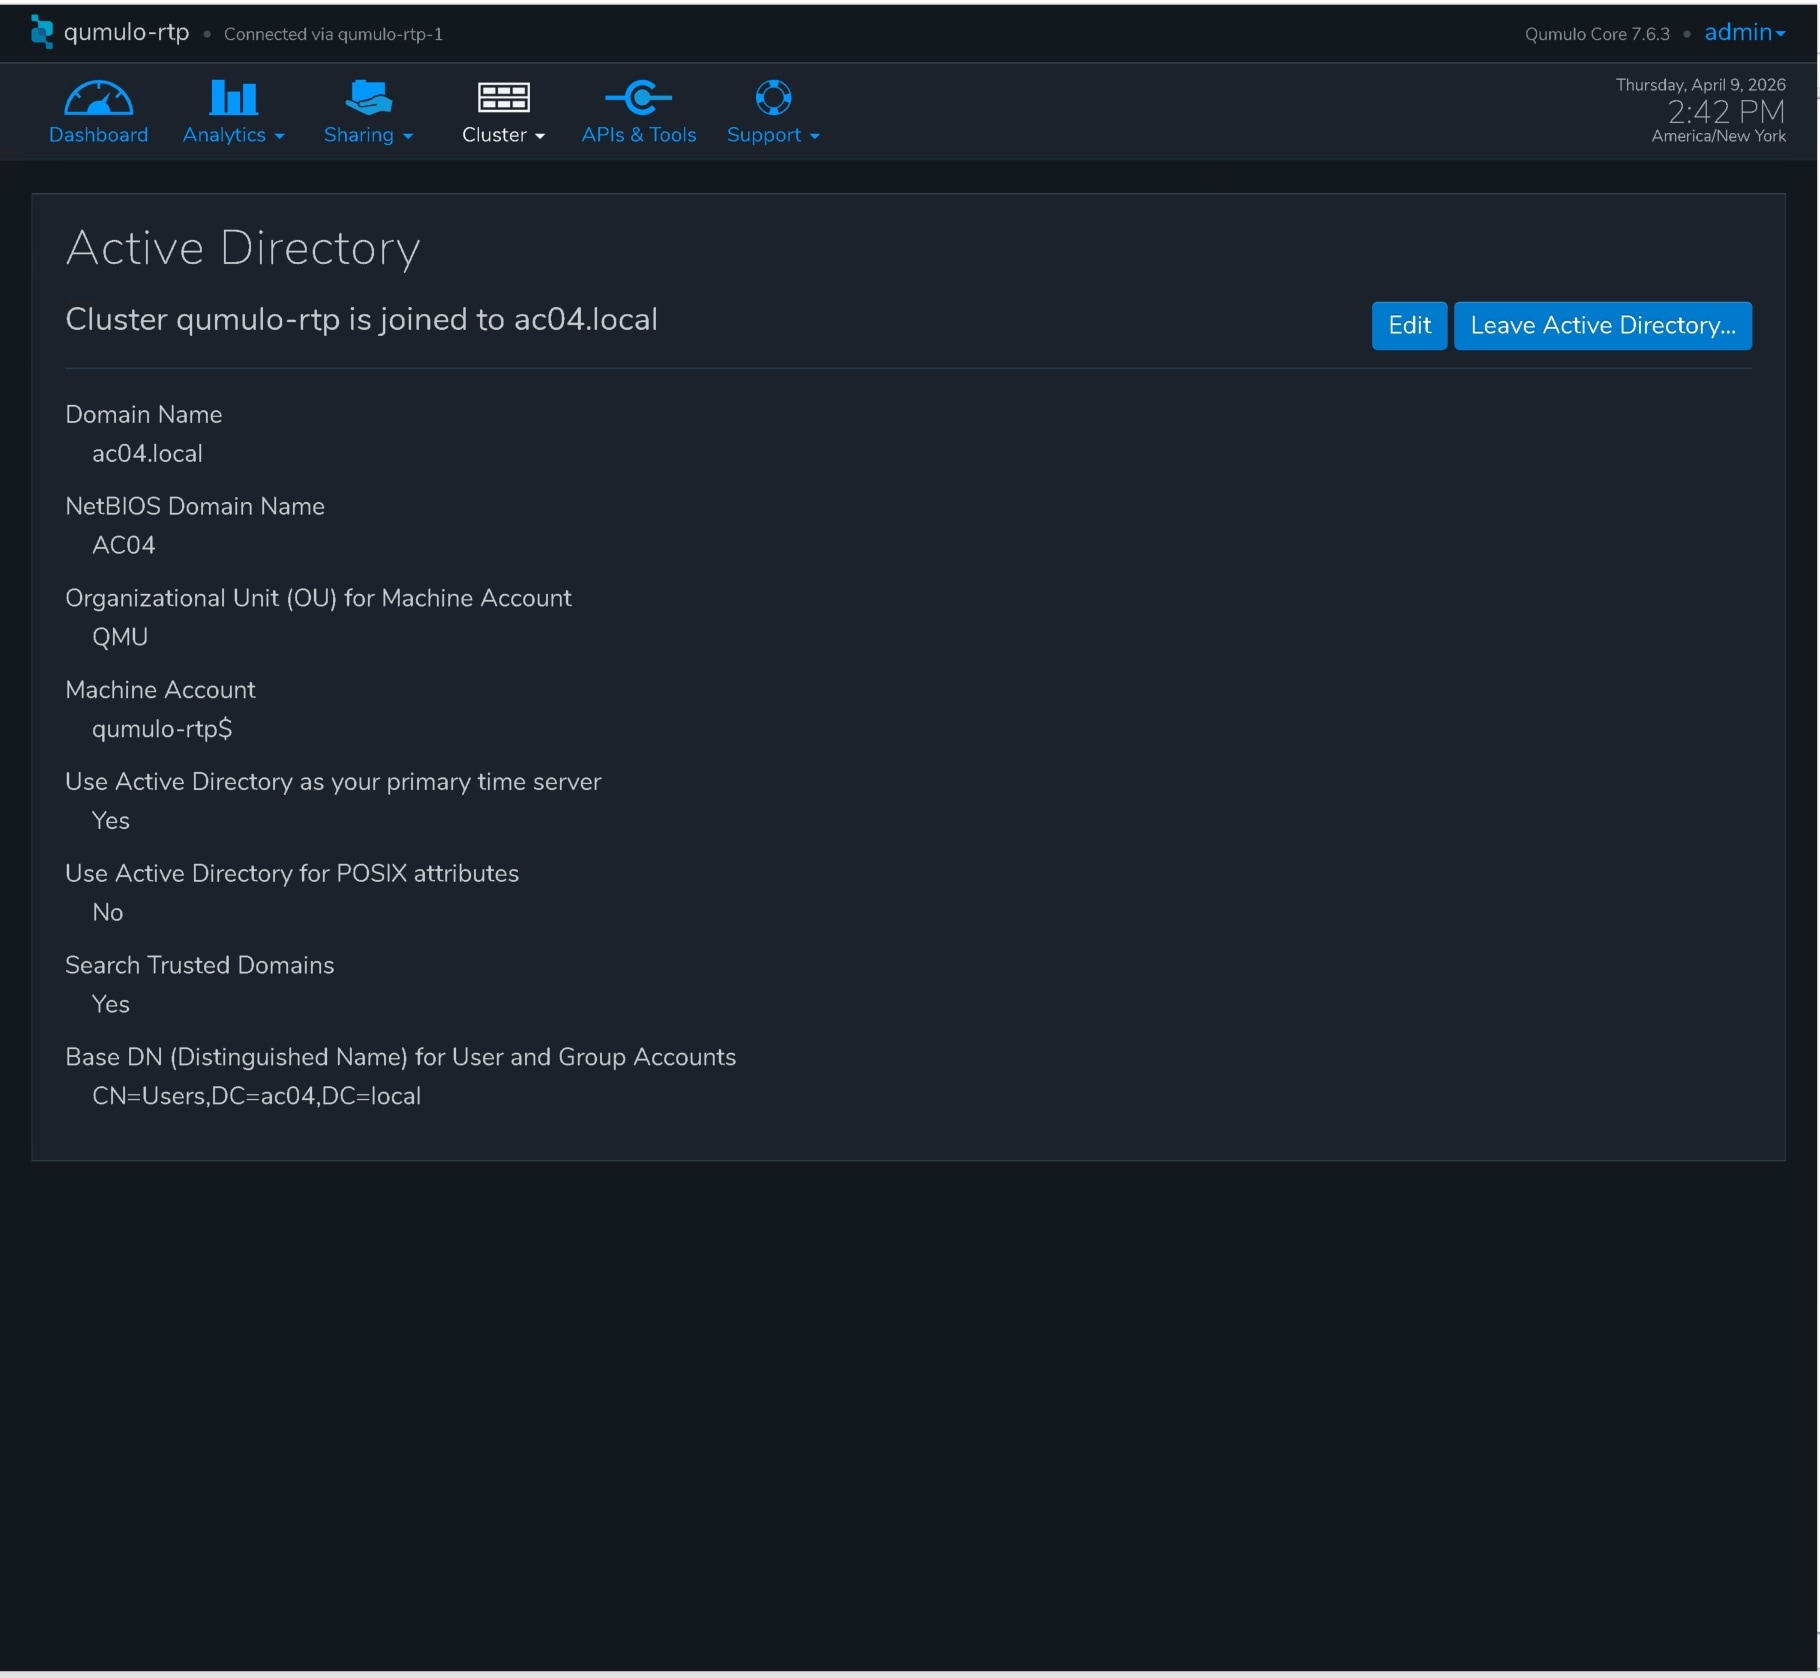
Step 5. In Qumulo Kiosk, navigate to Cluster and select Active Directory.
Step 6. On the Active Directory page, configure the following parameters:
1. Domain Name
2. Domain Username (name of a user account or service account)
3. Domain Password
4. Organizational Unit for Machine Account (optional)
5. Yes for Use Active Directory as your primary time server
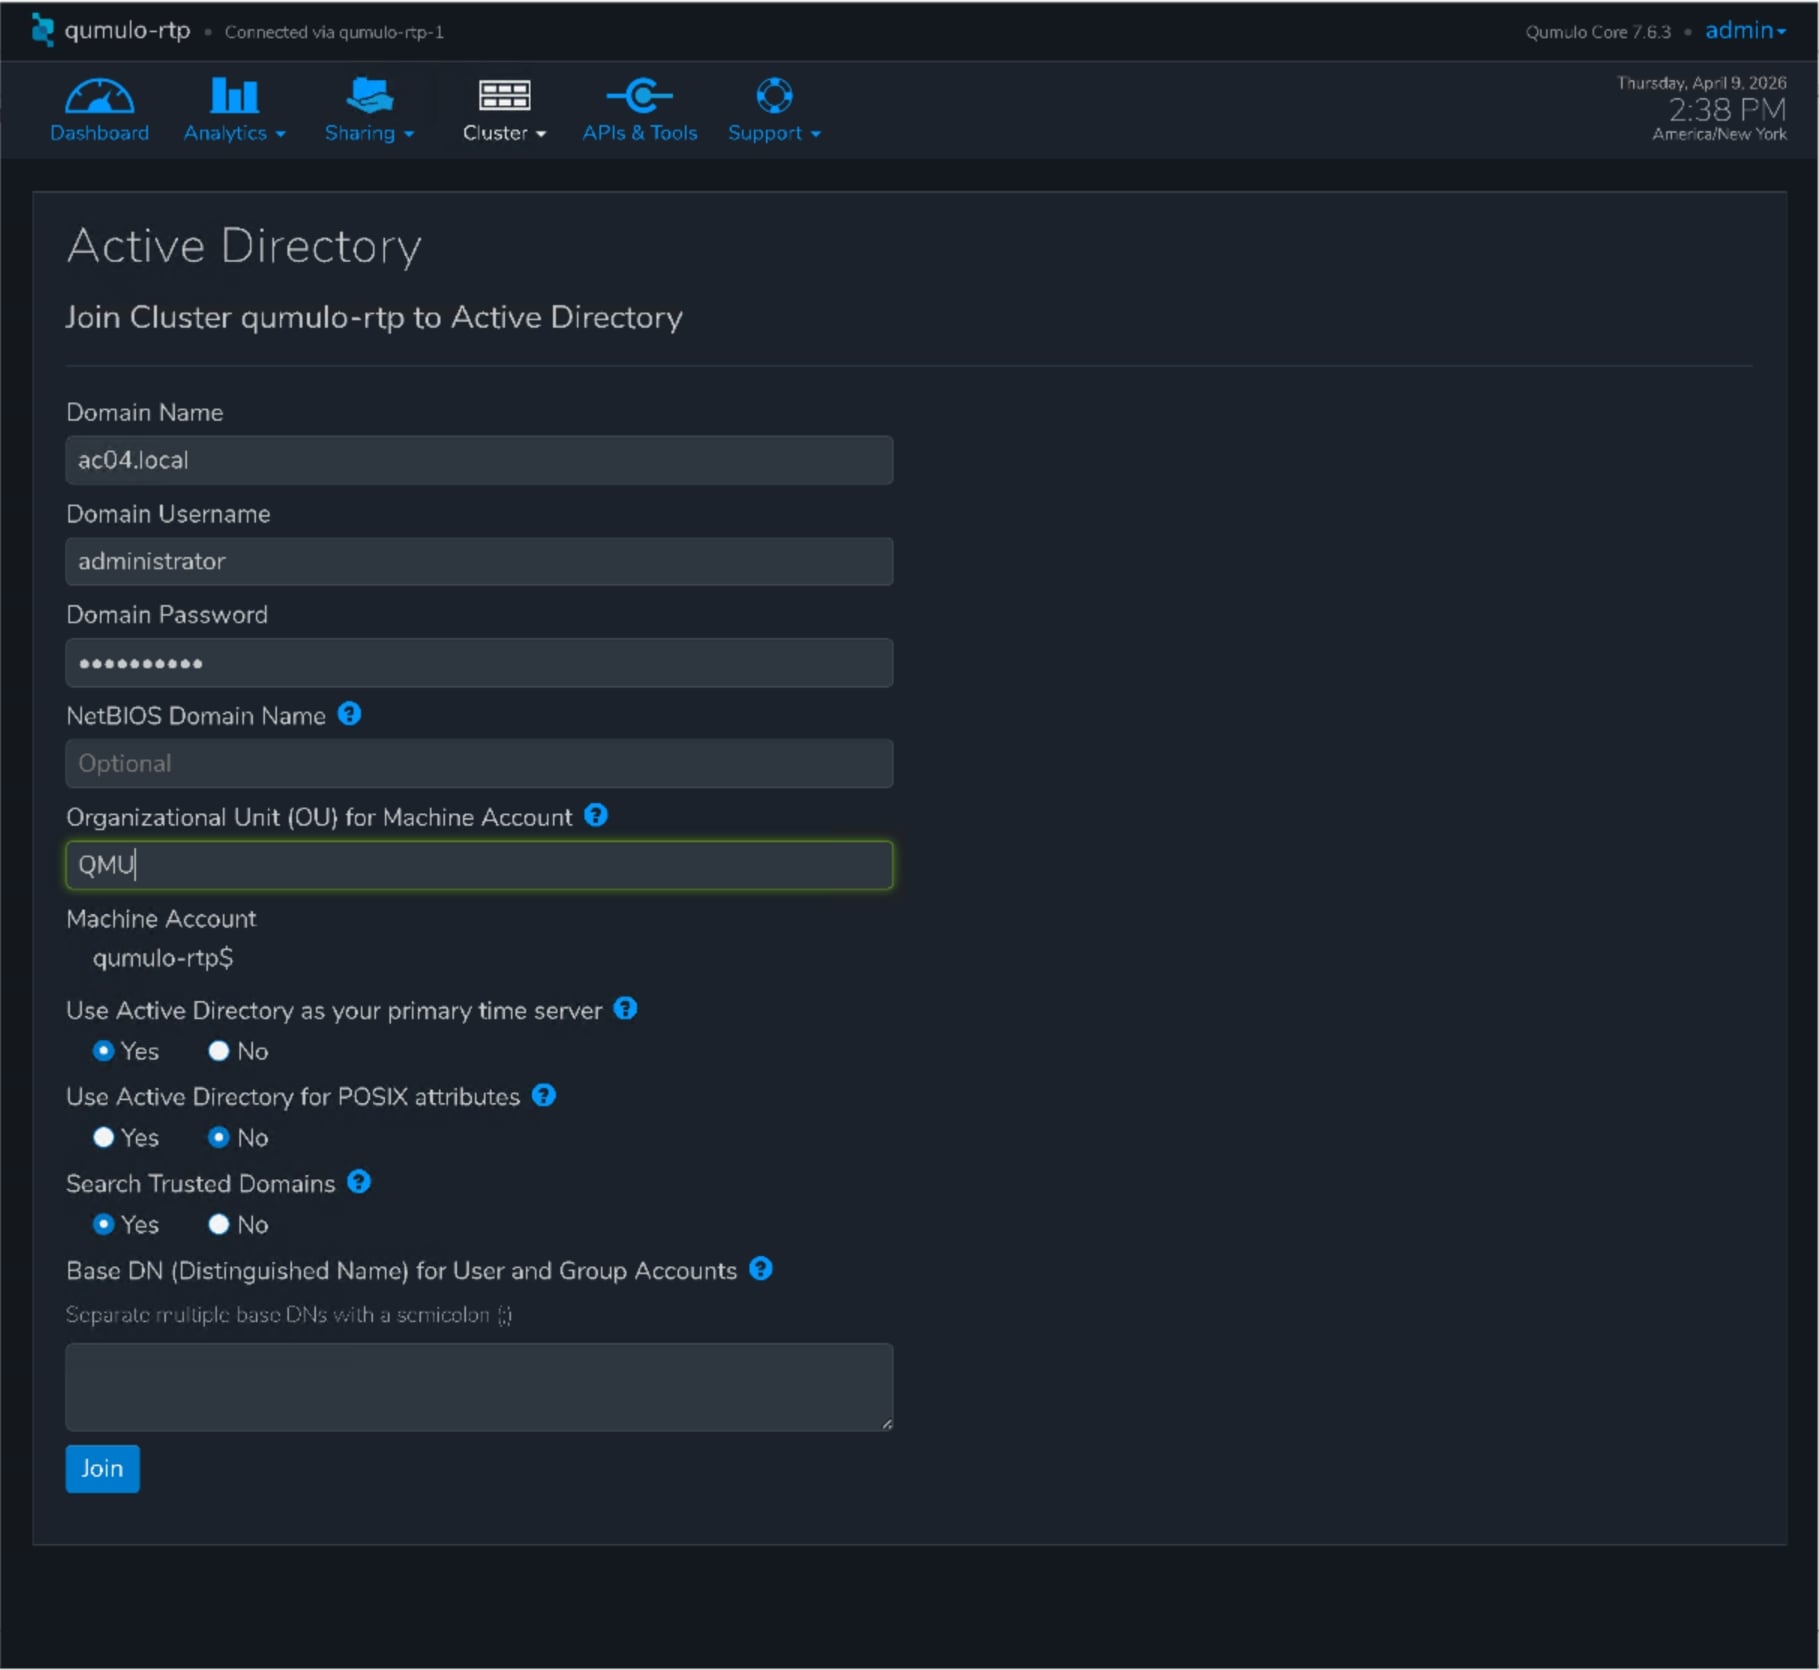
Step 7. Click Join and successful join operation
Create SMB Share in Qumulo Core using Qumulo Kiosk
Step 8. In Qumulo Kiosk, navigate to Sharing and select SMB Shares.
Step 9. Select Create Share.

Step 10. Configure the following parameters:
1. Filesystem path
2. Create new directory, if it doesn’t exist.
3. Enter Share Name.
4. Specify Share Permissions.
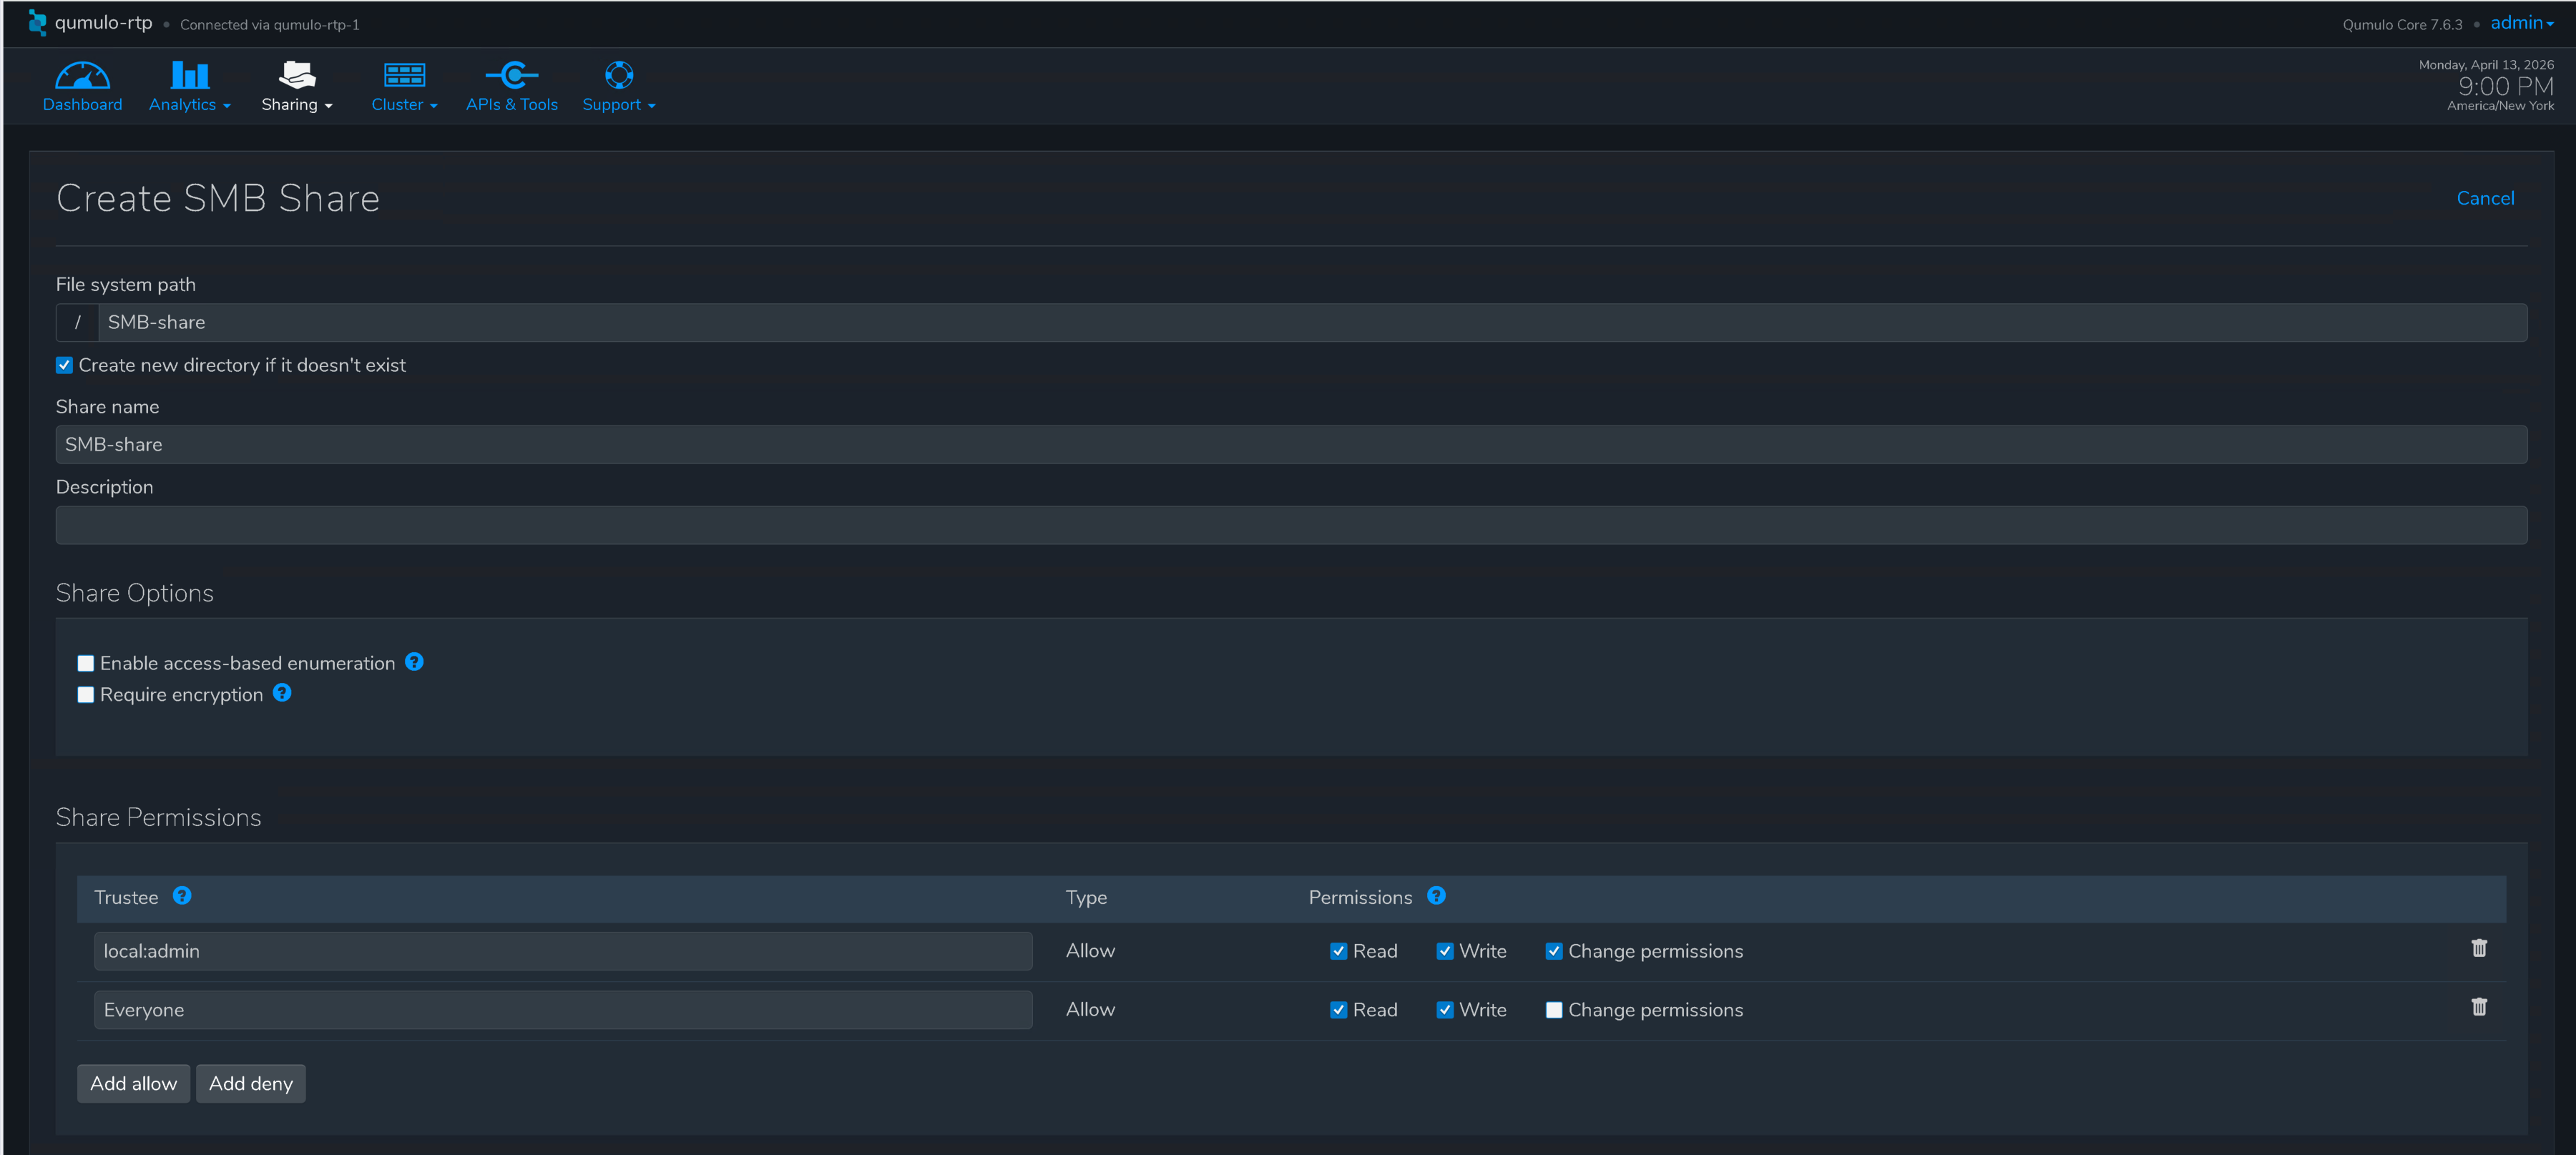
Step 11. Click Create Share.

Mount and access NFS share on Linux client
Note: It is a best practice to enable QDNS resolution. This allows your Qumulo cluster to provide load balancing for inbound connections by hosting a delegated DNS zone.
Mount NFS share to start using it by executing the command:
sudo mount -t nfs -o vers=3 qumulo-rtp:/NFS-datastore /mnt/<mount point>
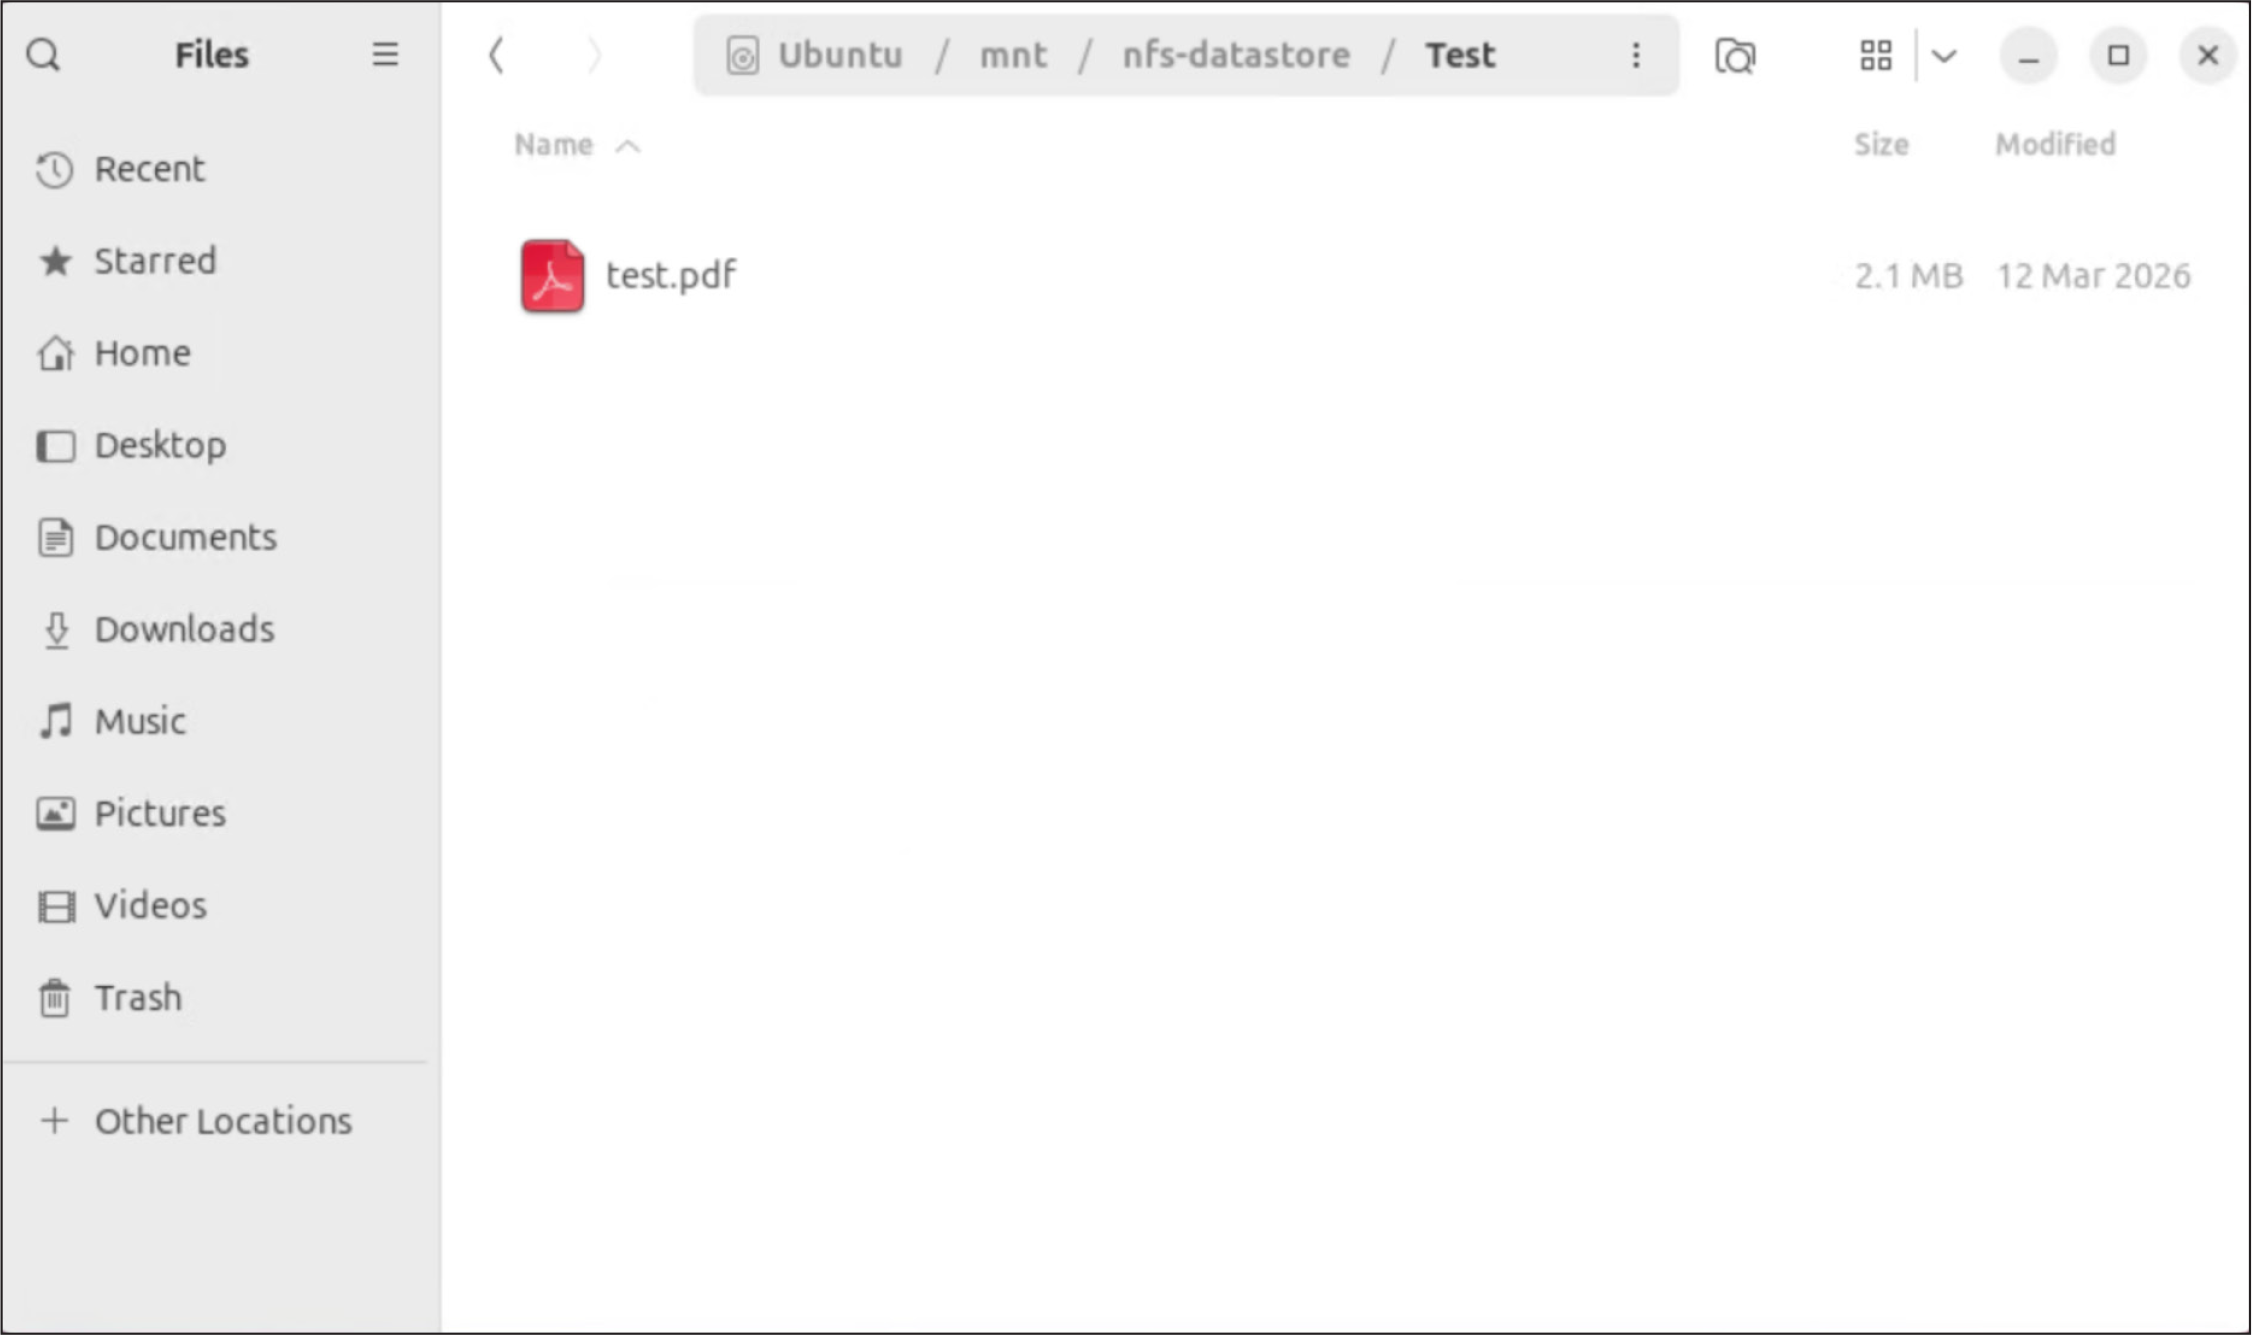
NFS share on the Qumulo Core cluster used by Ubuntu client
Mount SMB share on Windows client
Note: It is a best practice to enable QDNS resolution. This allows your Qumulo cluster to provide load balancing for inbound connections by hosting a delegated DNS zone.
Navigate to \\qumulo-rtp\SMB-share\Test and start using the share.
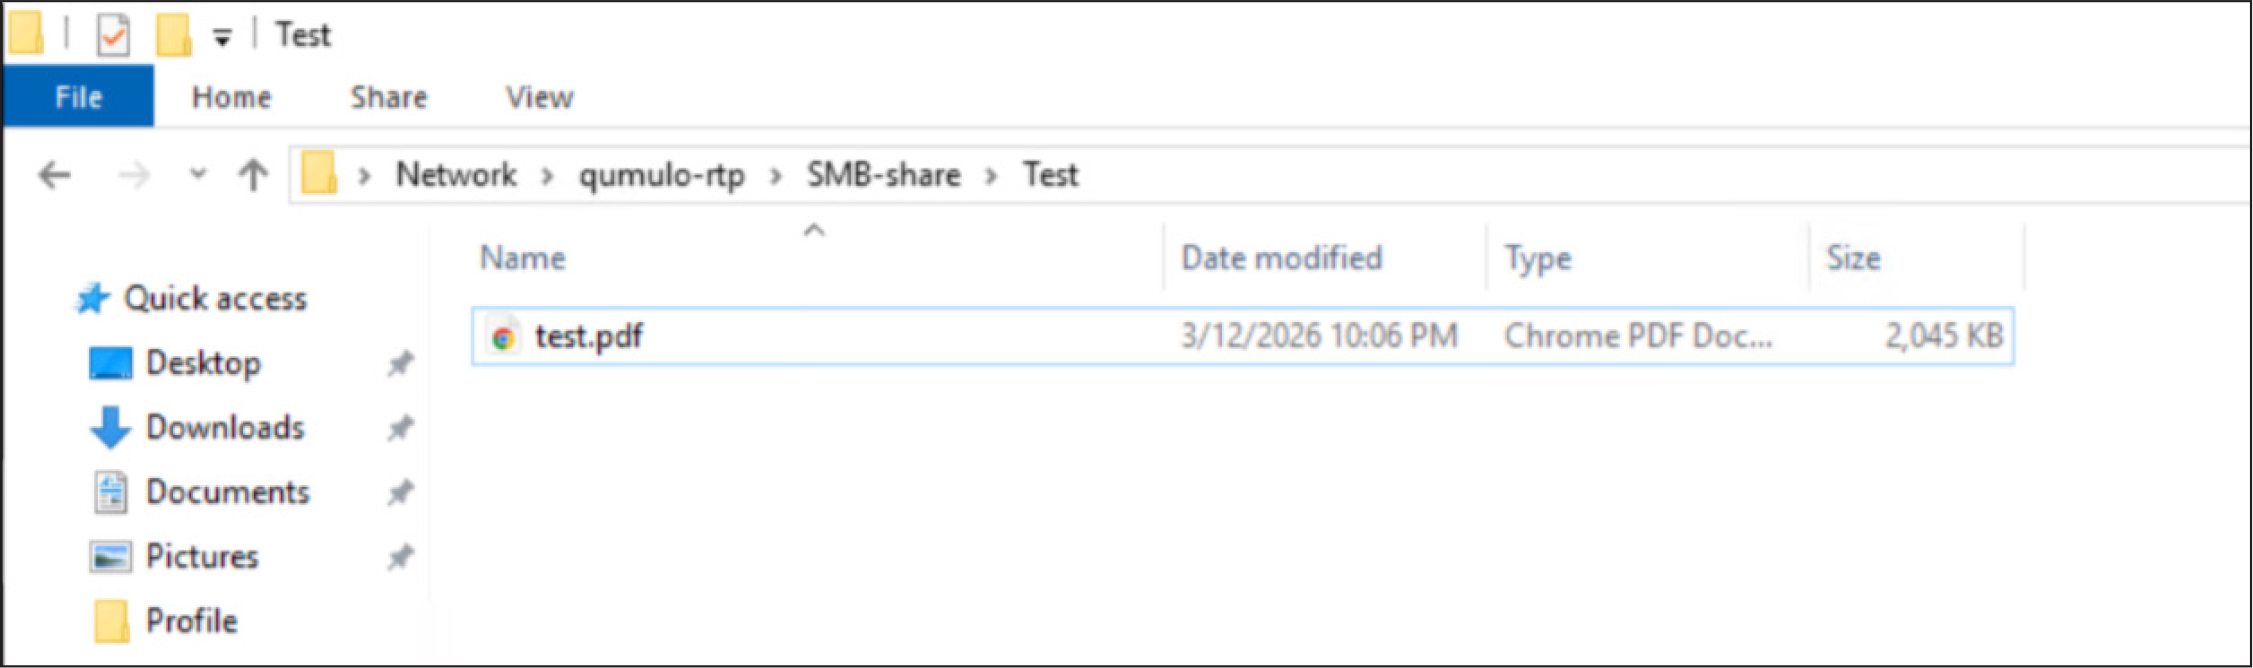
SMB share on the Qumulo Core cluster used by Windows Server client
Deploying Qumulo on Cisco UCS rack servers managed with Intersight offers a scalable, high-performance software-defined storage solution that is suitable for a wide variety of enterprise applications. This deployment leverages Cisco UCS servers’ robust I/O throughput and capacity combined with Qumulo’s scalable data platform to handle demanding workloads, ensuring low-latency and multi-protocol access that supports a wide range of data formats and workloads. The integration with Cisco networking components and Cisco Intersight management platform further simplifies operations by enabling centralized, blueprint-driven, provisioning and management of infrastructure and policies across multiple locations. This unified approach reduces operational overhead and accelerates deployment times, allowing IT teams to focus on strategic innovation.