Cisco Secure Client Tamper Resistance Guide
Available Languages
Bias-Free Language
The documentation set for this product strives to use bias-free language. For the purposes of this documentation set, bias-free is defined as language that does not imply discrimination based on age, disability, gender, racial identity, ethnic identity, sexual orientation, socioeconomic status, and intersectionality. Exceptions may be present in the documentation due to language that is hardcoded in the user interfaces of the product software, language used based on RFP documentation, or language that is used by a referenced third-party product. Learn more about how Cisco is using Inclusive Language.
Contents
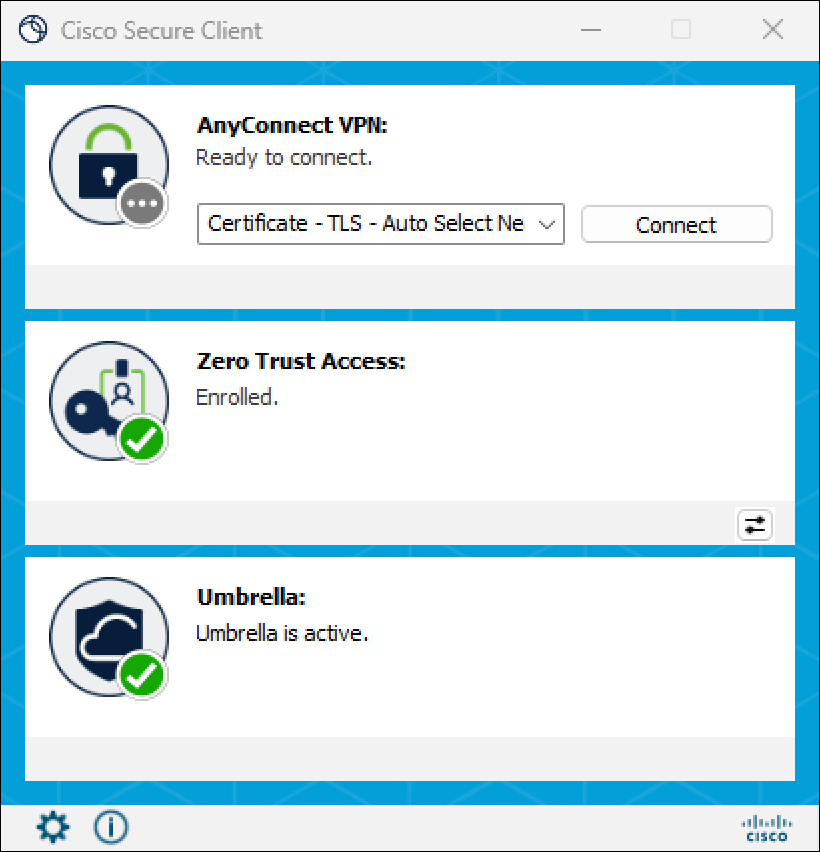
Cisco Secure Client is a unified endpoint security solution designed to support Secure Access customers by integrating key security modules such as VPN, Zero Trust Access (ZTA), and Umbrella Roaming Security. These modules collectively provide secure connectivity to corporate resources, enforce granular access policies, and extend DNS-layer protection even when devices are off the corporate network. The VPN module ensures secure remote access, the ZTA module enables least-privilege access based on user and device trust, and the Umbrella module offers roaming security by proxying DNS and web traffic to protect against threats like malware and phishing.
While these modules provide robust protection, their effectiveness relies on their ability to remain active and correctly configured. Tamper resistance is a critical security layer that ensures the integrity of the Secure Client installation by preventing unauthorized users or malicious processes from disabling, modifying, or bypassing these security controls.
Without tamper resistance, a device’s security posture can be compromised by accidental misconfiguration or intentional attempts to subvert corporate policies. By implementing tamper resistance through your Mobile Device Management (MDM) solution, you ensure that the security baseline remains enforced, guaranteeing that your endpoint protection remains consistent and reliable. This guide provides the necessary steps to configure and maintain this hardened state, ensuring that your Secure Client deployment remains resilient against unauthorized changes across your entire Windows and macOS fleet.
In Scope
● Tamper resistance configuration for Windows devices managed through Microsoft Intune
● Tamper resistance configuration for macOS devices managed through Jamf Pro
● Deployment and enforcement of tamper resistance for the following Secure Client modules:
◦ AnyConnect VPN
◦ Umbrella Roaming Security
◦ Zero Trust Access (ZTA)
● Configurations using Cisco Secure Access as the headend termination point. While Secure Access is used as the reference platform throughout this guide, the tamper resistance configurations described are generally platform-agnostic and can be applied to environments using alternative headends such as ASA, FTD, or Umbrella.
Out of Scope
● Linux, iOS, and Android devices are not covered by this guide
● MDM platforms other than Microsoft Intune and Jamf Pro
● Secure Client modules beyond VPN, Umbrella Roaming Security, and ZTA. While other modules may be referenced in passing, their tamper resistance configurations have not been validated and are not covered in this guide
● Deploying User Identity Certificates and Secure Access Root CA Certificates via MDM
● Enrolling devices into Intune or Jamf Pro. The guide assumes that the devices are already enrolled.
This guide is intended to provide best practices for improving the tamper resistance of Cisco Secure Client on both Windows and macOS endpoints by supporting configuration recovery, policy enforcement, and rapid remediation of unauthorized changes. It can help detect when services, agents, or related components have been stopped or disabled, when configurations have been altered, when permissions have been modified, or when software components have been removed, and it can support restoring the expected state through enterprise management platforms and endpoint management policies. However, it is important to recognize that these controls primarily support enforcement and recovery rather than absolute prevention. On both Windows and macOS, a user or process with sufficient administrative privilege can often stop services or daemons, change permissions, remove software, alter configurations, or otherwise circumvent local protections.
For that reason, effective tamper resistance in a corporate environment should be approached as a layered control strategy rather than a single technical safeguard. The most important preventive measure is minimizing and tightly controlling local administrative access. Additional enterprise controls such as application control, centralized device management, configuration compliance enforcement, operating system security features, and strong monitoring and alerting can significantly reduce the likelihood and impact of tampering. Platform protections such as BitLocker and Secure Boot on Windows, and FileVault and platform security controls on macOS, can also help reduce the risk of offline or alternate-boot modification of the endpoint.
In practice, the most effective model combines prevention, detection, and automated recovery. Preventive controls reduce opportunities for unauthorized change, monitoring provides visibility into attempted or successful tampering, and remediation mechanisms restore compliance when drift occurs. This document should therefore be understood as part of a broader endpoint hardening and operational security strategy for both Windows and macOS: it can materially improve resilience and response, but it should not be treated as a guarantee against compromise by users or attackers with elevated privileges.
Throughout this guide, references are made to example scripts hosted in the accompanying GitHub repository. These scripts were used to implement and validate the tamper resistance configurations described in this guide and represent a tested baseline for the approaches covered. While they may not be immediately applicable to every environment without modification, they are intended to serve as a practical starting point that demonstrates the core principles of each configuration. Organizations are encouraged to review, adapt, and extend these scripts to align with their specific operational requirements, module selections, and environmental constraints.
Implementing tamper resistance for Cisco Secure Client on Windows devices managed through Microsoft Intune involves a two-part approach. The first part focuses on deploying Secure Client modules as managed applications with specific scripts that lock down the installation. The second part leverages Intune's remediation script functionality to continuously monitor and enforce these attributes, ensuring that any deviation from the desired configuration is automatically detected and corrected. Together, these configurations establish a resilient security baseline that is both enforced at installation and actively maintained throughout the device's lifecycle.
● All target Windows devices must be enrolled in Microsoft Intune prior to beginning any configuration steps. This guide does not cover the Intune enrollment process.
● Administrative access to the Microsoft Intune Admin Center is required to create and assign Win32 applications, configure remediation script pairs, and manage deployment scopes.
● Access to the Cisco Secure Access dashboard is required to download the Cisco Secure Client pre-deployment package and gather the required module configuration files.
● The Microsoft Win32 Content Prep Tool must be downloaded from the official Microsoft GitHub repository before packaging can begin.
● The Microsoft Sysinternals PsTools suite is required on the designated test device to validate remediation scripts in the local system account context.
● The correct Cisco Secure Client pre-deployment package for your target Windows architecture (x86/x64 or ARM64) must be obtained prior to packaging. Confirm that the version meets or exceeds the minimum version requirement for your environment, as this value is referenced directly in the detection rule scripts.
● Managed devices must be able to reach Microsoft Intune service endpoints to receive application deployments and remediation script cycles.
● If your organization uses Cisco Secure Access SSL decryption policies, the domains used by Microsoft Intune must be excluded from SSL decryption, as inspection of Intune traffic can interfere with device check-ins, policy delivery, and application deployments. Refer to Microsoft's published list of Intune network endpoints for the complete set of domains that should be excluded.
● A valid Cisco Secure Access subscription and an active Microsoft Intune license assigned to all target devices or users are required prior to enrollment and policy assignment.
Deploying Windows Secure Client Modules via Intune
The installation script-based method described in this section was designed to address several limitations that arise when relying solely on the LOCKDOWN and ARPSYSTEMCOMPONENT attributes that can be applied to Cisco Secure Client modules at installation time. While those attributes provide a baseline level of protection, they have practical limitations that the script-based approach described in this guide is intended to overcome.
Most notably, the LOCKDOWN and ARPSYSTEMCOMPONENT attributes do not extend protection to the underlying Windows registry keys associated with each module's service or uninstall entry. A user or process with sufficient privileges can access those keys directly and modify or delete service configuration values or uninstall entries without being blocked, effectively bypassing the protections that those attributes were intended to enforce. This also leaves the acsock service, a core component shared across Cisco Secure Client modules, unprotected and vulnerable to being disabled, which can cause failures across dependent modules regardless of their own lockdown state.
The script-based approach described in this guide addresses these gaps by applying a layered set of controls that extend beyond the native installation attributes. In addition to restricting access at the Service Control Manager (SCM) level, deny-based ACLs are applied directly to service registry keys and uninstall entries, preventing modification even by accounts that might otherwise have sufficient registry privileges. The SystemComponent flag is reinforced with a protective ACL rather than left as the sole barrier against uninstallation. Finally, coverage is also extended to include Duo Desktop services and their associated registry keys as these services are used by the Cisco Secure Client ZTA module.
The installation scripts are used to deploy and manage the individual Cisco Secure Client modules on managed Windows devices via Intune Win32 app deployments. Each module is accompanied by a dedicated install script and uninstall script, both of which work in conjunction with a shared lockdown script and disable lockdown script to ensure that tamper resistance controls are correctly managed throughout the lifecycle of each module deployment. The following section describes each script and its intended function before diving into the steps required to package and deploy them within Intune.
● Install Scripts (VPN, Umbrella, ZTA): Deploying a Secure Client module onto a device where tamper resistance controls are already active presents a practical challenge. The restrictive service and registry security descriptors applied by the lockdown configuration, can prevent certain Secure Client module installers from completing successfully. To account for this, each module's install script follows a three-phase sequence. First, the disable lockdown script is run to remove all tamper resistance controls, with the exception of the SystemComponent registry DWORD, for Secure Client from the device. Second, the module's MSI installer is executed silently and without user interaction. Third, once installation completes successfully, the lockdown script is run to reapply the tamper resistance controls, restoring the device to its protected state. For the example install scripts used in this guide, reference:
◦ Umbrella Module - Install Script
● Uninstall Scripts (VPN, Umbrella, ZTA): Similar considerations apply when removing a Secure Client module from a device. Because the tamper resistance configuration actively restricts modifications to the installed modules, the uninstall process must first remove those controls before the module can be cleanly removed. Each module's uninstall script follows the same three-phase sequence as the install script. The disable lockdown script is invoked first, followed by the silent removal of the module, and finally the lockdown script is executed to reapply tamper resistance controls to any remaining Secure Client modules still present on the device. For the example uninstall scripts used in this guide, reference:
◦ VPN Module - Uninstall Script
◦ Umbrella Module - Uninstall Script
◦ ZTA Module - Uninstall Script
● Lockdown Script: The lockdown script is a shared utility invoked by both the install and uninstall scripts to enforce the full tamper resistance configuration. When executed, the script reviews the Secure Client and Duo-related services present on the device and ensures each is enabled and running. It then applies a layered set of security controls across three distinct surfaces. At the service control layer, a restrictive Security Descriptor Definition Language (SDDL) string is applied to each service via sc.exe sdset, limiting which accounts are permitted to interact with the service through the Service Control Manager. At the registry layer, a deny-based Access Control List (ACL) is applied to each service's registry key, preventing non-SYSTEM accounts from modifying the service configuration. Finally, at the uninstall layer, the SystemComponent flag is set on all Cisco Secure Client and Duo uninstall registry entries, and a protective ACL is applied to each entry to prevent unauthorized removal. Reference the Lockdown script used in this guide.
● Disable Lockdown Script: The disable lockdown script serves as the counterpart to the lockdown script and is responsible for reversing the tamper resistance controls applied to the device prior to any install or uninstall operation. The script restores permissive security descriptors to the relevant Secure Client and Duo services, removes the deny-based ACLs from their corresponding registry keys, and clears the protective ACLs from the uninstall registry entries. This allows the MSI installer or uninstaller to interact freely with the existing Secure Client installation without being blocked by the access restrictions that would otherwise be enforced. The disable lockdown script is designed to be invoked only as the first step of an install or uninstall operation, with the lockdown script immediately restoring protections upon completion. Reference the Disable Lockdown script used in this guide.
Note: The lockdown and disable lockdown scripts referenced in this guide are shared across all install and uninstall scripts, meaning that any install or uninstall operation regardless of which individual module is being targeted will enforce or remove tamper resistance controls for all Cisco Secure Client and Duo Desktop components present on the device. This approach was adopted for simplicity and ease of reference within the context of this guide. It is worth noting, however, that the lockdown and disable lockdown scripts can be tailored on a per-module basis, such that an install or uninstall operation for a given module only removes or restores protections for that specific module and/or other necessary modules, leaving the tamper resistance controls of other installed modules undisturbed. This level of granularity is outside the scope of this guide, and organizations requiring it are encouraged to adapt the provided scripts to meet their specific operational requirements.
Creating the intunewin Package
Intune can deploy Win32 applications using the intunewin file format, which is a packaged and compressed version of the application installer. This section covers the process of using the Microsoft Win32 Content Prep Tool to package the Secure Client installer into a deployable intunewin files. Proper packaging is a critical step, as it determines how the application is delivered to endpoints and ensures that the installer is correctly prepared before being uploaded to Intune. This section will walk through the packaging process and provide guidance on validating the resulting file before proceeding to deployment.
Step 1. From the Cisco Secure Access dashboard, navigate to Connect > Essentials > End User Connectivity.
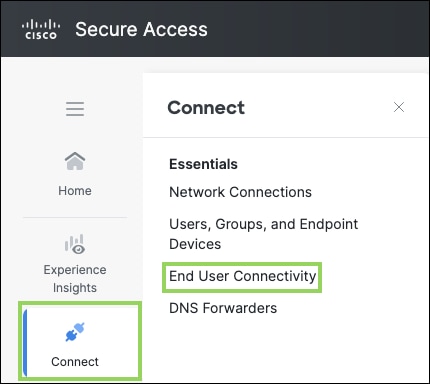
Step 2. Click Cisco Secure Client in the top right corner of the page.

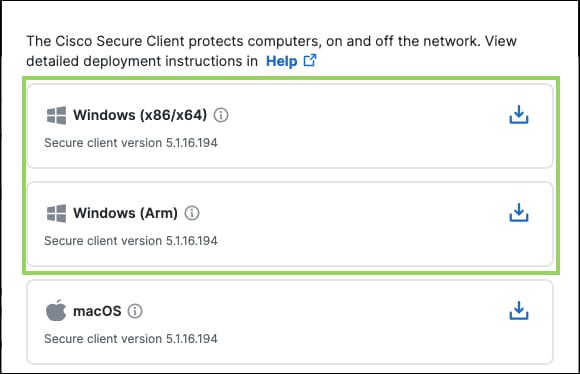
Step 3. Click Windows (x86/x64) or Windows (Arm) to download the relevant Cisco Secure Client Pre-Deployment package for Windows. This package contains the individual MSI installer files for each available CSC module. Alternatively, the pre-deployment package can be downloaded directly from the Cisco Software Download page by searching for Cisco Secure Client and selecting the appropriate Windows pre-deployment package for your target version. In this guide, the Windows ARM64 pre-deployment package is used for validation purposes.
Note: Ensure that the version of the package being downloaded meets or exceeds the minimum version requirement for your environment. The version string will also be referenced in the detection rule scripts configured in the following section, so it is important to note the exact version number before proceeding.
Step 4. Gather the required module configuration files from the Download configuration files section of the dashboard, or navigate to each module's individual section within the product as described below. These files will be bundled with their corresponding module installers in a later step.
Note: For Cisco Secure Access Commercial environments, the Zero Trust Access enrollment JSON is only required when certificate-based ZTA enrollment is in use. If your environment uses SAML-based enrollment, this file is not needed and the ZTA configuration packaging steps can be skipped.

● AnyConnect VPN Module: The VPN XML profile can be downloaded by navigating to Connect > Essentials > End User Connectivity and clicking the Virtual Private Network tab. Locate the relevant VPN profile and click the download icon under the Download XML column on the right side of the profile entry. This XML file defines the VPN gateway addresses, authentication settings, and connection behavior that will be deployed alongside the VPN module installer.
● Umbrella Module: The OrgInfo.json file can be downloaded by navigating to Connect > Essentials > End User Connectivity and clicking the Internet Security tab. Under the Deployment Options section, select the Windows and macOS tab and click Download profile. This file contains the organization ID, fingerprint, and user ID required for the Umbrella module to establish DNS-layer security.
● ZTA Module: If certificate-based Zero Trust Access enrollment is used in your environment, navigate to Connect > Essentials > End User Connectivity and click the Zero Trust Access tab. In the Enrollment Methods section, click Manage, then click Download under the second step labeled Download the enrollment configuration file. This JSON file contains the signed JWT payload and certificate matching rules required for ZTA enrollment.
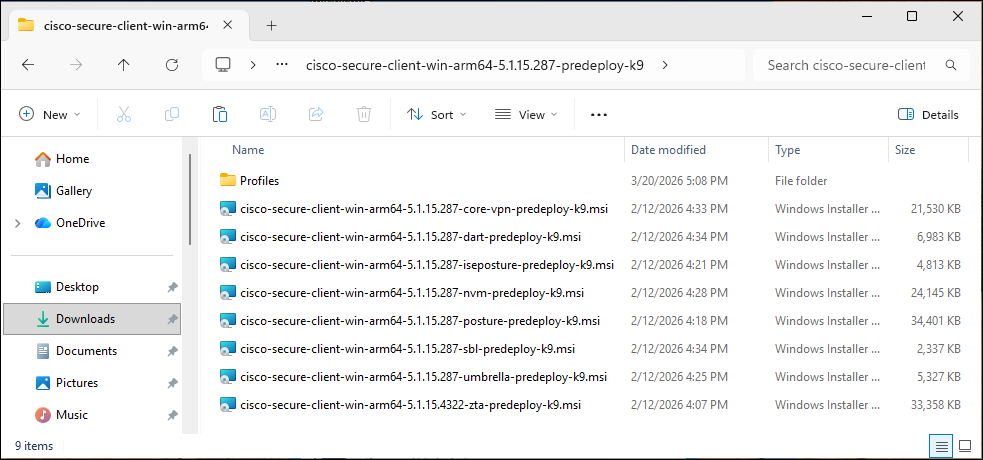
Step 5. Unzip the downloaded Cisco Secure Client pre-deployment package. Inside the extracted contents, locate the Profiles folder. Place the downloaded VPN XML profile into the Profiles\vpn\ subdirectory and the OrgInfo.json file into the Profiles\umbrella\ subdirectory. These files will be packaged alongside their respective module installers so that they are deployed to the correct locations on the endpoint during installation.
Note: At the time of writing this guide, the Cisco Secure Client pre-deployment package does not include a dedicated folder for the ZTA enrollment JSON file. If ZTA certificate-based enrollment is used in your environment, the enrollment JSON must be deployed to the endpoint separately after the ZTA module is installed. This is handled within the zta_module_install script where the Enrollment JSON can be named and copied to the appropriate location. If this isn’t needed, the specific lines of code can be ignored or commented out.
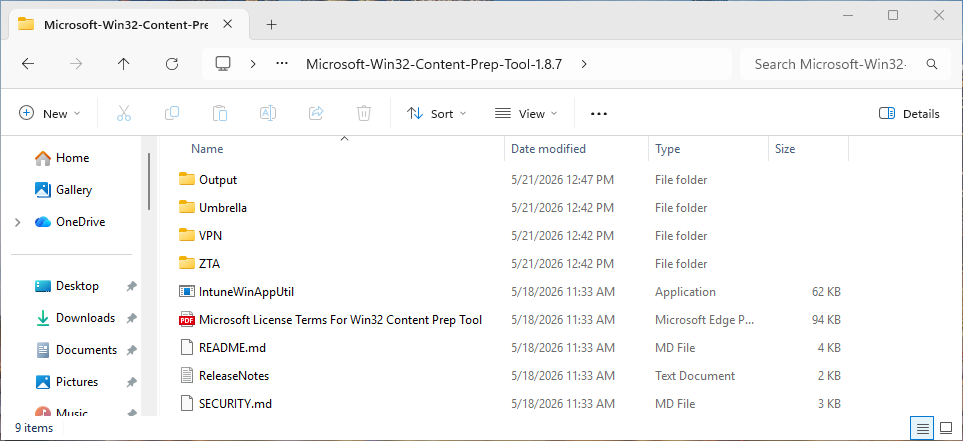
Step 6. Download and unzip the Microsoft Win32 Content Prep Tool from the Microsoft GitHub repository.
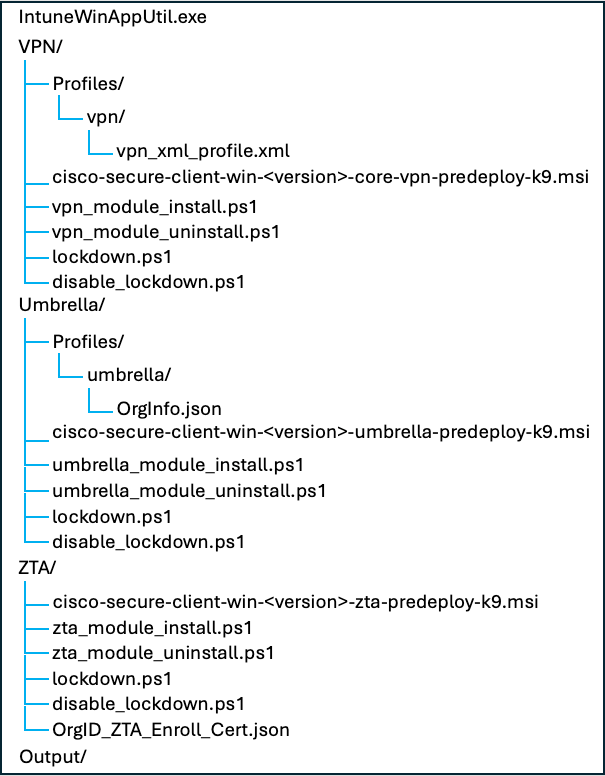
Step 7. Navigate into the unzipped folder where IntuneWinAppUtil.exe is located. Within this folder, create the following subdirectories to organize the source files and output for each Win32 app package that will be created:
| Folder Name |
Purpose |
| VPN |
Source files for the VPN module intunewin package |
| Umbrella |
Source files for the Umbrella module intunewin package |
| ZTA |
Source files for the ZTA module intunewin package |
| Output |
Destination folder for all generated intunewin files |
Note: Keeping the source files for each module in separate subdirectories is important because the Win32 Content Prep Tool packages the entire contents of the specified source folder into the intunewin file. Mixing files from different modules in the same source folder will result in packages that are larger than necessary for installation.
Step 8. Copy the appropriate files into each source folder as follows. Ensure that the folder structure within each installer directory matches the layout expected by the Cisco Secure Client installer so that configuration files are placed in the correct locations on the endpoint during installation:
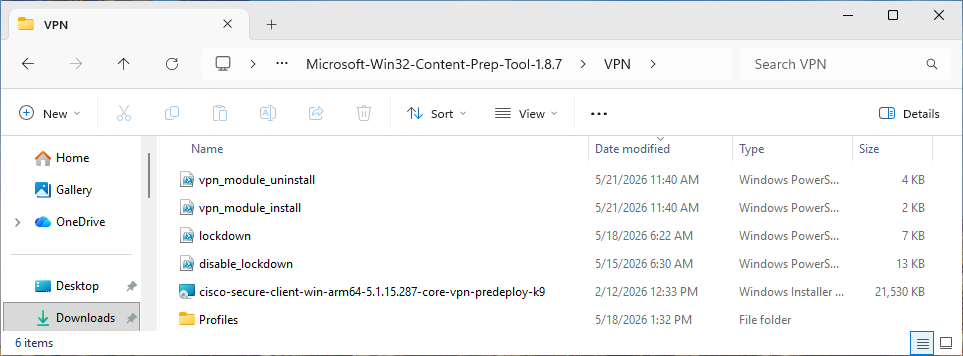
VPN
● The VPN Core MSI installer file (e.g., cisco-secure-client-win-
● The Profiles folder containing the VPN XML profile in the vpn subdirectory (Profiles\vpn\
● The vpn_module_install.ps1 script used for installing the VPN module
● The vpn_module_uninstall.ps1 script used for uninstalling the VPN module as well as any other Secure client modules that depend on it
● The lockdown.ps1 script used for locking down all Secure Client modules and Duo Desktop
● The disable_lockdown.ps1 script used for removing lockdown for Secure Client and Duo Desktop
Umbrella
● The Umbrella MSI installer file (e.g., cisco-secure-client-win-
● The Profiles folder containing the OrgInfo.json file in the umbrella subdirectory (Profiles\umbrella\OrgInfo.json)
● The umbrella_module_install.ps1 script used for installing the Umbrella module
● The umbrella_module_uninstall.ps1 script used for uninstalling the Umbrella module
● The lockdown.ps1 script used for locking down all Secure Client modules and Duo Desktop
● The disable_lockdown.ps1 script used for removing lockdown for Secure Client and Duo Desktop

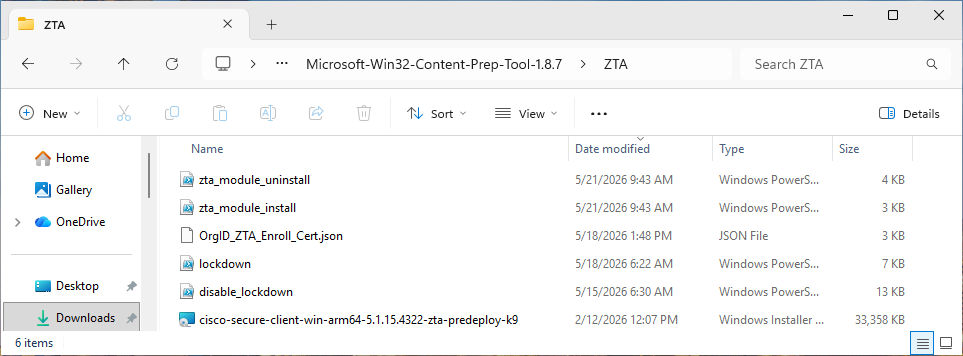
ZTA
● The ZTA MSI installer file (e.g., cisco-secure-client-win-
● (Optional) The ZTA enrollment JSON file (e.g.,
● The zta_module_install.ps1 script used for installing the ZTA module
● The zta_module_uninstall.ps1 script used for uninstalling the ZTA module and Duo Desktop
● The lockdown.ps1 script used for locking down all Secure Client modules and Duo Desktop
● The disable_lockdown.ps1 script used for removing lockdown for Secure Client and Duo Desktop
Note: Once all files have been copied into their respective folders, verify the directory structure before proceeding to ensure no files are missing or misplaced. A missing configuration file at this stage will result in the module being installed without its required configuration, which will subsequently be flagged by the remediation scripts.
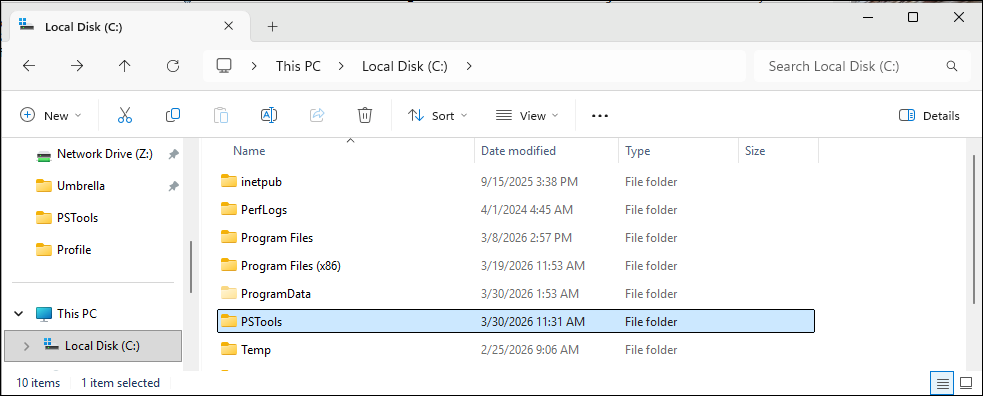
Step 9. To validate that the Win32 packages function correctly, it is recommended to test them on a designated test device before proceeding. To test this, PsTools will be used. Download the Microsoft Sysinternals PsTools suite and extract the contents of the zip file to a local folder on the test device (for example, C:\PSTools\).
Step 10. Open PowerShell as an administrator.
Step 11. In PowerShell navigate to the PsTools folder: cd C:\PSTools

Step 12. Launch a new PowerShell session running as the local system account using PsExec. This replicates the execution context used by Intune when running remediation scripts on managed devices, ensuring that the test results accurately reflect how the scripts will behave in production: ./PsExec.exe -i -s powershell.exe
A new PowerShell window will open running under the system account context. All subsequent script execution steps should be performed in this new system-context PowerShell window.

Step 13. In the new system-context PowerShell window, navigate to the VPN folder within the Microsoft Win32 Content Prep Tool folder.

Step 14. First test, VPN installation by running the command .\vpn_module_install. You should be able to open Secure Client from the Windows Start menu and find the AnyConnect VPN module running
Step 15. Test uninstalling VPN with the command .\vpn_module_uninstall.
Step 16. Once VPN testing is completed, reinstall the Secure Client AnyConnect VPN module, then run tests for the installation and uninstallation of the Umbrella and ZTA modules.
Step 17. Once testing is complete, open IntuneWinAppUtil.exe and provide the following inputs to package the VPN module. When prompted, enter each value as shown:
| Prompt |
Value |
| Please specify the source folder |
VPN |
| Please specify the setup file |
vpn_module_install.ps1 |
| Please specify the destination folder |
Output |
| Do you want to specify catalog folder (Y/N)? |
N |

Alternatively, the following command can be run directly from the Command Prompt to package the VPN module without interactive prompts:
.\IntuneWinAppUtil.exe -c VPN -s vpn_module_install.ps1 -o Output
Step 18. Repeat step 9 for the remaining modules, using the source folder and setup file values specific to each module as provided below.
Umbrella Module:
| Prompt |
Value |
| Please specify the source folder |
Umbrella |
| Please specify the setup file |
umbrella_module_install.ps1 |
| Please specify the destination folder |
Output |
| Do you want to specify catalog folder (Y/N)? |
N |

Command Prompt alternative:
.\IntuneWinAppUtil.exe -c Umbrella -s umbrella_module_install.ps1 -o Output
ZTA Module:
| Prompt |
Value |
| Please specify the source folder |
ZTA |
| Please specify the setup file |
zta_module_install.ps1 |
| Please specify the destination folder |
Output |
| Do you want to specify catalog folder (Y/N)? |
N |

Command Prompt alternative:
.\IntuneWinAppUtil.exe -c ZTA -s zta_module_install.ps1 -o Output
Step 19. Once all packaging operations are complete, navigate to the Output folder and verify that the expected intunewin files are present. Depending on your environment, the Output folder should contain the following files:
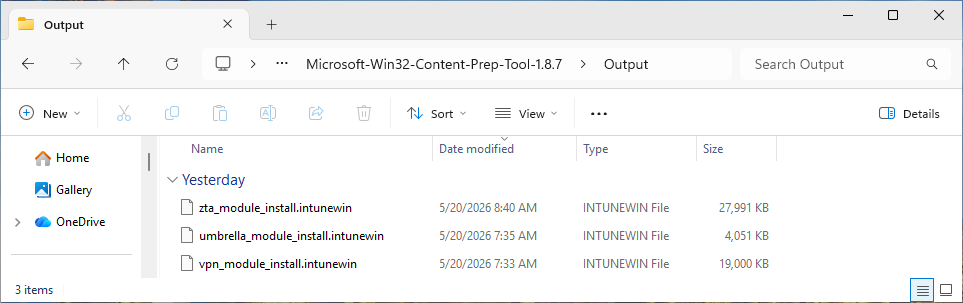
Note: If any expected intunewin files are missing from the Output folder, rerun the packaging tool for the affected module before proceeding. Do not attempt to upload incomplete or incorrectly packaged files to Intune, as this may result in failed deployments or endpoints receiving incomplete installations that the enforcement scripts will continuously attempt to remediate.
Creating Detection Rule Scripts
Detection Rule scripts are used by Intune to determine whether a Win32 application is already present on a device and whether it meets the required criteria. This section covers the configuration of detection rule scripts that validate the presence of each Secure Client module and confirm that it meets or exceeds the minimum required version.
If the detection rule script determines that a module is absent or below the required version threshold, Intune will automatically trigger a reinstallation of the application, ensuring that all managed devices maintain a consistent and up-to-date Secure Client deployment. This automated detection and reinstallation behavior is a key component of the overall tamper resistance strategy. For the example detection scripts used in this guide, reference:
● Umbrella Module Detection Script
Configuring the Intune Win32 App Deployment
Once the intunewin packages and detection rule scripts have been created, they must be uploaded to Intune and configured as Win32 applications. This section covers the process of uploading the packaged files, defining the install and uninstall command strings, and enabling the detection rule scripts. Correctly configuring these attributes at the deployment stage is fundamental to establishing the tamper-resistant baseline that the remediation scripts described in the following section are designed to maintain.
Step 1. Within the Microsoft Intune Admin Center, navigate to Apps > Platform > Windows.
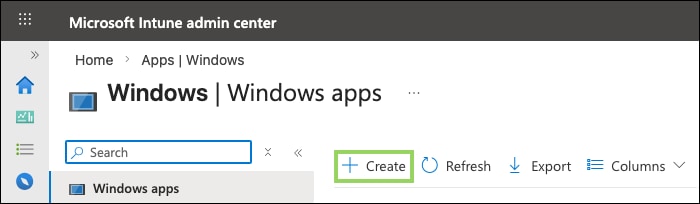
Step 2. Click Create. In the Select app type panel that appears on the right, select Windows app (Win32) from the app type dropdown, then click Select to proceed.

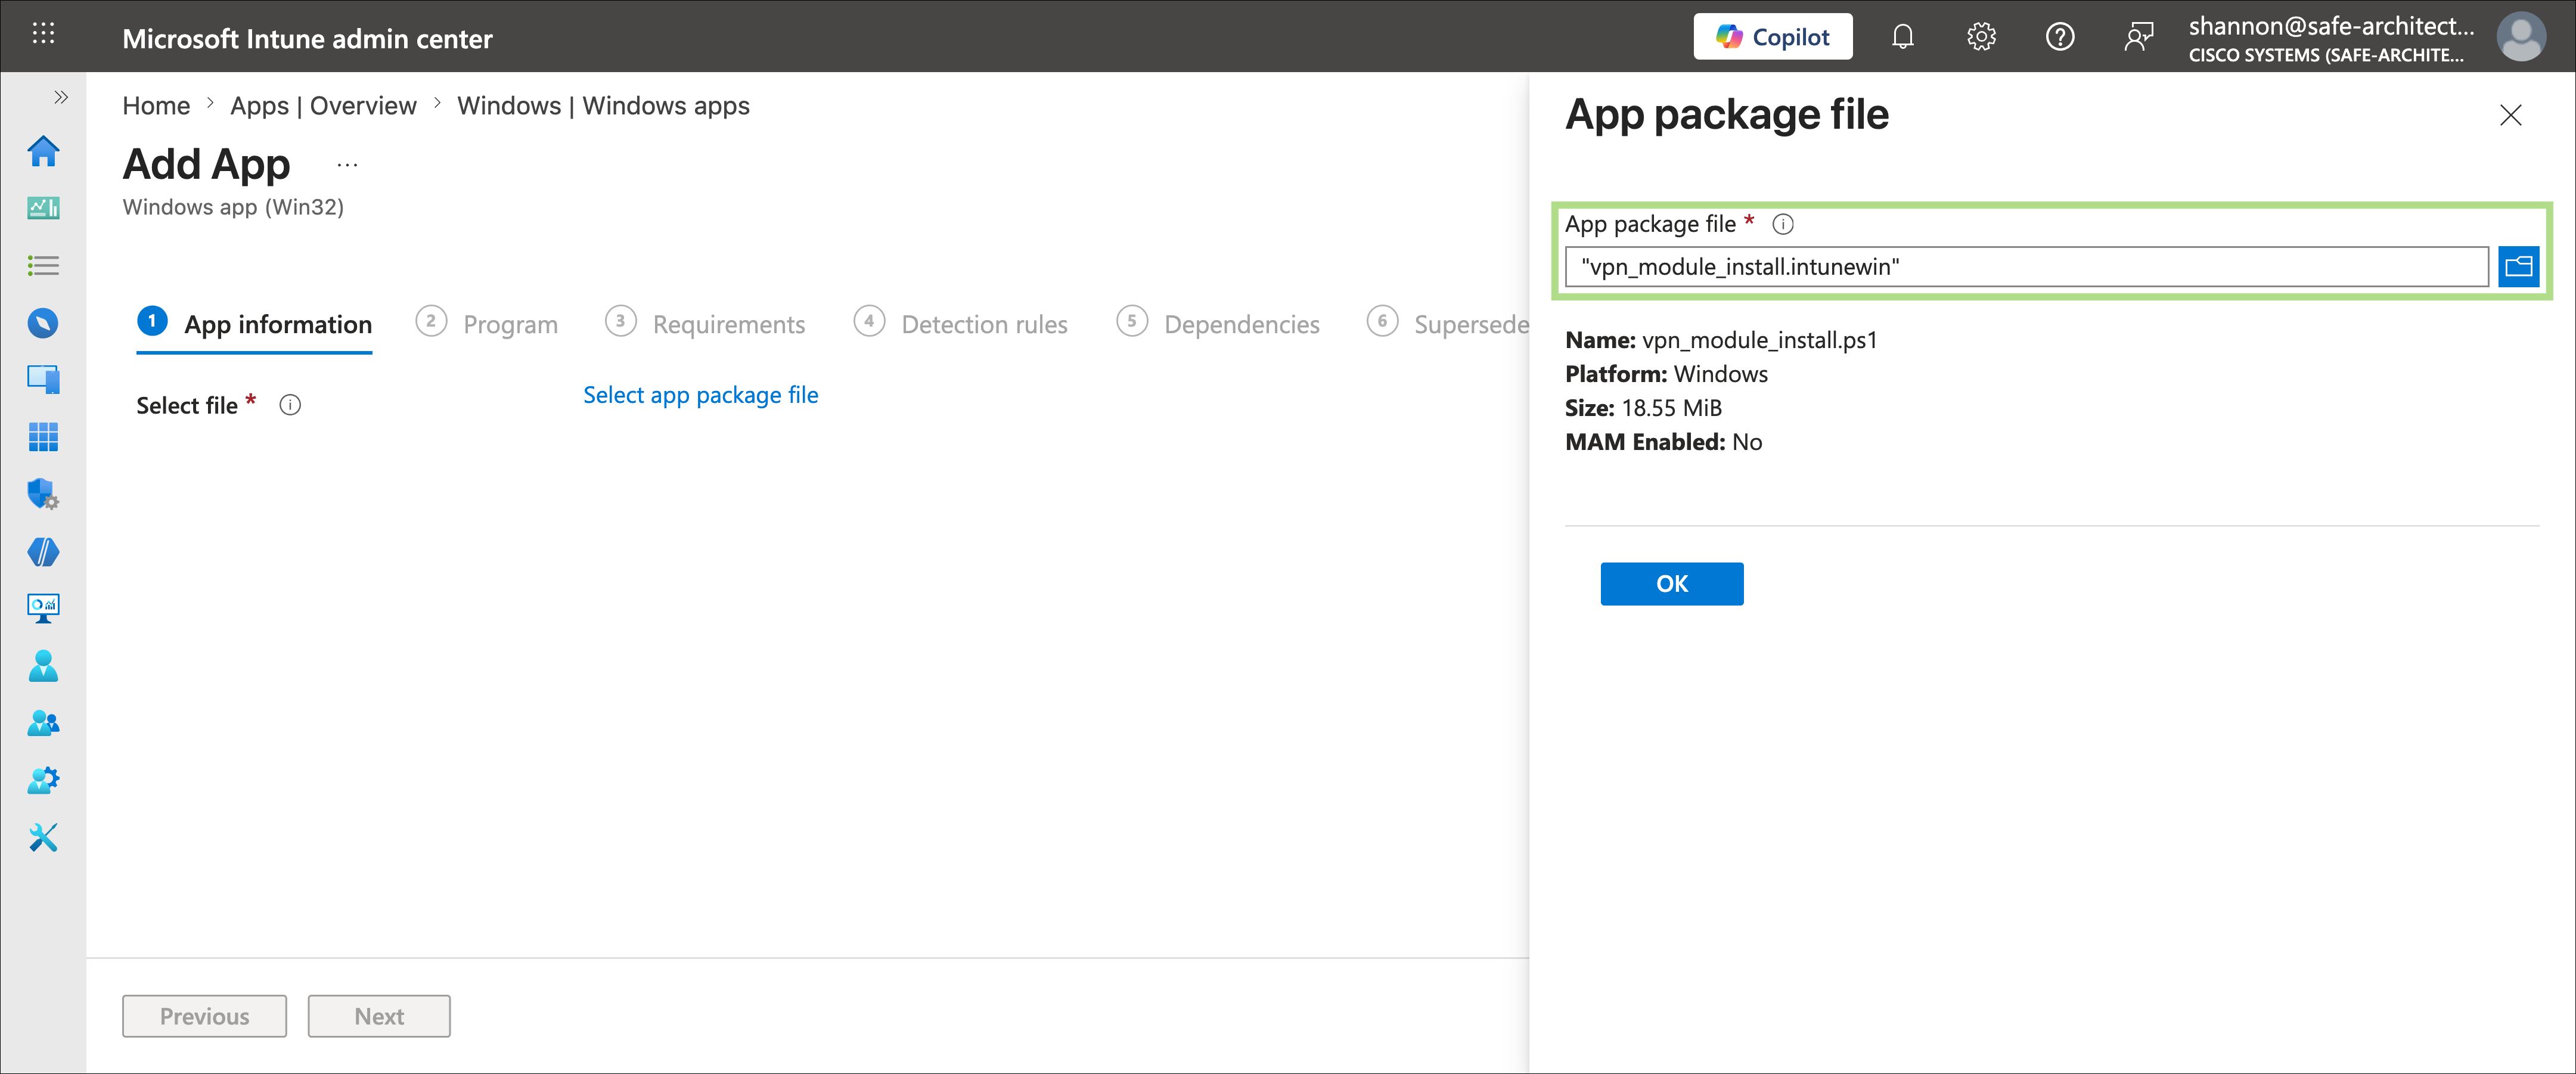
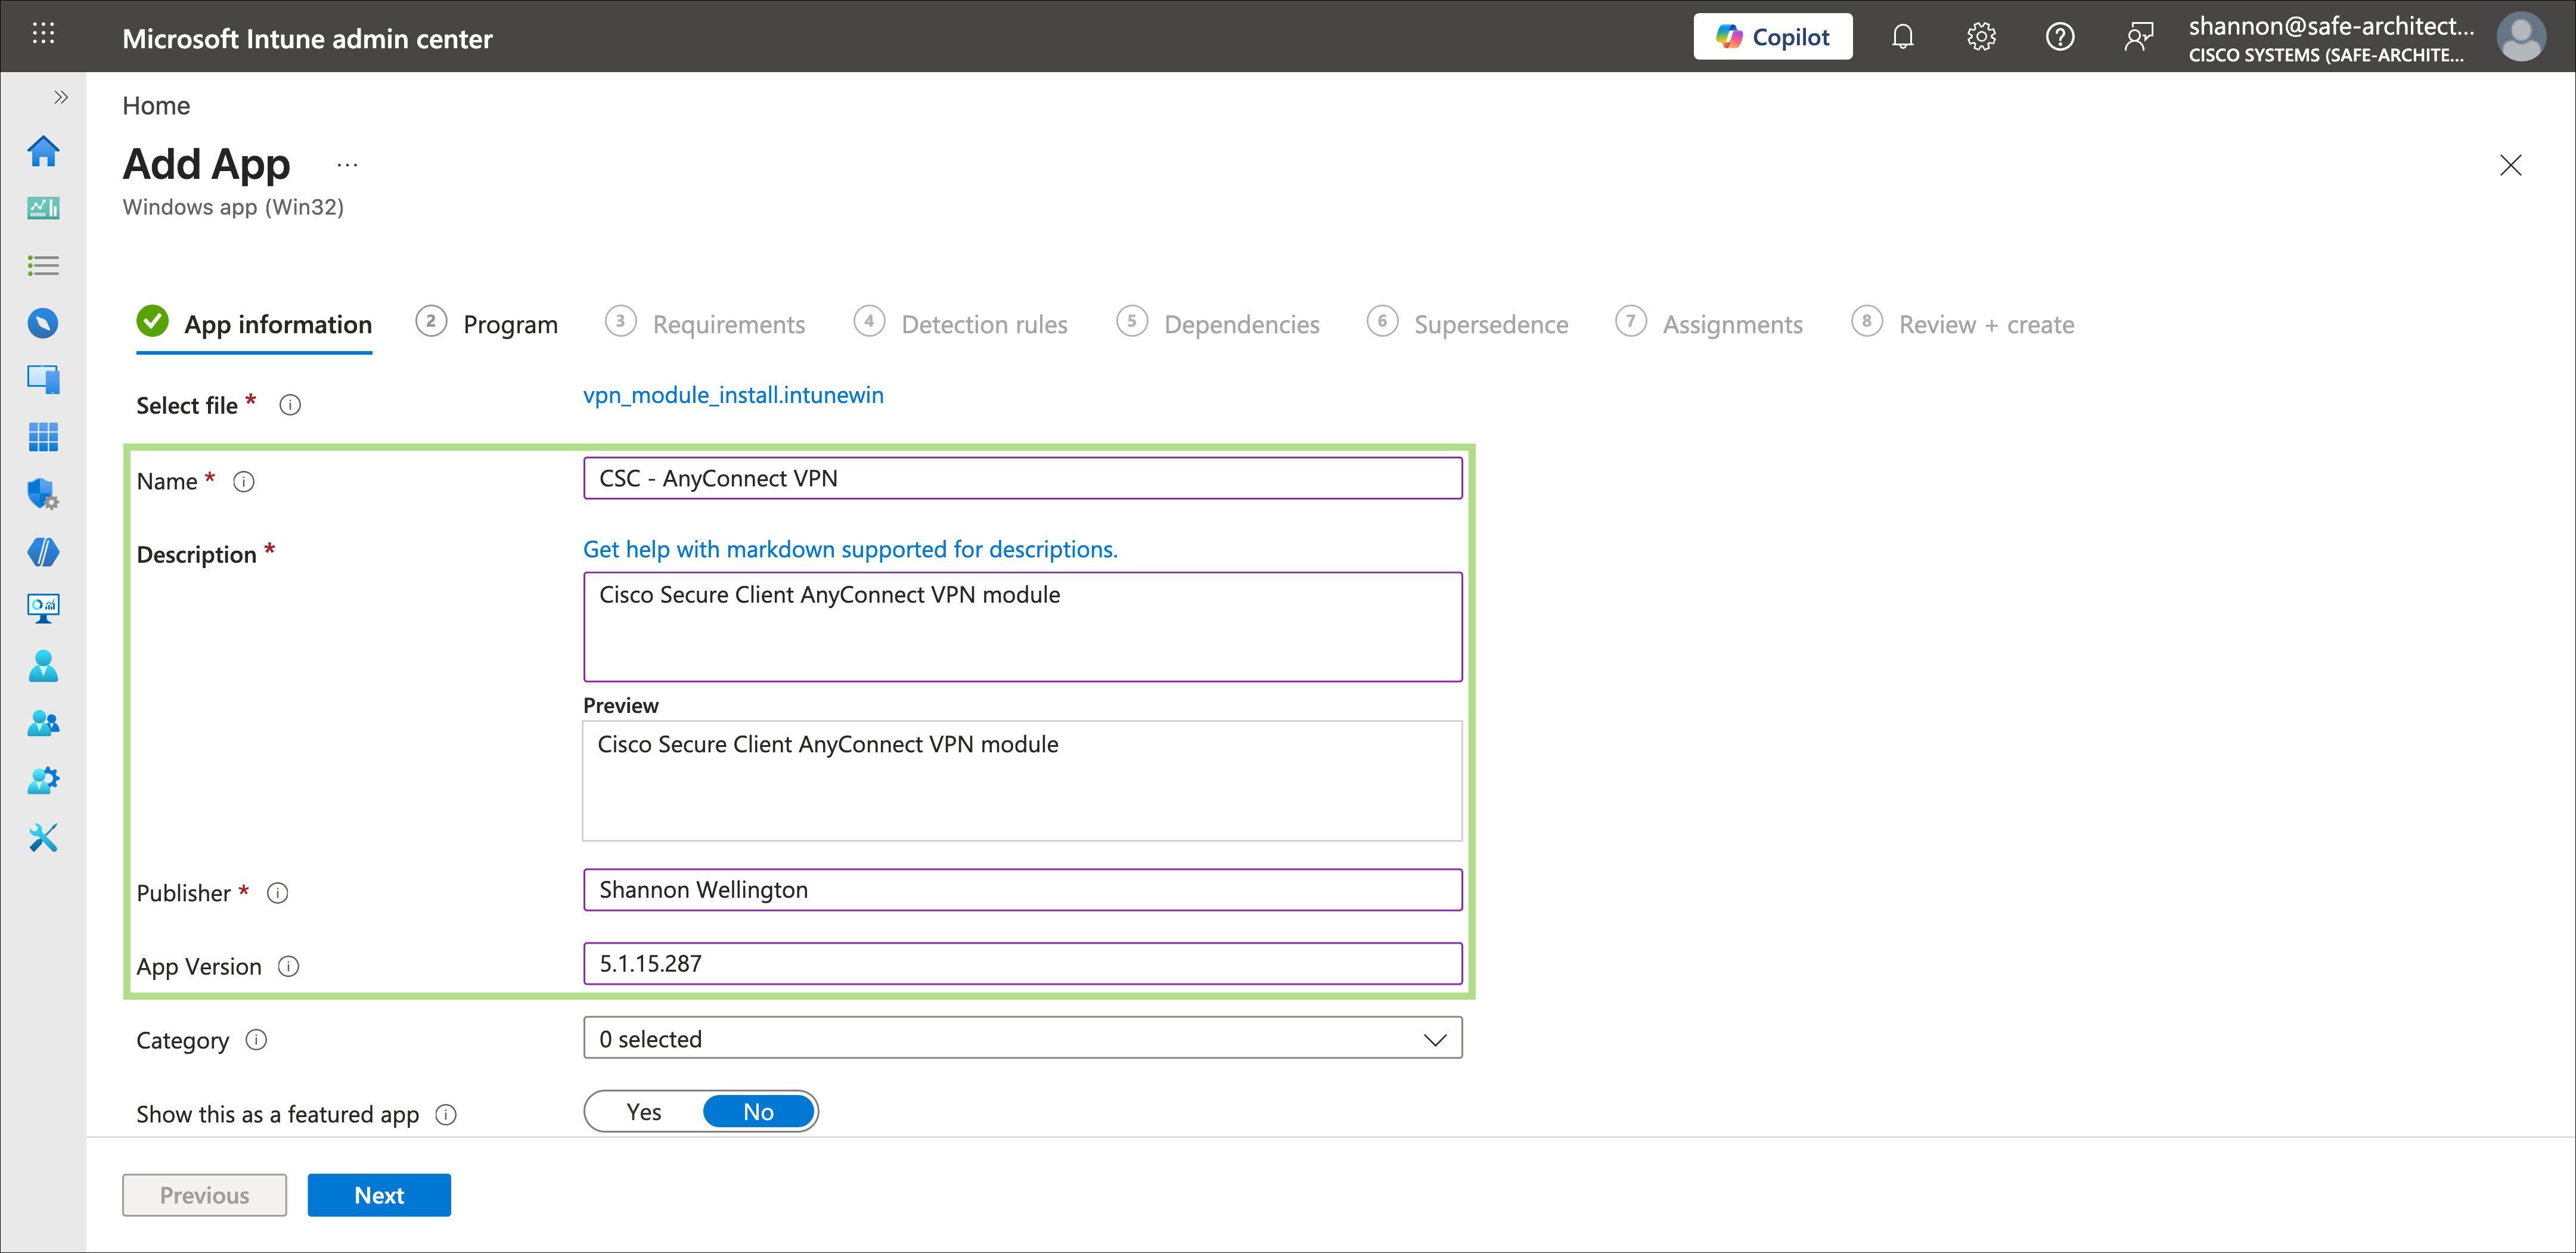
Step 3. On the App information step, click Select app package file. In the panel that appears on the right, click Select a file and select the Core VPN intunewin file created in the previous section. Once the file has been selected and validated by Intune, click OK to confirm.
Step 4. Complete the remaining fields on the App information page. At minimum, provide a value in the Publisher field, as this is required before proceeding. It is recommended to update the value for Name, Description, and App Version to make the application easier to identify and manage within the Intune app library. Click Next when complete.
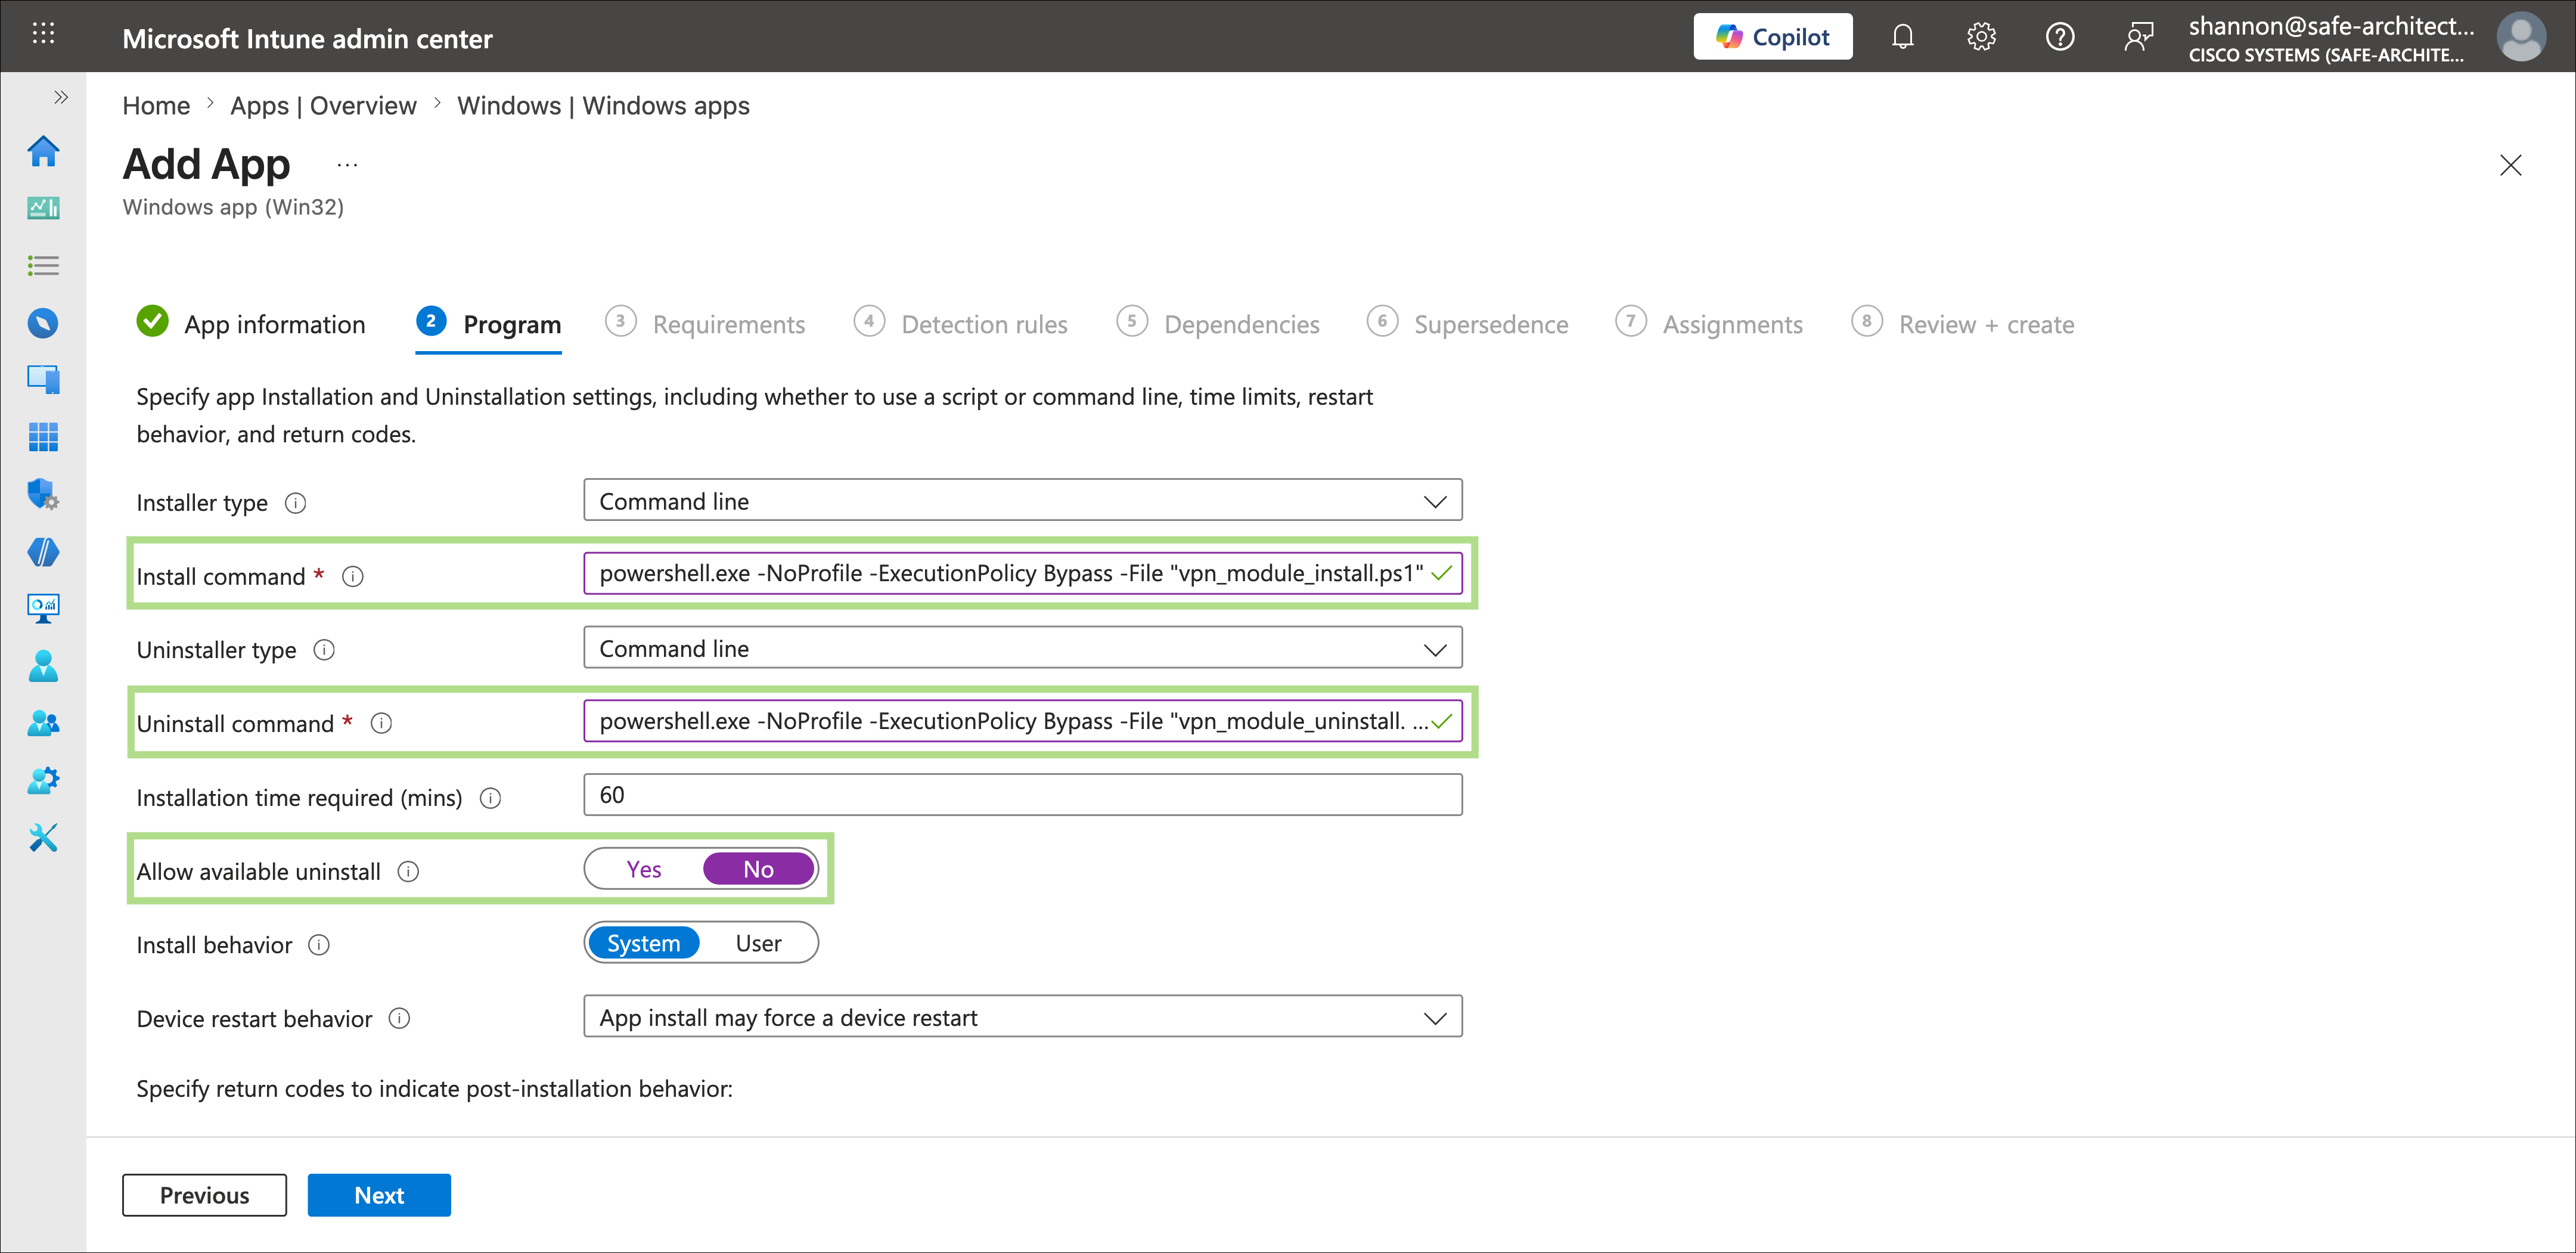
Step 5. On the Program step, configure the install and uninstall behavior for the Cisco Secure Client VPN module. This step is where the commands needed to install and uninstall the Secure Client module using the powershell scripts created earlier are defined. Make the following changes before proceeding:
● Install command: The installation script will be called to install the AnyConnect VPN module.
powershell.exe -NoProfile -ExecutionPolicy Bypass -File "vpn_module_install.ps1"
● Uninstall command: The uninstall script will be called whenever the AnyConnect VPN module needs to be uninstalled.
powershell.exe -NoProfile -ExecutionPolicy Bypass -File "vpn_module_uninstall.ps1"
● Allow available uninstall: Set to No to prevent users from initiating an uninstall of the module through the Intune Company Portal.
Click Next when complete.
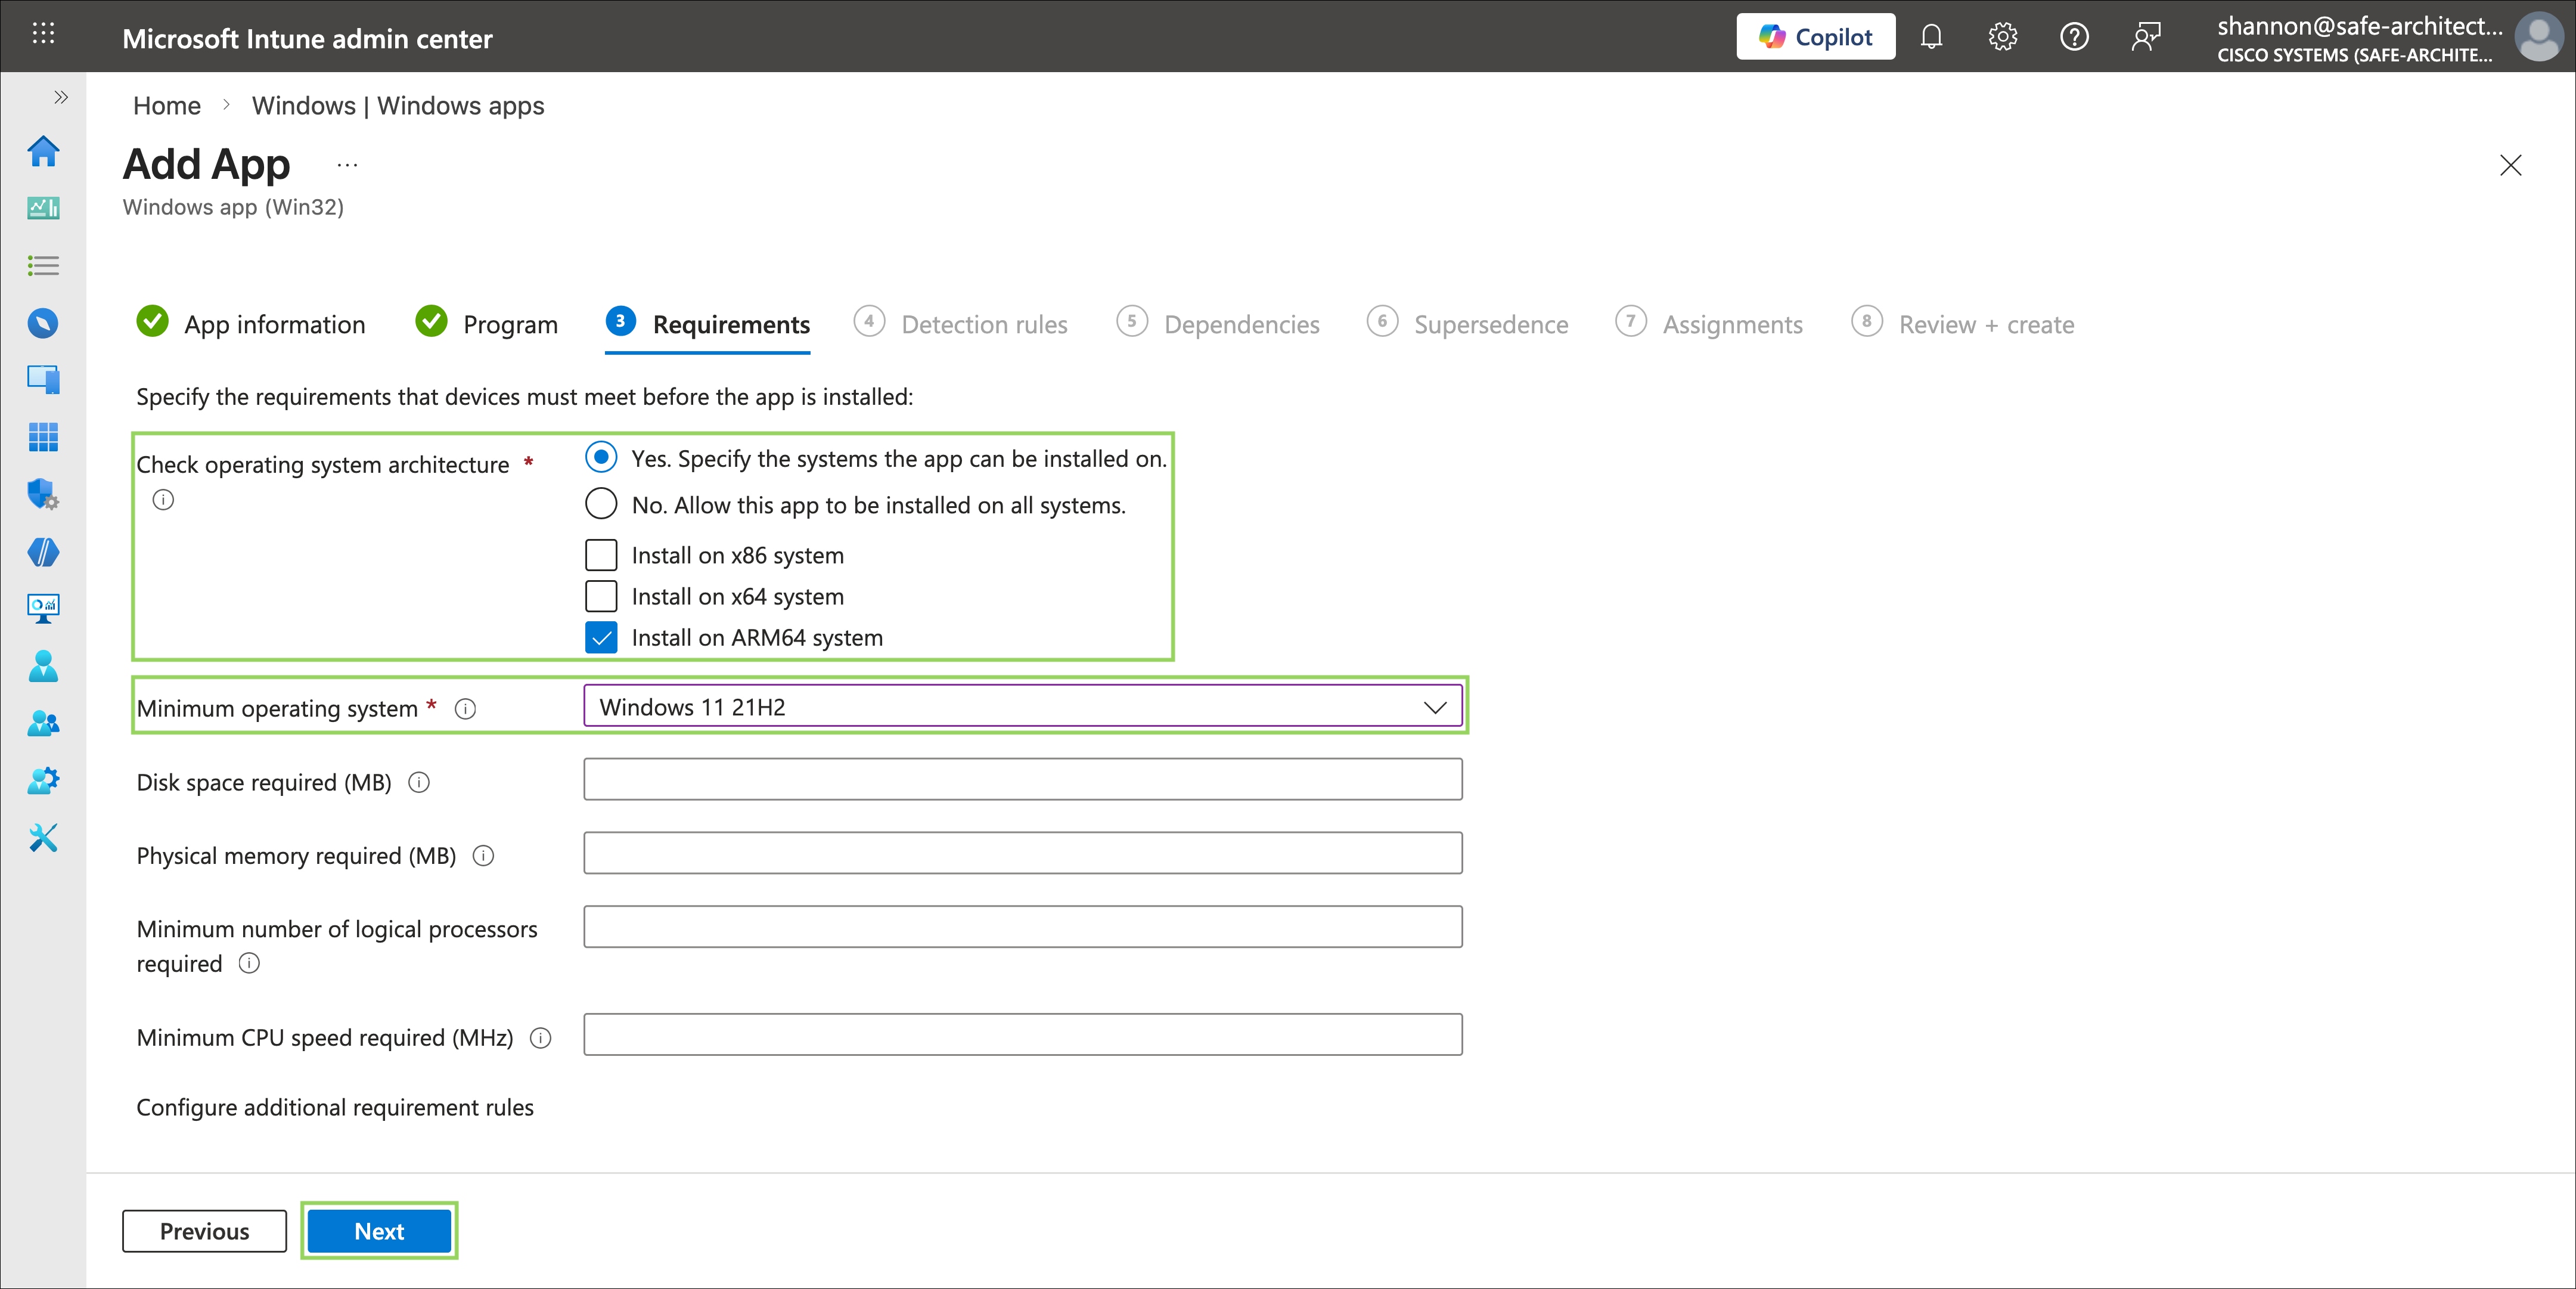
Step 6. On the Requirements step, define the device prerequisites that must be met before the application is installed. Cisco provides separate Cisco Secure Client pre-deployment packages for ARM64 and non-ARM64 Windows architectures, so the operating system architecture selection should reflect the package that was packaged in the previous section. In this guide, the test device uses Windows 11 ARM64, so that architecture is selected.
Additionally, ensure that the minimum Windows OS version is set to meet the requirements of the Cisco Secure Client version being deployed. In this guide, Cisco Secure Client 5.1.15.287 is used, which requires Windows 11 at minimum. The minimum operating system requirements for each Cisco Secure Client version can be found in the Cisco Secure Client Release Notes. Select the appropriate minimum OS version in the Minimum Operating System field.
Click Next when complete.
Note: Configuring the architecture and minimum OS version requirements correctly is important to prevent Intune from attempting to install an incompatible package on devices that do not meet the prerequisites. Deploying an ARM64 package to an x86/x64 device, or vice versa, will result in a failed installation that Intune will repeatedly attempt to remediate.
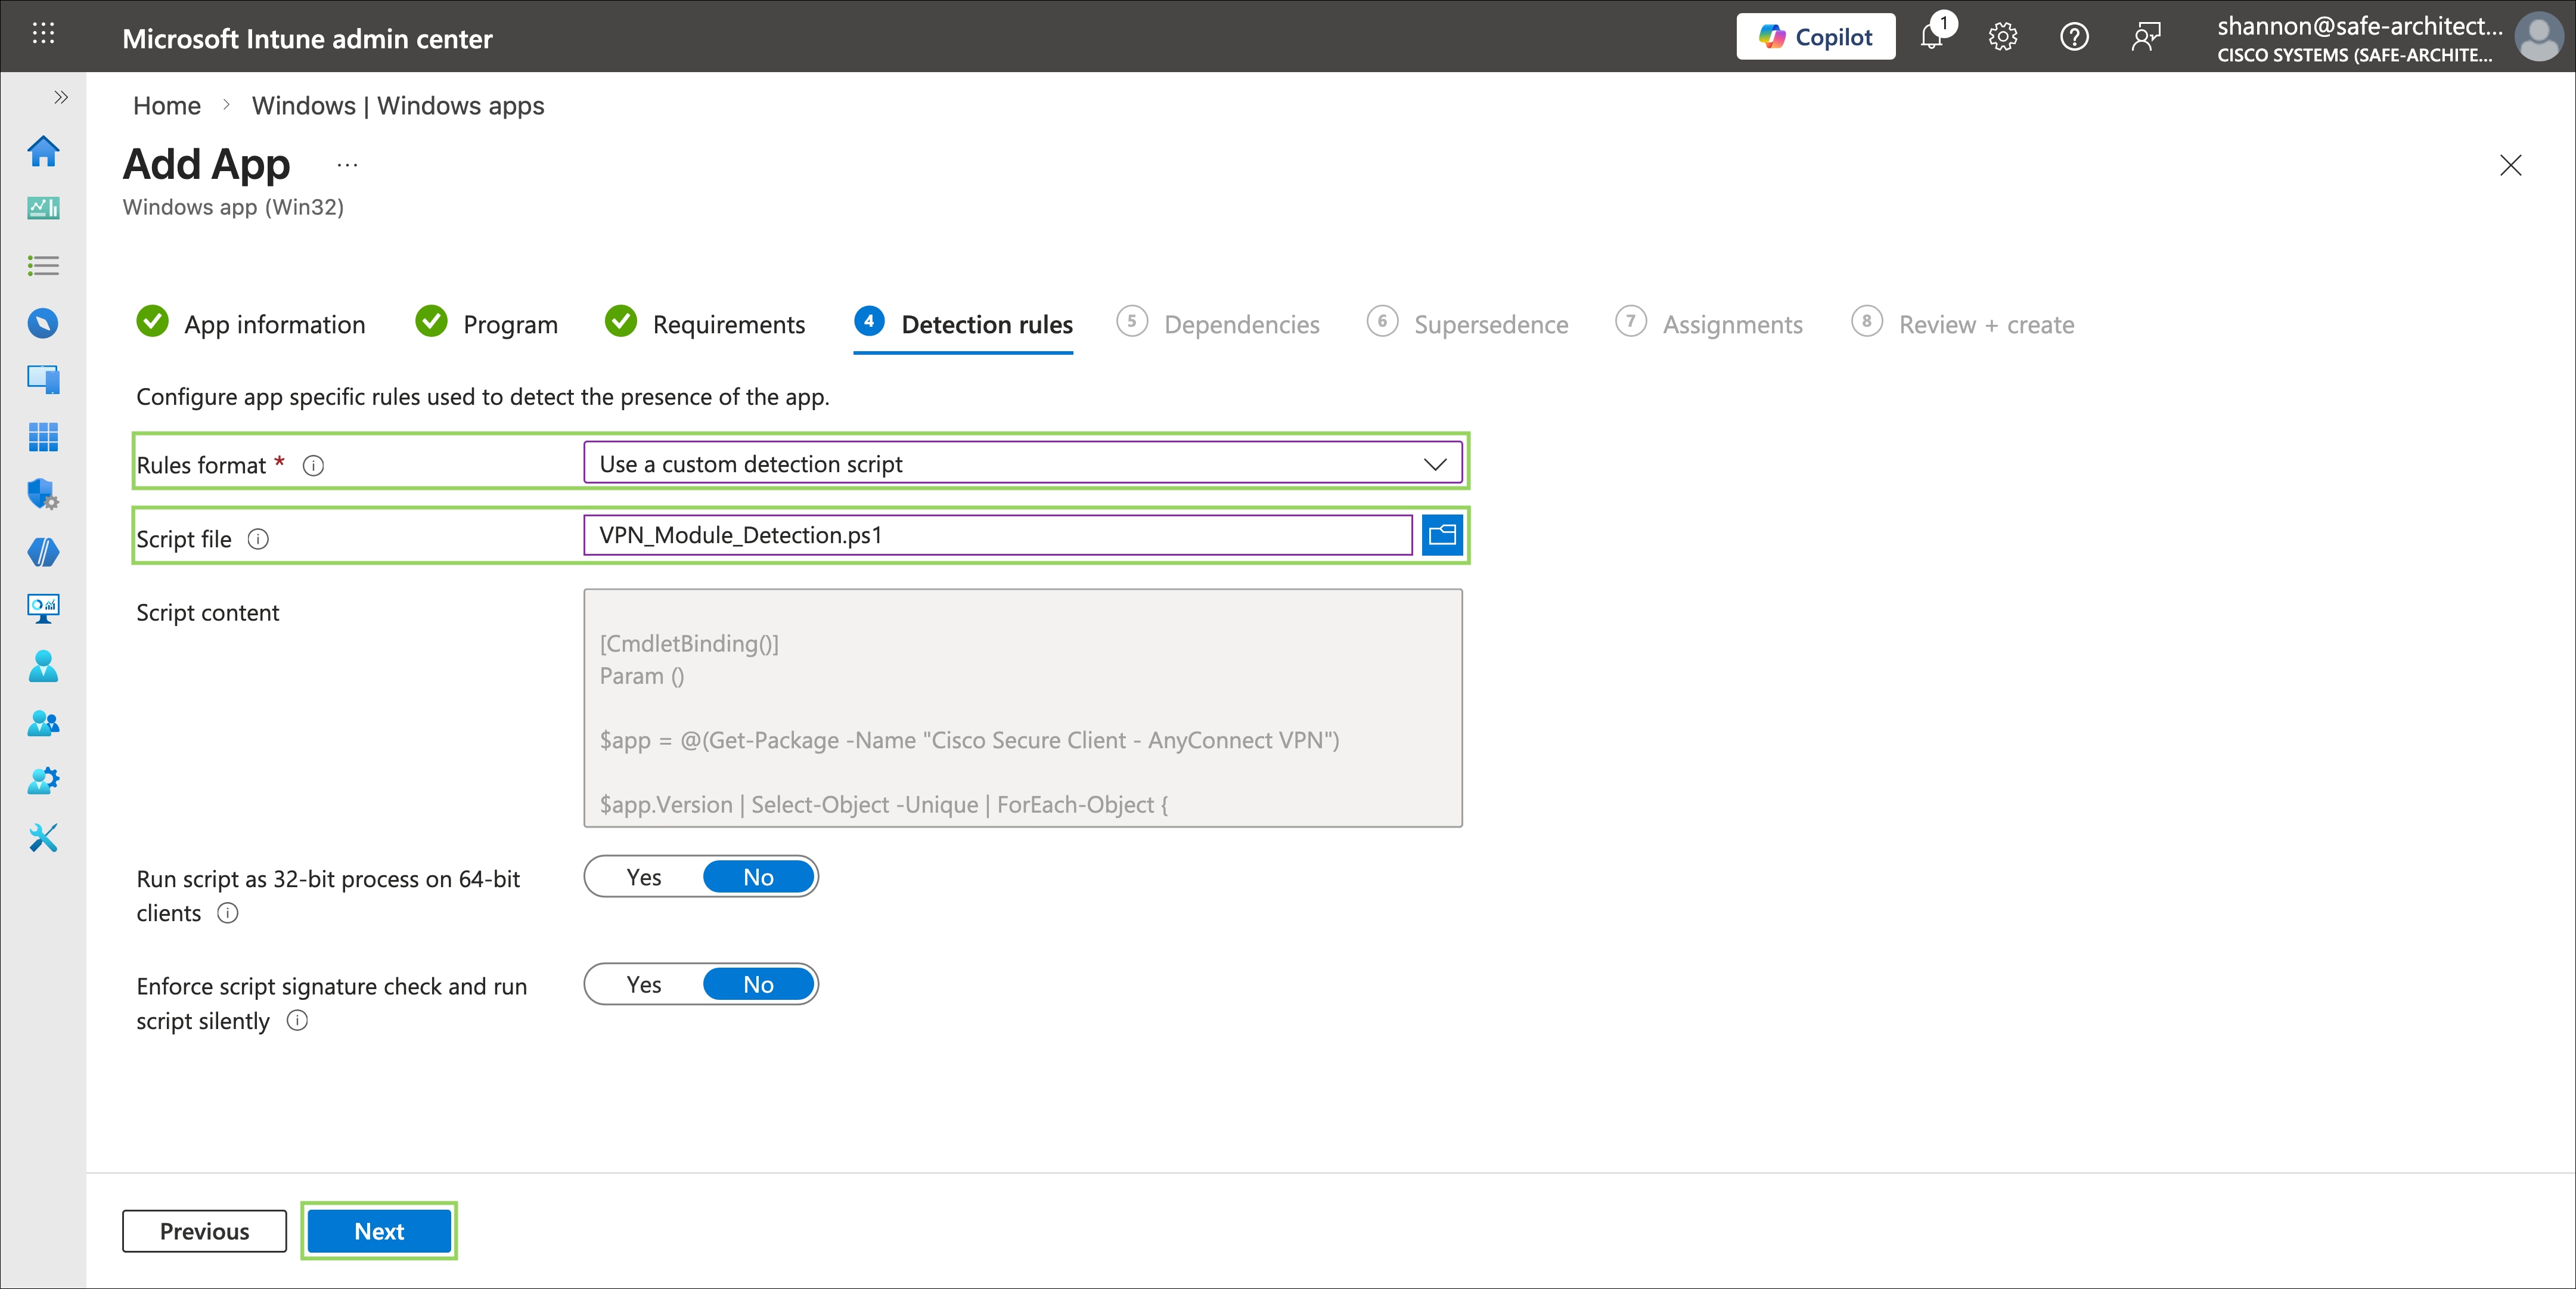
Step 7. On the Detection Rules step, configure how Intune will determine whether the application is already installed on the endpoint. Click the Rules format dropdown and select Use a custom detection script. In the Script file field, select the VPN module detection rule script created in the previous section.
Click Next when complete.
Note: The detection rule script is executed by Intune on a recurring basis to determine the installation and compliance state of the module. A well-written detection rule script should validate not only that the module is installed, but that it is installed at the correct version. This ensures that Intune will re-deploy the module if a version below the minimum requirement is detected, working in conjunction with the remediation scripts described later in this guide.
Step 8. On the Dependencies step, no dependencies are required for the Cisco Secure Client VPN Core module, as it is the foundational component upon which all other modules depend. Leave this step empty and click Next.
Step 9. On the Supersedence step, specify whether this application should supersede a previously deployed version of Cisco Secure Client. If this deployment is replacing an existing Intune Win32 app for an older version of Cisco Secure Client, configure the supersedence relationship here to ensure the old version is uninstalled and replaced cleanly. In this guide, no existing Cisco Secure Client deployment is being replaced, so this step is left empty. Click Next.
Step 10. On the Assignments step, specify the users, groups, and/or devices that Cisco Secure Client should be deployed to. To automatically install Cisco Secure Client on all managed Windows devices that meet the requirements set in the earlier Requirements step, select All Devices in the Required section. Adjust the assignment scope to match your organization's deployment strategy. For initial testing, it is recommended to target a specific test device or group before expanding to the broader managed fleet. Click Next when complete.
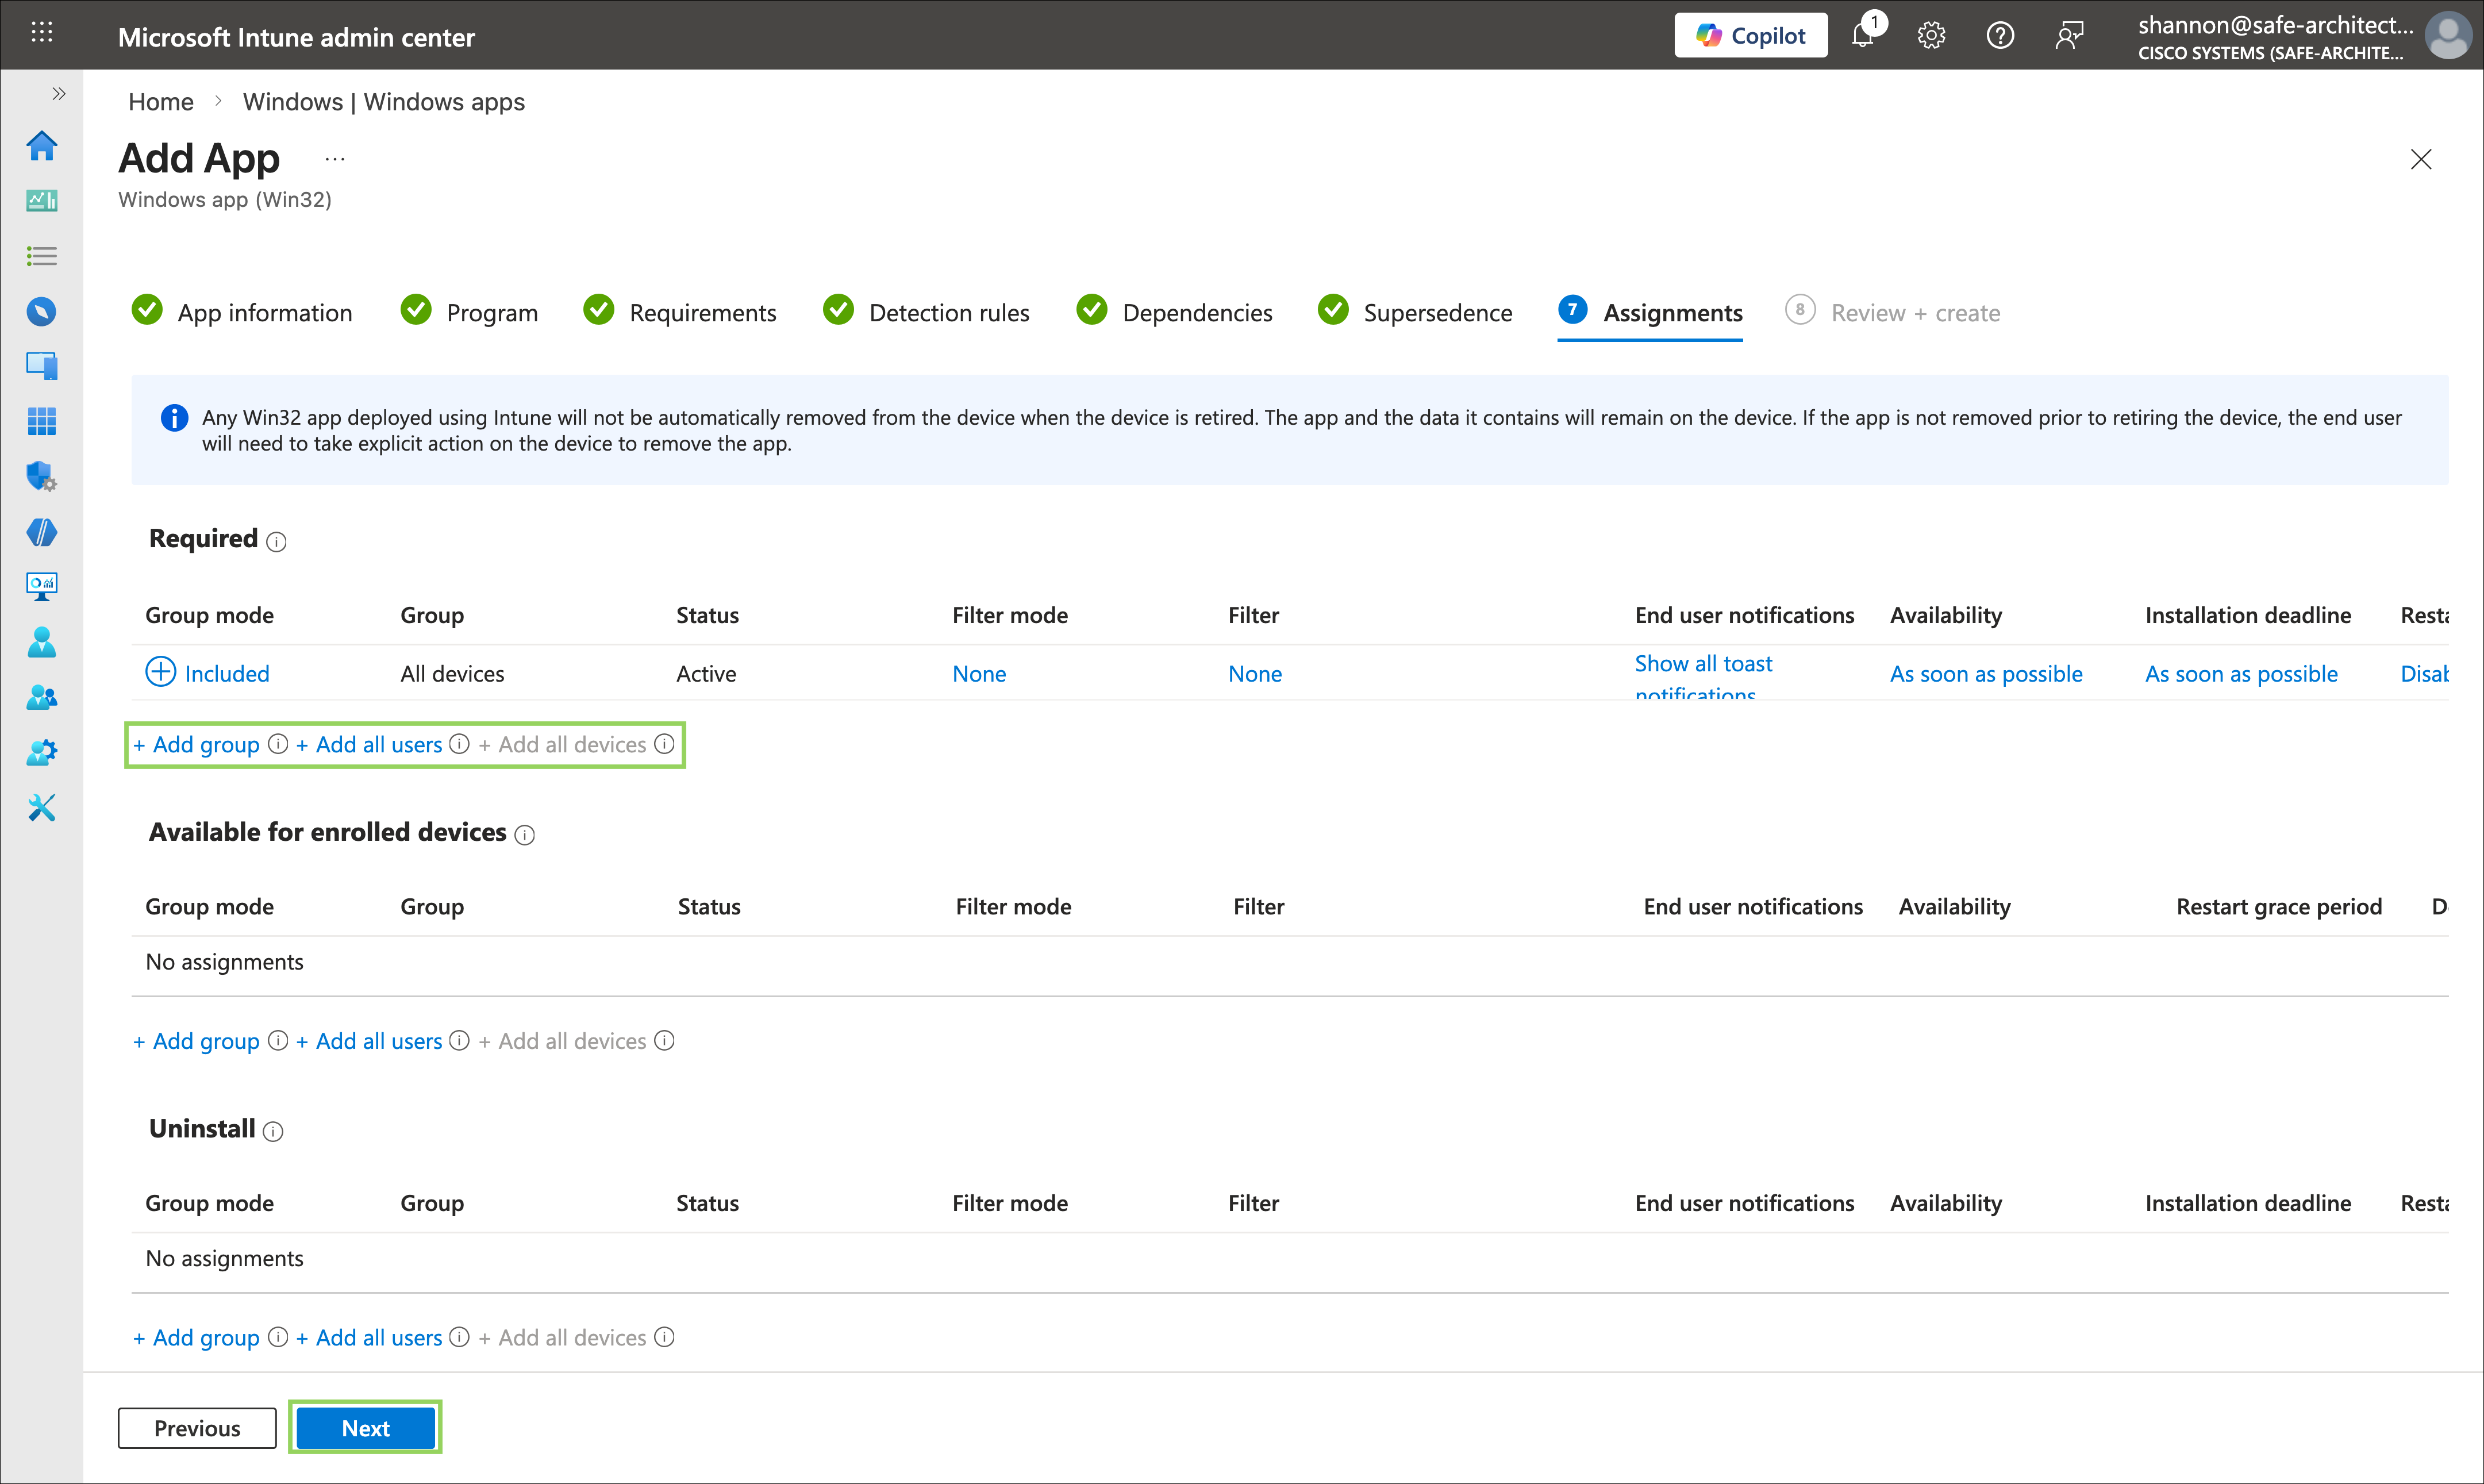
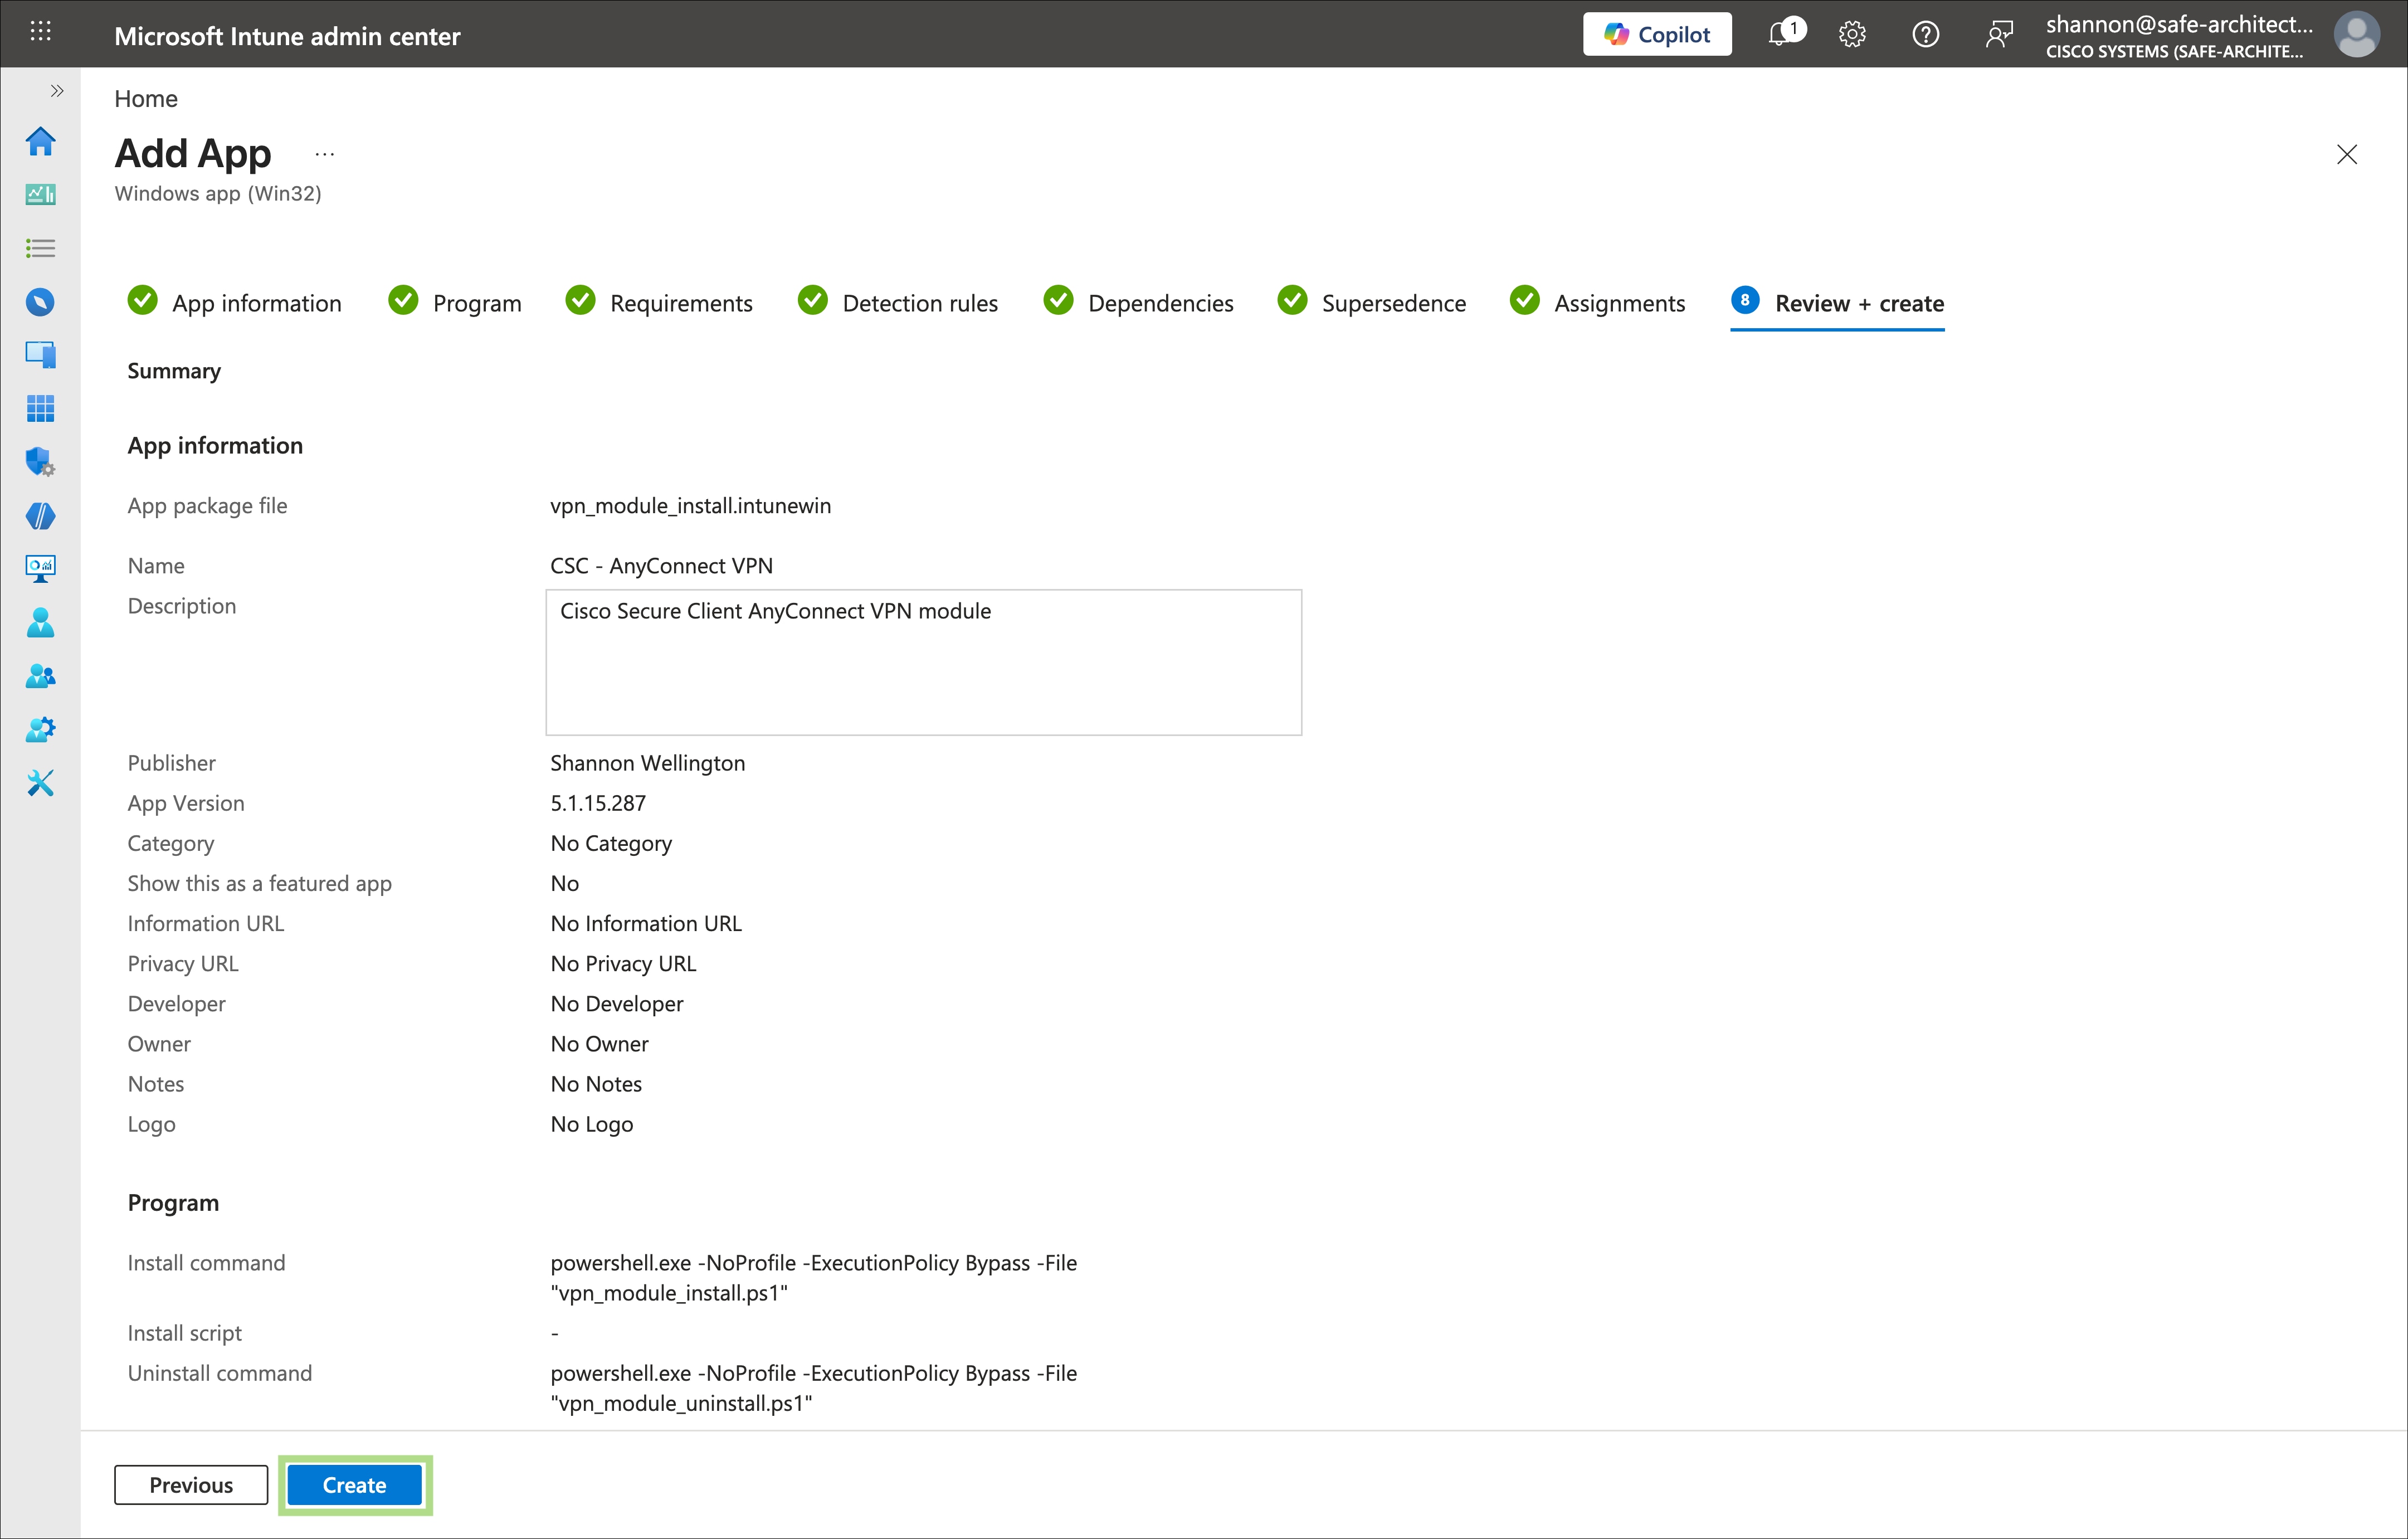
Step 11. Review the configuration summary presented on the final page and verify that all settings are correct before proceeding. Click Create to upload the intunewin package and create the Win32 application in Intune. The upload process may take several minutes depending on the size of the package and network conditions
Step 12. Repeat Steps 2 through 11 for the Umbrella module and ZTA module packages. The unique settings for each are provided below. Any steps not explicitly listed should be configured following the same approach used for the VPN module in Steps 1 through 11.
Note: The dependency configuration for the Umbrella and ZTA modules is a critical step that ensures modules are not installed on endpoints where the prerequisite VPN Core module is not yet present. Verify that Automatically Install is set to Yes for each dependency so that Intune will proactively install the prerequisite module if it is not already present, rather than waiting for a separate policy to fulfill the requirement.
Umbrella Module
| Step |
Setting |
Value |
| App information |
App package file |
Umbrella module intunewin file |
| App information |
Publisher |
Specify your organization's publisher value |
| Program |
Install command |
powershell.exe -NoProfile -ExecutionPolicy Bypass -File "umbrella_module_install.ps1" |
| Program |
Uninstall command |
powershell.exe -NoProfile -ExecutionPolicy Bypass -File "umbrella_module_uninstall.ps1" |
| Program |
Allow available uninstall |
No |
| Requirements |
OS architecture and minimum version |
Match to the package architecture and minimum OS requirements for the CSC version being deployed |
| Detection rules |
Rule format |
Use a custom detection script — select the Umbrella module detection rule script |
| Dependencies |
Required dependency |
Add the Cisco Secure Client VPN Core module; set Automatically Install to Yes |
| Supersedence |
Supersedence |
Specify if this app supersedes a prior Umbrella module deployment |
| Assignments |
Targets |
Specify the groups, users, and/or devices the module should be deployed to |
ZTA Module
| Step |
Setting |
Value |
| App information |
App package file |
ZTA module intunewin file |
| App information |
Publisher |
Specify your organization's publisher value |
| Program |
Install command |
powershell.exe -NoProfile -ExecutionPolicy Bypass -File "zta_module_install.ps1" |
| Program |
Uninstall command |
powershell.exe -NoProfile -ExecutionPolicy Bypass -File "zta_module_uninstall.ps1" |
| Program |
Allow available uninstall |
No |
| Requirements |
OS architecture and minimum version |
Match to the package architecture and minimum OS requirements for the CSC version being deployed |
| Detection rules |
Rule format |
Use a custom detection script — select the ZTA module detection rule script |
| Dependencies |
Required dependency |
Add the Cisco Secure Client VPN Core module; set Automatically Install to Yes |
| Supersedence |
Supersedence |
Specify if this app supersedes a prior ZTA module deployment |
| Assignments |
Targets |
Specify the groups, users, and/or devices the module should be deployed to |
Intune's remediation script feature allows administrators to deploy paired scripts that work together to detect and correct configuration drift on managed devices. Each remediation pair consists of a detection script, which evaluates the current state of the device against a desired configuration, and a remediation script, which corrects deviations from the desired configuration. These script pairs run on a configurable schedule, enabling proactive and continuous enforcement of device configurations without requiring manual intervention. This section provides an overview of how remediation script pairs function within Intune and outlines the key considerations for scheduling and assigning them effectively across your device fleet.
The following remediation script pairs are used to monitor and enforce the tamper resistance configuration of Cisco Secure Client on managed Windows devices. Each script pair is designed to address a specific aspect of the tamper resistance strategy, and together they provide a comprehensive and layered approach to maintaining the integrity of the Secure Client installation. The following section describes each script pair and its intended function before diving into the steps required to create and deploy them within Intune.
● CSC Lockdown Remediation Scripts: While the initial deployment of Secure Client modules via Intune runs the Lockdown script, there is no guarantee that the tamper resistance attributes applied by the Lockdown script will remain intact over time. Configuration drift, manual changes, or other system events may result in these attributes being altered or removed, effectively weakening the tamper resistance of the Secure Client installation. This remediation script pair is designed to continuously monitor and enforce these attributes. The detection script probes the relevant services and registry keys to verify that attributes are correctly set, while the remediation script restores them to their required state if any deviation is detected. For the example remediation script pair used in this guide, reference:
◦ Lockdown – Remediation Script
● CSC Disable Lockdown Remediation Scripts: There may be circumstances where IT administrators or support teams need to temporarily remove the attributes set by the Lockdown script on a device to perform maintenance, apply updates, or troubleshoot issues with the Secure Client installation. To facilitate this, a separate remediation script pair is provided that is specifically designed for troubleshooting purposes. The detection script identifies devices where these attributes are currently active, and the remediation script safely disables them to allow administrative access to the Secure Client installation. For the example remediation script pair used in this guide, reference:
◦ Disable Lockdown - Detection Script
◦ Disable Lockdown – Remediation Script
● Configuration File Integrity for VPN, Umbrella, and ZTA modules: Even with the attributes set by the Lockdown script in place, the configuration files that govern the behavior of the VPN, Umbrella, and ZTA modules remain a potential vector for tampering. Unauthorized modifications to these files, whether intentional or accidental, could silently alter the security posture of the device without triggering a reinstallation of the client. To address this, a remediation script pair is provided that validates the integrity of the configuration files for each module by comparing the hash of the files found in their respective installation directories against a known expected hash value. If the detection script identifies a hash mismatch, or determines that a configuration file is absent entirely, the remediation script will automatically overwrite or restore the file to its expected state, ensuring that the module's configuration remains consistent with the desired baseline. For the example remediation script used in this guide, reference:
◦ VPN Configuration – Detection Script
◦ VPN Configuration – Remediation Script
◦ Umbrella Configuration – Detection Script
◦ Umbrella Configuration – Remediation Script
◦ ZTA Configuration – Detection Script
◦ ZTA Configuration – Remediation Script
Once the remediation script pairs have been created, they must be deployed and assigned to the appropriate device groups within Intune to begin actively monitoring and enforcing the tamper resistance configuration. This section covers the steps required to upload, configure, and assign each script pair within Intune, including scheduling considerations to ensure that detection and remediation cycles run at an appropriate frequency. It is important to carefully consider the scope of assignment for each script pair, particularly the Disable Lockdown script pair, to avoid conflicts or unintended disruption to the tamper resistance posture of your device fleet.
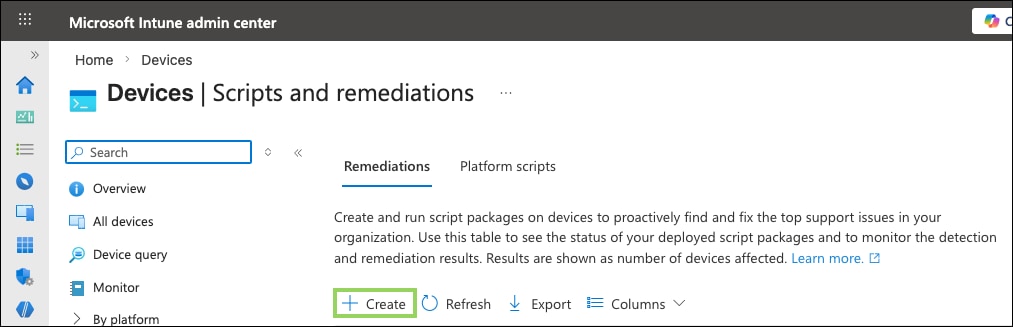
Step 1. From the Microsoft Intune Admin Center, navigate to Devices > Manage Devices > Scripts and Remediations.

Step 2. Under the Remediations tab, click Create to begin configuring a new remediation script pair.
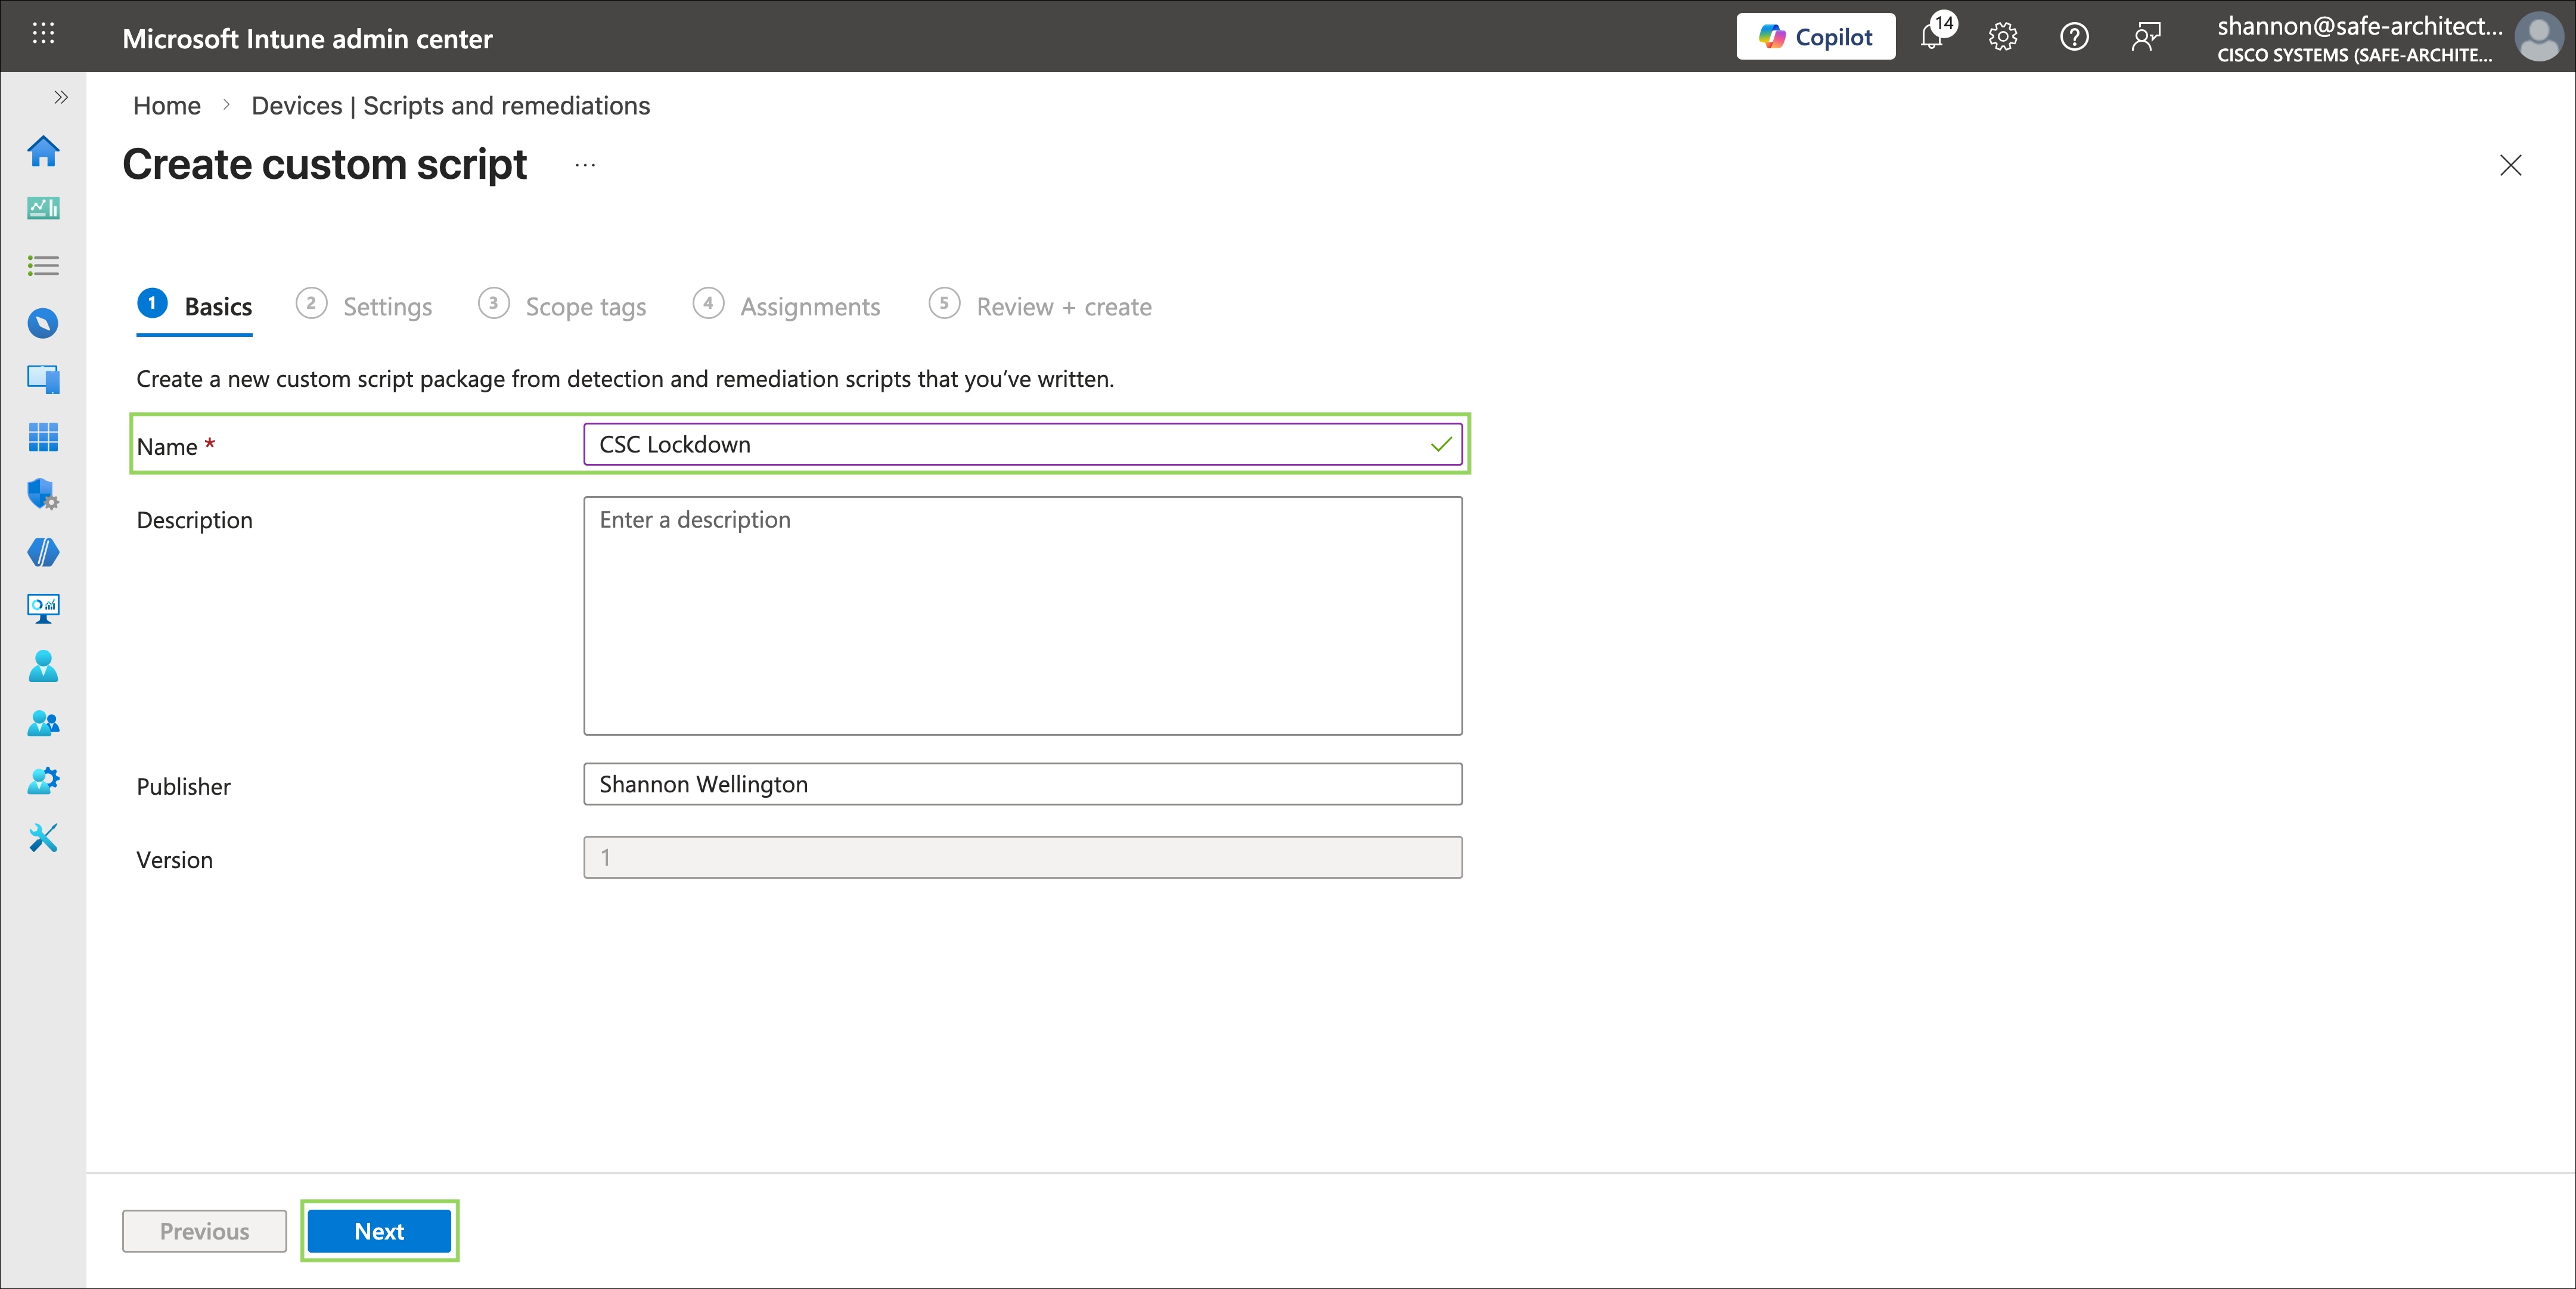
Step 3. On the Basics step, provide a descriptive name for the remediation script pair in the Name field. For the purposes of this guide, the name CSC Lockdown is used. Optionally, provide a Description to help other administrators identify the purpose and scope of the script pair within the Intune console. Click Next when complete.
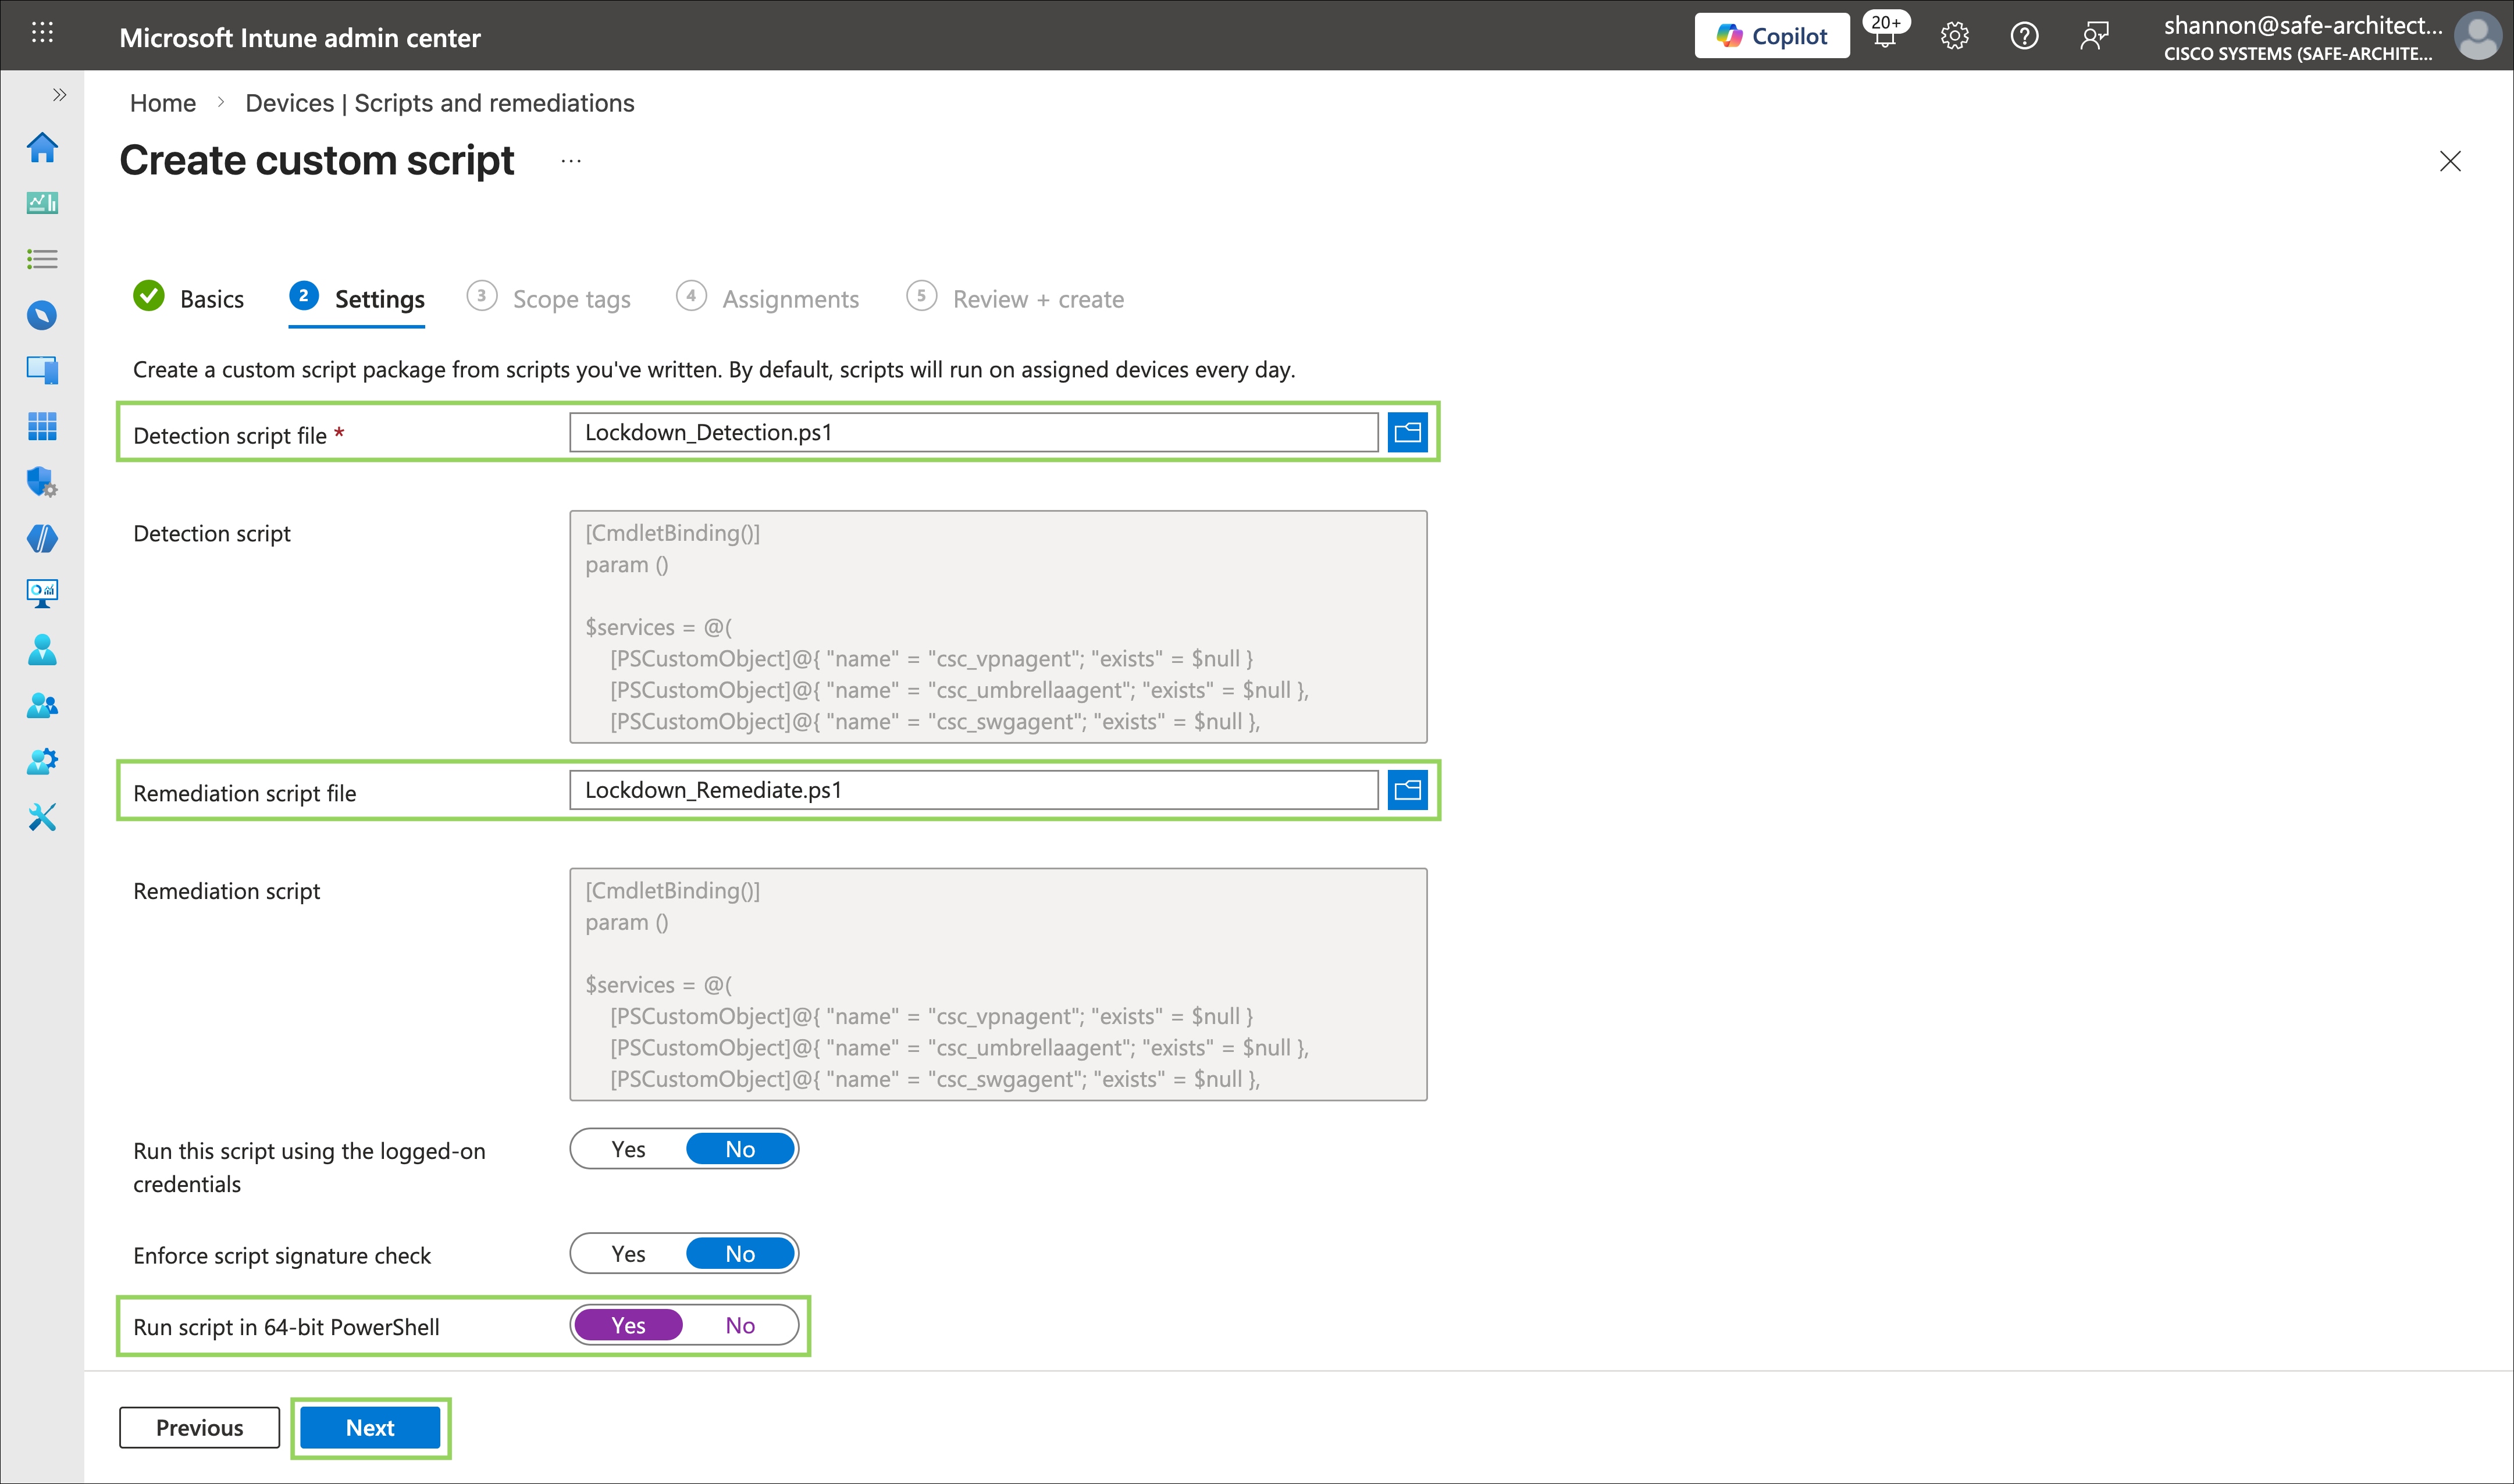
Step 4. On the Settings step, configure the detection and remediation scripts as follows:
● In the Detection script file field, click to browse and upload the detection script from the remediation script pair being configured.
● In the Remediation script file field, upload the corresponding remediation script from the same pair.
Note: The detection and remediation scripts configured here are distinct from the application detection rule scripts configured during the Win32 app deployment in the previous section. The Win32 app detection rules are used by Intune to determine whether an application is installed, while these remediation script pairs are used exclusively by Intune's proactive remediations feature to continuously monitor and correct configuration drift on managed devices after installation. Uploading the wrong script to either field will result in incorrect behavior that may be difficult to diagnose.
Set Run script in 64-bit PowerShell to Yes for environments where the target devices are running 64-bit Windows, as is the case for the test environment used in this guide. Administrators targeting 32-bit environments should set this to No. Leave Run this script using the logged-on credentials set to No so that the scripts execute in the system context, which is required to modify the registry keys and file system locations that the tamper resistance configuration depends on.
Click Next when complete.
Step 5. On the Scope tags step, no scope tags are required for this guide. If your organization uses scope tags to manage administrative boundaries and delegate management responsibilities within Intune, apply the appropriate tags before proceeding. Click Next when complete.
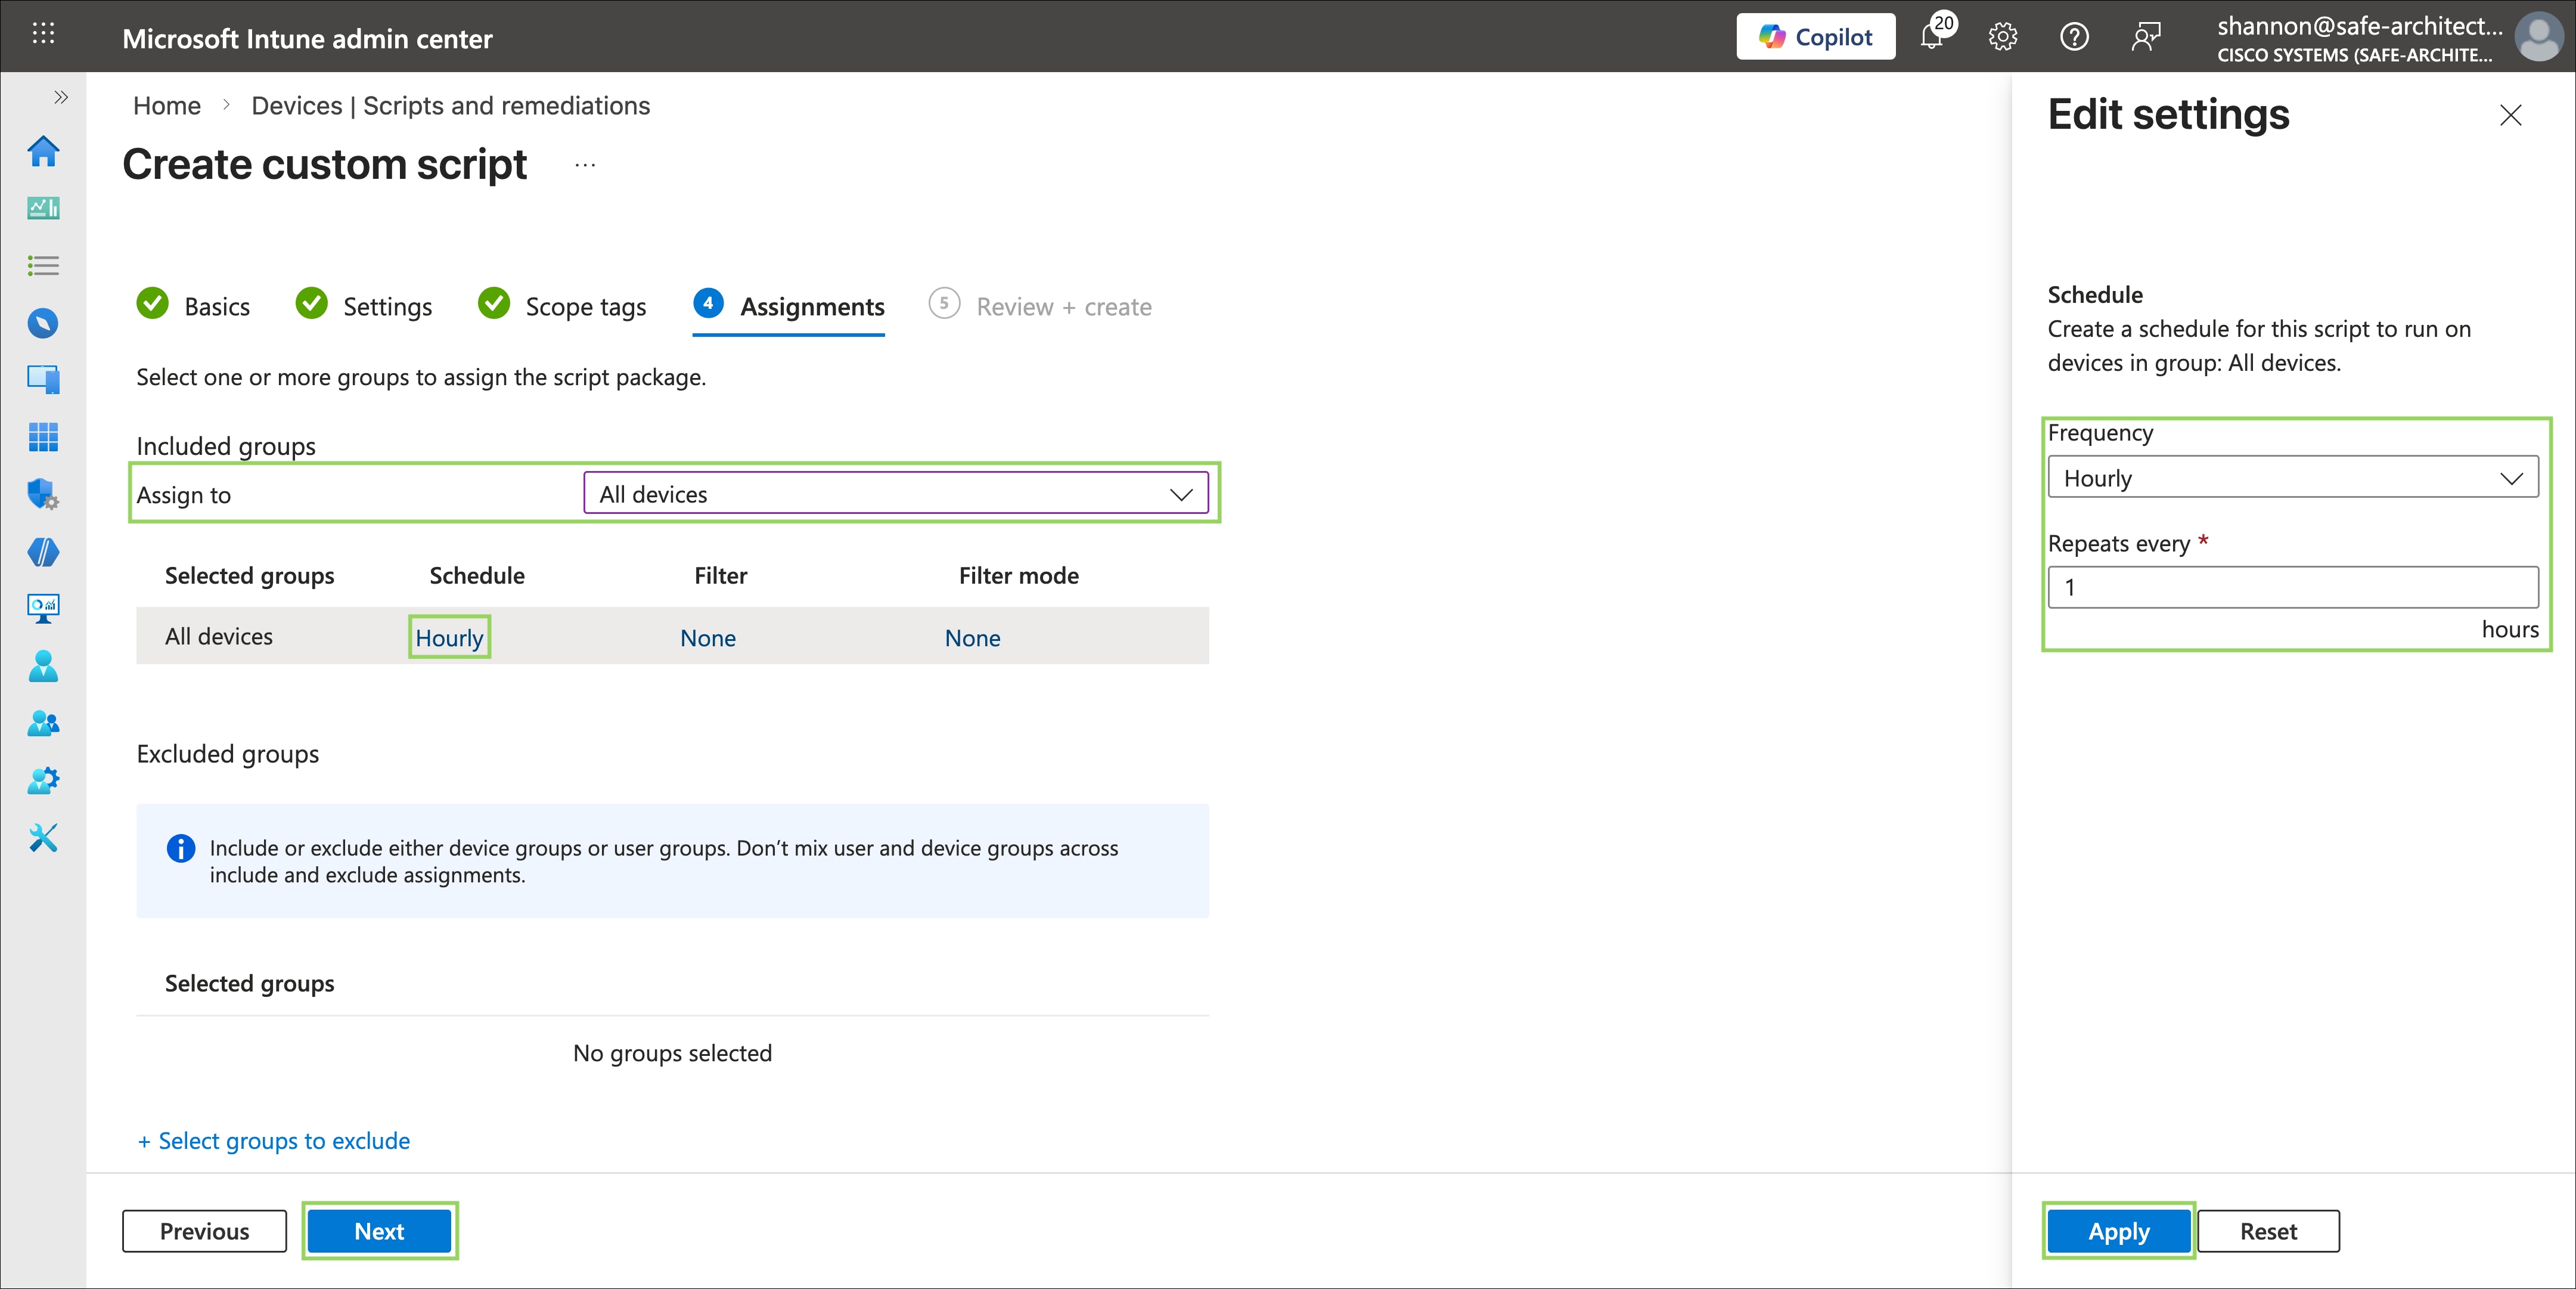
Step 6. On the Assignments step, select the users and/or devices to which the remediation script pair will be applied. For this guide, All Devices is selected under the Required section, as it is assumed that Cisco Secure Client will be deployed across the entire managed Windows device fleet.
Click the Schedule option to configure the execution frequency for the detection and remediation cycle. The default frequency is Daily. For this guide, the frequency is set to once per hour to ensure that any configuration drift is detected and corrected as soon as possible within Intune.
Note: This value should be carefully considered before deployment and adjusted to align with your organization's operational requirements, acceptable performance overhead, and the sensitivity of the environments being protected. Setting the remediation frequency too high may introduce unnecessary system overhead on endpoints, particularly on devices with limited resources. Setting it too low may allow a tampered configuration to persist for an unacceptable period before being corrected.
Click Next when complete.
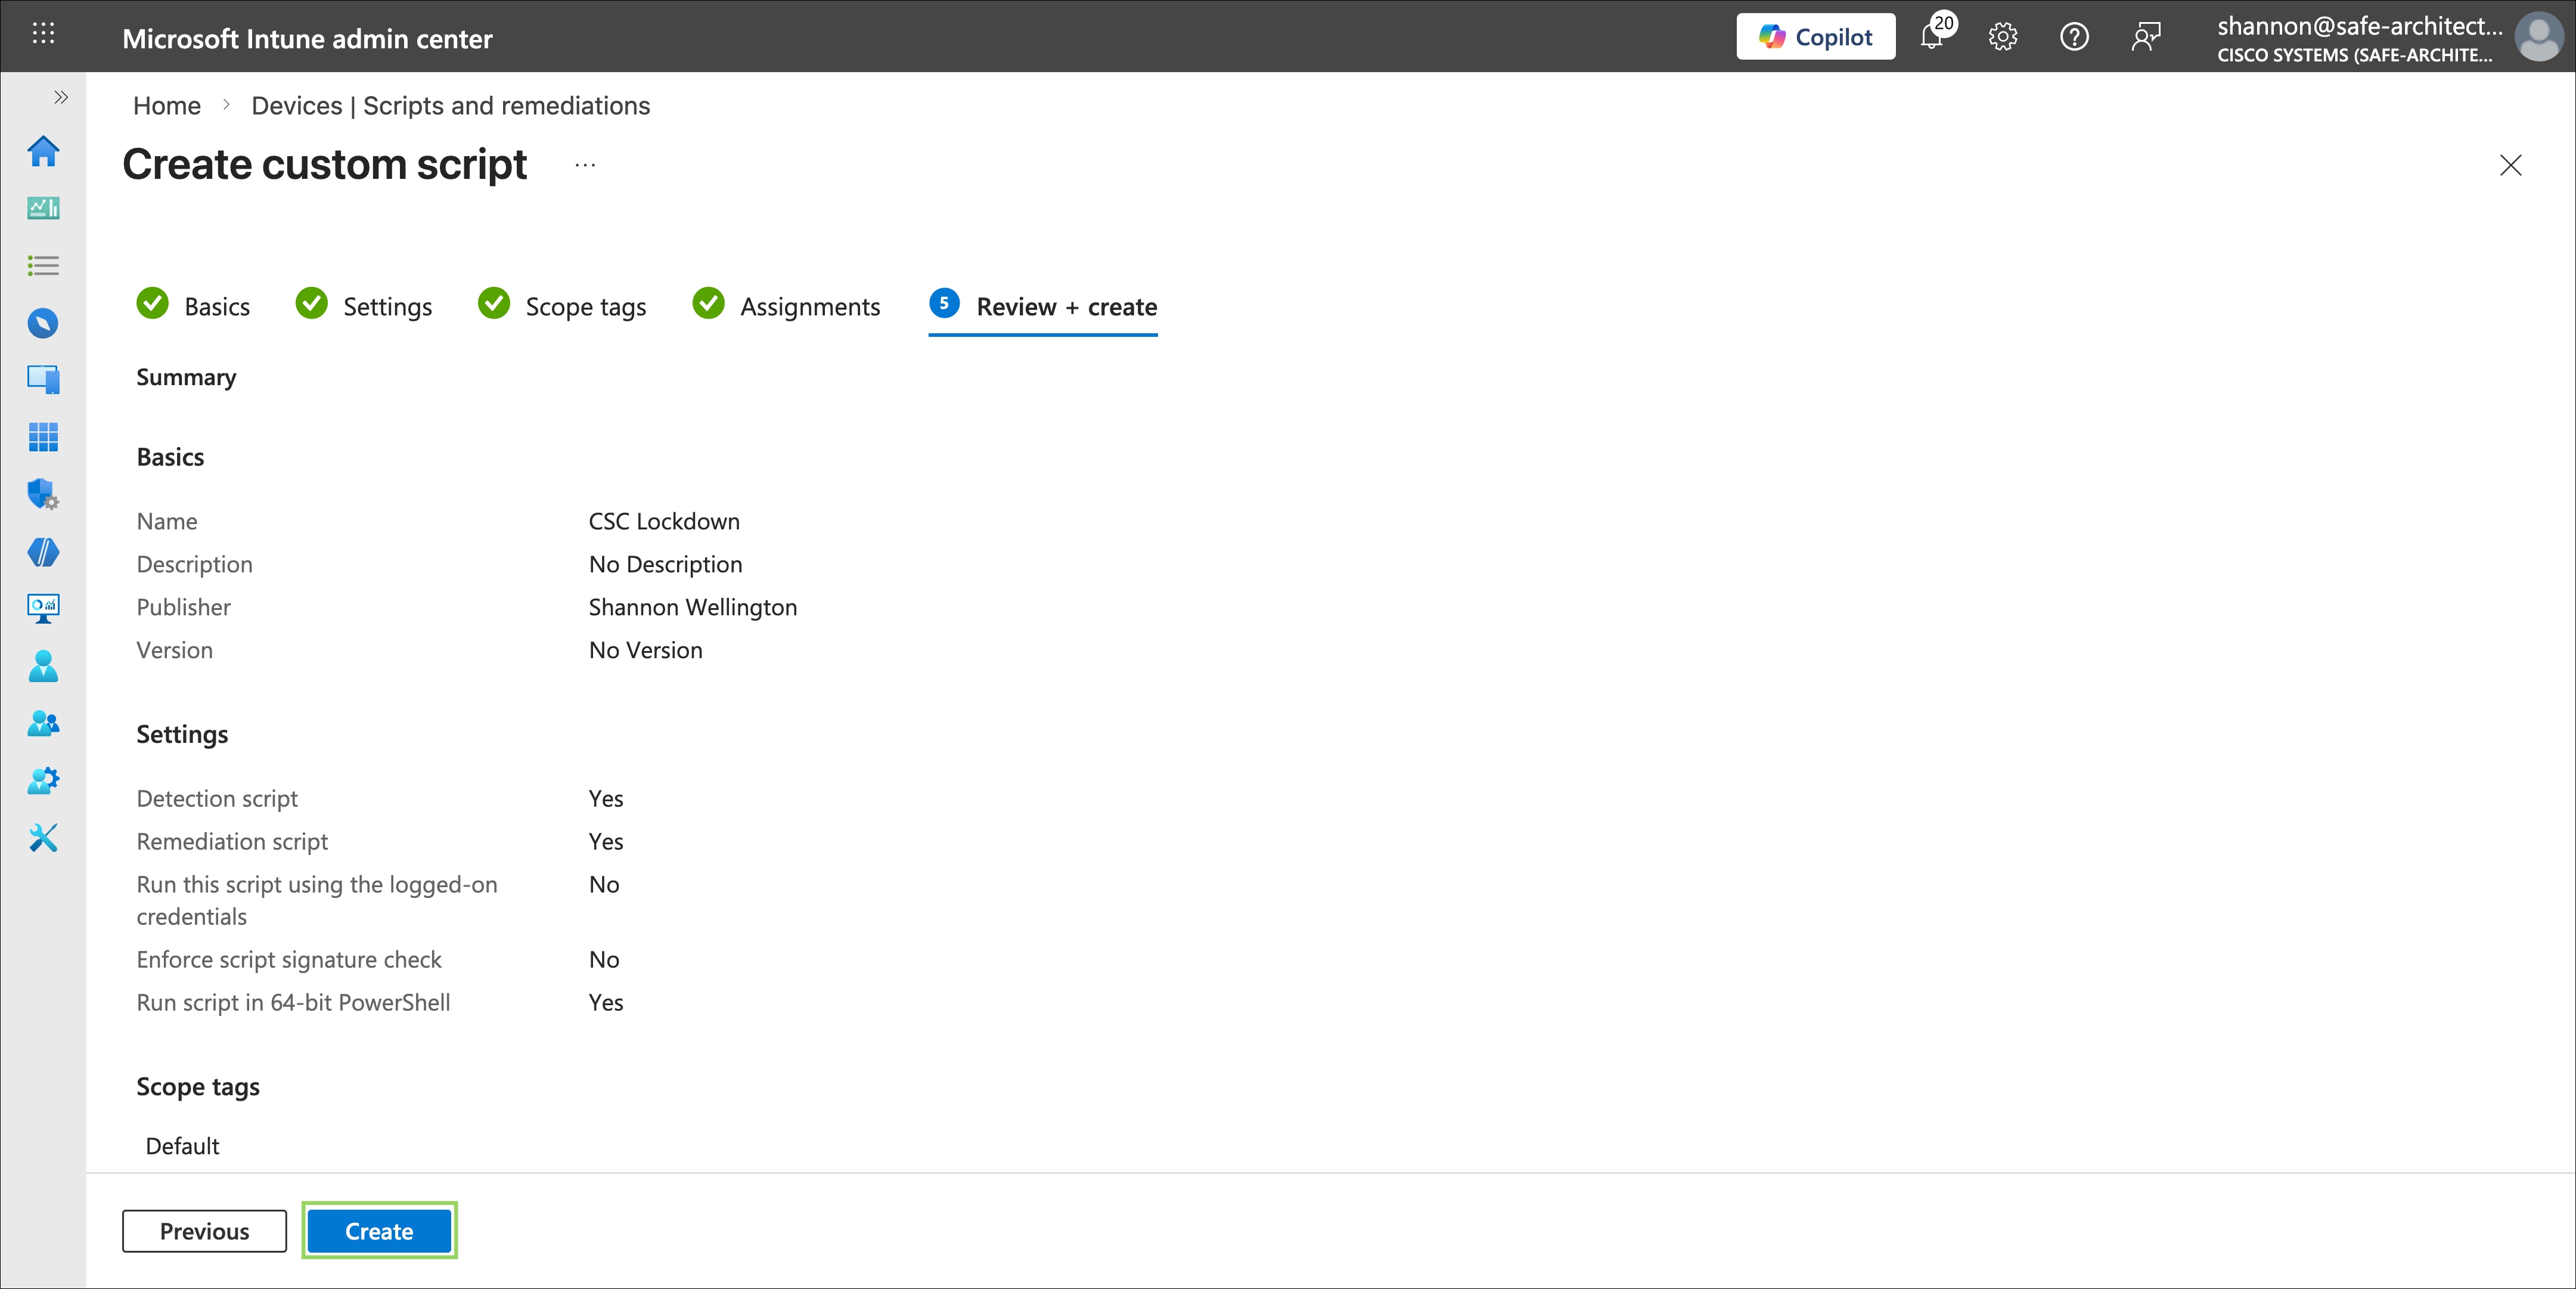
Step 7. On the Review + Create step, carefully review all configured settings, including the script assignments, execution context, PowerShell architecture setting, and assignment scope, to ensure they are correct before finalizing. Once confirmed, click Create to upload the scripts and activate the remediation script pair. Intune will begin executing the detection script on assigned devices at the next scheduled check-in following the configured frequency interval.
Step 8. Repeat Steps 2 through 7 for each remaining remediation script pair, following the same configuration process. The steps will be largely identical across all pairs, with one critical exception: special consideration must be given to the assignment configuration of the CSC Disable Lockdown remediation script pair.
Unlike the Lockdown and Configuration File Integrity script pairs, which are designed to enforce tamper resistance across the entire managed fleet, the Disable Lockdown script pair is intended to temporarily relax the attributes set by the Lockdown script on specific devices where administrative access or user exemptions are required. As a result, this script pair must never be assigned to the same device groups as the enforcement script pairs.
Note: Deploying the Disable Lockdown script pair to the same scope as the Lockdown script pair will create a direct and continuous conflict, where the Lockdown scripts repeatedly reapply the tamper resistance attributes while the Disable Lockdown scripts simultaneously remove them. This will result in an enforcement loop that undermines the tamper resistance configuration entirely and may generate a high volume of remediation activity in the Intune console that obscures genuine compliance issues. The Disable Lockdown script pair should be scoped exclusively to specific user or device groups where temporary exemptions are intentionally required, and its assignment should be removed promptly once the troubleshooting activity is complete.
Validating that the remediation scripts and tamper resistance configuration function correctly is an essential step before rolling out the configuration to the broader device fleet. While remediation script testing can be performed through the Intune console by either waiting for the next scheduled execution cycle or by selecting a device and using the Run Remediation option, a more efficient method for initial validation is to execute the scripts directly on the test device in the same execution context that Intune uses — the local system account. This is accomplished using PsExec from the Microsoft Sysinternals PsTools suite, which allows PowerShell scripts to be run as the system account, replicating the exact conditions under which Intune executes remediation scripts. The following steps walk through a complete end-to-end validation of all script pairs and tamper resistance behaviors.
Step 1. On the designated test device, verify that Cisco Secure Client has been successfully installed by all configured Intune Win32 app deployments. Confirm that the VPN, Umbrella, and ZTA modules are all present before proceeding, as the validation steps that follow depend on all three modules being installed and operational.
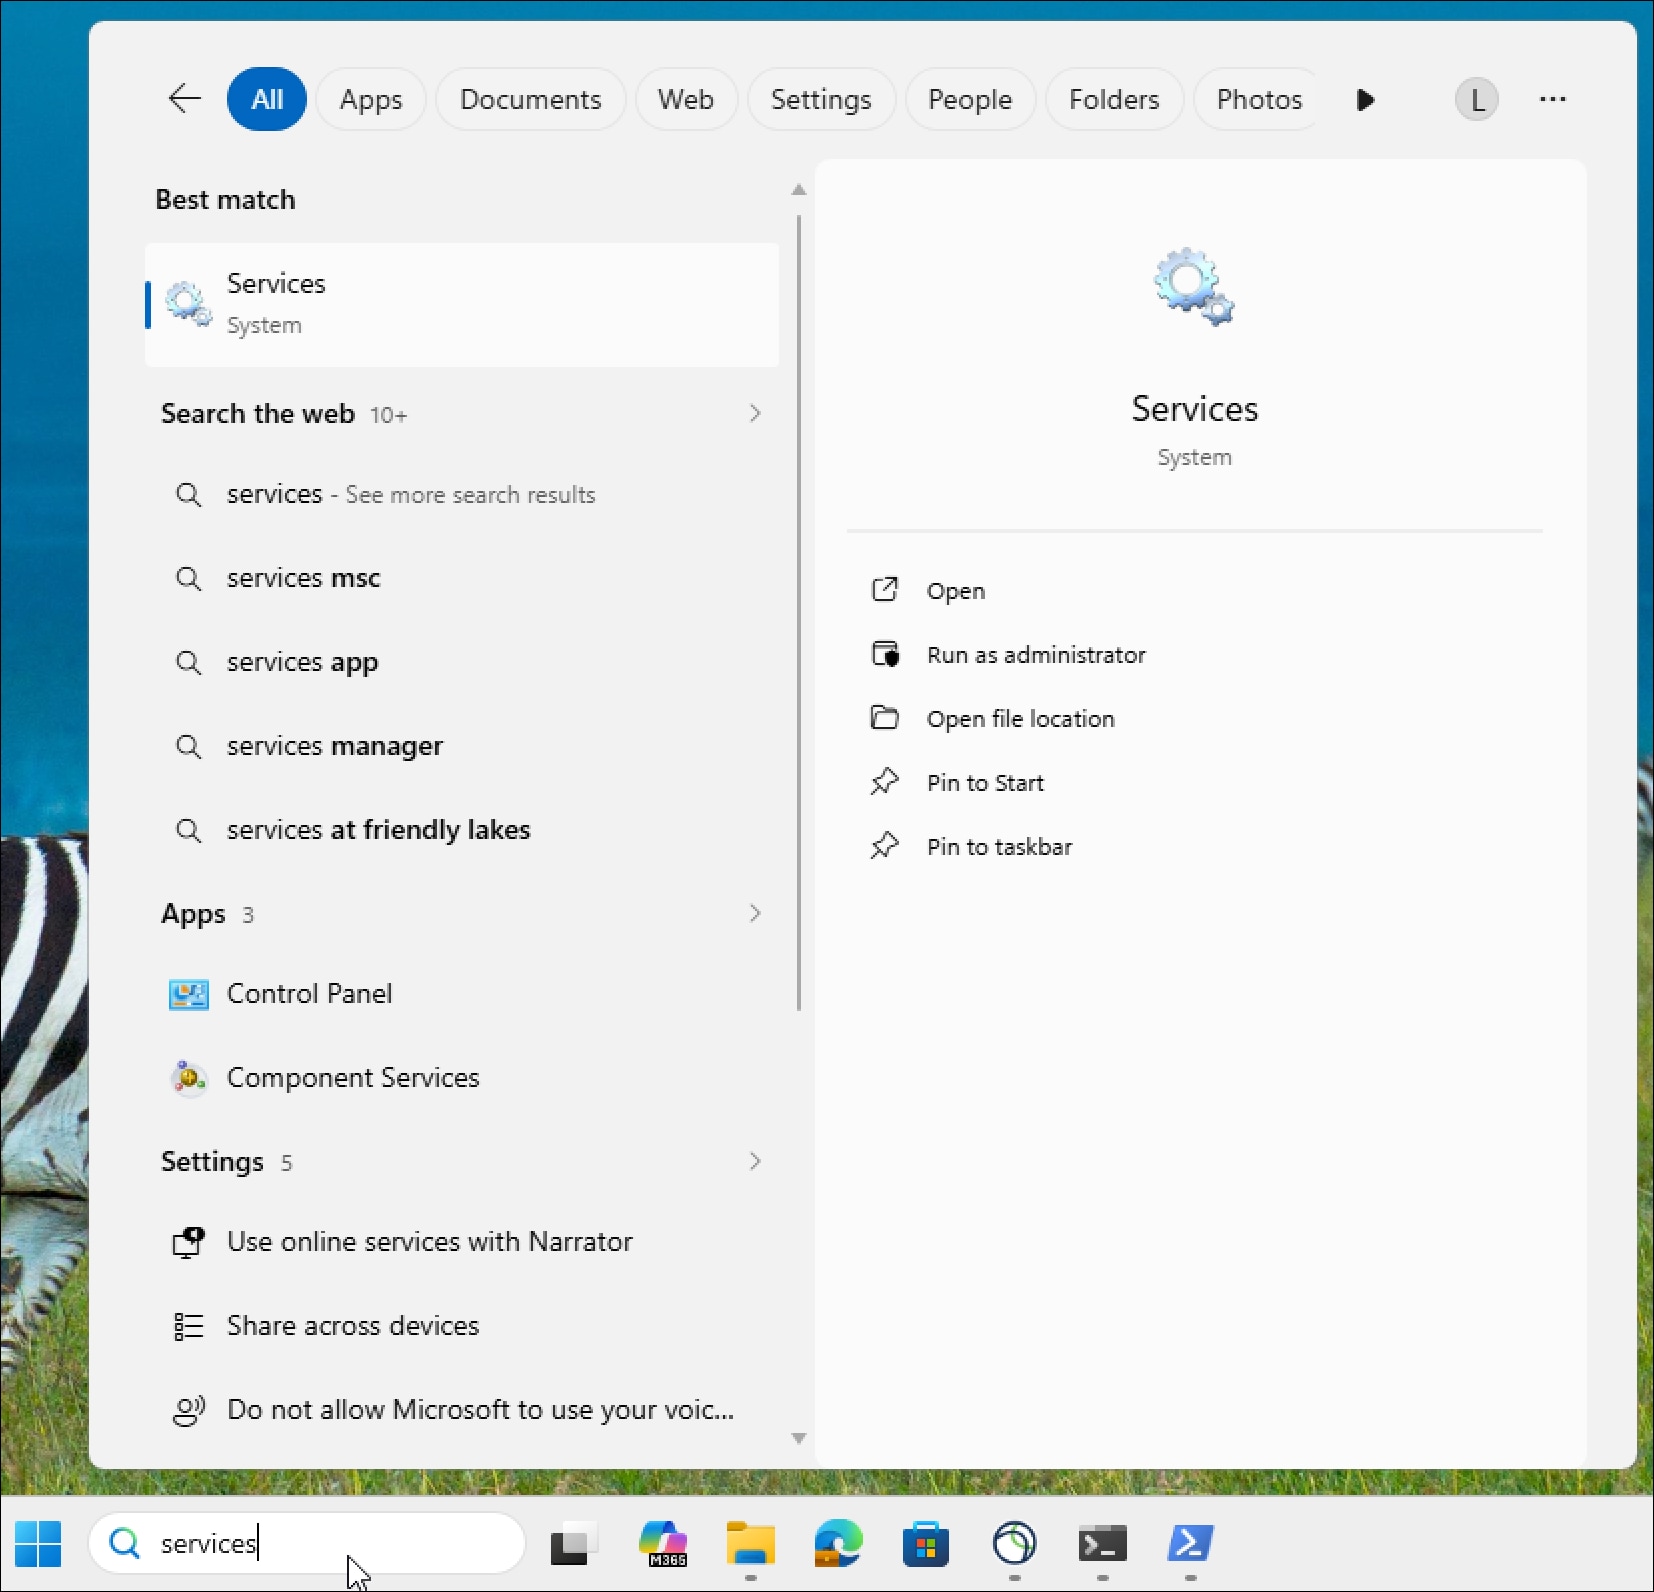
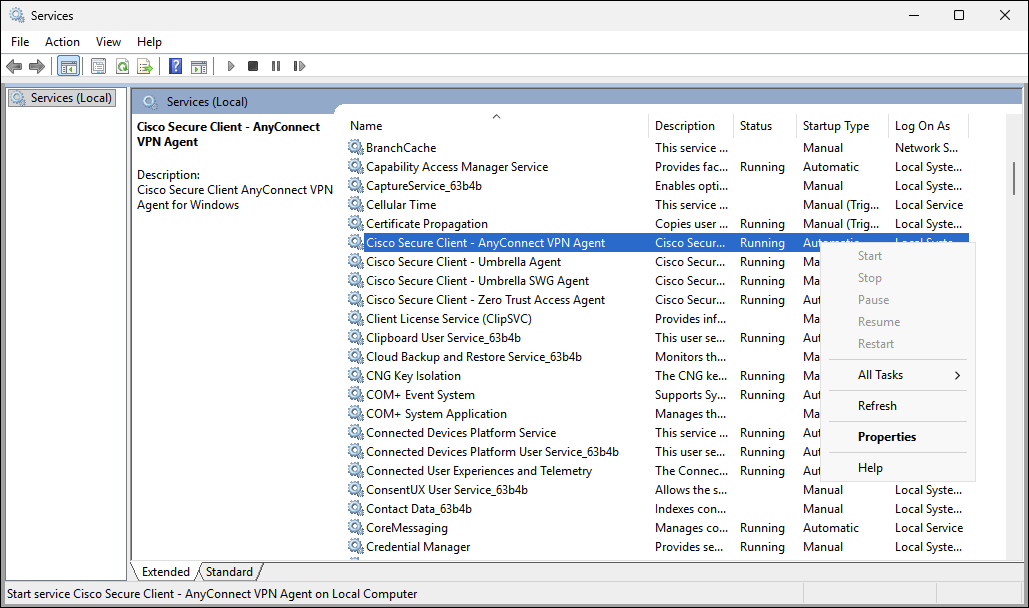
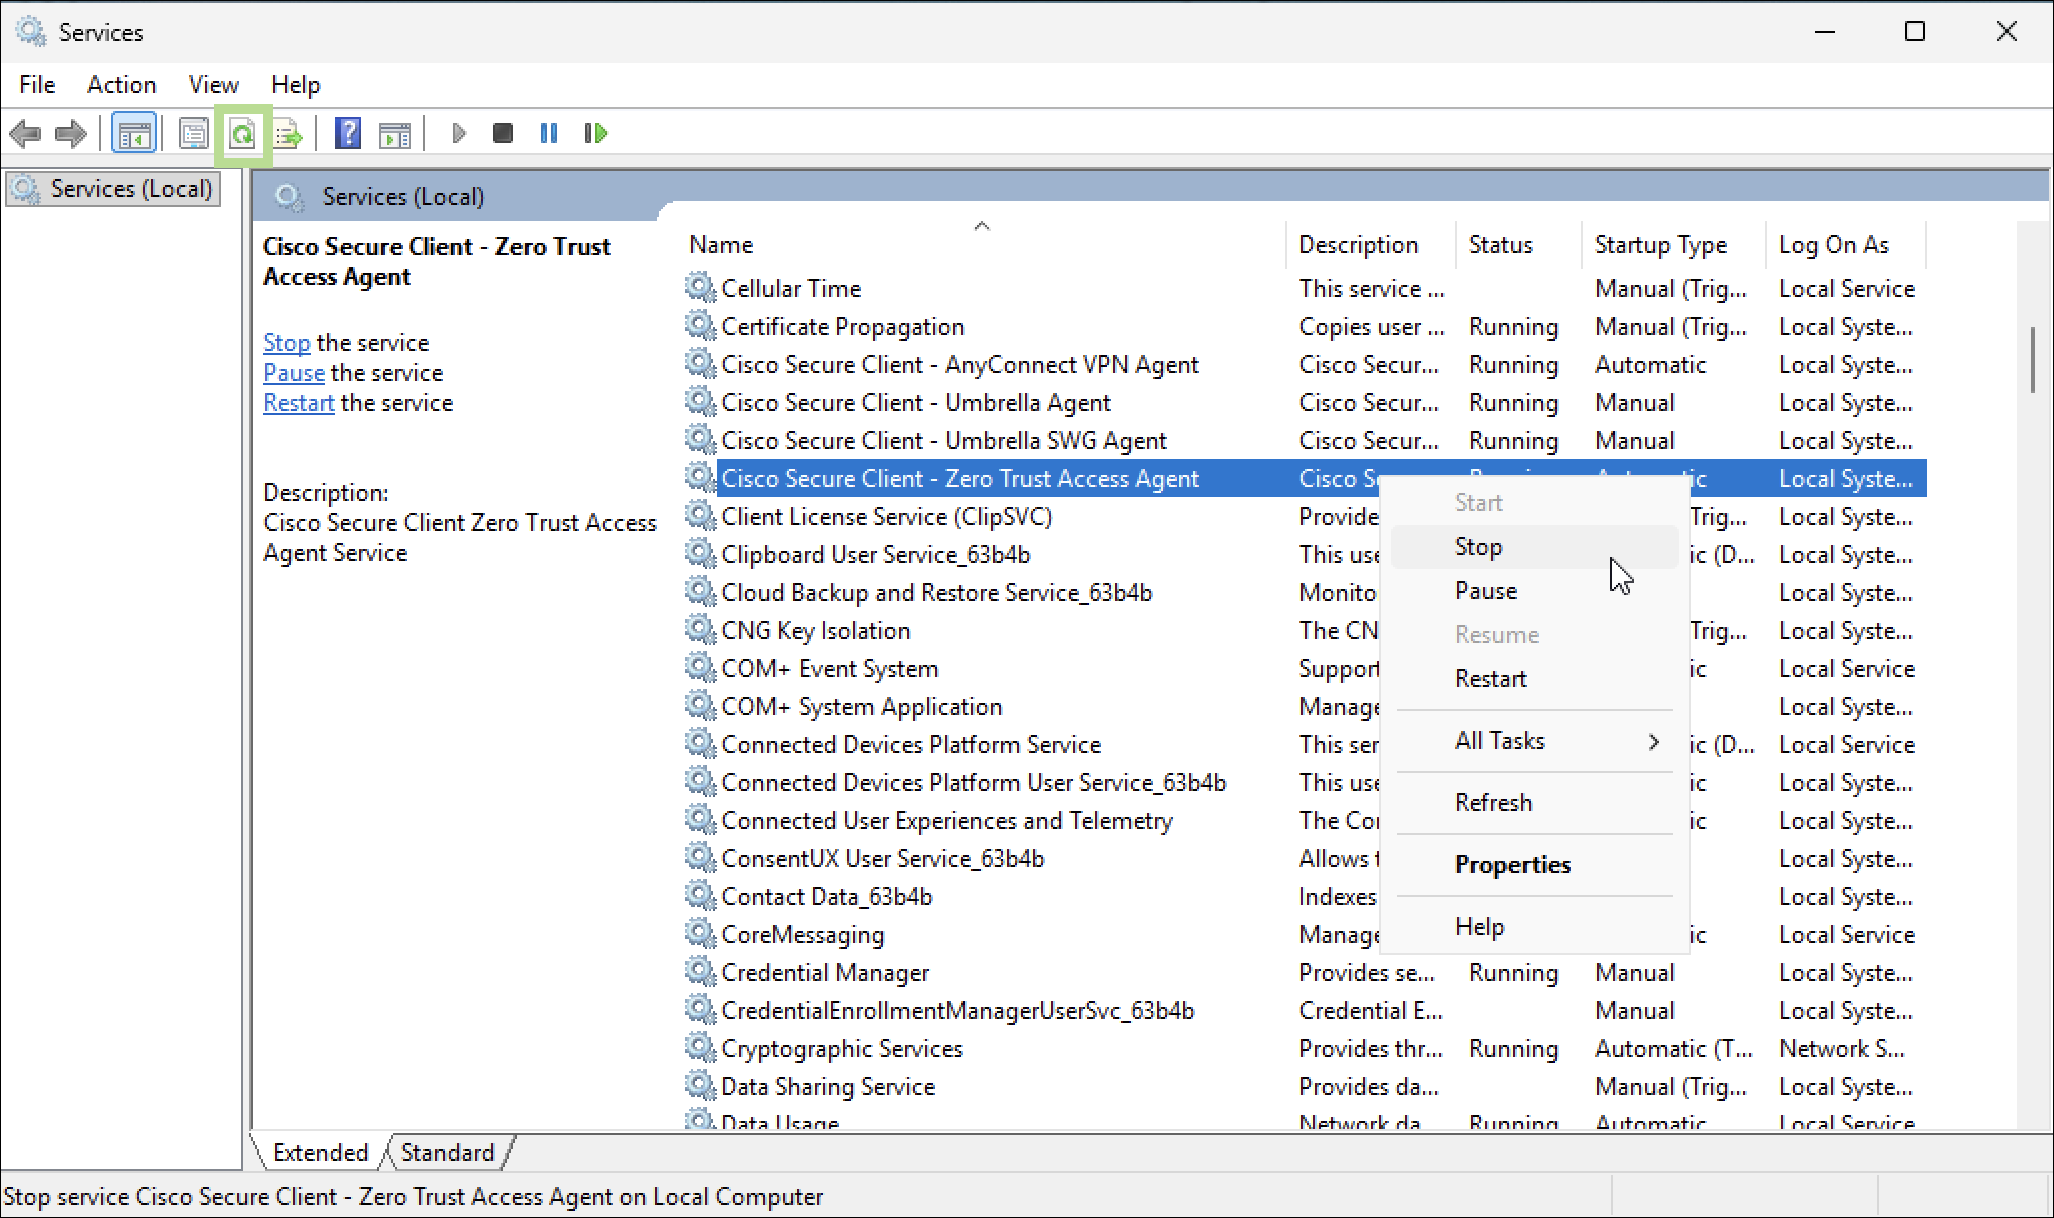
Step 2. Type Services in the Windows search bar and open the Services application. Locate the Cisco Secure Client module services in the list (such as the Cisco Secure Client – AnyConnect VPN Agent and Cisco Secure Client - Umbrella Agent).
Step 3. Right-click one of the Cisco Secure Client module services and attempt to stop it. Verify that the option to stop the service is grayed out. This confirms that the registry hardening attributes applied during the Intune Win32 app deployment are functioning correctly and that the service is protected from user or non-elevated process interference.
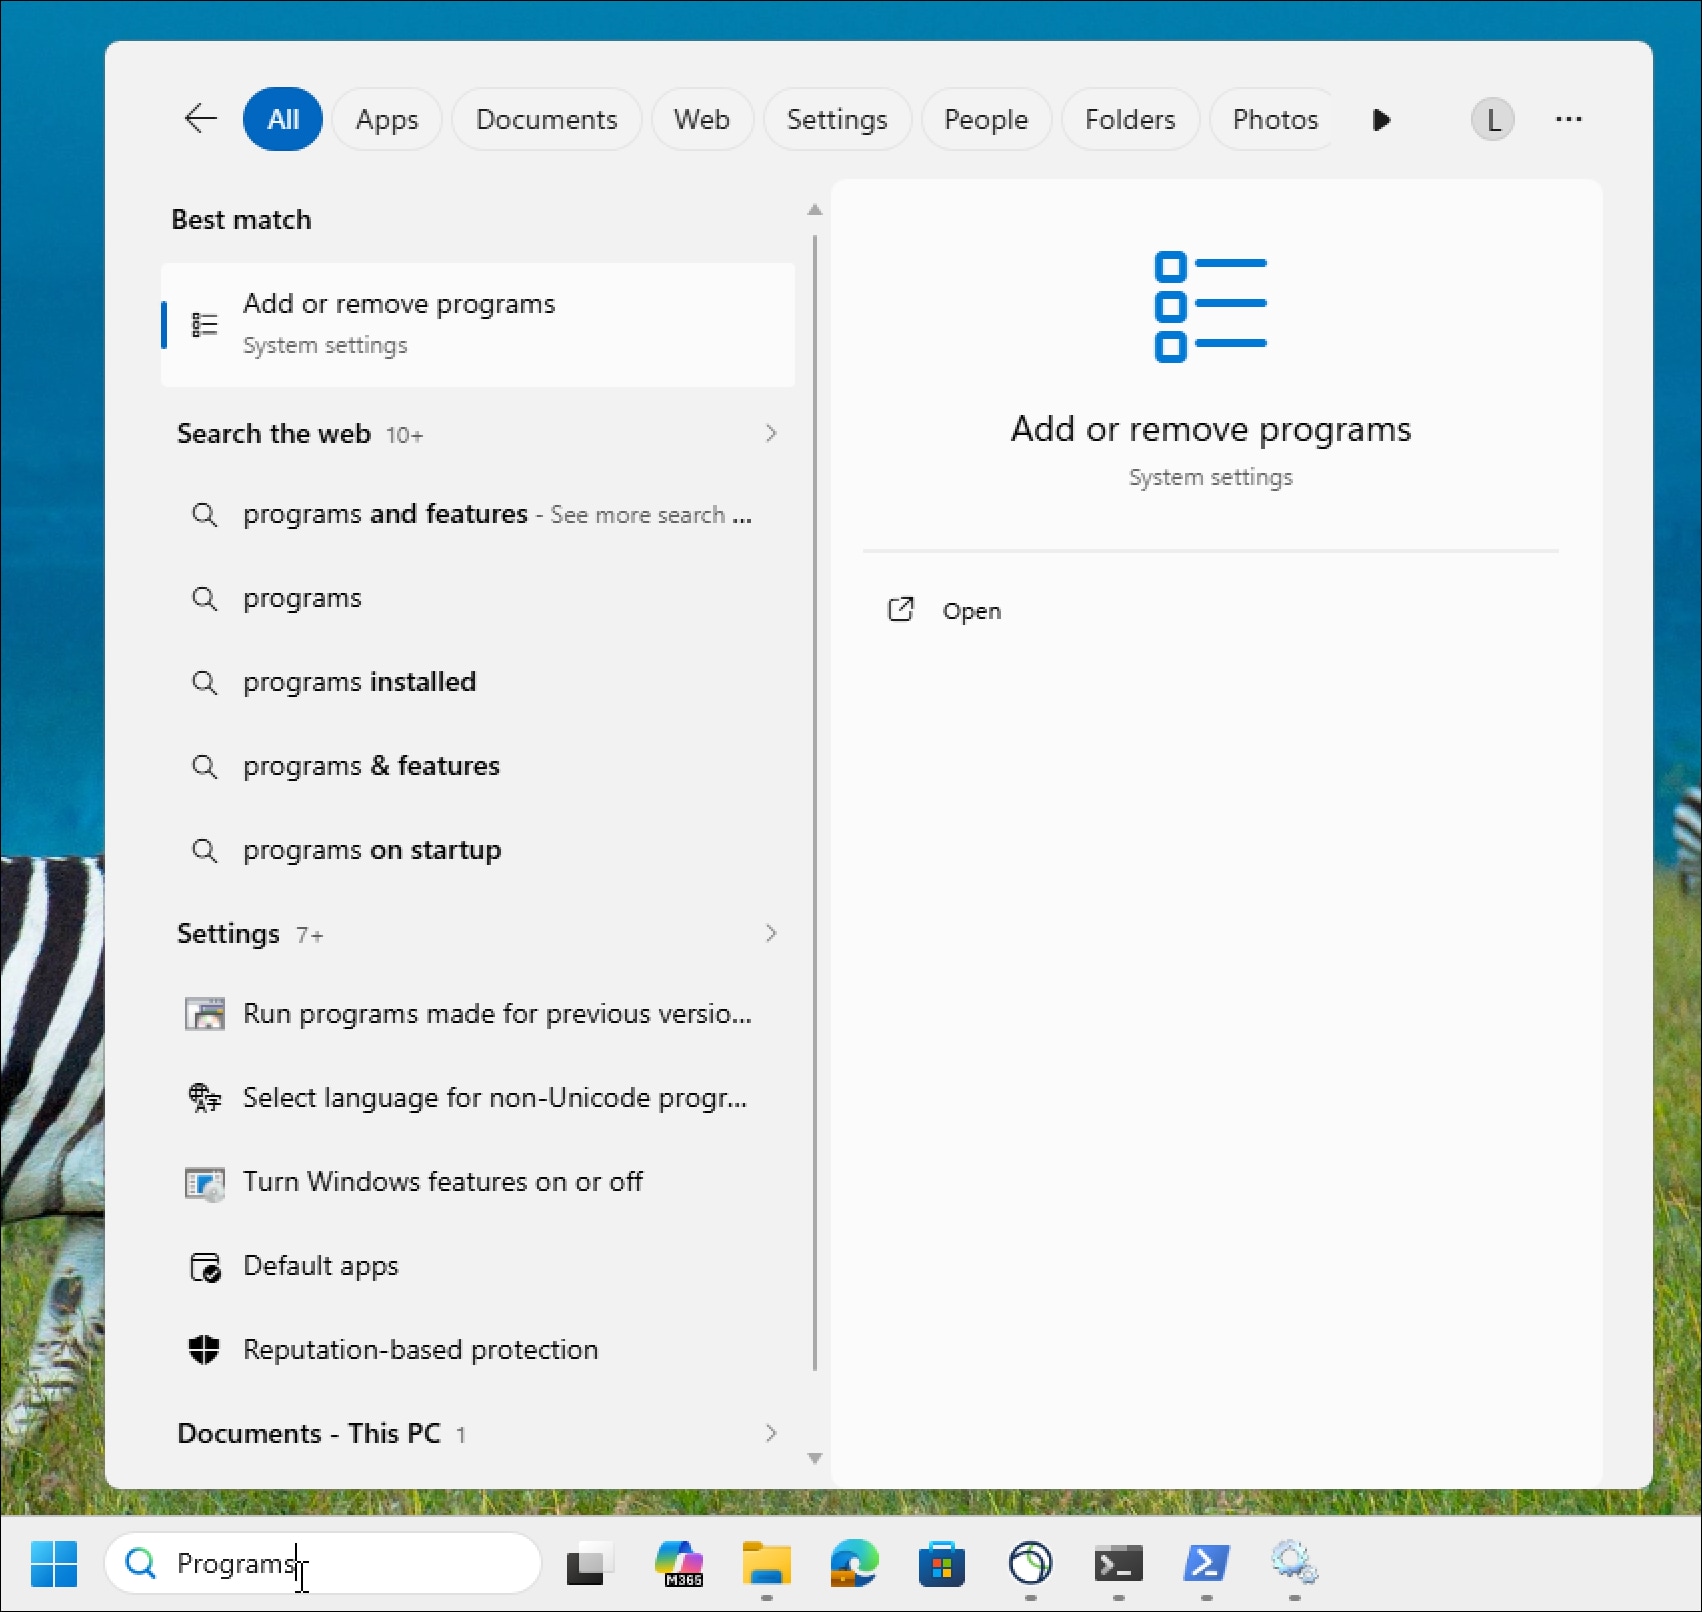
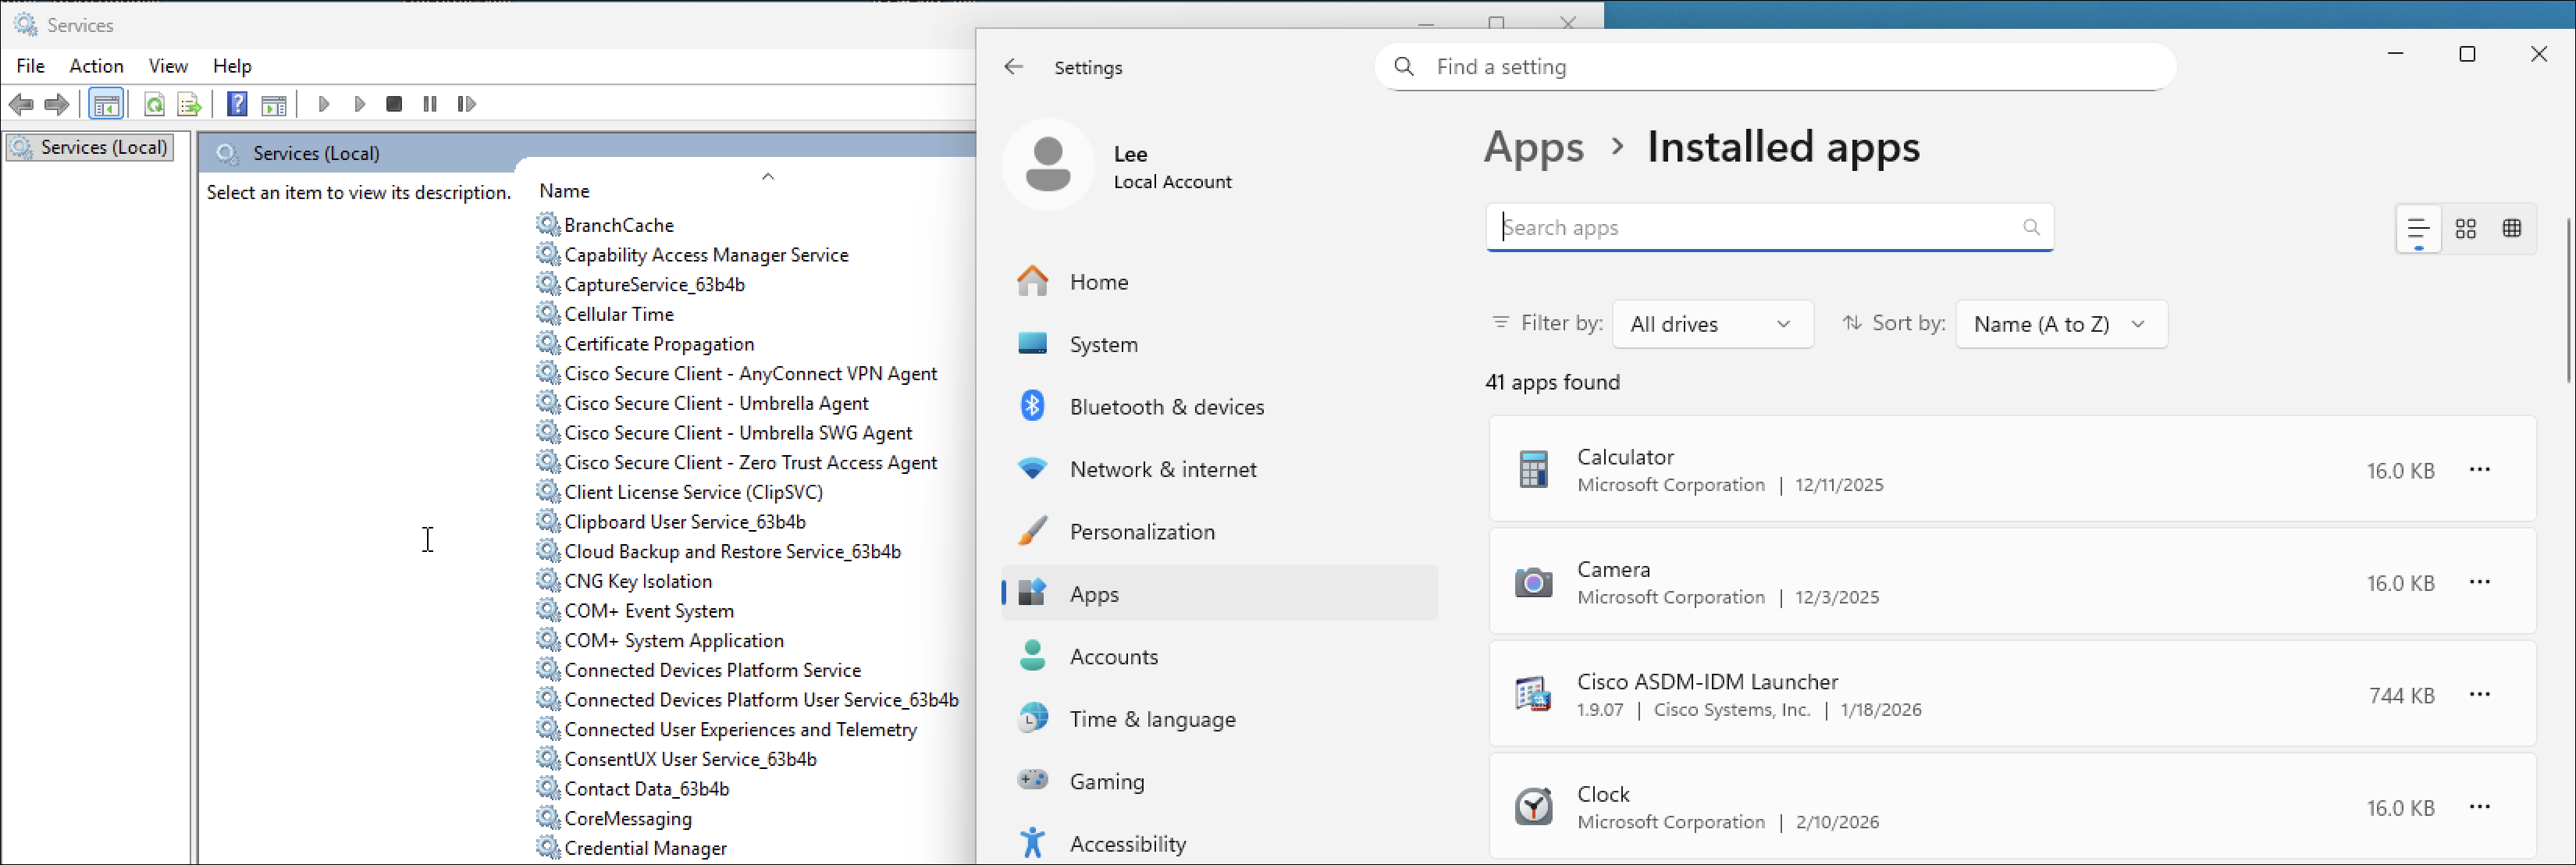
Step 4. Type Programs in the Windows search bar and open Add or Remove Programs.
Step 5. Scroll through the installed applications list and verify that none of the Cisco Secure Client modules appear as entries. This confirms that the registry hardening attributes applied during deployment are functioning correctly, hiding the Cisco Secure Client modules from the standard application management interface and reducing the likelihood of users attempting a manual uninstall.
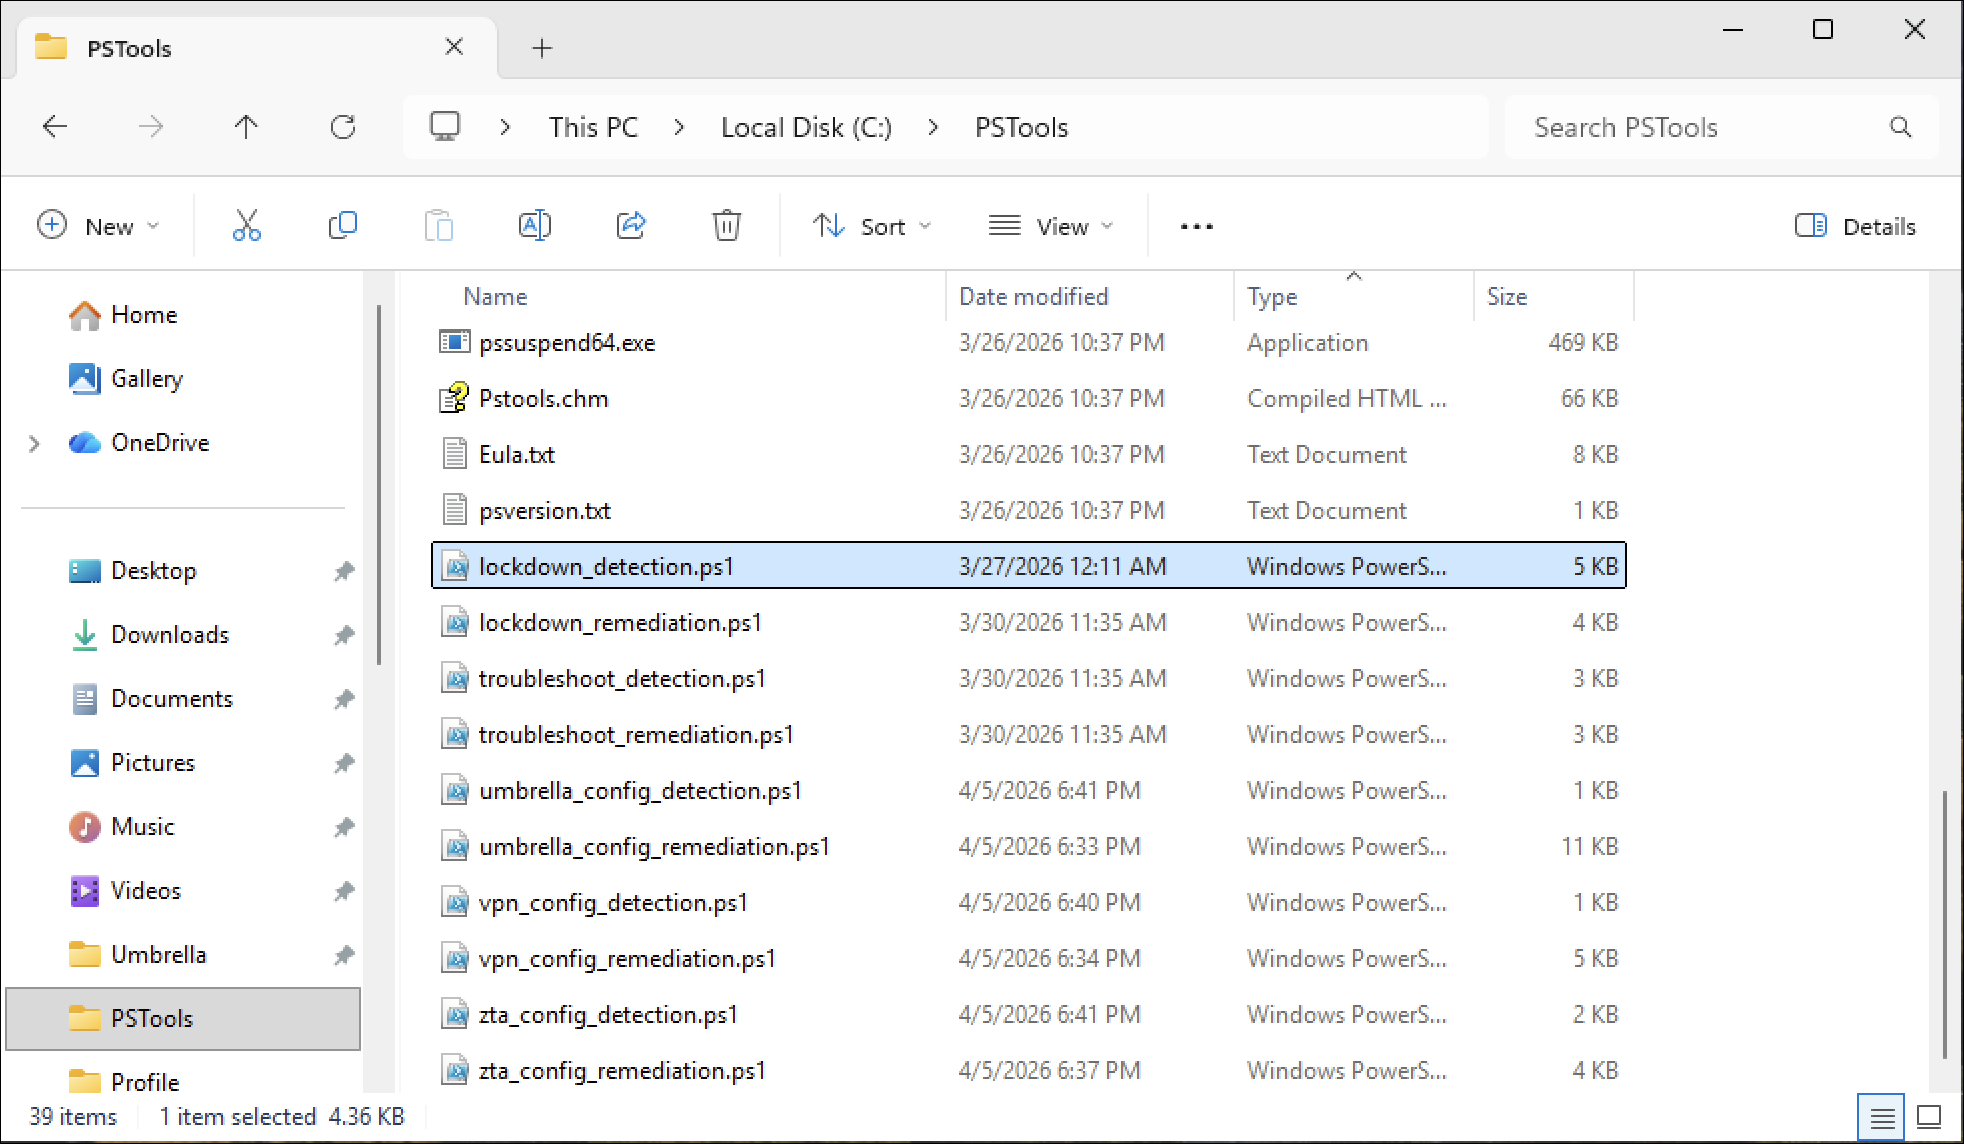
Step 6. If not already done on the device, download the Microsoft Sysinternals PsTools suite and extract the contents of the zip file to a local folder on the test device (for example, C:\PSTools\).
Step 7. Copy all remediation script pairs to the PsTools folder so that they are accessible from the same working directory when executing commands in the steps that follow. Keeping all scripts in the same directory simplifies path references during testing.
Step 8. Open PowerShell as an administrator.
Step 9. In PowerShell navigate to the PsTools folder: cd C:\PSTools

Step 10. Launch a new PowerShell session running as the local system account using PsExec. This replicates the execution context used by Intune when running remediation scripts on managed devices, ensuring that the test results accurately reflect how the scripts will behave in production: ./PsExec.exe -i -s powershell.exe
A new PowerShell window will open running under the system account context. All subsequent script execution steps should be performed in this new system-context PowerShell window.

Step 11. In the new system-context PowerShell window, navigate to the PsTools folder where the remediation scripts were copied in Step 7: cd C:\PSTools

Step 12. In the system-context PowerShell window, execute the Disable Lockdown Detection script to verify that it correctly identifies that the attributes applied by the Lockdown script are currently active on the Cisco Secure Client installation. The semicolon (;) is used to chain the $LASTEXITCODE check to the script execution so that both the script output and the resulting exit code are displayed in a single command:
powershell.exe -ExecutionPolicy Bypass -File .\disable_lockdown_detection.ps1; $LASTEXITCODE
The output should appear similar to the following:
{"missing":[],"services":[{"serviceName":"csc_vpnagent","isLocked":true},{"serviceName":"csc_umbrellaagent","isLocked":true},{"serviceName":"csc_swgagent","isLocked":true},{"serviceName":"csc_zta_agent","isLocked":true},{"serviceName":"acsock","isLocked":true},{"serviceName":"DuoCryptoService","isLocked":true},{"serviceName":"DuoTrustedPeerMessageBrokerService","isLocked":true},{"serviceName":"DuoDesktopUpdateService","isLocked":true}],"registry":[{"serviceName":"csc_vpnagent","isLocked":true},{"serviceName":"csc_umbrellaagent","isLocked":true},{"serviceName":"csc_swgagent","isLocked":true},{"serviceName":"csc_zta_agent","isLocked":true},{"serviceName":"acsock","isLocked":true},{"serviceName":"DuoCryptoService","isLocked":true},{"serviceName":"DuoTrustedPeerMessageBrokerService","isLocked":true},{"serviceName":"DuoDesktopUpdateService","isLocked":true}],"systemComponent":[{"moduleName":"Cisco Secure Client - AnyConnect VPN ","systemComponentSet":true,"isLocked":true},{"moduleName":"Cisco Secure Client - Zero Trust Access","systemComponentSet":true,"isLocked":true},{"moduleName":"Duo Desktop","systemComponentSet":true,"isLocked":true},{"moduleName":"Cisco Secure Client - Umbrella","systemComponentSet":true,"isLocked":true},{"moduleName":"Cisco Secure Client - AnyConnect VPN","systemComponentSet":true,"isLocked":true}]}
1
The script outputs a JSON object summarizing the current tamper resistance state of each monitored Cisco Secure Client module, followed by the exit code on the line below. The JSON output contains four sections:
● missing: Lists any monitored module services that are not found on the device. In this output, the array is empty ([]), confirming that all expected modules are installed.
● services: Reports the SCM-level service descriptor lockdown state for each monitored service. A value of true for isLocked indicates that the service's Security Descriptor Control Manager (SCM) SDDL matches the expected lockdown configuration, confirming that the lockdown attributes are currently active and the service is protected. This is the expected state when tamper resistance is correctly applied.
● registry: Reports the registry ACL lockdown state for each monitored service's registry key under HKLM\SYSTEM\CurrentControlSet\Services. A value of true for isLocked confirms that the lockdown SDDL is currently applied to the service's registry key, restricting write access for Administrators and standard users as expected.
● systemComponent: Reports the uninstall entry lockdown state for each detected Cisco Secure Client and Duo Desktop module. Each entry contains two fields:
◦ systemComponentSet: A value of true confirms that the SystemComponent flag is present in the module's uninstall registry entry, hiding the uninstall option from Add or Remove Programs.
◦ isLocked: A value of true confirms that the lockdown SDDL is currently applied to the module's uninstall registry key, preventing modification of the entry.
The exit code of 1 printed on the final line confirms that the Disable Lockdown detection script has identified that the lockdown attributes are active and would trigger the Disable Lockdown remediation script if this detection were executed as part of an Intune remediation cycle. An exit code of 0 would indicate that the lockdown attributes are not present, which would suggest an issue with the Win32 app deployment configuration that should be investigated before proceeding.
Step 13. Execute the Disable Lockdown Remediation script to remove the attributes set by the Lockdown script from the Cisco Secure Client installation:
powershell.exe -ExecutionPolicy Bypass -File .\disable_lockdown_remediation.ps1 ; $LASTEXITCODE
Verify that the script returns an exit code of 0, indicating that the remediation completed successfully. This simulates the action Intune would take when the Disable Lockdown script pair is deployed to a device where temporary removal of the lockdown attributes is required for administrative purposes.
Step 14. Return to the Services window opened in Step 2 and click Refresh. Right-click Cisco Secure Client ZTA module service and verify that the Stop option is now available and accessible. It should be the same for the other module services as well. Proceed to stop the ZTA service to simulate a stopped module process, which will be used to validate the lockdown remediation script in a subsequent step.
Step 15. In the system-context PowerShell window, simulate the uninstallation of a Cisco Secure Client module using a Secure Client msi file. Use the Umbrella module for this test, as it allows the ZTA service state from the previous step to be validated independently. Execute the uninstall command in the system-context PowerShell window.
msiexec /x cisco-secure-client-win-<version>-umbrella-predeploy-k9.msi /qn

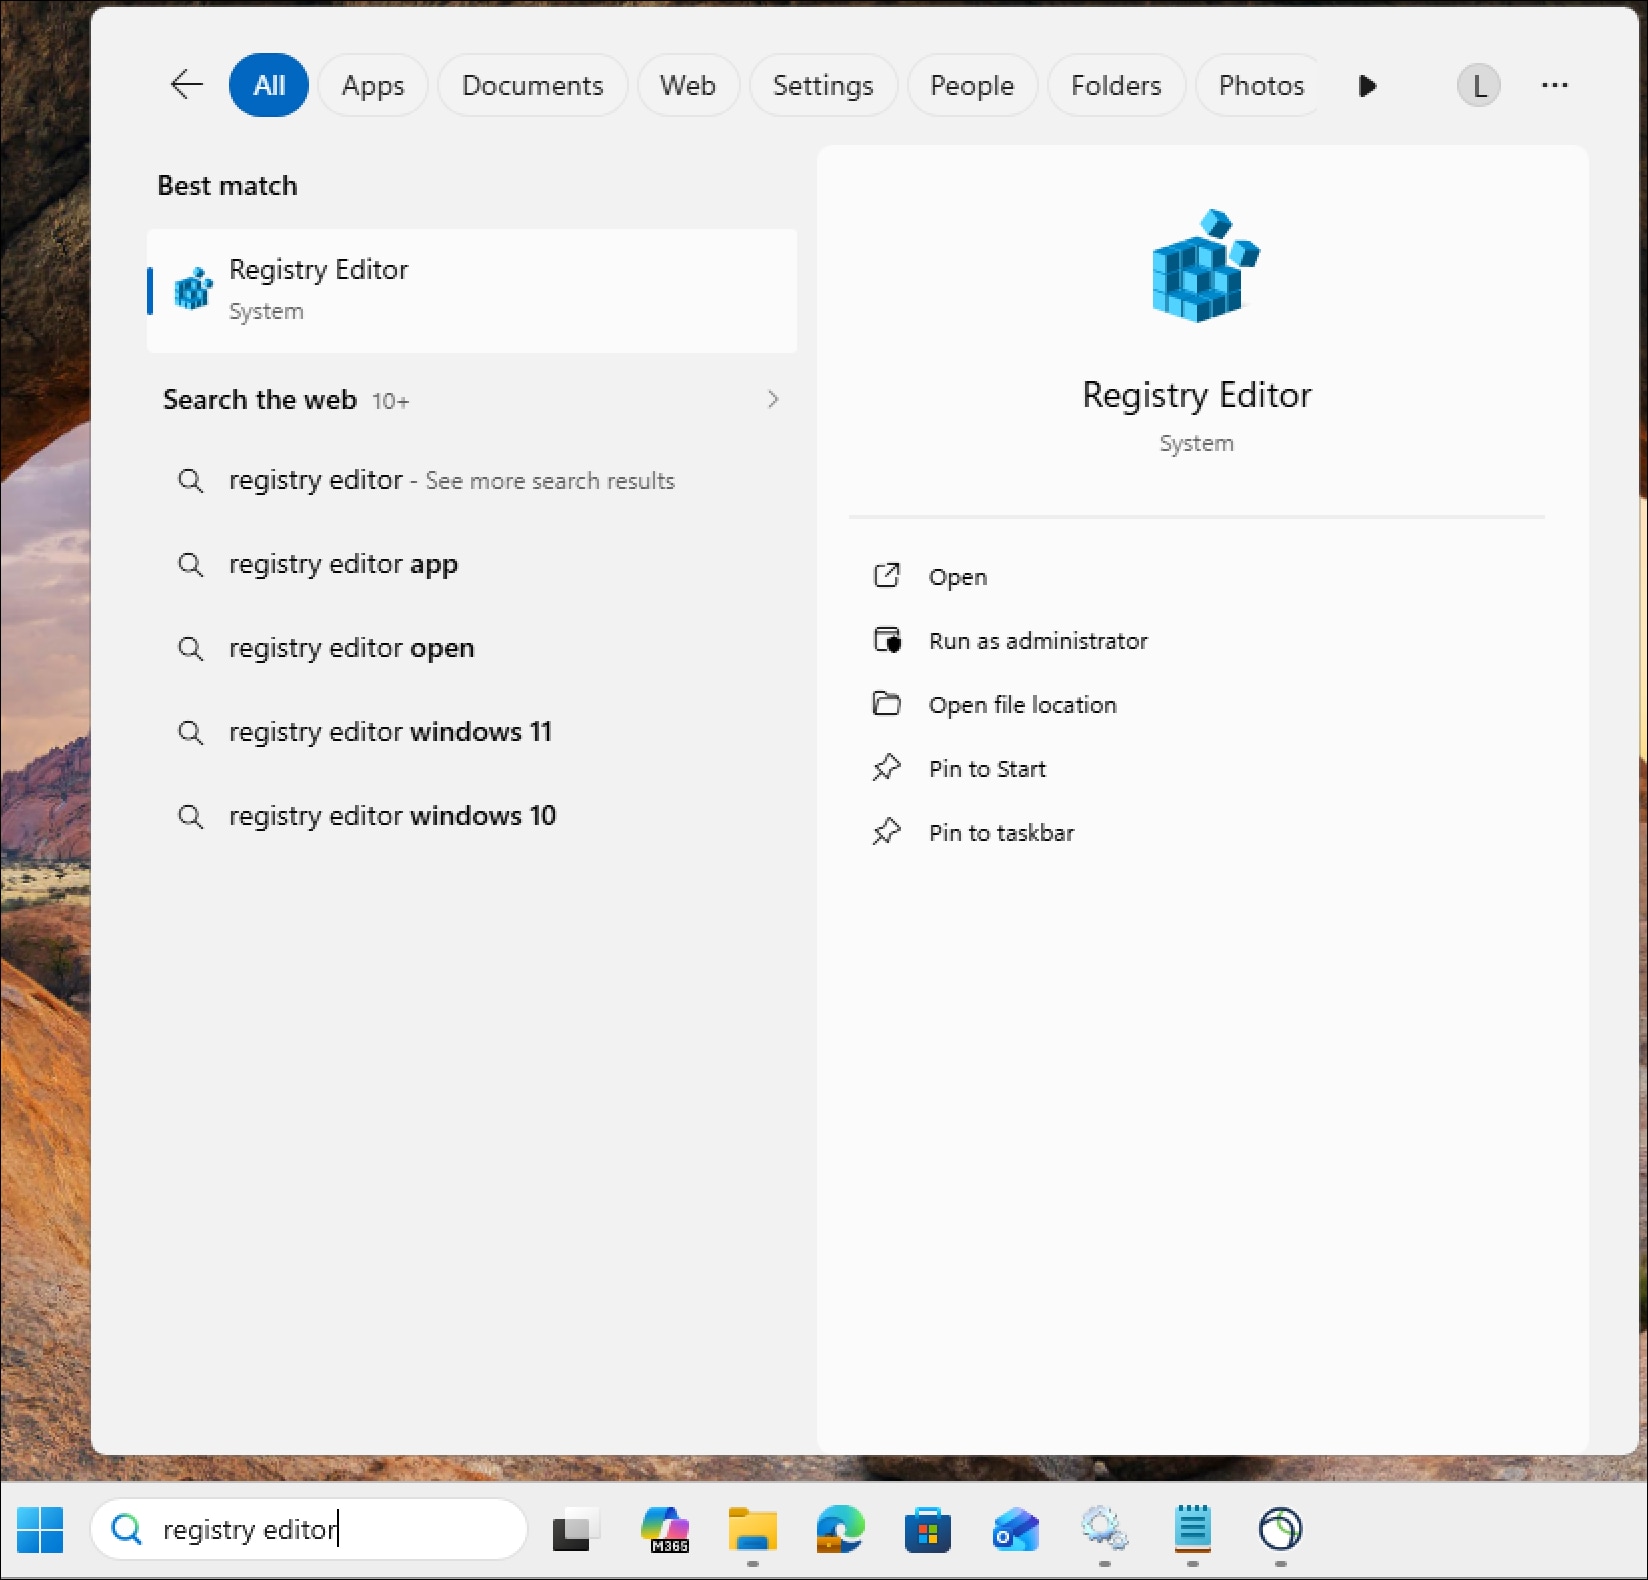
Step 16. Open Registry Editor as an administrator.
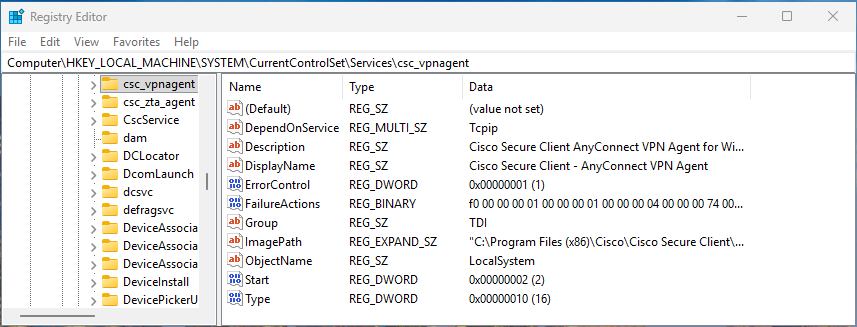
Step 17. Navigate to HKEY_LOCAL_MACHINE\SYSTEM\CurrentControlSet\Services\csc_vpnagent and verify that the registry key can be viewed.
Step 18. In the system-context PowerShell window, execute the Lockdown Detection script to verify that it correctly detects the absence of the lockdown attributes that were removed by the Disable Lockdown remediation script in Step 13:
powershell.exe -ExecutionPolicy Bypass -File .\lockdown_detection.ps1 ; $LASTEXITCODE
The output should look similar to this:
{"missing":["csc_umbrellaagent","csc_swgagent"],"states":[{"serviceName":"csc_vpnagent","running":true,"status":"Running"},{"serviceName":"csc_zta_agent","running":false,"status":"Stopped"},{"serviceName":"acsock","running":true,"status":"Running"},{"serviceName":"DuoCryptoService","running":true,"status":"Running"},{"serviceName":"DuoTrustedPeerMessageBrokerService","running":true,"status":"Running"},{"serviceName":"DuoDesktopUpdateService","running":true,"status":"Running"}],"services":[{"serviceName":"csc_vpnagent","correctDescriptor":false},{"serviceName":"csc_zta_agent","correctDescriptor":false},{"serviceName":"acsock","correctDescriptor":false},{"serviceName":"DuoCryptoService","correctDescriptor":false},{"serviceName":"DuoTrustedPeerMessageBrokerService","correctDescriptor":false},{"serviceName":"DuoDesktopUpdateService","correctDescriptor":false}],"registry":[{"serviceName":"csc_vpnagent","correctDescriptor":false},{"serviceName":"csc_zta_agent","correctDescriptor":false},{"serviceName":"acsock","correctDescriptor":false},{"serviceName":"DuoCryptoService","correctDescriptor":false},{"serviceName":"DuoTrustedPeerMessageBrokerService","correctDescriptor":false},{"serviceName":"DuoDesktopUpdateService","correctDescriptor":false}],"systemComponent":[{"moduleName":"Cisco Secure Client - AnyConnect VPN ","systemComponentSet":false},{"moduleName":"Cisco Secure Client - Zero Trust Access","systemComponentSet":false},{"moduleName":"Duo Desktop","systemComponentSet":false},{"moduleName":"Cisco Secure Client - AnyConnect VPN","systemComponentSet":false}]}
1
The script outputs a JSON object summarizing the current installation and lockdown state of each monitored Cisco Secure Client module, followed by the exit code on the line below. The JSON output contains five sections:
● missing: Lists any monitored module services that are not found on the device. In this output, csc_umbrellaagent and csc_swgagent are listed as missing, which is the expected result given that the Umbrella module was uninstalled in Step 15. The SWG agent is a component of the Umbrella module and is therefore also absent following its uninstallation. Only modules that are present on the device are evaluated in the remaining sections of the output.
● states: Reports the current running state of each module service that is present on the device. In this output, csc_vpnagent, acsock, DuoCryptoService, DuoTrustedPeerMessageBrokerService, and DuoDesktopUpdateService are each shown as running: true with a status of Running, confirming that those services are active. The csc_zta_agent is shown as running: false with a status of Stopped, which is the expected result given that the ZTA service was manually stopped in Step 14. This confirms that with the attributes set by the Lockdown script removed, the ZTA service is no longer protected from being stopped by a user or process with sufficient privileges.
● services: Reports the SCM-level descriptor state for each present module service. A value of false for correctDescriptor across all present services indicates that none of the service descriptors contain the expected lockdown configuration, confirming that the SCM-level lockdown attributes set by the Lockdown script have been successfully removed by the Disable Lockdown remediation script and that no remaining service is currently protected from modification.
● registry: Reports whether the registry ACL for each present service's key under HKLM\SYSTEM\CurrentControlSet\Services matches the expected lockdown configuration. A value of false for correctDescriptor for all present entries confirms that the registry ACLs have been successfully modified by the Disable Lockdown remediation script and that write access restrictions previously applied to those keys are no longer in place.
● systemComponent: Reports whether the SystemComponent flag is present in the uninstall registry entry for each detected Cisco Secure Client and Duo Desktop module. A value of false for systemComponentSet for all entries confirms that the SystemComponent flag has been successfully removed by the Disable Lockdown remediation script and that the remaining installed modules would now appear with an uninstall option in Add or Remove Programs.
The exit code of 1 printed on the final line confirms that the lockdown detection script has correctly identified that the tamper resistance attributes are no longer present on the installed modules and that the lockdown remediation script would be triggered by Intune if this detection were executed as part of a scheduled remediation cycle. An unexpected exit code of 0 at this stage would indicate that the Disable Lockdown remediation script did not successfully remove the lockdown attributes and should be investigated before proceeding.
Step 19. Execute the Lockdown remediation Script to restore the appropriate attributes to the Cisco Secure Client installation:
powershell.exe -ExecutionPolicy Bypass -File .\lockdown_remediation.ps1 ; $LASTEXITCODE
Verify that the script returns an exit code of 0, indicating that the lockdown attributes were successfully re-applied. This confirms that the lockdown remediation script correctly restores the tamper resistance configuration when drift is detected.
Step 20. Return to the Services window and click Refresh. Verify that the Zero Trust Access module service that was stopped in Step 14 has been restored to a running state and that the option to stop the service is no longer accessible, confirming that the lockdown attributes have been successfully re-applied. Note that the Umbrella module service will no longer appear in the list, as it was uninstalled in Step 15. This is the expected behavior. Intune will detect the missing module through its Win32 app detection rule and automatically reinstall it during the next policy evaluation cycle.
Step 21. Navigate back to the Registry Editor and click View > Refresh. Verify that access to the csc_vpnagent registry key has been denied.

Step 22. Allow Intune to detect the missing Umbrella module and automatically trigger a reinstallation through the configured Win32 app deployment. Depending on the Intune check-in interval for the test device, this may take a while. The reinstallation can be expedited by navigating to the device record in the Intune Admin Center and initiating a Sync to prompt an immediate policy evaluation. Once reinstalled, verify that the Umbrella module service is present and running in the Services window before proceeding to the configuration validation steps.
Step 23. With all modules confirmed as installed and running, validate that all module configuration files are in their expected state by executing the VPN, Umbrella, and ZTA Configuration Detection scripts — specifically the detection scripts associated with the remediation script pairs, not the Win32 app detection scripts used to verify module installation. Execute each script individually and check the exit code after each one:
powershell.exe -ExecutionPolicy Bypass -File .\vpn_config_detection.ps1 ; $LASTEXITCODE
powershell.exe -ExecutionPolicy Bypass -File .\umbrella_config_detection.ps1 ; $LASTEXITCODE
powershell.exe -ExecutionPolicy Bypass -File .\zta_config_detection.ps1 ; $LASTEXITCODE
The output should look similar to this:
PS C:\PSTools> powershell.exe -ExecutionPolicy Bypass -File .\vpn_config_detection.ps1; $LASTEXITCODE
{"FileExists":true,"HashMatch":true,"ExpectedHash":"676024C3E032549A24908A32F327F32696B1AC4F0D26748CB88FC7413CFB778B","ActualHash":"676024C3E032549A24908A32F327F32696B1AC4F0D26748CB88FC7413CFB778B"}
0
PS C:\PSTools> powershell.exe -ExecutionPolicy Bypass -File .\umbrella_config_detection.ps1; $LASTEXITCODE
{"FileExists":true,"HashMatch":true,"ExpectedHash":"CA71AB3C90A34C8D5909CB75310BAD201C6BED5F0E4879A0828D6F35EF09DF13","ActualHash":"CA71AB3C90A34C8D5909CB75310BAD201C6BED5F0E4879A0828D6F35EF09DF13"}
0
PS C:\PSTools> powershell.exe -ExecutionPolicy Bypass -File .\zta_config_detection.ps1; $LASTEXITCODE
{"FolderExists":true,"FileExists":true,"HashMatch":true,"ExpectedHash":"5674DD6F55527CD2711490D46F7D256AA75A0431F158840EA71BE9A821C62BED","ActualHash":"5674DD6F55527CD2711490D46F7D256AA75A0431F158840EA71BE9A821C62BED","ExtraFilesFound":false,"ExtraFileCount":0,"ExtraFileNames":[]}
0
Each script should return an exit code of 0, indicating that all configuration files are present and match their expected baseline values. An exit code of 1 from any script at this stage would indicate a pre-existing configuration issue that should be resolved before proceeding with the modification tests below.
Each script outputs a JSON object summarizing the current state of its respective module's configuration file, followed by the exit code on the line below. The fields reported differ slightly between scripts to account for the unique characteristics of each module's configuration:
VPN Detection Script output fields:
● FileExists: Confirms whether the VPN XML profile file is present at the expected path on the endpoint. A value of true confirms the file exists.
● HashMatch: Indicates whether the SHA256 hash of the current VPN XML profile matches the expected baseline hash embedded in the detection script. A value of true confirms the file has not been modified.
● ExpectedHash / ActualHash: Displays the baseline hash value the script is comparing against alongside the hash calculated from the file currently on disk. Both values being identical confirms the file is in its correct baseline state.
Umbrella Detection Script output fields:
● FileExists: Confirms whether the OrgInfo.json file is present at the expected Umbrella module directory path. A value of true confirms the file exists.
● HashMatch: Indicates whether the SHA256 hash of the current OrgInfo.json matches the expected baseline hash. A value of true confirms the file content is unmodified.
● ExpectedHash / ActualHash: Displays the baseline and actual hash values for comparison. Both values being identical confirms the file is in its correct baseline state.
ZTA Detection Script output fields:
● FolderExists: Confirms whether the ZTA enrollment_choices folder is present at the expected path. A value of true confirms the directory exists.
● FileExists: Confirms whether the ZTA enrollment JSON file is present within the enrollment_choices folder. A value of true confirms the file exists.
● HashMatch: Indicates whether the SHA256 hash of the current ZTA enrollment JSON matches the expected baseline hash. A value of true confirms the file has not been modified.
● ExpectedHash / ActualHash: Displays the baseline and actual hash values for comparison. Both values being identical confirms the file is in its correct baseline state.
● ExtraFilesFound: Indicates whether any unexpected additional files are present in the enrollment_choices folder. A value of false confirms no extraneous files are present that could interfere with ZTA enrollment.
● ExtraFileCount: Reports the number of extraneous files found. A value of 0 confirms the folder contains only the expected enrollment JSON file.
● ExtraFileNames: Lists the filenames of any extraneous files found. An empty array ([]) confirms no unexpected files are present.
Step 24. Simulate configuration drift by introducing deliberate modifications to each module's configuration files. For the purposes of this guide, make the following changes to replicate common real-world tampering and drift scenarios:
● VPN Module: Open the VPN XML profile and modify one or more values within the file to simulate an unauthorized configuration change.
● Umbrella Module: Delete the OrgInfo.json file from the Umbrella module directory to simulate a missing configuration file.
● ZTA Module: Copy the existing ZTA enrollment JSON file and place the duplicate in the enrollment_choices folder to simulate the presence of an extraneous configuration file that could cause enrollment conflicts.
Step 25. Re-execute the VPN, Umbrella, and ZTA configuration detection scripts and check the exit code after each one:
powershell.exe -ExecutionPolicy Bypass -File .\vpn_config_detection.ps1 ; $LASTEXITCODE
powershell.exe -ExecutionPolicy Bypass -File .\umbrella_config_detection.ps1 ; $LASTEXITCODE
powershell.exe -ExecutionPolicy Bypass -File .\zta_config_detection.ps1 ; $LASTEXITCODE
The output should look similar to this:
PS C:\PSTools> powershell.exe -ExecutionPolicy Bypass -File .\vpn_config_detection.ps1; $LASTEXITCODE
{"FileExists":true,"HashMatch":false,"ExpectedHash":"676024C3E032549A24908A32F327F32696B1AC4F0D26748CB88FC7413CFB778B","ActualHash":"52792456D402E78E777118810CF4B4E6C49446D98CE8E7887929A5FF398F0283"}
1
PS C:\PSTools> powershell.exe -ExecutionPolicy Bypass -File .\umbrella_config_detection.ps1; $LASTEXITCODE
{"FileExists":false,"HashMatch":false,"ExpectedHash":"CA71AB3C90A34C8D5909CB75310BAD201C6BED5F0E4879A0828D6F35EF09DF13","ActualHash":null}
1
PS C:\PSTools> powershell.exe -ExecutionPolicy Bypass -File .\zta_config_detection.ps1; $LASTEXITCODE
{"FolderExists":true,"FileExists":true,"HashMatch":true,"ExpectedHash":"5674DD6F55527CD2711490D46F7D256AA75A0431F158840EA71BE9A821C62BED","ActualHash":"5674DD6F55527CD2711490D46F7D256AA75A0431F158840EA71BE9A821C62BED","ExtraFilesFound":true,"ExtraFileCount":1,"ExtraFileNames":["OrgID_ZTA_Enroll_Cert - Copy.json"]}
1
Each script should now return an exit code of 1, confirming that the detection scripts correctly identify the configuration drift introduced in the previous step. If any script still returns 0 after the modifications were made, review the detection logic for that script to ensure it is validating the correct file path and content.
Each script's JSON output reflects the specific configuration issue introduced in the previous step, and each returns an exit code of 1 confirming that the detection scripts correctly identify the non-compliant state. The nature of the detected issue differs across each module:
VPN Detection Script output:
● FileExists: true — The VPN XML profile file is still present on disk, confirming that the file was not removed but rather modified.
● HashMatch: false — The SHA256 hash of the current VPN XML profile does not match the expected baseline hash, confirming that the file content has been altered.
● ExpectedHash / ActualHash — The two hash values differ (676024C3E032549A24908A32F327F32696B1AC4F0D26748CB88FC7413CFB778B vs. 52792456D402E78E777118810CF4B4E6C49446D98CE8E7887929A5FF398F0283), precisely identifying that the file on disk no longer matches the known-good baseline. Even a minor change to a single character within the XML file will produce a completely different hash value, demonstrating the sensitivity of hash-based detection for identifying unauthorized configuration modifications.
Umbrella Detection Script output:
● FileExists: false — The OrgInfo.json file is no longer present at the expected Umbrella module directory path, confirming that the file was successfully deleted in the previous step.
● HashMatch: false — Since the file does not exist, a hash comparison cannot be performed and the match is reported as false.
● ActualHash: null — A null value is returned for the actual hash because there is no file present on disk to calculate a hash from. This distinguishes a missing file scenario from a hash mismatch scenario, where ActualHash would contain a value that differs from ExpectedHash.
ZTA Detection Script output:
● FileExists: true and HashMatch: true — The original ZTA enrollment JSON file is still present and unmodified, confirming that the hash of the primary enrollment file matches the expected baseline.
● ExtraFilesFound: true — One or more unexpected files have been detected in the enrollment_choices folder beyond the expected enrollment JSON file.
● ExtraFileCount: 1 — Exactly one extraneous file was found in the folder.
● ExtraFileNames: ["OrgID_ZTA_Enroll_Cert - Copy.json"] — The filename of the extraneous file is identified as a duplicate copy of the enrollment JSON, introduced in the previous step. The presence of multiple JSON files in the enrollment_choices folder can cause ZTA enrollment conflicts, as the ZTA module may attempt to process multiple enrollment configurations simultaneously. The detection script correctly flags this condition as non-compliant even though the primary enrollment file itself is intact and unmodified.
An exit code of 1 from each script confirms that all three detection scripts correctly identify the configuration drift introduced in the previous step and would trigger their corresponding remediation scripts if executed as part of an Intune remediation cycle. If any script returns an exit code of 0 after the modifications were made, review the detection logic for that script to ensure it is correctly validating the expected file path, hash value, and — in the case of the ZTA script — the presence of extraneous files in the enrollment folder.
Step 26. Execute the VPN, Umbrella, and ZTA Configuration Remediation scripts to restore each module's configuration to the known-good baseline:
powershell.exe -ExecutionPolicy Bypass -File .\vpn_config_remediation.ps1 ; $LASTEXITCODE
powershell.exe -ExecutionPolicy Bypass -File .\umbrella_config_remediation.ps1 ; $LASTEXITCODE
powershell.exe -ExecutionPolicy Bypass -File .\zta_config_remediation.ps1 ; $LASTEXITCODE
Verify that each remediation script returns an exit code of 0. Once all remediation scripts have completed successfully, re-execute the detection scripts for each module and confirm that all return an exit code of 0, verifying that the configuration files have been fully restored to their baseline state and that the detection scripts no longer report a compliance issue.
Step 27. To validate the VPN-aware deferral behavior of the Umbrella remediation script, establish an active VPN connection to your environment on the test device before proceeding. Once the VPN connection is confirmed as active, simulate a configuration issue by either modifying the Umbrella OrgInfo.json file or deleting it entirely from the Umbrella module directory.
Step 28. With the VPN actively connected and the Umbrella configuration in a non-compliant state, execute the Umbrella Remediation script:
powershell.exe -ExecutionPolicy Bypass -File .\umbrella_config_remediation.ps1 ; $LASTEXITCODE
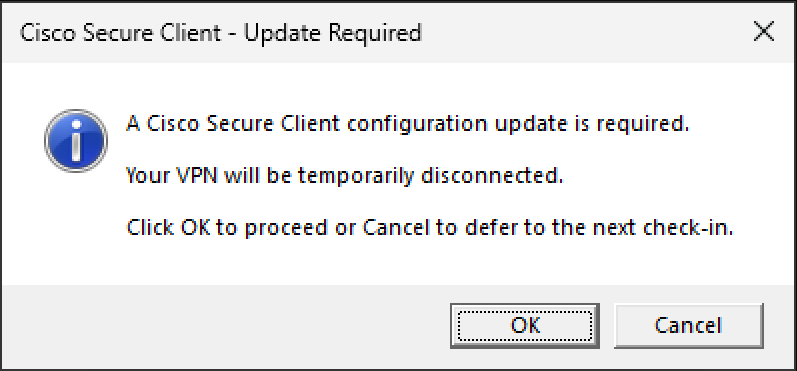
A dialog prompt should appear asking whether you wish to proceed with disconnecting the VPN to complete the remediation, or defer the action until later. This prompt confirms that the VPN-aware logic within the remediation script is functioning correctly and that the script will not silently disconnect an active VPN session without user awareness.
● Test the defer behavior: Click Cancel to confirm that the script respects the user's choice, exits without disconnecting the VPN, and returns an exit code of 0 indicating a graceful deferral rather than a failure.
● Test the proceed behavior: Re-execute the Umbrella Remediation Script and this time click OK to confirm that the script disconnects the active VPN session and proceeds with the Umbrella configuration remediation. After the script completes, verify the exit code returns 0, then re-execute the Umbrella Detection Script and confirm it also returns 0, indicating that the configuration has been successfully restored and the detection script no longer identifies a compliance issue.
Implementing tamper resistance for Cisco Secure Client on macOS devices managed through Jamf Pro involves a three-part approach. The first part focuses on deploying Cisco Secure Client modules as a managed package deployment, ensuring that the correct version and required modules are present on every endpoint. The second part leverages Jamf Pro's policy and script framework to continuously monitor and enforce installation integrity, version compliance, and configuration accuracy across all deployed CSC modules, ensuring that any deviation from the desired state is automatically detected and corrected. The third part establishes the MDM configuration profiles required to ensure that macOS system-level permissions — including system extensions, content filters, privacy preferences, and managed login items — are pre-approved and silently applied, preventing macOS from prompting the user for approvals that could be rejected and interrupt or block the installation and reinstallation process. Together, these three configurations establish a resilient security baseline that is both enforced at installation and actively maintained throughout the device's lifecycle.
● All target macOS devices must be enrolled in Jamf Pro prior to beginning any configuration steps. This guide does not cover the Jamf Pro enrollment process.
● Administrative access to the Jamf Pro console is required to create packages, scripts, policies, and configuration profiles, and to manage deployment scope.
● Access to the Cisco Secure Access dashboard is required to download the Cisco Secure Client pre-deployment package for macOS and gather the required module configuration files.
● Managed devices must be able to reach the Jamf Pro server to receive policies, scripts, and configuration profiles. Devices that are unable to check in will not receive enforcement cycles until connectivity is restored.
● If your organization uses Cisco Secure Access SSL decryption policies, the domains used by Jamf Pro must be excluded from SSL decryption, as inspection of Jamf Pro traffic can interfere with device check-ins, policy delivery, and script execution. Refer to Jamf's published documentation for the complete set of domains that should be excluded.
● A valid Cisco Secure Access subscription and a Jamf Pro license with sufficient device seats to cover all target macOS endpoints are required prior to enrollment and policy assignment.
Deploying macOS Secure Client Modules via Jamf Pro
Before Cisco Secure Client can be deployed through Jamf Pro, the installation files must be obtained from the Secure Access dashboard or Cisco's software download portal and prepared for deployment. This section covers the process of downloading the macOS Cisco Secure Client pre-deployment package, gathering the required module configuration files, and preparing a customized installation choices file that controls which modules are installed on managed endpoints.
Step 1. From the Secure Access dashboard, navigate to Connect > Essentials > End User Connectivity.
Step 2. Click Cisco Secure Client in the top right corner of the page.

Step 3. Click macOS to download the Secure Client Pre-Deployment package for macOS. This package is distributed as a disk image (.dmg) file and contains the installer packages for all available CSC modules. Alternatively, the pre-deployment package can be downloaded directly from the Cisco Software Download page by searching for Cisco Secure Client and selecting the appropriate macOS pre-deployment package for your target version.
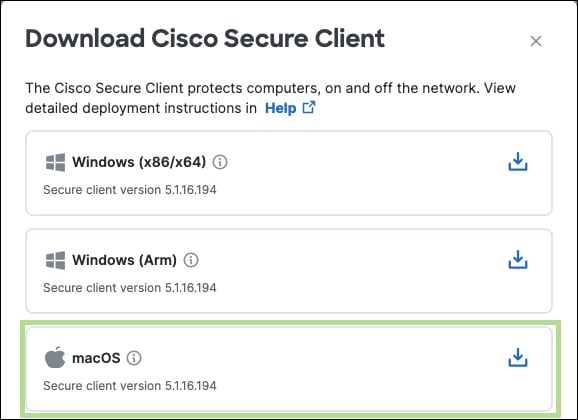
Step 4. Gather the required module configuration files from the Download configuration files section of the dashboard, or navigate to each module's individual section within the product as described below. These configuration files should be retained, as their SHA256 hash values will be needed when configuring the configuration enforcement policy in a later step.
Note: For Cisco Secure Access Commercial environments, the Zero Trust Access enrollment JSON is only required when certificate-based ZTA enrollment is in use. If your environment uses SAML-based enrollment, this file is not needed and the ZTA enforcement parameters can be left blank.
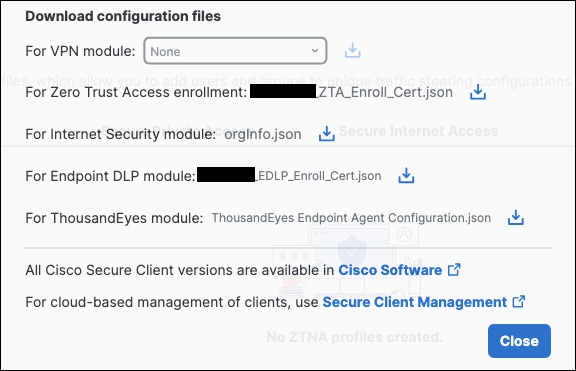
● AnyConnect VPN Module: The VPN XML profile can be downloaded by navigating to Connect > Essentials > End User Connectivity and clicking the Virtual Private Network tab. Locate the relevant VPN profile and click the download icon under the Download XML column on the right side of the profile entry. This XML file defines the VPN gateway addresses, authentication settings, and connection behavior that will be enforced by the configuration enforcement script.
● Umbrella Module: The OrgInfo.json file can be downloaded by navigating to Connect > Essentials > End User Connectivity and clicking the Internet Security tab. Under the Deployment Options section, select the Windows and macOS tab and click Download profile. This file contains the organization ID required for the Umbrella module to establish DNS-layer security and Secure Web Gateway functionality, and must be present at the correct path on the endpoint for the Umbrella module to function.
● ZTA Module: If certificate-based Zero Trust Access enrollment is used in your commercial Secure Access environment, navigate to Connect > Essentials > End User Connectivity and click the Zero Trust Access tab. In the Enrollment Methods section, click Manage, then click Download under the second step labeled Download the enrollment configuration file. This JSON file contains the signed JWT payload and certificate matching rules required for the ZTA module to initiate enrollment and must be deployed to the correct directory on the endpoint.
Step 5. Extract the installer package from the downloaded disk image. Mount the .dmg file by double-clicking it on a macOS device. Once mounted, locate the Cisco Secure Client .pkg installer file within the disk image and copy it to a local directory before proceeding, as it will be referenced in subsequent steps. This .pkg file will be uploaded to Jamf Pro as the installation package in the next section and will also be used in the following step to generate the installation choices file.
Step 6. By default, the Cisco Secure Client .pkg installer will install all available modules on the endpoint. In most environments, only a subset of modules are required. This guide focuses on the VPN, Umbrella, and ZTA modules, and therefore the installation is customized to install only these modules. To generate a baseline choices file for customization, run the following command on a macOS device that has access to the .pkg file copied in the previous step:
installer -pkg path/to/CSC_PKG/Cisco\ Secure\ Client.pkg -showChoiceChangesXML > ~/Downloads/install_choices.xml
This command extracts the complete list of installer choices from the package and writes the output to an install_choices.xml file, which can then be modified to define which modules will be selected during installation. The resulting file serves as the source content for the Install Choices Script created in the following section.
Note: The -showChoiceChangesXML flag does not perform an installation. It only reads and outputs the choice structure embedded in the package. The command must be run with access to the .pkg file but does not require elevated privileges to execute.
Step 7. Open the extracted install_choices.xml file and review the selected attribute entry for each module. For each choiceIdentifier, the corresponding selected dictionary entry controls whether that module will be installed. Set the attributeSetting value to 1 to include a module, or 0 to exclude it.
Each module's selection state is defined by a dictionary entry in the following format:
<dict>
<key>attributeSetting</key>
<integer>1</integer>
<key>choiceAttribute</key>
<string>selected</string>
<key>choiceIdentifier</key>
<string>choice_secure_umbrella</string>
</dict>
The example above enables the Umbrella module. The following example disables the NVM module:
<dict>
<key>attributeSetting</key>
<integer>0</integer>
<key>choiceAttribute</key>
<string>selected</string>
<key>choiceIdentifier</key>
<string>choice_nvm</string>
</dict>
Note: The ZTA module has a dependency on the Duo component (choice_duo). When enabling the ZTA module (choice_zta), the Duo component must also be set to 1 to ensure the ZTA module installs and functions correctly. Enabling choice_zta without enabling choice_duo will result in an incomplete ZTA installation. Additionally, the UI component (choice_ui) should be enabled to ensure the Cisco Secure Client system tray application is available to users. Refer to the Install Choices Script in the macOS Scripts section of the Appendix for the complete set of recommended selection values for a VPN, Umbrella, and ZTA deployment.
Step 8. Once the module selections have been finalized, retain the completed install_choices.xml file. The contents of this file will be embedded directly into the Install Choices script created in the following section and deployed to endpoints via Jamf Pro to ensure that every installation and enforcement-triggered reinstallation uses the correct module selection.
Create Secure Client Installation Policy
With the installation files prepared and uploaded to Jamf Pro, the next step is to create the policy that will deploy Cisco Secure Client to managed endpoints. This policy serves a dual purpose within the tamper resistance framework: it handles the initial deployment of Cisco Secure Client to new or unenrolled devices, and it acts as the reinstallation target called by the enforcement scripts when a necessary remediation is triggered. Configuring this policy correctly — including assigning the appropriate custom event trigger — ensures that the enforcement system can reliably restore a compliant CSC installation whenever it is needed without requiring manual intervention. For a fully silent reinstallation experience, this policy should be deployed alongside the MDM configuration profiles described later in this guide, which pre-approve the system-level permissions that macOS would otherwise present to the user as approval dialogs.
Two scripts are used in conjunction with the package installation to control which modules are installed and to perform the installation itself:
● Install Choices Script – Writes the install_choices.xml file to the endpoint, defining which Cisco Secure Client modules will be selected when the installer is executed. This script must run before the installation is initiated so that the choices file is present on disk when the installer is invoked. Reference the Install Choices script used in this guide.
● Install CSC Script – Performs the Cisco Secure Client package installation using the macOS installer command, referencing the install_choices.xml file written by the Install Choices Script via the -applyChoiceChangesXML flag. This script installs the package from the Jamf Pro Waiting Room cache directory on the endpoint, ensuring the installation can proceed without requiring a network download at the time of execution. Reference the Install CSC script used in this guide.
Step 1. In the Jamf Pro dashboard, click Settings in the left navigation bar, then navigate to Computer Management > Packages.
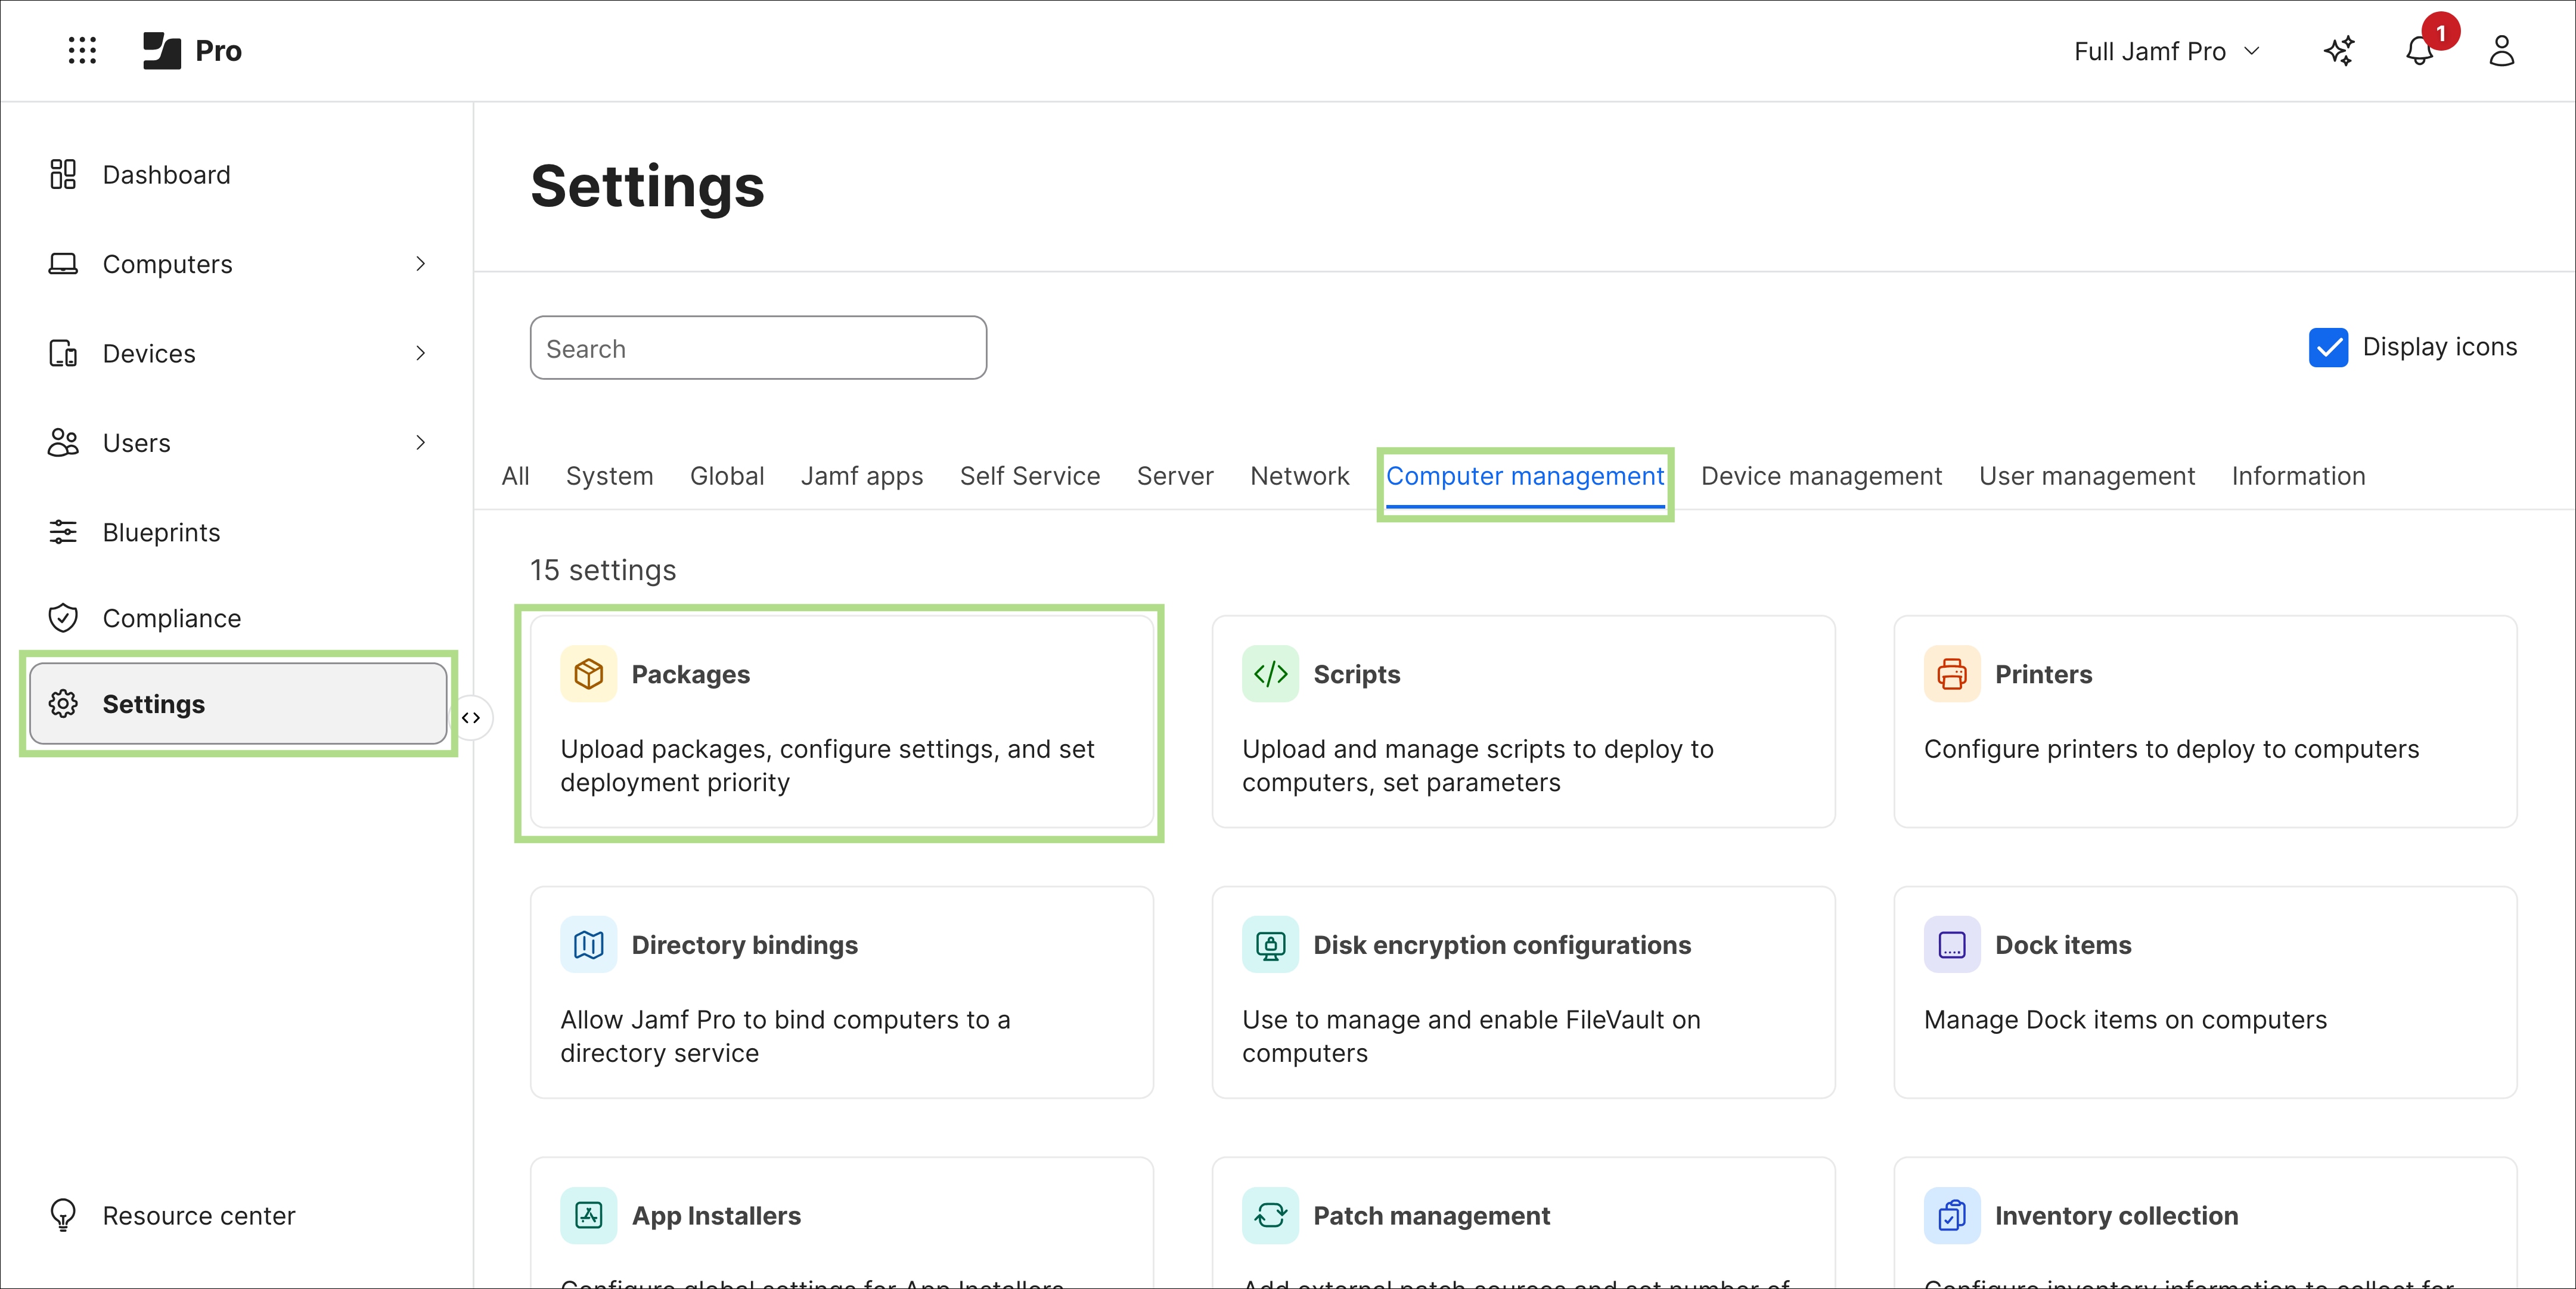
Step 2. Click New in the top right corner to begin creating a new package record.

Step 3. In the Display Name field, specify a descriptive name for the package that clearly identifies the Cisco Secure Client version being deployed (for example, Cisco Secure Client 5.1.15.287). Including the version number in the display name makes it easier to manage multiple package versions over time and identify which version is active when the enforcement script triggers a reinstallation. In the Filename section, either click Browse for a file or drag and drop the Cisco Secure Client .pkg file extracted from the .dmg in the previous section.
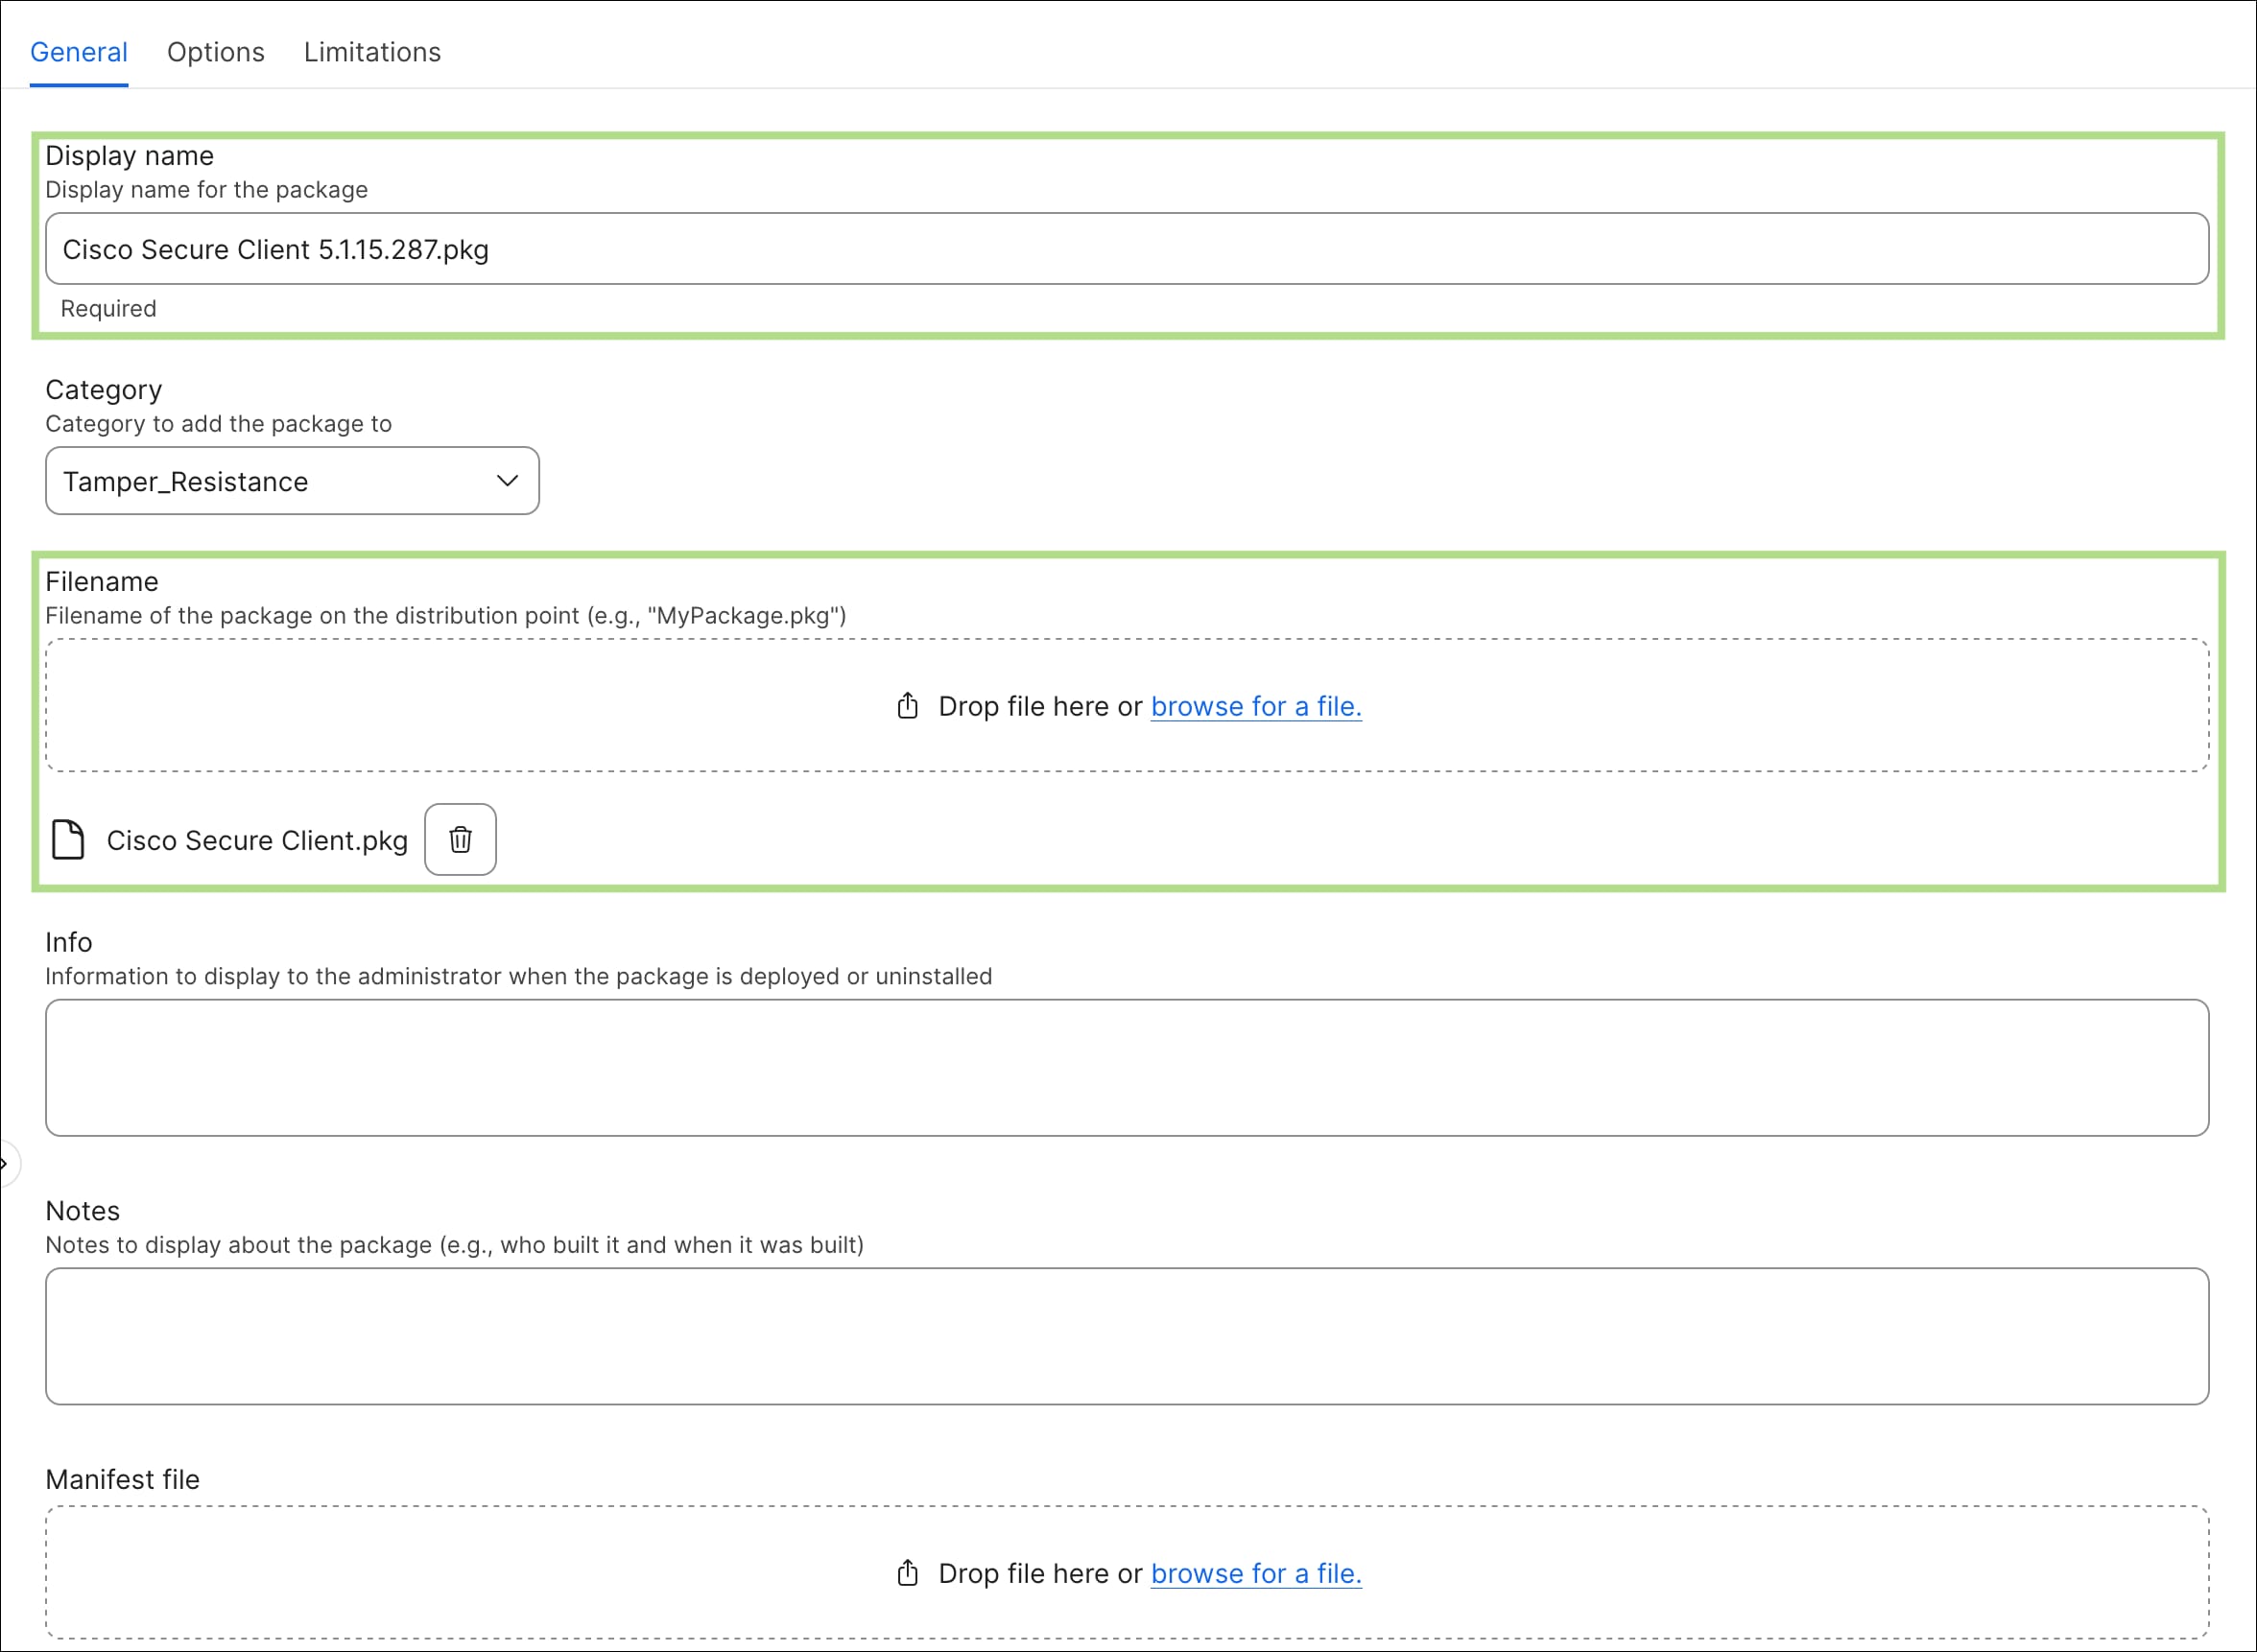
Step 4. Click Save in the bottom right corner to save the package record. Jamf Pro will upload the .pkg file to the distribution point, after which it will be available for use in policies.

Step 5. Navigate back to the Computer Management settings then click Scripts.
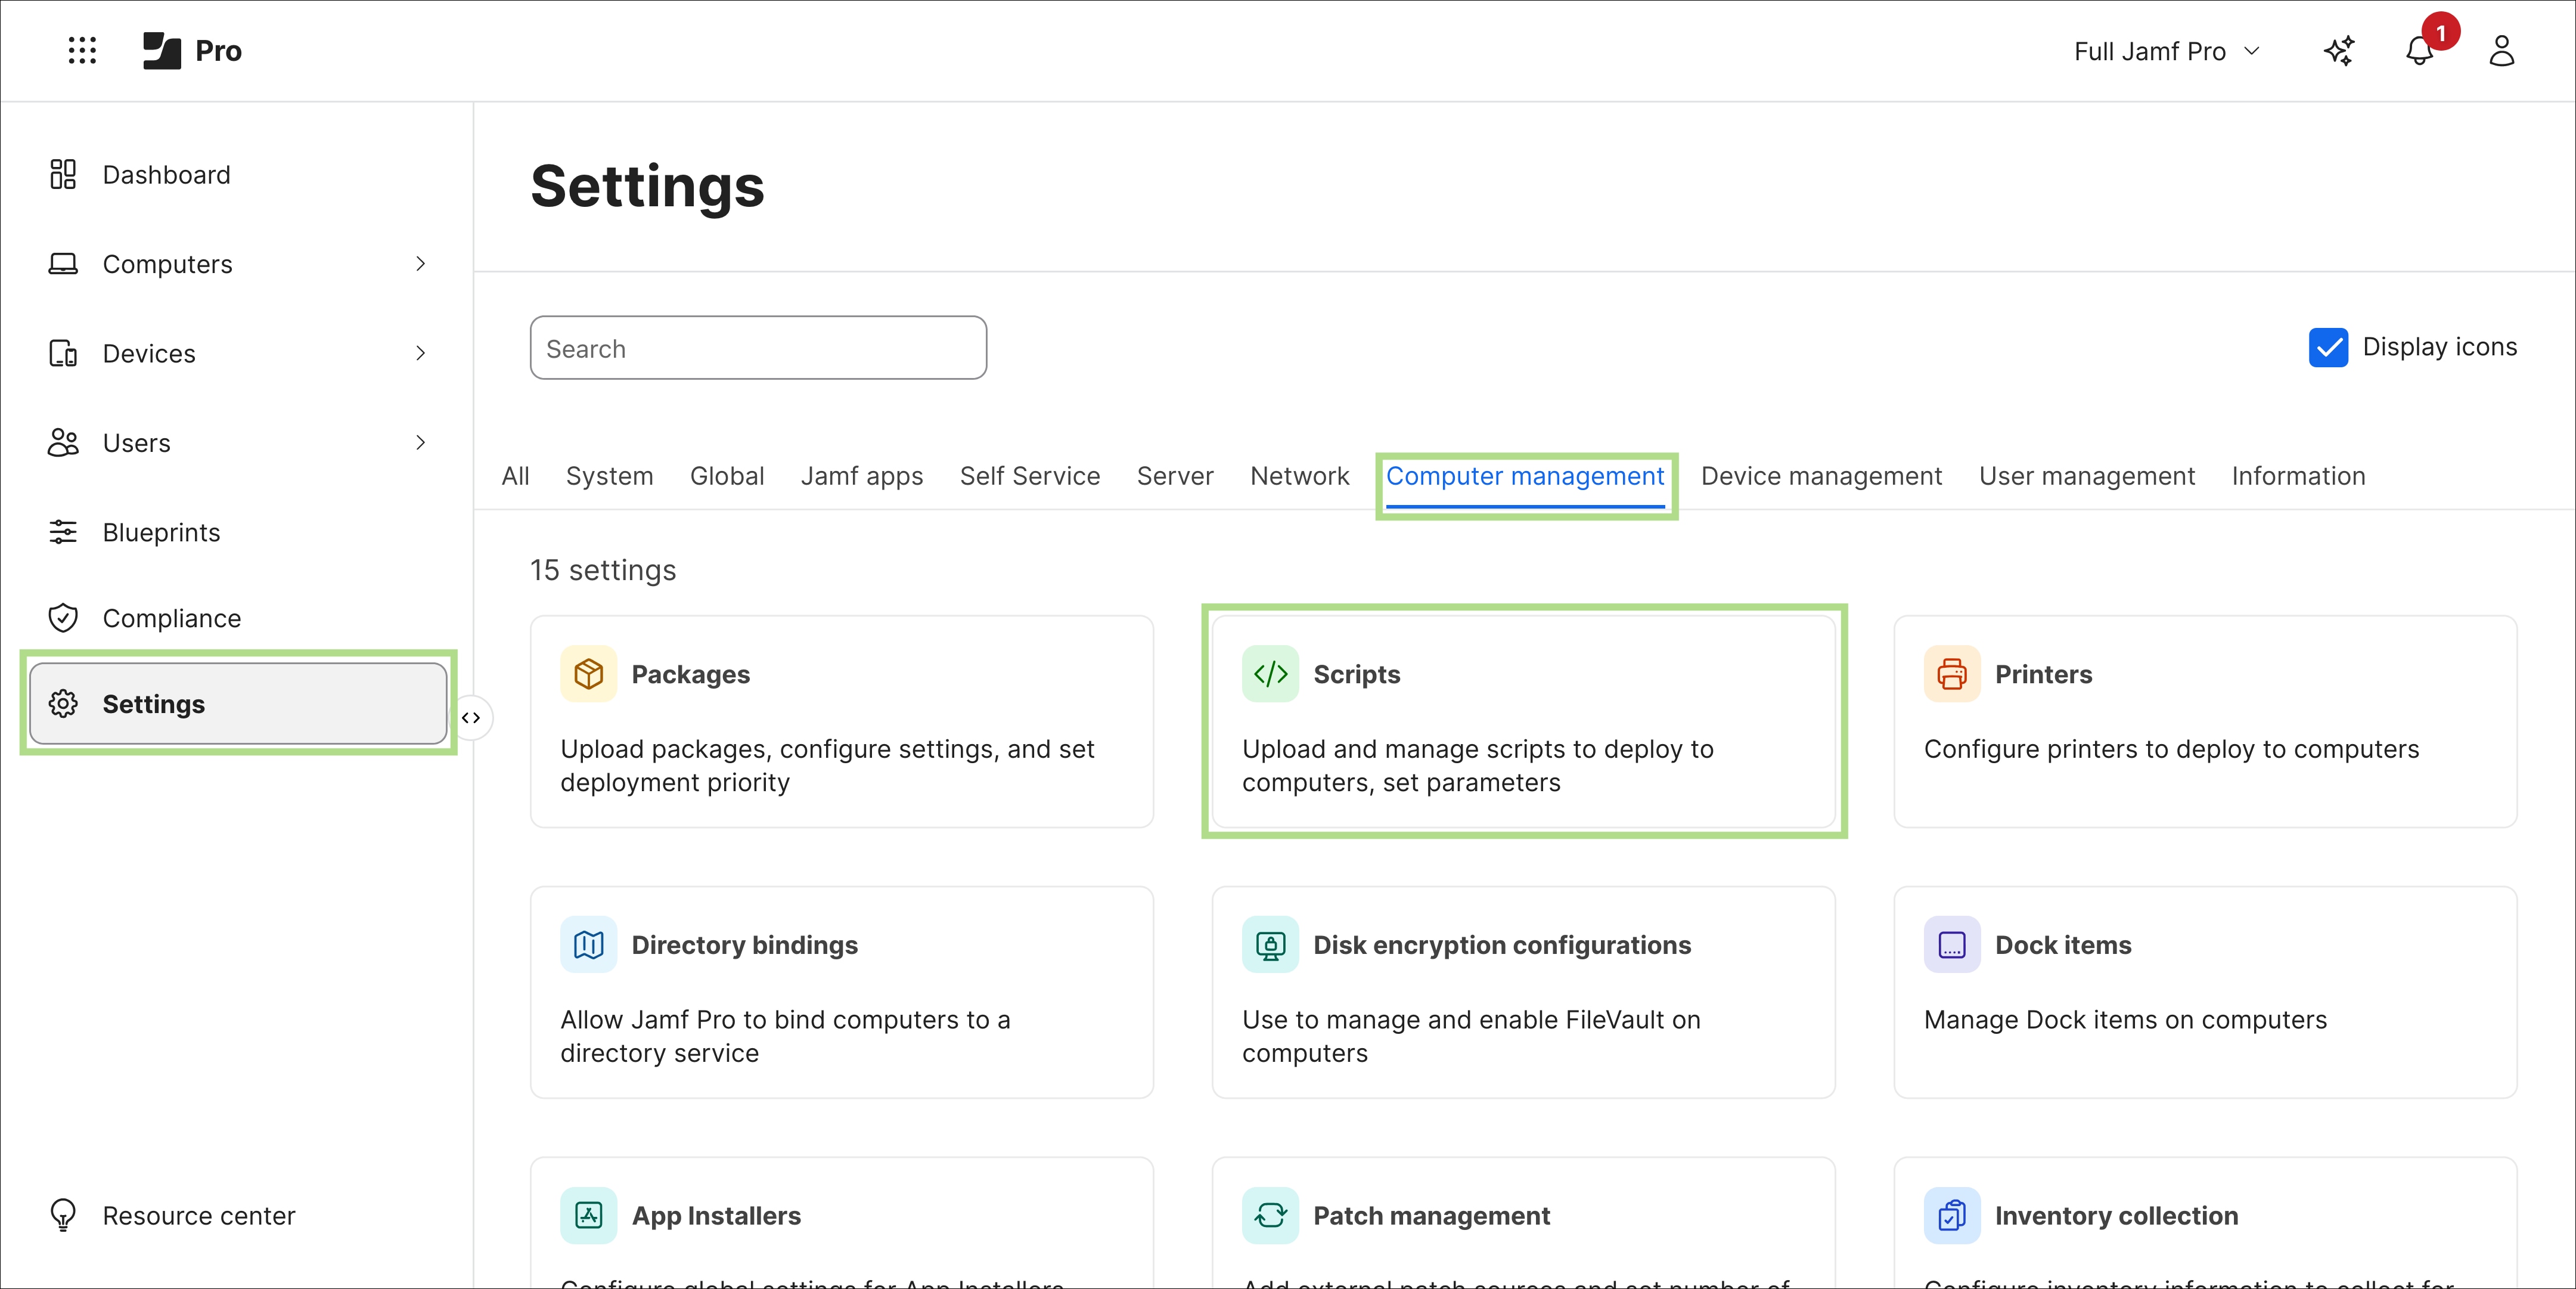
Step 6. Click New in the top right corner to begin creating a new script record.

Step 7. In the General tab, specify a Display Name for the script. For the Install Choices script, the name csc_choices.sh is used in this guide. Optionally, specify a Category, Information, and Notes to keep the script library organized and provide context for other administrators who may manage these scripts in the future.
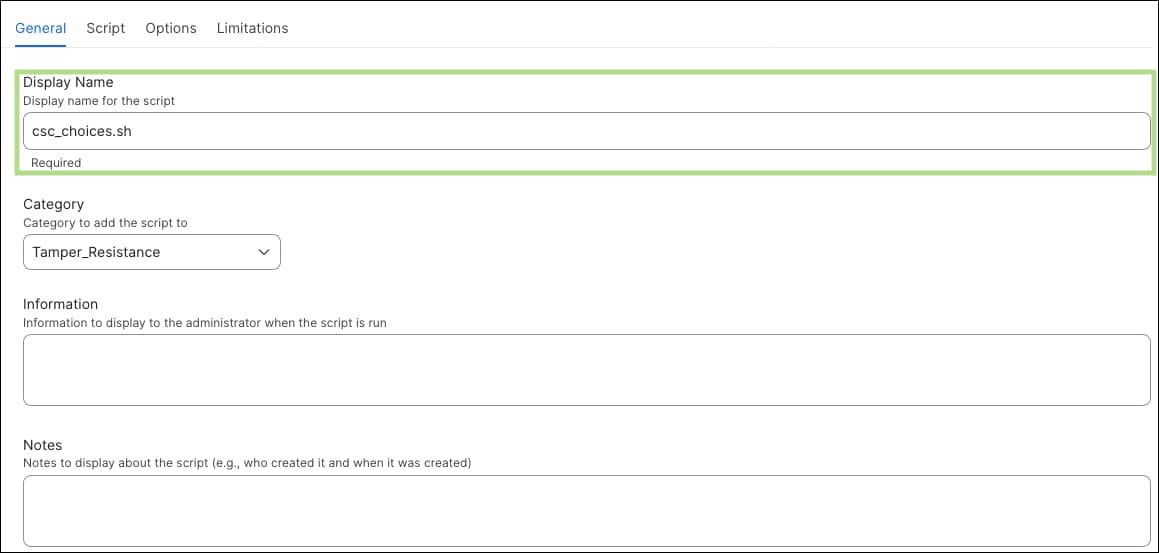
Step 8. Click the Script tab and paste the contents of the Install Choices script. Ensure that the Language dropdown is set to Shell/Bash before saving.
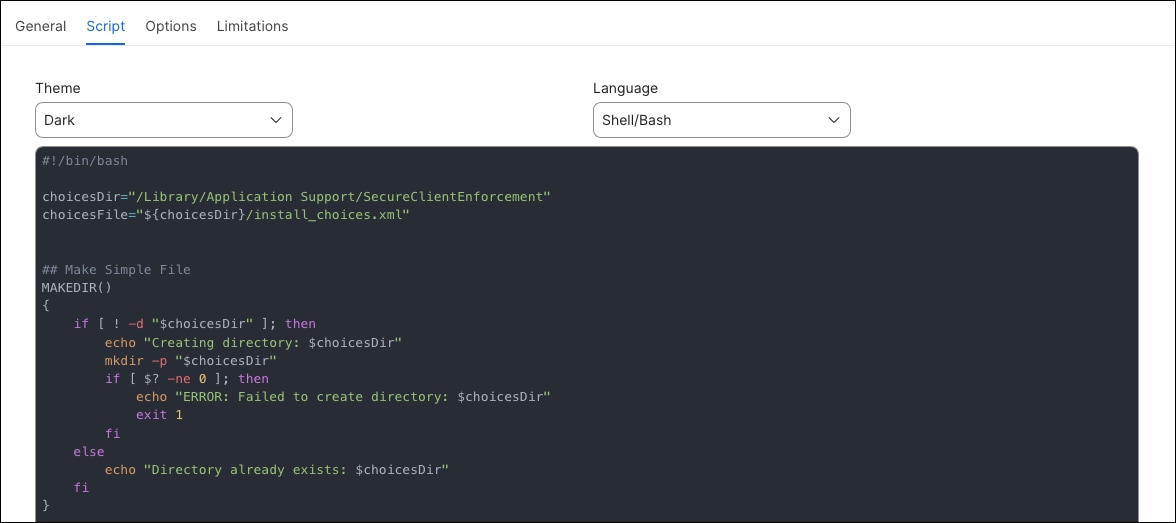
Step 9. Click the Options tab. Ensure Priority is set to Before. The Install Choices Script must execute before the package installation so that the install_choices.xml file is present on disk when the Install CSC Script invokes the installer. No parameters are required for this script; leave all parameter label fields blank.
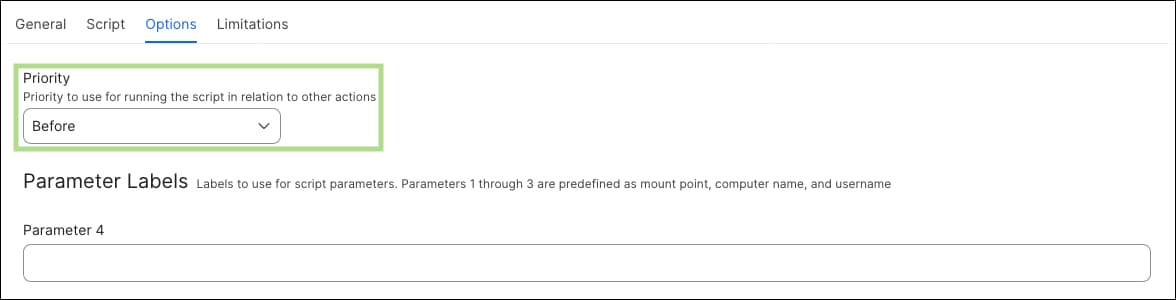
Step 10. Click Save on the bottom right once complete.
Step 11. Repeat steps 6 through 10 for the Install CSC Script. Set the Display Name to csc_install.sh and set Priority to After. The After priority ensures this script executes following the package cache operation and after the Install Choices Script has written the choices file to disk. Click Save when complete.
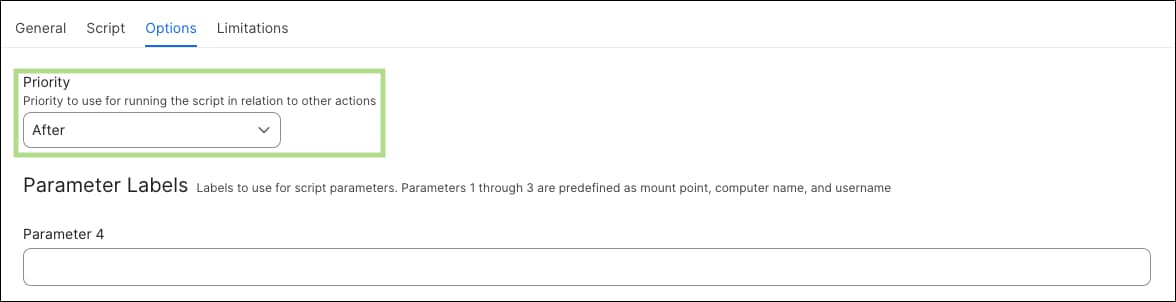
Step 12. In the Jamf Pro dashboard, click Computer in the left navigation bar, then click Policies under the Content Management section.

Step 13. Click New in the top right corner to begin creating a new policy.

Step 14. In the General section within the Options tab, configure the following fields:
| Setting |
Value |
| Display Name |
CSC – Install Secure Client Package |
| Enabled |
Checked |
| Trigger |
Custom — set the Custom Event value to the trigger name that will be referenced in the enforcement script parameters. In this guide, the value csc_install is used. |
| Execution Frequency |
Ongoing |
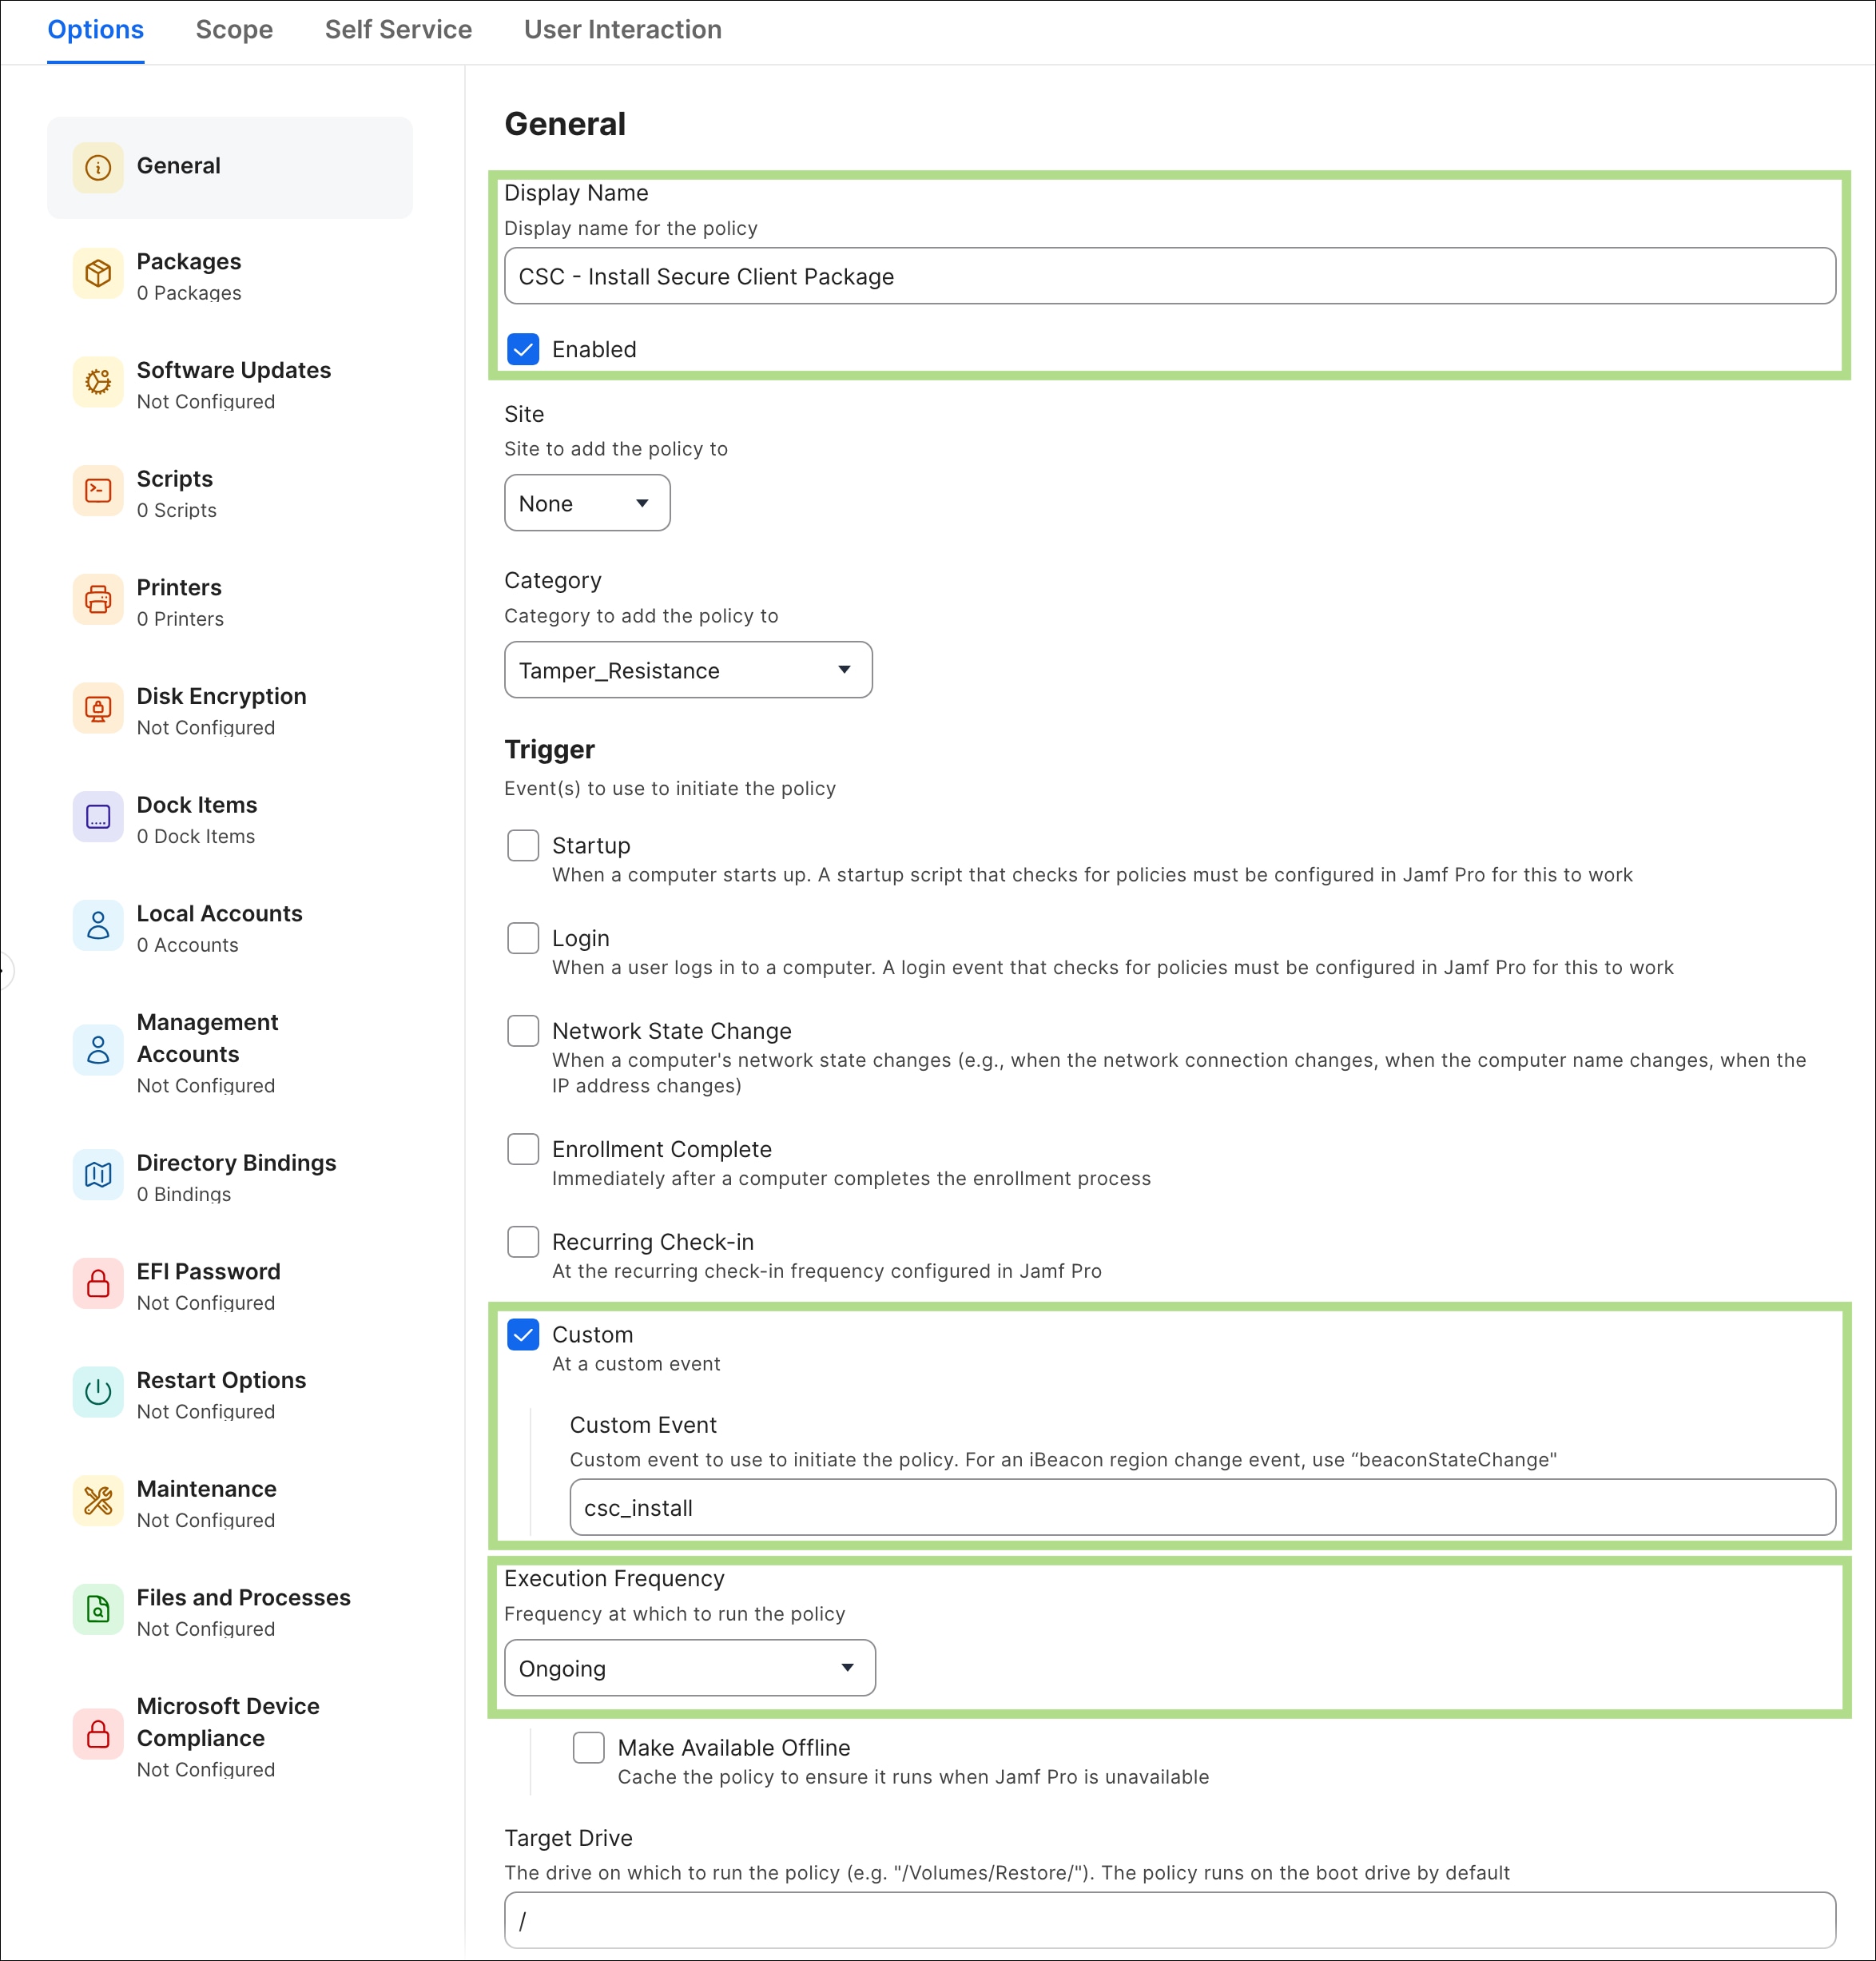
Step 15. Click Packages in the left sidebar, then click Configure to add a package payload to the policy.
Step 16. Locate and select the Cisco Secure Client package uploaded in Step 3. Change Action to Cache. This will store the Secure Client Package in the Jamf Waiting Room directory where it will be called by the CSC Install Script. No additional package options need to be modified for standard deployments.
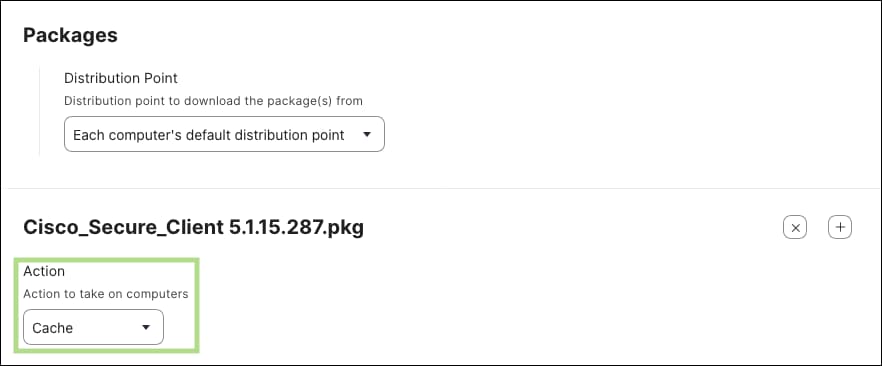
Step 17. Click Scripts in the left sidebar, then click Configure to add the script payload to the policy. Locate and select the Install Choices script. In this guide, the script was given the name csc_choices.sh.
![]()
Step 18. Verify that the Priority for the Install Choices script is set to Before. This should reflect the priority configured when the script was created in Step 9. If it is not set to Before, change it before proceeding. Leave all parameter fields blank.
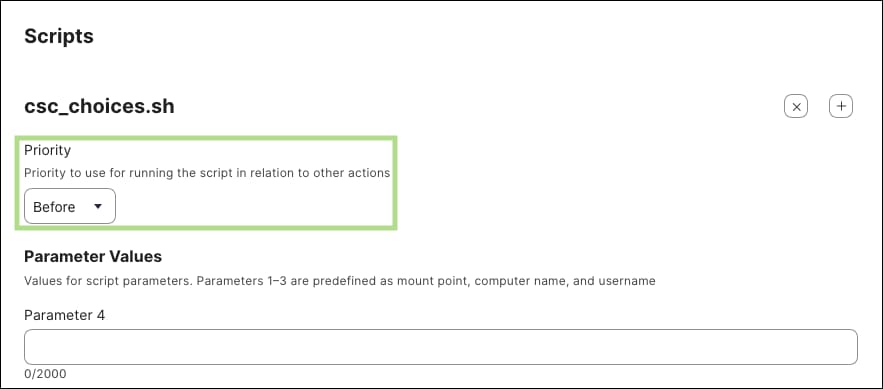
Step 19. Click the + icon in the right corner to add a second script payload to the policy.
Step 20. Locate and select the Install CSC script. In this guide, the script was given the name csc_install.sh.
![]()
Step 21. Verify that the Priority for the CSC Install script is set to After. This should reflect the priority configured when the script was created in Step 11. If it is not set to After, change it before proceeding. Leave all parameter fields blank.
Note: The execution order within this policy is important. The package cache operation downloads the Cisco Secure Client .pkg to the Jamf Waiting Room. The Install Choices Script then writes the install_choices.xml file to disk. The CSC Install script executes last, invoking the installer against the cached package with the choices file applied. If either script runs before the package has been cached or before the choices file has been written, the installation will fail.
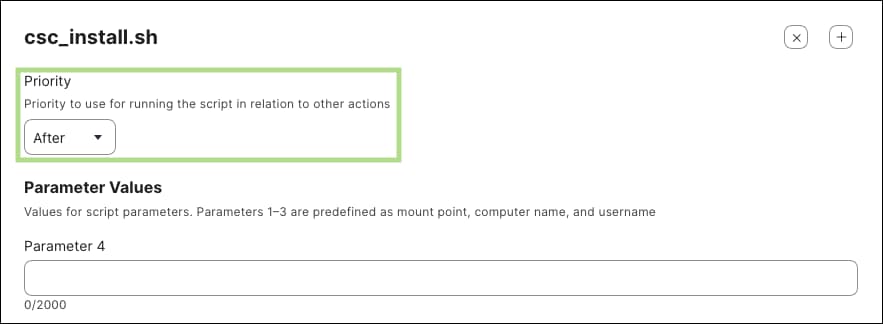
Step 22. Click the Scope tab at the top of the policy editor. In the Targets section, select the computers and/or groups the policy will apply to. For initial testing, it is recommended to scope the policy to a single test device to validate that the package installs correctly and that the enforcement script can successfully call this policy via its custom event trigger before expanding the scope to the broader managed fleet.

Step 23. Click Save in the bottom right corner when all configuration is complete.
Note: After saving, it is recommended to manually trigger this policy on a test device by running sudo jamf policy -event csc_install from the Terminal to confirm that the package is cached successfully, the choices file is written correctly, and the installation completes with only the intended modules installed. Validating the installer policy in isolation ensures that any packaging, scripting, or scoping issues are identified and resolved before the enforcement framework depends on this policy for automated reinstallation. After installation, verify the installed modules by checking for the expected binaries under /opt/cisco/secureclient/ and confirming that no unintended modules are present.
The framework for macOS Secure Client tamper resistance relies on a set of coordinated scripts that work together to detect, report, and remediate compliance issues across the Cisco Secure Client installation. Before these scripts can be deployed and scheduled through Jamf Pro, they must first be created and understood in the context of the broader enforcement system. The following sections cover the purpose of each script, how they are created, and how they are configured and deployed within Jamf Pro to form an automated enforcement solution.
Create macOS Enforcement Scripts
The scripts that make up the tamper resistance framework are created directly within Jamf Pro and stored in the script library for use across one or more policies. Each script serves a distinct role in the enforcement system — from validating installation integrity and configuration accuracy to coordinating remediation and notifying users — and must be configured with the correct parameters to function as intended. The following paragraphs describe what each script does and how it fits into the overall enforcement workflow.
● CSC Enforcement Orchestrator Script: While the individual enforcement scripts are responsible for detecting and remediating specific compliance issues, there is no guarantee that detected issues will be acted upon at the right time or in the right order without a coordinating layer. The orchestrator script serves as the central intelligence of the macOS Secure Client tamper resistance system, reading the shared compliance state written by all other enforcement scripts and determining when and how to respond. It manages deferral thresholds to avoid disrupting active VPN sessions, prompts the user via a notifier when remediation can no longer be deferred, disconnects the VPN when necessary, and triggers only the specific remediation policies relevant to the detected issues. After remediation, it re-validates the system to confirm all issues have been resolved before marking the endpoint as compliant. Reference the Orchestrator script used in this guide.
● CSC Module Enforcement Script: While the initial deployment of Cisco Secure Client establishes the required installation, there is no guarantee that the installation will remain intact, healthy, or up to date over time. Version drift, service crashes, corrupted binaries, or failed updates may result in CSC modules falling out of compliance without the user's awareness. This script continuously validates that the correct version of Cisco Secure Client is installed, that all required launch daemons are running, and that all module binaries are active processes. When issues are detected, the script attempts the least disruptive remediation available — restarting a stopped daemon, redeploying a configuration, or performing a full uninstall and reinstall — escalating through each tier only when the previous approach is insufficient. Reference the Module Enforcement script used in this guide.
● CSC Config Enforcement Scripts: While deployment scripts ensure that the correct configuration files are written to the endpoint at install time, there is no guarantee that these files will remain unmodified or present over time. Configuration drift, module updates, or manual changes may alter or remove configuration files, causing CSC modules to operate with incorrect settings or fail entirely. This script validates the integrity of VPN profile, Umbrella, and ZTA configuration files by comparing the SHA256 hash of each file against a known-good expected value. When a mismatch or missing file is detected, the script triggers the appropriate configuration deployment policy to restore the correct file, with built-in VPN-aware deferral logic to avoid disrupting active sessions before doing so. Reference the Config Enforcement script used in this guide.
● CSC Write Scripts (VPN, Umbrella, ZTA): When the configuration enforcement script detects a hash mismatch or missing file, it does not attempt to write configuration content directly. Instead, it triggers one of several dedicated deployment scripts, each responsible for writing a specific configuration file to the correct location on the endpoint. The VPN profile deployment script generates and writes the AnyConnect-compatible XML profile that governs how and where CSC connects for VPN. The Umbrella deployment script writes the OrgInfo.json file containing the organizational credentials required for DNS-layer security. The ZTA deployment script writes the signed JWT enrollment file that enables certificate-based Zero Trust Access. Each script uses a heredoc (a shell construct for embedding multi-line content directly within a script) to write its content directly to the appropriate CSC module directory, ensuring the file is always restored to an exact known-good state. For the example scripts used in this guide, reference:
Step 1. In the Jamf Pro dashboard, click Settings in the left navigation bar, then navigate to Content Management > Scripts.

Step 2. Click New in the top right corner to begin creating a new script record.

Step 3. In the General tab, specify a Display Name for the script. For the orchestrator, the name csc_enforcement_orchestrator.sh is used in this guide. Optionally, specify a Category, Information, and Notes to keep the script library organized and provide context for other administrators who may manage these scripts in the future.
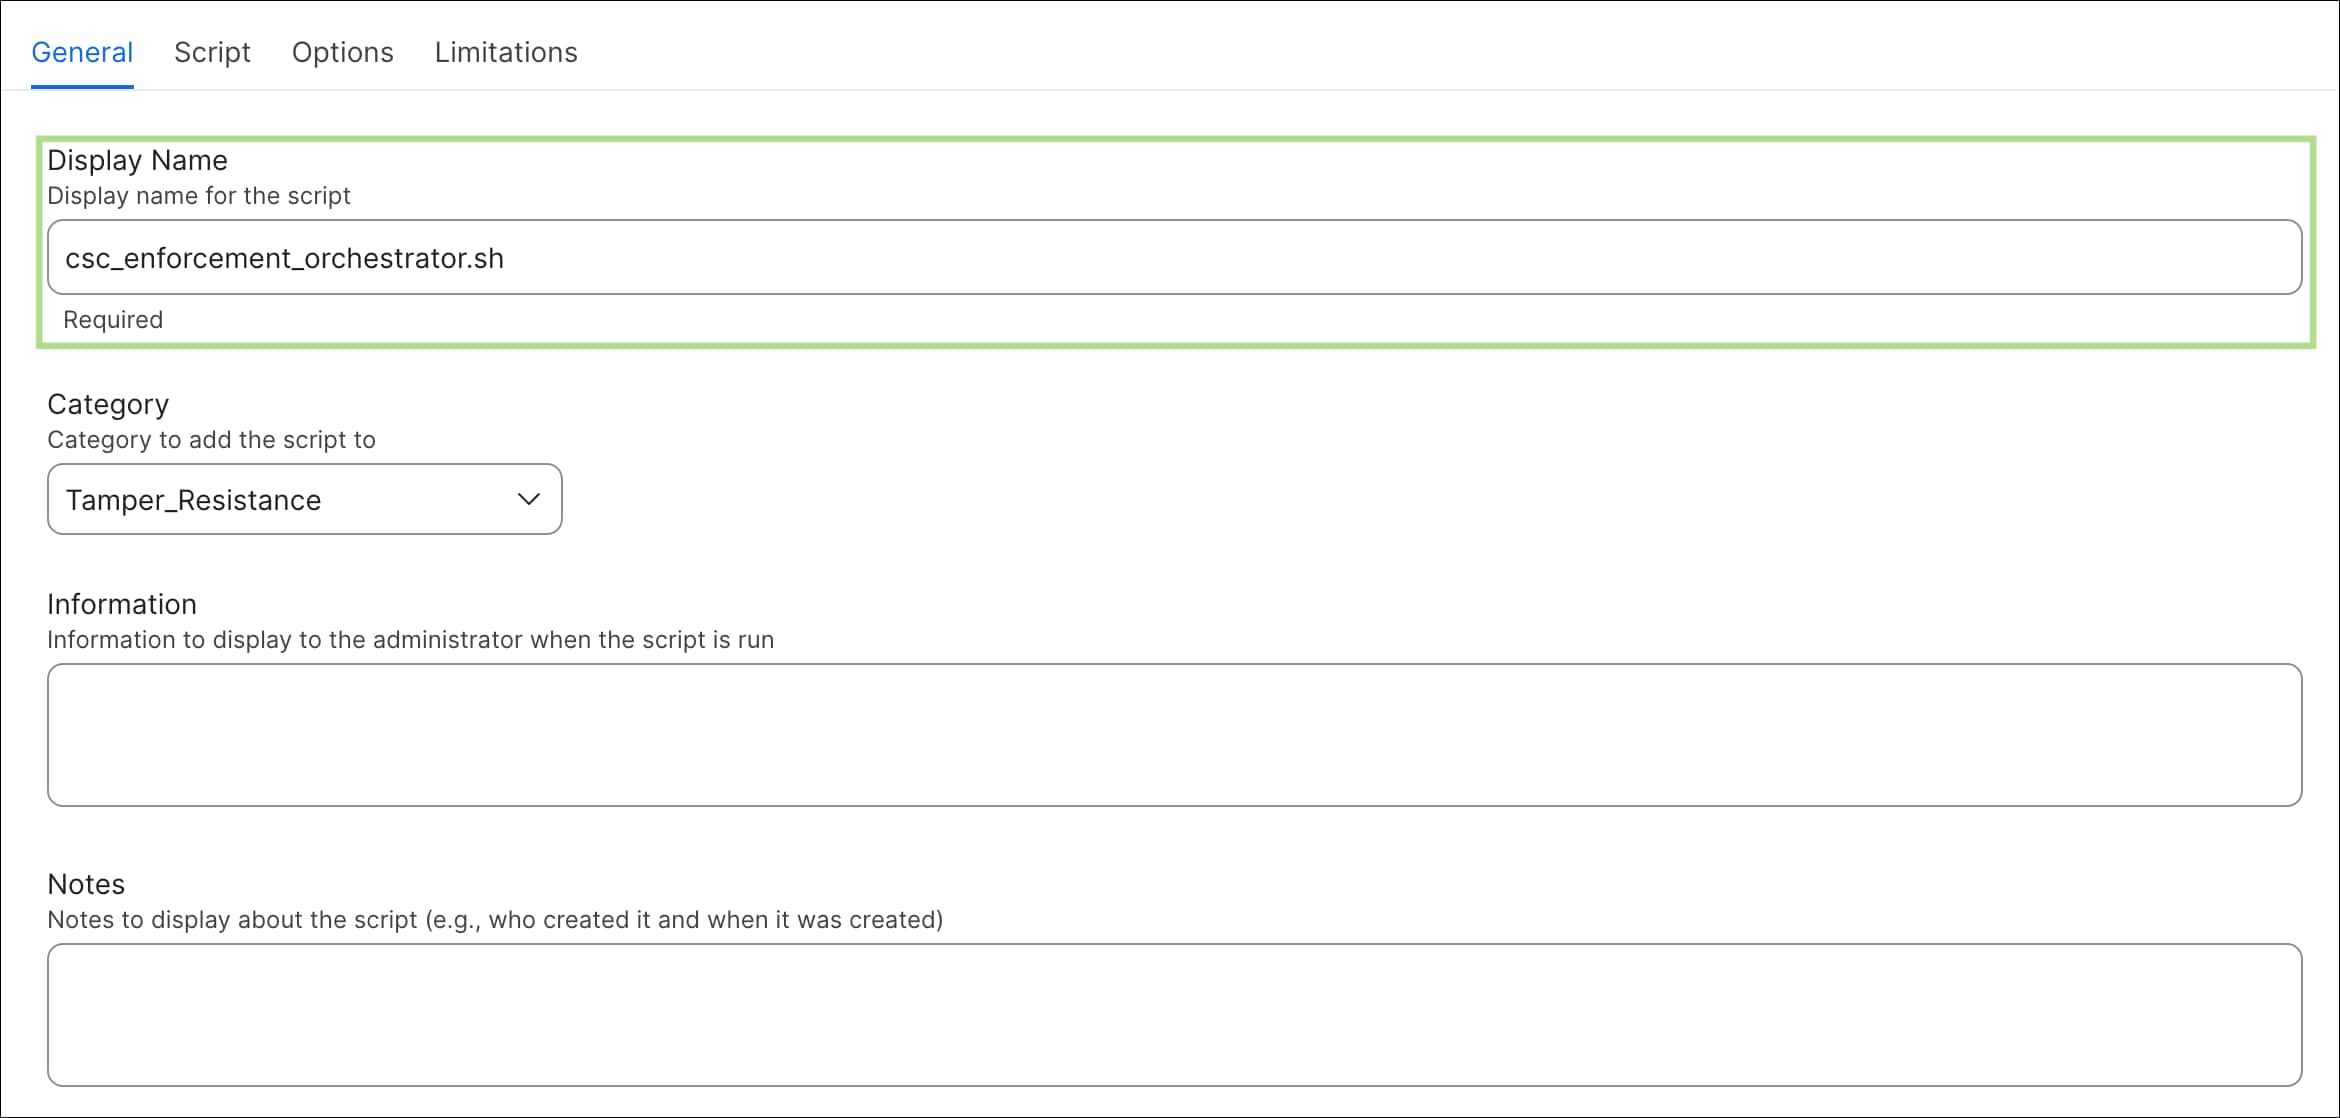
Step 4. Click the Script tab and paste the contents of the orchestrator script. Ensure that the Language dropdown is set to Shell/Bash before saving.
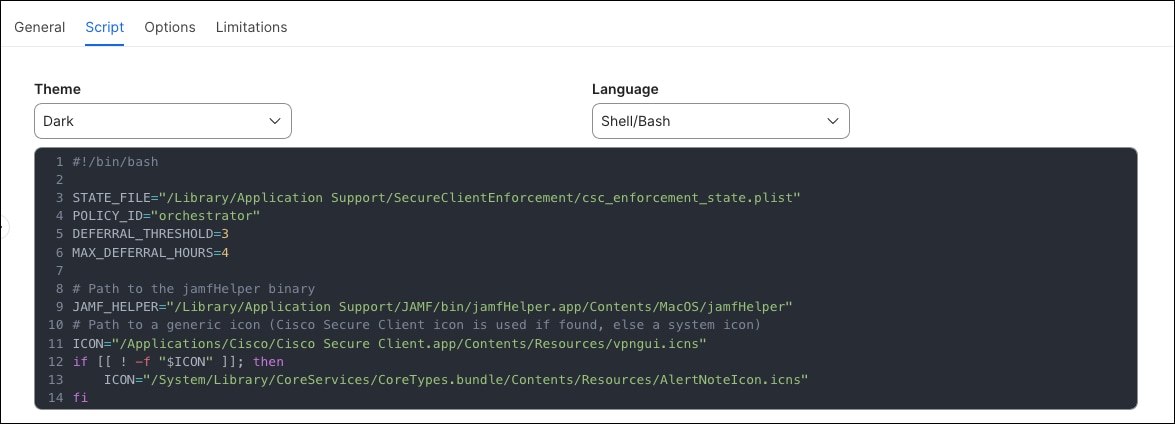
Step 5. Click the Options tab. Ensure Priority is set to After. Configure the Parameter Labels as follows. While parameter labels are optional, populating them is strongly recommended as they make parameter values significantly easier to identify and map correctly when configuring the policies in the next section, reducing the risk of misconfiguration.
| Parameter |
Label |
| Parameter 4 |
(Leave blank) |
| Parameter 5 |
CSC Enforce Policy Event |
| Parameter 6 |
VPN Enforce Config Event |
| Parameter 7 |
Umbrella Enforce Config Event |
| Parameter 8 |
ZTA Enforce Config Event |
| Parameter 9-11 |
(Leave blank) |
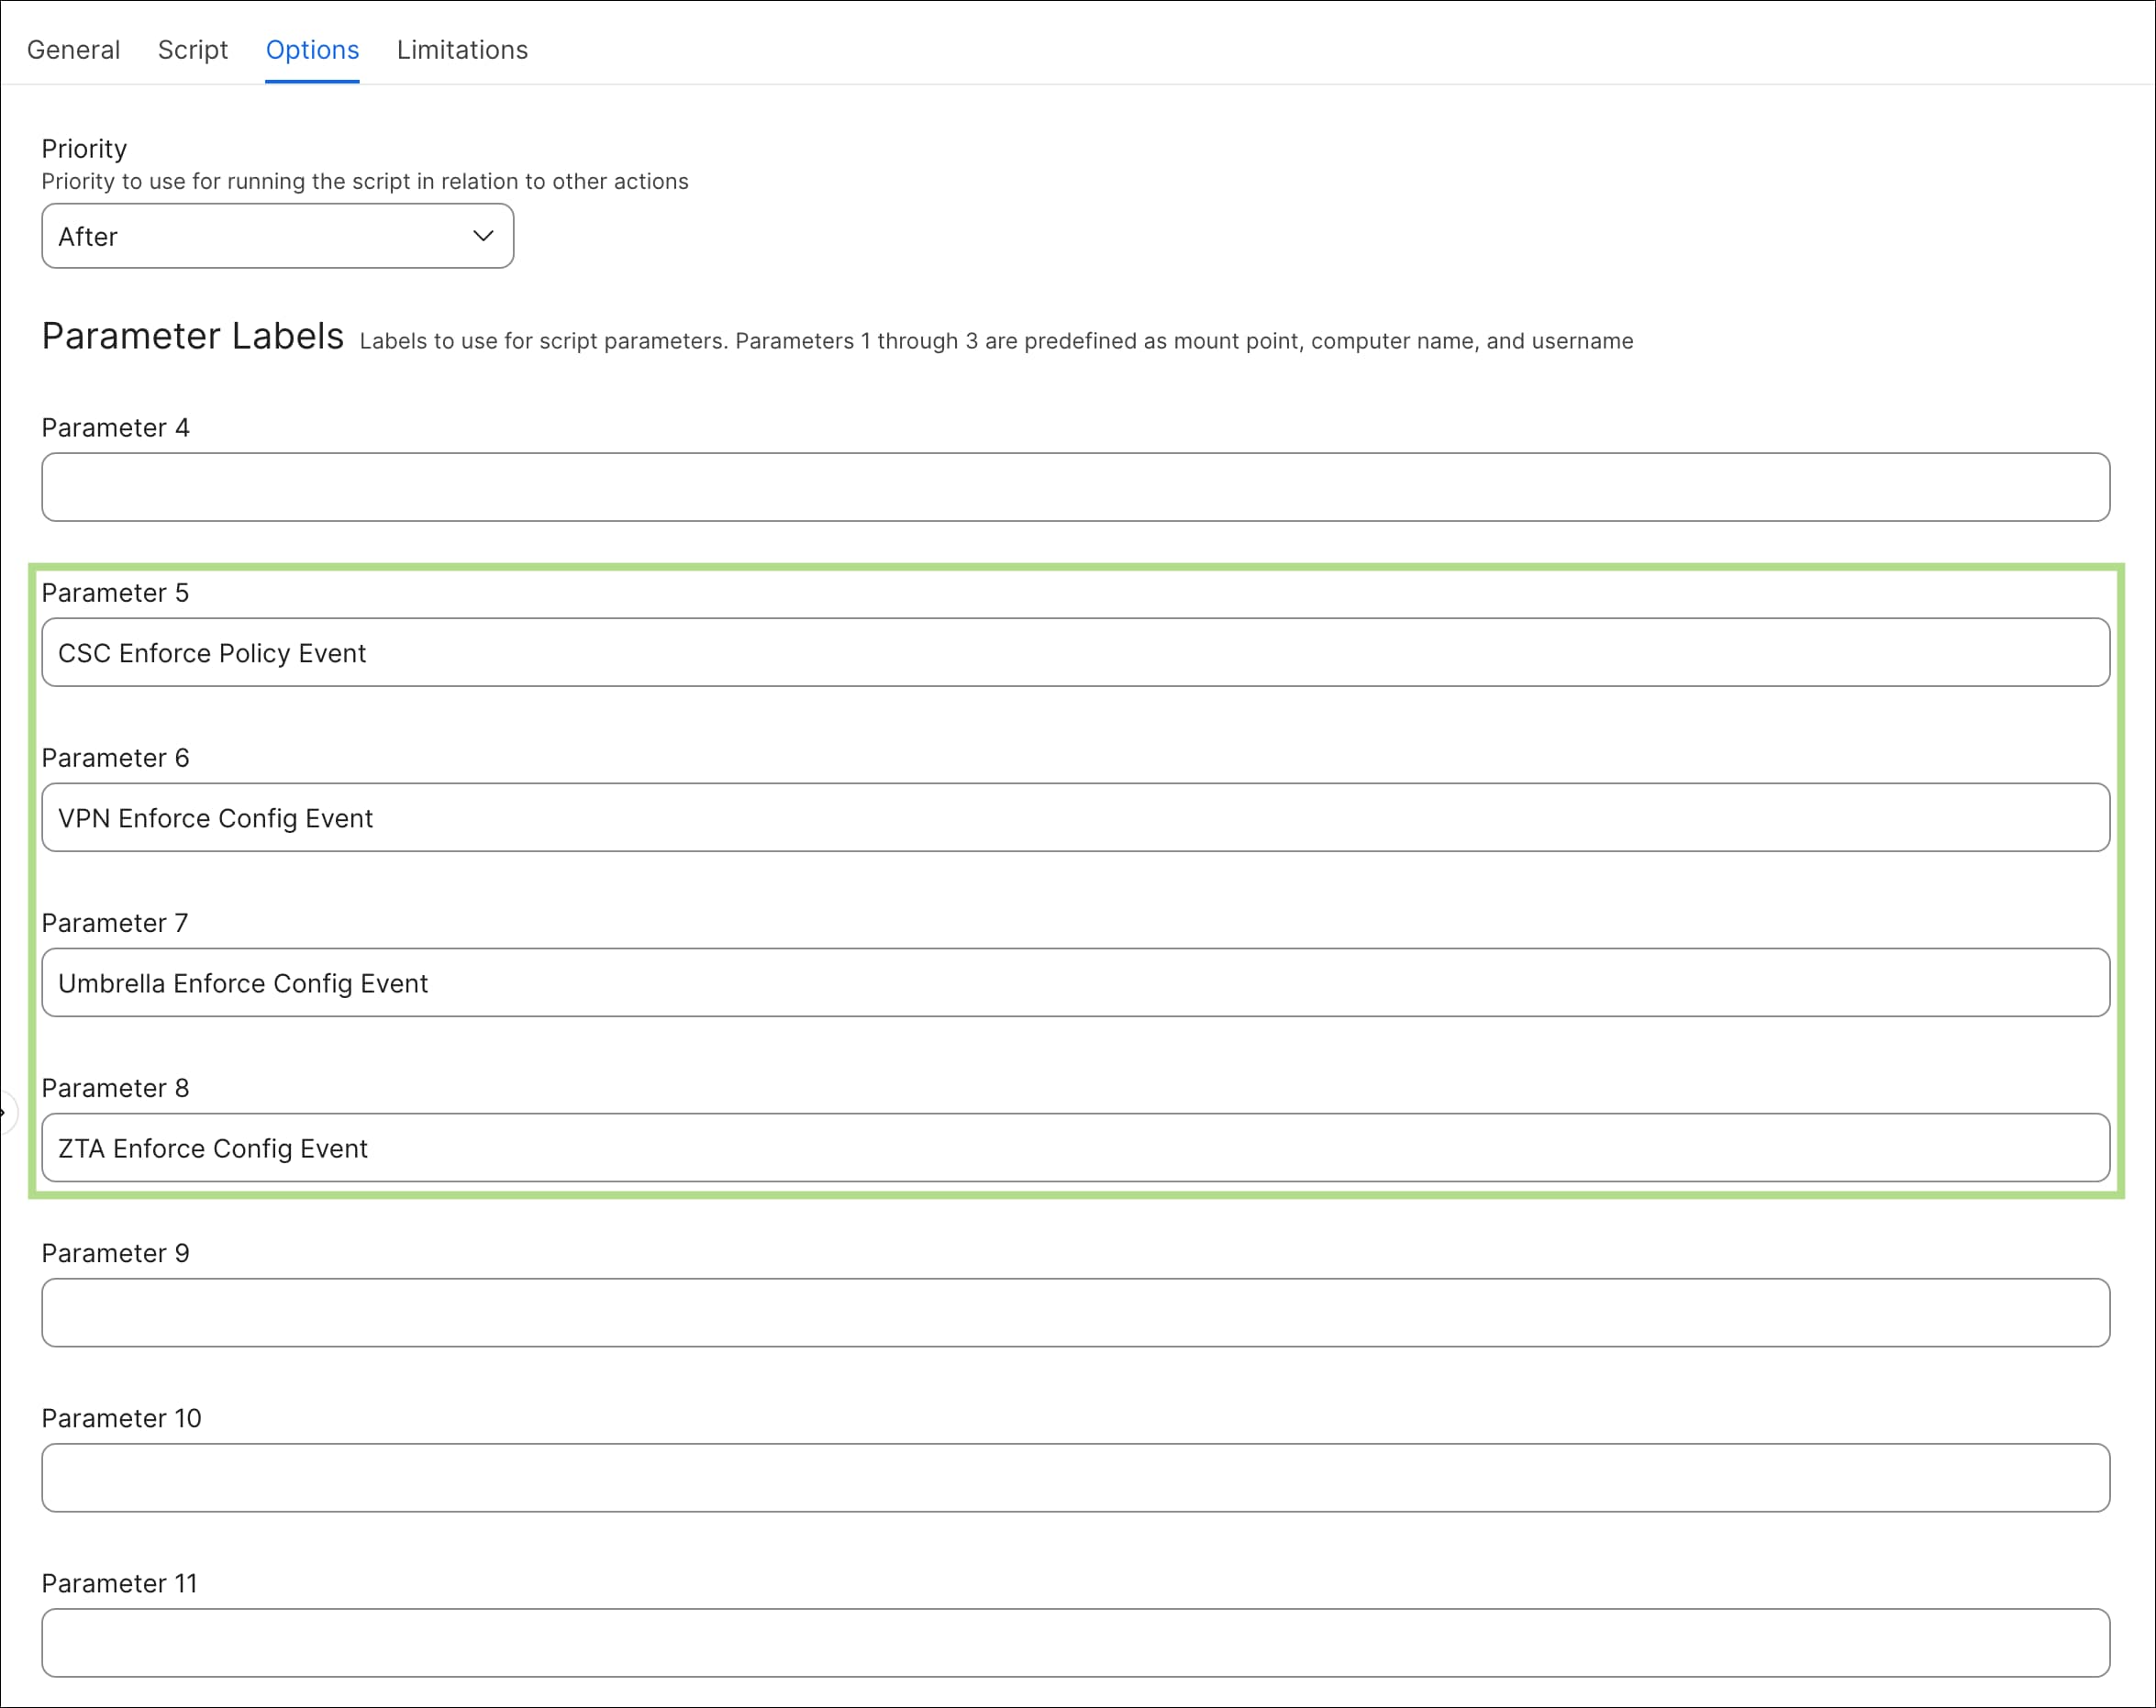
Step 6. Click Save on the bottom right once complete.
Step 7. Repeat Steps 2 through 6 for each of the remaining scripts. The display names and parameter labels for each script are provided below.
csc_module_enforcement.sh
| Parameter |
Label |
| Parameter 4 |
Minimum Version (e.g., 5.1.15.1561) |
| Parameter 5 |
CSC Installer Policy Event |
| Parameter 6 |
VPN Profile Policy Event |
| Parameter 7 |
Umbrella JSON Policy Event |
| Parameter 8 |
ZTA Enrollment JSON Policy Event |
| Parameter 9-11 |
(Leave blank) |
Note: The value entered for Parameter 4 at the policy level must be a valid 4-digit version string in the format Major.Minor.BuildMajor.BuildMinor. This value defines the minimum acceptable version of Cisco Secure Client that the enforcement script will consider compliant. Any installed version below this value will trigger a Tier 3 full uninstall and reinstall. Ensure this value is updated in the policy whenever a new minimum version is established for your environment.
It is important to note that the version number included in the Cisco Secure Client module installer packages and listed on the Cisco Software Download page may not match the version that the enforcement script uses for comparison. The script determines the installed version by reading the CFBundleShortVersionString value from the Cisco Secure Client GUI application bundle, which may differ from the version of the underlying module installers. Before configuring this parameter, verify the exact version string that will be reported by the script by running the following command on a macOS device that already has the target version of Cisco Secure Client installed:
defaults read "/Applications/Cisco/Cisco Secure Client.app/Contents/Info.plist" CFBundleShortVersionString
The value returned by this command is the version string the enforcement script will evaluate against the configured minimum and should be used as the reference value when setting this parameter, rather than the version number from the installer package.
csc_config_enforcement.sh
| Parameter |
Label |
| Parameter 4 |
Profile Check 1 (filename,hash,event,folder) |
| Parameter 5 |
Profile Check 2 |
| Parameter 6 |
Profile Check 3 |
| Parameter 7 |
Profile Check 4 |
| Parameter 8 |
Profile Check 5 |
| Parameter 9 |
Profile Check 6 |
| Parameter 10 |
Profile Check 7 |
| Parameter 11 |
Profile Check 8 |
Note: Each parameter accepts a comma-separated string in the format fileName,expectedSHA256Hash,policyEventTrigger,profileType. The expected SHA256 hash value for each configuration file should be calculated from the output of the corresponding write script after it has been deployed to a test device and finalized. If a write script is updated, the hash values in this policy must be recalculated and updated accordingly to prevent the enforcement script from continuously flagging the configuration as non-compliant. Additionally, the scripts are case sensitive so ensure that the hash values are lower case.
csc_write_vpn.sh
| Parameter |
Label |
| Parameter 4-11 |
(Leave blank) |
csc_write_umbrella.sh
| Parameter |
Label |
| Parameter 4-11 |
(Leave blank) |
csc_write_zta.sh
| Parameter |
Label |
| Parameter 4-11 |
(Leave blank) |
Note: The write scripts do not require any Jamf Pro parameters as all configuration values are embedded directly within each script. If the organizational configuration values change, such as a new Umbrella organization ID, an updated VPN gateway, or a renewed ZTA enrollment JWT, the relevant write script must be updated with the new values, and the expected SHA256 hash in the configuration enforcement policy must be recalculated to reflect the new file content.
With the scripts created and stored in the Jamf Pro script library, the next step is to configure the policies that will execute them on managed endpoints. Each script is assigned to a dedicated Jamf Pro policy with a specific custom event trigger, execution frequency, and scope that determines when and where the script runs. Some policies are triggered automatically on a recurring schedule, while others are called on demand by the orchestrator in response to detected compliance issues. The steps in this section walk through the creation and configuration of each required policy. For the enforcement system to function correctly during reinstallation, the MDM configuration profiles described in the following section should be in place before or alongside these policies, ensuring that any system-level permission requests are handled silently by macOS rather than presented to the user.
Step 1. In the Jamf Pro dashboard, click Computers in the left navigation bar, then click Policies under the Content Management section. The policy creation process is consistent across all enforcement policies. This guide will walk through the first policy in full detail, with the remaining policies summarized in subsequent steps.
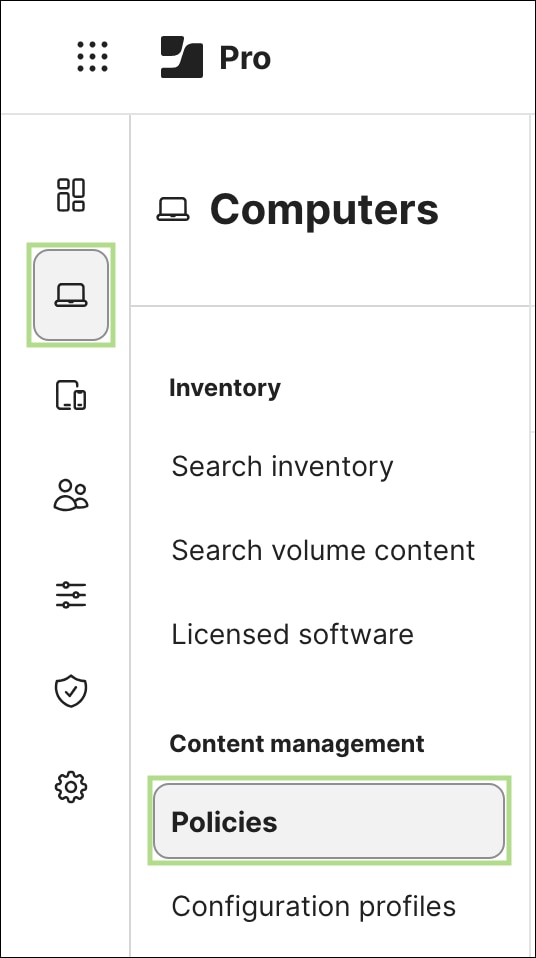
Step 2. Click New in the top right corner to begin creating a new policy.

Step 3. In the General section within the Options tab, configure the following fields for the VPN profile deployment policy:
| Setting |
Value |
| Display Name |
CSC – Deploy VPN Profile |
| Enabled |
Checked |
| Trigger |
Custom — set the Custom Event value to the trigger name that will be referenced in the enforcement script parameters. In this guide, the value deploy_vpn_profile is used. |
| Execution Frequency |
Ongoing |
Optionally, specify a Category and Site to keep the Jamf Pro policy library organized.

Step 4. Click Scripts in the left sidebar, then click Configure to add a script payload to the policy.
Step 5. Locate and select the VPN write script created in the previous section. In this guide, the script was given the name csc_write_vpn.sh

Step 6. The VPN write script does not require any parameters, as all configuration values are embedded directly within the script. Leave all parameter fields blank.
Step 7. Click the Scope tab at the top of the policy editor. In the Targets section, select the computers and/or groups the policy will apply to. For initial testing, it is recommended to scope the policy to a single test device before expanding to the broader managed fleet.
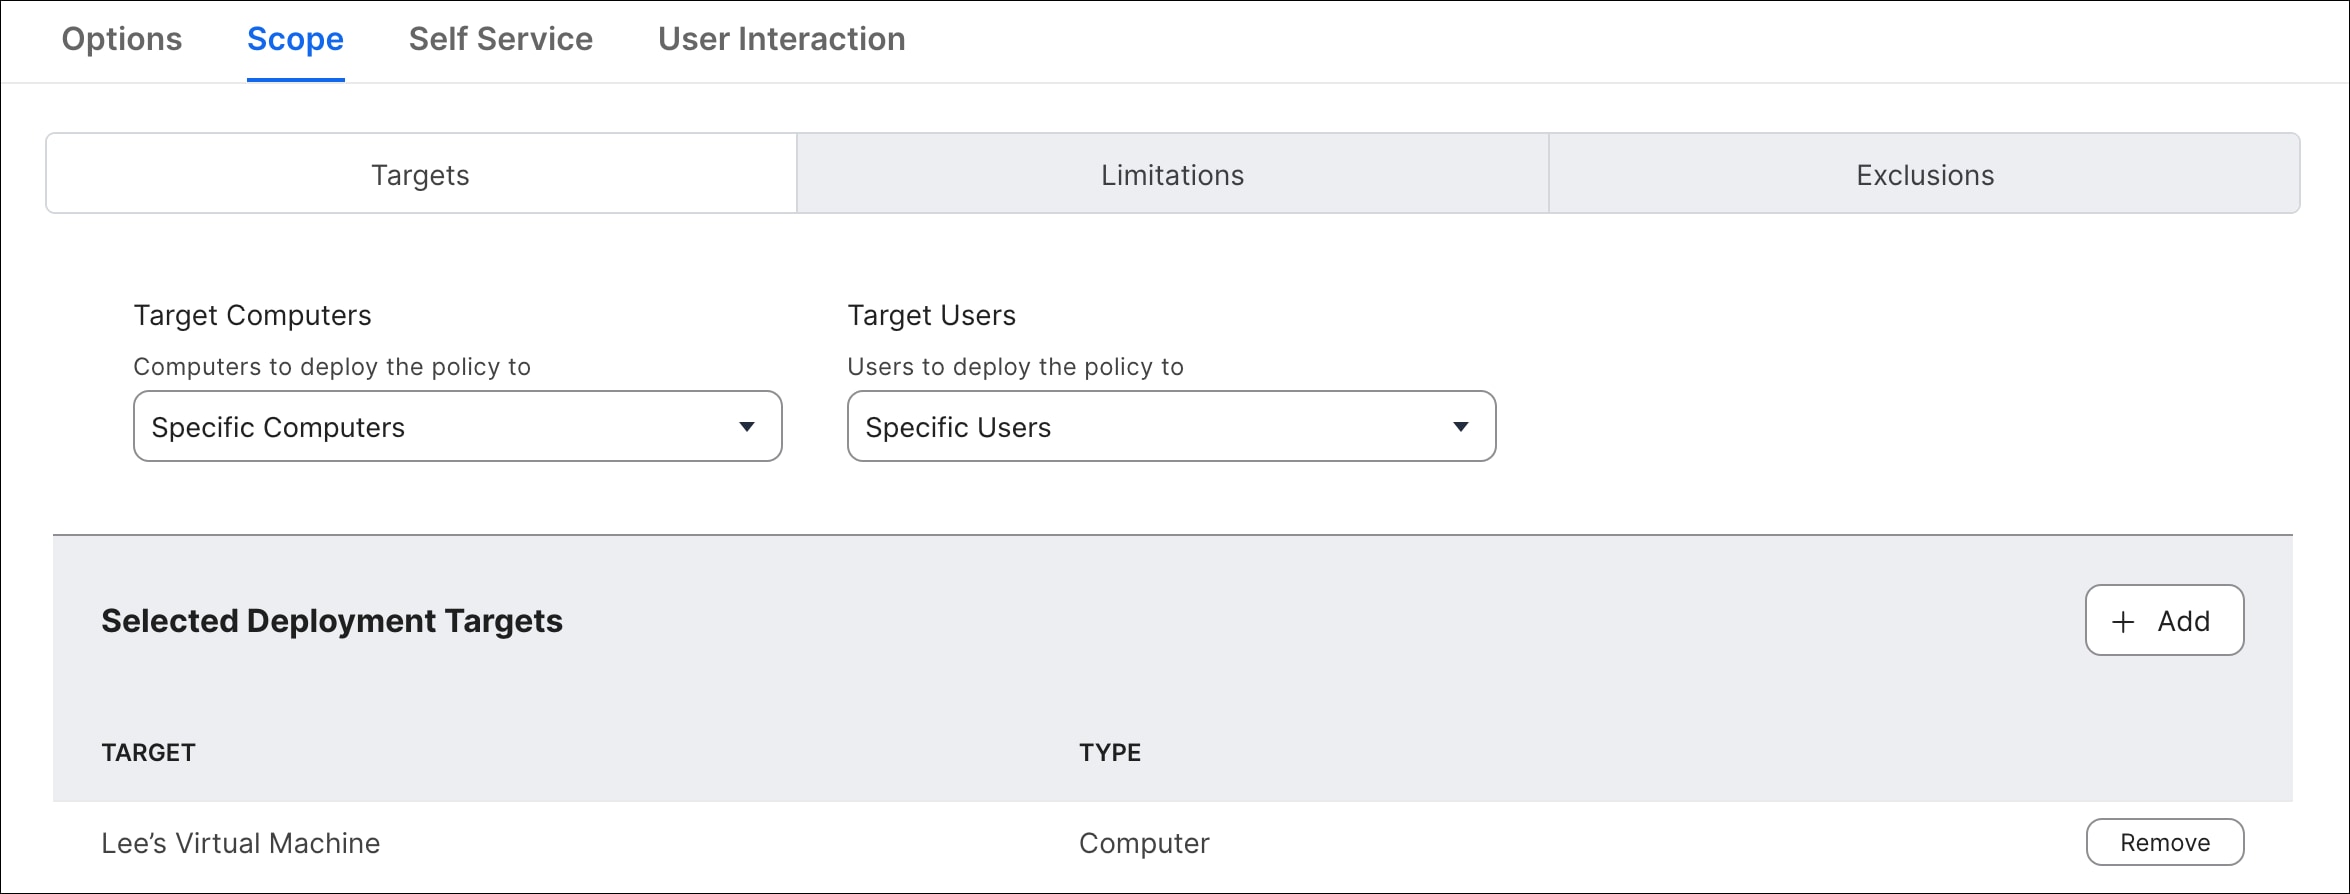
Step 8. Click Save in the bottom right corner when all configuration is complete.
Step 9. Repeat Steps 2 through 8 for the remaining configuration deployment policies. The settings for each policy are provided below.
Note: The custom event trigger names configured in these deployment policies must exactly match the values entered in the policyEvent field of the configuration enforcement script parameters configured in Step 10. If the values do not match, the configuration enforcement script will be unable to call the correct deployment policy when a hash mismatch is detected.
CSC – Deploy Umbrella Profile
| Setting |
Value |
| Display Name |
CSC – Deploy Umbrella Profile |
| Enabled |
Checked |
| Trigger |
Custom Event: deploy_umbrella_profile |
| Execution Frequency |
Ongoing |
| Script |
csc_write_umbrella.sh |
| Parameters |
Leave all blank |
| Scope |
Target test device(s) |
CSC – Deploy ZTA Profile
| Setting |
Value |
| Display Name |
CSC – Deploy ZTA Profile |
| Enabled |
Checked |
| Trigger |
Custom Event: deploy_zta_profile |
| Execution Frequency |
Ongoing |
| Script |
csc_write_zta.sh |
| Parameters |
Leave all blank |
| Scope |
Target test device(s) |
Step 10. Repeat Steps 2 through 8 for the VPN, Umbrella, and ZTA configuration enforcement policies. Note that all three of these policies use the same csc_config_enforcement.sh script, but each is configured with a different custom event trigger and a different Parameter 4 value that defines which configuration file is being checked. Parameters 5 through 11 are left blank for each of these policies, as each policy is scoped to enforce a single configuration file.
Note: In addition to the filenames for the VPN XML Profile and the ZTA Enrollment JSON (Cert_Profile.xml and OrgID_ZTA_Enroll_Cert.json, respectively), the hash values shown in the parameter examples below (abc123, def456, ghi789) are placeholders. Before configuring these policies, calculate the actual SHA256 hash of each configuration file by running the corresponding write script on a test device and executing the command:
shasum -a 256 /path/to/configfile | awk '{print $1}'
The resulting hash value must be entered exactly as-is. Any discrepancy will cause the enforcement script to continuously detect a mismatch and trigger repeated remediation.
The default paths to configuration files on macOS are:
● VPN – /opt/cisco/secureclient/vpn/profile/
● Umbrella - /opt/cisco/secureclient/umbrella/
● ZTA - /opt/cisco/secureclient/zta/enrollment_choices/
CSC - Enforce VPN Config
| Setting |
Value |
| Display Name |
CSC – Enforce VPN Config |
| Enabled |
Checked |
| Trigger |
Custom Event: csc_enforce_vpn |
| Execution Frequency |
Ongoing |
| Script |
csc_config_enforcement.sh |
| Parameter 4 (Profile Check 1) |
Cert_Profile.xml,abc123,deploy_vpn_profile,vpn |
| Parameters 5-11 |
Leave all blank |
| Scope |
Target test device(s) |
CSC - Enforce Umbrella Config
| Setting |
Value |
| Display Name |
CSC – Enforce Umbrella Config |
| Enabled |
Checked |
| Trigger |
Custom Event: csc_enforce_umbrella |
| Execution Frequency |
Ongoing |
| Script |
csc_config_enforcement.sh |
| Parameter 4 (Profile Check 1) |
OrgInfo.json,def456,deploy_umbrella_profile,umbrella |
| Parameters 5-11 |
Leave all blank |
| Scope |
Target test device(s) |
CSC - Enforce ZTA Config
| Setting |
Value |
| Display Name |
CSC – Enforce ZTA Config |
| Enabled |
Checked |
| Trigger |
Custom Event: csc_enforce_zta |
| Execution Frequency |
Ongoing |
| Script |
csc_config_enforcement.sh |
| Parameter 4 (Profile Check 1) |
OrgID_ZTA_Enroll_Cert.json,ghi789,deploy_zta_profile,zta |
| Parameters 5-11 |
Leave all blank |
| Scope |
Target test device(s) |
Note: In the example above, three separate profiles are created for each module type (VPN, Umbrella, ZTA) and each of these profiles is using the same script - csc_config_enforcement.sh. While it is possible to create a single profile with different types, the method used in this guide was chosen to show modularity.
Step 11. Repeat Steps 2 through 8 for the module enforcement policy. This policy uses the csc_module_enforcement.sh script and requires several parameters to be populated, as it must know the minimum acceptable CSC version and the custom event triggers for the installer and configuration deployment policies configured in the previous steps.
Note: The custom event trigger values entered in Parameters 5 through 8 must exactly match the trigger names configured in the CSC installer policy (Step 14 of the Create Secure Client Installation Policy section) and the deployment policies configured in Step 9 of this section. Mismatched trigger names will prevent the module enforcement script from calling the correct policies during Tier 2 and Tier 3 remediation.
CSC - Enforce Secure Client Modules
| Setting |
Value |
| Display Name |
CSC – Enforce Secure Client Modules |
| Enabled |
Checked |
| Trigger |
Custom Event: csc_enforce_modules |
| Execution Frequency |
Ongoing |
| Script |
csc_module_enforcement.sh |
| Parameter 4 (Minimum Version) |
5.1.15.1561 |
| Parameter 5 (CSC Installer Policy Event) |
csc_install |
| Parameter 6 (VPN Profile Policy Event) |
deploy_vpn_profile |
| Parameter 7 (Umbrella Profile Policy Event) |
deploy_umbrella_profile |
| Parameter 8 (ZTA Profile Policy Event) |
deploy_zta_profile |
| Parameters 9-11 |
Leave all blank |
| Scope |
Target test device(s) |
Step 12. Repeat Steps 2 through 8 for the orchestrator policy. The orchestrator is the only policy in this framework that uses a Recurring Check-in trigger in addition to a custom event trigger. The recurring check-in trigger ensures the orchestrator runs automatically on every Jamf Pro check-in, maintaining continuous enforcement across the managed fleet. The custom event trigger is configured additionally to allow the orchestrator to be invoked manually for testing and troubleshooting purposes without waiting for the next scheduled check-in.
Note: The custom event trigger values entered in Parameters 5 through 8 must exactly match the trigger names configured for the module enforcement policy (Step 11) and the configuration enforcement policies (Step 10). These are the values the orchestrator will use to call each enforcement policy when compliance issues are detected. If any trigger name does not match, the orchestrator will be unable to invoke the corresponding policy and remediation will not occur.
CSC - Orchestrator
| Setting |
Value |
| Display Name |
CSC – Orchestrator |
| Enabled |
Checked |
| Trigger |
Recurring Check-in — checked to enable automatic enforcement on every Jamf Pro check-in |
| Trigger |
Custom Event: csc_orchestrate — configured additionally for manual invocation during testing and troubleshooting |
| Execution Frequency |
Ongoing |
| Script |
csc_enforcement_orchestrator.sh |
| Parameter 4 |
Leave blank |
| Parameter 5 (CSC Enforce Policy Event) |
csc_enforce_modules |
| Parameter 6 (VPN Enforce Config Event) |
csc_enforce_vpn |
| Parameter 7 (Umbrella Enforce Config Event) |
csc_enforce_umbrella |
| Parameter 8 (ZTA Enforce Config Event) |
csc_enforce_zta |
| Parameters 9-11 |
Leave all blank |
| Scope |
Target test device(s) |
Note: Once all policies have been saved and validated on a test device, expand the scope of each policy to your full managed fleet. It is recommended to expand scope in a staged manner — starting with a pilot group before rolling out broadly — to identify any environment-specific issues before they affect all endpoints. Verify that the orchestrator is running successfully at each check-in by reviewing the Jamf Pro policy logs and inspecting the shared state file on test devices using defaults read /Library/Application Support/SecureClientEnforcement/csc_enforcement_state.plist
Even with the correct installer package and enforcement policies in place, a successful and fully silent Cisco Secure Client installation on macOS depends on a set of MDM configuration profiles that pre-approve the system-level permissions required by the CSC modules. Without these profiles, macOS will present the user with approval dialogs for system extensions, network content filters, and privacy permissions during installation or reinstallation — any of which could be dismissed or rejected by the user, leaving the installation in an incomplete or non-functional state. This section covers the creation and deployment of the configuration profiles needed to ensure that system extensions, content filters, Privacy Preferences Policy Controls (PPPC), and managed login items are all silently approved and applied by the MDM before the installer runs, whether during initial enrollment or an enforcement-triggered reinstallation.
Note: These configuration profiles should be deployed to managed endpoints before or alongside the Cisco Secure Client installer policy. Deploying them after installation may result in macOS prompting the user to approve permissions that should have been pre-authorized, particularly on devices that receive an enforcement-triggered reinstallation before the profiles are in place. Ensure the profiles are scoped to the same device group as the CSC installer policy.
Step 1. In the Jamf Pro dashboard, click Settings in the left navigation bar, then navigate to Content Management > Configuration profiles.
Step 2. Click New in the top right corner to begin creating a new configuration profile.
Step 3. In the General section under the Options tab, provide a descriptive Name for the configuration profile. In this guide, the name CSC – macOS System Permissions is used. Optionally, provide a Description, Site, and Category to keep the configuration profile library organized. Leave Level and Distribution Method at their default values, Computer Level and Install automatically, respectively.
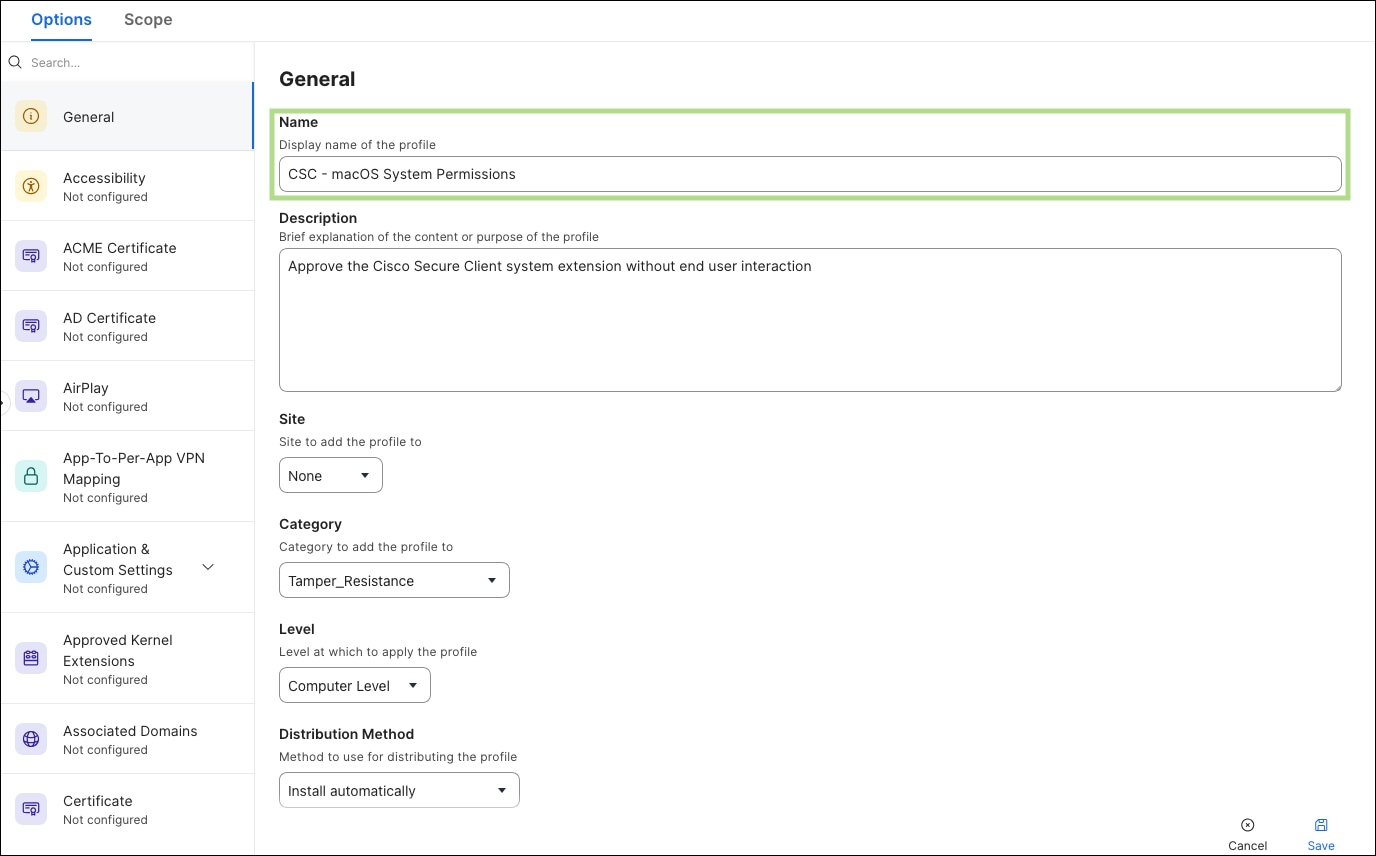
Step 4. Click the Content Filter payload in the left sidebar under the Options tab and click Configure. The content filter payload pre-authorizes the Cisco Secure Client network extension to filter network traffic at the socket level, which is required for the Umbrella and SWG modules to intercept and inspect DNS and web traffic. Configure the following settings:
| Setting |
Value |
| Filter Name |
Cisco AnyConnect Content Filter |
| Identifier |
com.cisco.anyconnect.macos.acsock |
| Filter Order |
Firewall |
| Socket Filter |
Enabled |
| Socket Filter Bundle Identifier |
com.cisco.anyconnect.macos.acsockext |
| Socket Filter Designated Requirement |
"com.cisco.anyconnect.macos.acsockext" and (certificate leaf[field.1.2.840.113635.100.6.1.9] /* exists */ or certificate 1[field.1.2.840.113635.100.6.2.6] /* exists */ and certificate leaf[field.1.2.840.113635.100.6.1.13] /* exists */ and certificate leaf[subject.OU] = DE8Y96K9QP) |

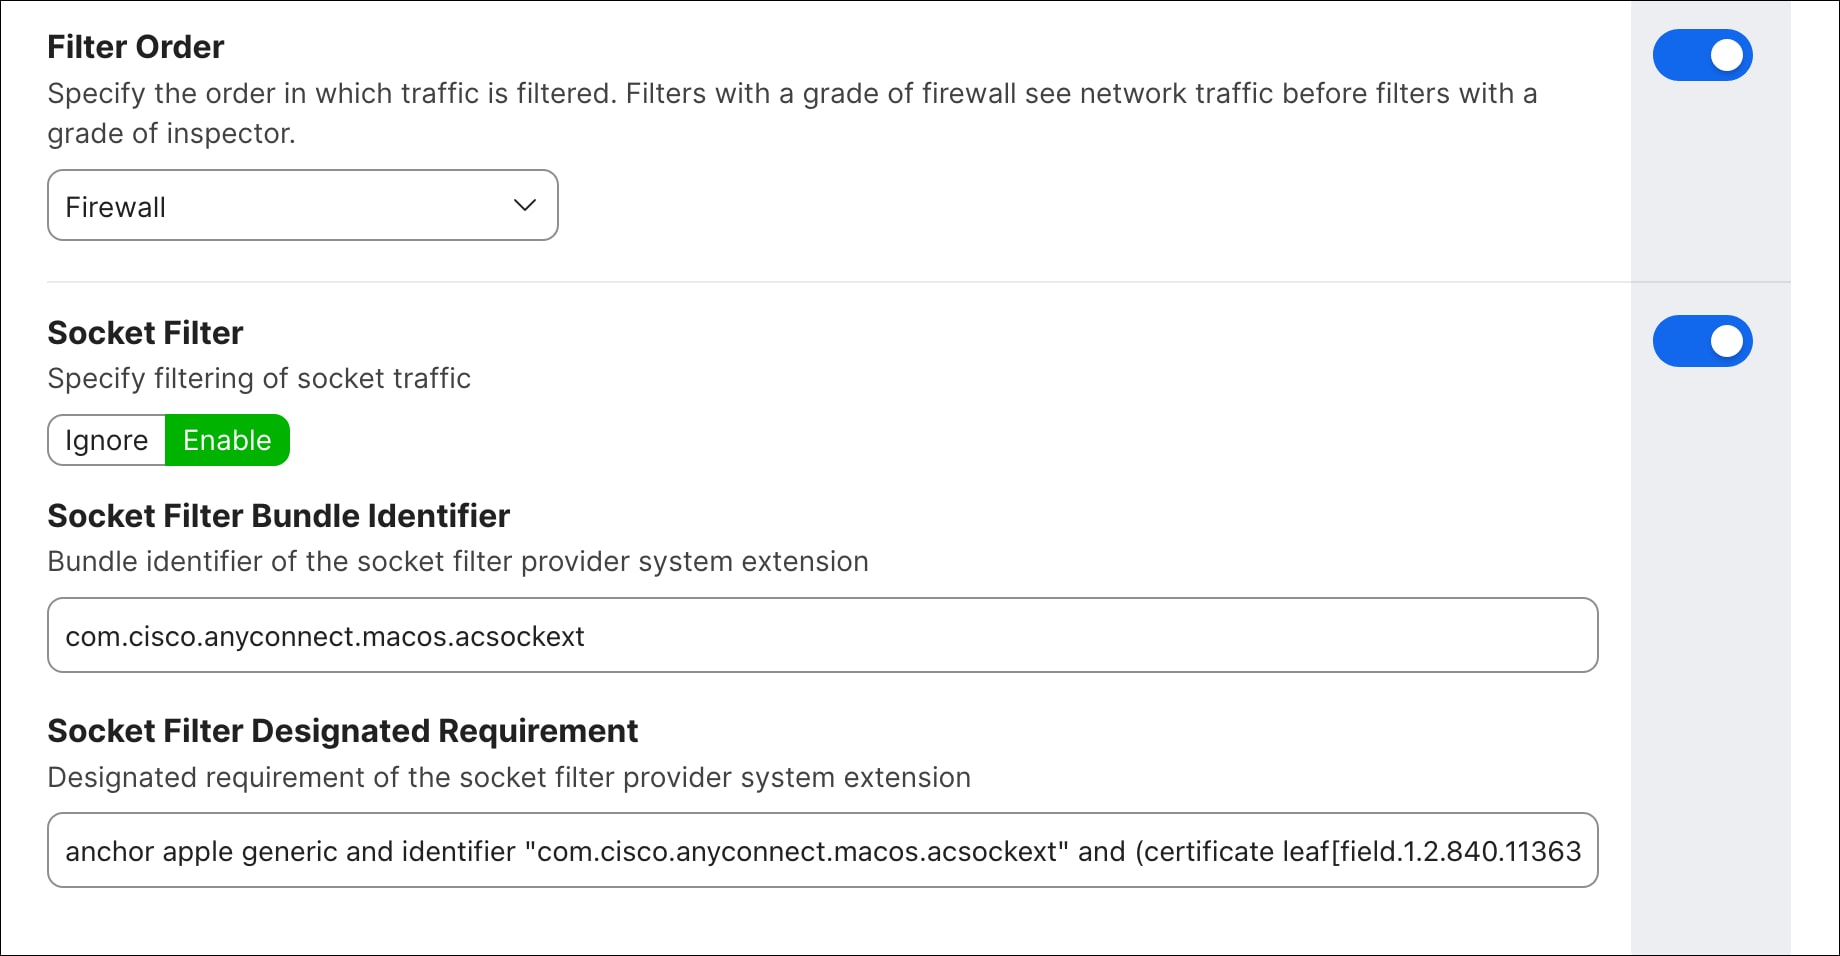
Under Custom Data, click Add five times and enter the following key-value pairs:
| Key |
Value |
| AutoFilterEnabled |
false |
| FilterBrowsers |
false |
| FilterSockets |
true |
| FilterPackets |
false |
| FilterGrade |
firewall |
Step 5. Click the Managed Login Items payload in the left sidebar under the Options tab and click Configure. The managed login items payload ensures that Cisco Secure Client background processes and agents launch automatically at login without requiring user interaction or presenting a login item approval dialog introduced in macOS 13 (Ventura) and later. Another Managed Login Item will also be added for Duo Desktop. Click the Add button in the bottom right to create two separate Managed Login Item entries and configure each as follows:
Managed Login Item Entry 1 – Secure Client
| Setting |
Value |
| Rule Type |
Bundle Identifier Prefix |
| Rule Value |
com.cisco.secureclient |
| Team Identifier |
DE8Y96K9QP |
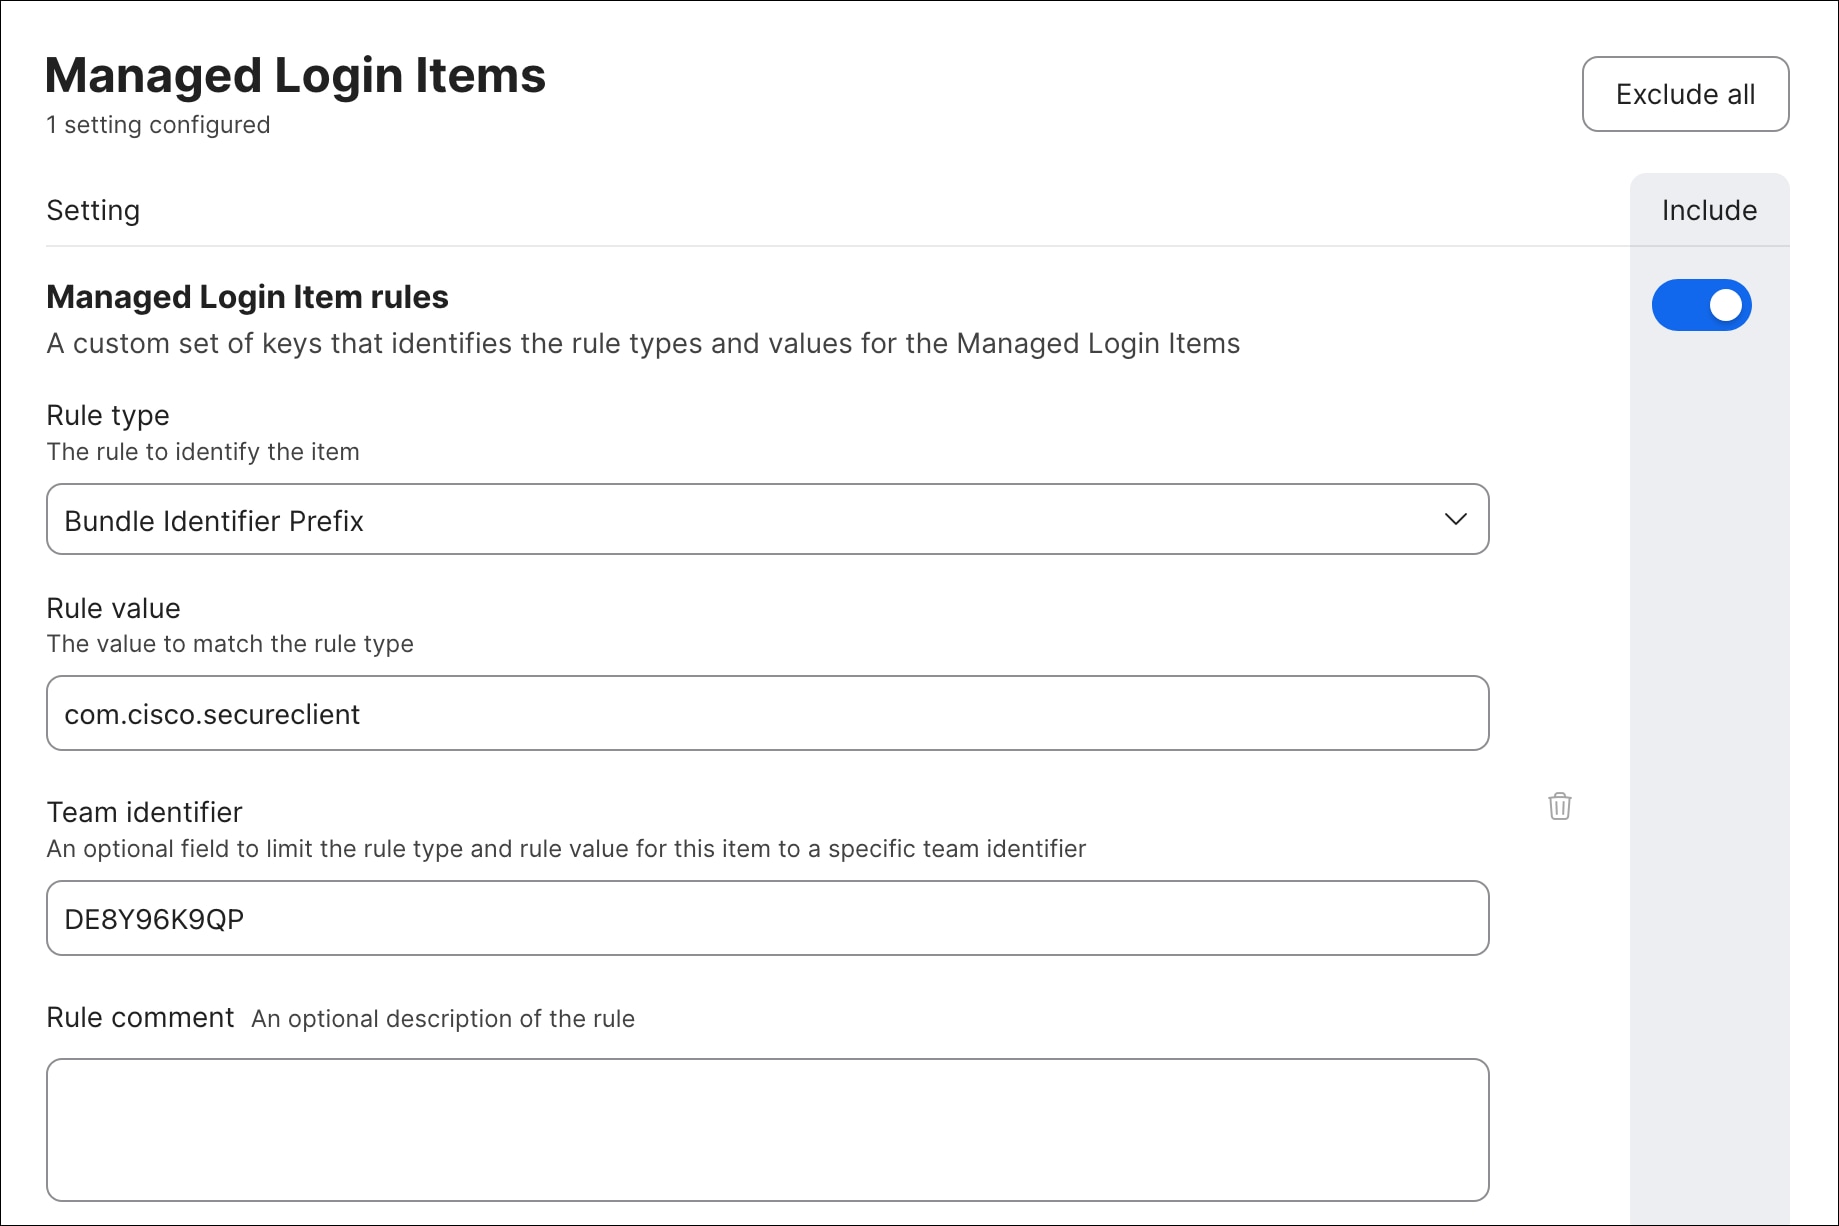
Managed Login Item Entry 2 – Duo Desktop
| Setting |
Value |
| Rule Type |
Team Identifier |
| Rule Value |
FNN8Z5JMFP |
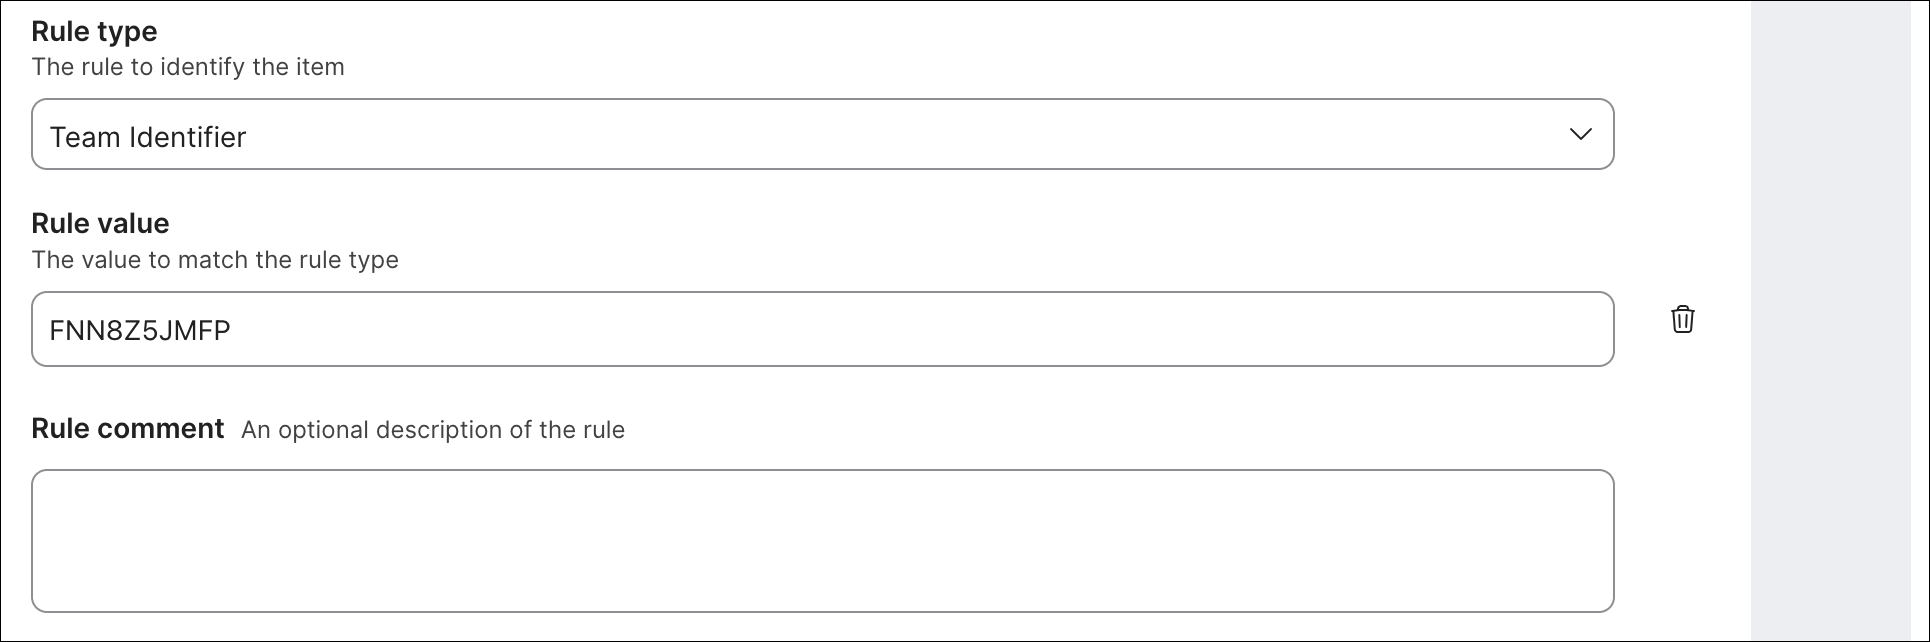
Step 6. Click the Privacy Preferences Policy Control payload in the left sidebar under the Options tab and click Configure. The PPPC payload pre-authorizes specific CSC processes to access protected system resources without prompting the user. This is required for the VPN service and GUI components to function correctly following installation or reinstallation. Click the + icon to create two separate app access entries and configure each as follows:
App Access Entry 1 – Cisco Secure Client GUI
| Setting |
Value |
| Identifier |
com.cisco.anyconnect.gui |
| Identifier Type |
Bundle ID |
| Code Requirement |
anchor apple generic and identifier "com.cisco.anyconnect.gui" and (certificate leaf[field.1.2.840.113635.100.6.1.9] /* exists */ or certificate 1[field.1.2.840.113635.100.6.2.6] /* exists */ and certificate leaf[field.1.2.840.113635.100.6.1.13] /* exists */ and certificate leaf[subject.OU] = DE8Y96K9QP) |
| Validate the Static Code Requirement |
Unchecked |
Under App or Server, click Add and configure:
| App/Service |
Access |
| SystemPolicyAllFiles |
Allowed |
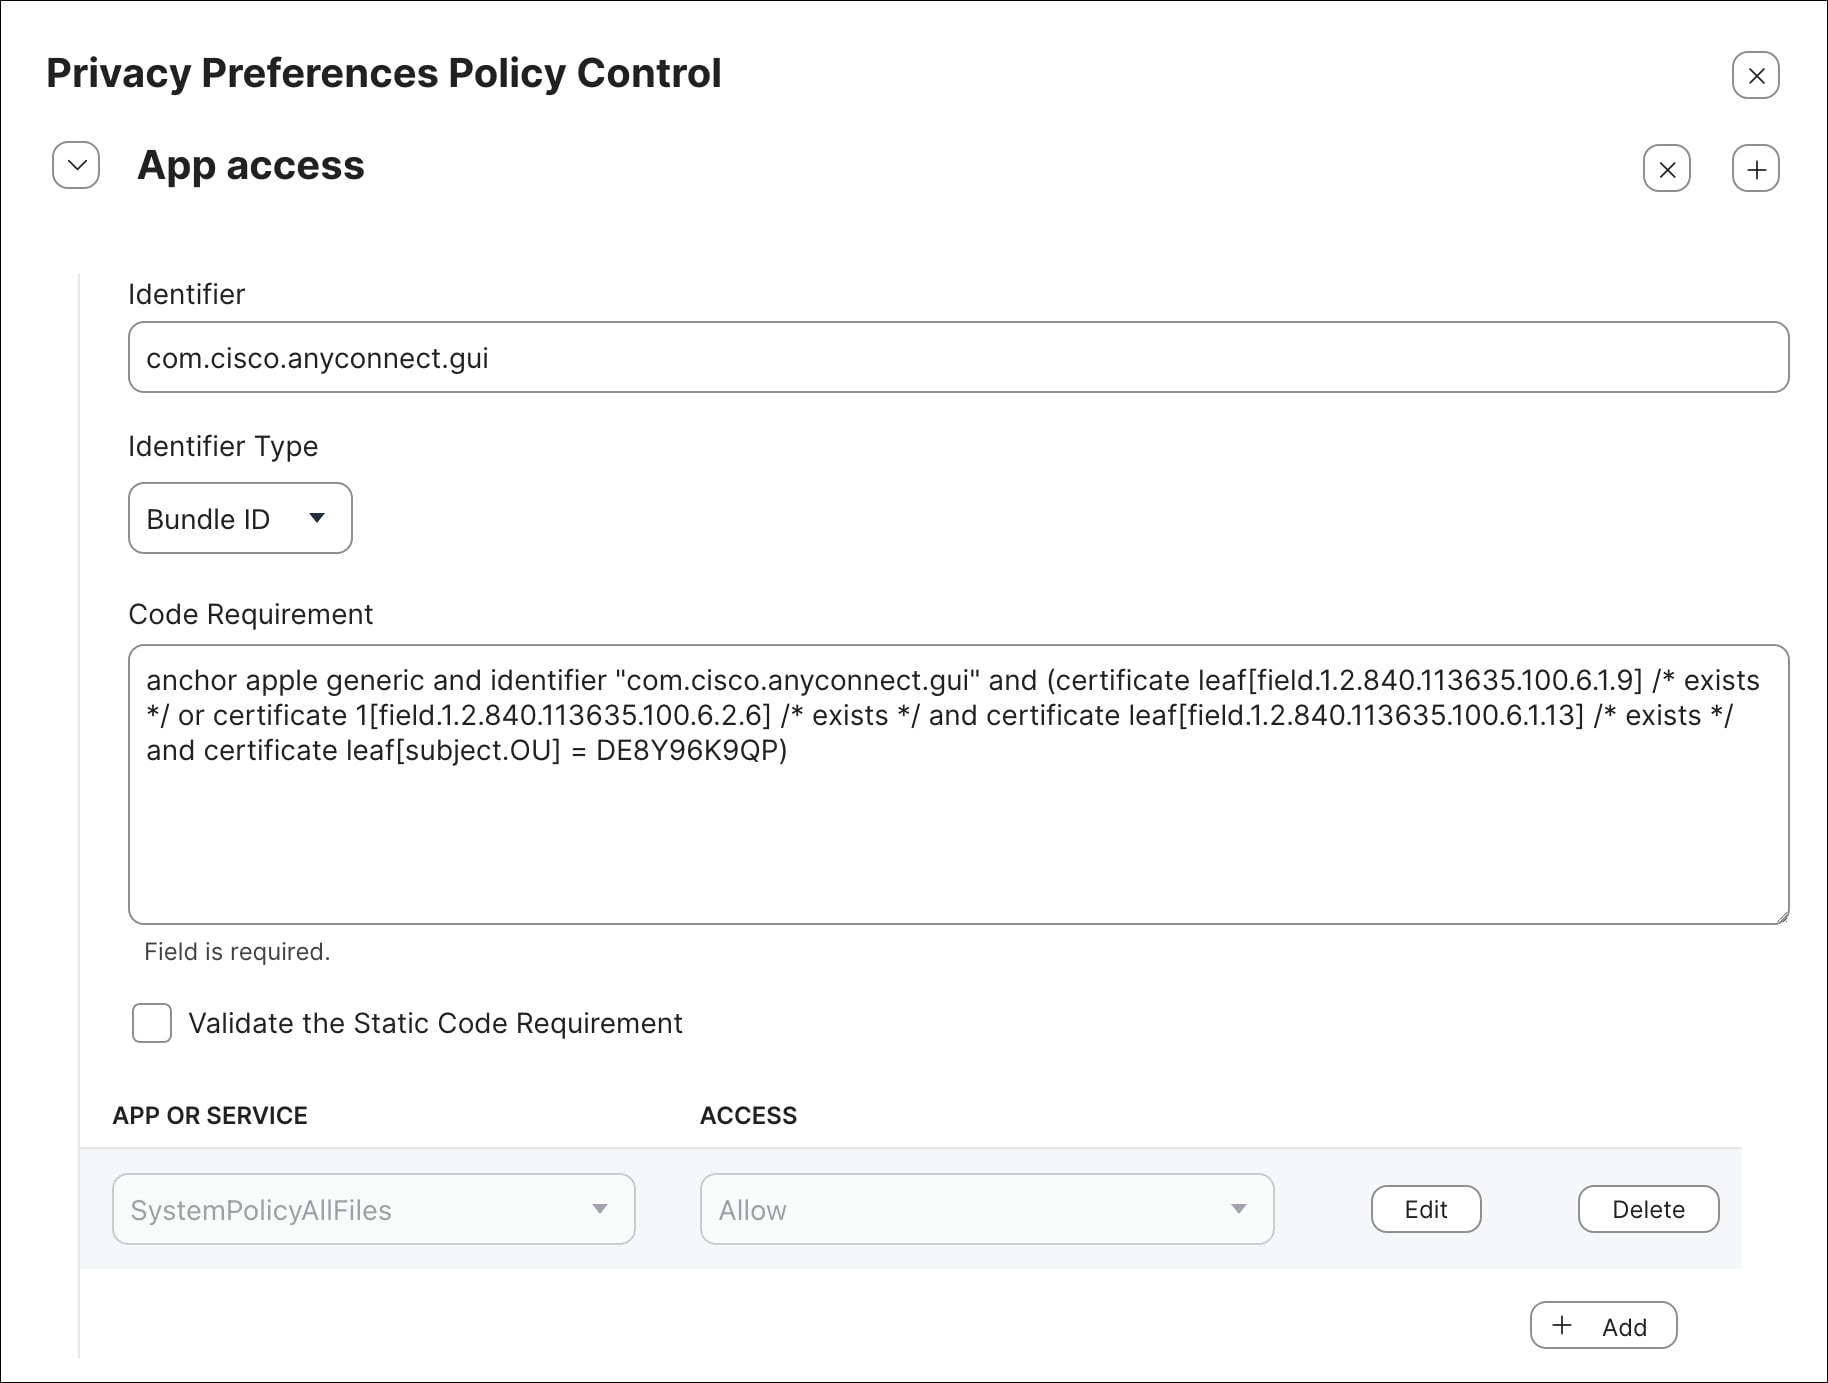
App Access Entry 2 – Cisco Secure Client VPN Service
| Setting |
Value |
| Identifier |
com.cisco.secureclient.vpn.service |
| Identifier Type |
Bundle ID |
| Code Requirement |
anchor apple generic and identifier "com.cisco.secureclient.vpn.service" and (certificate leaf[field.1.2.840.113635.100.6.1.9] /* exists */ or certificate 1[field.1.2.840.113635.100.6.2.6] /* exists */ and certificate leaf[field.1.2.840.113635.100.6.1.13] /* exists */ and certificate leaf[subject.OU] = DE8Y96K9QP) |
| Validate the Static Code Requirement |
Checked |
Under App or Server, click Add and configure:
| App/Service |
Access |
| SystemPolicyAllFiles |
Allowed |
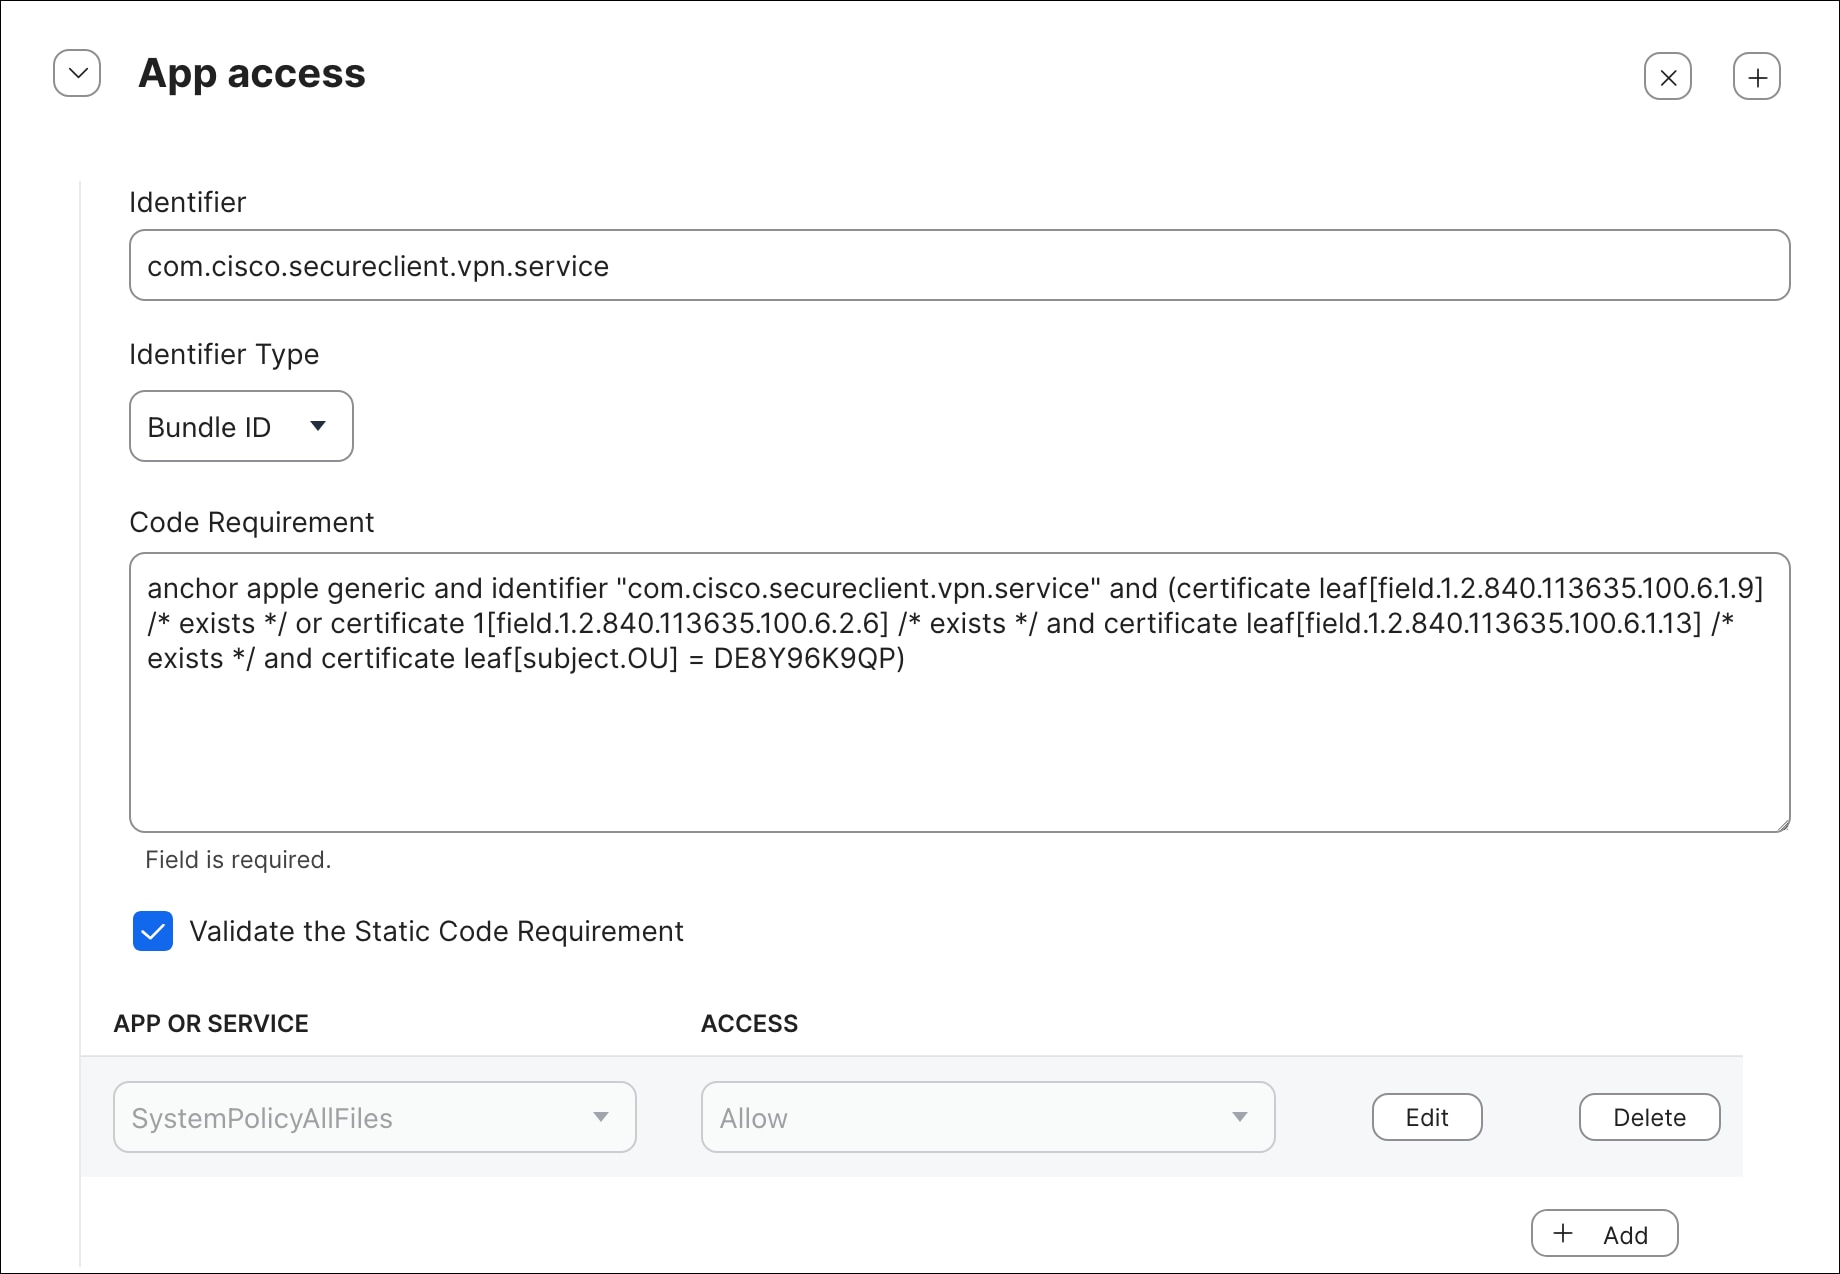
Step 7. Click the System Extensions payload in the left sidebar under the Options tab and click Configure. The system extensions payload pre-approves the Cisco Secure Client kernel-level extensions required for VPN and network filtering functionality, preventing macOS from presenting the user with a system extension approval prompt during installation or reinstallation. Click the + icon to create a new entry. Repeat until you have four entries in total. Configure each as follows:
Note: Four separate entries are required because each entry corresponds to a distinct system extension permission type in macOS. Together they ensure that the Cisco extensions are allowed, typed as network extensions, removable by MDM, and non-removable by the end user, providing both operational flexibility and tamper resistance at the system extension level.
Create four Allowed System Extensions and Team IDs by clicking the + icon three times, then use the following settings for each:
Entry 1 – Allowed System Extensions
| Setting |
Value |
| Display Name |
Cisco Secure Client – System Extensions |
| System Extension Types |
Allowed system extensions |
| Team Identifier |
DE8Y96K9QP |
| Allowed System Extensions |
com.cisco.anyconnect.macos.acsockext |
|
|
com.cisco.anyconnect.macos.acsock |
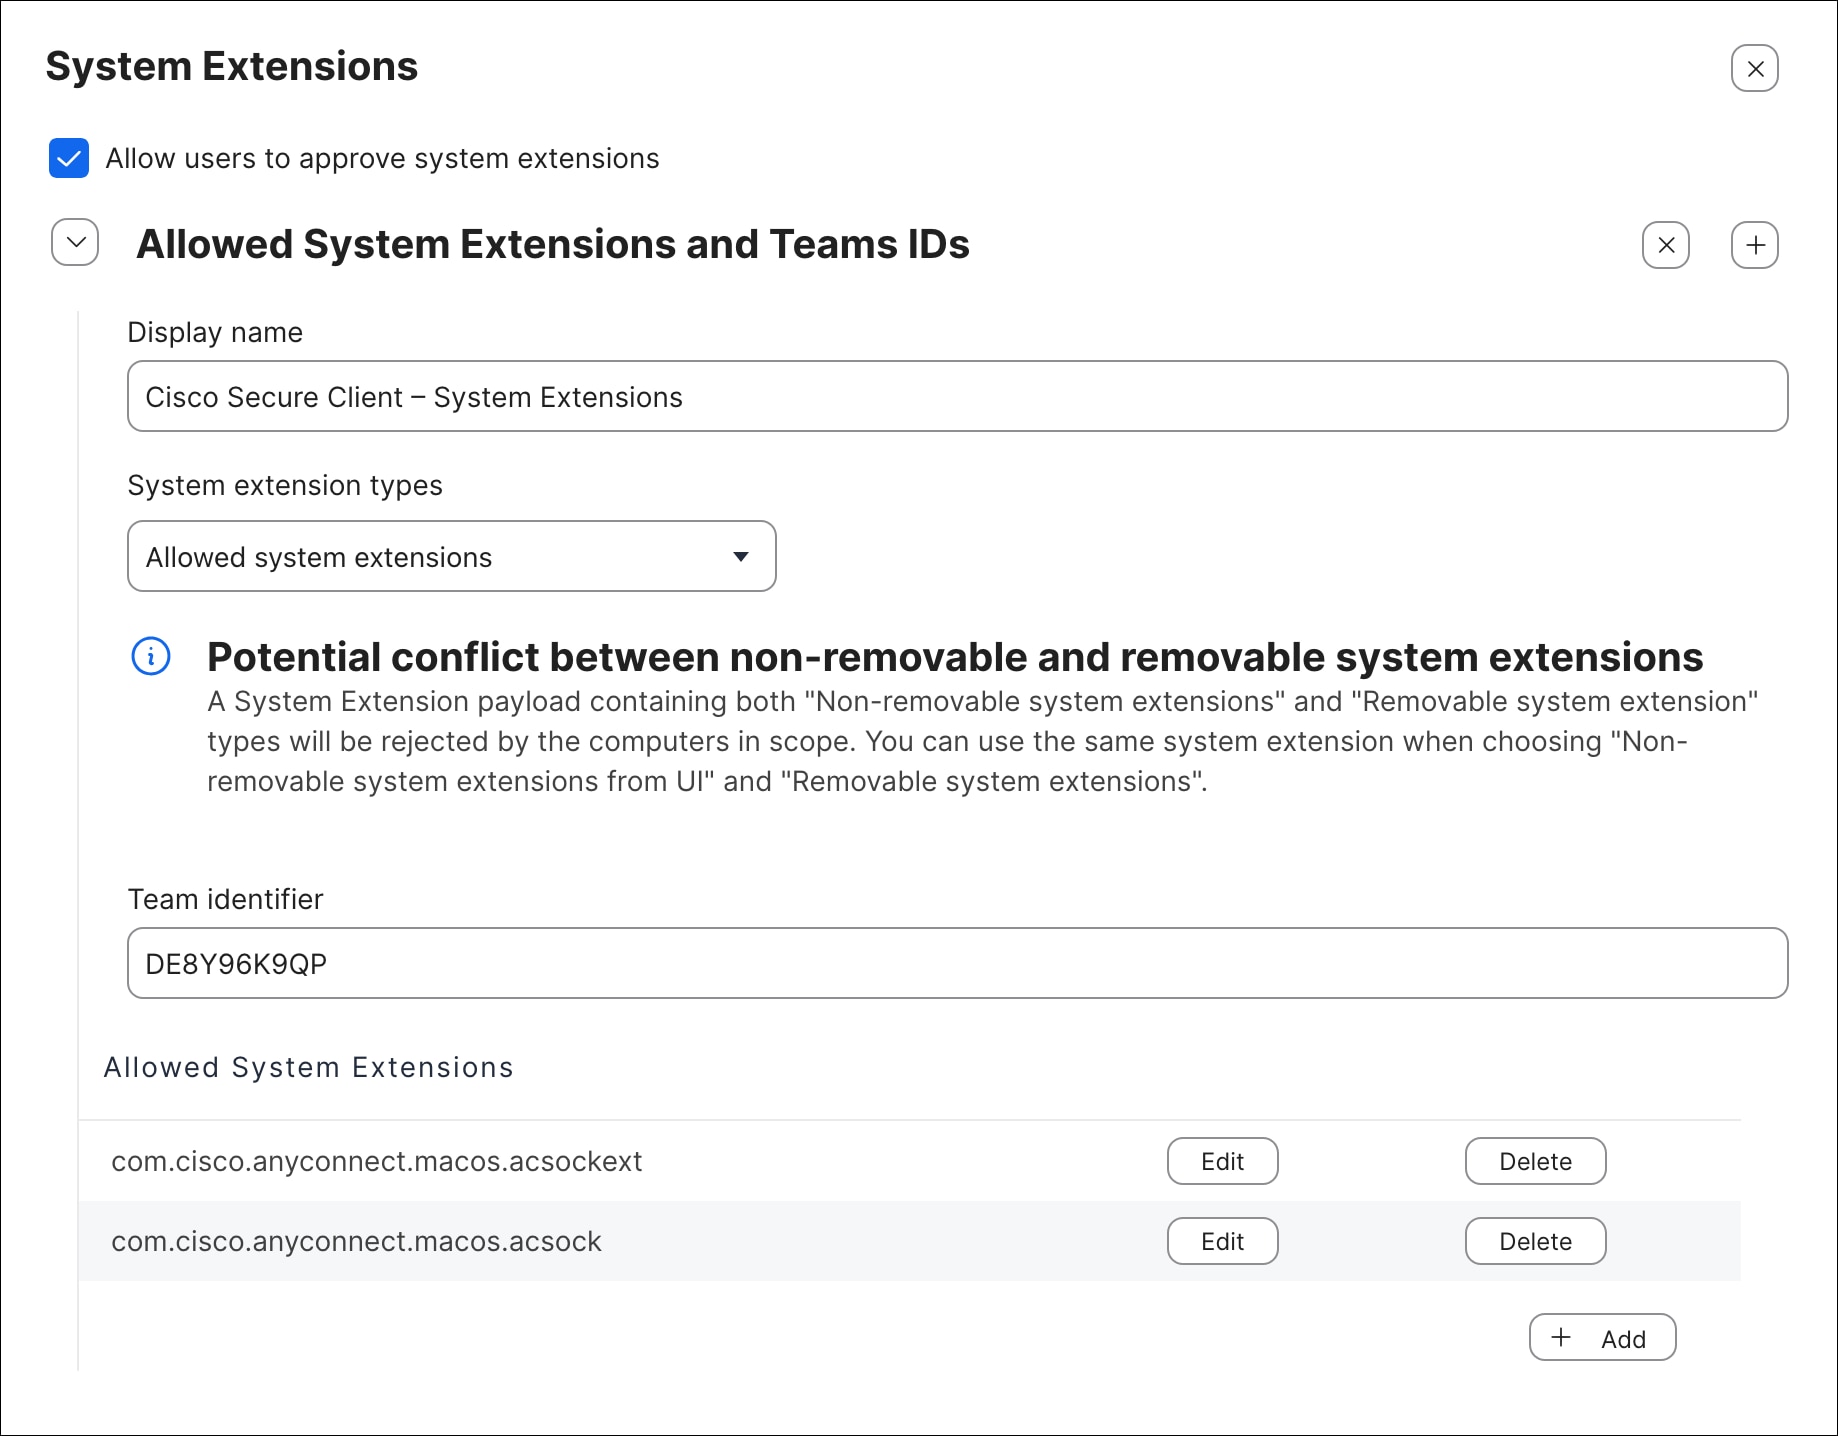
Entry 2 – Allowed System Extension Types
| Setting |
Value |
| Display Name |
Cisco Secure Client – System Extensions |
| System Extension Types |
Allowed system extension types |
| Team Identifier |
DE8Y96K9QP |
| Allowed System Extensions |
Network Extension (checked) |
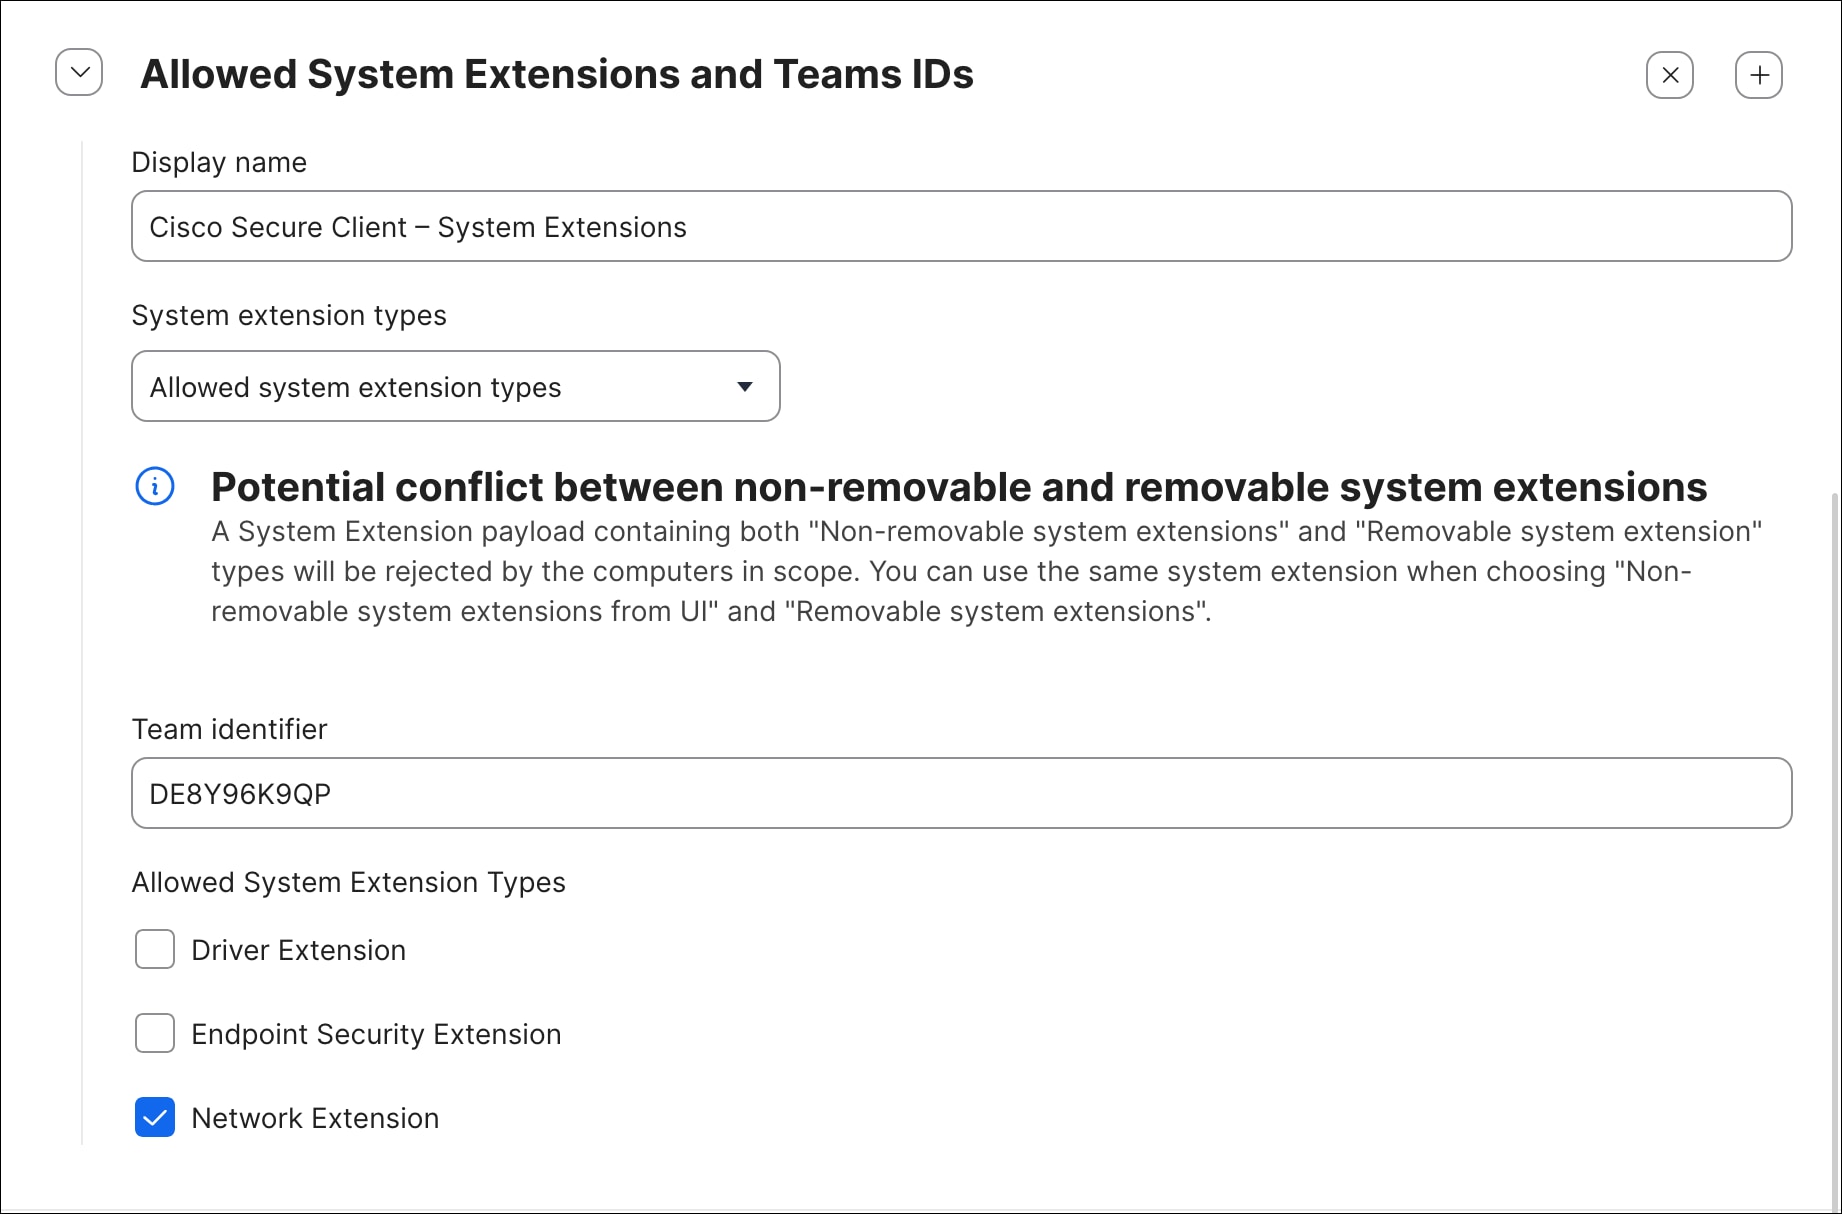
Entry 3 – Removable System Extensions
| Setting |
Value |
| Display Name |
Cisco Secure Client – System Extensions |
| System Extension Types |
Removable system extensions |
| Team Identifier |
DE8Y96K9QP |
| Allowed System Extensions |
com.cisco.anyconnect.macos.acsockext |
|
|
com.cisco.anyconnect.macos.acsock |
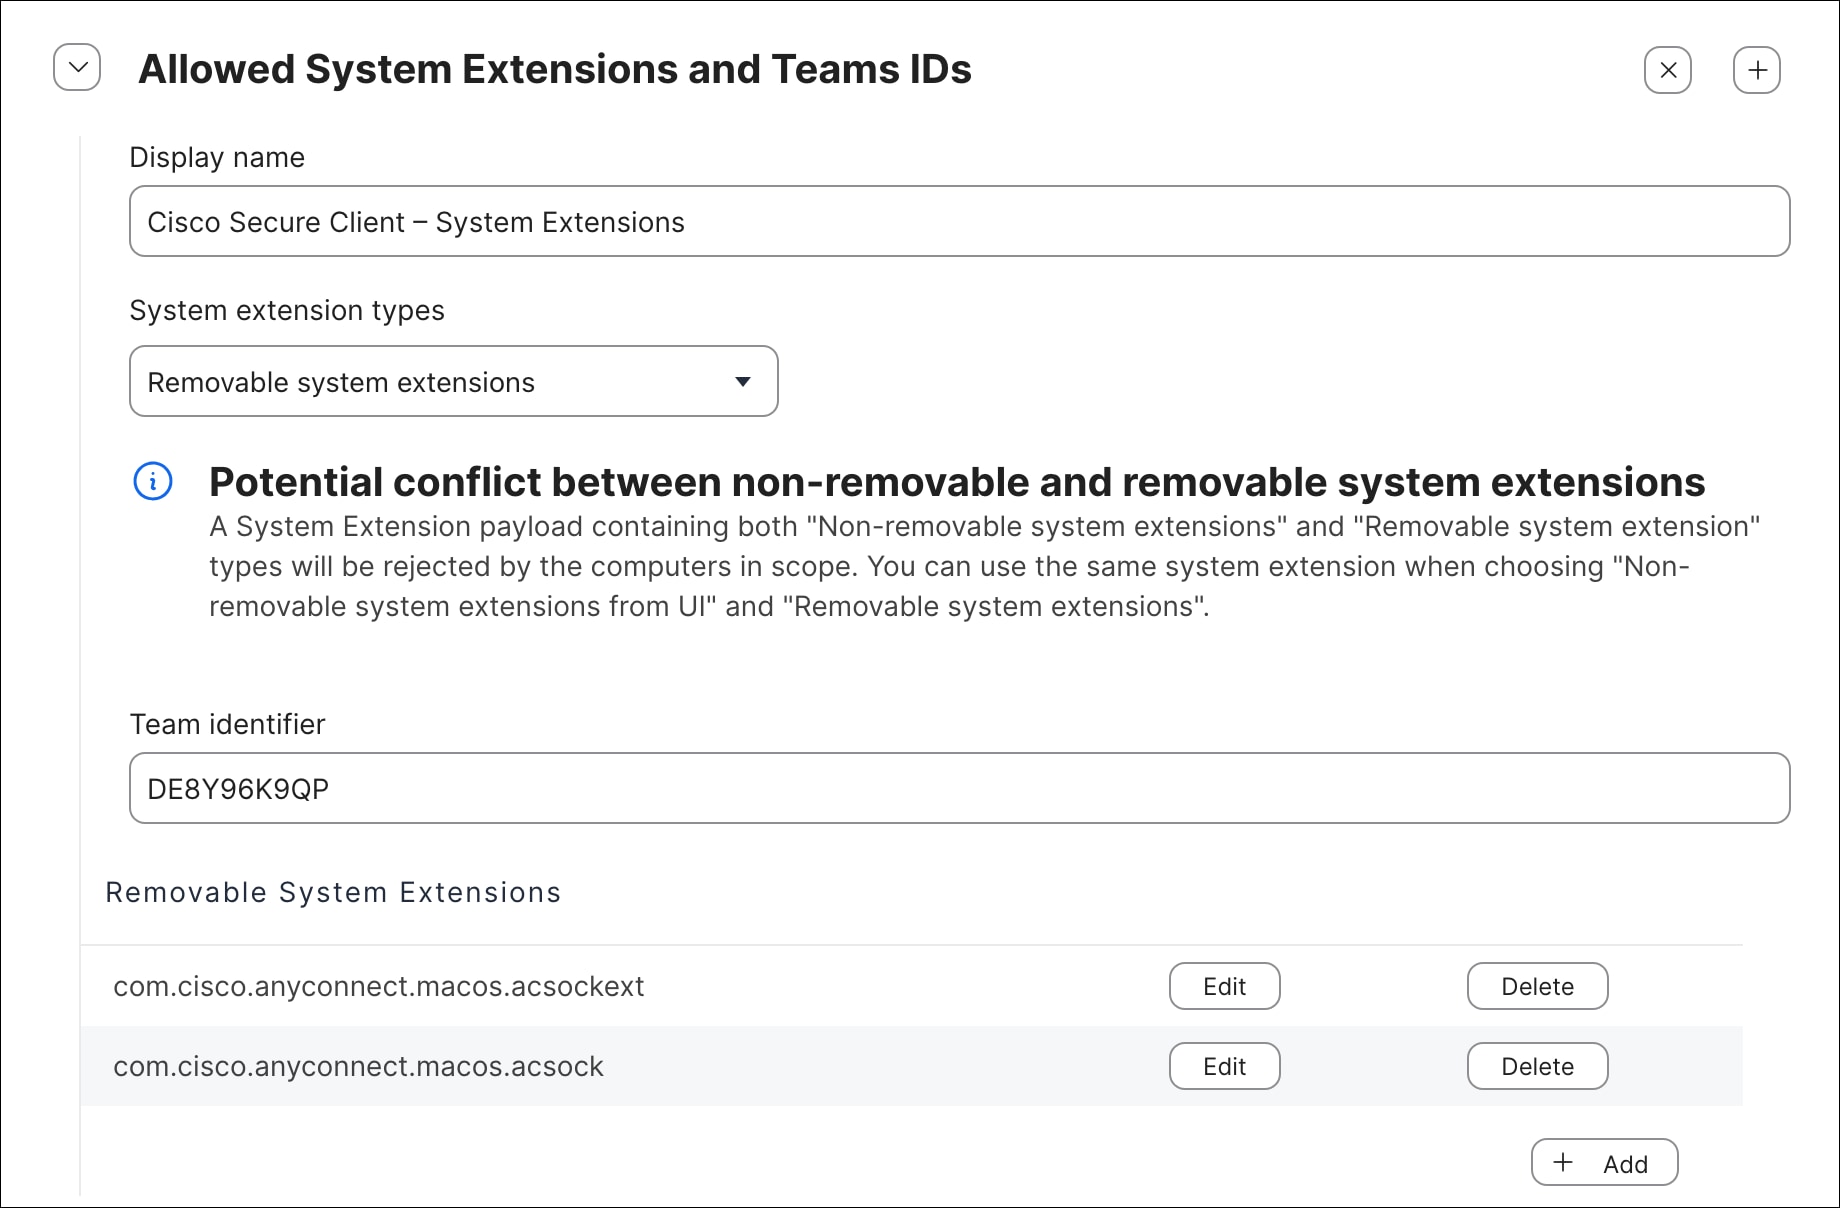
Entry 4 – Non-Removable System Extensions
| Setting |
Value |
| Display Name |
Cisco Secure Client – System Extensions |
| System Extension Types |
Non-removable system extensions from UI |
| Team Identifier |
DE8Y96K9QP |
| Allowed System Extensions |
com.cisco.anyconnect.macos.acsockext |
|
|
com.cisco.anyconnect.macos.acsock |
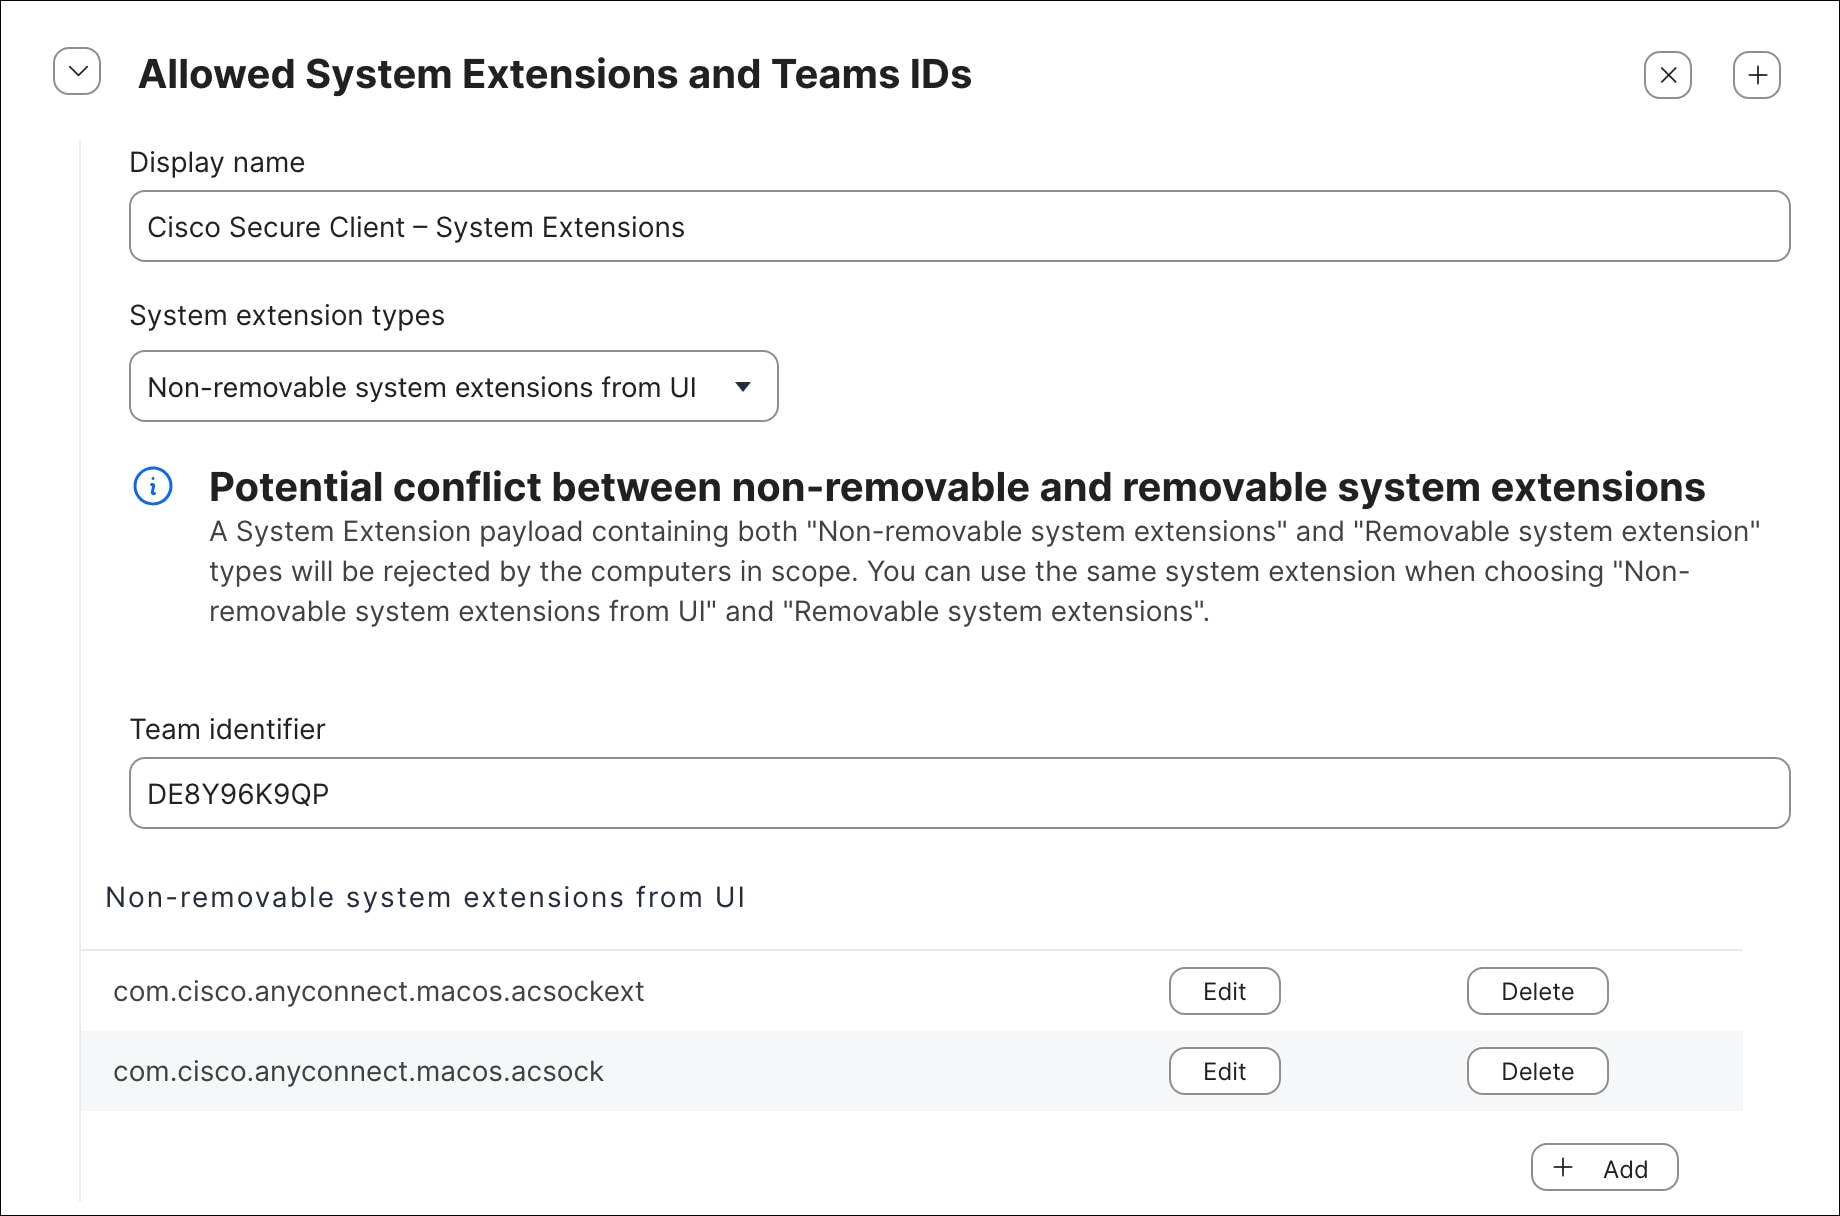
Note: Entries 3 and 4 serve complementary tamper resistance purposes. The Removable system extensions entry permits the MDM to remove and reinstall the extensions programmatically during an enforcement-triggered reinstallation. The Non-removable system extensions from UI entry simultaneously prevents the end user from removing the extensions through System Settings, ensuring that the extensions remain in place unless explicitly removed by the MDM. This combination is important for the enforcement system, as it allows the module enforcement script to perform clean reinstallations while preventing users from manually disabling CSC system extensions.
Step 8. Click the Scope tab at the top of the configuration profile editor. In the Targets section, select the computers and/or groups the profile will apply to. For initial testing, scope the profile to a single test device before expanding to the broader managed fleet.
Step 9. Click Save in the bottom right corner when all configuration is complete.
After saving, allow a few minutes for the profile to be delivered to the scoped test device via Jamf Pro.
Validating that the enforcement scripts and tamper resistance configuration function correctly is an essential step before rolling out the configuration to the broader device fleet. Unlike the Windows validation process, which uses PsExec to replicate the system account execution context used by Intune, macOS validation can be performed directly from the Terminal application using standard administrative commands. Because the Jamf Pro enforcement scripts run as root via Jamf's elevated execution context, the sudo command can be used to replicate this behavior during testing, ensuring that the validation results accurately reflect how the scripts will behave when triggered by Jamf Pro in production. In addition to executing the scripts directly, Jamf Pro provides the sudo jamf policy -event <trigger> command, which allows individual policies to be invoked on demand from the Terminal without waiting for the next scheduled check-in, enabling a faster and more targeted validation workflow. The following steps walk through a complete end-to-end validation of the enforcement system, covering initial state verification, simulated configuration drift and remediation, deferral threshold behavior, and VPN-aware enforcement logic.
Step 1. On the designated test device, verify that Cisco Secure Client has been successfully installed by all configured Jamf Pro policies. Confirm that the VPN, Umbrella, and ZTA modules are all present and operational before proceeding, as the validation steps that follow depend on all three modules being installed and running.
Step 2. Click the Apple icon in the top left corner of the screen and select System Settings.

Step 3. Navigate to General > Login Items & Extensions.
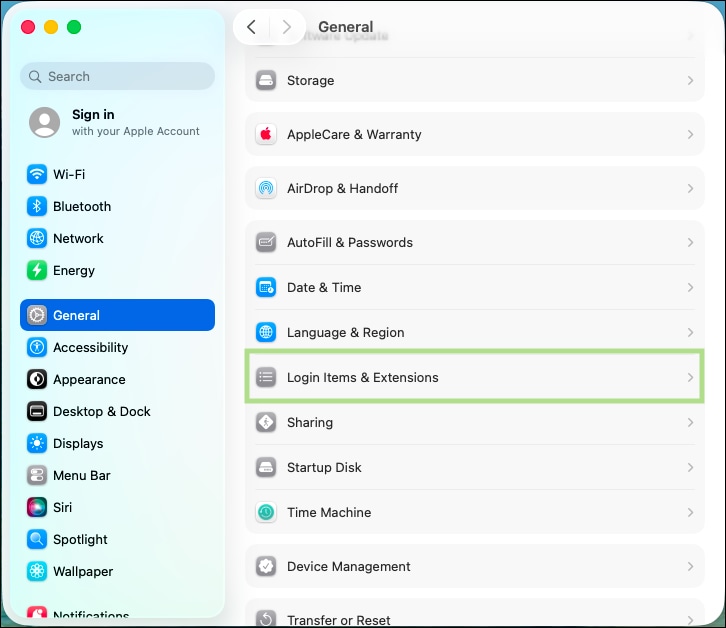
Step 4. Under App Background Activity, verify that the Apps for Secure Client and Duo Security have been “configured by a profile” and are not able to be disabled.

Step 5. Scroll down to Extensions. Click the Info button next to Cisco Secure Client – Socket Filter.
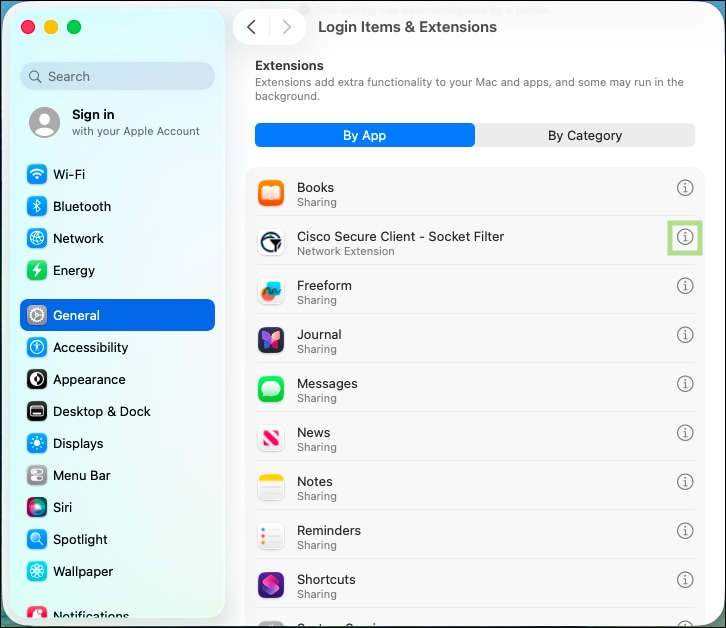
Step 6. Verify that the Network Extension cannot be disabled.
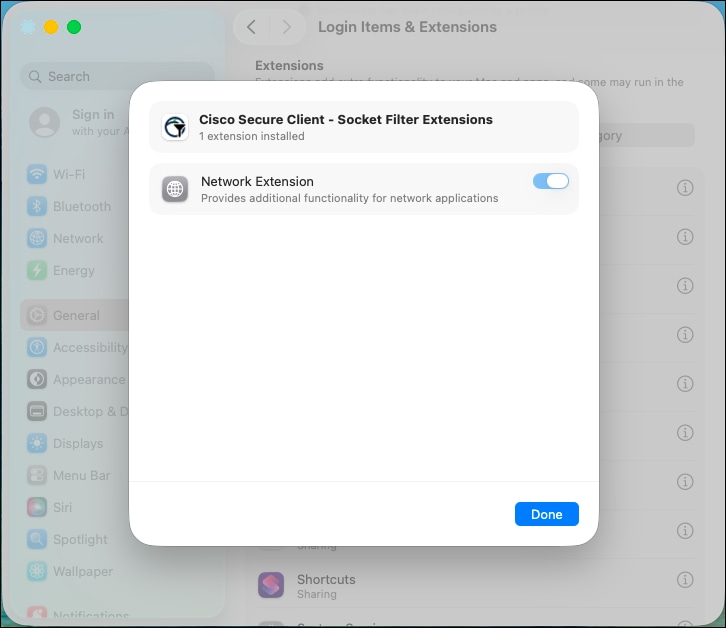
Step 7. Navigate to System Settings > Network and click Filters.

Step 8. Verify that the Cisco Secure Client Content Filter is listed and displayed as Enabled. Confirm that both the DNS and Transparent Proxy options are enabled as well. Attempt to disable either option and verify that it immediately re-enables.
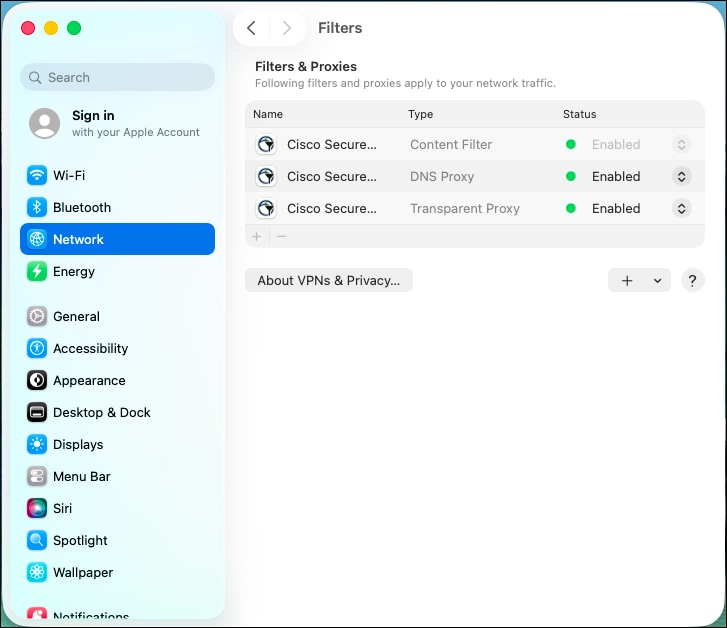
Step 9. Navigate to System Settings > Privacy & Security and click File & Folders.
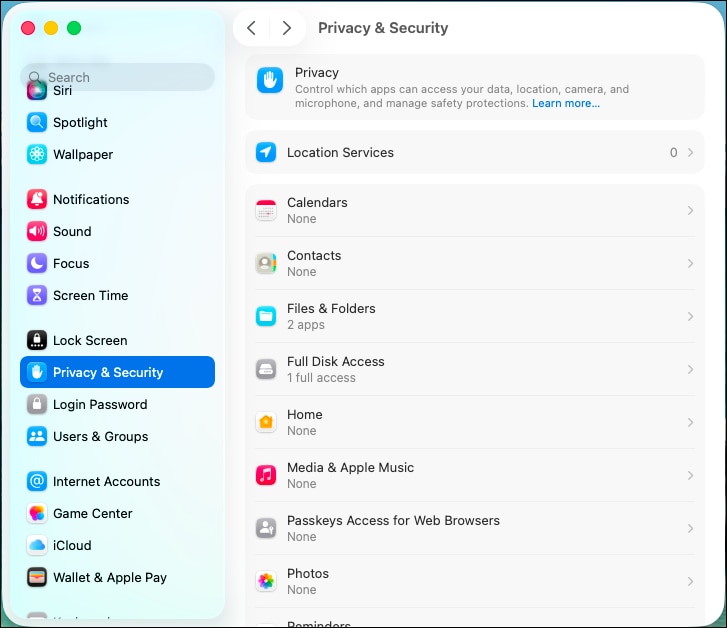
Step 10. Verify that Cisco Secure Client and Cisco Secure Client - AnyConnect VPN Service are both listed and have Full Disk Access granted. Confirm that these entries are enforced by the MDM profile and cannot be toggled off by the user, validating that the Privacy Preferences Policy Control (PPPC) payload in the configuration profile is correctly pre-authorizing the required permissions for the CSC processes.
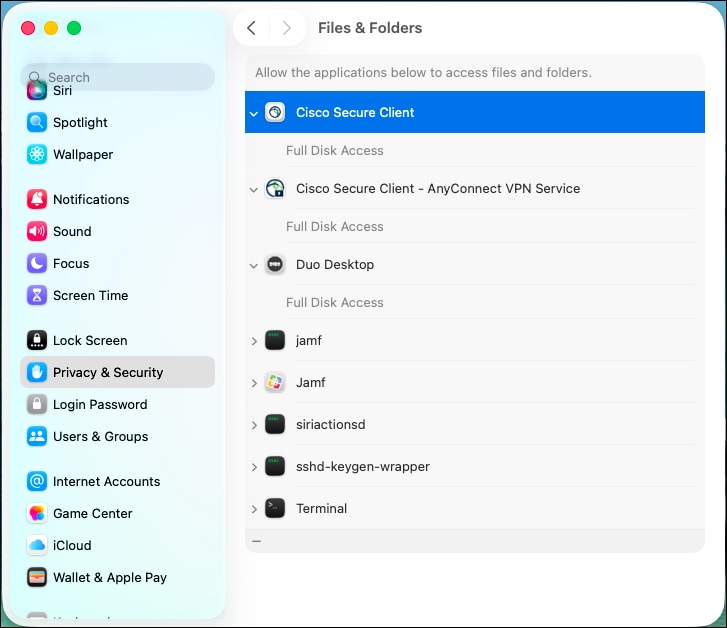
Step 11. Cisco Secure Client on macOS is inherently resistant to service interruption because terminated processes are automatically restarted by launchd. To simulate a module being absent for the purposes of validating the enforcement framework, the most reliable approach is to uninstall a module directly. Open Terminal and navigate to the Cisco Secure Client binary directory, then execute the ZTA module uninstall script to remove the ZTA module from the endpoint:
cd /opt/cisco/secureclient/bin
sudo ./zta_uninstall.sh
This simulates a real-world scenario where a module has been removed from the endpoint, whether through manual uninstallation, a failed update, or file corruption, and establishes the conditions needed to validate the module enforcement script's detection and remediation behavior in the following step.
Step 12. With the ZTA module uninstalled, trigger the orchestrator policy manually using the Jamf Pro custom event trigger to initiate a full enforcement cycle:
sudo jamf policy -event csc_orchestrate
The output should appear similar to the following:
Checking for policies triggered by "csc_orchestrate" for user "lee"...
Executing Policy CSC - Orchestrator
Running script csc_enforcement_orchestrator.sh...
Script exit code: 0
Script result: [2026-03-31 11:08:23] [orchestrator] Orchestrator started
Checking for policies triggered by "csc_enforce_modules" for user "lee"...
Executing Policy CSC - Enforce Secure Client & Modules
Running script csc_module_enforcement.sh...
Script exit code: 0
Script result: [2026-03-31 11:08:28] [csc_enforce_modules] VPN is NOT connected. Continuing...
[2026-03-31 11:08:28] [csc_enforce_modules] Installed version: 5.1.15.1561
[2026-03-31 11:08:28] [csc_enforce_modules] Required version: 5.1.14.145
[2026-03-31 11:08:28] [csc_enforce_modules] Secure Client is up to date. Checking services...
[2026-03-31 11:08:28] [csc_enforce_modules] com.cisco.secureclient.vpn.service.agent is running...
[2026-03-31 11:08:28] [csc_enforce_modules] com.cisco.secureclient.zta.app.agent is not running...
[2026-03-31 11:08:28] [csc_enforce_modules] csc_swgagent found
[2026-03-31 11:08:28] [csc_enforce_modules] csc_swgagent is running
[2026-03-31 11:08:28] [csc_enforce_modules] acumbrellaagent found
[2026-03-31 11:08:28] [csc_enforce_modules] acumbrellaagent is running
[2026-03-31 11:08:28] [csc_enforce_modules] vpnagentd found
[2026-03-31 11:08:28] [csc_enforce_modules] vpnagentd is running
[2026-03-31 11:08:28] [csc_enforce_modules] com.cisco.secureclient.vpn.service.agent.plist found
[2026-03-31 11:08:28] [csc_enforce_modules] Recorded needs_action: notInstalled: Launch daemons not running: com.cisco.secureclient.zta.app.agent; Secure Client binaries missing: csc_zta_agent; Secure Client files missing: com.cisco.secureclient.zta.app.agent.plist (preserved deferral_count: 0)
[2026-03-31 11:08:28] [csc_enforce_modules] Found: 3 reasons to remediate Secure Client
[2026-03-31 11:08:28] [csc_enforce_modules] Launch daemons not running: com.cisco.secureclient.zta.app.agent
[2026-03-31 11:08:28] [csc_enforce_modules] Secure Client binaries missing: csc_zta_agent
[2026-03-31 11:08:28] [csc_enforce_modules] Secure Client files missing: com.cisco.secureclient.zta.app.agent.plist
[2026-03-31 11:08:28] [csc_enforce_modules] Files missing or version mismatch - proceeding directly to Jamf policy
[2026-03-31 11:08:28] [csc_enforce_modules] Performing full uninstall of Cisco Secure Client...
[2026-03-31 11:08:28] [csc_enforce_modules] Running Cisco Secure Client uninstall script...
Exiting Cisco Secure Client
Uninstalling Cisco Secure Client - Umbrella...
Successfully removed Cisco Secure Client - Umbrella from the system.
Uninstalling Cisco Secure Client...
Successfully removed Cisco Secure Client from the system.
[2026-03-31 11:08:37] [csc_enforce_modules] Uninstall script completed
[2026-03-31 11:08:40] [csc_enforce_modules] No Cisco Secure Client components detected
[2026-03-31 11:08:40] [csc_enforce_modules] Uninstall validated successfully
[2026-03-31 11:08:40] [csc_enforce_modules] Running Jamf policy with event trigger: deploy_vpn_profile
[2026-03-31 11:08:44] [csc_enforce_modules] Policy completed successfully
[2026-03-31 11:08:44] [csc_enforce_modules] Running Jamf policy with event trigger: deploy_zta_json
[2026-03-31 11:08:48] [csc_enforce_modules] Policy completed successfully
[2026-03-31 11:08:48] [csc_enforce_modules] Running Jamf policy with event trigger: deploy_umbrella_json
[2026-03-31 11:08:51] [csc_enforce_modules] Policy failed or did not complete successfully (script returned non-zero)
[2026-03-31 11:08:51] [csc_enforce_modules] Running Jamf policy with event trigger: csc_install
[2026-03-31 11:09:16] [csc_enforce_modules] Policy completed successfully
...
[2026-03-31 11:09:39] [orchestrator] Deferral threshold not yet reached
The output above demonstrates the full Tier 3 remediation flow triggered by the detection of missing ZTA module components. The key events to note in the log output are as follows:
● VPN connection check: The script confirms that VPN is not connected (VPN is NOT connected. Continuing...) and proceeds with remediation immediately without deferring, which is the expected behavior when the VPN is not active.
● Version compliance: The installed version (5.1.15.1561) meets or exceeds the configured minimum version (5.1.14.145), so no version-related remediation is required.
● ZTA daemon and binary detection: The script identifies that com.cisco.secureclient.zta.app.agent is not running, that the csc_zta_agent binary is missing, and that the com.cisco.secureclient.zta.app.agent.plist file is absent — three separate indicators that the ZTA module has been removed. These are recorded in the state file as needs_action.
● Tier 3 remediation triggered: Because the missing files indicate an incomplete installation rather than a recoverable service or binary issue, the script correctly escalates directly to Tier 3, performing a full uninstall of all remaining CSC components before proceeding with reinstallation.
● Configuration pre-staging: Before executing the CSC installer policy, the script triggers the VPN profile (deploy_vpn_profile) and ZTA configuration (deploy_zta_json) deployment policies to stage the configuration files in advance, ensuring they are in place when the installer runs. Note that the Umbrella deployment policy (deploy_umbrella_json) reports a non-zero exit code at this stage — this is expected behavior in some environments where the Umbrella module directory does not yet exist prior to installation, and the Umbrella configuration will be redeployed in the subsequent enforcement cycle.
● CSC reinstallation: The CSC installer policy (csc_install) is triggered last and completes successfully, restoring the full Cisco Secure Client installation.
● Configuration enforcement: Following reinstallation, the orchestrator triggers the VPN, Umbrella, and ZTA configuration enforcement policies. The VPN and ZTA configurations are verified as correct (hash match), while the Umbrella OrgInfo.json is detected as missing and redeployed by the Umbrella write script. The vpnagentd process is then terminated and restarted by launchd to force the Umbrella module to reload with the newly deployed configuration.
● Deferral threshold not yet reached: The orchestrator logs Deferral threshold not yet reached at the end of the cycle, indicating that while the Umbrella configuration issue has been recorded in the state file, the deferral count has not yet exceeded the configured threshold. The issue will be evaluated on the next enforcement cycle.
Note: The installed version displayed in this log entry (5.1.15.1561) reflects the version of the Cisco Secure Client GUI application bundle as read from /Applications/Cisco/Cisco Secure Client.app/Contents/Info.plist, rather than the version of the individual module installer packages. In this example, the module installer packages are versioned 5.1.15.287, which is a different value from the GUI version reported here. The enforcement script uses the GUI version exclusively for compliance comparison against the configured minimum version string. The module installer package version is not evaluated. Administrators should be aware of this distinction when interpreting enforcement logs, as a version number that appears unexpectedly high or low in the log output relative to the downloaded installer package version is normal and does not indicate an error. The required version (5.1.14.145) shown in the log reflects the value configured in Parameter 4 of the csc_module_enforcement.sh policy, and the comparison result (Secure Client is up to date) confirms that the installed GUI version meets or exceeds this minimum threshold.
Step 13. Trigger the orchestrator policy a second time to confirm that all modules are now fully installed, all services are running, and all configuration files are in their expected state following the reinstallation and remediation performed in the previous step:
sudo jamf policy -event csc_orchestrate
The output should appear similar to the following:
[2026-03-31 13:08:53] [orchestrator] Orchestrator started
...
[2026-03-31 13:08:59] [csc_enforce_modules] Secure Client installed, up to date, and running...
[2026-03-31 13:08:59] [csc_enforce_modules] Cleared state entry (no longer needs action)
...
[2026-03-31 13:09:03] [csc_enforce_vpn] Profile Cert_Profile.xml verified (hash match)
...
[2026-03-31 13:09:07] [csc_enforce_umbrella] Profile OrgInfo.json verified (hash match)
...
[2026-03-31 13:09:11] [csc_enforce_zta] Profile OrgID_ZTA_Enroll_Cert.json verified (hash match)
...
[2026-03-31 13:09:12] [orchestrator] Device is compliant
The orchestrator reports Device is compliant at the end of the cycle, confirming that all modules are installed and operational, all launch daemons and binaries are running, and all configuration files match their expected baseline hash values. This is the expected steady-state output that will be produced on every subsequent enforcement cycle when the endpoint is fully compliant.
Step 14. With the endpoint confirmed as compliant, simulate configuration drift by introducing deliberate modifications to each module's configuration files, replicating common real-world tampering scenarios. Make the following changes:
● VPN Module: Open the VPN XML profile at /opt/cisco/secureclient/vpn/profile/
● Umbrella Module: Delete the OrgInfo.json file from the Umbrella module directory at /opt/cisco/secureclient/umbrella/OrgInfo.json to simulate a missing configuration file.
● ZTA Module: Create a duplicate copy of the ZTA enrollment JSON file within the enrollment_choices folder at /opt/cisco/secureclient/zta/enrollment_choices/ to simulate the presence of an extraneous configuration file that could cause ZTA enrollment conflicts.
Step 15. Trigger the orchestrator policy again to confirm that the configuration enforcement scripts correctly detect and remediate each of the issues introduced in the previous step:
sudo jamf policy -event csc_orchestrate
The output should appear similar to the following:
[2026-03-31 13:14:48] [orchestrator] Orchestrator started
...
[2026-03-31 13:14:54] [csc_enforce_modules] Secure Client installed, up to date, and running...
[2026-03-31 13:14:54] [csc_enforce_modules] Cleared state entry (no longer needs action)
...
[2026-03-31 13:14:58] [csc_enforce_vpn] Hash mismatch for Cert_Profile.xml (local: 6b975fdd06fdbb3020892be53a07a78fb6dec2770d046e8c1554ff7547310169, expected: 676024c3e032549a24908a32f327f32696b1ac4f0d26748cb88fc7413cfb778b)
[2026-03-31 13:14:58] [csc_enforce_vpn] Recorded needs_action: Hash mismatch: Cert_Profile.xml
Checking for policies triggered by "deploy_vpn_profile" for user "lee"...
Executing Policy CSC - Deploy VPN Profile
Running script csc_write_vpn.sh...
Script exit code: 0
Script result: Creating SimpleXML
...
[2026-03-31 13:15:07] [csc_enforce_umbrella] OrgInfo.json not present at /opt/cisco/secureclient/umbrella/OrgInfo.json
[2026-03-31 13:15:09] [csc_enforce_umbrella] VPN is NOT connected
[2026-03-31 13:15:09] [csc_enforce_umbrella] Recorded needs_action: File missing: OrgInfo.json
[2026-03-31 13:15:09] [csc_enforce_umbrella] Deleted umbrella data folder
[2026-03-31 13:15:09] [csc_enforce_umbrella] Deleted umbrella SWG folder
Checking for policies triggered by "deploy_umbrella_json" for user "lee"...
Executing Policy CSC - Deploy Umbrella JSON
Running script csc_write_umbrella.sh...
Script exit code: 0
...
[2026-03-31 13:15:13] [csc_enforce_umbrella] Killing vpnagentd (PID: 316) so launchd restarts it with new config...
[2026-03-31 13:15:13] [csc_enforce_umbrella] Killed vpnagentd process: 316
[2026-03-31 13:15:15] [csc_enforce_umbrella] vpnagentd restarted by launchd (new PID: 2667)
...
[2026-03-31 13:15:19] [csc_enforce_zta] Checking for and removing extraneous .json files in /opt/cisco/secureclient/zta/enrollment_choices...
[2026-03-31 13:15:19] [csc_enforce_zta] Removing unwanted JSON file: /opt/cisco/secureclient/zta/enrollment_choices/OrgID_ZTA_Enroll_Cert copy.json
[2026-03-31 13:15:19] [csc_enforce_zta] Finished cleaning up .json files
[2026-03-31 13:15:19] [csc_enforce_zta] Profile OrgID_ZTA_Enroll_Cert.json verified (hash match)
...
[2026-03-31 13:15:20] [orchestrator] Deferral threshold not yet reached
The log output confirms that all three configuration issues introduced in Step 9 were correctly detected and remediated. The key events to note are as follows:
● VPN profile hash mismatch: The configuration enforcement script detects that the hash of Cert_Profile.xml no longer matches the expected baseline value and immediately triggers the VPN profile deployment policy (deploy_vpn_profile), which invokes the VPN write script to restore the correct profile content. The log entry Creating SimpleXML confirms that the write script executed successfully.
● Umbrella OrgInfo.json missing: The script detects that OrgInfo.json is absent from the expected path. Because the VPN is not connected, remediation proceeds immediately without deferral. The Umbrella data and SWG folders are deleted to ensure a clean state before the Umbrella write script redeploys the correct OrgInfo.json. The vpnagentd process is then terminated and restarted by launchd to force the Umbrella module to reload with the newly deployed configuration file.
● ZTA extraneous file cleanup: The script detects the duplicate ZTA enrollment JSON file in the enrollment_choices folder and removes it automatically before verifying that the primary enrollment file is present and matches its expected hash value. The primary file is confirmed as compliant (hash match) and no further remediation is required for the ZTA module.
● Deferral threshold not yet reached: The orchestrator records the Umbrella configuration issue in the state file and notes that the deferral threshold has not yet been exceeded. The issue will continue to be tracked across subsequent enforcement cycles until it is resolved or the threshold is reached.
Step 16. Trigger the orchestrator policy one additional time to confirm that all configuration issues remediated in the previous step have been fully resolved and that the endpoint has returned to a compliant state:
sudo jamf policy -event csc_orchestrate
Verify that all configuration enforcement scripts report a hash match for their respective configuration files and that the orchestrator logs Device is compliant at the end of the cycle, confirming that no further remediation is required.
Step 17. With the endpoint confirmed as fully compliant, the next phase of validation tests the VPN-aware deferral behavior of the enforcement framework. Establish an active VPN connection using Cisco Secure Client on the test device before proceeding. Once the VPN connection is confirmed as active, simulate a configuration issue by deleting the Umbrella OrgInfo.json file:
sudo rm /opt/cisco/secureclient/umbrella/OrgInfo.json
Step 18. With the VPN actively connected and the Umbrella configuration in a non-compliant state, trigger the orchestrator policy:
sudo jamf policy -event csc_orchestrate
The output should appear similar to the following:
[2026-03-31 13:19:37] [orchestrator] Orchestrator started
...
[2026-03-31 13:19:43] [csc_enforce_modules] VPN is connected - will defer remediation after compliance checks...
...
[2026-03-31 13:19:43] [csc_enforce_modules] Secure Client installed, up to date, and running...
[2026-03-31 13:19:43] [csc_enforce_modules] Cleared state entry (no longer needs action)
...
[2026-03-31 13:19:52] [csc_enforce_umbrella] OrgInfo.json not present at /opt/cisco/secureclient/umbrella/OrgInfo.json
[2026-03-31 13:19:54] [csc_enforce_umbrella] VPN is connected
[2026-03-31 13:19:54] [csc_enforce_umbrella] Recorded needs_action: File missing: OrgInfo.json
[2026-03-31 13:19:54] [csc_enforce_umbrella] Incremented deferral count to 1 (VPN connected)
[2026-03-31 13:19:54] [csc_enforce_umbrella] VPN connected - deferring remediation for umbrella
...
[2026-03-31 13:19:58] [csc_enforce_zta] Profile OrgID_ZTA_Enroll_Cert.json verified (hash match)
...
[2026-03-31 13:19:59] [orchestrator] Deferral threshold not yet reached
The log output confirms that the VPN-aware deferral logic is functioning correctly. The key behaviors to note are as follows:
● Module enforcement deferral: The module enforcement script detects that the VPN is connected (VPN is connected - will defer remediation after compliance checks...) and adjusts its behavior accordingly. Because the CSC installation is healthy and no module-level remediation is required, the script completes its checks and exits without disrupting the VPN session.
● Umbrella configuration deferral: The configuration enforcement script detects that OrgInfo.json is missing, but upon checking the VPN connection state, determines that the VPN is active. Rather than proceeding with remediation — which would require deleting the Umbrella data folders and restarting vpnagentd, both of which would disrupt the active VPN session — the script records the issue in the state file, increments the deferral counter to 1, and exits gracefully without taking any remediation action.
● Deferral threshold not yet reached: The orchestrator evaluates the deferral count and elapsed time recorded in the state file and determines that neither the deferral count threshold nor the time-based threshold has been exceeded. No user notification is triggered at this stage, and the enforcement cycle exits without prompting the user.
Note that no user-facing notification is presented at this point, as the deferral thresholds have not yet been reached. The enforcement framework is designed to defer silently for a configured number of cycles before escalating to a user notification, balancing security compliance with user productivity.
Step 19. Inspect the shared state file to verify that the deferral count and compliance state are being tracked correctly across enforcement cycles. Run the following command in Terminal:
defaults read /Library/Application\ Support/SecureClientEnforcement/csc_enforcement_state.plist
The output should appear similar to the following:
{
"csc_enforce_modules" = {
"deferred_count" = 0;
"first_detected" = 0;
"last_checked" = 1774977583;
"needs_action" = 0;
reason = "Healthy - All checks passed";
};
"csc_enforce_umbrella" = {
"deferred_count" = 1;
"first_detected" = 1774977594;
"needs_action" = 1;
reason = "File missing: OrgInfo.json";
};
global = {
};
}
The state file confirms that the enforcement framework is correctly tracking the compliance state and deferral history for each monitored policy. The key values to note are as follows:
● csc_enforce_modules: The needs_action flag is set to 0 and the reason is Healthy - All checks passed, confirming that the module enforcement script found no issues with the CSC installation during the most recent cycle.
● csc_enforce_umbrella: The needs_action flag is set to 1 and the reason is File missing: OrgInfo.json, confirming that the Umbrella configuration issue is actively tracked. The deferred_count value of 1 reflects the single deferral that occurred in the previous step when the VPN was detected as connected. The first_detected value is a Unix timestamp recording the exact time the issue was first detected, which the orchestrator uses to calculate the elapsed time against the 4-hour time-based deferral threshold.
● global: The global dictionary is currently empty, indicating that no user-initiated deferrals have occurred yet. This key will be populated when the orchestrator presents a user notification and the user selects the defer option.
Step 20. Trigger the orchestrator policy two additional times, ensuring that the VPN remains connected between executions. Optionally, re-inspect the state file after each run to observe the deferred_count value incrementing with each cycle:
sudo jamf policy -event csc_orchestrate
defaults read /Library/Application\ Support/SecureClientEnforcement/csc_enforcement_state.plist
Verify that the deferred_count value for csc_enforce_umbrella increments by 1 on each run, progressing from 1 to 2 and then to 3. Once the deferral count reaches the configured threshold of 3, the orchestrator will determine that the threshold has been exceeded and will proceed to the user notification phase on the next enforcement cycle.
Step 21. On the third execution of the orchestrator policy, the deferral threshold will be exceeded and the orchestrator will present a user-facing notification via Cisco Notifier, prompting the user to either proceed with enforcement or defer further.
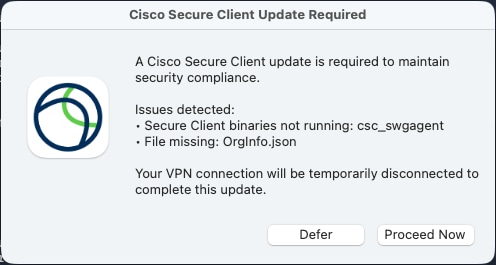
Two behaviors should be validated:
● Test the defer behavior: When the notification appears, click the Defer button and confirm that the VPN session remains active and uninterrupted. Verify in the Terminal output that the orchestrator logs a user deferral and exits without disconnecting the VPN or triggering any remediation policies. Check the state file to confirm that the global:user_deferrals count has been incremented.
● Test the proceed behavior: Trigger the orchestrator policy again and this time click Proceed Now when the notification appears. Confirm that the orchestrator proceeds to disconnect the VPN, triggers the Umbrella configuration enforcement policy to redeploy OrgInfo.json, and restarts vpnagentd to reload the Umbrella module with the new configuration. After the enforcement cycle completes, trigger the orchestrator one final time and verify that the endpoint is reported as Device is compliant, confirming that the Umbrella configuration has been successfully restored and the state file has been cleared.
| Acronym |
Definition |
| ACL |
Access Control List |
| ARP |
Add/Remove Programs |
| CA |
Certificate Authority |
| CSC |
Cisco Secure Client |
| DMG |
Disk Image |
| DNS |
Domain Name Service |
| GUI |
Graphical User Interface |
| JSON |
JavaScript Object Notation |
| JWT |
JSON Web Token |
| MDM |
Mobile Device Management |
| MSI |
Microsoft Installer |
| NVM |
Network Visibility Module |
| OS |
Operating System |
| PID |
Process Identifier |
| PKG |
Package |
| PPPC |
Privacy Preferences Policy Control |
| SAML |
Security Assertion Markup Language |
| SDDL |
Security Descriptor Definition Language |
| SWG |
Secure Web Gateway |
| TLS |
Transport Layer Security |
| VPN |
Virtual Private Network |
| XML |
Extensible Markup Language |
| ZTA |
Zero Trust Access |
| Product |
Platform |
Version |
| Cisco Secure Access |
Cloud Offering |
SaaS |
| Cisco Secure Client |
Software |
5.1.15.287 |
| Jamf Pro Cloud |
Cloud Offering |
SaaS |
| macOS Tahoe |
Software |
26.3 |
| Microsoft Intune |
Cloud Offering |
SaaS |
| Microsoft Win32 Content Prep Tool |
Software |
1.8.7 |
| Windows 11 Pro ARM64 |
Software |
10.0.26200 |