Managing Custom Reference Data

Feature Description

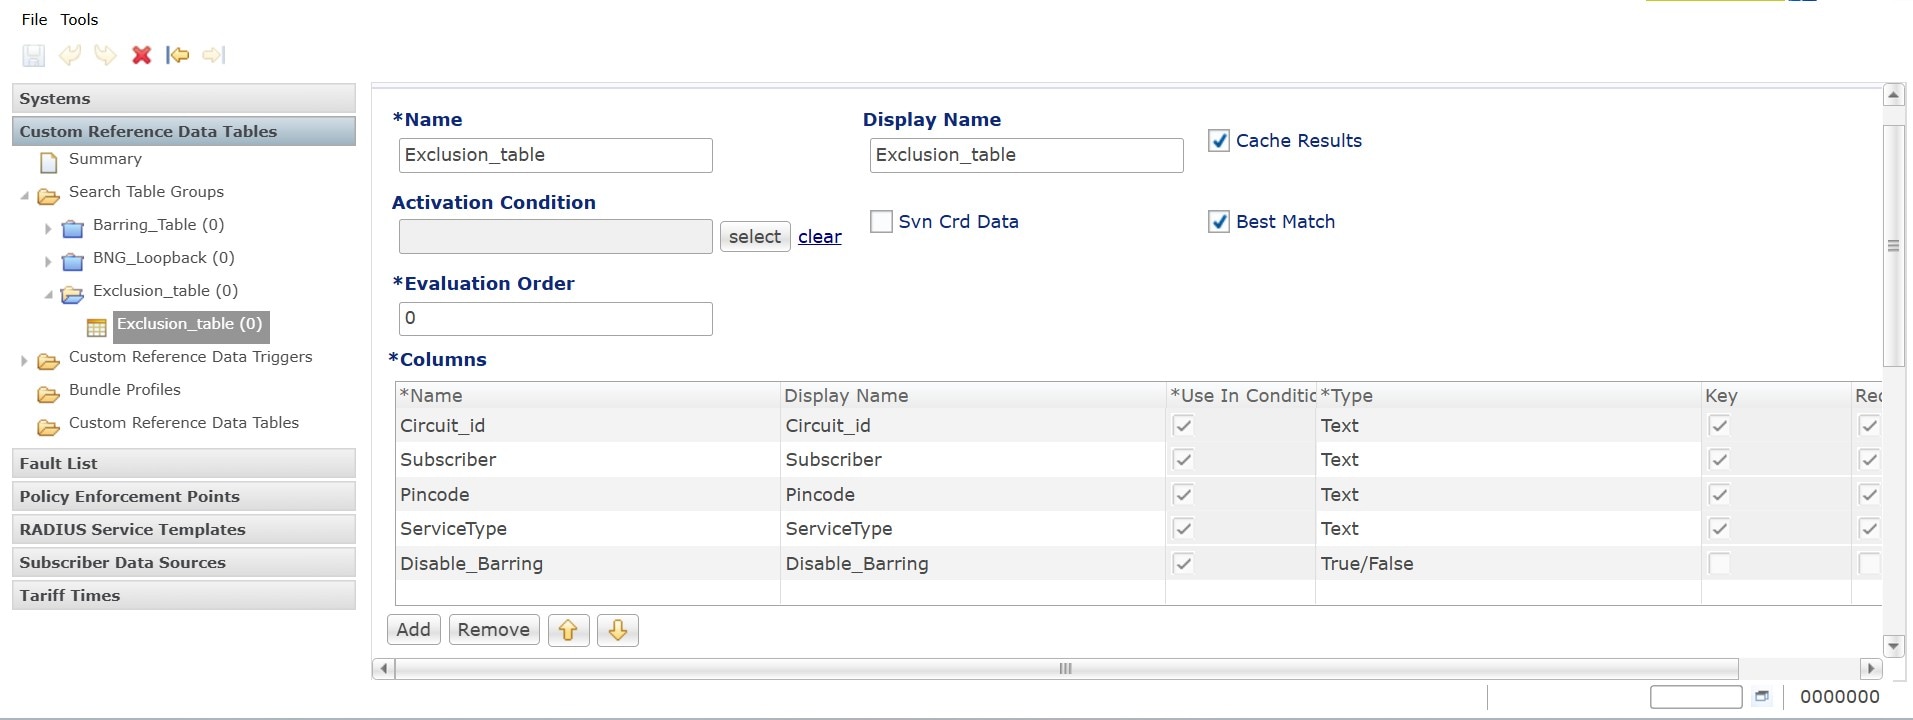
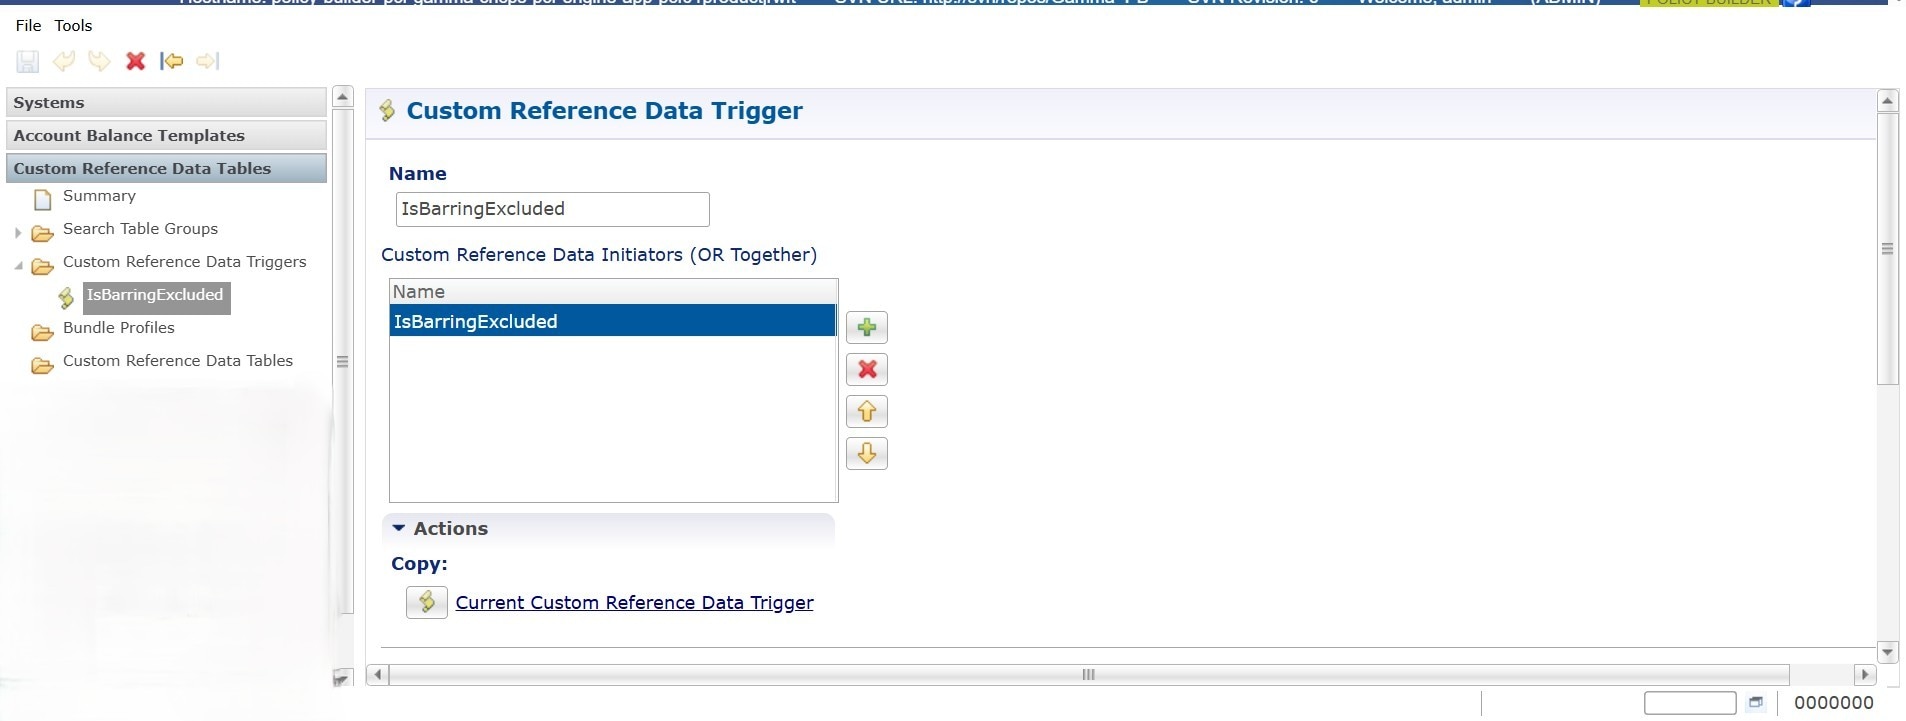
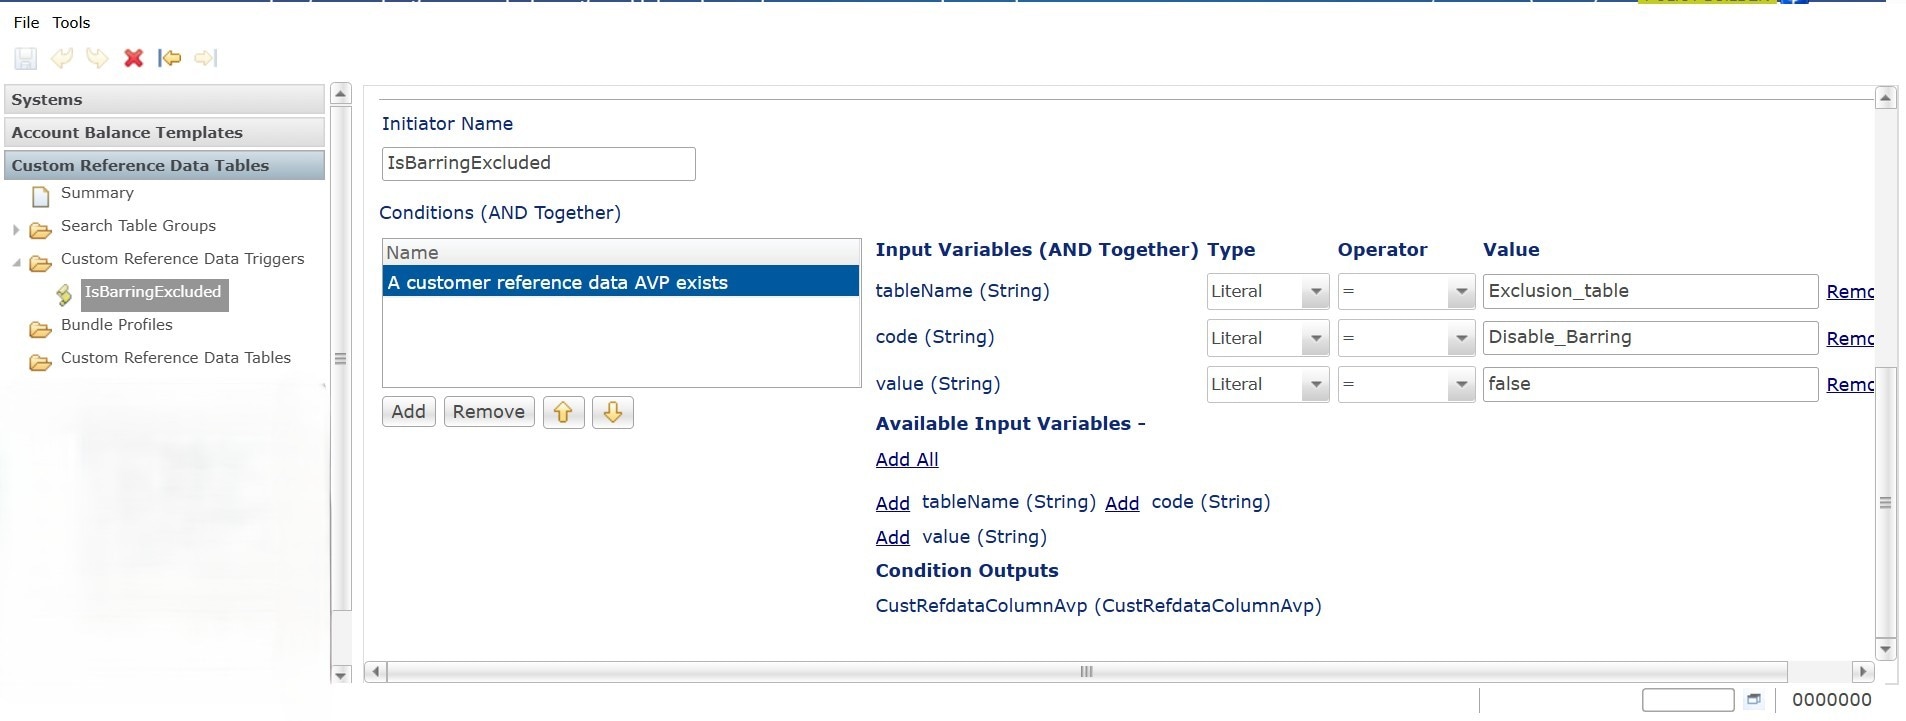
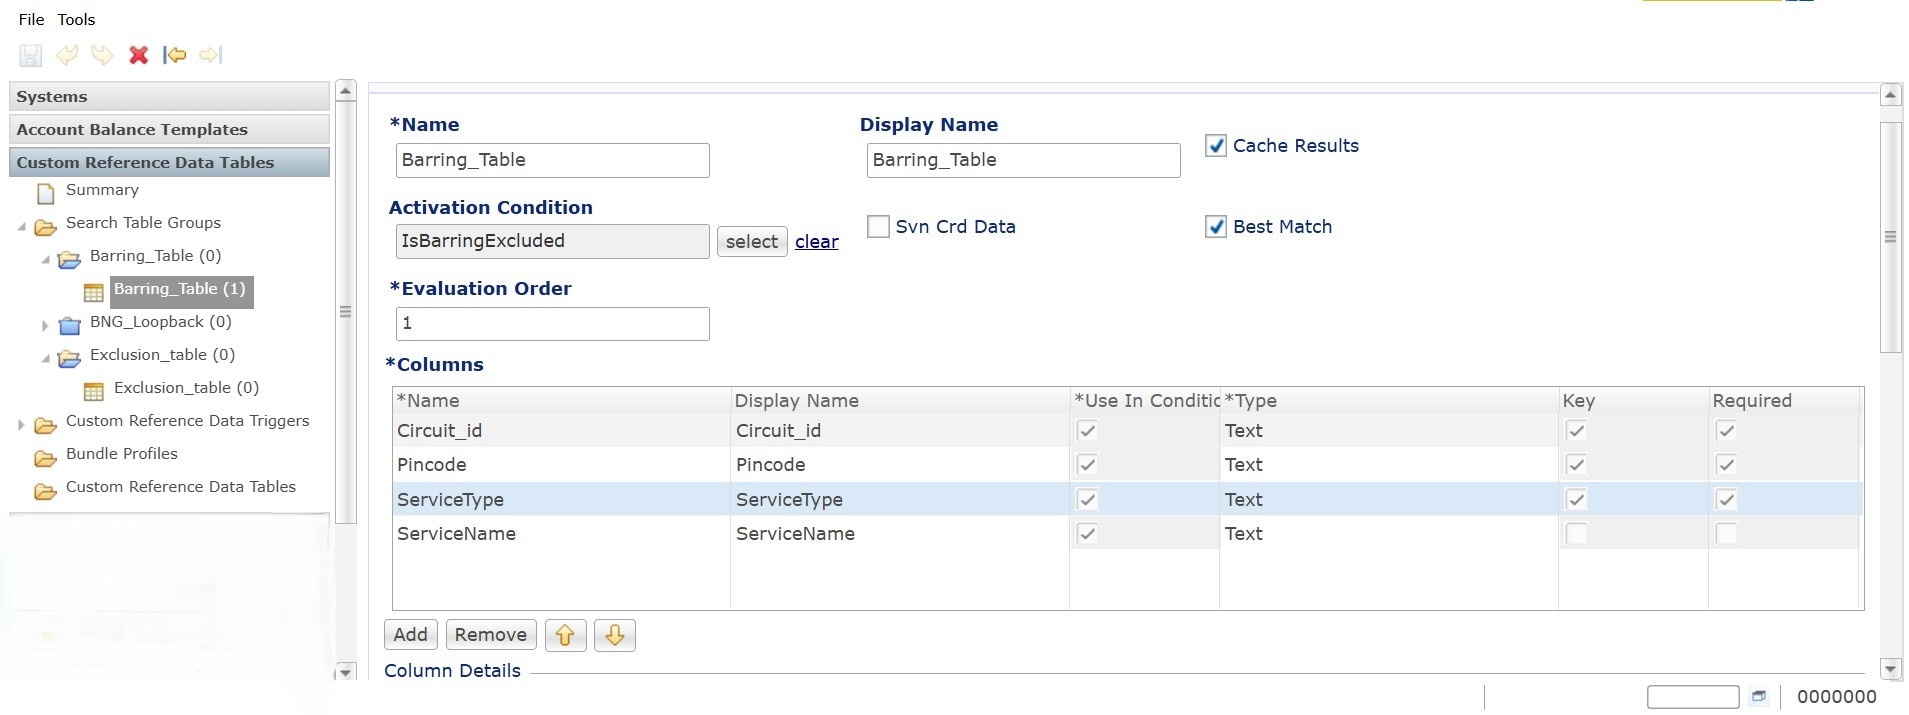
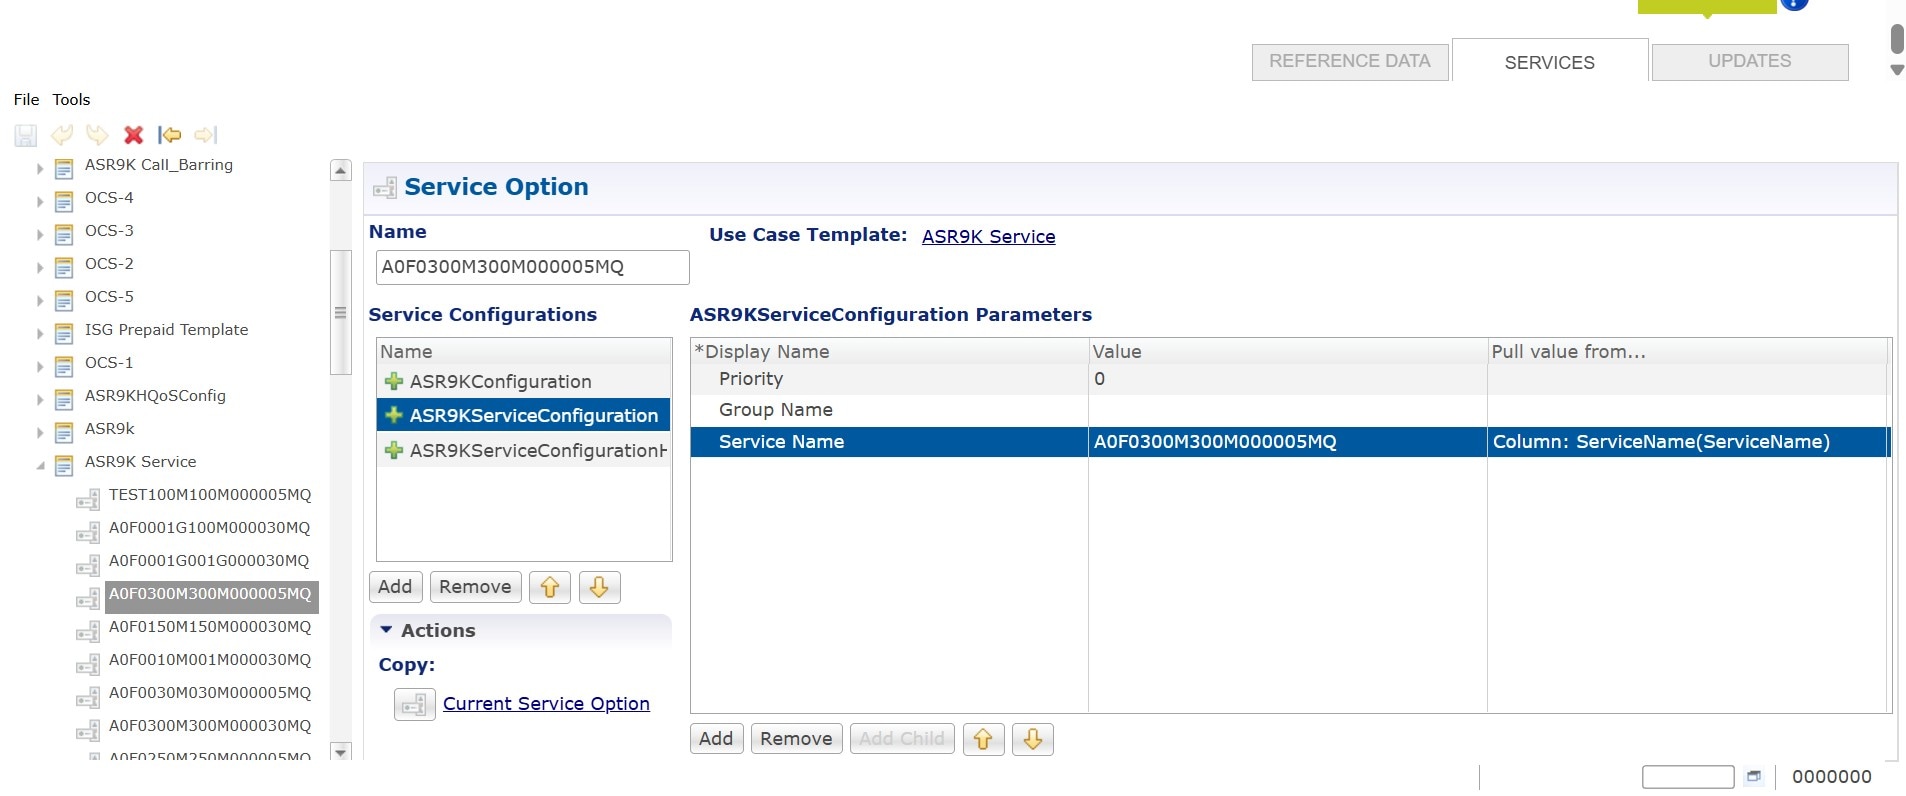
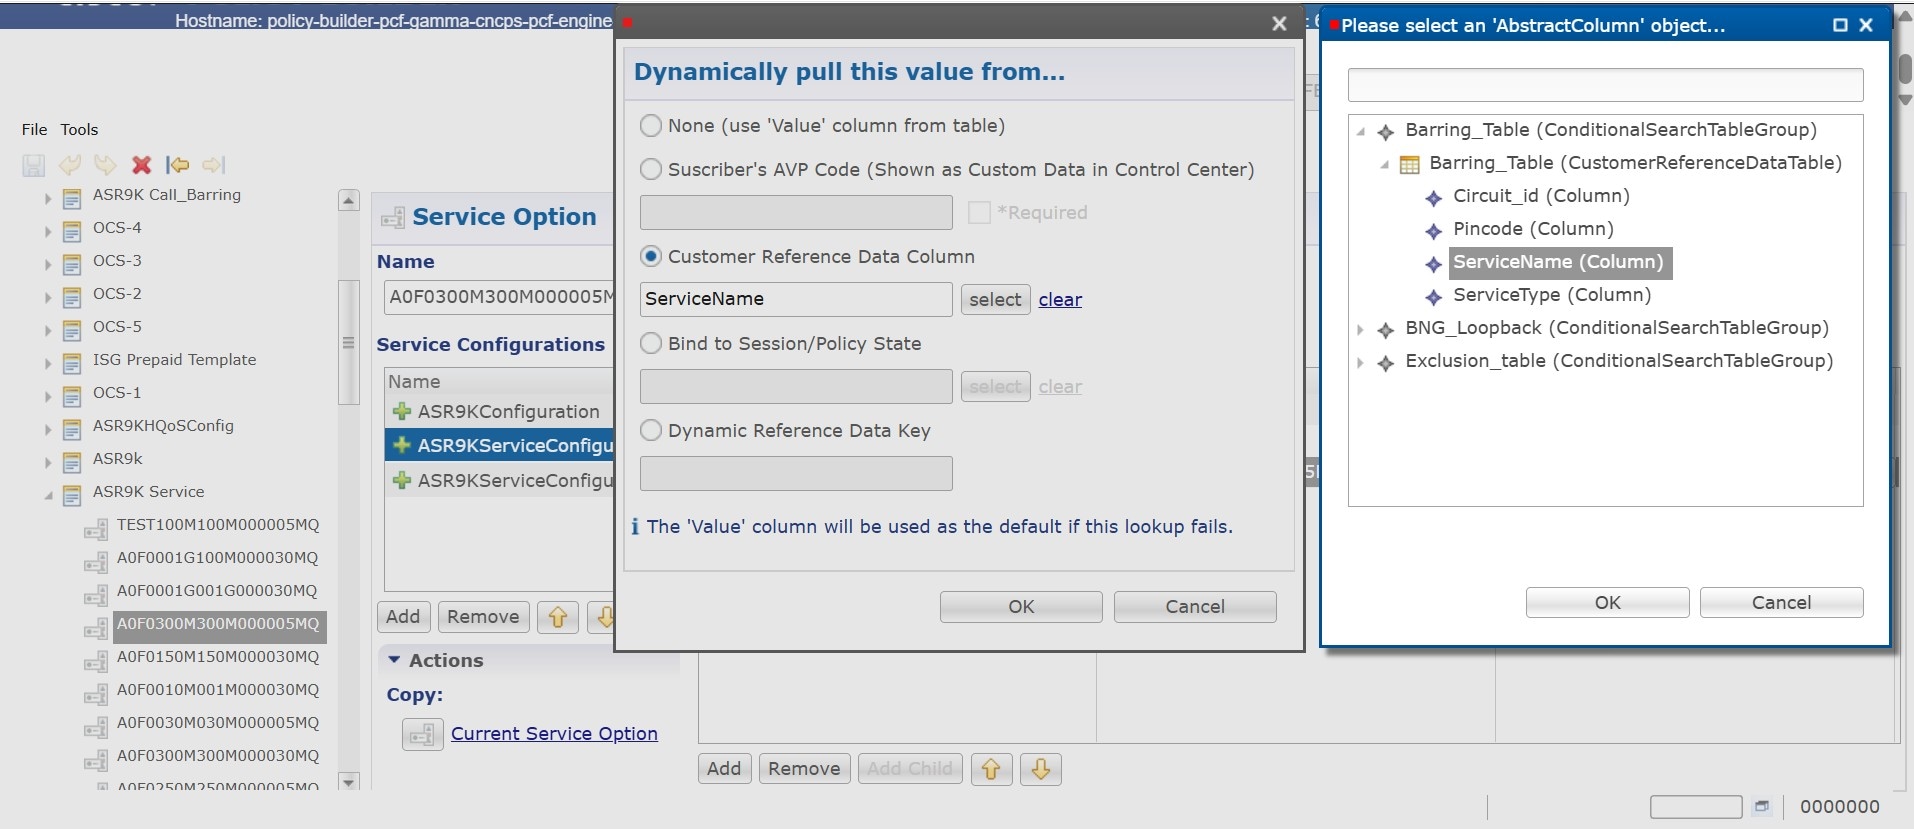
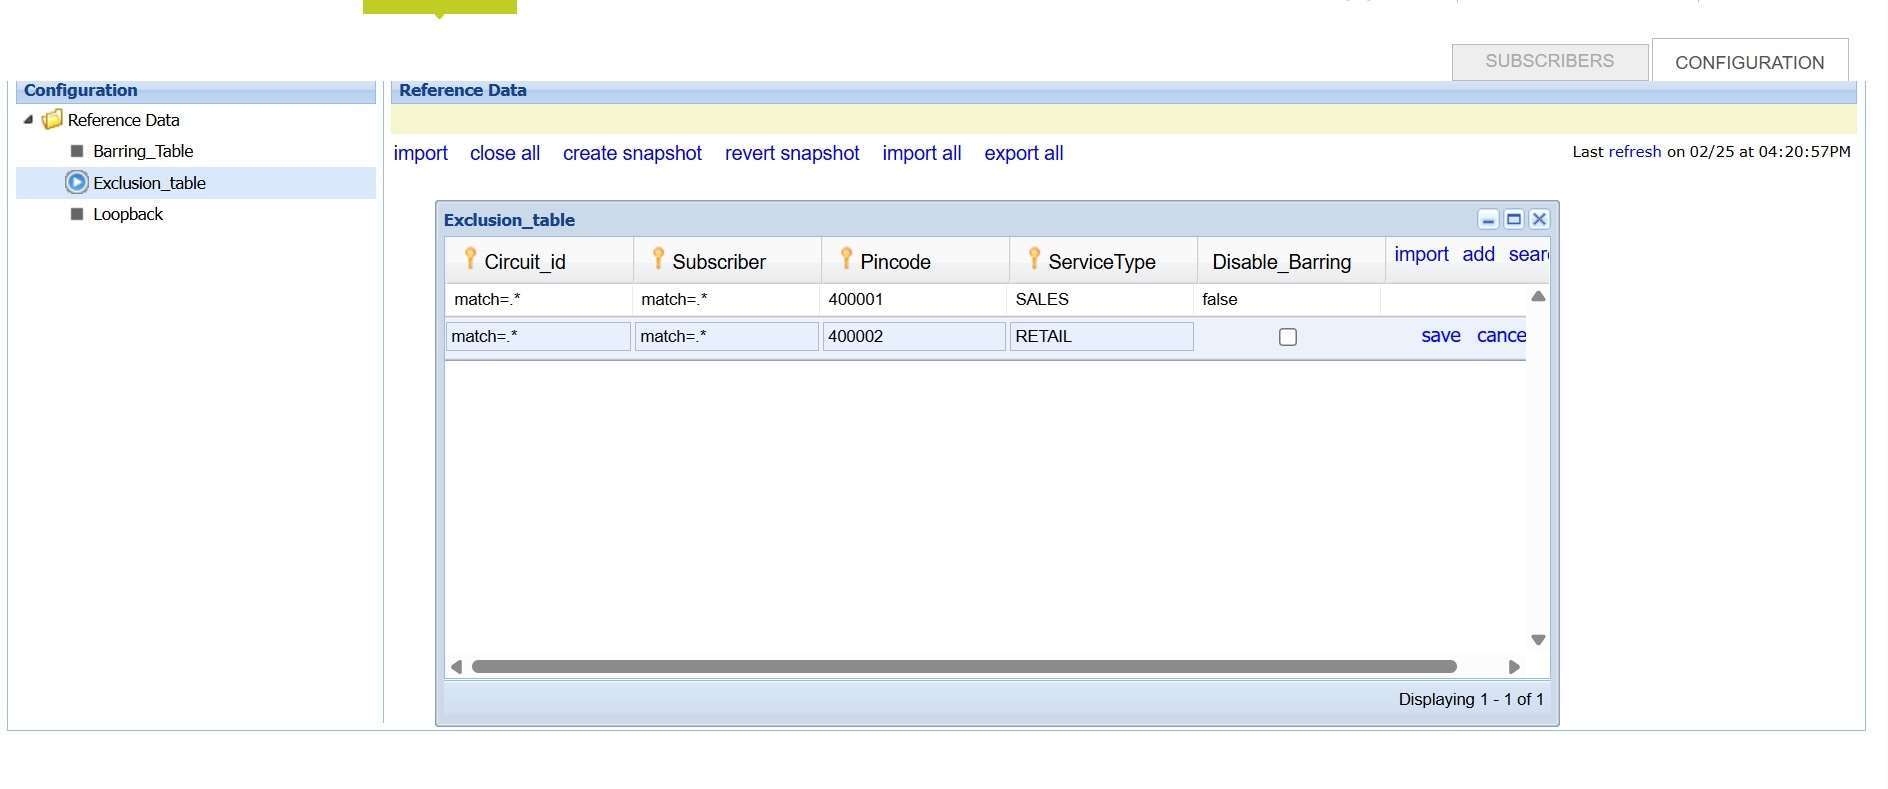
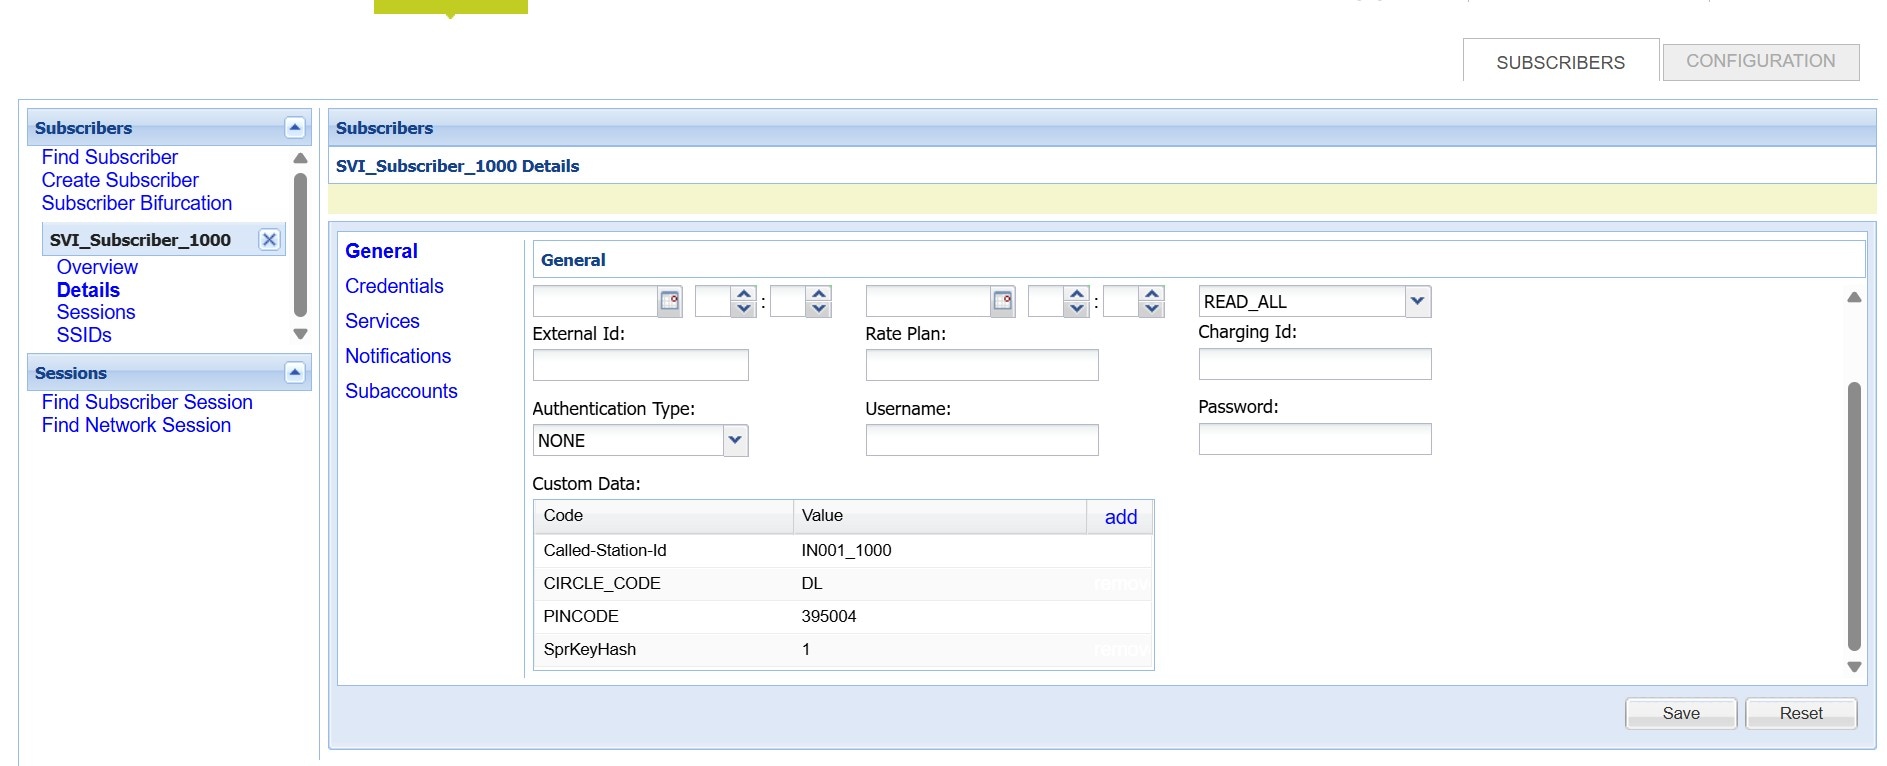
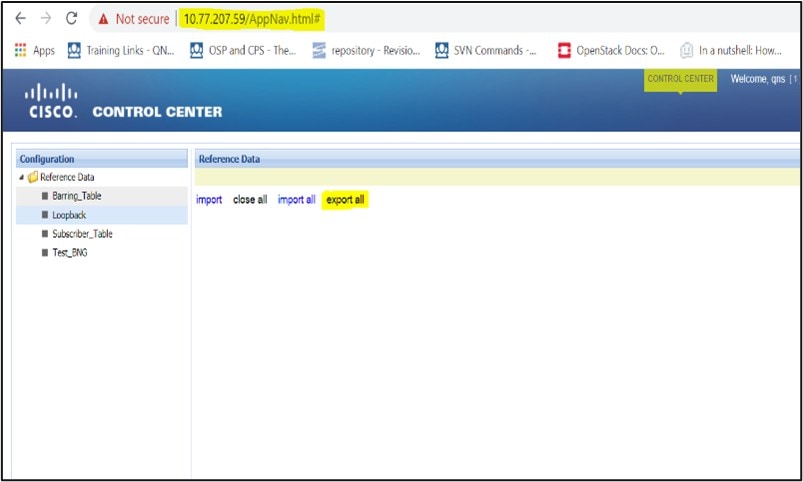
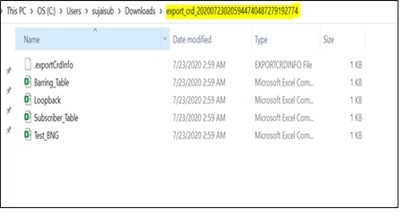
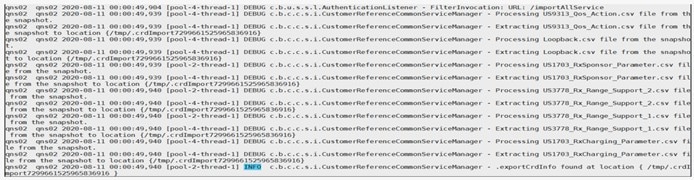
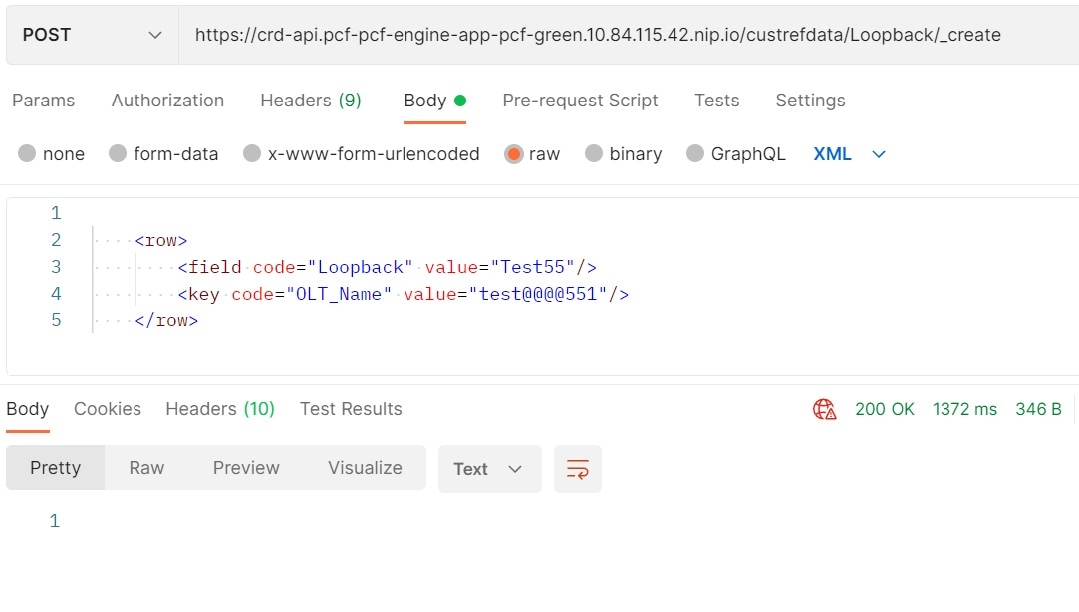
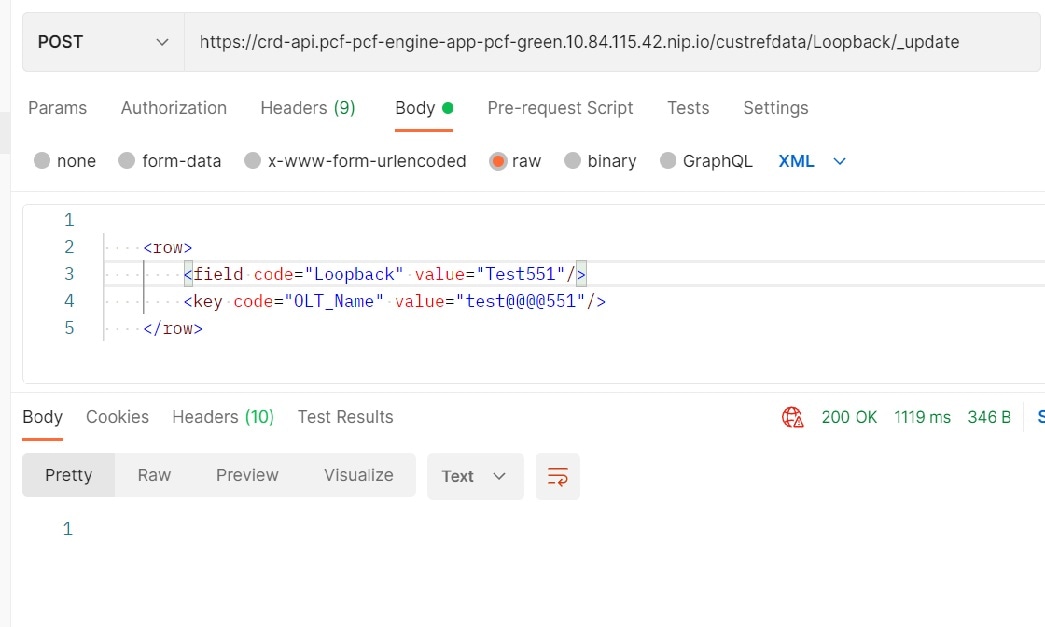
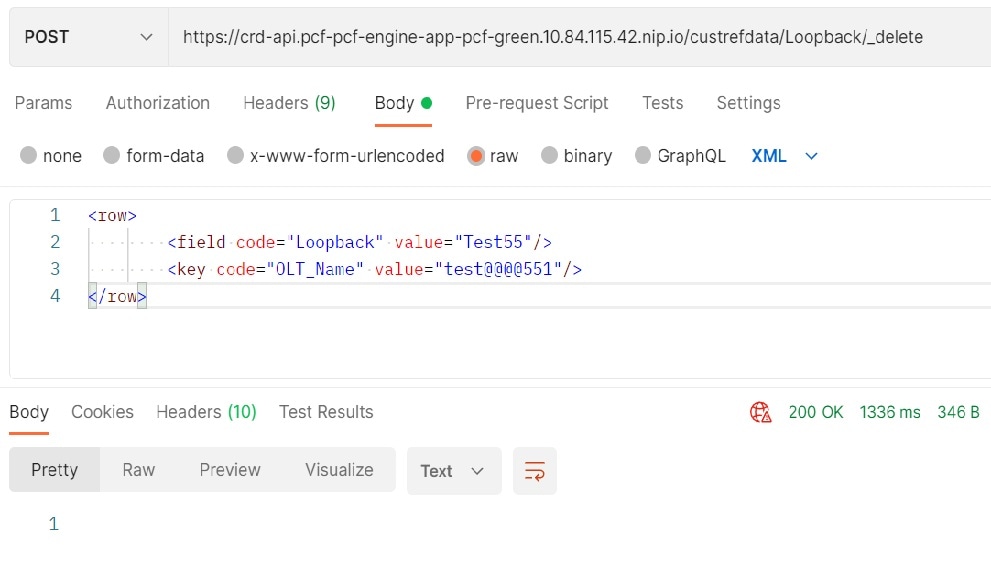
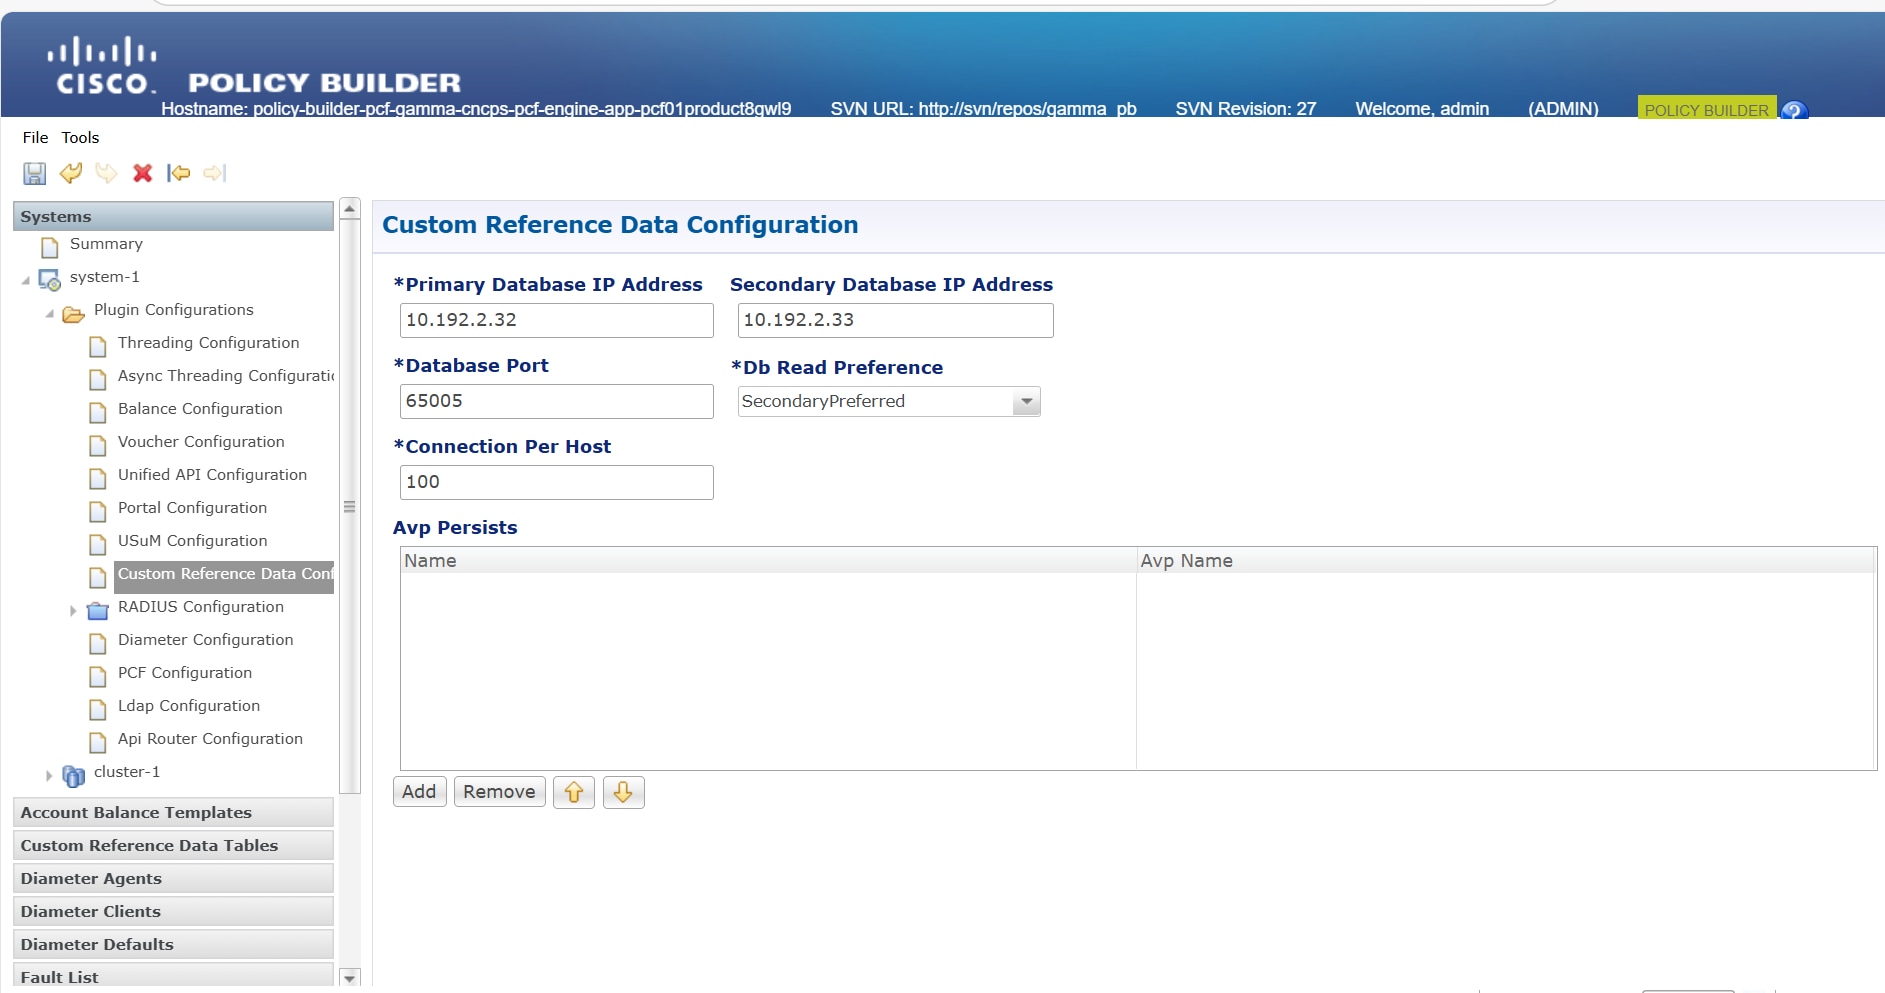
The Custom Reference Data (CRD) is the reference data specific to a service provider, such as their networks or cell sites' names and characteristics. This data is required to operate the policy engine but not used for evaluating the policies. The CRD is represented in the table format. The service providers have the flexibility to create custom data tables and manage them as per their requirements.


Note


Make sure to start all the policy servers after a CRD table schema is modified (for example, column added/removed).


CRD supports the pagination component, which controls the data displayed according to the number of rows configured for each page. You can change the number of rows to be displayed per page. Once you set the value for rows per page, the same value is used across the Central unless you change it. Also, you can navigate to other pages using the arrows.

Configuration support for importing CRD

This section describes the procedure to import CRD when the CRD schema is modified.

Importing of CRD involves the following steps:

  • Backing Up the Existing SVN Repository

  • Backing Up the Existing CRD

  • Removing the Existing CRD from MongoDB

  • Importing and Publishing the New CRD Schema

  • Importing the New CRD Table

Backup the existing SVN repository

This section describes how to import the SVN repository when the CRD schema is modified.

To take a backup of the existing SVN repository and store it on another environment, use the following configuration:

  1. Log in to the cnAAA Central GUI.

  2. On the Converged Policy & Charging Central page, navigate to Policy Builder and click the Import/Export link.

    The Import/Export form opens.

  3. In the Export tab, select the All data option to configure the export type.

    The following table describes the export/import options:

    Table 1. Export and Import Options

    Parameters

    Description

    All data

    Exports service configuration with environment data, which acts as a complete backup of both service configurations and environmental data.

    Exclude Environment

    Exports without environment data, which allows exporting configuration from a lab and into another environment without destroying the new system's environment-specific data.

    Only Environment

    Exports only environment data, which provides a way to back up the system-specific environmental information.

    Export URL

    The URL can be accessed from the Policy Builder or viewed directly in Subversion.

    Export File Prefix

    Provide a name (prefix) for the export file.

    Note


    The exported filename automatically includes the date and time when the export was performed.

  4. If you want to export the file in the compressed format, select the Use 'zip' file extension check box.

  5. Click Export.

  6. Navigate to the file and save it to your local machine. The file must include the cluster name and date.

Backup the existing CRD

This section describes how to import an existing CRD when the CRD schema is modified.

To take a backup of the configured CRD and store it to another environment, use the following configuration:

  1. Log in to the cnAAA Central GUI.

  2. On the Converged Policy & Charging Central page, navigate to Custom Reference Data and click the Custom Reference Data link.

    The Import/Export CRD data form opens.

  3. Under Export Custom Reference Data, the following options are displayed:

    Table 2. Export Custom Reference Data Options

    Options

    Description

    Use 'zip' file extension

    Enables easier viewing of the exported contents for the advanced users.

    Export CRD to Golden Repository

    When the system is in a BAD state, the CRD cache is built using the golden-crd data.

  4. Click Export.

Remove the existing CRD from MongoDB

This section describes how to remove the existing CRD tables that have schema change from MongoDB.

To remove a configured CRD schema change, use the following configuration:

  1. Log in to the admin-db pod that has the CRD (cust_ref_data) database.

  2. Access the cust_ref_data using the following command:

    use cust_ref_data
  3. Delete the data from one or more existing CRD tables using the following command:

    db.table_name.remove({})
  4. Exit the admin-db pod.

Mongo Replica Sets configuration

Mongo replica set configurations support both IPv4 and IPv6 addresses for replica member hosts. This ensures that the initialization, replication, and initial sync functionalities of the Mongo replica set operate without any impact, regardless of whether IPv4 or IPv6 addresses are used. This dual support allows for flexible network configurations and aids in transitioning to IPv6 while maintaining compatibility with existing IPv4 infrastructure.

Each replica subscriber must be configured with either IPv4 or IPv6 addresses to ensure optimal functionality. It is not recommended to mix both IP versions within a single subscriber configuration.

Ops-Center configuration for enabling IPv6 in MongoDB Replica Sets

To enable IPv6 in MongoDB replica sets within CPC, following configurations in OpsCenter are required:

Database and Replica Set Initialization

Database: db scdb
Replica Set Name: replica-name mongo-spr1
Port: 27018
Interface: interface db1.mdb.2564
Resource Memory Limit: 112000

Replica Set Labels

Replica Set Label Key: smi.cisco.com/node-type-5
Replica Set Label Value: db-spr

Member Configurations:
Member: sprdb-rs1-arbiter

Host: 2001:ddff::8
Arbiter: true
Site: remote
Member: sprdb-rs1-s1-m1

Host: 2001:ddff::9
Arbiter: false
Priority: 166
Site: remote
Member: sprdb-rs1-s1-m2

Host: 2001:ddff::10
Arbiter: false
Priority: 155
Site: remote
Member: sprdb-rs1-s2-m1

Host: 2001:ddff::11
Arbiter: false
Priority: 66
Site: local
Member: sprdb-rs1-s2-m2

Host: 2001:ddff::12
Arbiter: false
Priority: 55
Site: local

Import and publish the new CRD schema

This section describes how to import and publish the new CRD schema.

To import and publish the CRD schema, use the following configuration:

  1. Log in to the cnAAA Central GUI.

  2. On the Converged Policy & Charging Central page, navigate to Policy Builder and click the Import/Export link.

    The Import/Export form opens.

  3. In the Import tab, browse to the file that you want to import.

  4. In the Import URL field, enter the URL where the file must be imported. We recommend importing a new URL and verify it using the Policy Builder.

  5. In the Commit Message field, enter the appropriate information.

  6. To enforce import in situations where the checksums don't match, select the Force import even if checksums don't match check box.

  7. Click Import.

Importing the New CRD

To import the new CRD, use the following configuration:

  1. Access the Policy Builder URL and add a new repository.

    1. In the Choose Policy Builder data reposiorty... window, select <Add New Repository> from the drop-down.

      The Repository dialog box appears.

      The following parameters can be configured under Repository:

      Configure the parameters according to the network requirements.

      Table 3. Repository Parameters

      Parameter

      Description

      Name

      This is a mandatory field. Ensure that you specify a unique value to identify your repository's site.

      Note


      We recommend the following format for naming the repositories: customername_project_date, where underscores are used to separate customer name, project, and date. Date can be entered in the MMDDYYYY format.

      Username and Password

      Enter a username that is configured to view the Policy Builder data. The password can be saved for faster access, but it is less secure. A password, used with the Username, permits, or denies access to make changes to the repository.

      Save Password

      Select this check box to save the password on the local hard drive. This password is encrypted and saved as a cookie on the server.

      Url

      You can have several branches in the version control software to save different versions of configuration data. Create a branch in the version control software before assigning the URL in this screen.

      Enter the URL of the branch of the version control software server that is used to check in this version of the data.

      Local Directory

      Do not modify the value in this field.

      This is the location on the hard drive where the Policy Builder configuration objects are stored in the version control.

      When you click either Publish or Save to Repository, the data is saved from this directory to the version control application specified in the Url text field.

      The field supports the following characters:

      • Uppercase: A to Z

      • Lowercase: a to z

      • Digits: 1–9

      • Nonalphanumeric: /

      Note


      The user must use only the supported characters.

      Validate on Close

      Select this check box to see if the values for Username, Password, or the URL are legitimate and unique. If not, the screen displays an error message and provides a chance to correct the errors.

      Remove

      Removes the display of the repository in Cisco Policy Builder.

      Note


      The remove link here does not delete any data at that URL. The local directory is deleted.

    2. Click OK to save your work to the local directory.


      Note


      When you change screens, the Policy Builder automatically saves your work. We recommend saving your work to the local directory by clicking on the diskette icon on the Policy Builder GUI or CTRL-S on the keyboard.


    3. If you are ready to commit these changes to the version control software, choose File > Save to Client Repository on the Policy Builder home screen.

  2. Log in to the new repository.

  3. Verify the new CRD table schema and publish the changes.

  4. Review the crd-api pod logs for any exception or error related to the duplicate key or duplicate index. If there are no errors, then the CRD is successfully imported.

Service barring configuration

Service Barring feature allows you to bar subscribers from a particular PIN code.

cnAAA supports:

  • Service barring applies to new sessions based on Circuit ID, area, or PIN code.

  • Service barring also applies to existing sessions based on Circuit ID, area, or PIN code.

Configuring the service barring functionality involves these tasks:

  • Configure the CRD table

  • Configure service template in the Policy Builder

  • Configure the barring table and exclusion table entries in Control Center

Configure the CRD table

Use the customer reference table to configure exclusion and barring details. You can exclude barring based on a combination of the circuit_id, subscriber, PIN code, or service type attributes. The system applies barring only when the Disable_Barring parameter is set to false.

Perform these actions to configure the CRD table:

Procedure

Step 1

To configure the Exclusion_table

  1. In the Policy Builder, navigate to the Custom Reference Data Tables > Search Table Groups > Exclusion_table > Exclusion_table.

  2. Set the Evaluation Order to zero to make the table's output the activation condition for the barring_table.

    Define these columns in the exclusion table:

    • Input: Specify the circuit_id and other applicable fields.

    • Output: Specify Disable_barring value as True/False.

    Figure 1. Exclusion table
  3. disable_barring is the result of the CRD evaluation.

    • If disable_barring is set to True, the barring_table does not get evaluated.

    • If disable_barring is set to False, the system applies barring to the matching subscribers.

Step 2

Set the activation condition for Barring:

  1. Navigate to Custom Reference Data Tables > Custom Reference Data Triggers > IsBarringExcluded

    Figure 2. Call barring triggers

Step 3

To configure the Generic Barring Table:

  1. Apply Barring based on the combination of attributes Circuit_id, pincode, ServiceType, Circuit_id Attribute

  2. If required choose the Radius Called Station Id Retriever AVP from the list of input AVP’s of CRD.

Note


The ServiceName Attribute is the result of CRD evaluation.

Step 4

Configure the service template in the PB to associate each template with a static service name. If the service templates are not associated, the system uses input from the CRD output. If the CRD produces no result, the system considers the static input.


Configure service template in Policy Builder

Follow these steps to configure the service template in Policy Builder:

Procedure

Step 1

Configure the service options for all High Speed Internet (HSI) services.

Step 2

Click the ellipsis (...) icon to dynamically retrieve the service name from the CRD table.

Figure 3. Mapping the service name from CRD

Note

 
In the Policy Builder, choose File > Publish to Runtime Environment to publish the policy.

Configure the barring and exclusion table entries in Control Center
Procedure

Step 1

Login to the Content Center.

Step 2

Navigate to Configuration> Barring Table.

Step 3

In the Reference Data window, add entries to bar the subscribers.

Step 4

Navigate to Configuration > Exclusion Table.

Step 5

In the Reference Data window, Add entries to exclude subscribers from barring as shown in the example.

Step 6

Exclude the combination of ServiceType and Pincode from Barring.

Note


You do not need to restart from the CLI or publish the policy after you add rows to the control center CRD tables.

You do not need to restart the cnAAA system through the Ops-Center CLI or publish the policy after adding rows to the CRD tables. The system automatically loads the CRD table entries.


Sample SOAP request to provision subscriber PIN code AVP

You can include the PIN code and service type AVP for subscribers. These attributes serve as criteria for barring.

<soapenv:Envelope xmlns:soapenv="http://schemas.xmlsoap.org/soap/envelope/" xmlns:typ="http://broadhop.com/unifiedapi/soap/types">
<soapenv:Header/>
<soapenv:Body>
<subscriber>
<name> <fullName>EDRTest1</fullName> </name>
<credential>
<networkId>US4744_2</networkId>
<password>US4744_2</password>
</credential>
<service>
<code>A0F0005M005M000005MQ</code>
<enabled>true</enabled>
</service>
<status>ACTIVE</status>
<avp> <code>PINCODE</code> <value>400001</value> </avp>
<avp> <code>SERVICETYPE</code> <value>RETAIL</value> </avp>
</subscriber>
</soapenv:Body>
</soapenv:Envelope>
Verifying subscribers added:

View the provisioned subscriber details after SOAP Request.

Bar or unbar the services for existing sessions

Use the call-barring.py script to update the service plan for an existing session from the master node.

The script is located in the /data/<namespace>/data-pcf-utilities-0/support/script/ directory.

cd /data/pcf-beta-cncps/data-pcf-utilities-0/support/script/

Execute the script using the python3 command with the required arguments for PIN code, service name, called station ID, and SOAP URL.

python3 call-barring.py --pincode 395004 --servicename A0F0100M100M000030MQ --calledstationid 0005.9A3C.7A00 --port 27017 --soapurl https://pcf.unified-api.192.0.2.1.example.com/ua/soap/ --host mongo-admin-0

Example output:

luser@rid7508018-agandla-1-master1:~/test$ python3 callbarring.py --
pincode 395004 --servicename A0F0100M100M000030MQ --calledstationid
0005.9A3C.7A00 --port 27017 --soapurl https://pcf.unified-
api.10.127.34.151.nip.io/ua/soap/ --host mongo-admin-0
ARG servicename : A0F0100M100M000030MQ
ARG pincode : 395004
ARG calledstationid : 0005.9A3C.7A00
ARG Service Type :
ARG port spr mongoPort : 27017
ARG host spr mongoHost : mongo-admin-0
ARG Soap URL : https://pcf.unified-
api.10.127.34.151.nip.io/ua/soap/
Mongo Command: db = db.getSiblingDB("spr");
db.subscriber.find({"avps_key":{"$elemMatch":{"value_key": "395004",
"code_key": "PINCODE"}}}, {"_id": 0, "credentials_key.network_id_key": 1,
"services_key": 1}).forEach(printjson)
Namespace found: pcf
Kubectl command: kubectl exec -n pcf db-admin-0 -- mongo --port 27017 --host
mongo-admin-0 --eval db = db.getSiblingDB("spr");
db.subscriber.find({"avps_key":{"$elemMatch":{"value_key": "395004",
"code_key": "PINCODE"}}}, {"_id": 0, "credentials_key.network_id_key": 1,
"services_key": 1}).forEach(printjson)
Processing subscriber :0005.9A3C.7A00 for checking A0F0100M100M000030MQ,
Called Station id:0005.9A3C.7A00
Processed 1 records.
0 : Subscriber 0005.9A3C.7A00 is having the service :A0F0100M100M000030MQ
Response from server >> <Response [200]>
0 : Subscriber [0005.9A3C.7A00] SwitchService Was Success for Service
[A0F0100M100M000030MQ]
*** Done
luser@rid7508018-agandla-1-master1:~/test$

Import the new CRD table

This section describes how to import the CRD table.

To import new CRD tables, use the following configuration:

Before importing the CRD table, ensure that the CRD data archive is saved as dot (.) crd or dot (.) zip.

  1. Log in to the cnAAA Central.

  2. Click Custom Reference Data.

  3. Click Import/Export CRD Data.

  4. Under Export Custom Reference Data, the following options are displayed:

    • Select the Use 'zip' file extension check box to enable easier viewing of export contents for advanced users.

    • Select the Export CRD to Golden Repository check box to export CRD to golden repository which is used to restore cust_ref_data in case of error scenarios. A new input text box is displayed.

  5. Add a valid SVN server hostname or IP address to push CRD to repository. You can add multiple hostnames or IP addresses by clicking on the plus sign.

  6. Click Export.

Verify the successful export of CRD Table to golden repository

To verify of the export of the custom CRD table to the golden repository is successful, use the following configuration:

  1. Log in to the cnAAA Central.

  2. Click Custom Reference Data.

  3. Click Import/Export CRD Data.

  4. In Import Custom Reference Data, click Field to Import field and browse for the CRD archive.

  5. Click the Import button to import the CRD data.

  6. On successful import, verify that you receive a "Data imported" message on the cnAAA Central GUI.

  7. Review crd-api pod logs for any exception or error related to duplicate key or duplicate index. If there are no errors, then the CRD is successfully imported.

Bulk update for CRD table

This feature enables you to perform bulk updates on Custom Reference Data (CRD) table records. Previously, CRD tables lacked Export All and Import All options, making it difficult to manage large volumes of data.

To perform a bulk update, complete these two phases:

Export and modify data
  • Export the CRD table contents to a .crd file and unzip the .crd file to view and edit the table content in .csv files.

  • The exported contents include the .exportCrdInfo file and the CSV tables.

Import updated data

Import the updated .csv file contents back to the CRD table by zipping them into a .zip format.


Caution


Imported contents overwrite the existing contents in the CRD tables.


Troubleshoot bulk updates

If you face issues while performing a bulk update, you can:

  • Check the GUI error messages for issues with Import All or Export All.

  • Refer to the consolidated-qns.log file in the pcrfclient VM.


Note


Enable additional DEBUG level messages only in lab environments.


Figure 4. Export logs
Figure 5. Import logs

CRD REST API for OLT NEID and loopback addition

CRD REST API (Add/Update/Delete/Query)

In custref data REST API service, provide Logging for audit purpose: For Create/Update/Delete Requests, logging is added for SourceIp Address, complete request for audit purpose.

The headers are uniform for all the functions of the API.

Configure CRD REST API (Add/Update/Delete/Query)

To perform various actions, follow the steps:

Procedure


Step 1

Use HTTP headers to automate tasks.

Step 2

Add CustRefData loopback.

URL: https://crd-api.pcf-pcf-engine-app-pcf-green.10.84.115.42.nip.io/custrefdata/Loopback/_create

Output:

Step 3

Update CustRefData loopback.

URL: https://crd-api.pcf-pcf-engine-app-pcf-green.10.84.115.42.nip.io/custrefdata/Loopback/_update

Note


Make sure the OLT name is accurate. Update the value after confirming its accuracy.

Output:

Step 4

Delete CustRefData loopback.

URL: https://crd-api.pcf-pcf-engine-app-pcf-green.10.84.115.42.nip.io/custrefdata/Loopback/_delete

Output:

Step 5

Retrieve CustRefData loopback.

URL: https://crd-api.pcf-pcf-engine-app-pcf-green.10.84.115.42.nip.io/custrefdata/Loopback/_query

Output:


CRD refresh interval configuration and performance improvements in CRD functionality

Feature History

Feature Name

Release Information

Description

Customer reference data refresh interval configuration

2025.03.0

The CPC Performance and Scalability Enhancements optimizes CRD handling and enables Admin DB sharing. It allows configurable CRD cache refresh and secondary DB read preference to reduce primary load, while implementing Admin DB replica sets with specific IPs for cross-cluster reachability and simplified management.

Overview

The CPC Performance and Scalability Enhancements introduces two key improvements:

  • Configurable CRD cache refresh intervals (in milliseconds) and the option to direct CRD cache rebuilds to secondary databases, which reduces the load on the primary database and ensures optimal CRD versioning.

  • By default, the DB Read Preference is primary, but it is configurable in the CRD plugin configurations of PB to enable the CRD cache rebuilt using Secondary database rather than the Primary database to reduce the load on the Primary and to alleviate the overall system performance.

  • Admin DB replica sets within the CPC namespace, configured with specific IP addresses instead of local defaults.

Previously there was no option to configure DB preference and CRD refresh interval, to improve the system performance

Configure CRD refresh interval with Ops-Center

Follow these steps to configure the Ops-Center engine parameters and the CRD refresh interval:

Procedure


Step 1

Enter the engine configuration mode for cpc-green.

engine <engine-name>

Step 2

Configure CRD Cache Refresh Interval: Set the desired refresh interval (in milliseconds) using two separate Ops-Center commands.

  • crdapi crd-mongo-cache-refresh-interval value <value_in_ms> and commit the change.

  • properties crd.mongo.cache.refresh.interval value <value_in_ms> and commit the change.

Note


The interval values for crdapi and crd.mongo should be the same.

Step 3

Enter the exit command to complete and exit the configuration mode.

This sample configuration shows the commands for the Ops-Center engine:

engine cpc-green
crdapi crd-mongo-cache-refresh-interval 10000
properties crd.mongo.cache.refresh.interval
value 10000
exit

Step 4

Enable the debug logs in the Ops-Center with this configuration:

  1. Set the default logging level for all loggers to "error" to minimize unnecessary logs.

    debug logging default-level error
  2. Configure debug level for CRD Manager logger.

    debug logging logger com.broadhop.custrefdata.impl.CustomerReferenceDataManager
    level debug
    exit
  3. Configure debug level for GenericDao logger.

    debug logging logger com.broadhop.custrefdata.impl.dao.GenericDao
    level debug
    exit

Example

debug logging default-level error
debug logging logger com.broadhop.custrefdata.impl.CustomerReferenceDataManager
 level debug
exit
debug logging logger com.broadhop.custrefdata.impl.dao.GenericDao
 level debug
exit

Configure DB read preference in Policy Builder

To optimize CRD cache performance and manage database load, configure the DB Read Preference directly within the Policy Builder interface:

Procedure


Step 1

In Policy Builder, navigate to Plugin Configurations under Systems.

Step 2

Select Custom Reference Data Configuration.

Step 3

Go to DB Read Preference drop down and select SecondaryPreferred to enable CRD cache rebuilds using a secondary database, which helps reduce the load on the primary database.

Note


The read preference can only be pointed to the secondary when the multiple admin DB replica sets are configured in the CPC Ops-Center. It does not work with local DBs [ admin-db-0, admin-db-1]

To ensure that changes take effect after modifying the DB Read Preference in Policy Builder, it is necessary to manually restart the Engine, CRD, Policy Builder pod, and Control Center pods.