Space Manager

Overview of Space Manager

The Space Manager app enables facility managers to configure integrated devices such as Cisco Catalyst, Cisco Meraki, Cisco Webex, and Cisco IoT devices and sensors in your workspace to provide access to real-time occupancy data like meeting room capacity and availability.
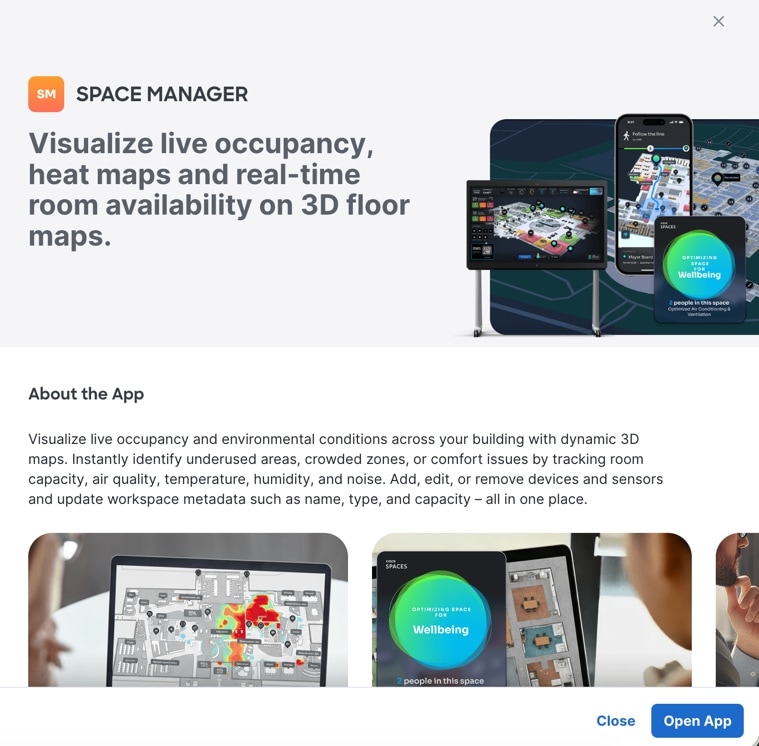
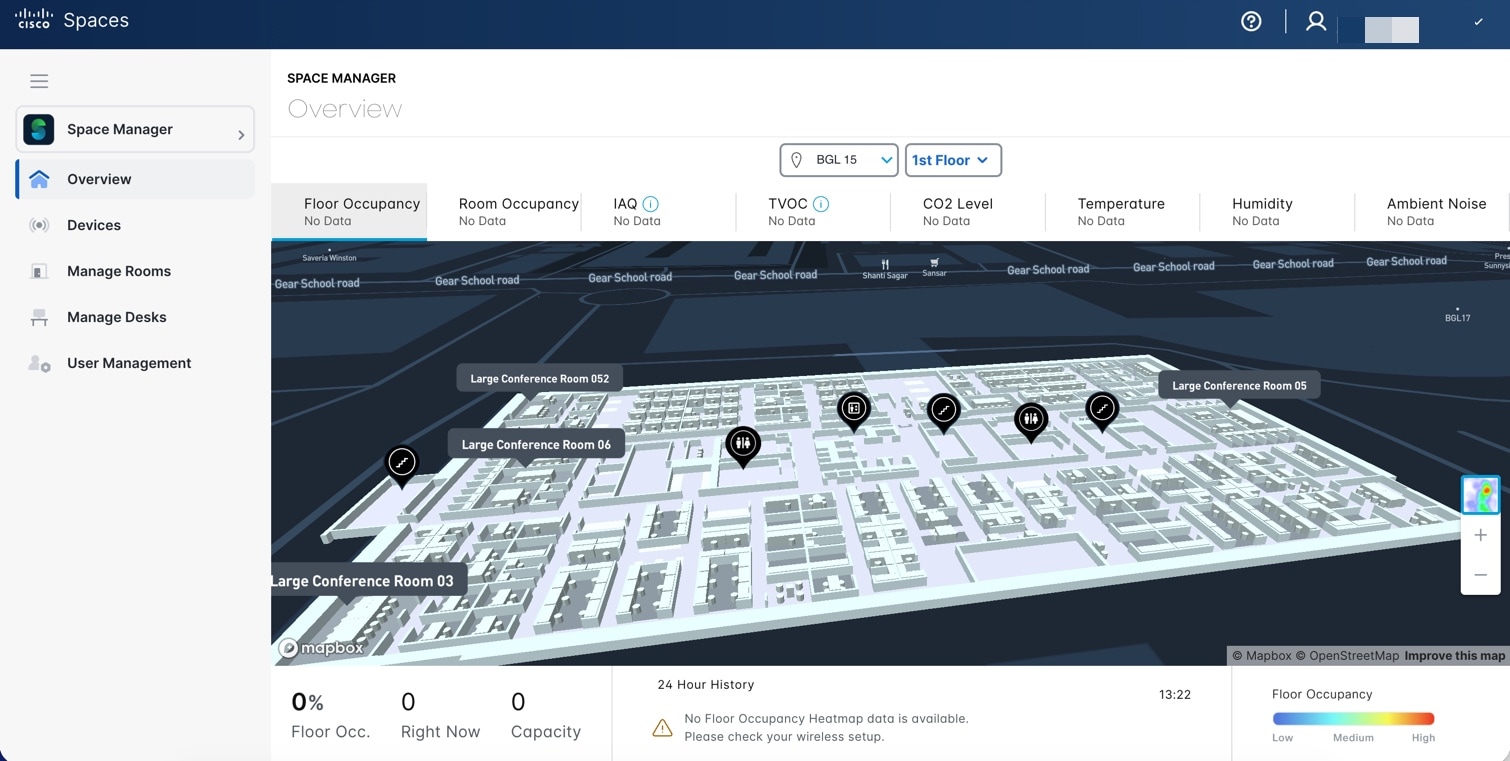
Figure 1. Space Manager

This app also displays environment-related telemetry such as ambient temperature, humidity, air quality, and noise on 3D digital maps for the meeting room, floor, or building.

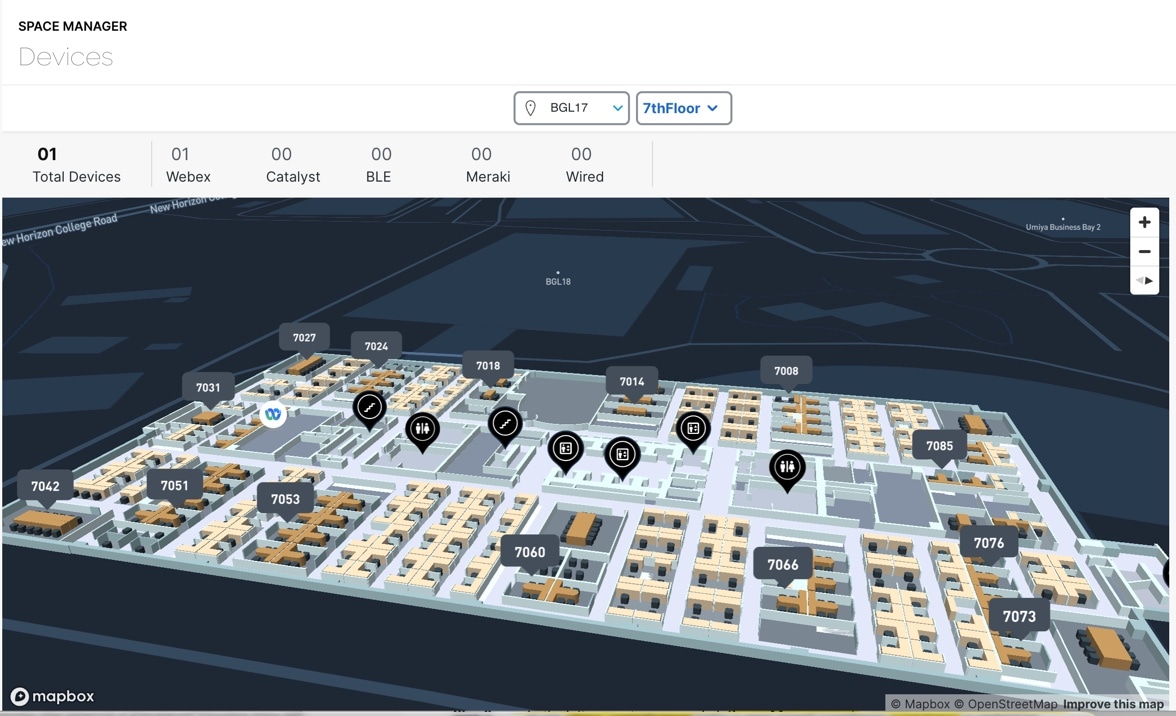
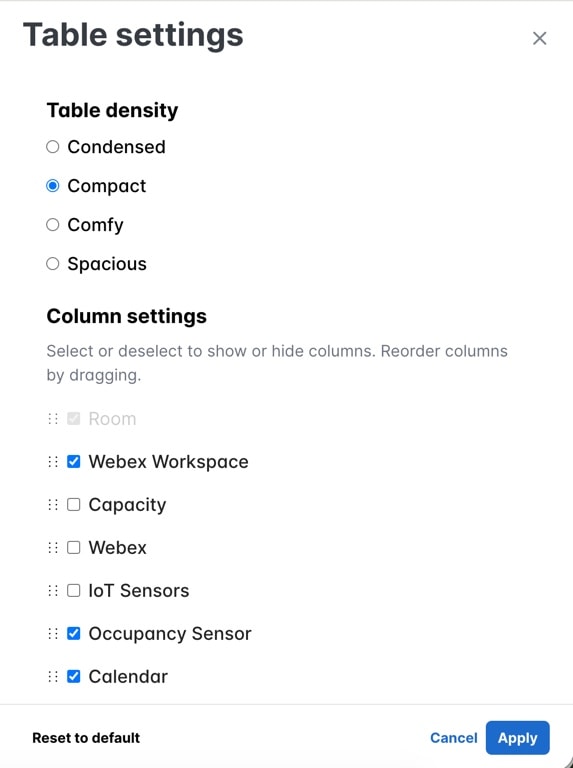
  • In the Devices section, you can view the configured devices and their telemetry details on digital maps

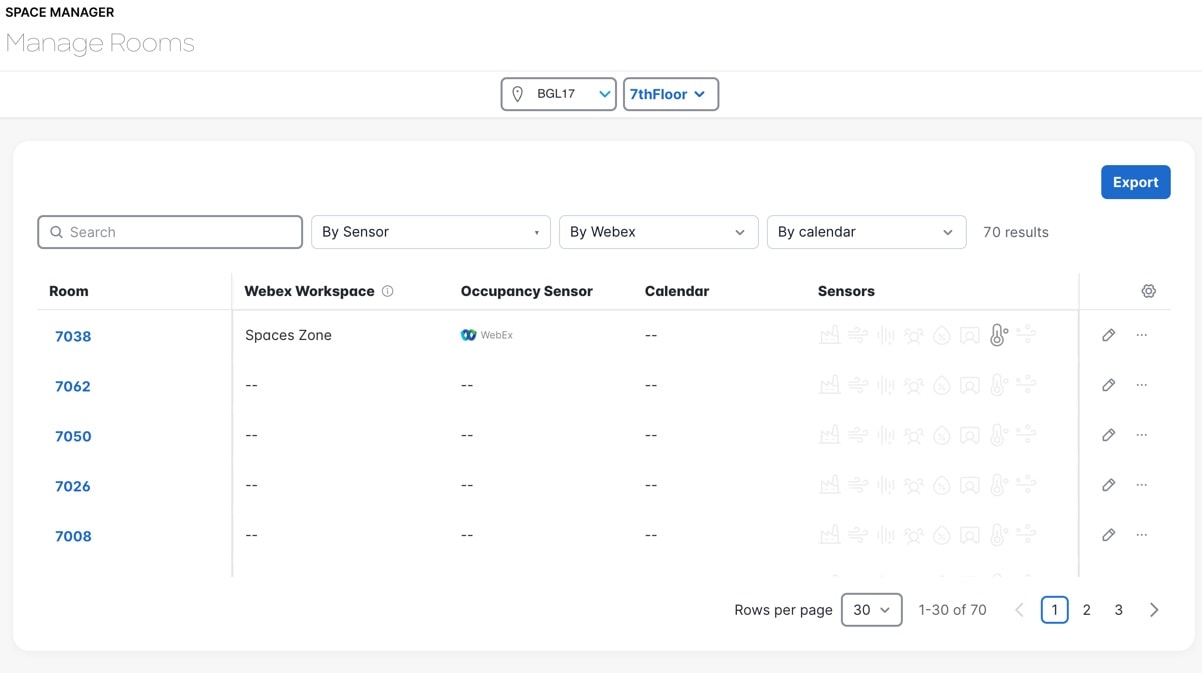
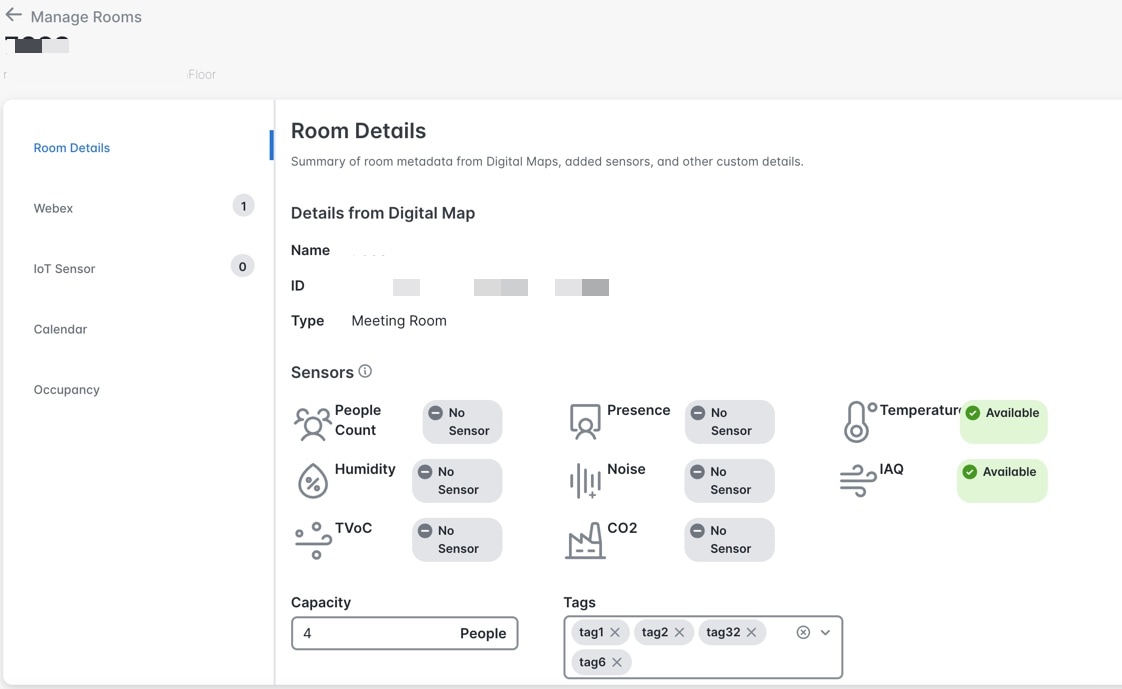
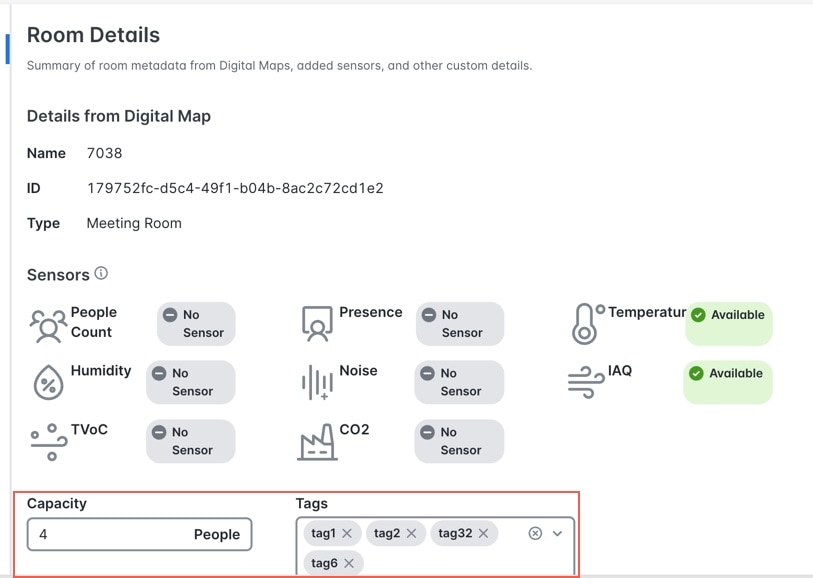
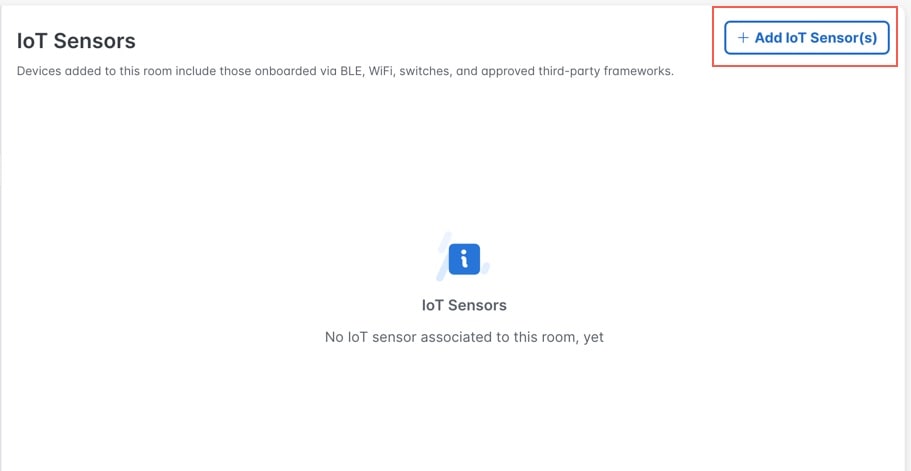
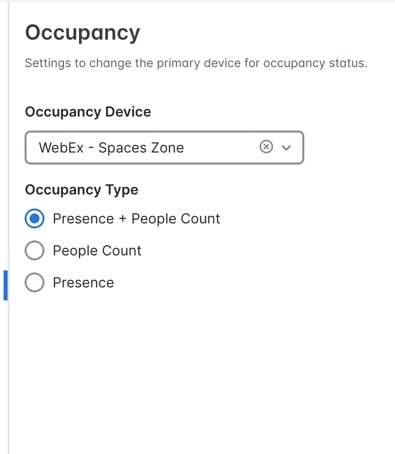
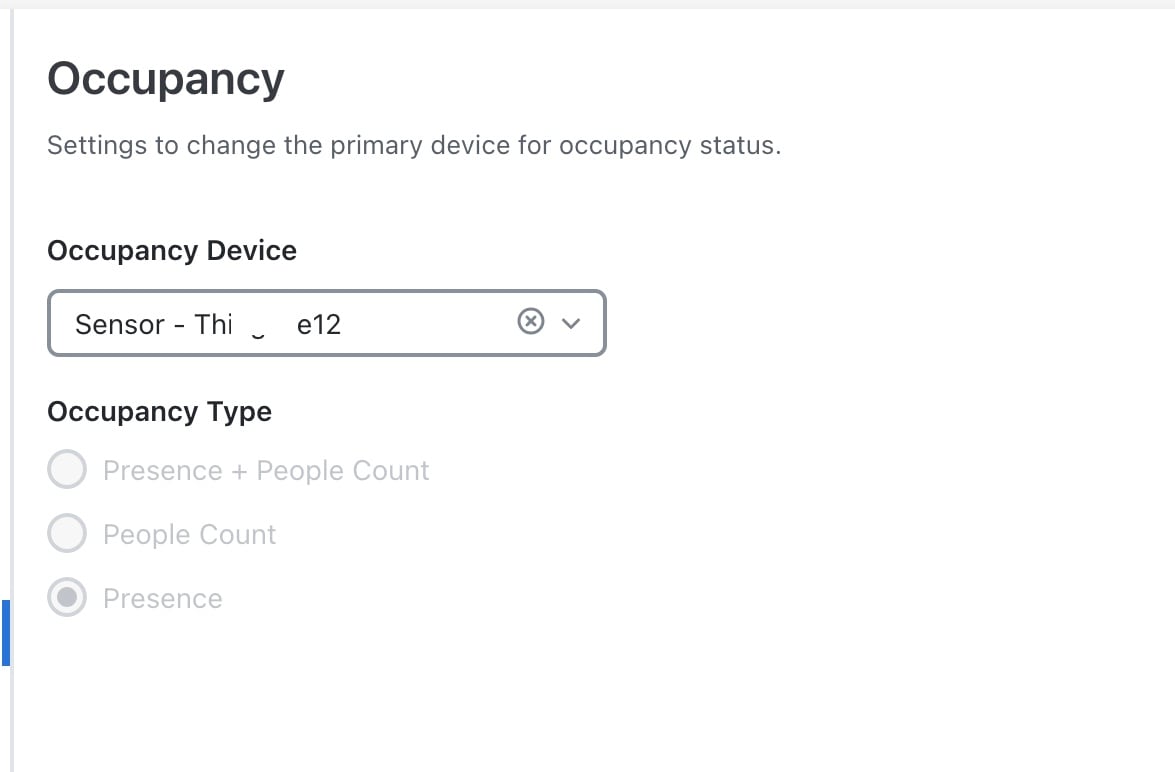
  • In the Manage Rooms section, you can view the count of configured meeting rooms and their details such as number of associated devices. You can also add or remove devices from the selected meeting rooms.

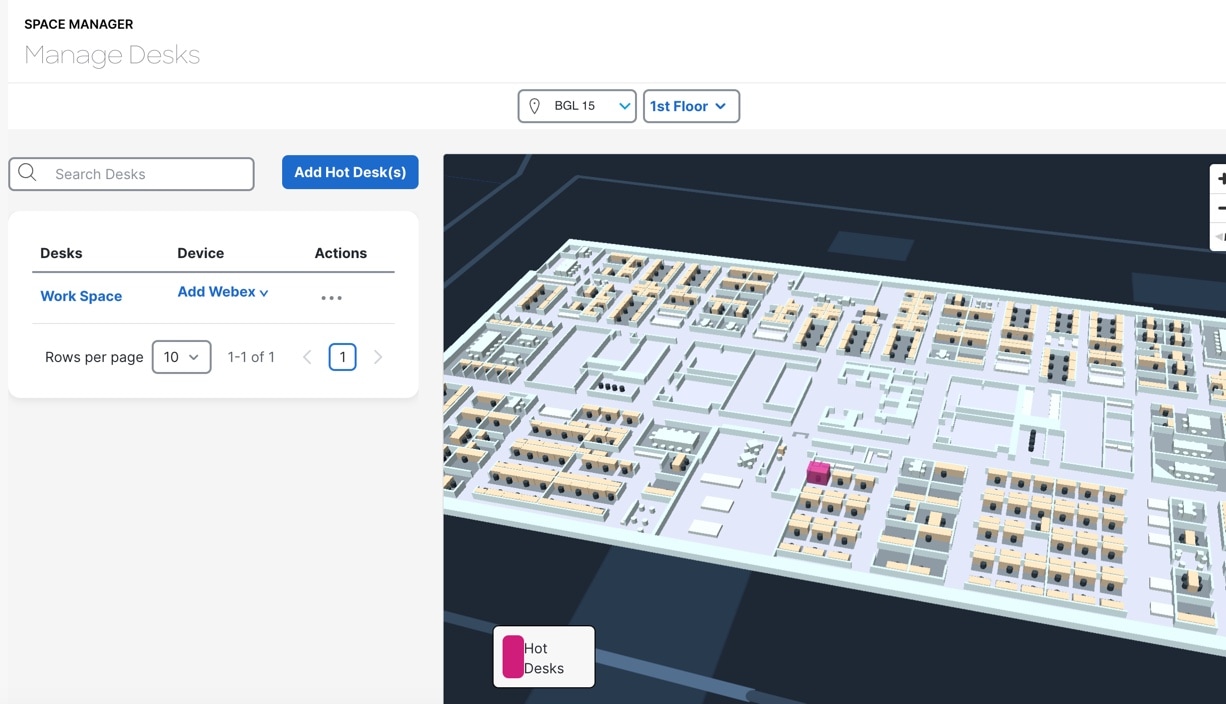
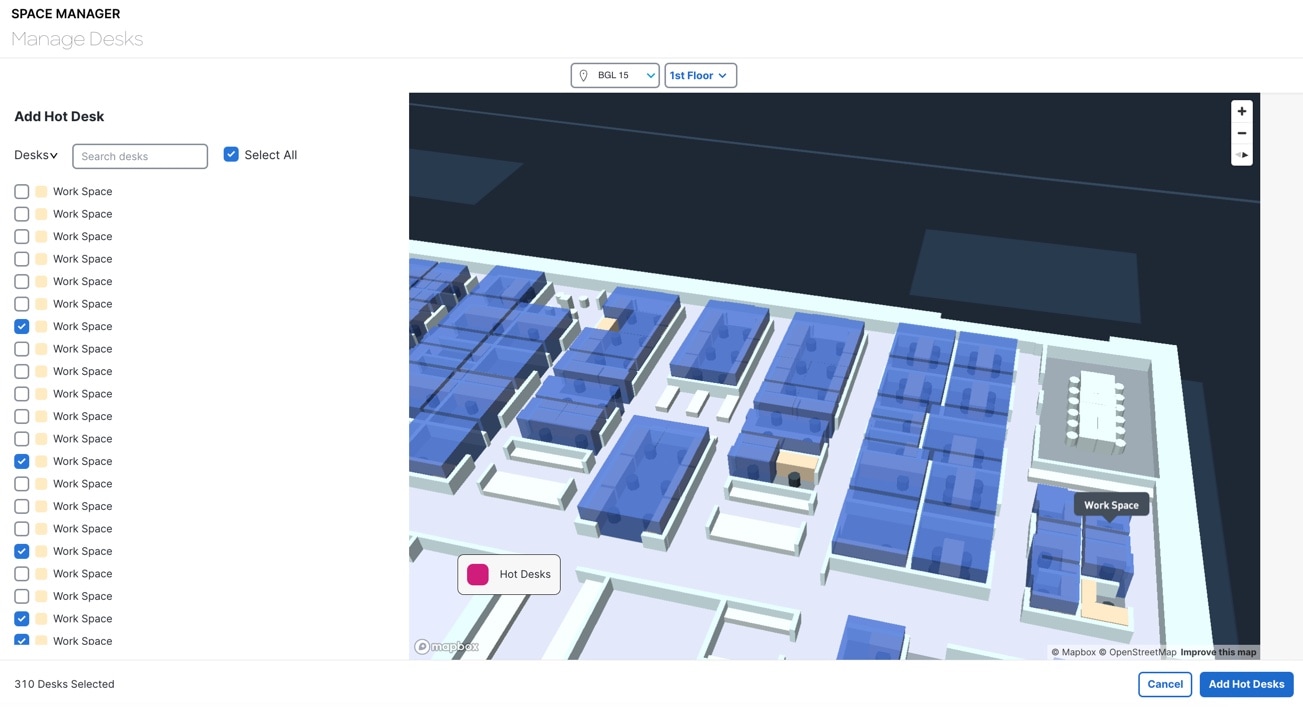
  • In the Manage Desks section, you can select workstations to add bookable hot desks to your Cisco Spaces employee experience applications and optionally assign IoT or Collaboration Devices to show live occupancy status.

  • In the User Management section, you can view a listing of all Space Manager users and their assigned roles. You also have the option to invite users to a specific campus, Meraki Org, building or network.

The Space Manager app is tied to these license types:

  • ACT (displayed in UI as Advantage)

  • UNLIMITED

  • PREMIER_W

  • PREMIER_CW

Figure 2. Space Manager App

Manage Devices

Procedure


Step 1

In Cisco Spaces, choose Dashboard > Space Manager.

The Space Manager window is displayed.

Step 2

In the left pane, click Devices.

Step 3

From the filter options drop-down list, choose the building and floor.

Step 4

View these device details:

  • Total Devices

  • Webex

  • Catalyst

  • BLE

  • Meraki

  • Wired

Figure 3. Devices

Manage Rooms

In the Space Manager app, you can view information about various rooms in a building or floor in the Manage Rooms page.

If you select a room, you can add Capacity and Tags metadata to the room details to provide additional information. These changes are intended to help you manage rooms more efficiently

Procedure


Step 1

In Cisco Spaces, choose Dashboard > Space Manager.

The Space Manager window is displayed.

Step 2

In the left pane, click Manage Rooms.

Figure 4. Manage Rooms

Step 3

In the Manage Rooms page, a table listing of configured rooms is displayed.

You can view configuration information about these parameters:

  • Webex Workspace

  • Occupancy Sensor

  • Calendar

  • Sensors

Use the Search field to search for meeting rooms.

Step 4

From the filter options drop-down list, choose the building and floor.

Step 5

To filter the records, click from any one of these drop-down lists:

  • By Sensor: Choose the required sensor filter options.

  • By Webex: Choose the required filter options.

  • By Calendar: Choose the required filter options.

Step 6

Click Export if you want to export the room details in a CSV format.

Step 7

Perform these if required:

  • Click Edit icon to edit any of these parameters.

  • Click the three dots to view these options: Add IoT Sensors and Disconnect Webex Workspace.

    Click Add IoT Sensors to add sensor devices. For more information, refer to Add IoT Sensor(s).

  • Click the Settings icon to reset or filter the display options. For more information, refer to Table Settings.

Step 8

Click the room to view the summary of the room metadata from digital maps, added sensors and other relavant information.

The left pane displays these options:

  • Room Details

  • Webex

  • IoT Sensor

  • Calendar

  • Occupancy

Figure 5. Room details

Step 9

In the Room Details section, for the room you select, you can:

  1. In the Capacity field, enter the people capacity.

  2. Click Tags field to view the list of available tags.

  3. Check the required tag check box.

  4. Click Save.

Figure 6. Room details

Step 10

In the IoT Sensor section, click Add IoT Sensor(s) to associate IoT sensor devices to the selected room.

Figure 7. IoT Sensor

Step 11

In the Calendar section, from the Select Calendar drop-down list, select and link a calendar to read calendar events.

Search the list of resources to read the calendar using Microsoft 365 or Google Calendar. When you link to a room with a Webex Workspace, Webex Hybrid Calendar events are overridden.

Figure 8. Calendar

Step 12

In the Occupancy section, update the primary device for occupancy status.

Figure 9. Occupancy
  1. From the Occupancy Device drop-down list, select the device.

  2. Choose the Occupancy Type. The options are:

    • Presence + People Count

    • People Count

    • Presence

Step 13

Click Save to save the updates.


Add IoT Sensor(s)

The Add IoT Sensor(s) page enables administrators to associate available IoT sensor devices with a selected room. This page displays all the devices available in your workspace vicinity.

Procedure


Step 1

In the Add IoT Sensor(s) page, check the check box next to the required device tile.

Figure 10. Add IoT Sensor(s)

Step 2

For the selected device, click the down arrow to view these details.

  • Location

  • Sensor Type

  • MAC Address

Step 3

At the top of the left panel, you can use these filter options to refine the list of available devices.

  1. Use the Search field to find a device by name or identifier.

  2. From the Device Type drop-down list, select either Wired or BLE to filter devices by category.

  3. From the Sensors drop-down list, select any required sensor-related devices option to refine the display.

    The options are:

    • Humidity

    • AQI

    • Weather

    • Temperature

    • CO2

    • Presence

Step 4

Configure the floor map for the location.

Step 5

Click Save.


Table Settings

Table settings allow you to personalize the appearance and layout of the table by adjusting row density, selecting which columns to display, and arranging the order of columns.

To access Table settings, click the Settings icon in the Manage Rooms window.

Figure 11. Table settings

In the Table settings slide-in window, you can perform these actions.

Change Table Density

Under Table density area, select how compact or spacious the rows in your table appear. The options are:

  • Condensed: Displays more rows with tight spacing.

  • Compact: Offers balanced spacing.

  • Comfy: Adds more padding for easier reading.

  • Spacious: Provides the most spacing for maximum readability.

Show or Hide Columns

In Column settings, use checkboxes to control column visibility:

  • Check a check box to show a column.

  • Uncheck a check box to hide a column.

Available options include:

  • Webex Workspace

  • Capacity

  • Webex

  • IoT Sensors

  • Occupancy Sensor

  • Calendar


Note


The Room column is mandatory and cannot be hidden.


Reorder Columns

Within Column settings, drag columns using the drag handle (grip icon) to change their order. After applying changes, the table updates to reflect the new column arrangement.

Save or Discard Changes

At the bottom of the settings panel, you can click:

  • Apply: To save changes and update the table.

  • Cancel: To close the panel without saving.

  • Reset to default: To restore default settings for density, columns, and column order.

Manage Desks

Use this task to efficiently manage desks within your workspace environment. You can add new desks, search for existing desks, and remove desks as needed to keep your workspace configuration up to date.

This task is useful for workspace administrators who need to keep track of desk inventory or adjust desk assignments in response to organizational changes.

Follow these steps to add, search for, and remove desks using the Manage Desks page.

Procedure


Step 1

In Cisco Spaces, choose Dashboard > Space Manager.

The Space Manager window is displayed.

Step 2

In the left pane, click Manage Desks.

Figure 12. Manage Desks

Step 3

In the Manage Desks page, a table listing configured desks is displayed.

Use the Search field to search for configured desks.

Step 4

From the filter options drop-down list, choose the building and floor.

Step 5

View these desk details:

  • Desks

  • Device

Step 6

Click Add Hot Desk(s) to add desks.

Step 7

Click Actions to perform these:

  1. Click Add PIR Sensor to configure the floor map for the location and add devices.

  2. Click Remove Hot Desk to delete a desk from the configuration.


Add Hot Desk

Use this task to add new hot desks to your organization’s workspace management system, enabling employees to reserve and use flexible seating as needed.

Adding hot desks ensures that employees can find and reserve available desks quickly, especially in dynamic or hybrid workplaces.

Procedure


Step 1

In Cisco Spaces, choose Dashboard > Space Manager.

The Space Manager window is displayed.

Step 2

In the left pane, click Manage Desks.

Step 3

Click Add Hot Desk(s) to add desks.

Figure 13. Manage Desks

Step 4

From the filter options drop-down list, choose the building and floor.

Step 5

Check the required workspaces check boxes. The map displays the hot desks as per your selection.

Step 6

Click Add Hot Desks.


Manage Users

Procedure


Step 1

In Cisco Spaces, choose Dashboard > Space Manager.

The Space Manager window is displayed.

Step 2

In the left navigation pane, click User Management.

The User Management is displayed.

Figure 14. User Management

Step 3

In the User Management window, click the Users tab.

Step 4

To invite other Cisco Spaces users to use the Space Manager app, click Invite User.

Step 5

Specify these parameters.

  1. Enter the user's email address associated with their Cisco Spaces account.

  2. Choose the role depending on the user's access privilege. You can choose between Read Write User (full access) or Read Only User (read-only access).

    Note


    To view user roles available in Space Manager, in the User Management window, click the Roles tab.

    • Role depending on the user's access privilege. You can choose between Read Write User (full access) or Read Only User (read-only access).

    • Location from the Location Hierarchy available in Cisco Spaces. Click Choose Locations to view all locations.

Step 6

Click Send Invitation.

Step 7

To delete an existing user, in the Users table, select the desired user(s) and click Delete.

The Users table is displayed listing available users and their assigned roles.

Configure Occupancy Reports

In the Space Manager app, you can configure, view, and download Room Occupancy Reports for a floor or building. This report provides the aggregated people count every 15 minutes in different rooms for the chosen floors and buildings.

Room Occupancy Reports contain information such as the building name, floor number, room name, room capacity, and peak people count in the room.

Procedure


Step 1

In Cisco Spaces, choose Dashboard > Space Manager.

The Space Manager window is displayed.

Step 2

In the left navigation pane of the Space Manager window, click Room Occupancy Reports.

Step 3

In the Room Occupancy Reports window, click Create New Report.

The Report Parameters wizard is displayed.

Step 4

In the Select Report Level section, click to choose one among Buildings, or Floors.

Step 5

Click Next.

The Locations pane is displayed.

Step 6

In the Locations pane, expand the hierarchy to navigate to the desired location, and select the corresponding check box.

Note


Alternatively, in the Locations pane, you can search for the desired Building, or Floor.

The selected locations are displayed in the right side of the pane.

Step 7

Click Next.

The Date Range pane is displayed.

Step 8

In the Select Date Range section, you can either specify a date range or choose a cadence for the occupancy report.

  1. Specify Date Range: Choose this option if you need a report for a fixed time period and select the Start Date and End Date from the date picker.

    Note


    The dates are based on the selected location's local time zone.

  2. Recurring Report: Choose this option if you want to generate a recurring occupancy report and specify the cadence by choosing one among the following options:

    • Weekly: This report contains data for the last completed week (Sunday to Saturday).

    • Bi-weekly: This report contains data for the last completed two weeks.

    • Monthly: This report will contain data for the last completed month.

Step 9

Specify the Reporting Time Interval by choosing one of these options: 15 minutes, 30 minutes, or 60 minutes.

Step 10

Click Next.

The Report Filters pane is displayed.

Step 11

In the Report Filters pane, you can specify the following criteria for the occupancy report:

  1. Under Filter By Specific Day(s), you can either select specific days of the week, or All Days of the Week.

    Note


    You must select at least one day. If not, the following error message is displayed:

    Atleast one day must be selected to generate a report.

  2. Under Filter By Specific Hours, you can either choose Full Day (24 Hrs) or specify the Start Time and End Time.

  3. Under Filter By Capacity of Room(s), choose the desired room capacity.

    Note


    You must select at least one room capacity group. If not, the following error message is displayed:

    Atleast one capacity group must be selected to generate a report.

  4. Choose Skip Empty Rows to exclude entries for those intervals where there is no data.

Step 12

Click Create Report.


What to do next

From the Space Manager left navigation pane, go to Room Occupancy Reports. In the Report History page, you can perform the following actions:

  • Download configured reports by clicking Download (for reports configured for a fixed date range) or Download Recent (for recurring reports) corresponding to the report name in the table.

  • Edit configured reports by navigating to the ellipsis icon (...) corresponding to the desired report in the table and clicking Edit.

  • View configured reports

View Occupancy Reports

Procedure


Step 1

In Cisco Spaces, choose Dashboard > Space Manager.

The Space Manager window is displayed.

Step 2

In the left navigation pane, click Room Occupancy Reports.

Step 3

In the Report History page, click the desired Report Name.

The detailed report is displayed.

Step 4

In the Reports pane, you can view the following details:

  • Report Name: This can be edited and is also updated in the Report History table.

  • Buildings: This is displayed in an occupancy report configured for buildings and indicates the total building count included in this report.

  • Floors: This is displayed in an occupancy report configured for floors and indicates the total floor count included in this report.

  • Rooms: This displays the total room count in the buildings or floors included in this report.

  • Reporting Interval: The frequency at which the room data is reported.

  • Showing <reporting period> data: The cadence for the report which can be one among weekly, bi-weekly, monthly, or a fixed interval.

  • Additional Filters: The days, timings, and room capacity based on which the data in the report is filtered.

  • A table listing the individual rooms (Workspace) along with the corresponding Floor and Building details, the assigned room capacity, the peak people count in the room, the Date and Interval Start Time (Local) as per the specified reporting criteria.


What to do next

You can edit and download individual Room Occupancy Reports both from the Report History table or while viewing the specific report.