Installing Cisco CMX in a VMware Virtual Machine
This chapter describes how to install and deploy a Cisco Mobility Services Engine (MSE) virtual appliance.
Cisco CMX is a prebuilt software solution that comprises one or more virtual machines (VMs) that are packaged, maintained, updated, and managed as a single unit. Cisco CMX is distributed as an Open Virtual Appliance (OVA) for installation on a virtual appliance and as an ISO image for installation on a physical appliance.
Cisco CMX acts as a platform (physical or virtual Cisco Mobility Services Engine [MSE] appliance) to deploy and run the Cisco services.
If you choose Location during installation, you will see the following services in Cisco CMX GUI.
-
DETECT & LOCATE—Active for 120 day trial period unless either a CMX base or advanced license is added.
-
ANALYTICS—Active for 120 day trial period unless a CMX advanced license is added.
Virtualization Concepts
Refer to these documents for information on virtualization:
Installation Overview
The following table lists the Cisco CMX virtual appliance installation process and contains information about the sections providing details about them:
| Step | Task | See |
|---|---|---|
|
1 |
Review the deployment checklist and prepare for the installation of a Cisco CMX virtual appliance. |
Cisco CMX Virtual Appliance Deployment Checklist and Hardware Guidelines |
|
2 |
Download the Cisco CMX Open Virtualization Archive (OVA) file from Cisco.com. |
|
|
3 |
Deploy the Cisco CMX OVA file. |
Deploying the Cisco CMX OVA File Using the VMware vSphere Web Client |
|
4 |
Configure the basic configurations and install the Cisco CMX virtual appliance. |
 Note |
Performing a Cisco CMX installation over high latency links might not work in a reliable manner. If you want to install Cisco CMX on a remote location, we recommend that you load the ISO to a remote file server that can be accessed locally by the remote server. |
Restrictions for Installing Cisco CMX in a VMware Virtual Machine
-
Map size must be less than 5 MB in Cisco Prime Infrastructure.
-
There must be less than 1000 access points on a single map.
-
The Mobile Application Server is not available.
-
The Wireless Intrusion Prevention System (wIPS) is available with limited feature support. From 10.4 release onwards, Cisco CMX supports rogue access points and rogue clients.
-
A common NTP server must be used to synchronize the time.
-
Simple Mail Transfer Protocol (SMTP) Mail Server name and authentication mechanism must be used for the Cisco CMX mail notification system.
-
VMware vSphere Storage API - Data Protection (VADP) hypervisor clone feature is not supported
Cisco CMX Virtual Appliance Deployment Checklist
-
Cisco Wireless Controller has IP connectivity to a Cisco CMX instance.
-
Cisco Prime Infrastructure has IP connectivity to a Cisco CMX instance.
-
Port 16113 is routable from Cisco WLC to the Cisco CMX IP address.
-
Port 161 (for Simple Network Management Protocol [SNMP] traffic) is routable from Cisco WLC to the Cisco CMX IP address.
-
SSH client to log in with the root access to the VM is present.
-
A Secure Copy (SCP) client (on MAC native or installed on PC) or a Secure File Transfer Protocol (SFTP) exists to move files into Cisco CMX OVA (specifically, map files and images to upgrade).
-
Ensure that UDP port 2003 is routable from Cisco WLC to Cisco CMX IP addresss for hyperlocation .
Note |
If you are using Cisco 3365 CMX Appliance and need to deploy Cisco CMX 10.5, you can only restore a backup file of maximium 200GB. If your backup file size is more than 200GB, we recommend that you add external disks or perform a selective backup for restoring Cisco CMX data. |
Prerequisites for Installing Cisco CMX in a VMware Virtual Machine
-
VMWare vSphere client.
-
Cisco 11.0.0 OVA, which can be downloaded from Download Software page on cisco.com.
-
Hostname IP address, netmask, default gateway, DNS IP address, and Network Time Protocol (NTP) Server IP address or name.
Hardware Guidelines
The following table lists the hardware guidelines for the Cisco CMX virtual appliance.
Note |
If the hardware requirements are not met, the OVA deployment fails. Similarly, the Cisco CMX setup fails during installation when the other minimum requirements listed in the table below are not met. |
| Hardware Platform | Basic Appliance | Standard Appliance | High-End Appliance |
|---|---|---|---|
|
CPU |
8 vCPU (2.4 GHz core) |
16 vCPU (2.4 GHz core) |
20 vCPU (2.4 GHz core) |
|
RAM |
24 GB |
48 GB |
64 GB 1 |
|
HDD 2 |
550 GB |
550 GB |
1 TB |
Note |
We recommend you to allocate the required HDD space. For more information, see Deploying the Cisco CMX OVA File Using the VMware vSphere Web Client. |
Release Upgrade Compatibility Matrix
The following table lists the Cisco CMX releases available on Cisco.com.
|
Cisco CMX Release |
OVA |
3365 ISO |
3375 ISO |
Upgrade Option Only |
|---|---|---|---|---|
|
10.1.0 |
cmx-v10-1-0.ova |
— |
— |
|
|
10.1.1 |
— |
10.1.1 |
— |
|
|
10.1.1-2 |
— |
— |
cisco_cmx-10.1.1-2.tar.gz (cisco_cmx-10.1.1-2.x86_64.rpm and cisco_cmx_connect-10.1.1-30.x86_64.rpm) |
|
|
10.1.2 |
— |
— |
cisco_cmx-10.1.1-2.tar.gz |
|
|
10.2 |
10.2 OVA |
10.2 ISO |
10.2 backend upgrade (10.1 and 10.1.1 to 10.2) script and.CMX image file |
|
|
10.3 |
10.3 OVA |
10.3 ISO |
— |
|
|
10.4 |
10.4 OVA |
10.4 ISO |
— |
|
|
10.5 |
10.5 OVA |
10.5 ISO |
No direct upgrade option. New OVA/ISO System |
|
|
10.6 |
10.6 OVA |
10.6 ISO |
10.6 ISO |
— |
|
Release |
Location and Analytics Node |
Location and Connect Node |
Location, Analytics, and Connect Node (L-Node) |
Connect and Presence Node (P-Node) |
High Availability |
|---|---|---|---|---|---|
|
10.1.0 |
Yes |
— |
— |
— |
— |
|
10.1.1-2 |
Yes |
Yes |
Yes |
— |
— |
|
10.1.2 |
Yes |
Yes |
Yes |
— |
— |
|
10.2 |
Use the upgrade script to change Location and Analytics to Location, Analytics, and Connect internally. |
Use the upgrade script to change Location and Connect to Location, Analytics, and Connect internally. |
Yes |
Yes |
— |
|
10.3 |
Use the upgrade script to change Location and Analytics to Location, Analytics, and Connect internally. |
Use the upgrade script to change Location and Connect to Location, Analytics, and Connect internally. |
Yes |
Yes |
Yes |
|
10.4 |
Use the upgrade script to change Location and Analytics to Location, Analytics, and Connect internally. |
Use the upgrade script to change Location and Connect to Location, Analytics, and Connect internally. |
Use the upgrade script to change Location and Connect to Location, Analytics, and Connect internally. |
Yes |
Yes |
|
10.5 |
No direct upgrade is available. New OVA/ISO system upgrade |
No direct upgrade is available. New OVA/ISO system upgrade |
Yes |
Yes |
Yes |
|
10.6 |
Use the upgrade script to change Location and Analytics to Location, Analytics, and Connect internally. |
Use the upgrade script to change Location and Connect to Location, Analytics, and Connect internally. |
Yes |
Yes |
Yes |
|
Upgrade Path 13 |
Location and Connect Node |
Location and Analytics Node |
Location, Analytics, and Connect Node (L-Node) |
Connect and Presence Node (P-Node) |
||
|
10.1.0 OVA to 10.2 |
10.2 backend script to upgrade image to10.2 and change Location and Connect to Location, Connect, and Analytics. |
10.2 backend script to upgrade image to10.2 and change Location and Analytics to Location, Connect, and Analytics. |
10.2 backend script to upgrade image to 10.2. |
— |
||
|
10.1.1-2 tar.gz to 10.2 |
10.2 backend script to upgrade image to10.2 and change Location and Connect to Location, Connect, and Analytics. |
10.2 backend script to upgrade image to10.2 and change Location and Analytics to Location, Connect, and Analytics. |
10.2 backend script to upgrade image to 10.2. |
— |
||
|
10.1.2 tar.gz to 10.2 |
10.2 backend script to upgrade image to10.2 and change Location and Connect to Location, Connect, and Analytics. |
10.2 backend script to upgrade image to10.2 and change Location and Analytics to Location, Connect, and Analytics. |
10.2 backend script to upgrade image to 10.2. |
— |
||
|
10.2 OVA/ISO to 10.3 |
— |
— |
UI upgrade script to upgrade image. |
UI upgrade script to upgrade image |
||
|
10.3 OVA/ISO to 10.4 |
— |
— |
UI upgrade script to upgrade image. |
UI upgrade script to upgrade image |
||
|
10.5 OVA/ISO |
— |
— |
UI upgrade script to upgrade image. |
UI upgrade script to upgrade image |
||
|
10.6 OVA/ISO |
— |
— |
UI upgrade script to upgrade image. |
Upgrade is supported from the Cisco CMX Release 10.5.x to Cisco CMX Release 10.6.
|
VM Alerts
The following table displays the alerts shown on the VM for the following conditions:
|
Hard Disk Status |
Alert Shown |
|---|---|
|
50 percent |
Do Not Back Up |
|
80 percent |
System Is About To Run Out Of Space |
|
85 percent |
All The Services Are Stopped |
Downloading the Cisco CMX OVA File
Procedure
|
Step 1 |
Download the Cisco CMX image from the Download Software page on cisco.com. |
|
Step 2 |
Save the Cisco CMX OVA installer to your computer and ensure that it is accessible. |
Deploying the Cisco CMX OVA File Using the VMware vSphere Web Client
From VMware vSphere Release 6.5, the thick client is no longer supported. Only the vSphere Client (HTML 5) and vSphere Web Client are supported.
To deploy the Cisco CMX OVA file using the VMware vSphere Web Client, follow these steps.
Procedure
|
Step 1 |
Launch the VMware vSphere Web Client application on your desktop. |
||
|
Step 2 |
From the Navigator pane, click Create/Register VM to create or register a virtual machine (VM). The Deploy OVF Template window is displayed. |
||
|
Step 3 |
In the Select an OVF Template section, click the Local file radio button to browse to a local directory, select the Cisco CMX OVA file that is stored locally, and click Next. This helps you create a VM from a Cisco CMX OVA file. 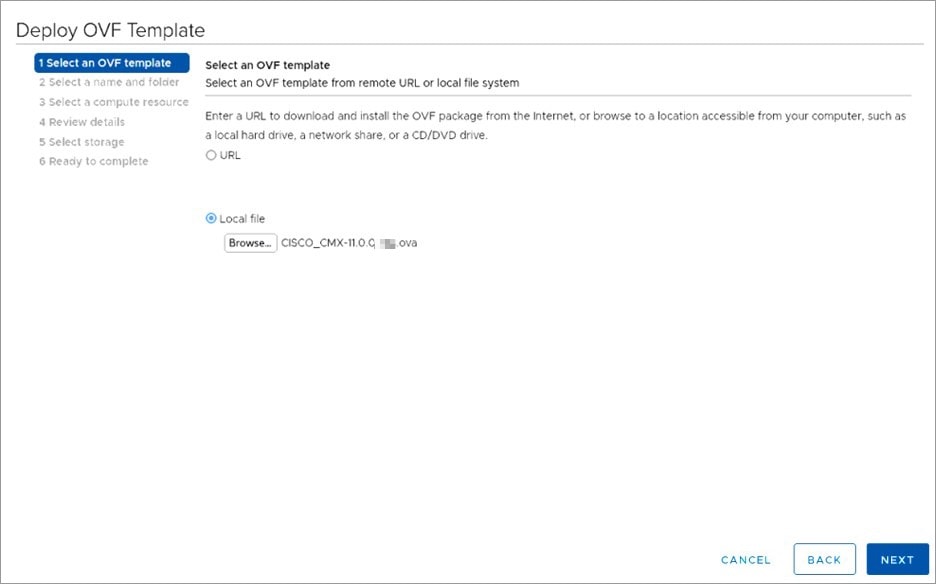
|
||
|
Step 4 |
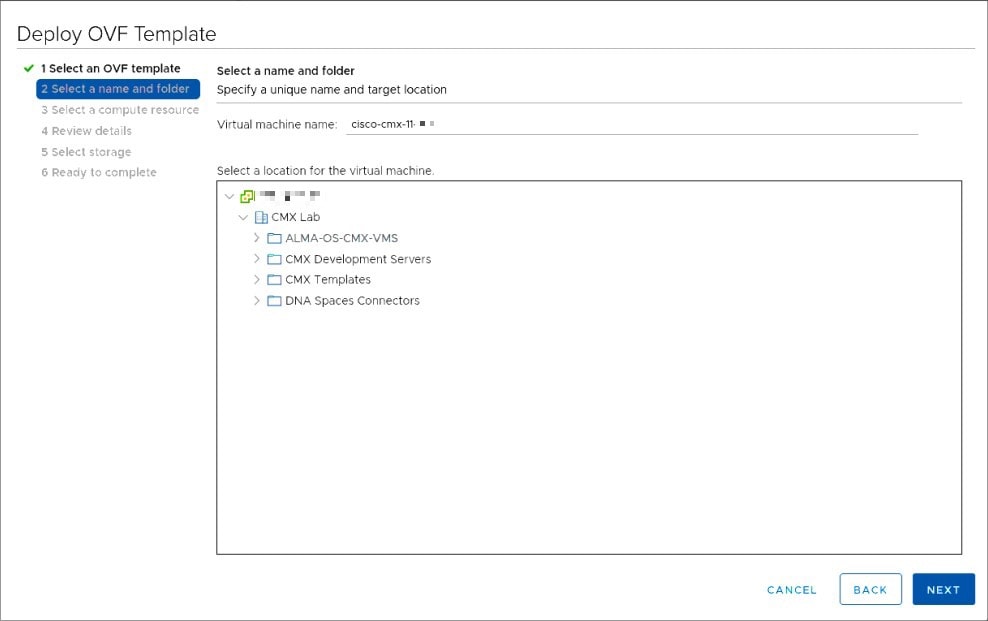
In the Select a name and folder section, enter the following information and click Next.
|
||
|
Step 5 |
In the Select a compute resource section, select the destination data store for the VM configuration files and virtual disks and click Next. 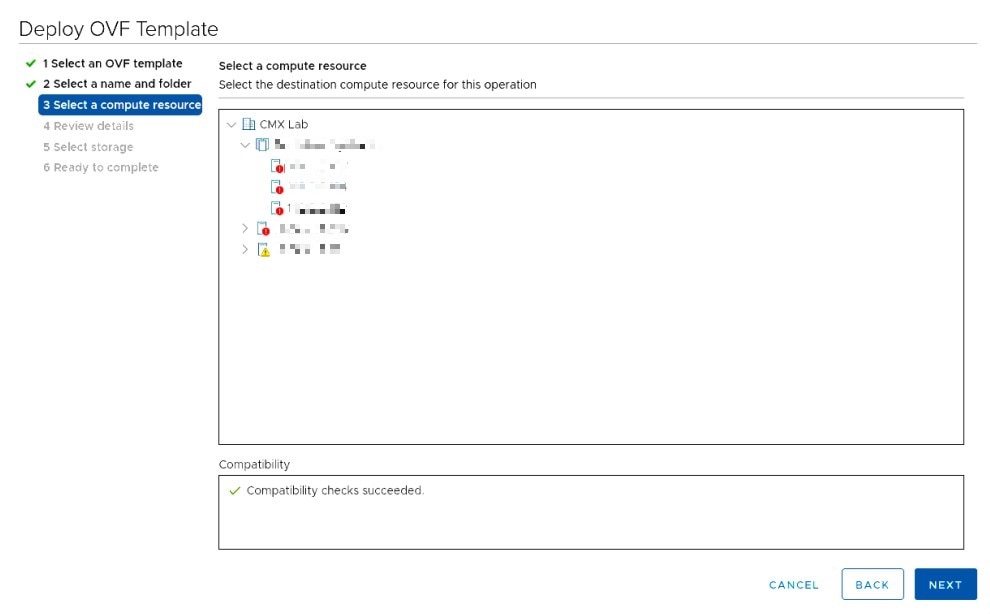
|
||
|
Step 6 |
In the License agreements section, click the I accept all license agreements check box to accept the End User License Agreement and click Next. 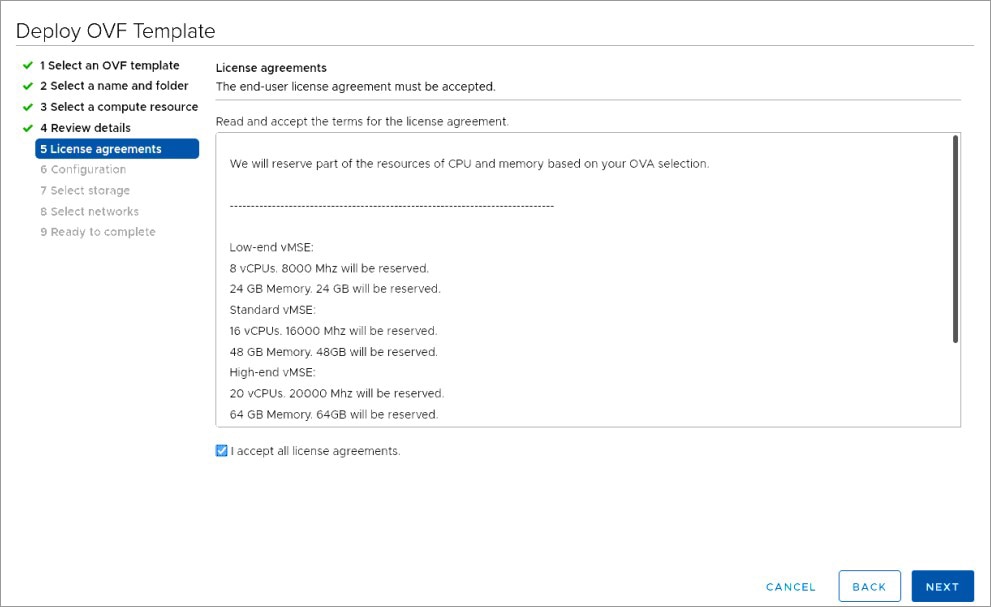
|
||
|
Step 7 |
In the Select storage section, select the storage for the configuration and disk files and click Next. 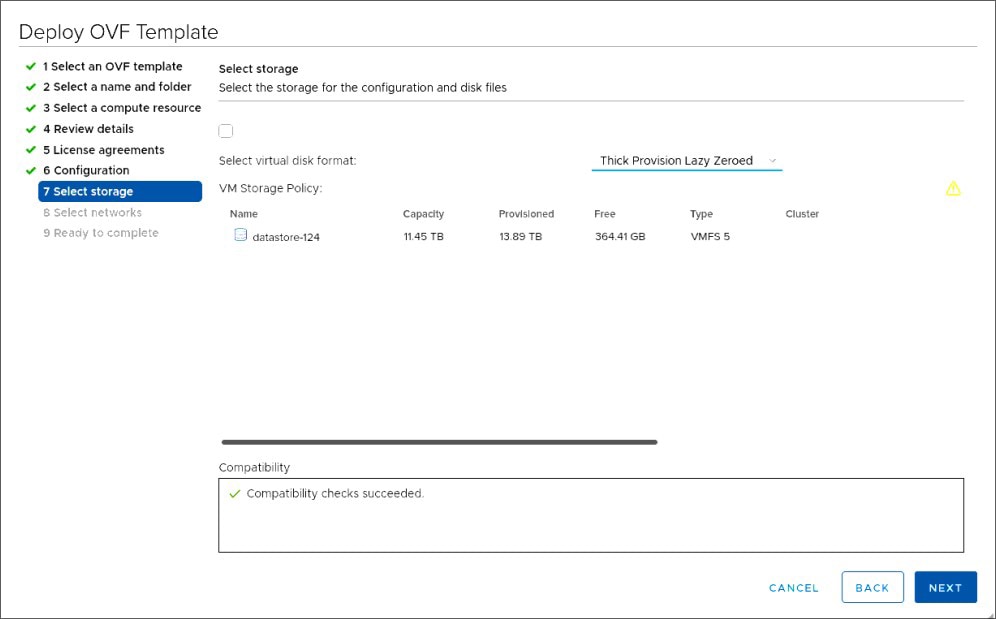
|
||
|
Step 8 |
In the Select Networks section, from the Destination Network drop-down list, choose a destination network for each source network and click Next. 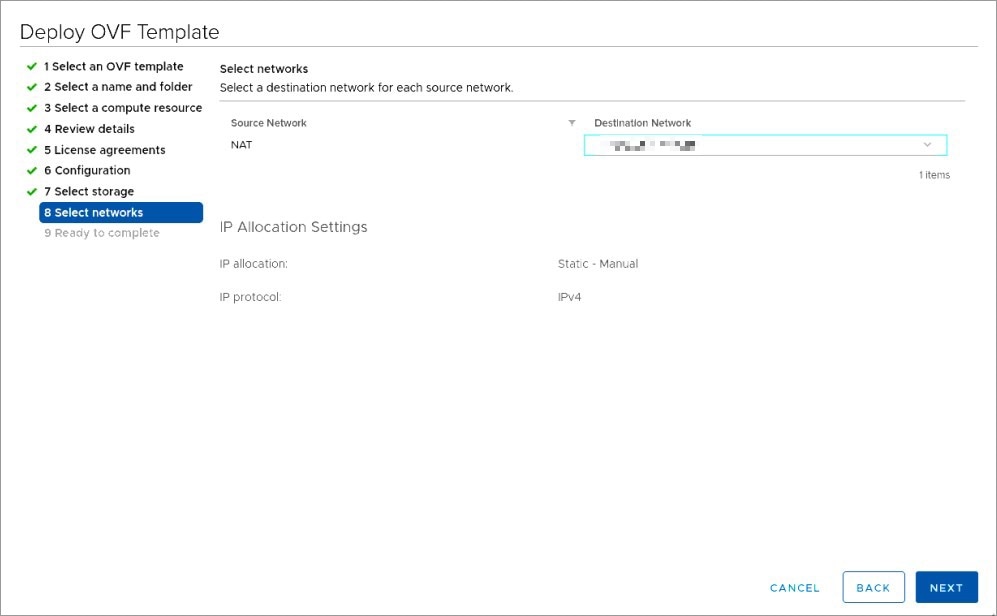
|
||
|
Step 9 |
In the Ready to complete section, review the settings and click Finish. Do not refresh the browser when the VM is deployed. 
|
||
|
Step 10 |
Click the deployed VM and choose Actions > Edit Settings. |
||
|
Step 11 |
In the Virtual Hardware tab, in the Hard disk 1 field, modify the provisioned size to match the instance requirement and click OK. The default size is 250 GB. 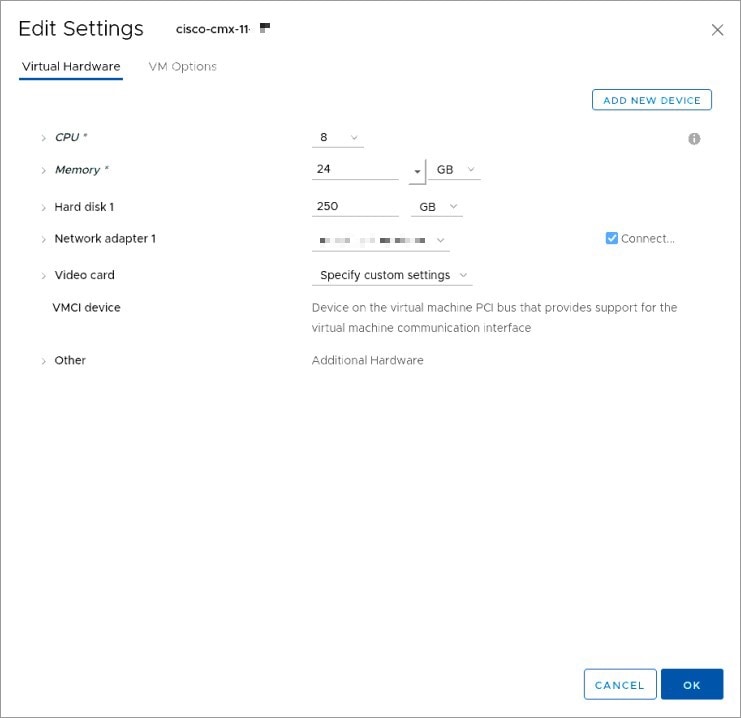
 |
||
|
Step 12 |
Click Power on to power on the VM. The first boot takes a while because the new disk has to be expanded. 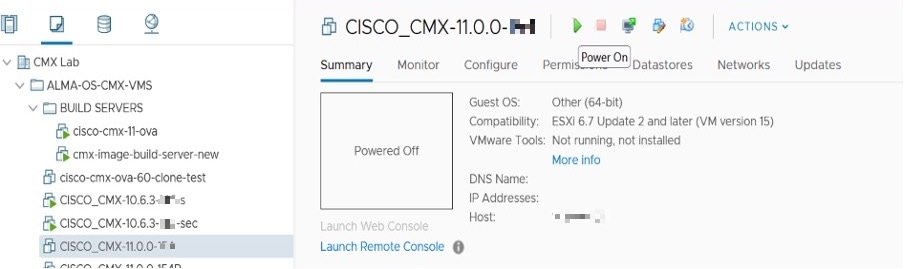
|
Configuring Cisco CMX Release 11.0.0
After the Cisco CMX is deployed, you can install and configure a Cisco CMX VM. Note the following points:
-
Cisco CMX does not have a node install menu. However, there is a first-boot script that checks if a configuration exists on the device. If the script does not find a valid configuration, it launches the setup routine and initiates network configuration tasks using the CLI and completes the installation. You should not use the Web install.
-
The new first-boot script determines if the initial configuration is completed, and then displays the normal login prompt. If the initial configuration is not completed, the default login prompt is displayed.
Note |
The cmxctl node install command is no longer valid. |
To install and configure a Cisco CMX VM, follow these steps.
Procedure
|
Step 1 |
Right-click the Cisco CMX VM and click Open Console. The initial boot displays two options, with the first option being selected by default. Retain the selection and wait for five seconds. |
||
|
Step 2 |
Enter the login name cmxadmin and password cisco, as prompted. 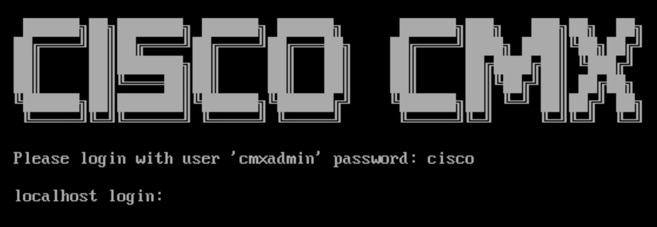
|
||
|
Step 3 |
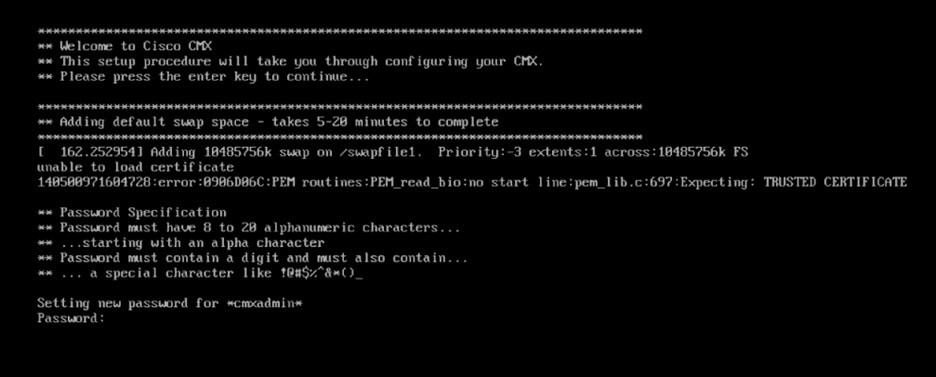
Press Enter when prompted. 
|
||
|
Step 4 |
Enter a new password for the root user and reconfirm it when prompted. The password should meet the minimum requirements listed on the screen.
|
||
|
Step 5 |
Enter a new password for the cmxadmin user and reconfirm it. The password should meet the minimum requirements listed on the screen.
|
||
|
Step 6 |
Enter the following network configuration parameters when prompted.

|
||
|
Step 7 |
Confirm the network configurations when prompted. 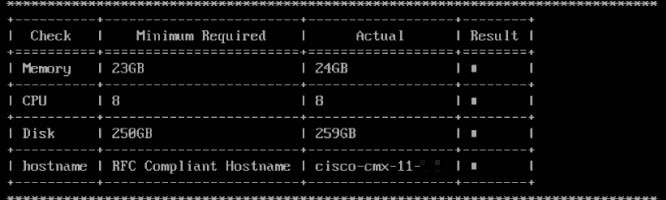
|
||
|
Step 8 |
(Optional) Enter the NTP server name or the IP address of the NTP server when prompted. 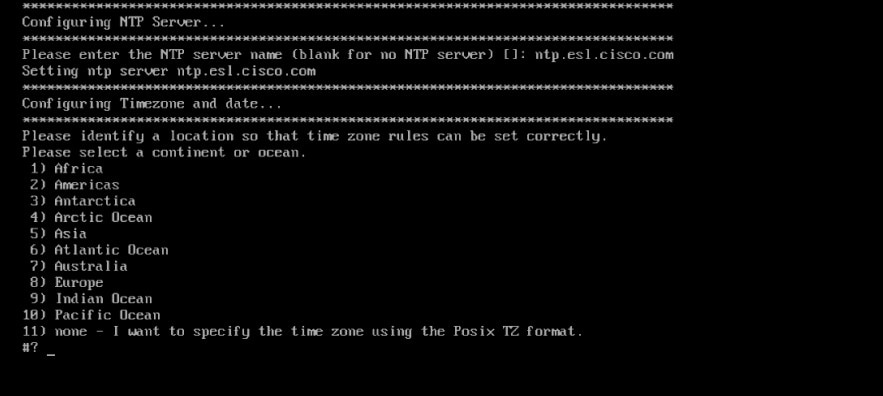
|
||
|
Step 9 |
Configure a time zone and save the changes. 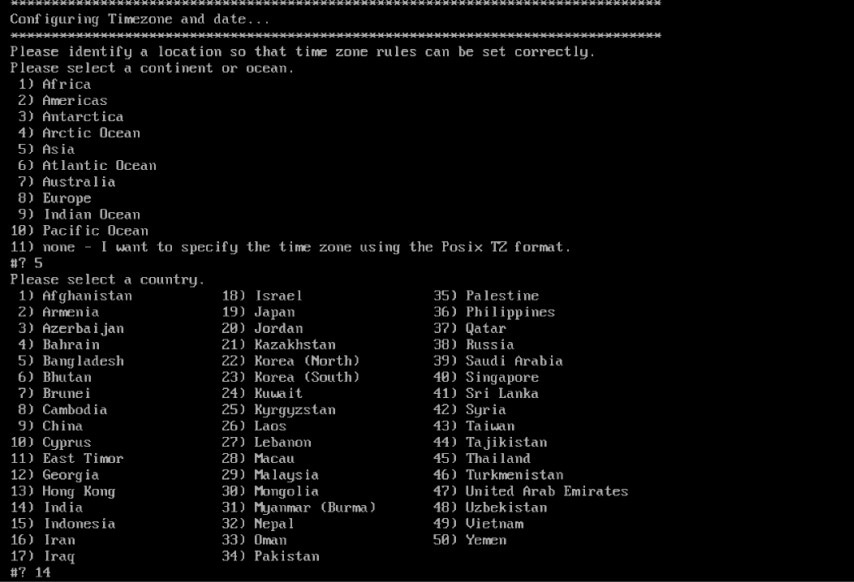
|
||
|
Step 10 |
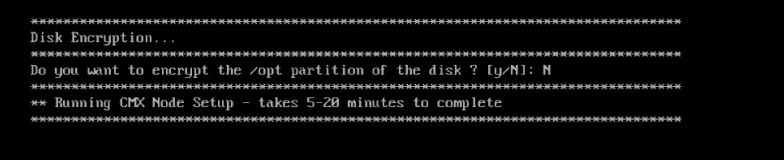
Encrypt the /opt partition of the disk. For Cisco CMX Release 11.0.0, select N.
|
||
|
Step 11 |
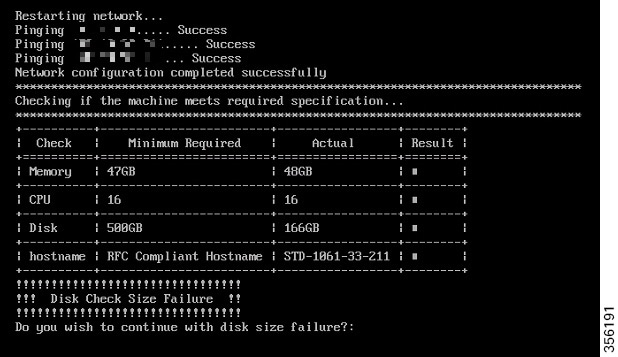
After the Cisco CMX installation is complete, the following success message is displayed. 
|
||
|
Step 12 |
To stop all the Cisco CMX services, run the cmxctl stop -a command. |
||
|
Step 13 |
To restart the Cisco CMX services, run the cmxctl start -a command. |
Verifying Installation of Cisco CMX in a VMware Virtual Machine
You can verify the overall system health and status of the Cisco CMX services using the System tab in the Cisco CMX GUI. Ensure that all the services, memory, and CPU indicate a healthy status (green) for each Cisco CMX and Cisco CMX node, and that there is at least one active Cisco WLC.
The System tab contains the following subtabs:-
Dashboard: Provides an overall view of the system.
-
Alerts: Enables you to view live alerts.
-
Patterns: Enables you to detect patterns of various criteria, such as Client Count, CPU Usage, Memory Usage, and so on.
-
Metrics: Enables you to view system metrics.
 Feedback