802.1X EAP Supplicant on COS AP
Available Languages
Contents
- Introduction
- EAP-TLS Authentication Workflow and Message Exchange
- EAP-PEAP Authentication Workflow and Message Exchange
- Restrictions to the 802.1x Feature in release 8.7
- Deployment and Test Scenarios
- Two Stage Deployment
- Configurations Steps for 802 .1x AP Supplicant
- Configuration and Debug on the AP Side
- CLI 802.1x Configuration on the WLC
- WLC 802.1x EAP-TLS GUI Configuration
- Switch Port Configuration
- ISE - Adding Certificates to ISE and Creating Certificate Profiles
- Final Verification
Introduction
This document introduces the 8.7 Feature – 802.x supplicant enhancement on the AP.
Prior to rel 8.7, AP port 802.1x only supported EAP-FAST, in rel 8.7 the AP supplicant will also support EAP-TLS / EAP-PEAP. We should be able either use the MIC certificate on APs or also to push certificates from an external CA from the WLC. Certificates with non-exportable keys and EAP-TLS will make the AP completely secure. The CA/ Device Cert has to be pushed if 802.1x AP shall act as an 802.1x supplicant authenticated by the switch against a RADIUS Server that supports EAP-FAST along with EAP-PEAP and EAP-TLS. Once it is configured for 802.1x authentication, the switch does not allow any traffic other than 802.1x traffic to pass through the port until the device connected to the port authenticates successfully. The switch will perform source MAC filtering to ensure that only the authenticated endpoint is allowed to send traffic. The APs shall use the LSC provisioning method to download the vendor device and CA certificates to AP during staging process. These certificates shall be used by the AP to authenticate with switch port using EAP-TLS/PEAP method.
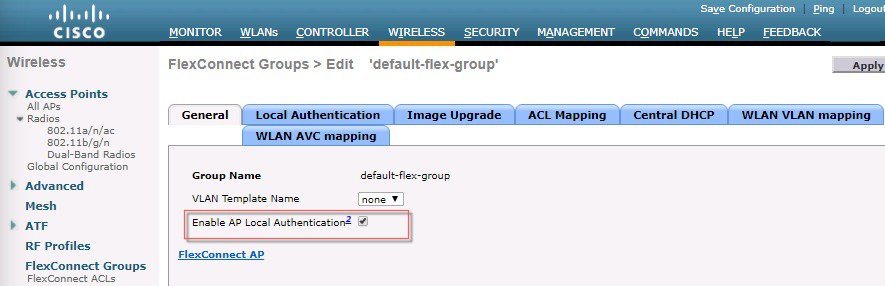
Authentication feature is enabled on the flex group, globally or the individual APs. This feature will operate with WLC3504/5520/8540 controllers. This feature will also be supported on all COS-APs in Flex Connect and Local Mode. APs in Bridge or Flex+Bridge mode are not supported in 8.7 release.
There will be a knob on the controller to enable 802.1x with EAP-TLS/EAP-PEAP/EAP_FAST. Only one authentication method can be enabled at a time. A global 802.1X configuration will be available for all APs, along with the option to override the global configuration for each AP individually. Individual AP specific configs will be maintained on the AP and sent to the WLC during the configuration stage of the join process.
The AP will try the configured EAP methods to authenticate to the dot1x port. The existing CAPWAP DTLS LSC support on the AP will be used for provisioning and downloading the certificate on to the AP for EAP authentication using EAP-TLS/PEAP.
Once the authentication is successful, AP will join the WLC using MIC (or ACT2 SUDI certificate if present) or LSC (configurable).
Authntication Workflow is shown in the Table below:
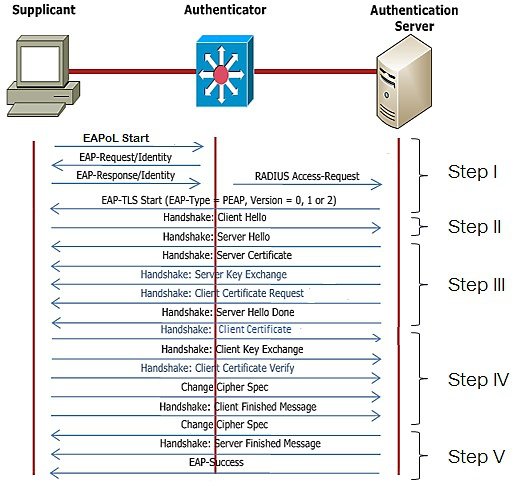
EAP-TLS Authentication Workflow and Message Exchange
As shown in the Table below EAP-TLS message exchange.
STEP I:
- When dot1x is enabled on the switch, switch does not permit the supplicant to send any data and sends an EAP Identity request
- The supplicant will then respond with an EAP Identity Response to the Authenticator.
- Authenticator will forward the EAP Identity Response to EAP server in RADIUS protocol.
- EAP server will send an EAP-TLS Start Packet to supplicant. The EAP-TLS conversation starts at this point.
STEP II:
- The supplicant sends an EAP-Response back to the authentication server which contains a client_hello handshake message.
STEP III:
The server will present its certificate to the supplicant as well as request a valid one from the supplicant. The authentication server responds with an EAP-Request packet that contains the following:
server_hello
handshake message
server certificate
server_key_exchange
certificate request
server_hello_done.
STEP IV
Supplicant responds with a EAP-Response message that contains the following:
- client certificate
- client_key_exchange
- certificate_verify - Verifies the server is trusted
- change_cipher_spec
- TLS finished
STEP V
EAP server will validate the client certificate and reply with cipher spec and server finished message.
Based on the client certificate validation, EAP server will send EAP success/failure.
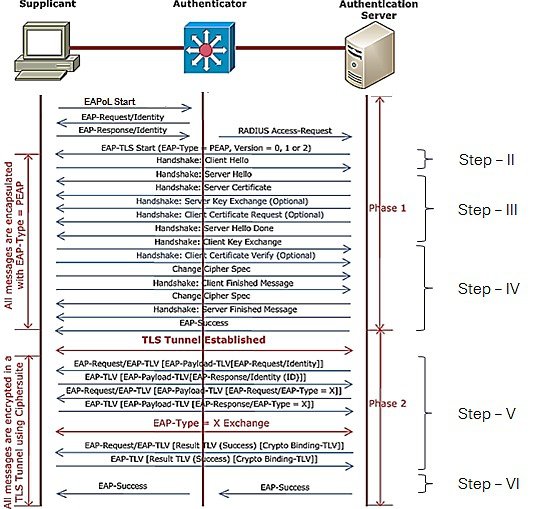
EAP-PEAP Authentication Workflow and Message Exchange
As shown in the Table below PEAP message exchange.
In EAP-PEAP, we have two stages.
STEP I - IV is same as EAP-TLS. However, the major difference lies in step 4 where the client will not exchange its certificate with the server instead will establish a TLS tunnel. The authentication messages can be exchanged securely in TLS tunnel. TLS tunnel is formed with the exchange of cipher spec.
STEP V
- After the tunnel is established, EAP server will send an EAP-Request.
- Supplicant send EAP-Response frame to server in the secured TLS tunnel.
- Server will send challenge request and supplicant will reply with challenge response.
STEP VI
- Finally, EAP server will validate the user identity and will send RADIUS Access-Accept (or Reject) in turn Authenticator convert it to EAP-Success (or Failure)
Based on the server reply (Pass or Fail), the authenticator will unblocks/blocks the port.
Restrictions to the 802.1x Feature in release 8.7
802.1X is not supported on trunk ports, dynamic ports, or Ether Channel ports
There would be no configuration from the controller to recover from misconfigured credentials/invalid certificate. The Switch port Dot1x Authentication has to be disabled to correct the misconfigured AP connect back to the Controller
NEAT/CISP will not be supported
Certificate revocation checks will not be implemented on the AP.
LSC certificate can be used for 802.1x port authentication and CAPWAP join. There shall be only one LSC certificate which can be downloaded/provisioned on the AP (Refresh of LSC is okay). LSC certificates should be deleted on the AP if LSC is not enabled for either 802.1X authentication or CAPWAP DTLS authentication.
Image version downgrades will need to be managed appropriately by the system administrator. 802.1X EAP-FAST is supported in the 8.6 release, and EAP-TLS and PEAP support will be added to If the image is downgraded from 8.7 to 8.6, EAP-FAST will be launched on AP by default. The ISE should allow EAP-FAST when the image is downgraded. In addition, for AP wired port dot1x support, we have two stages: staging and deployment. If the customers want to downgrade or upgrade, they need to plan the stages accordingly.
Clearing the config of the AP will disable 802.1X functionality and delete all LSC certificates on the AP. If 802.1X support is required, the AP will need to be re-configured and LSC re-provisioned (for methods other than EAP-FAST).
Deployment and Test Scenarios
802.1x on AP: DISABLED, Switch: DISABLED
AP boots up, starts the CAPWAP Discovery Process and JOINs the Controller This is current normal behavior.
802.1x on AP: DISABLED, Switch: ENABLED
AP doesn't JOIN the Controller.
AP boots up, since 802.1x authentication is not enabled, will start the usual CAPWAP Discovery process or DHCP (if configured for DHCP). Since the Switch port requires 802.1x authentication, no traffic is allowed from the AP to pass through the Switch. The AP continues to remain in the same Initial phase, until the dot1x authentication is disabled on the switch port.
802.1x on AP: ENABLED, Switch: DISABLED
AP JOINS the Controller
AP boots up, Once the Ethernet port is in UP state, the AP WPA supplicant waits for an EAP Identity Request from the Switch, upon not receiving an EAP Identity Request, AP WPA supplicant initiates EAPOL-START message, and retries.
Upon not receiving any EAP responses from Switch, the AP will suspend the dot1x initiation, and start the usual normal process of discovering the Controller.
In this scenario, AP needs to fallback to non-dot1x CAPWAP Discovery automatically. Also, anytime a EAP Identity Request (AP's dot1x is enabled, in CAPWAP RUN State, but hasn't done dot1x) the AP WPA supplicant needs to go to Initiation State and start the dot1x authentication with the switch.
802.1x on AP: ENABLED, Switch: ENABLED
AP JOINS the Controller, post port-Authentication
AP boots up, Once the Ethernet port is in UP state, the AP waits for an EAP Identity Request from the Switch, upon waiting for some time, AP initiates EAPOL-START message, and retries for fixed # of times.
Upon Successful dot1x Authentication, AP can now send messages to JOIN the controller.
If Authentication has failed, AP retries. After repeated failures, a combination of these steps need to be taken:
- Make sure the AP dot1x credentials configured, are present on the AuthServer
- Disable Dot1x Enable, on the Switch port
- Using the IOS CLI, configure appropriate dot1x credentials on the AP
- Make sure the Anonymous Provisioning is enabled on the AuthServer for PAC provisioning
- Make sure the AS is reachable
Two Stage Deployment
Pre-requirement for AP port EAP TLS/PEAP process:
Using existing methodology, provision LSC on WLC and AP and make AP to establish DTLS connection using LSC certificate downloaded.
Add the LSC certificate to ISE, which is going to act as Authentication Server(AS).
Stage1:
Configure 802.1x credentials and EAP method on WLC. COS based AP receives 802.1x credentials and EAP method from WLC. Another way is to 'prime' your APs in a lab with these 802.1X credentials. That can be done using the following CLI.
capwap ap dot1x username <name> password <pwd>LSC certificate required to be configured for EAP-TLS/PEAP
Stage 2:
Configurations Steps for 802 .1x AP Supplicant
Configuration and Debug on the AP Side
Show CLI
AP Console>show authentication interface wired-port status
key_mgmt=IEEE 802.1X (no WPA)
wpa_state=ASSOCIATED
address=a0:ec:f9:6c:d5:f0
Supplicant PAE state=HELD
suppPortStatus=Unauthorized
EAP state=FAILURE
selectedMethod=43 (EAP-FAST)
EAP TLS cipher=ADH-AES128-SHA
EAP-FAST Phase2 method=MSCHAPV2
Debug CLI
AP3800#debug authentication interface wired
  debug      Wired port 802.1X module debug
  error      Wired port 802.1X module error
  excessive  Wired port 802.1X module excessive
  info       Wired port 802.1X module info
  msgdump    Wired port 802.1X module msgdump
  warning    Wired port 802.1X module warning
Configuration CLI
capwap ap dot1x username <username> password <password>CLI 802.1x Configuration on the WLC
For configuring the global dot1x credentials, in the current implementation, we have a config at AP global configuration. This will be enhanced to include the EAP methods as well. Admin shall configure any one of EAP-METHODs (EAP-FAST / EAP-PEAP / EAP-TLS). A new capwap payload / TLV added to send this EAP method configure to each AP independent of Flex group the AP belongs to. The above needs to be enhanced to have EAP-FAST, EAP-TLS, EAP-PEAP
Similar changes need to be done from CLI and SNMP
In the current implementation, we have a config at AP level for dot1x
The above needs to be enhanced to have EAP-FAST, EAP-TLS, EAP-PEAP
Similar changes need to be done from CLI and SNMP
Inheritance between Global and AP specific should be handled, AP specific always override global configuration
Today, the LSC is tied to CAPWAP. Controller has configuration for LSC provisioning. There shall be a configuration of using LSC certificate for
config ap 802.1X user eap-method [add/delete] [FAST/PEAP/EAP-TLS] [all | <ap-name>]Show ap summaryIt will display the AP switch port authentication credentials and EAP method configured.
Show ap config general <ap_name>It will display the per AP dot1x credentials, and EAP method configured.
During staging process, for provisioning and downloading the certificate to AP, the LSC certificate provisioning method shall be used to install the vendor certificates on the AP. Once the provisioning is done, the vendor certificates are available for EAP authentication as well as for CAPWAP DTLS setup. These vendor certificate shall be used for either bot EAP authentication or DTLS setup for CAPWAP tunnel or both. The following existing CLI is the reference to enable the certificate provisioning.
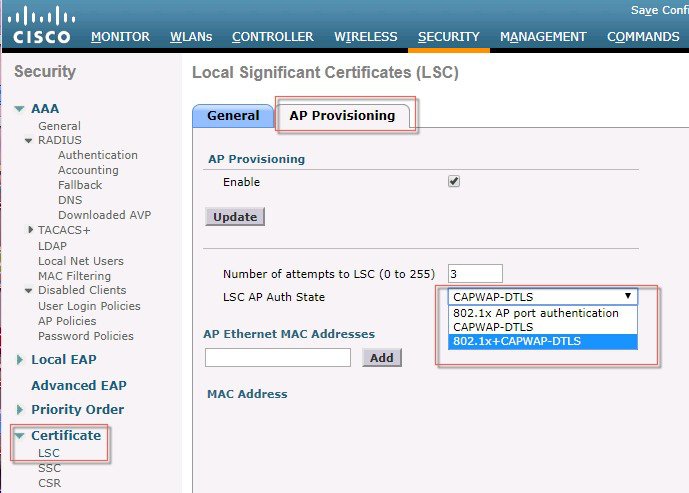
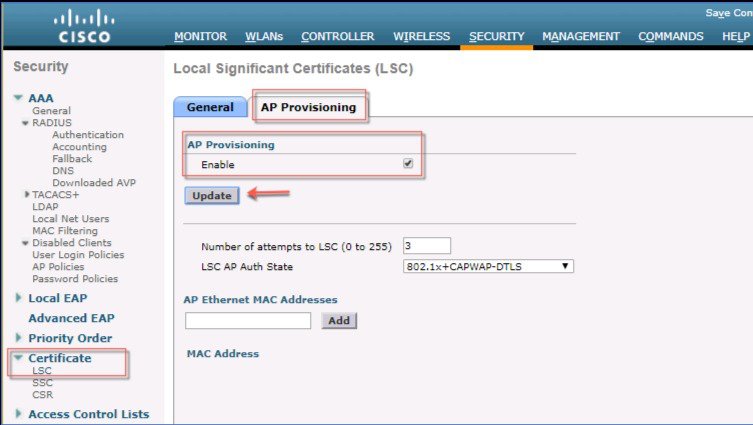
WLC> config certificate lsc ap-provision enableCLI to configure use of LSC certificate at AP (ap-auth-state)
config certificate lsc ap-auth-state ?
802.1x port authentication
CAPWAP-DTLS
802.1x + CAPWAP-DTLS
show certificate summary - It shall list the ap-auth-state configured LSC - ap-auth-state …… 802.1x / CAPWAP-DTLS / 802.1x+CAPWAPSend a CAPWAP payload to AP for the configured ap-auth-state.
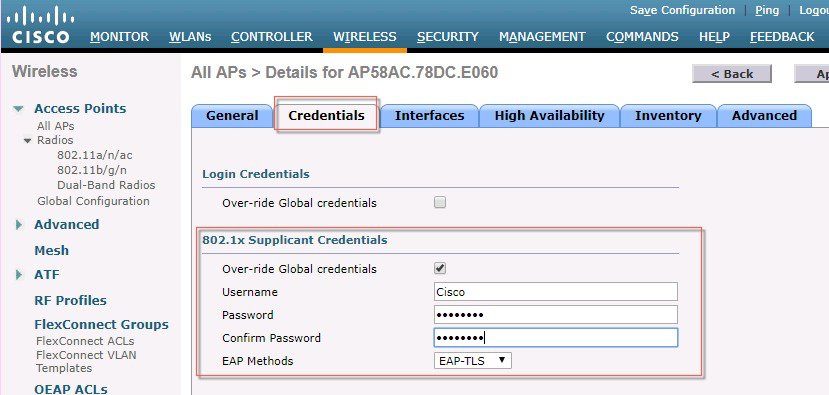
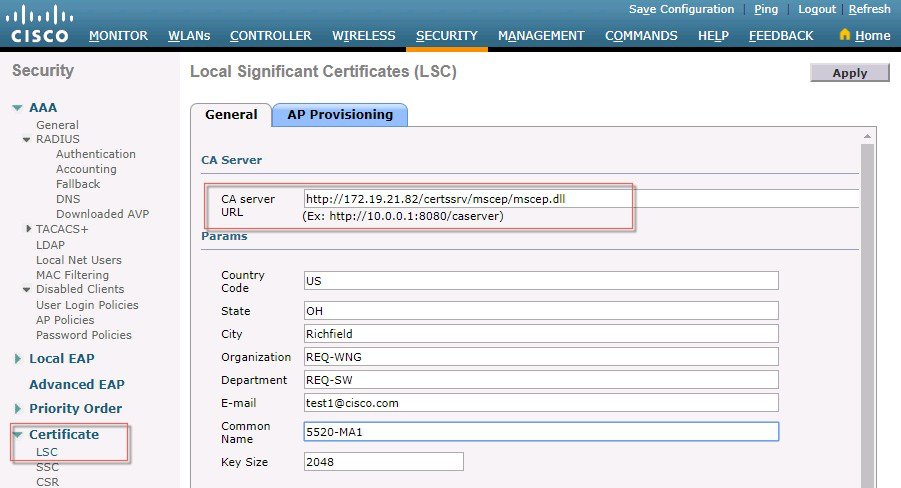
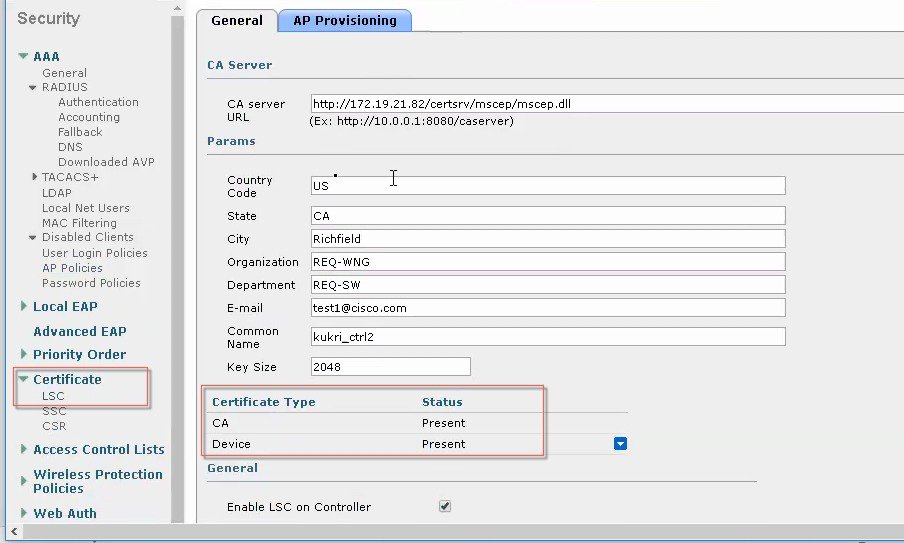
WLC 802.1x EAP-TLS GUI Configuration
Procedure
Switch Port Configuration
For the 802.1x Supplicant to work with the Switch port the following config has to be performed on the switch port that AP will be connected to. Please see an configuration example below:
Switch Port Dot1x Configuration Example:
switch#configure terminal
switch(config)#dot1x system-auth-control
switch(config)#aaa new-model
!--- Enables 802.1x on the Switch.
switch(config)#aaa authentication dot1x default group radius
switch(config)#aaa authorization network default group radius
switch(config)#radius server ISE
switch(config)# address ipv4 1.4.126.10 auth-port 1812 acct-port 1813
switch(config)# key cisco123
!--- Configures the RADIUS server with shared secret and enables switch to send
!--- 802.1x information to the RADIUS server for authentication.
switch(config)#ip radius source-interface vlan 14
!--- We are sourcing RADIUS packets from VLAN 253 with NAS IP: 192.168.153.10.
switch(config)interface gigabitEthernet 0/11
switch(config-if)switchport mode access
switch(config-if)switchport access vlan 253
switch(config-if)spanning-tree portfast
!--- gig0/11 is the port number on which the AP is connected.
switch(config-if)dot1x pae authenticator
!--- Configures dot1x authentication.
switch(config-if)dot1x port-control auto
!--- With this command, the switch initiates the 802.1x authentication.

switch(config-if)authentication priority dot1x
switch(config-if)authentication port-control auto
ISE - Adding Certificates to ISE and Creating Certificate Profiles
Beginning in ISE 1.3, ISE had the ability to be it's own internal Certificate Authority (CA) and issue certificates. Since most enterprises utilize an PKI infrastructure of some sort and since Windows Server as a CA is a popular choice in most deployments the ISE-issued certificates are typically only used for BYOD, we are going to focus this config on using the CA server on the MS Windows Server 2012 and above.
Note
Please refer to Microsoft CA certificate installation on Windows Server 2012 and above and to Cisco ISE 2.3 Administration Guide for complete step by step details. Information below is general and not to be followed step by step.
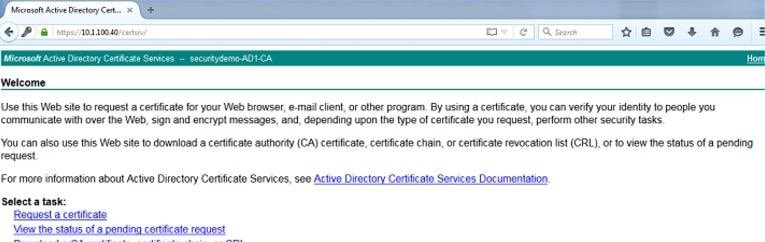
First navigate to Active Directory Certificate Services Web Enrollment page (https://AD-IP-address/certsrv) to download the CA certificate. Optionally you will need this certificate to add it to ISE's Trusted Certificates Store. This is a critical first step since you need the Certificate Authority to be trusted before you can start usinig it for signing Certificate Signing Requests. Once you have the page up, click on the Download a CA certificate, certificate chain, or CRL link:
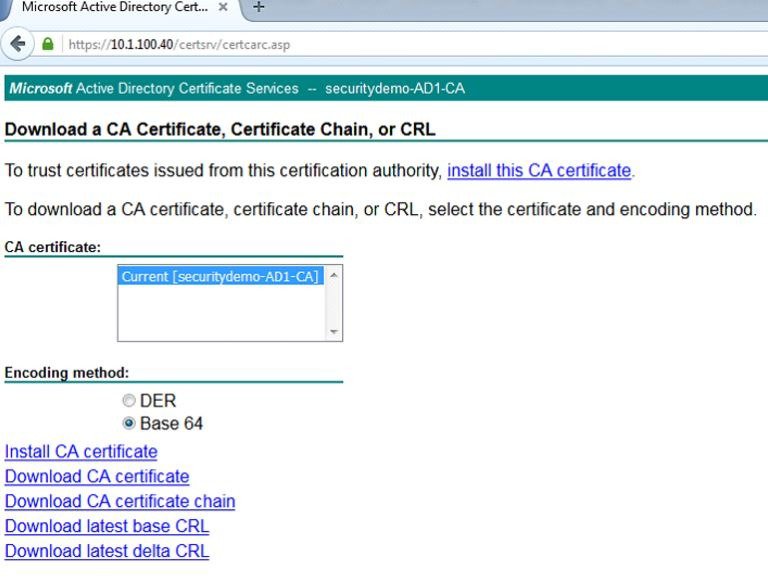
On the next page, choose the radio button for Base 64 and click on the Download CA certificate link. This will download the CA certificate locally for you
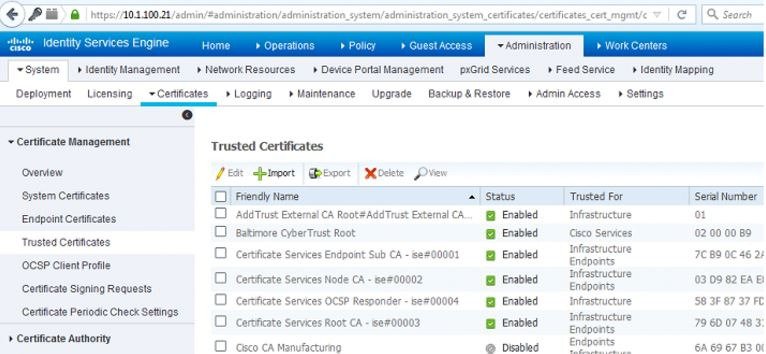
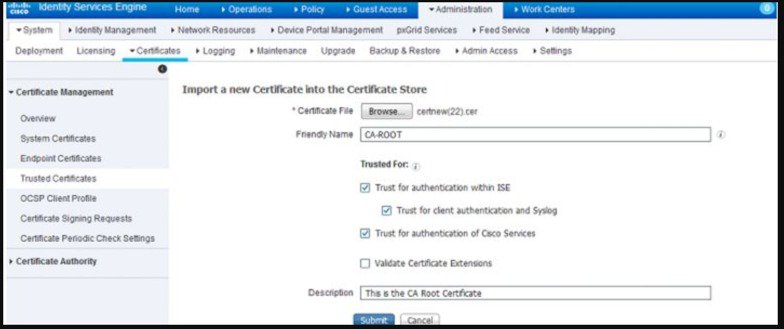
Login to your ISE node and navigate to Administration > System > Certificate > Certificate Management > Trusted Certificates and click Import.
On the next page, upload the CA certificate that you just download. Give it a friendly name that makes sense to be and a description that explains what the certificate is, adding this kind of detail is always good for the other ISE administrators that might get left managing this later on. Check the boxes next to:
Trust for authentication within ISE–This will all you to add new ISE nodes as long as they have the same trusted CA certificate loaded to their Trusted Certificate store
Trust for client authentication and Syslog-You would check this box if you want to use this certificate to authenticate endpoints that connect to ISE using EAP and/or trust a Secure Syslog server
Trust for authentication of Cisco Services–You only need to check this if you want this certificate to be trusted for external Cisco services such as a feed service.
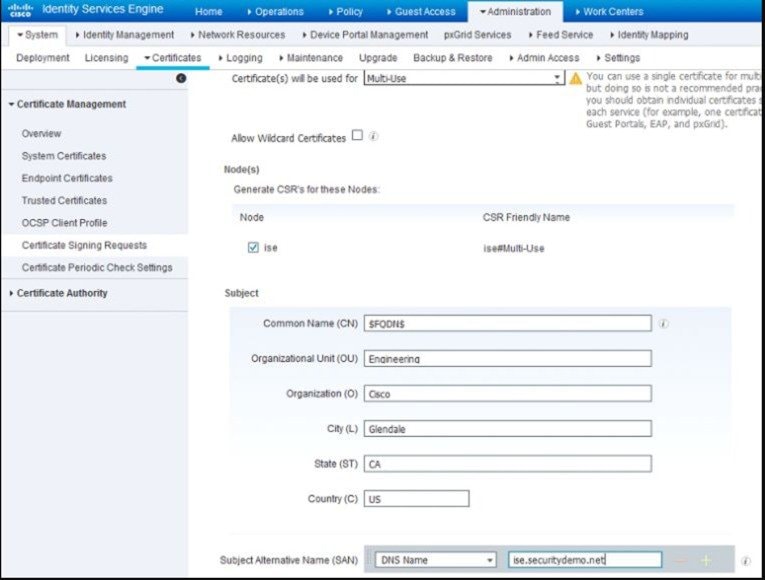
Now that we've add the CA certificate to the Trusted Certificate Store, we can now issue a Certificate Signing Request (CSR) and bind the resulting certificate to the ISE node. To do this we first have to issue the CSR by going to Administration > System > Certificates > Certificate Signing Requests and click on Generate Certificate Signing Requests (CSR) On the page that comes up, certificate will be used for Multi-use in the drop-down. Check the box next to your ISE node and fill out the subject information based on what makes sense to you or your organization. After you've completed this, click on Generate and then click Export on the pop-up that comes up. This will download the CSR request you just created:
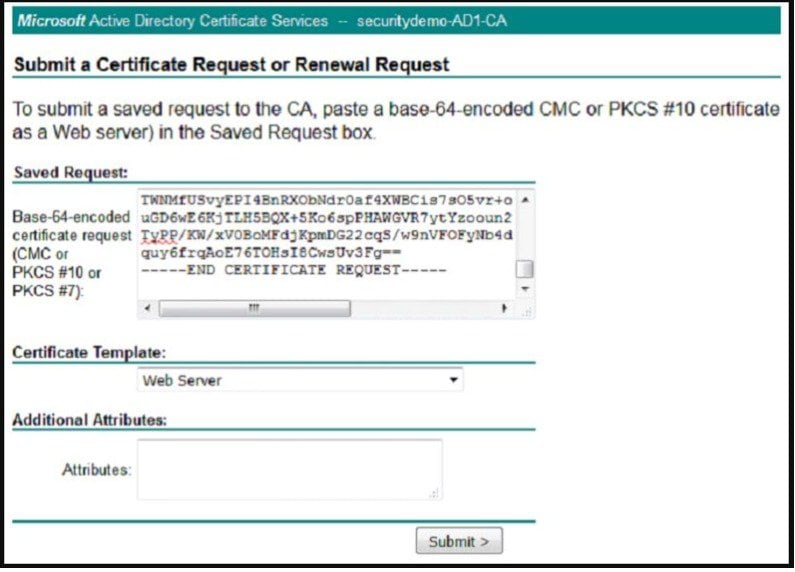
Open the CSR that you just downloaded in Notepad and reopen your Microsoft AD CA Web Enrollment page to the first page. Click on the Request a certificate link. On the next page, click on the advanced certificate request link.
At this point, you will be at the Certificate Request page. This is where you will use your CSR to generate a certificate. Copy and paste the body of the CSR from your Notepad into the Base-64-encoded certificate request field and under the Certificate Template drop-down, choose the Web Server (If you are using ISE 2.0 or 2.1, you can simple pick pxGrid as the template) template. Click Submit.
On the next page, choose the radio button for Base 64 encoded and click the Download certificate link. This will download the certificate signed by the CA that was generated from the CSR.
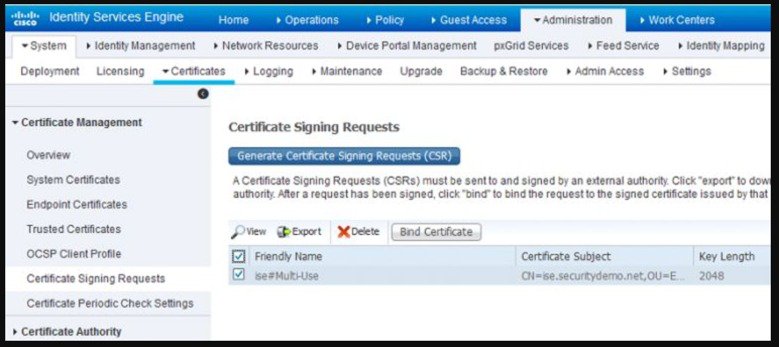
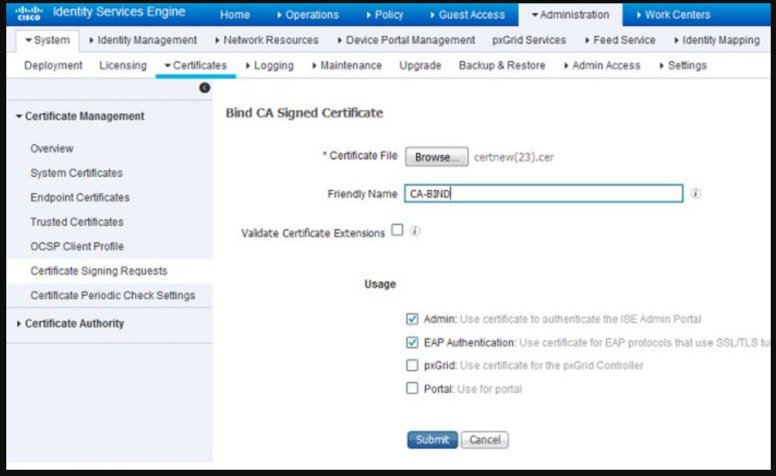
Going back into your ISE GUI, navigate to Administration > System > Certificates > Certificate Management > Certificate Signing Request and check the box next to the CSR you previously created. Click on the Bind Certificate button:
Next you will upload the certificate that you just downloaded and give it a friendly name for ISE. In this Example, we used "CA-BIND" as my friendly name. I also checked the boxes next to Admin and EAP authentication. You can choose the Portal as well but this is for Guest/Sponsor/Hotspot/etc portals so I would recommend using a publicly-signed certificate for that. The reason being is that if you have a user or guest coming into your network and your ISE portal is using a privately-signed certificate for the Guest Portal, they're going to get certificate errors or potentially have their browser block them from accessing it. To avoid all that, use a publicly-signed certificate for Portal use to ensure a better user experience.
After you click Submit, the ISE node should restart its services. Depending on the version and resources allocated to the VM, this can take anywhere from 5 to 15 minutes. To check the status of the application restarting, open the ISE command line and issue the show application status ise.
Now we are going to create the Certificate Authentication Profiles. This profile is necessary for our authentication methods that we will create in later posts. Since we will be using an EAP certificate-based authentication method in our policy, ISE will compare the certificate received from a client with the one in the server to verify the authenticity of a user or computer. This is considered a much more secure method than the traditional username and password method.
In the ISE GUI, navigate to Administration > Identity Management > External Identity Management > Certificate Authentication Profile and click Add.
You can name the profile a name that makes sense to you. In this lab, I just named it AD_CA_AltName. From the Identity Store drop-down, choose your AD server to tie this certificate template to your Active Directory CA. Make sure the Certificate Attribute radio button is chosen and from the drop-down box, choose Subject Alternative Name option. This specifies the value of the certificate attribute that ISE must retrieve from LDAP and compare against. On the Match Client Certificate Against Certificate in Identity Store option, I usually keep it at the default which is Only to resolve identity ambiguity.
In order for ISE to issue certificates for BYOD through SCEP, we will now need to configure our SCEP profile. Navigate to Administration > System > Certificates > Certificate Authority > External CA Settings and click Add. In the following page, you will need to provide a name for this profile as well as link to your SCEP server. By default, the URL should be http://CA-ip-address/certsrv/mscep/mscep.dll
Be sure to test the connection on this profile before clicking Submit:
Note
For additional Certificate configuration steps please see ISE configuration Guide.https://www.cisco.com/c/en/us/td/docs/security/ise/2-2/admin_guide/b_ise_admin_guide_22.html
Copyright © 2018, Cisco Systems, Inc. All rights reserved.


 Feedback
Contact Cisco
- Open a Support Case

- (Requires a Cisco Service Contract)