Getting Started

This chapter contains the following sections:

Prerequisite for Setting up and Accessing Cisco Business Wireless AP


Important


Ensure that there is no Primary AP running in the network other than the CBW AP during setup or daily operation of a CBW AP network. The Cisco Primary AP cannot inter-operate or co-exist with other Primary APs in the same network.


Important


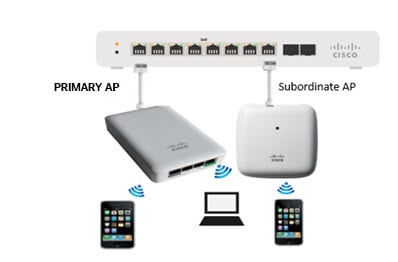
Decide on the first access point (AP) to be set up. The first AP to be set up should be the one that supports the Primary AP functionality. This is to ensure that this AP can act as the Primary AP, and the other APs can then connect to it as Subordinate APs. This will ensure that the pre-defined CiscoBusiness-Setup Service Set Identifier (SSID) is broad-cast only by the Primary AP and not by other APs.


  • Ensure that the AP is installed as per the instructions in the Quick Start Guide.

  • The initial setup of the CBW AP can be performed using the following methods:

    • Through the Primary AP Setup Wizard and over Wi-Fi

    • Cisco Business Mobile App

    • Using Network Plug n Play via Cisco Business Dashboard application. For details, refer to the section, Network Plug and Play in the Cisco Business Dashboard Administration Guide.

  • If you are not using the Cisco Business Mobile App, you will need a Wi-Fi enabled laptop to connect to the pre-defined CiscoBusiness-Setup SSID broadcasted by the Primary AP. You cannot access this SSID through a wired network.


    Note


    Only one client is allowed to connect to the Ciscobusiness-Setup SSID for security purposes. If connection is refused, another device may have joined automatically. In this case, you should reboot the AP.


  • Your laptop should have a compatible browser. For a list of browsers compatible with the CBW AP web user interface (UI), see Supported Browsers.

AP Set Up Checklist

Before you set up and use your CBW network, follow the steps below for a successful deployment.
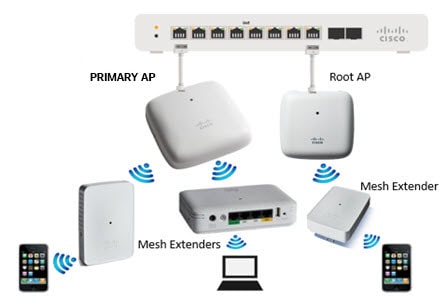
  1. Decide on the AP Deployment model.

  2. Use the setup wizard to configure the primary AP.

  3. Configure the Wireless Networks on your primary AP.

  4. If needed, add the subordinate APs.

  5. Verify all your settings.

AP Deployment Models

The following deployment models are supported in the Cisco Business Wireless AP network:

  • Non-Mesh deployment (wired deployment only)— All the APs in the CBW AP network have a Wired Uplink. The supported APs in the network are Primary capable. One among them will serve as a Primary AP and the other APs (referred to as Subordinate APs) in the CBW network will join the Primary AP. The APs will act in AP-only mode.

    Supported APs (Primary APs)— CBW140AC, CBW145AC, CBW240AC.


    Note


    Ensure that the switch is in turn connected to the router for internet access.


  • Mesh deployment (wireless deployment with single/multiple wired uplink APs)— In this deployment model, the CBW AP network comprises of both Primary AP and Subordinate APs (wired APs and wireless Mesh Extenders). The APs that have a wired uplink (includes the Primary AP) acts as Root AP (RAP) to which the Mesh Extenders (MAP) joins wirelessly. Primary AP will act in Bridge mode. To setup this deployment, refer to the section, Mesh. For Associating the wireless Mesh Extenders to the network, add the Ethernet MAC address of the Extenders in the local MAC address table of the Primary AP. For details, refer to Adding Mesh Extenders. Wireless Mesh Extenders have the dynamic algorithm to select the best RAP based on the signal strength and join the same.


    Note


    Ensure that you enable Mesh while configuring the Initial Setup Wizard for this deployment model.


    Note


    Only Mesh Extenders (such as CBW141AC, CBW142AC & CBW143AC) are required to be manually added to the auth-list. Where as, the Subordinate APs that are non-Mesh Extenders (such as CBW140AC, CBW145AC & CBW240AC) are connected via wired uplink and are automatically added to the auth-list.

    You can obtain the MAC address by reading the QR code on the back of the device with a QR Reader app on a mobile phone. You can also find the MAC address at the bottom of the AP Device.


    Supported APs in Mesh deployment:

    • Primary APs— CBW140AC, CBW145AC, CBW240AC

    • Subordinate APs— CBW141ACAM, CBW142ACM, CBW143ACM, CBW140AC, CBW145AC, CBW240AC.


Note


APs listed under Primary APs can also function as Subordinate APs.


Launching the Setup Wizard


Note


You may use the Cisco Business Mobile App instead of the Web UI to run the setup wizard.


Procedure


Step 1

Boot the AP that has the Primary capability.

In a few minutes, the CiscoBusiness-Setup SSID starts broadcasting and the AP's status LED cycles through patterns from red, amber and green to blinking green.

Step 2

Connect the laptop to the CiscoBusiness-Setup SSID through Wi-Fi and enter the default password: cisco123.

Note


The laptop obtains an IP address from the subnet of the Primary AP.

Step 3

Launch a supported web browser, such as Chrome, Firefox, Safari or Internet Explorer.

For the Apple clients, after connecting to the CiscoBusiness-Setup SSID, the captive portal window may automatically open with the Welcome page followed by the initial Setup Wizard.

Note


After connecting to the CiscoBusiness-Setup SSID, upon opening a web browser, you should automatically be redirected to http://ciscobusiness.cisco. If not, go to the following step.

Step 4

In the address bar, type the URL: http://ciscobusiness.cisco and press Enter

Step 5

Click Start on the Cisco Business Wireless Access Point page to launch the Setup Wizard. You will be required to create an admin account.

Note


Only one client can be connected to the CiscoBusiness-Setup SSID at a time.

When connecting to CiscoBusiness-Setup SSID, if you see an invalid password error on your client, it indicates that another client has been connected to the SSID.

You may confirm this by checking the LED status of the AP to be solid green. Turn off the client that is already connected and proceed with the Setup Wizard configuration of your AP.

For instructions on entering details on the Setup Wizard page, refer to Using the Setup Wizard.


Using the Setup Wizard

The Setup Wizard helps you configure certain basic parameters on your Cisco Business Wireless AP (CBW AP), and thereby get your AP network running.

Once you have completed the steps in Launching the Setup Wizard, use the following sections as a reference for the data that you enter and proceed with the configuration wizard pages.

Welcome Screen

Click the Start button in the Welcome screen. The Cisco Business Wireless Access Point page relevant to your AP model is displayed.

  1. Create an admin user account on the Primary AP. You can enter up to 24 ASCII characters.


    Note


    The username is case sensitive and cannot be cisco or its variant.


  2. Enter a password. The password can contain 8-127 ASCII characters. When specifying a password, ensure the following:

    • The password must include lowercase letters, uppercase letters, digits, or special characters. The special characters can be ~, !, @, #, $, %, ^, &, *.

    • No character in the password can be repeated more than three times consecutively.

    • The new password cannot be the same as the associated username or the username reversed.

    • The password cannot be cisco, ocsic, or any variant obtained by changing the capitalization of the letters in the word Cisco. In addition, you cannot substitute 1, I, or ! for i, 0 for o, or $ for s.

  3. Confirm the password and click Start.

Set Up Your Primary AP

Specify the following basic parameters for setting up your Primary AP:

Field Description

Primary AP Name

Enter the name that you want to assign to the Primary AP.

Note


A max of 24 characters is allowed.

The characters can be upper/lowercase letters, numbers, dot, and hyphen.

The name should always start with an alphabet and should not end with '.' or '-'.

Country

Choose the country that matches the physical location of the CBW AP.

Note


The CBW AP will display only countries that are supported by the regulatory domain of the AP. You can choose your country from the drop-down list.

There are strict regulatory rules to operate under the proper country code during the usage.

Date and Time

Specify the date. By default, your device's system time is applied. You can manually edit the date and time, if required.

Timezone

Select your time zone.

Mesh

To add Mesh Extenders to your AP network, enable the Mesh option. By default this option is disabled.

Would you like Static IP for your Primary AP (Management Network)

Enable this option, if you want to configure a static IP for the management interface. If not, the interface gets an IP address from your DHCP server (typically in your router). By default, this option is disabled.

Note


A management IP address should be within current subnet of your local VLAN and not in the client pool issued by your DHCP server.

If you choose to configure the static IP, then you will be required to enter data in the following fields. If not, you can proceed to the next section.

Note


Even when a static IP address is selected for the Primary AP, a DHCP server is still required to provide IP addresses to the Access Points and Clients. If the device cannot find a DHCP server after completing the Day0 setup sequence and rebooting, it will not complete the bootup sequence and the LED will be blinking Red.

Management IP Address

Enter the IP address for managing the Primary AP.

Subnet Mask

Enter the subnet mask for the Primary AP.

Default Gateway

Enter the default gateway or router IP address for the Primary AP.

Create your Wireless Networks

Specify the following parameters:

Field Description

Network Name

Specify a SSID for your Wireless network. You can enter up to 31 characters in this field.

Note


Make a note of this SSID to connect a client and log into the CBW web user interface which is detailed in the later section of this chapter. For details, refer to Logging into the Cisco Business Wireless AP.

Security

By default, the SSID security is set to WPA2 Personal that uses pre-shared key (PSK) authentication.

Choose SSID security for your Wireless network. It can be one of the following options:

WPA2 Personal-This uses pre-shared key (PSK) handshake mechanism for authentication

WPA2+WPA3 - Personal- This has both WPA2 and WPA3 enabled. WPA3 uses a reliable handshake mechanism called Simultaneous Authentication of Equals (SAE).

Passphrase

Specify the passphrase or the pre-shared key (PSK). The password should contain 8 - 63 ASCII characters.

Note


Make a note of this Passphrase to connect a client to the SSID and log into the CBW web user interface which is detailed in the later section of this chapter. For details, refer Logging into the Cisco Business Wireless AP.

Confirm Passphrase

Re-Enter the passphrase or the pre-shared key (PSK) here.

Show Passphrase

Enable in order to display the passphrase in clear text for visible confirmation.

Once you complete the configuration settings, click Next to proceed or Back to modify the data in the previous screens. Confirm the settings and click Apply to save the configuration.

The access point reboots. This may take up to 5 minutes. The booting process is complete when the LED is consistently blinking green, or solid green.


Note


For a detailed explanation on the LED behavior, see, LED Color Indicators for Cisco Business Wireless APs.


You can now proceed to Logging into the Cisco Business Wireless AP.

Logging into the Cisco Business Wireless AP

Once you have completed the steps in Using the Setup Wizard, follow the subsequent instructions to log into the CBW AP web user interface (UI). You can monitor and manage the access point and associated devices using this web interface (UI).

Procedure


Step 1

Connect to the new SSID that you created using the Setup Wizard ->Create Your Wireless Network process.

Step 2

Open a supported web browser. In the address bar, type https://ciscobusiness.cisco or https://<ip address> and press Enter. The Cisco Business Wireless Access Point login page is displayed.

The CBW AP uses a self-signed certificate for HTTPS. Therefore, all browsers will display a warning and ask you whether you wish to proceed with an exception when the certificate is presented to the browser. Accept the warning in order to access the Primary AP login page.

Note


If the Firefox browser doesn’t throw an exception, navigate to Options > Privacy & security > Certificates > view certificates> Servers > Add exception and add an exception for https://ciscobusiness.cisco

Step 3

Click Login and enter the user name and password you created during the initial Setup Wizard process to proceed with using the web UI options.


What to do next

After you log in, the default landing page is the Network Summary window. For more information, see About the Cisco Business Wireless AP Monitoring Service.

Adding New Subordinate APs

If you have a CBW network up and running, then adding new wired APs to the network is easy.

Procedure


Step 1

Plug the Wired uplink AP (CBW140AC, CBW145AC or CBW240AC) into the Ethernet LAN in which the current Primary AP is connected.

Step 2

The new AP will boot up, update its firmware to match the Primary AP, copy the configuration information and then join the Wireless Network.

Now, you can mange the newly added AP through the Web UI by navigating to Wireless Settings > Access Points page.


Adding Mesh Extenders

You can add a Mesh Extender such as CBW141ACM, CBW142ACM, or CBW143ACM to the Wireless Network.

Ensure that you have enabled the Mesh option in the initial setup wizard. If not, then, go to Wireless Settings > Mesh, enable the Mesh toggle button and click Apply. For detailed information, refer to About Cisco Mesh.

Now, MAC address of the Mesh Extender should be added to the Local MAC Addresses table. You can add this using one of the following methods:

Using the Management Web UI

You must enter the MAC address of all Mesh Extenders that you want to use in the mesh network with the Primary AP. A Primary AP responds only to discovery requests from indoor radios that appear in its authorization list. To add the MAC Address in Auth-List, do the following:

  1. Navigate to Wireless Settings > WLAN Users > Local MAC Addresses.

  2. Click Add MAC Address.

  3. Specify the MAC Addresses.

  4. In the Description field, specify a description of the mesh access point. The text that you enter identifies the mesh access point on the Primary AP.


    Note


    To make it easier you can include the last few digits of the MAC address, such as ap1522:62:39:10, the location, or the name.
  5. You can now choose to join or block an Access Point using the following instructions:

    • Choose the Type as Allowlist to join the access points to the Primary AP.

    • Choose the Type as Blocklist to block a particular access point from joining the Primary AP.


      Note


      Blocklisting a client or Mesh Extender that is currently joined to the network will not take effect until it attempts to rejoin the network (after disconnect or reboot).


  6. Select the Profile Name from the drop-down list and click Apply. By default, the profile name is mapped to Any WLAN/RLAN.

    You may now check to see if the MAC address you added has been listed in the AP network by navigating to Wireless Settings > Access Points. You will find the MAC address added in the column, AP Mac along with the AP name under the AP Model column of the table.

Using the Cisco Business Mobile App

  1. Connect to the SSID setup for the Primary AP and log into the Primary AP admin account.

  2. Select Monitor my Network, then choose Add a device.

  3. Scan the MAC address of the Mesh Extender using the QR code reader.

To troubleshoot issues with Mesh Extender, refer to Deployment and Troubleshooting Guidelines.