Overview of Cisco Unity Express Script Editor
Available Languages
Table Of Contents
Overview of Cisco Unity Express Script Editor
Creating Cisco Unity Express Scripts
Using the Cisco Unity Express Script Editor Window
Using Basic Built-in Variable Types
Exporting Variables Using Parameters
Using Advanced Built-in Variable Types
Using Expression Input Formats
Using Operators with the Expression Editor
Configuring Basic Error Handling
Configuring Advanced Error Handling
Using the On Exception Goto Step
Configuring Script Interruption
Overview of Cisco Unity Express Script Editor
The Cisco Unity Express Script Editor is a visual programming environment for creating auto attendant application scripts. You can use the Cisco Unity Express Script Editor on any PC with Microsoft Windows software.

Note
Do not install the Cisco Unity Express Script Editor application on hardware on which you previously installed the Cisco Customer Response Applications Developer (CRA) Editor application. These applications share registry files and will not work if installed on the same hardware.
This chapter provides an overview of the Cisco Unity Express Script Editor application, including the windows and panes, and gives information about using script elements. It contains the following topics:
•
•
•
Creating Cisco Unity Express Scripts
The Cisco Unity Express Script Editor allows you to create and validate scripts for handling calls that reach the auto attendant application. A script is comprised of steps and variables.
A step is a Java-based block of contact-processing logic. You do not need to understand Java programming to build a Cisco Unity Express script.
Each step has its own unique capabilities, such as simple incrementing, generating and playing out prompts, and obtaining user input.
Steps can act individually or they can be grouped to work as a subprocedure, called an output branch. An output branch returns a value to the main procedure.
Some steps require variables in order to complete their function; other steps do not require additional information.
Variables provide data that influence how the script will proceed. The data source may be user input or values calculated by other script steps or procedures.
Creating a script involves the following tasks:
•
Drag step icons from a palette on the left pane of the workspace to the design area on the right pane of the workspace. You can add, delete, or reorder steps as needed.
The Cisco Unity Express Script Editor supplies the code required to connect the steps.
•
•
Using the Cisco Unity Express Script Editor Window
To start the Cisco Unity Express Script Editor, use the following path:
Start > Programs > Cisco CUE Developer > Cisco CUE Editor
The Cisco Unity Express Script Editor window appears, as shown in Figure 1.
Figure 1 Cisco Unity Express Script Editor Window

Table 1 describes the four panes of the Cisco Unity Express Script Editor window:
Table 1 Cisco Unity Express Script Editor Window
Palette pane
Use the Palette pane to choose the steps you need to create your script. See "Using the Palette Pane" for a description of this pane.
Design pane
Use the Design pane to create your script. See "Using the Design Pane" for a description of this pane.
Debug pane
Use the Debug pane to view messages when you are validating a script. See "Using the Debug Pane" for a description of this pane.
Variable pane
Use the Variable pane to create, modify, and view variables for your script. See "Using the Variable Pane" for a description of this pane.
Using the Menu Bar
The following sections describe the menu bar options in the Cisco Unity Express Script Editor window.
File Menu Options
Use File menu options to perform a variety of tasks with files as shown in Table 2:
Edit Menu Options
Use Edit menu options to perform various editing tasks as shown in Table 3:
Table 3 Edit Menu Options
Undo
Undoes last action
Redo
Redoes last action
Cut
Cuts selected items
Copy
Copies selected items
Paste
Pastes selected items
Tools Menu Options
The only Tools menu option is Validate.
Use the Validate menu option to check that your script sequence and your step properties usage conform to the general syntax that the Cisco Unity Express Script Engine requires.
Window Menu Options
Use Window menu options to control how multiple files appear in the Design pane as shown in Table 4:
Help Menu Options
Use Help menu options to obtain more information about Cisco Unity Express Script Editor screens, fields, and software as shown in Table 5:
Using the Toolbar
The Cisco Unity Express Script Editor toolbar provides icons you click to choose some of the same options available from the Menu bar. (See Figure 2.)
Figure 2 Cisco Unity Express Script Editor Toolbar
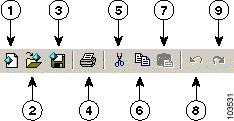
Table 6 describes the function of each numbered tool on the toolbar shown in Figure 2.
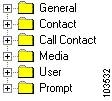
Using the Palette Pane
The Palette pane of the Cisco Unity Express Script Editor contains all the steps available for developing scripts. (See Figure 3.)
Figure 3 .Cisco Unity Express Script Editor Palette Pane
For complete descriptions of the steps in every palette pane category, go to:
•
To display the contents of a palette, click the plus sign (+) to the left of the palette icon in the Palette pane.
To create your script, click a step in the Palette pane and drag it on top of the step that it should follow in the Design pane. Each step performs a specific function and creates a portion of the underlying programming. You can customize most of the steps once you have placed them in the Design pane.
Your cursor will display the international prohibited sign until you move a step into a location that the Cisco Unity Express Script Editor allows.
Note
Using the Design Pane
The Design pane of the Cisco Unity Express Script Editor is the location where you perform the largest portion of your script development.
Starting a Script
To begin a new script in the Design pane of the Cisco Unity Express Script Editor window, choose File > New. The Cisco Unity Express Script Editor adds the Start step automatically and provides the starting point to which you add your steps.
Adding a Step
To add a step to your script, drag the step icon from the Palette pane and drop it onto the step it will follow in the Design pane. Place the steps in logical order for the script you are building.
To change the order of a step in the script, drag the individual step icon from its old location to its new location. To delete a step, select the step icon and press the Delete key.
To end the script, click the General palette and drag End to your script. The End step appears.
Figure 4 shows an example of how a script displays in the Design pane.
Figure 4 Script Example in the Design Pane
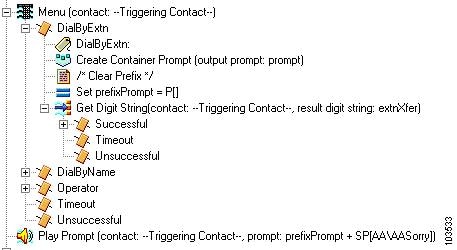
Many steps have output branches under which you add steps to provide desired script logic based on the exit condition of the step.
In Figure 4 above, for example, the Menu step has five output branches:
•
•
•
•
•
Output branches often contain steps and other output branches. In Figure 4, for example, the DialByExtn output branch contains five steps below it, one of which (the Get Digit String step) contains three output branches.
To expand the script under a step, click the plus sign (+) to the left of the step icon. To contract the script under a step, click the minus sign (-) to the left of the step icon.
At run time, each script follows a hierarchical sequence, as indicated by the vertical lines connecting steps. In Figure 4, for example, if the script reaches the Timeout output branch of the Get Digit String step, the script will move to the next step at the level of the Menu step, which, in this example, is the Play Prompt step.
Customizing a Step
You can customize most of the steps in the Cisco Unity Express Script Editor by opening windows called customizer windows. A customizer window contains text fields, called properties, that you can configure to meet the needs of your script. Depending on the step, the properties may be grouped under multiple tabs.
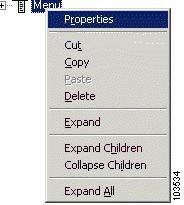
To display the customizer window for a step, perform the following procedure:
Step 1
The Properties popup menu appears. For example, Figure 5 shows the Menu step Properties popup menu.
Figure 5 Properties Popup Menu—Menu Step
Step 2
The customizer window of the step appears. For example, Figure 6 shows the Menu customizer window.
Figure 6 Menu Customizer Window
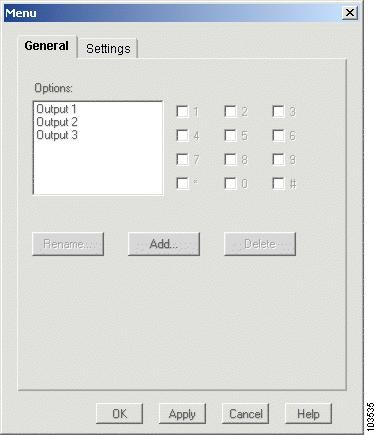
Step 3
Each customizer window contains four buttons:
•
•
•
•
Customizer windows may also have additional buttons that you use to modify and display various properties within a step.
Step 4
Using the Variable Pane
The Variable pane of the Cisco Unit Express Script Editor is the location where you add and modify the variables used by the script. (See Figure 7.) Variables store data that a script uses when it executes the steps. Any step in your script can use variables once you define them in the Variable pane of the Cisco Unity Express Script Editor window. (See Figure 1.)
You can also map variables you define for your script to variables you define in a subflow, which is a set of steps that function as part of another script, called the primary script. A subflow can use and manipulate a variable, then return the data that is stored in the variable to the primary script. Scripts cannot share variables with other scripts, except in the case of default scripts, in which the primary script automatically transfers the values of its variables to a default script.
The value of a variable can change during execution.
This section includes the following topics:
•
•
•
Defining Variables
To define a new variable, click the New Variable icon at the top left corner of the Variable pane of the Cisco Unity Express Script Editor window. The Edit Variable window appears. (See Figure 7.)
Figure 7 Variable Pane and Edit Variable Window
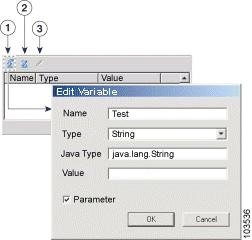
Table 7 describes the function of each tool in the Variable pane.
Table 7 Variable Pane Toolbar Functions
New Variable icon
Delete Variable icon
Modify Variable icon
After you use the Edit Variable window to define your variables, the variables appear in the Variable pane. You can select a variable and use the Modify or Delete icons to make any necessary changes.
Table 8 describes the fields in the Edit Variable window.
Table 8 Edit Variable Properties
Name
Name of the variable you want to declare.
Type
Type of variable you want to declare. See "Using Basic Built-in Variable Types" section for the available variable types.
Java Type
Fully qualified class name located using the CLASSPATH environment variable on your computer.
Note
Value
Data you initially assign to a variable. The type of data you enter must match the data type you declared in the Type field.
Parameter
If checked, sets the value for this parameter in the auto attendant web interface when you provision applications that use this script.
Using Basic Built-in Variable Types
Table 9 describes the basic built-in variable types:
Exporting Variables Using Parameters
You can declare variables as parameters by checking the Parameter check box in the Edit Variables dialog box.
This feature allows you to set the value for a parameter in the auto attendant web interface. Because the value is initialized at configuration time for the script that uses it, you can change the value without having to edit the script in the Cisco Unity Express Script Editor. Such a variable is called an exported variable.
For example, when you add a new automated attendant using the AA Wizard, the second window of the AA wizard (the Script Parameters window) provides a list of the parameters with their default or current values. You can modify the values in this list.
The variable types that Cisco Unity Express supports for parameters include Number, Character, String, Boolean, and Prompt.
Using Advanced Built-in Variable Types
The Cisco Unity Express Script Editor includes the following advanced built-in variable types:
Contact Variable
Java Class Name: com.cisco.contact.Contact
A Contact variable consists of a contact representing a telephone call.
You can pass a Contact variable as a parameter to a subflow.
Prompt Variable
Java Class Name: com.cisco.prompt.Playable
A Prompt variable contains the information that the script uses to create the prompt or prompts that it plays back to callers. A Prompt variable can be as simple as a single prompt or as complex as a concatenation of multiple prompts.
You can use the following input formats to define Prompt variables:
•
•
•
•
•
•
•
•
As in the other advanced variables, the expression input format for the prompt variable is the same as the variable input format:
•
•
When you use operators with the Expression Editor, if at least one of the operands is a Prompt, then the result will be a Prompt concatenation of the two operands, where the other one is converted to a Prompt according to the following rules:
•
•
N[ ] format). (See "Number Generator" on page 139 for information about the generator type.)•
•
User Variable
Java Class Name: com.cisco.user.User
A User variable contains information that is useful for user authentication.
You cannot manually enter a User variable as a value. User variables can be returned only from the Name To User step of the Media palette.
You can pass a User variable as a parameter to a subflow.
Using the Debug Pane
Use the Debug pane to validate your script.
The Validation Error messages appear in this pane when a script is validated. Double-clicking the error message takes you to the script step for which the validation failed.
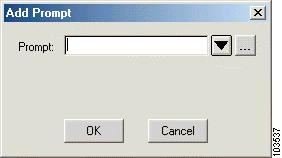
Using Prompts
The Cisco Unity Express Script Editor uses the following two types of prompts:
•
Note
•
All Media and Prompt steps support prompts specified in the following ways:
•
•
Note
The script retrieves both user and system prompts from the Prompt Repository. You can manage these prompts from the Voice Mail > Prompts web page of the Cisco Unity Express GUI administrator interface or by calling in to the Greeting Management System. (For more information on managing the prompts, refer to the Cisco Unity Express GUI and CLI administration documents for your system that can be found at http://www.cisco.com/univercd/cc/td/doc/product/voice/unityexp/index.htm.)
Using Expressions
Expressions are useful if you do not know the exact value at design time and instead enter a formula that can be evaluated at run time. The resulting type of the expression must match the expected input type or types (which you check at design time).
Many steps include an Expression Editor (...) button in the customizer window, which you can use to enter an expression. (See Figure 8.)
Figure 8 Expression Editor Button in a Customizer Window Example
You can type an expression directly in the input text field, or click the Expression Editor (...) button to open the Expression Editor. (See Figure 9.)
Figure 9 Expression Editor
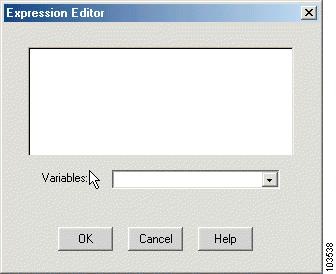
You can enter the expression in the text field, or you can use the Variable drop-down menu to get quick access to variables you have previously defined in the script. When you choose a variable from the Variable drop-down menu, the variable name appears in the input text field.
After you enter the expression, click OK. The Expression Editor closes.
Using Expression Input Formats
The following table describes the expression input formats for variable types.
Using Operators with the Expression Editor
The Cisco Unity Express Script Editor accepts the following operators, which are listed in order of execution priority:
1.
2.
Number operands are properly promoted to a valid type before testing.
3.
Number operands are properly promoted to a valid type before testing.
4.
Comparison operands work only on String, Character, and Number operands.
5.
Testing for the <null> constant is supported by the two equality operators.
6.
7.
8.
If at least one of the operands is a String, and the other one is not a prompt, then the other one is converted to a String using the String.value( ) method and the result is a new String corresponding to the concatenation of the String representation of both operands. Typically the String.valueOf() method simply calls the toString() method of the object being concatenated or returns the string "null" if the object is null.
If the operands are Characters, then they are concatenated together, resulting in a new String.
Configuring Error Handling
The Cisco Unity Express Script Editor allows you to create scripts with a variety of ways to handle errors.
Configuring Basic Error Handling
Continue on Prompt Errors
The Continue on Prompt Errors option allows the script to continue to execute when the script receives invalid input (for example, Invalid Audio Format or File Not Found).
The Cisco Unity Express Script Editor provides the Continue on Prompt Errors option in the customizer windows of steps in the Media palette. (See "Media Steps" on page 98.) For example, Figure 10 shows the Prompt tab of the Get Digit String customizer window.
Figure 10 Continue on Prompt Errors Option—Prompt Tab of the Get Digit String Customizer Window
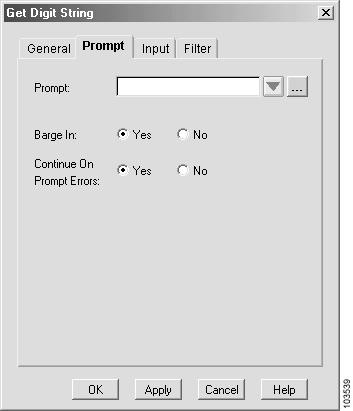
When enabled, the step continues with the next prompt in the list of prompts to be played back, or, if it is the last step in the list, it waits for caller input.
When you enable Continue on Prompt Errors, you instruct the script to ignore prompt errors and continue as if the playback of a particular prompt was successful. For example, in a sequence of prompts "1 + 2 + 3", if prompt #1 fails, the step will continue with prompt #2. If prompt #3 fails, the step will continue, waiting for caller input as if prompt #3 had been properly played back.
When you disable Continue on Prompt Errors, the media steps generate an exception, which can then be handled in the script.
Available prompt exceptions are:
•
•
•
•
•
Error Output Branches
Error output branches contain logic that provides instructions on what to do when typical errors occur.
Figure 11 shows error output branches under a Call Redirect step in a script.
Figure 11 Error Output Branches—Call Redirect Step
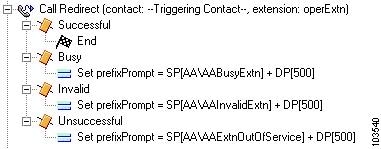
In this figure, the Call Redirect step includes logic for both an invalid extension and an out-of-service extension.
Note
Configuring Advanced Error Handling
Using the On Exception Goto Step
The On Exception Goto step of the General palette (see "On Exception Goto" on page 82) sends the execution to a specified place in the script when an exception is generated.
By using the On Exception Goto step for a specific exception in a script, you can register a new handler for a specific exception or override a previously existing one.
The registration process affects the complete script. The assigned handler activates the script no matter where the exception occurs (before, during, or after the given step). After the step executes, the handler is registered until either a new one is re-registered or the exception is cleared with the On Exception Clear step of the General palette.
If an exception results in a subflow, the script first consults the exception handlers of the subflows. If none are defined for the given exception, the exception aborts the subflow and the Cisco Unity Express application looks for exception handlers in the parent script. This process continues until the script finds an exception handler or the top level of the script is reached.
If no exception handlers are registered, the script aborts and error handling falls back to the last level of error handling, which is the default script.
Using Default Scripts
The default script is the last level of user-defined error handling before the Cisco Unity Express Script Editor applies a default system treatment to all active contacts.
The Cisco Unity Express Script Editor invokes this default script under the following conditions:
•
–
–
•
In each of these scenarios, the Cisco Unity Express Script Editor marks all active contacts as aborting before the default script is executed. The final state of these contacts is ABORTED even if they are transferred or redirected as a result of the execution of the default script.
Note
The default script does not execute if the primary script ends normally. If contacts are still active when the primary script ends, all active contacts not marked as handled will abort, and all active contacts marked as handled are simply terminated. In this case, check the primary script for any design problems.
Note
The system applies the CallContact script if the contact is still active after the system executes the default script (if any). The CallContact script plays back the prompt, "We are currently experiencing system problems, please call back later" as an announcement, followed by a fast busy signal.
Configuring Script Interruption
Script interruption is a feature that allows external events to interrupt the current processing of a script in order to return to another part of the script or stop the execution of the script.
Script interruption is typically used when the script needs to be notified that one of its contacts has been remotely terminated, such as when the caller hangs up.
Note
By default, scripts are automatically interruptible before any step is executed. Should any external event (such as that described above) interrupt the script, the script will continue processing based on the proper handling for the specific event before it begins to execute the next step.
If you want two consecutive steps to execute without the possibility of interruption, you must move these two steps to a subflow where you can disable interruptions completely while the script processes that subflow.
Cisco Unity Express Script Editor has an "interruptible" option for some steps that allows you to indicate whether or not the script can interrupt the step from within when an external event occurs.
When a contact terminates remotely, the script performs one of the following actions:
•
•
•
If an interrupting event happens when the script is not currently interruptible, the script is automatically interrupted whenever it becomes interruptible again. For example, although a script is not interruptible when it is running a subflow marked to disable interruptions, it will process the interruption as soon as the subflow terminates and control is returned to the parent (if that primary script is interruptible)
 Feedback
Contact Cisco
- Open a Support Case

- (Requires a Cisco Service Contract)
This Document Applies to These Products
- Collaboration Endpoints - Retired Products
- Conferencing - Retired Products
- Contact Center - Retired Products
- Optical Networking - Retired Products
- Routers - Retired Products
- Security - Retired Products
- Servers - Unified Computing (UCS) Retired Products
- Storage Networking Retired Products
- Switches - Retired Products
- Video - Retired Products
- Wireless - Retired Products