Configure Directory Integration for an On-Premises Deployment
Procedure
| Command or Action | Purpose | |
|---|---|---|
| Step 1 |
To replicate contact data to Cisco Unified Communications Manager. |
|
| Step 2 |
Only for Cisco Unified Communications Manager IM and Presence Service release 10.x or later. |
|
| Step 3 |
Populate the user ID and directory URI from an attribute in the directory. |
|
| Step 4 |
Synchronize Cisco Unified Communications Manager with the directory server. |
|
| Step 5 |
Configure Cisco Unified Communications Manager to authenticate with the directory server |
Enable Synchronization
To ensure that contact data in your directory server is replicated to Cisco Unified Communications Manager, you must synchronize with the directory server. Before you can synchronize with the directory server, you must enable synchronization.
Procedure
| Step 1 |
Open the Cisco Unified CM Administration interface. |
| Step 2 |
Select . The LDAP System Configuration window opens. |
| Step 3 |
Locate the LDAP System Information section. |
| Step 4 |
Select Enable Synchronizing from LDAP Server. |
| Step 5 |
Select the type of directory server from which you are synchronizing data from the LDAP Server Type drop-down list. |
What to do next
Specify an LDAP attribute for the user ID.
Configure IM Address Scheme
This feature is supported on Cisco Unified Communications Manager IM and Presence Service release 10.x or later. For versions of Cisco Unified Communications Manager IM and Presence Service release 9.x and earlier the default IM address scheme used is UserID@[Default Domain].
Procedure
| Step 1 |
Choose the IM Address Scheme. |
| Step 2 |
Select the required mapping. |
Populate User ID and Directory URI
-
User ID — You must specify a value for the user ID on Cisco Unified Communications Manager. This value is required for the default IM address scheme and for users to sign in. The default value is
sAMAccountName. -
Directory URI — You should specify a value for the directory URI if you plan to: -
Enable URI dialing in Cisco Jabber.
-
Use the directory URI address scheme on Cisco Unified Communications Manager IM and Presence Service version 10 and higher.
-
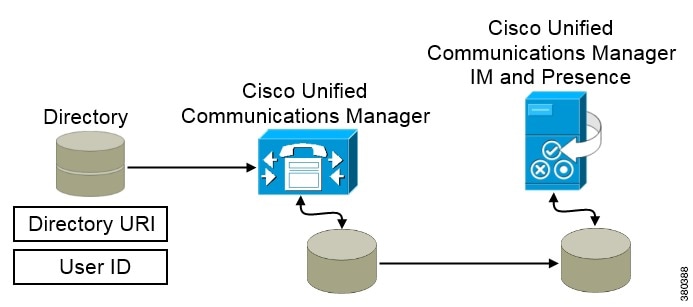
When Cisco Unified Communications Manager synchronizes with the directory source, it retrieves the values for the directory URI and user ID and populates them in the end user configuration table in the Cisco Unified Communications Manager database.
The Cisco Unified Communications Manager database then synchronizes with the Cisco Unified Communications Manager IM and Presence Service database. As a result, the values for the directory URI and user ID are populated in the end user configuration table in the Cisco Unified Communications Manager IM and Presence Service database.
Specify an LDAP Attribute for the User ID
When you synchronize from your directory source to Cisco Unified Communications Manager, you can populate the user ID from an attribute in the directory. The default attribute that holds the user ID is sAMAccountName.
Procedure
| Step 1 |
Locate the LDAP Attribute for User ID drop-down list on the LDAP System Configuration window. |
||
| Step 2 |
Specify an attribute for the user ID as appropriate and then select Save.
|
Specify an LDAP Attribute for the Directory URI
On Cisco Unified Communications Manager release 9.0(1) and later, you can populate the directory URI from an attribute in the directory.
Before you begin
Procedure
| Step 1 |
Select . |
| Step 2 |
Select the appropriate LDAP directory or select Add New to add an LDAP directory. |
| Step 3 |
Locate the Standard User Fields To Be Synchronized section. |
| Step 4 |
Select one of the following LDAP attributes from the Directory URI drop-down list:
|
| Step 5 |
Select Save. |
Perform Synchronization
After you add a directory server and specify the required parameters, you can synchronize Cisco Unified Communications Manager with the directory server.
Before you begin
-
Cisco Unified Presence — Cisco UP Sync Agent
-
Cisco Unified Communications Manager IM and Presence Service — Cisco Sync Agent
This service keeps data synchronized between the presence server and Cisco Unified Communications Manager. When you perform the synchronization with your directory server, Cisco Unified Communications Manager then synchronizes the data with the presence server. However, the Cisco Sync Agent service must be activated and started.
Procedure
| Step 1 |
Select . |
||
| Step 2 |
Select Add New. The LDAP Directory window opens. |
||
| Step 3 |
Specify the required details on the LDAP Directory window. See the Cisco Unified Communications Manager Administration Guide for more information about the values and formats you can specify. |
||
| Step 4 |
Create an LDAP Directory Synchronization Schedule to ensure that your information is synchronized regularly. |
||
| Step 5 |
Select Save. |
||
| Step 6 |
Select Perform Full Sync Now.
|
User data from your directory server is synchronized to the Cisco Unified Communications Manager database. Cisco Unified Communications Manager then synchronizes the user data to the presence server database.
Authenticate with the LDAP Server
Perform this procedure if you want to enable LDAP authentication so that end user passwords are authenticated against the password that is assigned in the company LDAP directory. LDAP authentication gives system administrators the ability to assign an end user a single password for all company applications. This configuration applies to end user passwords only and does not apply to end user PINs or application user passwords. When users sign in to the client, the presence service routes that authentication to Cisco Unified Communications Manager. Cisco Unified Communications Manager then sends that authentication to the directory server.
Procedure
| Step 1 |
Open the Cisco Unified CM Administration interface. |
| Step 2 |
Select . |
| Step 3 |
Select Use LDAP Authentication for End Users. |
| Step 4 |
Specify LDAP credentials and a user search base as appropriate. See the Cisco Unified Communications Manager Administration Guide for information about the fields on the LDAP Authentication window. |
| Step 5 |
Select Save. |
 Feedback