Your Phone

Cisco Wireless IP Phone 8821 and 8821-EX

The Cisco Wireless IP Phone 8821 and 8821-EX are 802.11 dual-band wireless devices that provide comprehensive voice communications in conjunction with Cisco Unified Communications Manager and with Cisco Aironet and Cisco Meraki access points (APs) in a private business communications network.

The phones provide voice communication over the same wireless LAN that your computer uses, allowing you to place and receive phone calls, put calls on hold, transfer calls, make conference calls, and so on.

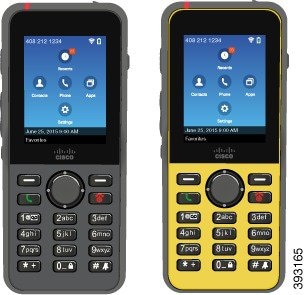
The Cisco Wireless IP Phone 8821-EX is certified for Potentially Explosive Atmosphere ATEX Zone 2 IP54 (pending) and North America Class I Division 2/Zone 2. The phone is certified for use in potentially explosive (hazardous) environments where flammable gases, vapors or liquids may be present for a short period of time or under abnormal conditions. The phone has an industry-standard yellow styling that offers fast recognition in emergency situations.

The following figure shows the Cisco Wireless IP Phone 8821 on the left and the Cisco Wireless IP Phone 8821-EX on the right.

Figure 1. Cisco Wireless IP Phone 8821 and 8821-EX
Cisco Wireless IP Phone 8821 and 8821-EX

These phones, like other network devices, must be configured and managed. The phones support G.711a. G.711u, G.722, G.729a, G.729ab, iLBC, iSAC, and OPUS codecs. The phones also support uncompressed wideband (16 bits, 16 kHz) audio.

The phones are hearing aid compatible (HAC) but do not have any TTY features. They have ridges on the sides of the 5 key that is a tactile identifier.

The physical characteristics include:

  • Resistance to damage from dropping the phone

  • Tolerance of antibacterial and alcohol-based wipes

  • Latex- and lead-free

  • Shockproof and vibration-proof

  • USB On-the-Go (OTG) 2.0 interface

  • Cisco Wireless IP Phone 8821: IP54 protection, which indicates dust-tight equipment that is protected against water (see below)

  • Cisco Wireless IP Phone 8821-EX only:

    • IP67 protection in ordinary locations

    • Certified for use in Potentially Explosive Atmosphere:

      • ATEX Zone 2 IP54 (pending)

      • METLABS Certified for Class I and II, Division 2 and Class III, Divisions 1 and 2, Groups A, B, C and D

    • Industry-standard yellow styling offers fast recognition in emergency situations.

  • Charge with a desktop charger for a single phone or a multicharger for up to 6 phones. For more information, see Supported Accessories.

In addition to basic call-handling features, your phone can provide enhanced productivity features that extend your call-handling capabilities.

Depending on the configuration, your phone supports:

  • Use of Bluetooth wireless headsets, including certain hands-free call features.

  • Wireless access to your phone number and the corporate directory.

  • Access to network data, XML applications, and web-based services.

  • Online customizing of phone features and services from your Self Care portal.

  • Location report generation when it first register. It reports its location when the location changes; for example, when walking around the building. The wireless phone also reports its location every 24 hours if it isn't moving.

    For more information, see the Cisco Unified Communications Manager documentation.

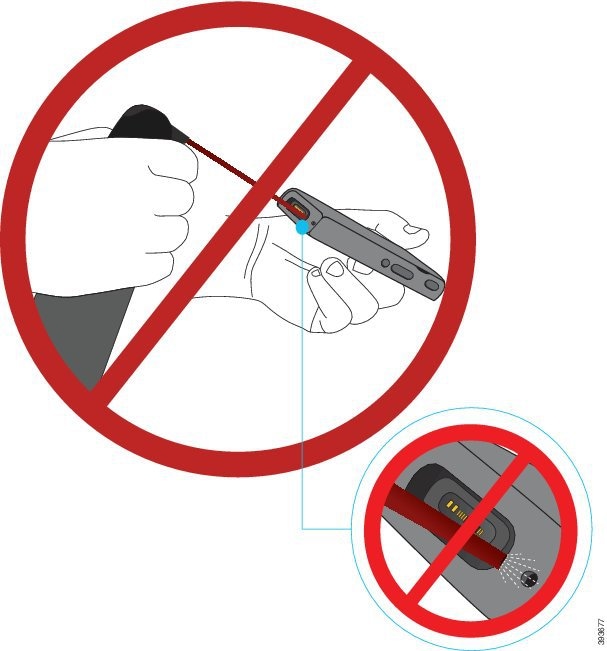
To prevent device damage:

  • Don't bathe or swim with the phone.

  • Don't expose phone to pressurized water or high velocity water, such as when showering, cleaning, or hand washing.

  • Don't use the phone in a sauna or steam room.

  • Don't intentionally submerge phone in water.

  • Don't operate the phone outside the suggested temperature ranges or in extremely humid, hot, or cold conditions.

  • Don't store phones, batteries, and accessories outside the suggested temperature ranges or in extremely humid, hot, or cold conditions.

  • Don't drop the phone or subject it to other impacts.

  • Don't disassemble the phone; don't remove any screws.

  • Don't use harsh cleaning agents, like bleach and other chemicals, to clean the phone exterior

  • Don't use a broken battery door or a battery door with a broken seal.

Minimize the exposure of your phone to soap, detergent, acids or acidic foods, and any liquids; for example, salt water, soapy water, pool water, perfume, insect repellent, lotions, sun screen, oil, adhesive remover, hair dye, soft drinks, and solvents. For more information, see Care of Your Phone.

IP54 and IP67

The Cisco Wireless IP Phone 8821 and 8821-EX are tested under controlled laboratory conditions under IEC standard 60529. The Cisco Wireless IP Phone 8821 has a rating of IP54 and the Cisco Wireless IP Phone 8821-EX has a rating of IP67 in ordinary locations. Ingress Protection 54 (IP54) and Ingress Protection 67 (IP67) indicate dust-tight equipment that is protected against water. Splash, water, and dust resistance are not permanent conditions, and resistance might decrease as a result of normal wear. Users are expected to take care of the phone and should not deliberately expose the device to a hostile environment of dust, splash, or water immersion.

Feature Support

This document describes all the features that the device supports. However, not all features may be supported with your current configuration. For information on supported features, contact your administrator.

New and Changed Information

New Information About Low Battery Warnings

The following table describes additions to this book on October 20, 2021.

Change

New

Added information about the low battery warning levels.

Low Battery Warning

New and Changed Information for Cisco Wireless IP Phone 8821-EX Support

The following updates were made to the document.

Feature

Description

Cisco Wireless IP Phone 8821-EX Support

Cisco Wireless IP Phone 8821 and 8821-EX

Phone Battery Life

Install the Cisco Wireless IP Phone 8821-EX Battery

Replace the Cisco Wireless IP Phone 8821-EX Battery

Supported Accessories

Desktop Chargers

Multichargers

Battery information update

Phone Battery Life

Damaged Battery Identification

Replace the Cisco Wireless IP Phone 8821 Battery

Replace the Cisco Wireless IP Phone 8821-EX Battery

New and Changed Information for Firmware Release 11.0(5)SR1

The following updates were made to the document.

Feature

Description

Minor updates

Phone Battery Life

New and Changed Information for Firmware Release 11.0(5)

The following table describes changes to this book to support Firmware Release 11.0(5).


Note

Cisco Wireless IP Phone 8821 Firmware Release 11.0(5) has been deferred. The features from the release are available in subsequent firmware releases.


Feature Name

Updates

New Chargers for the Cisco Wireless IP Phone 8821

Phone Battery Life

Desktop Chargers

Multichargers

User Interface Enhancements

Header Icons

Make a Call to a Favorite Number from the Applications Screen

Decline a Call

Several changed sections in Favorites

Several changed sections in Local Contacts

Create a New Local Contact from a Recent Call

Perform Audio Diagnostics

Set Battery Level Display

As a result of recent changes to the hardware, the Cisco Wireless IP Phone 8821 is now certified for IP54 ingress protection, and is no longer certified for IP67 ingress protection.

Cisco Wireless IP Phone 8821 and 8821-EX

Install the Cisco Wireless IP Phone 8821 Battery

Replace the Cisco Wireless IP Phone 8821 Battery

New and Changed Information for Firmware Release 11.0(4)

The following table describes changes to this book to support Firmware Release 11.0(4).

Feature Name

Updates

Configurable home screen

Buttons and Hardware was updated to discuss navigation.

Phone Screen Features was updated.

Home Screen was added to describe the home screen options.

Many of the procedures for app access were updated.

Improve cleaning instructions

The phone can be damaged if you blow or use compressed air on the microphones, so additional caution statements are added to:

Local contacts

Favorites and Local Contacts and their subsections were added to the "Contacts" chapter.

Problem report tool

Create a Problem Report from the Phone describes how to report a phone problem.

Resized wallpapers

Change the Wallpaper was updated for the new wallpapers.

User Interface Enhancements

Adjust the Screen Brightness and Change the Screen Display Timeout were updated with the default setting information.

General updates

Important Headset Safety Information added.

Getting Started

You must read Product Safety and Security before you install or charge the battery.

Your phone is powered by a rechargeable Lithium ion battery. Before you can use your phone, you must install the battery in the phone and charge the battery.

Your phone needs to connect to the corporate wireless network and the IP telephony network. Your administrator might set up your new wireless phone, or you might have to set it up.

After the phone is set up, you can use the phone.

Turn On Your Phone

When you turn the phone on, you may need to enter a username and password to access the wireless network. After the phone authenticates and registers with the call control system, the main screen displays and you can make or receive calls.

Procedure


Press and hold Power/End Call until the red LED lights.


Sign In to Your Phone

If you see a sign-in screen when you turn the phone on, you must enter your username and password to access the phone functions. You may also need to enter other information, as required by your wireless security requirements. Contact your administrator for assistance.

Procedure


Step 1

Enter your user ID.

Step 2

Enter your password.


Wake Up the Screen Display

By default, the phone screen dims after 10 seconds of inactivity. After 10 more seconds of inactivity, the screen display turns off. When the screen display is off, the phone uses less battery power.

If the screen display is off, you must wake it up to make a call.

Procedure


Press any key.


Turn Off Your Phone

To conserve the battery, turn off the phone when you don't need it to make or receive calls.

Procedure


Step 1

Press and hold Power/End Call for 4 seconds.

Step 2

Press Power off.


Lock the Phone Keypad

You can lock the keypad so that you don't press keys by mistake.

Procedure


Press and hold Zero (0) until you see the message that the keypad is locked.


Unlock the Phone Keypad

If you lock the keypad, you need to unlock it to use the phone.

Procedure


Step 1

Press Unlock.

Step 2

Press Zero (0) .


Access Your Voicemail

You can access your voicemail by calling the voicemail system phone number. But, if your administrator has enabled quick access, you can access voicemail with a single button. The button automatically dials the voicemail system for you.

Your voicemail system is separate from the phone. If you need information about the voicemail system phone numbers for internal and external access and other voicemail system information, contact your administrator.

Your administrator can configure the left softkey in the Applications view to be Voicemail.

Procedure


Step 1

Press and hold One (1) on the keypad or press Voicemail.

Step 2

Follow the prompts.


Self Care Portal

You can customize some phone settings with the Self Care portal web site, which you access from your computer. The Self Care portal is part of your organization's Cisco Unified Communications Manager.

Your administrator gives you the URL to access the Self Care portal, and provides your user ID and password.

In the Self Care portal, you can control features, line settings, and phone services for your phone.

  • Phone features include speed dial, do not disturb, and your personal address book.

  • Line settings affect a specific phone line (directory number) on your phone. Line settings can include call forwarding, visual and audio message indicators, ring patterns, and other line-specific settings.

  • Phone services can include special phone features, network data, and web-based information (such as stock quotes and movie listings). Use the Self Care Portal to subscribe to a phone service before you access it on your phone.

The following table describes some specific features that you configure with the Self Care portal. For more information, see the Self Care portal documentation for your call control system.

Table 1. Features Available on the Self Care Portal

Features

Description

Call forward

Use the number that receives calls when call forward is enabled on the phone. Use the Self Care portal to set up more complicated call forward functions, for example, when your line is busy.

Additional phones

Specify the additional phones such as your mobile phone that you want to use to make and receive calls with the same directory numbers as your desk phone. You can also define blocked and preferred contacts to restrict or allow calls from certain numbers to be sent to your mobile phone. When you set up additional phones, you can also set up these features:

  • Single number reach—Specify whether the additional phone should ring when someone calls your desk phone.

  • Mobile calls—If the additional phone is a mobile phone, you can set it up to allow you to transfer mobile calls to your desk phone or desk phone calls to your mobile phone.

Speed dial

Assign phone numbers to speed-dial numbers so that you can quickly call that person.

Speed-Dial Numbers

When you dial a number on your phone, you enter a series of digits. When you set up a speed-dial number, the speed-dial number must contain all the digits you need to make the call. For example, if you need to dial 9 to get an outside line, you enter the number 9 and then the number you want to dial.

You can also add other dialed digits to the number. Examples of additional digits include a meeting access code, an extension, a voicemail password, an authorization code, and a billing code.

The dial string can contain the following characters:

  • 0 to 9

  • Pound (#)

  • Asterisk (*)

  • Comma (,)—This is the pause character, and gives a 2 second delay in the dialing. You can have several commas in a row. For example, two commas (,,) represent a pause of 4 seconds.

The rules for dial strings are:

  • Use the comma to separate the parts of the dial string.

  • An authorization code must always precede a billing code in the speed-dial string.

  • A single comma is required between the authorization code and the billing code in the string.

  • A speed-dial label is required for speed dials with authorization codes and additional digits.

Before you configure the speed dial, try to dial the digits manually at least once to ensure that the digit sequence is correct.

Your phone does not save the authorization code, billing code, or extra digits from the speed dial in the call history. If you press Redial after you connect to a speed-dial destination, the phone prompts you to enter any required authorization code, billing code, or additional digits manually.

Example

To set up a speed-dial number to call a person at a specific extension, and if you need an authorization code and billing code, consider the following requirements:

  • You need to dial 9 for an outside line.

  • You want to call 5556543.

  • You need to input the authorization code 1234.

  • You need to input the billing code 9876.

  • You must wait for 4 seconds.

  • After the call connects, you must dial the extension 56789#.

In this scenario, the speed-dial number is 95556543,1234,9876,,56789#.

Buttons and Hardware

Your wireless phone has many buttons and hardware features that you will use regularly. Use the following figure and table to identify the important button and hardware features. The following figure shows the Cisco Wireless IP Phone 8821, but the Cisco Wireless IP Phone 8821-EX is similar in appearance.

Figure 2. Cisco Wireless IP Phone 8821 Buttons and Hardware
Cisco Wireless IP Phone 8821 with 5 callouts. Number 1 points to 2 locations on the top of the phone. Number 2 points to the 1 button on the right side of the phone. Number 3 points to the round navigation cluster surrounded by 4 buttons. The top buttons are the 2 softkeys. The bottom left button is Answer/Send and the bottom right button is Power/End Call. Number 4 points to the 12 button keypad. Number 5 points to the three buttons on the left side of the phone.

The following table describes the functions of the keys on the phones.

Item

Name or Grouping

Description

1

Indicator light (LED)

Headset port

Indicator light—Use the light to identify states:

  • Solid red—the phone is connected to the AC power source and battery is charging.

  • Solid green—the phone is connected to the AC power source and battery is fully charged.

  • Fast blinking amber—There is an incoming call. Phone can be charging or fully charged.

  • Fast blinking green—There is a voice message. When phone is connected to the AC power source, the green light displays longer than when using only the battery.

  • Slow blinking green (every 2 seconds): The phone is using only battery power. The phone is registered with the wireless network and is within service coverage area.

Headset port with cover protective cover over the headset port Remove the protective cover and plug in a headset or ear buds.

2

Speaker button

Speaker small round button Toggle the speaker mode on or off for the phone.

3

Softkey buttons

Navigation cluster

Call control buttons

Softkeys

  • The More softkey accesses a list of menus or functions.

  • The softkey activates the option displayed on the screen.

Navigation cluster round button surrounded by a 4 way ring Navigation ring and Select button

Navigation ring (outer ring):

  • Move up, down, left, or right in the Applications view to select these apps:

    • Recents press up for Recents

    • Contacts press left for Contacts

    • Apps press right for Apps

    • Settings press down for Settings

  • Scroll up and down menus to highlight options and to move left and right through phone numbers and text entries.

  • In Line view, press left on the Navigation ring to go to the Applications view.

Select button (center of the cluster):

  • Make a call from the main screen.

  • Select a menu item, a softkey, a call, or an action.

Answer/Send Answer a ringing call or, after dialing a number, place the call.

Power/End Call Turn the phone on or off, or end a connected call. When you use menus or when you are in an app, it acts as a shortcut to return to the main screen.

4

Keypad

Dial numbers, enter letters, and choose menu items by number.

One (1)

  • Enter "1" when you dial a number.

  • Access voicemail. Press and hold to automatically dial the voicemail system.

  • Enter these special text characters: / . @ : ; = ? - _ & %

Asterisk (*)

  • Before you enter an international phone number, press and hold for a few seconds to add the plus (+) symbol to the phone number.

  • Enter these special text characters: + * ~ ` < >

Zero (0)

  • Enter "0" when you dial a number.

  • Lock the keypad.

  • Enter a space or these special text characters: 0 , ! ^ ' " |

Pound (#)

  • Press to silence the phone ringer. If configured, the phone will vibrate instead.

  • Enter these special text characters: # $ £ ¤ ( ) { } [ ]

5

Left Side Buttons

Application small oblong button Use with XML applications, such as Push to Talk.

Volume long rocker button, press up to increase and press down to decrease

  • When the phone is idle, change the ring volume or turn off the ringer.

  • When you have an incoming (ringing) call, press the button once to silence the ringer.

  • During a call, control the speaker volume for the active handset, headset, or speaker.

  • When the phone is docked in the desktop charger, control the volume of the charger speaker.

Mute small round button Toggle the mute feature on or off.

Navigation

Use the outer ring of the Navigation cluster to scroll through menus and to move between fields. Use the inner Select button of the Navigation cluster to select menu items.

Navigation Cluster

If a menu item has an index number, you can enter the index number with the keypad to select the item.

Phone Screen Features

The phone screen shows information about your phone such as directory number, active call and line status, softkeys, speed dials, and placed calls. The screen is made up of these sections:

  • Header section—displays the phone number, Wi-Fi strength, battery charge, and a number of feature icons. The feature icons display when features are active.

  • Middle section—displays the home screen.

  • Footer section—displays the current date and time or softkey labels. Each softkey label indicates the action for the softkey button below the screen.

Header Icons

The screen header displays many icons. The following tables interpret these icons.

Table 2. Audio Path Icons

Icon

Description

outline of a speaker

The speakerphone or desktop charger speaker is in use.

headset

A wired or Bluetooth headset in use.

microphone with a line through it

The phone is muted.

bell with a link through it

The phone is in silent mode. This mode happens when you turn off the ringer from the Settings menu.

Table 3. Bluetooth Icons

Icon

Description

Bluetooth icon

Bluetooth is turned on.

dark oval with Bluetooth icon

A device is connected with Bluetooth.

oulined oval with Bluetooth icon

Bluetooth is turned on but no device is connected.

Table 4. Network Icons

Icon

Description

wi-fi icon with 4 active bars

wi-fi icon with 3 active bars

wi-fi icon with 2 active bars

wi-fi icon with 1 active bar

Wi-Fi connected and the number of bars indicates the signal strength.

wi-fi icon with no active bars

There is no Wi-Fi connection

network icon

The phone is connected to the Ethernet with the USB Ethernet dongle.

By default, your phone displays the battery charge icons. You can enable the phone to display the battery level as a percentage. For more information, see Set Battery Level Display.

Table 5. Battery Icons

Icon

Description

battery: all green

The battery fully charged.

battery: three quarters green

The battery charge is at about 75%.

battery: half green

The battery charge is at about 50%.

battery: one quarter green

The battery charge is at about 25%.

battery: one quarter red

The battery charge is less than 25%.

battery outline

The battery is drained. Recharge the battery or exchange it for a charged battery.

battery outline with question mark

There is no battery detected.

Home Screen

When your phone is idle, the home screen displays. The home screen can be either the Application view or the Line view.

Your administrator determines which home screen displays on your phone. If you frequently make or receive calls, you may prefer the Line view as your default home screen.

The following figure is a home screen in Applications view.

Figure 3. Application View
graphic of the Applications view

In the Applications view, the Phone app icon indicates the phone state:

  • Blue background and white icon: the phone is idle.

  • Yellow background and white icon: The phone is in an active call.

  • Blue background and red icon: The phone is on hold or the shared line is in an active call.

The following figure is a home screen in Line view. To access the Applications screen, press left on the Navigation ring.

Figure 4. Line View
graphic of the Line view

Differences Between Phone Calls and Lines

We use the terms lines and calls in very specific ways to explain how to use your phone. Here is an explanation of the differences.

Lines

Each line corresponds to a directory number or intercom number that others can use to call you. Your phone supports up to six lines. To see your phone lines, press Phone to open the line view. You have as many lines as you have directory numbers with phone line icons in the line view list.

Calls

Each line can support multiple calls, typically up to four calls. Your phone can support up to 24 connected calls, but your system administrator can adjust this number according to your needs. Only one call can be active at any time; other calls are automatically placed on hold.

Here is an example: If you have two lines and each line supports four calls, then you could have up to eight connected calls at one time. Only one of those calls is active and the other seven are held calls.

Out-of-Range Alerts

Your system administrator can configure your phone to send you an audible alert (beep) when you are out of range of the wireless network. When you hear the alert, the (no signal) icon displays on the phone screen.

When you are out of range of the wireless network, you cannot use the phone for features requiring a wireless network connection, such as making and receiving calls.

If your system administrator enabled the out-of-range alert, depending on the configuration, you might hear a beep only once, or every 10, 30, or 60 seconds until you are back within range of the wireless network.

To reconnect to the wireless network after you hear the alert, move to another location until you see the signal icon on the phone screen again.

Phone Battery Life

Your phone contains a lithium ion battery. The fully charged battery provides the following hours of service:

  • Up to 11.5 hours of talk time (depends on phone firmware and charger version)

    The following table shows the differences in talk time when you use:

    • The new 4.35V Cisco Wireless IP Phone 8821 Desktop Charger and Cisco Wireless IP Phone 8821 Multi Charger

    • The Cisco Wireless IP Phone 8821-EX Desktop Charger and Cisco Wireless IP Phone 8821-EX Multi Charger

    Table 6. Comparison of Talk Times

    Condition

    Original Cisco Wireless IP Phone 8821 Desktop Charger and Cisco Wireless IP Phone 8821 Multi Charger

    New Cisco Wireless IP Phone 8821 Desktop Charger and Cisco Wireless IP Phone 8821 Multi Charger

    Cisco Wireless IP Phone 8821-EX Desktop Charger and Cisco Wireless IP Phone 8821-EX Multi Charger

    Phone charged in charger, with wall adapter, or with USB

    Phone running Firmware Release 11.0(4)SR3 or earlier

    9.5 hours

    9.5 hours

    9.5 hours

    Phone charged in charger, with wall adapter, or with USB

    Phone running Firmware Release 11.0(5) or later

    11.5 hours

    11.5 hours

    9.5 hours

    Spare battery charged in the charging slot

    9.5 hours

    11.5 hours

    9.5 hours

  • Up to 145 hours of standby time

Battery life depends on a number of factors including:

  • On time—The battery life is reduced when the phone is turned on. Calls, messages, application use, Bluetooth use, and actions like menu navigation use power.

  • Scan mode—Your phone can be set up to scan the access points in three different ways (Continuous, Auto, Single AP). If your phone uses Continuous or Auto scan modes, the phone requires more power, which reduces battery talk time.

If you require longer talk times, you will find it useful to have a spare, charged battery.


Caution

The expected lifecycle for a battery is two years. Based on the average usage, this corresponds to approximately 500 charges. You can check the date printed on the battery to calculate the age of the battery. We recommend you to replace the battery when it reaches its end of life.


Low Battery Warning

There are two low battery warning levels. When the charge on your phone battery reaches each level, a low battery alarm beeps and a warning appears on the screen. Based on the warning level, you have a set amount of time to either charge or replace the battery before the phone automatically powers off. The following table describes the low battery warning levels.

Table 7. Low Battery Warning Levels

Level

Warning Appears at this Battery Charge Level

Onscreen Warning

Length of Time that the Warning Stays Onscreen

2

10%

Warning: Battery is low

Please connect charger.

5 seconds

1

2%

Warning: Battery is low

Phone will power off.

Until the phone powers off

(1 minute)

Bluetooth and Your Phone

You can use a Bluetooth headset with your phone.

Bluetooth connections work best when you're within 3 to 6 feet (1 to 2 meters) from your phone, but you might be able to be as far away as 66 feet (20 meters). The Bluetooth connection can degrade if you have a barrier (wall, door, window), large metal object, or other electronic devices between your phone and the connected device.

To connect a headset to your phone with Bluetooth, you start by pairing the headset with your phone. You can pair up to 5 Bluetooth headsets with the phone. After the headset is paired, the phone connects to the headset when the headset is turned on. The last Bluetooth headset connected with the phone is the headset that the phone uses.


Note

The Cisco Wireless IP Phone 8821-EX has not been tested or certified with any accessories for use in Potentially Explosive Atmosphere.


Care of Your Phone

You can clean your phone. Make sure you follow our cleaning instructions.

Clean your phone immediately if it comes in contact with anything that may cause stains, or other damage; for example, dirt or sand, ink, makeup, soap, detergent, acids, acidic foods, or lotions.


Caution

Do not blow or use compressed air (for example, aerosol cans, low- or high-pressure air nozzles) to clean the openings of the phone.

graphic representation of the text

Do not use a vacuum cleaner or other suction device to clean the openings of the phone.

Do not use pins or other objects to clean the openings of the phone.

Use of air, suction, or mechanical objects to clean the openings can damage the phone and voids the phone warranty.


If you happen to drop the phone into water, or it gets splashed, follow our instructions to dry off the phone. See If You Drop Your Phone in Water.

Clean the Phone Exterior

You can clean the phone exterior using a dry, lint-free cloth. For the health-care environment, we recommend that you use Caviwipes™ and Saniwipes™ to thoroughly clean the phone. Caviwipes and Saniwipes contain up to 17% isopropanol.

Any cleaning solution containing a higher amount of isopropanol, including pure isopropanol, or an alternative alcohol-based liquid could potentially damage the phone. Do not clean the phone with bleach or other caustic products.

Excessive use of Caviwipes and Saniwipes more than 3 times a day will damage the phone surface coating and will change the appearance of phone.

Clean your phone immediately if it comes in contact with anything that may cause stains, or other damage; for example, dirt or sand, ink, makeup, soap, detergent, acids, acidic foods, or lotions.


Caution

Do not blow or use compressed air (for example, aerosol cans, low- or high-pressure air nozzles) to clean the openings of the phone.

graphic representation of the text

Do not use a vacuum cleaner or other suction device to clean the openings of the phone.

Do not use pins or other objects to clean the openings of the phone.

Use of air, suction, or mechanical objects to clean the openings can damage the phone and voids the phone warranty.

Do not submerge the phone in any liquid.

Do not use a heavily-saturated cloth.


Procedure


Step 1

Remove the phone from the charger or unplug it from the charging cable.

Step 2

If the phone is in a protective case, remove the phone from the case.

Step 3

Wipe the phone and screen with a damp, soft, lint-free cloth.

Step 4

If there are foreign objects (for example, fine sand) in an opening in the phone, tap the phone against your hand to dislodge the objects.


If You Drop Your Phone in Water

If you drop your phone in water, here's what you do:

  • Gently shake the water off the phone.

  • Dry the phone with a soft, dry, lint-free cloth.

  • Leave your phone in a dry area with some air flow; for example, a fan blowing cool air can be directed onto the phone speaker grill to help the phone dry out. Just don't put the fan close to the phone.

Here are some things you don't do:

  • Don't open the battery door while the phone is wet.

  • Don't use compressed air to blow off the water.

  • Don't use a hair dryer to dry off the phone.

  • Don't put a cotton swab, paper towel, or cloth into the headset jack or inside the battery compartment.

  • Don't tap the phone on a hard surface.

  • Don't charge a wet phone using the charging cable. You must wait until the phone is completely dry.

  • Don't put a wet phone into the desktop charger, or multicharger. You must wait until the phone is completely dry.


Caution

Do not blow or use compressed air (for example, aerosol cans, low- or high-pressure air nozzles) to clean the openings of the phone.

graphic representation of the text

Do not use a vacuum cleaner or other suction device to clean the openings of the phone.

Do not use pins or other objects to clean the openings of the phone.

Use of air, suction, or mechanical objects to clean the openings can damage the phone and voids the phone warranty.


Caution

To ensure that the phone does not get water into the battery compartment, make sure that the compartment is tightly closed. See Install the Cisco Wireless IP Phone 8821 Battery.


If the sound is muffled after you dry the phone, there may still be water in the microphone or speaker compartments. Place your phone, speaker-side down, on a dry, lint-free cloth to see if water drips out. If there is still water in the phone, allow the phone to completely dry before you use it.

Additional Help and Information

If you have questions about the functions available on your phone, you should contact your administrator.

The Cisco web site (http://www.cisco.com) contains more information about the phones and call control systems.

Cisco One-Year Limited Hardware Warranty Terms

Special terms apply to your hardware warranty and services that you can use during the warranty period.

This warranty does not apply to phone batteries.

Your formal Warranty Statement, including the warranties and license agreements applicable to Cisco software, is available on Cisco.com at this URL: https://www.cisco.com/go/hwwarranty.

Battery Warranty

The warranty period of the battery is 6 months after the manufacturing date.