- The Cisco IP Phone 8800 Series
- New and Changed Features
- Phone Setup
- Sign into Your Extension from Another Phone
- Sign In to a Phone as a Guest
- Monitor a Coworker's Line
- Phone Web Page
- Buttons and Hardware
- Energy Savings
- Additional Help and Information
- Accessibility Features
- Troubleshooting
- Find Information About Your Phone
- View the Customization State on the Phone
- View the Network Status
- View the Phone Status
- View the Status Messages on the Phone
- View the Transaction Status
- View the Line Status
- Set the Profile Rule on the Phone
- View the Reboot History
- Report All Phone Issues
- Factory Reset the Phone from Phone Web Page
- Identify Phone Issues with a URL in the Phone Web Page
- Lost Phone Connectivity
- Cisco One-Year Limited Hardware Warranty Terms
Your Phone
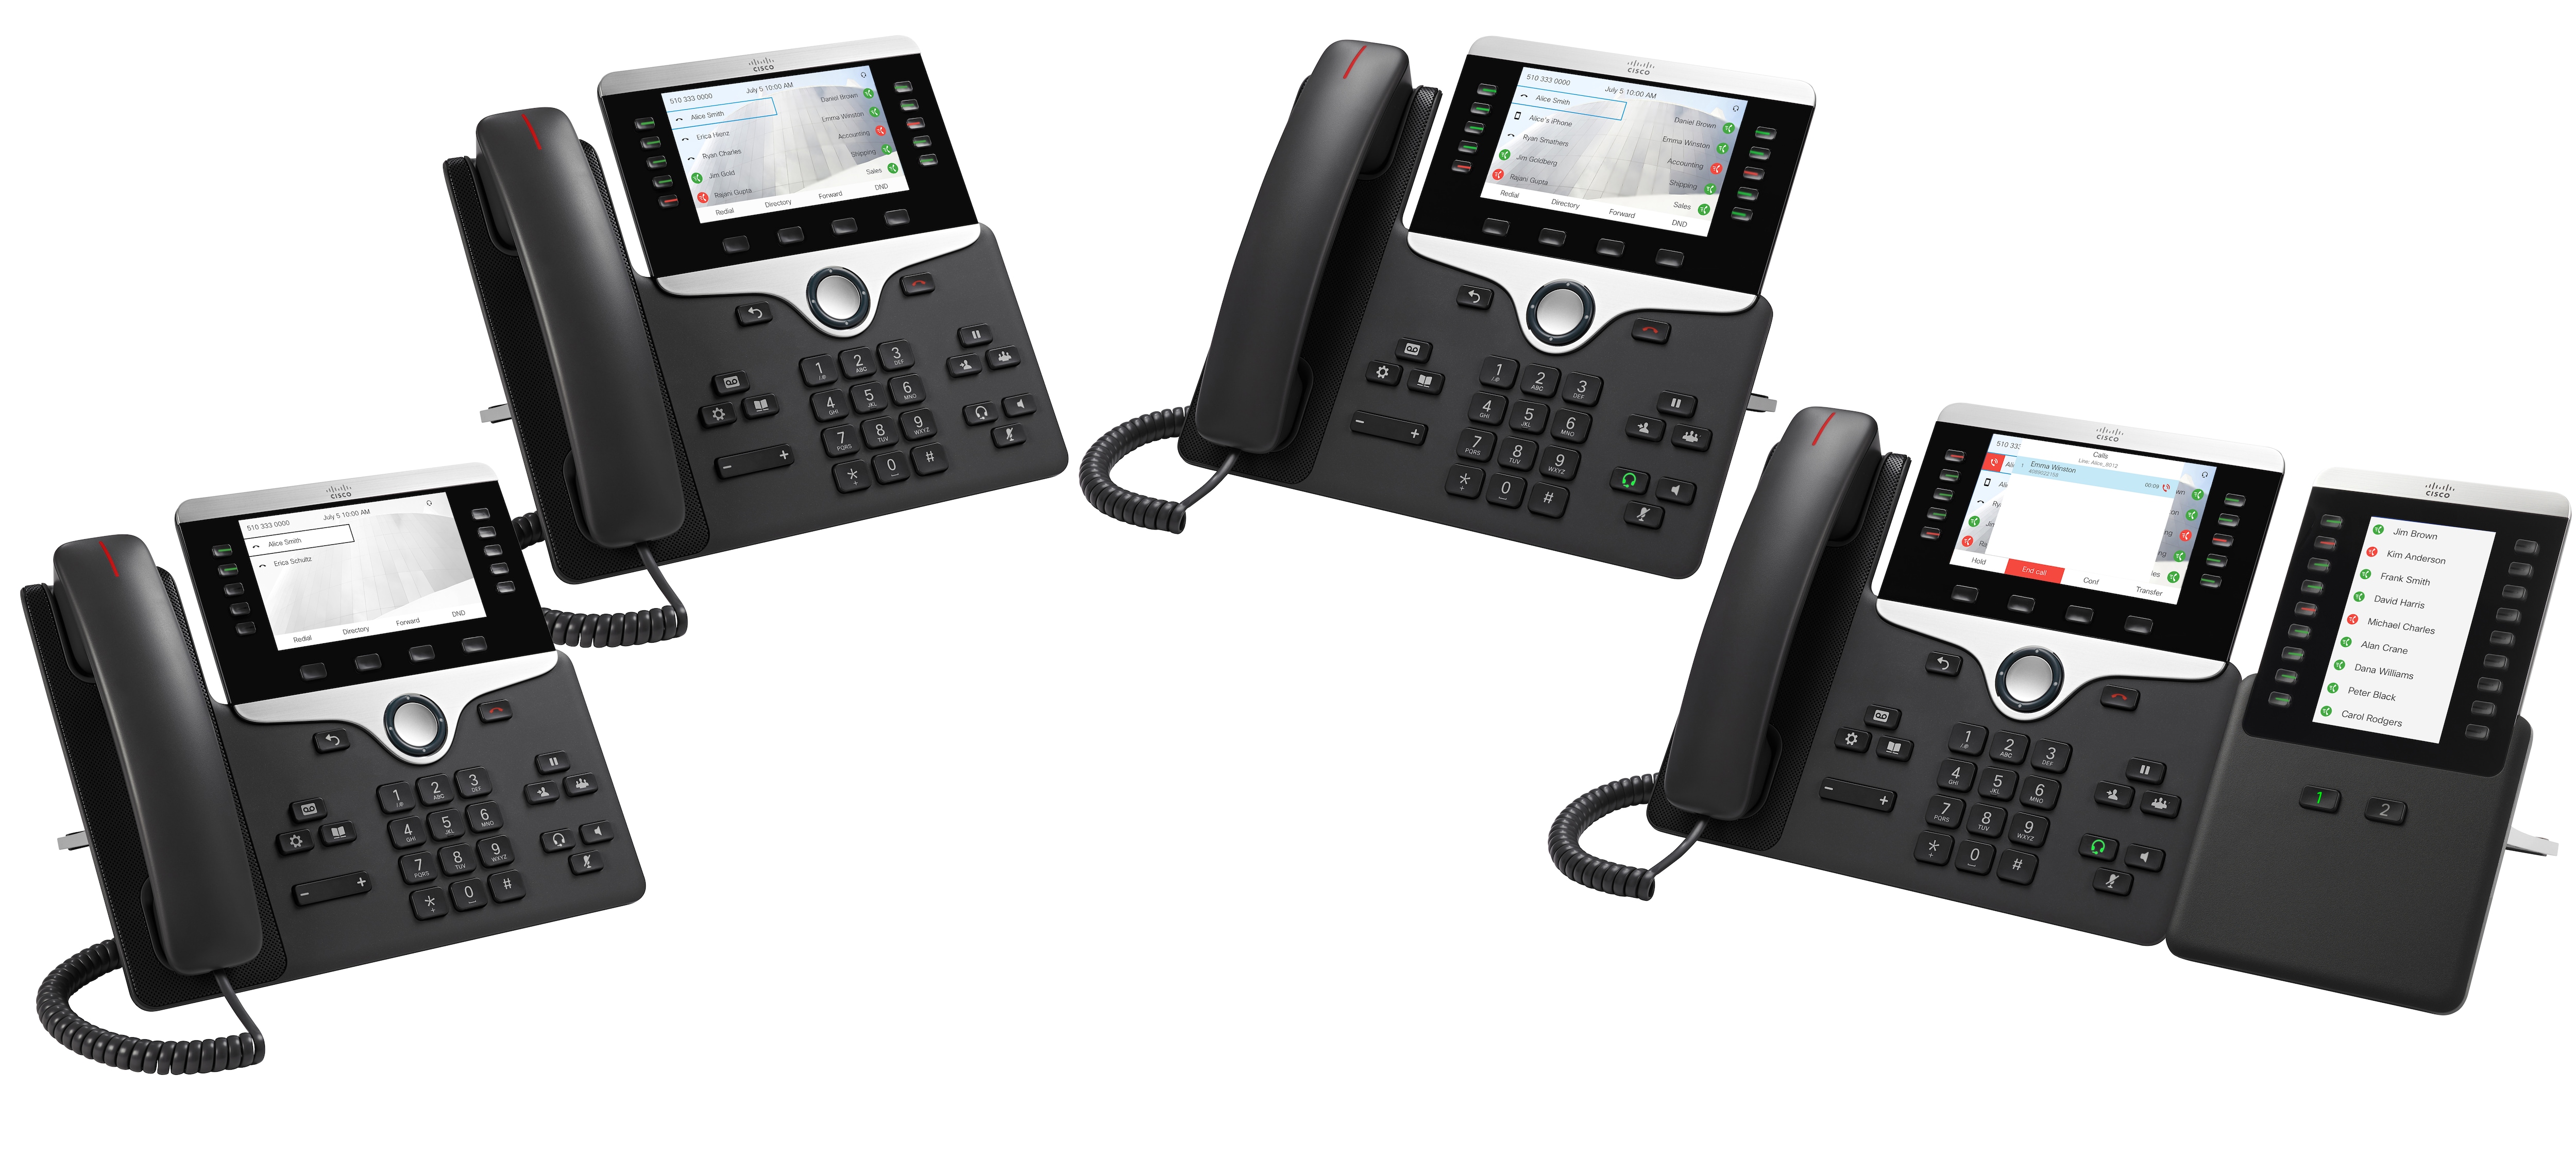
The Cisco IP Phone 8800 Series
The Cisco IP Phones 8811, 8841, 8851, and 8861 deliver easy-to-use, highly-secure voice communications.
|
Features |
8811 |
8841 |
8851 |
8861 |
|---|---|---|---|---|
|
Screen |
Grayscale |
Color |
Color |
Color |
|
USB Ports |
0 |
0 |
1 |
2 |
Wi_Fi |
No |
No |
No |
Yes |
|
Bluetooth |
No |
No |
Yes |
Yes |
|
Cisco Intelligent Proximity |
No |
No |
Yes |
Yes |
To use the phone, the phone needs to be connected to a network and configured to connect to a call control system. The phones support many functions and features, depending on the call control system. Your phone might not have all functions available, based on the way your administrator has set up the phone.
New and Changed Features
New and Changed Features for Firmware Release 11.0(1)
|
Revision |
Updated Section |
|---|---|
|
Configure a line key to perform a speed dial either with a VID or without a VID |
|
|
Perform a check to confirm whether the call is made with the current focusing line |
|
|
Configure missed call indication on the Configuration Utility Page |
Phone Behavior with Voicemail Setting Phone Behavior with Voicemail and Missed Call Configuration Setting |
|
To add wallpaper available options are default, download picture, and logo. The new default wallpaper is a monochrome picture |
|
|
A star code is added to Conference hard key from the phone web page |
|
|
Logo can be added as phone background |
New and Changed Features for Firmware Release 10.4(1)SR1
|
Revision |
Updated Section |
|---|---|
|
Added Multicast paging support |
New and Changed Features for Firmware Release 10.4(1)
Revision |
Updated Section |
|---|---|
Added Problem Reporting Tool support |
|
Added Speed-Dial support on a line key |
|
Added Key Expansion Module support |
Cisco IP Phone Key Expansion Module Setup Overview |
Added Provisioning Authority support |
|
Added Busy Lamp Field support |
|
Updated Call Park support |
Phone Setup
Typically, your administrator sets up your phone and connects it to the network. If your phone is not set up and connected, contact your administrator for instructions.
- Adjust the Handset Rest
- Change the Viewing Angle of Your Phone
- Connect to the Network
- Set a Password on Initial Phone Boot Up
- Secure the Phone with a Cable Lock
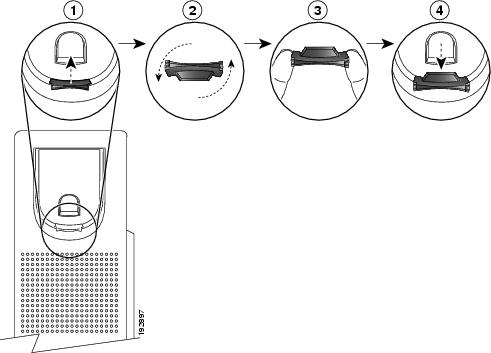
Adjust the Handset Rest
If your phone is wall-mounted or if the handset slips out of the cradle too easily, you may need to adjust the handset rest to ensure that the receiver does not slip out of the cradle.
Change the Viewing Angle of Your Phone
You can change the angle of the phone to eliminate glare on the screen.
Connect to the Network
You need to connect the phone to the telephone network.
Mobile and Remote Access Through Expressway—If your administrator sets up Mobile and Remote Access Through Expressway and you connect your phone to the network, it connects to the Expressway server automatically.
Set a Password on Initial Phone Boot Up
| Step 1 | Enter your password in the New password and Reenter new password fields. |
| Step 2 | Press Save. |
Secure the Phone with a Cable Lock
You can secure your phone with a laptop cable lock up to 20 mm wide.
Sign into Your Extension from Another Phone
If extension mobility is configured, you can sign into a different phone in your network and have it act the same as your phone. After you sign in, the phone adopts your personal directory number.
Your administrator configures provisioning authority.
Sign out of Your Extension from Another Phone
Sign In to a Phone as a Guest
| Step 1 | Press Sign in. |
| Step 2 | Enter your user ID and password.
The password field allows two types of input method; alphanumeric and numeric. While you type in the password, you see Options softkey on the phone. You can use this softkey to change the current password input type. Select Input all for alphanumeric input and select Input num for numeric entry. |
| Step 3 | Press Save. |
Sign Out of a Phone as a Guest
| Step 1 | Press Guest Out. |
| Step 2 | Press Sign Out. |
Monitor a Coworker's Line
With the busy lamp field feature, you can monitor the line status of a coworker or supervisor. This feature is useful if you routinely handle calls for a colleague and need to see their ability to answer a call.
On your phone, you see the caller ID for the calls that you receive. For lines that you monitor, you do not see caller ID.
You can use this feature with speed dial or call pickup for even greater flexibility. But you may see different icons displayed on your phone based on your combination of features. The following table shows the various busy lamp field icons based on each feature combination.
|
Busy Lamp Field |
Busy Lamp Field and Speed Dial |
Busy Lamp Field and Call Pickup |
Busy Lamp Field and Call Park |
Busy Lamp Field, Speed Dial, and Call Pickup |
Busy Lamp Field, Call Park, and Call Pickup |
Busy Lamp Field, Speed Dial, and Call Park |
Busy Lamp Field, Speed Dial, Call Pickup, and Call Park |
|
|---|---|---|---|---|---|---|---|---|
|
Idle |
||||||||
|
Alerting |
||||||||
|
In use |
||||||||
|
Call parked |
- |
- |
- |
- |
||||
|
Error |
Phone Web Page
You can customize some phone settings with the phone web page, which you access from your computer. Your administrator gives you the page URL, your user ID, and password.
In the phone web page, you can control features, line settings, and phone services for your phone.
-
Phone features include speed dial, do not disturb, and your personal address book.
-
Line settings affect a specific phone line (directory number) on your phone. Line settings can include call forwarding, visual and audio message indicators, ring patterns, and other line-specific settings.
The following table describes some specific features that you configure using the phone web page.
|
Features |
Description |
|---|---|
|
Call forward |
You specify the number that will receive calls when call forward is enabled on the phone. Use the phone web page to set up more complicated call forward functions, for example, when your line is busy. |
|
Speed dial |
You assign phone numbers to speed-dial numbers so that you can quickly call that person. |
|
Ringtone |
You assign a ringtone to a specific line. |
|
Personal directory contact |
You add a contact to your personal directory with phone web page. |
Speed-Dial Numbers
When you dial a number on your phone, you enter a series of digits. When you set up a speed-dial number, the speed-dial number must contain all the digits you need to make the call. For example, if you need to dial 9 to get an outside line, you enter the number 9 and then the number you want to dial.
You can also add other dialed digits to the number. Examples of additional digits include a meeting access code, an extension, a voicemail password, an authorization code, and a billing code.
The dial string can contain the following characters:
-
0 to 9
-
Pound (#)
-
Asterisk (*)
-
Comma (,)—This is the pause character, and gives a 2- second delay in the dialing. You can have several commas in a row. For example, two commas (,,) represent a pause of 4 seconds.
The rules for dial strings are:
-
Use the comma to separate the parts of the dial string.
-
An authorization code must always precede a billing code in the speed-dial string.
-
A single comma is required between the authorization code and the billing code in the string.
-
A speed-dial label is required for speed dials with authorization codes and additional digits.
Before you configure the speed dial, try to dial the digits manually at least once to ensure that the digit sequence is correct.
 Note | Your phone does not save the authorization code, billing code, or extra digits from the speed dial in the call history. If you press Redial after you connect to a speed-dial destination, the phone prompts you to enter any required authorization code, billing code, or additional digits manually. |
Example
To set up a speed-dial number to call a person at a specific extension, and if you need an authorization code and billing code, consider the following requirements:
-
You need to dial 9 for an outside line.
-
You want to call 5556543.
-
You need to input the authorization code 1234.
-
You need to input the billing code 9876.
-
You must wait for 4 seconds.
-
After the call connects, you must dial the extension 56789#.
In this scenario, the speed-dial number is 95556543,1234,9876,,56789#.
Buttons and Hardware
The Cisco IP Phone 8800 Series has two distinct hardware types:
-
Cisco IP Phones 8811, 8841, 8851, and 8861—do not have a camera.
-
Cisco IP Phones 8845 and 8865—have a built-in camera.
- Navigation
- Softkey, Line, and Feature Buttons
- Phone Screen Features
- Differences Between Phone Calls and Lines
- USB Ports
- Bluetooth and Your Phone
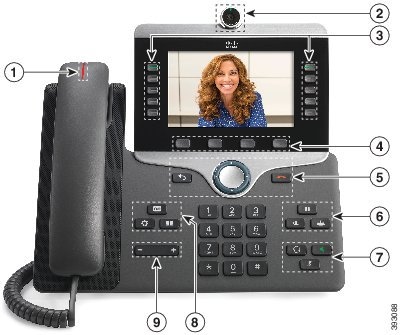
Navigation
Use the outer ring of the Navigation cluster to scroll through menus. Use the inner Select button of the Navigation cluster to select menu items.
If a menu item has an index number, you can enter the index number with the keypad to select the item.
Softkey, Line, and Feature Buttons
You can interact with the features on your phone in several ways:
-
Softkeys, located below the screen, give you access to the function displayed on the screen above the softkey. The softkeys change depending on what you are doing at the time. The More ... softkey shows you that more functions are available.
-
Feature and line buttons, located on either side of the screen, give you access to phone features and phone lines.
Feature and line buttons illuminate to indicate status:
-
 Green, steady—Active call or two-way intercom call
-
Green, flashing—Held call
-
 Amber, steady—Privacy in use, one-way intercom call, Do Not Disturb (DND) active, or logged into a Hunt Group
-
Amber, flashing—Incoming call or reverting call
-
 Red, steady—Remote line in use (shared line or Line Status)
-
Red, flashing—Remote line on hold
Your administrator can set up some functions as softkeys or as feature buttons. You can also access some functions with softkeys or the associated hard button.
Phone Screen Features
The phone screen shows information about your phone such as directory number, active call and line status, softkeys, speed dials, placed calls, and phone menu listings. The screen is made up of three sections: the header row, the middle section, and the footer row.
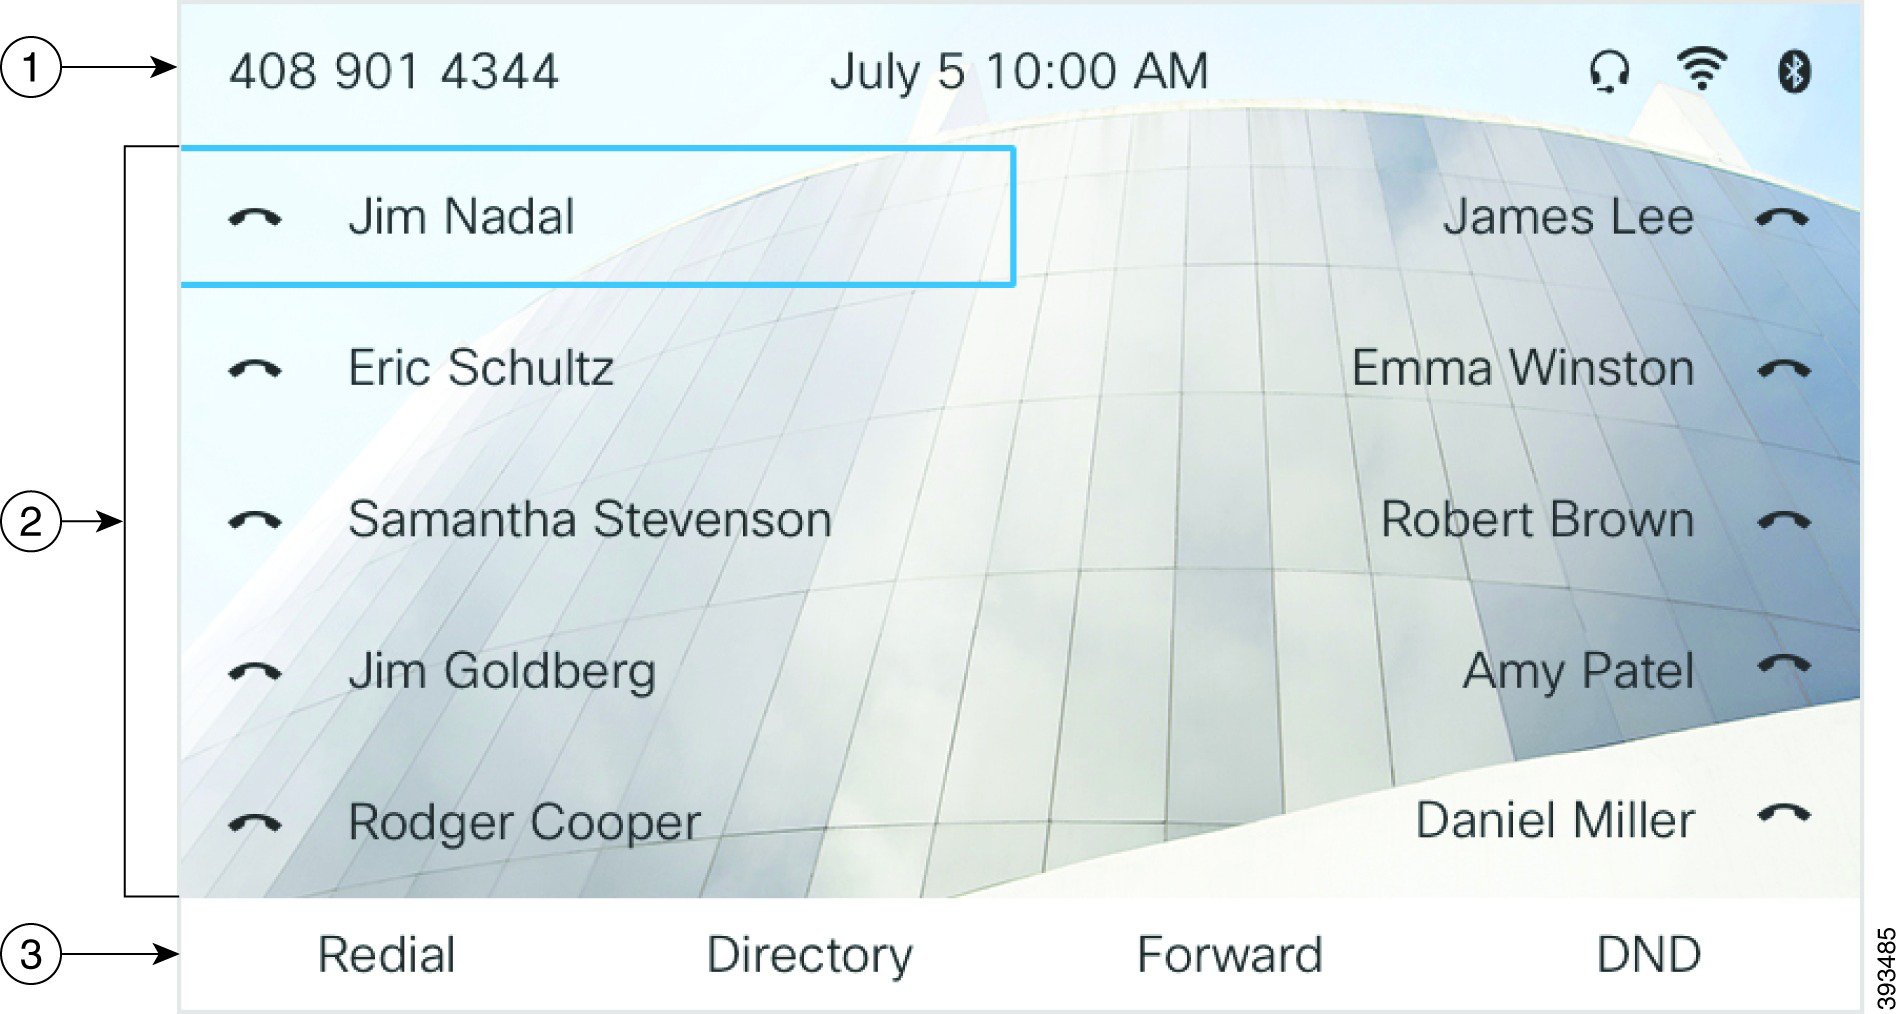
|
1 |
At the top of the screen is the header row. The header row displays the phone number, current date and time, as well a number of icons. The icons display when features are active. |
|
2 |
The middle of the phone screen displays the information associated with the line and feature buttons on the phone. |
|
3 |
The bottom row of the screen contains the softkey labels. Each label indicates the action for the softkey button below the screen. |
Clean the Phone Screen
|
Differences Between Phone Calls and Lines
We use the terms lines and calls in very specific ways to explain how to use your phone.
Lines—Each line corresponds to a directory number or intercom number that others can use to call you. You have as many lines as you have directory numbers and phone line icons.
Calls—Each line can support multiple calls. By default, your phone supports two connected calls per line, but your administrator can adjust this number according to your needs.
Only one call can be active at any time; other calls are automatically placed on hold.
Here is an example: If you have two lines and each line supports four calls, then you could have up to eight connected calls at one time. Only one of those calls is active and the other seven are held calls.
USB Ports
Only for Cisco IP Phone 8851 and 8861.
Your phone may have one or more USB ports. Each USB port supports a maximum of five USB devices. Each device connected to the port is included in the maximum device count.
For example, your phone can support five USB devices on the side port and five additional standard USB devices on the back port. Many third-party USB products contain more than one USB device, and thus count as more than one device.
Note | If you use a USB hub and remove the USB cable from the phone during an active call, your phone might restart. |
Mobile Device Charging
You can use the USB ports on your phone to charge your mobile device if the device has a USB connection. The following ports support USB charging:
Your phone continues to charge the mobile device while it is in power saving mode.
When you use your phone to charge your mobile device, the following conditions apply:
-
A short delay may occur before charging begins.
-
In some situations, your device will not display the charging icon. For example, the icon may not display when the device is fully charged.
If you unplug your tablet and immediately plug in a USB headset to the phone, a 3-second delay occurs before the phone recognizes the USB headset.
Bluetooth and Your Phone
Bluetooth is supported on Cisco IP Phone 8851 and 8861.
If your phone supports Bluetooth, use a Bluetooth headset and connect your mobile phone or tablet to the phone.
Bluetooth connections work best when you're within 3 to 6 feet (1 to 2 meters) from your phone, but you might be able to be as far away as 66 feet (20 meters). The Bluetooth connection can degrade if you have a barrier (wall, door, window), large metal object, or other electronic devices between your phone and the connected device.
To connect a mobile device or headset to your phone with Bluetooth, start by pairing the device with your phone. You can pair up to three devices. If you try to pair more than three devices, you are prompted to delete one device.
After the headset or mobile device is paired, the phone connects to the headset or mobile device when the headset or mobile device is turned on.
When you pair a device, you can set the Bluetooth mode to Phone, Handsfree or Both. Phone allows you to use only a Bluetooth headset. Handsfree allows you to use only your mobile phone. Both allows you to use both a headset and a mobile phone.
When you use a Bluetooth headset and mobile devices with your phone, keep these things in mind:
-
The last Bluetooth headset or mobile device connected with the phone is the default device that the phone uses.
-
You can have only one active connection at any time. For example, you can have a Bluetooth headset or a mobile phone active.
-
The phone supports one device of each type. For example, you cannot connect two Bluetooth headsets.
-
You can connect one mobile device at any time. For example, if your Bluetooth headset is active, and you connect a mobile phone, the Bluetooth headset disconnects.
-
Your Bluetooth device will reconnect if you move back into range, or if it restarts.
Energy Savings
Your administrator can reduce the amount of power that the phone screen uses when you're not using your phone. Level of energy-saving that your administrator can set up:
Turn On Your Phone
When your phone is powered off to save energy, the phone screen is blank.
Additional Help and Information
If you have questions about the functions available on your phone, contact your administrator.
The Cisco website (https://www.cisco.com) contains more information about the phones and call control systems.
Accessibility Features
Cisco IP Phones provide accessibility features for the vision impaired, the blind, and the hearing and mobility impaired.
You can also find more information about accessibility at this Cisco website:
http://www.cisco.com/web/about/responsibility/accessibility/index.html
Troubleshooting
You may experience issues related to the following scenarios:
-
Your phone cannot communicate with the call control system.
-
The call control system has communication or internal problems.
-
Your phone has internal problems.
If you experience problems, your administrator can help troubleshoot the root cause of the problem.
- Find Information About Your Phone
- View the Customization State on the Phone
- View the Network Status
- View the Phone Status
- View the Status Messages on the Phone
- View the Transaction Status
- View the Line Status
- Set the Profile Rule on the Phone
- View the Reboot History
- Report All Phone Issues
- Factory Reset the Phone from Phone Web Page
- Identify Phone Issues with a URL in the Phone Web Page
- Lost Phone Connectivity
Find Information About Your Phone
Your administrator may ask for information about your phone. This information uniquely identifies the phone for troubleshooting purposes.
View the Customization State on the Phone
After the RC download from the EDOS server completes, you can view the customization state of a phone on the LCD UI.
Open—The phone has booted for the first time and is not configured.
Aborted—Remote Customization is aborted due to other Provisioning like DHCP options.
Pending—The profile has been downloaded from the EDOS server.
Custom-Pending—The phone has downloaded a redirect URL from the EDOS server.
Acquired—In the profile downloaded from the EDOS server, there is a redirect URL for provision configuration. If the redirect URL download from the provisioning server is successful, this state is displayed.
Unavailable—Remote customization has stopped because the EDOS server responded with an empty provisioning file and the HTTP response was 200 OK.
View the Network Status
View the Phone Status
View the Status Messages on the Phone
View the Transaction Status
View the Line Status
Set the Profile Rule on the Phone
View the Reboot History
Report All Phone Issues
You can use the Problem Reporting Tool (PRT) to collect and send phone logs, and to report problems to your administrator.
Factory Reset the Phone from Phone Web Page
You can restore your phone to its original manufacturer settings from the phone web page. After you reset the phone, you can reconfigure it.
You can enter URL in the format: http://<Phone IP>/admin/factory-resetwhere: Phone IP = actual IP address of your phone. /admin = path to access admin page of your phone. factory-reset = command that you need to enter in the phone web page to factory-reset your phone. |
Identify Phone Issues with a URL in the Phone Web Page
When the phone doesn't work or doesn't register, a network error or any misconfiguration might be the cause. To identify the cause, add a specific IP address or a domain name to the phone admin page. Then, try to access so that the phone can ping the destination and display the cause.
Enter a URL in the format: http:/<Phone IP>/admin/ping?<ping destination>where: Phone IP = actual IP address of your phone. /admin = path to access admin page of your phone. ping destination = any IP address or domain name that you want to ping. Only alphanumeric characters, ‘-’, and “_” are allowed as the ping destination. Otherwise the phone shows an error on the web page. If the <ping destination> includes spaces, only the first part of the address is used as the pinging destination. For example, “http://<Phone IP>/admin/ping?192.168.1.1 cisco.com” will actually ping 192.168.1.1. |
Lost Phone Connectivity
Sometimes your phone can lose its connection to the call control system. When this connection is lost, your phone displays a message.
If you are on an active call when the connection is lost, the call continues. However, you do not have access to all normal phone functions because some functions require information from the call control system. Your softkeys might not work as you expect.
When the phone reconnects to the call control system, you'll be able to use your phone normally again.
Cisco One-Year Limited Hardware Warranty Terms
Special terms apply to your hardware warranty and services that you can use during the warranty period.
Your formal Warranty Statement, including the warranties and license agreements applicable to Cisco software, is available on Cisco.com at this URL: https://www.cisco.com/go/hwwarranty.
 Feedback