About the phones

Cisco Wireless Phone 840 and 860

The Cisco Wireless Phone 840 and 860 are wireless smartphones. These phones provide voice communication over your organization's wireless network using Cisco Unified Communications Manager and access points (APs). They work within the Wi-Fi range set by your organization.

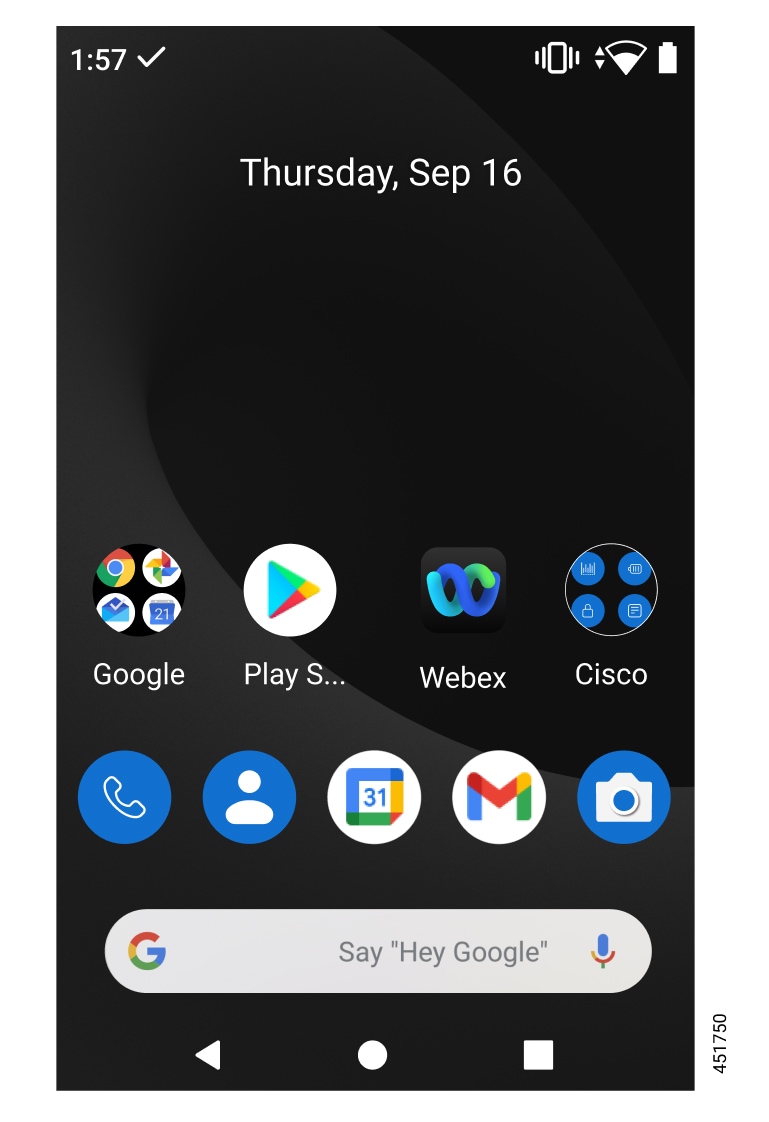
Like other devices powered by Android, your phone is app-driven, not menu-driven. You tap icons to open applications. Your phone may include several different Cisco apps that allow you to:

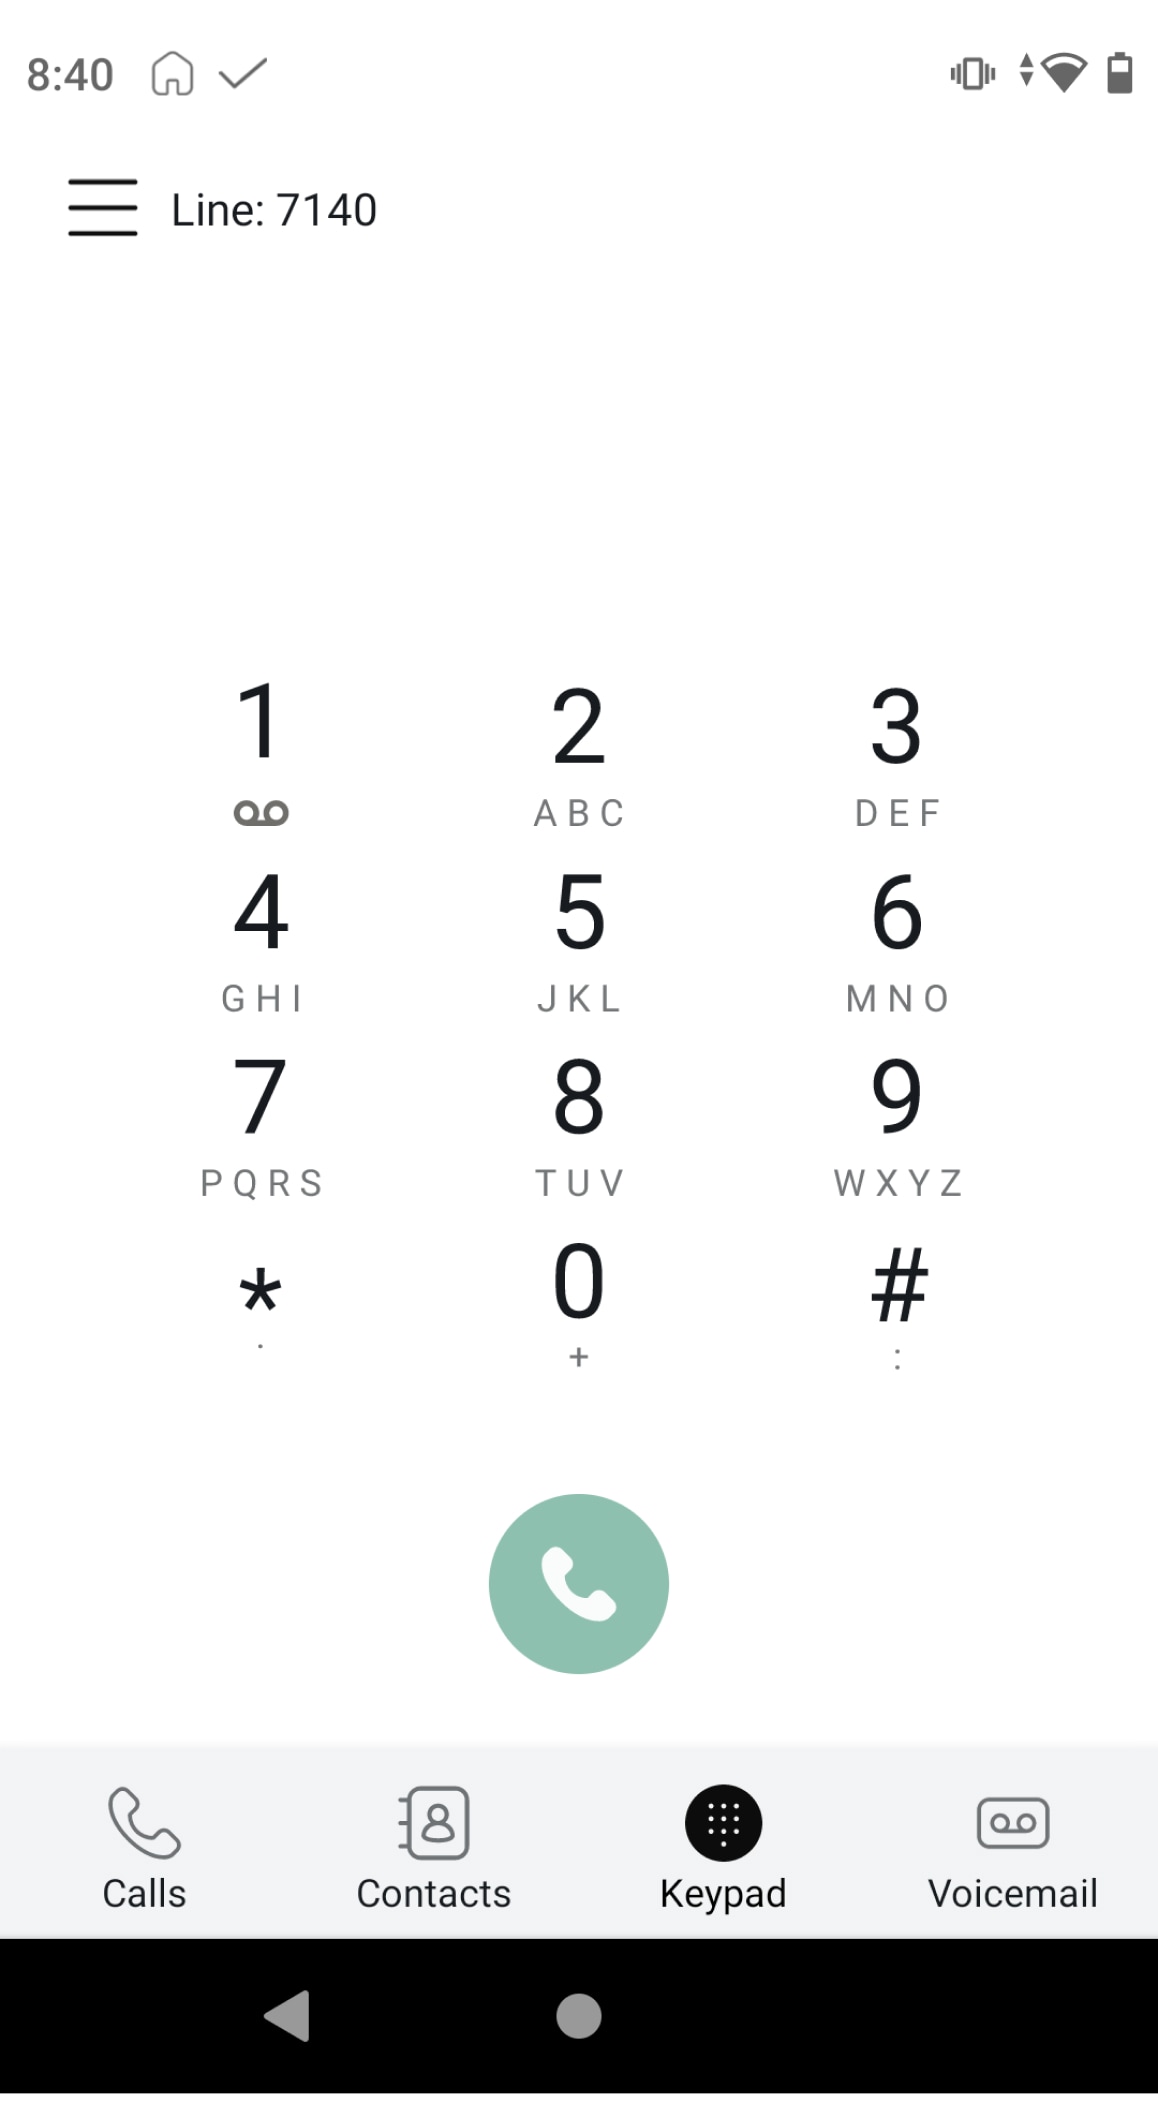
  • Place and receive phone calls.

  • Put calls on hold.

  • Transfer calls.

  • Have conference calls.

  • Forward your calls.

  • Monitor your phone battery life.

  • Customize your phone buttons.

  • If configured, provide emergency safety features such as alarms and motion monitoring.

  • If configured, send group broadcasts.

Like other network devices, the administrator configures and manages these phones. Based on the needs of your organization, the administrator may limit certain apps, features, or settings that may be available on consumer-grade Android devices.

Contact your administrator for information about the configured capabilities of your phone within your organization.

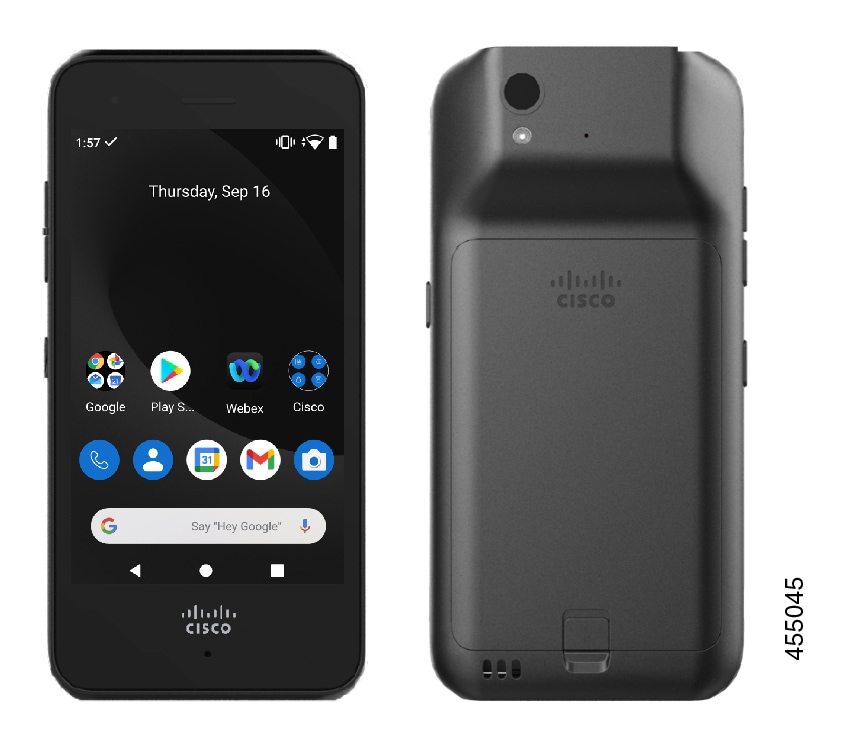
The following figure shows the Cisco Wireless Phone 840 on the left and the Cisco Wireless Phone 840S on the right. The Cisco Wireless Phone 840S includes a barcode scanner.

Figure 1. Cisco Wireless Phone 840 and Cisco Wireless Phone 840S
Two images of the 840 phone. Front with the home screen showing, and rear of the 840S with the barcode scanner showing.

The following figure shows the Cisco Wireless Phone 860 on the left and the Cisco Wireless Phone 860S on the right. The Cisco Wireless Phone 860S includes a barcode scanner.

Figure 2. Cisco Wireless Phone 860 and Cisco Wireless Phone 860S
Three images of the 860 phone. Front with the home screen showing, rear of the 860S with barcode and fingerprint scanners, and side view of 860S with a barcode scanner at top.

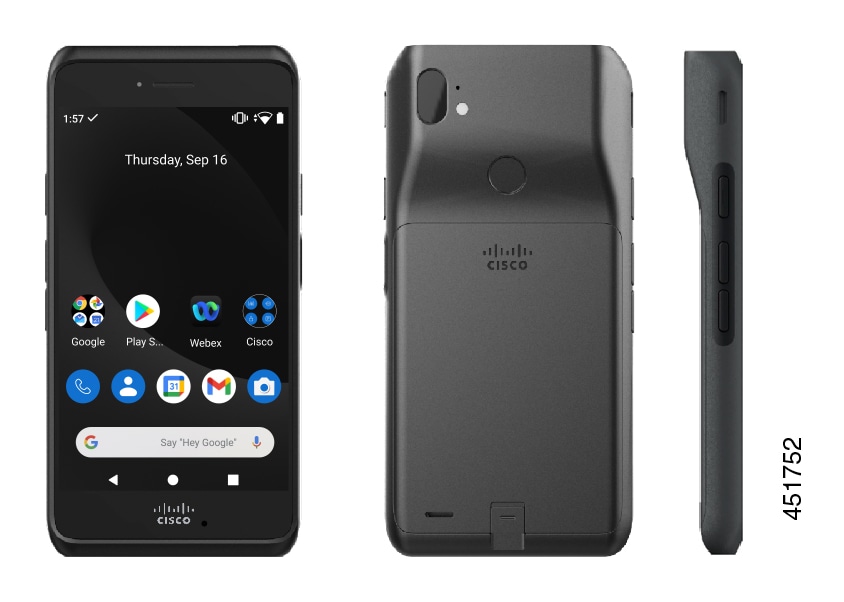
The Cisco Wireless Phone 860 and Cisco Wireless Phone 860S, though larger in size than the Cisco Wireless Phone 840 and Cisco Wireless Phone 840S, are similar in appearance and functionality.

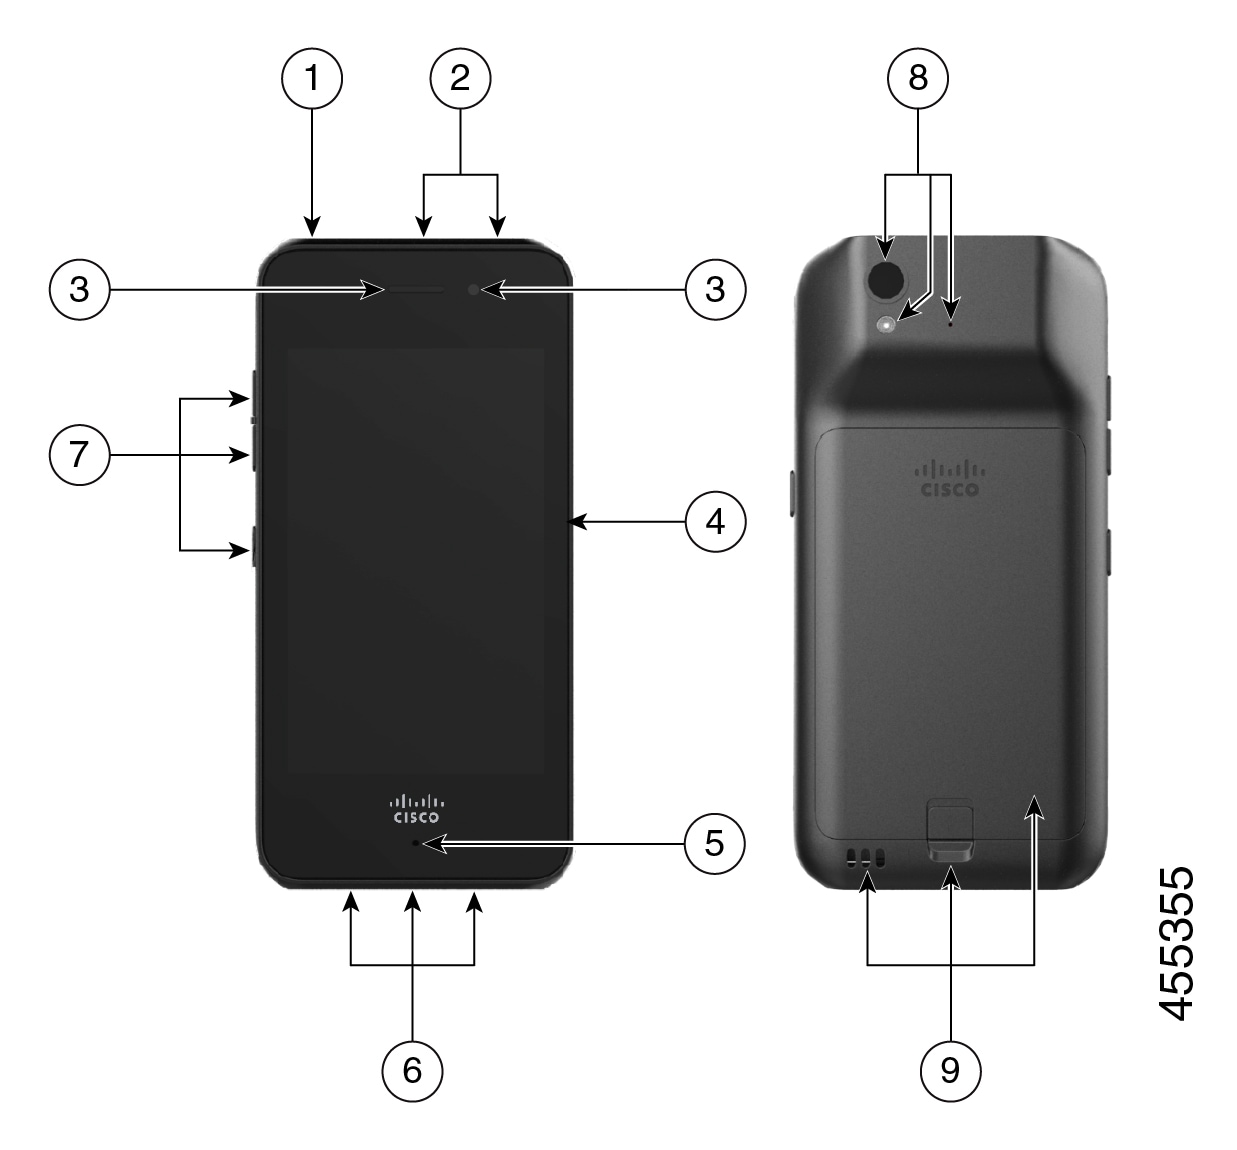
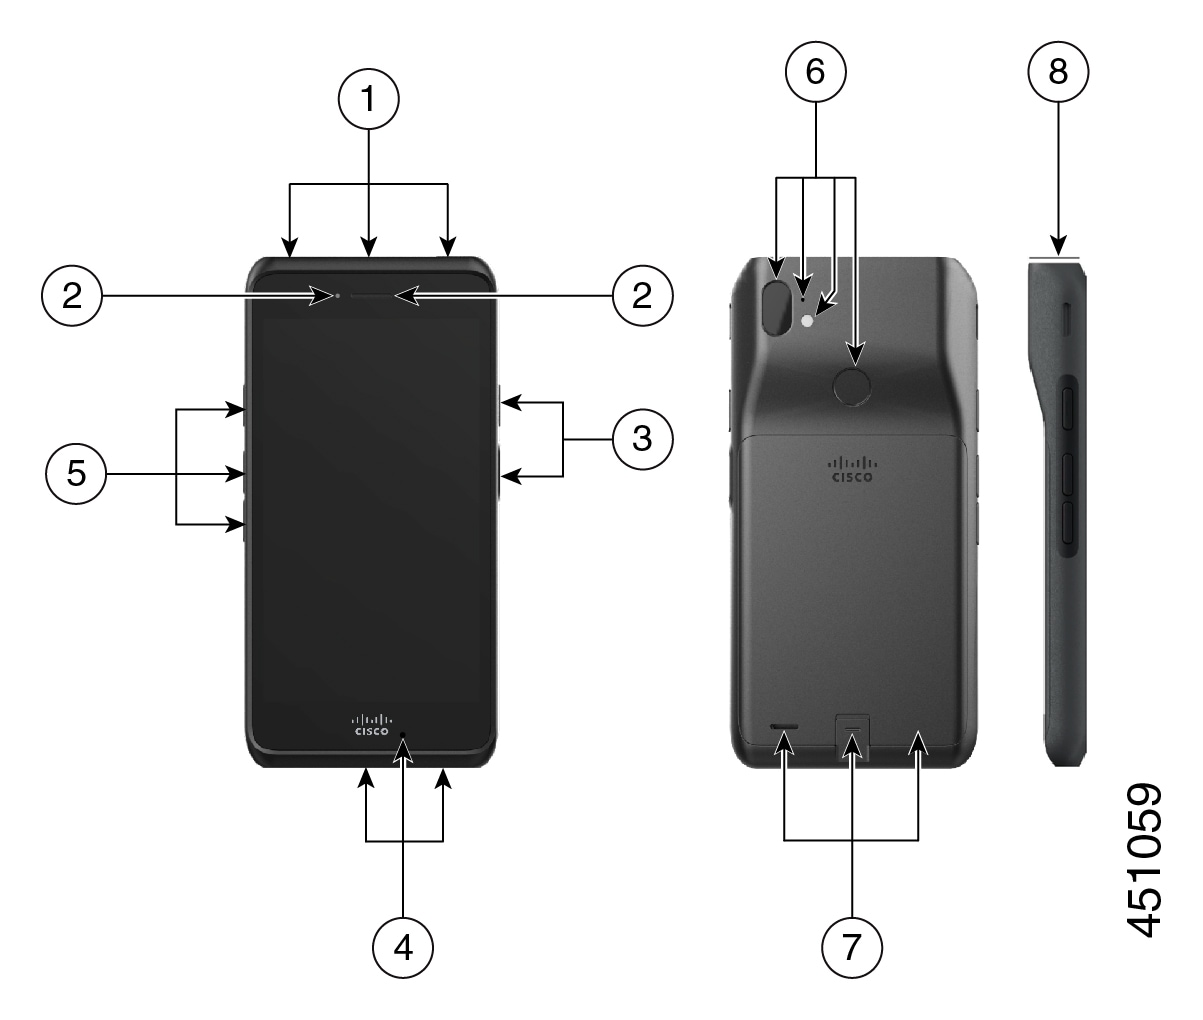
Some physical characteristics of the Cisco Wireless Phone 840 and 860 include:

  • 4.0 in. (10.2 cm) touchscreen for the 840 phones

  • 5.2 in. (13.2 cm) touchscreen for the 860 phones

  • 8 MP rear and 5 MP front camera for the 840 phones

  • 13 megapixel (MP) rear and 8 MP front camera for the 860 phones

  • Damage resistant Gorilla™ glass

  • Recessed display for screen protection

  • Tolerance of antibacterial and alcohol-based wipes

  • Latex- and lead-free

  • Shockproof and vibration-proof

  • USB-C interface

  • USB On-the-Go (OTG) 2.0 interface for use with a desktop charger or multicharger

  • Cisco Wireless Phone 840 has Ingress Protection 65 (IP65) with resistance to dust and water spray from a nozzle

  • Cisco Wireless Phone 860 has Ingress Protection 68 (IP68) with resistance to dust, drops, and liquids

  • Chargeable with a USB, desktop charger, or multicharger

For more details about the phones, see the product data sheet.

If configured, your phone provides enhanced productivity features that extend your call-handling capabilities, such as:

  • Bluetooth® wireless headsets, including some hands-free call features

  • Wireless access to your phone number and the corporate directory

  • Access to network data, Android apps, and web-based services

  • Online customization of the call forward feature from the Self Care portal

To prevent device damage:

  • Don't intentionally submerge the phone or battery in water.

  • Don't expose the phone to pressurized water or high velocity water, such as when showering, cleaning, or hand washing.

  • Don't bathe or swim with the phone.

  • Don't use the phone in a sauna or steam room.

  • Don't use the phone in corrosive environments.

  • Don't operate or store the phone, batteries, and accessories outside the suggested temperature ranges or in extremely humid, hot, or cold conditions.

  • Don't intentionally drop the phone or subject it to other impacts.

  • Don't disassemble the phone; don't remove any screws.

  • Don't use harsh cleaning agents, like bleach and other chemicals, to clean the phone exterior.

  • Don't use a broken battery.

Minimize the exposure of your phone to soap, detergent, acids or acidic foods, and any liquids; for example, salt water, soapy water, pool water, perfume, insect repellent, lotions, sun screen, oil, adhesive remover, hair dye, soft drinks, and solvents. For more information, see Care of your phone.

Ingress Protection

The Cisco Wireless Phone 840 and 860 are tested under controlled laboratory conditions.

The Cisco Wireless Phone 840 and 840S have a rating of IP65 in ordinary locations. IP65 indicates that the phones can withstand dust and are resistant to water spray from a nozzle.

The Cisco Wireless Phone 860 and 860S have a rating of IP68 in ordinary locations. IP68 indicates that the phones can withstand dust and are resistant to brief submersion in shallow fresh water.

Due to normal wear, the resistance of the phone to dust and water may decrease. Therefore, it’s important to take care of your phone and not deliberately expose the phone to a hostile environment of dust or water.

Phone model numbers

Each phone has a model number. If you're unsure which model you have, you can locate the model number on the back of the phone after you remove the battery.


Note


You can also find the model number through Settings > About Phone > Model & hardware.


Table 1. Cisco Wireless Phone 840 and 860 model numbers

Phone

Model number

Cisco Wireless Phone 840

CP-840

Cisco Wireless Phone 840S

CP-840S

Cisco Wireless Phone 860

CP-860

Cisco Wireless Phone 860S

CP-860S

New and changed information

The following section describes changes to this book to support new releases.

New and changed information for release 1.10(3)

The following table describes changes to this book to support release 1.10(3).

Table 2. New and changed information for release 1.10(3)

Feature

New or changed information

Answer and end calls using the hardware buttons

New:

Set a button to answer a call

New:

Set a button to end or decline a call

New:

Turn ON and OFF flashlight using the hardware buttons

New:

Set a button to control the flashlight

New:

Set a button to toggle the flashlight

New:

New and changed information for release 1.10(0)

The following table describes changes to this book to support release 1.10(0).

Table 3. New and changed information for release 1.10(0)

Feature

New or changed information

Updated Ringtone Per Line Management for Cisco Unified Communications Manager

Updated:

Third Party Application Conflicts

Updated:

CTI Controlled support

Updated:

Cisco Unified IP Phone Services Application Development / XML object support (Informacast)

New:

CTI Controlled support

New:

New and changed information for release 1.9(0)

The following table describes changes to this book to support release 1.9(0).

Table 4. New and changed information for release 1.9(0)

Feature

New or changed information

Cisco Unified Survivable Remote Site Telephony

Updated:

Add Configuration File Dump to Cisco Apps and Log Bundles

Updated:

Call Pickup

New:

Report a Problem User Choice in Cisco Phone UI

Updated:

Diagnostics Application

New:

Updated:

CAC is Disabled by Default

Updated:

Announced Caller ID

Updated:

Mute SIP Registration Notifications

Updated:

Push Custom Ringtone, Notification, Alarm, and Wallpaper

Updated:

New and changed information for release 1.8(0)

The following table describes changes to this book to support release 1.8(0).

Table 5. New and changed information for release 1.8(0)

Feature

New or changed information

Recording for Cisco Unified Communications Manager

Updated:

Recording for Cisco Unified Communications Manager

Updated:

Ringtone Per Line Management for Cisco Unified Communications Manager

Updated:

New and changed information for release 1.7(0)

The following table describes changes to this book to support release 1.7(0).

Table 6. New and changed information for release 1.7(0)

Feature

New or changed information

Lightweight Directory Access Protocol (LDAP) for Webex Calling

Updated:

Maximum Battery Charge Cycles Notification

Updated:

Sound Stage app

Updated:

Sound Stage app

New:

New and changed information for release 1.6(0)

The following table describes changes to this book to support release 1.6(0).

Table 7. New and changed information for release 1.6(0)

Feature

New or changed information

Webex Calling support

Updated:

Configure a Call server mode

New:

New and changed information for release 1.5(0)

The following table describes changes to this book to support release 1.5(0).

Table 8. New and changed information for release 1.5(0)

Feature

New or changed information

New Cisco Wireless Phone Configuration Management tool to quickly deploy and configure multiple Cisco Wireless Phones without an Enterprise Mobility Management (EMM) application.

When you use the Cisco Wireless Phone Configuration Management tool, the phone has a new smart launcher screen with single-app or multi-app display mode.

New:

Updated:

Alternate Network Time Protocol (NTP) service from local network in DHCP option 42.

Updated:

New and changed information for release 1.4(0)

The following table describes changes to this book to support release 1.4(0).

Table 9. New and changed information for release 1.4(0)

Feature

New or changed information

To download firmware, use HTTP on TCP 6970 only, not HTTPS on TCP 6971

Updated:

Product Specific Configuration Layout fields

Cisco app software updates

Extension mobility cross cluster (EMCC)

Updated:

Phone services

Personal directory is available with contacts that synchronize through Cisco Unified Communications Manager

New:

Corporate and personal directories setup

Corporate directory setup

Personal directory setup

Self Care Portal overview

Set up user access to the Self Care Portal

New test scan is available in the Barcode app

Updated:

Barcode app

New:

Test scan a barcode

Information about the Wi-Fi access point connection displays in the Call Quality Settings app

New:

Wi-Fi information

Updates to the user interface with new Webex branding color and style

Updated:

With this release, you'll notice some minor changes to user interface elements, such as button colors and icon shapes.

The only icon that looks different is on the Call Quality Settings app.

New and changed information for release 1.3(0)

The following table describes changes to this book to support release 1.3(0).

Table 10. New and changed information for release 1.3(0)

Feature

New or changed information

Multiple lines

Updated:

Shared lines

Updated:

Privacy on shared lines

Updated:

Cisco Extension Mobility

New:

Auto answer

New:

Line text label

New:

Call Admission Control and Traffic Specification

Updated:

PTT broadcast on a locked phone

Updated:

Custom Settings app has Dark theme and Nearby share quick settings tiles

Updated:

Custom Settings app now includes display settings

Updated:

More information about model numbers and accessories

New:

Updated:

Supported languages

The phones currently support the following languages.

  • Danish

  • Dutch

  • English

  • Finnish

  • French

  • German

  • Hungarian

  • Italian

  • Norwegian

  • Portuguese

  • Russian

  • Slovenian

  • Spanish

  • Swedish

Hardware, buttons, screen, and apps

Your phone's hardware, buttons, screens, and apps are similar to that of a consumer-grade smartphone or other Android device. However, since your phone is a managed device, your organization may configure certain limitations or allowances on the phone.

Hardware and buttons

Your wireless phone has many hardware features and buttons that you use regularly.

Although the Cisco Wireless Phone 840 and Cisco Wireless Phone 860 are different sizes, the hardware and buttons perform the same actions. However, the hardware features and buttons are not in the same location on the phones. Another difference between the phones is that the Cisco Wireless Phone 840 doesn't have a fingerprint button.

Cisco Wireless Phone 840 hardware and buttons

The following figure shows the Cisco Wireless Phone 840 and 840S with a barcode scanner.

Figure 3. Cisco Wireless Phone 840 and 840S
The front and back view of the 840S with numbered callouts. On the front view, callouts 1 and 2 are at the top of the phone. Callout 3 is on the top-left front and top-right front of the phone. Callout 4 is on the right side of the phone. Callout 5 is on the bottom front of the phone. Callout 6 is on the bottom of the phone. Callout 7 is on the left side of the phone. On the back view of the phone, callout 8 is at the top of the phone and callout 9 is at the bottom.
Table 11. Cisco Wireless Phone 840 and 840S hardware and buttons

Group number

Hardware or buttons in group

1

On the top left of the phone is the round Power button, which turns the power on and off, and locks and unlocks the screen.

2

On the top center of the Cisco Wireless Phone 840S is the barcode scanner, and on the top right is a round red Programmable Emergency alarm button.

  • Barcode scanner—If the phone is an 840S, scans a barcode.

  • Programmable Emergency button—By default this programmable button is set as an Emergency button. If configured, the button sends a preprogrammed emergency panic alert.

3

On the top front of the phone is the receive speaker in the middle, and the front camera on the right.

  • Receive speaker—Receives audio.

  • Front camera—Captures images.

4

On the right side of the phone is the Programmable PTT button. By default this programmable button is set to activate PTT. If enabled, PTT sends broadcast messages over preprogrammed channels like a walkie-talkie.

5

On the bottom front of the phone is the microphone, which captures your audio to send.

6

On the bottom of the phone is the headset jack on the left, the USB charging port in the middle, and the speaker on the right.

  • Headset jack—Supports a headset with a 3.5-mm audio plug.

  • USB charging port—Supports a USB cable to charge the phone.

  • Speaker—Receives audio you can hear.

7

On the left side of the phone are three programmable buttons. By default, the top and middle buttons are set as Volume up and Volume down respectively. By default, the bottom button is not set.

  • Programmable Volume up button—By default, this programmable button is set to turn up the volume.

  • Programmable Volume down button—By default, this programmable button is set to turn down the volume.

  • Programmable button—By default, this programmable button is set as the barcode scanner on the 840S phones.

8

On the upper left back of the phone is the rear camera above the flash lens or torch, with the rear microphone to the right.

  • Rear camera—Captures images.

  • Flash lens or torch—Emits light for a camera flash, or torch flashlight.

  • Rear microphone—Cancels noise.

9

On the lower back of the phone are the charger contacts on the left, the battery latch in the middle lower edge of the battery, and the battery.

  • Charger contacts—Connects with the contacts on a desktop charger or multicharger to charge the battery.

  • Battery latch—Releases and catches the battery in the phone.

  • Rechargeable battery—Powers the phone.

Cisco Wireless Phone 860 hardware and buttons

The following figure shows the Cisco Wireless Phone 860 and 860S with a barcode scanner.

Figure 4. Cisco Wireless Phone 860 and 860S
The front, back, and side view of 860S with numbered callouts. On the front view, callouts 1 and 2 are at the top of the phone. Callout 3 is on the right side of the phone. Callout 4 is on the bottom of the phone, and callout 5 is on the left side of the phone. On the back view of the phone, callout 6 is at the top of the phone and callout 7 is at the bottom. On the side view of the phone, callout 8 is at the top of the phone.
Table 12. Cisco Wireless Phone 860 and 860S hardware and buttons

Group number

Hardware or buttons in group

1

On the top of the phone is the headset jack on the left, the bar code scanner for 860S phones in the middle, and a red Programmable Emergency alarm button on the right.

  • Headset jack—Supports a headset with a 3.5-mm audio plug.

  • Barcode scanner—If the phone is an 860S, scans a barcode.

  • Programmable Emergency button—By default this programmable button is set as an Emergency button. If configured, the button sends a preprogrammed emergency panic alert.

2

On the top front left of the phone is the front camera, with the receive speaker to the right.

  • Front camera—Captures images.

  • Receive speaker—Receives audio.

3

On the right side of the phone is the Programmable Push to Talk (PTT) button on the top, and the Power button on the bottom.

  • Programmable PTT button—By default this programmable button is set to activate PTT. If enabled, PTT sends broadcast messages over preprogrammed channels like a walkie-talkie.

  • Power button—Turns the power on and off, and locks and unlocks the screen. A raised edge protects the power button, so it’s not easy to press by accident.

4

On the bottom of the phone is the USB charging port on the left, the microphone in the middle, and the charger contacts on the right.

  • USB charging port—Supports a USB cable to charge the phone.

  • Microphone—Captures your audio to send.

  • Charger contacts—Connects with the contacts on a desktop charger to charge the battery.

5

On the left side of the phone are three programmable buttons. By default, the top button is set as the Scanner for 860S phones. By default, the middle and bottom buttons are set as Volume up and Volume down respectively.

  • Programmable button—By default, this programmable button is set as the barcode scanner on the 860S phones.

  • Programmable Volume up button—By default, this programmable button is set to turn up the volume.

  • Programmable Volume down button—By default, this programmable button is set to turn down the volume.

6

On the top back of the phone is the rear camera on the far left, and the rear microphone above the flash lens or torch. In the upper middle of the phone is a Programmable Fingerprint scanner button.

  • Rear camera—Captures images.

  • Rear microphone—Cancels noise.

  • Flash lens or torch—Emits light for a camera flash, or torch flashlight.

  • Programmable Fingerprint scanner button—By default, this programmable button is set to act as a fingerprint scanner to unlock the phone.

7

On the lower back of the phone is the rear speaker on the left, the battery latch in the middle lower edge of the battery, and the battery.

  • Rear speaker—Receives audio you can hear.

  • Battery latch—Releases and catches the battery in the phone.

  • Rechargeable battery—Powers the phone.

8

This side view of the 860S highlights the barcode scanner on the top of the phone.

Note


If you use an incorrect cable to connect to the phone USB port, third-party accessories such as keyboards or a mouse may not work. When buying these products, look for Benson Approved and OTG cables. Any cables or adapters must be USB certified and built to the USB-C specification.


Note


If available, you can reprogram the Programmable buttons with the Buttons app.


Launcher screen

The launcher screen is the first screen that you see after you turn on or unlock the phone. It differs based on how the administrator customizes the phones, but contains the following general areas:

  • Top of the screen—Contains the status bar, which displays the time and icons that give you information about the status of your phone and notifications.

  • Body of the screen—Contains the apps and widgets that the administrator installs on the phone. The administrator may use a smart launcher to display a limited number of apps, so what you see can vary from a:

    • Launcher screen with all the factory default apps and widgets such as a phone, web browser, camera, and collection of Android and custom Cisco apps.

    • Smart launcher screen with multiple selected apps.

    • Smart launcher screen with a single, open app.

  • Bottom of the screen—Contains navigation controls.


Note


The smart launchers in this guide show what you may see if the administrator uses the Cisco Wireless Phone Configuration Management tool to set up your phone. Your phone may not look or act exactly as described in this guide if set up with another tool, such as an Enterprise Mobility Management (EMM) application.


Figure 5. Sample launcher screens: factory default launcher, smart launcher with multiple apps, and smart launcher with a single open app
Dark background on the home screen of the phone with: narrow bar of status icons on the top. In the middle of the screen, is the date and the following apps and collections. Google, Play Store, Webex, Cisco Apps, Cisco Phone app, Contacts, Gmail, Calendar, Camera, and Google search bar. At the bottom of the screen, are the Back, Home, and Recents navigation icons. Dark background on the home screen of the phone with: narrow bar of status icons on the top. In the middle of the screen, is the label Smart Launcher, followed by an overflow menu and icons for five apps: Cisco Phone, PTT, Emergency, Web API, and Webex. At the bottom of the screen, are the Back and Home navigation icons. Narrow bar of status icons on the top. In the middle of the screen, is Cisco Phone app opened to the Keypad tab. At the bottom of the screen, are the Back and Home navigation icons.

Cisco apps

These Cisco apps may be available on your phone.

Table 13. Cisco apps

Cisco app

Description

A phone receiver is on the blue Cisco Phone app icon.

The Cisco Phone app allows you to use full SIP phone call functionality.

A barcode is on the blue Barcode app icon.

The Barcode app allows you to use the barcode scanner on your 800S phone.

A battery is on the blue Battery Life app icon.

The Battery Life app displays the current condition of the battery and allows you to adjust the battery alarm volume.

A finger presses a button on the blue Buttons app icon.

The Buttons app allows you to program the buttons on your device.

A phone receiver with a small settings gear icon is on the blue Call Quality Settings app icon.

The Call Quality Settings app allows the administrator to optimize audio and video calls from Cisco dialers or other third-party dialers.

An image of a mobile phone is on the Custom Settings app icon.

The Custom Settings app allows the administrator to provide extra controls for the phone.

A closed lock is on the blue Emergency app icon.

The Emergency app allows you to use personal monitoring alarms and emergency calling. Deploy this app in lone worker environments or where you need extra security.

A piece of paper with text is on the blue Logging app icon.

The Logging app allows the administrator to access various debug options on the phone.

A walkie-talkie is on the blue Push to Talk app icon.

The PTT app allows you to use a radio multicast app on your device.

A download arrow is on the blue System Updater app icon.

The System Updater app allows you to see the current and available firmware versions for the phone. However, the administrator manages and pushes firmware updates to the phone through the Cisco Unified Communications Manager.

.

An image of the globe is on the blue Web API app.

The Web API app allows developers to interface with external services and provide links to frequently used websites.

An image of a house is on the blue Smart Launcher app.

The Smart Launcher app allows the administrator to specify which apps to display on the launcher screen.

An image of a lock in a cicrcle is on the blue Device Policy Controller app.

The Device Policy Controller app allows the administrator to specify which apps aren't allowed on the phone.

An image of a metrics in a cicrcle is on the blue Diagnostics app.

The Diagnostics app allows the administrator to perform diagnostics tests quickly and efficiently to verify phone’s hardware components.

Care of your phone

Your phone is rugged and made for use in tough environments. It’s built out of strong and resilient plastics. All components are durable and reliable.

We’ve extensively tested the phones and warranty them for normal use under rigorous conditions. The Cisco Wireless Phone 840 has an IP65 rating and the Cisco Wireless Phone 860 has an IP68 rating. However, accidental, or inadvertent exposure to various substances can cause the phone to perform poorly or fail completely.

There are many substances that you can’t clean off without damaging the device beyond repair. For instance, if you drop your phone into glue or paint, even if you carefully clean the phone, it may not function properly. Also, oil-based substances, such as make-up or lotion, can leave a sticky residue on the phone that attracts and binds particles. This can jam key components such as the camera, microphone, speaker, or headset jack. We don’t cover damage from such conditions under warranty. You can prevent or remedy such damage through careful use and proper care and maintenance.


Warning


There are no serviceable parts in the phone, batteries, or chargers. Don't open or disassemble the phone case, battery, or charger. You void your warranty if you disassemble any of these items.


Caution


Don't roughly handle the battery contacts when you clean the phone, or you may bend them. If you bend the battery contacts, the phone may not turn on or it may display a battery error.


Maintenance schedule

It’s important to clean your phone regularly so that it functions properly. To set an effective maintenance schedule for your phone, consider the following degrees of exposure and types of substances that may be present in your organization.

Table 14. Sample exposure levels

Exposure level

Typical work setting

Potential substances

Light exposure

Normal office settings with desks and chairs and moderately mobile workers.

  • Paper and fiber lint.

  • Light soil, dust, and pet hair and dander

  • Food residue and spills.

  • Human residue from coughs, sneezes, makeup, lotion, or hair products.

Medium exposure

Interactive work settings with lots of human contact, such as medical outpatient facilities, restaurants, hotels, light manufacturing, schools, and retail.

  • All the substances from the light exposure list, in larger quantities.

  • Possibly some substances from the heavy exposure list.

Heavy exposure

Highly interactive work with much more human contact and exposure to different types of substances.

  • All the substances from the light and medium exposure list.

  • Manufacturing materials such as metal lint and other particulates, various types of fluids, glues and solutions, and waste products.

  • In-patient medical exposures include body fluids and waste, medical chemicals, drugs, and various residue from medical processes.

Maintain your phone

To avoid substances building up on your phone, follow these steps to maintain your phone. How frequently you follow these steps depends on your work environment and exposure to various substances.


Warning


  • Never bend battery contacts.

  • Never submerge your phone into any cleaning solution.

  • Never allow a cleaning solution to pool on the phone or in an orifice.

  • Never spray any solution directly onto the phone.

  • Never mix cleaning agents. The combined effects of cleaning agents are unknown. Mixing chemical agents could seriously degrade the construction of the phone and make it susceptible to damage, even with normal use.

  • Never use furniture polishes, waxes, or plasticizer-based cleaners (ArmorAll®, and so on).

  • Never use lanolin, aloe, glycerin, or other skin care products.

  • Never use hand sanitizers to clean your phone or handle your phone when hands are wet with sanitizer solution.

  • Never apply any solvent such as acetone, mineral spirits, and so on

  • Don’t exert undue pressure on the battery contacts on the bottom of the phone and inside the battery compartment. Don’t rub, scrub, or use bleach.


Procedure


Step 1

Turn off the phone and remove the clip and battery.

Step 2

Spray canned air into crevices and orifices to blow out any lint or dirt.

Always point canned air at an angle away from your face and eyes.

Warning


Always wear safety goggles or glasses.

Never insert any instrument into any orifice including the microphone, earpiece, headphone jack, USB plug, reset pin hole, or battery contacts.

Step 3

Clean surface dirt with soap and water with a damp, lint-free cloth.

You may scrub stubborn spots.

Warning


Don't scrub or bend battery contacts.

Don't squeeze water or any liquid into orifices, or a sticky plug can form that blocks the opening. The result may be a significant deterioration in performance.

Step 4

Wipe off soap film with a different clean damp cloth.

Step 5

Dry with yet another clean dry cloth.

Step 6

Wipe battery contacts with a cotton swab dampened with alcohol to remove any lint.

Step 7

Polish the glass screen, photo lenses, flashlight, fingerprint scanner, and barcode reader (if present) with glass cleaner towelettes.

Caution


Don't exert too much pressure on the glass screen.

Step 8

Clean the clip and battery separately.

Step 9

When the phone and battery are completely dry, reinstall the battery and replace the clip.

Step 10

Use an approved disinfectant to sanitize the device.


Disinfectants

Products listed here are often used to clean and disinfect in medical environments. They are considered safe when used according to solution strength and manufacturer instructions. New products are introduced constantly and generally have similar ingredients. Always follow the manufacturer guidelines for a cleaning or disinfecting product.

Table 15. Generic liquid products

Product

Solution strength

Hydrogen peroxide

Use a 3% solution

Bleach

Use a 10% solution (Sodium Hypochlorite 0.55%)

Warning


Don't use on metal charging contacts.

Isopropyl alcohol

Up to 91% solution

Here are some brand name products that you can use:

  • AZOWIPE™

  • Brulin BruTab 6S® Tablets

  • Clinell© Universal Wipes

  • Clorox© Dispatch Hospital Cleaner Disinfectant Towels with Bleach

  • Clorox© Formula 409® Glass and Surface Cleaner

  • Clorox© Healthcare Bleach Germicidal Wipes

  • Clorox© Healthcare Hydrogen Peroxide Wipes

  • Clorox© Healthcare Multi-Surface Quat Alcohol WipesDispatch® Hospital Cleaner with Bleach

  • Diversey© D10® Concentrate Detergent Sanitizer

  • Diversey© Dimension 256 Neutral Disinfectant Cleaner

  • Diversey© Oxivir® Tb Wipes

  • Diversey© Virex II® 256 One-Step Disinfectant Cleaner

  • Medipal© Alcohol Wipes

  • Metrex© CaviCide®

  • Metrex© CaviCide1®

  • Metrex© CaviWipes™

  • Metrex© CaviWipes1®

  • Oxivir©

  • PDI© Easy Screen® Cleaning Wipe

  • PDI© Sani-Cloth AF3® Germicidal Disposable Wipe

  • PDI© Sani-Cloth® Bleach Germicidal Disposable Wipe

  • PDI© Sani-Cloth® HB Sani-Germicidal Disposable Wipe

  • PDI© Sani-Cloth® Plus Germicidal Disposable Cloth

  • PDI© Super Sani-Cloth® Germicidal Wipe

  • Progressive© Products Wipes Plus

  • Sani© Professional Disinfecting Multi-Surface Wipes

  • Sani-Hands® Instant Hand Sanitizing Wipes

  • SC Johnson© Windex® Original Glass Cleaner with Ammonia-D

  • Spartan© Hepacide® Quat II

  • Sterets© Alcowipe®

  • Steris© Coverage Plus Germicidal Surface Wipes

  • Veridien© Viraguard

  • Windex© Glass Cleaner

UV disinfection

Ultraviolet (UV) light from the C spectrum has germicidal properties and is used within specially built chambers to disinfect devices. It is best to use UV-C chambers after you clean a device. In a medical environment, germicidal UV-C is employed as an extra safeguard against Healthcare-Associated Infections or Hospital Acquired Infections (HAIs). Although ultraviolet light destroys viruses, bacteria, and spores it can damage plastics.

Labs conducted extensive testing to determine the durability of Cisco Wireless Phone 840 and 860 when exposed to UV-C. The phones were tested against a UV-C chamber, the AUVS KR615, designed for disinfecting mobile devices under hospital disinfection protocols. Commonly known as The UV Box, the KR615 was developed and is manufactured by Advanced Ultra-Violet Systems and is available through Safety Net.

Due to its superior plastic enclosure and precision manufacturing, the phones exceeded performance expectations and retained full functionality and integrity throughout the tests. We therefore approve germicidal UV-C for disinfecting Cisco Wireless Phone 840 and 860 when used according to both Cisco and UV-C device manufacturer guidelines. For more information about The UV Box, visit Safety Net.

Dry your phone

If your phone is dropped into water or the interior gets wet, you need to take steps to dry your phone.


Warning


Use of an oven or dryer on the phone to speed up drying can damage the phone and voids the warranty.


Note


If the phone doesn’t work after these steps, contact your administrator.


Procedure


Step 1

Immediately power off the phone and remove the battery.

Step 2

Shake excess liquid from the phone.

Step 3

Place the phone and battery in an area that is at room temperature and has good airflow.

Step 4

Let the phone and battery dry for 72 hours before you reconnect the battery and power on the phone.


Related documentation

Use the following sections to obtain related information.

Cisco Unified Communications Manager documentation

See the Cisco Unified Communications Manager Documentation Guide and other publications that are specific to your Cisco Unified Communications Manager release on the product support page.

Cisco IP phone user support

If you are an administrator, you are likely the primary source of information for Cisco IP phone users in your network or company. It is important to provide current and thorough information to end users.

To successfully use some of the features on the Cisco IP phone (including Services and voice message system options), users must receive information from you, or from your network team or must be able to contact you for assistance. Make sure to provide users with the names of people to contact for assistance and with instructions for contacting those people.

We recommend that you create a web page on your internal support site that provides end users with important information about their Cisco IP phones.

Consider including the following types of information on this site:

  • User guides for all Cisco IP phone models that you support

  • Information on how to access the Cisco Unified Communications Self Care Portal

  • List of features supported

  • User guide or quick reference for your voicemail system

Configuration and deployment workflow

Cisco Unified Communications Manager (Unified Communications Manager) provides call services through the Cisco Phone app. There are options to set up and manage these phones:

  • We recommend that you use an Enterprise Mobility Management (EMM) application, such as Cisco Meraki Systems Manager, to manage the devices and Cisco apps.

  • If you don't have an EMM application, we recommend that you use the Cisco Wireless Phone Configuration Management tool to set up phones with release 1.5(0) or later.

  • If you don’t use an EMM application or the Cisco Wireless Phone Configuration Management tool, you can manage the devices and apps individually on each phone. However, we don't recommend this method for deployments of more than a few phones.

We also recommend using an EMM application or the Cisco Wireless Phone Configuration Management tool and a Quick Response (QR) code to program the phones to connect to a WPA2 PSK WLAN and, if applicable, the EMM application. Alternately, you can use a Google Wizard to manually configure the network Service Set Identifier (SSID) settings.

Procedure

  Command or Action Purpose

Step 1

Configure the network.

See Network requirements.

Step 2

Configure Unified Communications Manager to initialize devices.

  • You can manually program Unified Communications Manager for a few devices.

  • You can also use a bulk programming method to replace several of these steps to provision many devices at once.

See Cisco Unified Communications Manager phone configuration.

Step 3

Fully charge the phones.

Use a USB, desktop charger, or multicharger to fully charge the phone.

See Phone battery charging, Desktop chargers, or Multichargers.

Step 4

Choose one of the following:

  • (Recommended, especially if you need third-party apps) Configure an EMM application console and generate a QR code to program the phones to connect to a WPA2 PSK WLAN and EMM application.
  • (Recommended, if you don't have an EMM application) Configure the Cisco Wireless Phone Configuration Management tool and generate a QR code to program the phones to connect to a WPA2 PSK WLAN.
  • (Recommended only for small deployments) If not using an EMM application or Cisco Wireless Phone Configuration Management tool, manually configure the SSID settings to program the phones to connect to the wireless network.

See Phone configuration and Cisco app configuration.

Step 5

Phones contact Unified Communications Manager and, if used, the EMM application, or configuration file created in the Cisco Wireless Phone Configuration Management tool:

  • Each phone uses DHCP option 150 or 66 to locate its HTTP (Alt TFTP) servers. Using its Unified Communications Manager device name (based on its MAC address) the phone downloads its configuration file in the Unified Communications Manager.

  • Each phone connects to the WLAN.

  • (Optional) Each phone enrolls with the EMM application. The EMM application provides the phone apps, certificates, and configuration for all non-Unified Communications Manager related functionality.

See Phone configuration and Cisco app configuration.

Step 6

The phone is fully functional and downloads software updates from the server, which is administered through the Unified Communications Manager. If used, the EMM application provides app updates.

See Phone configuration and Cisco app configuration.