Initial setup

Network requirements

Network requirements for the Cisco Wireless Phone 840 and 860 include:

The phones use DHCP Option 150 or 66 for Unified Communications Manager server configuration. If the network doesn't provide DHCP Option 150 or 66, or is pointing to the incorrect Unified Communications Manager server, then you must manually configure the servers in the Cisco Phone app.

Hosts on the network use DHCP to obtain initial configuration information, including IP address, subnet mask, default gateway, and HTTP server address. DHCP eases the administrative burden of manually configuring each host with an IP address and other configuration information. DHCP also provides automatic reconfiguration of network configuration when devices are moved between subnets. The configuration information is provided by a DHCP server that is located in the network, which responds to DHCP requests from DHCP-capable clients. Although the server is referred to as an HTTP server in this document, the actual communications protocol that is used is HTTP or HTTPS.

To simplify deployment of these devices, configure the phones to use DHCP. Use any Request for Comments (RFC) 2131 compliant DHCP server to provide configuration information to the phones.

Configure the phones to rely on DHCP Option 150 or 66 to identify the source of telephony configuration information, available from a Unified Communications Manager HTTP server. Option 150 or 66 should contain a single IP address in a system with one Unified Communications Manager HTTP server or two IP addresses for deployments where there are two HTTP servers within the same cluster.

The phone uses the second address if it fails to contact the primary HTTP server, thus providing redundancy. To achieve both redundancy and load sharing between the HTTP servers, you can configure Option 150 or 66 to provide the two HTTP server addresses in reverse order for half of the DHCP scopes.

The phone requires using a direct IP address (that is, not relying on a Domain Name System (DNS) service) for Option 150 or 66 because doing so eliminates dependencies on DNS service availability during the phone boot and registration process.


Note


From release 1.3(0) and later, you can enable Call Admission Control (CAC) and Traffic Specification (TSPEC) for call control and voice on the WLAN Controller or Access Point. See the Cisco Wireless Phone 840 and 860 Deployment Guide for more information.


Note


By default, the Cisco Wireless Phones send a Network Time Protocol (NTP) request to a server on the internet to get the date and time, or to the internal NTP server that you set in the Custom Settings app.

From release 1.5(0) and later, you can define a server in DHCP option 42 to provide an alternate NTP service in case the NTP server isn't available. If the NTP server isn't available, for example there's no internet, the phones get their time source from the server that you define in DHCP option 42.


Cisco Unified Communications Manager requirements

Cisco Unified Communications Manager (Unified Communications Manager) requirements for the Cisco Wireless Phone 840 and 860 include:

  • Unified Communications Manager 11.5, 12.5, 14.0, or later

  • Installation of both of these Cisco Options Package (COP) files on Unified Communications Manager:

    • Device enabler QED installer—Enables Cisco Wireless Phone 840 and 860 in Unified Communications Manager.

    • Phone software—Updates software for all Cisco apps.


    Note


    If you want to use the Cisco Wireless Phone Configuration Management tool to configure your phones, install release 1.5(0) files or later.


Device enabler QED installer file

The Cisco Unified Communications Manager (Unified Communications Manager) device enabler QED installer Cisco Options Package (COP) file contains configuration files that register the phone and enable features on the phone. Install the latest device enabler QED installer COP file on the Unified Communications Manager so that the Cisco Wireless Phone 840 and 860 can register to the Unified Communications Manager and access the phone features. New features may be turned off by default and they have attributes or settings that you must configure.

Phone software file

The factory installs a version of the phone software on the phone during manufacturing. But that software may not be the latest version.

Your Cisco Unified Communications Manager stores the software loads. If the version of software on the phone isn’t the latest version, the Cisco Unified Communications Manager sends the updated software load to the phone.


Caution


You can't downgrade the phone software to an earlier version. The lowest phone software version that you can have on the phone is the factory installed version. However, when you upgrade the phone software, that version becomes the lowest possible software version. Even if you perform a factory reset, the phone software stays on the latest installed version.


Phone configuration files

Configuration files for a phone are stored on an HTTP server and define parameters for connecting to Cisco Unified Communications Manager (Unified Communications Manager). In general, anytime you make a change in Unified Communications Manager that requires the phone to be reset, a change is automatically made to the phone configuration file.

Configuration files also contain information about which image load the phone should be running. If this image load differs from the one currently loaded on a phone, the phone contacts the HTTP server to request the required load files.

If you configure security-related settings in Cisco Unified Communications Manager Administration, the phone configuration file contains sensitive information. To ensure the privacy of a configuration file, you must configure it for encryption. For more information, see the documentation for your particular Unified Communications Manager release. A phone requests a configuration file whenever it resets and registers with Unified Communications Manager.

Load the COP files to Cisco Unified Communications Manager

You must install the Cisco Wireless Phone 840 and 860 device enabler QED installer and phone software Cisco Options Package (COP) files into each Cisco Unified Communications Manager (Unified Communications Manager) in the cluster.


Note


These COP files are signed with the sha512 checksum. Cisco Unified Communications Manager versions before version 14 don't automatically include support for sha512.


For the first installation, install the device enabler QED installer file first and then the software file.

For future software updates, there is not always a corresponding device enabler QED installer update. When a software update is available, check the latest version of the device enabler QED installer file to see whether you also must update it.


Note


With each new software release, the Cisco apps are also updated in the Play Store. However, if you manage the phones through an Enterprise Mobility Management (EMM) application, we recommend that you update the firmware on the phones to minimize any risk of app incompatibility.


Before you begin

  • Download the device enabler QED installer and phone software COP files from the Software Download site.


    Note


    If you want to use the Cisco Wireless Phone Configuration Management tool to configure your phones, install release 1.5(0) files or later.


  • If you have Unified Communications Manager version 11.5 or 12.5 and don't already have sha512 checksum support enabled, install ciscocm.enable-sha512sum-2021-signing-key-v1.0.cop.sgn.


Caution


Choose an appropriate time to perform this task. As part of this task you must restart each Unified Communications Manager in the cluster after you install a device enabler QED installer COP file, unless your version of Unified Communications Manager offers an alternate process that does not require a reboot.

See the Manage Device Firmware section of the Administration Guide for Cisco Unified Communications Manager for your Unified Communications Manager version, to see if it allows an installation process that does not require a reboot.


Procedure


Step 1

In each Unified Communications Manager in the cluster, select Cisco Unified OS Administration > Software Upgrades > Install/Upgrade.

Step 2

Enter the Software Location data.

Step 3

Click Next.

Step 4

Select the COP (.cop.sha512) file.

Note


If the COP file doesn't appear in the available files list, ensure that you enable sha512 checksum support.

Step 5

Click Next to download the COP file to Unified Communications Manager.

Step 6

Check that the file checksum details are correct.

Step 7

Click Next to install the COP file on Unified Communications Manager.

Step 8

Click Install Another and repeat steps 2–7 to install another COP file.

Step 9

Perform the following actions based on the COP files that you installed.

  1. If you installed a device enabler QED installer COP file:

    • For 11.5(1)SU4 and earlier:

      • Reboot all Unified Communications Manager nodes through Cisco Unified OS Administration > Settings > Version > Restart.

    • For 11.5(1)SU5 and later or 12.5(1) and later:

      • Restart the Cisco Tomcat service on all Unified Communications Manager nodes.

      • If running the Unified Communications Manager service on the publisher node, restart the service on the publisher node only. You do not need to restart the Cisco Call Manager Service on subscriber nodes.

  2. If you installed a software COP file, restart the Cisco TFTP service for all nodes running the Cisco TFTP service.


Phone battery installation

You must read the information in the Product Safety and Security chapter of the User Guide, before you install or charge the battery, or use the phone.

Before you can use your phone, you must install and charge the battery. The battery may already be installed in your phone, or you may have to install it yourself.

To maximize the battery storage capacity and lifespan, fully charge the battery before you turn on and set up the phone.

Install the battery

Don't install the battery in a dusty or wet environment.

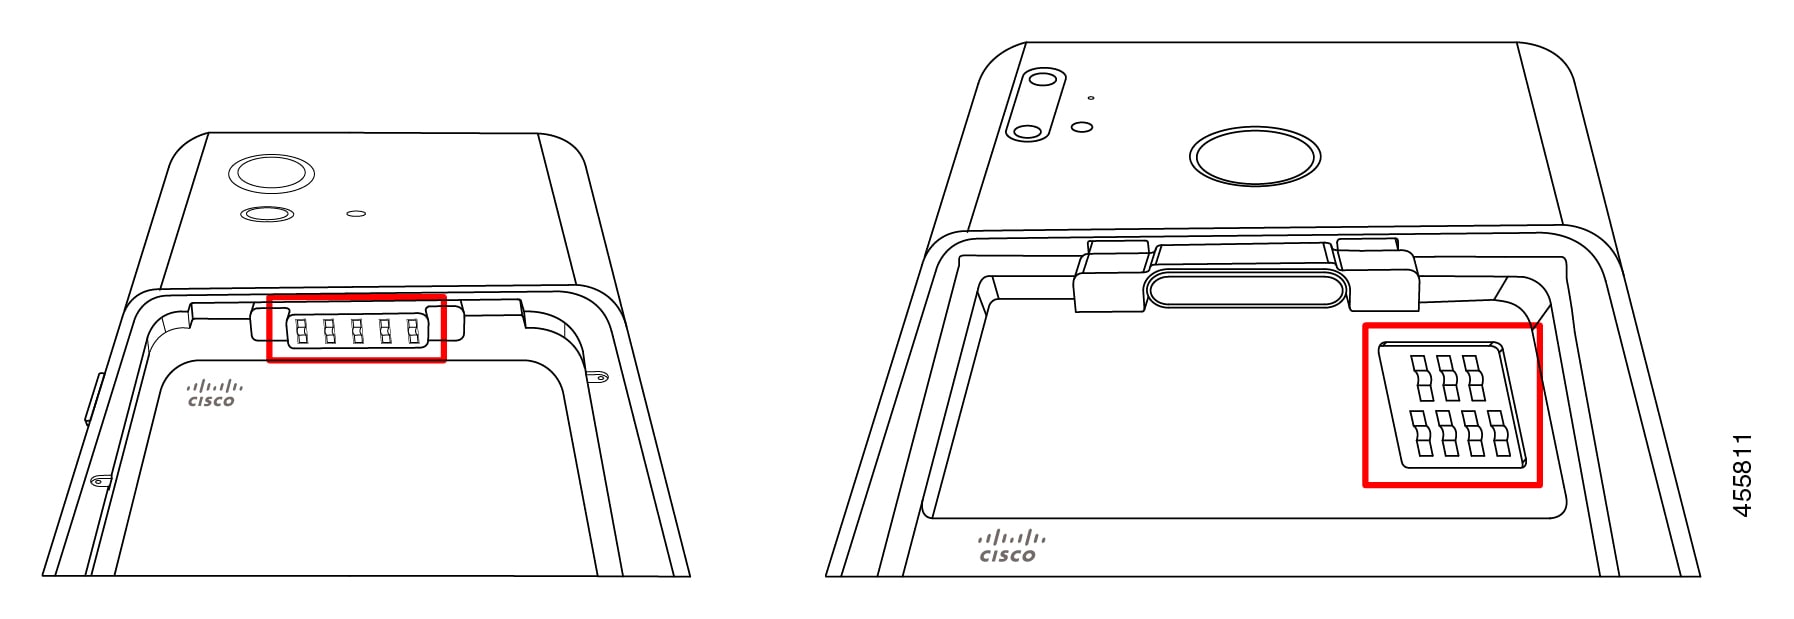
The steps to install the battery are the same for both the Cisco Wireless Phone 840 and Cisco Wireless Phone 860. However, the battery contacts are in different locations on these models, as shown in the following illustration. The illustrations in the steps are of the Cisco Wireless Phone 860.

Figure 1. Battery contact location on the Cisco Wireless Phone 840 and Cisco Wireless Phone 860
Image of the back of the 840 and 860 with their batteries removed and red highlight on the battery contact fingers. For the 840 the contacts are at the top, and for the 860 the contacts are on the right side.

Warning


Take care not to damage the battery contacts within the handset when you remove the battery from the handset. Take special care not to touch, compress, or come into contact with the battery contacts in any way or damage may occur.


Warning


Use only the Cisco-branded batteries for this phone. If you attempt to use a third-party battery, you will receive an error and the battery will not work. We don't support damage from attempting to use third-party batteries.


Procedure


Step 1

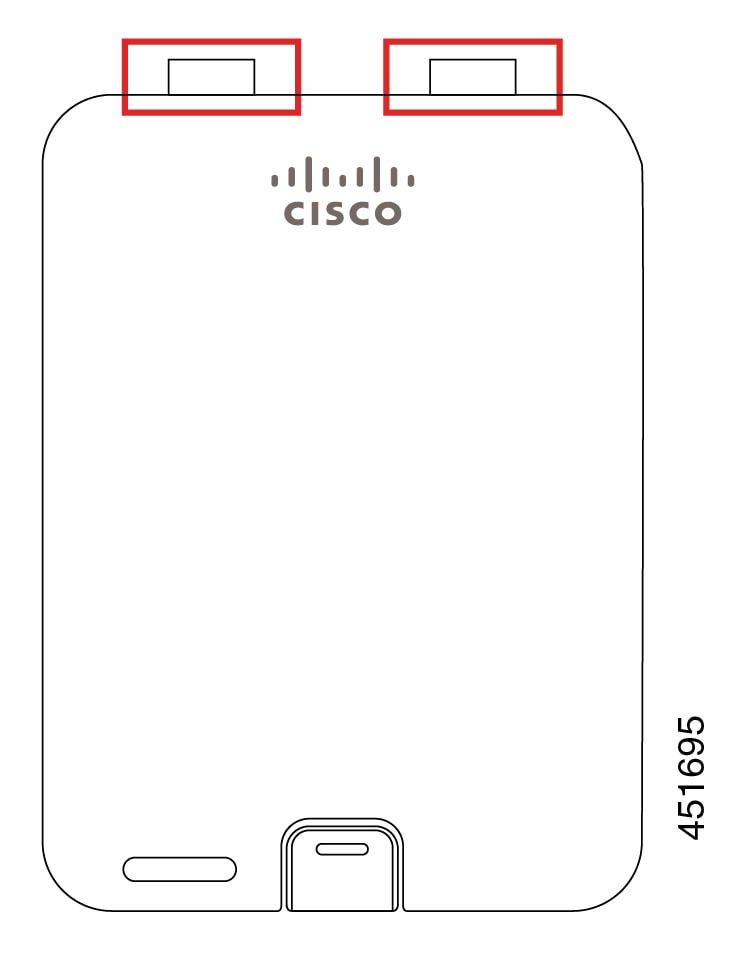
Locate the two battery tabs on the top edge of the battery.

Image of battery with the two tabs on the top highlighted.

Step 2

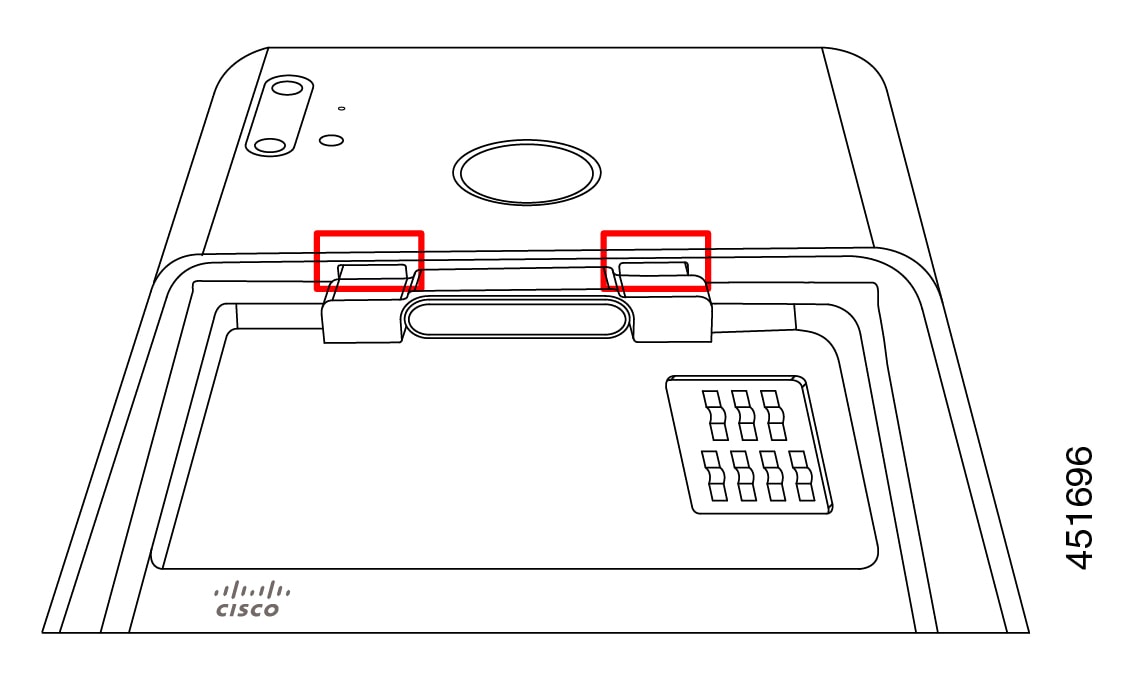
Locate the two slots in the wall at the top of the phone battery compartment.

Image of the back of the phone with no battery in it and red highlights on the two battery slots.

Step 3

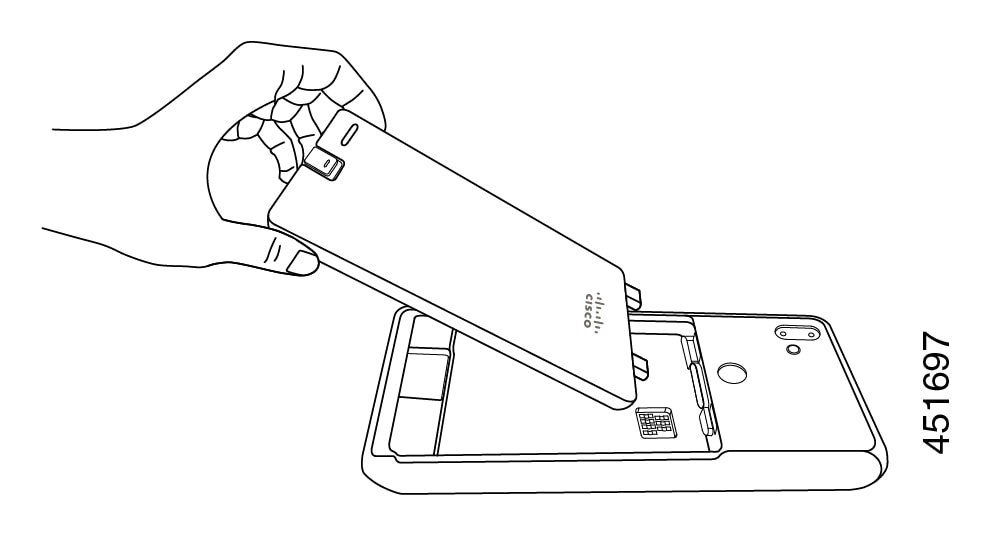
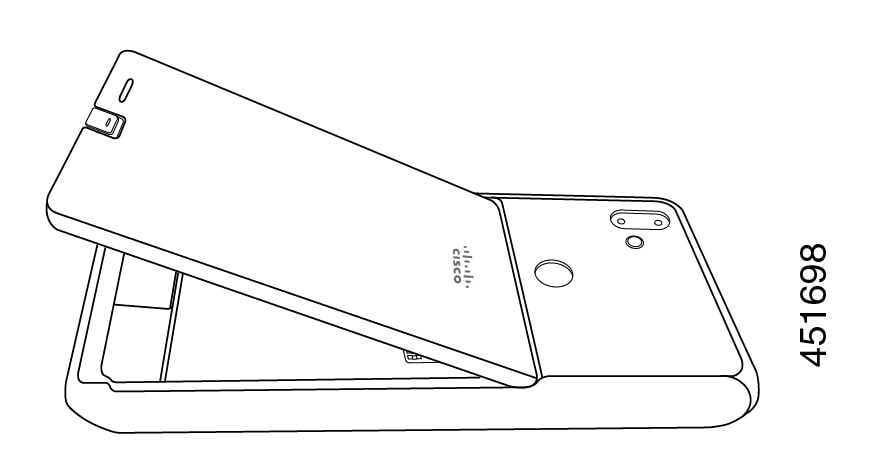
Position the battery at an angle approximately 45–60 degrees to the phone battery compartment.

Point the battery edge with the two plastic tabs toward the two slots in the battery compartment.

Illustration of step description.

Step 4

Insert the two plastic battery tabs directly into the two battery compartment slots.

Illustration of step description.

Step 5

Use the tab and slot contact point as a pivot to lower the battery into the compartment.

Illustration of step description.

Step 6

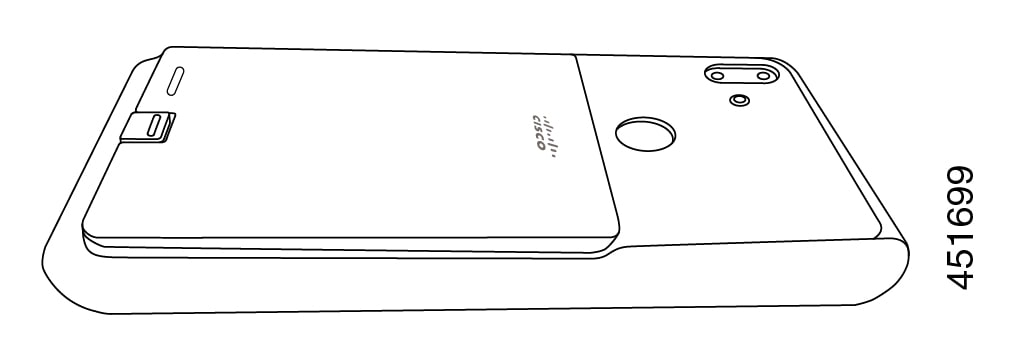
Use your finger to press down until you feel and hear the battery clip snap into place.

Illustration of step description.

Remove the battery

Battery removal follows a reversed but similar procedure to battery insertion.

The steps to remove the battery are the same for both the Cisco Wireless Phone 860 and Cisco Wireless Phone 840. However, the battery contacts are in different locations on these models. The illustrations in the following steps are of the Cisco Wireless Phone 860.

Procedure


Step 1

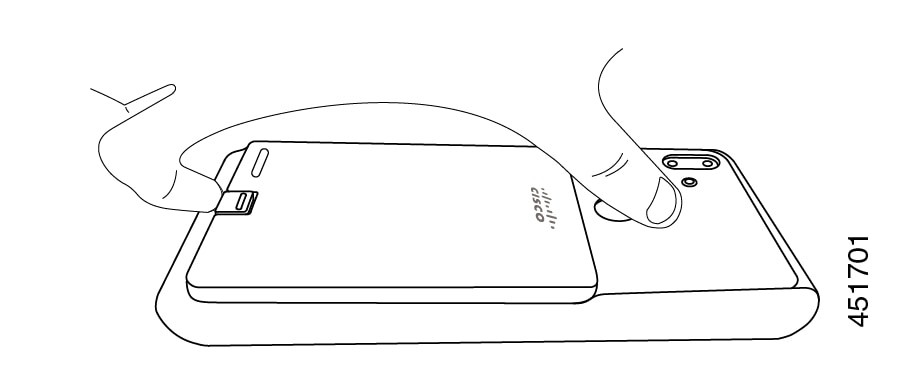
To disengage the battery clip, gently use a fingernail to depress the clip towards the top of the phone.

Caution


Don’t pull up on or twist the clip. Don't use a tool, such as letter opener or screwdriver, to pry the clip open. An incorrect prying action with a tool can break the battery clip.

Illustration of step description.

Step 2

Use your fingernail to lift the battery gently about an eighth of an inch (a few millimeters) out of the battery compartment.

Step 3

Release the battery clip and grab the battery with your fingers.

Step 4

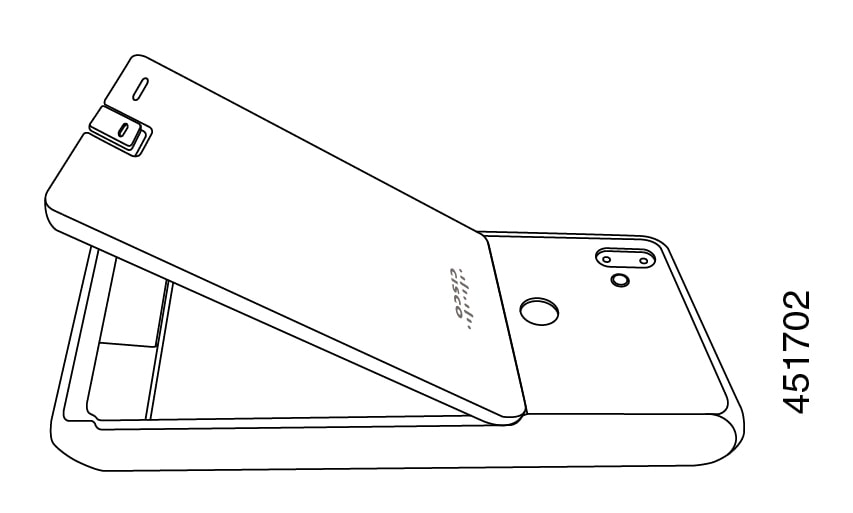
Use the battery tabs and battery compartment slots as a pivot point to raise the battery edge out the battery compartment.

Warning


Don’t slide the battery across the battery compartment because this action may damage the contacts.

Illustration of step description.

Step 5

Gently withdraw the battery tabs from the battery compartment slots and lift the battery out of the battery compartment.

Warning


Make sure that no part of the battery drags across the battery contacts in the phone.


Hot swap the battery for Cisco Wireless Phone 860 and 860S

The Cisco Wireless Phone 860 and 860S have a hot swap feature that allows you to continue to use your phone while you change a low battery. During a hot swap, the internal phone battery provides minimum power to allow the phone to remain on.

You can perform a battery hot swap under most normal operations, such as during a voice call or other activity on an active phone screen. Active use of the phone or anything that increases the power draw during a hot swap may, in rare situations, cause the phone to power off.


Caution


If the new battery that you use during the hot swap doesn't have a proper charge, a low battery alert displays and the phone shuts down.

If the internal phone battery isn't awake and charged, the battery hot swap may fail. If the phone was in sleep mode or if you just turned on the phone, the internal battery may not be awake and charged.


Note


The Cisco Wireless Phone 840 and 840S don't have an internal battery, so they don't support the hot swap feature.


Before you begin

  • Make sure that the new battery that you use during the hot swap has a proper charge.

  • If the phone was in sleep mode or if you just turned on the phone, wake and charge the internal battery:

    1. Choose one of the following:

      • If the phone screen was in sleep mode, unlock the phone and wait for 30 seconds.

      • If you just turned on the phone, unlock the phone and wait for 3-5 minutes.

    2. Briefly press the Power button to turn off the phone screen and wait for 3-5 seconds.

Procedure


Step 1

Remove the battery.

Step 2

Within 60 seconds, install the new battery.


Battery contact damage prevention

If you slide or drag part of the battery over the battery contacts during insertion or removal, it may damage the battery contacts.

Damaged battery contacts that can't make proper contact with the contacts in the phone, may cause issues such as:

  • The phone won’t power on.

  • The phone shuts down randomly.

  • The phone displays an Invalid Battery Shutdown message before it shuts down.

In these failure scenarios, remove the battery from the phone and examine the battery contact fingers and pads.


Note


The battery contacts are in different locations on the Cisco Wireless Phone 840 and Cisco Wireless Phone 860.


  • Check that the contacts aren’t dirty or covered with any substances, or it may prevent a proper electrical connection.

  • Check that the contact fingers on the phone are straight relative to the contact base, with all fingers at the same height.

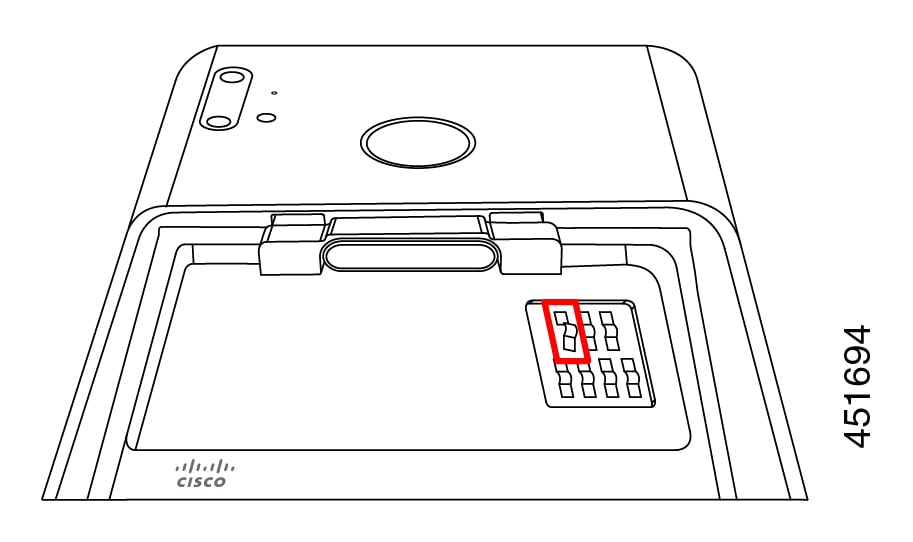
In the following image of the Cisco Wireless Phone 860 battery compartment, the finger on the top left illustrates damage from incorrect battery insertion.

Figure 2. Cisco Wireless Phone 860 battery contact damage
860 phone battery contacts with one finger bent from damage.

Phone battery charging


Warning


Explosion hazard: Don’t charge the phone battery in a potentially explosive atmosphere. Statement 431


You can charge the battery using any of the following options:

  • USB cable—You can charge the phone with an Cisco Unified Communications Manager Attendant Console power adapter or your computer.

  • Desktop chargers—You can charge a phone and spare battery.

  • Multicharger—You can charge several phones or batteries at the same time.

The length of time to charge a phone and battery varies depending on the charge method.

  • It takes about 3 hours to charge a phone using the USB cable and AC plug.

  • It takes about 8 hours to charge a phone using the USB cable and your computer.

  • Under normal conditions, a discharged battery charges fully in approximately 3 hours in a desktop or multicharger.

  • If both a phone and battery are in a desktop charger, the phone takes priority. So it takes longer to charge the battery.


Note


Charge your phone batteries in an ambient temperature of 50–86°F (10–30°C) for the best results. If you charge the batteries outside of this temperature range, it results in longer charge times or incomplete charge cycles.

Store the batteries in dry conditions at approximately 65° F (20° C).


Caution


Don’t let the main battery or the internal battery of your Cisco Wireless Phone 860 or 860S fully deplete for extended periods. If you must store the phone or battery for longer than one month, then we recommend that you fully charge the battery installed in the phone to 100% every six months. Never store a phone without the main battery for longer than one month.


Note


Severely damaged battery contact pins are not repairable and not covered under the Cisco warranty. Minor deformation may be remediated by carefully bending the battery contact pins back to the correct position using appropriate tools. Cisco is not responsible for any damage that is caused during this action.


Charge the battery with the AC power supply

If you don't have a desktop charger or multicharger, you can charge your phone battery using the USB cable and AC power adapter.


Caution


Use only the approved USB cable and power adapter for the Cisco Wireless Phone 840 and 860.


Procedure


Step 1

Plug the USB cable into the bottom of the phone with the pins aligned.

Step 2

Plug the USB cable into the power adapter.

Step 3

Plug the power adapter into the electrical outlet.


Charge the battery with the USB cable and a USB port on your computer

If you don't have a desktop charger, multicharger, or USB cable and AC power adapter, you can charge your phone with a USB cable and computer. However, this method takes more time to charge your phone than the other methods.


Caution


Use only the approved USB cable for the Cisco Wireless Phone 840 and 860.


Procedure


Step 1

Plug the USB cable into the bottom of the phone with the pins aligned.

Step 2

Plug the USB cable into a USB port on a computer.