Deploy Calling in Webex App (Unified CM)

Calling in Webex App (Unified CM) deployment task flow

These steps walk you through a typical phone only deployment that's used for Calling in Webex App (Unified CM). For this deployment, Webex App is going to register to Unified CM as a softphone client, just like Cisco Jabber does.

Before you begin

Prepare your environment for Calling in Webex App (Unified CM)

Procedure

  Command or Action Purpose

Step 1

Configure UC services workflow

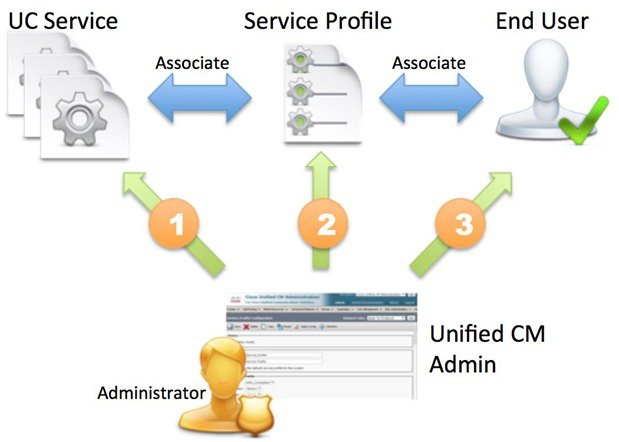
Bundle together UC services in a service profile. You must create a CTI service which provides Webex App with the devices that are associated with the user. You can create a voicemail service if you want users to have access to voicemail in Webex App. At the end, create a service profile to add the UC services which later get applied to end user accounts.

Step 2

Choose from the Service discovery options:

Service discovery enables clients to automatically detect and locate services on your enterprise network. You can configure service discovery using one of the following options.

  • DNS SRV Records—The client (Webex App) automatically locates and connects to services. This is the recommended option.

  • Manual Connection Settings—Manual connection settings provide a fallback mechanism when service discovery is not used. With administrator guidance, users must manually enter a server address or UC domain followed by their SSO or non-SSO credentials, as documented at the end of the task flow.

Step 3

Choose from the Authentication options:

These options determine the authentication mechanism that is used when a user signs into phone services in Webex App:

  • SAML Single Sign-On (SSO)—End user passwords are authenticated against the password that resides in the identity provider used for SSO.

  • LDAP Server—End user passwords are authenticated against the password that is assigned in the company LDAP directory.

Step 4

Set parameters on phone configuration for desktop clients

The client can retrieve configuration settings in the phone configuration from specific locations on Cisco Unified Communications Manager.

Step 5

Configure Unified CM end users for Calling in Webex App (Unified CM)

For Calling in Webex App (Unified CM) to work, you must create new users or configure existing users on Unified CM with the following settings.

Step 6

Follow these steps in the Create softphones workflow:

Follow these steps to manually or automatically create and configure softphone devices (these correspond to each Webex App for softphone use), add a directory number to the softphone device, associate the device with an end user account, and optionally configure devices and Webex App instances for secure and encrypted calls.

Step 7

Follow these steps in the Create softphones workflow:

Follow these steps to manually or automatically create and configure softphone devices (these correspond to each Webex App for softphone use), add a directory number to the softphone device, associate the device with an end user account, and optionally configure devices and Webex App instances for secure and encrypted calls.

Step 8

Configure push notifications and recommended settings

With Push Notifications, your deployment uses Google or Apple's cloud-based Push Notification service to push voice calls, video calls, and instant message notifications to Webex App for iOS and Android clients that are running in the background. You must enable Push Notifications to maintain persistent communication with Webex App for iOS and Android.

Step 9

Choose an option:

You can set client configuration parameters that are applied when users sign in using one of the following methods:

  • Set the client configuration parameters with Unified CM.

  • Create XML files using an XML editor that contain configuration parameters. You then host the XML files on a TFTP server. Calling in Webex App (Unified CM) leverages the existing Jabber configuration XML file functionality. You can use the file to enable specific calling features (such as hunt groups and call pickup) and other supported functionality for Webex App users in your organization.

Step 10

Configure moving a call into a meeting

When users are in the middle of a call, they may want to invite other coworkers into the discussion while making use of some advanced meetings features. Users can move that call to a meeting. From there, people can raise their hands when they want to share something important, add an emoji to let someone know visually that they agree with what's being said, make use of breakout rooms, and much more.

Step 11

Follow these steps in Calling experience for users workflow:

You can use Control Hub to customize the calling experience for you users. Set a UC Manager Profile with either or both a voice services domain and UDS server. Set the calling behavior for some of your users (recommended) or for your entire organization (when you're ready to roll out the service). For Calling in Webex App (Unified CM), you configure this setting so that users can use the calling feature set. Set calling options that appear in the app and whether users can do a single click-to-call.

Step 12

Authenticate with phone services in Webex App

If you have DNS SRV implemented, users will be autodiscovered for phone services in the Webex App. If you don't, you can also simplify their sign-in process with the UC manager profile you configured earlier, which contains UDS server or the UC domain (FQDN or IP address of Unified CM) for Phone Services. If none of these options is in place, users must manually enter a server address for the UDS server or the UC domain (FQDN or IP address of Unified CM) that you provide to them.

Step 13

Configure extra features after deployment

These tasks are optional and are not mandatory for deploying Calling in Webex App (Unified CM). However, these features provide more customization for you and your users. You can refer to the documentation that is linked in each step for additional guidance.

Overview of service profile

Figure 1. Service profiles workflow


  1. Create UC services.

  2. Associate the UC Service with the Service Profile.

  3. Associate the User with the Service Profile.

Create default service profile

Create a service profile to add the UC services.

Procedure


Step 1

Open the Cisco Unified CM Administration interface.

Step 2

Select User Management > User Settings > Service Profile.

The Find and List Service Profiles window opens.

Step 3

Select Add New.

The Service Profile Configuration window opens.

Step 4

Enter a name for the service profile in the Name field.

Step 5

Select Make this the default service profile for the system if you want the service profile to be the default for the cluster.

Step 6

Select Save.


What to do next

Create the UC services for your deployment.

Configure UC services workflow

Set up the relevant UC services in a service profile for your Calling in Webex App (Unified CM) deployment. The CTI service is required.

Set up the voicemail service if you have Unity Connection deployed and want to integrate voicemail access into Webex App.

Before you begin

Voicemail

Procedure

  Command or Action Purpose

Step 1

Configure voicemail pilot number

If you're configuring voicemail access for Webex App users, ensure that you identify a directory number in your Unified CM deployment to use for voicemail system access.

Step 2

Configure UC services

The CTI UC service provides Webex App with the location of the CTI service, which retrieves a list of devices that are associated with the user. The voicemail service ties into your existing Unity Connection deployment and provides voicemail retrieval to users when they are associated with the corresponding service profile.

Step 3

Configure service profile with UC services

After you add and configure Cisco Unified Communications Manager services, you add them to a service profile. You can apply additional configuration in the service profile.

What to do next

Associate the service profile to end user accounts.

Configure voicemail pilot number

The voicemail pilot number designates the directory number that you dial to access your voice messages. Cisco Unified Communications Manager automatically dials the voice-messaging number when users press the Message button on their phones or access voicemail through Webex App. Each pilot number can belong to a different voice-messaging system.

Procedure


Step 1

From Cisco Unified CM Administration, go to Advanced Features > Voice Mail > Voice Mail Pilot.

Step 2

Configure the following settings:

  • Voice Mail Pilot Number—Enter a number to identify the voice mail pilot number. Allowed characters are numeric (0-9), plus (+), asterisk (*), and pound (#).

    Note


    You cannot save the configuration if both the Voice Mail Pilot Number and Calling Search Space fields are empty. You must enter a value in one of the two fields.

  • Calling Search Space—Choose the appropriate calling search space. A calling search space comprises a collection of partitions that are searched for numbers that are called from this pilot number.
  • Description—Enter the description of the pilot number. The description can include up to 50 characters in any language, but it cannot include double-quotes ("), percentage sign (%), ampersand (&), or angle brackets (<>).
  • Make this the default Voice Mail Pilot for the system—Check this setting to make this pilot number the default Voice Mail Pilot for the system.

    Note


    If you check the Default box, this voice mail pilot number replaces your current default pilot number.

Step 3

Save your changes.


Configure UC services

Add Cisco Unified Communications Manager services to specify the address and other settings for the service.

The CTI UC service provides Webex App with the location of the CTI service, which retrieves a list of devices that are associated with the user. The voicemail service ties into your existing Unity Connection deployment and provides voicemail retrieval to users when they are associated with the corresponding service profile.

Procedure


Step 1

Open the Cisco Unified CM Administration interface.

Step 2

Select User Management > User Settings > UC Service.

The Find and List UC Services window opens.

Step 3

Select Add New.

The UC Service Configuration window opens.

Step 4

In the Add a UC Service section, select CTI from the UC Service Type drop-down list.

Step 5

Select Next.

Step 6

Provide details for the CTI service as follows:

  1. Specify a name for the service in the Name field.

    The name you specify displays when you add services to profiles. Ensure the name you specify is unique, meaningful, and easy to identify.

  2. Specify the CTI service address in the Host Name/IP Address field.

    Enter the address in the form of a hostname, IP address, or fully qualified domain name (FQDN). This value corresponds to the Unified CM publisher that's running the CTI Manager service. You'll create a second service for the subscriber.

  3. Specify the port number for the CTI service in the Port field.

Step 7

Save your changes, return to User Management > User Settings > UC Service, and then click Add New.

Step 8

Choose Voicemail and then click Next.

Step 9

Provide details for the Voicemail service as follows:

  1. Specify a name for the service in the Name field.

    The name you specify displays when you add services to profiles. Ensure the name you specify is unique, meaningful, and easy to identify.

  2. Specify the voicemail address in the Host Name/IP Address field.

    Enter the address in the form of a fully qualified domain name (FQDN). Otherwise, the certificate validation step fails.

    Note


    By default, the client always uses port 443 and the HTTPS protocol to connect to the voicemail server. For this reason, any value you specify does not take effect.

Step 10

Save your changes.


What to do next

Add UC services to the service profile.

Configure service profile with UC services

After you add and configure Cisco Unified Communications Manager services, you add them to a service profile. You can apply additional configuration in the service profile.

Procedure


Step 1

Open the Cisco Unified CM Administration interface.

Step 2

Select User Management > User Settings > Service Profile.

Step 3

Enter a name for the service profile in the Name field.

Step 4

Select Make this the default service profile for the system if you want the service profile to be the default for the cluster.

Step 5

Add your UC services under Voicemail Profile and CTI Profile.

Step 6

Set Credential source for voicemail service to Unified CM - IM and Presence.

Step 7

Complete any additional configuration and then click Save.


What to do next

You must assign the configured service profile to end user accounts in Unified CM.

Voicemail Icon Indicators in Webex App

The Unity Connection server's web version of Visual Voicemail provides checkboxes for the following attributes when a voicemail is composed. The corresponding icons appear in Webex App next to the voice message entry in a user's visual voicemail list.

  • Exclamation—Indicates an urgent, important voice message.

  • Lock—Indicates a secure voice message. Each time you play the message, it is downloaded and then the local file is deleted when you're finished.

  • Key—Indicates a private voice message. You cannot forward private messages to other people.

Service discovery options

Service discovery enables clients to automatically detect and locate services on your enterprise (internal) and MRA (external) network. You can configure service discovery using one of the following options.

Option

Description

Configure DNS SRV records

The client automatically locates and connects to services.

This is the recommended option.

Manual connection settings

Manual connection settings provide a fallback mechanism when service discovery is not used.


Note


We support SRV look up over internal and MRA environments. Service discovery enables clients to automatically detect and locate services on or outside your enterprise network. Clients query domain name servers to retrieve service (SRV) records that provide the location of servers. See the DNS SRV guidance that follows for internal and external environments.


Configure DNS SRV records

Before you begin

Review your SRV record requirements in the Service Discovery chapter of the Planning Guide for Cisco Jabber.

Procedure


Create the SRV records for your deployment:

Option Description
_cisco-uds

Provides the location of Cisco Unified Communications Manager. The client can retrieve service profiles from Cisco Unified Communications Manager to determine the authenticator.

_collab-edge

Provides the location of Cisco VCS Expressway or Cisco Expressway-E. The client can retrieve service profiles from Cisco Unified Communications Manager to determine the authenticator.


Example of an SRV record

_cisco-uds._tcp.DOMAIN service location:
priority = 0
weight = 0
port = 8443
svr hostname=_cisco-uds._tcp.example.com

What to do next

Test SRV records

Test SRV records

After creating your SRV records test to see if they are accessible.


Tip


You can also use the SRV check tool on the Collaboration Solutions Analyzer site if you prefer a web-based option.


Procedure

Step 1

Open a command prompt.

Step 2

Enter nslookup.

The default DNS server and address is displayed. Confirm that this is the expected DNS server.

Step 3

Enter set type=SRV.

Step 4

Enter the name for each of your SRV records.

For example, _cisco-uds._tcp.exampledomain

  • Displays server and address—SRV record is accessible.

  • Displays _cisco-uds_tcp.exampledomain: Non-existent domain—There is an issue with your SRV record.


Authentication options

Authenticate with the LDAP server

Perform this procedure if you want to enable LDAP authentication so that end user passwords are authenticated against the password that is assigned in the company LDAP directory. LDAP authentication gives system administrators the ability to assign an end user a single password for all company applications. When users sign in to the client, Webex App routes that authentication to Cisco Unified Communications Manager. Cisco Unified Communications Manager then sends that authentication to the directory server.

Procedure


Step 1

Open the Cisco Unified CM Administration interface.

Step 2

Select System > LDAP > LDAP Authentication.

Step 3

Select Use LDAP Authentication for End Users.

Step 4

Specify LDAP credentials and a user search base as appropriate.

See the Cisco Unified Communications Manager Administration Guide for information about the fields on the LDAP Authentication window.

Step 5

Select Save.


Set parameters on phone configuration for desktop clients

The client can retrieve configuration settings in the phone configuration from the following locations on Cisco Unified Communications Manager:

Enterprise Phone Configuration

Applies to the entire cluster.

Common Phone Profile Configuration

Applies to groups of devices and takes priority over the cluster configuration.

Cisco Unified Client Services Framework (CSF) Phone Configuration

Applies to individual CSF desktop devices and takes priority over the group configuration.

Configure Unified CM end users for Calling in Webex App (Unified CM)

For Calling in Webex App (Unified CM) to work, you must create new users or configure existing users on Unified CM with the following settings.


Note


If you use LDAP synchronization, these settings may already be in place. If setting up a new LDAP synchronization, see "LDAP Synchronization Overview" in the On-Premises Deployment for Cisco Jabber documentation at https://www.cisco.com/c/en/us/support/unified-communications/jabber-windows/products-installation-guides-list.html.


Procedure


Step 1

From Cisco Unified CM Administration, go to User Management > End Users, choose any criteria, click Find, and then open the user account that you want to configure.

Step 2

Verify that Mail ID contains the user's email address.

Note


If you're using Server Information for configuration and not SRV records, your users' Webex App email addresses must match their Unified CM email addresses—at a minimum, the user ID portion before the domain must match.

Step 3

Under the user's Service Settings, check the Home Cluster checkbox.

Configure this setting on the Cisco Unified Communications Manager where each user is homed and where their devices are registered.

Step 4

(Optional) Choose your service profile from the UC Service Profile drop-down list that you created earlier (with CTI service and voicemail) if you need to make user-level overrides.

Step 5

Save your changes, and then you'll assign applicable roles to the user.

Step 6

Click Add to Access Control Group.

Step 7

Click the corresponding check box for each access control group that you want to assign to the end users.

At a minimum you should assign the user to the following access control groups:

  • Standard CCM End Users

  • Standard CTI Enabled—This option is used for desk phone control.

Certain phone models require additional control groups, as follows:

  • Cisco Unified IP Phone 9900, 8900, or 8800 series or DX series, select Standard CTI Allow Control of Phones supporting Connected Xfer and conf.

  • Cisco Unified IP Phone 6900 series, select Standard CTI Allow Control of Phones supporting Rollover Mode.


What to do next

Associate devices to the user.

Create softphones workflow

Procedure

  Command or Action Purpose

Step 1

Use one of these options to create softphones for users:

  • Control Hub through Cloud Connected UC (CCUC)Auto provision devices.

    Note


    This process may take up to 5 minutes to auto create the device for users and connect them to phone services. If your users were on a version of the app that didn't support auto provisioning, they need to restart to upgrade the app, and then the softphone device is auto created in the specified time frame.

  • Unified CMCreate and configure Webex App softphone devices

Tip


We recommend using the auto-provisioning feature in Control Hub. This feature allows the users to self-provision the devices for Calling in Webex (Unified CM) with zero or minimal intervention. This feature avoids over-provisioning of multiple devices in Unified CM that helps to minimize the impact on cluster scaling and licensing usage. Devices are auto created in Unified CM, when a user provisioned for Calling in Webex (Unified CM) signs in with their registered email address or User ID to Webex Apps.

Create at least one device for every user that wants to use Webex App in softphone mode.

You can add one softphone device for any supported Webex App platforms that the users are on—for example, appropriate device types for desktop, mobile and tablet.

Step 2

Add a directory number to the device

For each device you create, add a directory number.

Step 3

Associate users with devices

Associate users with devices.

Step 4

Configure the phone security profile for encrypted calls

Complete this task to set up secure phone capabilities for all devices and Webex App.

Create and configure Webex App softphone devices

To make the Webex App a softphone client, create at least one device for every user that you're configuring for Calling in Webex App (Unified CM). Webex App for desktop and mobile registers to Unified CM using the same softphone device types as Cisco Jabber.


Note


If you want any user to only have desk phone control and no softphone functionality, you do not need to create a desktop CSF device for them.


Procedure


Step 1

Log in to the Cisco Unified CM Administration interface.

Step 2

Select Device > Phone.

Find and List Phones window opens.

Step 3

Select Add New.

Step 4

From the Phone Type drop-down list, select the option that is applicable to the device type you are configuring and then select Next.

For Webex App users, you can only create one type of device per platform for a user, although you can create multiple devices for each user. For example, you can create one dual mode mobile device and one CSF device but not two CSF devices.

  • Cisco Unified Client Services Framework—Select this option to create a CSF device for Webex App for Mac or Webex App for Windows.
  • Cisco Dual Mode for iPhone—Select this option to create a TCT device for Webex App for iPhone users.
  • Cisco Jabber for Tablet—Select this option to create a TAB device for Webex App on an iPad, Android tablet, or Google Chromebook. For Android, Webex App identifies devices with displays that are 600 density-independent pixels (dp) or greater as a tablet.
  • Cisco Dual Mode for Android—Select this option to create a BOT device for Webex App for Android phone users. Webex App identifies devices with displays that are under 600dp as a phone.

Note


For more information about how Webex App identifies Android devices, see Android Devices and Density-Independent Pixels.

Users can be signed into phone service on one device type for each platform (for example, Webex App for a Windows device and Webex App for an iPhone). Users can't be signed into phone service on more than one device type on the same platform (for example, Webex App for an iPad and Webex App for an Android tablet).

Note


While Chromebook users require a TAB device to use Calling in Webex App (Unified CM), phone service does work for a user with both a Chromebook and an Android phone signed in at the same time.

Step 5

From the Owner User ID drop-down list, select the user for whom you want to create the device.

Step 6

In the Device Name field, use the applicable format to specify a name for the device:

If you select

Required format

Cisco Unified Client Services Framework

  • Valid characters: a–z, A–Z, 0–9.

  • 15-character limit.

Cisco Dual Mode for iPhone

  • The device name must begin with TCT.

    For example, if you create a TCT device for user, Tanya Adams, whose username is tadams, enter TCTTADAMS.

  • Must be uppercase.

  • Valid characters: A–Z, 0–9, period (.), underscore (_), hyphen (-).

  • 15-character limit.

Cisco Jabber for Tablet

  • The device name must begin with TAB.

    For example, if you create a TAB device for user, Tanya Adams, whose username is tadams, enter TABTADAMS.

  • Must be uppercase.

  • Valid characters: A–Z, 0–9, period (.), underscore (_), hyphen (-).

  • 15-character limit.

  • For Android, Webex App identifies devices with displays that are 600 density-independent pixels (dp) or greater as a tablet. See Android Devices and Density-Independent Pixels for more information.

Cisco Dual Mode for Android

  • The device name must begin with BOT.

    For example, if you create a BOT device for user, Tanya Adams, whose username is tadams, enter BOTTADAMS.

  • Must be uppercase.

  • Valid characters: A–Z, 0–9, period (.), underscore (_), hyphen (-).

  • 15-character limit.

  • For Android, Webex App identifies devices with displays that are less than 600 density-independent pixels (dp) as a phone. See Android Devices and Density-Independent Pixels for more information.

Note


You need to deploy Mobile and Remote Access (MRA) on Expressway if your Webex App users need to connect outside of the corporate network.

Step 7

For mobile devices only (TCT, BOT, and TAB), in the Product Specific Configuration Layout section, enter any designated emergency numbers in Emergency Numbers to route emergency calls through the user's mobile provider.

You can enter a comma-separated list of additional emergency numbers that users can direct dial. These numbers must contain only numerical digits; we do not allow spaces, dashes, or other character.

Emergency numbers as defined on the device are always dialed direct using the mobile network instead of through the enterprise environment. Use direct-dial numbers for users who frequently travel to countries other than the country of their mobile network provider, if the emergency number differs depending on the location, or if your organization uses a dedicated security number.

Step 8

Select Save.

Step 9

Click Apply Config.


What to do next

Add one or more Directory Numbers (lines) to the softphone device.

Android Devices and Density-Independent Pixels

Webex App uses density-independent pixels (dp) to identify Android devices. A dp is a unit of length for screen size, typically used in mobile software to scale an app display to different screen sizes. Devices with displays that are 600dp or greater are identified as tablets; devices with tess than 600dp are identified as phones.

  • Tablets (600dp or greater)—The device shows the Tablet UI (left and right layout, the right panel shows the space chat content or profile detail page), and we choose the TAB softphone device type in Unified CM.

  • Phones (less than 600dp)—The device shows the Phone UI (vertical layout), and we choose the BOT softphone device type in Unified CM.

For more information, see the Android developer documentation.

Add a directory number to the device

After you create and configure each device, you must add a directory number to the device. This topic provides instructions on adding directory numbers using the Device > Phone menu option.

Before you begin

Create a device.

Procedure


Step 1

Locate the Association Information section on the Phone Configuration window.

Step 2

Click Add a new DN.

Step 3

In the Directory Number field, specify a directory number.

Step 4

In the Users Associated with Line section, click Associate End Users.

Step 5

In the Find User where field, specify the appropriate filters and then click Find.

Step 6

From the list that appears, select the applicable users and click Add Selected.

Step 7

Specify all other required configuration settings as appropriate.

Step 8

Select Apply Config.

Step 9

Select Save.


Associate users with devices

Before you begin


Note


A softphone device for Webex App should not be associated to multiple users if you intend to use different service profiles for these users.


Procedure


Step 1

Associate users with devices.

  1. Open the Unified CM Administration interface.

  2. Select User Management > End User.

  3. Find and select the appropriate user.

    The End User Configuration window opens.
  4. Select Device Association in the Device Information section.

  5. Associate the user with devices as appropriate.

  6. Return to the End User Configuration window and then select Save.

Step 2

Set the User Owner ID field in the device configuration.

  1. Select Device > Phone.

  2. Find and select the appropriate device.

    The Phone Configuration window opens.
  3. Locate the Device Information section.

  4. Select User as the value for the Owner field.

  5. Select the appropriate user ID from the Owner User ID field.

  6. Select Save.


Configure the phone security profile for encrypted calls

You can optionally set up secure phone capabilities for all devices and Webex App instances. Secure phone capabilities provide secure SIP signaling and secure media streams.

If you enable secure phone capabilities for users, device connections to Cisco Unified Communications Manager are secure. However, calls with other devices are secure only if both devices have a secure connection. Secure call support requires Unified CM 12.5 and later.

Before you begin

Procedure


Step 1

In Cisco Unified Communications Manager, select System > Security > Phone Security Profile.

Step 2

Select Add New.

Step 3

From the Phone Type drop-down list, select the option that is applicable to the device type you are configuring and then select Next.

  • Cisco Unified Client Services Framework—Select this option to create a CSF device for Webex App for Mac or Windows.
  • Cisco Dual Mode for iPhone—Select this option to create a TFT device for an iPhone.
  • Cisco Jabber for Tablet—Select this option to create a TAB device for an iPad or an Android tablet.
  • Cisco Dual Mode for Android—Select this option to create a BOT device for an Android device.
  • CTI Remote Device—Select this option to create a CTI remote device.

    CTI remote devices are virtual devices that monitor and have call control over a user's remote destination.

Step 4

In the Name field of the Phone Security Profile Configuration window, specify a name for the phone security profile.

Step 5

For Device Security Mode, choose Encrypted.

The SIP connection is over TLS using AES 128/SHA encryption. The client uses Secure Real-time Transport Protocol (SRTP) to offer encrypted media streams.

Step 6

Check Enable Oath Authentication

Step 7

Click Save.


What to do next

You can use Webex App for Windows or Mac to make a call and confirm the secure calling setup. During the call, you'll see a lock icon at the top right of your calling window, letting you know that the call is secure.

Configure push notifications and recommended settings

With Push Notifications, your deployment uses Google or Apple's cloud-based Push Notification service to push voice calls, video calls, and instant message notifications to Cisco Webex App for iOS and Android clients that are running in the background.

If your calling environment uses voicemail and Single Number Reach (SNR), we also recommend some timer changes to optimize the overall configuration.

Before you begin

Make sure that Unified CM and Expressway are on a support minimum version for Push Notifications. See Call control environment requirements.

Procedure


Step 1

From Cisco Unified CM Administration, go to Advanced Features > Cisco Cloud Onboarding.

Step 2

Check Enable Push Notifications.

For more information, see the Push Notifications Deployment Guide at https://www.cisco.com/c/en/us/td/docs/voice_ip_comm/cucm/push_notifications/cucm_b_push-notifications-deployment-guide.html.

Step 3

If you have voicemail configured, we recommend that you go to Call Routing > Voicemail, and change No Answer Ring Duration (seconds) to 25 or greater.

If a voicemail server is configured, the timer for no answer forward to voicemail is 12 seconds. Push notifications take approximately 8 seconds, which leaves only 4 seconds for ringing if the duration value isn't changed.

Step 4

If you have SNR configured, we recommend that you go to Device > Remote Destination, open any entries, and then change the Wait seconds before ringing this phone when my business line is dialed to 13 or greater.

Upon receive incoming call notification, Webex App must register to Unified CM quickly before this wait timeout. Otherwise, the call rings the phone itself and not Webex App.


Set client configuration parameters (releases 12.5 and later)

Set client configuration parameters and assign to service profiles in Unified CM.

Before you begin

You must ensure the required Unified CM configuration is in place for the supported features. See the following documentation for guidance:

  • Hunt Groups in the System Configuration Guide for Cisco Unified Communications Manager.

  • Call Pickup in the Feature Configuration Guide for Cisco Unified Communications Manager.

Procedure


Step 1

Define configuration parameters

Unified CM allows you to add, search, display, and maintain information about UC Services including client configuration.

Step 2

Assign Client Configuration to Service Profile

Unified CM allows you to assign client configuration to users through service profiles.


Define configuration parameters

Unified CM (Releases 12.5 and later) allows you to add, search, display, and maintain information about UC Services including Webex App client configuration, which is provided by the jabber-config.xml file.

Procedure


Step 1

Open the Cisco Unified CM Administration interface.

Step 2

Select User Management > User Settings > UC Service.

Step 3

Choose one:

  • For a new configuration, select Add New, and then choose Jabber Client Configuration (jabber-config.xml) as the UC Service Type.
  • For an existing configuration, choose an existing UC Service that you configured with Jabber Client Configuration (jabber-config.xml) as the UC Service Type.

Step 4

Select Next.

Step 5

Enter a name in the UC Service Information section, refer to Unified CM Help for more requirements.

Step 6

Enter the parameters in the Jabber Configuration Parameters section. For more information, see Policy parameters.

Step 7

Select Save.


Assign Client Configuration to Service Profile

Unified CM allows you to assign client configuration to users through service profiles.

Procedure


Step 1

Open the Cisco Unified CM Administration interface.

Step 2

Select User Management > User Settings > Service Profile.

Step 3

Select Add New or select the existing service profile you want to assign the Webex App client configuration to.

Step 4

Select the name of the configuration you want to apply to the profile in the section Jabber Client Configuration (jabber-config.xml) Profile.

Step 5

Select Save.


Create and host client configuration files (releases earlier than 12.5)

Create client configuration files and host them on the Cisco Unified Communications Manager TFTP service.

Before you begin

You must ensure the required Unified CM configuration is in place for the features that the config file supports. See the following documentation for guidance:

  • Hunt Groups in the System Configuration Guide for Cisco Unified Communications Manager.

  • Call Pickup in the Feature Configuration Guide for Cisco Unified Communications Manager.

Procedure

  Command or Action Purpose

Step 1

XML config file requirements

Understand the proper formatting and other requirements for XML config files.

Step 2

Policy parameters

Reference the table for the policy parameters that you can use to enable specific features for users.

Step 3

Create global configurations

Configure the clients for users in your deployment.

Step 4

Create group configurations

Apply different configuration to different set of users.

Step 5

Host configuration files

Host the configuration files on your TFTP server.

Step 6

Restart TFTP server

Restart the TFTP server before the client can access the configuration files.

XML config file requirements

Note the following configuration file requirements:

  • Configuration filenames are case-sensitive. Use lowercase letters in the filename to prevent errors and to ensure that the client can retrieve the file from the TFTP server.

  • Use UTF-8 encoding for the configuration files.

  • The client cannot read configuration files that do not have a valid XML structure. Check the structure of your configuration file for closing elements and correct nesting of elements.

  • Use only valid XML character entity references in your configuration file. For example, use &amp; instead of &. If your XML contains invalid characters, the client cannot parse the configuration file.

    To validate your configuration file, open the file in Microsoft Internet Explorer.

    • If Internet Explorer displays the entire XML structure, your configuration file is valid.

    • If Internet Explorer displays only part of the XML structure, your configuration file likely contains invalid characters or entities.

Create global configurations

Calling in Webex App (Unified CM) leverages the existing Jabber configuration XML file functionality. You can use the file to enable specific calling features (hunt groups and call pickup) for Webex App users in your organization.

Before you begin

If you already deployed Jabber in the past, you have a jabber-config.xml file on your Unified CM TFTP server. You can confirm by opening http://tftp_server_address:6970/jabber-config.xml in your browser (where tftp_server_address is the server FQDN or IP address of your publisher) and see if a file downloads.

If you have the required policy parameters already specified, no further action is needed in the config file.


Note


Webex App and Jabber share the same jabber-config.xml file. Webex App only honors a subset of Jabber parameters in that file, as documented in this guide.


Procedure


Step 1

Either create a file named jabber-config.xml with any text editor or open the file you downloaded.

  • Use lowercase letters in the filename.

  • Use UTF-8 encoding.

Note


Unified CM 12.5 and later lets you create the file in the administration interface.

Step 2

Define the required configuration parameters in jabber-config.xml under <policies></policies>:

  • For call pickup:
    <EnableCallPickup>true</EnableCallPickup>
    <EnableGroupCallPickup>true</EnableGroupCallPickup>
    <EnableOtherGroupPickup>true</EnableOtherGroupPickup>
  • For hunt groups:

    <EnableHuntGroup>true</enableHuntGroup>

    To hide the decline button for an incoming call in a hunt group:

    <PreventDeclineOnHuntCall>true</PreventDeclineOnHuntCall>


Create group configurations

Group configuration files apply to subsets of users and are supported on Webex App for desktop (CSF devices) and on Webex App for mobile devices. Group configuration files take priority over global configuration files.

If you provision users with CSF devices, specify the group configuration filenames in the Cisco Support Field field on the device configuration. If users do not have CSF devices, set a unique configuration filename for each group during installation with the TFTP_FILE_NAME argument.

Before you begin

If the structure of your configuration file is not valid, the client cannot read the values you set. Review the XML samples in this chapter for more information.

Procedure


Step 1

Create an XML group configuration file with any text editor.

The group configuration file can have any appropriate name; for example, webexteams-groupa-config.xml.

Step 2

Define the required configuration parameters in the group configuration file.

Step 3

Add the group configuration file to applicable CSF devices.

  1. Open the Cisco Unified CM Administration interface, and then choose Device > Phone.

  2. Find and select the appropriate CSF device to which the group configuration applies.

  3. In the Phone Configuration window, navigate to Product Specific Configuration Layout > Desktop Client Settings.

  4. In the Cisco Support Field field, enter configurationfile=group_configuration_file_name.xml. For example, enter configurationfile=webexteams-groupa-config.xml.

    If you host the group configuration file on your TFTP server in a location other than the default directory, you must specify the path and the filename; for example, configurationfile=/customFolder/webexteams-groupa-config.xml. Do not add more than one group configuration file. The client uses only the first group configuration in the Cisco Support Field field.

  5. Click Save.

Step 4

Host the group configuration file on your TFTP server.


Host configuration files

We recommend hosting configuration files on the Cisco Unified Communications Manager TFTP server, which is where the device configuration file resides.

Procedure

  Command or Action Purpose

Step 1

From Cisco Unified OS Administration, go to Software Upgrades > TFTP File Management, and then click Upload File.

If your environment has multiple TFTP servers, ensure that the configuration file is the same on all TFTP servers.

Step 2

Click Browse, choose the jabber-config.xml file from your local system, leave the directory field blank, and then click Upload File.

You should leave an empty value in the Directory text box so that the configuration file resides in the default directory of the TFTP server.

Restart TFTP server

You must restart your TFTP server before the client can access the configuration files.

Procedure


Step 1

From the drop-down on the top right, click Cisco Unified Serviceabilty, and then sign in.

Step 2

Click Tools > Control Center - Feature Services, and then choose your Unified CM publisher from the Server drop-down.

Step 3

Click Go, then scroll to CM Services, and click Cisco Tftp.

Step 4

Scroll to the top, click Restart, and then click OK.

You'll see a message that the service restart was successful.

If your environment has multiple TFTP servers, ensure that the configuration file is the same on all TFTP servers.


What to do next

To verify that the configuration file is available on your TFTP server, open the configuration file in any browser. Typically, you can access the global configuration file at the following URL: http://tftp_server_address:6970/jabber-config.xml

Create global configurations

Calling in Webex App (Unified CM) leverages the existing Jabber configuration XML file functionality. You can use the file to enable specific calling features (hunt groups and call pickup) for Webex App users in your organization.

Before you begin

If you already deployed Jabber in the past, you have a jabber-config.xml file on your Unified CM TFTP server. You can confirm by opening http://tftp_server_address:6970/jabber-config.xml in your browser (where tftp_server_address is the server FQDN or IP address of your publisher) and see if a file downloads.

If you have the required policy parameters already specified, no further action is needed in the config file.


Note


Webex App and Jabber share the same jabber-config.xml file. Webex App only honors a subset of Jabber parameters in that file, as documented in this guide.


Procedure


Step 1

Either create a file named jabber-config.xml with any text editor or open the file you downloaded.

  • Use lowercase letters in the filename.

  • Use UTF-8 encoding.

Note


Unified CM 12.5 and later lets you create the file in the administration interface.

Step 2

Define the required configuration parameters in jabber-config.xml under <policies></policies>:

  • For call pickup:
    <EnableCallPickup>true</EnableCallPickup>
    <EnableGroupCallPickup>true</EnableGroupCallPickup>
    <EnableOtherGroupPickup>true</EnableOtherGroupPickup>
  • For hunt groups:

    <EnableHuntGroup>true</enableHuntGroup>

    To hide the decline button for an incoming call in a hunt group:

    <PreventDeclineOnHuntCall>true</PreventDeclineOnHuntCall>


Configuration file requirements

  • Configuration filenames are case sensitive. Use lowercase letters in the filename to prevent errors and to ensure the client can retrieve the file from the TFTP server.
  • You must use utf-8 encoding for the configuration files.
  • The client cannot read configuration files that do not have a valid XML structure. Ensure you check the structure of your configuration file for closing elements and that elements are nested correctly.
  • Your XML can contain only valid XML character entity references. For example, use &amp; instead of &. If your XML contains invalid characters, the client cannot parse the configuration file.

    Tip


    Open your configuration file in Microsoft Internet Explorer to see if any characters or entities are not valid.

    If Internet Explorer displays the entire XML structure, your configuration file does not contain invalid characters or entities.

    If Internet Explorer displays only part of the XML structure, your configuration file most likely contains invalid characters or entities.


Configure moving a call into a meeting

When users are in the middle of a call, they may want to invite other coworkers into the discussion while making use of some advanced meetings features. Users can move that call to a meeting. From there, people can raise their hands when they want to share something important, add an emoji to let someone know visually that they agree with what's being said, make use of breakout rooms, and much more.

This feature requires specific Unified CM, Expressway, and Webex App site configuration, as detailed in the following steps.

Before you begin


Note


Moving a call into a meeting won't work in the following Webex Meetings site configurations:

  • Encryption is set to End-to-End or PKI.

  • Telephony is disabled.

  • Video Mesh is deployed and media encryption is enabled.

  • The site is on the slow release channel. See Manage Software Release Channels for more information.


Procedure


Step 1

Configure SIP URI dialing on Unified CM.

See "Configure URI Dialing" in the System Configuration Guide for your release at https://www.cisco.com/c/en/us/support/unified-communications/unified-communications-manager-callmanager/products-installation-and-configuration-guides-list.html

You must configure a SIP Route Pattern in Unified CM to route calls to your Webex App site, such as example.webex.com.

Step 2

Configure a partition and Calling Search Space (CSS), and then use the CSS as a Reroute Calling Search Space (CSS), which evaluates the partition to see if the rerouted destination is allowed.

This configuration is required for users who make a call and then want to bring a remote participant into a meeting.

  • See this document for the partition and CSS steps.

  • For the reroute CSS for the softphone devices of the user, go to Device > Phone, find the device that you want to modify (for example, csf<userid>). Then, choose the CSS you created for the Rerouting Calling Search Space setting and then save your changes.

A reroute CSS allows users to forward calls along a different path so that calls can be moved to meetings. The reroute CSS should have access to the SIP Route Pattern that you configured in the first step.

Step 3

Configure an Expressway pair to route calls from Unified CM to Webex App.

See the section "Zones and Neighbors" in the Cisco Expressway Administrator Guide for more information.

On an Expressway-C, configure two neighbor zones—one for Unified CM, one for an Expressway-E which can reach Webex App.

See Configure Expressway for Mutual TLS Authentication for more information.

Step 4

Ensure that your Webex Meetings site is on a minimum of 41.3 or later and that Telephony is Enabled.

To check your meeting version, use the steps in Determine Your Webex Site Version in Cisco Webex Control Hub.

Step 5

Enable the full-featured meetings experience for any users who want to move calls to meetings.

  • Customers are automatically enabled for this experience. If you encounter any issues, contact your partner or CSM for guidance.

  • Remote users being added to an escalated meeting do not require this feature.

Step 6

Users must set their default Webex App site using these steps.

Step 7

In the jabber-config.xml file (Unified CM earlier than 12.5) or the Jabber Client Configuration profile (Unified CM 12.5 and later), set the EnableMeetingPowerUp parameter to True.

For parameter configuration, see the relevant section in this chapter. For more information on parameters and their values, see Policy parameters in the Appendix.


Users are enabled for moving calls to meetings in Webex App. The changes take effect immediately, but users in active calls won't be able to move them to meetings until the next call.

For end user information about how to use the feature, see Move a Call into a Meeting.

Calling experience for users workflow

Use these tasks to customize various aspects of the calling experience for users: set login behavior (for on-net and MRA, for example) and set calling behavior.


Note


For information about additional customization features, such as setting virtual backgrounds and prioritizing calling options, see Configure extra features after deployment.


Procedure

  Command or Action Purpose

Step 1

Create a UC manager profile

Your UC Manager Profile defaults to your organization's domain. This may mean that users need to manually specify a domain when they sign into Phone Services in Webex App. If you want to override the default and specify a domain, you can set up UC Manager Profiles for the whole organization or for user-level overrides. You can choose either the default option for your organization or manually create a new profile if you want users to sign into Webex App Phones Services with a different domain.

Step 2

Edit a UC manager profile

You can edit your UC Manager Profiles in Control Hub at any time.

Step 3

Set up calling behavior and UC manager profiles in Control Hub

Your UC manager profiles are tied in with the Calling Behavior setting (either organization-wide or user-level) in Control Hub. When you set the calling behavior, you can also choose the default option or a manual option for UC manager profiles.

Create a UC manager profile

Procedure


Step 1

From the customer view in https://admin.webex.com, go to Management > Organization Settings, and under UC Manager Profiles select Add Profile.

Step 2

Add a Profile Name, choose the necessary settings, and then select Save.

Enter a Voice Services Domain if you have SRV records but the login email domain is not used for service discovery. It's required for Mobile Remote Access (MRA), as well. You can also enter a UDS server if the Webex App account user ID does not match the Unified CM user ID or ILS is not enabled in a multiple Unified CM cluster deployment. With both values entered, Webex App uses UDS first for the premises and Voice Services for MRA.


Set up calling behavior and UC manager profiles in Control Hub

You can use Control Hub to set the calling behavior for specific users in your organization or for your entire organization. For Calling Behavior, you configure this setting for users so that they can use the calling feature set. Webex App first connects to cloud services and retrieves its configuration, including the calling behavior setting.

By default, the Webex App sends DNS SRV queries based on the Webex organization domain (the user email domain). If the Webex domain does not match the existing Voice Services Domain or you have multiple domains without a DNS SRV record for each, you can specify a UC Manager profile as an override setting—either your organization's default or one that you manually configured if you want to specify a different domain for users assigned to a UC Manager profile.

The option is not available if Hybrid Calling is still enabled for users in your organization. You must remove Hybrid Calling from users before you can assign Calling Behavior. See the "Prepare Your Environment" chapter for more information.


Note


We recommend that you configure this setting based on your organization's needs—for example, you may want to enable specific users in your organization, have them test out the service, and then configure the service for your entire organization when you're ready.


More information

Control which calling application opens when users make the calls from the Webex App. You can configure the client's calling settings, including mixed-mode deployment for organizations with users entitled with Unified CM, Webex Calling, and users without paid calling services from Cisco.

Depending upon the user’s calling license, the calling behavior options can be set up.

  • For Unified CM licensed users, you can set up to make calls directly from the Cisco Jabber or through the Webex App, and choose the domain (organization domain or UC Manager profile) that gets applied to the users. You can configure the settings at organization level, group level, and user level.

  • For users without paid calling services from Cisco, you can set up third-party applications to initiate calls. By default, all calls through the Webex App use "Call on Webex" option. You can configure the settings at the organization level.

  • For Webex Calling licensed users, the Webex App is the default calling application to make calls. Hence, no specific calling behavior configuration is needed.

Enable calling behavior settings at the organization level

The settings configured at the organization level automatically apply to all users under the organization.
Procedure

Step 1

Log in to Control Hub at https://admin.webex.com

Step 2

Go to Services > Calling > Client Settings.

Step 3

Go to Calling Behavior section and set the calling behavior options for Unified CM Users and Users without Paid Calling Services from Cisco.

For Unified CM Users:

  • Select Use the email domain of the user to apply your organization's domain (default option) to all Unified CM users in Webex App, or select the Use UC Manager Profile for calling and choose a created UC Manager profile from the dropdown.

  • Select Open Cisco Jabber from the Webex app check box, if the organization uses the Jabber app for calling. Unified CM users can make calls directly in Cisco Jabber or through Webex. When users make call in Webex App, the Cisco Jabber app launches and is used to make the call.

For Users without Paid Calling Services from Cisco:

  • Select Open third-party app from Webex check box to allow all the users to make calls through a third-party app, even if they haven't enabled calling in Webex. When users make call in Webex App, the third-party app is launched and used to make the call.


Enable calling behavior settings at the group level

You can enable unified CM calling behavior organization settings for a user-group through a Calling template. You can create a template and assign to the user-group. The configuration in the template applies to all users in the group.

To create a template
Before you begin

Make sure that the user has the Unified CM license. For more information, see: Edit service licenses for individual users.

Procedure

Step 1

Log in to Control Hub at https://admin.webex.com.

Step 2

Go to Services > Calling > Client Settings > Templates

Step 3

Click Create template.

Step 4

In the General section, type the Template name and description.

Step 5

Go to the Calling behavior section and update following settings.

  • Select the Use the email domain of the user to apply your organization's domain (default option) to the user group, or select the Use UC Manager Profile for calling and choose a created UC Manager profile from the dropdown.

  • Select the Open Cisco Jabber from the Webex app check box to allow Unified CM users to make calls directly in Cisco Jabber or through Webex. When users make call in Webex App, the Cisco Jabber app launches and is used to make the call.

Step 6

Click Create template and next.

Step 7

Search and select a group for this template in the search box.

Step 8

Click Done.

To delete the template, click the template and select Delete from the Actions drop-down list. In the Delete template page, check the check box informing you that deleting a template is permanent, and then click Delete.

To modify the template, click the template, modify the toggles, and click Save.


To apply an existing template to a user-group

Few pointers to consider when applying the Calling templates:

  • When a user is on boarded to an organization, the user inherits the settings from the organization-level.

  • If the user is added to a user-group, then the settings from the Calling template apply.

  • If a user belongs to multiple user-groups, then the template with the highest rank (Rank 1) takes the highest precedence and that template settings apply.

  • If the user has individual user settings, then these settings take precedence over user-group or organization-level settings.

See Configure settings templates for more information about managing your templates.

You can apply the existing template either from Group section or Calling section.

To apply template from Group section, see: Configure settings template.

To apply from the Calling section, perform the following steps:

Procedure

Step 1

From the customer view in https://admin.webex.com, go to Services in the left navigation bar and then click Calling > Client Settings > Templates.

Step 2

Click the … icon next to an existing template and then click Apply template.

Step 3

Type the group name to which you want to apply the template and then choose the group.

Step 4

Click Done.


Override calling behavior organization settings at the user level

Before you begin

Make sure that the user has the Unified CM license. For more information, see: Edit service licenses for individual users.

Procedure

Step 1

Log in to Control Hub at https://admin.webex.com.

Step 2

Go to Management > Users and select the user that you want to modify.

Step 3

Select Calling > Calling Behavior.

Step 4

Toggle off the Use organization level settings to override the organization default settings with the user settings.

To revert to the organization default settings, toggle on the Use organization level settings.

Note


The toggle is visible only when the user is not part of any group and overriding the organization level settings.

Step 5

Update the following calling behavior settings:

  • Select the Use the email domain of the user to apply your organization's domain (default option) to the user, or select the Use UC Manager Profile for calling and choose a created UC Manager profile from the dropdown.

  • Select the Open Cisco Jabber from the Webex app check box to allow a Unified CM user to make calls directly in Cisco Jabber or through Webex. When a user makes call in Webex App, the Cisco Jabber app launches and is used to make the call.

Step 6

Click Save and confirm Yes.


Override calling behavior group level settings at the user level

Before you begin
  • Make sure that the user has the Unified CM license. For more information, see: Edit service licenses for individual users.

  • Make sure that the user is a part of a user group with the calling template assigned.

Procedure

Step 1

Log in to Control Hub at https://admin.webex.com.

Step 2

Go to Management > Users and select the user that you want to modify.

Step 3

Select Calling > Calling Behavior.

Step 4

Update the following calling behavior settings:

  • Select the Use the email domain of the user to apply your organization's domain (default option), or select the Use UC Manager Profile for calling and choose a created UC Manager profile from the dropdown.

  • Select the Open Cisco Jabber from the Webex app check box to allow the Unified CM user to make calls directly in Cisco Jabber or through Webex. When a user makes call in Webex App, the Cisco Jabber app launches and is used to make the call.

Step 5

Click Save and confirm Override setting.


The marking Overridden displays beside the updated field. To revert to the group template settings, click Actions > Reset. To view the details of calling template inherited by the user, click Actions > View inheritance.

Note


The Reset option is available only when the inherited settings are overridden for the user.


Manual connection settings

Manual connection settings provide a fallback mechanism when Service Discovery is not used.

When you start Webex App, you can specify the authenticator and server address in the Phone Services window. The app caches the server address to the local application configuration that loads on subsequent starts. Webex App prompts users to enter advanced settings on the initial start if the app cannot get the authenticator and server addresses from the service profile.

Authenticate with phone services in Webex App

If you have DNS SRV implemented, users will be autodiscovered for phone services in the Webex App and they can use their SSO or manual credentials to sign in. If you don't, you can still simplify their sign-in process by configuring a UC manager profile (covered earlier in the guide). If none of these options is in place, users must manually enter a server address for the UDS server or the UC domain (FQDN or IP address of Unified CM) that you provide to them.

Procedure

  • If you have autodiscovery through DNS SRV or configured a UC manager profile, users simply open Webex App and are prompted for SSO or manual credentials. No further steps are needed.

    The option to enter the server address or UC domain is not presented if you use service discovery with matching login and UC domains. The option also doesn't appear if you specified a UC manager profile for the specific domain for Phone Services.

  • If you don't have autodiscovery through DNS SRV, help your users follow these steps:

    1. Access the Phone Services settings using the applicable Webex App platform:

      • For Windows, click your profile picture, choose Settings, and then click Phone Services.

      • For Mac, click your profile picture, choose Preferences, and then click Phone Services.

      • For Android, tap your profile picture, choose Settings, and then choose Phone Services.

      • For iPhone and iPad, tap your profile picture, and then choose Phone Services

    2. Enter an option, depending on the authentication type and platform:

      For Windows or Mac, enter one of the following:

      • Server address—Enter the User Data Service (UDS) server if you don't have SRV records configured. Typically, this is the Unified CM publisher.

      • UC Domain—Enter the domain name of the Unified CM that is used for service discovery.

      For Android, iPhone, or iPad, enter the UDS server or domain name in the Server Address or UC Domain field, and then tap Apply or Apply Changes.


      Note


      If both Server address/UDS Server and UC domain/Voice Services Domain are configured, Server Address determines the Home Cluster (autodiscovery through DNS SRV is ignored) and UC domain determines whether the client is on-premises or off-premises (MRA).


    3. Tell users to enter their username and password when they're prompted in the app, and then they can sign in.


      Note


      The sign in screen varies, depending on the existing SSO setup.


Users are authenticated with phone services and can use Calling in Webex App (Unified CM) features.

What to do next

  • Train Your Users—You can direct users to the Supported calling options article or use it in your training materials to assist your users with learning how to use the feature set (such as putting a call on hold in Webex App or using desk phone control) in Calling in Webex App (Unified CM).

  • Troubleshoot Issues—If there are errors with registration, see the troubleshooting material in this guide for more information.

  • Reset Server Information—If the phone services information changes or you need Webex App users to reenter the server information for the Unified CM (for example, moving from a lab to production server), they must reset the database (for desktop, under Settings > Health Checker > Reset Database). For mobile apps, users must uninstall and reinstall on their devices to reset server information.

Configure extra features after deployment

These extra features are not mandatory for the first-time deployment of Calling in Webex App (Unified CM). However, after you complete the initial deployment steps, you can configure these features for more customization for you and your users. You can refer to the documentation that is linked for each feature for additional guidance.

Procedure


Go to the article links to learn how to configure these additional features:

Table 1. Documentation for extra features

Help Center article

Feature description and benefits

Configure call settings for your organization in Control Hub

You have complete control and flexibility as an administrator in managing different calling deployments with these call settings features in Control Hub. Enable and prioritize different calling options (such as work number or extension, SIP address, and so on) and set single click-to-call for users.

Configure SIP Address Routing for Your Organization

If you configure this setting in Control Hub and change the default option, SIP calls in Webex can route through your Unified CM environment for the domains that you enter. This setting reduces calling traffic from going directly to the cloud and back.

Configure virtual backgrounds for Webex App users

Blurring your background makes your surroundings appear out of focus so people can't see what's going on behind you.

As an administrator, you can use Control Hub to configure what options users have for applying virtual backgrounds to their meetings and calls in Webex. You can allow users to use preset backgrounds or their own custom backgrounds.

Configure virtual cameras for calls and meetings in Control Hub (macOS only)

You can use Control Hub to enable or disable virtual camera usage for your users' calls and meetings in the Webex app. Users can use a virtual camera, such as an application, driver, or software, to create an overlay of video, images, or feeds.

Enable or disable video for calling in the Webex App (Call on Webex only)

You can disable video for calling and other Webex services on the Webex app. Enabling and disabling the video option is available for all Calling licenses and is configured on the organization or user level in Control Hub.

Note


The Control Hub setting only affects Call on Webex. If you want to configure video for Calling in Webex App (Unified CM), use the EnableVideo parameter in the config file or associated service profile on Unified CM. See the customization parameters in the Appendix for more information.

Enable or disable remote desktop control for calling in the Webex App (Call on Webex only)

You can disable Remote Desktop Control (RDC) for Calling and other Webex services on the Webex app. Enabling and disabling RDC is available for all Calling licenses and is configured on the organization or user level in Control Hub.


Known issues and limitations with Calling in Webex App (Unified CM)

You can also use the Known Issues article for information that is specific to the Webex App.

Mobile

  • These limitations apply to Wi-Fi to LTE call handoff on Webex for mobile (41.8):

    • This feature only supports active call handover of 1 call.

      For multiple concurrent calls on the Webex mobile app, all calls end after the network switch.

    • The sharing capability is lost after the network switch, so the calling user cannot start or receive a share during that call.

    • An active call ends if the network does not recover within 20 seconds.

    • If Call recording is active, the recording is stopped and won't continue after handover.

    • Network handover does not support the following: midcall features (such as hold or transfer), screen share handover, conference call handover, call center features.

  • Calling in Webex App (Unified CM) for mobile and proximity pairing do not work together.

  • When running two instances of the app on a mobile platform, a message about another active connection appears.

  • For numbers in a contact card on the mobile apps, users must tap the green video icon to see other users' numbers.

  • For Webex App login and phone services, the web sessions are separated. For example, a user can be prompted two times for authentication even through the same IdP (SSO) is configured for components in your calling environment and the Webex cloud. To fix this issue, you can upgrade your Unified CM and Expressway environment to support the SSO redirect URI enhancement. See the Prepare Your Environment chapter for more information on this recommended configuration.

General

  • Prior to Unified CM 15 SU2, users who utilized the Hunt Group feature would see missed calls even when the calls were answered. The fix is included in Unified CM 15.SU2.

  • Calling in Webex App (Unified CM) does not work alongside Hybrid Calling or Webex Calling. You must disable Hybrid Calling or Webex Calling user enablement before you can enable Calling in Webex App (Unified CM) for your users. See the Prepare Your Environment chapter for more information on how to disable Hybrid Calling for users.

  • Certificates issued with a deprecated signature algorithm (such as SHA-1) do not work; you must use a supported secure signature algorithm such as SHA-256 or later, as documented in the Certificates chapter in the Administration Guide for Cisco Unified Communications Manager.

  • Cross-launch calling app functionality and Calling in Webex App (Unified CM) cannot be configured for a single user. You can use Control Hub to do overrides and set calling behavior for individual users—for example, you may want some users on Calling in Webex App (Unified CM) and some users on a Cisco Jabber app cross-launch.

  • Phone services and coexistence with Jabber:

    • Phone Services can only be used on one device of each type (desktop and mobile). Phone Services cannot be signed in on both Jabber and Webex App at the same time.

    • Jabber and Webex App each try to register as the same softphone device in Unified CM. A registration popup lets you choose which client you want to use for calling.

      If a user is already registered on one client, and then somehow another client forces registration, that user does not see the dialog on the originally registered client

  • Calls through Calling in Webex App (Unified CM) do not leverage Webex Video Mesh nodes.