-
null
- Restrictions for Virtual Switching Systems
- Understanding Virtual Switching Systems
- VSS ISSU Concept
- Traffic and Network Protocol Disruption During ISSU in a VSS
- Related Documents
- Prerequisites to Performing ISSU
- About Performing ISSU
- Compatibility Verification Using Cisco Feature Navigator
- How to Perform the ISSU Process
- Verifying the ISSU Software Installation
- Verifying Redundancy Mode Before Beginning the ISSU Process
- Verifying the ISSU State Before Beginning the ISSU Process
- ISSU using the Four-command Sequence: Step 1 (loadversion)
- ISSU using the Four-command Sequence: Step 2 (runversion)
- ISSU using the Four Command Sequence: Step 3 (acceptversion)
- ISSU using the Four Command Sequence: Step 4 (commitversion)
- Using changeversion to Automate an ISSU Upgrade
- Aborting a Software Upgrade During ISSU
- Configuring the Rollback Timer to Safeguard Against Upgrade Issues
- The ISSU Compatibility Matrix
Configuring Virtual Switching Systems
This chapter describes how to configure a virtual switching system (VSS) on Catalyst 4500 series switches with Supervisor Engine 9-E, 8L-E, 8-E, 7-LE, and 7-E, and Catalyst 4500-X). VSS is supported on Cisco Release IOS XE 3.4.0SG and later.

Note For complete syntax and usage information for virtual switch commands used in this chapter, see the publication at this location:
Cisco IOS Virtual Switch Command Reference
For complete syntax and usage information for the switch commands used in this chapter, see the
Cisco IOS Command Reference Guides for the Catalyst 4500 Series Switch.
If a command is not in the Cisco Catalyst 4500 Series Switch Command Reference , you can locate it in the Cisco IOS Master Command List, All Releases.
Restrictions for Virtual Switching Systems
Virtual Switching System (VSS) requires all the supervisors to have the same license level. For the In-chassis Standby supervisors to be capable of Route Processor Redundancy (RPR) their licenses should match those on the In-chassis Active supervisors. For VSS to function, install the same licenses levels on the In-chassis Standby supervisors as the In-chassis Active supervisors.
Understanding Virtual Switching Systems
These sections describe a VSS:
- VSS Overview
- VSS Redundancy
- Multichassis EtherChannels
- Packet Handling
- System Monitoring
- Dual-Active Detection
- Configuring a Recovery IP Address
- VSS Initialization
VSS Overview
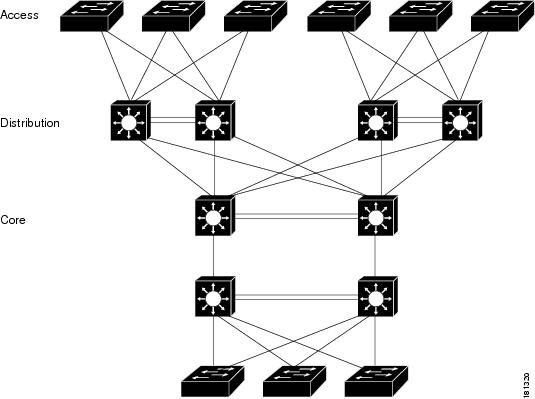
Network operators increase network reliability by configuring switches and by provisioning links to the redundant pairs. Figure 5-1 shows a typical switch network configuration. Redundant network elements and redundant links can add complexity to network design and operation. Virtual switching simplifies the network by reducing the number of network elements and hiding the complexity of managing redundant switches and links.
A VSS combines a pair of Catalyst 4500 or 4500-X series switches into a single network element. The VSS manages the redundant links, which externally act as a single port channel.
The VSS simplifies network configuration and operation by reducing the number of Layer 3 routing neighbors and by providing a loop-free Layer 2 topology.
Figure 5-1 Typical Switch Network Design
The following sections present an overview of the VSS. These topics are covered in detail in subsequent chapters:
Key Concepts
Virtual Switching System
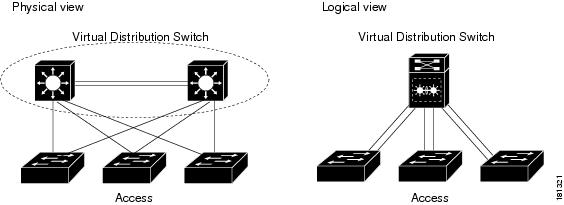
A VSS combines a pair of switches into a single network element. For example, a VSS in the distribution layer of the network interacts with the access and core networks as if it were a single switch. See Figure 5-2.
An access switch connects to both switches of the VSS using one logical port channel. The VSS manages redundancy and load balancing on the port channel. This capability enables a loop-free Layer 2 network topology. The VSS also simplifies the Layer 3 network topology by reducing the number of routing peers in the network.
Figure 5-2 VSS in the Distribution Network
VSS Active and VSS Standby Switch
When you create or restart a VSS, the peer switches negotiate their roles. One switch becomes the VSS Active switch, and the other switch becomes the VSS Standby switch.
The VSS Active controls the VSS, running the Layer 2 and Layer 3 control protocols for the switching modules on both switches. The VSS Active switch also provides management functions for the VSS, such as module online insertion and removal (OIR) and the console interface.
The VSS Active and VSS Standby switches perform packet forwarding for ingress data traffic on their locally hosted interfaces. However, the VSS Standby switch sends all control traffic to the VSS Active switch for processing.
Virtual Switch Link
For the two switches of the VSS to act as one network element, they need to share control information and data traffic.
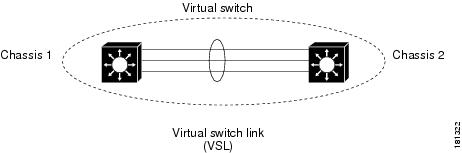
The virtual switch link (VSL) is a special link that carries control and data traffic between the two switches of a VSS, as shown in Figure 5-3. The VSL is implemented as an EtherChannel with up to eight links. The VSL gives control and management traffic higher priority than data traffic so that control and management messages are never discarded. Data traffic is load balanced among the VSL links by the EtherChannel load-balancing algorithm.
Note![]() EtherChannel load balancing method is a global configuration; VSL observes that method of load balancing.
EtherChannel load balancing method is a global configuration; VSL observes that method of load balancing.
Figure 5-3 Virtual Switch Link
When you configure VSL, all existing configurations are removed from the interface except for specific allowed commands. When you configure VSL, the system puts the interface into a restricted mode. This means that only specific configuration commands can be configured on the interface.
The following VSL configuration commands are inserted automatically on all VSL member ports:
- switchport mode trunk
- switchport nonegotiate
- no lldp transmit
- no lldp receive
- no cdp enable
- service-policy output VSL-Queuing-Policy
In VSL restricted mode, only these configuration commands are available:
Multichassis EtherChannel
Note![]() Beginning with Cisco Release IOS XE 3.5.0E and IOS 15.2(1)SG, Layer 3 MEC is supported on the Catalyst 4500 series switch. Cisco Release IOS XE 3.4.0SG does not support Layer 3 MEC.
Beginning with Cisco Release IOS XE 3.5.0E and IOS 15.2(1)SG, Layer 3 MEC is supported on the Catalyst 4500 series switch. Cisco Release IOS XE 3.4.0SG does not support Layer 3 MEC.
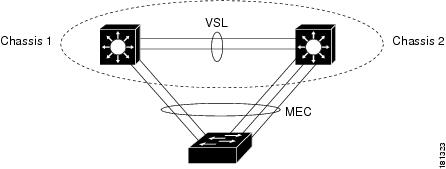
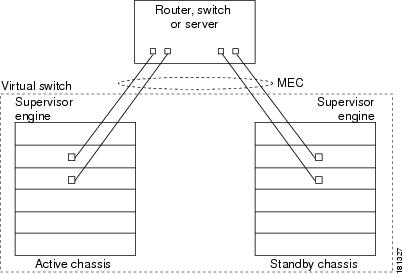
An EtherChannel (also known as a port channel) is a collection of two or more physical links that combine to form one logical link. Layer 2 protocols operate on the EtherChannel as a single logical entity. A VSS enables the creation of Multi-Chassis EtherChannel (MEC), which is an Etherchannel whose member ports can be distributed across the member switches in a VSS. Because non-VSS switches connected to a VSS view the MEC as a standard EtherChannel, non-VSS switches can connect in a dual homed manner. Figure 5-4 displays a dual-homed connection for an MEC into the VSS; VSS is seen as a single logical switch. Traffic traversing an MEC can be load balanced locally within a VSS member switch much as in standard EtherChannels. Cisco MEC supports the bundling protocols LACP and PAgP as well as ON mode.
VSS supports a maximum of 256 EtherChannels. This limit applies to the total number of regular EtherChannels and MECs. Because the VSL requires two EtherChannel numbers (one for each switch in the VSS), there are 254 user-configurable EtherChannels.
For information on how to configure Layer 3 Multichassis EtherChannels, see For information on how to configure Layer 3 Multichassis EtherChannels, see For information on how to configure Layer 3 Multichassis EtherChannels, see, page 5-5
VSS Functionality
The following sections describe the main functionality of a VSS:
Redundancy and High Availability
In a VSS, supervisor engine redundancy operates between the VSS Active and VSS Standby switch, using stateful switchover (SSO) and nonstop forwarding (NSF). The peer switch exchange configuration and state information across the VSL and the VSS Standby supervisor engine runs in SSO-HOT mode.
The VSS Standby switch monitors the VSS Active switch using the VSL. If it detects failure, the VSS Standby switch initiates a switchover and takes on the VSS Active role. When the failed switch recovers, it takes on the VSS Standby role.
If either the VSS Active switch fails or all links that belong to the VSL port-channel fail, the VSS Standby switch initiates a switchover and assumes the role of the VSS Active switch. If the previous VSS Active switch has failed, it reloads and boots as the VSS Standby switch. However, if only the VSL port-channel failure caused the switchover, the previous VSS Active switch enters recovery mode (provided dual-active detection is configured). In this scenario, the previous VSS Active chassis (now in recovery mode) carries no traffic and only monitors the VSL link. When one link in the VSL port-channel is up, the recovery mode switch reloads and boots as a VSS Standby chassis. For additional information about dual-active detection, see the “Dual-Active Detection” section.
Packet Handling
The VSS Active supervisor engine runs the Layer 2 and Layer 3 protocols and features for the VSS and manages all ports on both switches.
The VSS uses VSL to communicate protocol and system information between the peer switches and to carry data traffic between the switches when required.
Both switches perform packet forwarding for ingress traffic on their interfaces. If possible, ingress traffic is forwarded to an outgoing interface on the same switch to minimize data traffic that must traverse the VSL.
System Management
The VSS Active supervisor engine acts as a single point of control for the VSS. For example, the VSS Active supervisor engine handles OIR of switching modules on both switches. The VSS Active supervisor engine uses VSL to send messages to and from local ports on the VSS Standby switch.
The command console on the VSS Active supervisor engine is used to control both switches. In virtual switch mode, the command console on the VSS Standby supervisor engine blocks attempts to enter configuration mode.
The VSS Standby switch runs a subset of system management tasks. For example, the VSS Standby switch handles its own power management, linecard bringup, and other local hardware management.
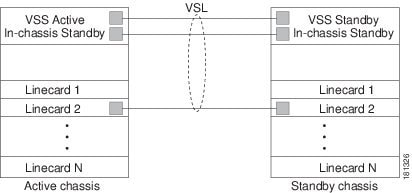
Quad-Supervisor (In-chassis Standby Supervisor Engine) Support
Beginning with IOS XE release 3.8.0E, Cisco Catalyst 4500-E switches configured with Supervisor Engines 7-E, 7-LE, or 8E support Quad-Supervisor VSS Mode.
With Quad-Supervisor VSS mode, each chassis in the VSS supports a redundant supervisor engine, called the in-chassis standby (ICS). The ICS supervisor engines use Route Processor Redundancy (RPR) mode, and remain in RPR Standby Cold redundancy state. If the Active supervisor fails, the ICS supervisor boots fully, and becomes the Active supervisor within the chassis, while the local chassis remains nonoperational till SSO redundancy is established with the VSS Active supervisor.
The following table displays a matrix of the chassis that support Quad-Supervisor VSS mode, and the corresponding number of supervisors required in each case.
|
|
||||
Asymmetric chassis support
Ensure that both participating switches in the VSS have the same supervisor engine type. The chassis can differ in type (i.e., +E and -E chassis can be in a single VSS) and also can differ in the number of slots in chassis. VSS cannot be formed between different flavors of Catalyst 4500X (e.g., 4500X-16 and 4500X-32).
Interface Naming Convention
In VSS mode, interfaces are specified using the switch number (in addition to slot and port), because the same slot numbers are used on both chassis. For example, the interface 1/5/4 command specifies port 4 of the switching module in slot 5 of switch 1. The interface 2/5/4 command specifies port 4 on the switching module in slot 5 of switch 2.
Module Number Convention
IOS treats modules in both chassis as if they belong to one single chassis and the module number space is 1-20.
Switch 1 receives a module number from 1-10 and switch 2 receives a number from 11-20, irrespective the chassis type, supervisor type, or number of slots in a chassis. For example, on a 3-slot chassis VSS, the module numbers on switch 1 would be 1, 2, and 3, and on switch 2, the numbers would be 11, 12, and 13. The module number on switch 2 always starts from 11.
The show switch virtual slot-map command provides virtual to physical slot mapping. The following is a sample output:
Key Software Features not Supported on VSS
With some exceptions, the VSS maintains feature parity with the standalone Catalyst 4500 or 4500-X series switches. Major exceptions include:
Hardware Requirements
The following sections describe the hardware requirements of a VSS:
Chassis and Modules
Table 5-1 describes the hardware requirements for the VSS chassis and modules.
VSL Hardware Requirements
The VSL EtherChannel supports both 10-Gigabit Ethernet ports and 1- Gigabit Ethernet ports.
We recommend that you use at least two of the 10-Gigabit/1-Gigabit Ethernet ports to create the VSL between the two switches. You cannot combine 10-Gigabit and 1-Gigabit Ethernet ports in a VSL port-channel.
- You can add additional physical links to the VSL EtherChannel with the 10-Gigabit Ethernet ports on any supported supervisor engine or linecard.
- Oversubscribed linecard ports can be used for VSL but total bandwidth requirements of VSL or any traffic drop because of a certain hashing mechanism must be accounted for before using oversubscribed linecard ports for VSL.
- VSL ports can have only 10 Gigabit Ethernet port mode on a WS-X4606-X2-E linecard; non-VSL ports can be configured as 10 or 1 Gigabit Ethernet port mode.
- 1 Gigabit Ethernet ports on line card X4606-X2-E cannot be used as VSL links.
Multichassis EtherChannel Requirements
Physical links from any of the supervisor engines or linecard modules can be used to implement a Multichassis EtherChannel (MEC).
Understanding VSL Topology
A VSS contains two switches that communicate using the VSL, which is a special port group.
We recommend that you configure at least two of the 10-Gigabit/1-Gigabit Ethernet ports as VSL, selecting ports from different modules. Figure 5-5 shows a example topology.
Figure 5-5 VSL Topology Example
VSS Redundancy
The following sections describe how redundancy in a VSS supports network high availability:
Overview
A VSS operates stateful switchover (SSO) between the VSS Active and VSS Standby supervisor engines. Compared to standalone mode, a VSS has the following important differences in its redundancy model:
- The VSS Active and VSS Standby supervisor engines are hosted in separate switches and use the VSL to exchange information.
- The VSS Active supervisor engine controls both switches of the VSS. The VSS Active supervisor engine runs the Layer 2 and Layer 3 control protocols and manages the switching modules on both switches.
- The VSS Active and VSS Standby switches perform data traffic forwarding.
If the VSS Active supervisor engine fails, the VSS Standby supervisor engine initiates a switchover and assumes the VSS Active role.
RPR and SSO Redundancy
Beginning in IOS XE release 3.8.0E, Quad-Supervisor VSS mode supports intra-chassis redundancy. When the VSS Active fails, the in-chassis standby supervisor operates in RPR mode and becomes the VSS Standby.
A VSS operates with stateful switchover (SSO) redundancy if it meets the following requirements:
- Both supervisor engines must be running the same software version, unless it is in the process of software upgrade.
Note![]() If the supervisors are running different software versions, the system will reach SSO only if the two versions are ISSU-compatible. However, this is not supported in the current release.
If the supervisors are running different software versions, the system will reach SSO only if the two versions are ISSU-compatible. However, this is not supported in the current release.
- VSL-related configuration in the two switches must match.
- SSO and nonstop forwarding (NSF) must be configured on each switch.
Note![]() See the “SSO Dependencies” section for additional details about the requirements for SSO redundancy on a VSS. See Chapter 13, “Configuring Cisco NSF with SSO Supervisor Engine Redundancy” for information about configuring SSO and NSF.
See the “SSO Dependencies” section for additional details about the requirements for SSO redundancy on a VSS. See Chapter 13, “Configuring Cisco NSF with SSO Supervisor Engine Redundancy” for information about configuring SSO and NSF.
With SSO redundancy, the VSS Standby supervisor engine is always ready to assume control following a fault on the VSS Active supervisor engine. Configuration, forwarding, and state information are synchronized from the VSS Active supervisor engine to the redundant supervisor engine at startup and whenever changes to the VSS Active supervisor engine configuration occur. If a switchover occurs, traffic disruption is minimized.
If a VSS does not meet the requirements for SSO redundancy, it will be incapable of establishing a relationship with the peer switch.
The VSS runs stateful switchover (SSO) between the VSS Active and VSS Standby supervisor engines (see Figure 5-6). The VSS determines the role of each supervisor engine during initialization.
The supervisor engine in the VSS Standby switch runs in hot standby state. The VSS uses the VSL link to synchronize configuration data from the VSS Active to the VSS Standby supervisor engine. Also, protocols and features that support high availability synchronize their events and state information to the VSS Standby supervisor engine.
Switch Roles in a VSS
Figure 5-6 illustrates the switches’ roles in a VSS.
Figure 5-6 Switches’ Roles in a VSS
Failed Switch Recovery
If the VSS Active switch or supervisor engine fails, the VSS initiates a stateful switchover (SSO) and the former VSS Standby supervisor engine assumes the VSS Active role. The failed switch performs recovery action by reloading the supervisor engine.
In Quad-Supervisor VSS mode, if the VSS Active switch or supervisor engine fails, the VSS initiates a stateful switchover (SSO) and the former VSS Standby supervisor engine assumes the VSS Active role. The in-chassis standby (ICS) on the failed switch becomes the VSS Standby and the former VSS Active becomes the ICS for the VSS Standby.
If the VSS Standby switch or supervisor engine fails, no switchover is required. The failed switch performs recovery action by reloading the supervisor engine.
The VSL links are unavailable while the failed switch recovers. After the switch reloads, it becomes the new VSS Standby switch and the VSS reinitializes the VSL links between the two switches.
The switching modules on the failed switch are unavailable during recovery, so the VSS operates only with the MEC links that terminate on the VSS Active switch. The bandwidth of the VSS is reduced until the failed switch has completed its recovery and become operational again. Any devices that are connected only to the failed switch experience an outage.
Note![]() The VSS may experience a brief data path disruption when the switching modules in the VSS Standby switch become operational after the SSO.
The VSS may experience a brief data path disruption when the switching modules in the VSS Standby switch become operational after the SSO.
After the SSO, much of the processing power of the VSS Active supervisor engine is consumed in bringing up a large number of ports simultaneously in the VSS Standby switch. As a result, some links might be brought up before the supervisor engine has configured forwarding for the links, causing traffic to those links to be lost until the configuration is complete. This condition is especially disruptive if the link is an MEC link and it is running in "ON" mode. This is why it is recommended that MEC ports always have either PAgP or LACP mode of EtherChannel configured.
Note![]() We recommend not configuring LACP independent mode (standalone-mode) for MEC because ports on the VSS Standby switch (while it boots) come up tens of seconds before the control plane is fully functional. This behavior causes a port to start working in independent mode and might cause traffic loss until the port is bundled.
We recommend not configuring LACP independent mode (standalone-mode) for MEC because ports on the VSS Standby switch (while it boots) come up tens of seconds before the control plane is fully functional. This behavior causes a port to start working in independent mode and might cause traffic loss until the port is bundled.
VSL Failure
To ensure fast recovery from VSL failures, fast link failure detection is enabled in virtual switch mode on all VSL port channel members.
Note![]() Fast link notification is based upon internal hardware assisted BFD sessions between the pair of physical VSL links.
Fast link notification is based upon internal hardware assisted BFD sessions between the pair of physical VSL links.
If a single VSL physical link goes down, the VSS adjusts the port group so that the failed link is not selected.
If the VSS Standby switch detects complete VSL link failure, it initiates a stateful switchover (SSO). If the VSS Active switch has failed (causing the VSL links to go down), the scenario is switch failure, as described in the previous section.
If only the VSL has failed and the VSS Active switch is still operational, this is a dual-active scenario. The VSS detects that both switches are operating in VSS Active mode and performs recovery action. See the “Dual-Active Detection” section for additional details about the dual-active scenario.
User Actions
From the VSS Active switch command console, you can initiate a VSS switchover or a reload.
If you enter the reload command from the command console, it performs a reload on the switch where reload is issued.
To reload only the VSS Standby switch, use the redundancy reload peer command.
To force a switchover from the VSS Active to the VSS Standby supervisor engine, use the redundancy force-switchover command.
To reset both the VSS Active and Standby switch, use the redundancy reload shelf command.
To reset the in-chassis standby (ICS), use the hw-module module < supervisor slot number> reset command.
Multichassis EtherChannels
Overview
A multichassis EtherChannel is an EtherChannel with ports that terminate on both switches of the VSS (see Figure 5-7). A VSS MEC can connect to any network element that supports EtherChannel (such as a host, server, router, or switch).
At the VSS, an MEC is an EtherChannel with additional capability: the VSS balances the load across ports in each switch independently. For example, if traffic enters the VSS Active switch, the VSS will select an MEC link from the VSS Active switch. This MEC capability ensures that data traffic does not unnecessarily traverse the VSL.
Each MEC can optionally be configured to support either PAgP or LACP. These protocols run only on the VSS Active switch. PAgP or LACP control packets destined for an MEC link on the VSS Standby switch are sent across VSL.
An MEC can support up to eight physical links, which can be distributed in any proportion between the VSS Active and VSS Standby switch.
MEC Failure Scenarios
We recommend that you configure the MEC with at least one link to each switch. This configuration conserves VSL bandwidth (traffic egress link is on the same switch as the ingress link), and increases network reliability (if one VSS supervisor engine fails, the MEC is still operational).
The following sections describe possible failures and the resulting impacts:
Single MEC Link Failure
If a link within the MEC fails (and other links in the MEC are still operational), the MEC redistributes the load among the operational links, as in a regular port.
All MEC Links to the VSS Active Switch Fail
If all links to the VSS Active switch fail, the MEC becomes a regular EtherChannel with operational links to the VSS Standby switch.
Data traffic terminating on the VSS Active switch reaches the MEC by crossing the VSL to the VSS Standby switch. Control protocols continue to run in the VSS Active switch. Protocol messages reach the MEC by crossing the VSL.
All MEC Links to the VSS Standby Switch Fail
If all links fail to the VSS Standby switch, the MEC becomes a regular EtherChannel with operational links to the VSS Active switch.
Control protocols continue to run in the VSS Active switch. All control and data traffic from the VSS Standby switch reaches the MEC by crossing the VSL to the VSS Active switch.
All MEC Links Fail
If all links in an MEC fail, the logical interface for the EtherChannel is set to unavailable. Layer 2 control protocols perform the same corrective action as for a link-down event on a regular EtherChannel.
On adjacent switches, routing protocols and Spanning Tree Protocol (STP) perform the same corrective action as for a regular EtherChannel.
VSS Standby Switch Failure
If the VSS Standby switch fails, the MEC becomes a regular EtherChannel with operational links on the VSS Active switch. Connected peer switches detect the link failures, and adjust their load-balancing algorithms to use only the links to the VSS Active switch.
In Quad-Supervisor VSS mode, the in-chassis standby (ICS supervisor in the VSS Standby switch becomes the VSS Standby supervisor and the former VSS Standby supervisor becomes the ICS.
VSS Active Switch Failure
VSS Active switch failure results in a stateful switchover (SSO). See the “VSS Redundancy” section for details about SSO on a VSS. After the switchover, the MEC is operational on the new VSS Active switch. Connected peer switches detect the link failures (to the failed switch), and adjust their load-balancing algorithms to use only the links to the new VSS Active switch.
Packet Handling
In a VSS, the VSS Active supervisor engine runs the Layer 2 and Layer 3 protocols and features for the VSS and manages the ports on both switches.
The VSS uses the VSL to communicate system and protocol information between the peer switches and to carry data traffic between the two switches.
Both switches perform packet forwarding for ingress traffic on their local interfaces. The VSS minimizes the amount of data traffic that must traverse the VSL.
Traffic on the VSL
The VSL carries data traffic and in-band control traffic between the two switches. All frames forwarded over the VSL link are encapsulated with a special header (up to ten bytes for data traffic and 18 bytes for control packets), which provides information for the VSS to forward the packet on the peer switch.
The VSL transports control messages between the two switches. Messages include protocol messages that are processed by the VSS Active supervisor engine, but received or transmitted by interfaces on the VSS Standby switch. Control traffic also includes module programming between the VSS Active supervisor engine and switching modules on the VSS Standby switch.
The VSS needs to transmit data traffic over the VSL under the following circumstances:
- Layer 2 traffic flooded over a VLAN (even for dual-homed links).
- Packets processed by software on the VSS Active supervisor engine where the ingress interface is on the VSS Standby switch.
- The packet destination is on the peer switch, such as the following examples:
–![]() Traffic within a VLAN where the known destination interface is on the peer switch.
Traffic within a VLAN where the known destination interface is on the peer switch.
–![]() Traffic that is replicated for a multicast group and the multicast receivers are on the peer switch.
Traffic that is replicated for a multicast group and the multicast receivers are on the peer switch.
–![]() The known unicast destination MAC address is on the peer switch.
The known unicast destination MAC address is on the peer switch.
–![]() The packet is a MAC notification frame destined for a port on the peer switch.
The packet is a MAC notification frame destined for a port on the peer switch.
VSL also transports system data, such as NetFlow export data and SNMP data, from the VSS Standby switch to the VSS Active supervisor engine.
To preserve the VSL bandwidth for critical functions, the VSS uses strategies to minimize user data traffic that must traverse the VSL. For example, if an access switch is dual-homed (attached with an MEC terminating on both VSS switches), the VSS transmits packets to the access switch using a link on the same switch as the ingress link.
Traffic on the VSL is load-balanced with the same global hashing algorithms available for EtherChannels (the default algorithm is source-destination IP).
Layer 2 Protocols
The VSS Active supervisor engine runs the Layer 2 protocols (such as STP and VTP) for the switching modules on both switches. Protocol messages that are transmitted and received on the VSS Standby switch switching modules must traverse the VSL to reach the VSS Active supervisor engine.
All Layer 2 protocols in VSS work similarly in standalone mode. The following sections describe the difference in behavior for some protocols in VSS:
Spanning Tree Protocol
The VSS Active switch runs Spanning Tree Protocol (STP). The VSS Standby switch redirects STP BPDUs across the VSL to the VSS Active switch.
The STP bridge ID is commonly derived from the chassis MAC address. To ensure that the bridge ID does not change after a switchover, the VSS continues to use the original chassis MAC address for the STP Bridge ID.
EtherChannel Control Protocols
Link Aggregation Control Protocol (LACP) and Port Aggregation Protocol (PAgP) packets contain a device identifier. The VSS defines a common device identifier for both chassis. You should use PAgP or LACP on MECs instead of mode ON, although all three modes are supported.
A new PAgP enhancement has been defined for assisting with dual-active scenario detection. For additional information, see the “Dual-Active Detection” section.
Jumbo frame size restriction
The maximum jumbo frame size supported on a VSS interface is 9188 bytes (MTU of 9170 bytes). This accommodates the overhead of transporting packets between the two member switches over VSL.
Not all frames traverse VSL. So, packets confined to one of the member switches could have a size of 9216 bytes (MTU of 9198 bytes). Such frames may require diversion over VSL when a failure occurs. This is why the max configured MTU on non-VSL front panel ports is 9170.
Note![]() The MTU CLI is unavailable on a VSL interface. It is set internally to 9198 (Max frame size of 9216), addressing the overhead of VSL.
The MTU CLI is unavailable on a VSL interface. It is set internally to 9198 (Max frame size of 9216), addressing the overhead of VSL.
For example, if we send traffic between two ports on the active switch, no overhead exists. However, overhead exists when we send packets between ports of active to ports of standby. Even more overhead exists when we send packets from standby ports to the active CPU. The higher limit accommodates the worst case and guarantees consistent forwarding under all scenarios.
SPAN
VSS supports all SPAN features for non-VSL interfaces.
Note![]() SPAN on VSL ports is not supported; VSL ports can be neither a SPAN source, nor a SPAN destination.
SPAN on VSL ports is not supported; VSL ports can be neither a SPAN source, nor a SPAN destination.
The number of SPAN sessions available on a VSS matches that on a single switch running in standalone mode.
Private VLANs
Private VLANs on VSS work similarly in standalone mode. The only exception is that the native VLAN on isolated trunk ports must be configured explicitly. Refer to Chapter 47, “Configuring Private VLANs” for details on how to configure the native VLAN on isolated trunk ports.
Layer 3 Protocols
The VSS Active supervisor engine runs the Layer 3 protocols and features for the VSS. All layer 3 protocol packets are sent to and processed by the VSS Active supervisor engine. Both member switches perform hardware forwarding for ingress traffic on their interfaces. If possible, to minimize data traffic that must traverse the VSL, ingress traffic is forwarded to an outgoing interface on the same switch. When software forwarding is required, packets are sent to the VSS Active supervisor engine for processing.
The same router MAC address, assigned by the VSS Active supervisor engine, is used for all Layer 3 interfaces on both VSS member switches. After a switchover, the original router MAC address is still used. The router MAC address is configurable and can be chosen from three options: virtual-mac (derived from domainId), chassis-mac (preserved after switchover), and user-configured MAC address. VSS uses virtual MAC address as the default.
The following sections describe Layer 3 protocols for a VSS:
IPv4
The supervisor engine on the VSS Active switch runs the IPv4 routing protocols and performs any required software forwarding. All routing protocol packets received on the VSS Standby switch are redirected to the VSS Active supervisor engine across the VSL. The VSS Active supervisor engine generates all routing protocol packets to be sent out over ports on either VSS member switch.
Hardware forwarding is distributed across both members on the VSS. The supervisor engine on the VSS Active switch sends Forwarding Information Base (FIB) updates to the VSS Standby supervisor engine, which installs all routes and adjacencies in its hardware.
Packets intended for a local adjacency (reachable by local ports) are forwarded locally on the ingress switch. Packets intended for a remote adjacency (reachable by remote ports) must traverse the VSL.
The supervisor engine on the VSS Active switch performs all software forwarding (for protocols such as IPX) and feature processing (such as fragmentation and TTL exceed). If a switchover occurs, software forwarding is disrupted until the new VSS Active supervisor engine obtains the latest CEF and other forwarding information.
In virtual switch mode, the requirements to support non-stop forwarding (NSF) match those in standalone redundant mode of operation.
From a routing peer perspective, Multi-Chassis EtherChannels (MEC) remain operational during a switchover (only the links to the failed switch are down, but the routing adjacencies remain valid).
The VSS achieves Layer 3 load-balancing over all paths in the FIB entries, be it local or remote.
IPv6
VSS supports IPv6 unicast and multicast as it is there on standalone system.
IPv4 Multicast
The IPv4 multicast protocols run on the VSS Active supervisor engine. Internet Group Management Protocol (IGMP) and Protocol Independent Multicast (PIM) protocol packets received on the VSS Standby supervisor engine are transmitted across VSL to the VSS Active supervisor engine. The VSS Active supervisor engine generates IGMP and PIM protocol packets to be sent over ports on either VSS member.
The VSS Active supervisor engine syncs Multicast Forwarding Information Base (MFIB) state to the VSS Standby supervisor engine. On both member switches, all multicast routes are loaded in hardware with replica expansion table (RET) entries programmed for only local outgoing interfaces. Both member switches are capable of performing hardware forwarding.
Note![]() To avoid multicast route changes as a result of the switchover, we recommend that all links carrying multicast traffic be configured as MEC rather than Equal Cost Multipath (ECMP).
To avoid multicast route changes as a result of the switchover, we recommend that all links carrying multicast traffic be configured as MEC rather than Equal Cost Multipath (ECMP).
For packets traversing VSL, all Layer 3 multicast replication occurs on the egress switch. If there are multiple receivers on the egress switch, only one packet is replicated and forwarded over the VSL, and then replicated to all local egress ports.
Software Features
Software features run only on the VSS Active supervisor engine. Incoming packets to the VSS Standby switch that require software processing are sent across the VSL to the VSS Active supervisor engine.
System Monitoring
The following sections describe system monitoring and system management for a VSS:
Environmental Monitoring
Environmental monitoring runs on both supervisor engines. The VSS Standby switch reports notifications to the VSS Active supervisor engine. The VSS Active switch gathers log messages for both switches. The VSS Active switch synchronizes the calendar and system clock to the VSS Standby switch.
File System Access
File system access on VSS is the same as it is on dual supervisor standalone system. All files on a standby switch are accessible with slave prefix as following:
All file or directory name with prefix "slave" show vss standby files.
In Quad-Supervisor VSS mode, the following output is displayed:
Note![]() The in-chassis standby (ICS) bootflash is displayed as
The in-chassis standby (ICS) bootflash is displayed as bootflash-ics: and slavebootflash-ics. The ICS USB0: and slot0: is not accessible from the VSS Active switch, and is not displayed in the output.
Diagnostics
Bootup diagnostics are run independently on both switches. Online diagnostics can be invoked on the basis of virtual slots, which provide accessibility to modules on both switches. Use the show switch virtual slot-map command to display the virtual to physical slot mapping.
Network Management
The following sections describe network management for a VSS:
Telnet over SSH Sessions and the Web Browser User Interface
A VSS supports remote access using Telnet over SSH sessions and the Cisco web browser user interface.
All remote access is directed to the VSS Active supervisor engine, which manages the whole VSS.
If the VSS performs a switchover, Telnet over SSH sessions and web browser sessions are disconnected.
SNMP
The SNMP agent runs on the VSS Active supervisor engine.
CISCO-VIRTUAL-SWITCH-MIB is a new MIB for virtual switch mode and contains the following main components:
- cvsGlobalObjects — Domain #, Switch #, Switch Mode
- cvsCoreSwitchConfig — Switch Priority
- cvsChassisTable — Switch Role and Uptime
- cvsModuleTable — Information on the physical modules listed in the ENTITY-MIB entPhysicalTable, whose entPhysicalClass is module(9)
- cvsVSLConnectionTable — VSL Port Count, Operational State
- cvsVSLStatsTable — Total Packets, Total Error Packets
- cvsVSLPortStatsTable — TX/RX Good, Bad, Bi-dir and Uni-dir Packets
Command Console
Because the management plane of the two switches are common (that is, both switches in a VSS can be configured and managed from Active switch itself), you do not require access to the Standby console. However, the consoles of both switches are available by connecting console cables to both supervisor engine console ports. Availability of the Standby console does not imply that you can configure the switch from Standby console as well. Config mode is not available on the Standby and show commands are limited in availability. Observe that all show commands, even for remote ports, are available on the Active switch.
The console on the VSS Standby switch will indicate that switch is operating in VSS Standby mode by adding the characters “-stdby” to the command line prompt. You cannot enter configuration mode on the VSS Standby switch console.
The following example shows the prompt on the VSS Standby console:
Accessing the Remote Console on VSS
Note![]() The remote login command is not supported on switches running Quad-Supervisor VSS mode.
The remote login command is not supported on switches running Quad-Supervisor VSS mode.
Remote console (the Standby's console) can be accessed from the Local (Active) switch. This is available on a standalone system and works similarly on VSS. To access the remote console from the Active, you can use the remote login command with a VSS-Standby module number. Observe that the module number is a virtual slot and it would be an In-Chassis-Active supervisor module number on the remote chassis.
Because the Standby console is not available in config mode and only partially available in EXEC mode, distributed features like Netflow and Wireshark have special exemptions for respective commands (that is, these commands are allowed). Refer to Chapter 76, “Configuring Flexible NetFlow” and Chapter 71, “Configuring Wireshark” for details.
Copying Files to Bootflash
When you copy a file to a bootflash on the Active, it is not automatically copied to the Standby bootflash. This means that when you perform an ISSU upgrade or downgrade, both switches must receive the files individually. This behavior matches that on a dual-supervisor standalone system. Similarly, the removal of a file on one switch does not cause the removal of the same file on the other switch.
Transferring a Large File over VSL
Because the management plane of the VSS switches are performed through the Active, you might need to send a large-config/image file from one switch to another (that is, sending a file transfer over VSL). When you do this, the VSL link becomes “busy.” Because data is flowing on a front panel port, it [the data] is significantly slower than what you might see on a dual-supervisor standalone system because in the latter, this action occurs through dedicated EOBC link.
On VSS, copying a large file from one switch to another may take several minutes. Hence, you should do this only when needed. Consider a wait of several minutes before file transfer completes.
Dual-Active Detection
If the VSL fails, the VSS Standby switch cannot determine the state of the VSS Active switch. To ensure that switchover occurs without delay, the VSS Standby switch assumes the VSS Active switch has failed and initiates switchover to take over the VSS Active role.
If the original VSS Active switch is still operational, both switch are now VSS Active. This situation is called a dual-active scenario. A dual-active scenario can have adverse effects on network stability, because both switches use the same IP addresses, SSH keys, and STP bridge ID. The VSS must detect a dual-active scenario and take recovery action.
The VSS supports the methods, Enhanced PAgP and Fast-Hello, for detecting a dual-active scenario. PAgP uses messaging over the MEC links to communicate between the two switches through a neighbor switch. Enhanced PAgP requires a neighbor switch that supports the PAgP enhancements.
The dual-active detection and recovery methods are described in the following sections:
Dual-Active Detection Using Enhanced PAgP
Port aggregation protocol (PAgP) is a Cisco-proprietary protocol for managing EtherChannels. If a VSS MEC terminates to a Cisco switch, you can run PAgP protocol on the MEC. If PAgP is running on the MECs between the VSS and an upstream or downstream switch, the VSS can use PAgP to detect a dual-active scenario. The MEC must have at least one port on each switch of the VSS.
In virtual switch mode, PAgP messages include a new type length value (TLV) which contains the ID of the VSS Active switch. Only switches in virtual switch mode send the new TLV.
For dual-active detection to operate successfully, one or more of the connected switches must be able to process the new TLV. Catalyst 4500, Catalyst 4500-X, and Catalyst 49xx series switches have this capability. For a list of other Cisco products that support enhanced PAgP, refer to Release Notes for Cisco IOS Release at this URL:
http://www.cisco.com/en/US/products/ps6350/tsd_products_support_series_home.html
When the VSS Standby switch detects VSL failure, it initiates SSO and becomes VSS Active. Subsequent PAgP messages to the connected switch from the newly VSS Active switch contain the new VSS Active ID. The connected switch sends PAgP messages with the new VSS Active ID to both VSS switches.
If the formerly VSS Active switch is still operational, it detects the dual-active scenario because the VSS Active ID in the PAgP messages changes. This switch initiates recovery actions as described in the “Recovery Actions” section.
Dual-Active Detection Using Fast-Hello
Dual-Active fast-hello employs fast-hello Layer 2 messages over a direct Ethernet connection. When the VSL goes down, the event is communicated to the peer switch. If the switch was operating as the active before the VSL went down, it goes into recovery mode upon receipt of a VSL down indication from the peer switch. This method is faster than IP BFD and ePAGP and does not require a neighboring switch.
Fast-Hello Link
A fast-hello link is configured between two VSS members with the intention of detecting a dual-active condition. Configuring dual-active fast-hello automatically removes all configurations from the specified interfaces, and restricts the interface to dual-active configuration commands. The following commands are allowed only in restricted mode on a fast-hello interface:
default—Sets a command to its defaults
description—Describes the interface
dual-active—Specifies a virtual switch dual-active config
exit—Exits from the fast hello interface configuration mode
load-interval—Specifies the interval for load calculation on an interface
logging—Configures logging for interface
no—Negates a command or set its defaults
shutdown—Shuts down the selected interface
No data traffic other than fast-hello can be used by fast-hello links.
For details on how to configure fast-hello dual-active detection, see the “Configuring Fast-Hello Dual-Active Detection” section.
Recovery Actions
An VSS Active switch that detects a dual-active condition shuts down (by err-disabling) all of its non-VSL interfaces to remove itself from the network, and waits in recovery mode until the VSL links have recovered. You might need to intervene directly to fix the VSL failure. When the shut down switch detects that VSL is operational again, the switch reloads and returns to service as the VSS Standby switch.
Loopback interfaces are also shut down in recovery mode. The loopback interfaces are operationally down and not err-disabled.
Note![]() If the running configuration of the switch in recovery mode has been changed without saving, the switch will not automatically reload. In this situation, you must write the configuration to memory and then reload manually using the reload command. Only configuration changes applied to VSL ports on the switch can be saved. All other configuration changes are discarded as the node reboots as VSS standby.
If the running configuration of the switch in recovery mode has been changed without saving, the switch will not automatically reload. In this situation, you must write the configuration to memory and then reload manually using the reload command. Only configuration changes applied to VSL ports on the switch can be saved. All other configuration changes are discarded as the node reboots as VSS standby.
When a switch becomes active (either due to dual-active scenario or otherwise), the IP address configured for fa1 management interface is associated with the active switch. By default, the switch in recovery mode will not have any IP address for the fa1 interface on its supervisor engine. To ensure IP connectivity to the switch during recovery, you ca n configure an recovery IP address. (IP address configuration is mandatory if you want IP connectivity while switch is in recovery.) When a switch enters recovery mode, the IP address for the management interface on its supervisor engine is associated with the recovery IP address.
The recovery IP address for a management interface can be verified in the output of commands such as show ip interface brief and show interfaces.
Configuring a Recovery IP Address
The recovery IP address is the IP address that is used for the fa1 interface (of a switch) while in recovery mode.
To configure the recovery IP address for the fa1 interface, perform the following task:
|
|
|
|
|---|---|---|
Switch (config-vs-domain)# [no] dual-active recovery [switch n] ip address recovery-ip-address recovery-ip-mask |
The following example shows how to set a recovery IP address 10.1.1.1:
By default, ip address is not configured for recovery mode. So, the switch-fa1 interface is not associated with an IP address while the switch is in recovery mode. This ensures that two devices do not respond to the same IP address.
Without the switch n option, the (same) recovery ip address is used by either switch when it enters recovery mode. By definition, there is only one switch (in a given VSS system) in recovery mode at a time, making one recovery ip address sufficient.
If the two switches must use different IP addresses when the respective switch is in recovery mode, use the switch n option.
You can configure recovery IP addresses without the switch n option and with the switch n option simultaneously (for a total of three IP addresses, one global and one per switch). When done, the per-switch IP address takes precedence. If no per-switch IP address exists, the global IP address is used. Following are two examples:
Scenario 1
The VSS System is configured as follows:
In this scenario, if switch 1 enters recovery mode, it will use IP1 for the fa1 interface on switch 1. Conversely, if switch 2 enters recovery mode, it will use IP2 for the fa1 interface on switch2.
Scenario 2
The VSS system is configured as follows:
In this scenario, if switch 1 enters recovery mode, it will use IP1 for the fa1 interface on the switch 1. Conversely, if switch 2 enters recovery mode, it will use GIP for the fa1 interface on switch2.
VSS Initialization
A VSS is formed when the two switches and the VSL link between them become operational. The peer switch communicates over the VSL to negotiate the switches’ roles.
If only one switch becomes operational, it assumes the VSS Active role. The VSS forms when the second switch becomes operational and both switches bring up their VSL interfaces.
Virtual Switch Link Protocol
The Virtual Switch Link Protocol (VSLP) consists of several protocols that contribute to virtual switch initialization. The VSLP includes the following protocols:
The peer switch use Role Resolution Protocol (RRP) to negotiate the role (VSS Active or VSS Standby) for each switch.
The Link Management Protocol (LMP) runs on all VSL links, and exchanges information required to establish communication between the two switches.
LMP identifies and rejects any unidirectional links. If LMP flags a unidirectional link, the switch that detects the condition brings the link down and up to restart the VSLP negotiation. VSL moves the control traffic to another port if necessary.
SSO Dependencies
For the VSS to operate with SSO redundancy, the VSS must meet the following conditions:
- Identical software versions (except during ISSU with compatible versions)
- VSL configuration consistency
During the startup sequence, the VSS Standby switch sends virtual switch information from the startup-config file to the VSS Active switch.
The VSS Active switch ensures that the following information matches correctly on both switches:
–![]() VSL port channel: switch virtual link identifier
VSL port channel: switch virtual link identifier
–![]() VSL ports: channel-group number, shutdown, total number of VSL ports
VSL ports: channel-group number, shutdown, total number of VSL ports
- If the VSS detects a mismatch, it prints out an error message on the VSS Active switch console and the VSS Standby switch does not bootup. There are various ways to recover from this situation. If the switch is not running live traffic, you can either disconnect the VSL links or shutdown VSL ports on the peer, which would boot in VSS Active mode. You can make the necessary changes afterwards and reboot the switch and ensure VSL links are connected and not put in shutdown mode. Alternatively, you could clear the VSS rommon variable (VS_SWITCH_NUMBER) and allow the switch to boot in standalone mode. This method requires that no traffic flows through this switch. Once the switch is in standalone mode, you can convert it to VSS and then reboot it.
- SSO and NSF enabled
SSO and NSF must be configured and enabled on both switches. For detailed information on configuring and verifying SSO and NSF, see Chapter13, “Configuring Cisco NSF with SSO Supervisor Engine Redundancy”
If these conditions are unsatisfied, the VSS stops booting and ensures that the forwarding plane is not performing forwarding. For a description of SSO and RPR, see the “VSS Redundancy” section.
Initialization Procedure
The following sections describe the VSS initialization procedure:
VSL Initialization
A VSS is formed when the two switches and the VSL link between them become operational. Because both switches need to be assigned their role (VSS Active or VSS Standby) before completing initialization, VSL is brought online before the rest of the system is initialized. The initialization sequence is as follows:
1.![]() The VSS initializes all cards with VSL ports, and then initializes the VSL ports.
The VSS initializes all cards with VSL ports, and then initializes the VSL ports.
2.![]() The two switch communicate over VSL to negotiate their roles (VSS Active or VSS Standby).
The two switch communicate over VSL to negotiate their roles (VSS Active or VSS Standby).
3.![]() The VSS Active switch completes the boot sequence, including the consistency check described in the “SSO Dependencies” section.
The VSS Active switch completes the boot sequence, including the consistency check described in the “SSO Dependencies” section.
4.![]() If the consistency check completed successfully, the VSS Standby switch comes up in SSO VSS Standby mode. If the consistency check failed, the VSS Standby switch comes up in RPR mode.
If the consistency check completed successfully, the VSS Standby switch comes up in SSO VSS Standby mode. If the consistency check failed, the VSS Standby switch comes up in RPR mode.
5.![]() The VSS Active switch synchronizes configuration and application data to the VSS Standby switch. If VSS is either forming for the first time or a mismatch exists between VSL information sent by the Standby switch and what is on the Active switch, the new configuration is absorbed in the startup-config. This means that if the Active switch was running prior to the Standby switch and unsaved configurations existed, they would be written to the startup-config if the Standby switch sends mismatched VSL information.
The VSS Active switch synchronizes configuration and application data to the VSS Standby switch. If VSS is either forming for the first time or a mismatch exists between VSL information sent by the Standby switch and what is on the Active switch, the new configuration is absorbed in the startup-config. This means that if the Active switch was running prior to the Standby switch and unsaved configurations existed, they would be written to the startup-config if the Standby switch sends mismatched VSL information.
System Initialization
If you boot both switches simultaneously, the switch configured as Switch 1 boots as VSS Active and the one with Switch 2 boots as VSS Standby. If priority is configured, the higher priority switch becomes active.
If you boot only one switch, the VSL ports remain inactive, and the switch boots as VSS Active. When you subsequently boot the other switch, the VSL links become active, and the new switch boots as VSS Standby. Because preemption is not supported, if a VSS Active is already running, the peer switch would always receive the VSS Standby role, even if its priority is higher than that of the Active's.
VSL Down
If the VSL is down when both switches try to boot up, the situation is similar to a dual-active scenario.
One of the switch becomes VSS Active and the other switch initiates recovery from the dual-active scenario. For further information, see the “Configuring Dual-Active Detection” section.
VSS Configuration Guidelines and Restrictions
The following sections describe restrictions and guidelines for VSS configuration:
- General VSS Restrictions and Guidelines
- Multichassis EtherChannel Restrictions and Guidelines
- Dual-Active Detection Restrictions and Guidelines
General VSS Restrictions and Guidelines
When configuring the VSS, note the following guidelines and restrictions:
- Beginning in Cisco IOS XE 3.8.0E, Quad-Supervisor VSS mode is supported on the Catalyst 4500 series switches.
- In Cisco IOS XE 3.4.0E (15.1(2)SG, E, VSS did not support SMI (both Director and Client).
Beginning with Cisco IOS XE 3.5.0E (15.2(1)E, VSS supports SmartInstall Director but not SMI Client.
Beginning with Cisco IOS XE 3.6.0E (15.2(2)E), VSS supports SmartInstall Director and SMI Client.
VSS [mode] is transparent to SMI except for the changes in interface names.
- The SMI Director has only one instance on VSS and runs on the VSS active switch. The standby Catalyst 4500 switch in a VSS is not listed as a director in the output of the sh vstack status command.
- The VSS configurations in the startup-config file must match on both switches; that is, the domain must match, the switch ID must be unique, and the VSL ports' information must match the physical connection.
- There is no restriction to configure oversubscribed linecard ports as VSL. The responsibility of bandwidth availability for a given network requirement lies with the network operator.
- VSL portchannel must have more than one port in the channel, preferably distributed on more than one module. If the VSL consists of only one link, its failure causes a Dual-Active operation of the VSS. Also, all VSL links configured on one module may cause a Dual-Active operation, if the module goes down..
- Classification and marking based on 'qos-group' in a QoS policy-map is not supported in VSS.
- The following older gneration linecards (WS-X42xy to WS-X45xy) are supported with the VSS feature:
Please remove all other linecards from your system when converting from standalone to VSS mode.
- Do not attach a QoS policy with the maximum queue-limit (8184) to a large number of targets in a VSS system. This will cause continuous reloads on the standby supervisor engine.
- When an aymmetric virtual switch (i.e. a VSS comprising of chassis with different slot capacities) boots initially after conversion from standalone mode, the entPhysicalDescr object for the standby chassis does not hold the correct value. The entPhysicalDescr objects for both the active and standby chassis will match and hold the value for the active chassis.
After the running configuration is saved and a shelf reload occurs, this behaviour is not observed - the entPhysicalDescr objects for both chassis accurately reflects the correct chassis types.
Multichassis EtherChannel Restrictions and Guidelines
When configuring MECs, note the following guidelines and restrictions:
- Port Security over EtherChannels is not supported.
- All links in an MEC must terminate locally on the VSS Active or VSS Standby switch of the same virtual domain.
- An MEC can be connected to another MEC on a different VSS domain.
- Policers applied on an MEC are applied on two switches independently; if a policer is applied for 100 Mbps of conforming action, it will apply 100Mbps on both switches, resulting in a total conforming rate of 200 Mbps. To mitigate this, you can reduce the policer rate. In a more restrictive case, a rate of 50 Mbps might be necessary to achieve a maximum of 100Mbps. In a more liberal case, where conforming action of 200 Mbps is not a problem, policing rate could be kept to 100Mbps.
Dual-Active Detection Restrictions and Guidelines
When configuring dual-active detection, note the following guidelines and restrictions:
- For line redundancy, we recommend configuring at least two ports per switch for dual-active detection. For module redundancy, the two ports can be on different modules in each switch, and should be on different modules than the VSL ports, if feasible.
- Only trusted PAgP channels are relied upon to detect dual-active mode of operation.
Configuring a VSS
These sections describe how to configure a VSS:
- Configuring Easy VSS
- Converting to a VSS
- Converting to Quad-Supervisor VSS
- Displaying VSS Information
- Converting a VSS to Standalone Switch
- Configuring VSS Parameters
- Configuring Multichassis EtherChannels
- Configuring Dual-Active Detection
Configuring Easy VSS
Beginning with Cisco IOS XE 3.6.0E (IOS 15.2(2)E), the Catalyst 4500 series switch supports Easy VSS, which enables you to configure VSS with a single command on the active switch and no action on the VSS standby switch.
The active switch can gather information from all switches that are Layer 3 reachable.
Note![]() Quad-Supervisor VSS mode is not supported with Easy VSS.
Quad-Supervisor VSS mode is not supported with Easy VSS.
Note![]() Both switches are directly connected to each other using Layer 3 physical interfaces and are reachable through these interfaces. These physical interfaces are candidate VSL interfaces and are displayed in a list of "potential" VSL interfaces in the output of the vsl ? command in easy-vss mode. This output also displays a list of indirectly-reachable Layer 3 interfaces.
Both switches are directly connected to each other using Layer 3 physical interfaces and are reachable through these interfaces. These physical interfaces are candidate VSL interfaces and are displayed in a list of "potential" VSL interfaces in the output of the vsl ? command in easy-vss mode. This output also displays a list of indirectly-reachable Layer 3 interfaces.
Cisco IOS XE 3.6.0E (IOS 15.2(2)E) only supports reachability using a default route. Management and user-created VRF are not supported.
Note![]() Switches are reachable to each other through management interfaces. Reachability to neighboring switches using a management interface isn't supported although the management interface appears in the candidate VSL list.
Switches are reachable to each other through management interfaces. Reachability to neighboring switches using a management interface isn't supported although the management interface appears in the candidate VSL list.
Switches can be Layer 3 reachable indirectly but directly connected. The directly-connected physical interfaces display in the output of the vsl? command, which displays all switches that have direct physical connections.
Alternatively, you can make a physical interface Layer 3 “capable” (i.e., make two switches reachable via directly connected Layer 3 links), by performing the following steps on both switches (A and B):
|
|
|
|
|---|---|---|
Selects interface and switches to interface configuration mode. |
||
Issuing the switch convert mode easy-virtual-switch exec command on a VSS active switch displays a list of potential VSS standby switches - those that are directly connected and hardware compatible. From the displayed list, the sub-command vsl ? derives input from interfaces that belong to the switch where we are executing the command.
Perform the following task on the VSS active switch that you want to make the master switch, which manages the standby switch after VSS boot-up:
The following example illustrates use of the vsl ? command:
The switch on which we execute the above commands becomes the master switch after VSS boots. Local Interfaces lists interfaces on the switch where we are executing the commands. Remote Interfaces lists the interfaces on the peer switch connected with the local interfaces.
Select a maximum of eight VSL local interfaces (i.e., interfaces under the Local Interface column).
This example forces both the master and standby switches to reboot and come up in VSS. Now, we have two interfaces as VSL members with the local interfaces GigabitEthernet 2/15 and GigabitEthernet 2/17.
Note![]() 10G and 1G interfaces cannot be mixed. Chosen interfaces should belong to the same peer.
10G and 1G interfaces cannot be mixed. Chosen interfaces should belong to the same peer.
The master switch shares the tftp image path with the standby switch. On reboot, if the tftp path is used for loading the image, both switches boot with the same image.
Converting to a VSS
By default, the Catalyst 4500 series switch is configured to operate in standalone mode (the switch works independently). The VSS combines two standalone switches into one virtual switch, operating in virtual switch mode.
Note![]() When you convert two standalone switches into one VSS, all non-VSL configuration settings on the VSS Standby switch will revert to the default configuration.
When you convert two standalone switches into one VSS, all non-VSL configuration settings on the VSS Standby switch will revert to the default configuration.
Note![]() Preferably, conversion to VSS should be done on a maintenance window. If you plan to use the same port channel number for VSL, default the existing port channel configurations that are available on standalone switches. Then, follow the guidelines in section Configuring VSL Port Channel and Ports.
Preferably, conversion to VSS should be done on a maintenance window. If you plan to use the same port channel number for VSL, default the existing port channel configurations that are available on standalone switches. Then, follow the guidelines in section Configuring VSL Port Channel and Ports.
To convert two standalone switches into a VSS, you perform the following major activities:
- Save the standalone configuration files.
- Configure each switch for required VSS configurations.
- Convert to a VSS.
In virtual switch mode, both switches use the same configuration file. When you make configuration changes on the VSS Active switch, these changes are automatically propagated to the VSS Standby switch.
The tasks required to convert the standalone switch to a VSS are detailed in the following sections:
- Backing Up the Standalone Configuration
- Configuring SSO and NSF
- Assigning Virtual Switch Domain and Switch Numbers
- Configuring VSL Port Channel and Ports
- Converting the Switch to Virtual Switch Mode
- (Optional) Configuring VSS Standby Switch Modules
In the procedures that follow, the example commands assume the configuration shown in Figure 5-8.
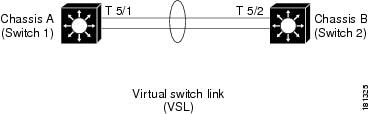
Two chassis, A and B, are converted into a VSS with virtual switch domain 100. Interface 10-Gigabit Ethernet 5/1 on Switch 1 is connected to interface 10-Gigabit Ethernet 5/2 on Switch 2 to form the VSL.
Note![]() The port channels 10 and 20 mentioned in the config steps below are merely exemplary. You can configure any port channel number from 1-64 for VSL port channel.
The port channels 10 and 20 mentioned in the config steps below are merely exemplary. You can configure any port channel number from 1-64 for VSL port channel.
Backing Up the Standalone Configuration
Save the configuration files for both switches operating in standalone mode. You need these files to revert to standalone mode from virtual switch mode.
Perform this task on both switches:
Configuring SSO and NSF
Assigning Virtual Switch Domain and Switch Numbers
You must configure the same virtual switch domain number on both switches of the VSS. The virtual switch domain is a number between 1 and 255, and must be unique for each VSS in your network (the domain number is incorporated into various identifiers to ensure that these identifiers are unique across the network).
Within the VSS, you must configure one switch to be switch number 1 and the other switch to be switch number 2.
To configure the virtual switch domain and switch number on both switches, perform this task on Switch 1:
|
|
|
|
|---|---|---|
Perform the following task on Switch 2:
|
|
|
|
|---|---|---|
Note![]() The switch number is not stored in the startup or running configuration, because both switches use the same configuration file (but must not have the same switch number).
The switch number is not stored in the startup or running configuration, because both switches use the same configuration file (but must not have the same switch number).
Configuring VSL Port Channel and Ports
The VSL is configured with a unique port channel on each switch. During the conversion, the VSS configures both port channels on the VSS Active switch. If the VSS Standby switch VSL port channel number has been configured for another use, the VSS comes up in RPR mode. To avoid this situation, check that both port channel numbers are available on both of the switches.
Check the port channel number with the show running-config interface port-channel command. The command displays an error message if the port channel is available for VSL. For example, the following command shows that port channel 20 is available on Switch 1:
To configure the VSL port channels, perform this task on Switch 1:
Note![]() The port channels 10 and 20 mentioned in the configuration steps below are exemplary only. You can configure any port channel number from 1-64 for VSL port channel.
The port channels 10 and 20 mentioned in the configuration steps below are exemplary only. You can configure any port channel number from 1-64 for VSL port channel.
|
|
|
|
|---|---|---|
Perform the following task on Switch 2:
|
|
|
|
|---|---|---|
You must add the VSL physical ports to the port channel. In the following example, interfaces 10-Gigabit Ethernet 3/1 and 3/2 on Switch 1 are connected to interfaces 10-Gigabit Ethernet 5/2 and 5/3 on Switch 2.

Tip![]() For line redundancy, we recommend configuring at least two ports per switch for the VSL. For module redundancy, the two ports can be on different switching modules in each chassis.
For line redundancy, we recommend configuring at least two ports per switch for the VSL. For module redundancy, the two ports can be on different switching modules in each chassis.
To configure the VSL ports, perform this task on Switch 1:
|
|
|
|
|---|---|---|
Enters configuration mode for interface range tengigabitethernet 3/1-2 on Switch 1. |
||
Note![]() 1G ports, which are converted from 10G ports using a connector, are not supported for VSL. This impacts Sup7-E and Sup7L-E ports.
1G ports, which are converted from 10G ports using a connector, are not supported for VSL. This impacts Sup7-E and Sup7L-E ports.
On Switch 2, perform this task:
|
|
|
|
|---|---|---|
Enters configuration mode for interface range tengigabitethernet 5/2-3 on Switch 2. |
||
Note![]() 1G ports, which are converted from 10G ports using a connector, are not supported for VSL. This impacts Sup7-E and Sup7L-E ports.
1G ports, which are converted from 10G ports using a connector, are not supported for VSL. This impacts Sup7-E and Sup7L-E ports.
Converting the Switch to Virtual Switch Mode
Conversion to virtual switch mode requires a restart for both switches. After the reboot, commands that specify interfaces with module/port now include the switch number. For example, a port on a switching module is specified by switch/module/port.
Prior to the restart, the VSS converts the startup configuration to use the switch/module/port convention. A backup copy of the startup configuration file is saved in bootflash. This file is assigned a default name, but you are also prompted to override the default name if you want to change it.
To convert Switch 1 to virtual switch mode, perform this task:
To convert Switch 2 to virtual switch mode, perform this task on Switch 2:
Note![]() After you confirm the command (by entering yes at the prompt), the running configuration is automatically saved as the startup configuration and the switch reboots. After the reboot, the switch is in virtual switch mode, so you must specify interfaces with three identifiers (switch/module/port).
After you confirm the command (by entering yes at the prompt), the running configuration is automatically saved as the startup configuration and the switch reboots. After the reboot, the switch is in virtual switch mode, so you must specify interfaces with three identifiers (switch/module/port).
When switches are being converted to VSS, you should not set them to ignore startup-config. If done, the switch can be enabled to parse the startup-config at the rommon prompt. Ignoring startup-config in VSS mode, causes a switch to boot in a semi-VSS mode, which can only be corrected by a reboot and by enabling the parsing of startup-config.
Converting to Quad-Supervisor VSS
You can convert to Quad-Supervisor VSS mode using one of the following ways:
Converting an Existing VSS Switch to Quad-Supervisor VSS Mode
To convert to Quad-Supervisor VSS from an existing VSS setup, perform the following task:
Step 1![]() Perform an ISSU or a switch reload, to upgrade the chassis active supervisors with the Cisco IOS XE image that supports Quad-Supervisor VSS mode. Ensure that the switch reaches Stateful Switchover (SSO) in the VSS. The BOOT variable must point to the path of the Cisco IOS XE image and must be saved in the startup configuration. For more information about ISSU upgrade, see In-Service Software Upgrade (ISSU) on a VSS.
Perform an ISSU or a switch reload, to upgrade the chassis active supervisors with the Cisco IOS XE image that supports Quad-Supervisor VSS mode. Ensure that the switch reaches Stateful Switchover (SSO) in the VSS. The BOOT variable must point to the path of the Cisco IOS XE image and must be saved in the startup configuration. For more information about ISSU upgrade, see In-Service Software Upgrade (ISSU) on a VSS.
Step 2![]() Insert the redundant supervisors in the appropriate slots. Configure ROM monitor to auto-boot on the standby supervisors of both the VSS Active and the VSS Standby switches, using config register. Load the Cisco IOS XE image on both the standby supervisors and ensure that both supervisors are brought up in RPR mode as in-chassis standby (ICS) supervisors. The in-chassis active supervisor then syncs its startup configuration to the ICS.
Insert the redundant supervisors in the appropriate slots. Configure ROM monitor to auto-boot on the standby supervisors of both the VSS Active and the VSS Standby switches, using config register. Load the Cisco IOS XE image on both the standby supervisors and ensure that both supervisors are brought up in RPR mode as in-chassis standby (ICS) supervisors. The in-chassis active supervisor then syncs its startup configuration to the ICS.
Step 3![]() Copy the Cisco IOS XE image on the standby supervisors of both the switches, from the VSS Active switch console, using the IOS copy command so that the boot variable has a valid path to point to
Copy the Cisco IOS XE image on the standby supervisors of both the switches, from the VSS Active switch console, using the IOS copy command so that the boot variable has a valid path to point to
The ICS bootflash filesystem is mounted with the name bootflash-ics:. On the VSS Active switch, the ICS bootflash filesystem of the VSS standby switch is available as slavebootflash-ics:.
Converting a Standalone Switch to Quad-Supervisor VSS
To convert a standalone switch to Quad-Supervisor VSS mode, perform the following task:
Step 1![]() Copy the Cisco IOS XE image that supports Quad-Supervisor VSS mode on the bootflash: on the active and standby supervisors on both switches.
Copy the Cisco IOS XE image that supports Quad-Supervisor VSS mode on the bootflash: on the active and standby supervisors on both switches.
Step 2![]() Follow the steps in Converting to a VSS.
Follow the steps in Converting to a VSS.
Example of Show Module Output for Switches in Quad- Supervisor VSS Mode
The show module command should display similar output in Quad-Supervisor VSS mode:
(Optional) Configuring VSS Standby Switch Modules
Note![]() You cannot configure or provision modules on VSS.
You cannot configure or provision modules on VSS.
When switches form initial VSS relationships, they send module information to each other and this information is pushed to the configuration and used subsequently for provisioning, provided the switch is booting and the peer is down or not present.
The following example shows the module provisioning information:
These commands are not available to the user and that various numbers used in these commands are internal to the system and used to identify a module. These commands are written to the startup-config when a switch detects a given module while it is running in VSS mode. When reconverted to standalone mode, these commands are removed from the startup-config.
Displaying VSS Information
To display basic information about the VSS, perform one of these tasks:
|
|
|
|---|---|
Displays the virtual switch domain number, and the switch number and role for each of the switches. |
|
Displays the role, switch number, and priority for each of the switch in the VSS. |
|
The following example shows the information output from these commands:
Converting a VSS to Standalone Switch
To convert a VSS into two standalone systems, you perform the following major steps:
Copying the VSS Configuration to a Backup File
Save the configuration file from the VSS Active switch. You may need this file if you convert to virtual switch mode again. You only need to save the file from the VSS Active switch, because the configuration file on the VSS Standby switch is identical to the file on the VSS Active switch.
|
|
|
|
|---|---|---|
(Optional) Saves the running configuration to startup configuration. This step is only required if there are unsaved changes in the running configuration that you want to preserve. |
||
Converting the VSS Active Switch to Standalone
When you convert the VSS Active switch to standalone mode, the VSS Active switch removes the provisioning and configuration information related to VSL links and the peer chassis modules, saves the configuration file, and performs a reload. The switch comes up in standalone mode with only the configuration data relevant to the standalone system.
The VSS Standby switch of the VSS becomes VSS Active. VSL links on this switch are down because the peer is now unavailable.
To convert the VSS Active switch to standalone mode, perform this task on the VSS Active switch:
|
|
|
|---|---|
Converts Switch 1 to standalone mode. After you enter the command, you are prompted to confirm the action. Enter yes. |
Conversion from VSS to standalone causes all physical interfaces to be administratively shutdown and written to the startup-config. This is a safeguard against a standalone system arriving in the network alive and conflicting with a bridge or router MAC address, which might still be there if one of the VSS switches is still running in VSS mode.
We do not recommend that you convert a VSS to standalone in a live network.
Converting the VSS Standby Switch to Standalone
When you convert the new VSS Active switch to standalone mode, the switch removes the provisioning and configuration information related to VSL links and the peer switch modules, saves the configuration file and performs a reload. The switch comes up in standalone mode with only its own provisioning and configuration data.
To convert the peer switch to standalone, perform this task on the VSS Standby switch:
|
|
|
|---|---|
Converts Switch 2 to standalone mode. After you enter the command, you are prompted to confirm the action. Enter yes. |
Configuring VSS Parameters
Configuring VSL Switch Priority
To configure the switch priority, perform this task:
Note![]() If you make configuration changes to the switch priority, the changes only take effect after you save the running configuration to the startup configuration file and perform a reload. The show switch virtual role command shows the operating and configured priority values. You can manually set the VSS Standby switch to VSS Active using the redundancy force-switchover command.
If you make configuration changes to the switch priority, the changes only take effect after you save the running configuration to the startup configuration file and perform a reload. The show switch virtual role command shows the operating and configured priority values. You can manually set the VSS Standby switch to VSS Active using the redundancy force-switchover command.
This example shows how to configure virtual switch priority:
This example shows how to display priority information for the VSS:
Configuring a VSL
To configure a port channel to be a VSL, perform this task:
|
|
|
|
|---|---|---|
Assigns the port channel to the virtual link for the specified switch. |
Note![]() We recommend that you configure the VSL prior to converting the switch into a VSS.
We recommend that you configure the VSL prior to converting the switch into a VSS.
This example shows how to configure the VSL:
Adding and Deleting a VSL Port After the Bootup
At any time, you can add and delete VSL ports from a port-channel to increase the nunber of links in the VSL, to move the port from one port to another, or to remove it from VSL.
Before adding or deleting VSL ports, do the following:
- Ensure all ports are physically connected to the peer switch. The peer port must also be configured for VSL.
- Shutdown the port before configuring VSL. When both ports on the link are configured for VSL, unshut them.
- Spread VSL ports across multiple modules.
- While deleting a port, retain at least one “active” VSL port pair. Else, a dual-active operation could occur.
- To save link flap and high CPU, shutdown the ports before VSL is unconfigured.
- After adding, deleting, or modifying VSL ports, write the config to nvram (that is, startup-config).
- If you need to move ports to another port, account for the bandwidth requirement of VSL. You should add an additional VSL link in the channel, move ports and remove additional links in the channel.
Displaying VSL Information
To display information about the VSL, perform one of these tasks:
|
|
|
|---|---|
This example shows how to display VSL information:
Configuring VSL QoS
When a physical port is configured as a member of a VSL port-channel, a queuing policy is automatically attached to the VSL member ports. This queuing policy provides a dedicated queue for VSS Management, VSLP, BFD, Layer 2 and Layer 3 control protocols, and voice and video data traffic. Each queue is provided with a minimum bandwidth, ensuring that VSS management and control protocol packets are not dropped when congestion occurs on the VSL. The bandwidth assigned to a class of traffic is the minimum bandwidth that is guaranteed to the class during congestion. The VSL link uses Transmit Queue Sharing, where the output link bandwidth is shared among multiple queues of a given VSL port. Any modification or removal of VSL Queuing policy is restricted in a VSS system.
The following command sequence is inserted automatically by software.
Configuring the Router MAC Address
On VSS, all routing protocols are centralized on the active supervisor engine. A common router MAC address is used for Layer 3 interfaces on both active and standby switches. Additionally, to ensure non-stop forwarding, the same router MAC address is used after switchover to Standby, so that all layer 3 peers see a consistent router MAC address.
There are three ways to configure a router MAC address on VSS:
- HHH—Manually set a router MAC address. Ensure that this MAC address is reserved for this usage.
- chassis—Use the mac-address range reserved for Chassis. This is the Cisco MAC address assigned to the chassis.
- use-virtual—Use the mac-address range reserved for the VSS. This is the served Cisco MAC address pool, which is derived from a base MAC address +vvs domain-id.
By default, the virtual domain based router MAC address is used. Any change of router MAC address configuration requires a reboot of both VSS supervisor engines
The follow table shows how to configure the router MAC address.
Configuring Multichassis EtherChannels
Configure multichassis EtherChannels (MECs) as you would for a regular EtherChannel. The VSS will recognize that the EtherChannel is an MEC when ports from both switches are added to the EtherChannel. You can verify the MEC configuration by entering the show etherchannel command.
One VSS supports a maximum of 256 port channels.
To configure Layer 3 Multichassis EtherChannels, create the port channel logical interface and then put the Ethernet interfaces from both the VSS active and VSS standby into the port channel.
Creating Port Channel Logical Interfaces
Note![]() To move an IP address from a physical interface to an EtherChannel, you must delete the IP address from the physical interface before configuring it on the port channel interface.
To move an IP address from a physical interface to an EtherChannel, you must delete the IP address from the physical interface before configuring it on the port channel interface.
To create a port channel interface for a Layer 3 EtherChannel, perform this task:
This example shows how to create port channel interface 1:
This example shows how to verify the configuration of port channel interface 1:
Configuring Physical Interfaces as Layer 3 EtherChannels
To configure physical interfaces as Layer 3 EtherChannels, perform this task for each interface:
This example shows how to configure Gigabit Ethernet interfaces 1/3/26 and 2/2/26 into port channel 1 with PAgP mode desirable :
Note![]() See the “Configuring a Range of Interfaces” section for information about the range keyword.
See the “Configuring a Range of Interfaces” section for information about the range keyword.
The following two examples show how to verify the configuration of GigabitEthernet interface 1/3/26:
This example shows how to verify the configuration of port channel interface 1 after the interfaces have been configured:
This example shows how to display a one-line summary per channel group:
Prior to Cisco Release IOS XE 3.5.0E and IOS 15.2(1)SG, when you tried to add a port to an EtherChannel from different chassis of the VSS system, an error message displayed:
Configuring Dual-Active Detection
The following sections describe how to configure dual-active detection:
Configuring Enhanced PAgP Dual-Active Detection
If enhanced PAgP is running on the MECs between the VSS and its access switches, the VSS can use enhanced PAgP messaging to detect a dual-active scenario.
By default, PAgP dual-active detection is enabled. However, the enhanced messages are only sent on port channels with trust mode enabled (see the trust mode description in the note).
Note![]() Before changing PAgP dual-active detection configuration, ensure that all port channels with trust mode enabled are in administrative down state. Use the shutdown command in interface configuration mode for the port channel. Remember to use the no shutdown command to reactivate the port channel when you are finished configuring dual-active detection.
Before changing PAgP dual-active detection configuration, ensure that all port channels with trust mode enabled are in administrative down state. Use the shutdown command in interface configuration mode for the port channel. Remember to use the no shutdown command to reactivate the port channel when you are finished configuring dual-active detection.
To enable or disable PAgP dual-active detection, perform this task:
|
|
|
|
|---|---|---|
You must configure trust mode on the port channels that will detect PAgP dual-active detection. By default, trust mode is disabled.
Note![]() If PAgP dual-active detection is enabled, you must place the port channel in administrative down state before changing the trust mode. Use the shutdown command in interface configuration mode for the port channel. Remember to use the no shutdown command to reactivate the port channels when you are finished configuring trust mode on the port channel.
If PAgP dual-active detection is enabled, you must place the port channel in administrative down state before changing the trust mode. Use the shutdown command in interface configuration mode for the port channel. Remember to use the no shutdown command to reactivate the port channels when you are finished configuring trust mode on the port channel.
To configure trust mode on a port channel, perform this task:
|
|
|
|
|---|---|---|
Switch(config-vs-domain)# dual-active detection pagp trust channel-group group_number |
This example shows how to enable PAgP dual-active detection:
This example shows the error message if you try to enable PAgP dual-active detection when a trusted port channel is not shut down first:
This example shows the error message if you try to configure trust mode for a port channel that is not shut down first:
Configuring Fast-Hello Dual-Active Detection
To configure an interface as part of a dual-active detection pair, you need to configure dual-active fast-hello on the interface. Although fast hello dual-active detection is enabled by default, you must configure dual-active interface pairs to act as fast hello dual-active messaging links.
To enable or disable fast-hello dual-active detection, perform this task:
When you configure fast hello dual-active interface pairs, note the following information:
- You can configure a maximum of four interfaces on each chassis to connect with the other chassis in dual-active interface pairs. Attempting to configure more than four interfaces causes an error message to display (and your command is rejected).
- Each interface must be directly connected to the other chassis and must not be a VSL link. We recommend using links from a switching module not used by the VSL.
- Each interface must be a physical port. Logical ports such as an SVI are not supported.
- The fast-hello links are Layer 2 ports.
- Configuring fast hello dual-active mode automatically removes all existing configuration from the interface and restricts the interface to fast hello dual-active configuration commands. It can only be used for “fast-hello” traffic.
- Unidirectional link detection (UDLD) is disabled on fast hello dual-active interface pairs.
- Do not configure fast-hello ports on an oversubscribed line card. Doing so might lead to a loss of fast-hello messages, impacting the functionality of fast-hello based dual-active detection.
This example shows how to configure an interface for fast hello dual-active detection:
Displaying Dual-Active Detection
To display information about dual-active detection, perform this task:
This example shows how to display the summary status for dual-active detection:
This example shows how to display the summary status for dual-active detection when recovery is triggered by RRP rather than PagP:
This example shows how to display PAgP status and the channel groups with trust mode enabled:
This example shows how to display the status of links configured as fast-hello:
This example shows how to display the status of packet exchanges between the individual fast-hello links:
This example shows how to display the status of total packets exchanged between the fast-hello links on the VSS:
In-Service Software Upgrade (ISSU) on a VSS
- VSS ISSU Concept
- Traffic and Network Protocol Disruption During ISSU in a VSS
- Related Documents
- Prerequisites to Performing ISSU
- About Performing ISSU
- How to Perform the ISSU Process
- License installation and subsequent VSS formation are now complete.
VSS ISSU Concept
In a VSS, the supervisor engines on the peer switches maintain an SSO (stateful switchover) relationship between themselves. This facilitates the ability to perform a software upgrade (or downgrade) on both the VSS supervisor engines.
Figure 5-9 below depicts (at a conceptual level) the sequence of events that take place when the VSS system is upgraded from software version X to version Y.
Figure 5-9 Upgrading VSS System
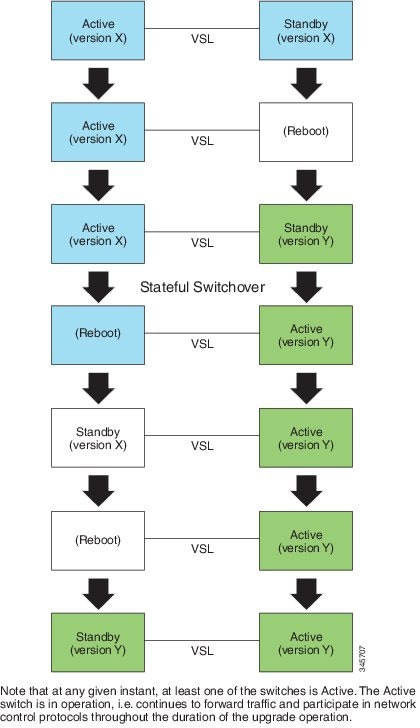
Traffic and Network Protocol Disruption During ISSU in a VSS
Figure 5-9indicates that both switches in a VSS reboot at some point during the upgrade process.
When a switch reboots, all the network links that terminate on that switch undergo a link-down event. This means that network devices that are connected to the switch that is rebooting will observe a disruption in service, unless the connection is over an MEC that contains at least one link that terminates on the other switch. If a peer device is connected to the VSS over an MEC that has links terminating in both switches, that device will not experience a disruption of service during the software upgrade process. This is illustrated in Figure 5-10.
Figure 5-10 Connecting a Peer Device to VSS to Avoid Service Disruption
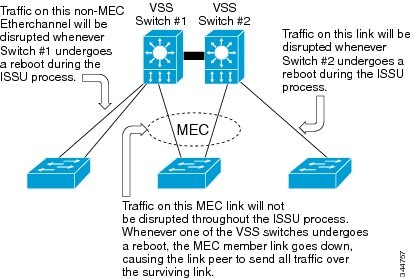
Related Documents
|
|
|
|---|---|
Cisco IOS Software: Guide to Performing In Service Software Upgrades |
Prerequisites to Performing ISSU
Before performing ISSU, you must meet these prerequisites:
- Ensure that the current Cisco IOS XE version running in the system supports ISSU. Also ensure that the target version supports ISSU.
- In a Quad-Supervisor VSS setup, ensure that you copy the Cisco IOS XE image on the standby supervisors of both the switches, from the VSS Active switch console, using the IOS copy command so that the boot variable has a valid path to point to.
You can enter various commands on the switch to determine supervisor engine versioning and Cisco IOS XE software compatibility. Alternatively, you can use the ISSU application on Cisco Feature Navigator to determine this.
- The type of the pre- and post-upgrade images must match precisely. Identical. ISSU is not supported from a Universal_lite to a Universal image, or vice versa. ISSU is also not supported from a k9 image to a non-k9 image, or vice versa.
- VSS must be functionally in SSO mode; that is, both switches must be powered up and operational, with one supervisor engine running as the SSO active, and the other as the SSO standby.
- The pre- and post-upgrade Cisco IOS XE software image files must both be available in the local file systems (bootflash, SD card, or USB) of both the Active and the standby supervisor engines before you begin the ISSU process.
Both supervisor engines should be running the pre-upgrade image, and should have booted from the image location in the local file system. (bootflash, SD card, or USB).
Note![]() Beginning in Cisco IOS XE release 3.8.0E, in VSS mode,
Beginning in Cisco IOS XE release 3.8.0E, in VSS mode, USB0: and Slot0: are not available on the the in-chassis standby (ICS).s
Note![]() The show version command can be used to confirm that the supervisor engine has actually booted from the pre-upgrade image location in the local filesystem.
The show version command can be used to confirm that the supervisor engine has actually booted from the pre-upgrade image location in the local filesystem.
Note![]() Auto-boot must be enabled in the rommon for ISSU to succeed. The config-register value displayed in the output of show version can be used to confirm this.
Auto-boot must be enabled in the rommon for ISSU to succeed. The config-register value displayed in the output of show version can be used to confirm this.
- It is advisable to take measures to mitigate the effects of switch down-time. ISSU in a VSS will result in loss of service on non-MEC links, and peers must be prepared for this. On links connected over MECs, Nonstop Forwarding (NSF) must be configured and working properly. If you do not have NSF enabled, see the Cisco Nonstop Forwarding document for further information on how to enable and configure NSF.
- Autoboot is turned on and the current booted image matches the one specified in the BOOT environmental variable. For details on how to configure and verify these, please refer to “Modifying the Boot Field and Using the boot Command” section.
- The no ip routing command is not supported - both before starting the ISSU process, and at any time during the ISSU process.
- Save the image on the same partition in both supervisor engines (e.g. if it is saved at slot0: in the active supervisor engine it should be saved at slaveslot0:). Similarly if it is at bootflash: in the active supervisor engine, it should be at savebootflash: in the standby supervisor engine.
About Performing ISSU
Note![]() Do not make any hardware changes while performing ISSU.
Do not make any hardware changes while performing ISSU.
Before you perform ISSU, you should understand the following concepts:
Performing an ISSU Upgrade: Two Methods
ISSU using the four-command sequence
The manual ISSU upgrade process involves issuing four distinct ISSU EXEC commands in sequence
A fifth command, issu abortversion, enables you to abort the ISSU upgrade process at any time, and to revert to the initial system state.
These four commands take the VSS through a series of states that culminate in the Active and standby supervisor engines running the post-upgrade IOS XE image. The VSS continues to operate throughout the entire process; however as explained in Traffic and Network Protocol Disruption During ISSU in a VSS, service is disrupted on network links that terminate on interfaces that reside in the switch that is undergoing a reboot.
Figure 5-11 depicts the states through which the VSS Active and standby supervisor engines progress as the sequence of four commands entered. It also shows the effect of the issu abortversion command at any given point during the process.
Figure 5-11 States of VSS Active and Standby during Command Execution
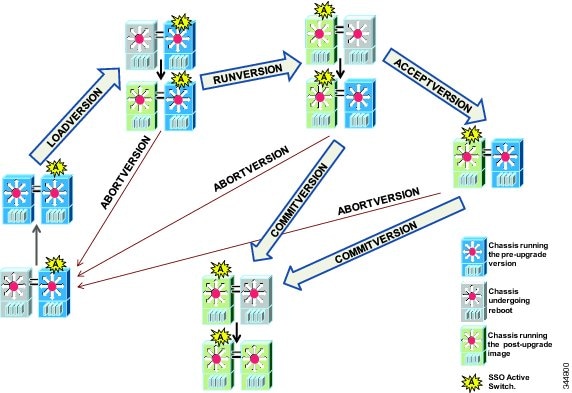
During the ISSU process, several show commands are available to evaluate the success of each command before proceeding to the next step.
ISSU using the Single Command Sequence (issu changeversion)
The use of multiple ISSU commands dictates an additional level of care to ensure no service disruption. However, in some scenarios, this upgrade procedure might be cumbersome and of minimal value. A typical example is during a network upgrade that involves performing an ISSU upgrade on a large number of Catalyst 4500 switches. In these cases, we recommend that you first perform the manual (four command) ISSU upgrade procedure on one VSS (possibly in a lab environment) to verify successful upgrade. Then, use the single issu changeversion procedure to perform an automatic ISSU on the rest of the Catalyst 4500 switches in the network.
The issu changeversion command launches a single-step complete ISSU upgrade cycle. It performs the logic for all four of the standard commands (issu loadversion, issu runversion, issu acceptversion, and issu commitversion) without user intervention, streamlining the upgrade through a single CLI step.
Additionally, issu changeversion allows the upgrade process to be scheduled for a future time. This enables you to stage a number of systems to perform upgrades sequentially when a potential disruption would be least harmful.
After the standby supervisor engine initializes and the system reaches a terminal state (SSO), the upgrade process is complete and the BOOT variable is permanently written with the new IOS XE software image. Hence, a reset on any RP will keep the system booting the new software image. Console and syslog messages will be generated to notify anyone monitoring the upgrade that the state transition has occurred.
Similar to the normal ISSU upgrade procedure, the in-progress upgrade procedure initiated by the
issu changeversion command can be aborted with the issu abortversion command. If the system detects any problems or detects an unhealthy system during an upgrade, the upgrade might be automatically aborted.
When the issu runversion command is entered during the four step manual upgrade process, if any incompatible ISSU clients exist, the upgrade process reports them and their side effects, and allows the user to abort the upgrade. While performing a single-step upgrade process, when the process reaches the runversion state, it will either automatically continue with the upgrade provided the base clients are compatible, or automatically abort because of client incompatibility.
Changeversion: “quick” option
The issu changeversion command provides a “quick” option that can reduce the time required to perform the automatic ISSU upgrade. When the quick command option is applied, the ISSU upgrade state transition differs from that illustrated in Figure 5-9. With this option, the state progression upto the loadversion stage remains the same as described in the figure, but the runversion and commitversion stages are combined. This progression skips the step in the upgrade procedure that loads the old software version on the new standby (old active) supervisor, thereby reducing the time required for the automatic ISSU upgrade by about a third.
Scheduled Changeversion: “in” and “at” Options
issu changeversion provides in and at command options that enable you to schedule a future automatic ISSU upgrade.
The at command option schedules an automatic ISSU upgrade to begin at a specific time. This option specifies an exact time (hh:mm, 24 hour format) in the next 24 hours at which the upgrade will occur.
The in command option schedules an automatic ISSU upgrade to begin after a certain amount of time has elapsed. This option specifies the number of hours and minutes (hh:mm format) that must elapse before an upgrade will occur, with a maximum value of 99:59.
Changeversion Deployment Scenario
The typical issu changeversion command usage scenario is for experienced users with a large installed base. These users typically validate a new image using a topology and configuration similar to their production network. The validation process should be done using both the existing multi-command process and the new issu changeversion command process. Once users certify an IOS XE software image and want to roll it out broadly, they can use the single command process to perform an efficient upgrade of their network.
Aborting an In-Progress Changeversion Procedure
The issu changeversion command functionality is designed to perform an ISSU software upgrade without user intervention. However, status messages are displayed to the console as the upgrade transitions through the various states. If any anomalies are noticed during the automatic upgrade, perhaps with peers or other parts of the network, you can use the issu abortversion command to manually abort the upgrade at any point in the process prior to the commitversion operation.
Guidelines for Performing ISSU
Be aware of the following guidelines while performing the ISSU process:
- Even with ISSU, it is recommended that upgrades be performed during a maintenance window.
- As explained in Traffic and Network Protocol Disruption During ISSU in a VSS, ISSU on VSS may cause loss of network connectivity to both the VSS switches at some point during the process (although not at the same time). The mitigation steps as explained in that section must be implemented.
- The new features should not be enabled (if they require change of configuration) during the ISSU process.
Note![]() Enabling them will cause the system to enter RPR mode because commands are only supported on the new version.
Enabling them will cause the system to enter RPR mode because commands are only supported on the new version.
Compatibility Matrix
ISSU requires additional information to determine compatibility between software versions. Therefore, a compatibility matrix is defined that contains information about other IOS XE software image with respect to the one in question.
This compatibility matrix represents the compatibility of two software versions, one running on the active and the other on the standby supervisor engine, and to allow the system to determine the highest operating mode it can achieve. Incompatible versions will not be able to progress to SSO operational mode. Because SSO is a pre-requisite for a VSS, incompatibility will also lead to the loss of VSS relationship between the supervisors engines in the two switches.
The compatibility matrix represents the compatibility relationship a Cisco IOS XE software image has with all of the other Cisco IOS XE software versions within the designated support window (for example, all of those software versions the IOS XE software image “knows” about) and is populated and released with every IOS XE software image. The matrix stores compatibility information between its own release and prior releases. It is always the newest release that contains the latest information about compatibility with existing releases in the field. The compatibility matrix is available within the Cisco IOS XE software image and on Cisco.com so that users can determine in advance whether a successful upgrade can be achieved using the ISSU process.
You can perform the ISSU process when the old and new Cisco IOS XE software are compatible. The compatibility matrix information stores the compatibility among releases as follows:
- Compatible—The base-level system infrastructure and all optional HA-aware subsystems are compatible. An in-service upgrade or downgrade between these versions will succeed with minimal service impact. The matrix entry designates the images to be compatible (C).
- Base-level compatible—One or more of the optional HA-aware subsystems is not compatible. An in-service upgrade or downgrade between these versions will succeed; however, some subsystems will not be able to maintain state always during the transition from the old to the new version of Cisco IOS XE. The matrix entry designates the images to be base-level compatible (B).
- Incompatible—A core set of system infrastructure exists in Cisco IOS XE that must be able to interoperate in a stateful manner for SSO to function correctly. If any of these required features or subsystems is not interoperable, then the two versions of the Cisco IOS XE software image are declared to be incompatible. An in-service upgrade or downgrade between these versions is not possible. The matrix entry designates the images to be incompatible (I). The system operates in RPR mode during the upgrade process when the versions of Cisco IOS XE at the active and standby supervisor engines are incompatible.
- Cisco IOS XE determines the compatibility between the active and the standby IOS XE software dynamically during Standby boot up. The matrix is represented by “x”.
To display the compatibility matrix data between two software versions on a given system, enter the show issu comp-matrix stored command.
Note![]() This command is useful only for verification purposes because it is available only after the ISSU process has started. You might want to check the compatibility matrix prior to starting ISSU. Use the Feature Navigator to obtain the needed information:
This command is useful only for verification purposes because it is available only after the ISSU process has started. You might want to check the compatibility matrix prior to starting ISSU. Use the Feature Navigator to obtain the needed information:
http://tools.cisco.com/ITDIT/CFN/jsp/index.jsp
Compatibility Verification Using Cisco Feature Navigator
The ISSU application on Cisco Feature Navigator allows you to:
- Select a specific software bundle.
- Identify which software images are compatible with the selected software image.
- Compare two IOS XE software images and understand the compatibility level of the software images (that is, compatible, base-level compatible, and incompatible), or dynamically determined.
- Compare two software images and see the client compatibility for each ISSU client.
- Provide links to release notes for the software image.
How to Perform the ISSU Process
Unlike SSO, which is a mode of operation for the device and a prerequisite for performing ISSU, the ISSU process is a series of steps performed while the switch is in operation. The steps result in an upgrade to new or modified Cisco IOS XE software, and have a minimal impact to traffic.
Note![]() For an illustration of the process flow for ISSU, refer to Figure 5-11.
For an illustration of the process flow for ISSU, refer to Figure 5-11.
This section includes the following topics:
- Verifying the ISSU Software Installation
- Verifying Redundancy Mode Before Beginning the ISSU Process
- Verifying the ISSU State Before Beginning the ISSU Process
- ISSU using the Four-command Sequence: Step 1 (loadversion)
- ISSU using the Four-command Sequence: Step 2 (runversion)
- ISSU using the Four Command Sequence: Step 3 (acceptversion)
- ISSU using the Four Command Sequence: Step 4 (commitversion)
- Using changeversion to Automate an ISSU Upgrade
- Aborting a Software Upgrade During ISSU
- Configuring the Rollback Timer to Safeguard Against Upgrade Issues
- The ISSU Compatibility Matrix
Verifying the ISSU Software Installation
During the ISSU process, there are five valid states: disabled, init, load version, run version, and system reset. Use the show issu state command to obtain the current ISSU state:
- Disabled state—The state for the standby supervisor engine while this supervisor engine is resetting.
- Init state—The initial state for two supervisor engines, one active and one standby, before the ISSU process is started. It is also the final state after the ISSU process completes.
- Load version (LV) state—The standby supervisor engine is loaded with the new version of Cisco IOS XE software.
- Run version (RV) state—The issu runversion command forces the switchover of the supervisor engines. The newly active supervisor engine runs the new Cisco IOS XE software image.
- While running ISSU, if both supervisor engines are reset (because of a power outage, for example), the ISSU context is lost and the system returns to the Init state. Both supervisor engines return to the old software.
You can verify the ISSU software upgrade by entering show commands to provide information on the state of the during the ISSU process:
This example shows how to display the state and the current status of the supervisor engine during the ISSU process:
Verifying Redundancy Mode Before Beginning the ISSU Process
Before you begin the ISSU process, verify that the VSS is operating correctly; one supervisor engine operates as the SSO Active and the peer supervisor engine in the other switch operating as the SSO Hot Standby.
The following example displays verification that the system operating correctly as a VSS. Slot 1/1 (the supervisor engine in slot 1 of Switch 1) is the active supervisor engine, and Slot 2/1 (the supervisor engine in slot 1 of Switch 2) is the standby supervisor engine.
Verifying the ISSU State Before Beginning the ISSU Process
Ensure that both the supervisor engines are configured to auto-boot, and that they have currently been booted from the pre-upgrade image residing on the local file system. This is verified by the values of the BOOT variable and the configuration register (refer to the sample output of show redundancy command in the previous section).
Ensure that the active and standby supervisor engines are up and in ISSU Init state and that both supervisor engines are running the same current image.
The following example displays the ISSU state before the process begins:
Note that the Standby slot number is reported as 11, which is a Virtual Slot number that corresponds to physical slot 1 on Switch 2. The correspondence between the Virtual Slot number and the physical location of the slot can be determined using the show switch virtual slot-map command, as shown in the following example:
The new version of the Cisco IOS XE software must be present on both of the supervisor engines. The directory information displayed for each of the supervisor engines shows that the new version is present.
ISSU using the Four-command Sequence: Step 1 (loadversion)
This task describes the first step of the ISSU four-command sequence, loadversion, wherein the standby supervisor engine is loaded with the post-upgrade image.
Please ensure that you have read the Prerequisites to Performing ISSU section, and implemented the appropriate steps.
Perform the following steps at the active supervisor engine:
This example shows how to start the ISSU process, boot the standby supervisor engine in the Standby Hot state, and load the standby supervisor engine slot (6) with the new IOS XE software image:
ISSU using the Four-command Sequence: Step 2 (runversion)
This task describes the second step of the ISSU four-command sequence, runversion, wherein a switchover occurs and the standby supervisor engine, which is now loaded with the post-upgrade image, takes over as the new Active.
At the end of the loadversion step, the following message is logged:
Now, you are ready to proceed to the next step.
Perform the following steps at the active supervisor engine.
This example shows how to cause a switchover to the former standby supervisor engine (slot 11), reset the former active supervisor engine and reload it with the old IOS XE software image so it becomes the standby supervisor engine:
A switchover happens at this point. At the new active supervisor engine, do the following after old active supervisor engine comes up as standby.
Note![]() The new active supervisor engine is now running the new version of software, and the standby supervisor engine is running the old version of software and is in the standby hot state.
The new active supervisor engine is now running the new version of software, and the standby supervisor engine is running the old version of software and is in the standby hot state.
Once Runversion has completed, the new active supervisor engine will be running the new version of software and the previously active supervisor engine will now become the standby supervisor engine. The standby supervisor engine will be reset and reloaded, but it will remain on the previous version of software and come back online in Standby hot status.
Use the show redundancy, show redundancy states, and show issu state [detailed] commands described previously to verify that the standby supervisor engine is running the pre-upgrade version and that the Active is running the post-upgrade version.
ISSU using the Four Command Sequence: Step 3 (acceptversion)
This step is optional. It is needed only if you wish to stop the ISSU rollback timer. Otherwise you may proceed to the next step (commitversion)
Cisco IOS XE software maintains an ISSU rollback timer to safeguard against an upgrade that may leave the new active supervisor engine in a state in which communication with the standby supervisor engine is severed. By default, this duration is 45 minutes. If the commitversion command is not applied before the rollback timer duration expires, the VSS reverts to the pre-upgrade version.
The acceptversion command stops the rollback timer. This means that you can maintain the system in the current state (runversion, with the post-upgrade version running on the active supervisor engine, and pre-upgrade image running on the standby supervisor engine) for an extended duration, and proceed to the commitversion state only when you are satisfied with the behavior of the post-upgrade software version.
This optional task describes how to stop the rollback timer.
This example displays the Timer before you stop it. In the following example, the “Automatic Rollback Time” information indicates the amount of time remaining before an automatic rollback will occur.
ISSU using the Four Command Sequence: Step 4 (commitversion)
The commitversion step reloads the standby supervisor engine with the post-upgrade image.
Perform the following steps at the active supervisor engine:
This example shows how to reset and reload the current standby supervisor engine (slot 1) with the new Cisco IOS XE software version. After you enter the commitversion command, the standby supervisor engine boots in the Standby Hot state.
As in prior states, the show redundancy, show redundancy states, show issu state [detailed], and show switch virtual commands can be used to verify that the VSS has reached the desired state.
At the end of the commitversion state, the ISSU process has completed. At this stage, any further Cisco IOS XE software version upgrade or downgrade will require that a new ISSU process be invoked anew.
Using changeversion to Automate an ISSU Upgrade
This task describes how to use the issu changeversion command to perform a one step ISSU upgrade.
Please ensure that you have read Prerequisites to Performing ISSU, and implemented the appropriate steps.
Perform the following steps at the active supervisor engine:
This example shows how to initiate an ISSU upgrade process using the issu changeversion command. The outputs of the show switch virtual, show issu state detail, show redundancy, and show redundancy states commands are included to show the supervisor state before and after the upgrade procedure.
Switch 2 goes down, reboots with the post-upgrade image, then reaches SSO Hot Standby state.
A Stateful Switchover occurs. Switch 2 takes over as the Active switch. Switch 1 goes down, then reboots (still with the pre-upgrade image) and reaches SSO Hot Standby state.
(From this point on, the console logs are gathered on Switch 2)
Switch 1 goes down again, then boots up (this time with the post-upgrade image), and comes up as SSO Hot Standby
The following example shows how to use issu changeversion with the "at" command option to schedule an ISSU upgrade procedure to automatically start at the specified time. This example specifies that the ISSU upgrade should be started at 16:30 (24 hour format).
Aborting a Software Upgrade During ISSU
You can abort the ISSU process at any stage manually (prior to entering the issu commitversion command) by entering the issu abortversion command. The issu abortversion command may also be issued after entering the issu changeversion command while the automatic ISSU upgrade is still in progress. The ISSU process also aborts on its own if the software detects a failure.
Note![]() If you enter the issu abortversion command before the standby supervisor engine becomes hot, the traffic might be disrupted.
If you enter the issu abortversion command before the standby supervisor engine becomes hot, the traffic might be disrupted.
If you abort the process after you issue the issu loadversion command, the standby supervisor engine is reset and reloaded with the original software.
If the process is aborted after you enter either the issu runversion or issu acceptversion command, then a second switchover is performed to the new standby supervisor engine that is still running the original software version. The supervisor engine that had been running the new software is reset and reloaded with the original software version.
Note![]() Ensure that the standby supervisor is fully booted before issuing the abortversion command on an active supervisor engine.
Ensure that the standby supervisor is fully booted before issuing the abortversion command on an active supervisor engine.
The following task describes how to abort the ISSU process before you complete the ISSU process with the issu commitversion command.
Perform the following task on the active supervisor engine:
|
|
|
|
|---|---|---|
Cancels the ISSU upgrade or downgrade process in progress and restores the switch to its state before the process had started. |
This example shows how to abort the ISSU process on slot number 11, the slot for the current active supervisor engine. In this example, the ISSU upgrade process is in the Runversion state when the issu abortversion command is entered:
Configuring the Rollback Timer to Safeguard Against Upgrade Issues
Cisco IOS XE software maintains an ISSU rollback timer, to safeguard against an upgrade that may leave the new active supervisor engine in a state in which communication with the standby supervisor engine is severed.
You may want to configure the rollback timer to fewer than 45 minutes (the default) so that you need not wait in case the new software is not committed or the connection to the switch was lost while it was in runversion mode. Conversely, you may want to configure the rollback timer to more than 45 minutes in order to have enough time to verify the operation of the new Cisco IOS XE software before committing the new software image.
The ISSU rollback timer kicks in immediately after issu run version is entered so that the minimum value configured should be more than the time required for a chassis reload. Else, the process fails.
Note![]() The valid timer value range is from 0 to 7200 seconds (two hours). A value of 0 seconds disables the rollback timer.
The valid timer value range is from 0 to 7200 seconds (two hours). A value of 0 seconds disables the rollback timer.
Once you are satisfied that the new image at the active supervisor engine has been successful and you want to remain in the current state, you may indicate acceptance by issuing the issu acceptversion command, which stops the rollback timer.
Issuing the issu commitversion command at this stage is equal to entering both the issu acceptversion and the issu commitversion commands. Use the issu commitversion command if you do not intend to run in the current state for a period of time and are satisfied with the new software version.
Note![]() The rollback timer can be configured only in the ISSU Init state.
The rollback timer can be configured only in the ISSU Init state.
This task explains how to configure the rollback timer:
|
|
|
|
|---|---|---|
Configures the rollback timer value, which can range from 0 to 7200. |
||
This example shows how to set the rollback timer to 3600 seconds:
Enter configuration commands, one per line. End with CNTL/Z.
Switch(config)# issu set rollback-timer 3600
% Rollback timer value set to [ 3600 ] seconds
Switch# show issu rollback-timer
Rollback Process State = Not in progress
Configured Rollback Time = 60:00
The Rollback Timer cannot be set in loadversion or runversion state, as the following example illustrates:
The ISSU Compatibility Matrix
The ISSU Compatibility Matrix contains information about the compatibility of the IOS XE software version currently running on the system, and other versions. The Compatibility Matrix deals with two kinds of information:
Stored Information
The stored compatibility matrix contains a list of other IOS XE software releases for the Catalyst 4500 platform that are compatible with this release. This information is precomputed and stored inside the IOS XE image.
When an ISSU upgrade is attempted, the software looks up the Stored Compatibility Matrix on the supervisor engine that is running the higher (that is, later) IOS XE version. In this matrix, the software tries to locate the IOS XE version number that is running on the other supervisor engine (that is, the lower or earlier version number). If this information is missing, the ISSU upgrade cannot proceed.
All current IOS XE releases on the Catalyst 4500 platform support Dynamic Image Version Capability (DIVC). This means that the ISSU compatibility for the specified version is dynamically computed, as illustrated with the following example:
The above Stored Compatibility Matrix is for IOS XE version 03.03.01.SG.
The "Comp(3)" entry shows that IOS XE version 03.03.01.SG is compatible with this version, and the end result is guaranteed to succeed.
The "Dynamic(0)" entry against IOS XE version 03.02.04.SG means that an ISSU upgrade from or to IOS XE version 03.02.04.SG is e permitted. However, the end result will depend upon the ability of individual software features comprising the two versions to successfully complete the ISSU negotiation.
IOS XE version 03.01.01.SG is not in the list. This means that an ISSU upgrade from that version to this IOS XE version (03.03.01.SG) is not possible.
Negotiated Information
While the Stored compatibility matrix information is used before an ISSU upgrade is attempted, the Negotiated compatibility matrix information pertains to the ISSU state after or during an ISSU upgrade attempt. It contains information about how the different software components comprising the IOS XE images on the two supervisor engines were able to negotiate their states. So, this data is useful for troubleshooting failed ISSU upgrade operations.
To display information about the ISSU compatibility matrix, perform this task:
This example shows how to display negotiated information regarding the compatibility matrix:
This example shows how to display negotiated information regarding non-IOSd clients:
License Upgrade on a VSS
When a current license is about to expire, or a new license is to be installed, perform the following task to update the license on a VSS:
Step 1![]() Ensure that the new license is installed on both VSS active (Switch 1) and VSS standby (Switch 2). If your device supports using Right-to-use (RTU) licensing, use the following command to activate the new license on both switches:
Ensure that the new license is installed on both VSS active (Switch 1) and VSS standby (Switch 2). If your device supports using Right-to-use (RTU) licensing, use the following command to activate the new license on both switches:
Switch# license right-to-use activate [add-on {dna-advantage | dna-essentials }{ evaluation | subscription}| entservices | internal_service | ipbase | lanbase] [accepteula]
Step 2![]() Run the Switch# write memory command to save the configuration.
Run the Switch# write memory command to save the configuration.
Step 3![]() On Switch 2, the VSS standby, shutdown all the non-VSL ports.
On Switch 2, the VSS standby, shutdown all the non-VSL ports.

Step 4![]() On Switch 1, shut down the VSL ports. The VSS standby (Switch 2) becomes the VSS active switch.
On Switch 1, shut down the VSL ports. The VSS standby (Switch 2) becomes the VSS active switch.
Step 6![]() While Switch 2 boots up with the updated license, run the no shut command on the VSL ports on Switch 1 and reload Switch1 immediately. Switch 2 boots as the VSS standby.
While Switch 2 boots up with the updated license, run the no shut command on the VSL ports on Switch 1 and reload Switch1 immediately. Switch 2 boots as the VSS standby.
Step 7![]() When Switch 2 achieves SSO-HOT, run the no shut command on all ports.
When Switch 2 achieves SSO-HOT, run the no shut command on all ports.
Step 8![]() Failover the chassis to bring the VSS pair license to the correct level.
Failover the chassis to bring the VSS pair license to the correct level.
License installation and subsequent VSS formation are now complete.
 Feedback